This document provides an introduction to getting started with Python programming. It explains the difference between interpreted and compiled languages, walks through a simple "Hello World" Python program, and covers basic Python concepts like variables, data types, and creating and running Python files. The introduction creates a Python directory, touches a hello_world.py file, makes the file executable, adds the Python shebang and print statement, and runs the program to output "Hello World". It also defines common Python data types like integers, floats, booleans, strings, lists, tuples, and dictionaries.


![Get started with Python
10 The Python Book
TIP
Ifyouwereusingagraphical
editorsuchasgedit,then
youwouldonlyhavetodo
thelaststepofmakingthe
fileexecutable.Youshould
onlyhavetomarkthefileas
executableonce.Youcan
freelyeditthefileonceit
isexecutable.
Interpretedvscompiledlanguages
AninterpretedlanguagesuchasPythonisonewherethesource
codeisconvertedtomachinecodeandthenexecutedeachtimethe
programruns.ThisisdiferentfromacompiledlanguagesuchasC,
wherethesourcecodeisonlyconvertedtomachinecodeonce–the
resultingmachinecodeisthenexecutedeachtimetheprogramruns.
HelloWorld
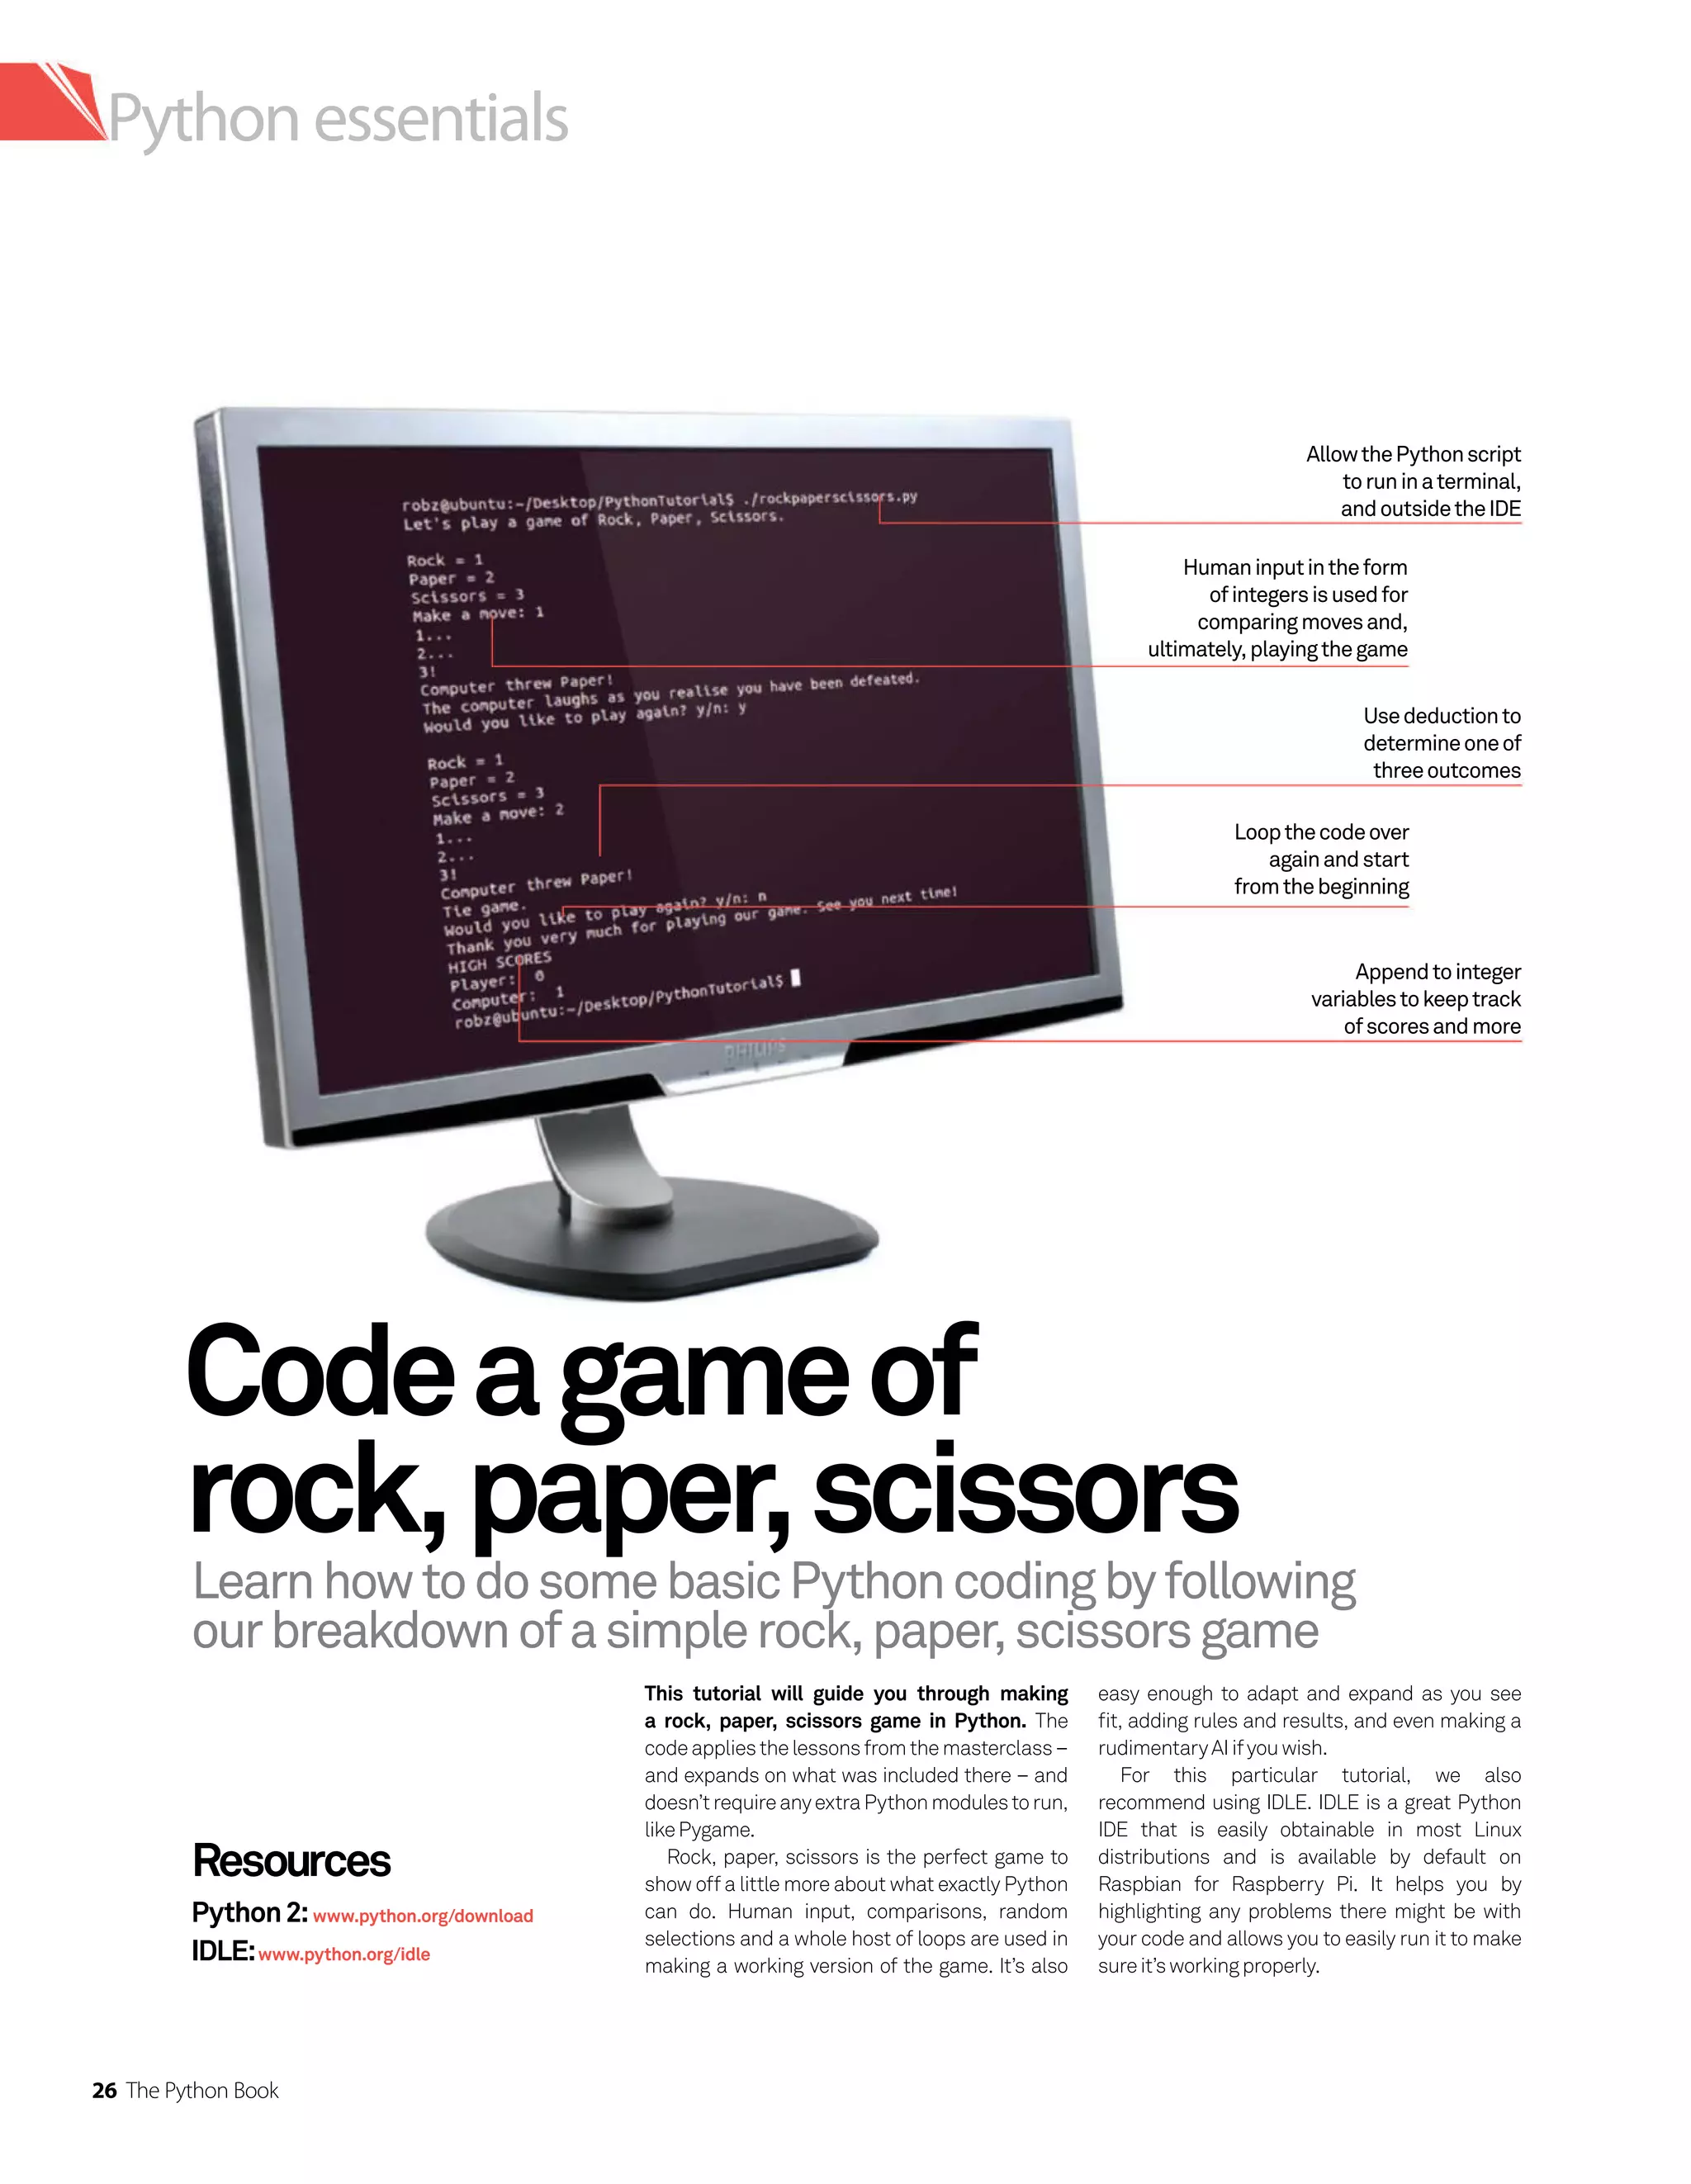
Let’s get stuck in, and what better way than with the
programmer’s best friend, the ‘Hello World’ application! Start
by opening a terminal. Its current working directory will be your
home directory. It’s probably a good idea to make a directory for
the files we’ll be creating in this tutorial, rather than having them
loose in your home directory. You can create a directory called
Python using the command mkdir Python. You’ll then want to
change into that directory using the command cdPython.
The next step is to create an empty file using the command
‘touch’ followed by the filename. Our expert used the command
touch hello_world.py. The final and most important part of
setting up the file is making it executable. This allows us to run
code inside the hello_world.py file. We do this with the command
chmod +x hello_world.py. Now that we have our file set up, we
can go ahead and open it up in nano, or any text editor of your
choice. Gedit is a great editor with syntax highlighting support
that should be available on any distribution. You’ll be able to
install it using your package manager ifyou don’t have it already.
[liam@liam-laptop ~]$ mkdir Python
[liam@liam-laptop ~]$ cd Python/
[liam@liam-laptop Python]$ touch hello_world.py
[liam@liam-laptop Python]$ chmod +x hello_world.py
[liam@liam-laptop Python]$ nano hello_world.py
Our Hello World program is very simple, it only needs two lines.
The first line begins with a ‘shebang’ (the symbol #! – also known
as a hashbang) followed by the path to the Python interpreter.
The program loader uses this line to work out what the rest of the
lines need to be interpreted with. If you’re running this in an IDE
likeIDLE, you don’t necessarily needto do this.
The code that is actually read by the Python interpreter is only
a single line. We’re passing the value Hello World to the print
function by placing it in brackets immediately after we’ve called
the print function. Hello World is enclosed in quotation marks to
indicate that it is a literal value and should not be interpreted as
source code. As expected, the print function in Python prints any
value that getspassedto it from the console.
You can save the changes you’ve just made to the file in nano
using the key combination Ctrl+O, followed by Enter. Use Ctrl+X
toexit nano.
#!/usr/bin/env python2
print(“Hello World”)
You can run the Hello World program by prefixing
its filename with ./ – in this case you’d type:
./hello_world.py.
[liam@liam-laptop Python]$ ./hello_world.py
Hello World
Variablesanddatatypes
A variable is a name in source code that is associated with an
area in memory that you can use to store data, which is then
called upon throughout the code. The data can be one of many
types,including:
Integer Stores whole numbers
Float Storesdecimalnumbers
Boolean Can havea value ofTrueorFalse
String Storesacollectionofcharacters.“Hello
World”is astring
As well as these main data types, there are sequence types
(technically, a string is a sequence type but is so commonly used
we’ve classed it asa main data type):
List Containsacollectionofdatainaspecificorder
Tuple Contains a collection immutable data in a
specific order
A tuple would be used for something like a co-ordinate,
containing an x and y value stored as a single variable, whereas
a list is typically used to store larger collections. The data
stored in a tuple is immutable because you aren’t able to
change values of individual elements in a tuple. However, you
can do so in a list.
It will also be useful to know about Python’s dictionary
type. A dictionary is a mapped data type. It stores data in
key-value pairs. This means that you access values stored in
the dictionary using that value’s corresponding key, which is
different to how you would do it with a list. In a list, you would
access an element of the list using that element’s index (a
number representing the element’s position in the list).
Let’s work on a program we can use to demonstrate how to
use variables and different data types. It’s worth noting at
this point that you don’t always have to specify data types
in Python. Feel free to create this file in any editor you like.
Everything will work just fine as long as you remember to make
the file executable. We’re going to call ours variables.py.
“A variable is a name
in source code that is
associated with an area in
memory that you can use to
store data”](https://image.slidesharecdn.com/thepythonbooktheultimateguidetocodingwithpythonpdfdrive-220527060944-728dd1fe/75/The-Python-Book_-The-ultimate-guide-to-coding-with-Python-PDFDrive-pdf-10-2048.jpg)
![Get started with Python
The following line creates an
integer variable called hello_int
with the # value of 21. Notice
how it doesn’t need to go in
quotation marks
You could also create the
same list in the following way
We might as well create a
dictionary while we’re at it.
Notice how we’ve aligned the
colons below to make the
code tidy
The same principal is true of
Boolean values
We create a tuple in the
following way
And a list in this way
#!/usr/bin/env python2
# We create a variable by writing the name of the variable we want followed
# by an equals sign, which is followed by the value we want to store in the
# variable. For example, the following line creates a variable called
# hello_str, containing the string Hello World.
hello_str =“Hello World”
hello_int = 21
hello_bool = True
hello_tuple = (21, 32)
hello_list = [“Hello,”,“this”,“is”,“a”,“list”]
# This list now contains 5 strings. Notice that there are no spaces
# between these strings so if you were to join them up so make a sentence
# you’d have to add a space between each element.
hello_list = list()
hello_list.append(“Hello,”)
hello_list.append(“this”)
hello_list.append(“is”)
hello_list.append(“a”)
hello_list.append(“list”)
# The irst line creates an empty list and the following lines use the append
# function of the list type to add elements to the list. This way of using a
# list isn’t really very useful when working with strings you know of in
# advance, but it can be useful when working with dynamic data such as user
# input. This list will overwrite the irst list without any warning as we
# are using the same variable name as the previous list.
hello_dict = {“irst_name”:“Liam”,
“last_name” :“Fraser”,
“eye_colour”:“Blue”}
# Let’s access some elements inside our collections
# We’ll start by changing the value of the last string in our hello_list and
# add an exclamation mark to the end. The“list”string is the 5th element
# in the list. However, indexes in Python are zero-based, which means the
# irst element has an index of 0.
print(hello_list[4])
hello_list[4] +=“!”
# The above line is the same as
hello_list[4] = hello_list[4] +“!”
print(hello_list[4])
TIP
Atthispoint,it’sworth
explainingthatanytextin
aPythonfilethatfollows
a#characterwillbe
ignoredbytheinterpreter.
Thisissoyoucanwrite
commentsinyourcode.
Notice that there will now be
two exclamation marks when
we print the element
“Any text in a Python file that follows a #
character will be ignored”](https://image.slidesharecdn.com/thepythonbooktheultimateguidetocodingwithpythonpdfdrive-220527060944-728dd1fe/75/The-Python-Book_-The-ultimate-guide-to-coding-with-Python-PDFDrive-pdf-11-2048.jpg)
![12 The Python Book
Get started with Python
Indentationindetail
Aspreviouslymentioned,thelevelofindentation
dictateswhichstatementablockofcodebelongs
to.IndentationismandatoryinPython,whereasin
otherlanguages,setsofbracesareusedtoorganise
codeblocks.Forthisreason,itisessentialthatyou
useaconsistentindentationstyle.Fourspaces
aretypicallyusedtorepresentasinglelevelof
indentationinPython.Youcanusetabs,buttabsare
notwelldefined,especiallyifyouhappentoopena
fileinmorethanoneeditor.
Moreabouta
Pythonlist
APythonlistissimilartoan
arrayinotherlanguages.A
list(ortuple)inPythoncan
containdataofmultiple
types,whichisnotusually
thecasewitharraysinother
languages.Forthisreason,
werecommendthatyou
onlystoredataofthesame
typeinalist.Thisshould
almostalwaysbethecase
anywayduetothenatureof
thewaydatainalistwould
beprocessed.
print(str(hello_tuple[0]))
# We can’t change the value of those elements like we just did with the list
# Notice the use of the str function above to explicitly convert the integer
# value inside the tuple to a string before printing it.
print(hello_dict[“irst_name”] +““ + hello_dict[“last_name”] +“ has“ +
hello_dict[“eye_colour”] +“ eyes.”)
print(“{0} {1} has {2} eyes.”.format(hello_dict[“irst_name”],
hello_dict[“last_name”],
hello_dict[“eye_colour”]))
Remember that tuples are
immutable, although we can
access the elements of them
like so
Let’s create a sentence using the
data in our hello_dict
A tidier way of doing this
would be to use Python’s
string formatter
Controlstructures
In programming, a control structure is any kind of statement that
can change the path that the code execution takes. For example, a
control structure that decided to end the program if a number was
less than 5 would looksomething like this:
#!/usr/bin/env python2
import sys # Used for the sys.exit function
int_condition = 5
if int_condition 6:
sys.exit(“int_condition must be = 6”)
else:
print(“int_condition was = 6 - continuing”)
The path that the code takes will depend on the value of
the integer int_condition. The code in the ‘if’ block will only be
executed if the condition is true. The import statement is used
to load the Python system library; the latter provides the exit
function, allowing you to exit the program, printing an error
message. Notice that indentation (in this case four spaces per
indent) is used to indicate which statement a block of code
belongs to.
‘If’ statements are probably the most commonly used control
structures. Othercontrol structures include:
•For statements, which allow you to iterate over items in
collections, or to repeat a piece of code a certain number
oftimes;
• While statements, a loop that continues while the condition
istrue.
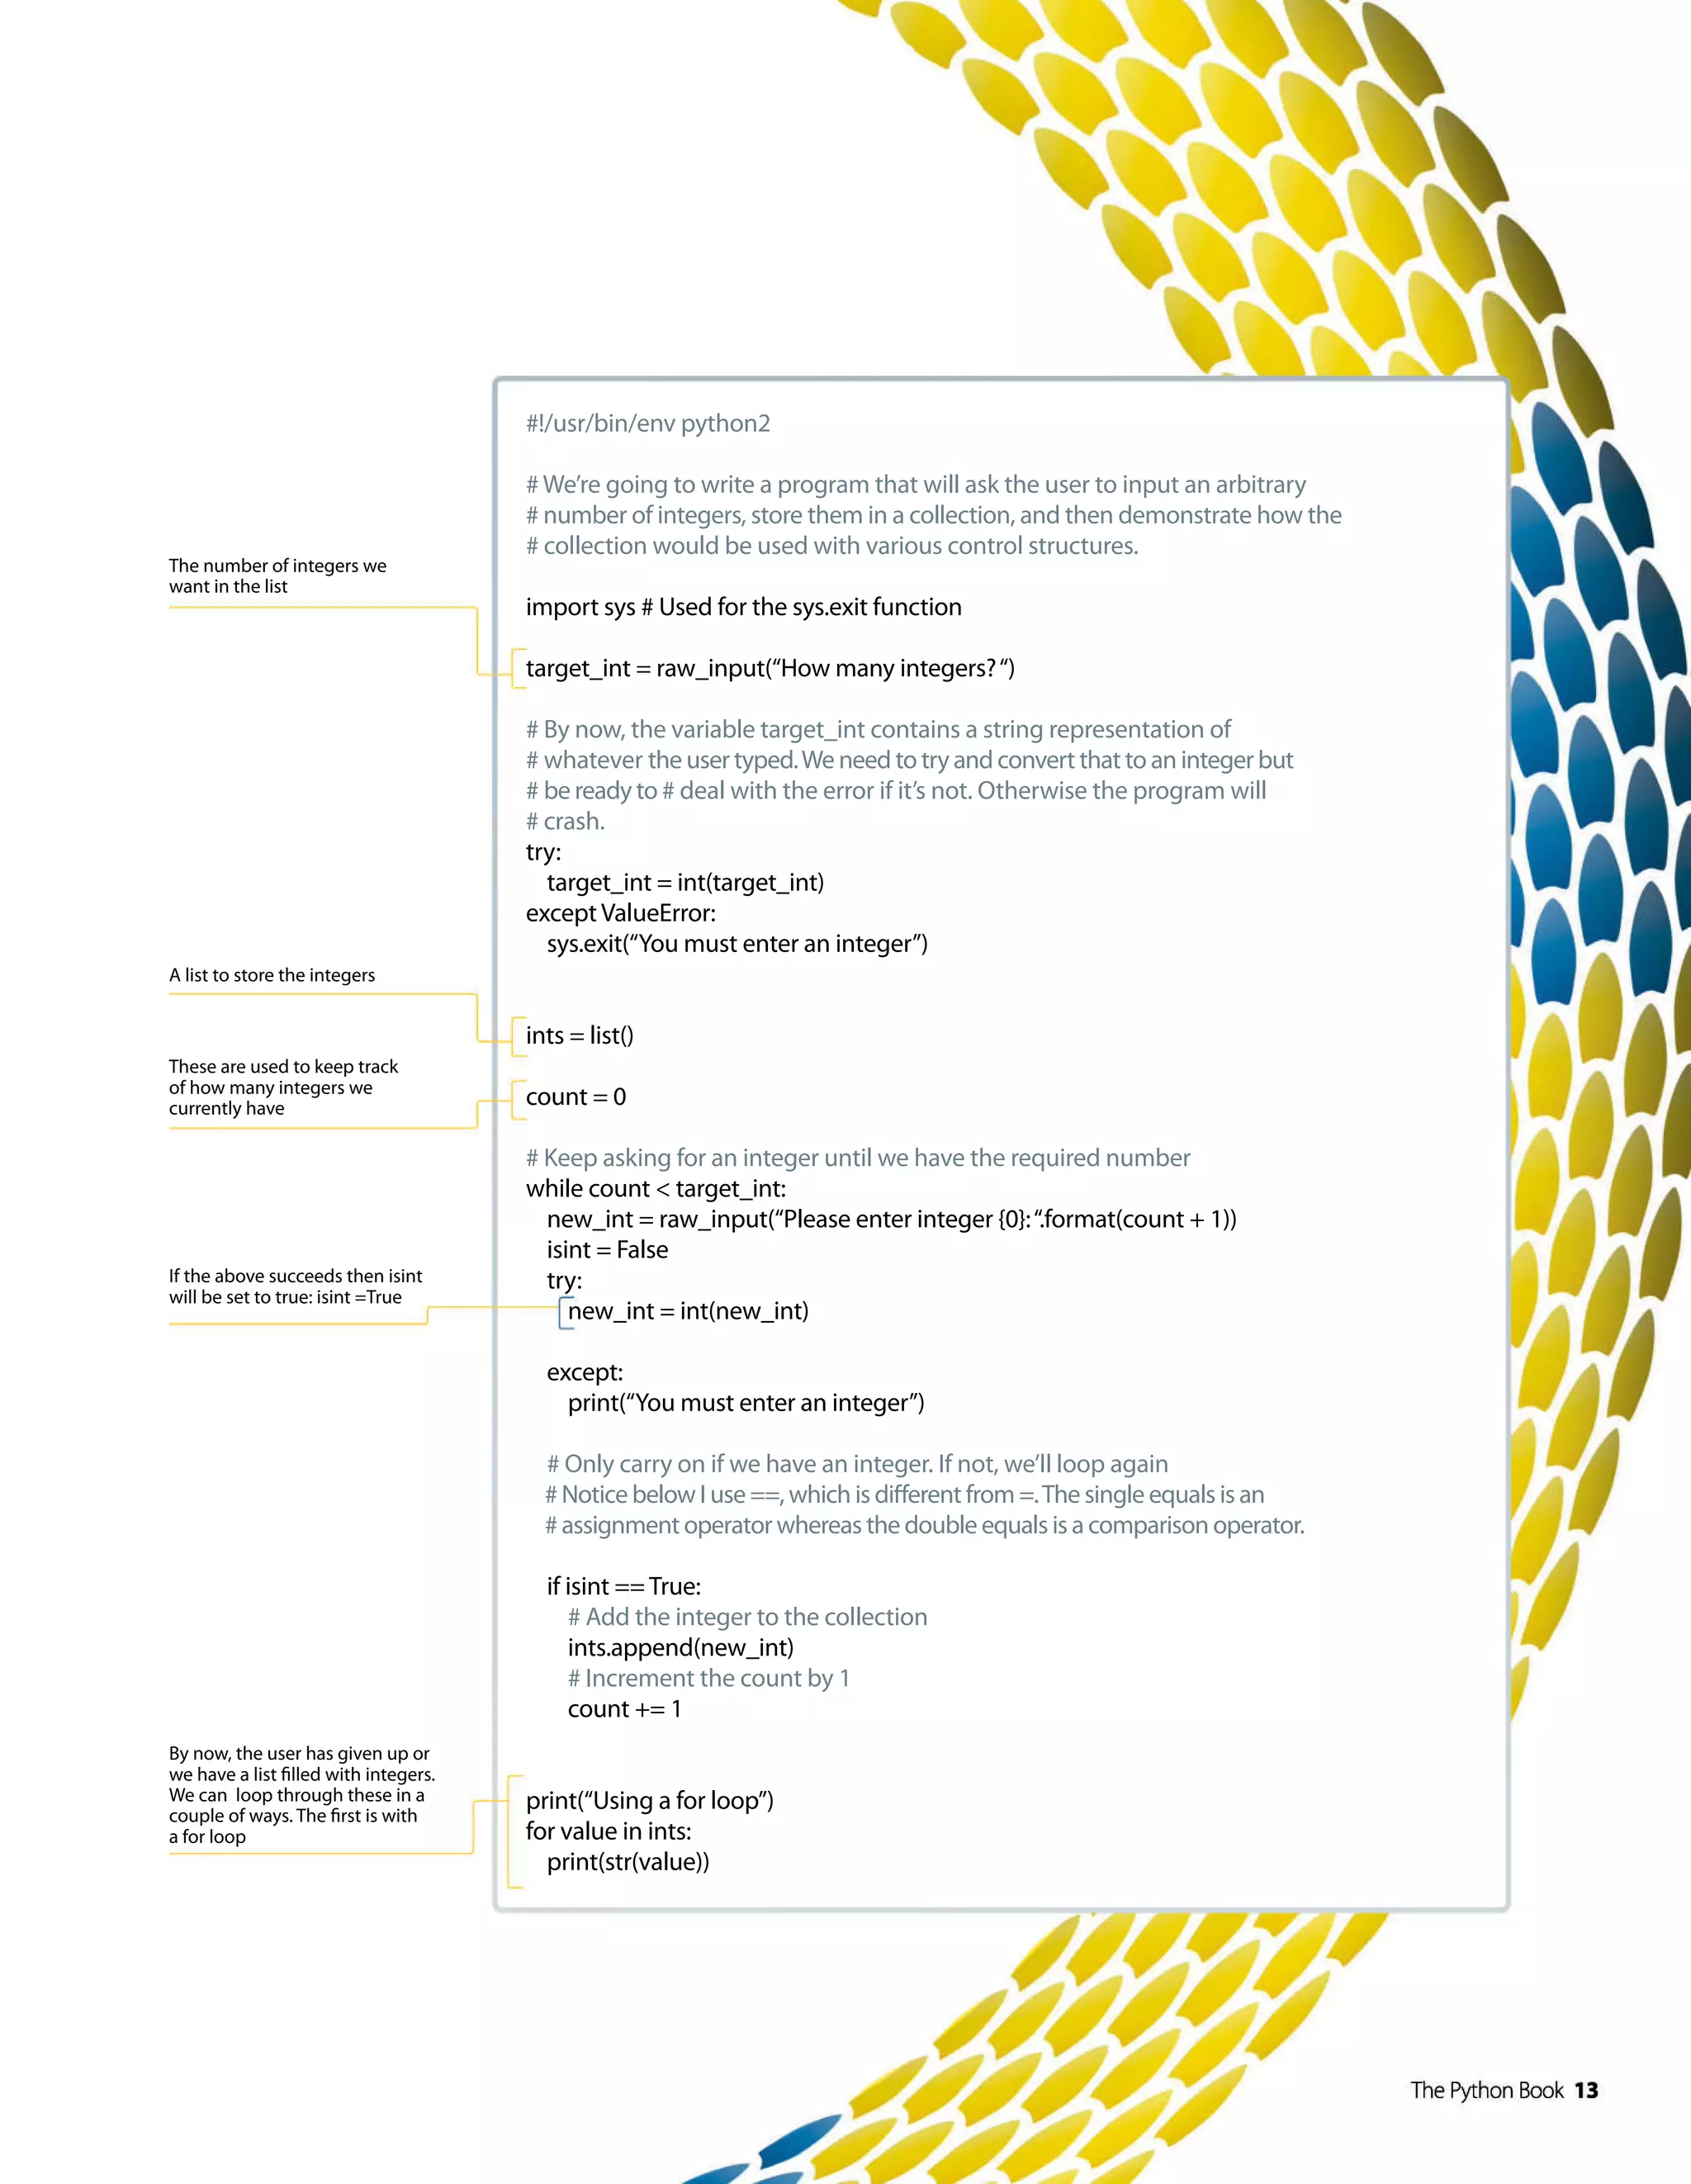
We’re going to write a program that accepts user input from the
user to demonstrate how control structures work. We’re calling it
construct.py.
The ‘for’ loop is using a local copy of the current value, which
means any changes inside the loop won’t make any changes
affecting the list. On the other hand however, the ‘while’ loop is
directly accessing elements in the list, so you could change the list
there should you want to do so. We will talk about variable scope in
some more detail later on. The output from the above program is
as follows:
[liam@liam-laptop Python]$ ./construct.py
How many integers? acd
You must enter an integer
[liam@liam-laptop Python]$ ./construct.py
How many integers? 3
Please enter integer 1: t
You must enter an integer
Please enter integer 1: 5
Please enter integer 2: 2
Please enter integer 3: 6
Using a for loop
5
2
6
Using a while loop
5
2
6
“The ‘for‘ loop uses
a local copy, so
changes in the loop
won’t affect the list”](https://image.slidesharecdn.com/thepythonbooktheultimateguidetocodingwithpythonpdfdrive-220527060944-728dd1fe/75/The-Python-Book_-The-ultimate-guide-to-coding-with-Python-PDFDrive-pdf-12-2048.jpg)
![14 The Python Book
Get started with Python
#!/usr/bin/env python2
# Below is a function called modify_string, which accepts a variable
# that will be called original in the scope of the function. Anything
# indented with 4 spaces under the function definition is in the
# scope.
def modify_string(original):
original += “ that has been modified.”
# At the moment, only the local copy of this string has been modified
def modify_string_return(original):
original += “ that has been modified.”
# However, we can return our local copy to the caller. The function
# ends as soon as the return statement is used, regardless of where it
# is in the function.
return original
test_string = “This is a test string”
modify_string(test_string)
print(test_string)
test_string = modify_string_return(test_string)
print(test_string)
# The function’s return value is stored in the variable test string,
# overwriting the original and therefore changing the value that is
# printed.
We are now outside of
the scope of the modify_
string function, as we
have reduced the level
of indentation
The test string won’t be
changed in this code
However, we can call the
function like this
TIP
Youcandefinedefaults
forvariablesifyouwant
tobeabletocallthe
functionwithoutpassing
anyvariablesthroughat
all.Youdothisbyputting
anequalssignafter
thevariablename.For
example,youcando:
def modify_string
(original=” Default
String”)
# Or with a while loop:
print(“Using a while loop”)
# We already have the total above, but knowing the len function is very
# useful.
total = len(ints)
count = 0
while count total:
print(str(ints[count]))
count += 1
Functionsandvariablescope
Functions are used in programming to break processes down into smaller
chunks. This often makes code much easier to read. Functions can also be
reusable if designed in a certain way. Functions can have variables passed
to them. Variables in Python are always passed by value, which means that
a copy of the variable is passed to the function that is only valid in the scope
of the function. Any changes made to the original variable inside the function
will be discarded. However, functions can also return values, so this isn’t
an issue. Functions are defined with the keyword def, followed by the
name of the function. Any variables that can be passed through are put in
brackets following the function’s name. Multiple variables are separated by
commas. The names given to the variables in these brackets are the ones
that they will have in the scope of the function, regardless of what
the variable that’s passed to the function is called. Let’s see this
in action.
Theoutputfromtheprogramoppositeisasfollows:
“Functions are used in
programming to break
processes down in”](https://image.slidesharecdn.com/thepythonbooktheultimateguidetocodingwithpythonpdfdrive-220527060944-728dd1fe/75/The-Python-Book_-The-ultimate-guide-to-coding-with-Python-PDFDrive-pdf-14-2048.jpg)
![Get started with Python
[liam@liam-laptop Python]$ ./functions_and_scope.py
This is a test string
This is a test string that has been modified.
Scope is an important thing to get the hang of, otherwise it can get you
into some bad habits. Let’s write a quick program to demonstrate this. It’s
going to have a Boolean variable called cont, which will decide if a number
will be assigned to a variable in an if statement. However, the variable
hasn’t been defined anywhere apart from in the scope of the if statement.
We’ll finish off by trying to print the variable.
#!/usr/bin/env python2
cont = False
if cont:
var = 1234
print(var)
In the section of code above, Python will convert the integer to a string
before printing it. However, it’s always a good idea to explicitly convert
things to strings – especially when it comes to concatenating strings
together. If you try to use the + operator on a string and an integer, there
will be an error because it’s not explicitly clear what needs to happen.
The + operator would usually add two integers together. Having said that,
Python’s string formatter that we demonstrated earlier is a cleaner way of
doing that. Can you see the problem? Var has only been defined in the scope
of the if statement. This means that we get a very nasty error when we try to
access var.
[liam@liam-laptop Python]$ ./scope.py
Traceback (most recent call last):
File “./scope.py”, line 8, in module
print var
NameError: name ‘var’ is not defined
If cont is set to True, then the variable will be created and we can access
it just fine. However, this is a bad way to do things. The correct way is to
initialise the variable outside of the scope of the if statement.
#!/usr/bin/env python2
cont = False
var = 0
if cont:
var = 1234
if var != 0:
print(var)
The variable var is defined in a wider scope than the if statement, and
can still be accessed by the if statement. Any changes made to var inside
the if statement are changing the variable defined in the larger scope.
This example doesn’t really do anything useful apart from illustrate the
potential problem, but the worst-case scenario has gone from the program
crashing to printing a zero. Even that doesn’t happen because we’ve added
an extra construct to test the value of var before printing it.
Codingstyle
It’s worth taking a little time to talk about coding style. It’s simple to write
tidy code. The key is consistency. For example, you should always name
your variables in the same manner. It doesn’t matter if you want to use
camelCase or use underscores as we have. One crucial thing is to use
self-documenting identifiers for variables. You shouldn’t have to guess
what a variable does. The other thing that goes with this is to always
comment your code. This will help anyone else who reads your code,
and yourself in the future. It’s also useful to put a brief summary at
the top of a code file describing what the application does, or a part of
the application ifit’smadeup ofmultiplefiles.
Summary
This article should have introduced you to the basics of programming
in Python. Hopefully you are getting used to the syntax, indentation
and general look and feel of a Python program. The next step is
to learn how to come up with a problem that you want to solve, and
break it down into small enough steps that you can implement in a
programming language.
Google, or any other search engine, is very helpful. If you are stuck
with anything, or have an error message you can’t work out how to
fix, stick it into Google and you should be a lot closer to solving your
problem. For example, if we Google ‘play mp3 file with python’, the
first link takes us to a Stack Overflow thread with a bunch of useful
replies. Don’t be afraid to get stuck in – the real fun of programming is
solving problemsone manageablechunk ata time.
Happyprogramming!
Comparisonoperators
The common comparison operators available in Python include:
strictlylessthan
= lessthanorequal
strictlygreaterthan
= greaterthanorequal
== equal
!= notequal](https://image.slidesharecdn.com/thepythonbooktheultimateguidetocodingwithpythonpdfdrive-220527060944-728dd1fe/75/The-Python-Book_-The-ultimate-guide-to-coding-with-Python-PDFDrive-pdf-15-2048.jpg)
![20 The Python Book
Printing
The most direct way of getting output
to the user is with the print command.
This will send text out to the console window. If you
are using version 2.X of Python, there are a couple
of ways you can use the print command. The most
common way had been simply call it as ‘print
“Some text”’. You can also use print with the same
syntax that you would use for any other function.
So, the above example would look like ‘print(“Some
text”)’. This is the only form available in version 3.X.
If you use the function syntax, you can add extra
parameters that give you finer control over this
output. For example, you can give the parameter
‘file=myfile.txt’ and get the output from the print
command being dumped into the given text file.
It also will accept any object that has some string
representation available.
With modules
The ‘with’ command provides the ability to
wrap a code block with methods defined
by a context manager. This can help clean up code
and make it easier to read what a given piece of
code is supposed to be doing months later. A classic
example of using ‘with’ is when dealing with files.
You could use something like ‘with open(“myfile.
txt”, “r”) as f:’. This will open the file and prepare it for
reading. You can then read the file in the code block
with ‘data=f.read()’. The best part of doing this is that
the file will automatically be closed when the code
block is exited, regardless of the reason. So, even if
the code block throws an exception, you don’t need to
worry about closing the file as part of your exception
handler. If you have a more complicated ‘with’
example, you can create a context manager class to
helpout.
32
31
Memoryview
Sometimes, you need to access the raw data of some object, usually as a buffer of bytes. You
can copy this data and put it into a bytearray, for example. But this means that you will be using extra
memory, and this might not be an option for large objects. The command ‘memoryview(object_name)’
wraps the object handed in to the command and provides an interface to the raw bytes. It gives access
to these bytes an element at a time. In many cases, elements are the size of one byte. But, depending
on the object details, you could end up with elements that are larger than that. You can find out the size
of an element in bytes with the property ‘itemsize’. Once you have your memory view created, you can
accesstheindividualelementsasyouwouldgetelementsfromalist(mem_view[1],forexample).
33
“A classic example of using ‘with’ is when dealing
with files. The best part of doing this is that the
file will automatically be closed when the code
block is exited, regardless of the reason”
Ranges
You may need a list of numbers, maybe in
a ‘for’ loop. The command ‘range()’ can create an
iterable list of integers. With one parameter, it
goes from 0 to the given number. You can provide
an optional start number, as well as a step size.
Negative numbers count down.
Xranges
One problem with ranges is that all of the
elements need to be calculated up front and
stored in memory. The command ‘xrange()’ takes
the same parameters and provides the same
result, but only calculates the next element as it
is needed.
27
Iterators
Iteration is a very Pythonic way of doing
things. For objects which are not intrinsically
iterable, you can use the command ‘iter(object_
name)’ to essentially wrap your object and provide
an iterable interface for use with other functions
and operators.
28
Sorted lists
You can use the command ‘sorted(list1)’
to sort the elements of a list. You can give it
a custom comparison function, and for more
complex elements you can include a key function
that pulls out a ranking property from each
element for comparison.
29
Summing items
Above, we saw the general reduction
function reduce. A specific type of reduction
operation, summation, is common enough to
warrant the inclusion of a special case, the
command ‘sum(iterable_object)’. You can include
a second parameter here that will provide a
starting value.
30
26](https://image.slidesharecdn.com/thepythonbooktheultimateguidetocodingwithpythonpdfdrive-220527060944-728dd1fe/75/The-Python-Book_-The-ultimate-guide-to-coding-with-Python-PDFDrive-pdf-20-2048.jpg)
![22 The Python Book
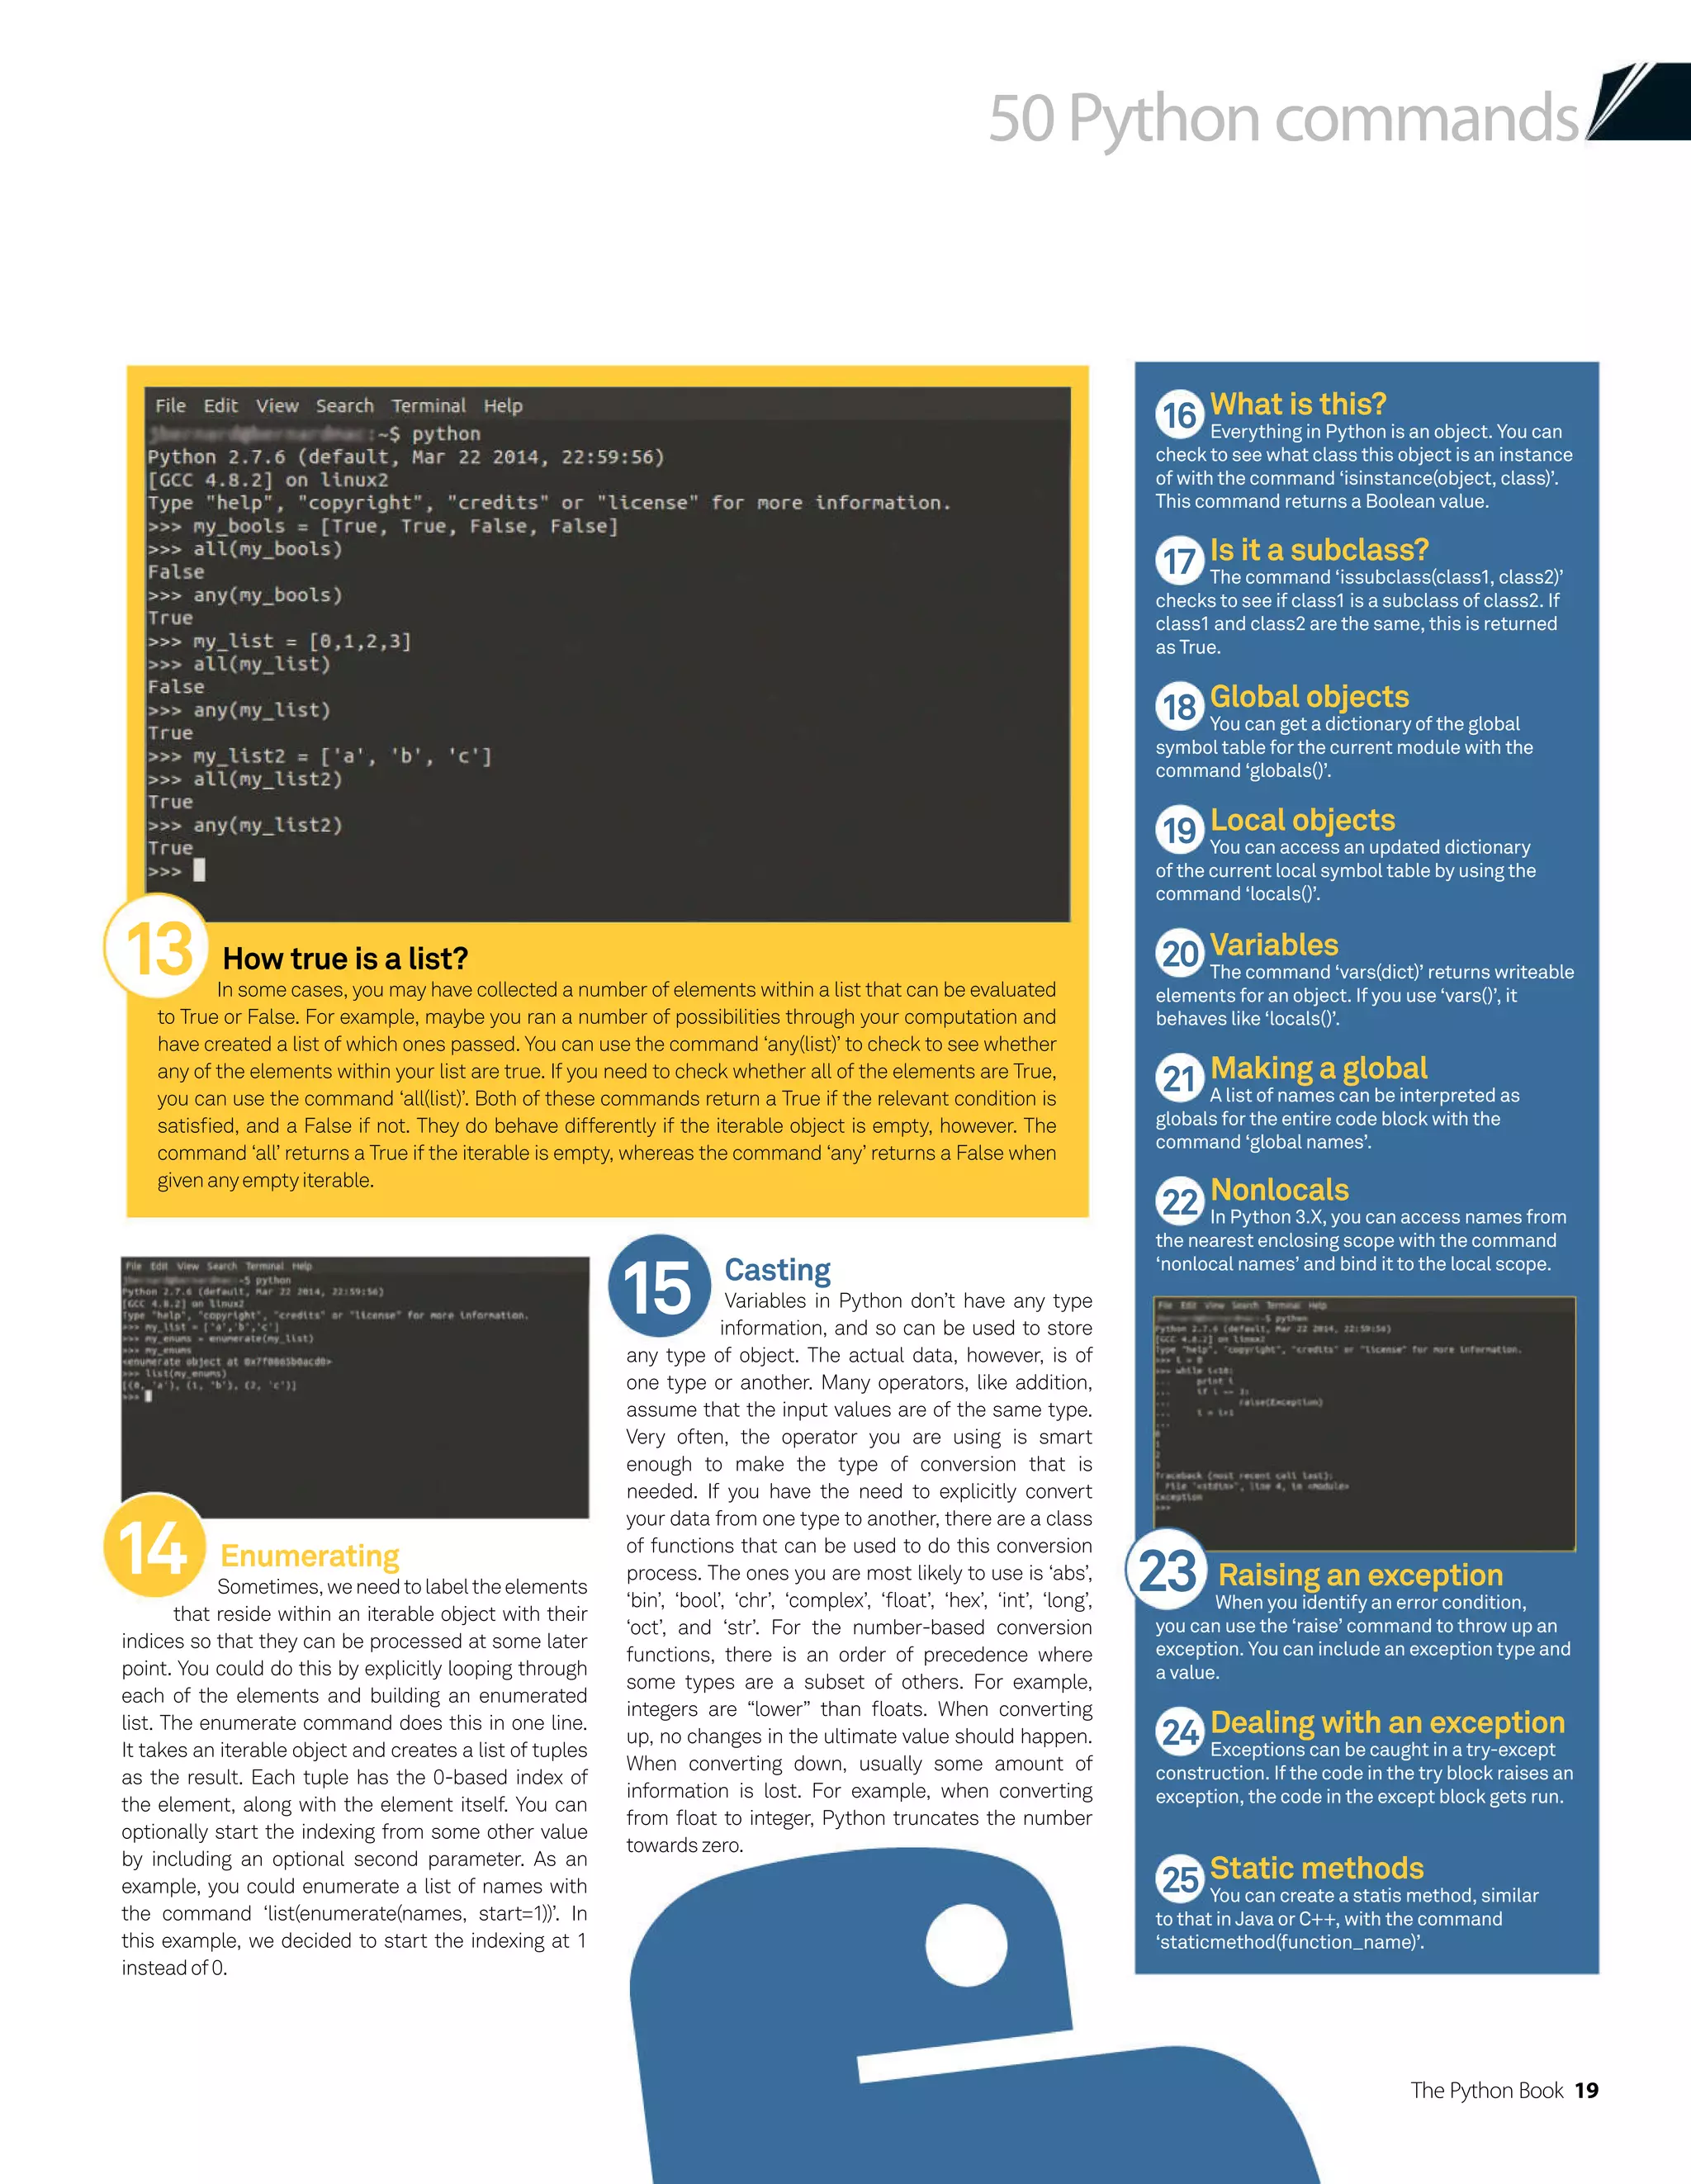
50 Python commands
Slices
While not truly a command, slices are
too important a concept not to mention in this
list of essential commands. Indexing elements
in data structures, like lists, is one of the most
common things done in Python. You can select a
single element by giving a single index value. More
interestingly, you can select a range of elements by
giving a start index and an end index, separated by
a colon. This gets returned as a new list that you can
save in a new variable name. You can even change
the step size, allowing you to skip some number of
elements. So, you could grab every odd element from
the list ‘a’ with the slice ‘a[1::2]’. This starts at index 1,
continues until the end, and steps through the index
values 2 at a time. Slices can be given negative index
values. If you do, then they start from the end of the
listandcountbackwards.
43
Inputting data
Sometimes, you need to collect input
from an end user. The command ‘input()’ can
take a prompt string to display to the user, and
then wait for the user to type a response. Once
theuserisdonetypingandhitstheenterkey,the
text is returned to your program. If the readline
module was loaded before calling input, then
you will have enhanced line editing and history
functionality. This command passes the text
through eval first, and so may cause uncaught
errors. If you have any doubts, you can use the
command ‘raw_input()’ to skip this problem. This
command simply returns the unchanged string
inputted by the user. Again, you can use the
readlinemoduletogetenhancedlineediting.
40
Comparing objects
There are several ways to compare objects within Python, with several caveats. The first is that
you can test two things between objects: equality and identity. If you are testing identity, you are testing
to see if two names actually refer to the same instance object. This can be done with the command
‘cmp(obj1, obj2)’. You can also test this condition by using the ‘is’ keyword. For example, ‘obj1 is obj2’. If
you are testing for equality, you are testing to see whether the values in the objects referred to by the
two names are equal. This test is handled by the operator ‘==’, as in ‘obj1 == obj2’. Testing for equality
canbecomecomplexformorecomplicatedobjects.
42
Internal variables
Forpeoplecomingfromotherprogramminglanguages,thereisaconceptofhavingcertainvariables
or methods be only available internally within an object. In Python, there is no such concept. All elements of an
object are accessible. There is a style rule, however, that can mimic this type of behaviour. Any names that start
with an underscore are expected to be treated as if they were internal names and to be kept as private to the
object.Theyarenothidden,however,andthereisnoexplicitprotectionforthesevariablesormethods.Itisupto
theprogrammertohonourtheintentionfromtheauthortheclassandnotalteranyoftheseinternalnames.You
arefreetomakethesetypesofchangesifitbecomesnecessary,though.
41](https://image.slidesharecdn.com/thepythonbooktheultimateguidetocodingwithpythonpdfdrive-220527060944-728dd1fe/75/The-Python-Book_-The-ultimate-guide-to-coding-with-Python-PDFDrive-pdf-22-2048.jpg)
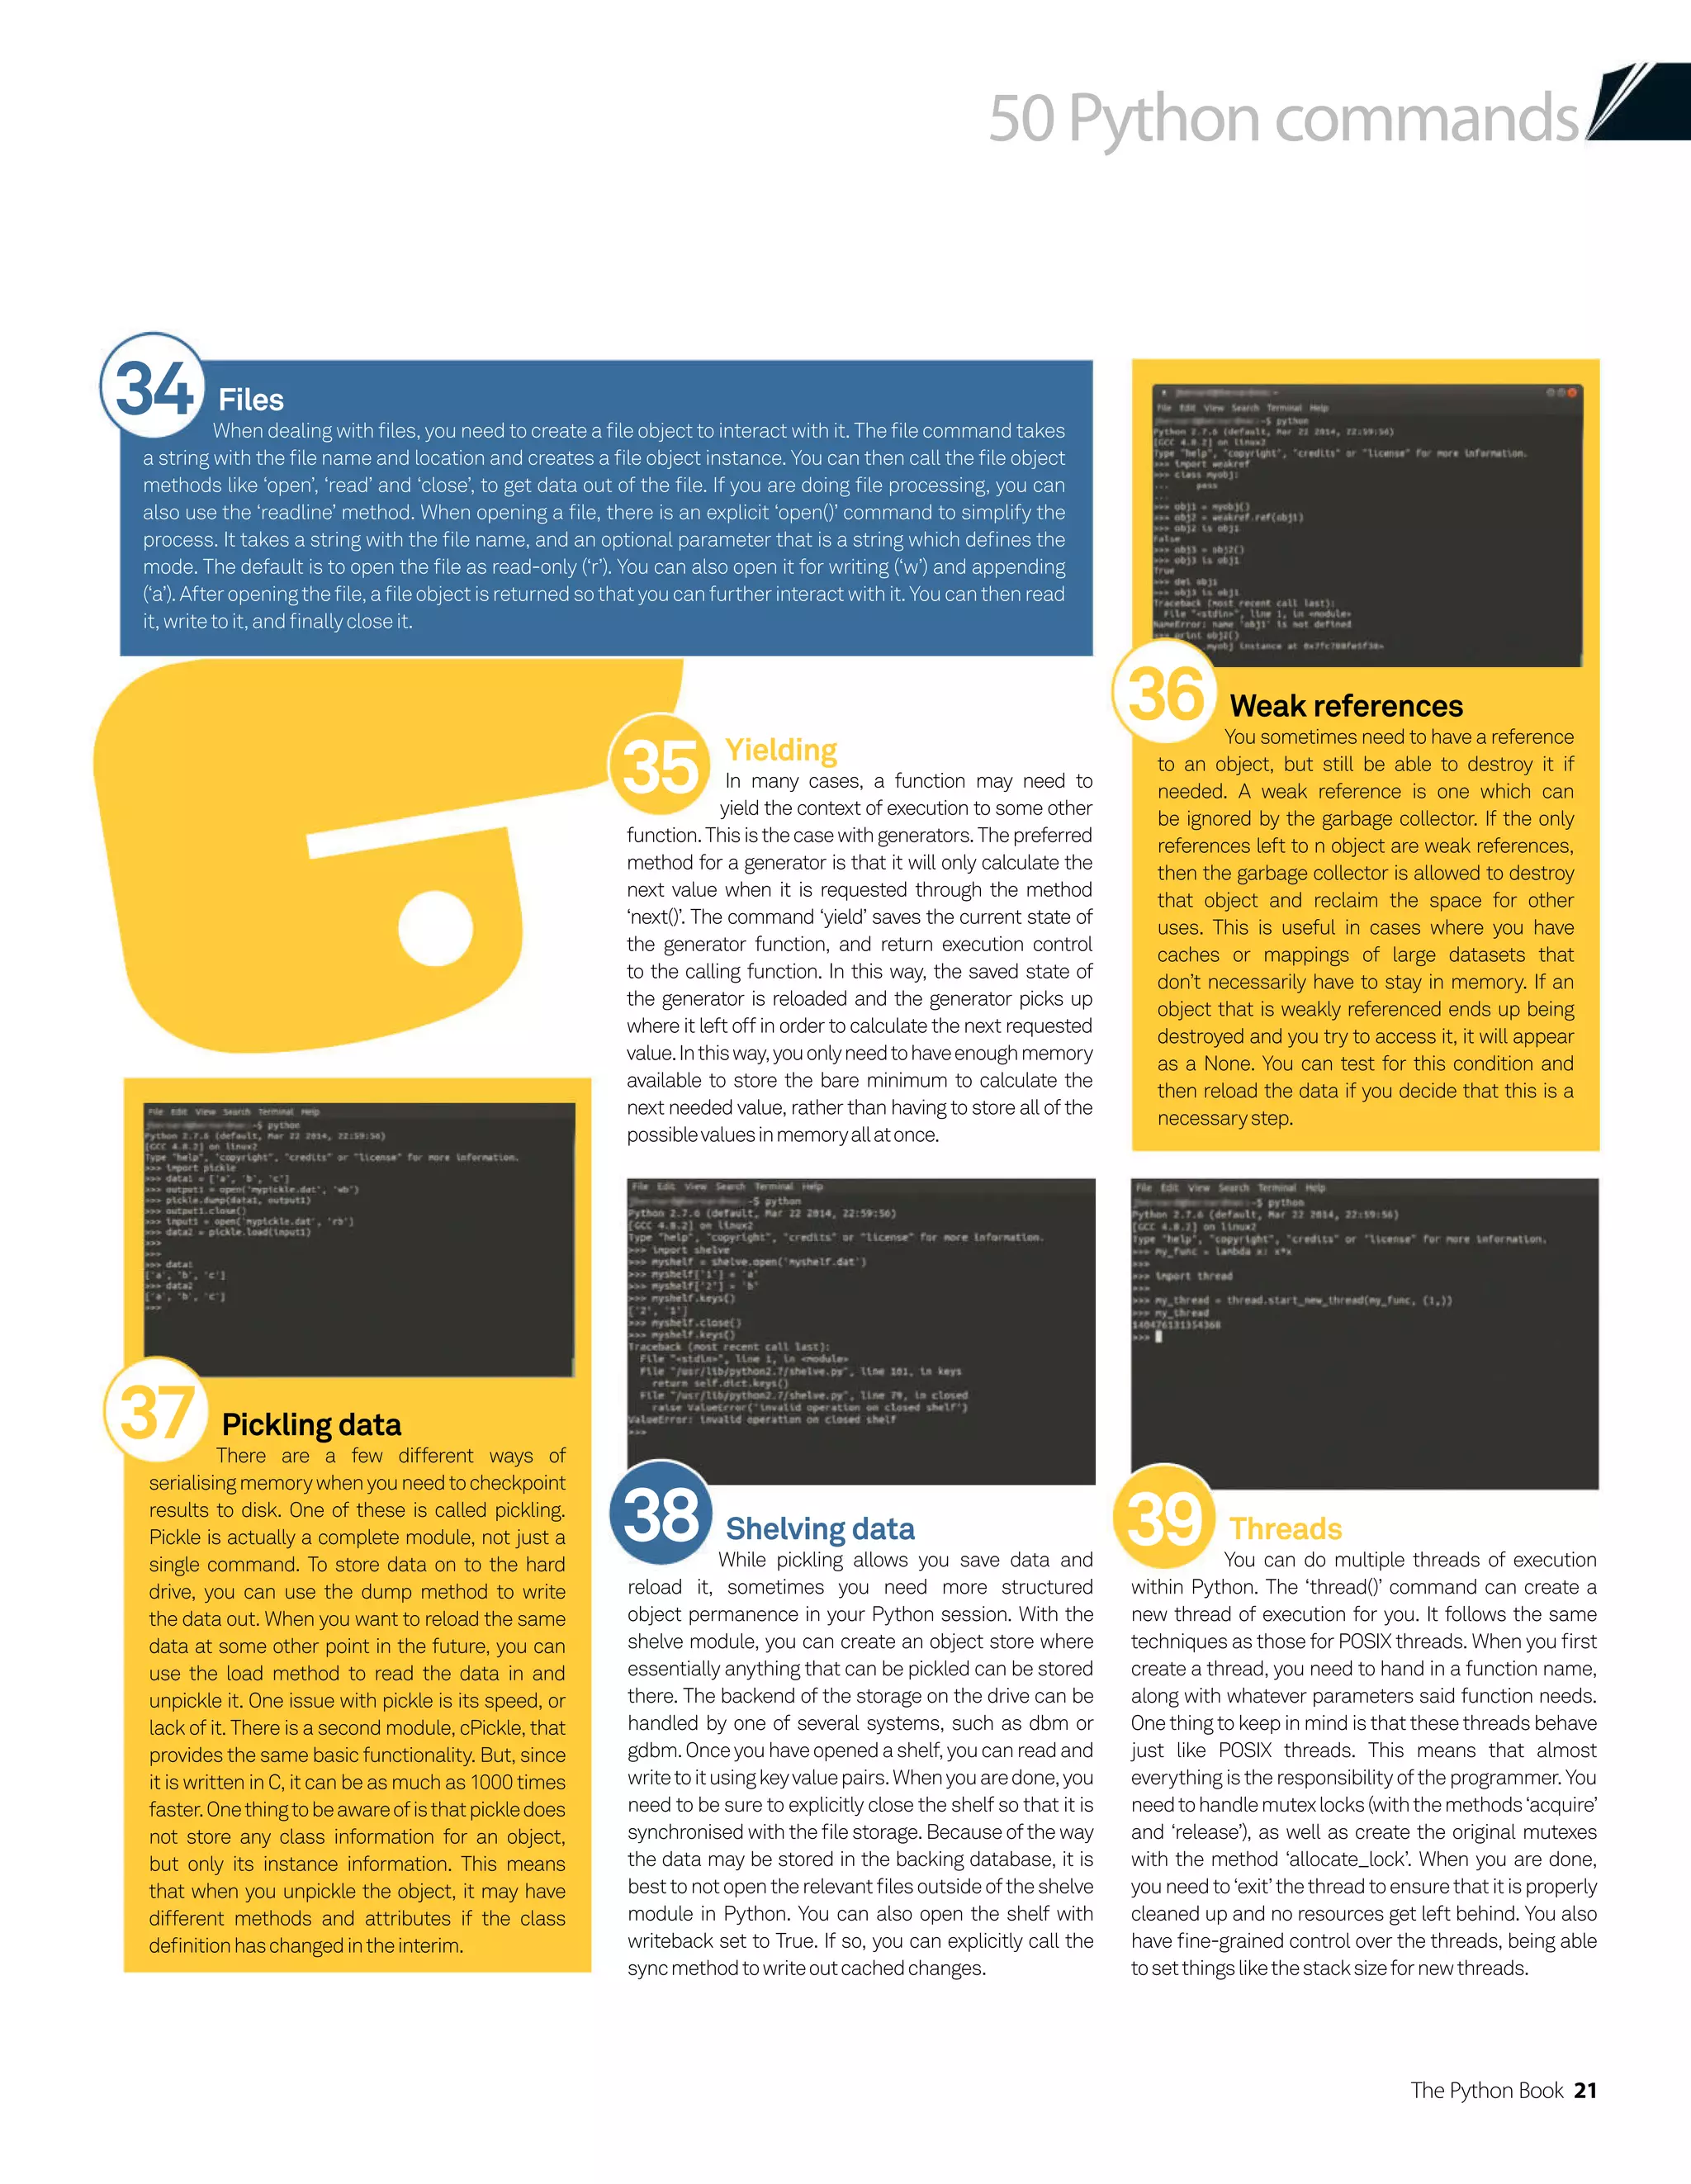
![30 The Python Book
Python essentials
11Theresultfunctiononlytakesthevariables
playerandcomputerforthistask,whichis
why we set that in result(player, computer). We’re
starting off by having a countdown to the result.
The printed numbers are self-explanatory, but
we’ve also thrown in sleep from the time module
we imported. Sleep pauses the execution of the
lookupwhatthetextversionofthemoveiscalled
from the names we set earlier on, and then to
insertthatwhere{0}is.
13Here we’re simply calling the scores we
set earlier. Using the global function
allows for the variable to be changed and used
outside of the variable, especially after we’ve
appendedanumbertooneoftheirscores.
15Ifit’snotatie,weneedtokeepchecking,
as it could still be a win or a loss. Within
the else, we start another if statement. Here,
we use the rules list from earlier to see if the
losing move to the player’s move is the same
as the computer’s. If that’s the case, we print
the message saying so, and add one to the
player_scorevariablefrombefore.
code by the number of seconds in the brackets.
We’ve put a one-second pause between counts,
thenhalfasecondafterthattoshowtheresults.
12To print out what the computer threw,
we’re using string.format(). The {0} in the
printed text is where we’re inserting the move,
which we have previously defined as numbers.
Usingnames[computer],we’retellingthecodeto
14The way we’re checking the result is
basicallythroughaprocessofelimination.
Our first check is to see if the move the player
and computer used were the same, which is the
simplest part. We put it in an if statement so that
if it’s true, this particular section of the code ends
here.Itthenprintsourtiemessageandgoesback
tothegamefunctionforthenextstep.
16If we get to this point, the player has lost.
We print the losing message, give the
computer a point and it immediately ends the
resultfunction,returningtothegamefunction.
11
12
13
14
15
16
Thecodeinaction](https://image.slidesharecdn.com/thepythonbooktheultimateguidetocodingwithpythonpdfdrive-220527060944-728dd1fe/75/The-Python-Book_-The-ultimate-guide-to-coding-with-Python-PDFDrive-pdf-30-2048.jpg)
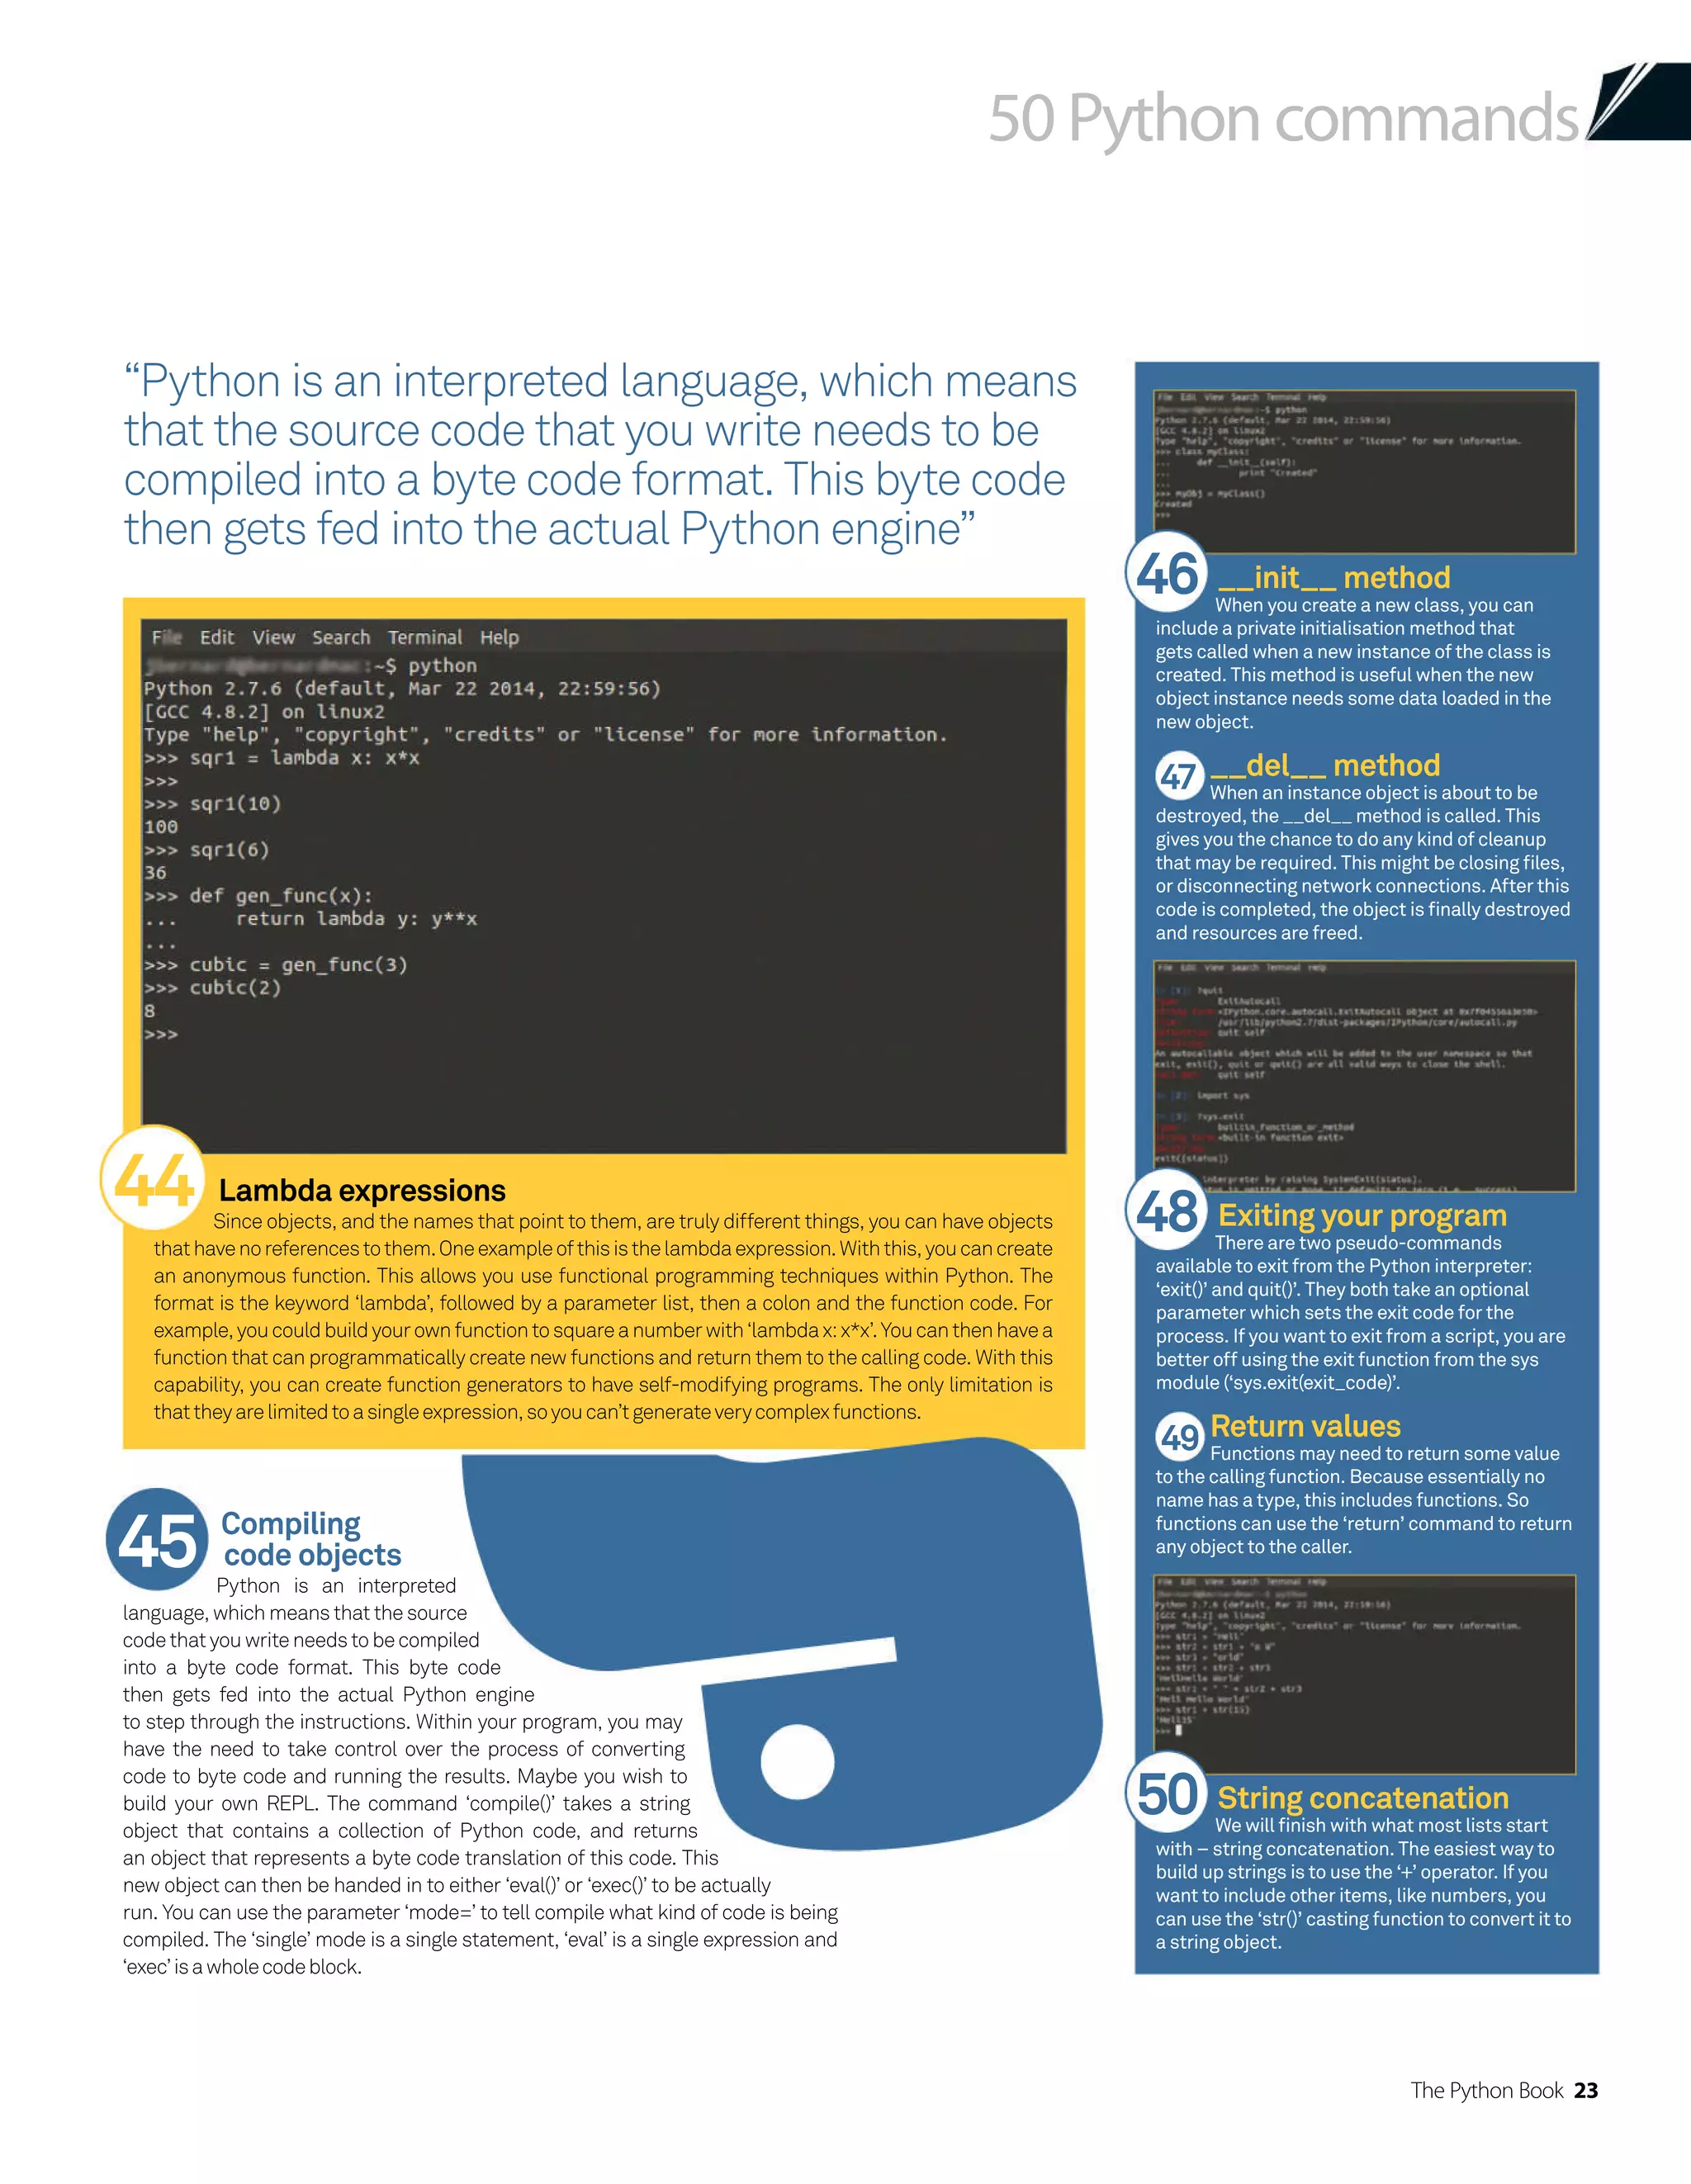
![32 The Python Book
Python essentials
ThissectionimportstheextraPython
functions we’ll need for the code –
they’re still parts of the standard
Python libraries, just not part of the
defaultenvironment
We’re again providing variables so we
can keep score of the games played,
andthey’reupdatedeachround
Our very basic graphics involve ASCII
art of the game’s stages, printed out
aftereveryturn
LearnhowtodosomemorePython
codingbyfollowingourbreakdownofa
simpleHangmangame
Programa
gameof
Hangman
One of the best ways to get to know Python is
by building lots of simple projects so you can
understand a bit more about the programming
language. This time round, we’re looking at
Hangman, a multi-round game relying on if
and while loops and dealing with strings of text
in multiple ways. We’ll be using some of the
techniquesweimplementedlasttimeaswell,so
wecanbuilduponthem.
Hangman still doesn’t require the Pygame
set of modules, but it’s a little more advanced
than rock-paper-scissors. We’re playing
around with a lot more variables this time.
However, we’re still looking at comparisons,
random selections and human input, along
with splitting up a string, editing a list and even
displaying rudimentary graphics.
You should continue to use IDLE for these
tutorials. As we’ve mentioned before, its built-
in debugging tools are simple yet effective and
it can be used on any Linux system, as well as
the Raspberry Pi.
Codelisting
#!/usr/bin/env python2
from random import *
player_score = 0
computer_score = 0
def hangedman(hangman):
graphic = [
“””
+-------+
|
|
|
|
|
==============
“””,
“””
+-------+
| |
| O
|
|
|
===============
“””,
“””
“””,
“””
+-------+
| |
| O
| -|-
| /
|
===============
“””]
print graphic[hangman]
return
Resources
Python2:www.python.org/download
IDLE:www.python.org/idle](https://image.slidesharecdn.com/thepythonbooktheultimateguidetocodingwithpythonpdfdrive-220527060944-728dd1fe/75/The-Python-Book_-The-ultimate-guide-to-coding-with-Python-PDFDrive-pdf-32-2048.jpg)
![The Python Book 33
Python essentials
The actual game starts here, with a while loop to
let you continually play the game until you decide
otherwise, thenending the program
The game rules are decided here, as well as the
setup for the word and keeping track of tries and
incorrectanswers
Each round of the game is played here, asking for
aninput,thentellingyouifyouwerecorrectornot.
It prints out the graphic and changes any variables
that need to be updated, especially incorrect and
correctguesses
After each round, the code checks if you’ve won or
lostyet–thewinconditionbeingthatyouguessed
theword,orlosingifyou’ve made sixguesses
The human input for the game takes the letter
and turns it into something the code can use. It’s
verified in the previous block of code and then
referred back to if you’ve entered an unsupported
or already used character
The same class as last time, which allows you to
selectwhether or not you wishto play again
Upon quitting the game, scores are given for the
durationoftheplaysession.Wealsoendthescript
withtheif__name__code like before
def start():
print “Let’s play a game of Linux Hangman.”
while game():
pass
scores()
def game():
dictionary = [“gnu”,”kernel”,”linux”,”mageia”,”penguin”,”ubuntu”]
word = choice(dictionary)
word_length = len(word)
clue = word_length * [“_”]
tries = 6
letters_tried = “”
guesses = 0
letters_right = 0
letters_wrong = 0
global computer_score, player_score
while (letters_wrong != tries) and (“”.join(clue) != word):
letter=guess_letter()
if len(letter)==1 and letter
.isalpha():
if letters_tried.find(letter) != -1:
print “You’ve already picked”, letter
else:
letters_tried = letters_tried + letter
first_index=word.find(letter)
if first_index == -1:
letters_wrong +=1
print “Sorry,”,letter
,”isn’t what we’re looking for
.”
else:
print”Congratulations,”,letter
,”is correct.”
for i in range(word_length):
if letter == word[i]:
clue[i] = letter
else:
print “Choose another
.”
hangedman(letters_wrong)
print “ “.join(clue)
print “Guesses: “, letters_tried
if letters_wrong == tries:
print “Game Over
.”
print “The word was”,word
computer_score += 1
break
if “”.join(clue) == word:
print “You Win!”
print “The word was”,word
player_score += 1
break
return play_again()
def guess_letter():
print
letter = raw_input(“Take a guess at our mystery word:”)
letter
.strip()
letter
.lower()
print
return letter
def play_again():
answer = raw_input(“Would you like to play again? y/n: “)
if answer in (“y”, “Y”, “yes”, “Yes”, “Of course!”):
return answer
else:
print “Thank you very much for playing our game. See you next time!”
def scores():
global player_score, computer_score
print “HIGH SCORES”
print “Player: “, player_score
print “Computer: “, computer_score
if __name__ == ‘__main__’:
start()
Codehighlighting
IDLEautomaticallyhighlightsthecodetomake
reading your work that bit easier. It also allows
youtochangethesecoloursandhighlightingin
IDLE’s Preferences, in case you’re colour blind
or are just used to a different colour scheme
in general.
Codelistingcontinued](https://image.slidesharecdn.com/thepythonbooktheultimateguidetocodingwithpythonpdfdrive-220527060944-728dd1fe/75/The-Python-Book_-The-ultimate-guide-to-coding-with-Python-PDFDrive-pdf-33-2048.jpg)
![34 The Python Book
Python essentials
IseeASCII
Here’s a close-up of the seven
stages we’ve used for Hangman’s
graphics. You can change them
yourself, but you need to make
sure the quote marks are all in
the correct place so that the art
is considered a text string to be
printedout.
#!/usr/bin/env python2
from random import *
player_score = 0
computer_score = 0
def hangedman(hangman):
graphic = [
“””
+-------+
|
|
|
|
|
==============
“””,
“””
def start():
print “Let’s play a game of Linux Hangman.”
while game():
pass
scores()
01
02
03
04
05
01We begin by using this line to enter the path
to the Python interpreter. This allows us to
run the program inside a terminal or otherwise outside
of a Python-specific IDE like IDLE. Note that we’re
also using Python 2 for this particular script, as it is
installed by default on most Linux systems and will
thereforeensurecompatibility.
02We’re importing the ‘random’ module slightly
differently this time, importing the actual
names of the functions from random rather than just
the module itself. This allows us to use the functions
without having syntax like random.function. The
asterisk imports all the functions from random,
although you can switch that for specific names of
any of random’s functions. We’ll be using the random
functiontoselectawordfortheplayertoguess.
03Very simply, this creates a variable that can
be used throughout the code to keep track
of scores. We need to start it at zero now so that it
exists; otherwise if we defined it in a function, it would
only exist inside that function. The code adds a point
to the computer or player depending on the outcome
of the round.
04Our simple graphics consist of a series of
ASCII hanging man stages. We’re storing
these in a function as a list of separate string objects
so we can call upon them by passing on the number of
incorrect guesses to it. There are seven graphics in all,
like in the pen-and-paper version. We also include the
print command with the function, so when it’s called it
will completely handle the selection and display of the
hanging man, with the first one being printed after the
firstletterisguessed.
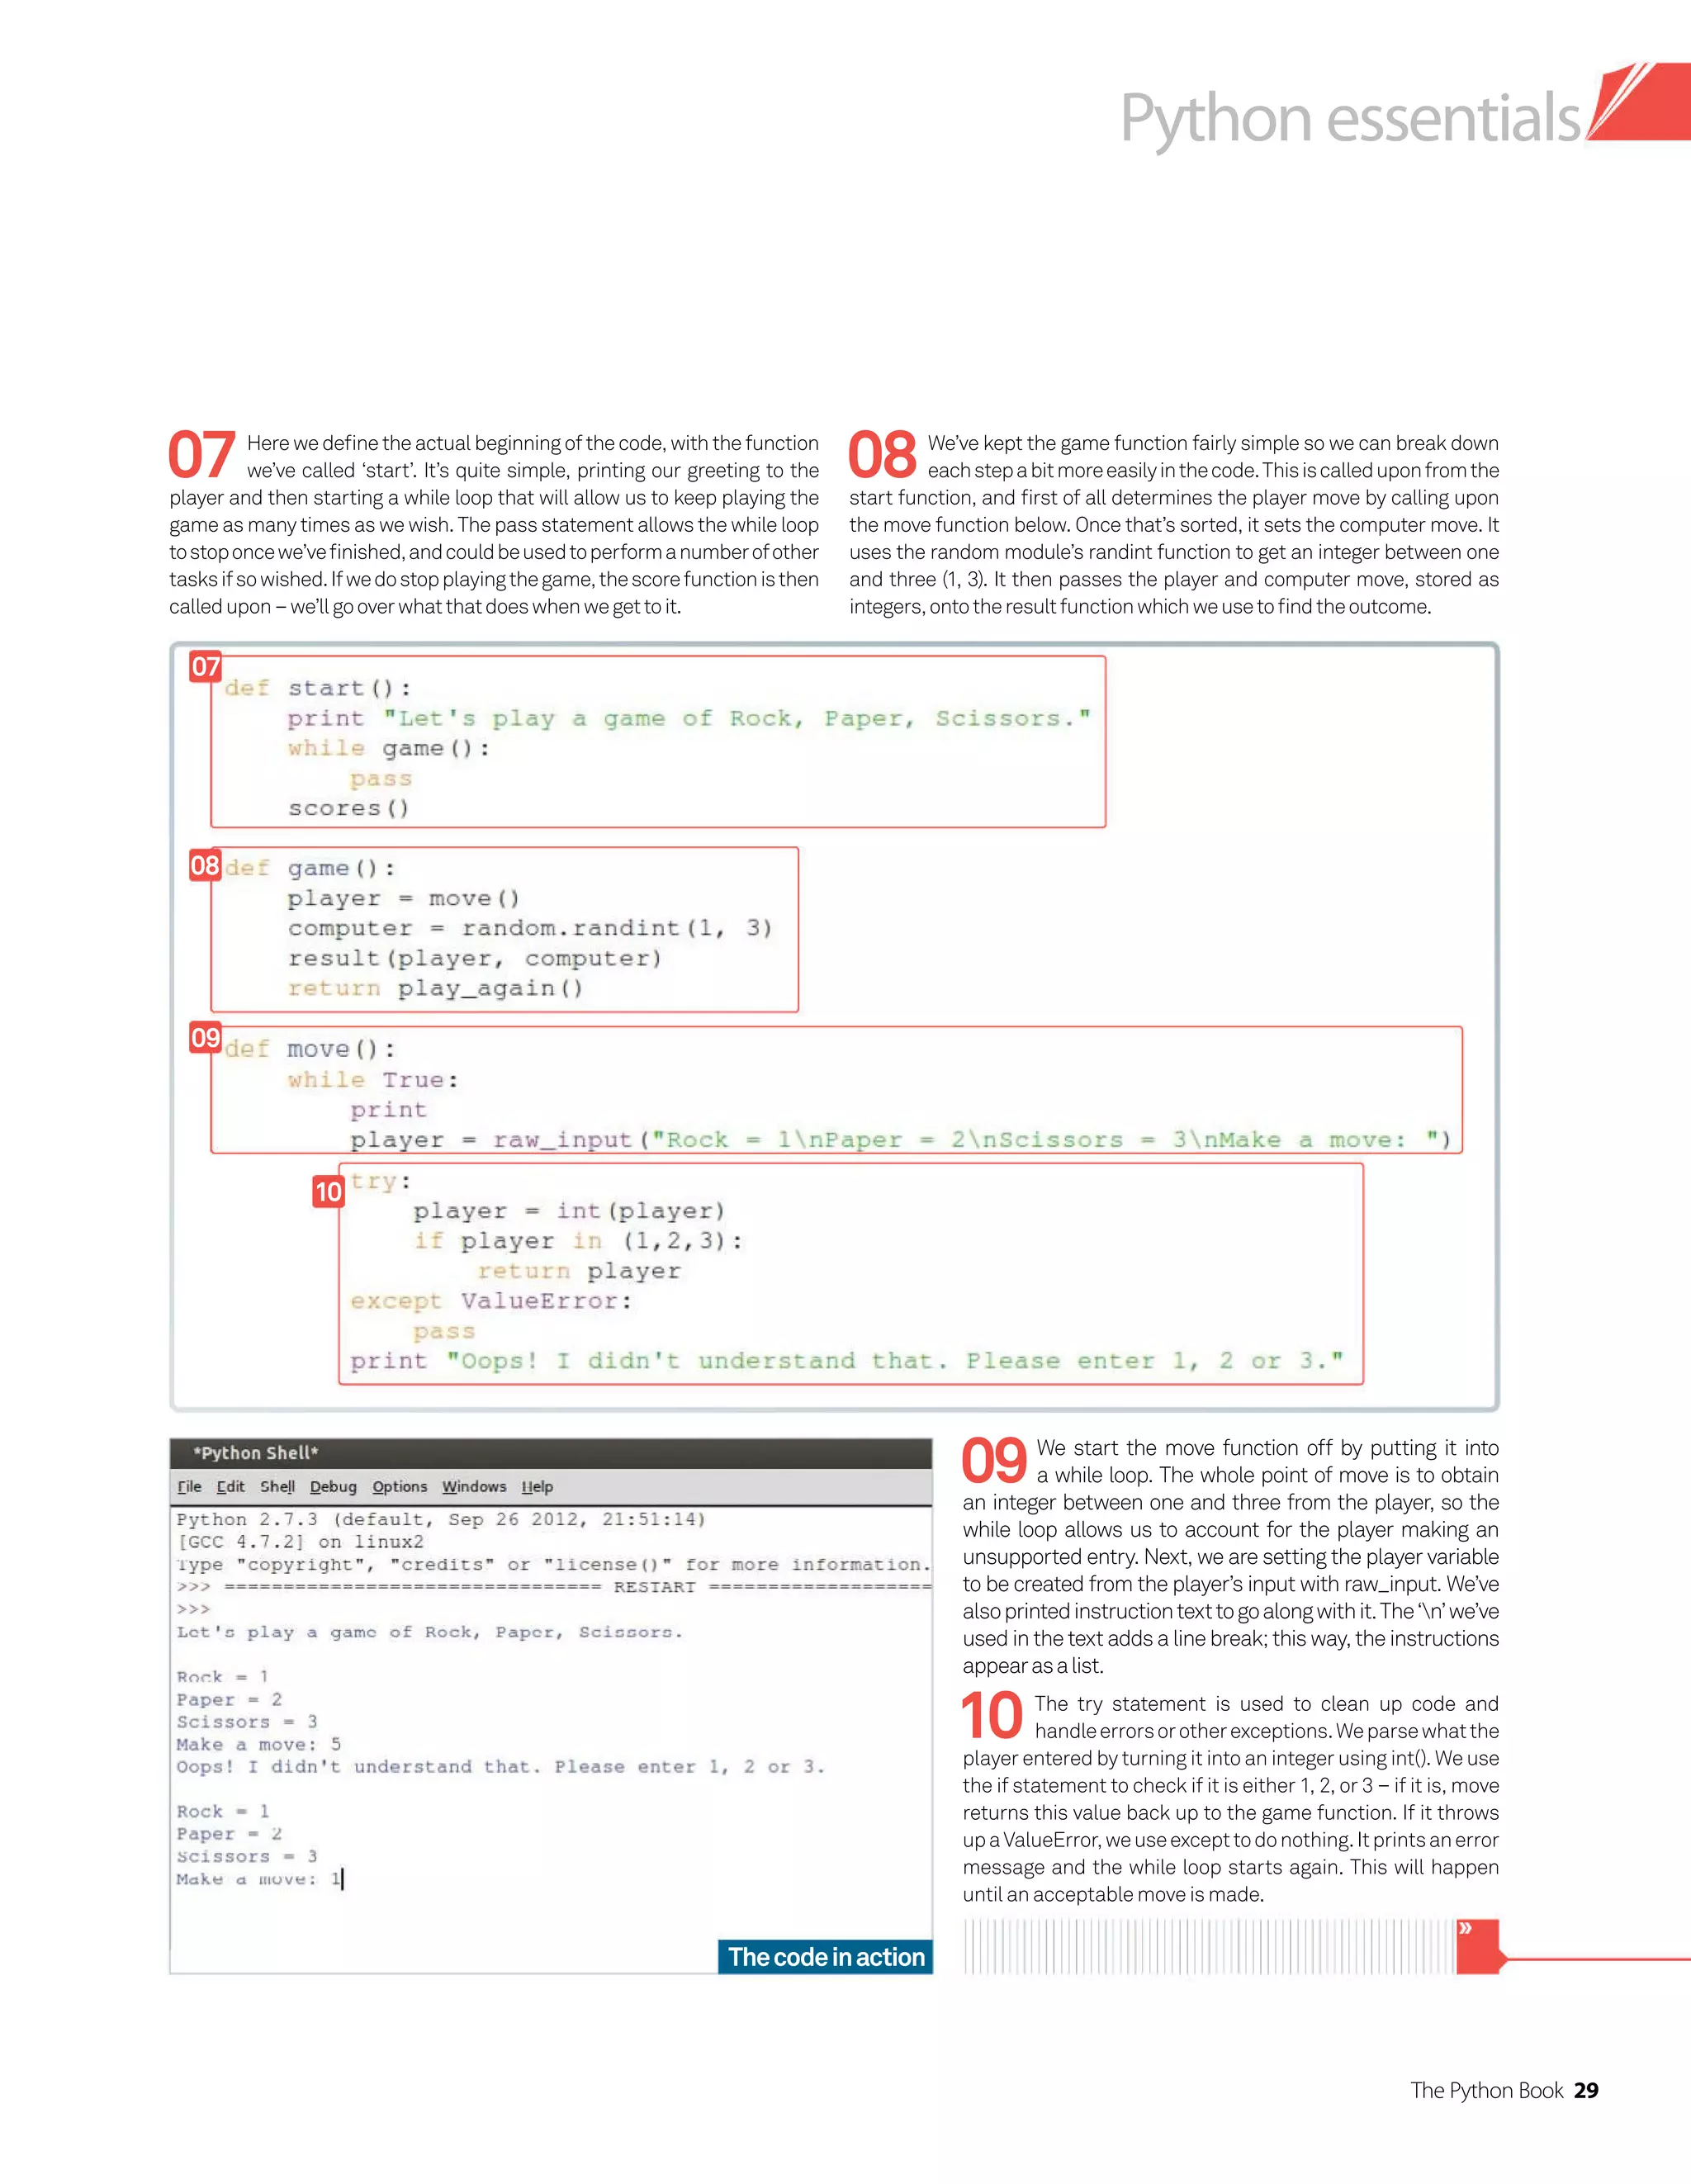
05Here we define the actual beginning of the
code, with the function we’ve called ‘start’.
It’s quite simple, printing our greeting to the player
and then starting a while loop that will allow us to keep
playing the game as many times as we wish. The pass
statement allows the while loop to stop once we’ve
finished, and could be used to perform a number
“””
+-------+
|
|
|
|
|
==============
“””,
“””
+-------+
| |
| O
|
|
|
===============
“””,
“””
+-------+
| |
| O
| |
|
|
===============
“””,
“””
+-------+
| O
| -|
|
|
|
===============
“””,
“””
+-------+
| |
| O
| -|-
|
|
===============
“””,
“””
+-------+
| |
| O
| -|-
| /
|
===============
“””,
“””
+-------+
| |
| O
| -|-
| /
|
===============
“””]
Therules
Although we’ve moved some of
the rules to the ‘game’ function
this month, you can always put
them back here and call upon
them using the global variable, as
we would do with the scores. For
thewords,youcouldalsocreatea
separatefileandimportthemlike
therandom module.](https://image.slidesharecdn.com/thepythonbooktheultimateguidetocodingwithpythonpdfdrive-220527060944-728dd1fe/75/The-Python-Book_-The-ultimate-guide-to-coding-with-Python-PDFDrive-pdf-34-2048.jpg)
![The Python Book 35
Python essentials
of other tasks if so wished. If we do stop playing the
game, the score function is then called upon –we’ll go
overwhatthatdoeswhenwegettoit.
06We have put a majority of the game code
in the ‘game’ function this time around, as
there’s not as much that needs to be split up. You can
split it up further if you wish, using the style of code
from last issue, if it would make the code cleaner
for you or help you understand the building blocks a
bitmore.
07The first four lines quickly set up the word
for the player to guess. We’ve got a small
selection of words in a list here. However, these can be
imported via HTML or expanded upon. Choice is used
to select a random element from the list, which comes
from the random module we imported. Finally, we
ascertain how long the string is of the word to guess,
and then create the clue variable with a number of
underscores of that length. This is used to display the
wordasyoubuilditupfromguesses.
08We start to set up the rules and the individual
variables to keep track of during the game.
There can only be six incorrect guesses before the
hanging man is fully drawn, or in our case displayed,
so we set the tries variable to six. We’ll keep track of
the letters through letters_tried to make sure that not
only will the player know, but also the code for when
def game():
dictionary = [“gnu”,”kernel”,”linux”,”mageia”,”penguin”,”ubuntu”]
word = choice(dictionary)
word_length = len(word)
clue = word_length * [“_”]
tries = 6
letters_tried = “”
guesses = 0
letters_right = 0
letters_wrong = 0
global computer_score, player_score
while (letters_wrong != tries) and (“”.join(clue) != word):
letter=guess_letter()
if len(letter)==1 and letter
.isalpha():
if letters_tried.find(letter) != -1:
print “You’ve already picked”, letter
it’s checking against letters already played. Finally,
we create empty variables for the number of guesses
made, letters correct and letters incorrect, to make
the code slightly easier. We also import the global
scoreshere.
09We’re starting a while loop to perform the
player selection and check the status of the
game. This loop continues until the player wins or loses.
It starts by checking if all the tries have been used up
by seeing if letters_wrong is not equal to tries. As each
try will only add one point to wrong, it will never go
above six. It then concatenates ‘clue’ and sees if it’s the
same as the word the computer selected. If both these
statementsaretrue,itgoesontothenextturn.
10We call upon the function we’re using to
input a letter and give it the variable ‘letter’.
We check what it returns by first of all making sure
it’s only a single letter, with len(letter), then by
using isalpha to see if it’s one of the 26 letters of the
alphabet. If these conditions are satisfied, we start
a new if statement to make sure it’s a new guess,
and tell the player if it’s already been chosen so they
can start again. If all this is acceptable, we move on
to the next section of the code to see if it’s a correct
guess or not.
06
08
09
10
07
Indentations
While IDLE will keep track of the
indentsinthecode,ifyou’reusing
atexteditortowritesomePython,
you’ll have to make sure you’re
using them correctly. Python is
very sensitive to whether or not
indents are used correctly, and it
doesaid in readability aswell.](https://image.slidesharecdn.com/thepythonbooktheultimateguidetocodingwithpythonpdfdrive-220527060944-728dd1fe/75/The-Python-Book_-The-ultimate-guide-to-coding-with-Python-PDFDrive-pdf-35-2048.jpg)
![36 The Python Book
Python essentials
11
12
13
14
16
15
11If it’s a new letter that we find acceptable,
the first thing we do is add it to the list
of letters tried. This is done simply by adding
the strings together. We then use the find
command to search the word string for the letter
entered, which will then return a number of the
placement of the letter in the string. If it doesn’t
find the letter, it returns a -1 value, which we use
in the next if statement to see if the first_index
variable is -1. If so, it adds one to the number of
letters_wrong and then prints a message to let
theplayerknowthatitwasanincorrectguess.
12If we’ve got this far and the letter is not
incorrect, than we can only assume
it is correct. Through this simple process of
elimination, we first print out a message to let
theplayerknowthatthey’vebeensuccessfuland
thenmakearecordofit.
13We’re going to start a small loop here so
we can update the clue with the correct
letter we’ve added. We use the range function to
tell the code how many times we wish to iterate
over the clue by using the word_length variable.
We then check to see which letter in the word
has been guessed correctly and change that
specific part of the clue to be that letter so it can
be printed out for the player to see, and for us to
checkwhetherornotthegameisover.
14We end the original if statement by telling
the player to choose again if they did not
enter a supported input. Before we go on to the
next round of choices, we print out the hanging
else:
letters_tried = letters_tried + letter
first_index=word.find(letter)
if first_index == -1:
letters_wrong +=1
print “Sorry,”
,letter
,”isn’t what we’re looking for
.”
else:
print”Congratulations,”
,letter
,”is correct.”
for i in range(word_length):
if letter == word[i]:
clue[i] = letter
else:
print “Choose another
.”
hangedman(letters_wrong)
print “ “.
join(clue)
print “Guesses: “, letters_tried
if letters_wrong == tries:
print “Game Over
.”
print “The word was”
,word
computer_score += 1
break
if “”
.
join(clue) == word:
print “You Win!”
print “The word was”
,word
player_score += 1
break
return play_again()
man graphic as it stands, by calling the graphic
in the list that corresponds to the number of
incorrect guesses that have been made. We then
print how the clue currently looks, with a space
in between each character, and then print the
numberofguessesthathavebeenmade.
15Here we check to see if the game is
over again, first of all comparing the
letters_wrong to the number of tries. If that’s
true, we print a message that the game has
endedandrevealthemysteryofthehiddenword.
We increase the computer’s score and break the
loop. The next loop checks to see if the full clue
concatenatedisthesameastheoriginalword–if
that’sthecase,weprintthewinmessage,thefull
wordandaddonepointtotheplayerscorebefore
breaking the loop again. This can also be done
withifsandelifstoavoidusingbreaks.
Continuation
This code is still part of the
game function we started on the
previous page, so make sure your
indentations are in alignment if
you’renotusinganIDE.Ifyouplan
to split this code up, we’d suggest
starting with the word selection
andresults.](https://image.slidesharecdn.com/thepythonbooktheultimateguidetocodingwithpythonpdfdrive-220527060944-728dd1fe/75/The-Python-Book_-The-ultimate-guide-to-coding-with-Python-PDFDrive-pdf-36-2048.jpg)
![38 The Python Book
Python essentials
TheStart
Here we’re doing some minor setups so we can
get our code to run with some extra modules not
includedwiththe basics
TheRules
We’re setting names for each dice roll so they can
be properly identified to the player – much more
interesting than numbers
TheScore
Again we’ve got some basic variables set up so we
cankeepscoreofthe gamesifwe want to
TheScript
The game is handled here, passing the player onto
thenextfunctiontoactuallyplay,andhandlingthe
endofthesession aswell
TheGame
We access the full game loop via here, and the
function that allows us to play again if we’re
so inclined
TheThrow
The initial hand is dealt, so to speak, at the start of
the throws function. This function handles all the
decision making in the game, while passing off the
dicerollstoanother function
TheHand
We’ve also got a special function so we can inform
the player exactly whatstyle ofhandthey have
TheDecision
There are two rounds in this version of poker
dice, and you can select how many dice you wish
to re-roll in this small while loop that makes sure
you’realso usinga correct number
#!/usr/bin/env python2
import random
from itertools import groupby
nine = 1
ten = 2
jack = 3
queen = 4
king = 5
ace = 6
names = { nine: “9”, ten: “10”, jack: “J”, queen: “Q”, king: “K”, ace: “A” }
player_score = 0
computer_score = 0
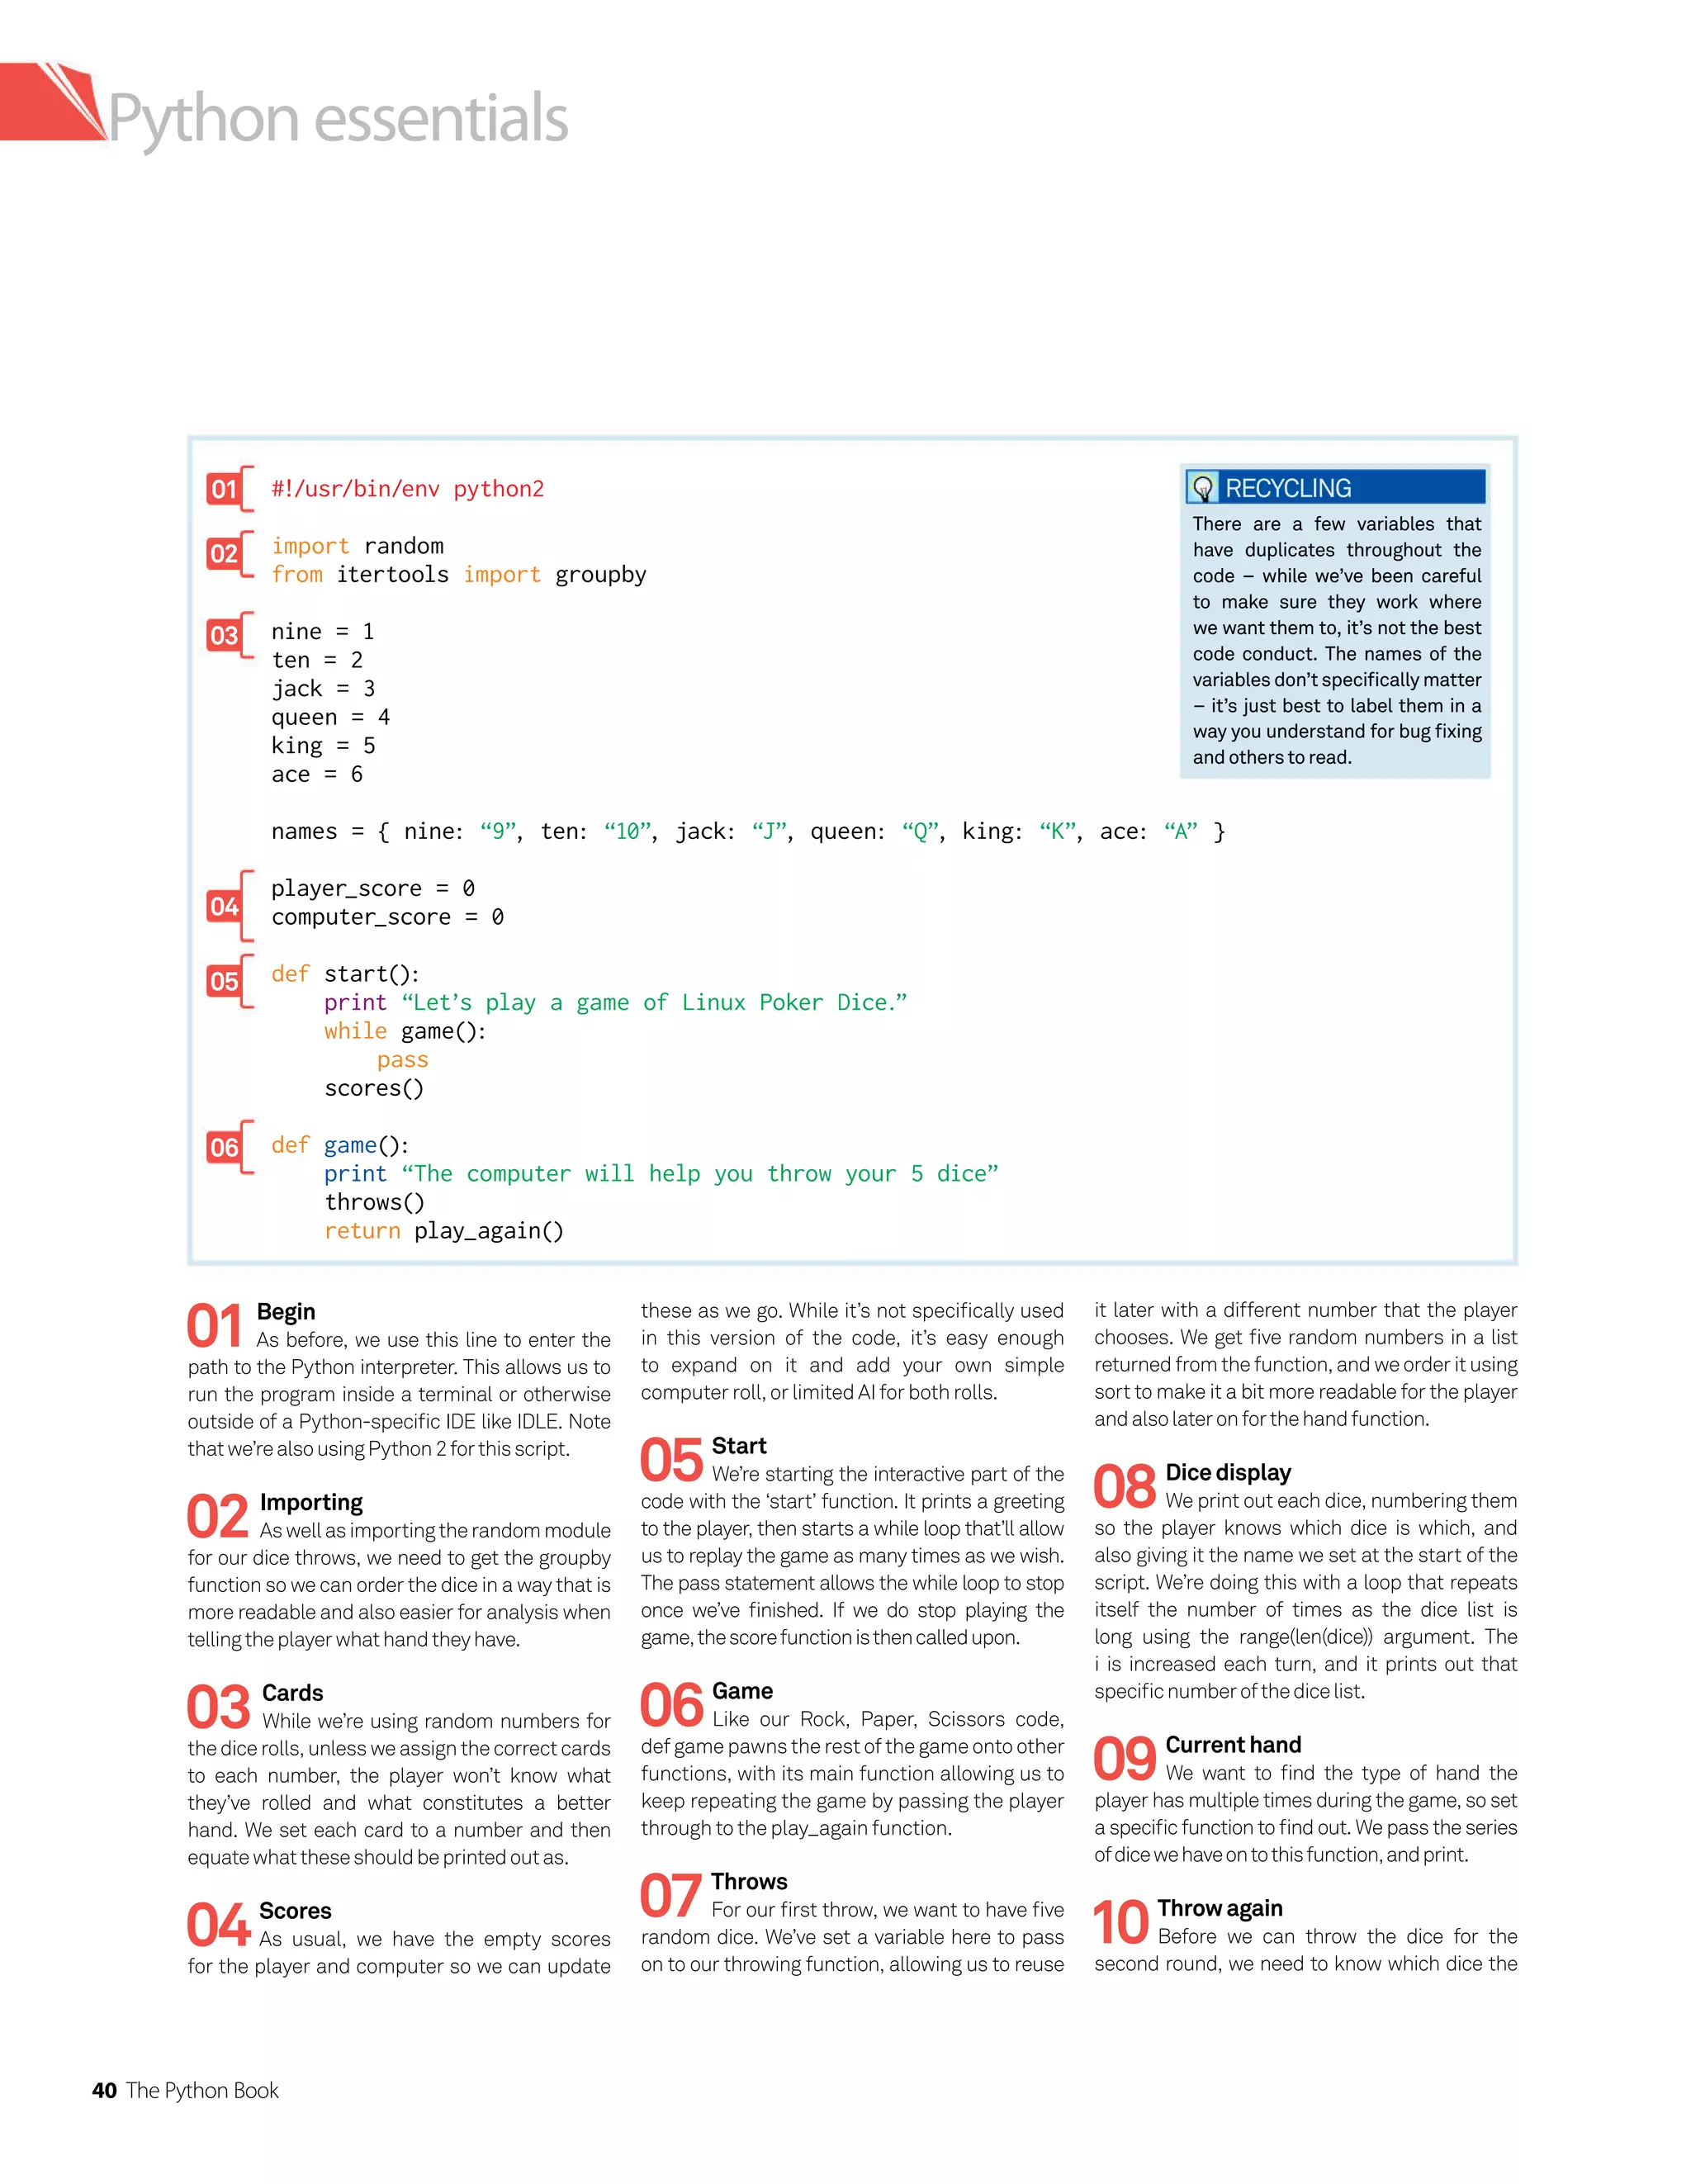
def start():
print “Let’s play a game of Linux Poker Dice.”
while game():
pass
scores()
def game():
print “The computer will help you throw your 5 dice”
throws()
return play_again()
def throws():
roll_number = 5
dice = roll(roll_number)
dice.sort()
for i in range(len(dice)):
print “Dice”,i + 1,”:”,names[dice[i]]
result = hand(dice)
print “You currently have”, result
while True:
rerolls = input(“How many dice do you want to throw again? “)
try:
if rerolls in (1,2,3,4,5):
break
except ValueError:
pass
print “Oops! I didn’t understand that. Please enter 1, 2, 3, 4 or 5.”
Codelisting
Putonyourpokerfaceandgetreadytogambleasyouhone
yourprogrammingskillwithabitofpokerdice
PlaypokerdiceusingPython
So you’ve learnt how to program tic-tac-toe
and guessed your way to victory at hangman.
Now it’s time to head to Las Vegas and play our
cardsright.Orinthiscase,virtualdice,andmore
like Reno as we continue with our Python game
tutorialsandintroduceyoutosomepokerdice.
We’re again using some of the lessons we’ve
already learnt, including random number
generation, list creation and modification,
human input, rule setting, scoring and more.
But we’ll also be adding some new skills in this
tutorial.Namely,we’llbecreatingandappending
lists with random numbers, and using functions
multiple times in one block of code to cut down
onbloat.
Again, we recommend using IDLE, and we’re
using Python 2 to ensure compatibility with a
wider variety of distros, including the Raspberry
Pi. So, we hope luck is a lady for you and that the
odds are ever in your favour – just keep those
fingers crossed that you don’t roll a snake eyes
(wearecodinginPython,afterall)!
Resources
Python2:www.python.org/download
IDLE:www.python.org/idle](https://image.slidesharecdn.com/thepythonbooktheultimateguidetocodingwithpythonpdfdrive-220527060944-728dd1fe/75/The-Python-Book_-The-ultimate-guide-to-coding-with-Python-PDFDrive-pdf-38-2048.jpg)
![The Python Book 39
Python essentials
TheRe-roll
We’re doing the second set of rolls and starting
the end of the game here by calling on the same
function as before, but we’re also aware that
choosing no re-rollsmeans the endofthe game
TheDice
Here we’re finding out which dice the player wants
to re-roll, and also making sure that they enter
a valid number. Just so they know they’re doing
something, weprint something after every turn
SecondHand
We change and display the new dice hand to end
the game. Again, we make sure to tell the player
what theactualhandtheyhaveis
TheRolls
The function we reuse to roll our virtual six dice
using a simple while loop. This allows us to keep
thecodebase smaller
TheAnalysis
There are eight possible types of hands in poker
dice, and we can use a bit of logic to work out all
but one of them without checking against all 7,776
outcomes – in fact, we only specifically have to
checkfortwo
TheQuestion
Our simple ‘play again’ function that parses player
input so wecan restart or end the script
TheEnd
Scores are displayed at the end of the script, and
the very final part allows us to import this into
otherPythonscriptsasa module
EXTRAFUNCTIONS
Splitting up actions into functions
makes it easier to not only perform
them multiple times, but reduce
the amount of code. On larger
projects,thiscanaidwithspeed.
if rerolls == 0:
print “You finish with”, result
else:
roll_number = rerolls
dice_rerolls = roll(roll_number)
dice_changes = range(rerolls)
print “Enter the number of a dice to reroll: “
iterations = 0
while iterations rerolls:
iterations = iterations + 1
while True:
selection = input(“”)
try:
if selection in (1,2,3,4,5):
break
except ValueError:
pass
print “Oops! I didn’t understand that. Please enter 1, 2, 3, 4 or 5.”
dice_changes[iterations-1] = selection-1
print “You have changed dice”, selection
iterations = 0
while iterations rerolls:
iterations = iterations + 1
replacement = dice_rerolls[iterations-1]
dice[dice_changes[iterations-1]] = replacement
dice.sort()
for i in range(len(dice)):
print “Dice”,i + 1,”:”,names[dice[i]]
result = hand(dice)
print “You finish with”, result
def roll(roll_number):
numbers = range(1,7)
dice = range(roll_number)
iterations = 0
while iterations roll_number:
iterations = iterations + 1
dice[iterations-1] = random.choice(numbers)
return dice
def hand(dice):
dice_hand = [len(list(group)) for key, group in groupby(dice)]
dice_hand.sort(reverse=True)
straight1 = [1,2,3,4,5]
straight2 = [2,3,4,5,6]
if dice == straight1 or dice == straight2:
return “a straight!”
elif dice_hand[0] == 5:
return “five of a kind!”
elif dice_hand[0] == 4:
return “four of a kind!”
elif dice_hand[0] == 3:
if dice_hand[1] == 2:
return “a full house!”
else:
return “three of a kind.”
elif dice_hand[0] == 2:
if dice_hand[1] == 2:
return “two pair.”
else:
return “one pair.”
else:
return “a high card.”
def play_again():
answer = raw_input(“Would you like to play again? y/n: “)
if answer in (“y”, “Y”, “yes”, “Yes”, “Of course!”):
return answer
else:
print “Thank you very much for playing our game. See you next time!”
def scores():
global player_score, computer_score
print “HIGH SCORES”
print “Player: “, player_score
print “Computer: “, computer_score
if __name__ == ‘__main__’:
start()
Codelistingcontinued](https://image.slidesharecdn.com/thepythonbooktheultimateguidetocodingwithpythonpdfdrive-220527060944-728dd1fe/75/The-Python-Book_-The-ultimate-guide-to-coding-with-Python-PDFDrive-pdf-39-2048.jpg)
![The Python Book 41
Python essentials
def throws():
roll_number = 5
dice = roll(roll_number)
dice.sort()
for i in range(len(dice)):
print “Dice”,i + 1,”:”,names[dice[i]]
result = hand(dice)
print “You currently have”, result
while True:
rerolls = input(“How many dice do you want to throw again? “)
try:
if rerolls in (1,2,3,4,5):
break
except ValueError:
pass
print “Oops! I didn’t understand that. Please enter 1, 2, 3, 4 or 5.”
if rerolls == 0:
print “You finish with”, result
else:
roll_number = rerolls
dice_rerolls = roll(roll_number)
dice_changes = range(rerolls)
print “Enter the number of a dice to reroll: “
iterations = 0
while iterations rerolls:
iterations = iterations + 1
while True:
selection = input(“”)
try:
if selection in (1,2,3,4,5):
break
except ValueError:
pass
print “Oops! I didn’t understand that. Please enter 1, 2, 3, 4 or 5.”
dice_changes[iterations-1] = selection-1
print “You have changed dice”, selection
playerwantstorollagain.Westartthisbyasking
them how many re-rolls they want to do, which
allows us to create a custom while loop to ask
the user which dice to change that iterates the
correctnumberoftimes.
We also have to make sure it’s a number
within the scope of the game, which is why
we check using the try function, and print out
a message which tells the user if and how they
arewrong.
11Stick
One of the things we’ve been trying to do
in these tutorials is point out how logic can cut
down on a lot of coding by simply doing process
07
08
10
11
12
13
09
INDENTATIONS
Watch the indentations again as
we split the else function. The
following page’s code is on the
same level as roll roll_number,
dice_rerolls and dice_changes in
thecode.
WHITESPACE
The big if function at the end of
throws doesn’t have many line
breaks between sections – you
canaddtheseasmuchasyouwant
to break up the code into smaller
chunksvisually,aidingdebugging.
of eliminations or following flow charts. If the
userwantstore-rollzerotimes,thenthatmeans
they’re happy with their hand, and it must be the
end of the game. We print a message to indicate
thisanddisplaytheirhandagain.
12There-rolls
Here’s where we start the second roll
and the end of the game, using a long else to the
if statement we just started. We first of all make
sure to set our variables – updating roll_number
to pass onto the roll function with the re-roll
number the user set, and creating the list that’s
the exact length of the new set of rolls we wish to
usethankstorange(rerolls).
13Parse
We ask the player to enter the numbers
of the dice they wish to re-roll. By setting an
iterations variable, we can have the while loop
last the same number of times as we want re-
rolls by comparing it to the reroll variable itself.
We check each input to make sure it’s a number
thatcanbeused,andaddthevalidchoicestothe
dice_changes list. We use iterations-1 here as
Pythonlistsbeginat0ratherthan1.Wealsoprint
out a short message so the player knows the
selectionwassuccessful.](https://image.slidesharecdn.com/thepythonbooktheultimateguidetocodingwithpythonpdfdrive-220527060944-728dd1fe/75/The-Python-Book_-The-ultimate-guide-to-coding-with-Python-PDFDrive-pdf-41-2048.jpg)
![42 The Python Book
Python essentials
14New dice
We’re resetting and reusing the iterations
variabletoperformasimilarwhilelooptoupdate
the rolls we’ve done to the original dice variable.
The main part of this while loop is using the
iterations-1 variable to find the number from
dice_changes list, and using that to change that
specific integer in the dice list with the number
from the replacement list. So if the first item on
the dice_changes list is two, then the second
item on the dices list is changed to the number
wewanttoreplaceitwith.
15Sorting
We’re ending the throw function in
basically the same way we ended the first throw.
First of all, we re-sort the dice list so that all the
numbers are in ascending order. Then we print
out the final cards that the dice correspond to,
before again passing it onto the hand function
so that we can fully determine the hand that the
player has. We print out this result and that ends
thefunction,sendingthewholethingbacktothe
gamefunctiontoaskifyouwanttoplayagain.
16Dicerolling
The roll function is used twice in the
code for both times that we roll the dice. Being
able to use the same code multiple times means
we can cut down on bloat in the rest of the
script, allowing it to run a little faster, as we’ve
explained. It also means in this case that we can
use it again if you want to change the game to
threerounds,ormodifyitforrealpoker.
17Numberofrolls
We begin the whole thing by bringing
over the roll_number variable into the function
– this is because while in the original roll it will
always be five, the second roll could between
one and the full five dice. We create a list with
the number of entries we need for each roll, and
again set an iterations variable for the upcoming
whileloop.
18Remember
Much like the while loops in the rest of the
code so far, we’re keeping it going until iterations
is the same as roll_number. Each entry in the
dice list is replaced with a random number using
the random.choice function and keeping it in the
range of the numbers variable, which is one to
six for each side of the dice. After this is done, we
return the dice variable to the throw function that
makesupthemajorityofthegame.
19Handanalysis
While not technically a hand of cards,
the poker terminology still applies. We start in
this function by setting up a few things. The first
part uses the groupby function we imported –
this is used in this case to count the numbers
that make up the dice variable. If there are three
twos,afourandafive,itwillreturn[3,1,1].We’re
using this to ascertain what kind of hand the
player has. As the output of this groupby won’t
be in any specific order, weuse thesortfunction
again to sort it; however, this time we use the
reverse=TRUE argument to make the analysis
easieragain.
20Straights
Straights and high cards are odd ones
out in poker dice, as they do not rely on being
able to count any repetitions in the cards.
There are, however, only two hands that create
a straight in poker dice, so we have created
two lists here that contain them. We can then
check first to see if the dice make these hands,
and then if all other checks fail, it has to be a
high card.
2
1Yourhand
While seemingly lengthy, this a fairly
simple if statement. As we stated before, we
check to see if it’s one of the two straight hands.
As there are no flushes or royal straight flushes
inpokerdice,wedon’thavetoworryaboutthose.
We then check to see if the first item in the list
is five, which can only result in five of a kind;
similarly, if the first item is four then the hand
mustbefourofakind.Ifthefirstnumberisthree,
thenitcanbeeitherafullhouseorthreeofakind,
iterations = 0
while iterations rerolls:
iterations = iterations + 1
replacement = dice_rerolls[iterations-1]
dice[dice_changes[iterations-1]] = replacement
dice.sort()
for i in range(len(dice)):
print “Dice”,i + 1,”:”,names[dice[i]]
result = hand(dice)
print “You finish with”, result
def roll(roll_number):
numbers = range(1,7)
dice = range(roll_number)
iterations = 0
while iterations roll_number:
iterations = iterations + 1
dice[iterations-1] = random.choice(numbers)
return dice
14
15
16
18
17
HIGHERORLOWER
Which hand is best? What are the
odds of getting certain hands in
the game? Some of the answers
are surprising, as the poker
hands they’re based on trump the
differing odds the dice produce.
We’ve ranked hands from highest
to lowest.
FiveofaKind .................6/7776
FourofaKind ............150/7776
FullHouse .................300/7776
Straight......................240/7776
ThreeofaKind ........1200/7776
TwoPairs .................1800/7776
OnePair ...................3600/7776
HighCard ...................480/7776](https://image.slidesharecdn.com/thepythonbooktheultimateguidetocodingwithpythonpdfdrive-220527060944-728dd1fe/75/The-Python-Book_-The-ultimate-guide-to-coding-with-Python-PDFDrive-pdf-42-2048.jpg)
![The Python Book 43
Python essentials
def hand(dice):
dice_hand = [len(list(group)) for key, group in groupby(dice)]
dice_hand.sort(reverse=True)
straight1 = [1,2,3,4,5]
straight2 = [2,3,4,5,6]
if dice == straight1 or dice == straight2:
return “a straight!”
elif dice_hand[0] == 5:
return “five of a kind!”
elif dice_hand[0] == 4:
return “four of a kind!”
elif dice_hand[0] == 3:
if dice_hand[1] == 2:
return “a full house!”
else:
return “three of a kind.”
elif dice_hand[0] == 2:
if dice_hand[1] == 2:
return “two pair
.”
else:
return “one pair
.”
else:
return “a high card.”
def play_again():
answer = raw_input(“Would you like to play again? y/n: “)
if answer in (“y”, “Y”, “yes”, “Yes”, “Of course!”):
return answer
else:
print “Thank you very much for playing our game. See you next time!”
def scores():
global player_score, computer_score
print “HIGH SCORES”
print “Player: “, player_score
print “Computer: “, computer_score
if __name__ == ‘__main__’
:
start()
19
20
21
22
23
24
HOMEWORK
There is currently no scoring in
place for this version of the game.
Try adding a computer player, or
create a rule set that requires a
certain hand or higher. You could
even makeittwo-player.
so we nest an if statement. Again, we do this for
pairs, where that could be one or two pairs. If all
else fails then, by a process of elimination, it can
only be a high card. We give each outcome a text
stringtosendbacktothethrowfunctionsothatit
canbeprinted.
22Playagain
As before, we ask the player for raw input
with the text offering another game. Instead of
parsing it, we assume the player will choose a
specified yes response based on the text, and if
none of these versions is received, we print out
themessagethankingthemforplayingthegame.
Thisendsthegamefunction.
23Finalscores
Going all the way back to the start
function, after the game finishes we move onto
the results. This section is quite simple – it
calls the scores, which are integers, and then
prints them individually after the names of the
players. This is the end of the script, as far as the
player is concerned. Currently, the code will not
permanently save the scores, but you can have
Pythonwriteittoafiletokeepifyouwish.
24Modules
The final part of the code allows for
the script to be used in two ways. Firstly, we
can execute it in the command line and it will
work just fine. Secondly, we can import this into
another Python script, perhaps if you wanted to
add it as a game to a collection. This last piece of
code will prevent our script being executed when
imported by another module – it will only do so
whenbeingrundirectly.
TEXTEDITORS
Instead of the IDE we’ve suggested, you
should also try coding in a text editor. Some
of them are a little more lightweight and
format code similar to the way the IDE does,
separating functions and strings by colours
etc. Some of the ones we’d recommend are
the classic gedit, a popular text editor from
GNOME desktops; Geany, which has a few
IDE-esque features written into it; TEA, a
multifunctioning text editor and project
manager; and Jedit, a text editor that lives
in the command line for minimum resource
usage. These can also be used with multiple
programminglanguages,soyoucangetused
tothem with Python,thenmaketheswitch.](https://image.slidesharecdn.com/thepythonbooktheultimateguidetocodingwithpythonpdfdrive-220527060944-728dd1fe/75/The-Python-Book_-The-ultimate-guide-to-coding-with-Python-PDFDrive-pdf-43-2048.jpg)
![The Python Book 45
Python essentials
Newimports
ImportnewmodulesthatallowustocreatetheGUI
part of Rock, Paper, Scissors, as well as removing
themoduleswenolonger need
Newinterface
Our new main function allows us to call the
majorityofthegamescriptwhentherps_buttonis
pressed. This contains the game components and
thegraphicalcomponents
Newstart
We’ve changed the start function so that it no
longergoestothescorefunctionafterit’sfinished.
We’vealsoremovedthescorefunction,aswetrack
thatdifferentlysoit can be displayedproperly
Newgame
We’ve changed the game function so that it now
takes the input from our graphical interface. We
use a new variable to do this that works with the
GUI,otherwiseitworksroughlythesameasbefore
Newresults
The result function remains largely unchanged,
only now it sends the outcome message to a
variable we use for the interface, and generally
usesthenewGUI’svariables
Newwindow
Wecreatethegamewindowwithaslightlydifferent
method due to already having a ‘mainloop’ root
window. We’re also giving it a name so you can
identify it properly
Newvariables
Ournewvariablesaresetupsotheycaninteractwith
boththegamecodeandtheinterfacecodeproperly.
We’ve also made sure to have a default selection for
theplayersothatthecoderunsproperly
Newframe
Determine the size and layout of the window for
the game using a slightly different method than
before. We’ve also allowed for elements to be
anchored in certain positions around the window
Newchoice
Here we place radio buttons in a specific
configuration in the window, giving the user the
choice of three moves. This is then passed along to
thevariableandusedbythegamecode
Newmove
Here we allow for the computer’s move to be
displayedunderthe‘Computer’ label
Newbutton
Pressing the Play button we’ve put here runs the
game script, prints out the scores and finally a
messagebasedonthe outcome
Newending
We’ve changed this so that the main script begins
withguinowratherthan the start function
#!/usr/bin/env python2
# Linux User Developer presents: Rock, Paper, Scissors: The Video Game: The Module
from Tkinter import *
from ttk import *
import random
def gui():
rock = 1
paper = 2
scissors = 3
names = { rock: “Rock”, paper: “Paper”, scissors: “Scissors” }
rules = { rock: scissors, paper: rock, scissors: paper }
def start():
while game():
pass
def game():
player = player_choice.get()
computer = random.randint(1, 3)
computer_choice.set(names[computer])
result(player, computer)
def result(player, computer):
new_score = 0
if player == computer:
result_set.set(“Tie game.”)
else:
if rules[player] == computer:
result_set.set(“Your victory has been assured.”)
new_score = player_score.get()
new_score += 1
player_score.set(new_score)
else:
result_set.set(“The computer laughs as you realise you have been defeated.”)
new_score = computer_score.get()
new_score += 1
computer_score.set(new_score)
rps_window = Toplevel()
rps_window.title (“Rock, Paper, Scissors”)
player_choice = IntVar()
computer_choice = StringVar()
result_set = StringVar()
player_choice.set(1)
player_score = IntVar()
computer_score = IntVar()
rps_frame = Frame(rps_window, padding = ‘3 3 12 12’
, width = 300)
rps_frame.grid(column=0, row = 0, sticky=(N,W,E,S))
rps_frame.columnconfigure(0, weight=1)
rps_frame.rowconfigure(0,weight=1)
Label(rps_frame, text=’Player’).grid(column=1, row = 1, sticky = W)
Radiobutton(rps_frame, text =’Rock’
, variable = player_choice, value = 1).grid(column=1,
row=2, sticky=W)
Radiobutton(rps_frame, text =’Paper’
, variable = player_choice, value = 2).grid(column=1,
row=3, sticky=W)
Radiobutton(rps_frame, text =’Scissors’
, variable = player_choice, value =
3).grid(column=1, row=4, sticky=W)
Label(rps_frame, text=’Computer’).grid(column=3, row = 1, sticky = W)
Label(rps_frame, textvariable = computer_choice).grid(column=3, row=3, sticky = W)
Button(rps_frame, text=”Play”, command = start).grid(column = 2, row = 2)
Label(rps_frame, text = “Score”).grid(column = 1, row = 5, sticky = W)
Label(rps_frame, textvariable = player_score).grid(column = 1, row = 6, sticky = W)
Label(rps_frame, text = “Score”).grid(column = 3, row = 5, sticky = W)
Label(rps_frame, textvariable = computer_score).grid(column = 3, row = 6, sticky = W)
Label(rps_frame, textvariable = result_set).grid(column = 2, row = 7)
if __name__ == ‘__main__’:
gui()
ModifiedRPSCodeListing](https://image.slidesharecdn.com/thepythonbooktheultimateguidetocodingwithpythonpdfdrive-220527060944-728dd1fe/75/The-Python-Book_-The-ultimate-guide-to-coding-with-Python-PDFDrive-pdf-45-2048.jpg)
![46 The Python Book
Python essentials
01
02
03
04
07
08
09
06
05
01Firstline
We use this line to enter the path to the
Python interpreter. This lets us run the program
inside a terminal or otherwise outside of a
Python-specific IDE like IDLE. Note that we’re
alsousingPython2forthisparticularscript.
06Introductions
We create the intro variable as a label
that lives in the main frame. We give it text to
introduce the interface, using the triple quote
marks to have it go across multiple lines and
format better. We then use pack to display it, and
tellTkintertoputitatthetopoftheinterface.
07Rock,Paper,Scissors
We create a button for the Rock, Paper,
Scissors game using the Button function. We
attach to it the main frame, give it a label using
02Importgraphics
Tkinter is the graphical interface we’re
using and while it’s a standard Python function,
you’llneedtoimportthemodulesoyoucanuseit.
We’ve used the ‘from [module] import *’ method
so that we can use the functions from it without
havingtoaddTkinteratthebeginning.
04Rootwindow
Using the Tk() function creates the
window we’re going to be placing everything
into. We’ve decided to call it root for now;
however, you can call it anything you like, as
long as you’re consistent with it. We’ve also
named it using the title command from Tkinter
and a string of text.
05Mainframe
The first line has us set the variable
mainframe as a Frame in the interface. We’ve
attached it to root, the main window, and given
03Importgames
We’re importing the modules for the
three games. We added the line at the bottom
MAINWINDOW
The main interface window that
this code creates is fairly basic,
but contains the functions we
require. The window exit button
will do the same job as the Quit
button, and the Hangman and
Poker Dice buttons run the old
scripts in the Python shell.
#!/usr/bin/env python2
#Linux User Developer presents: Mega Microgrames Collection
from Tkinter import *
import rockpaperscissors
import hangman
import pokerdice
root = Tk()
root.title (“Linux User Developer’s Mega Microgames Collection”)
mainframe = Frame(root, height = 200, width = 500)
mainframe.pack_propagate(0)
mainframe.pack(padx = 5, pady = 5)
intro = Label(mainframe, text = “””Welcome to Linux User Developers Mega Microgames Collection.
Please select one of the following games to play:
“””)
intro.pack(side = TOP)
rps_button = Button(mainframe, text = “Rock, Paper
, Scissors”, command = rockpaperscissors.gui)
rps_button.pack()
hm_button = Button(mainframe, text = “Hangman”, command = hangman.start)
hm_button.pack()
pd_button = Button(mainframe, text = “Poker Dice”, command = pokerdice.start)
pd_button.pack()
exit_button = Button(mainframe, text = “Quit”, command = root.destroy)
exit_button.pack(side = BOTTOM)
root.mainloop()
it a minimum height and width in pixels. We
use pack_propogate to create the window, and
then make sure it’s the size that we’ve defined.
We’ve then used pack to pad the borders,
allowing the contents of the window to not
touch the sides of it.
of each script so we can do this. To make sure
to differentiate the functions in each game, we
will have to specify [module].[function] so there
are no errors in the code.](https://image.slidesharecdn.com/thepythonbooktheultimateguidetocodingwithpythonpdfdrive-220527060944-728dd1fe/75/The-Python-Book_-The-ultimate-guide-to-coding-with-Python-PDFDrive-pdf-46-2048.jpg)
![The Python Book 47
Python essentials
#!/usr/bin/env python2
# Linux User Developer presents: Rock, Paper
, Scissors: The Video Game: The Module
from Tkinter import *
from ttk import *
import random
def gui():
rock = 1
paper = 2
scissors = 3
names = { rock: “Rock”, paper: “Paper”, scissors: “Scissors” }
rules = { rock: scissors, paper: rock, scissors: paper }
def start():
while game():
pass
def game():
player = player_choice.get()
computer = random.randint(1, 3)
computer_choice.set(names[computer])
result(player
, computer)
10
11
12
13
14
09Breaktheloop
The exit button works similarly to the
other buttons we’ve created, but instead it uses
the command root.destroy. This ends the loop
that we’ve created with root.mainloop(), which
allows the interface code to continue looping,
allowing us to continually use it. We place the
exit button at the bottom of the window with
‘side = BOTTOM’.
12Gamevariables
The variables are staying the same
so that we can do the same comparisons we
made in the original code. We’ve put them into
the function itself so that they don’t affect the
other imported code into the main interface –
and so that when calling just this function, we
don’t need to use global to bring them in.
14Gamefunction
The game function has had a few
modifications to make sure it works with
the interface. First of all, the player variable
is retried using get() on the special variable
we’ve created to contain the player choice.
We do a similar thing for the computer, using
‘set’ to change the variable in our interface-
friendly computer_choice value. We still use
the name variable to set the text that goes into
computer_choice. This then passes the player
and computer variables along in the same way
we did before.
13Startfunction
We’ve removed the part that calls
the score function from the start function,
as we have the interface handle the scoring
now. It still calls upon the game function,
though, putting it into a loop so it can be
used continuously. This function is called by
the interface to begin the game by setting a
computer move and then comparing it to the
player’s choice.
10Gamecode
Nothingmuchhaschangedinthestartof
this code, other than a few import changes. The
code for running it in the command line is still
PYTHONSHELL
Our other code will run in the shell
or via a command line in the same
way as before when the buttons
arepressed.
08Othergames
For the other two games, the code is
mostlythesame;however,wecalluponthestart
function in both of them. In the final interface,
this will cause the games to run in the shell or
commandlineasthey’vebeenrunningbefore.
11Gameinterface
One of the biggest changes we’re making
to this script is having it all contained in one
function, ‘def gui’. The interface code needs to
be put into a function, otherwise it will be run
during import. While we’ve chosen to put the
entirety of the code in a function, you can also
try just having the graphical interface code in
one. All our variables are kept in here so that
they still work properly.
there, and with a few modifications the code will
run independently of the main interface. We’ve
removed the time module, as we no longer need
it, and imported not only the Tkinter module,
but the ttk module. The ttk module allows us to
arrange the GUI in a grid, which will be slightly
easiertouseandunderstand.
text that appears on the button, and then have
it run a command. In this case, we use the
modified rockpapershotgun.py code that has a
gui function, hence rockpapershotgun.py. We
then use pack to place it in the window](https://image.slidesharecdn.com/thepythonbooktheultimateguidetocodingwithpythonpdfdrive-220527060944-728dd1fe/75/The-Python-Book_-The-ultimate-guide-to-coding-with-Python-PDFDrive-pdf-47-2048.jpg)
![48 The Python Book
Python essentials
def result(player
, computer):
new_score = 0
if player == computer:
result_set.set(“Tie game.”)
else:
if rules[player] == computer:
result_set.set(“Your victory has been assured.”)
new_score = player_score.get()
new_score += 1
player_score.set(new_score)
else:
result_set.set(“The computer laughs as you realise you have been defeated.”)
new_score = computer_score.get()
new_score += 1
computer_score.set(new_score)
rps_window = Toplevel()
rps_window.title (“Rock, Paper
, Scissors”)
player_choice = IntVar()
computer_choice = StringVar()
result_set = StringVar()
player_choice.set(1)
player_score = IntVar()
computer_score = IntVar()
15
16
17
19
20
18
GAMEWINDOW
In its default state, the game
window will have rock selected
and no message will be displayed.
Once the player makes a move, the
message will be displayed at the
bottom and the computer’s move
will be printed. There’s no quit
button on this menu, but clicking
the window exit will bring you back
to the main interface.
15Resultfunction
The result function still takes the same
two variables as before, which we set in the
game function. While technically we can use
the variables set up for the interface, these
are not pure integers and can cause an error if
not handled correctly. With that in mind, we’ve
created an empty new_score variable that we
can use to effectively clean the interface value
beforeaddingitbackintoit.
20Interfacevariables
Here is the reason we had to call and
change the variables in a different manner.
For Tkinter, we need to let the interface know
whether or not a variable is an integer or a text
value. IntVar and StringVar allow for these
respectively. We’ve also set the player_choice
variable to be one, which we have already set as
thechoiceforrock.Thismeanstherewillatleast
be a default choice when the game is started,
anditwon’tcauseanerror.
21Gameframe
We’ve created the frame for our
interface items slightly differently. Instead
of using the pack command in the main
interface, we’re using grid to make sure they’re
orientated in such a way that makes sense
for the user. Padding does just that, setting
up values to make sure the items in the frame
don’t touch the edge of the window. Using the
.grid command, we then create this frame.
The row and column variables allow for rows
and columns to be included in the structure of
16Tie
The logic for determining the result is
the same as before. We first do the easy check –
whether or not the numeric value for the player
andcomputervariableisthesame.Whatchanges
this time is that, instead of printing the text,
we send the “Tie game” message to our result
variableusingthesetfunctionfromTkinter.
18Lose
This part of the overall if statement
works in the same way as before, by assuming
that if it isn’t a tie or a win, it’s a loss. Like the
new version of the win code, it then uses set
to change the message that will be displayed
to the player, and calls upon and changes
the computer score by putting it through the
new_score variable.
19New window
As the original window is part of the
mainloop, we cannot have the window be
created using Tk() like in the main interface
code. As this window is coming off it, though,
we instead create it using Toplevel(). This
allows the window to run separately and on
top of the main window. We’ve also given
17Win
The if statement continues by seeing if
the player has won. Like before, we use the rules
we set to make the comparison for the code to
it a name, which will not change the main
window’s name in the process.
make. We set the result_set like we did in the
tie game, with a different message to the user.
Finally, we set the new_score variable to be the
current player score, using the get function to
obtain it, plus one to the score, and then use
set again to put it back into the player_score
variable. We can’t use += with the player_score
variable,asitisnotastandardvariable.](https://image.slidesharecdn.com/thepythonbooktheultimateguidetocodingwithpythonpdfdrive-220527060944-728dd1fe/75/The-Python-Book_-The-ultimate-guide-to-coding-with-Python-PDFDrive-pdf-48-2048.jpg)
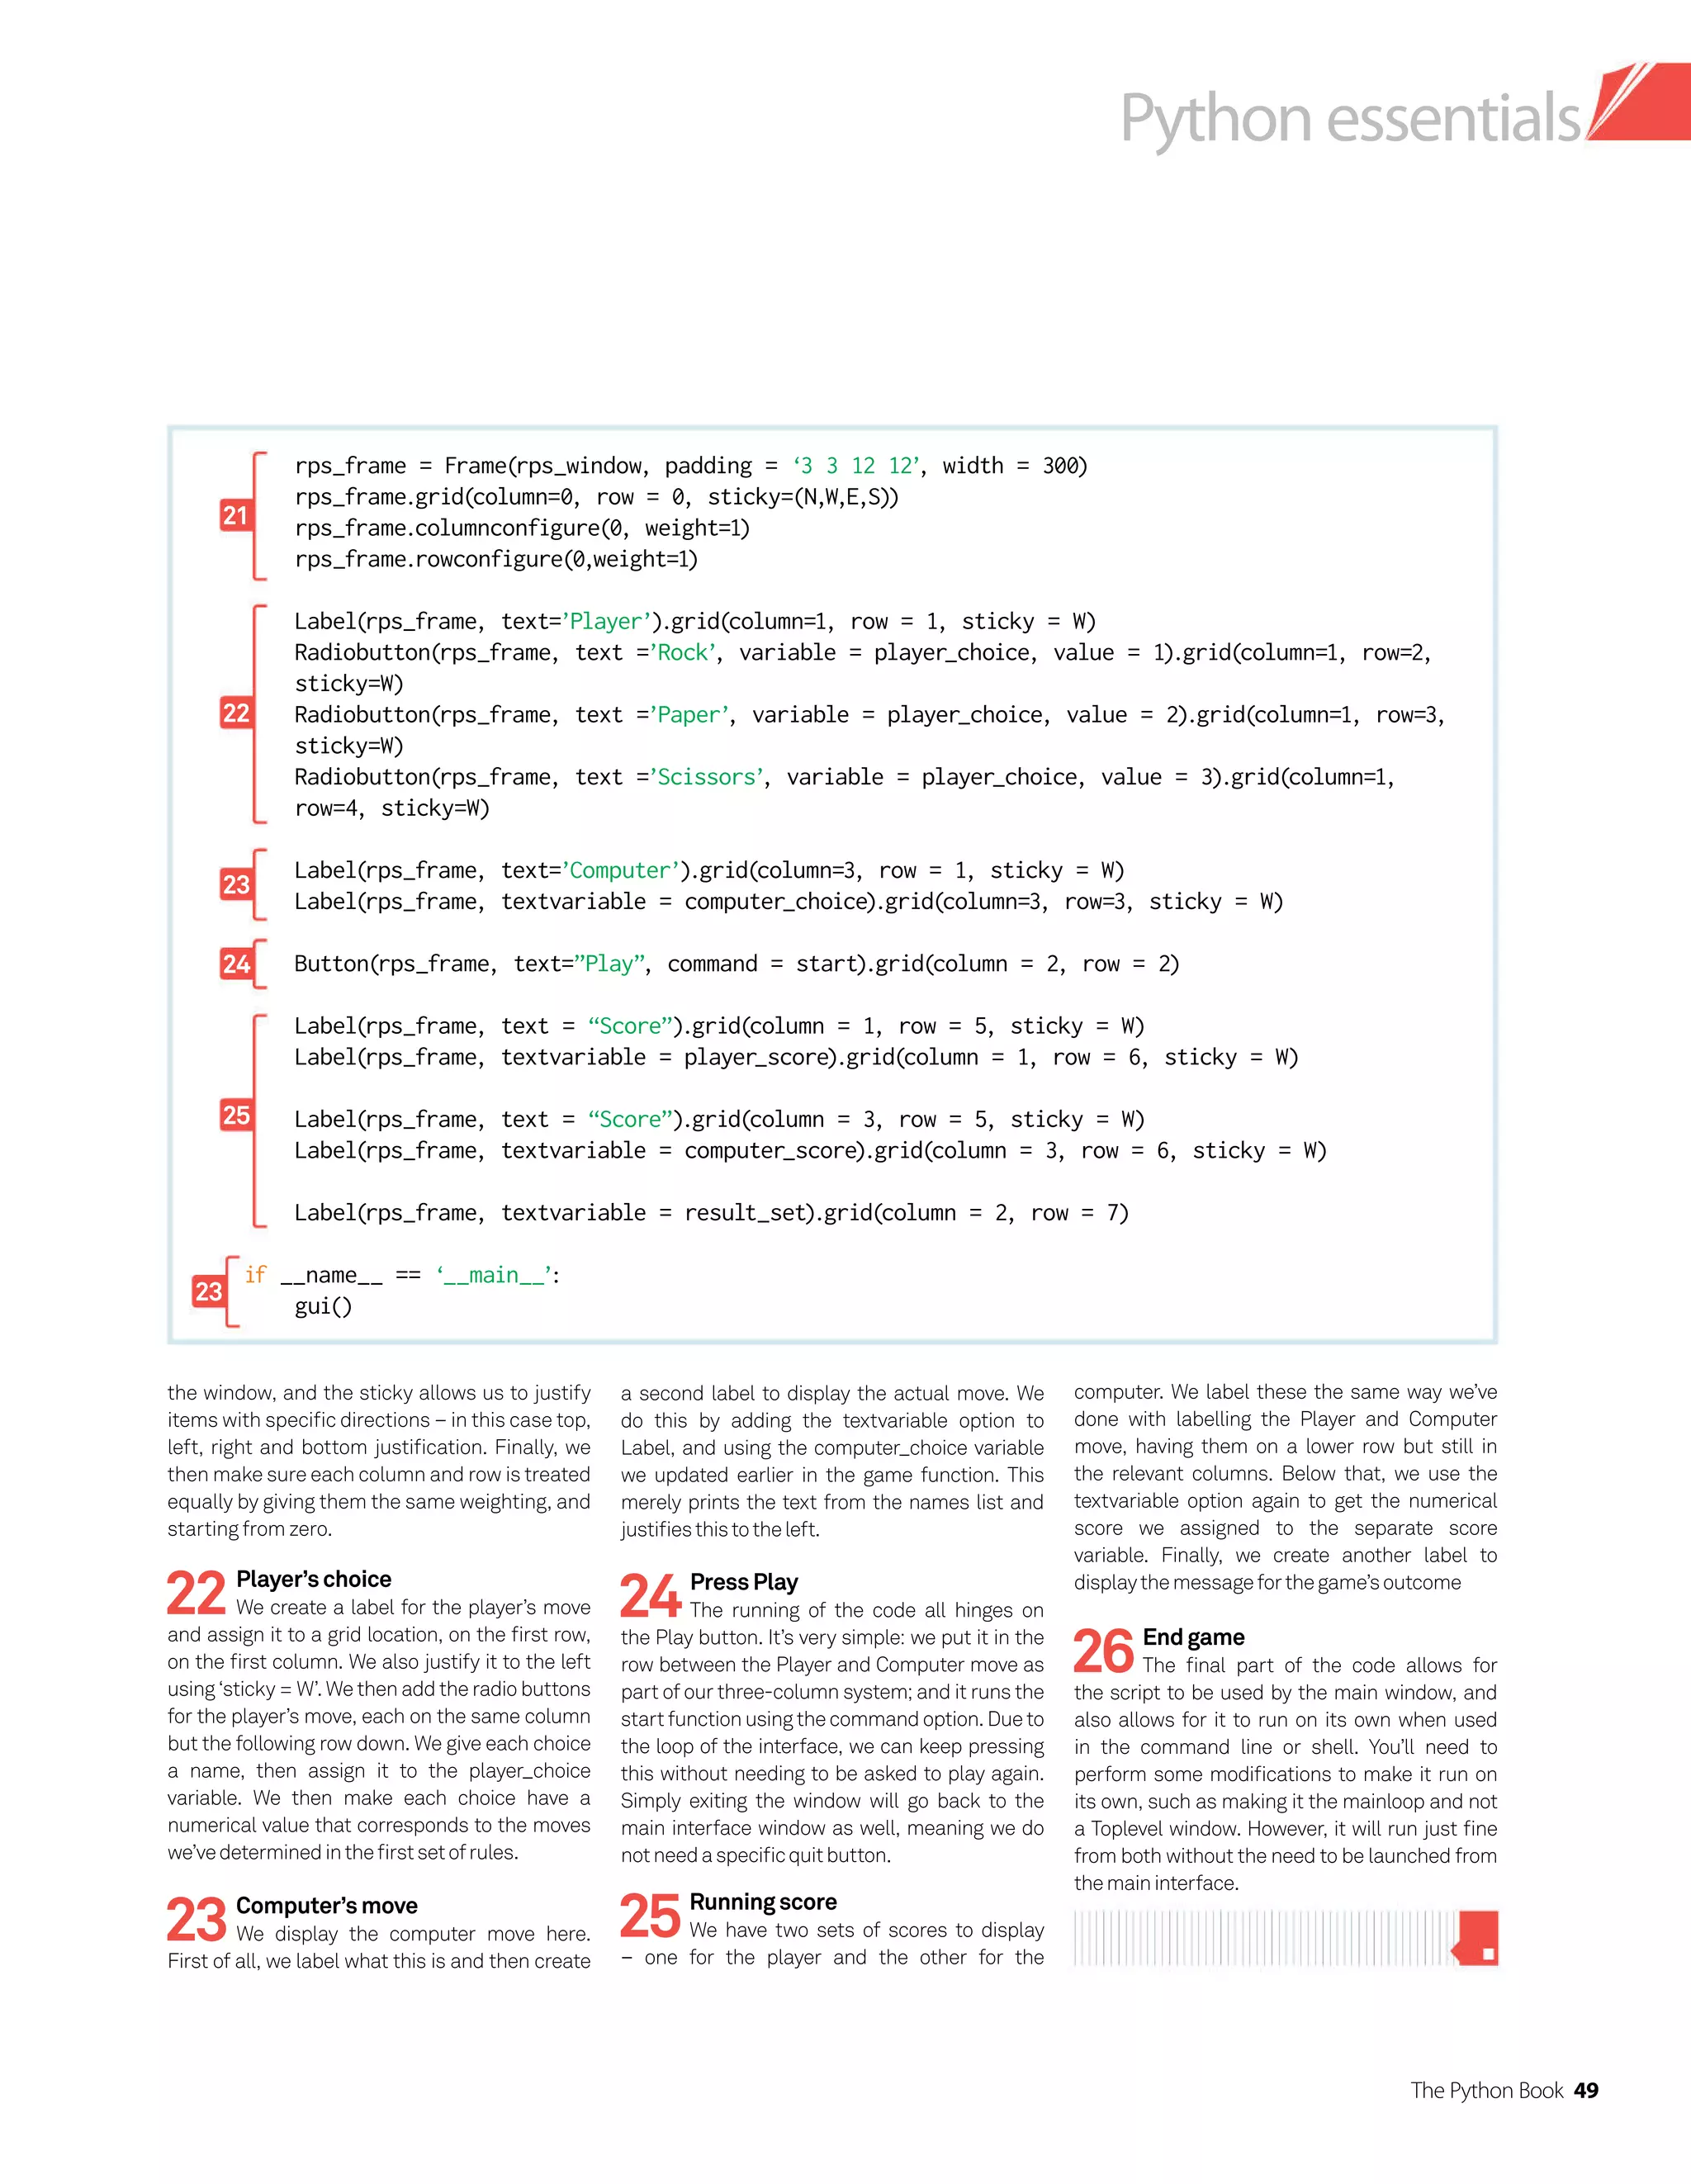
![50 The Python Book
Python essentials
Completeyourtrioofgameswithagraphicalinterfaceforthe
hangmanandpokerdicecode
Bringgraphicstosimple
Pythongames
We have now created a simple selector for the
trio of Python games we made previously. This
interface was able to launch a GUI for our rock,
paper, scissors game, and run the other two in
the terminal. Now, we’re going to convert the
hangman and poker dice codes to work in a
similar way to rock, paper, scissors.
The trick with hangman comes in allowing
for a different type of input, text, and the ability
to have multiple rounds of the game. Tkinter
allows for text entry, and we rely a lot less on
‘while’ loops to play the game in its entirety.
Poker Dice needs to keep the dice analysis
code, and the option to change specific dice
using checkboxes.
We’ll be modifying a large amount of the
original code to fit in with the new graphical
scheme. This mainly involves cutting specific
parts and having the Tkinter-specific code
handle these itself. The code listings on these
pages include the modified code – we’ll discuss
the graphical part on the following pages.
Resources
Python2:www.python.org/download
IDLE:www.python.org/idle
1Imported
Herewe’re doing the
sameminorsetup,
including getting
theTkinter module
that helps us create
asimplegraphical
interface
2Words
We’re keeping
ourvariablesthat
determine the word to
guessheresoitcan
be easily accessed
anywhere in the code
3Function
Likelasttime,we’re
putting the majority of
our originalcodeinto a
newfunction,gui
4Analysis
Weselecttheword
andanalyseitbefore
continuingon with the
restofthecode
5Graphics
Thehangedman
functionislargely
unchanged,albeitwith
newcode todisplay
ourASCIIgraphicson
the interface
6Guesses
Wecheckthe number
ofmistakesmade,and
calltheguess_letter
function tocheck the
letter entered
from Tkinter import *
from ttk import *
from random import *
word = 0
word_length = 0
clue = 0
def gui():
global word, word_length, clue
dictionary = [“gnu”,”kernel”,”linux”,”magei
a”,”penguin”,”ubuntu”]
word = choice(dictionary)
word_length = len(word)
clue = word_length * [“_”]
tries = 6
def hangedman(hangman):
graphic = [
“””
+-------+
| |
| O
| -|-
| /
|
===============
“””]
graphic_set = graphic[hangman]
hm_graphic.set(graphic_set)
def game():
letters_wrong = incorrect_guesses.get()
letter=guess_letter()
first_index=word.find(letter)
if first_index == -1:
letters_wrong +=1
incorrect_guesses.set(letters_
wrong)
else:
for i in range(word_length):
if letter == word[i]:
clue[i] = letter
hangedman(letters_wrong)
clue_set = “ “.join(clue)
word_output.set(clue_set)
if letters_wrong == tries:
result_text = “Game Over. The word
was “ + word
result_set.set(result_text)
new_score = computer_score.get()
new_score += 1
computer_score.set(new_score)
if “”.join(clue) == word:
result_text = “You Win! The word
was “ + word
result_set.set(result_text)
new_score = player_score.get()
new_score += 1
player_score.set(new_score)
def guess_letter():
letter = letter_guess.get()
letter.strip()
letter.lower()
return letter
def reset_game():
global word, word_length, clue
incorrect_guesses.set(0)
hangedman(0)
result_set.set(“”)
letter_guess.set(“”)
word = choice(dictionary)
word_length = len(word)
clue = word_length * [“_”]
new_clue = “ “.join(clue)
word_output.set(new_clue)
if __name__ == ‘__main__’:
gui()
01
02
03
04
05
06
HangmanCodeListing](https://image.slidesharecdn.com/thepythonbooktheultimateguidetocodingwithpythonpdfdrive-220527060944-728dd1fe/75/The-Python-Book_-The-ultimate-guide-to-coding-with-Python-PDFDrive-pdf-50-2048.jpg)
![The Python Book 51
Python essentials
1Moreimports
We’ve added the new imported
modulesweneedto make Tkinter
workandkeeptherest the same
2Dicelist
Thelistthatholdsthe dice iskept
outside the main function so that it
canbeaccessedeverywhere
3Rolls
Samegoesfortherollfunction.
It doesn’tspecificallyneed to be
inside the gui functionanyway
4Decisions
The checkboxes in the graphical
codewe’re going to createlater will
giveusnumberswecan analyse for
thecode.Weretrieve thesenumbers
andcheckthemtofindoutwhich
dicetheuser wishestore-roll
5Hands
Finally,ourhandanalysisfunction
isthe lastpartofthe originalcode
thatiskeptoutsidethe guifunction.
Boththis and the abovefunction
passthe necessary details back
upthe chain to thenbeaddedinto
thenewgraphicalelementsofthe
newinterface
6Nodice
Ifnodicehavebeenselectedto
re-roll, the hand output ischanged
to showa finalmessage
7Re-roll
Thispartisalmostthe same as
before–anewsetofdice are rolled
and then inserted into the list ofdice
likebefore,thenre-sortedtomake
the handanalysiseasier
8Morefunctions
The new gui functionisthe main
changetothePoker Dice code,
and asbeforeincludesthe Tkinter
elementsandotherpartsofthe
original code
9Gamestart
Asimplefunctionthat we can use to
activatethere-rollsofthedice
10Newhand
Thenewdicearenamed,analysed,
andeverythingisthen set for the gui
to display the finaloutcome
11Reset
Likewiththehangman code,we
haveafunctiontoreset allthe
variables,allowingyoutostart the
gameagain
from Tkinter import *
from ttk import *
import random
from itertools import groupby
dice = 0
def roll(roll_number):
numbers = range(1,7)
dice = range(roll_number)
iterations = 0
while iterations roll_number:
iterations = iterations + 1
dice[iterations-1] = random.
choice(numbers)
return dice
def hand(dice):
dice_hand = [len(list(group)) for key,
group in groupby(dice)]
dice_hand.sort(reverse=True)
straight1 = [1,2,3,4,5]
straight2 = [2,3,4,5,6]
if dice == straight1 or dice ==
straight2:
return “a straight!”
elif dice_hand[0] == 5:
return “five of a kind!”
elif dice_hand[0] == 4:
return “four of a kind!”
elif dice_hand[0] == 3:
if dice_hand[1] == 2:
return “a full house!”
else:
return “three of a kind.”
elif dice_hand[0] == 2:
if dice_hand[1] == 2:
return “two pair.”
else:
return “one pair.”
else:
return “a high card.”
def gui():
global dice
dice = roll(5)
dice.sort()
nine = 1
ten = 2
jack = 3
queen = 4
king = 5
ace = 6
names = { nine: “9”, ten: “10”, jack:
“J”, queen: “Q”, king: “K”, ace: “A” }
result = “You have “ + hand(dice)
def game():
throws()
def throws():
global dice
dice1_check = dice1.get()
dice2_check = dice2.get()
dice3_check = dice3.get()
dice4_check = dice4.get()
dice5_check = dice5.get()
dice_rerolls = [dice1_check,
dice2_check, dice3_check, dice4_check,
dice5_check]
for i in range(len(dice_rerolls)):
if 0 in dice_rerolls:
dice_rerolls.remove(0)
if len(dice_rerolls) == 0:
result = “You finish with “ +
hand(dice)
hand_output.set(result)
else:
roll_number = len(dice_rerolls)
number_rerolls = roll(roll_num-
ber)
dice_changes = range(len(dice_
rerolls))
iterations = 0
while iterations roll_number:
iterations = iterations + 1
dice_changes[iterations-1]
= number_rerolls[iterations-1]
iterations = 0
while iterations roll_number:
iterations = iterations + 1
replacement = number_
rerolls[iterations-1]
dice[dice_
changes[iterations-1]] = replacement
dice.sort()
new_dice_list = [0,0,0,0,0]
for i in range(len(dice)):
new_dice_list[i] =
names[dice[i]]
final_dice = “ “.join(new_dice_
list)
dice_output.set(final_dice)
final_result = “You finish with
“ + hand(dice)
hand_output.set(final_result)
def reset_game():
global dice
dice = roll(5)
dice.sort()
for i in range(len(dice)):
empty_dice[i] = names[dice[i]]
first_dice = “ “.join(empty_dice)
dice_output.set(first_dice)
result = “You have “ + hand(dice)
hand_output.set(result)
if __name__ == ‘__main__’:
gui()
01
02
03
04
05
11
10
09
08
07
06
PokerDiceCodeListing](https://image.slidesharecdn.com/thepythonbooktheultimateguidetocodingwithpythonpdfdrive-220527060944-728dd1fe/75/The-Python-Book_-The-ultimate-guide-to-coding-with-Python-PDFDrive-pdf-51-2048.jpg)
![52 The Python Book
Python essentials
01
02
03
01Firstlines
As usual, we start off each program with
the code that lets us run it in the command line,
followed by importing the necessary modules:
random, to determine the word to use; Tkinter,
for the majority of the graphical code; and
06Gamesbegin
All the analysis of the letter we’ve
entered is done in this function. To that end, we
start by obtaining the incorrect guesses so far
from the variable we’ve set up so the interface
can access it if we want it to. The letter from
the entry field in the interface is then obtained
and cleaned up so it can be used with the rest of
thecode.
07Checktheletter
This section of the code is again largely
unchanged–theletteristakenandcomparedto
the word with find to see if it matches with one
of the letters. The if statement then adds one to
the incorrect guess variable, or updates the clue
variabletoaddtheletterintherightspot.
09Updatescores
Exactly as before, we check to see if the
player has won or lost yet. In the event of either,
a message is displayed to signify this, and the
winsandlossesscoreisupdatedusingset.
02Globalvariables
We have kept these three variables
outside of the gui function so they can be
04Randomword
We bring in the three variables with
global so we can modify them throughout
the code, and then set the word. As before, a
random item from the list of words is selected
with choice, the length is ascertained, and the
cluetodisplayisset.
08Updateinterface
These three lines set the graphic for this
round, join the current clue together as a string,
and then set it on the variable for the interface
toread.
03Graphicalfunction
We’re putting all the working code into
the gui function so it can be activated from the
main interface. This means we can import the
Hangman code into the interface without the
game window popping up, and only run it when
weactivatetheguifunctionfromhere.
05Thehangedman
The main difference this time for the
Hangman graphics is that instead of printing
these out, we’re going to display them in the
interface. When the function is called and the
graphic selected, it’s placed in the variable we’ve
set up in the interface code that we’re using to
displaytheresult.
ttk, for the grid code we’ll be using to align the
differentelements.
accessedatallpointsinthecode.Python2does
not allow you to call upon global variables when
you’re in a nested function, whereas in Python 3
thiscouldhavegoneintotheguifunction.
09
08
07
06
05
04
#!/usr/bin/env python2
from Tkinter import *
from ttk import *
from random import *
word = 0
word_length = 0
clue = 0
def gui():
global word, word_length, clue
dictionary = [“gnu”,”kernel”,”linux”,”mageia”,”penguin”,”ubuntu”]
word = choice(dictionary)
word_length = len(word)
clue = word_length * [“_”]
tries = 6
def hangedman(hangman):
graphic = [
“””
+-------+
| |
| O
| -|-
| /
|
===============
“””]
graphic_set = graphic[hangman]
hm_graphic.set(graphic_set)
def game():
letters_wrong = incorrect_guesses.get()
letter=guess_letter()
first_index=word.find(letter)
if first_index == -1:
letters_wrong +=1
incorrect_guesses.set(letters_wrong)
else:
for i in range(word_length):
if letter == word[i]:
clue[i] = letter
hangedman(letters_wrong)
clue_set = “ “.join(clue)
word_output.set(clue_set)
if letters_wrong == tries:
result_text = “Game Over. The word was “ + word
result_set.set(result_text)
new_score = computer_score.get()
new_score += 1
computer_score.set(new_score)
if “”.join(clue) == word:
result_text = “You Win! The word was “ + word
result_set.set(result_text)
new_score = player_score.get()
new_score += 1
player_score.set(new_score)
YOULOSE
When you’ve run out of guesses,
the game stops. From here, you
can also reset the game to play
againifyouwish.](https://image.slidesharecdn.com/thepythonbooktheultimateguidetocodingwithpythonpdfdrive-220527060944-728dd1fe/75/The-Python-Book_-The-ultimate-guide-to-coding-with-Python-PDFDrive-pdf-52-2048.jpg)
![The Python Book 53
Python essentials
10
11
15
12
16
13
14
12Interfacevariables
Tkinter only works with specific variables
– we’ve created all the ones we need or can use
here. IntVars take integers, while StringVars take
strings. We’ve used get and set throughout the
restofthecodewiththesetogetandsetvalues.
14CluetoHangman
These labels are fairly straightforward
– we’re either giving them fixed text, or telling
them to use a specific textvariable so they can
beupdatedasweplaythegame.
13Framedwindow
The frame is set up the same way as
last time. We pad the frame from the edge of
the window, set a grid, give it sticky points at
compass points, and allow for setting objects
withspecificrowandcolumnpoints.
16Resultsandreset
The rest of the code is similar to what
we’ve done already: labels to display fixed text
and the scores/result text that change. The
button that activates the reset function is also
put at the bottom here. The final two lines allow
ustoimportthemoduleintotheinterfacecode.
10Sanitiseinput
The guess_letter function purely gets
the letter from the player input variable, strips it
of any formatting, makes it lower case, and then
returns it back to the game function. This is so
thelettercanbeusedproperly.
11New window
We use the Toplevel command from
Tkinter like last month to separate the loops of
the main interface and game window. We then
usetitletocallitHangman.
15Textentry
Entry here sets a text box we will add the
letters to. The exportselection option makes it
so selecting the letter won’t immediately copy it
to the clipboard, and the textvariable selection
is where the code stores the letter added. The
button activates the game function, analysing
thelettertheplayerentered.
Theframeisset
upasbefore
def guess_letter():
letter = letter_guess.get()
letter.strip()
letter.lower()
return letter
def reset_game():
global word, word_length, clue
incorrect_guesses.set(0)
hangedman(0)
result_set.set(“”)
letter_guess.set(“”)
word = choice(dictionary)
word_length = len(word)
clue = word_length * [“_”]
new_clue = “ “.join(clue)
word_output.set(new_clue)
hm_window = Toplevel()
hm_window.title (“Hangman”)
incorrect_guesses = IntVar()
incorrect_guesses.set(0)
player_score = IntVar()
computer_score = IntVar()
result_set = StringVar()
letter_guess = StringVar()
word_output = StringVar()
hm_graphic = StringVar()
hm_frame = Frame(hm_window, padding = ‘3 3 12 12’, width = 300)
hm_frame.grid(column=0, row = 0, sticky=(N,W,E,S))
hm_frame.columnconfigure(0, weight=1)
hm_frame.rowconfigure(0,weight=1)
Label(hm_frame, textvariable = hm_graphic).grid(column=2, row = 1)
Label(hm_frame, text=’Word’).grid(column=2, row = 2)
Label(hm_frame, textvariable = word_output).grid(column=2, row = 3)
Label(hm_frame, text=’Enter a letter’).grid(column=2, row = 4)
hm_entry = Entry(hm_frame, exportselection = 0, textvariable = letter_guess).grid(column = 2, row = 5)
hm_entry_button = Button(hm_frame, text = “Guess”, command = game).grid(column = 2, row = 6)
Label(hm_frame, text = “Wins”).grid(column = 1, row = 7, sticky = W)
Label(hm_frame, textvariable = player_score).grid(column = 1, row = 8, sticky = W)
Label(hm_frame, text = “Losses”).grid(column = 3, row = 7, sticky = W)
Label(hm_frame, textvariable = computer_score).grid(column = 3, row = 8, sticky = W)
Label(hm_frame, textvariable = result_set).grid(column = 2, row = 9)
replay_button = Button(hm_frame, text = “Reset”, command = reset_game).grid(column = 2, row = 10)
if __name__ == ‘__main__’:
gui()
THEHANGMANGUI
Press the updated Hangman
button to launch a new window.
Here we have the initial graphic,
wordclueandentryfortheplayer
to interact with. The scores
are set to zero, and no result
message is displayed as no
games havebeen played yet.
ORIGINALINTERFACE
You’ll also need the interface
code from last issue, which
already works with the modified
Rock, Paper, Scissors code. The
way it was left off means it won’t
work with the new code, so you’ll
have to change the command in
each button from [game].start
to [game].gui.](https://image.slidesharecdn.com/thepythonbooktheultimateguidetocodingwithpythonpdfdrive-220527060944-728dd1fe/75/The-Python-Book_-The-ultimate-guide-to-coding-with-Python-PDFDrive-pdf-53-2048.jpg)
![54 The Python Book
Python essentials
17
19
24
22
20
18
21
23
22Firstroll
As the window opens, we immediately
make the first roll. This is then sorted, each
number is attributed to a card, and then the
result is created to be displayed in the main
window. This is similar to how it worked before,
but instead it’s now entered into the StringVars
fortheinterfacetowardstheendofthescript
23Startgame
When we activate the button that starts
game, it immediately sends us to the rest of the
code. This would also work if you had the button
go to the throws function instead; however, you
canaddotherfunctionstothispartifyouwish.
24Diceselection
The first thing we do is find out what
checkboxes have been ticked by the player. We
then put these in a list so we can change out the
correct dice numbers. We’ve also brought in dice
so we can check against that what the current
dicerollsare.
20Handofdice
Like roll, nothing has changed for the
hand function. It’s simply now placed outside
the gui function for the exact same reasons.
It also means that you can easily import this
functionintoanotherscriptifyouwish.
21GUIstart
As we’ve mentioned last month and in
the Hangman code, we put all the GUI code into
afunctionsothatwecancallonitwhenwewant
to. In this case, pressing the Poker Dice button
on the main interface activates pokerdice.gui,
whichisthisfunction.
18Outsidedice
For Poker Dice, there’s only one variable
to show at any one time, the dice. Again, due to
the nested functions, and because we’re using
Python2,weneedtocallitwithglobalfromhere
tomakesurethegamecanberesetproperly.
19Dicerolls
The roll function has been removed from
the gui function so as not to create any code
errors with some of its variables. It can be easily
called within the nested functions. It hasn’t
changedatallfromtheoriginalcode.
17Startover
The usual array of command-line
compatibility and module importing here. The
groupby function is specifically imported here
fordiceanalysis.
#!/usr/bin/env python2
from Tkinter import *
from ttk import *
import random
from itertools import groupby
dice = 0
def roll(roll_number):
numbers = range(1,7)
dice = range(roll_number)
iterations = 0
while iterations roll_number:
iterations = iterations + 1
dice[iterations-1] = random.choice(numbers)
return dice
def hand(dice):
dice_hand = [len(list(group)) for key, group in groupby(dice)]
dice_hand.sort(reverse=True)
straight1 = [1,2,3,4,5]
straight2 = [2,3,4,5,6]
if dice == straight1 or dice == straight2:
return “a straight!”
elif dice_hand[0] == 5:
return “five of a kind!”
elif dice_hand[0] == 4:
return “four of a kind!”
elif dice_hand[0] == 3:
if dice_hand[1] == 2:
return “a full house!”
else:
return “three of a kind.”
elif dice_hand[0] == 2:
if dice_hand[1] == 2:
return “two pair.”
else:
return “one pair.”
else:
return “a high card.”
def gui():
global dice
dice = roll(5)
dice.sort()
nine = 1
ten = 2
jack = 3
queen = 4
king = 5
ace = 6
names = { nine: “9”, ten: “10”, jack: “J”, queen: “Q”, king: “K”,
ace: “A” }
result = “You have “ + hand(dice)
def game():
throws()
def throws():
global dice
dice1_check = dice1.get()
dice2_check = dice2.get()
dice3_check = dice3.get()
dice4_check = dice4.get()
dice5_check = dice5.get()
dice_rerolls = [dice1_check, dice2_check, dice3_check, dice4_
check, dice5_check]
THEPOKERDICEGUI
Two things are being printed out
on the initial window. The first
set of dice, ordered in the way
we did last time, and the current
hand. The checkboxes activate
a specific number that is used
when re-rolling dice with the
Rerollbutton.
EXTRAGAMEFUNCTIONS
We mentioned that the game function
doesn’t necessarily need to be used right
now. You can either clean up the code and
remove it, or add extra functions, such
as being able to choose a random new
selection of dice, or making it two-player.
Experimentwith whatyouwanttodo!](https://image.slidesharecdn.com/thepythonbooktheultimateguidetocodingwithpythonpdfdrive-220527060944-728dd1fe/75/The-Python-Book_-The-ultimate-guide-to-coding-with-Python-PDFDrive-pdf-54-2048.jpg)
![The Python Book 55
Python essentials
25Dicetore-roll
If a checkbox isn’t selected, we have
it set to give a zero value. We want to remove
these from the list so that the correct dice
are changed, so we use the for loop to check
each part of the list, and then use the remove
functionwhentheelementdoesequalzero.
26Earlyfinish
If no dice have been selected to re-roll,
the list will contain all 0s, which will then be
removed. The length of this list will then also be
zero,meaningwecanusethattoendthegameif
theplayerhitsRerollwithoutselectinganydice.
27New dice
This else function works roughly
the same as before. We start by getting the
necessary information for how many dice to roll,
andalisttoputthere-rolls.Wethenrollasmany
newdiceasweneedwiththefirstwhileloop
28Gameover
We use the same kind of while loop to
replace the new numbers into the original list,
much like last time. Then the dice are re-sorted,
analysed, joined as a string and then set into the
interface’s variable. The final hand message is
alsocreateandset.
29Graphicalvariables
As we’re rolling the dice as soon as
we launch the game, but the interface code
doesn’t start until the end, you can see that
after creating the necessary variables, we also
then set them. Of note, the dice have to be made
into a string separately with the for loop before
addingtothevariable.
30Checkbuttons
The main new addition to this code is
the check buttons with Checkbutton. You can
set an on and off value, with default off being 0.
We’ve made it so that the check buttons return
the same number as the dice they’re changing,
which we explained how we used earlier in the
code. The variable option sets whatever the
outcomeistothespecificTkintervariable.
25
26
27
28
29
30
Thecheck
buttonsarenew
for i in range(len(dice_rerolls)):
if 0 in dice_rerolls:
dice_rerolls.remove(0)
if len(dice_rerolls) == 0:
result = “You finish with “ + hand(dice)
hand_output.set(result)
else:
roll_number = len(dice_rerolls)
number_rerolls = roll(roll_number)
dice_changes = range(len(dice_rerolls))
iterations = 0
while iterations roll_number:
iterations = iterations + 1
dice_changes[iterations-1] = number_rerolls[iterations-1]
iterations = 0
while iterations roll_number:
iterations = iterations + 1
replacement = number_rerolls[iterations-1]
dice[dice_changes[iterations-1]] = replacement
dice.sort()
new_dice_list = [0,0,0,0,0]
for i in range(len(dice)):
new_dice_list[i] = names[dice[i]]
final_dice = “ “.join(new_dice_list)
dice_output.set(final_dice)
final_result = “You finish with “ + hand(dice)
hand_output.set(final_result)
def reset_game():
global dice
dice = roll(5)
dice.sort()
for i in range(len(dice)):
empty_dice[i] = names[dice[i]]
first_dice = “ “.join(empty_dice)
dice_output.set(first_dice)
result = “You have “ + hand(dice)
hand_output.set(result)
pd_window = Toplevel()
pd_window.title (“Poker Dice”)
dice_output = StringVar()
empty_dice = [0,0,0,0,0]
for i in range(len(dice)):
empty_dice[i] = names[dice[i]]
first_dice = “ “.join(empty_dice)
dice_output.set(first_dice)
hand_output = StringVar()
hand_output.set(result)
dice1 = IntVar()
dice2 = IntVar()
dice3 = IntVar()
dice4 = IntVar()
dice5 = IntVar()
result_set = StringVar()
player_score = IntVar()
computer_score = IntVar()
pd_frame = Frame(pd_window, padding = ‘3 3 12 12’, width = 300)
pd_frame.grid(column=0, row = 0, sticky=(N,W,E,S))
pd_frame.columnconfigure(0, weight=1)
pd_frame.rowconfigure(0,weight=1)
Label(pd_frame, text=’Dice’).grid(column=3, row = 1)
Label(pd_frame, textvariable = dice_output).grid(column=3, row = 2)
Label(pd_frame, textvariable = hand_output).grid(column=3, row = 3)
Label(pd_frame, text=’Dice to Reroll?’).grid(column=3, row = 4)
reroll1 = Checkbutton(pd_frame, text = “1”, variable = dice1, onvalue = 1, offvalue
= 0).grid(column=1, row = 5)
reroll2 = Checkbutton(pd_frame, text = “2”, variable = dice2, onvalue = 2, offvalue
= 0).grid(column=2, row = 5)
reroll3 = Checkbutton(pd_frame, text = “3”, variable = dice3, onvalue = 3, offvalue
= 0).grid(column=3, row = 5)
reroll4 = Checkbutton(pd_frame, text = “4”, variable = dice4, onvalue = 4, offvalue
= 0).grid(column=4, row = 5)
reroll5 = Checkbutton(pd_frame, text = “5”, variable = dice5, onvalue = 5, offvalue
= 0).grid(column=5, row = 5)
pd_reroll_button = Button(pd_frame, text = “Reroll”, command = game).grid(column =
3, row = 6)
replay_button = Button(pd_frame, text = “Reset”, command = reset_game).grid(column
= 3, row = 7)
if __name__ == ‘__main__’:
gui()
ONEWINDOW
Thewaywe’vemadetheseTkinter
interfaces is to have the games
launch in a separate window. You
can have them all running in one
window, though, by replacing the
labels and buttons of the original
interface by putting them as
different functions or classes.
Make sure to add a quit button to
the games that lets you go back
to the main page.](https://image.slidesharecdn.com/thepythonbooktheultimateguidetocodingwithpythonpdfdrive-220527060944-728dd1fe/75/The-Python-Book_-The-ultimate-guide-to-coding-with-Python-PDFDrive-pdf-55-2048.jpg)
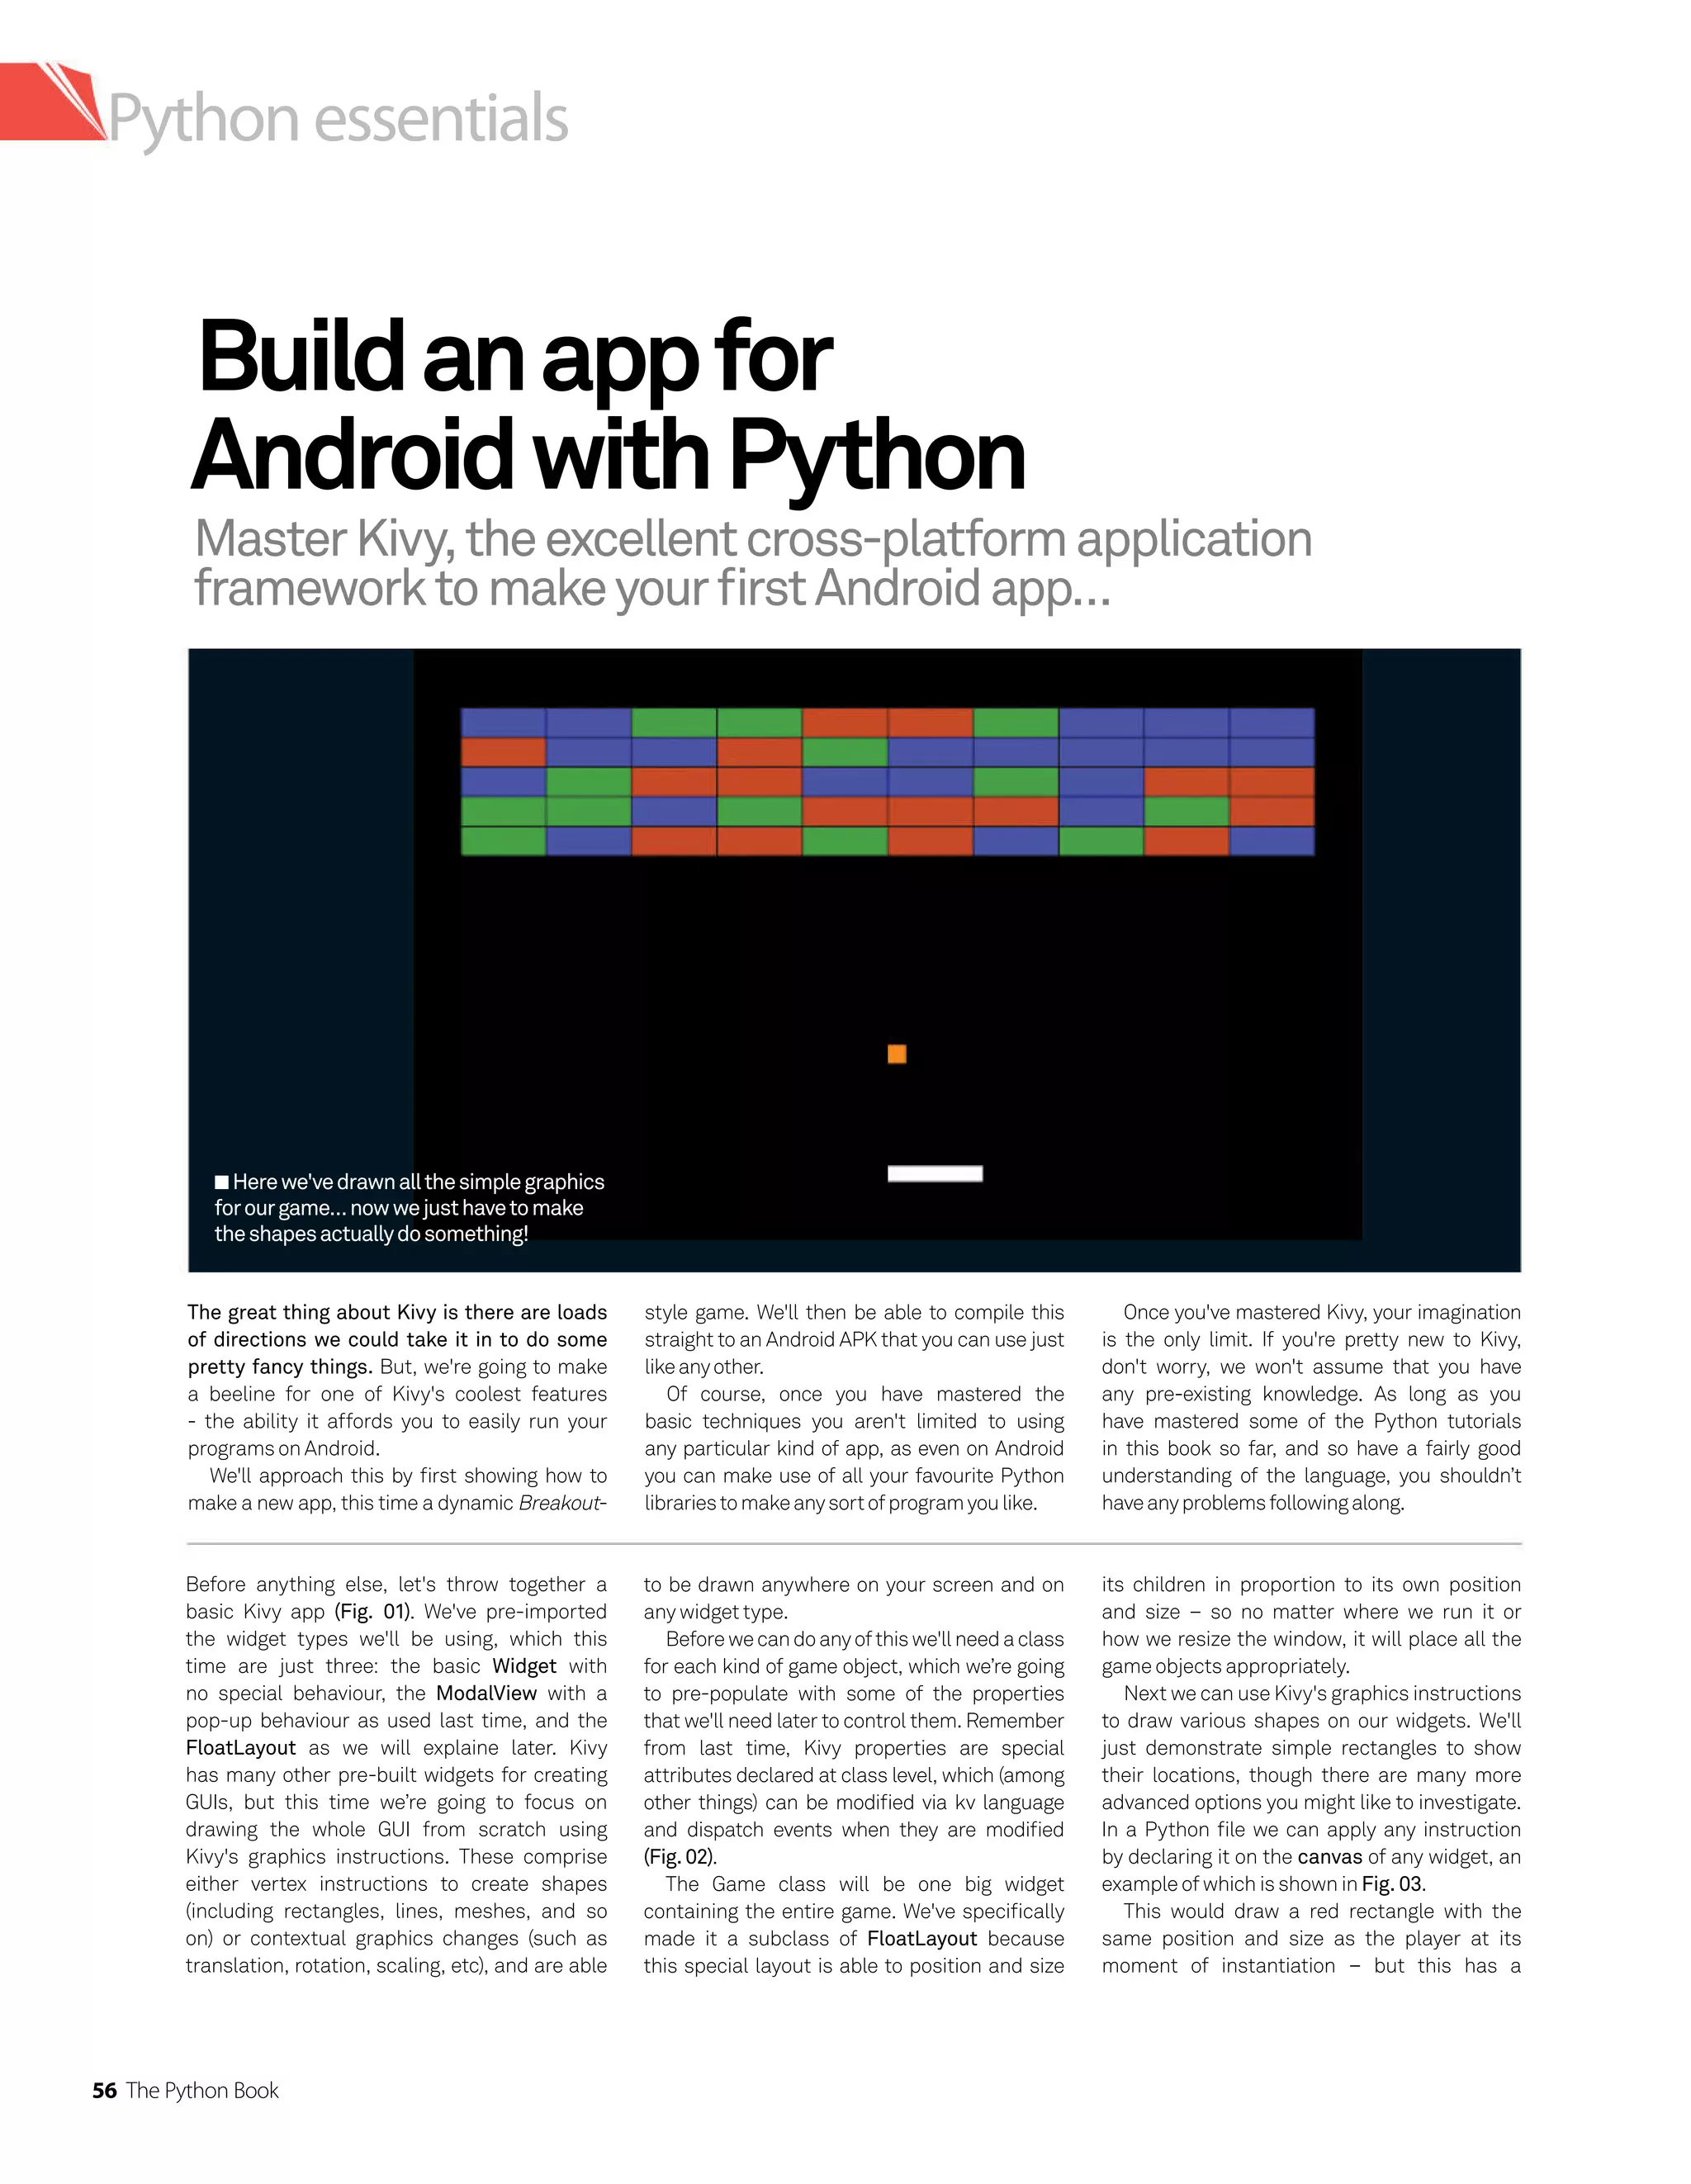
![The Python Book 57
Python essentials
from kivy.app import App
from kivy.uix.widget import Widget
from kivy.uix.floatlayout import FloatLayout
from kivy.uix.modalview import ModalView
__version__ = '0.1' # Used later during Android compilation
class BreakoutApp(App):
pass
BreakoutApp().run()
Fig. 01
from kivy.graphics.context_instructions import Color
from kivy.graphics.vertex_instructions import Rectangle
class Player(Widget):
def __init__(self
, **kwargs):
super(Player
, self).__init__(**kwargs)
with self
.canvas:
Color(1, 0, 0, 1) # r
, g, b, a - red
Rectangle(pos=self
.pos, size=self
.size)
# or without the with syntax, self
.canvas.add(...
)
Fig. 03
from kivy.properties import (ListProperty, NumericProperty,
ObjectProperty, StringProperty)
class Game(FloatLayout): # Will contain everything
blocks = ListProperty([])
player = ObjectProperty() # The game's Player instance
ball = ObjectProperty() # The game's Ball instance
class Player(Widget): # A moving paddle
position = NumericProperty(0.5)
direction = StringProperty('none')
class Ball(Widget): # A bouncing ball
# pos_hints are for proportional positioning, see below
pos_hint_x = NumericProperty(0.5)
pos_hint_y = NumericProperty(0.3)
proper_size = NumericProperty(0.
)
velocity = ListProperty([0.1, 0.5])
class Block(Widget): # Each coloured block to destroy
colour = ListProperty([1, 0, 0])
Fig. 02
problem, unfortunately, as the drawing is
static. When we later move the player widget,
the red rectangle will stay in the same place,
and the widget will be invisible when it is in its
real position.
We could fix this by keeping references to our
canvas instructions and repeatedly updating
their properties to track the player, but there's
actually an easier way to do all of this - we
can use the Kivy language we introduced last
time. It has a special syntax for drawing on
the widget canvas, which we can use to draw
each of our widget shapes:
Player:
canvas:
Color:
rgba: 1, 1, 1, 1
Rectangle:
pos: self.pos
size: self.size
Ball:
canvas:
Color:
rgb: 1, 0.55, 0
Rectangle:
pos: self.pos
size: self.size
Block:
canvas:
Color:
rgb: self.colour
# A property we predefined above
Rectangle:
pos: self.pos
size: self.size
Color:
rgb: 0.1, 0.1, 0.1
Line:
rectangle:
[self.x, self.y,
self.width, self.height]
The canvas declaration is special, underneath
it we can write any canvas instructions we
like. Don't get confused, canvas is not a
widget and nor are graphics instructions
like Line. This is just a special syntax that is
unique to the canvas. Instructions all have
different properties that can be set, like the
pos and size of the rectangle, and you can
check the Kivy documentation online for all
the possibilities. The biggest advantage is
that although we still declare simple canvas
instructions, kv language is able to detect
what Kivy properties we have referred to and
automatically track them, so when they are
updated (the widget moves or is resized) the
canvas instructions move to follow!
Onceyouhavethebasictechniques,
youaren’tlimitedtooneapp…your
imaginationistheonlylimit](https://image.slidesharecdn.com/thepythonbooktheultimateguidetocodingwithpythonpdfdrive-220527060944-728dd1fe/75/The-Python-Book_-The-ultimate-guide-to-coding-with-Python-PDFDrive-pdf-57-2048.jpg)
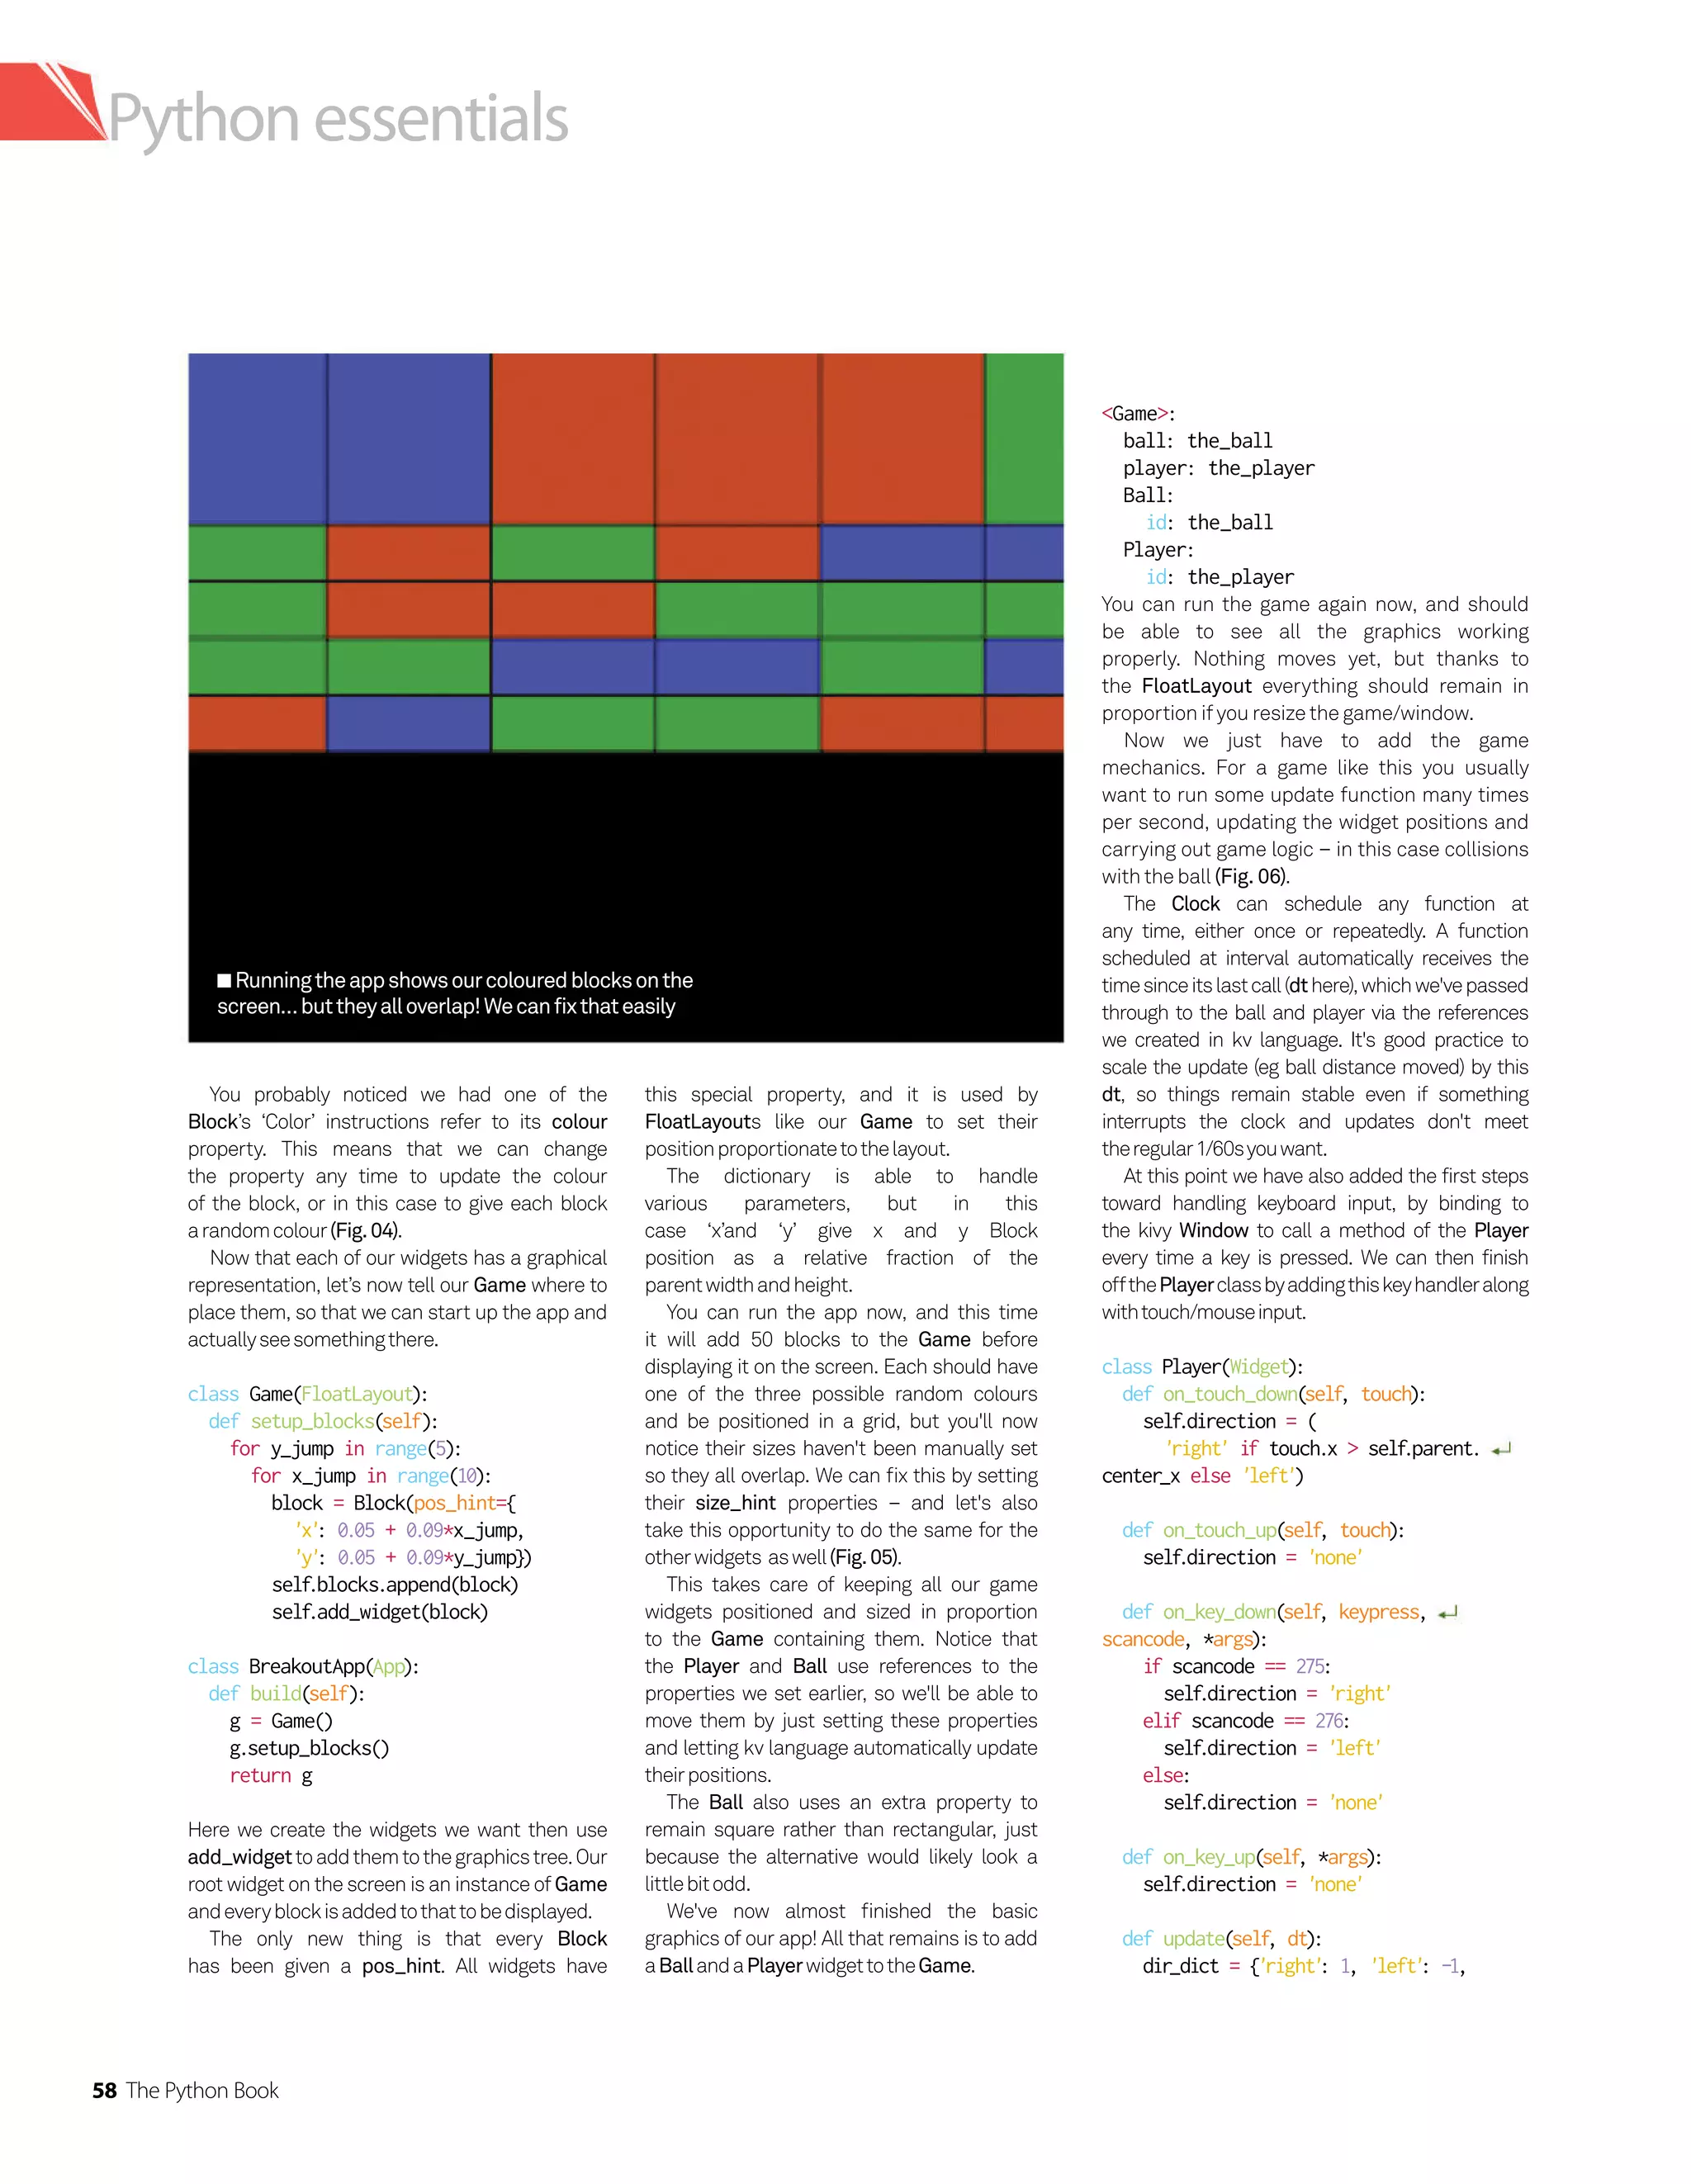
![The Python Book 59
Python essentials
'none'
: 0}
self
.position += (0.5 * dt * dir_
dict[self
.direction])
These on_touch_ functions are Kivy's general
method for interacting with touch or mouse input,
they are automatically called when the input
is detected and you can do anything you like in
response to the touches you receive. In this case
we set the Player's direction property in response
to either keyboard and touch/mouse input, and
use this direction to move the Player when its
updatemethodiscalled.Wecanalsoaddtheright
behaviourfortheball(Fig.07).
This makes the ball bounce off every wall by
forcing its velocity to point back into the Game,
as well as bouncing from the player paddle –
but with an extra kick just to let the ball speed
change. It doesn't yet handle any interaction
with the blocks or any win/lose conditions,
but it does try to call Game.lose() if the
ball hits the bottom of the player's screen,
solet'snowaddinsomegameendcodetohandle
allofthis(Fig.08).AndthenaddthecodeinFig.09
toyour'breakout.kv'file.
This should fully handle the loss or win,
opening a pop-up with an appropriate message
and providing a button to try again. Finally, we
have to handle destroying blocks when the
ballhitsthem(Fig.10).
Thisfullycoverstheselastconditions,checking
collision via Kivy's built-in collide_widget method
that compares their bounding boxes (pos and
size). The bounce direction will depend on how far
the ball has penetrated, as this will tell us how it
firstcollidedwiththeBlock.
So there we have it, you can run the code to
play your simple Breakout game. Obviously it's
very simple right now, but hopefully you can
see lots of different ways to add whatever extra
behaviour you like – you could add different
types of blocks and power-ups, a lives system,
more sophisticated paddle/ball interaction, or
even build a full game interface with a menu and
settingsscreenaswell.
We’rejustgoingtofinishshowingonecoolthing
that you can already do – compile your game for
Android!GenerallyspeakingyoucantakeanyKivy
app and turn it straight into an Android APK that
will run on any of your Android devices. You can
even access the normal Android API to access
hardware or OS features such as vibration,
sensorsornativenotifications.
We'll build for Android using the Buildozer tool,
and a Kivy sister project wrapping other build
tools to create packages on different systems.
This takes care of downloading and running the
Android build tools (SDK, NDK, etc) and Kivy's
Python-for-AndroidtoolsthatcreatetheAPK.
import random
class Block(Widget):
def __init__(self
, **kwargs):
super(Block, self).__init__(**kwargs)
self
.colour = random.choice([
(0.78, 0.28, 0), )0.28, 0.63, 0.28), )0.25, 0.28, 0.78)])
Fig. 04
from kivy.clock import Clock
from kivy.core.window import Window
from kivy.utils import platform
class Game(FloatLayout):
def update(self
, dt):
self
.ball.update(dt) # Not defined yet
self
.player
.update(dt) # Not defined yet
def start(self
, *args):
Clock.schedule_interval(self
.update, 1./60.
)
def stop(self):
Clock.unschedule(self
.update)
def reset(self):
for block in self
.blocks:
self
.remove_widget(block)
self
.blocks = []
self
.setup_blocks()
self
.ball.velocity = [random.random(), 0.5]
self
.player
.position = 0.5
class BreakoutApp(App):
def build(self):
g = Game()
if platform() != 'android'
:
Window.bind(on_key_down=g.player
.on_key_down)
Window.bind(on_key_up=g.player
.on_key_up)
g.reset()
Clock.schedule_once(g.start, 0)
return g
Fig. 06
Block:
size_hint: 0.09, 0.05
# ... canvas part
Player:
size_hint: 0.1, 0.025
pos_hint: {'x'
: self
.position, 'y'
: 0.1}
# ... canvas part
Ball:
pos_hint: {'x'
: self
.pos_hint_x, 'y'
: self
.pos_hint_y}
size_hint: None, None
proper_size:
min(0.03*self
.parent.height, 0.03*self
.parent.width)
size: self
.proper_size, self
.proper_size
# ... canvas part
Fig. 05](https://image.slidesharecdn.com/thepythonbooktheultimateguidetocodingwithpythonpdfdrive-220527060944-728dd1fe/75/The-Python-Book_-The-ultimate-guide-to-coding-with-Python-PDFDrive-pdf-59-2048.jpg)
![60 The Python Book
Python essentials
Here you will be needing some basic
dependencies, which can be installed with
ease just by using your distro's normal
repositories. The main ones to use are
OpenJDK7, zlib, an up-to-date Cython,
and Git. If you are using a 64-bit distro you will also
be in need of 32-bit compatibility libraries for zlib,
libstdc++,aswellaslibgcc.Youcanthengoonand
downloadandinstallBuildozer:
git clone git://github.com/kivy/buildozer
cd buildozer
sudo python2.7 setup.py install
When you’re done with that part you
can then go on and navigate to your
Kivyapp,andyou’llhavetonamethemaincodefile
‘main.py’, this is the access point that the Android
APKwillexpect.Then:
buildozer init
This creates a ‘buildozer.spec’ file, a settings file
containing all the information that Buildozer needs
to create your APK, from the name and version to
thespecificAndroidbuildoptions.Wesuggestthat
you check through the whole file just to see what's
available but most of the default settings will be
fine,theonlythingwesuggestchangingis(Fig.11).
There are various other options you will often
want to set, but none are really all that vital right
now, so you’re able to immediately tell Buildozer to
buildyourAPKandgetgoing!
buildozer android debug
This will take some time, so be patient and it will
workoutfine.Whenyoufirstrunit,itwilldownload
both the Android SDK and NDK, which are large
(at least hundreds of megabytes) but vital to the
build. It will also take time to build these and to
compile the Python components of your APK. A lot
ofthisonlyneedstobedoneonce, asfuturebuilds
will take a couple of minutes if you change the
buildozer.spec, or just a few seconds if you've only
changedyourcode.
The APK produced is a debug APK, and you can
install and use it but there are extra steps if you
wanttofullydigitallysignitsothatitcanbeposted
on the Play store. This isn't hard, and Buildozer
can do some of the work, but you can check the
documentationonlineforfulldetails.
Assuming everything goes fine (it should!),
your Android APK will be in a newly created 'bin'
directory with the name ‘KivyBreakout-0.1-debug.
apk’. You can send it to your phone any way you
like (eg email), though you may need to enable
application installation from unknown sources in
yourSettingsbeforeyoucaninstallit.
class Ball(Widget)
def update(self
, dt):
self
.pos_hint_x += self
.velocity[0] * dt
self
.pos_hint_y += self
.velocity[1] * dt
if self
.right self
.parent.right: # Bounce from right
self
.velocity[0] = -1 * abs(self
.velocity[0])
if self
.x self
.parent.x: # Bounce from left
self
.velocity[0] = abs(self
.velocity[0])
if self
.top self
.parent.top: # Bounce from top
self
.velocity[1] = -1 * abs(self
.velocity[1])
if self
.y self
.parent.y: # Lose at bottom
self
.parent.lose() # Not implemented yet
self
.bounce_from_player(self
.parent.player)
def bounce_from_player(self
, player):
if self
.collide_widget(player):
self
.velocity[1] = abs(self
.velocity[1])
self
.velocity[0] += (
0.1 * ((self
.center_x - player
.center_x) /
player
.width))
Fig. 07
class GameEndPopup(ModalView):
message = StringProperty()
game = ObjectProperty()
class Game(Widget):
def lose(self):
self
.stop()
GameEndPopup(message='[color=#ff0000]You lose![/color]'
,
game=self).open()
def win(self): # Not called yet, but we'll need it later
self
.stop()
GameEndPopup(message='[color=#00ff00]You win![/color]'
,
game=self).open()
Fig. 08
GameEndPopup:
size_hint: 0.8, 0.8
auto_dismiss: False # Don't close if player clicks outside
BoxLayout:
orientation: 'vertical'
Label:
text: root.message
font_size: 60
markup: True
halign: 'center'
Button:
size_hint_y: None
height: sp(80)
text: 'Play again?'
font_size: 60
on_release: root.game.start(); root.dismiss()
Fig. 09](https://image.slidesharecdn.com/thepythonbooktheultimateguidetocodingwithpythonpdfdrive-220527060944-728dd1fe/75/The-Python-Book_-The-ultimate-guide-to-coding-with-Python-PDFDrive-pdf-60-2048.jpg)
![self
.parent.do_layout()
self
.parent.destroy_blocks(self)
class Game(FloatLayout):
def destroy_blocks(self
, ball):
for i, block in enumerate(self
.blocks):
if ball.collide_widget(block):
y_overlap = (
ball.top - block.y if ball.velocity[1] 0
else block.top - ball.y) / block.size_hint_y
x_overlap = (
ball.right - block.x if ball.velocity[0] 0
else block.right - ball.x) / block.size_hint_x
if x_overlap y_overlap:
ball.velocity[0] *= -1
else:
ball.velocity[1] *= -1
self
.remove_widget(block)
self
.blocks.pop(i)
if len(self
.blocks) == 0:
self
.win()
return # Only remove at most 1 block per frame
Fig. 10
title = Kivy Breakout # Displayed in your app drawer
package.name = breakout # Just a unique identifying string,
# along with the package.domain
fullscreen = 0 # This will mean the navbar is not covered
log_level = 2 # Not vital, but this will print a lot more debug
# information and may be useful if something
# goes wrong
Fig. 11
PuttingyourAPK
onthePlayStore
Findouthowtodigitallysignarelease
APKanduploadittoanappstoreof
yourchoice
1
BuildandsignareleaseAPK
First we have to begin by creating a personal
digital key, then using it to digitally sign a
special release version of the APK. Run these
commands, and follow the instructions they then
giveyou.
## Create your personal digital key
## You can choose your own
## keystore name, alias, and passwords.
$ keytool -genkey -v -keystore test-
release-key.keystore
-alias test-alias -keyalg RSA
-keysize 2048 -validity 10000
## Compile your app in release mode
$ buildozer android release
## Sign the APK with your new key
$ jarsigner -verbose -sigalg
SHA1withRSA -digestalg SHA1
-keystore ./test-release-key.keystore
./bin/KivyBreakout-0.1-release-
unsigned.apk test-alias
## Align the APK zip file
$ ~/
.buildozer/android/platform/android-
sdk-21/tools/zipalign -v 4
./bin/KivyBreakout-0.1-release-
unsigned.apk
./bin/KivyBreakout-0.1-release.apk
3
Uploadyourapptothestore
Click 'Add new application'
to submit your app the store,
including uploading your APK and
adding description text. When
everything is ready, simply click
Publish, and it should take just a few
hoursforyourapptogolive!
2
SignupasaGoogle
PlayDeveloper
Visit https://play.google.com/
apps/publish/signup, and follow
the instructions. You'll need to pay a
one-off $25 charge, but then you can
uploadasmanyappsasyoulike.
Python essentials
QYourgameshouldrunonanymodernAndroiddevice…you
canevenbuildareleaseversionandpublishtoanappstore!](https://image.slidesharecdn.com/thepythonbooktheultimateguidetocodingwithpythonpdfdrive-220527060944-728dd1fe/75/The-Python-Book_-The-ultimate-guide-to-coding-with-Python-PDFDrive-pdf-61-2048.jpg)
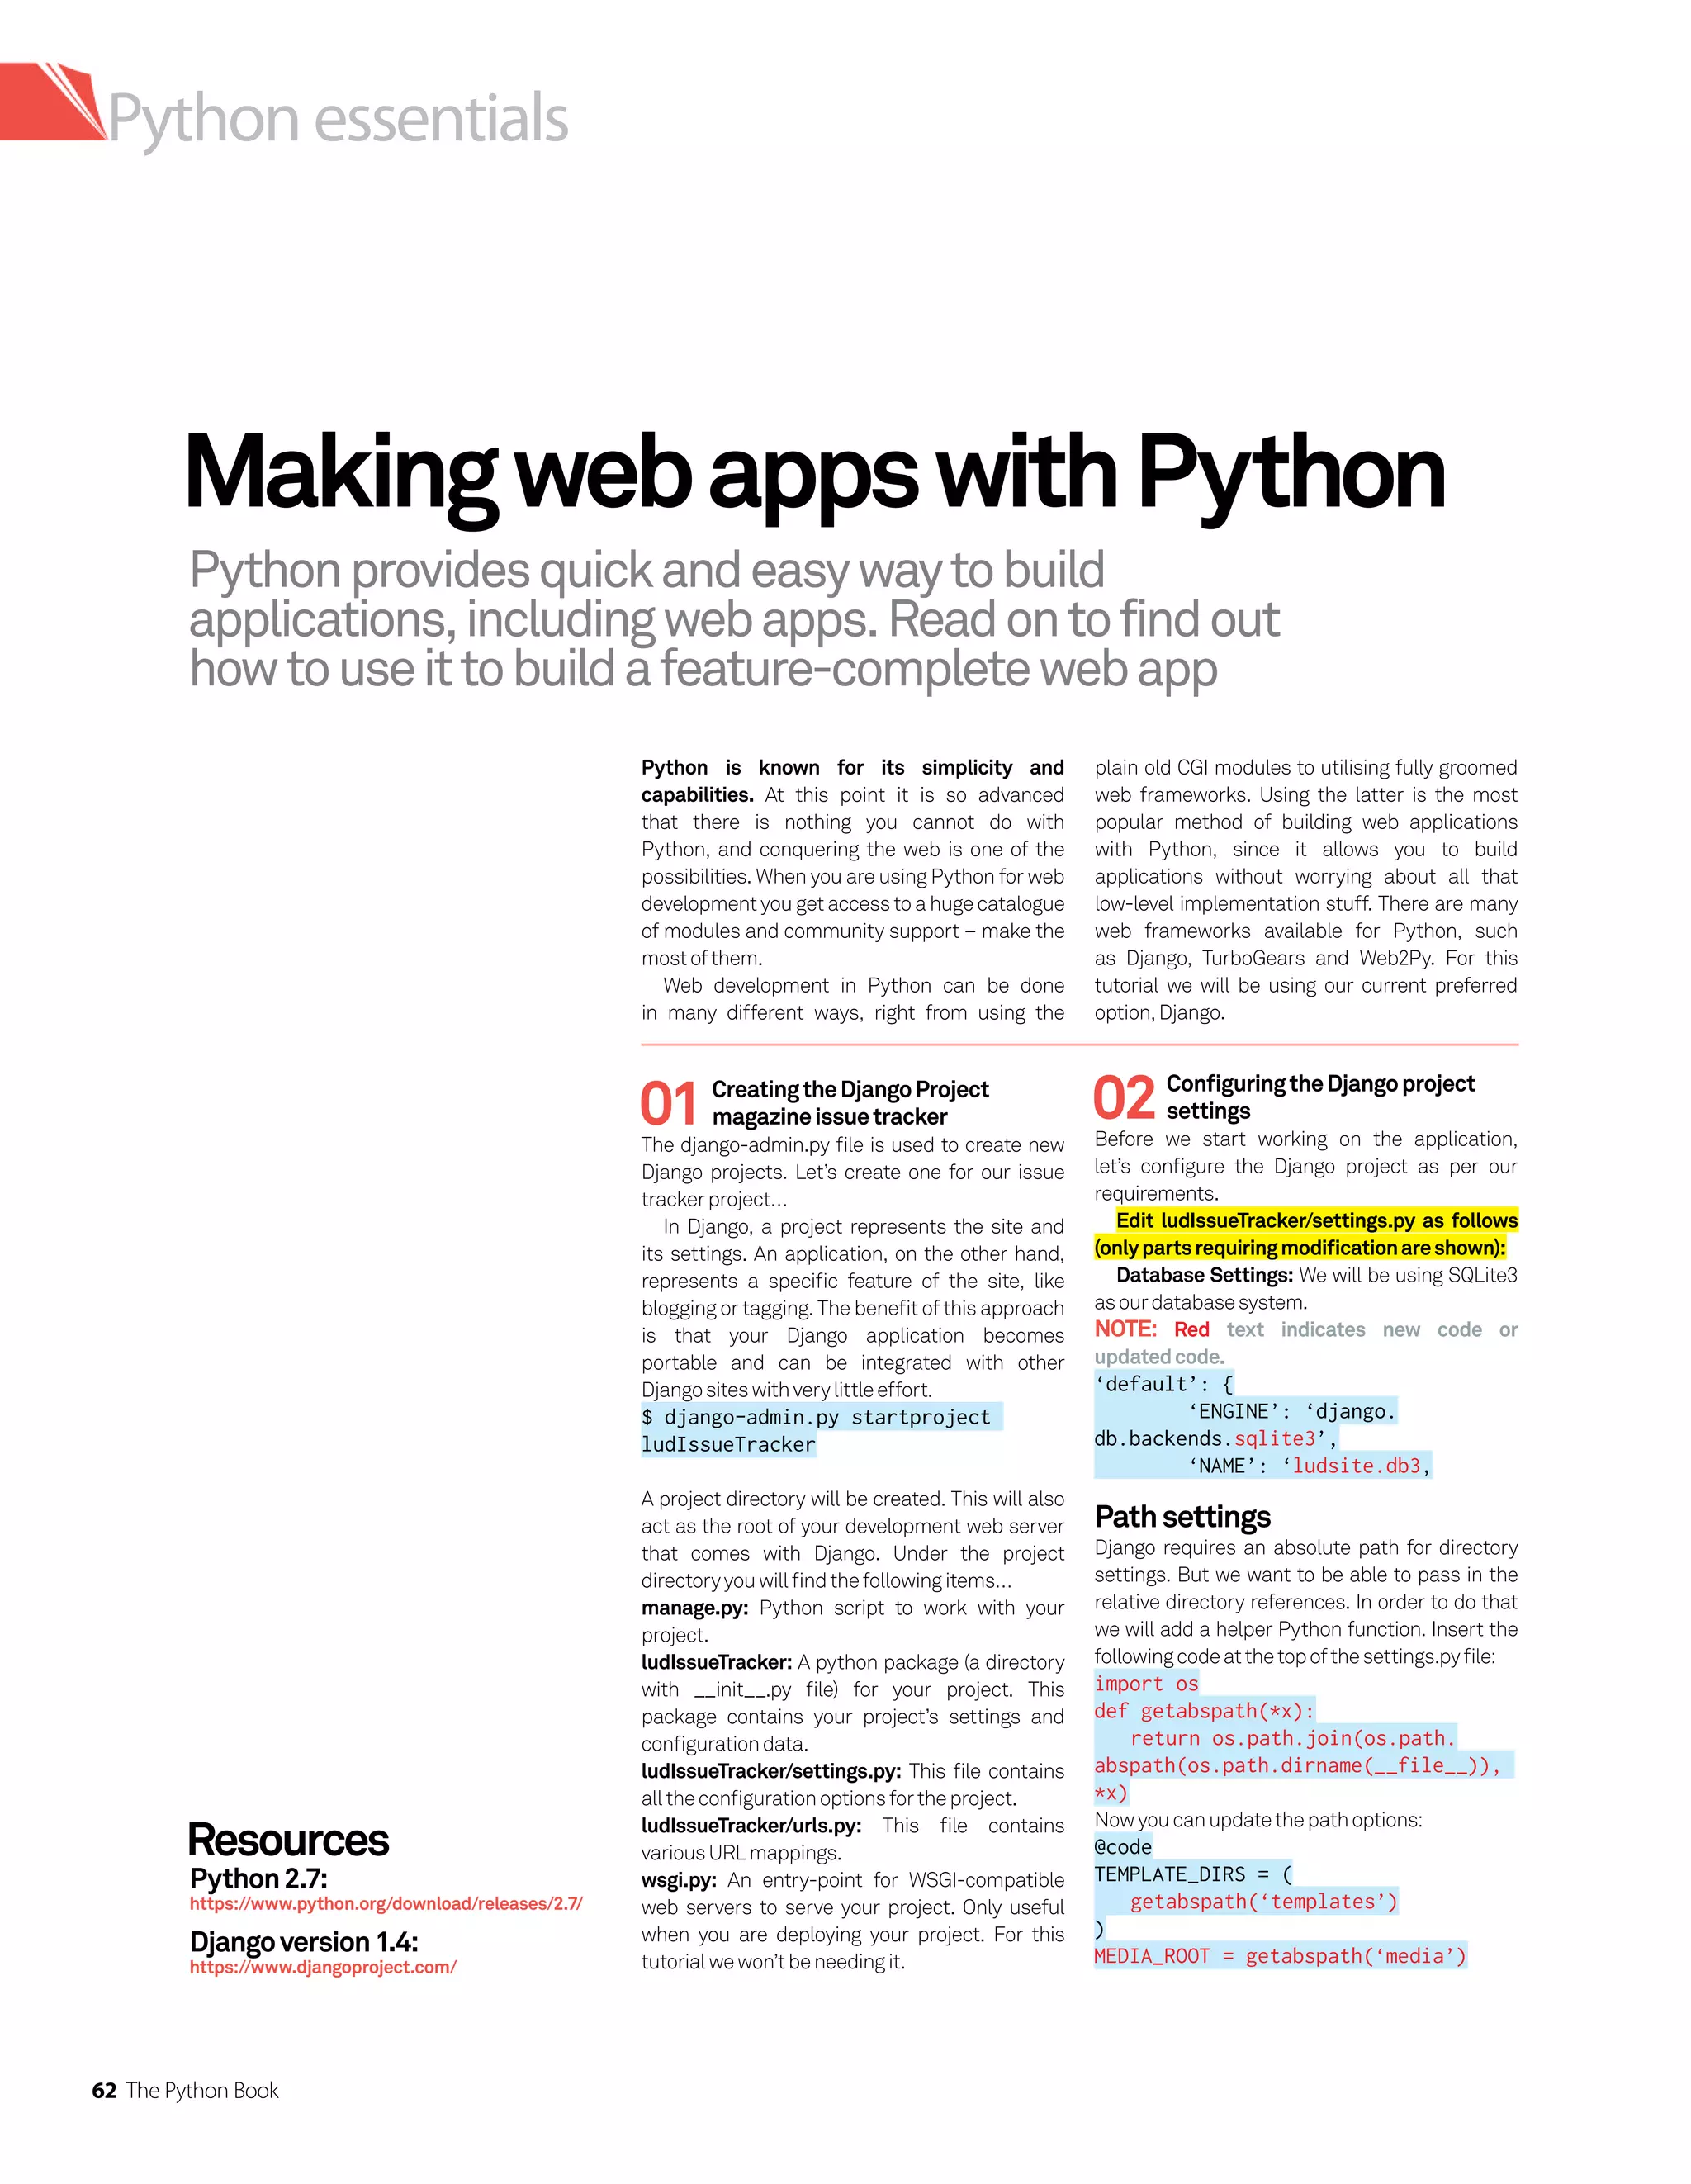
![The Python Book 63
Python essentials
03Creatingludissuesapp
In this step we will create the primary
app for our site, called ludissues. To do that, we
willusethemanage.pyscript:
$ python manage.py startapp
ludissues
We will need to enable this app in the config file
aswell:
INSTALLED_APPS = (
.............
'django.contrib.admin',
‘ludissues’,
)
04Creatingthedatamodel
This is the part where we define the
data model for our app. Please see the inline
commentstounderstandwhatishappening.
Fromdjango.dbimportmodels:
# We are importing the user
authentication module so that we use
the built
# in authentication model in this
app
from django.contrib.auth.models
import User
# We would also create an admin
interface for our app
from django.contrib import admin
# A Tuple to hold the multi choice
char fields.
# First represents the field name
the second one repersents the
display name
ISSUE_STATUS_CHOICES = (
MEDIA_URL = ‘/media/’
Nowwewillneedtoenabletheadmininterface
forourDjangosite.ThisisaneatfeatureofDjango
which allows the automatic creation of an admin
interfaceofthesitebasedonthedatamodel.The
admin interface can be used to add and manage
contentforaDjangosite.
Uncommentthefollowingline:
INSTALLED_APPS = (
‘django.contrib.auth’,
‘django.contrib.contenttypes’,
‘django.contrib.sessions’,
‘django.contrib.sites’,
‘django.contrib.messages’,
‘django.contrib.staticfiles’,
‘django.contrib.admin’,
# ‘django.contrib.admindocs’,
)
('new', 'New'),
('accepted','Accepted'),
('reviewed','Reviewed'),
('started','Started'),
('closed','Closed'),
)
class Issue(models.Model):
# owner will be a foreign key
to the User model which is already
built-in Django
owner = models.ForeignKey(User,n
ull=True,blank=True)
# multichoice with defaulting to
new
status = models.CharField(max_
length=25,choices=ISSUE_STATUS_
CHOICES,default='new')
summary = models.TextField()
# date time field which will be
set to the date time when the record
is created
opened_on = models.
DateTimeField('date opened', auto_
now_add=True)
modified_on = models.
DateTimeField('date modified', auto_
now=True)
def name(self):
return self.summary.
split('n',1)[0]
# Admin front end for the app. We
are also configuring some of the
# built in attributes for the admin
interface on
# how to display the list, how it
will be sorted
# what are the search fields etc.
class IssueAdmin(admin.ModelAdmin):
date_hierarchy = 'opened_on'
list_filter = ('status','owner')
list_display = ('id','name','sta
tus','owner','modified_on')
search_fields =
['description','status']
# register our site with the Django
admin interface
admin.site.
register(Issue,IssueAdmin)
To have the created data model reflected in the
database,runthefollowingcommand:
$ python manage.py syncdb
You’llbealsoaskedtocreateasuperuserforit:
You just installed Django's auth
system, which means you don't have
any superusers defined.
Would you like to create one now?
(yes/no): yes
05Enablingtheadminsite
The admin site is already enabled,
but we need to enable it in the urls.py file – this
contains the regex-based URL mapping from
modeltoview.Updatetheurls.pyfileasfollows:
from django.conf.urls import
patterns, include, url
from django.contrib import admin
admin.autodiscover()
urlpatterns = patterns(‘’,
url(r’^admin/’, include(admin.
site.urls)),
)
06StartingtheDjangowebserver
Django includes a built-in web server
which is very handy to debug and test Django
applications. Let’s start it to see how our admin
interfaceworks…
Tostartthewebserver:
$ python manage.py runserver
If you do not have any errors in your code, the
server should be available on port 8000. To
launch the admin interface, navigate your
browsertohttp://localhost:8000/admin.
You will be asked to log in here. Enter the
username and password that you created while
syncingthedatabase.
After logging in, you will notice that all the apps
installedinyourprojectareavailablehere.Weare
onlyinterestedintheAuthandLudIssuesapp.
You can click the +Add to add a record. Click
the Add button next to Users and add a few
users to the site.
Once you have the users inside the system,
youcannowaddafewissuestothesystem.
Q Adminloginscreen](https://image.slidesharecdn.com/thepythonbooktheultimateguidetocodingwithpythonpdfdrive-220527060944-728dd1fe/75/The-Python-Book_-The-ultimate-guide-to-coding-with-Python-PDFDrive-pdf-63-2048.jpg)
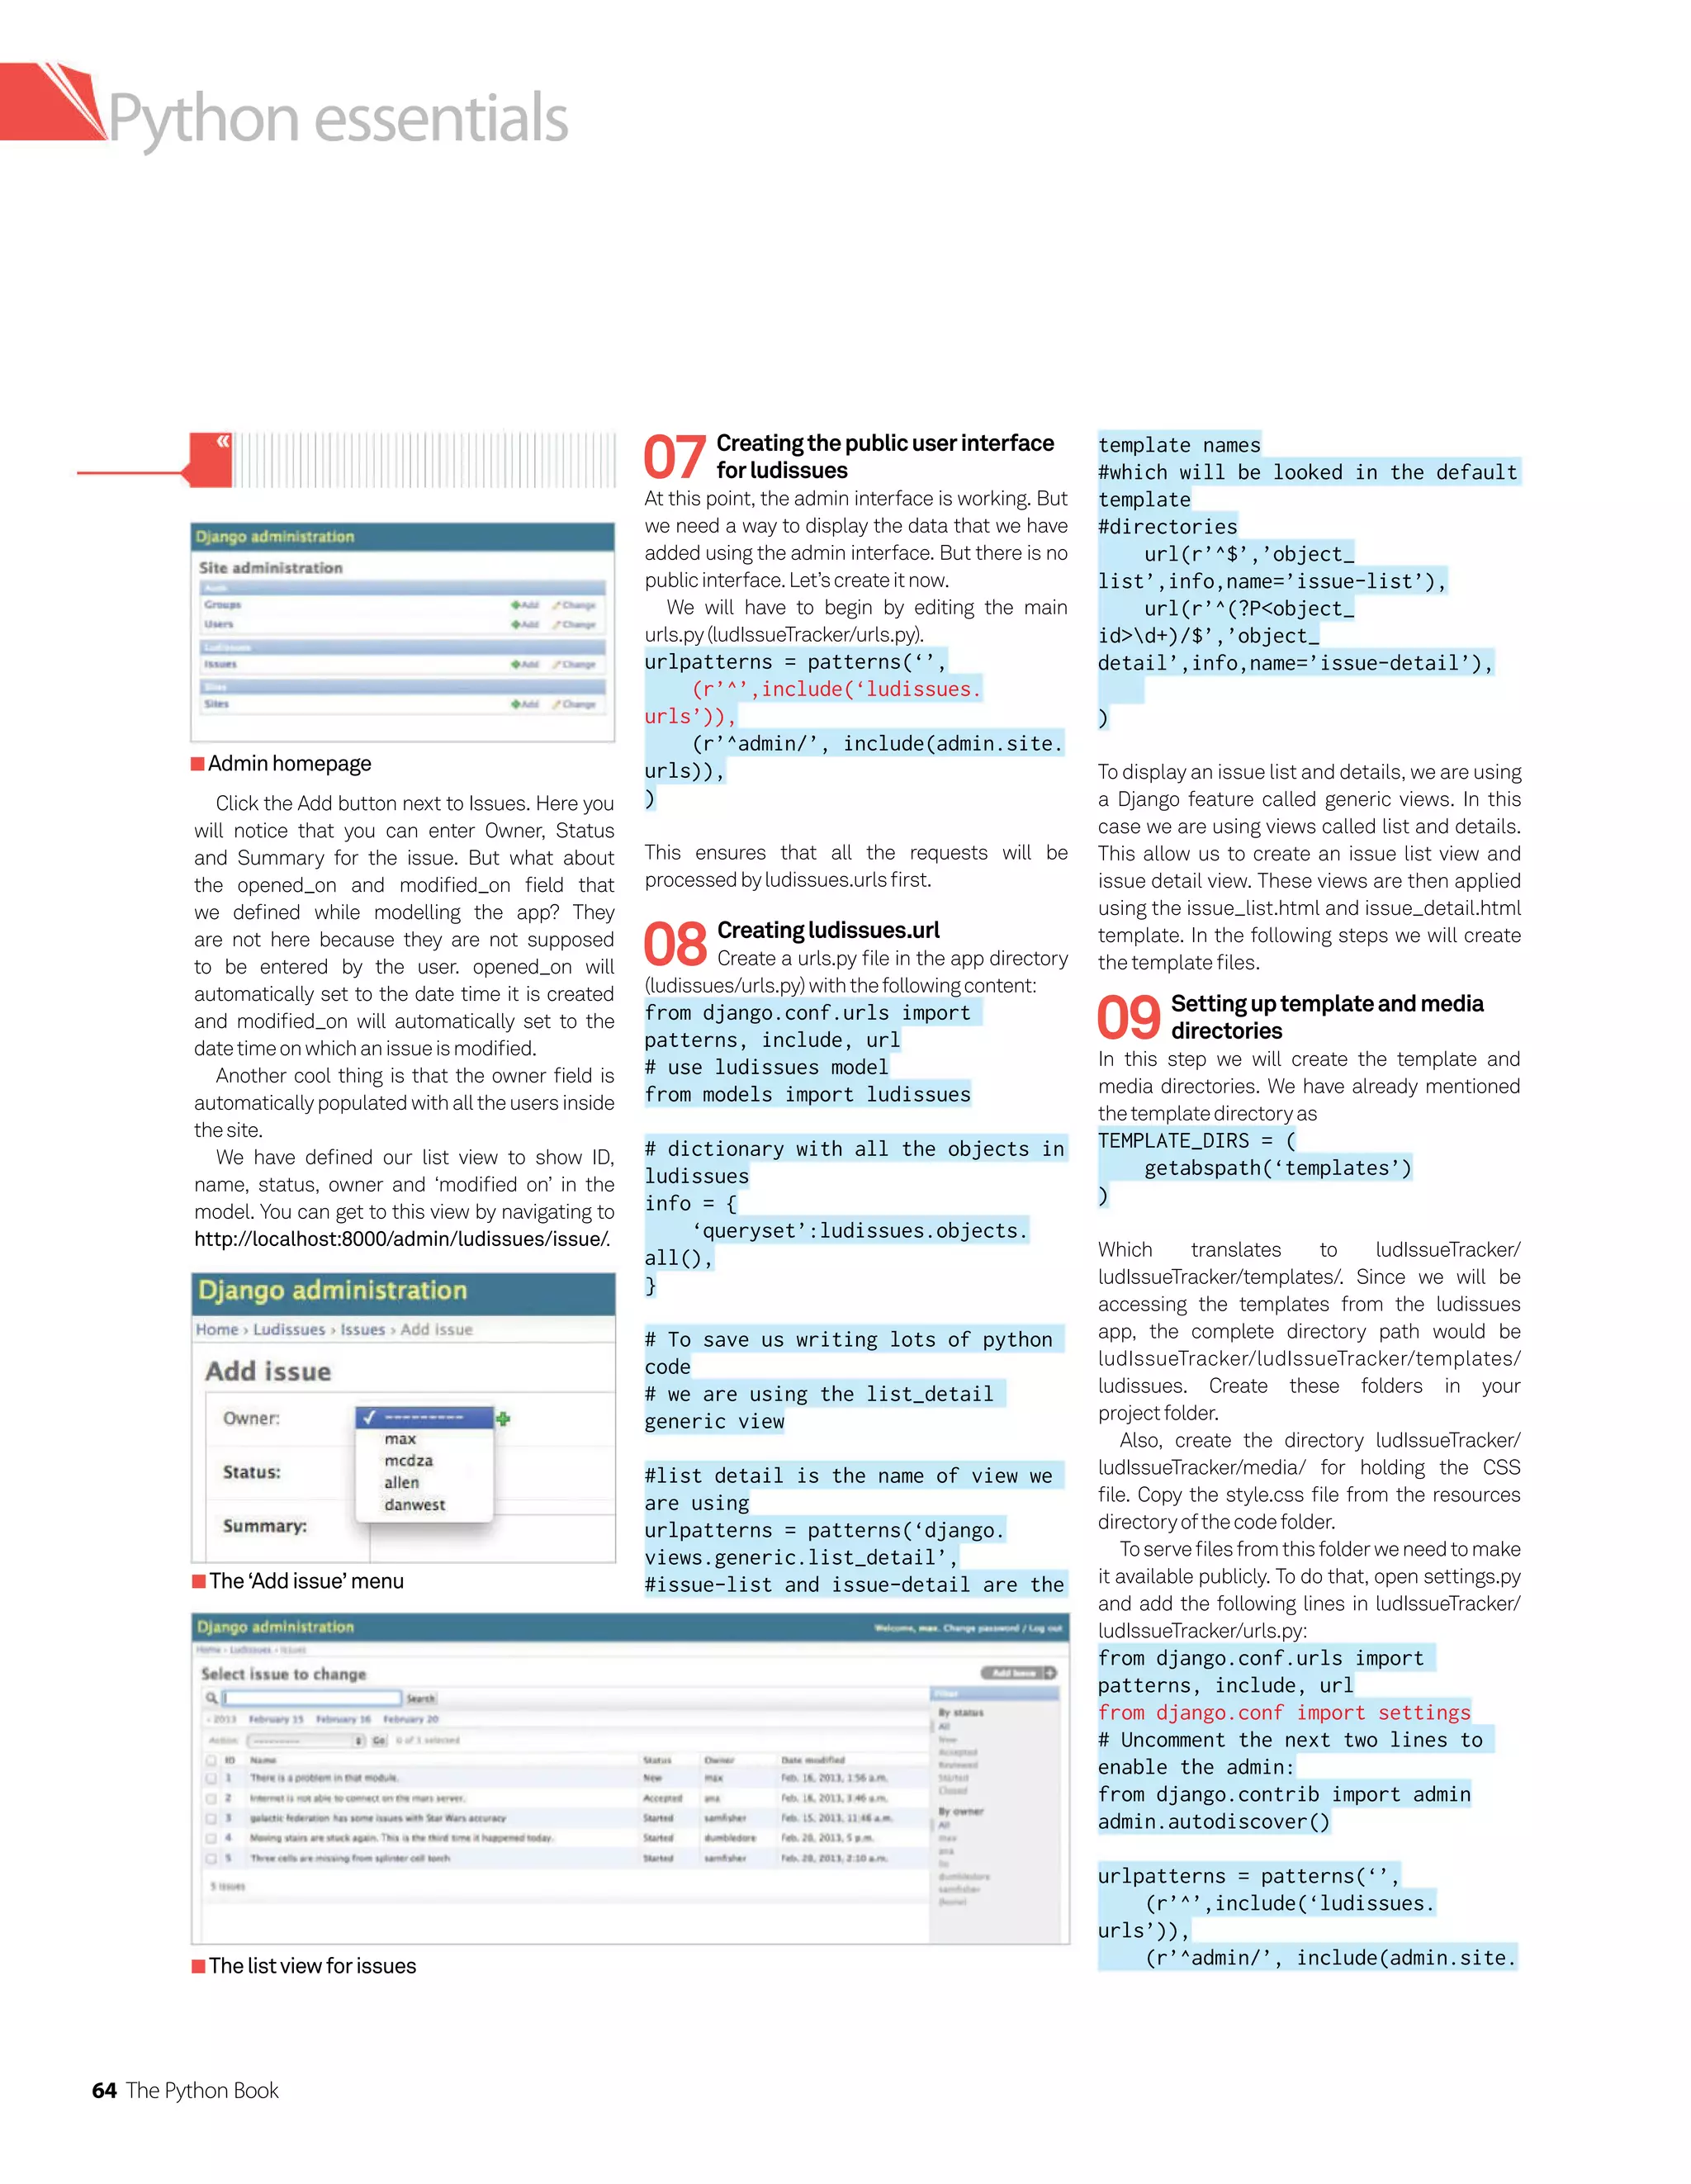
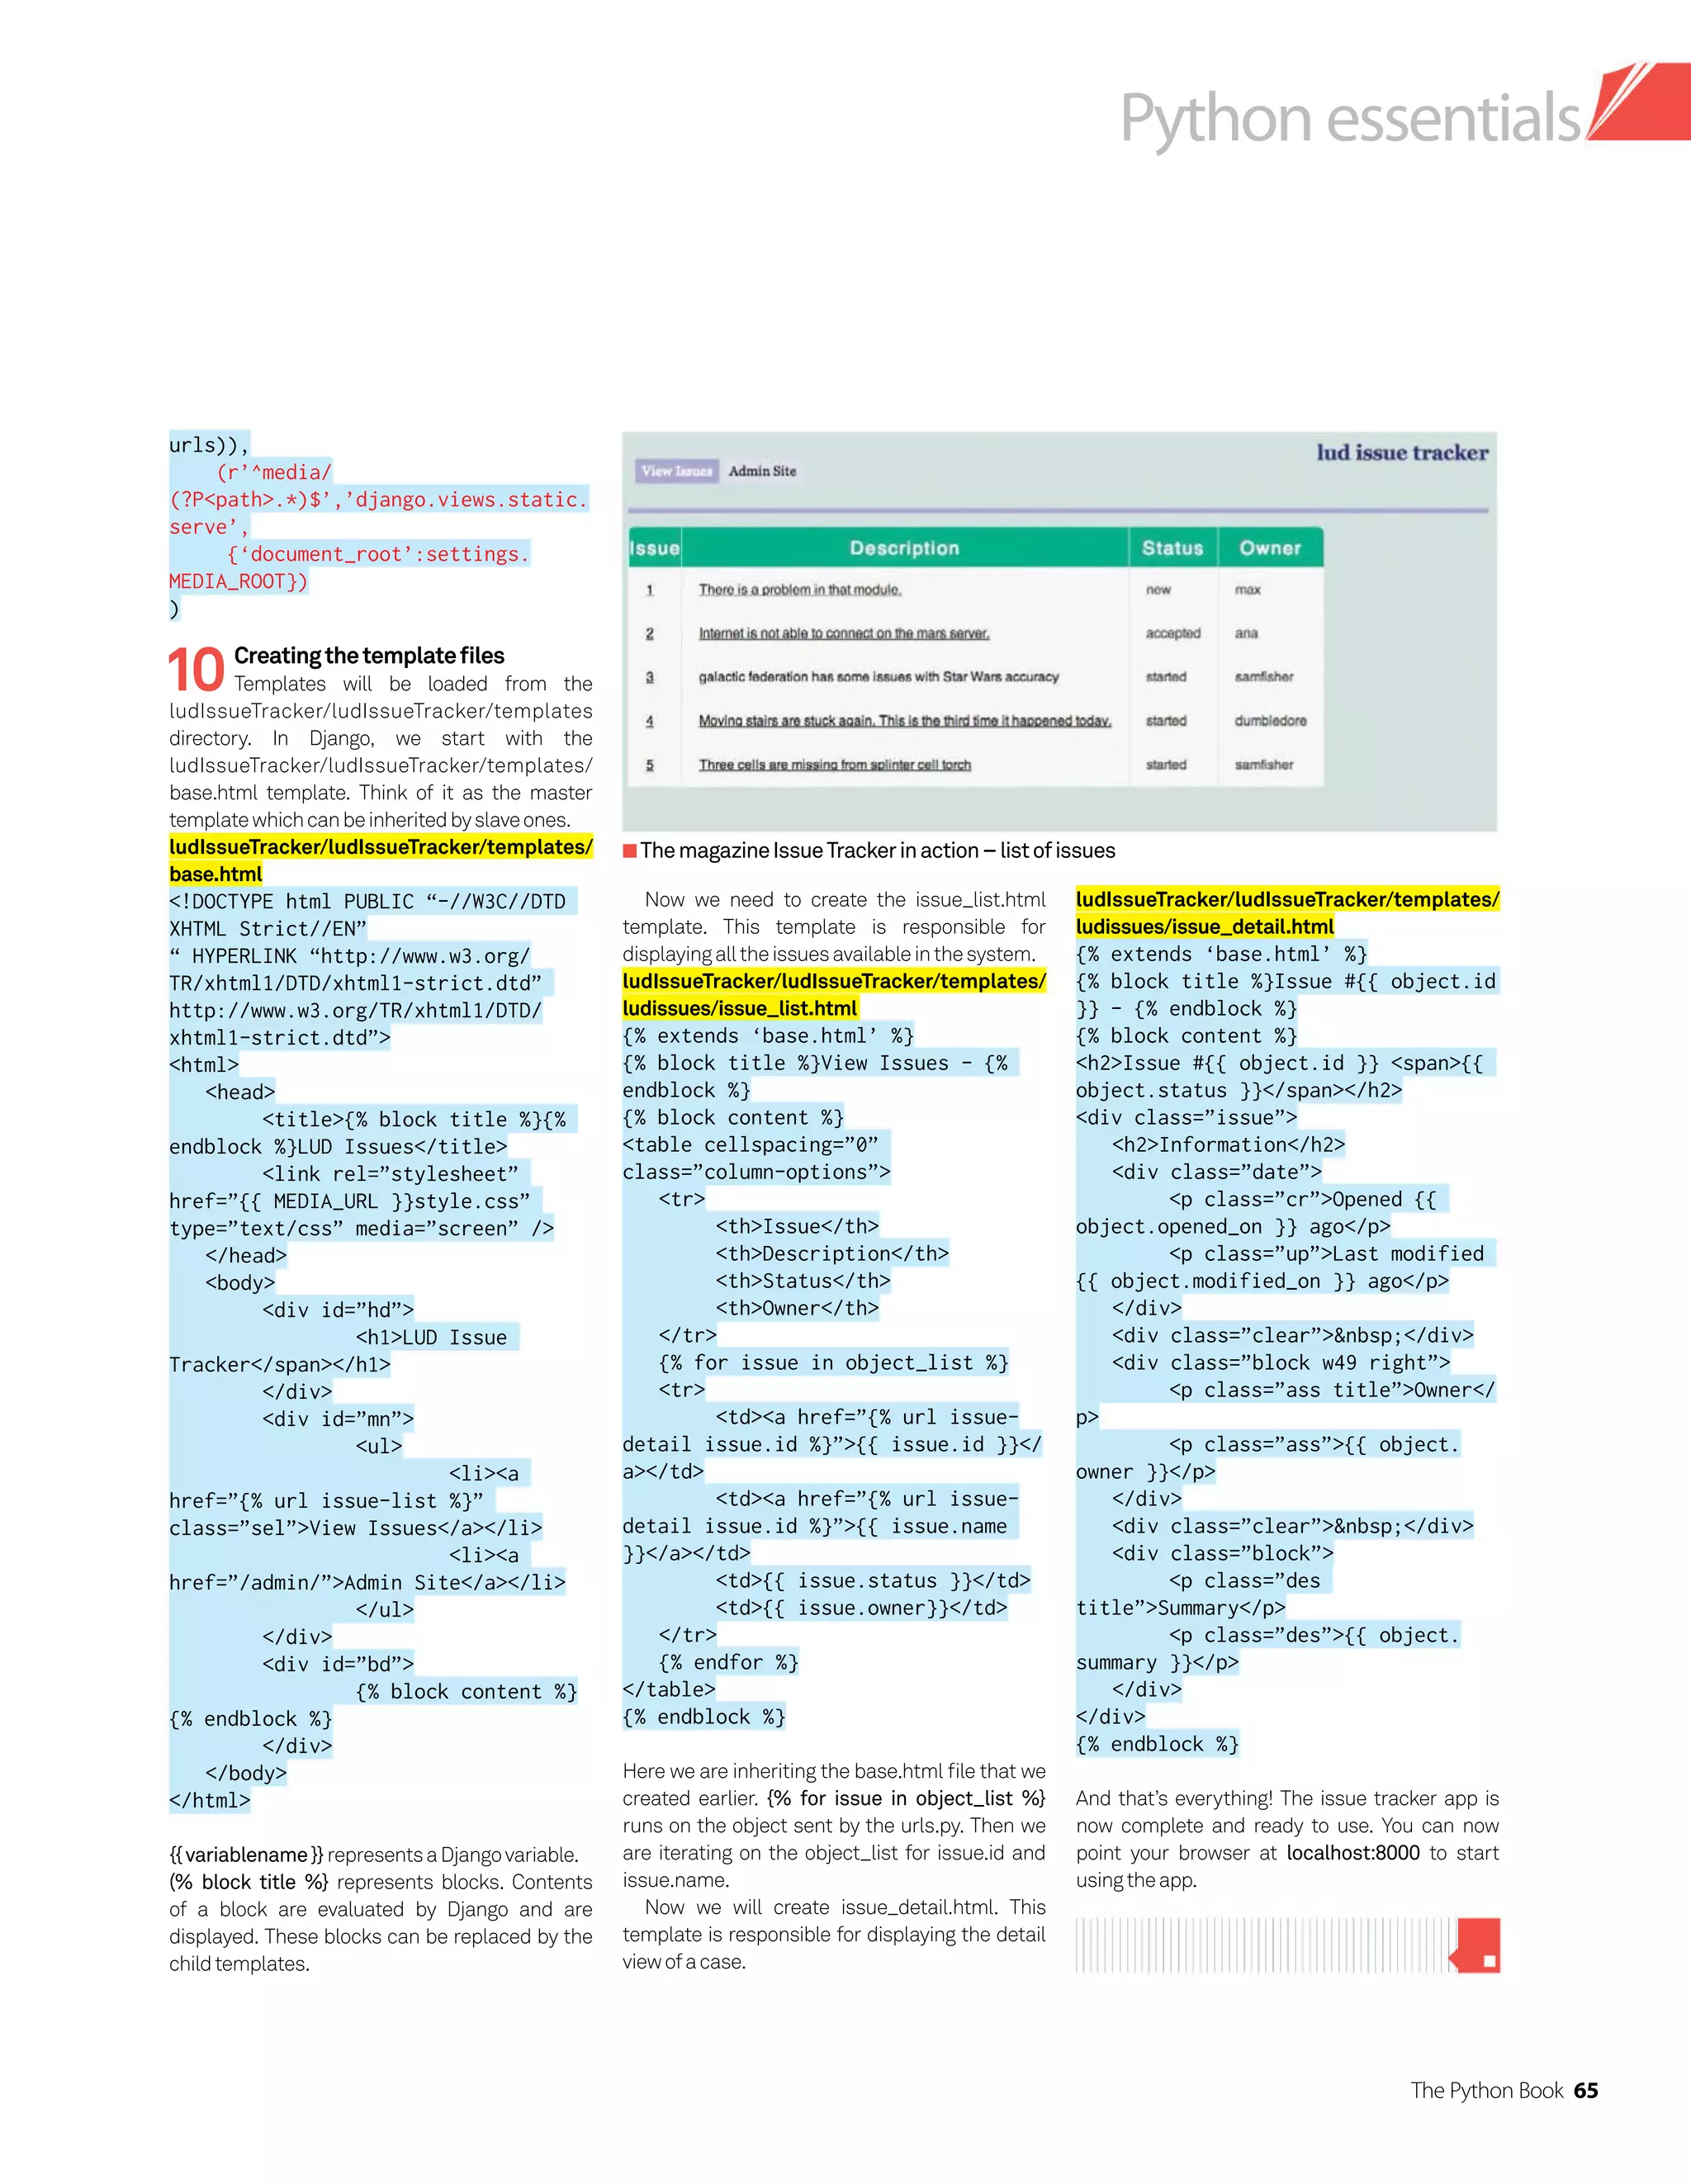
![66 The Python Book
Python essentials
Pythonisaprogramminglanguagethatletsyouworkmorequicklyand
integrateyoursystemsmoreeffectively.Today,Pythonisoneofthemost
popularprogramminglanguagesintheopensourcespace.Lookaround
andyouwillfinditrunningeverywhere,fromvariousconfigurationtools
toXMLparsing.Hereisthecollectionof50gemstomakeyourPython
experienceworthwhile…
Basics
1.RunningPythonscripts
On most of the UNIX systems, you can run
Pythonscriptsfromthecommandline.
$ python mypyprog.py
2.RunningPython
programsfrom
Pythoninterpreter
The Python interactive interpreter makes it
easy to try your first steps in programming and
using all Python commands. You just issue each
command at the command prompt (), one by
one,andtheanswerisimmediate.
Python interpreter can be started by issuing
thecommand:
$ python
kunal@ubuntu:~$ python
Python 2.6.2 (release26-maint, Apr
19 2009, 01:56:41)
[GCC 4.3.3] on linux2
Type “help”, “copyright”, “credits”
or “license” for more information.
type commands here
Inthisarticle,allthecodestartingatthe
symbolismeanttobegivenatthe
Pythonprompt.
It is also important to remember that Python
takes tabs very seriously – so if you are
receiving any error that mentions tabs, correct
thetabspacing.
3.Dynamictyping
In Java, C++, and other statically typed
languages, you must specify the data type of
the function return value and each function
argument. On the other hand, Python is
a dynamically typed language. In Python
you never have to explicitly specify the data
type of anything. Based on what value you
assign, Python will keep track of the data
typeinternally.
50
Python
tips](https://image.slidesharecdn.com/thepythonbooktheultimateguidetocodingwithpythonpdfdrive-220527060944-728dd1fe/75/The-Python-Book_-The-ultimate-guide-to-coding-with-Python-PDFDrive-pdf-66-2048.jpg)
![The Python Book 67
Python essentials
x,y = my_function.minmax(25, 6.3)
9.Moduledefinednames
Example:
The built-in function ‘dir()’ can be used to find
out which names a module defines. It returns a
sortedlistofstrings.
import time
dir(time)
[‘__doc__’, ‘__file__’, ‘__name__’,
‘__package__’, ‘accept2dyear’,
‘altzone’, ‘asctime’, ‘clock’,
‘ctime’, ‘daylight’, ‘gmtime’,
‘localtime’, ‘mktime’, ‘sleep’,
‘strftime’, ‘strptime’, ‘struct_
time’, ‘time’, ‘timezone’, ‘tzname’,
‘tzset’]
10.Moduleinternal
documentation
You can see the internal documentation (if
available) of a module name by looking at
.__doc__.
Example:
import time
print time.clock.__doc__
clock() - floating point number
This example returns the CPU time or real time
since the start of the process or since the first
call to clock(). This has as much precision as the
systemrecords.
11.Passingarguments
toaPythonscript
Pythonletsyouaccesswhateveryouhavepassed
to a script while calling it. The ‘command line’
contentisstoredinthesys.argvlist.
import sys
print sys.argv
12.Loadingmodulesor
commandsatstartup
You can load predefined modules or
commands at the startup of any Python
script by using the environment variable
$PYTHONSTARTUP. You can set environment
variable $PYTHONSTARTUP to a file which
contains the instructions load necessary
modulesorcommands.
13.Convertingastring
todateobject
You can use the function ‘DateTime’ to convert a
stringtoadateobject.
Example:
from DateTime import DateTime
dateobj = DateTime(string)
14.Convertingalist
toastringfordisplay
You can convert a list to string in either of the
followingways.
1stmethod:
mylist = [‘spam’, ‘ham’, ‘eggs’]
print ‘, ‘.join(mylist)
spam, ham, eggs
2ndmethod:
print ‘n’.join(mylist)
spam
ham
eggs
15.Tabcompletion
inPythoninterpreter
You can achieve auto completion inside Python
interpreterbyaddingtheselinestoyour.pythonrc
file(oryourfileforPythontoreadonstartup):
import rlcompleter, readline
readline.parse_and_bind(‘tab: complete’)
This will make Python complete partially typed
function, method and variable names when you
presstheTabkey.
16.Python
documentationtool
Youcanpopupagraphicalinterfaceforsearching
thePythondocumentationusingthecommand:
$ pydoc -g
Youwillneedpython-tkpackageforthistowork.
17.Python
documentationserver
You can start an HTTP server on the given port on
thelocalmachine.Thiswillgiveyouanice-looking
access to all Python documentation, including
third-partymoduledocumentation.
$ pydoc -p portNumber
18.Pythondevelopment
software
There are plenty of tools to help with Python
development.Hereareafewimportantones:
IDLE: The Python built-in IDE, with
autocompletion, function signature popup help,
andfileediting.
IPython: Another enhanced Python shell with
tab-completionandotherfeatures.
Eric3: A GUI Python IDE with autocompletion,
classbrowser,built-inshellanddebugger.
WingIDE: Commercial Python IDE with
free licence available to open-source
developerseverywhere.
4.Pythonstatements
Python uses carriage returns to separate
statements, and a colon and indentation to
separate code blocks. Most of the compiled
programming languages, such as C and C++, use
semicolons to separate statements and curly
bracketstoseparatecodeblocks.
5. ==and=operators
Python uses ‘==’ for comparison and ‘=’ for
assignment. Python does not support inline
assignment, so there’s no chance of accidentally
assigning the value when you actually want to
compareit.
6.Concatenatingstrings
Youcanuse‘+’toconcatenatestrings.
print ‘kun’+’al’
kunal
7.The__init__method
The __init__ method is run as soon as
an object of a class is instantiated. The
method is useful to do any initialization
you want to do with your object. The
__init__ method is analogous to a constructor in
C++,C#orJava.
Example:
class Person:
def __init__(self, name):
self.name = name
def sayHi(self):
print ‘Hello, my name is’, self.name
p = Person(‘Kunal’)
p.sayHi()
Output:
[~/src/python $:] python initmethod.py
Hello, my name is Kunal
8.Modules
To keep your programs manageable as they
grow in size, you may want to break them up into
several files. Python allows you to put multiple
function definitions into a file and use them as a
modulethatcanbeimportedintootherscriptsand
programs.Thesefilesmusthavea.pyextension.
Example:
# file my_function.py
def minmax(a,b):
if a = b:
min, max = a, b
else:
min, max = b, a
return min, max
Module Usage
import my_function](https://image.slidesharecdn.com/thepythonbooktheultimateguidetocodingwithpythonpdfdrive-220527060944-728dd1fe/75/The-Python-Book_-The-ultimate-guide-to-coding-with-Python-PDFDrive-pdf-67-2048.jpg)
![68 The Python Book
Python essentials
19.Executingfunctions
atthetimeofPython
interpretertermination
You can use ‘atexit’ module to execute functions
atthetimeofPythoninterpretertermination.
Example:
def sum():
print(4+5)
def message():
print(“Executing Now”)
import atexit
atexit.register(sum)
atexit.register(message)
Output:
Executing Now
9
20.Convertingfrominteger
tobinary,hexadecimal
andoctal
Python provides easy-to-use functions – bin(),
hex() and oct() – to convert from integer to binary,
decimalandoctalformatrespectively.
Example:
bin(24)
‘0b11000’
hex(24)
‘0x18’
oct(24)
‘030’
21.Convertingany
charsettoUTF-8
You can use the following function to convert any
charsettoUTF-8.
data.decode(“input_charset_here”).
encode(‘utf-8’)
22.Removing
duplicatesfromlists
If you want to remove duplicates from a list,
just put every element into a dict as a key (for
example with ‘none’ as value) and then check
dict.keys().
from operator import setitem
def distinct(l):
d = {}
map(setitem, (d,)*len(l), l, [])
return d.keys()
23.Do-whileloops
Since Python has no do-while or do-until loop
constructs (yet), you can use the following
methodtoachievesimilarresults:
while True:
do_something()
if condition():
break
24.Detectingsystem
platform
To execute platform-specific functions, it is very
usefultodetecttheplatformonwhichthePython
interpreter is running. You can use ‘sys.platform’
tofindoutthecurrentplatform.
Example:
OnUbuntuLinux
import sys
sys.platform
‘linux2’
OnMacOSXSnowLeopard
import sys
sys.platform
‘darwin’
25.Disablingandenabling
garbagecollection
Sometimes you may want to enable or disable
the garbage collector at runtime. You can
use the ‘gc’ module to enable or disable the
garbagecollection.
Example:
import gc
gc.enable
built-in function enable
gc.disable
built-in function disable
26.UsingC-basedmodules
forbetterperformance
Many Python modules ship with counterpart
C modules. Using these C modules will
give a significant performance boost in
complex applications.
Example:
cPickle instead of Pickle, cStringIO
instead of StringIO .
27.Calculatingmaximum,
minimumandsum
outofanylistoriterable
Youcanusethefollowingbuilt-infunctions.
max:Returnsthelargestelementinthelist.
min:Returnsthesmallestelementinthelist.
sum: This function returns the sum of all
elements in the list. It accepts an optional
second argument: the value to start with when
summing(defaultsto0).
28.Representing
fractionalnumbers
Fraction instance can be created using the
followingconstructor:
Fraction([numerator
[,denominator]])
29.Performing
mathoperations
The ‘math’ module provides a plethora of
mathematical functions. These work on integer
and float numbers, except complex numbers.
For complex numbers, a separate module is
used,called‘cmath’.
Forexample:
math.acos(x): Return arc cosine of
x.
math.cos(x): Returns cosine of x.
math.factorial(x) : Returns x
factorial.
30.Workingwitharrays
The ‘array’ module provides an efficient way to
use arrays in your programs. The ‘array’ module
definesthefollowingtype:
array(typecode [, initializer])
Once you have created an array object, say
myarray,youcanapplyabunchofmethodstoit.
Hereareafewimportantones:
myarray.count(x): Returns the
number of occurrences of x in a.
myarray.extend(x): Appends x at the
end of the array.
myarray.reverse(): Reverse the
order of the array.
31.Sortingitems
The ‘bisect’ module makes it very easy to keep
lists in any possible order. You can use the
following functions to order lists.
bisect.insort(list, item [, low [,
high]])
Inserts item into list in sorted order. If item is
already in the list, the new entry is inserted to
therightofanyexistingentries.
bisect.insort_left(list, item [, low
[, high]])
Inserts item into list in sorted order. If item is
already in the list, the new entry is inserted to
theleftofanyexistingentries.
Built-in
modules](https://image.slidesharecdn.com/thepythonbooktheultimateguidetocodingwithpythonpdfdrive-220527060944-728dd1fe/75/The-Python-Book_-The-ultimate-guide-to-coding-with-Python-PDFDrive-pdf-68-2048.jpg)
![The Python Book 69
Python essentials
32.Usingregular
expression-based
search
The ‘re’ module makes it very easy to use regxp-
based searches. You can use the function
‘re.search()’ with a regexp-based expression.
Checkouttheexamplebelow.
Example:
import re
s = “Kunal is a bad boy”
if re.search(“K”, s): print
“Match!” # char literal
...
Match!
if re.search(“[@A-Z]”, s): print
“Match!” # char class
... # match either at-sign or capital
letter
Match!
if re.search(“d”, s): print
“Match!” # digits class
...
33.Workingwithbzip2(.bz2)
compressionformat
You can use the module ‘bz2’ to read and write
datausingthebzip2compressionalgorithm.
bz2.compress() : For bz2
compression
bz2.decompress() : For bz2
decompression
Example:
# File: bz2-example.py
import bz2
MESSAGE = “Kunal is a bad boy”
compressed_message = bz2.
compress(MESSAGE)
decompressed_message = bz2.
decompress(compressed_message)
print “original:”, repr(MESSAGE)
print “compressed message:”,
repr(compressed_message)
print “decompressed message:”,
repr(decompressed_message)
Output:
[~/src/python $:] python bz2-
example.py
original: ‘Kunal is a bad boy’
compressed message: ‘BZh91AYSYxc4
x0fGx98x00x00x02x15x80@x00
x00x084%x8a x00”x00x0cx84r
x03Cxa2xb0xd6sxa5xb3x19x00
xf8xbbx92)xc2x84x86 zxc0’
decompressed message: ‘Kunal is a
bad boy’
34.UsingSQLitedatabase
withPython
SQLiteisfastbecomingaverypopularembedded
database because of its zero configuration
needed, and superior levels of performance. You
can use the module ‘sqlite3’ in order to work with
SQLitedatabases.
Example:
import sqlite3
connection = sqlite.connect(‘test.
db’)
curs = connection.cursor()
curs.execute(‘’’create table item
... (id integer primary key, itemno
text unique,
... scancode text, descr text, price
real)’’’)
sqlite3.Cursor object at 0x1004a2b30
35.Workingwithzipfiles
You can use the module ‘zipfile’ to work with
zipfiles.
zipfile.ZipFile(filename [, mode [,
compression [,allowZip64]]])
Open a zip file, where the file can be either a path
toafile(astring)orafile-likeobject.
zipfile.close()
Closethearchivefile.Youmustcall‘close()’before
exiting your program or essential records will not
bewritten.
zipfile.extract(member[, path[,
pwd]])
Extract a member from the archive to the current
working directory; ‘member’ must be its full
name (or a zipinfo object). Its file information
is extracted as accurately as possible. ‘path’
specifies a different directory to extract to.
‘member’ can be a filename or a zipinfo object.
‘pwd’isthepasswordusedforencryptedfiles.
36.UsingUNIX-style
wildcardstosearch
forfilenames
You can use the module ‘glob’ to find all the
pathnames matching a pattern according to the
rules used by the UNIX shell. *, ?, and character
rangesexpressedwith[]willbe matched.
Example:
import glob
glob.glob(‘./[0-9].*’)
[‘./1.gif’, ‘./2.txt’]
glob.glob(‘*.gif’)
[‘1.gif’, ‘card.gif’]
glob.glob(‘?.gif’)
[‘1.gif’]
37.Performingbasicfile
operations(copy,delete
andrename)
You can use the module ‘shutil’ to perform basic
file operation at a high level. This module works
with your regular files and so will not work with
special files like named pipes, block devices, and
soon.
shutil.copy(src,dst)
Copiesthefilesrctothefileordirectorydst.
shutil.copymode(src,dst)
Copiesthefilepermissionsfromsrctodst.
shutil.move(src,dst)
Movesafileordirectorytodst.
shutil.copytree(src, dst, symlinks
[,ignore]])
Recursivelycopyanentiredirectoryatsrc.
shutil.rmtree(path [, ignore_errors
[, onerror]])
Deletesanentiredirectory.
38.ExecutingUNIX
commandsfromPython
You can use module commands to execute UNIX
commands. This is not available in Python3 –
insteadyouneedtousethemodule‘subprocess’.
Example:
import commands
commands.getoutput(‘ls’)
‘bz2-example.pyntest.py’
39.Readingenvironment
variables
You can use the module ‘os’ to gather operating-
system-specificinformation:
Example:
import os
os.path module ‘posixpath’
from ‘/usr/lib/python2.6/posixpath.
pyc’ os.environ {‘LANG’: ‘en_
IN’, ‘TERM’: ‘xterm-color’, ‘SHELL’:
‘/bin/bash’, ‘LESSCLOSE’:
‘/usr/bin/lesspipe %s %s’,
‘XDG_SESSION_COOKIE’:
‘925c4644597c791c704656354adf56d6-
1257673132.347986-1177792325’,
‘SHLVL’: ‘1’, ‘SSH_TTY’: ‘/dev/
pts/2’, ‘PWD’: ‘/home/kunal’,
‘LESSOPEN’: ‘| /usr/bin
lesspipe
......}
os.name
‘posix’
os.linesep
‘n’](https://image.slidesharecdn.com/thepythonbooktheultimateguidetocodingwithpythonpdfdrive-220527060944-728dd1fe/75/The-Python-Book_-The-ultimate-guide-to-coding-with-Python-PDFDrive-pdf-69-2048.jpg)
![70 The Python Book
Python essentials
40.Sendingemail
You can use the module ‘smtplib’ to send email
using an SMTP (Simple Mail Transfer Protocol)
clientinterface.
smtplib.SMTP([host [, port]])
Example(sendanemailusingGoogleMail
SMTPserver):
import smtplib
# Use your own to and from email
address
fromaddr = ‘kunaldeo@gmail.com’
toaddrs = ‘toemail@gmail.com’
msg = ‘I am a Python geek. Here is
the proof.!’
# Credentials
# Use your own Google Mail
credentials while running the
program
username = ‘kunaldeo@gmail.com’
password = ‘xxxxxxxx’
# The actual mail send
server = smtplib.SMTP(‘smtp.gmail.
com:587’)
# Google Mail uses secure
connection for SMTP connections
server.starttls()
server.login(username,password)
server.sendmail(fromaddr, toaddrs,
msg)
server.quit()
41.Accessing
FTPserver
‘ftplib’ is a fully fledged client FTP module for
Python. To establish an FTP connection, you
canusethefollowingfunction:
ftplib.FTP([host [, user [, passwd
[, acct [, timeout]]]]])
Example:
host = “ftp.redhat.com”
username = “anonymous”
password = “kunaldeo@gmail.com”
import ftplib
import urllib2
ftp_serv = ftplib.
FTP(host,username,password)
# Download the file
u = urllib2.urlopen (“ftp://
ftp.redhat.com/pub/redhat/linux/
README”)
# Print the file contents
print (u.read())
Output:
[~/src/python $:] python
ftpclient.py
OlderversionsofRedHatLinuxhavebeenmoved
to the following location: ftp://archive.download.
redhat.com/pub/redhat/linux/
42.Launchingawebpage
withthedefaultweb
browser
The ‘webbrowser’ module provides a convenient
way to launch webpages using the default
webbrowser.
Example(launchgoogle.co.ukwithsystem’s
defaultwebbrowser):
import webbrowser
webbrowser.open(‘http://google.
co.uk’)
True
43.Creatingsecurehashes
The ‘hashlib’ module supports a plethora of
secure hash algorithms including SHA1, SHA224,
SHA256,SHA384,SHA512andMD5.
Example(createhexdigestofthegiventext):
import hashlib
# sha1 Digest
hashlib.sha1(“MI6 Classified
Information 007”).hexdigest()
‘e224b1543f229cc0cb935a1eb9593
18ba1b20c85’
# sha224 Digest
hashlib.sha224(“MI6 Classified
Information 007”).hexdigest()
‘3d01e2f741000b0224084482f905e9b7b97
7a59b480990ea8355e2c0’
# sha256 Digest
hashlib.sha256(“MI6 Classified
Information 007”).hexdigest()
‘2fdde5733f5d47b672fcb39725991c89
b2550707cbf4c6403e fdb33b1c19825e’
# sha384 Digest
hashlib.sha384(“MI6 Classified
Information 007”).hexdigest()
‘5c4914160f03dfbd19e14d3ec1e74bd8b99
dc192edc138aaf7682800982488daaf540be
9e0e50fc3d3a65c8b6353572d’
# sha512 Digest
hashlib.sha512(“MI6 Classified
Information 007”).hexdigest()
‘a704ac3dbef6e8234578482a31d5ad29d25
2c822d1f4973f49b850222edcc0a29bb89077
8aea807a0a48ee4ff8bb18566140667fbaf7
3a1dc1ff192febc713d2’
# MD5 Digest
hashlib.md5(“MI6 Classified
Information 007”).hexdigest()
‘8e2f1c52ac146f1a999a670c826f7126’
44.Seedingrandom
numbers
You can use the module ‘random’ to generate
a wide variety of random numbers. The most
used one is ‘random.seed([x])’. It initialises
the basic random number generator. If x is
omitted or None, current system time is used;
current system time is also used to initialise the
generatorwhenthemoduleisfirstimported.
45.WorkingwithCSV
(comma-separated
values)files
CSVfilesareverypopularfordataexchangeover
theweb.Usingthemodule‘csv’,youcanreadand
writeCSVfiles.
Example:
import csv
# write stocks data as comma-
separated values
writer = csv.writer(open(‘stocks.
csv’, ‘wb’, buffering=0))
writer.writerows([
(‘GOOG’, ‘Google, Inc.’, 505.24, 0.47,
0.09),
(‘YHOO’, ‘Yahoo! Inc.’, 27.38, 0.33,
1.22),
(‘CNET’, ‘CNET Networks, Inc.’, 8.62,
-0.13, -1.49)
])
# read stocks data, print status
messages
stocks = csv.reader(open(‘stocks.
csv’, ‘rb’))
status_labels = {-1: ‘down’, 0:
‘unchanged’, 1: ‘up’}
for ticker, name, price, change, pct
in stocks:
status = status_
labels[cmp(float(change), 0.0)]
print ‘%s is %s (%s%%)’ % (name,
status, pct)
46.Installingthird-
partymodulesusing
setuptools
‘setuptools’ is a Python package which lets you
download, build, install, upgrade and uninstall
packages very easily.
To use ‘setuptools’ you will need to install
from your distribution’s package manager.
After installation you can use the command
‘easy_install’ to perform Python package
management tasks.](https://image.slidesharecdn.com/thepythonbooktheultimateguidetocodingwithpythonpdfdrive-220527060944-728dd1fe/75/The-Python-Book_-The-ultimate-guide-to-coding-with-Python-PDFDrive-pdf-70-2048.jpg)
![The Python Book 71
Python essentials
Example(installingsimplejsonusing
setuptools):
kunal@ubuntu:~$ sudo easy_install
simplejson
Searching for simplejson
Reading http://pypi.python.org/simple/
simplejson/
Reading http://undefined.org/
python/#simplejson
Best match: simplejson 2.0.9
Downloading http://pypi.python.
org/packages/source/s/simplejson/
simplejson-2.0.9.tar.gz#md5=af5e67a39c
a3408563411d357e6d5e47
Processing simplejson-2.0.9.tar.gz
Running simplejson-2.0.9/setup.py
-q bdist_egg --dist-dir /tmp/easy_
install-FiyfNL/simplejson-2.0.9/egg-
dist-tmp-3YwsGV
Adding simplejson 2.0.9 to easy-
install.pth file
Installed /usr/local/lib/python2.6/
dist-packages/simplejson-2.0.9-py2.6-
linux-i686.egg
Processing dependencies for simplejson
Finished processing dependencies for
simplejson
47.Loggingtosystemlog
Youcanusethemodule‘syslog’towritetosystem
log. ‘syslog’ acts as an interface to UNIX syslog
libraryroutines.
Example:
import syslog
syslog.syslog(‘mygeekapp: started
logging’)
for a in [‘a’, ‘b’, ‘c’]:
b = ‘mygeekapp: I found letter ‘+a
syslog.syslog(b)
syslog.syslog(‘mygeekapp: the script
goes to sleep now, bye,bye!’)
Output:
$ python mylog.py
$ tail -f /var/log/messages
Nov 8 17:14:34 ubuntu -- MARK --
Nov 8 17:22:34 ubuntu python:
mygeekapp: started logging
Nov 8 17:22:34 ubuntu python:
mygeekapp: I found letter a
Nov 8 17:22:34 ubuntu python:
mygeekapp: I found letter b
Nov 8 17:22:34 ubuntu python:
mygeekapp: I found letter c
Nov 8 17:22:34 ubuntu python:
mygeekapp: the script goes to sleep
now, bye,bye!
48.GeneratingPDF
documents
‘ReportLab’ is a very popular module for PDF
generationfromPython.
PerformthefollowingstepstoinstallReportLab
$ wget http://www.reportlab.org/ftp/
ReportLab_2_3.tar.gz
$ tar xvfz ReportLab_2_3.tar.gz
$ cd ReportLab_2_3
$ sudo python setup.py install
Forasuccessfulinstallation,youshouldseea
similarmessage:
############SUMMARY INFO###########
###################################
#Attempting install of _rl_accel, sgmlop
pyHnj
#extensions from ‘/home/kunal/python/
ReportLab_2_3/src/rl_addons/rl_accel’
###################################
#Attempting install of _renderPM
#extensions from ‘/home/kunal/python/
ReportLab_2_3/src/rl_addons/renderPM’
# installing with freetype version 21
###################################
Example:
from reportlab.pdfgen.canvas import
Canvas
# Select the canvas of letter page size
from reportlab.lib.pagesizes import
letter
pdf = Canvas(“bond.pdf”, pagesize =
letter)
# import units
from reportlab.lib.units import cm,
mm, inch, pica
pdf.setFont(“Courier”, 60)
pdf.setFillColorRGB(1, 0, 0)
pdf.drawCentredString(letter[0] / 2,
inch * 6, “MI6 CLASSIFIED”)
pdf.setFont(“Courier”, 40)
pdf.drawCentredString(letter[0] / 2,
inch * 5, “For 007’s Eyes Only”)
# Close the drawing for current page
pdf.showPage()
# Save the pdf page
pdf.save()
Output:
@image:pdf.png
@title: PDF Output
49.UsingTwitterAPI
You can connect to Twitter using the ‘Python-
Twitter’module.
Performthefollowingstepstoinstall
Python-Twitter:
$ wget http://python-twitter.
googlecode.com/files/python-twitter-
0.6.tar.gz
$ tar xvfz python-twitter*
$ cd python-twitter*
$ sudo python setup.py install
Example(fetchingfollowerslist):
import twitter
# Use you own twitter account here
mytwi = twitter.Api(username=’kunald
eo’,password=’xxxxxx’)
friends = mytwi.GetFriends()
print [u.name for u in friends]
[u’Matt Legend Gemmell’, u’jono wells’,
u’The MDN Big Blog’, u’Manish Mandal’,
u’iH8sn0w’, u’IndianVideoGamer.com’,
u’FakeAaron Hillegass’, u’ChaosCode’,
u’nileshp’, u’Frank Jennings’,..’]
50.DoingYahoo!news
search
You can use the Yahoo! search SDK to access
Yahoo!searchAPIsfromPython.
Performthefollowingstepstoinstallit:
$wget http://developer.yahoo.com/
download/files/yws-2.12.zip
$ unzip yws*
$ cd yws*/Python/pYsearch*/
$ sudo python setup.py install
Example:
# Importing news search API
from yahoo.search.news import
NewsSearch
srch = NewsSearch(‘YahooDemo’,
query=’London’)
# Fetch Results
info = srch.parse_results()
info.total_results_available
41640
info.total_results_returned
10
for result in info.results:
... print “’%s’, from %s” %
(result[‘Title’], result[‘NewsSource’])
...
‘Afghan Handover to Be Planned at London
Conference, Brown Says’, from Bloomberg
.................
Third-partymodules](https://image.slidesharecdn.com/thepythonbooktheultimateguidetocodingwithpythonpdfdrive-220527060944-728dd1fe/75/The-Python-Book_-The-ultimate-guide-to-coding-with-Python-PDFDrive-pdf-71-2048.jpg)
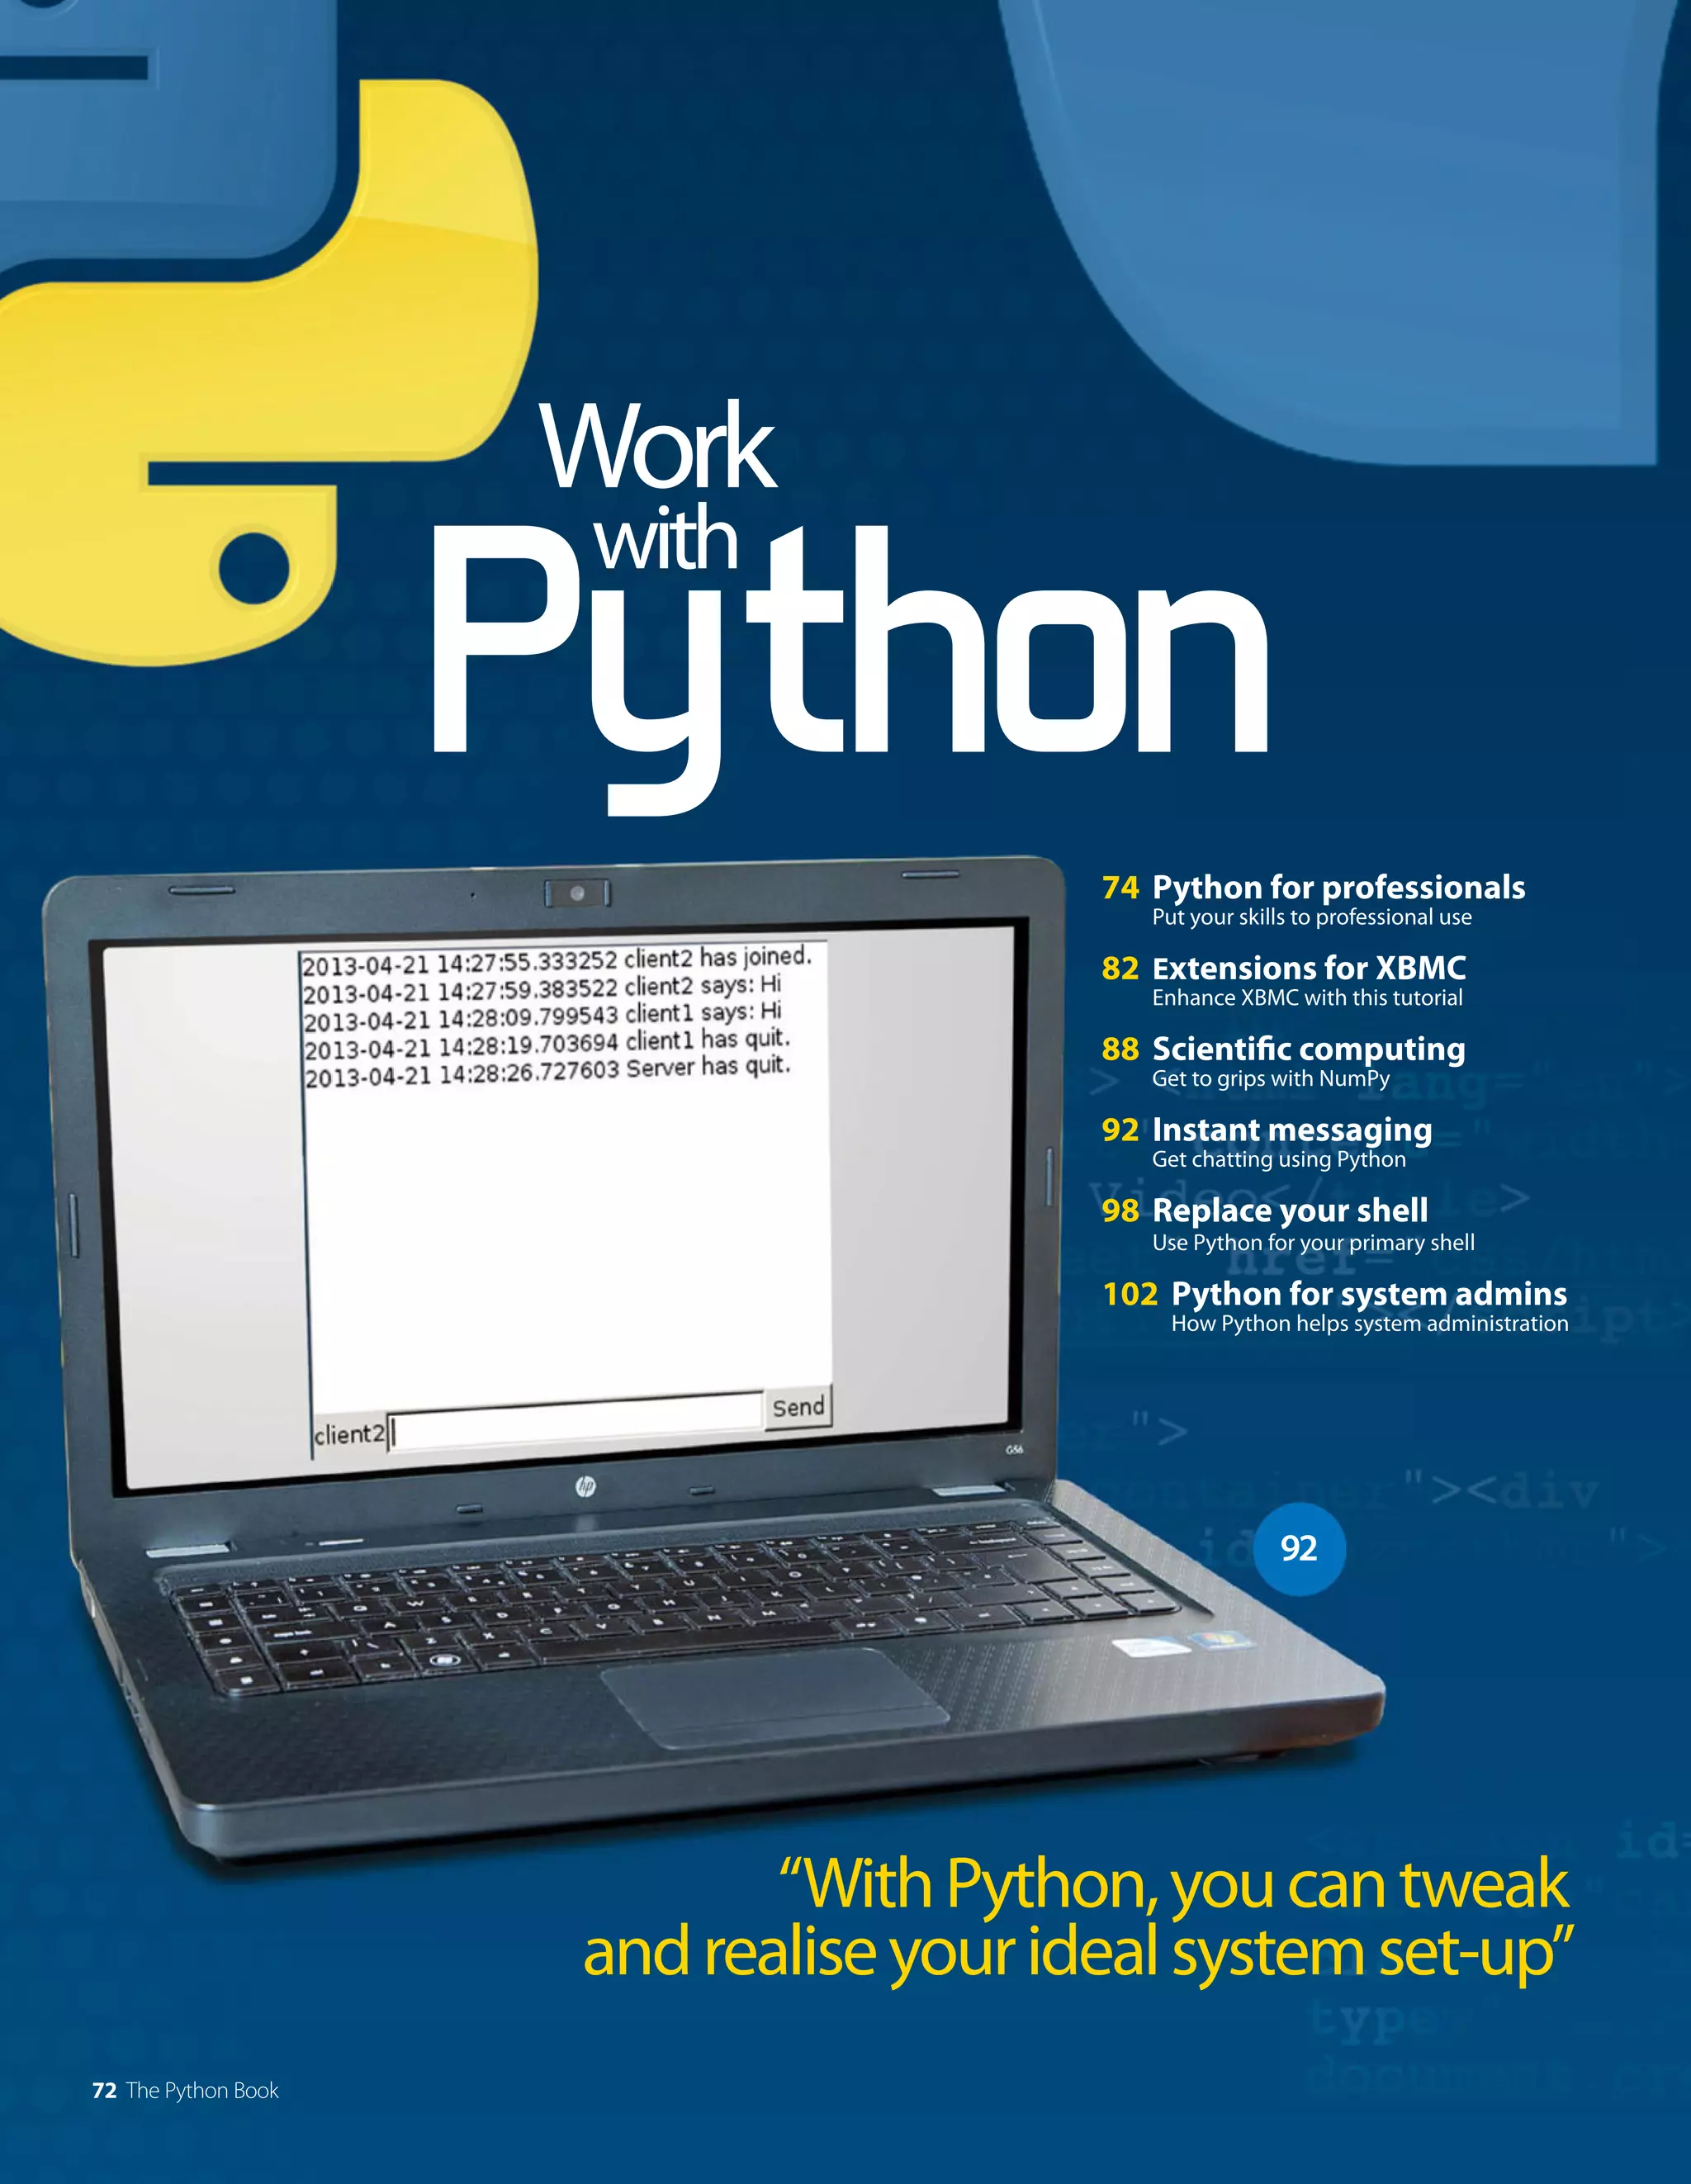

![The Python Book 75
Work with Python
Systemadministration
System administration tasks are some of the most
annoying things that you need to deal with when you
have to maintain your own system. Because of this,
system administrators have constantly been trying to find
ways to automate these types of tasks to maximise their
time.Theystartedwithbasicshellscripts,andthenmoved
on to various scripting languages. For a long time, Perl had
been the language of choice for developing these types
of maintenance tools. However, Python is now growing in
popularity as the language to use. It has reached the point
where most Linux distributions have a Python interpreter
included in order to run system scripts, so you shouldn’t
haveanyexcusefornotwritingyourownscripts.
Because you will be doing a lot system level work, you
will have most need of a couple of key Python modules.
The first module is ‘os’. This module provides the bulk of
the interfaces to interacting with the underlying system.
The usual first step is to look at the environment your
script is running in to see what information might exist
there to help guide your script. The following code gives
you a mapping object where you can interact with the
environmentvariablesactiverightnow:
import os
os.environ
You can get a list of the available environment variables
with the function “os.environs.keys()”, and then access
individual variables with “os.environs[key]”. These
environment variables are used when you spawn a
subprocess, as well. So you will want to change values,
like the PATH or the current working directory, in order
for you to run these subprocesses correctly. While there
is a “putenv” function that edits these values for you, it
unfortunately does not exist on all systems. So the better
way to do this is to edit the values directly within the
environsmapping.
Another category of tasks you may want to automate
is when working with files. For example, you can get the
currentworkingdirectorywithcodelike
cwd = os.getcwd()
Youcanthengetalistofthefilesinthisdirectorywith
os.listdir(cwd)
You can move around the file system with the function
“os.chdir(new_path)”. Once you’ve found the file you are
interested in, you can open it with “os.open()” and open it
for reading, writing and/or appending. You can then read
or write to it with the functions “os.read()” and “os.write()”.
Oncedone,youcanclosethefilewith“os.close()”.
Left Pythonscripts
enableyoutoinstruct
andinteractwithyour
operatingsystem
GetthemostoutofPythoninhandlingalloftheday-to-day
upkeepthatkeepsyoursystemhealthy
RunningsubprocessesfromPython
The underlying philosophy of Unix is to build small, specialised
programs that do one job extremely well. You then chain these
together to build more complex behaviours. There is no reason
why you shouldn’t use the same philosophy within your Python
scripts. There are several utility programs available to use with
very little work on your part. The older way of handling this was
through using functions like “popen()” and “spawnl()” from the
os module, but a better way of running other programs is by
using the subprocess module instead. You can then launch a
program, like ls, by using:
import subprocess
subprocess.run([‘ls’
, ‘-l’])
This provides you with a long file listing for the current
directory. The function “run()” was introduced in Python
3.5 and is the suggested way of handling this. If you have an
older version, or if you require more control than that, then
you can employ the underlying “popen()” function that we
mentioned earlier instead. If you want to get the output, you
can use the following:
cmd_output = subprocess.run([‘ls’
, ‘-l’],
stdout=subprocess.PIPE)
The variable “cmd_output” is a CompletedProcess object that
containsthereturncodeandastringholdingthestdoutoutput.
SYSTEMADMINISTRATION
BASH,PERL,PYTHON
OPERATINGSYSTEM
CPU FILES/IO
Onceyouhaveyourscript
allwrittenup,youmaywant
toschedulethemtorun
automaticallywithoutyour
intervention.OnUnixsystems,
youcanhavecronrunyour
scriptonwhateverschedule
isnecessary.Theutility
“crontab-l”liststhecurrent
contentsofyourcronfile,and
“crontab-e”letsyoueditthe
scheduledjobsthatyouwant
crontorun.
Scheduling
withcron](https://image.slidesharecdn.com/thepythonbooktheultimateguidetocodingwithpythonpdfdrive-220527060944-728dd1fe/75/The-Python-Book_-The-ultimate-guide-to-coding-with-Python-PDFDrive-pdf-75-2048.jpg)
![76 The Python Book
Work with Python
With the content and the bulk of the computing hosted
on a server, a web application can better guarantee
a consistent experience for the end user. The popular
Django framework provides a very complete environment
of plugins and works on the DRY principle (Don’t Repeat
Yourself). Because of this, you should be able to build
your web application very quickly. Since Django is built
on Python, you should be able to install it with “sudo pip
install Django”. Most distributions should have a package
for Django, too. Depending on what you want to do with
your app, you may need to install a database like MySQL or
postgresqltostoreyourapplicationdata.
There are Django utilities available to automatically
generateastartingpointforyournewproject’scode:
django-admin startproject newsite
This command creates a file named “manage.py” and
a subdirectory named “newsite”. The file “manage.py”
contains several utility functions you can use to administer
your new application. The newly created subdirectory
contains the files “__init__.py”, “settings.py”, “urls.py” and
“wsgi.py”. These files and the subdirectory they reside in
comprise a Python package that gets loaded when your
web site is started up. The core configuration for your site
can be found in the file “settings.py”. The URL declarations,
basically a table of contents for your site, are stored in the
file “urls.py”. The file “wsgi.py” contains an entry point for
WSGI-compatiblewebservers.
Once your application is done, it should be hosted on a
properly configured and hardened web server. But, this is
inconvenient if you are in the process of developing your
web application. To help you out, Django has a web server
built into the framework. You can start it up by changing
directory to the “newsite” project directory and running the
followingcommand:
Left Pythoninterpreterswork
withyourdatabasestopowera
webserver
Bottom TheModel-View-
Controllerarchitectureisoften
usedforUIs
python manage.py runserver
This will start up a server listening to port 8000 on your
local machine. Because this built in server is designed to
be used for development, it automatically reloads your
Python code for each request. This means that you don’t
needtorestarttheservertoseeyourcodechanges.
All of these steps get you to a working project. You are
now ready to start developing your applications. Within the
“newsite”subdirectory,youcantype:
python manage.py startapp newapp
This will create a new subdirectory named “newapp”, with
the files “models.py”, “tests.py” and “views.py”, among
others.Thesimplestpossibleviewconsistsofthecode:
from django.http import HttpResponse
def index(request):
return HttpResponse(“Hello world”)
This isn’t enough to make it available, however. You will
also need to create a URLconf for the view. If the file
“urls.py”doesn’texistyet,createitandthenaddthecode:
from django.conf.urls import url
from . Import views
urlpatterns = [ url(r’^$’
, views.index,
name=‘index’), ]
The last step is to get the URL registered within your
project.Youcandothiswiththecode
from django.conf.urls import include, url
from django.contrib import admin
urlpatterns = [ url(r’^newapp/’
, include(‘newapp.
urls’)
),
Webdevelopment
Pythonhas several frameworksavailable forallofyour
variouswebdevelopmenttasks. Wewilllook at someofthe
morepopularones
Whenyoustartdeveloping
yourownapplications,you
maybeginadescentinto
dependencyhell.Several
Pythonpackagesdepend
onotherPythonpackages.
Thisisitsstrength,butalso
itsweakness.Luckily,you
havevirtualenvavailable
tohelptamethisjungle.
Youcancreatenewvirtual
environmentsforeachofyour
projects.Thankfullywiththis,
youcanbesuretocaptureall
ofthedependenciesforyour
ownpackage.
Virtual
environments
USER
WEBSERVER
DATABASE
PYTHON
INTERPRETER
MODEL
USER
VIEW CONTROLLER
Manipulates
Sees
Updates
Uses](https://image.slidesharecdn.com/thepythonbooktheultimateguidetocodingwithpythonpdfdrive-220527060944-728dd1fe/75/The-Python-Book_-The-ultimate-guide-to-coding-with-Python-PDFDrive-pdf-76-2048.jpg)
![The Python Book 77
Work with Python
url(r’^admin’
, admin.site.urls), ]
This needs to be put in the “urls.py” file for the main
project. You can now pull up your newly created
applicationwiththeURLhttp://localhost:8000/newapp/.
The last part of many applications is the database
side. The actual connection details to the database, like
the username and password, are contained in the file
“settings.py”. This connection information is used for
all of the applications that exist within the same project.
You can create the core database tables for your site with
thiscommand:
python manage.py migrate
For your own applications, you can define the data model
you need within the file “models.py”. Once the data
model is created, you can add your application to the
INSTALLED_APPS section of the “settings.py” so that
django knows to include it in any database activity. You
initializeitwith:
python manage.py makemigrations newapp
Once these migrations have been created, you need to
applythemtothedatabasebyusingthecommand:
python manage.py migrate
Any time you make changes to your model, you will need to
runthemakemigrationsandmigratestepsagain.
Once you have your application finished, you can make
the move to the final hosting server. Don’t forget to check
the available code within the Django framework before
puttingtoomuchworkintodevelopingyourowncode.
UsingthePyCharmIDE
THEEDITORPANE
Themaineditorpanecanbeconfiguredtomatchyour
ownstyle,orthestyleofoneoftheothermaineditors,
likeemacs.Ithandlessyntaxhighlighting,andeven
displayserrorlocations
THEPROJECTPANE
Thispaneisthecentrallocationforyourproject.Allof
yourfilesandlibrariesarelocatedhere.Right-clicking
inthepanebringsupadrop-downmenuwhereyoucan
addnewfilesorlibraries,rununittests,orevenstartup
adebugger
THESTATUSBARE
PyCharmdoesalotofworkbehindthescenes.
Thestatusbarhelpsyoukeeptrackofallofthese
backgroundprocesses
OtherPython
frameworks
WhileDjangoisoneofthemostpopularframeworksaround
fordoingwebdevelopment,itisbynomeanstheonlyone
around.Thereareseveralothersavailablethatmayproveto
beabetterfitforparticularproblemdomains.Forexample,
ifyouarelookingforareallyself-containedframework,you
couldlookatweb2py.Everythingyouneedtobeabletohave
acompletesystem,fromdatabasestowebserverstoa
ticketingsystem,areincludedaspartoftheframework.Itis
soself-containedthatitcanevenrunfromaUSBdrive
Ifyouneedevenlessofaframework,thereareseveral
mini-frameworksthatareavailable.Forexample,CherryPy
isapurelyPythonicmulti-threadedwebserverthatyou
canembedwithinyourownapplication.Thisisactually
theserverincludedwithTurboGearsandweb2py.Areally
popularmicroframeworkisaprojectcalledflask.Itincludes
integratedunittestingsupport,jinja2templatingandRESTful
requestdispatching.
Oneoftheoldestframeworksaroundiszope,nowupto
version3.ThislatestversionwasrenamedBlueBream.Zope
isfairlylow-level,however.Youmaybemoreinterestedin
lookingatsomeoftheotherframeworksthatarebuilton
topofwhatisprovidedbyzope.Forexample,pyramidisa
veryfast,easytouseframeworkthatfocusesonthemost
essentialfunctionsrequiredbymostwebapplications.To
thisend,itprovidestemplating,theservingofstaticcontent,
mappingofURLstocode,amongotherfunctions.Ithandles
thiswhileprovidingtoolsforapplicationsecurity.
Ifyouarelookingforsomeideas,thereareseveralopen
sourceprojectsthathavebeenbuiltusingtheseframeworks,
fromblogs,toforumstoticketingsystems.Theseprojectscan
providesomebest-practiceswhenyougotoconstructyour
ownapplication.
Whenyouareinthemiddleof
developingyourapplication,
youmayneedtohaveseveral
differentterminalwindows
openinordertohaveacode
editoropen,amonitoronthe
server,andpotentiallytesting
output.Ifyouaredoingthison
yourownmachine,thisisn’tan
issue.But,ifyouareworking
remotely,youshouldlookinto
usingtmux.Itcanprovidea
muchmorerobustterminal
environmentforyou.
Terminal
development
environments](https://image.slidesharecdn.com/thepythonbooktheultimateguidetocodingwithpythonpdfdrive-220527060944-728dd1fe/75/The-Python-Book_-The-ultimate-guide-to-coding-with-Python-PDFDrive-pdf-77-2048.jpg)
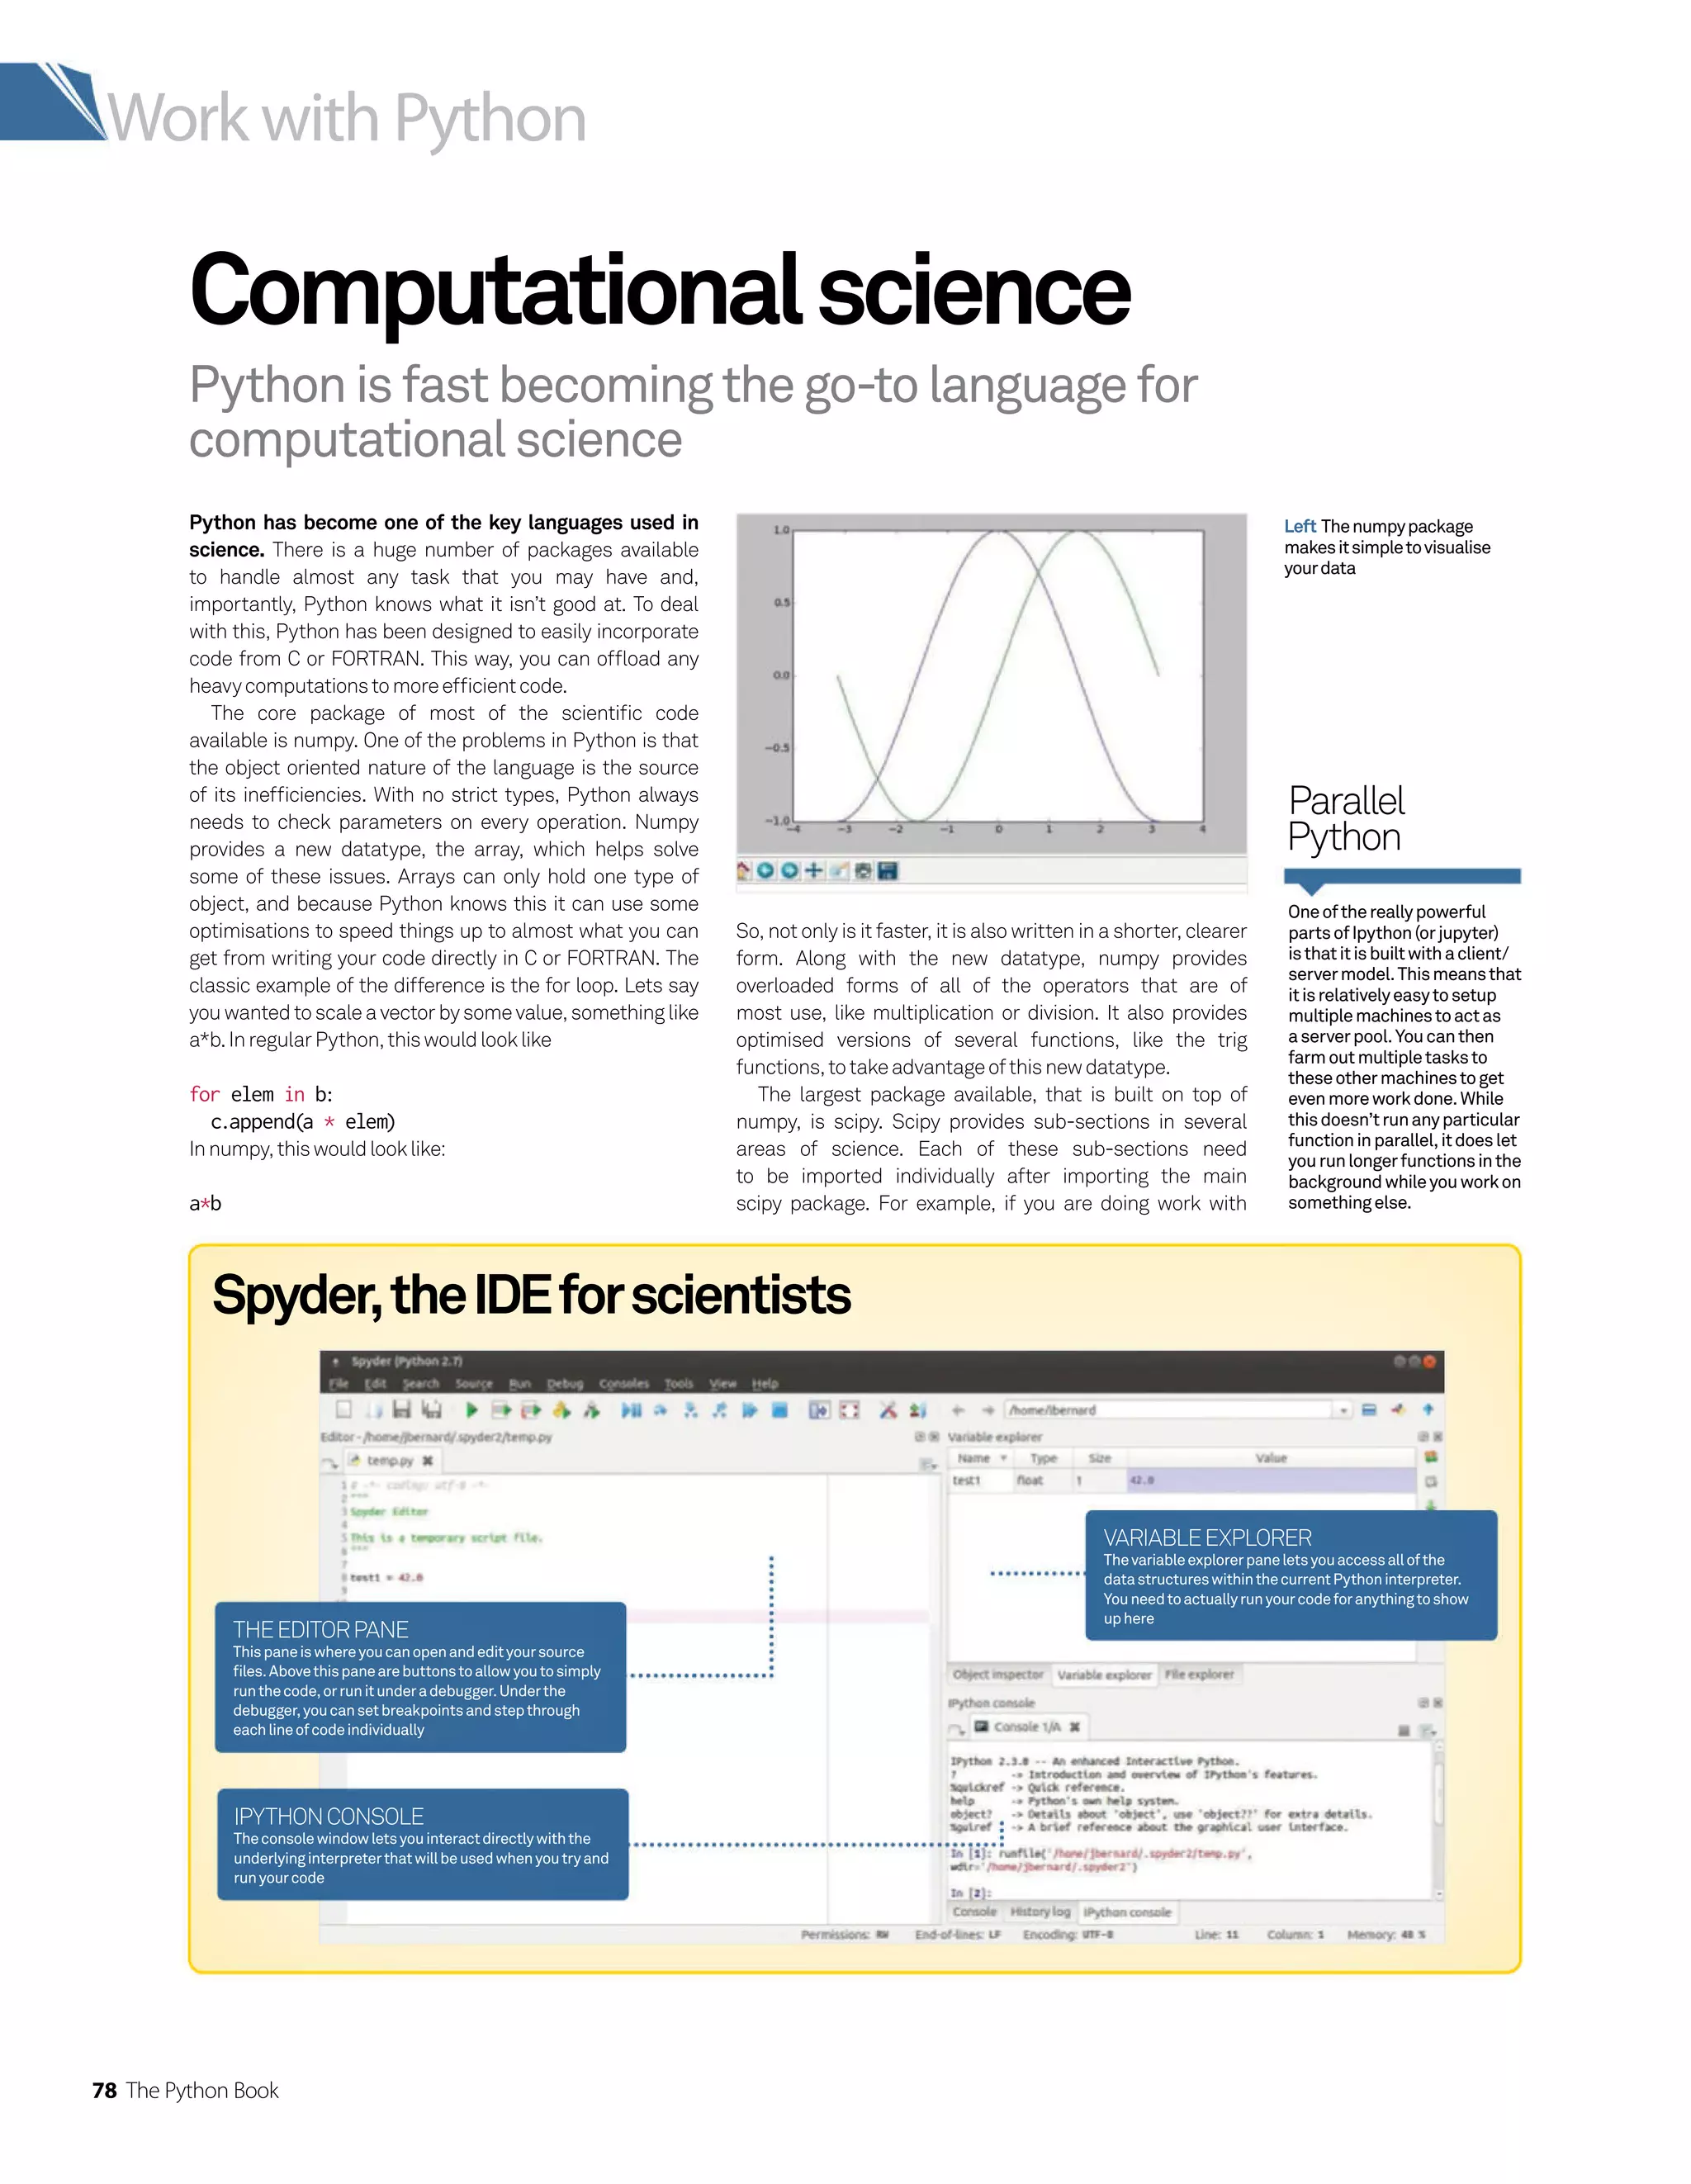
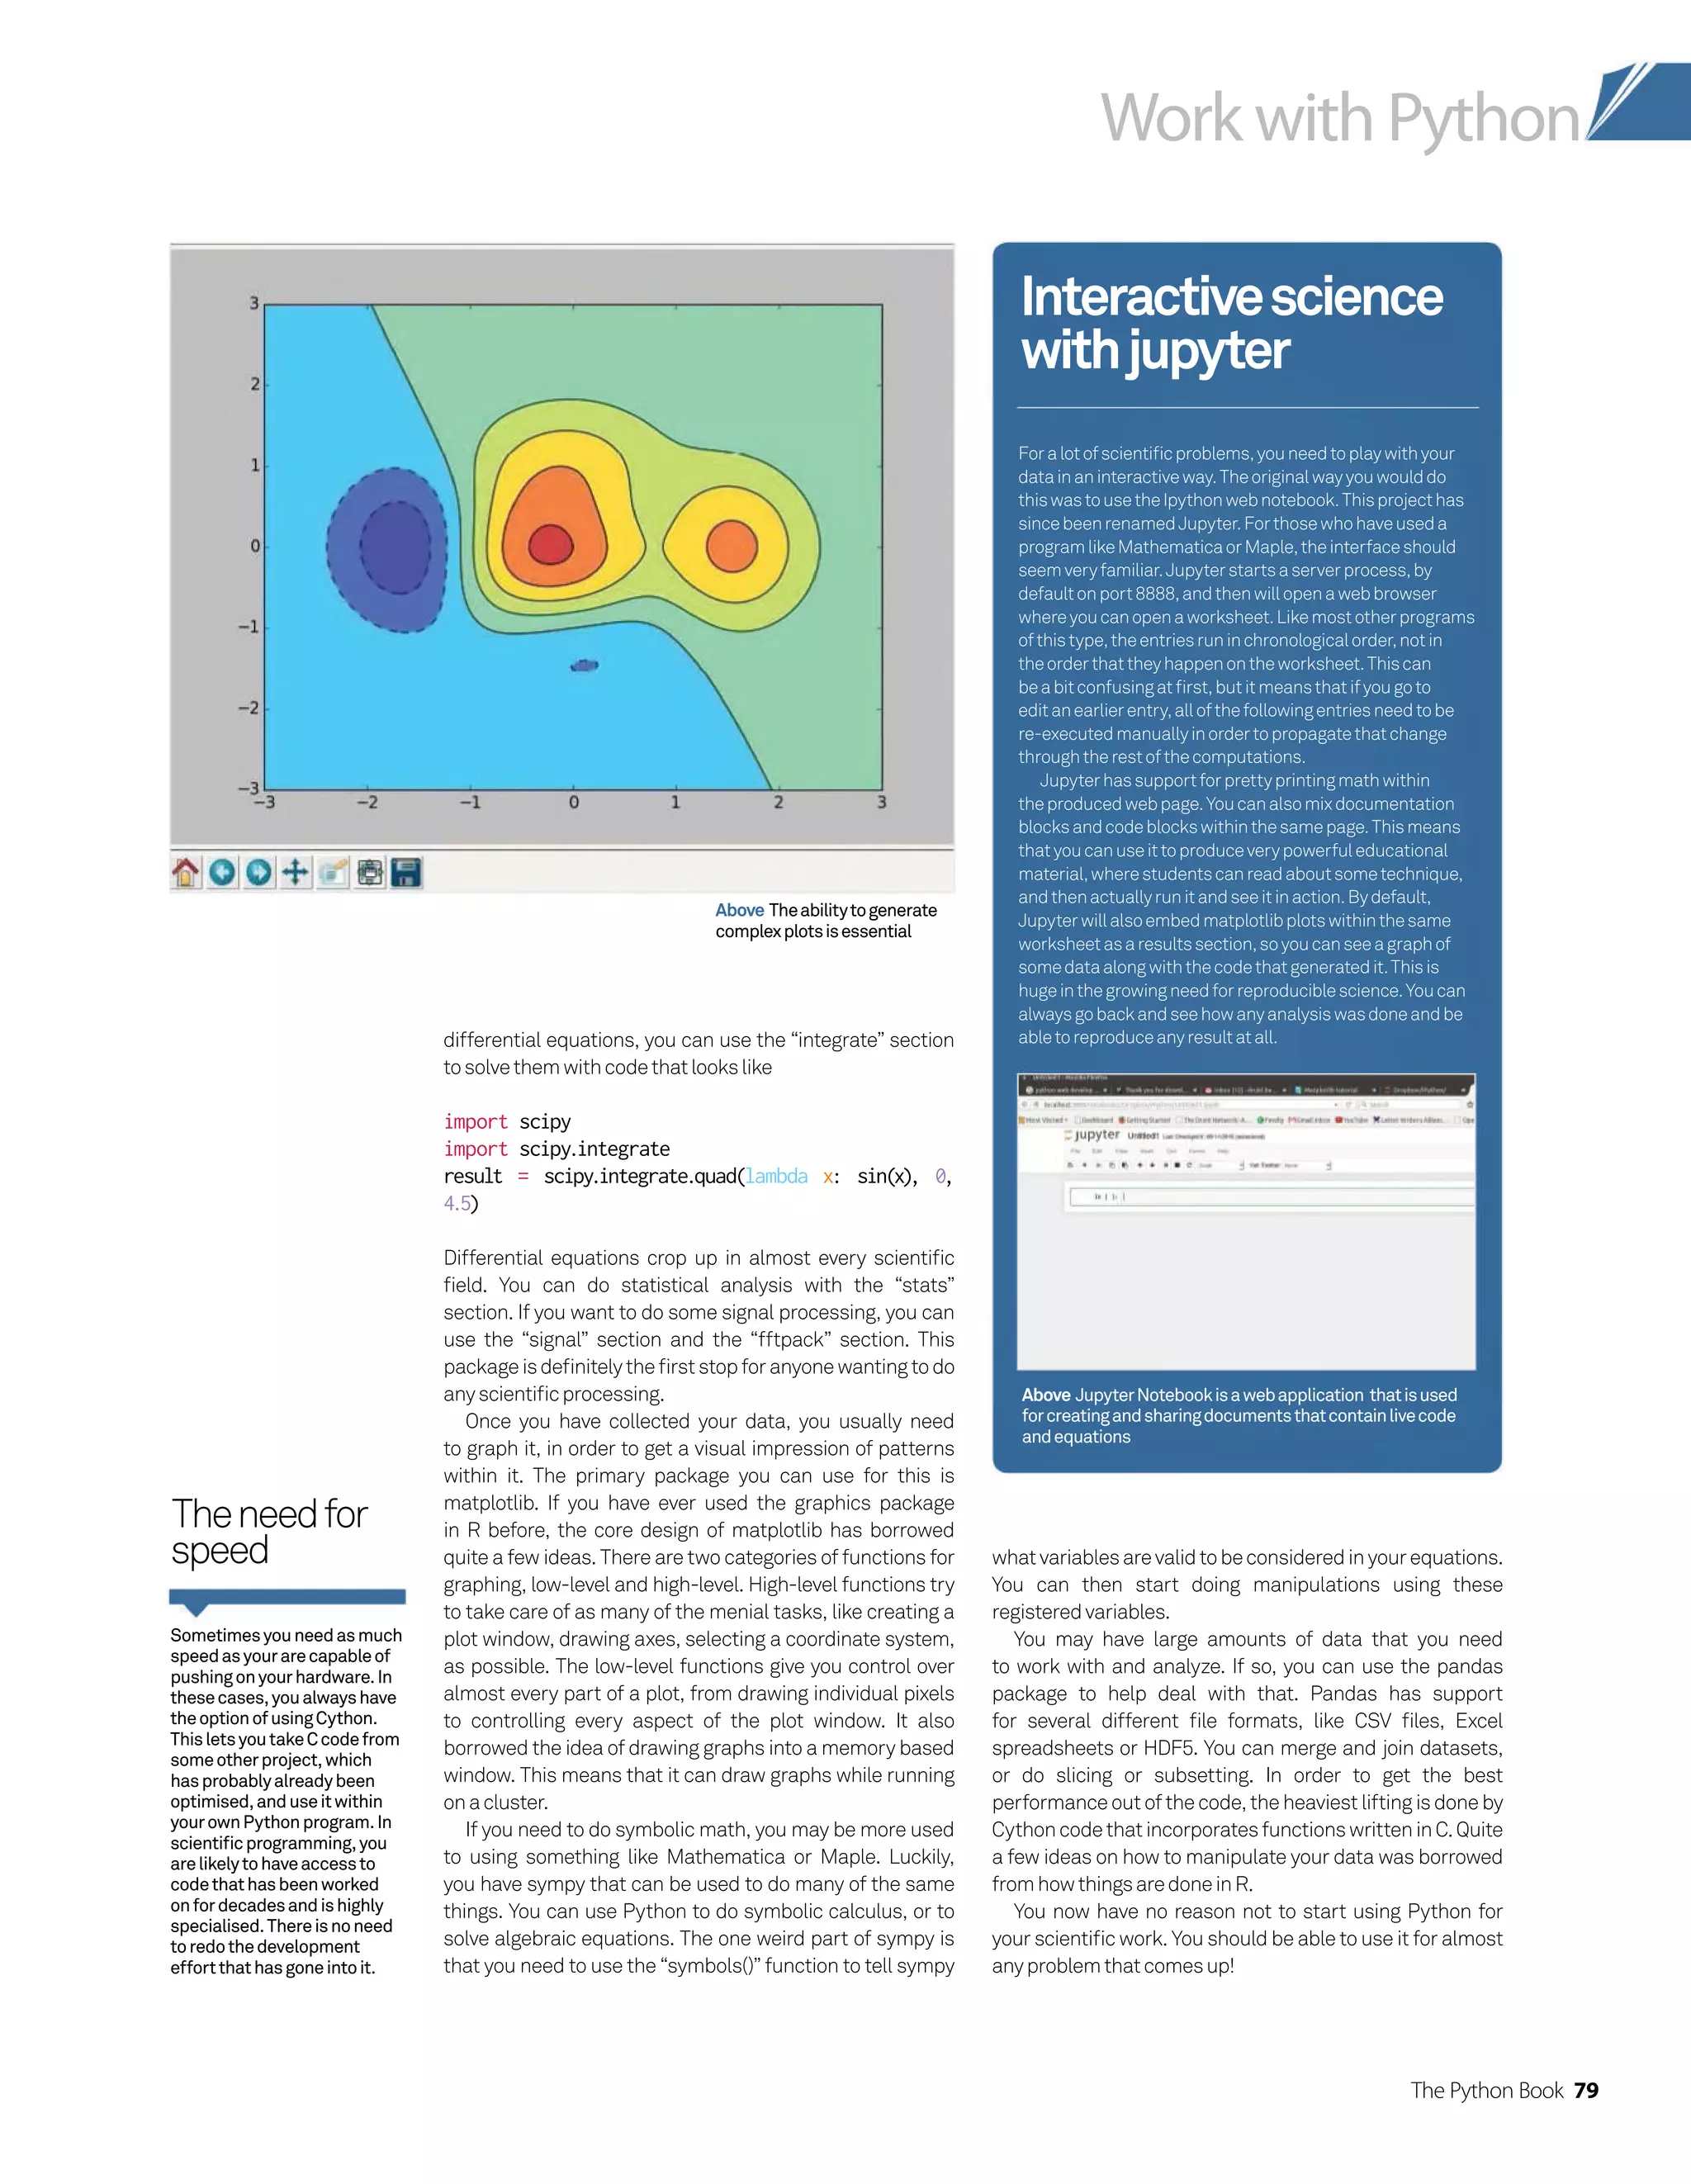
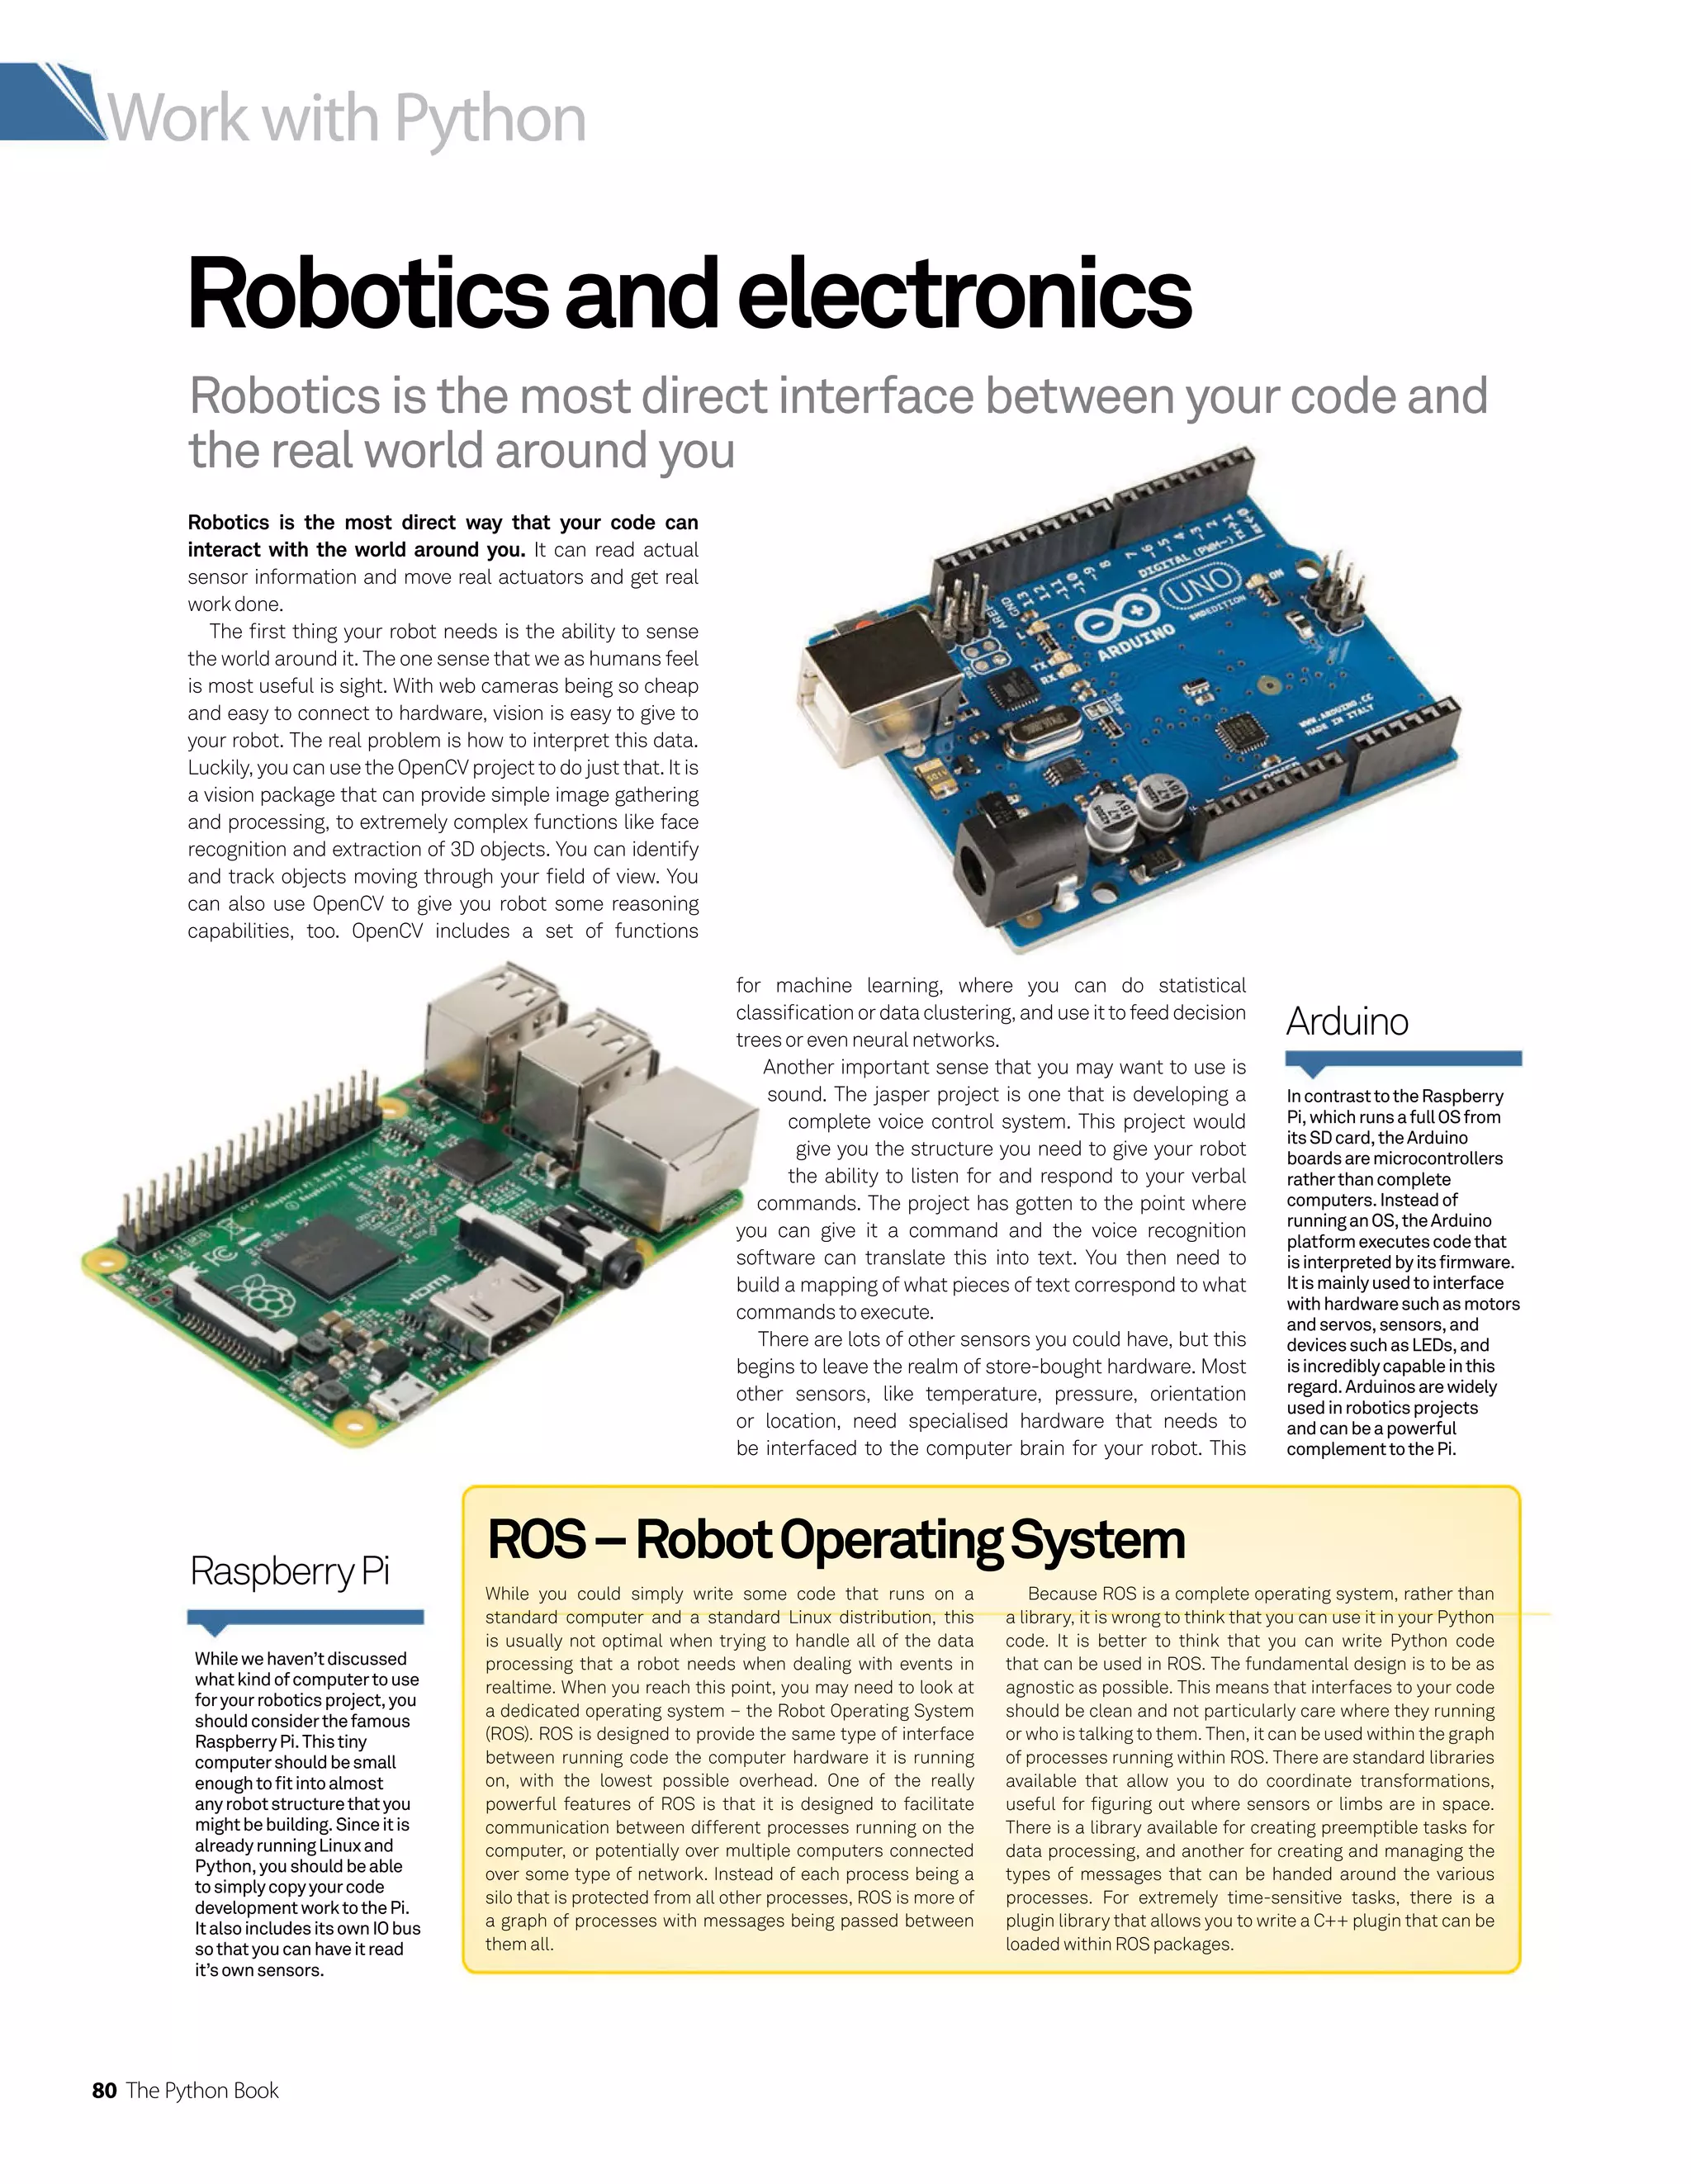
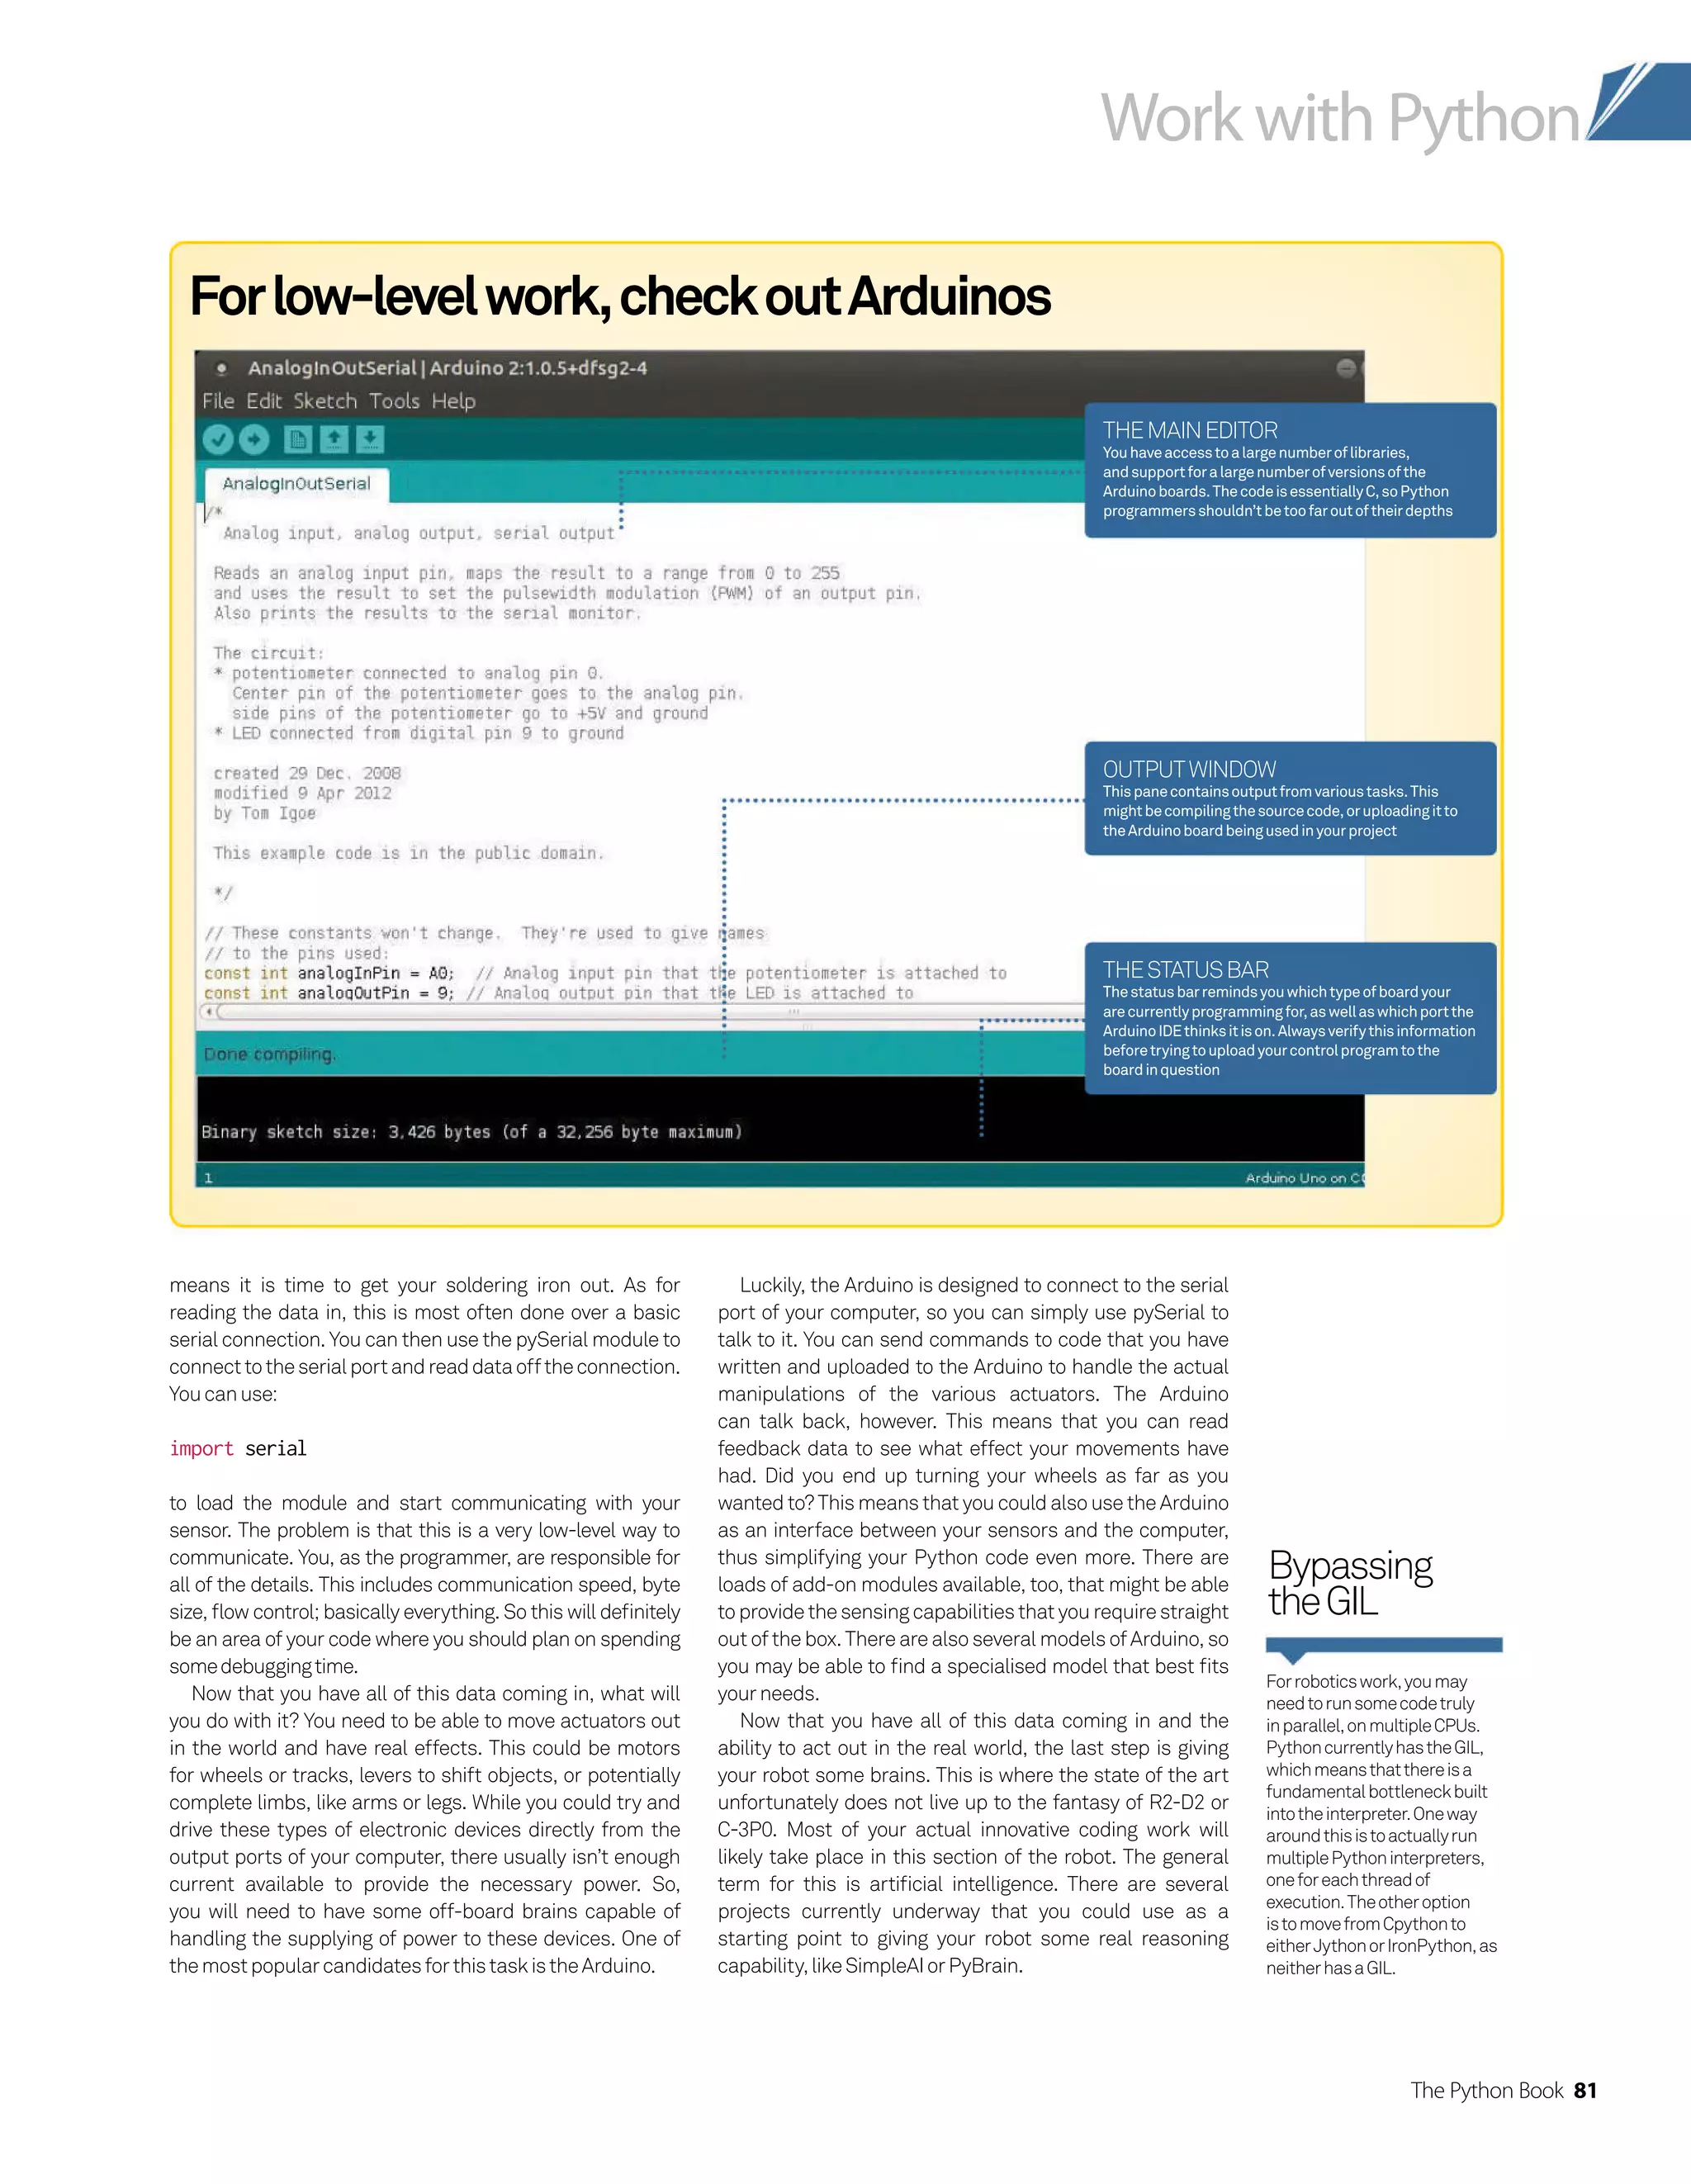

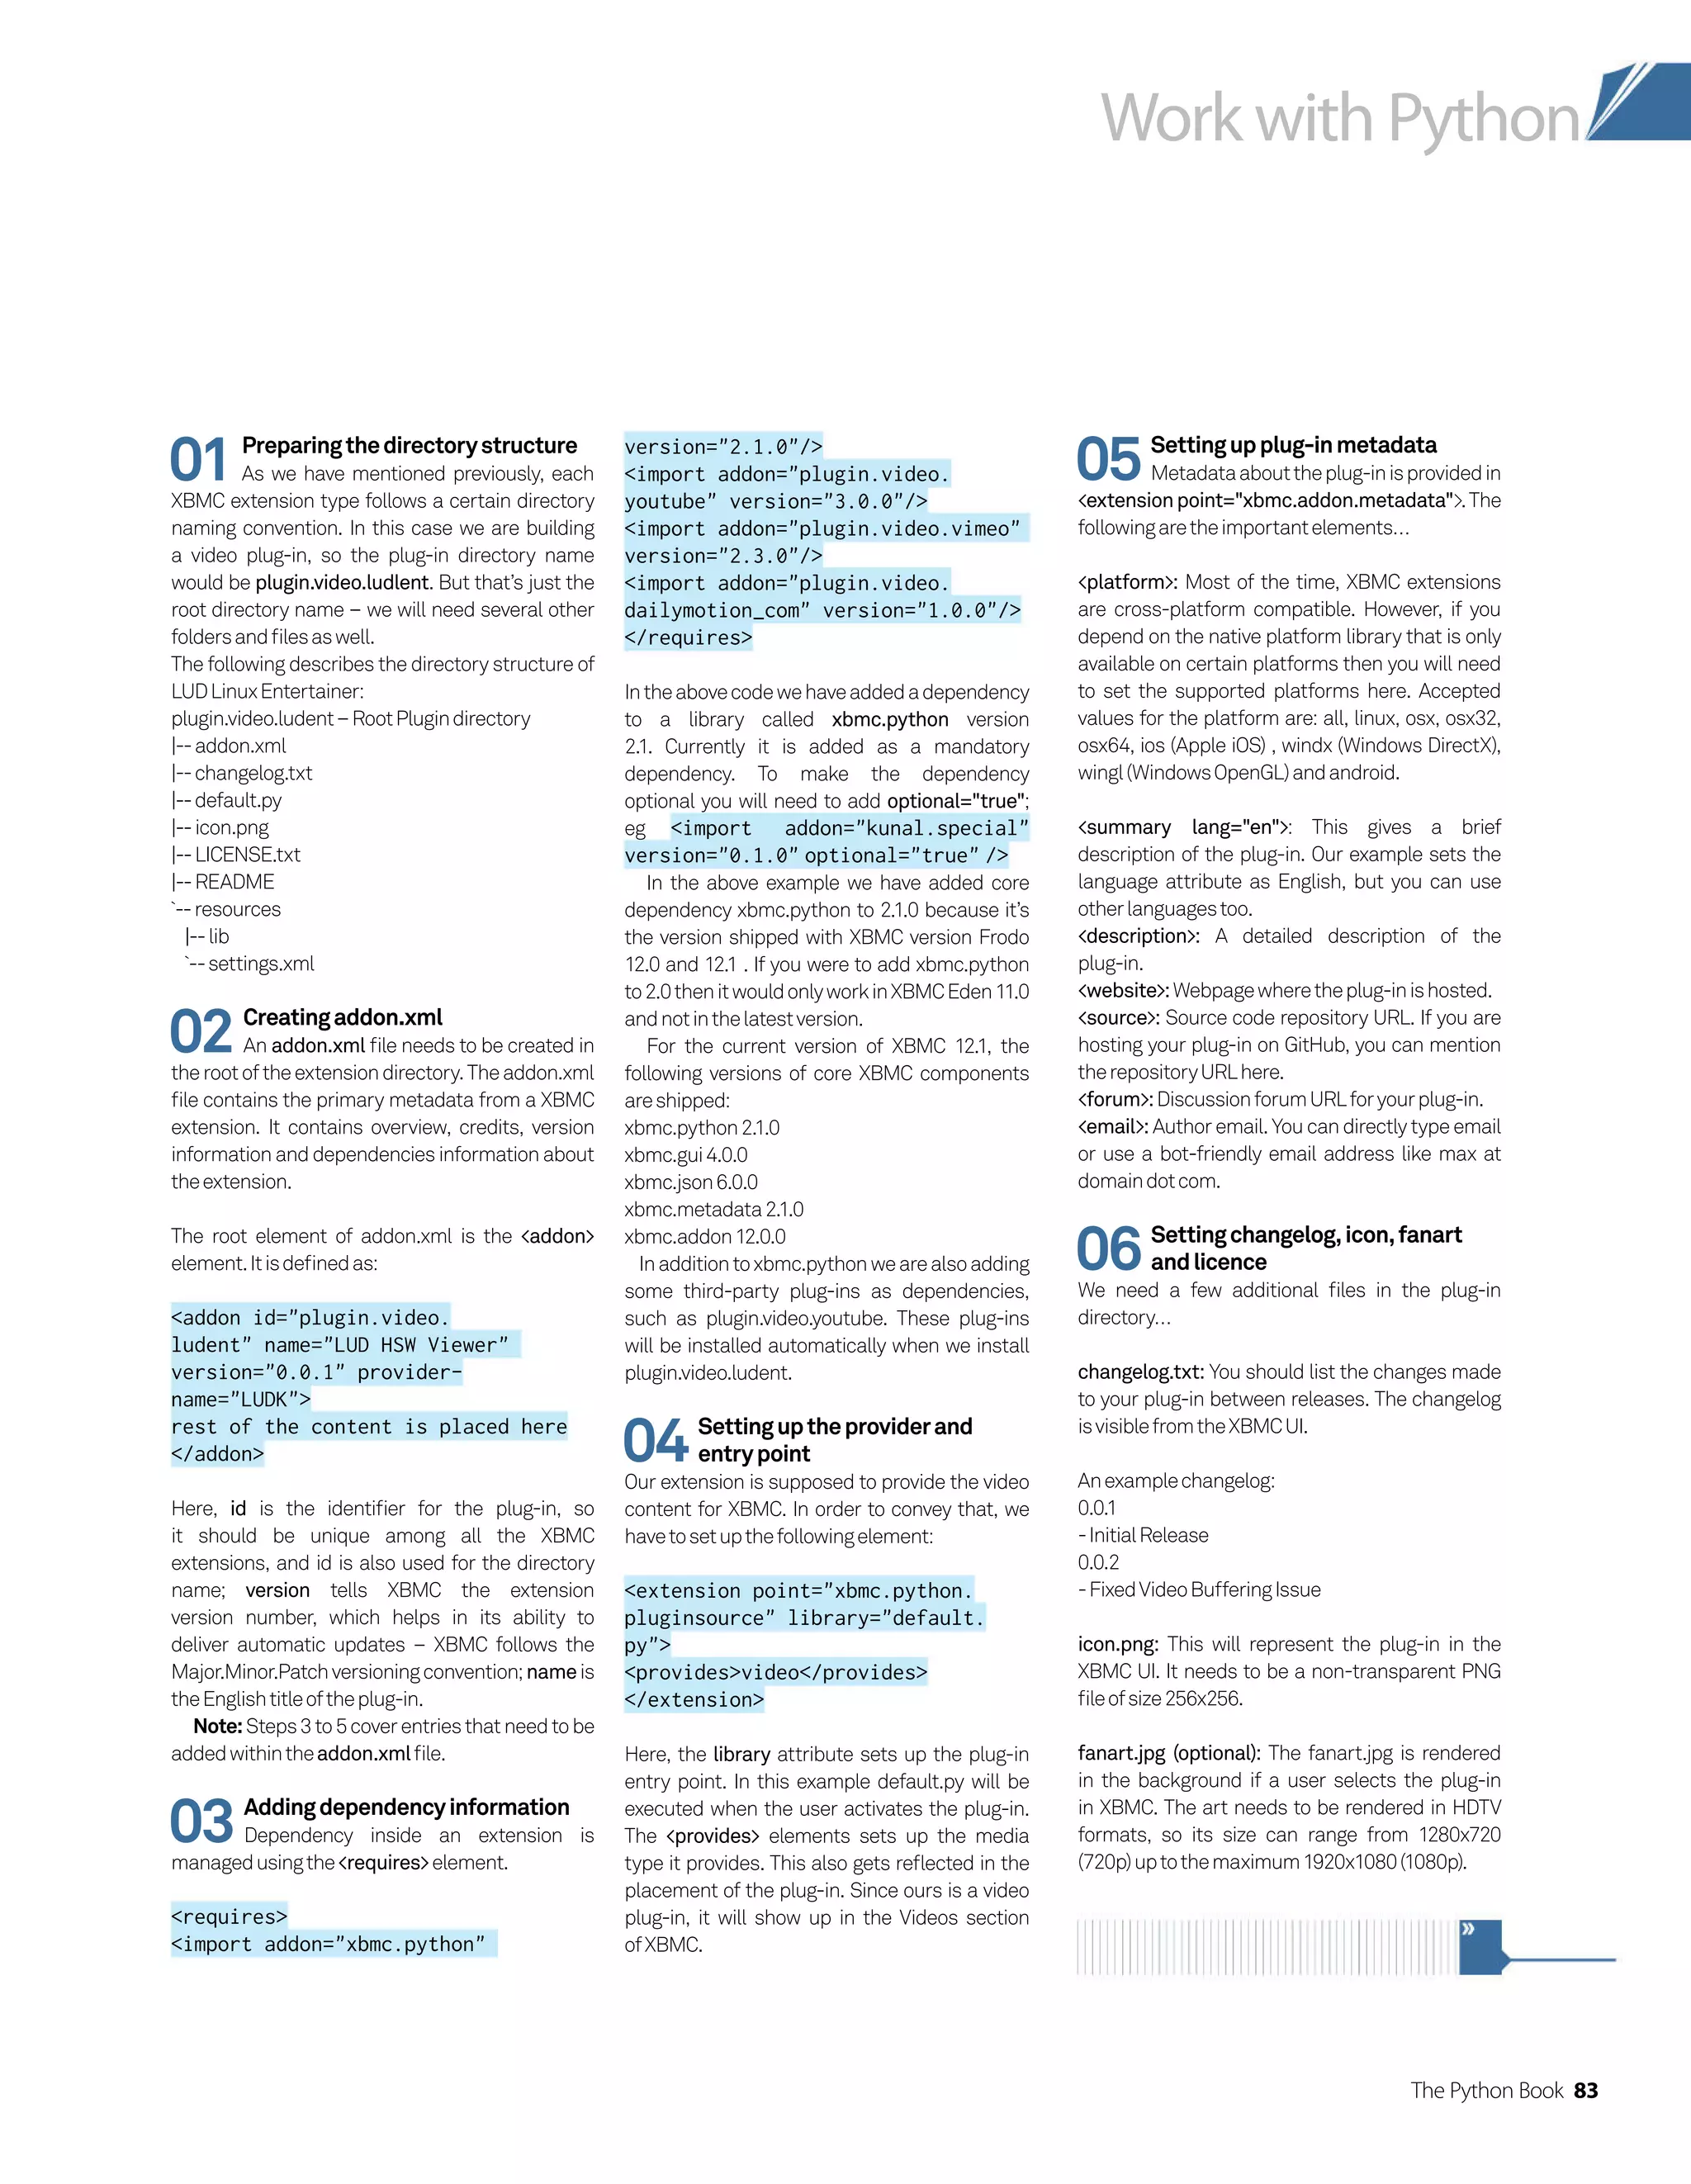
![84 The Python Book
Work with Python
License.txt: This file contains the licence of
the distributed plug-in. The XBMC project
recommends the use of the Creative Commons
Attribution-ShareAlike 3.0 licence for skins,
and GPL 2.0 for add-ons. However, most of the
copyleftlicencescanbeused.
Note: For the purpose of packaging, extensions/
add-ons/themes/plug-insarethesame.
07Providingsettingsfortheplug-in
Settings can be provided by the file
resources/settings.xml.Thesearegreatforuser-
configurableoptions.
Partial:resources/settings.xml
settings
category label=30109
setting id=filter type=bool
label=30101 default=false/
setting type=sep /
setting id=showAll type=bool
label=30106 default=false/
setting id=showUnwatched
type=bool label=30107
default=true/
setting id=showUnfinished
type=bool label=30108
default=false/
setting type=sep /
setting id=forceViewMode
type=bool label=30102
default=true/
setting id=viewMode type=number
label=30103 default=504/
/category
category label=30110
setting id=cat_hot type=bool
label=30002 default=true/
setting id=cat_new type=bool
label=30003 default=true/
/category
/settings
Here, label defines the language id string which
will then be used to display the label. id defines
the name which will be used for programmatic
access. type defines the data type you want
to collect; it also affects the UI which will be
displayed for the element. default defines the
default value for the setting. You should always
useadefaultvaluewhereverpossibletoprovidea
betteruserexperience.
The following are a few important settings
typesthatyoucanuse…
text:Usedforbasicstringinputs.
ipaddress:Usedtocollectinternetaddresses.
number: Allows you enter a number. XBMC will
also provide an on-screen numeric keyboard for
theinput.
slider: This provides an elegant way to collect
integer, float and percentage values. You can get
theslidersettinginthefollowingformat:
setting label=21223 type=slider
id=sideinput default=10
range=1,1,10 option=int /
Intheaboveexamplewearecreatingasliderwith
min range 1, max range 10 and step as 1. In the
option field we are stating the data type we are
interested in – we can also set option to float
orpercent.
bool: Provides bool selection in the form of on
oroff.
file: Provides a way to input file paths. XBMC will
provideafilebrowsertomaketheselectionoffile.
If you are looking to make selection for a specific
type of file you can use audio, video, image or
executableinsteadoffile.
folder:Providesawaytobrowseforafolder…
Example:
setting label=12001 type=folder
id=folder source=auto
option=writeable/
Here, source sets the start location for the
folder, while option sets the write parameter for
theapplication.
sep lsep: sep is used to draw a horizontal line
in the setting dialog; lsep is used for drawing
a horizontal line with text. They do not collect
any input but are there for building better user
interfaceelements…
setting label=21212 type=lsep
/
08Languagesupport
Language support is provided in
the form of the strings.xml file located in
resources/languages/[language name]. This
approach is very similar to many large software
projects, including Android, where static strings
areneverused.
resource/language/english/string.xml
example:
?xml version=1.0 encoding=utf-8
standalone=yes?
strings
string id=30001Add subreddit/
string
string id=30002Hot/string
string id=30003New/string
string id=30004Top/string
string id=30005Controversial/
string
string id=30006Hour/string
string id=30007Day/string
string id=30008Week/string
string id=30009Month/string
string id=30010Year/string
/strings
As you may have seen in the settings.xml
example, all the labels are referring to string
ids. You can have many other languages as
well. Depending upon the language XBMC is
running in, the correct language file will be
loadedautomatically.
Post XBMC Frodo (12.1), strings.xml will be
deprecated. Post Frodo, XBMC will be moved
to a GNU gettext-based translation system;
gettext uses PO files. You can use a tool called
xbmc-xml2po to convert strings.xml into
equivalentPOfiles.
09Buildingdefault.py
Since our plug-in is small, it will all be
contained inside default.py. If you are developing
a more complex add-on then you can create
supporting files in the same directory. If your
library depends upon third-party libraries, you
have two ways to go about it. You can either place
the third-party libraries into the resources/lib
folder; or bundle the library itself into a plug-in,
then add that plug-in as the dependency in the
addon.xmlfile.
Our plug-in works with reddit.tv. This is the
website from Reddit which contains trending
videos shared by its readers. Videos posted on
Reddit are actually sourced from YouTube, Vimeo
andDailymotion.
We will be starting off default.py using the
followingimports:
import urllib
import urllib2
…
import xbmcplugin](https://image.slidesharecdn.com/thepythonbooktheultimateguidetocodingwithpythonpdfdrive-220527060944-728dd1fe/75/The-Python-Book_-The-ultimate-guide-to-coding-with-Python-PDFDrive-pdf-84-2048.jpg)
![The Python Book 85
Work with Python
import xbmcgui
import xbmcaddon
Apart from xbmcplugin, xbmcgui and
xbmcaddon, the rest are all standard Python
libraries which are available on PyPI (Python
Package Index) via pip. You will not need to install
any library yourself since the Python runtime for
XBMChasallthecomponentsbuiltin.
urllib and urllib2 help in HTTP communication.
socket is used for network I/O; re is used
for regular expression matching; sqlite3 is
the Python module for accessing an SQLite
embedded database; xbmcplugin, xbmcgui and
xbmcaddoncontaintheXBMC-specificroutine.
10Initialising
During the initialisation process, we will
be reading various settings from settings.xml.
Settingscanbereadinthefollowingway:
addon = xbmcaddon.Addon()
filterRating = int(addon.
getSetting(filterRating))
filterVoteThreshold = int(addon.getS
etting(filterVoteThreshold))
Inordertoreadsettingsoftypeboolyouwillneed
todosomethinglike:
filter = addon.getSetting(filter)
== true
We are also setting the main URL, plug-in handle
andtheuseragentforit:
pluginhandle = int(sys.argv[1])
urlMain = http://www.reddit.com
userAgent = Mozilla/5.0 (Windows NT
6.2; WOW64; rv:22.0) Gecko/20100101
Firefox/22.0
opener = urllib2.build_opener()
opener.addheaders = [(‘User-Agent’,
userAgent)]
11Readinglocalisedstrings
As mentioned, XBMC uses strings.xml to
serve up the text. In order to read those strings,
youwillneedtousegetLocalizedString.
translation = addon.
getLocalizedString
translation(30002)
In this example, translation(30002) will
return the string Hot when it is running in an
Englishenvironment.
12Buildinghelperfunctions
In this step we will look at some of the
importanthelperfunctions.
getDbPath(): This returns the location of the
SQLite database file for videos. XBMC stores
library and playback information in SQLite DB
files. There are separate databases for videos
and music, located inside the .xbmc/userdata/
Database folder. We are concerned with the
videosDB.Itisprefixedwith‘MyVideos’…
def getDbPath():
path = xbmc.
translatePath(special://userdata/
Database)
files = os.listdir(path)
latest =
for file in files:
if file[:8] == ‘MyVideos’
and file[-3:] == ‘.db’:
if file latest:
latest = file
return os.path.join(path,
latest)
getPlayCount(url): Once we have the database
location, we can get the play count using a
simple SQL query. The MyVideo database
contains a table called files, which keeps a
record of all the video files played in XBMC by
filename.InthiscaseitwillbeURL.
dbPath = getDbPath()
conn = sqlite3.connect(dbPath)
c = conn.cursor()
def getPlayCount(url):
c.execute(‘SELECT playCount FROM
files WHERE strFilename=?’, [url])
result = c.fetchone()
if result:
result = result[0]
if result:
return int(result)
return 0
return -1
Theabovetableisanexampleofafilestable.
addSubreddit(): Our plug-in allows users to add
their own Subreddit. This function takes the
Subreddit input from the user, then saves it in
thesubredditsfileinsidetheaddondatafolder.
Thefollowingsetsthesubredditsfilelocation:
subredditsFile = xbmc.
translatePath(special://profile/
addon_data/+addonID+/subreddits)
this translates into .xbmc/userdata/
addon_data/plugin.video.ludent/
subreddits
def addSubreddit():
keyboard = xbmc.Keyboard(‘’,
translation(30001))
keyboard.doModal()
if keyboard.isConfirmed() and
keyboard.getText():
subreddit = keyboard.
getText()
fh = open(subredditsFile,
‘a’)
fh.write(subreddit+’n’)
fh.close()
This function also demonstrates how to take
a text input from the user. Here we are calling
the Keyboard function with a text title. Once it
detects the keyboard, it writes the input in the
subredditsfilewithanewlinecharacter.
getYoutubeUrl(id): When we locate a YouTube
URL to play, we pass it on to the YouTube plug-in
(plugin.video.youtube) to handle the playback. To
doso,weneedtocallitinacertainformat…
def getYoutubeUrl(id):
url = plugin://plugin.
video.youtube/?path=/root/
videoaction=play_videovideoid= +
id
return url
idFile idPath strFilename playCount lastPlayed dateAdded
1 1 plugin://plugin. 2013-08-0623:47
2 2 plugin://plugin. 1 2013-08-0722:42
3 2 plugin://plugin. 1 2013-08-0800:09
4 2 plugin://plugin. 1 2013-08-0800:55
5 2 plugin://plugin. 1 2013-08-0800:58](https://image.slidesharecdn.com/thepythonbooktheultimateguidetocodingwithpythonpdfdrive-220527060944-728dd1fe/75/The-Python-Book_-The-ultimate-guide-to-coding-with-Python-PDFDrive-pdf-85-2048.jpg)
![86 The Python Book
Work with Python
SimilarlyforVimeo:
def getVimeoUrl(id):
url = plugin://plugin.video.
vimeo/?path=/root/videoaction=play_
videovideoid= + id
return url
AndforDailymotion:
def getDailyMotionUrl(id):
url = plugin://plugin.video.
dailymotion_com/?url= + id +
mode=playVideo
return url
Once we have the video URL resolved into the
respectiveplug-in,playingitisverysimple:
def playVideo(url):
listitem = xbmcgui.
ListItem(path=url)
xbmcplugin.
setResolvedUrl(pluginhandle, True,
listitem)
13Populatingplug-incontentlisting
xbmcplugin contains various routines
for handling the content listing inside the
plug-ins UI. The first step is to create directory
entries which can be selected from the XBMC
UI. For this we will use a function called
xbmcplugin.addDirectoryItem.
For our convenience we will be abstracting
addDirectoryItem to suit it to our purpose, so
that we can set name, URL, mode, icon image
andtypeeasily.
def addDir(name, url, mode,
iconimage, type=):
u = sys.argv[0]+?url=+urllib.
quote_plus(url)+mode=+str(mode)+
type=+str(type)
ok = True
liz = xbmcgui.ListItem(name,
iconImage=DefaultFolder.png,
thumbnailImage=iconimage)
liz.setInfo(type=Video,
infoLabels={Title: name})
ok = xbmcplugin.
addDirectoryItem(handle=int(sys.
argv[1]), url=u, listitem=liz,
isFolder=True)
return ok
On the same lines, we can build a function to
placelinksaswell…
def addLink(name, url, mode,
iconimage, description, date):
u = sys.argv[0]+?url=+urllib.
quote_plus(url)+mode=+str(mode)
ok = True
liz = xbmcgui.ListItem(name,
iconImage=DefaultVideo.png,
thumbnailImage=iconimage)
liz.setInfo(type=Video,
infoLabels={Title: name, Plot:
description, Aired: date})
liz.setProperty(‘IsPlayable’,
‘true’)
ok = xbmcplugin.
addDirectoryItem(handle=int(sys.
argv[1]), url=u, listitem=liz)
return ok
Based on the abstractions we have just created,
we can create the base functions which will
populate the content. But before we do that,
let’s first understand how Reddit works. Most of
the Reddit content filters are provided through
something called Subreddits. This allows you to
view discussions related to a particular topic. In
our plug-in we are interested in showing videos;
we also want to show trailers, documentaries
etc. We access these using Subreddits. For
example, for trailers it would be reddit.com/r/
trailers. For domains we can use /domain; for
example, to get all the YouTube videos posted
on Reddit, we will call reddit.com/domain/
youtube.com. Now you may ask what is the
guarantee that this Subreddit will only list
videos? The answer is that it may not. For that
reason we scrape the site ourselves to find
videos.Moreonthisinthenextstep.
The first base function we’ll define is index().
Thisiscalledwhentheuserstartstheplug-in.
def index():
defaultEntries = [videos,
trailers, documentaries,
music]
entries = defaultEntries[:]
if os.path.
exists(subredditsFile):
fh = open(subredditsFile,
‘r’)
content = fh.read()
fh.close()
spl = content.split(‘n’)
for i in range(0, len(spl),
1):
if spl[i]:
subreddit = spl[i]
entries.
append(subreddit)
entries.sort()
for entry in entries:
if entry in defaultEntries:
addDir(entry.title(),
r/+entry, ‘listSorting’, )
else:
addDirR(entry.title(),
r/+entry, ‘listSorting’, )
addDir([ Vimeo.com ],
domain/vimeo.com, ‘listSorting’,
)
addDir([ Youtu.be ], domain/
youtu.be, ‘listSorting’, )
addDir([ Youtube.com
], domain/youtube.com,
‘listSorting’, )
addDir([ Dailymotion.com
], domain/dailymotion.com,
‘listSorting’, )
addDir([B]-
+translation(30001)+ -[/B], ,
‘addSubreddit’, )
xbmcplugin.
endOfDirectory(pluginhandle)
Here, the penultimate entry makes a call to
addSubreddit. listSorting takes care of sorting
out the data based on criteria such as Hot,
New etc. It also calls in Reddit’s JSON function,
whichreturnsniceeasy-to-parseJSONdata.
We have created a settings entry for all the
sorting criteria. Based on what is set, we go
aheadandbuildoutthesortedlist.
def listSorting(subreddit):
if cat_hot:
addDir(translation(30002),
urlMain+/+subreddit+/hot/.
json?limit=100, ‘listVideos’, )
if cat_new:
addDir(translation(30003),
urlMain+/+subreddit+/new/.
json?limit=100, ‘listVideos’, )
if cat_top_d:
addDir(translation(30004)+:
+translation(30007),
urlMain+/+subreddit+/
top/.json?limit=100t=day,
‘listVideos’, )
xbmcplugin.
endOfDirectory(pluginhandle)](https://image.slidesharecdn.com/thepythonbooktheultimateguidetocodingwithpythonpdfdrive-220527060944-728dd1fe/75/The-Python-Book_-The-ultimate-guide-to-coding-with-Python-PDFDrive-pdf-86-2048.jpg)
![The Python Book 87
Work with Python
In the code listed to the left here, we are
opening the URL, then – based on regular
expression matches – we are discovering
the location title, description, date, ups,
downs and rating. We are also locating
video thumbnails and then passing them on
to XBMC.
Later in the code, we also try to match the
URL to a video provider. With our plug-in we are
supporting YouTube, Vimeo and Dailymotion.
If this is detected successfully, we call the
helper functions to locate the XBMC plug-
in based playback URL. During this whole
parsing process, if any exception is raised, the
whole loop is ignored and the next JSON item
is parsed.
15Installing running theadd-on
You can install the add-on using one of
thefollowing two methods:
• You can copy the plug-in directory to
.xbmc/addons.
• You can install the plug-in from the zip file. To
do so, compress the add-on folder into a zip file
using the command:
$ zip -r plugin.video.ludent.zip
plugin.video.ludent
To install the plug-in from the zip file, open
XBMC, go to System then Add-ons, then click
‘Install from zip file’. The benefit of installing
from a zip file is that XBMC will automatically
try to install all the dependent plug-ins as well.
Once you have the plug-in installed, you can
run it by going to the Videos Add-ons section of
XBMC, selecting Get More… and then clicking
on LUD Reddit Viewer.
You can access the settings dialog of the
plug-in by right-clicking the LUD Reddit Viewer,
then selecting ‘Add-on settings’.
So, you have seen how robust and powerful
XBMC’s extension system is. In this example,
we were able to leverage the full power of
Python (including those magical regular
expression matches) from within XBMC.
XBMC itself also offers a robust UI framework,
which provides a very professional look for
our add-on.
As powerful as it may seem, we have only
built a video plug-in. XBMC’s extension system
also provides a framework for building fully
fledged programs (called Programs). We will
coverthisinalaterissue.
14Populatingtheepisodeview(listingvideos)
At this point we have the URL in hand, which returns JSON data; now we need to extract the
dataoutofitwhichwillmakesensetous.
By looking at the JSON data, you can see there’s a lot of interesting information present here. For
example, url is set to youtube.com/watch?v=n4rTztvVx8E; title is set to ‘The Counselor – Official
Trailer’. There also many other bits of data that we will use, such as ups, downs, num_comments,
thumbnail_urlandsoon.Inordertofilteroutthedatathatweneed,wewilluseregularexpressions.
There is one more thing to note: since we are not presenting directories any more but are ready to
placecontent,wehavetosetthexbmcplugin.setContenttoepisodesmode.
def listVideos(url):
currentUrl = url
xbmcplugin.setContent(pluginhandle, episodes)
content = opener
.open(url).read()
spl = content.split(‘content’)
for i in range(1, len(spl), 1):
entry = spl[i]
try:
match = re.compile(‘title: (
.+?)’
, re.DOTALL).findall(entry)
title = match[0].replace(amp;
, )
match = re.compile(‘description: (
.+?)’
, re.DOTALL).
findall(entry)
description = match[0]
match = re.compile(‘created_utc: (
.+?),
’
, re.DOTALL).findall(entry)
downs = int(match[0].replace(}
, ))
rating = int(ups*100/(ups+downs))
if filter and (ups+downs) filterVoteThreshold and rating
filterRating:
continue
title = title+ (+str(rating)+%)
match = re.compile(‘num_comments: (
.+?),
’
, re.DOTALL).
findall(entry)
comments = match[0]
description = dateTime+ | +str(ups+downs)+ votes:
+str(rating)+% Up | +comments+ commentsn+description
match = re.compile(‘thumbnail_url: (
.+?)’
, re.DOTALL).
findall(entry)
thumb = match[0]
matchYoutube = re.compile(‘url: http://www.youtube.com/
watch?v=(
.+?)’
, re.DOTALL).findall(entry)
matchVimeo = re.compile(‘url: http://vimeo.com/(
.+?)’
,
re.DOTALL).findall(entry)
url =
if matchYoutube:
url = getYoutubeUrl(matchYoutube[0])
elif matchVimeo:
url = getVimeoUrl(matchVimeo[0].replace(#
, ))
if url:
addLink(title, url, ‘playVideo’
, thumb, description, date)
except:
pass
match = re.compile(‘after: (
.+?)’
, re.DOTALL).findall(entry)
xbmcplugin.endOfDirectory(pluginhandle)
if forceViewMode:
xbmc.executebuiltin(‘Container
.SetViewMode(‘+viewMode+’)’)](https://image.slidesharecdn.com/thepythonbooktheultimateguidetocodingwithpythonpdfdrive-220527060944-728dd1fe/75/The-Python-Book_-The-ultimate-guide-to-coding-with-Python-PDFDrive-pdf-87-2048.jpg)
![88 The Python Book
Work with Python
Powerfulcalculationswith
NumPy,SciPyandMatplotlib
Scientificcomputing
withNumPy
NumPy is the primary Python package for
performing scientific computing. It has a
powerful N-dimensional array object, tools
for integrating C/C++ and Fortran code, linear
algebra, Fourier transform, and random
number capabilities, among other things.
NumPy also supports broadcasting, which is
a clever way for universal functions to deal in
a meaningful way with inputs that do not have
exactly the same form.
Apart from its capabilities, the other
advantage of NumPy is that it can be integrated
into Python programs. In other words, you may
get your data from a database, the output of
another program, an external file or an HTML
pageandthenprocessitusingNumPy.
This article will show you how to install
NumPy, make calculations, plot data, read and
write external files, and it will introduce you to
some Matplotlib and SciPy packages that work
wellwithNumPy.
NumPy also works with Pygame, a Python
package for creating games, though explaining
itsuseisbeyondofthescopeofthisarticle.
It is considered good practice to try the
various NumPy commands inside the Python
shellbeforeputtingthemintoPythonprograms.
The examples in this article are using either
PythonshelloriPython.
AsimplePython
programfor
PolynomialFitting!
APythonscript
thatusesSciPyto
processanimage
Matplotlib
generatedoutput
Findinghelp
iseasy
Resources
NumPy:
www.numpy.org
SciPy:
www.scipy.org
Matplotlib:
www.matplotlib.org
01 Installing NumPy
Most Linux distributions have a
ready-to-install package you can use. After
installation, you can find out the NumPy version
youareusingbyexecutingthefollowing:
$ python
Python 2.7
.3 (default, Mar 13 2014, 11:03:55)
[GCC 4.7
.2] on linux2
Type help
, copyright
, credits or
license for more information.
numpy.version.version](https://image.slidesharecdn.com/thepythonbooktheultimateguidetocodingwithpythonpdfdrive-220527060944-728dd1fe/75/The-Python-Book_-The-ultimate-guide-to-coding-with-Python-PDFDrive-pdf-88-2048.jpg)
![The Python Book 89
Work with Python
Traceback (most recent call last):
File stdin
, line 1, in module
NameError: name 'numpy' is not defined
import numpy
numpy.version.version
'1.6.2'
Not only have you found the NumPy version but
you also know that NumPy is properly installed.
02AboutNumPy
Despite its simplistic name, NumPy is
a powerful Python package that is mainly for
working with arrays and matrices.
There are many ways to create an array but
the simplest is by using the array() function:
oneD = array([1,2,3,4])
The aforementioned command creates a
one-dimensional array. If you want to create a
two-dimensional array, you can use the array()
functionasfollows:
twoD = array([ [1,2,3],
... [3,3,3],
... [-1,-0.5,4],
... [0,1,0]] )
Youcanalsocreatearrayswithmoredimensions.
03Making simple calculations
using NumPy
Given an array named myArray, you can find
the minimum and maximum values in it by
executing the following commands:
myArray.min()
myArray.max()
Should you wish to find the mean value of all
array elements, run the next command:
myArray.mean()
Similarly, you can find the median of the array
by running the following command:
median(myArray)
The median value of a set is an element that
divides the data set into two subsets (left
and right subsets) with the same number of
elements. If the data set has an odd number of
elements, then the median is part of the data
set. On the other side, if the data set has an
even number of elements, then the median is
the mean value of the two centre elements of
the sorted data set.
04UsingarrayswithNumPy
NumPy not only embraces the indexing
methods used in typical Python for strings and
lists but also extends them. If you want to select
a given element from an array, you can use the
followingnotation:
twoD[1,2]
You can also select a part of an array (a slice)
usingthefollowingnotation:
twoD[
:1,1:3]
Finally, you can convert an array into a Python
listusingthetolist()function.
05Readingfiles
Imaginethatyouhavejustextracted
informationfromanApachelogfileusingAWKand
youwanttoprocessthetextfileusingNumPy.
The following AWK code finds out the total
numberofrequestsperhour:
$ cat access.log | cut -d[ -f2 | cut -d]
-f1 | awk -F: '{print $2}
' | sort -n | uniq
-c | awk '{print $2, $1}
' timeN.txt
The format of the text file (timeN.txt) with the
data is the following:
00 191
01 225
02 121
03 104
Reading the timeN.txt file and assigning it to a
new array variable can be done as follows:
aa = np.loadtxt(timeN.txt)
06Writingtofiles
Writing variables to a file is largely
similar to reading a file. If you have an array
variable named aa1, you can easily save its
contents into a file called aa1.txt by using the
followingcommand:
In [17]: np.savetxt(aa1.txt, aa1)
As you can easily imagine, you can read
the contents of aa1.txt later by using the
loadtxt()function.
07Commonfunctions
NumPy supports many numerical and
statistical functions. When you apply a function
to an array, the function is automatically applied
toallarrayelements.
When working with matrices, you can find the
inverse of a matrix AA by typing “AA.I”. You can
also find its eigenvalues by typing “np.linalg.
eigvals(AA)” and its eigenvector by typing “np.
linalg.eig(BB)”.
08Workingwithmatrices
A special subtype of a two-dimensional
NumPy array is a matrix. A matrix is like an
array except that matrix multiplication replaces
element-by-element multiplication. Matrices
are generated using the matrix (or mat) function
asfollows:
In [2]: AA = np.mat('0 1 1; 1 1 1; 1 1 1
')
You can add two matrices named AA and BB by
typing AA + BB. Similarly, you can multiply them
bytypingAA*BB.
03Makingsimple
calculations](https://image.slidesharecdn.com/thepythonbooktheultimateguidetocodingwithpythonpdfdrive-220527060944-728dd1fe/75/The-Python-Book_-The-ultimate-guide-to-coding-with-Python-PDFDrive-pdf-89-2048.jpg)
![90 The Python Book
Work with Python
SciPyisbuiltontopofNumPy
andismoreadvanced
09PlottingwithMatplotlib
The first move you should make is to
install Matplotlib. As you can see, Matplotlib has
manydependenciesthatyoushouldalsoinstall.
The first thing you will learn is how to
plot a polynomial function. The necessary
commands for plotting the 3x^2-x+1
polynomial are the following:
import numpy as np
import matplotlib.pyplot as plt
myPoly = np.poly1d(np.array([3, -1, 1]).
astype(float))
x = np.linspace(-5, 5, 100)
y = myPoly(x)
plt.xlabel('x values')
plt.ylabel('f(x) values')
xticks = np.arange(-5, 5, 10)
yticks = np.arange(0, 100, 10)
plt.xticks(xticks)
plt.yticks(yticks)
plt.grid(True)
plt.plot(x,y)
The variable that holds the polynomial
is myPoly. The range of values that will
be plotted for x is defined using “x =
np.linspace(-5, 5, 100)”. The other important
variable is y, which calculates and holds the
values of f(x) for each x value.
It is important that you start ipython using
the “ipython --pylab=qt” parameters in order
to see the output on your screen. If you are
interested in plotting polynomial functions,
you should experiment more, as NumPy can
also calculate the derivatives of a function and
plot multiple functions in the same output.
10AboutSciPy
SciPy is built on top of NumPy and
is more advanced than NumPy. It supports
numerical integration, optimisations, signal
processing, image and audio processing,
and statistics. The example in Fig. 01 (to the left)
uses a small part of the scipy.stats package that
isaboutstatistics.
The example uses two statistics distributions
and may be difficult to understand even if you
know mathematics, but it is presented in order
togiveyouabettertasteofSciPycommands.
11UsingSciPyforimageprocessing
Now we will show you how to process
and transform a PNG image using SciPy.
The most important part of the code is the
following line:
In [36]: from scipy.stats import poisson, lognorm
In [37]: mySh = 10;
In [38]: myMu = 10;
In [39]: ln = lognorm(mySh)
In [40]: p = poisson(myMu)
In [41]: ln.rvs((10,))
Out[41]:
array([ 9.29393114e-02, 1.15957068e+01, 9.78411983e+01,
8.26370734e-07, 5.64451441e-03, 4.61744055e-09,
4.98471222e-06, 1.45947948e+02, 9.25502852e-06,
5.87353720e-02])
In [42]: p.rvs((10,))
Out[42]: array([12, 11, 9, 9, 9, 10, 9, 4, 13, 8])
In [43]: ln.pdf(3)
Out[43]: 0.013218067177522842
Fig 01
09Plottingwith
Matplotlib](https://image.slidesharecdn.com/thepythonbooktheultimateguidetocodingwithpythonpdfdrive-220527060944-728dd1fe/75/The-Python-Book_-The-ultimate-guide-to-coding-with-Python-PDFDrive-pdf-90-2048.jpg)
![The Python Book 91
Work with Python
ProcessandtransformaPNG
imageusingSciPy
12Otherusefulfunctions
It is very useful to be able to find out
the data type of the elements in an array; it
can be done using the dtype() function.
Similarly, the ndim() function returns the
number of dimensions of an array.
When reading data from external files, you
can save their data columns into separate
variables using the following way:
In [10]: aa1,aa2 = np.loadtxt(timeN.txt,
usecols=(0,1), unpack=True)
The aforementioned command saves column
1 into variable aa1 and column 2 into variable
aa2. The “unpack=True” allows the data to be
assigned to two different variables. Please
note that the numbering of columns starts
with 0.
14ArraybroadcastinginNumPy
To close, we will talk more about
array broadcasting because it is a very
useful characteristic. First, you should know
that array broadcasting has a rule: in order
for two arrays to be considered for array
broadcasting, “the size of the trailing axes for
both arrays in an operation must either be the
same size or one of them must be one.”
Put simply, array broadcasting allows
NumPy to “change” the dimensions of an array
by filling it with data in order to be able to do
calculations with another array. Nevertheless,
you cannot stretch both dimensions of an
array to do your job.
13Fittingtopolynomials
The NumPy polyfit() function tries to fit
a set of data points to a polynomial. The data
was found from the timeN.txt file, created
earlier in this article.
The Python script uses a fifth degree
polynomial, but if you want to use a different
degree instead then you only have to change
the following line:
coefficients = np.polyfit(aa1, aa2, 5)
image = np.array(Image.open('SA.png').
convert('L
'))
This line allows you to read a usual PNG
file and convert it into a NumPy array for
additional processing. The program will
also separate the output into four parts and
displays a different image for each of these
four parts.
11UsingSciPyfor
imageprocessing
13Fittingto
Polynomials](https://image.slidesharecdn.com/thepythonbooktheultimateguidetocodingwithpythonpdfdrive-220527060944-728dd1fe/75/The-Python-Book_-The-ultimate-guide-to-coding-with-Python-PDFDrive-pdf-91-2048.jpg)
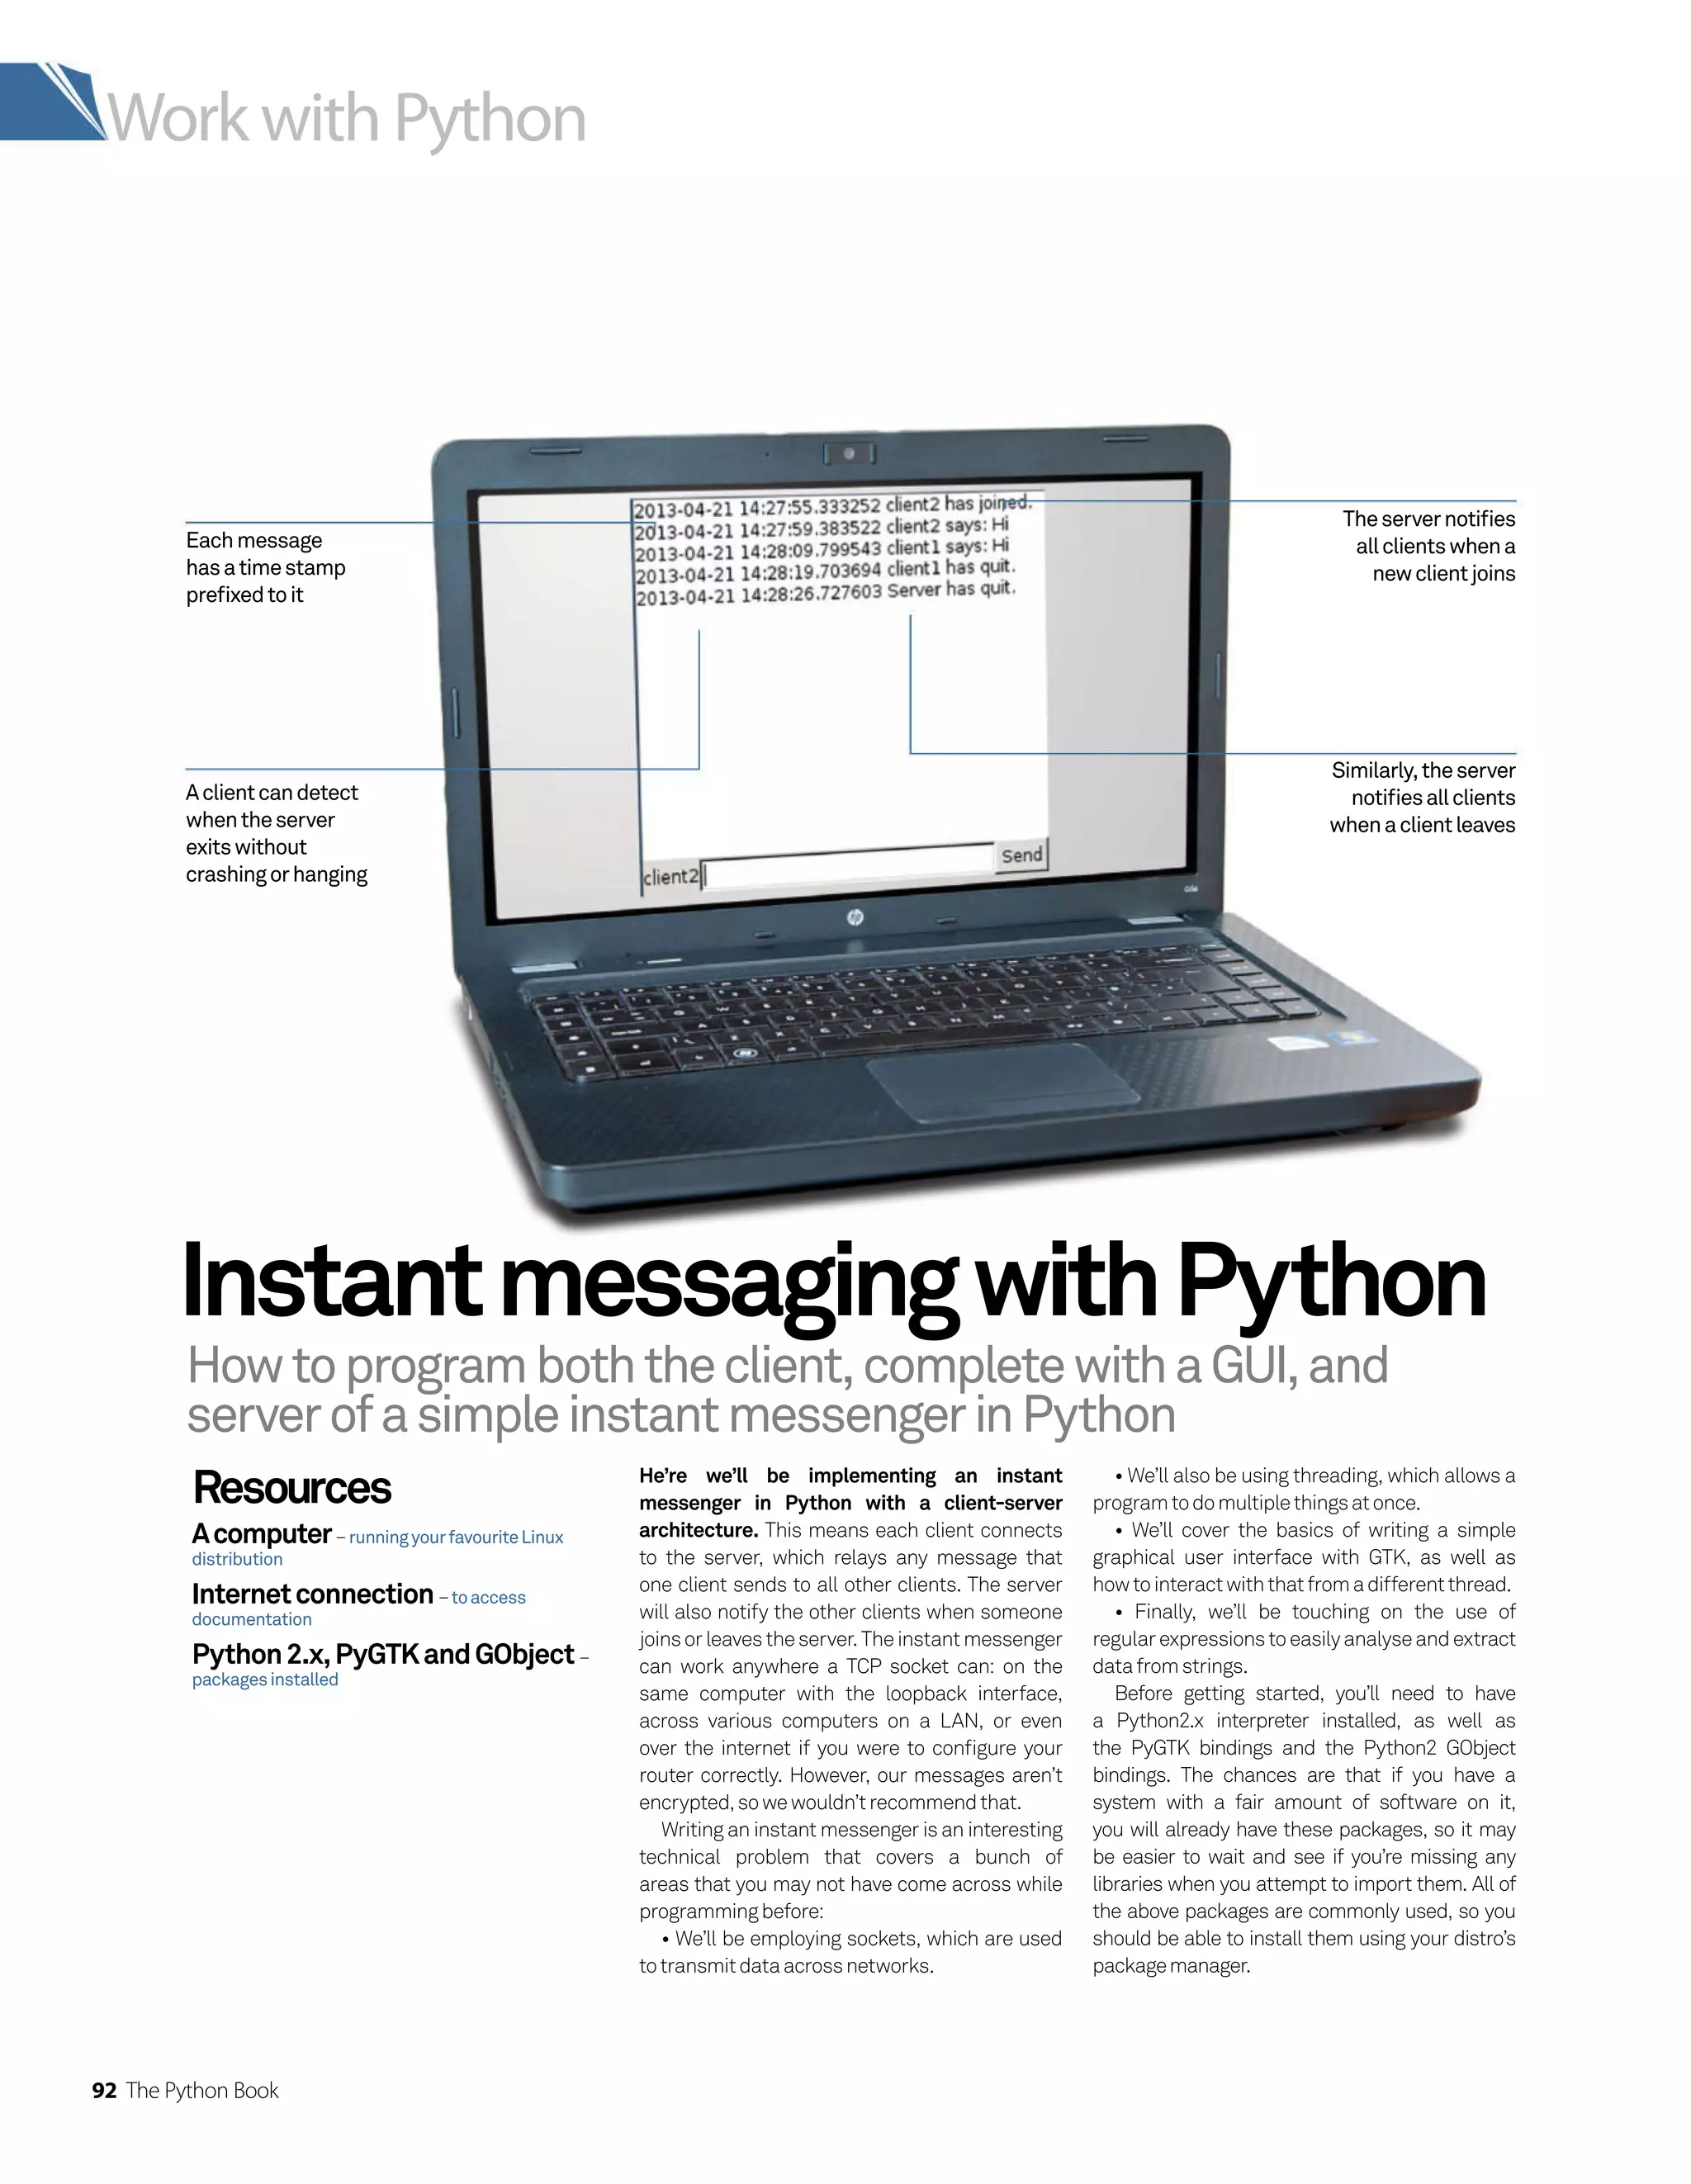
![The Python Book 93
Work with Python
01Theserver
The server will do the following jobs:
• Listen for new clients
• Notify all clients when a new client joins
• Notify all clients when a client leaves
• Receive and deliver messages to all clients
We’re going to write the server side of the
instant messenger first, as the client requires
it. There will be two code files, so it’s a good
idea to make a folder to keep them inside. You
can create an empty file with the command
touch [filename], and mark that file as
executable using chmod +x [filename]. This
file is now ready to edit in your favourite editor.
[liam@liam-laptop Python]$ mkdir
Python-IM
[liam@liam-laptop Python]$ cd
Python-IM/
[liam@liam-laptop Python-IM]$ touch
IM-Server.py
[liam@liam-laptop Python-IM]$ chmod
+x IM-Server.py
02Startingoff
As usual, we need to start off with the
line that tells the program loader what it needs
to interpret the rest of the file with. In your
advisor’s case, that line is:
#!/usr/bin/env python2.
On your system, it may need to be changed to
#!/usr/bin/env/ python2.6 or #!/usr/
bin/env python2.7
After that, we’ve written a short comment about
what the application does, and imported the
required libraries. We’ve already mentioned
what the threading and socket libraries are
for. The re library is used for searching strings
with regular expressions. The signal library is
used for dealing with signals that will kill the
program, such as SIGINT. SIGINT is sent when
Ctrl+C is pressed. We handle these signals so
that the program can tell the clients that it’s
exiting rather than dying unexpectedly. The sys
library is used to exit the program. Finally, the
timelibraryisusedtoputasensiblelimitonhow
frequentlythebodyofwhileloopsexecute.
#!/usr/bin/env python2
# The server side of an instant
messaging application. Written as
part of a Linux User Developer
tutorial by Liam Fraser in 2013.
import threading
03TheServerclass
TheServerclassisthemainclassofour
instant messenger server. The initialiser of this
class accepts a port number to start listening
for clients on. It then creates a socket, binds the
socket to the specified port on all interfaces,
and then starts to listen on that port. You can
optionally include an IP address in the tuple that
contains the port. Passing in a blank string like
wehavedonecausesittolistenonallinterfaces.
The value of 1 passed to the listen function
specifies the maximum number of queued
connections we can accept. This shouldn’t be
a problem as we’re not expecting a bunch of
clientstoconnectatexactlythesametime.
Now that we have a socket, we’ll create an
empty array that will be later used to store a
collection of client sockets that we can echo
messages to. The final part is to tell the signal
library to run the self.signal_handler function,
which we have yet to write, when a SIGINT or
SIGTERM is sent to the application so that we
cantidyupnicely.
class Server():
def __init__(self, port):
# Create a socket and bind it to a
port
self.listener = socket.
socket(socket.AF_INET, socket.SOCK_
STREAM)
self.listener.bind((‘’,
port))
self.listener.listen(1)
print “Listening on port
{0}”.format(port)
# Used to store all of the client
sockets we have, for echoing
to them
self.client_sockets = []
# Run the function self.signal_
handler when Ctrl+C is pressed
signal.signal(signal.SIGINT,
self.signal_handler)
signal.signal(signal.
SIGTERM, self.signal_handler)
04Theserver’smainloop
The server’s main loop essentially
accepts new connections from clients,
adds that client’s socket to the collection of
import socket
import re
import signal
import sys
import time Threading:docs.python.org/2/library/
threading.html
Sockets: docs.python.org/2/library/
socket.html
Regular expressions:docs.python.
org/2/library/re.html
Thesignalhandler:docs.python.org/
2/library/signal.html
PyGTK: www.pygtk.org/
pygtk2reference
GObject: www.pygtk.org/
pygtk2reference/gobject-functions.html
Useful
documentation
sockets and then starts an instance of the
ClientListener class, which we have yet to
write, in a new thread. Sometimes, defining
interfaces you are going to call before you’ve
written them is good, because it can give an
overview of how the program will work without
worrying about the details.
Note that we’re printing information as we go
along, to make debugging easier should we need
to do it. Sleeping at the end of the loop is useful
to make sure the while loop can’t run quickly
enough to hang the machine. However, this is
unlikely to happen as the line that accepts new
connections is blocking, which means that the
program waits for a connection before moving
on from that line. For this reason, we need to
enclose the line in a try block, so that we can
catch the socket error and exit when we can no
longer accept connections. This will usually be
whenwe’veclosedthesocketduringtheprocess
ofquittingtheprogram.
def run(self):
while True:
# Listen for clients, and create a
ClientThread for each new client
print “Listening for
more clients”
try:
(client_socket,
client_address) = self.listener.
accept()
except socket.error:
sys.exit(“Could not](https://image.slidesharecdn.com/thepythonbooktheultimateguidetocodingwithpythonpdfdrive-220527060944-728dd1fe/75/The-Python-Book_-The-ultimate-guide-to-coding-with-Python-PDFDrive-pdf-93-2048.jpg)
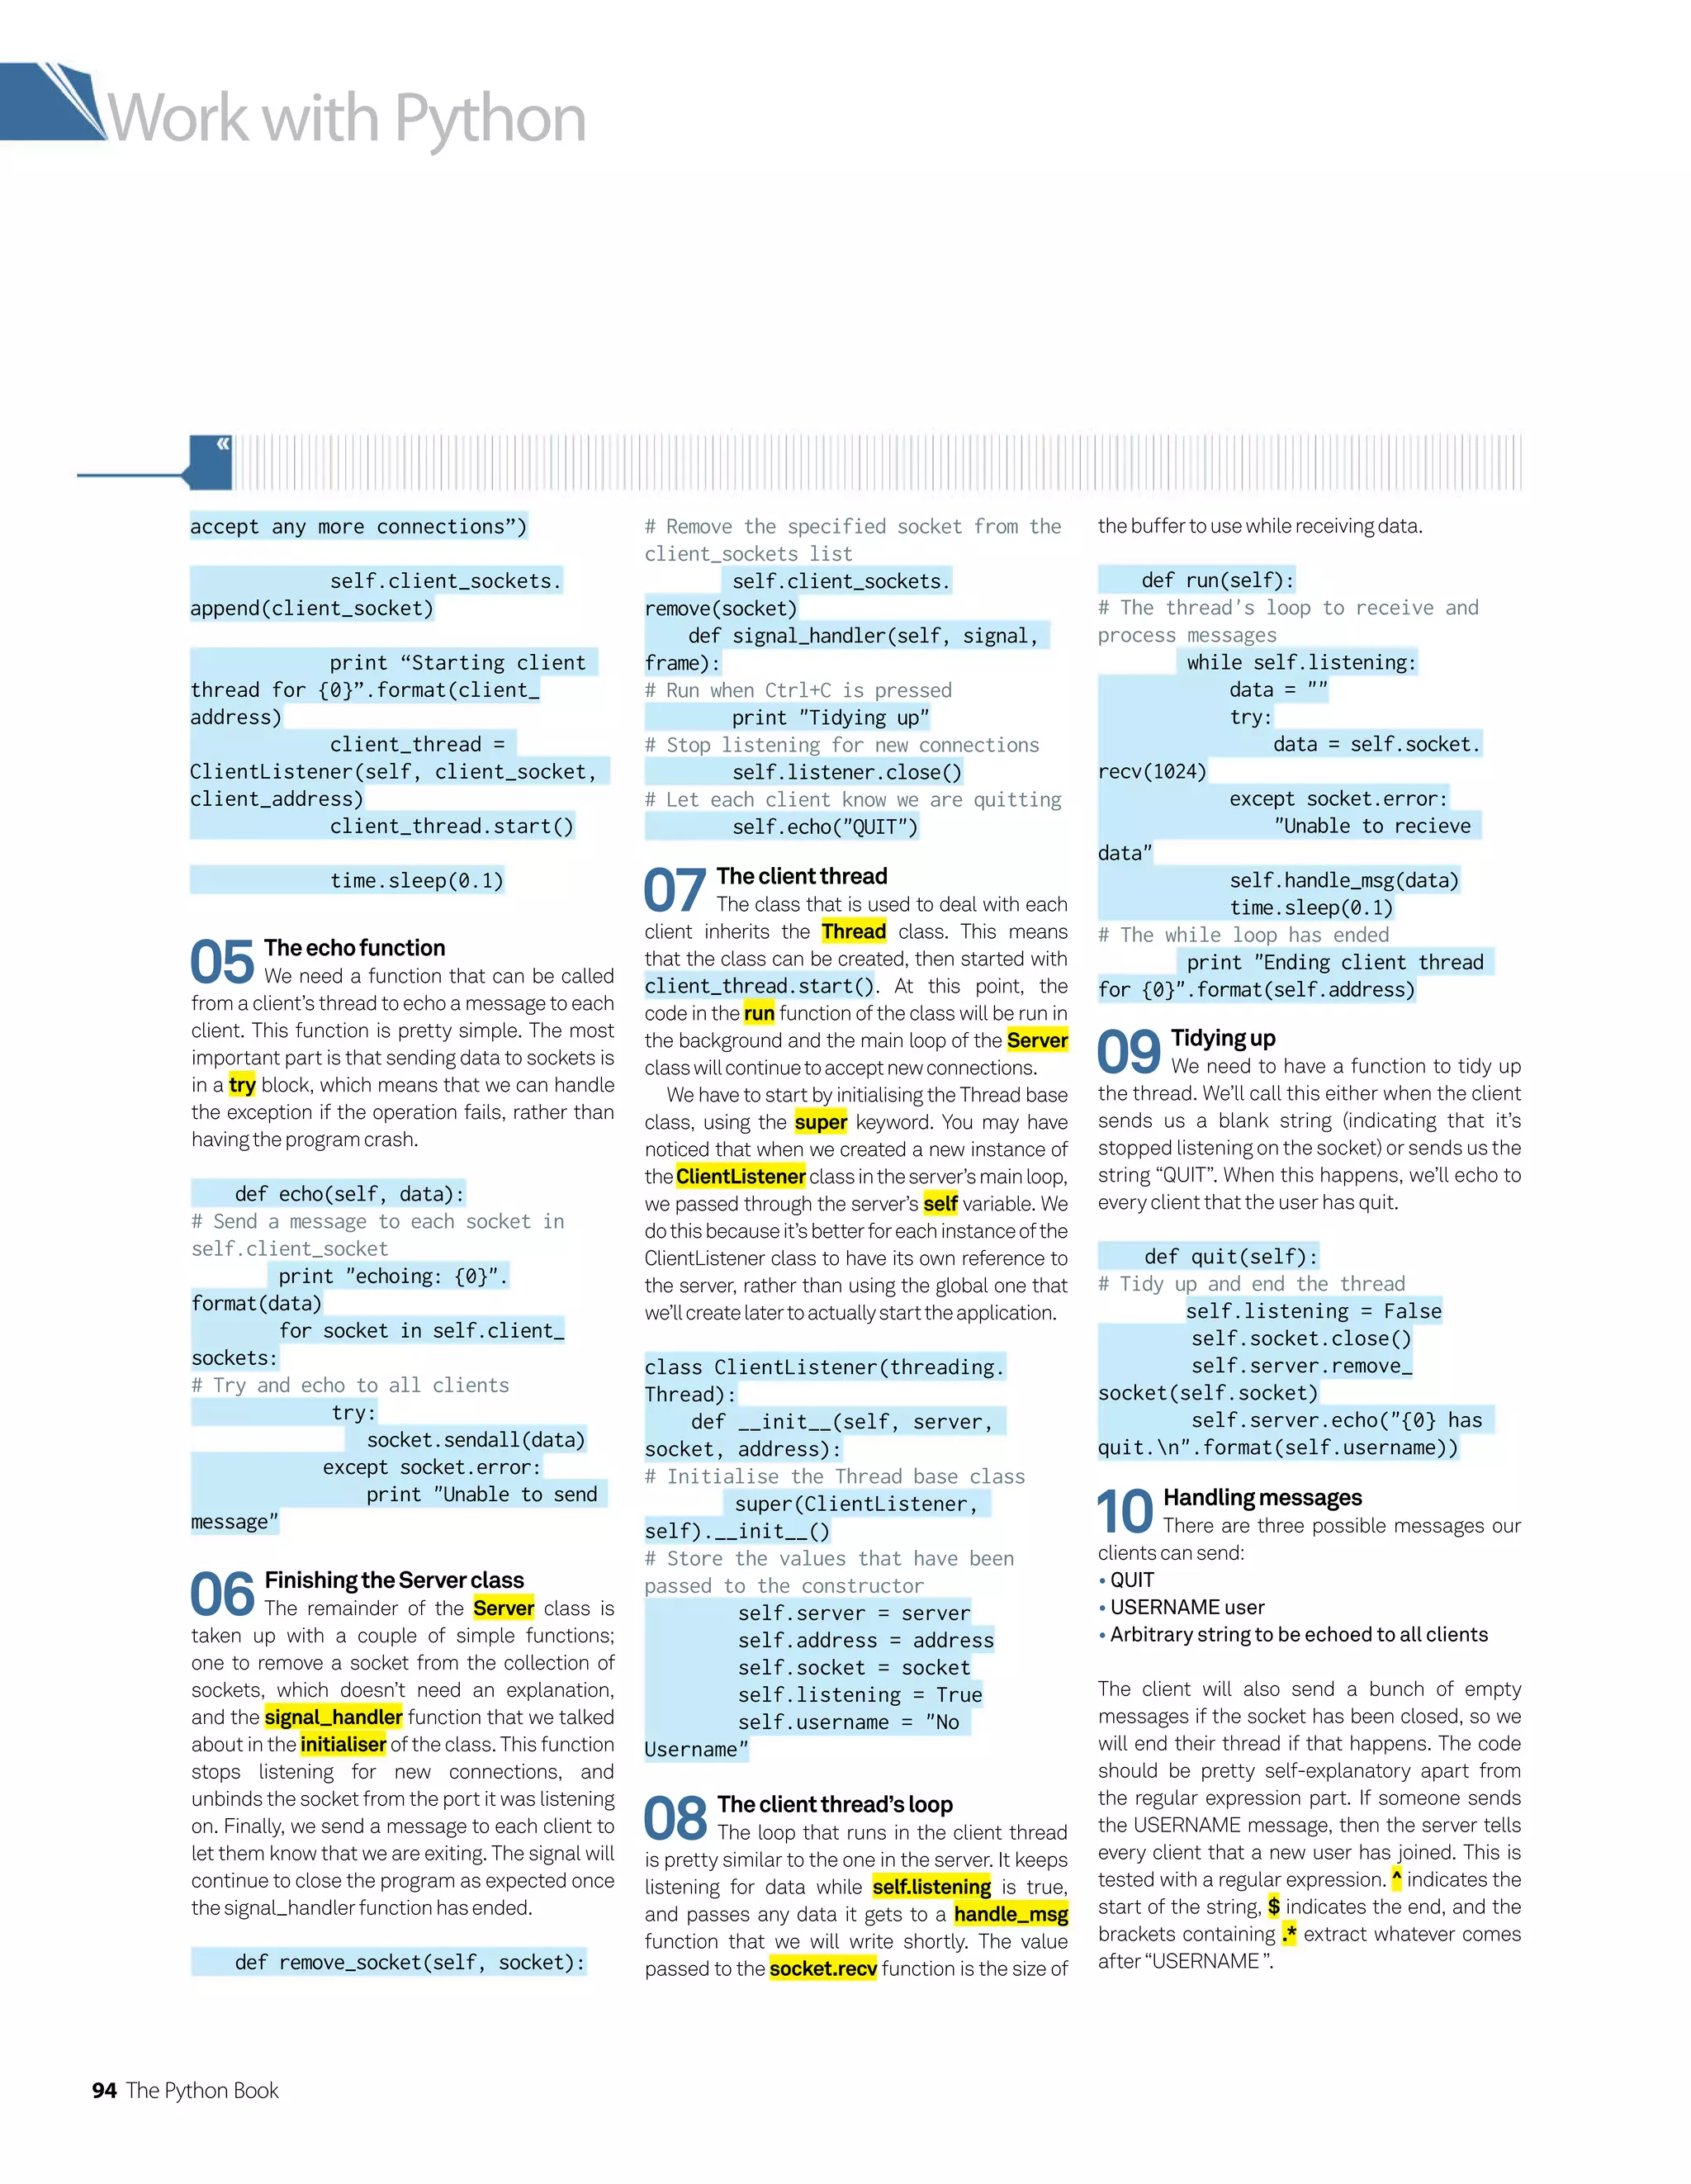
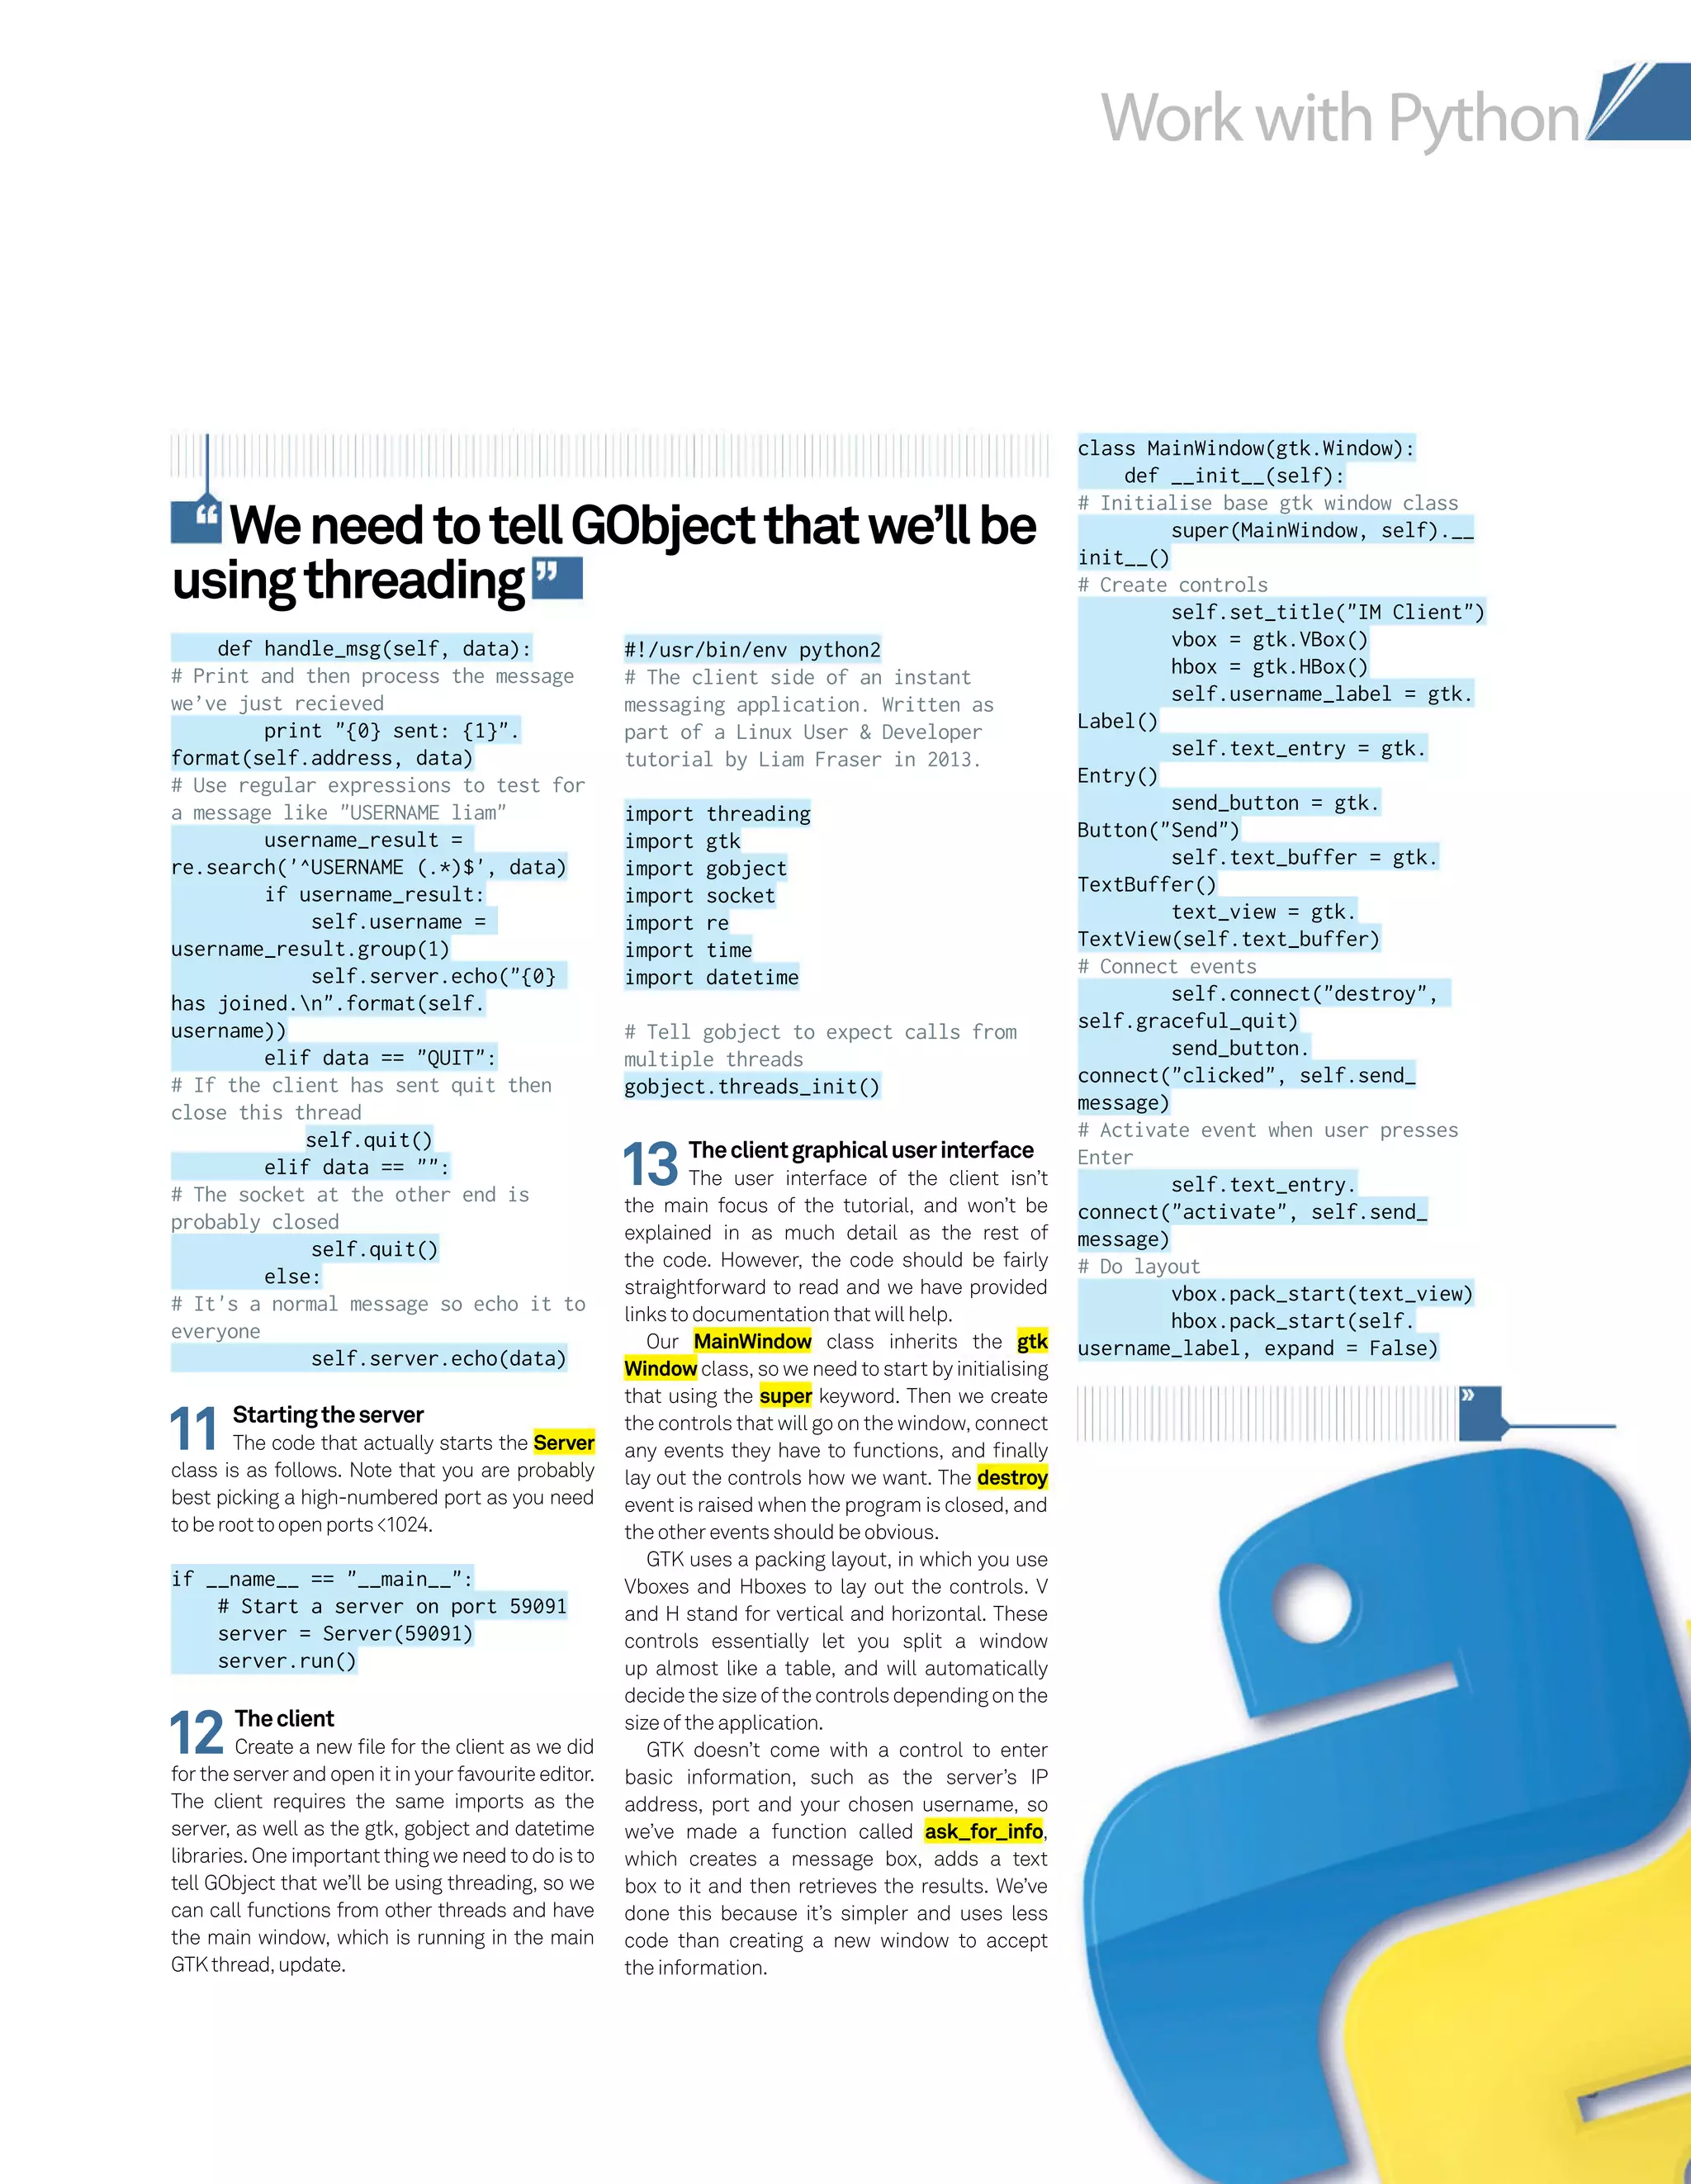
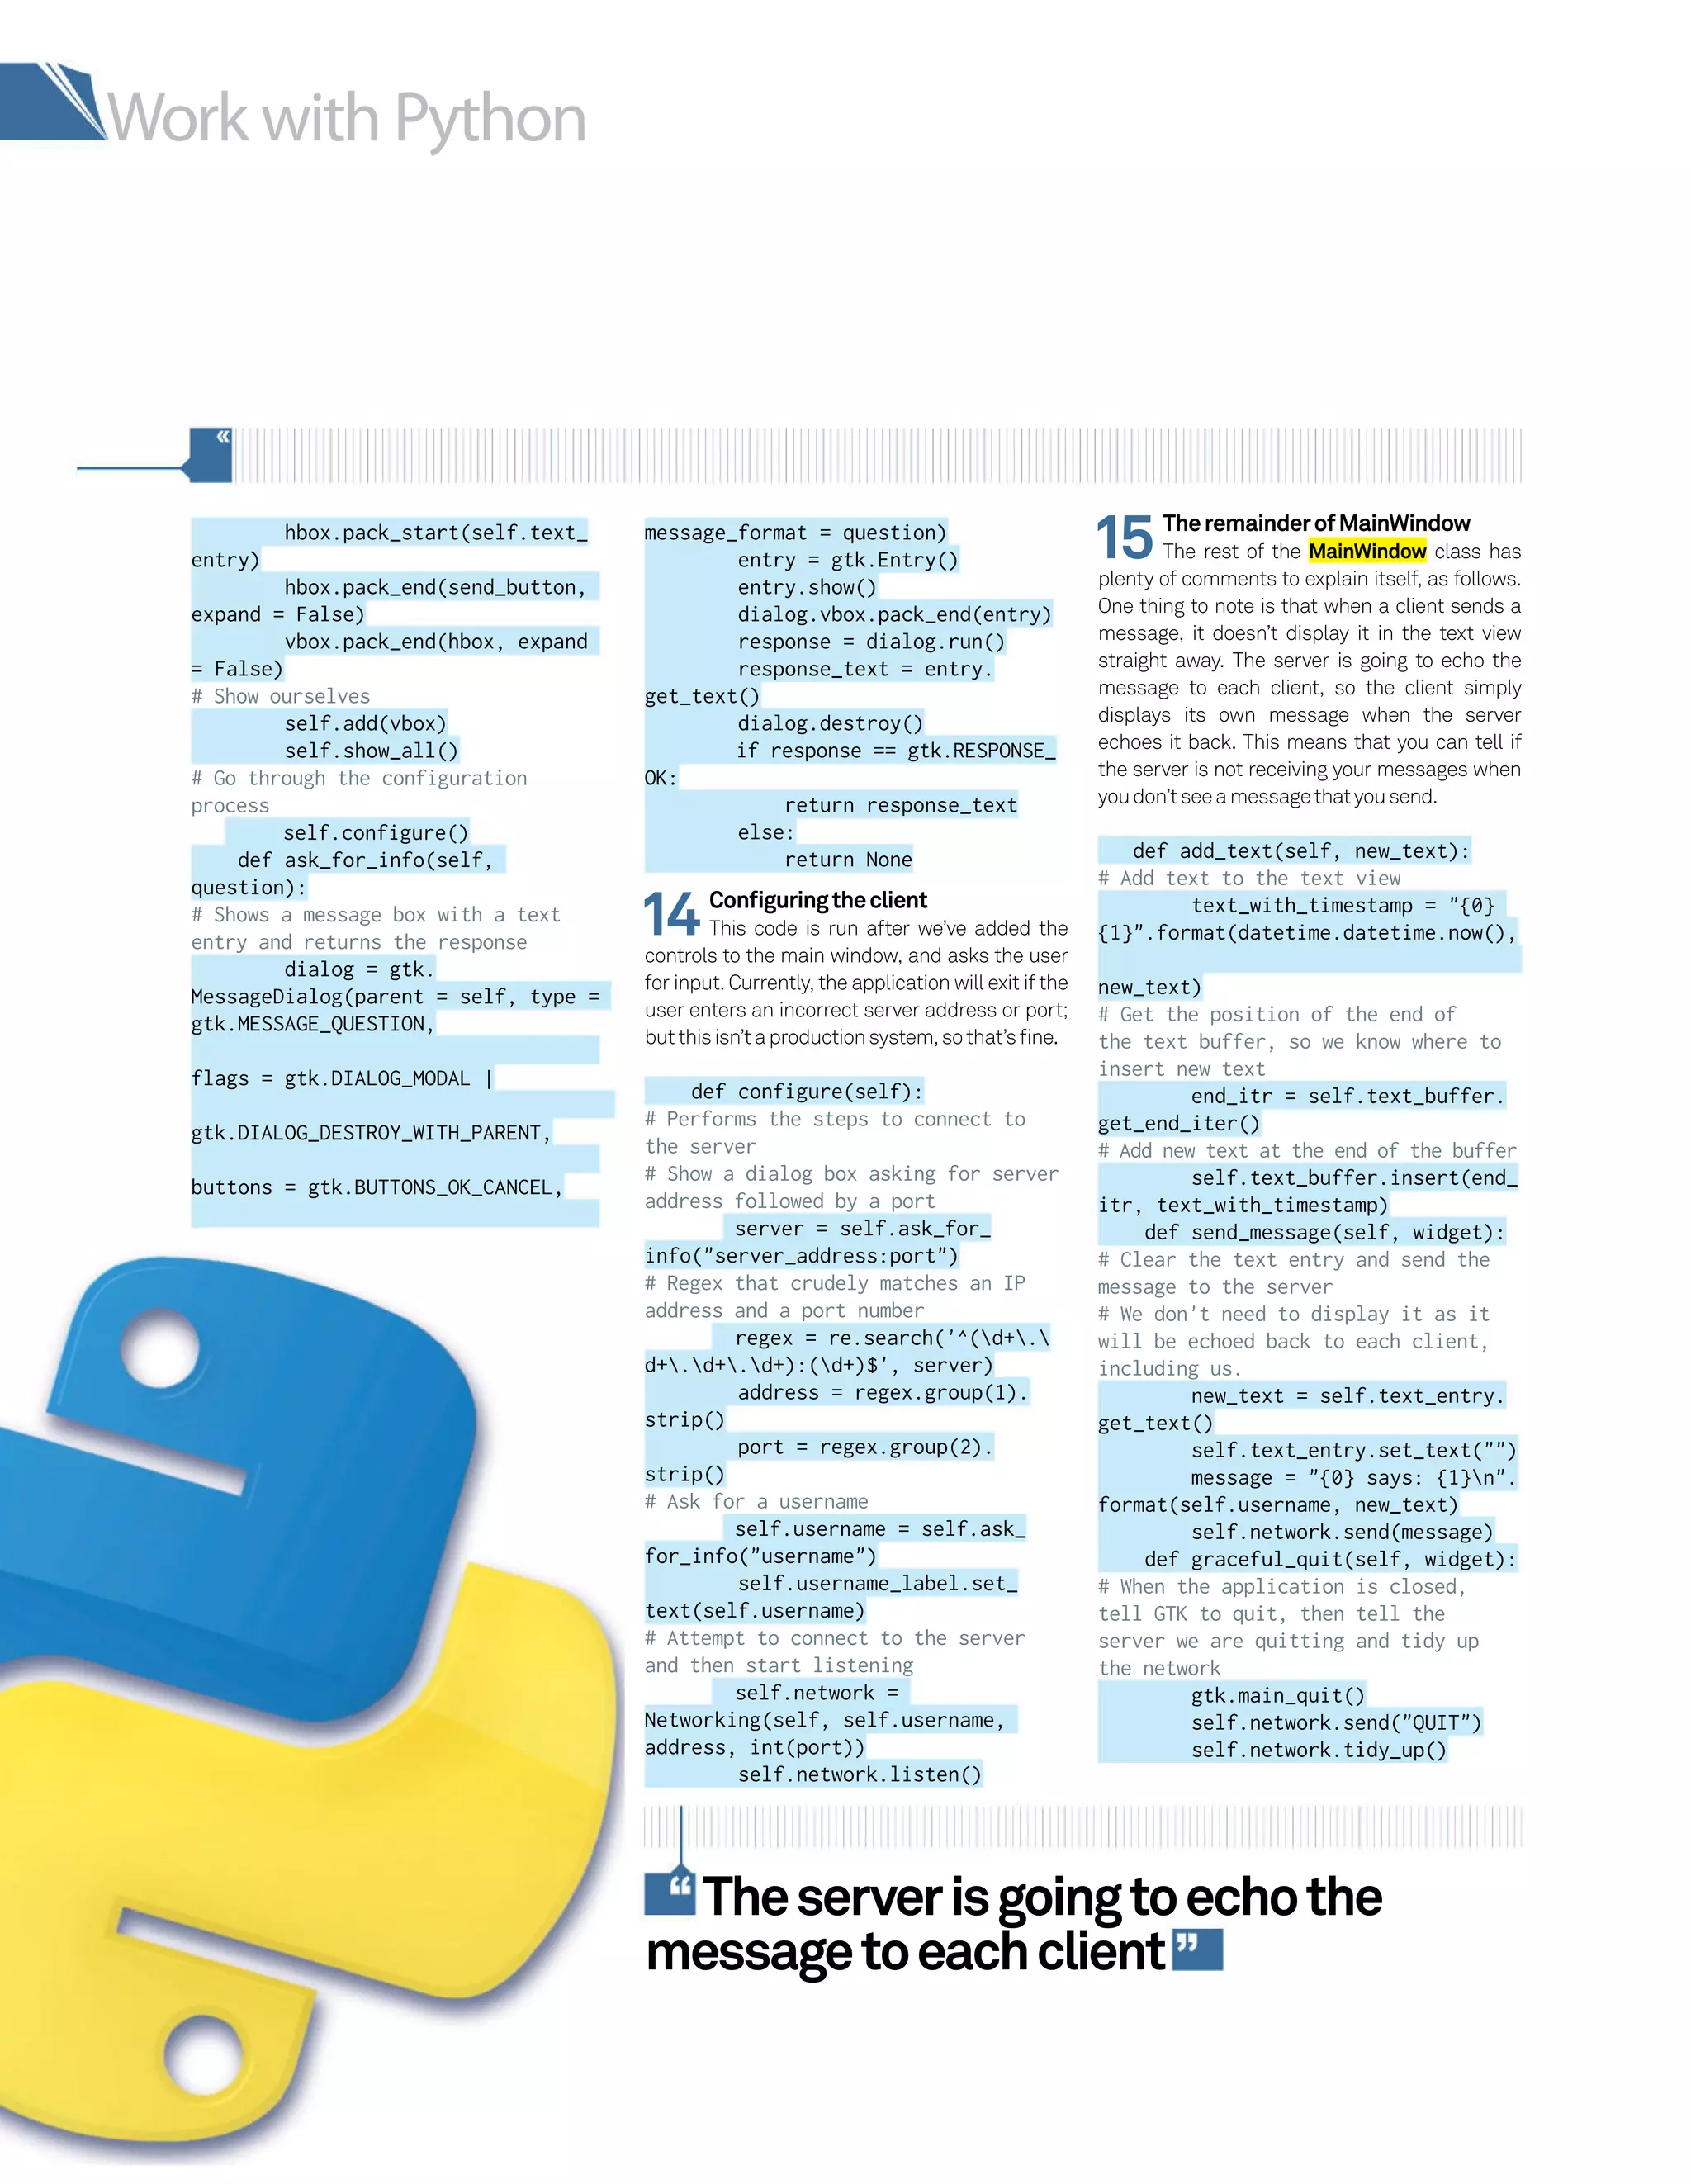
![Work with Python
The Python Book 97
17Runningafunctionasathread
The listener function above will be run
as a thread. This is trivial to do. Enabling the
daemon option on the thread means that it will
dieifthemainthreadunexpectedlyends.
def listen(self):
# Start the listening thread
self.listen_thread =
threading.Thread(target=self.
listener)
# Stop the child thread from keeping
the application open
self.listen_thread.daemon =
True
self.listen_thread.start()
18FinishingtheNetworkingclass
Again, most of this code is similar to
the code in the server’s Networking class. One
19Startingtheclient
The main window is started by initialising
an instance of the class. Notice that we don’t
need to store anything that is returned. We then
starttheGTKthreadbycallinggtk.main().
if __name__ == __main__:
# Create an instance of the main
window and start the gtk main loop
MainWindow()
gtk.main()
21That’sit!
So, it’s not perfect and could be a little
more robust in terms of error handling, but we
have a working instant messenger server that
can accept multiple clients and relay messages
between them. More importantly, we have
learned a bunch of new concepts and methods
ofworking.
20Tryingitout
You’ll want a few terminals: one to
start the server, and some to run clients. Once
you’ve started the server, open an instance of
the client and enter 127.0.0.1:port, where
‘port’ is the port you decided to use. The server
will print the port it’s listening on to make this
easy. Then enter a username and click OK. Here
is an example output from the server with two
clients. You can use the client over a network
by replacing 127.0.0.1 with the IP address of the
server. You may have to let the port through your
computer’sfirewallifit’snotworking.
[liam@liam-laptop Python]$ ./IM-
Server.py
Listening on port 59091
Listening for more clients
Starting client thread for
('127.0.0.1', 38726)
('127.0.0.1', 38726) sent: USERNAME
client1
echoing: client1 has joined.
Listening for more clients
Starting client thread for
('127.0.0.1', 38739)
('127.0.0.1', 38739) sent: USERNAME
client2
echoing: client2 has joined.
Listening for more clients
('127.0.0.1', 38739) sent: client2
says: Hi
echoing: client2 says: Hi
('127.0.0.1', 38726) sent: client1
says: Hi
echoing: client1 says: Hi
('127.0.0.1', 38726) sent: QUIT
echoing: client1 has quit.
Ending client thread for
('127.0.0.1', 38726)
^CTidying up
echoing: QUIT
Could not accept any more
connections
('127.0.0.1', 38739) sent:
echoing: client2 has quit.
Ending client thread for
('127.0.0.1', 38739)
difference is that we want to add some things to
the text view of our window. We do this by using
the idle_add function of GObject. This allows
us to call a function that will update the window
runninginthemainthreadwhenitisnotbusy.
def send(self, message):
# Send a message to the server
print Sending: {0}.
format(message)
try:
self.socket.
sendall(message)
except socket.error:
print Unable to send
message
def tidy_up(self):
# We'll be tidying up if either we are
quitting or the server is quitting
self.listening = False
self.socket.close()
# We won't see this if it's us
that's quitting as the window will
be gone shortly
gobject.idle_add(self.
window.add_text, Server has
quit.n)
def handle_msg(self, data):
if data == QUIT:
# Server is quitting
self.tidy_up()
elif data == :
# Server has probably closed
unexpectedly
self.tidy_up()
else:
# Tell the GTK thread to add some
text when it's ready
gobject.idle_add(self.
window.add_text, data)
16Theclient’sNetworkingclass
Much of the client’s Networking class is
similar to that of the server’s. One difference is
that the class doesn’t inherit the Thread class –
wejuststartoneofitsfunctionsasathread.
class Networking():
def __init__(self, window,
username, server, port):
# Set up the networking class
self.window = window
self.socket = socket.
socket(socket.AF_INET, socket.SOCK_
STREAM)
self.socket.connect((server,
port))
self.listening = True
# Tell the server that a new user
has joined
self.send(USERNAME {0}.
format(username))
def listener(self):
# A function run as a thread that
listens for new messages
while self.listening:
data =
try:
data = self.socket.
recv(1024)
except socket.error:
Unable to recieve
data
self.handle_msg(data)
# Don't need the while loop to be
ridiculously fast
time.sleep(0.1)](https://image.slidesharecdn.com/thepythonbooktheultimateguidetocodingwithpythonpdfdrive-220527060944-728dd1fe/75/The-Python-Book_-The-ultimate-guide-to-coding-with-Python-PDFDrive-pdf-97-2048.jpg)
![The Python Book 99
Work with Python
Youcaneasilywritealiasestothe
equivalentoftheBashcommandthat
youintendtoreplace
SECTION1:Completingbasicshell
tasksinPython
1.Filemanagement
The Python module shutil provides support for
file and directory operations. It provides support
for file attributes, directory copying, archiving
etc.Let’slookatsomeofitsimportantfunctions.
shutil module
copy (src,dst): Copy the src file to
the destination directory. In this
mode permissions bits are copied but
metadata is not copied.
copy2 (src,dst): Same as copy() but
also copies the metadata.
copytree(src, dst[, symlinks=False[,
ignore=None]]): This is similar to ‘cp
-r’, it allows you to copy an entire
directory.
ignore_patterns (*patterns): ignore_
patterns is an interesting function
that can be used as a callable for
copytree(), it allows you to ignore
files and directories specified by the
glob-style patterns.
rmtree(path[, ignore_errors[,
onerror]]): rmtree() is used to delete
an entire directory.
move(src,dst): Similar to mv command it
allows you to recessively move a file
or directory to a new location.
Example:
from shutil import copytree, ignore_
patterns
copytree(source, destination,
ignore=ignore_patterns(‘*.pyc’,
‘tmp*’))
make_archive(base_name, format[, root_
dir[, base_dir[, verbose[, dry_run[,
owner[, group[, logger]]]]]]] : Think
of this as a replacement for tar, zip,
bzip etc. make_archive() creates an
archive file in the given format
such as zip, bztar, tar , gztar.
Archive support can be extended via
Python modules.
Example
from shutil import make_archive
import os
archive_name = os.path.
expanduser(os.path.join(‘~’,
‘ludarchive’))
root_dir = os.path.expanduser(os.
path.join(‘~’, ‘.ssh’))
make_archive(archive_name, ‘gztar’,
root_dir)
‘/Users/kunal/ludarchive.tar.gz’
2.Interfacingoperatingsystem
subprocesses
Python provides two modules to interface
with the OS and to manage processes, called
os and subprocess. These modules allow you
to interact with the core operating system
shell and let you work with the environment,
processes,usersandfiledescriptors.
The subprocess module was introduced to
support better management of subprocesses
(part of which already exists in the os
module) in Python and is aimed to replace
os.system, os.spawn*, os.popen, popen2.* and
commands.*modules.
osmodule
environ: environment represents the OS
environmentvariablesinastringobject.
example:
import os
os.environ
{‘VERSIONER_PYTHON_PREFER_32_BIT’:
‘no’, ‘LC_CTYPE’: ‘UTF-8’, ‘TERM_
PROGRAM_VERSION’: ‘297’, ‘LOGNAME’:
‘kunaldeo’, ‘USER’: ‘kunaldeo’, ‘PATH’:
‘/System/Library/Frameworks/Python.
framework/Versions/2.7/bin:/Users/
kunaldeo/narwhal/bin:/opt/local/sbin:/
usr/local/bin:/usr/bin:/bin:/usr/sbin:/
sbin:/usr/local/bin:/usr/X11/bin:/opt/
local/bin:/Applications/MOTODEV_Studio_
For_Android_2.0.0_x86/android_sdk/
tools:/Applications/MOTODEV_Studio_For_
Android_2.0.0_x86/android_sdk/platform-
tools:/Volumes/CyanogenModWorkspace/
bin’, ‘HOME’: ‘/Users/kunaldeo’,
‘PS1’: ‘[e[0;32m]u[e[m]
[e[1;34m]w[e[m]
[e[1;32m]$[e[m]
[e[1;37m]’, ‘NARWHAL_ENGINE’:
‘jsc’, ‘DISPLAY’: ‘/tmp/launch-s2LUfa/
org.x:0’, ‘TERM_PROGRAM’: ‘Apple_
Terminal’, ‘TERM’: ‘xterm-color’,
‘Apple_PubSub_Socket_Render’: ‘/tmp/
launch-kDul5P/Render’, ‘VERSIONER_
PYTHON_VERSION’: ‘2.7’, ‘SHLVL’:
‘1’, ‘SECURITYSESSIONID’: ‘186a5’,
‘ANDROID_SDK’: ‘/Applications/MOTODEV_
Studio_For_Android_2.0.0_x86/android_
sdk’,’_’: ‘/System/Library/Frameworks/
Python.framework/Versions/2.7/bin/
python’, ‘TERM_SESSION_ID’: ‘ACFE2492-
BB5C-418E-8D4F-84E9CF63B506’, ‘SSH_
AUTH_SOCK’: ‘/tmp/launch-dj6Mk4/
Listeners’, ‘SHELL’: ‘/bin/bash’,
‘TMPDIR’: ‘/var/folders/6s/pgknm8b118
737mb8psz8x4z80000gn/T/’, ‘LSCOLORS’:
‘ExFxCxDxBxegedabagacad’, ‘CLICOLOR’:
‘1’, ‘__CF_USER_TEXT_ENCODING’:
‘0x1F5:0:0’, ‘PWD’: ‘/Users/kunaldeo’,
‘COMMAND_MODE’: ‘unix2003’}
You can also find out the value for an
environmentvalue:
os.environ[‘HOME’]
‘/Users/kunaldeo’
putenv(varname,value) : Adds or sets
an environment variable with the given
variable name and value.
getuid() : Return the current process’s
user id.
getlogin() : Returns the username of
currently logged in user
getpid(pid) : Returns the process group
id of given pid. When used without
any parameters it simply returns the
current process id.
getcwd() : Return the path of the
current working directory.
chdir(path) : Change the current
working directory to the given path.](https://image.slidesharecdn.com/thepythonbooktheultimateguidetocodingwithpythonpdfdrive-220527060944-728dd1fe/75/The-Python-Book_-The-ultimate-guide-to-coding-with-Python-PDFDrive-pdf-99-2048.jpg)
![100 The Python Book
Work with Python
listdir(path) : Similar to ls, returns
a list with the content of directories
and file available on the given path.
Example:
os.listdir(“/home/homer”)
[‘.gnome2’, ‘.pulse’, ‘.gconf’,
‘.gconfd’, ‘.beagle’, ‘.gnome2_
private’, ‘.gksu.lock’, ‘Public’,
‘.ICEauthority’, ‘.bash_history’,
‘.compiz’, ‘.gvfs’, ‘.update-
notifier’, ‘.cache’, ‘Desktop’,
‘Videos’, ‘.profile’, ‘.config’,
‘.esd_auth’, ‘.viminfo’, ‘.sudo_
as_admin_successful’, ‘mbox’,
‘.xsession-errors’, ‘.bashrc’, ‘Music’,
‘.dbus’, ‘.local’, ‘.gstreamer-0.10’,
‘Documents’, ‘.gtk-bookmarks’,
‘Downloads’, ‘Pictures’, ‘.pulse-
cookie’, ‘.nautilus’, ‘examples.
desktop’, ‘Templates’, ‘.bash_logout’]
mkdir(path[, mode]) : Creates a
directory with the given path with the
numeric code mode. The default mode is
0777.
makedirs(path[, mode]) : Creates given
path (inclusive of all its directories)
recursively. The default mode is 0777.
:
Example:
import os
path = “/home/kunal/greatdir”
os.makedirs( path, 0755 );
rename (old,new) : The file or
directory “old” is renamed to “new”
If “new” is a directory, an error
will be raised. On Unix and Linux, if
“new” exists and is a file, it will
be replaced silently if the user has
permission to do so.
renames (old,new) : Similar to rename
but also creates any directories
recessively if necessary.
rmdir(path) : Remove directory from the
path mentioned. If the path already
has files you will need to use shutil.
rmdtree()
subprocess:
call(*popenargs, **kwargs) : Runs the
command with arguments. On process
completion it returns the returncode
attribute.
Example:
import subprocess
print subprocess.call([“ls”,”-l”])
total 3684688
drwx------+ 5 kunaldeo staff
170 Aug 19 01:37 Desktop
drwx------+ 10 kunaldeo staff
340 Jul 26 08:30 Documents
drwx------+ 50 kunaldeo staff
1700 Aug 19 12:50 Downloads
drwx------@ 127 kunaldeo staff
4318 Aug 19 01:43 Dropbox
drwx------@ 42 kunaldeo staff
1428 Aug 12 15:17 Library
drwx------@ 3 kunaldeo staff
102 Jul 3 23:23 Movies
drwx------+ 4 kunaldeo staff
136 Jul 6 08:32 Music
drwx------+ 5 kunaldeo staff
170 Aug 12 11:26 Pictures
drwxr-xr-x+ 5 kunaldeo staff
170 Jul 3 23:23 Public
-rwxr-xr-x 1 kunaldeo staff
1886555648 Aug 16 21:02 androidsdk.tar
drwxr-xr-x 5 kunaldeo staff
170 Aug 16 21:05 sdk
drwxr-xr-x 19 kunaldeo staff
646 Aug 19 01:47 src
-rw-r--r-- 1 root staff
367 Aug 16 20:36 umbrella0.log
STD_INPUT_HANDLE: The standard input
device.Initially,thisistheconsoleinputbuffer.
STD_OUTPUT_HANDLE: The standard output
device. Initially, this is the active console
screenbuffer.
STD_ERROR_HANDLE: The standard error
device. Initially, this is the active console
screenbuffer.
SECTION2:IPython:aready-made
Pythonsystemshellreplacement
In section 1 we have introduced you to the
Python modules which allow you to do system
shell-related tasks very easily using vanilla
Python. Using the same features, you can build
a fully featured shell and remove a lot of Python
boilerplate code along the way. However, if
you are kind of person who wants everything
ready-made, you are in luck. IPython provides a
powerful and interactive Python shell which you
can use as your primary shell. IPython supports
Python 2.6 to 2.7 and 3.1 to 3.2 . It supports
two type of Python shells: Terminal based and
Qtbased.
Just to reiterate, IPython is purely implemented
in Python and provides a 100% Python-
compliant shell interface, so everything you
have learnt in section 1 can be run inside
IPythonwithoutanyproblems.
IPython is already available in most Linux
distributions. Search your distro’s repositories to
look for it. In case you are not able to find it, you
canalsoinstallitusingeasy_installorPyPI.
IPython provides a lot of interesting features
whichmakesitagreatshellreplacement…
Tab completion: Tab completion provides an
excellent way to explore any Python object that
you are working with. It also helps you to avoid
makingtypos.
Example:
In [3]: import o {hit tab}
objc opcode operator
optparse os os2emxpath
In [3]: import os
In [4]: os.p {hit tab}
os.pardir os.pathconf_names
os.popen os.popen4
os.path os.pathsep
os.popen2 os.putenv
os.pathconf os.pipe
os.popen3
Built In Object Explorer: You can add
‘?’ after any Python object to view
its details such as Type, Base Class,
String Form, Namespace, File and
Docstring.
Example:
In [28]: os.path?
Type: module
Base Class: type ‘module’
String Form:module ‘posixpath’ from
‘/System/Library/Frameworks/Python.
framework/Versions/2.7/lib/python2.7/
posixpath.pyc’
Namespace: Interactive
File: /System/Library/Frameworks/](https://image.slidesharecdn.com/thepythonbooktheultimateguidetocodingwithpythonpdfdrive-220527060944-728dd1fe/75/The-Python-Book_-The-ultimate-guide-to-coding-with-Python-PDFDrive-pdf-100-2048.jpg)
![The Python Book 101
Work with Python
As you can see, it’s easy to tailor Python
for all your shell environment needs.
Python modules like os, subprocess
and shutil are available at your
disposal to do just about everything
you need using Python. IPython turns
this whole experience into an even
more complete package. You get to do
everything a standard Python shell
does and with much more convenient
features. IPython’s magic functions
really do provide a magical Python shell
experience. So next time you open a
Bash session, think again: why settle for
goldwhen platinum is a stepaway?
IPythonalsocomeswithitsown
Qt-basedconsole
Python.framework/Versions/2.7/lib/
python2.7/posixpath.py
Docstring:
Common operations on POSIX pathnames.
Instead of importing this module directly, import
os and refer to this module as os.path. The
‘os.path’ name is an alias for this module on
POSIX systems; on other systems (eg Mac,
Windows),os.pathprovidesthesameoperations
in a manner specific to that platform, and is an
aliastoanothermodule(egmacpath,ntpath).
Some of this can actually be useful on non-
POSIX systems too, eg for manipulation of the
pathnamecomponentofURLs.
You can also use double question marks (??) to
viewthesourcecodefortherelevantobject.
Magic functions: IPython comes with a set of
predefined ‘magic functions’ that you can call
with a command-line-style syntax. IPython
‘magic’ commands are conventionally prefaced
by %, but if the flag %automagic is set to on,
then you can call magic commands without the
preceding%.
To view a list of available magic functions,
you can use ‘magic function %lsmagic’. Magic
functions include functions that work with code
such as %run, %edit, %macro, %recall etc;
functions that affect shell such as %colors,
%xmode, %autoindent etc; and other functions
such as %reset, %timeit, %paste etc. Most of
the cool features of IPython are powered using
magicfunctions.
Example:
In [45]: %lsmagic
Available magic functions:
%alias %autocall %autoindent
%automagic %bookmark %cd %colors
%cpaste %debug %dhist %dirs
%doctest_mode %ed %edit %env %gui
%hist %history %install_default_
config %install_profiles %load_ext
%loadpy %logoff %logon %logstart
%logstate %logstop %lsmagic %macro
%magic %page %paste %pastebin %pdb
%pdef %pdoc %pfile %pinfo %pinfo2
%popd %pprint %precision %profile
%prun %psearch %psource %pushd %pwd
%pycat %pylab %quickref %recall
%rehashx %reload_ext %rep %rerun
%reset %reset_selective %run %save
%sc %sx %tb %time %timeit %unalias
%unload_ext %who %who_ls %whos
%xdel %xmode
Automagic is OFF, % prefix IS needed
for magic functions
To view help on any Magic Function, call
‘%somemagic?’toreaditsdocstring.
Python script execution and runtime code
editing: You can use %run to run any Python
script. You can also control-run the Python
script with pdb debugger using -d, or pdn
profiler using -p. You can also edit a Python
script using the %edit command. %edit will
open the given Python script in the editor
definedbythe$EDITORenvironmentvariable.
Shell command support: If you are in the mood
to just run a shell command, you can do it very
easilybyprefixingthecommandwith!.
Example:
In [5]: !ps
PID TTY TIME CMD
4508 ttys000 0:00.07 -bash
84275 ttys001 0:00.03 -bash
17958 ttys002 0:00.18 -bash
In [8]: !clang prog.c -o prog
prog.c:2:1: warning: type specifier
missing, defaults to ‘int’ [-Wimplicit-
int]
main()
^~~~
1 warning generated.
Qt console : IPython also comes with its own
Qt-based console. This provides a number of
features that are only available in a GUI, such
as inline figures, multiline editing with syntax
highlighting,andgraphicalcalltips.
YoucanstarttheQtconsolewith:
$ ipython qtconsole
If you get errors related to missing modules,
makesurethatyouhaveinstalledthedependent
packages, such as PyQt, pygments, pyexpect
andZeroMQ.
QIPythonQtconsolewithGUIcapabilities](https://image.slidesharecdn.com/thepythonbooktheultimateguidetocodingwithpythonpdfdrive-220527060944-728dd1fe/75/The-Python-Book_-The-ultimate-guide-to-coding-with-Python-PDFDrive-pdf-101-2048.jpg)
![102 The Python Book
Work with Python
LearnhowPythoncanhelpinsystemadministrationasitdaresto
replacetheusualshellscripting…
Pythonforsystem
administrators
Parsingconfigurationfiles
Configurationfilesprovideawayforapplications
to store various settings. In order to write a
script that allows you to modify settings of a
particular application, you should be able to
parse the configuration file of the application.
In this section we learn how to parse INI-style
configuration files. Although old, the INI file
format is very popular with much modern open
sourcesoftware,suchasPHPandMySQL.
Excerptforphp.iniconfigurationfile:
[PHP]
engine = On
zend.ze1_compatibility_mode = Off
short_open_tag = On
asp_tags = Off
precision = 14
y2k_compliance = On
output_buffering = 4096
;output_handler =
zlib.output_compression = Off
[MySQL]
; Allow or prevent persistent links.
mysql.allow_persistent = On
mysql.max_persistent = 20
mysql.max_links = -1
mysql.default_port = 3306
mysql.default_socket =
mysql.default_host = localhost
mysql.connect_timeout = 60
mysql.trace_mode = Off
Python provides a built-in module called
ConfigParser (known as configparser in Python
3.0).Youcanusethismoduletoparseandcreate
configurationfiles.
@code:writeconfig.py
@description: The following demonstrates
addingMySQLsectiontothephp.inifile.
@warning: Do not use this script with the
actual php.ini file, as it’s not designed to
handleallaspectsofacompletephp.inifile.
import ConfigParser
config = ConfigParser.
RawConfigParser()
config.add_section(‘MySQL’)
config.set(‘MySQL’,’mysql.trace_
mode’,’Off’)
config.set(‘MySQL’,’mysql.connect_
timeout’,’60’)
config.set(‘MySQL’,’mysql.default_
host’,’localhost’)
config.set(‘MySQL’,’mysql.default_
port’,’3306’)
config.set(‘MySQL’,’mysql.allow_
persistent’, ‘On’ )
config.set(‘MySQL’,’mysql.max_
persistent’,’20’)
with open(‘php.ini’, ‘ap’) as
configfile:
config.write(configfile)
Output:php.ini
[MySQL]
mysql.max_persistent = 20
mysql.allow_persistent = On
mysql.default_port = 3306
mysql.default_host = localhost
mysql.trace_mode = Off
mysql.connect_timeout = 60
@code:parseconfig.py
@description: Parsing and updatingthe config
file
import ConfigParser
config = ConfigParser.ConfigParser()
config.read(‘php.ini’)
# Print config values
print config.get(‘MySQL’,’mysql.
System administration is an important part of
our computing environment. It does not matter
whether you are managing systems at your work
our home. Linux, being a UNIX-based operating
system, already has everything a system
administrator needs, such as the world-class
shells(notjustonebutmany,includingBash,csh,
zsh etc), handy tools, and many other features
which make the Linux system an administrator’s
dream. So why do we need Python when Linux
already has everything built-in? Being a dynamic
scripting language, Python is very easy to read
and learn. That’s just not us saying that, but
many Linux distributions actually use Python
in core administrative parts. For example, Red
Hat (and Fedora) system setup tool Anaconda
is written in Python (read this line again, got the
snakeconnection?).Also,toolslikeGNUMailman,
CompizConfig Settings Manager (CCSM) and
hundreds of tiny GUI and non-GUI configuration
tools are written using Python. Python does not
limit you on the choice of user interface to follow
–youcanbuildcommand-line,GUIandwebapps
using Python. This way, it has got covered almost
allthepossibleinterfaces.
Here we will look into executing sysadmin-
relatedtasksusingPython.
Python-develPython development
libraries, required for compiling
third-party Python module
setuptoolssetuptools allows you to
download, build, install, upgrade,
and uninstall Python packages
with ease
Resources
Note
This is written for the Python 2.X series,
as it is still the most popular and default
Python distribution across all the
platforms (including all Linux distros,
BSDsandMacOSX).](https://image.slidesharecdn.com/thepythonbooktheultimateguidetocodingwithpythonpdfdrive-220527060944-728dd1fe/75/The-Python-Book_-The-ultimate-guide-to-coding-with-Python-PDFDrive-pdf-102-2048.jpg)
![The Python Book 103
Work with Python
default_host’)
print config.get(‘MySQL’,’mysql.
default_port’)
config.remove_option(‘MySQL’,’mysql.
trace_mode’)
with open(‘php.ini’, ‘wb’) as
configfile:
config.write(configfile)
ParsingJSONdata
JSON (also known as JavaScript Object
Notation) is a lightweight modern data-
interchange format. JSON is an open standard
under ECMA-262. It is a text format and is
completely language-independent. JSON
is also used as the configuration file format
for modern applications such as Mozilla
Firefox and Google Chrome. JSON is also
very popular with modern web services such
as Facebook, Twitter, Amazon EC2 etc. In
this section we will use the Python module
‘simplejson’ to access Yahoo Search (using
the Yahoo Web Services API), which outputs
JSONdata.
To use this section, you should have the
following:
1.Pythonmodule:simplejson.
Note: You can install Python modules using the
command ‘easy_install module name’. This
command assumes that you have a working
internetconnection.
2. Yahoo App ID: The Yahoo App ID can be
created from https://developer.apps.yahoo.
com/dashboard/createKey.html. The Yahoo
App ID will be generated on the next page. See
thescreenshotbelowfordetails.
QGeneratingtheYahooAppID
simplejson is very easy to use. In the following
example we will use the capability of mapping
JSON data structures directly to Python data
types. This gives us direct access to the JSON
datawithoutdevelopinganyXMLparsingcode.
JSONPYTHONDATAMAPPING
JSON Python
object dict
array list
string unicode
number(int) int,long
number(real) float
TRUE TRUE
FALSE FALSE
null None
For this section we will use the simplejson.
load function, which allows us to deserialise a
JSONobjectintoaPythonobject.
@code:LUDSearch.py
import simplejson, urllib
APP_ID = ‘xxxxxxxx’ # Change this to
your APP ID
SEARCH_BASE = ‘http://search.
yahooapis.com/WebSearchService/V1/
webSearch’
class YahooSearchError(Exception):
pass
def search(query, results=20,
start=1, **kwargs):
kwargs.update({
‘appid’: APP_ID,
‘query’: query,
‘results’: results,
‘start’: start,
‘output’: ‘json’
})
url = SEARCH_BASE + ‘?’ +
urllib.urlencode(kwargs)
result = simplejson.load(urllib.
urlopen(url))
if ‘Error’ in result:
# An error occurred; raise
an exception
raise YahooSearchError,
result[‘Error’]
return result[‘ResultSet’]
Let’s use the above code from the Python shell
to see how it works. Change to the directory
where you have saved the LUDYSearch.py and
openaPythonshell.
@code: Python Shell Output. Lines starting
with‘’indicateinput
execfile(“LUDYSearch.py”)
results = search(‘Linux User and
Developer’)
results[‘totalResultsAvailable’]
123000000
results[‘totalResultsReturned’]
20
items = results[‘Result’]
for Result in items:
... print
Result[‘Title’],Result[‘Url’]
...
Linux User http://www.linuxuser.
co.uk/
Linux User and Developer -
Wikipedia, the free encyclopedia
http://en.wikipedia.org/wiki/Linux_
User_and_Developer
Linux User amp;amp; Developer |
Linux User http://www.linuxuser.
co.uk/tag/linux-user-developer/
Gatheringsystem
information
One of the important jobs of a system
administrator is gathering system information.
In this section we will use the SIGAR (System
Information Gatherer And Reporter) API to
demonstrate how we can gather system
information using Python. SIGAR is a very
complete API and it can provide lot of
information,includingthefollowing:
1. System memory, swap, CPU, load average,
uptime,logins.
2. Per-process memory, CPU, credential info,
state,arguments,environment,openfiles.
3.Filesystemdetectionandmetrics.
4. Network interface detection, configuration
infoandmetrics.
5.TCPandUDPconnectiontables.
6.Networkroutetable.
InstallingSIGAR
The first step is to build and install SIGAR. SIGAR
is hosted at GitHub, so make sure that you have
Git installed in your system. Then perform
the following steps to install SIGAR and its
Pythonbindings:
$ git clone git://github.com/
hyperic/sigar.git sigar.git
$ cd sigar.git/bindings/python
$ sudo python setup.py install
Pythondoesn’t
limityourchoice
ofinterface](https://image.slidesharecdn.com/thepythonbooktheultimateguidetocodingwithpythonpdfdrive-220527060944-728dd1fe/75/The-Python-Book_-The-ultimate-guide-to-coding-with-Python-PDFDrive-pdf-103-2048.jpg)
![104 The Python Book
Work with Python
At the end you should see a output similar to
thefollowing:
Writing /usr/local/lib/python2.6/
dist-packages/pysigar-0.1.egg-info
SIGAR is a very easy-to-use library and can be
usedtogetinformationonalmosteveryaspectof
asystem.Thenextexampleshowsyouhow.
The following code shows the memory and the
filesysteminformation
@code:PySysInfo.py
import os
import sigar
sg = sigar.open()
mem = sg.mem()
swap = sg.swap()
fslist = sg.file_system_list()
print “==========Memory
Information==============”
print “tTotaltUsedtFree”
print “Mem:t”,
(mem.total() / 1024),
(mem.used() / 1024),
(mem.free() / 1024)
print “Swap:t”,
(swap.total() / 1024),
(swap.used() / 1024),
(swap.free() / 1024)
print “RAM:t”, mem.ram(), “MB”
print “==========File System
Information===============”
def format_size(size):
return sigar.format_size(size *
1024)
print ‘FilesystemtSizetUsed
tAvailtUse%tMounted ontTypen’
for fs in fslist:
dir_name = fs.dir_name()
usage = sg.file_system_
usage(dir_name)
total = usage.total()
used = total - usage.free()
avail = usage.avail()
pct = usage.use_percent() * 100
if pct == 0.0:
pct = ‘-’
print fs.dev_name(), format_
size(total), format_size(used),
format_size(avail),
pct, dir_name, fs.sys_type_
name(), ‘/’, fs.type_name()
@Output
==========Memory
Information==============
Total Used Free
Mem: 8388608 6061884 2326724
Swap: 131072 16048 115024
RAM: 8192 MB
==========File System
Information===============
Filesystem Size Used Avail
Use% Mounted on Type
/dev/disk0s2 300G 175G 124G 59.0 / hfs
/ local
devfs 191K 191K 0 - /dev devfs /
none
AccessingSecureShell
(SSH)services
SSH (Secure Shell) is a modern replacement for an
old remote shell system called Telnet. It allows data
to be exchanged using a secure channel between
two networked devices. System administrators
frequently use SSH to administrate networked
systems. In addition to providing remote shell, SSH
is also used for secure file transfer (using SSH File
Transfer Protocol, or SFTP) and remote X server
forwarding (allows you to use SSH clients as X
server). In this section we will learn how to use the
SSH protocol from Python using a Python module
called paramiko, which implements the SSH2
protocolforPython.
paramiko can be installed using the following
steps:
$ git clone https://github.com/robey/
paramiko.git
$ cd paramiko
$ sudo python setup.py install
To the core of paramiko is the
SSHClient class. This class
wraps L{Transport},L{Channel},andL{SFTPClient}
to handle most of the aspects of SSH. You can use
SSHClientas:
client = SSHClient()
client.load_system_host_keys()
client.connect(‘some.host.com’)
stdin, stdout, stderr = client.exec_
command(‘dir’)
The following example demonstrates a full SSH
clientwrittenusingtheparamikomodule.
@code:PySSHClient.py
import base64, getpass, os, socket, sys,
socket, traceback
import paramiko
import interactive
# setup logging
paramiko.util.log_to_file(‘demo_simple.
log’)
# get hostname
username = ‘’
if len(sys.argv) 1:
hostname = sys.argv[1]
if hostname.find(‘@’) = 0:
username, hostname = hostname.
Note
If you are confused with the tab spacing of
thecode,lookforthecodefilesonFileSilo.
split(‘@’)
else:
hostname = raw_input(‘Hostname: ‘)
if len(hostname) == 0:
print ‘*** Hostname required.’
sys.exit(1)
port = 22
if hostname.find(‘:’) = 0:
hostname, portstr = hostname.
split(‘:’)
port = int(portstr)
# get username
if username == ‘’:
default_username = getpass.
getuser()
username = raw_input(‘Username
[%s]: ‘ % default_username)
if len(username) == 0:
username = default_username
password = getpass.getpass(‘Password
for %s@%s: ‘ % (username, hostname))
# now, connect and use paramiko
Client to negotiate SSH2 across the
connection
try:
client = paramiko.SSHClient()
client.load_system_host_keys()
client.set_missing_host_key_
policy(paramiko.WarningPolicy)
print ‘*** Connecting...’
client.connect(hostname, port,
username, password)
chan = client.invoke_shell()
print repr(client.get_transport())
print ‘*** SSH Server Connected!
***’
print
interactive.interactive_
shell(chan)
chan.close()
client.close()
except Exception, e:
print ‘*** Caught exception: %s:
%s’ % (e.__class__, e)
traceback.print_exc()
try:
client.close()
except:
pass
sys.exit(1)
To run this code you will also need a custom
Python class interactive.py which implements](https://image.slidesharecdn.com/thepythonbooktheultimateguidetocodingwithpythonpdfdrive-220527060944-728dd1fe/75/The-Python-Book_-The-ultimate-guide-to-coding-with-Python-PDFDrive-pdf-104-2048.jpg)
![The Python Book 105
Work with Python
Administrators are comfortable with running raw
scripts by hand, but end-users are not. So if you
are writing a script that is supposed to be used by
common users, it is a good idea to create a user-
friendly interface on top of the script. This way
end-users can run the scripts just like any other
application. To demonstrate this, we will create
a simple GRUB configuration tool which allows
userstoselectdefaultbootentryandthetimeout.
We will be creating a TUI (text user interface)
application and will use the Python module
‘snack’ to facilitate this (not to be confused with
thePythonaudiolibrary,tksnack).
Thisappconsistsoftwofiles…
grub.py: GRUB Config File (grub.conf) Parser
(available on FileSilo). It implements two main
functions, readBootDB() and writeBootFile(),
which are responsible for reading and writing the
GRUBconfigurationfile.
grub_tui.py: Text user interface file for
manipulating the GRUB configuration file using
thefunctionsavailableingrub.py.
@code:grub_tui.py
import sys
from snack import *
from grub import (readBootDB,
writeBootFile)
def main(entry_
value=’1’,kernels=[]):
try:
(default_value, entry_
value, kernels)=readBootDB()
except:
print sys.stderr,
(“Error reading /boot/grub/grub.
conf.”)
sys.exit(10)
screen=SnackScreen()
while True:
g=GridForm(screen, (“Boot
configuration”),1,5)
if len(kernels)0 :
li=Listbox(height=len(kernels),
width=20, returnExit=1)
for i, x in
enumerate(kernels):
li.append(x,i)
g.add(li, 0, 0)
li.setCurrent(default_value)
bb = ButtonBar(screen,
WritingauserinterfaceusingPython
Learnhowtocreateauser-friendlyinterfaceusingPython
(((“Ok”), “ok”), ((“Cancel”),
“cancel”)))
e=Entry(3, str(entry_
value))
l=Label((“Timeout (in
seconds):”))
gg=Grid(2,1)
gg.setField(l,0,0)
gg.setField(e,1,0)
g.add(Label(‘’),0,1)
g.add(gg,0,2)
g.add(Label(‘’),0,3)
g.add(bb,0,4,growx=1)
result = g.runOnce()
if
bb.buttonPressed(result) ==
‘cancel’:
screen.finish()
sys.exit(0)
else:
entry_value =
e.value()
try :
c = int(entry_
value)
break
except ValueError:
continue
writeBootFile(c,
li.current())
screen.finish()
if __name__== ‘__main__’:
main()
Start the tool using the sudo
command (as it reads the grub.
conf file)
$ sudo grub_tui.py
the interactive shell for the SSH session. Look
for this file on FileSilo and copy it into the same
folderwhereyouhavecreatedPySSHClient.py.
@code_Output
kunal@ubuntu-vm-kdeo:~/src/paramiko/
demos$ python demo_simple.py
Hostname: 192.168.1.2
Username [kunal]: luduser
Password for luduser@192.168.1.2:
*** Connecting...
paramiko.Transport at 0xb76201acL
(cipher aes128-ctr, 128 bits)
(active; 1 open channel(s))
*** SSH Server Connected! ***
Last login: Thu Jan 13 02:01:06 2011
from 192.168.1.9
[~ $:]
If the host key for the SSH server is not added
to your $HOME/.ssh/known_hosts file, the
clientwillthrowthefollowingerror:
*** Caught exception: type
‘exceptions.TypeError’: unbound
method missing_host_key() must be
called with WarningPolicy instance
as first argument (got SSHClient
instance instead)
This means that the client cannot verify the
authenticity of the server you are connected
to. To add the host key to known_hosts, you
can use the ssh command. It is important
to remember that this is not the ideal way to
add the host key; instead you should use ssh-
keygen. But for simplicity’s sake we are using
thesshclient.
kunal@ubuntu-vm-kdeo:~/.ssh$ ssh
luduser@192.168.1.2
The authenticity of host
‘192.168.1.2 (192.168.1.2)’ can’t be
established.
RSA key fingerprint is be:01:76:6a:b
9:bb:69:64:e3:dc:37:00:a4:36:33:d1.
Are you sure you want to continue
connecting (yes/no)? yes
Warning: Permanently added
‘192.168.1.2’ (RSA) to the list of
known hosts.
So now you’ve seen how easy it can be to
carry out the complex sysadmin tasks using
Python’sversatilelanguage.
As is the case with all Python coding, the
code that is presented here can easily be
adoptedintoyourGUIapplication(withsoftware
such as PyGTK or PyQt) or a web application
(usingaframeworksuchasDjangoorGrok).](https://image.slidesharecdn.com/thepythonbooktheultimateguidetocodingwithpythonpdfdrive-220527060944-728dd1fe/75/The-Python-Book_-The-ultimate-guide-to-coding-with-Python-PDFDrive-pdf-105-2048.jpg)
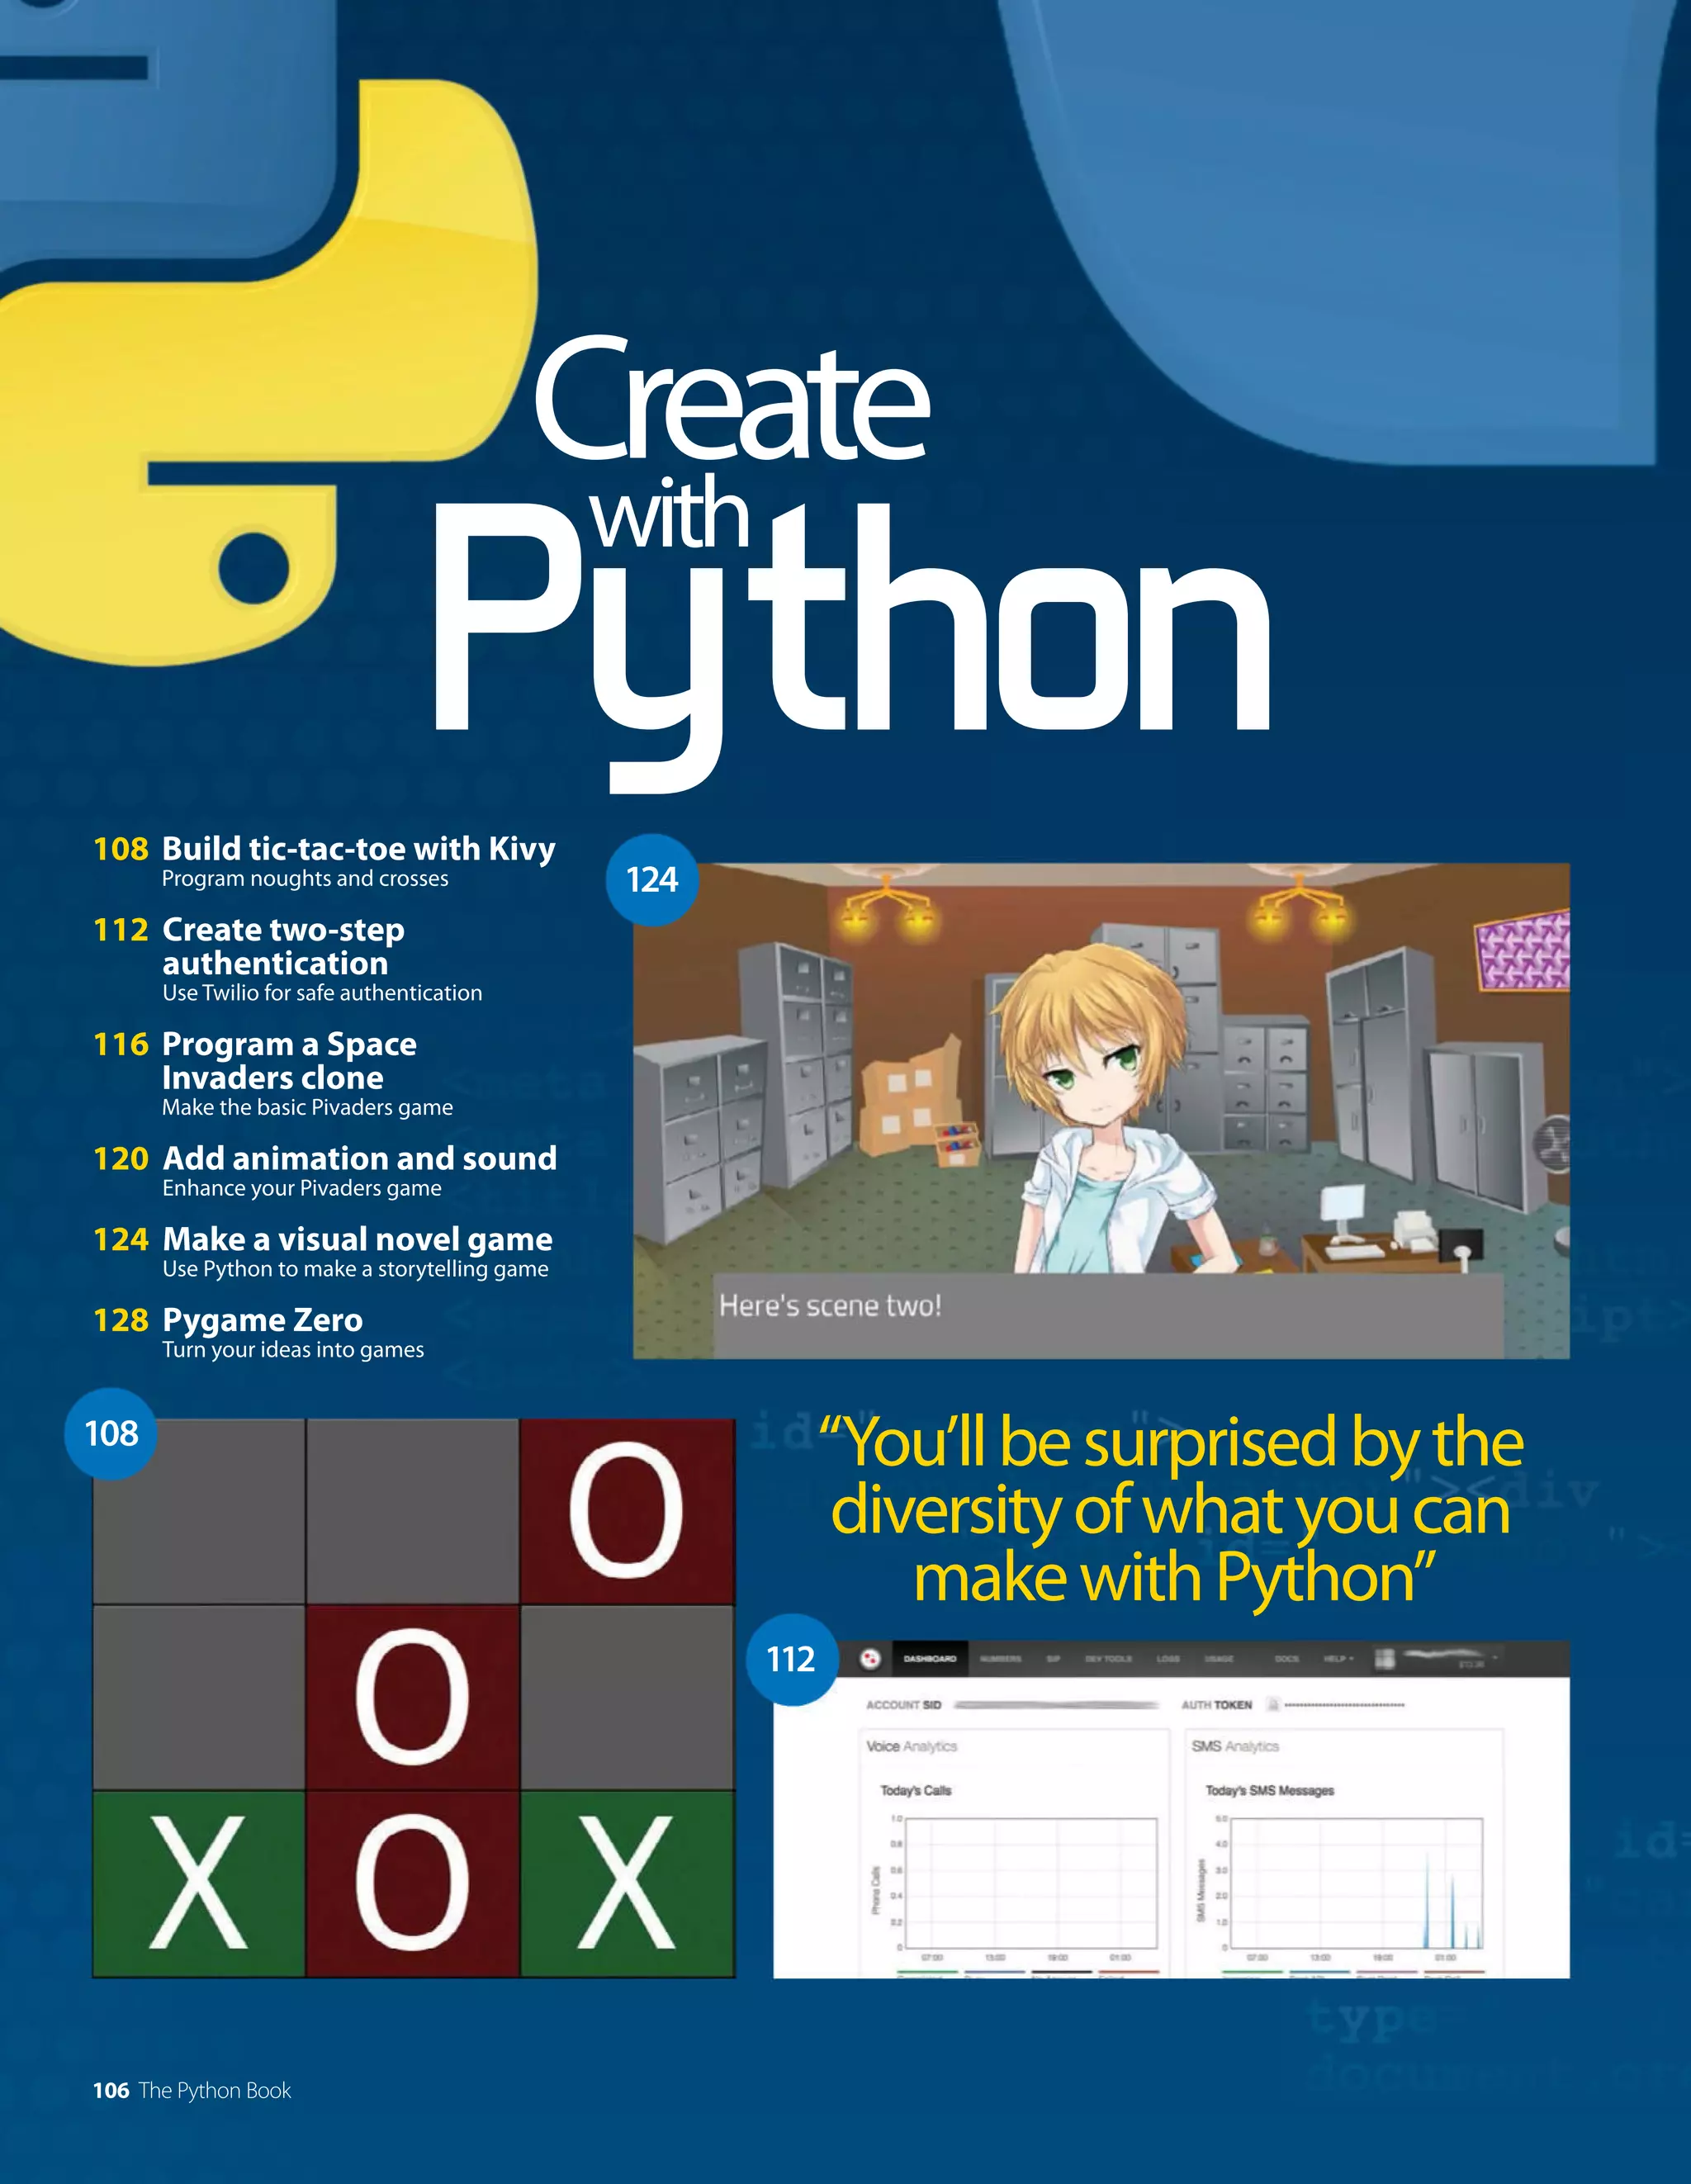

![The Python Book 109
Create with Python
QAtic-tac-toegridnowacceptinginput,addingaOorXalternately
the former, creating a rule for the ‘TicTacToeGrid’
widget by declaring that every ‘TicTacToeGrid’
instantiatedshouldhaveits‘cols’propertysetto3.
We’ll use some more kv language features later,
but for now let’s go back to Python to create the
buttonsthatwillbetheentriesinourtic-tac-toegrid.
from kivy.uix.button import Button
from kivy.properties import ListProperty
class GridEntry(Button):
coords = ListProperty([0, 0])
This inherits from Kivy’s ‘Button’ widget, which
interacts with mouse or touch input, dispatching
events when interactions toggle it. We can hook
into these events to call our own functions when a
user presses the button, and can set the button’s
‘text’ property to display the ‘X’ or ‘O’. We also
createdanewKivypropertyforourwidget,‘coords’
– we’ll show how this is useful later on. It’s almost
identical to making a normal Python attribute by
writing‘self.coords=[0,0]’in‘GridEntry.__init__’.
As with the ‘TicTacToeGrid’, we’ll style our new
class with kv language, but this time we get to see
amoreinterestingfeature.
GridEntry:
font_size: self
.height
As before, this syntax defines a rule for how a
‘GridEntry’ widget should be constructed, this
time setting the ‘font_size’ property that controls
the size of the text in the button’s label. The extra
magic is that kv language automatically detects
thatwe’vereferencedtheButton’sownheightand
will create a binding to update this relationship
– when a ‘GridEntry’ widget’s height changes, its
‘font_size’ will change so the text fits perfectly.
We could have made these bindings straight
from Python (another usage of the ‘bind’ method
used later on), but that’s rarely as convenient as
referencingthepropertywewanttobindto.
Let’s now populate our ‘TicTacToeGrid’ with
‘GridEntry’ widgets (Fig.01). This introduces a
few new concepts: When we instantiated our
‘GridEntry’ widgets, we were able to set their
‘coords’ property by simply passing it in as a
kwarg.Thisisaminorfeaturethatisautomatically
handledbyKivyproperties.
We used the ‘bind’ method to call the
grid’s ‘button_pressed’ method whenever
the `GridEntry` widget dispatches an
‘on_release’ event. This is automatically
handled by its ‘Button’ superclass, and
will occur whenever a user presses, then
releases a ‘GridEntry’ button. We could also
bind to ‘on_press’, which is dispatched when the
button is first clicked, or to any Kivy property of
the button, which is dispatched dynamically
wheneverthepropertyismodified.
We added each ‘GridEntry’ widget to our ‘Grid’
via the ‘add_widget’ method. That means each
one is a child widget of the ‘TicTacToeGrid’, and
so it will display them and knows it should
automatically arrange them into a grid with the
numberofcolumnswesetearlier.
Nowallwehavetodoisreplaceourrootwidget
(returned from ‘App.build’) with a ‘TicTacToeGrid’
andwecanseewhatourapplookslike.
automatically arrange any child widgets to fit
nicelywithasmanyrowsasnecessary.Tic-tac-toe
requiresthreecolumnsandninechildren.
Here we introduce the Kivy language (kv), a
special domain-specific language for making
rules describing Kivy widget trees. It’s very simple
but removes a lot of necessary boilerplate for
manipulatingtheGUIwithPythoncode-asaloose
analogy you might think of it as the HTML/CSS to
Python’s JavaScript. Python gives us the dynamic
powertodoanything,butallthatpowergetsinthe
way if we just want to declare the basic structure
of our GUI. Note that you never need kv language,
youcanalwaysdothesamethinginPythonalone,
but the rest of the example may show why Kivy
programmersusuallyliketousekv.
Kivy comes with all the tools needed to use kv
language;thesimplestwayistowriteitinafilewith
anamebasedonourAppclass.Thatis,weshould
placethefollowinginafilenamed‘tictactoe.kv’:
TicTacToeGrid:
cols: 3 # Number of columns
This is the basic syntax of kv language; for each
widget type we may write a rule defining its
behaviour, including setting its properties and
adding child widgets. This example demonstrates
Kivycomes
withallthetools
neededtousekv
language](https://image.slidesharecdn.com/thepythonbooktheultimateguidetocodingwithpythonpdfdrive-220527060944-728dd1fe/75/The-Python-Book_-The-ultimate-guide-to-coding-with-Python-PDFDrive-pdf-109-2048.jpg)
![110 The Python Book
Create with Python
def build(self):
return TicTacToeGrid()
# Replaces the previous label
With this complete you can run your main Python
file again and enjoy your new program. All being
well, the single Label is replaced by a grid of
nine buttons, each of which you can click (it will
automatically change colour) and release (you’ll
see the printed output information from our
binding). We could customise the appearance by
modifying other properties of the Button, but for
nowwe’llleavethemastheyare.
Hasanyonewonyet?
We’llwanttokeeptrackofthestateoftheboardto
check if anyone has won, which we can do with a
couplemoreKivyproperties:
from kivy.properties import
(ListProperty, NumericProperty)
class TicTacToeGrid(GridLayout):
status = ListProperty([0, 0, 0,
0, 0, 0,
0, 0, 0])
current_player = NumericProperty(1)
This adds an internal status list representing who
has played where, and a number to represent the
current player (1 for ‘O’, -1 for ‘X’). By placing these
numbers in our status list, we’ll know if somebody
winsbecausethesumofarow,columnordiagonal
will be +-3. Now we can update our graphical grid
whenamoveisplayed(Fig.02).
You can run your app again to see exactly what
this did, and you’ll find that clicking each button
now places an ‘O’ or ‘X’ as well as a coloured
background depending on whose turn it is to
play. Not only that, but you can only play one
move in each button thanks to our status
arraykeepingtrackofexistingmoves.
This is enough to play the game but there’s one
vital element missing... a big pop-up telling you
when you’ve won! Before we can do that, we need
toaddsomecodetocheckifthegameisover.
Kivy properties have another useful feature
here, whenever they change they automatically
call an ‘on_propertyname’ method if it exists
and dispatch a corresponding event in Kivy’s
event system. That makes it very easy to write
code that will run when a property changes,
both in Python and kv language. In our case
we can use it to check the status list every time
it is updated, doing something special if a player
hasfilledacolumn,rowordiagonal.
def on_status(self
, instance, new_value):
status = new_value
# Sum each row, column and diagonal.
# Could be shorter
, but let’s be extra
# clear what’s going on
sums = [sum(status[0:3]), # rows
sum(status[3:6]),
sum(status[6:9]),
sum(status[0:
:3]), # columns
sum(status[1:
:3]),
sum(status[2:
:3]),
sum(status[
:
:4]), # diagonals
sum(status[2:-2:2])]
# Sums can only be +-3 if one player
# filled the whole line
if 3 in sums:
print(‘Os win!’)
elif -3 in sums:
print(‘Xs win!’)
elif 0 not in self
.status: # Grid full
print(‘Draw!’)
This covers the basic detection of a won or drawn
board, but itonlyprintsthe result tostdout. At this
stage we probably want to reset the board so that
the players can try again, along with displaying a
graphicalindicatoroftheresult(Fig.03).
Finally, we can modify the `on_status` method
to both reset the board and display the winner
ina‘ModalView’widget.
from kivy.uix.modalview import ModalView
This is a pop-up widget that draws itself on top of
everything else rather than as part of the normal
widget tree. It also automatically closes when the
userclicksortapsoutsideit.
winner = None
if -3 in sums:
winner = ‘Xs win!’
elif 3 in sums:
winner = ‘Os win!’
elif 0 not in self
.status:
winner = ‘Draw.
.
.nobody wins!’
if winner:
popup = ModalView(size_hint=0.75, 0.5))
victory_label = Label(text=winner
,
QThegamewithfinaladditions,makingthegridsquareandextendingtheinterface](https://image.slidesharecdn.com/thepythonbooktheultimateguidetocodingwithpythonpdfdrive-220527060944-728dd1fe/75/The-Python-Book_-The-ultimate-guide-to-coding-with-Python-PDFDrive-pdf-110-2048.jpg)
![The Python Book 111
Create with Python
Tryswappingoutthedifferentwidget
typestoseehowotherwidgetsbehave
font_size=50)
popup.add_widget(victory_label)
popup.bind(on_dismiss=self
.reset)
popup.open()
This mostly uses the same ideas we already
covered, adding the ‘Label’ widget to the
‘ModalView’ then letting the ‘ModalView’ take
care of drawing itself and its children on top of
everything else. We also use another binding; this
time to ‘on_dismiss’, which is an event dispatched
by the ‘ModalView’ when it is closed. Finally, we
made use of the ‘size_hint’ property common
to all widgets, which in this case is used to set
the ‘ModalView’ size proportional to the window
– while a ‘ModalView’ is open you can resize
the window to see it dynamically resize, always
maintainingtheseproportions.Thisisanothertrick
madepossiblebyabindingwiththe‘size_hint’Kivy
property,thistimemanagedinternallybyKivy.
That’s it, a finished program! We can now
not only play tic-tac-toe, but our program
automatically tells us when somebody has won,
and resets the board so we can play again. Simply
runyourprogramandenjoyhoursoffun!
Timetoexperiment
This has been a quick tour through some of Kivy’s
features, but hopefully it demonstrates how
to think about building a Kivy application. Our
programs are built from individual Kivy widgets,
interacting by having Python code run when their
properties change (eg our ‘on_status’ method)
or when they dispatch events (eg ‘Button’ ‘on_
release’). We also briefly saw kv language and
experienced how it can automatically create
bindingsbetweenproperties.
You can find a copy of the full program on
FileSilo, which you can reference to check you’ve
followed everything correctly. We’ve also added
an extra widget, the ‘Interface’, with a structure
coded entirely in kv language that demonstrates
how to add child widgets this way. You can test
it by uncommenting the ‘return Interface()’ line
in ‘TicTacToeGrid.build’. It doesn’t do anything
fundamentally different to what we already
covered, but it does make extensive use of kv
language’s binding ability to automatically update
a label showing the current player, and to resize
the TicTacToeGrid so that it is always square to
fit within its parent. You can play with all these
settings to see exactly how it fits together, or try
thingslikeswappingoutthedifferentwidgettypes
toseehowotherwidgetsbehave.
class TicTacToeGrid(GridLayout):
def __init__(self
, *args, **kwargs):
super(TicTacToeGrid, self).__init__(*args, **kwargs)
for row in range(3):
for column in range(3):
grid_entry = GridEntry(
coords=(row, column))
grid_entry.bind(on_release=self
.button_pressed)
self
.add_widget(grid_entry)
def button_pressed(self
, instance):
# Print output just to see what’s going on
print(‘{} button clicked!’
.format(instance.coords))
Fig 01
# Note the *args parameter! It’s important later when we make a binding
# to reset, which automatically passes an argument that we don’t care about
def reset(self
, *args):
self
.status = [0 for _ in range(9)]
# self
.children is a list containing all child widgets
for child in self
.children:
child.text = ‘’
child.background_color = (1, 1, 1, 1)
self
.current_player = 1
Fig 03
def button_pressed(self
, button):
# Create player symbol and colour lookups
player = {1: ‘O’
, -1: ‘X’}
colours = {1: (1, 0, 0, 1), -1: (0, 1, 0, 1)} # (r
, g, b, a)
row, column = button.coords # The pressed button is automatically
# passed as an argument
# Convert 2D grid coordinates to 1D status index
status_index = 3*row + column
already_played = self
.status[status_index]
# If nobody has played here yet, make a new move
if not already_played:
self
.status[status_index] = self
.current_player
button.text = {1: ‘O’
, -1: ‘X’}[self
.current_player]
button.background_color = colours[self
.current_player]
self
.current_player *= -1 # Switch current player
Fig 02
Codeon
FileSilo](https://image.slidesharecdn.com/thepythonbooktheultimateguidetocodingwithpythonpdfdrive-220527060944-728dd1fe/75/The-Python-Book_-The-ultimate-guide-to-coding-with-Python-PDFDrive-pdf-111-2048.jpg)
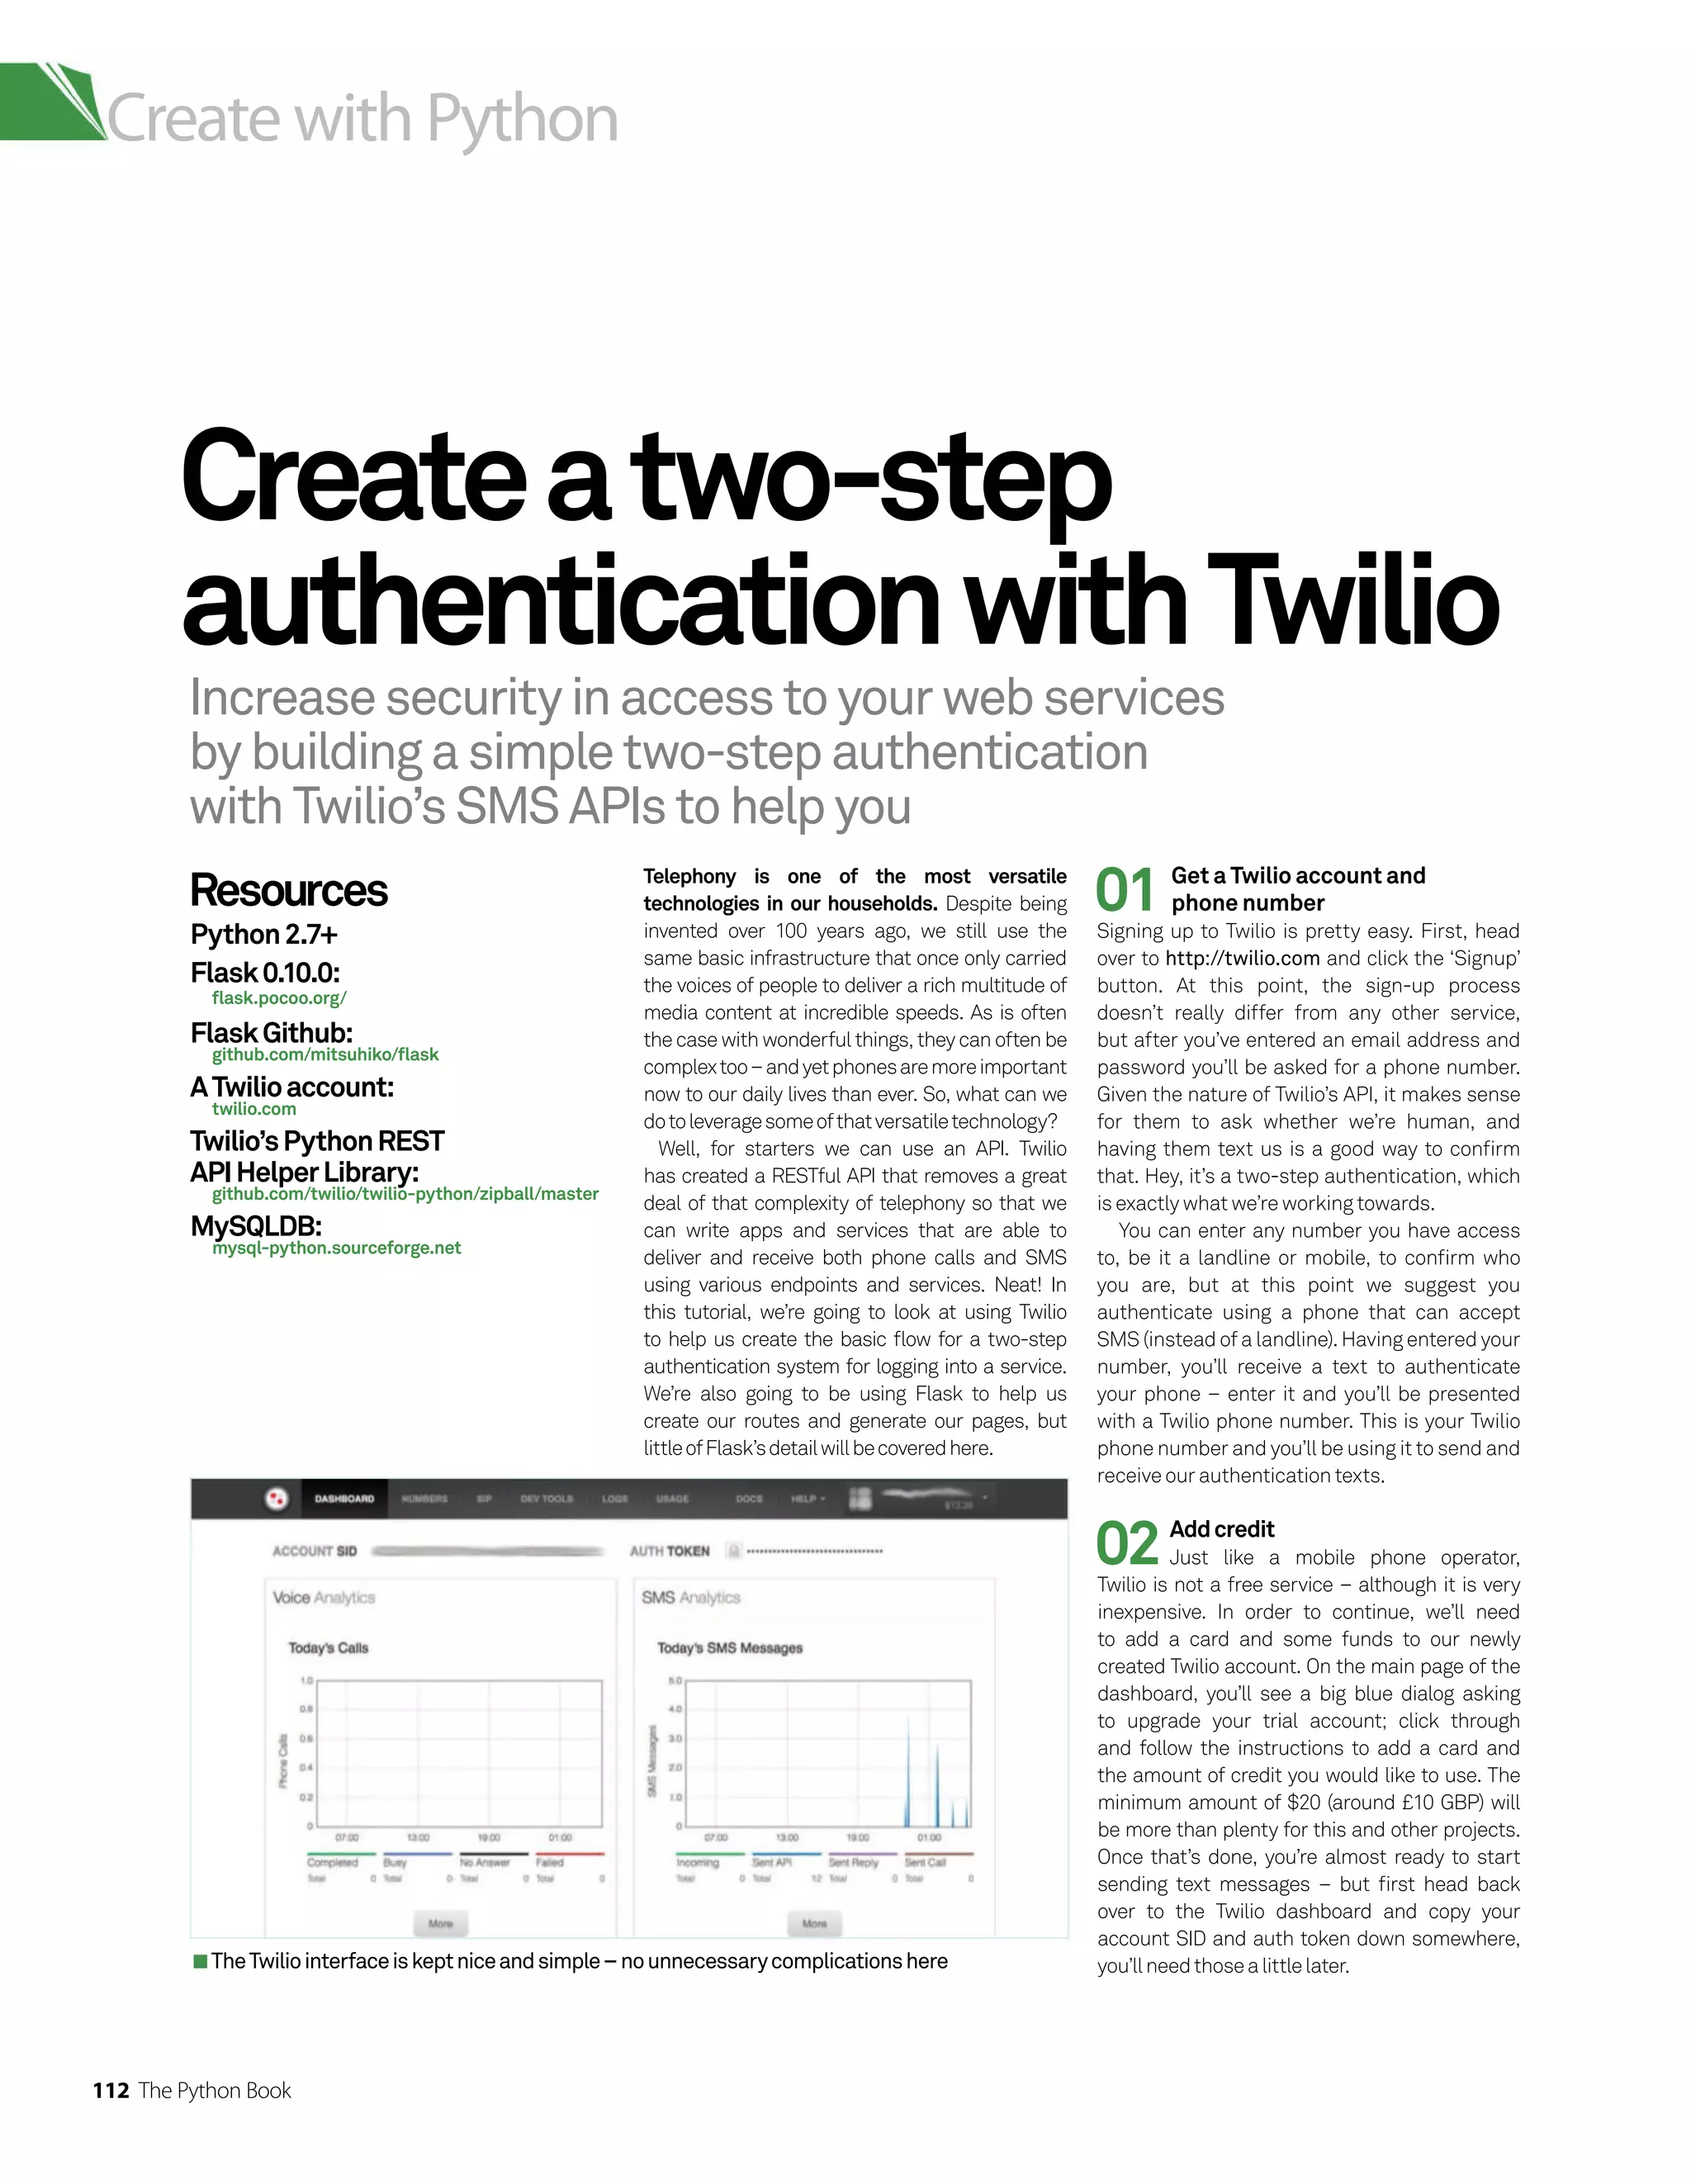
![The Python Book 113
Create with Python
import MySQLdb
from flask import Flask, redirect, request, session, render_template
from twilio.rest import TwilioRestClient as twilio
import string, random, time
db = MySQLdb.connect(host=127.0.0.1, user=SQLUSER,
passwd=SQLPASS, db=two-step, port=3306)
expirationLength = 300
account_sid = YOUR ACCOUNT SID
auth_token = YOUR ACCOUNT AUTH TOKEN
client = twilio(account_sid, auth_token)
@app.route('/')
def index():
return index page
@app.route('/login', methods=['GET'])
def login():
return login page
@app.route('/check-user', methods=['POST'])
def checkUser():
return check user page
@app.route('/logout')
def logout():
return logout page
@app.route('/verify', methods=['GET'])
def twoStep():
return verify page
@app.route('/check-code', methods=['POST'])
def checkCode():
return check code page
if __name__ == '__main__':
app.secret_key = 'R4nDOMCRypt0gr4ph1cK3yf0R5355i0N'
app.run(host='0.0.0.0', debug=True)
Fig 01
03InstalltheTwilioHelperLibrary
andMySQLDB
The Twilio helper library is a fantastic piece of
codethatletsyoujumpstraightintosendingand
handling text messages in no time at all. There
areacoupleofwaystoinstallthelibrary:youcan
useeitherPIPorEasy_Install,likeso
$ pip install twilio
$ easy_install twilio
Or you can download the source code for the
helper library and run the ‘setup.py’ file. It
really is as simple as that. Now, for storing the
verification tokens we’re going to use a MySQL
database. To get Python talking to our SQL
server, we’ll use the Python module MySQLDB,
thepackageforwhichyoucangrablikeso…
apt-get install python-mysqldb
In the tutorial resources we have included an
SQL dump with the table structure. Import it
into a database of your choosing. Assuming
everything so far has gone swimmingly, you can
create a new project folder/environment and
addanewfile‘server.py’.
04Serversetup
Open the ‘server.py’ file for editing. The
firstthingwe'regoingtodoisimportthelibraries
we need for our authentication flow, create the
endpoints for our server and assign some of the
variablesneededtorunourFlaskserver.(Fig 01)
You may have noticed the account_sid and
auth_token variable we’ve set after the import
statements. We’ll use these with our Twilio
client so we can interact with Twilio and our
mobile phones. These settings can be found
on the Twilio account dashboard, right below
the header. We’ve also connected to our SQL
database, so make sure your SQL server is
running before you fire up the app, otherwise
you’ll have an error thrown. Save, now if you run
your ‘server.py’ file, you should be able to access
theindexpageofyourserverat127.0.0.1:5000/.
05Serverlogic
If you’ve hit all of your server endpoints
already, so far all you will see are the strings we
returned at the end of endpoint declarations.
These are not all that good-looking, so let’s
add some Flask templates to pretty things
up a little. The focus of this tutorial is not on
the intricacies of Flask and as such, included
on the DVD is a folder called ‘templates’ and
another called ‘static’; copy them both to the
root of your current project folder and amend
your endpoints as in Fig 02. If you revisit the
pages again, things might seem a little out of
whack at the moment, but don’t worry about
that for the time being. It’s mostly because
we’ve not put together the server logic to help
the templates figure out what to do.
Let’s deal with the ‘/’ path first. All we’re
doing here is checking the state of our session
cookies and effecting how the index.html
page renders according to that state. If the
user isn’t logged in, we’ll give them a link to the
login page, if the user is logged in but hasn’t
verified, then we’ll give them a link to the
code verification page. Before we deliver the
template we need to check that our session has
its particular variables set, otherwise we’ll end
up getting KeyErrors.
@app.route(‘/’)
def index():
checkSessionState()
return render_template(‘index.
html’)
def checkSessionState():](https://image.slidesharecdn.com/thepythonbooktheultimateguidetocodingwithpythonpdfdrive-220527060944-728dd1fe/75/The-Python-Book_-The-ultimate-guide-to-coding-with-Python-PDFDrive-pdf-113-2048.jpg)
![114 The Python Book
Create with Python
try:
session[‘verified’] == True
except KeyError:
session[‘verified’] = ’’
try:
session[‘loggedin’] == True
except KeyError:
session[‘loggedin’] = ’’
try:
session[‘user’] == True
except KeyError:
session[‘user’] = ’’
result = cur.fetchone()
returnedPassword = result[2]
returnedPhoneNumber = result[3]
We can then build an SQL statement using cur.
execute().Noticethe%s;thiswillbereplacedwith
the value passed through in the next variable. We
execute the statement with cur.fetchone(), which
will get us the first row that the query returns – if
there is no result we’ll get None and we can then
return the user to the login page with an error
message. Let’s assume we’ve requested a valid
user–we’llnextcheckthatthepasswordassigned
tothatuseristhesameastheonesubmitted.Ifso,
we’ll generate the validation code to send to the
user, which we’ll store in the verification table of
ourdatabaseuntilit’susedorexpires.We’llneedto
createanewcursortoinserttheverificationcode
intoourtable.Afterwe’veexecutedthestatement
we need to commit the changes to the database,
wedothiswithdb.commit() –we’llthenaddthe
resultsofthequerytooursessionsowecancheck
againstthemlater.(Fig03)
that will make up the body of our message,
the number that we want to send it to and the
number that we want to send it from. When
inputting the number that we want to send it
to, it’s best to use the +CountryCode type of
phone number to avoid any ambiguity about
the intended recipient. The number that we’re
sending from is our Twilio number; you can
use any Twilio number you have assigned to
your account, so long as it has credit. As soon
as we execute that code, the message will be
sent and your SMS will go straight through to
the telephone. The SID is the unique identifier
for the message/call sent; receiving it means
the message has been executed successfully.
After that, we can redirect our user to the
verification page with return redirect(‘/
verify’) at the end of /check-user.
06Loggingin
The first step in two-step authentication
is logging in with a traditional username/email
and password. Access your database and create
anewuserwiththefollowingquery:
INSERT INTO users (username, password,
phonenumber) VALUES (‘A USERNAME', ‘A
PASSWORD', ‘+44YOURUSERSPHONENUMBER')
For the purposes of this tutorial, the password
is plain text – but we implore you, when you’re
implementing passwords in a live environment,
makesurethatyouhashthem.Still,fornowwe’re
goingtouseaplaintextpassword.Ourlogin.html
template has a form that’s going to POST itself
to check-user; here we'll check the validity of
the credentials and then trigger the verification
if needed. So we’re going to use the MySQLDB
moduletogetdetailsfromourdatabase.
In order to query our database we need to
create a cursor from which to execute our MySQL
statements.Wedothiswithcur = db.cursor():
@app.route(‘/check-user',
methods=[‘POST'])
def checkUser():
#session.clear()
if request.method == ‘POST':
#print request.form['username']
cur = db.cursor()
cur.execute(SELECT * FROM
users WHERE username = %s,
(request.form[‘username'],))
07Sendtheverificationcode
Now that we believe we’re dealing with
a valid user, it’s time for the second step of our
two-step process. On the line after where we
stored a variable in our session, we make a call
to sendVerificationCode (VERIFICATION
CODE, USER PHONE NUMBER) and pass
through the code we want to send to our user
and the user’s phone number. So what does
that function actually look like? It must be
big, long and complicated because it deals
with the telecommunications network, right?
Wrong. It’s actually incredibly simple to send
an SMS with Twilio. In fact, part of the inherent
beauty of Twilio lies in its simplicity. To send a
text, all we have to do is:
def sendVerificationCode(code,
number):
text = client.messages.create(
body=“Your verification code
is: + code,
to=number,
from_=“+YOURTWILIONUMBER
)
return text.sid
Using the client variable we used to instantiate
the Twilio REST module, we can access the
messages class and execute the create
method. All we need to pass through is the text
08Checkverificationcode
At this point the user will have received
a text message with something along the lines
of ‘Your verification code is: 12cd56’ and will
be presented with the verification page. If, at
this point, they choose to browse around our
site, they won’t be able to access anything that
we don't want them to. Still, we’ll know that
they’ve logged in, so if they head back to the
verification page, we can just let them input
their code. Once they submit their code, it will
be sent to the /check-code endpoint.
Just like before when we checked for our
user’s validity, we’re going to attempt to retrieve
the verification code and check it. (Fig 04)
First we’re simply going to retrieve the code
and check the user it has assigned to it. If that
user assigned to the code matches the user
in our session, then we can be certain that
the right person is logging in with the right
code – if not we can redirect them accordingly.
Assuming the code is correct, we need to
check it’s still valid. Back in Step 6, we created
an expiration time that was five minutes in the
future from when the code was generated. If it’s
been more than five minutes (or whatever time
you’ve set on it) then we’re going to consider it
invalid, delete the code from our table and then
log out our user so they can start over, like so.
elif time.time() expirationTime:
expirySQL = db.cursor()
expirySQL.execute(DELETE FROM
verification WHERE code=%s,
(codeToCheck,))](https://image.slidesharecdn.com/thepythonbooktheultimateguidetocodingwithpythonpdfdrive-220527060944-728dd1fe/75/The-Python-Book_-The-ultimate-guide-to-coding-with-Python-PDFDrive-pdf-114-2048.jpg)
![The Python Book 115
Create with Python
expirySQL.close()
session['loggedin'] == False
return redirect('/logout')
If we manage to pass the tests so far, then
we’ve two-step verified our user – hooray!
Surprisingly easy, eh? Before we give our user
free reign around our service, we still want
to get rid of that token – we don’t need it any
more and we don’t want to risk someone else
using it maliciously in the future.
else:
delSql = db.cursor()
delSql.execute(DELETE FROM
verification WHERE code=%s,
(codeToCheck,))
delSql.close()
db.commit()
session['verified'] = True
return redirect('/')
else:
return redirect('/
verify?error=true')
And that’s it! Now we redirect our user to
wherever we want them to be at the end of the
process. In this instance we’re sending them
back to our index page, which will render a
success message and give the user a link to
log out whenever they like – but they could be
redirectedtotheiruserpage,andsoon.
09Conclusion
In every web-based service, security
is king. Users entrust more and more personal
data and trends to services every day and it’s
the responsibility of those services to maintain
the privacy of that data as best they can. It’s no
wonder that services such as Amazon, Google
and Facebook have all implemented two-
step verification across their services. With
two-step authentication, a user can tie their
account to one of the most personal things they
own: their phone. With services like Twilio and
some simple code, they contain people’s keys –
or at least a part of them.
@app.route('/')
def index():
return render_template('index.html')
@app.route('/login', methods=['GET'])
def login():
return render_template('login.html')
@app.route('/check-user', methods=['POST'])
def checkUser():
return check user page
@app.route('/logout')
def logout():
return logout page
@app.route('/verify', methods=['GET'])
def twoStep():
return render_template('verify.html')
@app.route('/check-code', methods=['POST'])
def checkCode():
return check code page
Fig 02
verficationCode = generateVerificationCode(size=6)
ins = db.cursor()
expiration = int(time.time() + expirationLength)
sql = INSERT INTO verification (code, expiration, username) VALUES ('%s',
'%s', '%s') % (verficationCode, expiration, request.form['username'])
ins.execute(sql)
ins.close()
db.commit()
session['user'] = request.form['username']
session['loggedin'] = True
Fig 03
@app.route('/check-code', methods=['POST'])
def checkCode():
if request.method == 'POST':
codeToCheck = request.form['code']
if not 'user' in session:
return redirect('/login')
else:
cur = db.cursor()
cur.execute(SELECT * FROM verification WHERE code = %s, (codeToCheck,))
result = cur.fetchone()
cur.close()
if result != None:
returnedUser = result[3]
expirationTime = int(result[2])
if returnedUser != session['user']:
return redirect('/verify?error=true')
Fig 04](https://image.slidesharecdn.com/thepythonbooktheultimateguidetocodingwithpythonpdfdrive-220527060944-728dd1fe/75/The-Python-Book_-The-ultimate-guide-to-coding-with-Python-PDFDrive-pdf-115-2048.jpg)

![The Python Book 117
Create with Python
#!/usr/bin/env python2
import pygame, random
BLACK = (0, 0, 0)
BLUE = (0, 0, 255)
WHITE = (255, 255, 255)
RED = (255, 0, 0)
ALIEN_SIZE = (30, 40)
ALIEN_SPACER = 20
BARRIER_ROW = 10
BARRIER_COLUMN = 4
BULLET_SIZE = (5, 10)
MISSILE_SIZE = (5, 5)
BLOCK_SIZE = (10, 10)
RES = (800, 600)
class Player(pygame.sprite.Sprite):
def __init__(self):
pygame.sprite.Sprite.__init__(self)
self.size = (60, 55)
self.rect = self.image.get_rect()
self.rect.x = (RES[0] / 2) - (self.size[0] / 2)
self.rect.y = 520
self.travel = 7
self.speed = 350
self.time = pygame.time.get_ticks()
def update(self):
self.rect.x += GameState.vector * self.travel
if self.rect.x 0:
self.rect.x = 0
elif self.rect.x RES[0] - self.size[0]:
self.rect.x = RES[0] - self.size[0]
class Alien(pygame.sprite.Sprite):
def __init__(self):
pygame.sprite.Sprite.__init__(self)
self.size = (ALIEN_SIZE)
self.rect = self.image.get_rect()
self.has_moved = [0, 0]
self.vector = [1, 1]
self.travel = [(ALIEN_SIZE[0] - 7), ALIEN_SPACER]
self.speed = 700
self.time = pygame.time.get_ticks()
def update(self):
if GameState.alien_time - self.time self.speed:
if self.has_moved[0] 12:
self.rect.x += self.vector[0] * self.travel[0]
self.has_moved[0] +=1
else:
if not self.has_moved[1]:
self.rect.y += self.vector[1] * self.travel[1]
self.vector[0] *= -1
self.has_moved = [0, 0]
self.speed -= 20
if self.speed = 100:
self.speed = 100
self.time = GameState.alien_time
class Ammo(pygame.sprite.Sprite):
def __init__(self, color, (width, height)):
pygame.sprite.Sprite.__init__(self)
self.image = pygame.Surface([width, height])
self.image.fill(color)
self.rect = self.image.get_rect()
self.speed = 0
self.vector = 0
def update(self):
self.rect.y += self.vector * self.speed
if self.rect.y 0 or self.rect.y RES[1]:
self.kill()
class Block(pygame.sprite.Sprite):
def __init__(self, color, (width, height)):
pygame.sprite.Sprite.__init__(self)
self.image = pygame.Surface([width, height])
self.image.fill(color)
self.rect = self.image.get_rect()
class GameState:
pass
class Game(object):
def __init__(self):
pygame.init()
pygame.font.init()
self.clock = pygame.time.Clock()
self.game_font = pygame.font.Font(
‘data/Orbitracer.ttf’, 28)
self.intro_font = pygame.font.Font(
‘data/Orbitracer.ttf’, 72)
self.screen = pygame.display.set_mode([RES[0], RES[1]])
self.time = pygame.time.get_ticks()
self.refresh_rate = 20
self.rounds_won = 0
self.level_up = 50
self.score = 0
self.lives = 2
self.player_group = pygame.sprite.Group()
self.alien_group = pygame.sprite.Group()
self.bullet_group = pygame.sprite.Group()
self.missile_group = pygame.sprite.Group()
self.barrier_group = pygame.sprite.Group()
self.all_sprite_list = pygame.sprite.Group()
self.intro_screen = pygame.image.load(
‘data/start_screen.jpg’).convert()
self.background = pygame.image.load(
‘data/Space-Background.jpg’).convert()
pygame.display.set_caption(‘Pivaders - ESC to exit’)
pygame.mouse.set_visible(False)
Player.image = pygame.image.load(
‘data/ship.png’).convert()
Player.image.set_colorkey(BLACK)
Alien.image = pygame.image.load(
‘data/Spaceship16.png’).convert()
Alien.image.set_colorkey(WHITE)
GameState.end_game = False
GameState.start_screen = True
GameState.vector = 0
GameState.shoot_bullet = False
def control(self):
for event in pygame.event.get():
if event.type == pygame.QUIT:
GameState.start_screen = False
GameState.end_game = True
if event.type == pygame.KEYDOWN
and event.key == pygame.K_ESCAPE:
if GameState.start_screen:
GameState.start_screen = False
GameState.end_game = True
self.kill_all()
else:
GameState.start_screen = True
self.keys = pygame.key.get_pressed()
if self.keys[pygame.K_LEFT]:
GameState.vector = -1
elif self.keys[pygame.K_RIGHT]:
GameState.vector = 1
else:
GameState.vector = 0
if self.keys[pygame.K_SPACE]:
if GameState.start_screen:
GameState.start_screen = False
self.lives = 2
self.score = 0
self.make_player()
self.make_defenses()
self.alien_wave(0)
else:
GameState.shoot_bullet = True
def splash_screen(self):
while GameState.start_screen:
self.kill_all()
self.screen.blit(self.intro_screen, [0, 0])
self.screen.blit(self.intro_font.render(
“PIVADERS”, 1, WHITE), (265, 120))
self.screen.blit(self.game_font.render(
“PRESS SPACE TO PLAY”, 1, WHITE), (274, 191))
GroupsThis
longlistofgroups
we’recreatingare
essentiallysets.Each
timewecreateone
oftheseitems,it’s
addedtothesetso
itcanbetestedfor
collisionsanddrawn
withease.
Cleanclode
Havingallthemost
regularlyused
globalvariables
clearlylabelled
heremakesour
codelateroneasier
toread.Also,ifwe
wanttochangethe
sizeofsomething,
weonlyneedtodo
ithereanditwill
workeverywhere.
ControlTaking
careofkeyboard
inputisthecontrol
method.Itchecks
forkeyeventsand
actsaccordingly
dependingwhether
we’reonthestart
screenorplaying
thegame.
Rainbullets
TheAmmoclassis
shortandsweet.
Weonlyneedafew
initialisingattributes
andtheupdate
methodchecksifit’s
stillonthescreen.If
not,it’sdestroyed.
Get
thecode:
bit.ly/
11k5f2x](https://image.slidesharecdn.com/thepythonbooktheultimateguidetocodingwithpythonpdfdrive-220527060944-728dd1fe/75/The-Python-Book_-The-ultimate-guide-to-coding-with-Python-PDFDrive-pdf-117-2048.jpg)
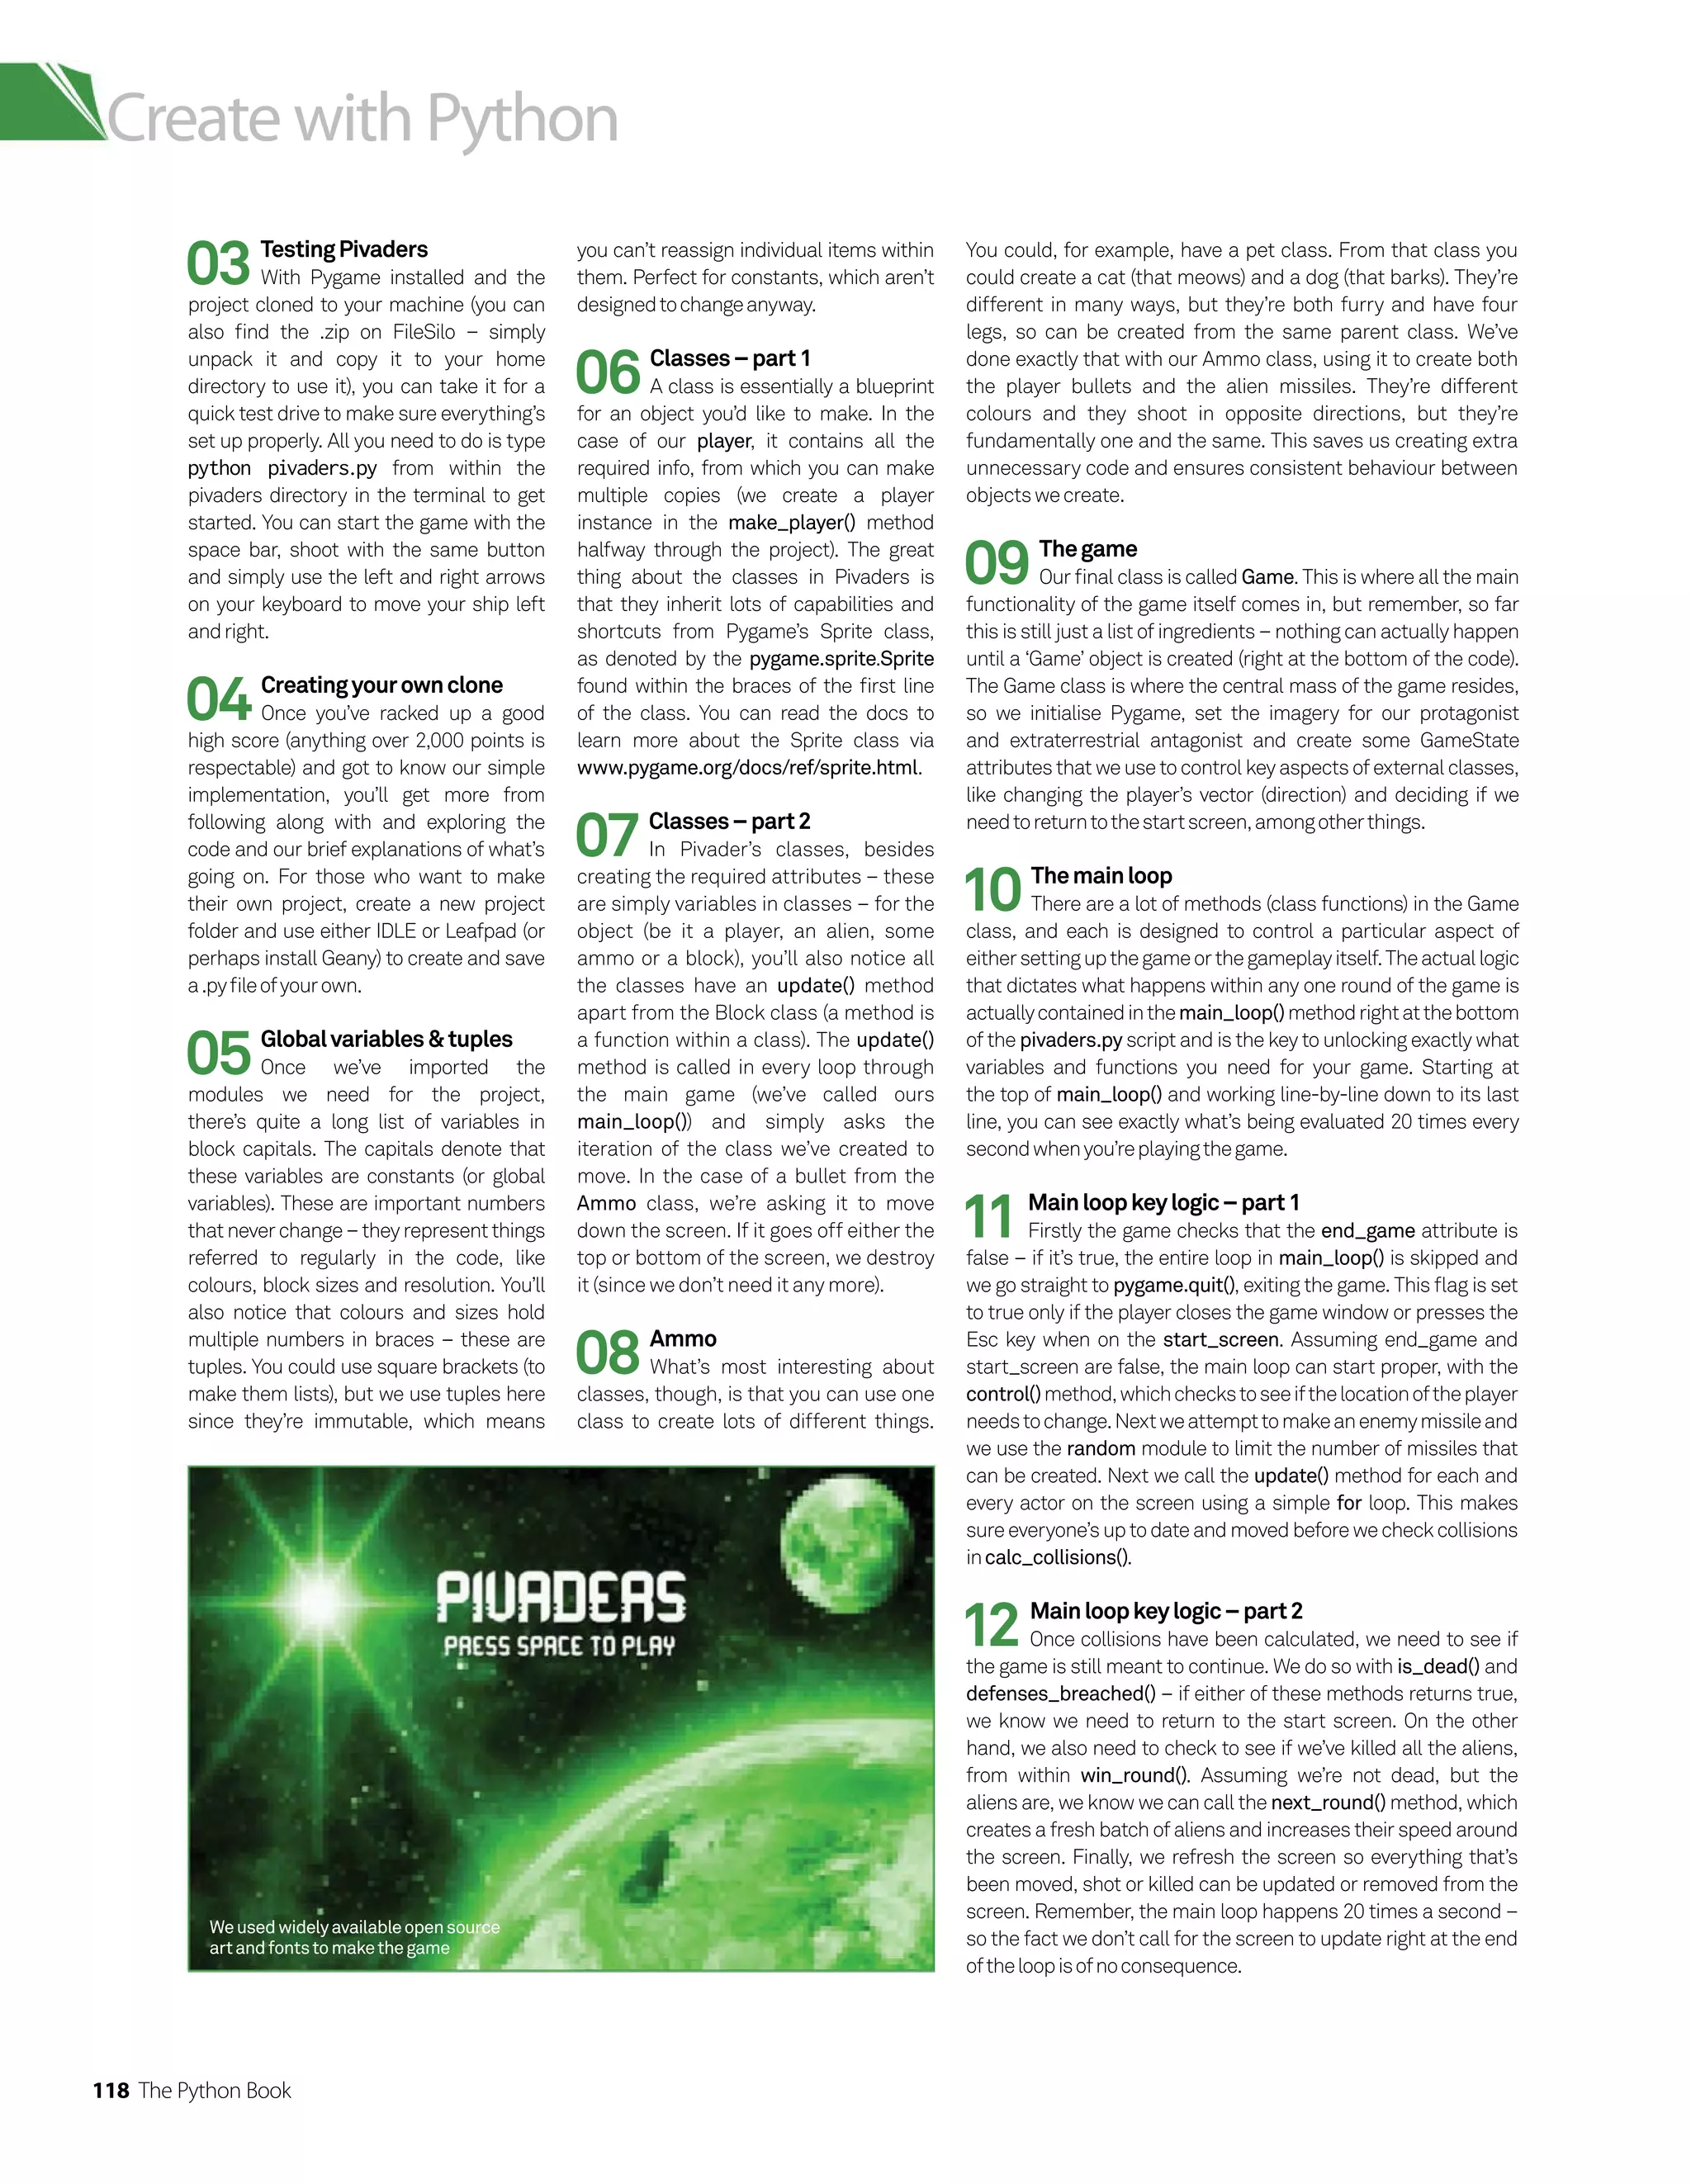
![The Python Book 119
Create with Python
DeadoraliveProbablytwoofthemost
importantquestionsareansweredhere–is
theplayerdeadordidyouwintheround?
StartthegameTheverylastthing
wedoiscreateaGameobjectandcallthe
mainloop.Besidesourconstants,thisis
theonlycodethatsitsoutsideaclass.
pygame.display.flip()
self.control()
def make_player(self):
self.player = Player()
self.player_group.add(self.player)
self.all_sprite_list.add(self.player)
def refresh_screen(self):
self.all_sprite_list.draw(self.screen)
self.refresh_scores()
pygame.display.flip()
self.screen.blit(self.background, [0, 0])
self.clock.tick(self.refresh_rate)
def refresh_scores(self):
self.screen.blit(self.game_font.render(
“SCORE “ + str(self.score), 1, WHITE), (10, 8))
self.screen.blit(self.game_font.render(
“LIVES “ + str(self.lives + 1), 1, RED), (355, 575))
def alien_wave(self, speed):
for column in range(BARRIER_COLUMN):
for row in range(BARRIER_ROW):
alien = Alien()
alien.rect.y = 65 + (column * (
ALIEN_SIZE[1] + ALIEN_SPACER))
alien.rect.x = ALIEN_SPACER + (
row * (ALIEN_SIZE[0] + ALIEN_SPACER))
self.alien_group.add(alien)
self.all_sprite_list.add(alien)
alien.speed -= speed
def make_bullet(self):
if GameState.game_time - self.player.time self.player.speed:
bullet = Ammo(BLUE, BULLET_SIZE)
bullet.vector = -1
bullet.speed = 26
bullet.rect.x = self.player.rect.x + 28
bullet.rect.y = self.player.rect.y
self.bullet_group.add(bullet)
self.all_sprite_list.add(bullet)
self.player.time = GameState.game_time
GameState.shoot_bullet = False
def make_missile(self):
if len(self.alien_group):
shoot = random.random()
if shoot = 0.05:
shooter = random.choice([
alien for alien in self.alien_group])
missile = Ammo(RED, MISSILE_SIZE)
missile.vector = 1
missile.rect.x = shooter.rect.x + 15
missile.rect.y = shooter.rect.y + 40
missile.speed = 10
self.missile_group.add(missile)
self.all_sprite_list.add(missile)
def make_barrier(self, columns, rows, spacer):
for column in range(columns):
for row in range(rows):
barrier = Block(WHITE, (BLOCK_SIZE))
barrier.rect.x = 55 + (200 * spacer) + (row * 10)
barrier.rect.y = 450 + (column * 10)
self.barrier_group.add(barrier)
self.all_sprite_list.add(barrier)
def make_defenses(self):
for spacing, spacing in enumerate(xrange(4)):
self.make_barrier(3, 9, spacing)
def kill_all(self):
for items in [self.bullet_group, self.player_group,
self.alien_group, self.missile_group, self.barrier_group]:
for i in items:
i.kill()
def is_dead(self):
if self.lives 0:
self.screen.blit(self.game_font.render(
“The war is lost! You scored: “ + str(
self.score), 1, RED), (250, 15))
self.rounds_won = 0
self.refresh_screen()
pygame.time.delay(3000)
return True
def win_round(self):
if len(self.alien_group) 1:
self.rounds_won += 1
self.screen.blit(self.game_font.render(
“You won round “ + str(self.rounds_won) +
“ but the battle rages on”, 1, RED), (200, 15))
self.refresh_screen()
pygame.time.delay(3000)
return True
def defenses_breached(self):
for alien in self.alien_group:
if alien.rect.y 410:
self.screen.blit(self.game_font.render(
“The aliens have breached Earth defenses!”,
1, RED), (180, 15))
self.refresh_screen()
pygame.time.delay(3000)
return True
def calc_collisions(self):
pygame.sprite.groupcollide(
self.missile_group, self.barrier_group, True, True)
pygame.sprite.groupcollide(
self.bullet_group, self.barrier_group, True, True)
if pygame.sprite.groupcollide(
self.bullet_group, self.alien_group, True, True):
self.score += 10
if pygame.sprite.groupcollide(
self.player_group, self.missile_group, False, True):
self.lives -= 1
def next_round(self):
for actor in [self.missile_group,
self.barrier_group, self.bullet_group]:
for i in actor:
i.kill()
self.alien_wave(self.level_up)
self.make_defenses()
self.level_up += 50
def main_loop(self):
while not GameState.end_game:
while not GameState.start_screen:
GameState.game_time = pygame.time.get_ticks()
GameState.alien_time = pygame.time.get_ticks()
self.control()
self.make_missile()
for actor in [self.player_group, self.bullet_group,
self.alien_group, self.missile_group]:
for i in actor:
i.update()
if GameState.shoot_bullet:
self.make_bullet()
self.calc_collisions()
if self.is_dead() or self.defenses_breached():
GameState.start_screen = True
if self.win_round():
self.next_round()
self.refresh_screen()
self.splash_screen()
pygame.quit()
if __name__ == ‘__main__’:
pv = Game()
pv.main_loop()
Refreshing
thescreenYou
needtocarefully
considerthewayin
whichyouupdate
thescreen.Blitting
thebackground
betweenactor
movementsisvital
forcleananimation.
MainloopThis
isthebusinessend
ofourapplication.
Thisloopexecutes
20timesasecond.It
needstobelogical
andeasyforanother
codertounderstand.
Guns’n’ammo
Bulletsandmissiles
usethesameparent
class.Wechangea
fewkeyattributes
originallyinitialised
tocreatethe
behaviourweneed;
egthevectorforeach
isopposite.
Get
thecode:
bit.ly/
11k5f2x
Aclassisessentiallyablueprint](https://image.slidesharecdn.com/thepythonbooktheultimateguidetocodingwithpythonpdfdrive-220527060944-728dd1fe/75/The-Python-Book_-The-ultimate-guide-to-coding-with-Python-PDFDrive-pdf-119-2048.jpg)
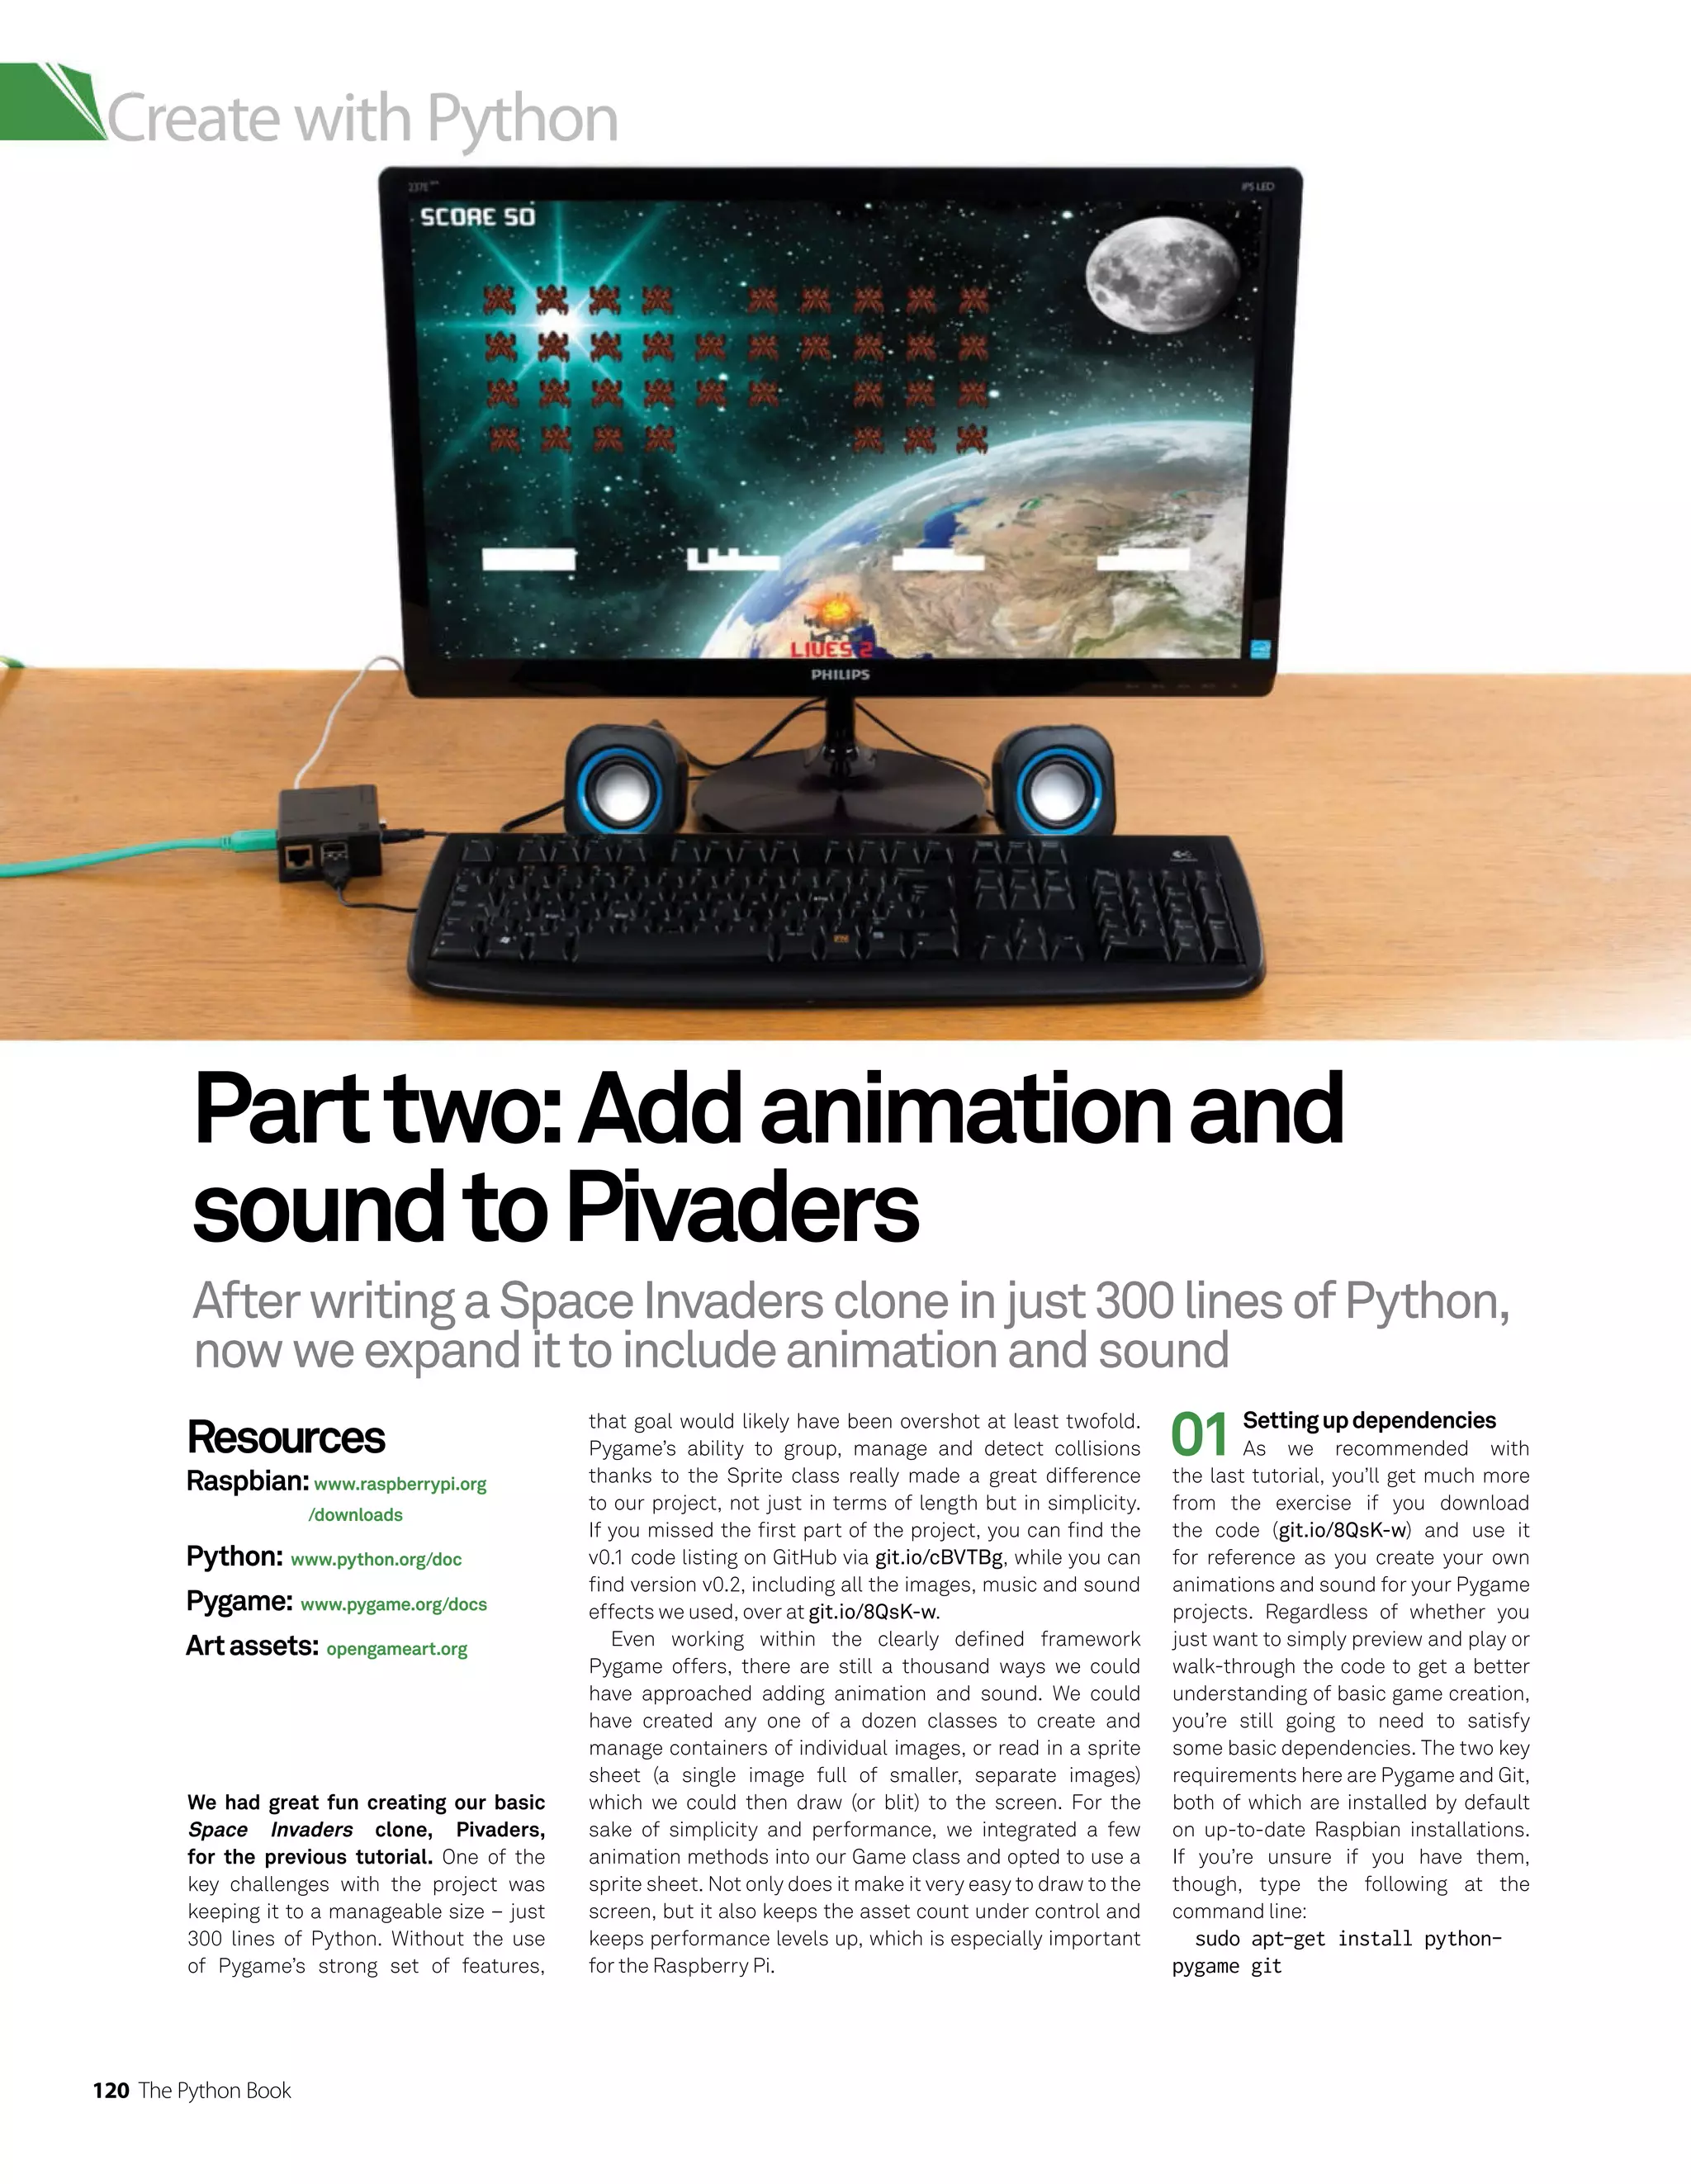
![The Python Book 121
Create with Python
class Game(object):
def __init__(self):
pygame.init()
pygame.font.init()
self.clock = pygame.time.Clock()
self.game_font = pygame.font.Font(
‘data/Orbitracer
.ttf’
, 28)
self.intro_font = pygame.font.Font(
‘data/Orbitracer
.ttf’
, 72)
self.screen = pygame.display.set_mode([RES[0], RES[1]])
self.time = pygame.time.get_ticks()
self.refresh_rate = 20; self.rounds_won = 0
self.level_up = 50; self.score = 0
self.lives = 2
self.player_group = pygame.sprite.Group()
self.alien_group = pygame.sprite.Group()
self.bullet_group = pygame.sprite.Group()
self.missile_group = pygame.sprite.Group()
self.barrier_group = pygame.sprite.Group()
self.all_sprite_list = pygame.sprite.Group()
self.intro_screen = pygame.image.load(
‘data/graphics/start_screen.jpg’).convert()
self.background = pygame.image.load(
‘data/graphics/Space-Background.jpg’).convert()
pygame.display.set_caption(‘Pivaders - ESC to exit’)
pygame.mouse.set_visible(False)
Alien.image = pygame.image.load(
‘data/graphics/Spaceship16.png’).convert()
Alien.image.set_colorkey(WHITE)
self.ani_pos = 5 # 11 images of ship
self.ship_sheet = pygame.image.load(
‘data/graphics/ship_sheet_final.png’).convert_alpha()
Player
.image = self.ship_sheet.subsurface(
self.ani_pos*64, 0, 64, 61)
self.animate_right = False
self.animate_left = False
self.explosion_sheet = pygame.image.load(
‘data/graphics/explosion_new1.png’).convert_alpha()
self.explosion_image = self.explosion_sheet.subsurface(0, 0,
79, 96)
self.alien_explosion_sheet = pygame.image.load(
‘data/graphics/alien_explosion.png’)
self.alien_explode_graphics = self.alien_explosion_sheet.
subsurface(0, 0, 94, 96)
self.explode = False
self.explode_pos = 0; self.alien_explode = False
self.alien_explode_pos = 0
pygame.mixer
.music.load(‘data/sound/10_Arpanauts.ogg’)
pygame.mixer
.music.play(-1)
pygame.mixer
.music.set_volume(0.7)
self.bullet_fx = pygame.mixer
.Sound(
‘data/sound/medetix__pc-bitcrushed-lazer-beam.ogg’)
self.explosion_fx = pygame.mixer
.Sound(
‘data/sound/timgormly__8-bit-explosion.ogg’)
self.explosion_fx.set_volume(0.5)
self.explodey_alien = []
GameState.end_game = False
GameState.start_screen = True
GameState.vector = 0
GameState.shoot_bullet = False
def control(self):
for event in pygame.event.get():
if event.type == pygame.QUIT:
GameState.start_screen = False
GameState.end_game = True
if event.type == pygame.KEYDOWN
and event.key == pygame.K_ESCAPE:
if GameState.start_screen:
GameState.start_screen = False
GameState.end_game = True
self.kill_all()
else:
GameState.start_screen = True
self.keys = pygame.key.get_pressed()
if self.keys[pygame.K_LEFT]:
GameState.vector = -1
self.animate_left = True
self.animate_right = False
elif self.keys[pygame.K_RIGHT]:
GameState.vector = 1
self.animate_right = True
self.animate_left = False
else:
GameState.vector = 0
self.animate_right = False
self.animate_left = False
if self.keys[pygame.K_SPACE]:
if GameState.start_screen:
GameState.start_screen = False
self.lives = 2
self.score = 0
self.make_player()
self.make_defenses()
self.alien_wave(0)
else:
GameState.shoot_bullet = True
self.bullet_fx.play()
def animate_player(self):
if self.animate_right:
if self.ani_pos 10:
Player
.image = self.ship_sheet.subsurface(
self.ani_pos*64, 0, 64, 61)
self.ani_pos += 1
else:
if self.ani_pos 5:
self.ani_pos -= 1
Player
.image = self.ship_sheet.subsurface(
self.ani_pos*64, 0, 64, 61)
if self.animate_left:
if self.ani_pos 0:
self.ani_pos -= 1
Player
.image = self.ship_sheet.subsurface(
self.ani_pos*64, 0, 64, 61)
else:
if self.ani_pos 5:
Player
.image = self.ship_sheet.subsurface(
self.ani_pos*64, 0, 64, 61)
self.ani_pos += 1
def player_explosion(self):
if self.explode:
if self.explode_pos 8:
self.explosion_image = self.explosion_sheet.
subsurface(0, self.explode_pos*96, 79, 96)
self.explode_pos += 1
self.screen.blit(self.explosion_image, [self.player
.
rect.x -10, self.player
.rect.y - 30])
else:
self.explode = False
self.explode_pos = 0
def alien_explosion(self):
if self.alien_explode:
if self.alien_explode_pos 9:
self.alien_explode_graphics = self.alien_explosion_
sheet.subsurface(0, self.alien_explode_pos*96, 94, 96)
self.alien_explode_pos += 1
self.screen.blit(self.alien_explode_graphics,
[int(self. explodey_alien[0]) - 50 , int(self.explodey_alien[1]) - 60])
else:
self.alien_explode = False
self.alien_explode_pos = 0
self.explodey_alien = []
def splash_screen(self):
while GameState.start_screen:
self.kill_all()
self.screen.blit(self.intro_screen, [0, 0])
self.screen.blit(self.intro_font.render(
“PIVADERS”, 1, WHITE), (265, 120))
self.screen.blit(self.game_font.render(
“PRESS SPACE TO PLAY”, 1, WHITE), (274, 191))
pygame.display.flip()
self.control()
self.clock.tick(self.refresh_rate / 2)
def make_player(self):
self.player = Player()
Pivaders.py listing from line 86 (continued on next page)
ship_sheet
Wesettheplayer
imagetobeequalto
onesmallsegment
ofthespritesheetby
usingthe‘ani_pos’
variable.Changethe
variabletochange
thepicture
SetflagsWe’ve
added‘animate_left’
and‘animate_right’
Booleanflagsto
thecontrolmethod.
Whenthey’retrue,
theactualanimation
codeiscalledviaa
separatemethod
fx.play()
Havingalready
loadedthesound
effectwewantwhen
weshoot,wenow
justneedtocallit
whenwepressthe
spacebar
Get
thecode:
bit.ly/
1xPvY1F](https://image.slidesharecdn.com/thepythonbooktheultimateguidetocodingwithpythonpdfdrive-220527060944-728dd1fe/75/The-Python-Book_-The-ultimate-guide-to-coding-with-Python-PDFDrive-pdf-121-2048.jpg)
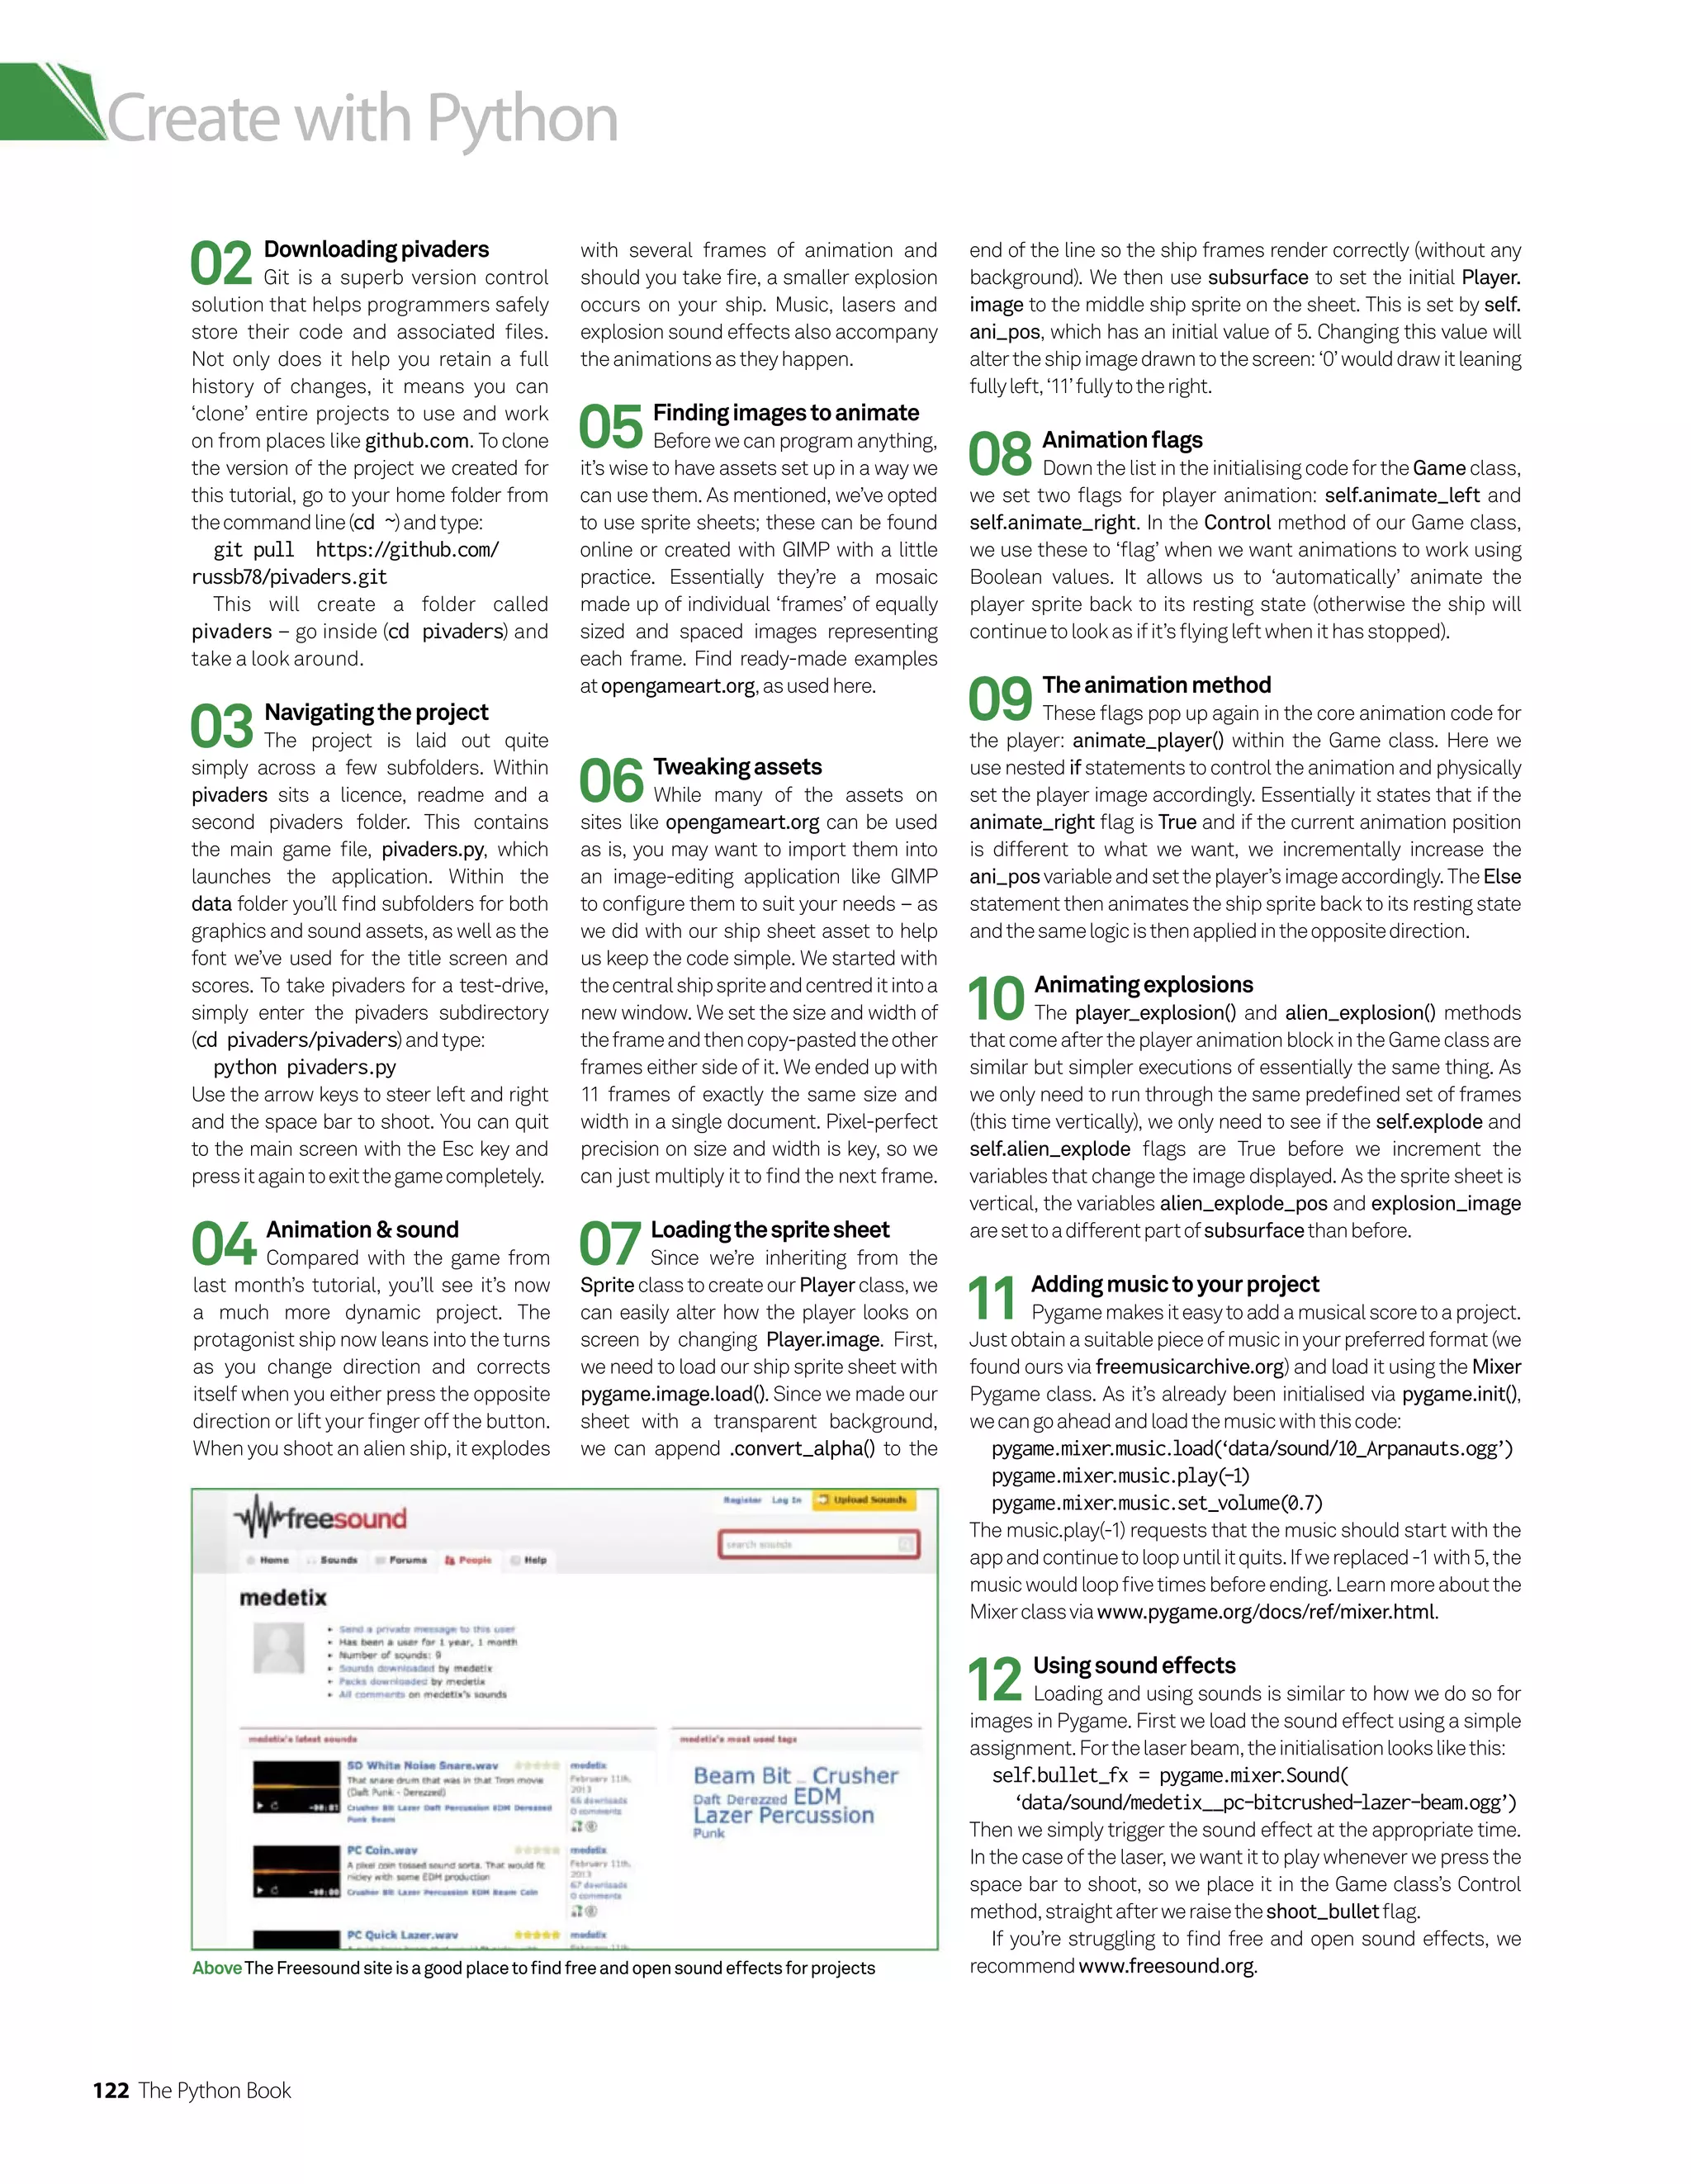
![The Python Book 123
Create with Python
self.player_group.add(self.player)
self.all_sprite_list.add(self.player)
def refresh_screen(self):
self.all_sprite_list.draw(self.screen)
self.animate_player()
self.player_explosion()
self.alien_explosion()
self.refresh_scores()
pygame.display.flip()
self.screen.blit(self.background, [0, 0])
self.clock.tick(self.refresh_rate)
def refresh_scores(self):
self.screen.blit(self.game_font.render(
“SCORE “ + str(self.score), 1, WHITE), (10, 8))
self.screen.blit(self.game_font.render(
“LIVES “ + str(self.lives + 1), 1, RED), (355, 575))
def alien_wave(self, speed):
for column in range(BARRIER_COLUMN):
for row in range(BARRIER_ROW):
alien = Alien()
alien.rect.y = 65 + (column * (
ALIEN_SIZE[1] + ALIEN_SPACER))
alien.rect.x = ALIEN_SPACER + (
row * (ALIEN_SIZE[0] + ALIEN_SPACER))
self.alien_group.add(alien)
self.all_sprite_list.add(alien)
alien.speed -= speed
def make_bullet(self):
if GameState.game_time - self.player
.time self.player
.speed:
bullet = Ammo(BLUE, BULLET_SIZE)
bullet.vector = -1
bullet.speed = 26
bullet.rect.x = self.player
.rect.x + 28
bullet.rect.y = self.player
.rect.y
self.bullet_group.add(bullet)
self.all_sprite_list.add(bullet)
self.player
.time = GameState.game_time
GameState.shoot_bullet = False
def make_missile(self):
if len(self.alien_group):
shoot = random.random()
if shoot = 0.05:
shooter = random.choice([
alien for alien in self.alien_group])
missile = Ammo(RED, MISSILE_SIZE)
missile.vector = 1
missile.rect.x = shooter
.rect.x + 15
missile.rect.y = shooter
.rect.y + 40
missile.speed = 10
self.missile_group.add(missile)
self.all_sprite_list.add(missile)
def make_barrier(self, columns, rows, spacer):
for column in range(columns):
for row in range(rows):
barrier = Block(WHITE, (BLOCK_SIZE))
barrier
.rect.x = 55 + (200 * spacer) + (row * 10)
barrier
.rect.y = 450 + (column * 10)
self.barrier_group.add(barrier)
self.all_sprite_list.add(barrier)
def make_defenses(self):
for spacing, spacing in enumerate(xrange(4)):
self.make_barrier(3, 9, spacing)
def kill_all(self):
for items in [self.bullet_group, self.player_group,
self.alien_group, self.missile_group, self.barrier_group]:
for i in items:
i.kill()
def is_dead(self):
if self.lives 0:
self.screen.blit(self.game_font.render(
“The war is lost! You scored: “ + str(
self.score), 1, RED), (250, 15))
self.rounds_won = 0
self.refresh_screen()
self.level_up = 50
self.explode = False
self.alien_explode = False
pygame.time.delay(3000)
return True
def defenses_breached(self):
for alien in self.alien_group:
if alien.rect.y 410:
self.screen.blit(self.game_font.render(
“The aliens have breached Earth defenses!”,
1, RED), (180, 15))
self.refresh_screen()
self.level_up = 50
self.explode = False
self.alien_explode = False
pygame.time.delay(3000)
return True
def win_round(self):
if len(self.alien_group) 1:
self.rounds_won += 1
self.screen.blit(self.game_font.render(
“You won round “ + str(self.rounds_won) +
“ but the battle rages on”, 1, RED), (200, 15))
self.refresh_screen()
pygame.time.delay(3000)
return True
def next_round(self):
self.explode = False
self.alien_explode = False
for actor in [self.missile_group,
self.barrier_group, self.bullet_group]:
for i in actor:
i.kill()
self.alien_wave(self.level_up)
self.make_defenses()
self.level_up += 50
def calc_collisions(self):
pygame.sprite.groupcollide(
self.missile_group, self.barrier_group, True, True)
pygame.sprite.groupcollide(
self.bullet_group, self.barrier_group, True, True)
for z in pygame.sprite.groupcollide(
self.bullet_group, self.alien_group, True, True):
self.alien_explode = True
self.explodey_alien.append(z.rect.x)
self.explodey_alien.append(z.rect.y)
self.score += 10
self.explosion_fx.play()
if pygame.sprite.groupcollide(
self.player_group, self.missile_group, False, True):
self.lives -= 1
self.explode = True
self.explosion_fx.play()
def main_loop(self):
while not GameState.end_game:
while not GameState.start_screen:
GameState.game_time = pygame.time.get_ticks()
GameState.alien_time = pygame.time.get_ticks()
self.control()
self.make_missile()
self.calc_collisions()
self.refresh_screen()
if self.is_dead() or self.defenses_breached():
GameState.start_screen = True
for actor in [self.player_group, self.bullet_group,
self.alien_group, self.missile_group]:
for i in actor:
i.update()
if GameState.shoot_bullet:
self.make_bullet()
if self.win_round():
self.next_round()
self.splash_screen()
pygame.quit()
if __name__ == ‘__main__’
:
pv = Game()
pv.main_loop()
Get
thecode:
bit.ly/
1xPvY1F](https://image.slidesharecdn.com/thepythonbooktheultimateguidetocodingwithpythonpdfdrive-220527060944-728dd1fe/75/The-Python-Book_-The-ultimate-guide-to-coding-with-Python-PDFDrive-pdf-123-2048.jpg)

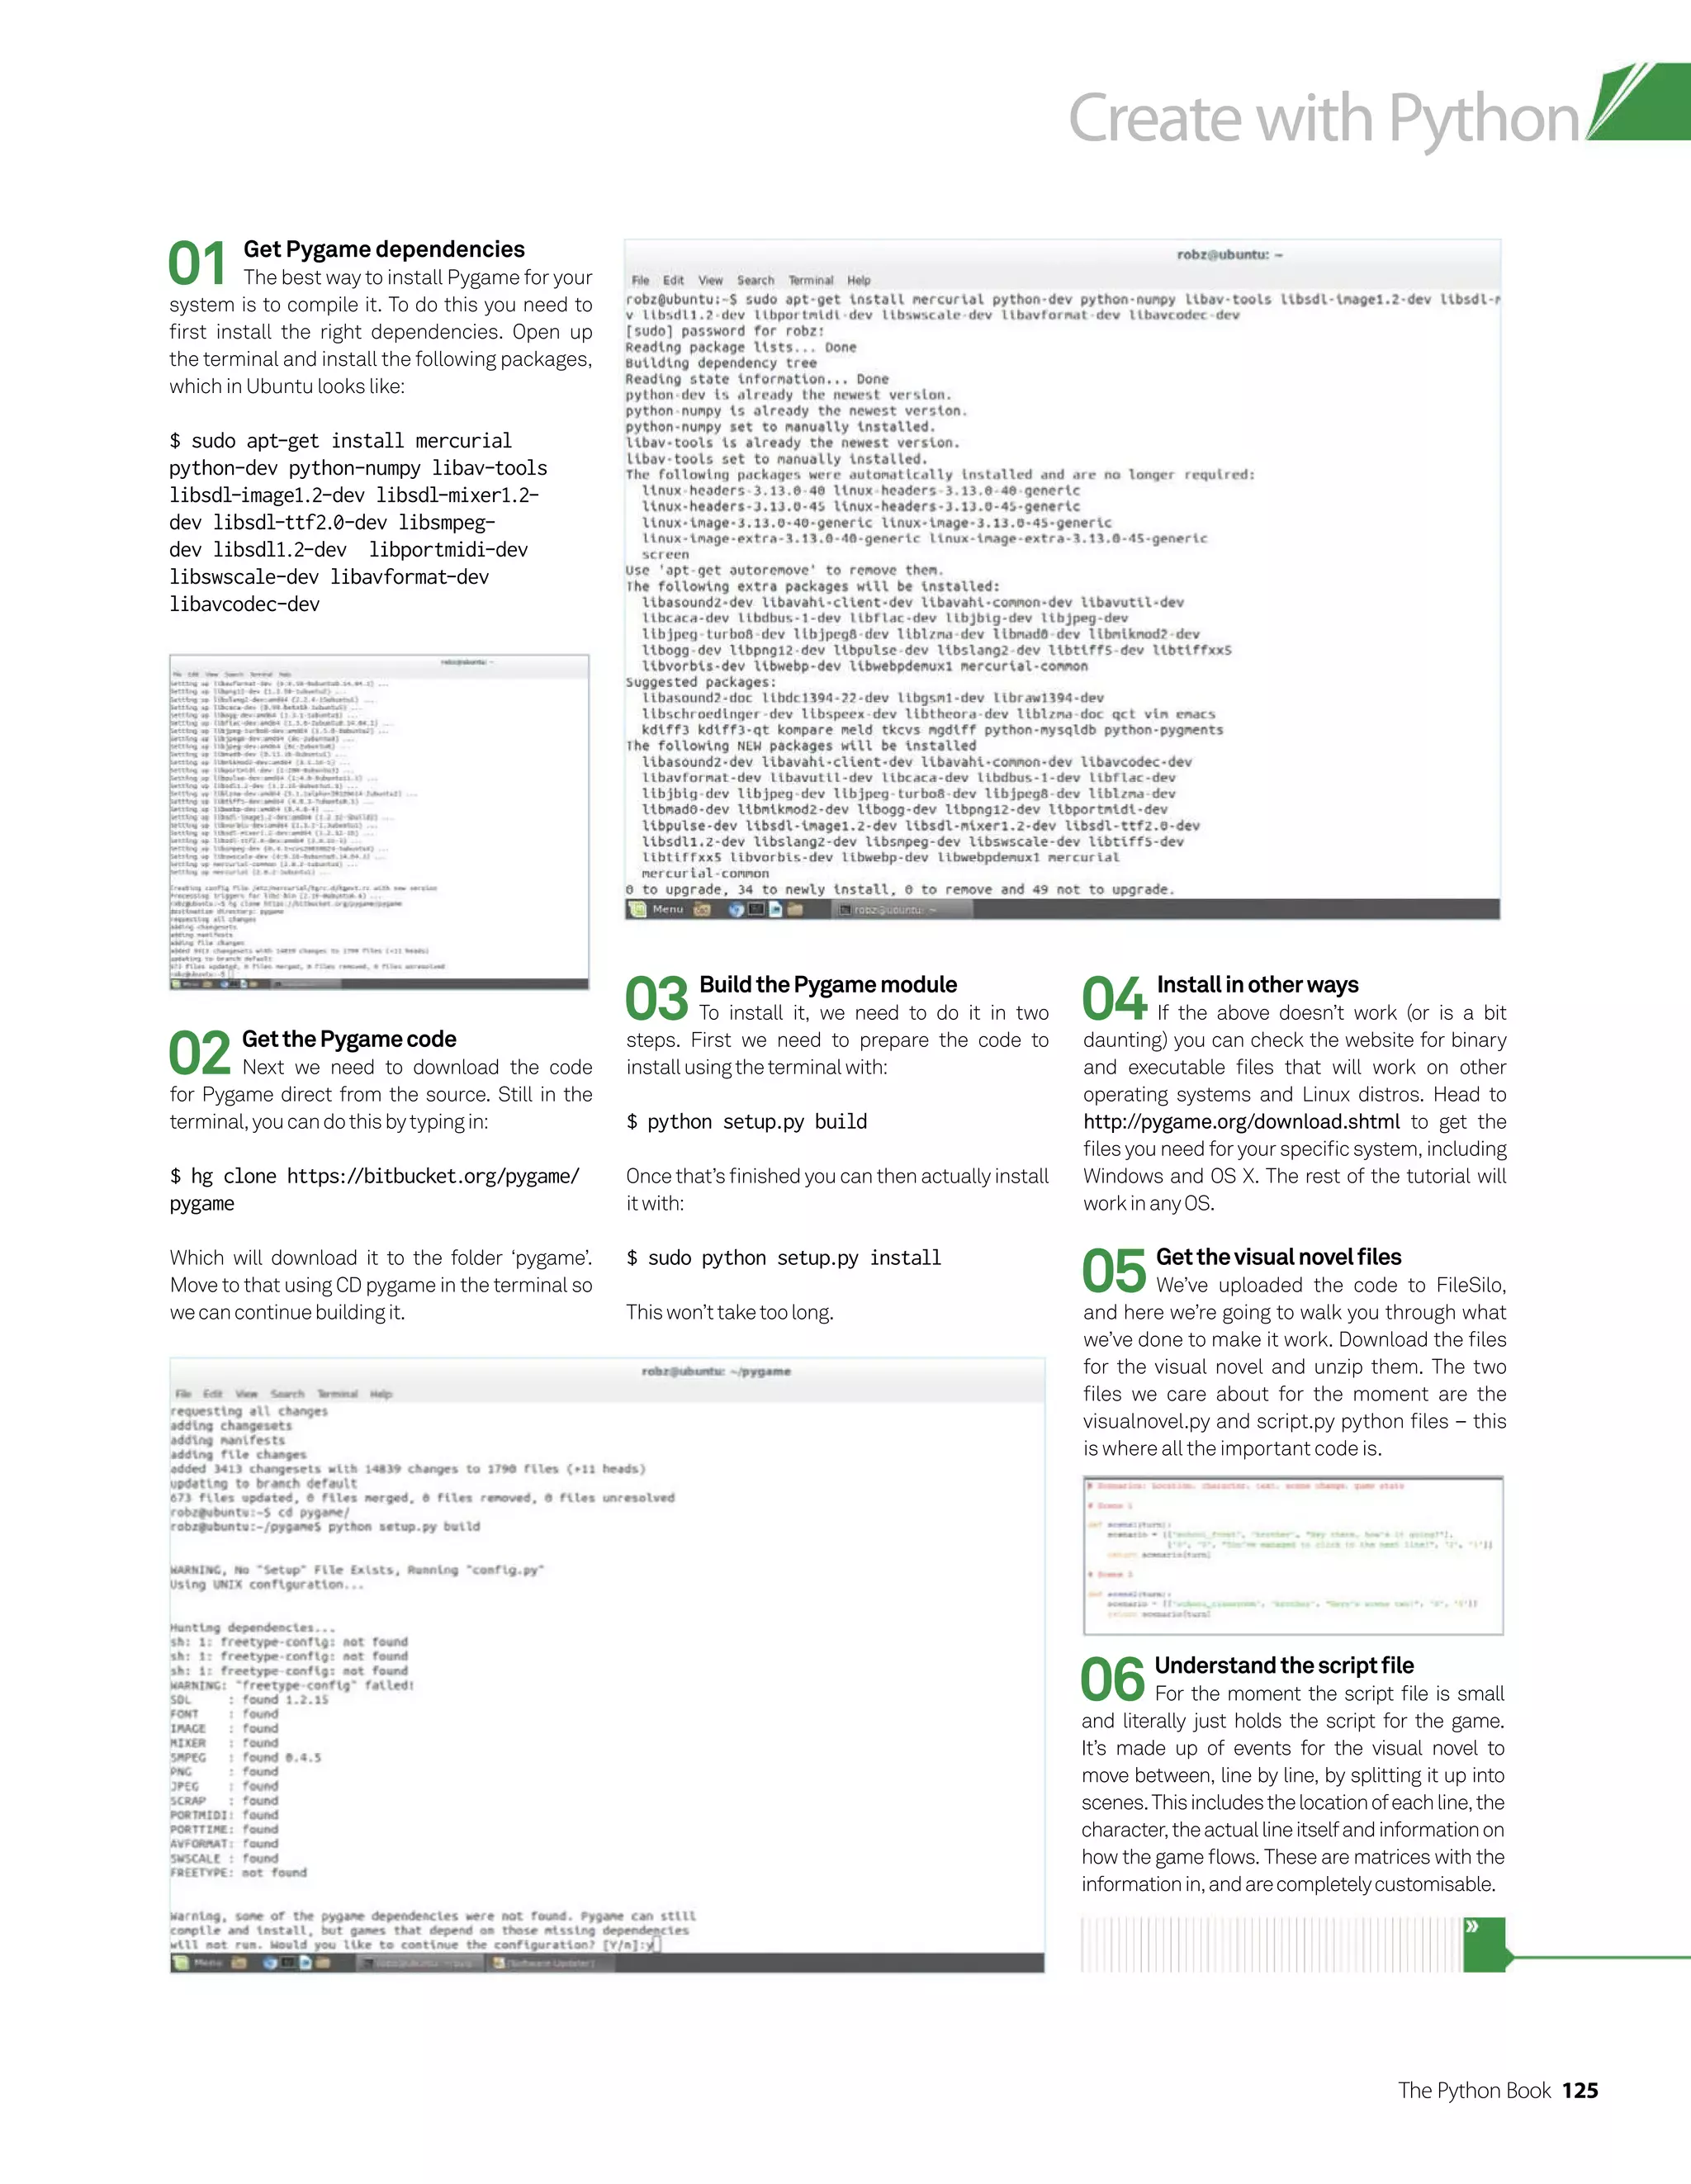
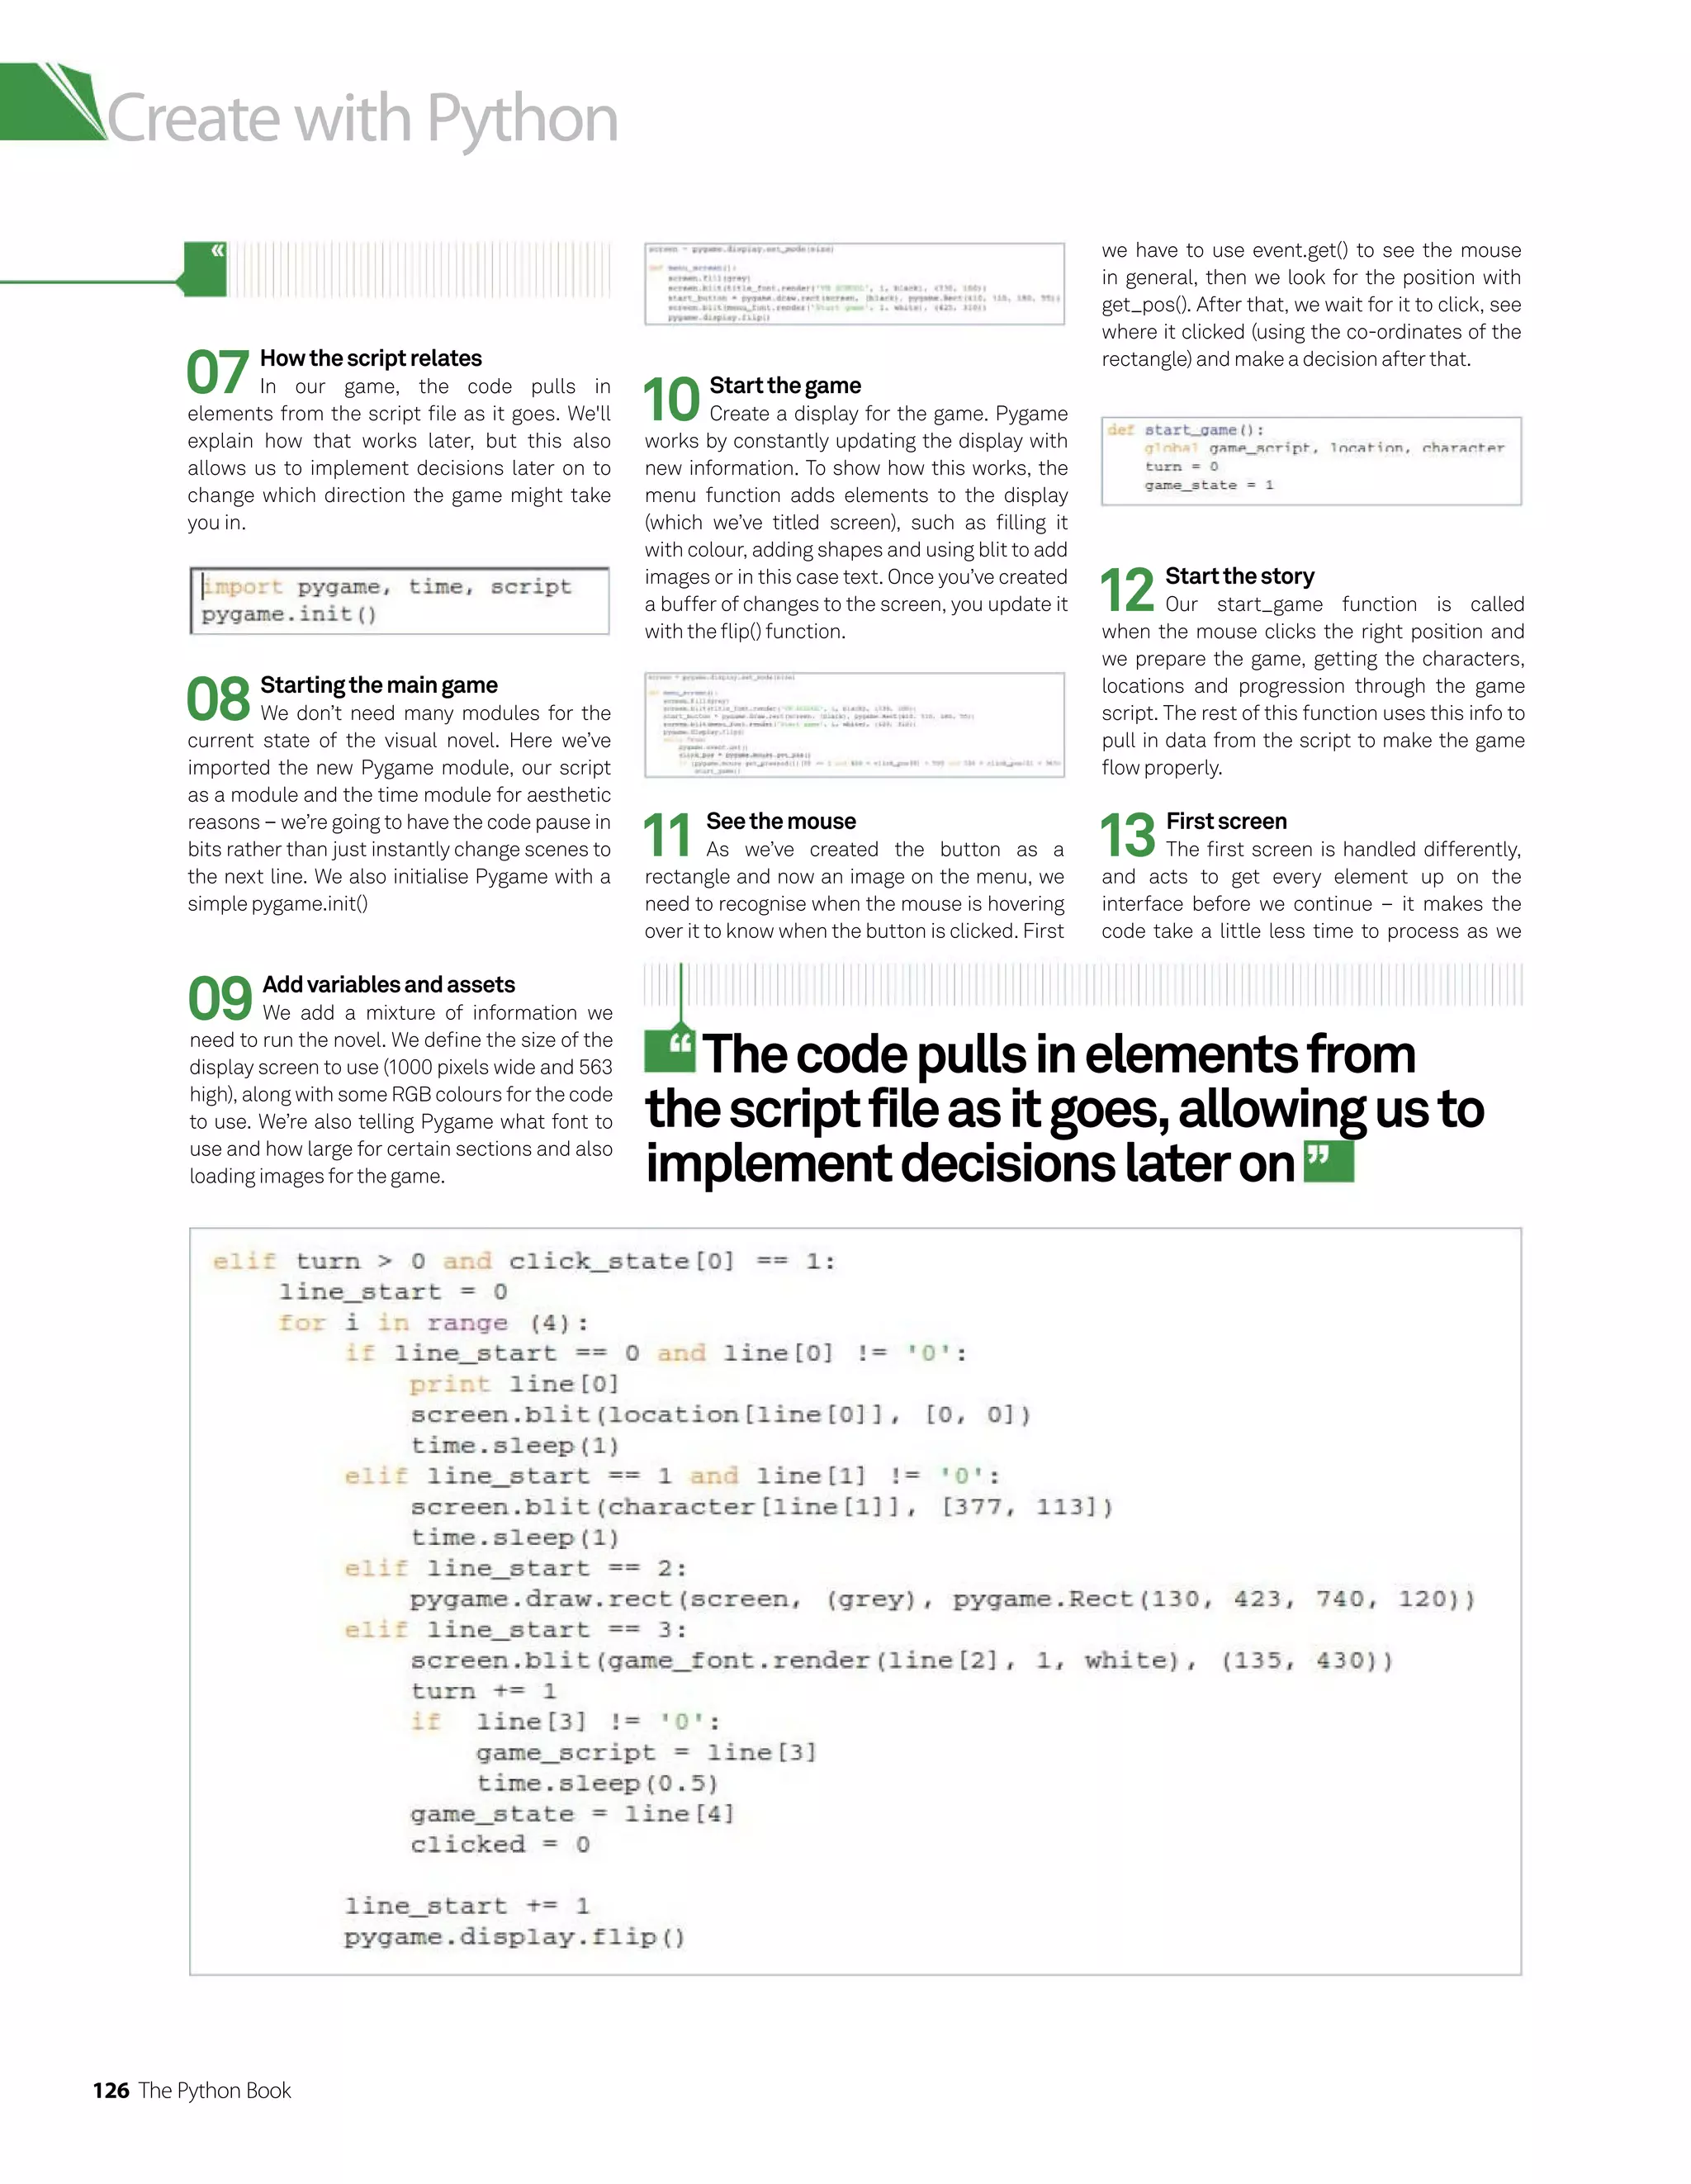
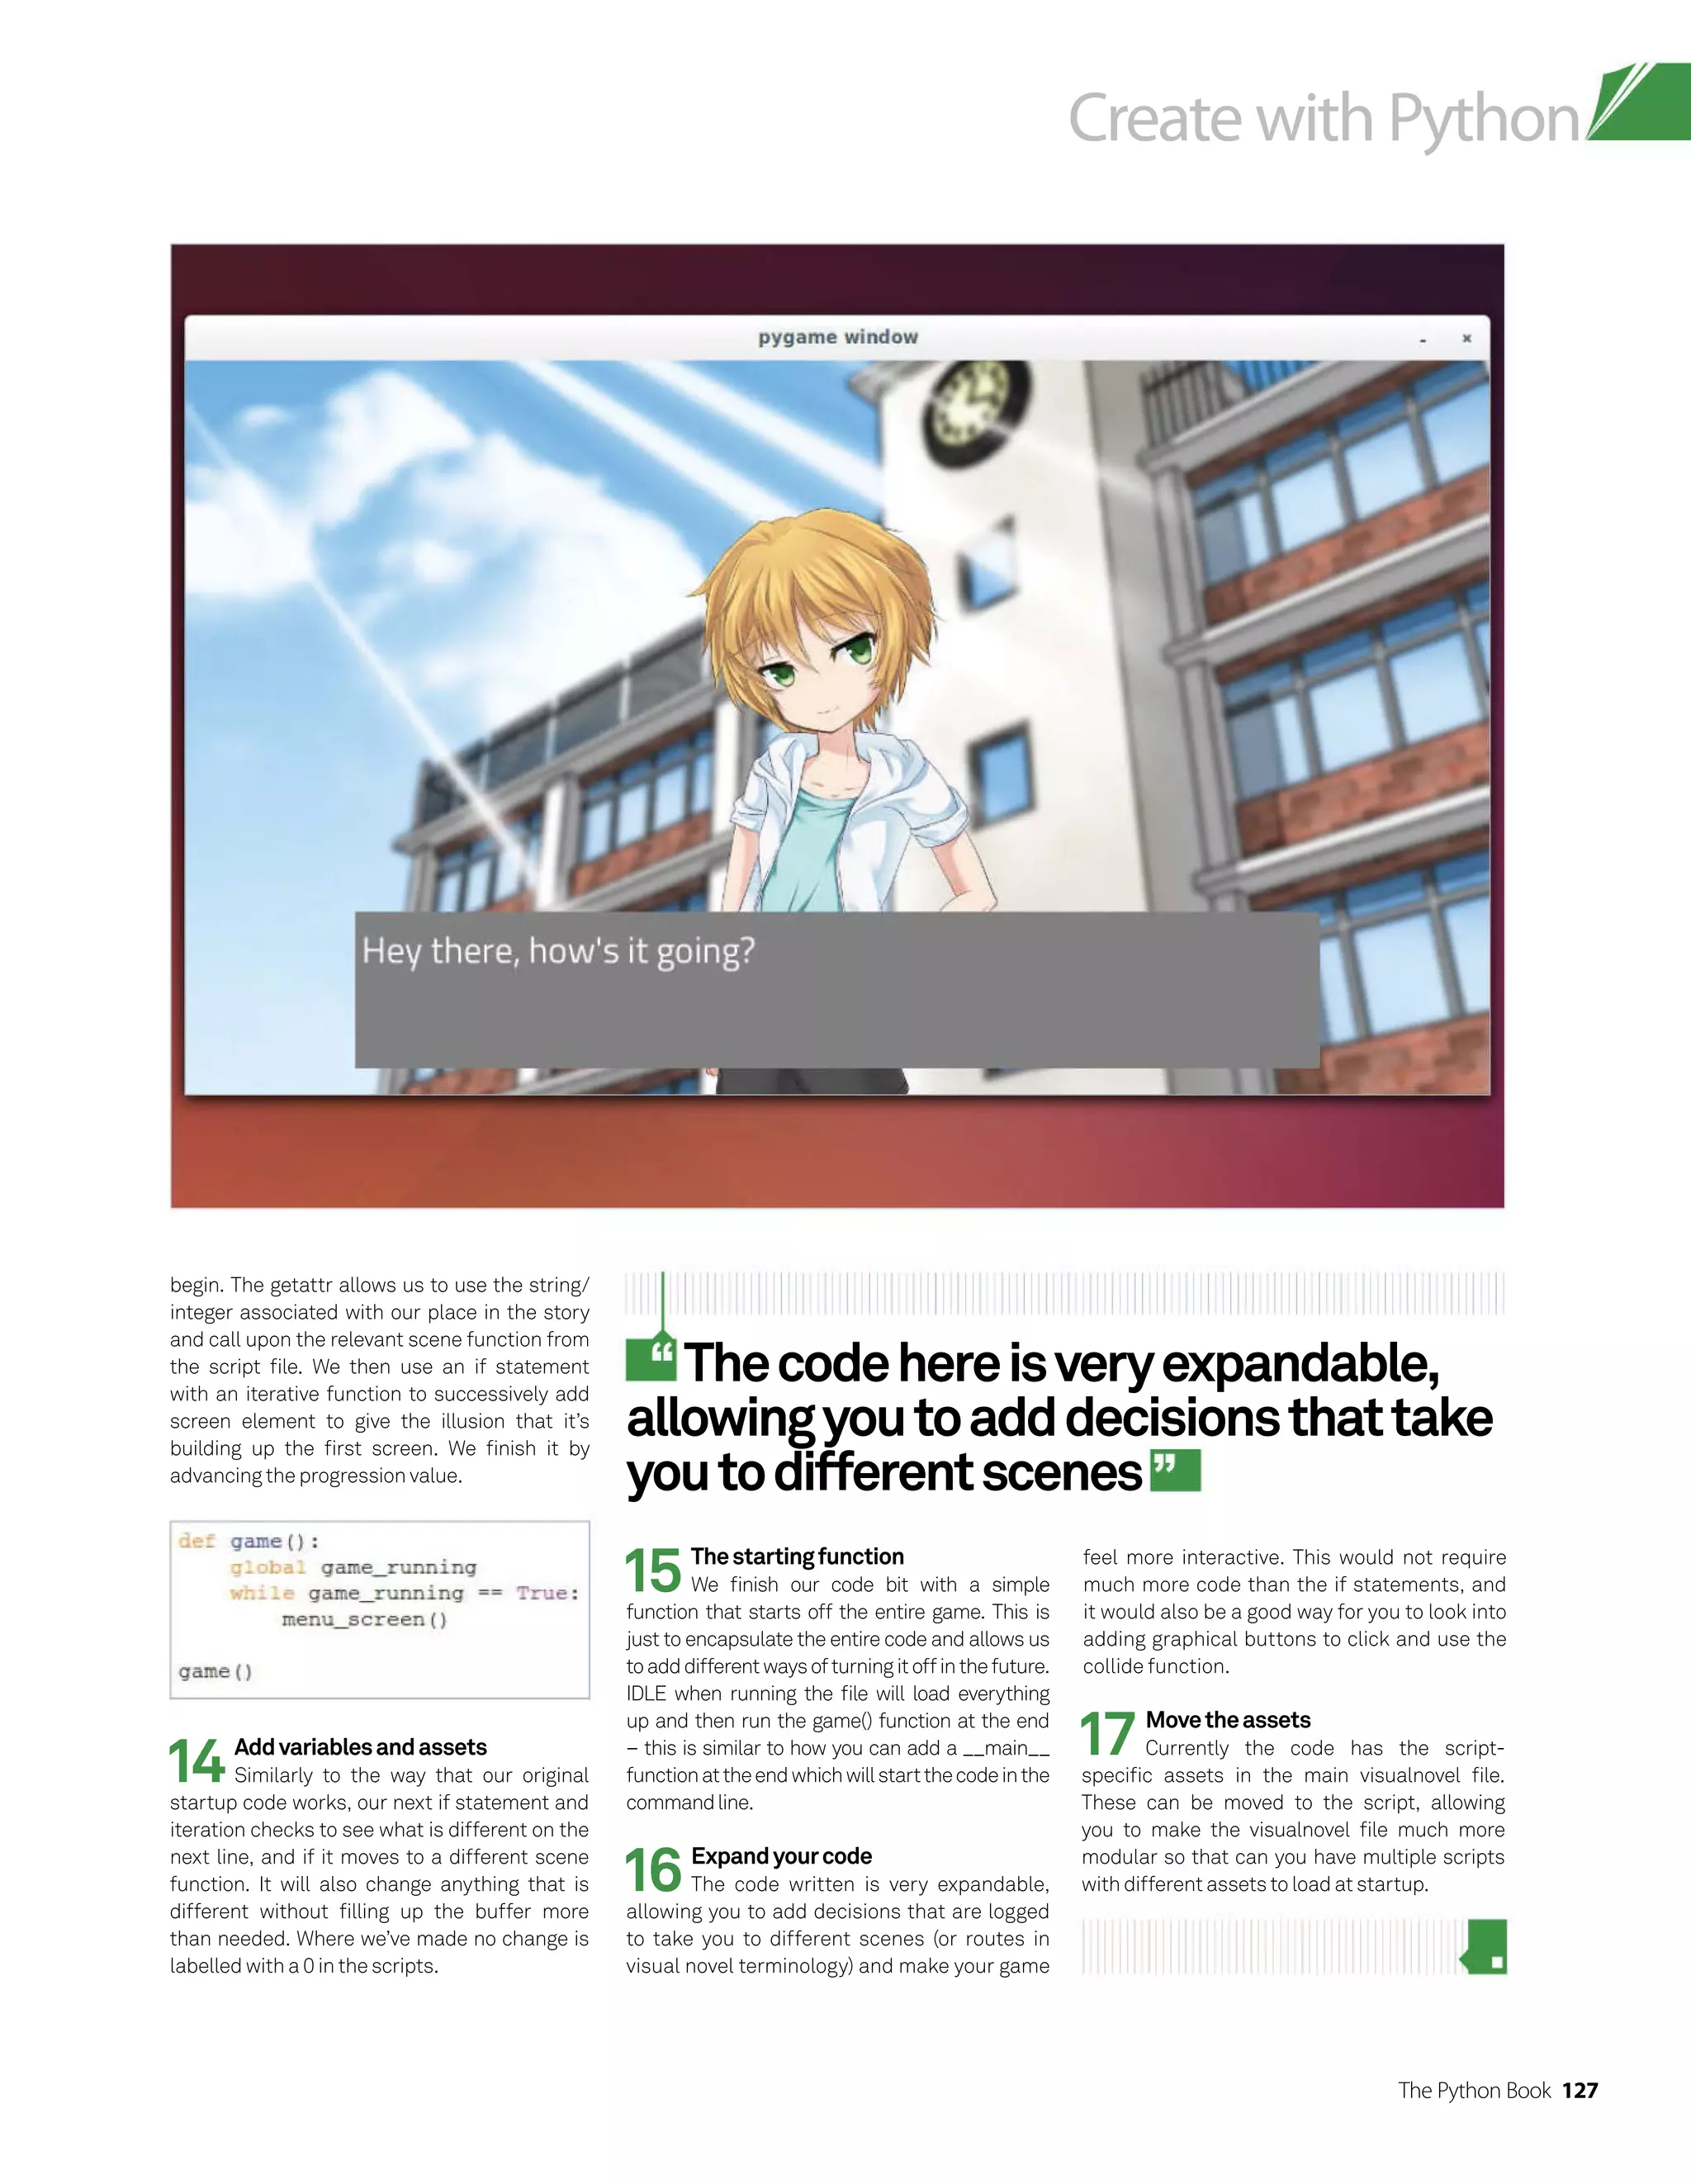
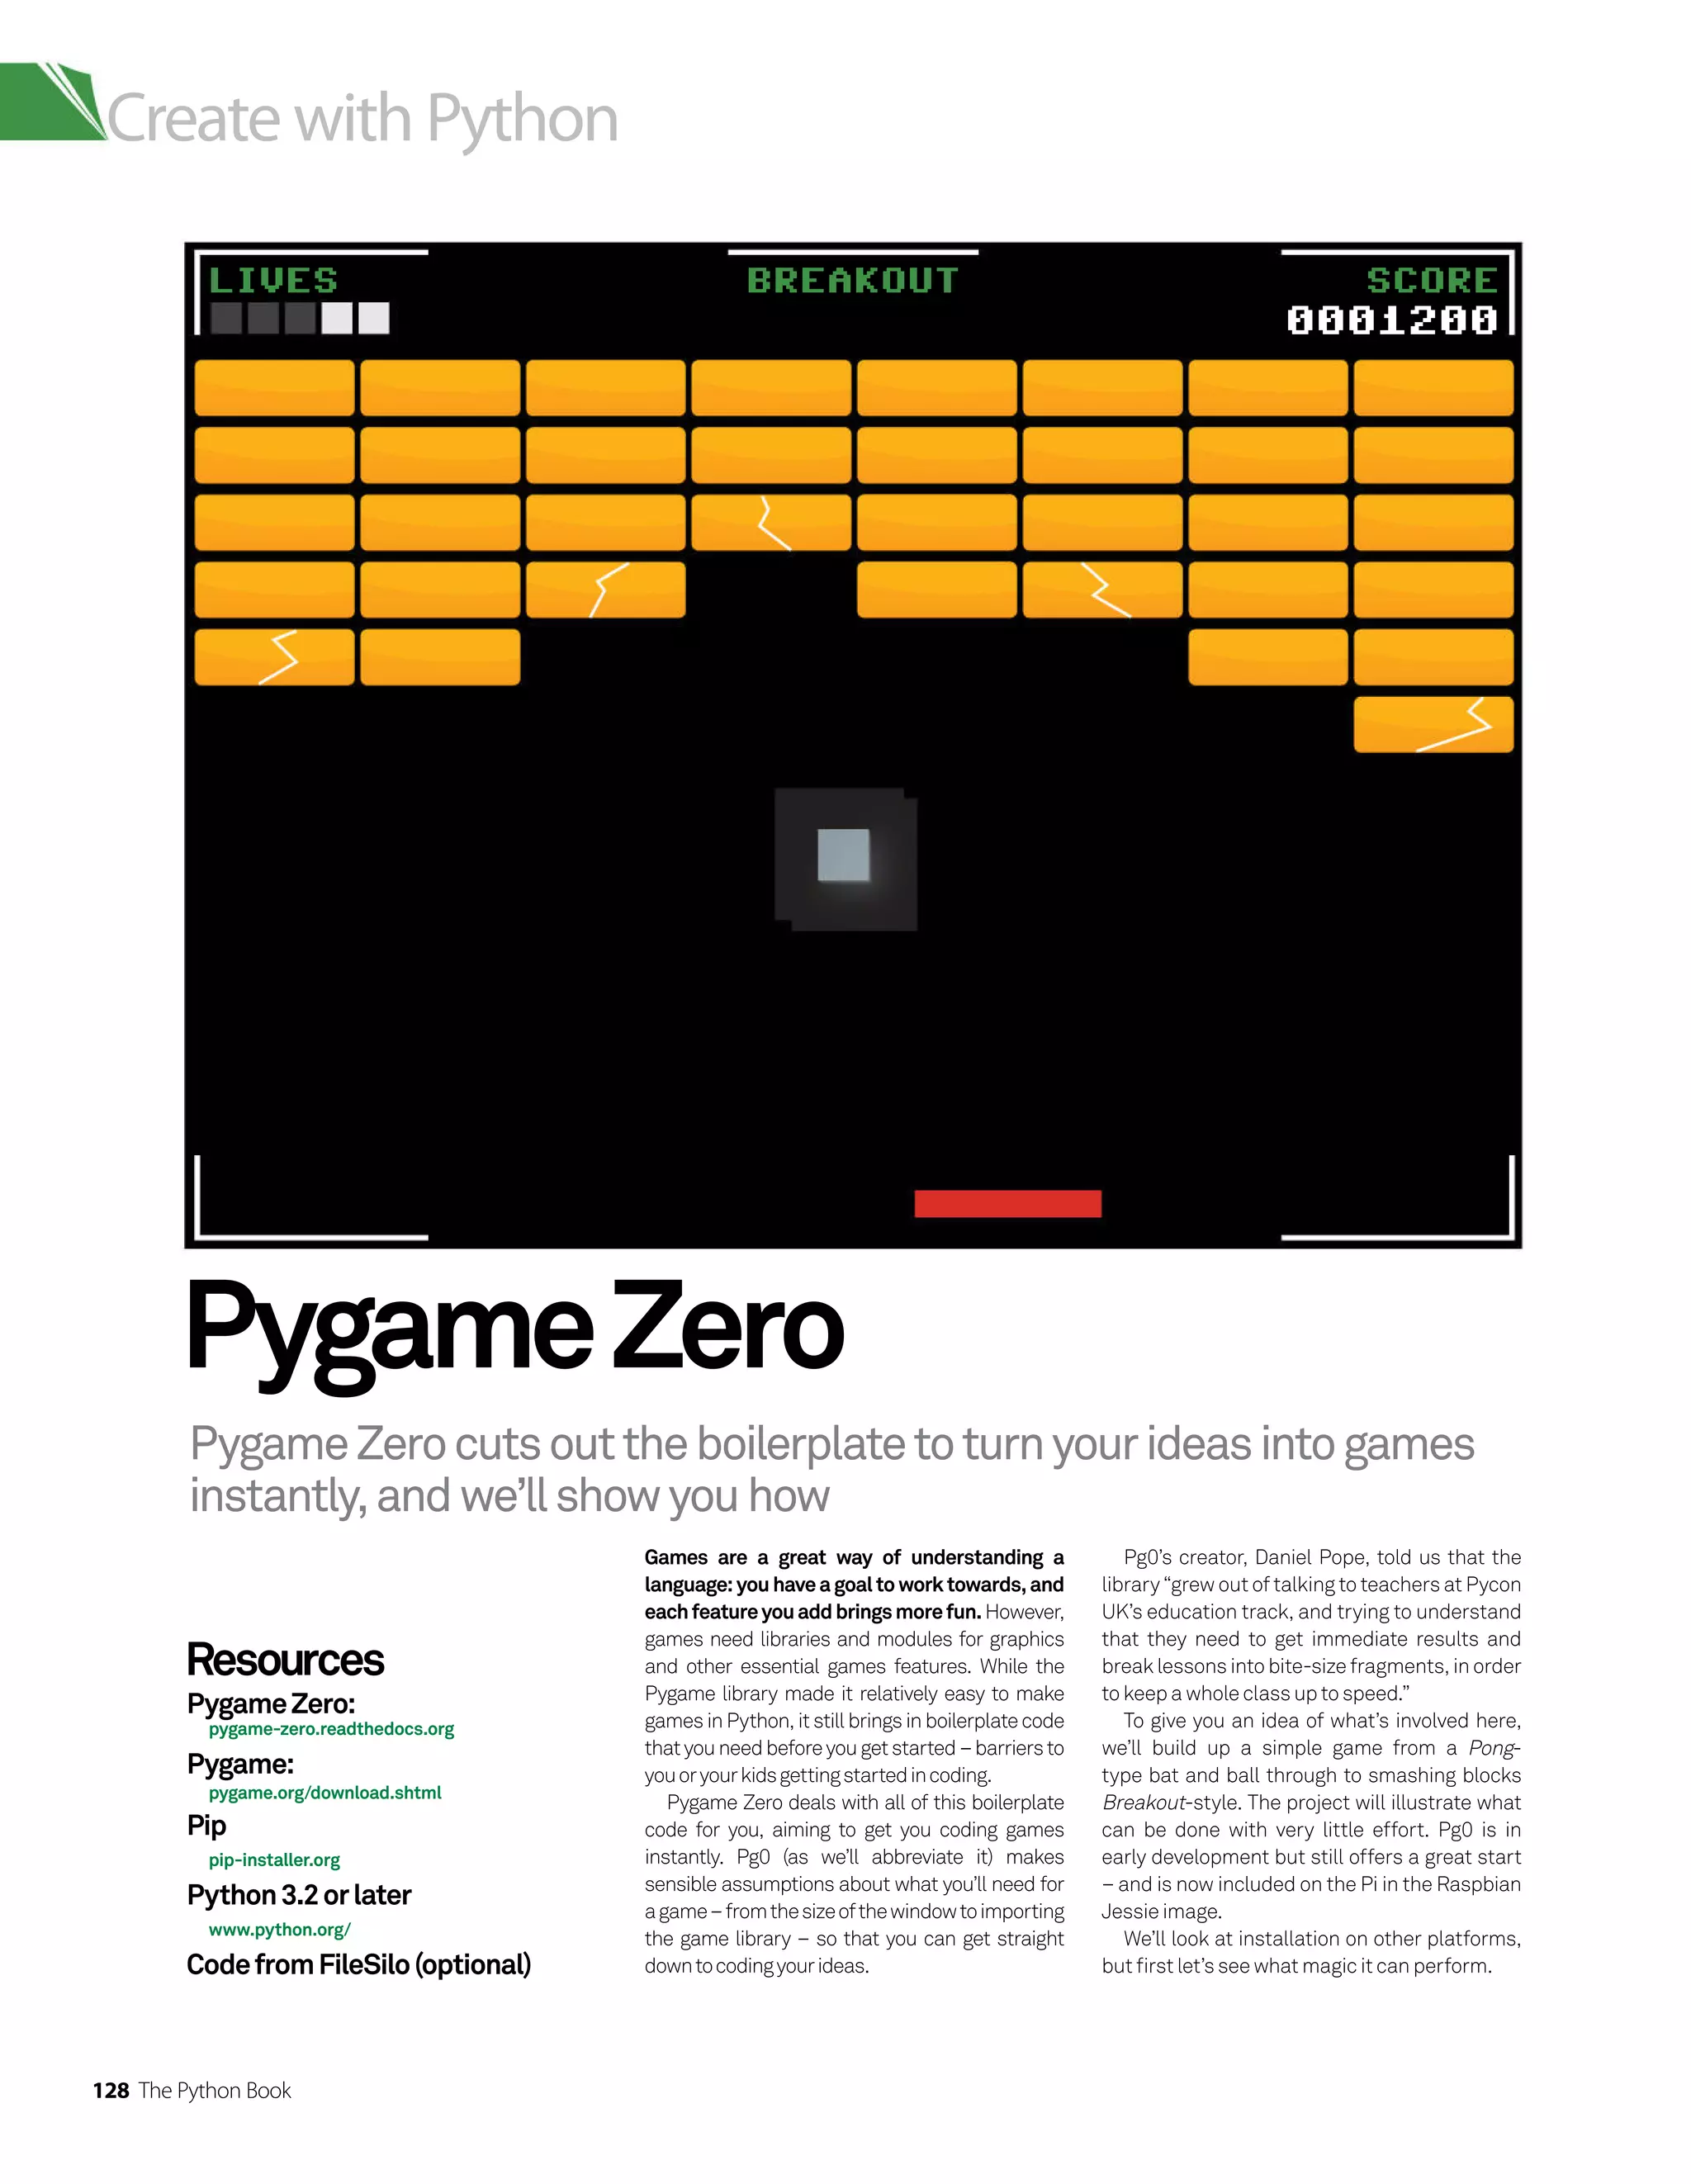
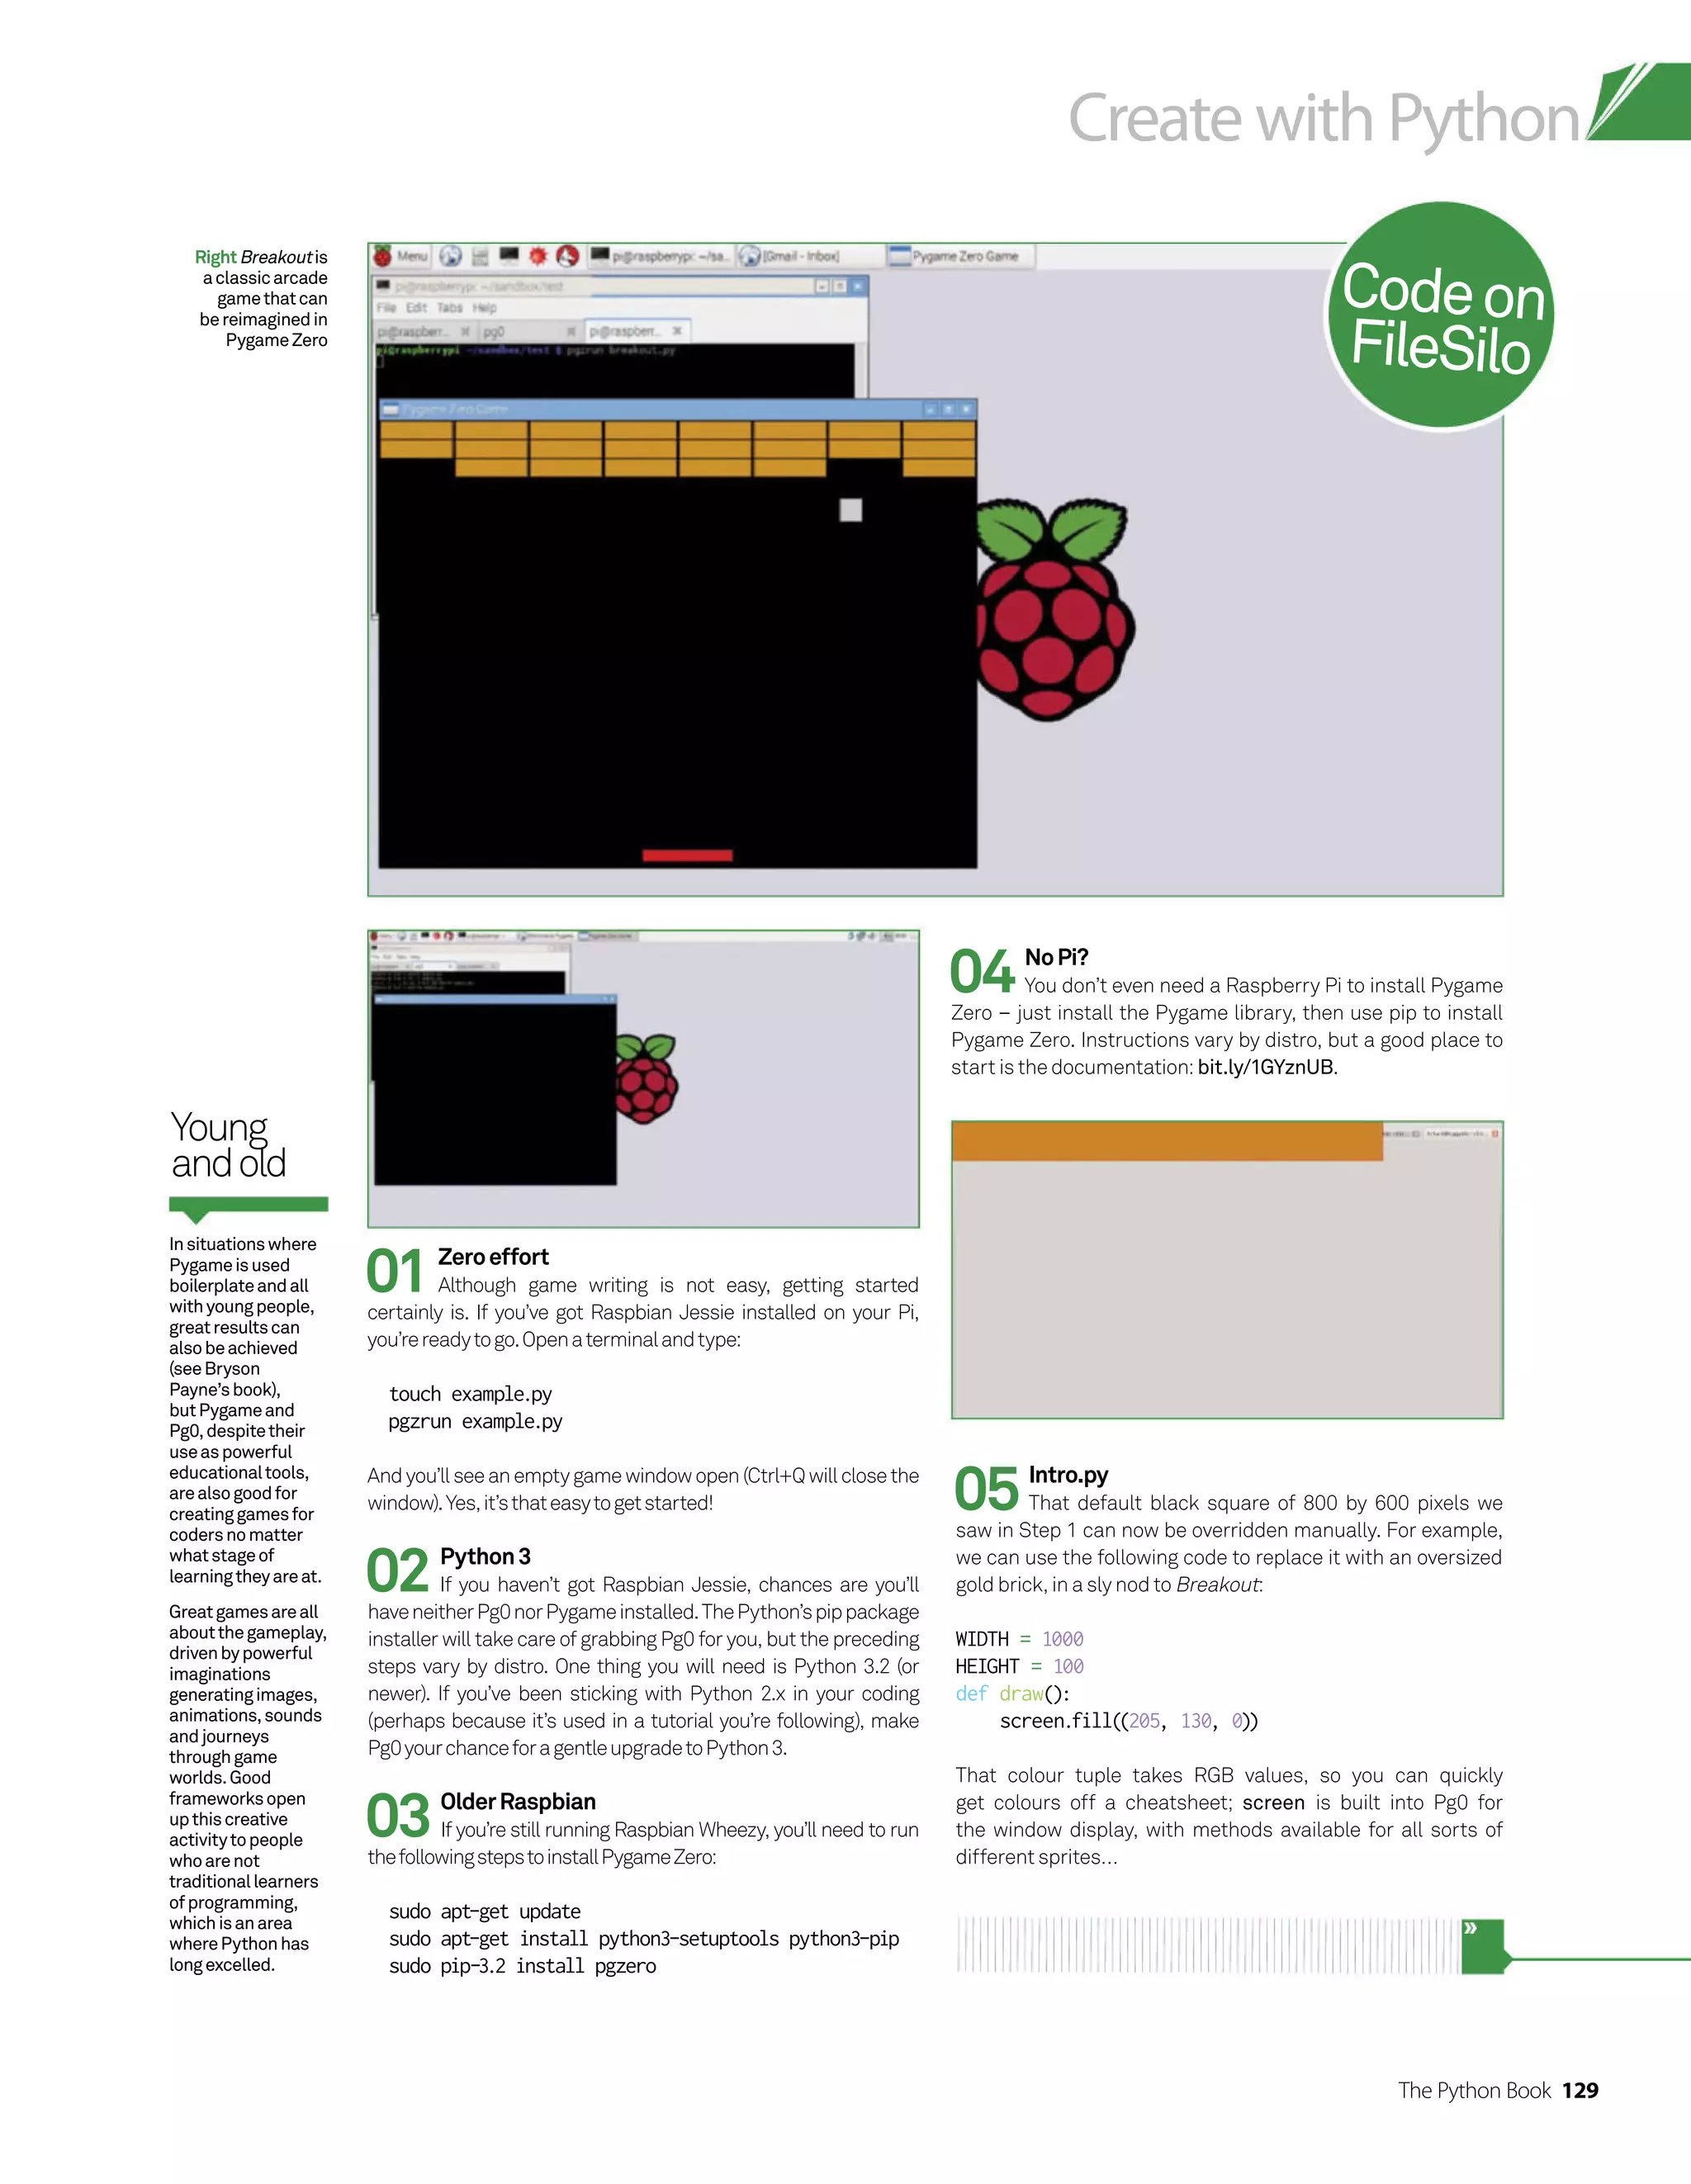
![130 The Python Book
Create with Python
09Mousemove
We want to move the bat, and the mouse is closer to an
arcadepaddlethanthearrowkeys.Addthefollowing:
def on_mouse_move(pos):
x, y = pos
bat.center = (x, bat.center[1])
Usepgzruntotestthatyouhaveascreen,batandmovement.
08Batty
You can think of Breakout as essentially being a
moving bat – that is, you’re hitting a moving ball in order to
knock out blocks. The bat is a rectangle, and Pygame’s Rect
objects store and manipulate rectangular areas – we use
Rect((left, top), (width, height)), before which we define the bat
colour and then call upon the draw function to put the bat on
thescreen,usingthescreenfunction.
W = 800
H = 600
RED = 200, 0, 0
bat = Rect((W/2, 0.96 * H), (150, 15))
def draw():
screen.clear()
screen.draw.filled_rect(bat, RED)
07BreakoutviaPong
While the Pi is something of a tribute to 1980s 8-bit
computers, Breakout comes from the 1970s and is a direct
descendant of the early arcade classic Pong. We’ll follow the
route from Pong to Breakout (which historically involved Apple
founders Steve Wozniak and Steve Jobs) in the steps to creating
our code, leaving you with the option of developing the Pong
elements into a proper game, as well as refining the finished
Breakoutclone.
06Sprite
The intro example from the Pg0 docs expands on that
with the Actor class, which will automatically load the named
sprite (Pg0 will hunt around for a .jpg or .png in a subdirectory
calledimages).
alien = Actor(‘alien’)
alien.pos = 100, 56
WIDTH = 500
HEIGHT = alien.height + 20
def draw():
screen.clear()
alien.draw()
You can download the alien from the Pg0 documentation (bit.
ly/1Sm5lM7) and try out the animation shown there, but we’re
takingadifferentapproachinourgame.
Right Thebat
andballcome
first–they’rethe
cornerstonesof
PongandBreakout
DavidAmes,who
usesPg0toteach
youngerchildren
tocodeatevents
acrosstheUK,
toldus:“Onething
toavoidwhenit
comestoteaching
kidsisObject
Orientation.”OOP
(object-oriented
programming)is
partlyabstracted
awaybyPg0,butit
can’tbeignored.
Perhapsthebest
approachisusing
Pg0andsome
simplecodeto
start,thendropping
inapieceofOO
whenit’sneededto
solveaparticular
problem.
WiththeCodeClub
agegroup–about
eighttoeleven–
feedinginformation
tosolvepractical
problemsworks
well.Itcanwork
withadults,too–
butthere’salways
someonewho’s
readaheadand
hasafewtricky
questions.
Program
objects](https://image.slidesharecdn.com/thepythonbooktheultimateguidetocodingwithpythonpdfdrive-220527060944-728dd1fe/75/The-Python-Book_-The-ultimate-guide-to-coding-with-Python-PDFDrive-pdf-130-2048.jpg)
![The Python Book 131
Create with Python
## Breakout type game to demonstrate Pygame Zero library
## Based originally upon Tim Viner’s London Python Dojo
## demonstration
## Licensed under MIT License - see file COPYING
from collections import namedtuple
import pygame
import sys
import time
W = 804
H = 600
RED = 200, 0, 0
WHITE = 200,200,200
GOLD = 205,145,0
ball = Rect((W/2, H/2), (30, 30))
Direction = namedtuple(‘Direction’, ‘x y’)
ball_dir = Direction(5, -5)
bat = Rect((W/2, 0.96 * H), (120, 15))
class Block(Rect):
def __init__(self, colour, rect):
Rect.__init__(self, rect)
self.colour = colour
blocks = []
for n_block in range(24):
block = Block(GOLD, ((((n_block % 8)* 100) + 2, ((n_block //
8) * 25) + 2), (96, 23)))
blocks.append(block)
def draw_blocks():
for block in blocks:
screen.draw.filled_rect(block, block.colour)
def draw():
screen.clear()
screen.draw.filled_rect(ball, WHITE)
screen.draw.filled_rect(bat, RED)
draw_blocks()
def on_mouse_move(pos):
x, y = pos
bat.center = (x, bat.center[1])
def on_mouse_down():
global ball_dir
ball_dir = Direction(ball_dir.x * 1.5, ball_dir.y * 1.5)
Fullcodelisting
Togettheballtomoveweneed
todefinemove(ball)foreachcase
wheretheballmeetsawall
10Squareball
In properly retro graphics-style, we define a square
ball too – another rectangle, essentially, with the (30, 30) size
makingitthatsubsetofrectanglesthatwecallasquare.
We’re doing this because Rect is another built-in in Pg0. If we
wanted a circular ball, we’d have to define a class and then use
Pygame’s draw.filled_circle(pos, radius, (r, g, b)) - but Rect we
cancalldirectly.Simplyadd:
WHITE = 200,200,200
ball = Rect((W/2, H/2), (30, 30))
…totheinitialvariableassignments,and:
screen.draw.filled_rect(ball, WHITE)
…tothedef draw()block.
12defmove(ball)
To get the ball to move within the screen we need to
define move(ball) for each case where the ball meets a wall.
For this we use if statements to reverse the ball’s direction at
eachoftheboundaries.Refertothefullcodelistingonpage67.
Note the hardcoded value of 781 for the width of screen,
minus the width of ball – it’s okay to hardcode values in
early versions of code, but it’s the kind of thing that will need
changing if your project expands. For example, a resizable
screenwouldneedavalueofW - 30.
13Absolutevalues
You might expect multiplying y by minus one to work for
reversingthedirectionoftheballwhenithitsthebat:
ball_dir = Direction(ball_dir
.x, -1 * ball_dir
.y)
… but you actually need to use abs, which removes any minus
signs,thenminus:
ball_dir = Direction(ball_dir
.x, - abs(ball_dir
.y))
Try it without in the finished code and see if you get some
strangebehaviour.Yourhomeworkistoworkoutwhy.
11Action!
Now let’s make the ball move. Download the tutorial
resources in FileSilo.co.uk and then add the code inside the
‘move.py’ file to assign movement and velocity. Change the 5 in
ball_dir = Direction(5, -5) if you want the ball slower or faster,
as your processor (and dexterity) demands – but it’s hard to
tell now because the ball goes straight off the screen! Pg0 will
call the update() function you define once per frame, giving the
illusionofsmooth(ish)scrollingifyou’renotrunningmuchelse.](https://image.slidesharecdn.com/thepythonbooktheultimateguidetocodingwithpythonpdfdrive-220527060944-728dd1fe/75/The-Python-Book_-The-ultimate-guide-to-coding-with-Python-PDFDrive-pdf-131-2048.jpg)
![132 The Python Book
Create with Python
19Drawingblocks
Draw_blocks() is added to def draw() after defining:
def draw_blocks():
for block in blocks:
screen.draw.filled_rect(block, block.colour)
20Blockbashing
All that remains with the blocks is to expand def
move(ball) – to destroy a block when the ball hits it.
to_kill = ball.collidelist(blocks)
if to_kill = 0:
sounds.block.play()
ball_dir = Direction(ball_dir
.x, abs(ball_dir
.y))
blocks.pop(to_kill)
17Goingforgold
CreateaBlockclass:
class Block(Rect):
def __init__(self, colour
, rect):
Rect.__init__(self, rect)
self.colour = colour
…andpickanicecolourforyourblocks:
GOLD = 205,145,0
18Lineuptheblocks
Thisbuildsanarrayof24blocks,threerowsofeight:
blocks = []
for n_block in range(24):
block = Block(GOLD, ((((n_block % 8)* 100) + 2,
((n_block // 8) * 25) + 2), (96, 23)))
blocks.append(block)
16Buildingblocks
There are many ways of defining blocks and distributing
them onto the screen. In Tom Viner’s team’s version, from
the London Python Dojo – which was the code that originally
inspired this author to give this a go – the blocks are sized in
relationtonumberacrossthescreen,thus:
N_BLOCKS = 8
BLOCK_W = W / N_BLOCKS
BLOCK_H = BLOCK_W / 4
BLOCK_COLOURS = RED, GREEN, BLUE
Using multicoloured blocks which are then built into an
array means that blocks can join without needing a border.
With its defining variables in terms of screen width, it’s good
sustainable code, which will be easy to amend for different
screensizes–seegithub.com/tomviner/breakout.
However, the array of colour bricks in a single row is not
enough for a full game screen, so we’re going to build our array
fromhard-codedvalues…
15Blockhead!
If you’re not very familiar with the ancient computer
game Breakout, then:
apt-get install lbreakout2
… and have a play. Now, we haven’t set our sights on building
something quite so ambitious in just these six pages, but we
do need blocks.
14Sounds
Also upon bat collision, sounds.blip.play() looks in
the sounds subdirectory for a sound file called blip. You can
download the sounds (and finished code) from FileSilo.co.uk.
Actually, now we think about it, ignore the previous
comment about homework – your real homework is to turn
what we’ve written so far into a proper game of Pong! But first
let’s finish turning it into Breakout!
RightTomViner’s
arrayofblocks
negatestheneedfor
borderedrectangles
There’sanew
versionofPg0in
development–it
mayevenbeout
asyoureadthis.
Pg0creatorDaniel
Popetellsus“atone
generationAPIisin
theworks,”andthat
atthePg0PyConUK
sprint,“wefinished
Actorrotation.”
Contributionsare
welcome–notonly
tothePg0code,but
moreexamplesare
needednotjustto
showwhatcanbe
done,buttogive
teacherstoolsto
enthusechildren
aboutthecreative
actofprogramming.
Pg0hasalso
inspiredGPIO
Zero,tomake
GPIOprogramming
easieronthe
RaspberryPi,with
rapiddevelopment
occurringonthis
newlibraryaswego
topress.
Pg0+1](https://image.slidesharecdn.com/thepythonbooktheultimateguidetocodingwithpythonpdfdrive-220527060944-728dd1fe/75/The-Python-Book_-The-ultimate-guide-to-coding-with-Python-PDFDrive-pdf-132-2048.jpg)
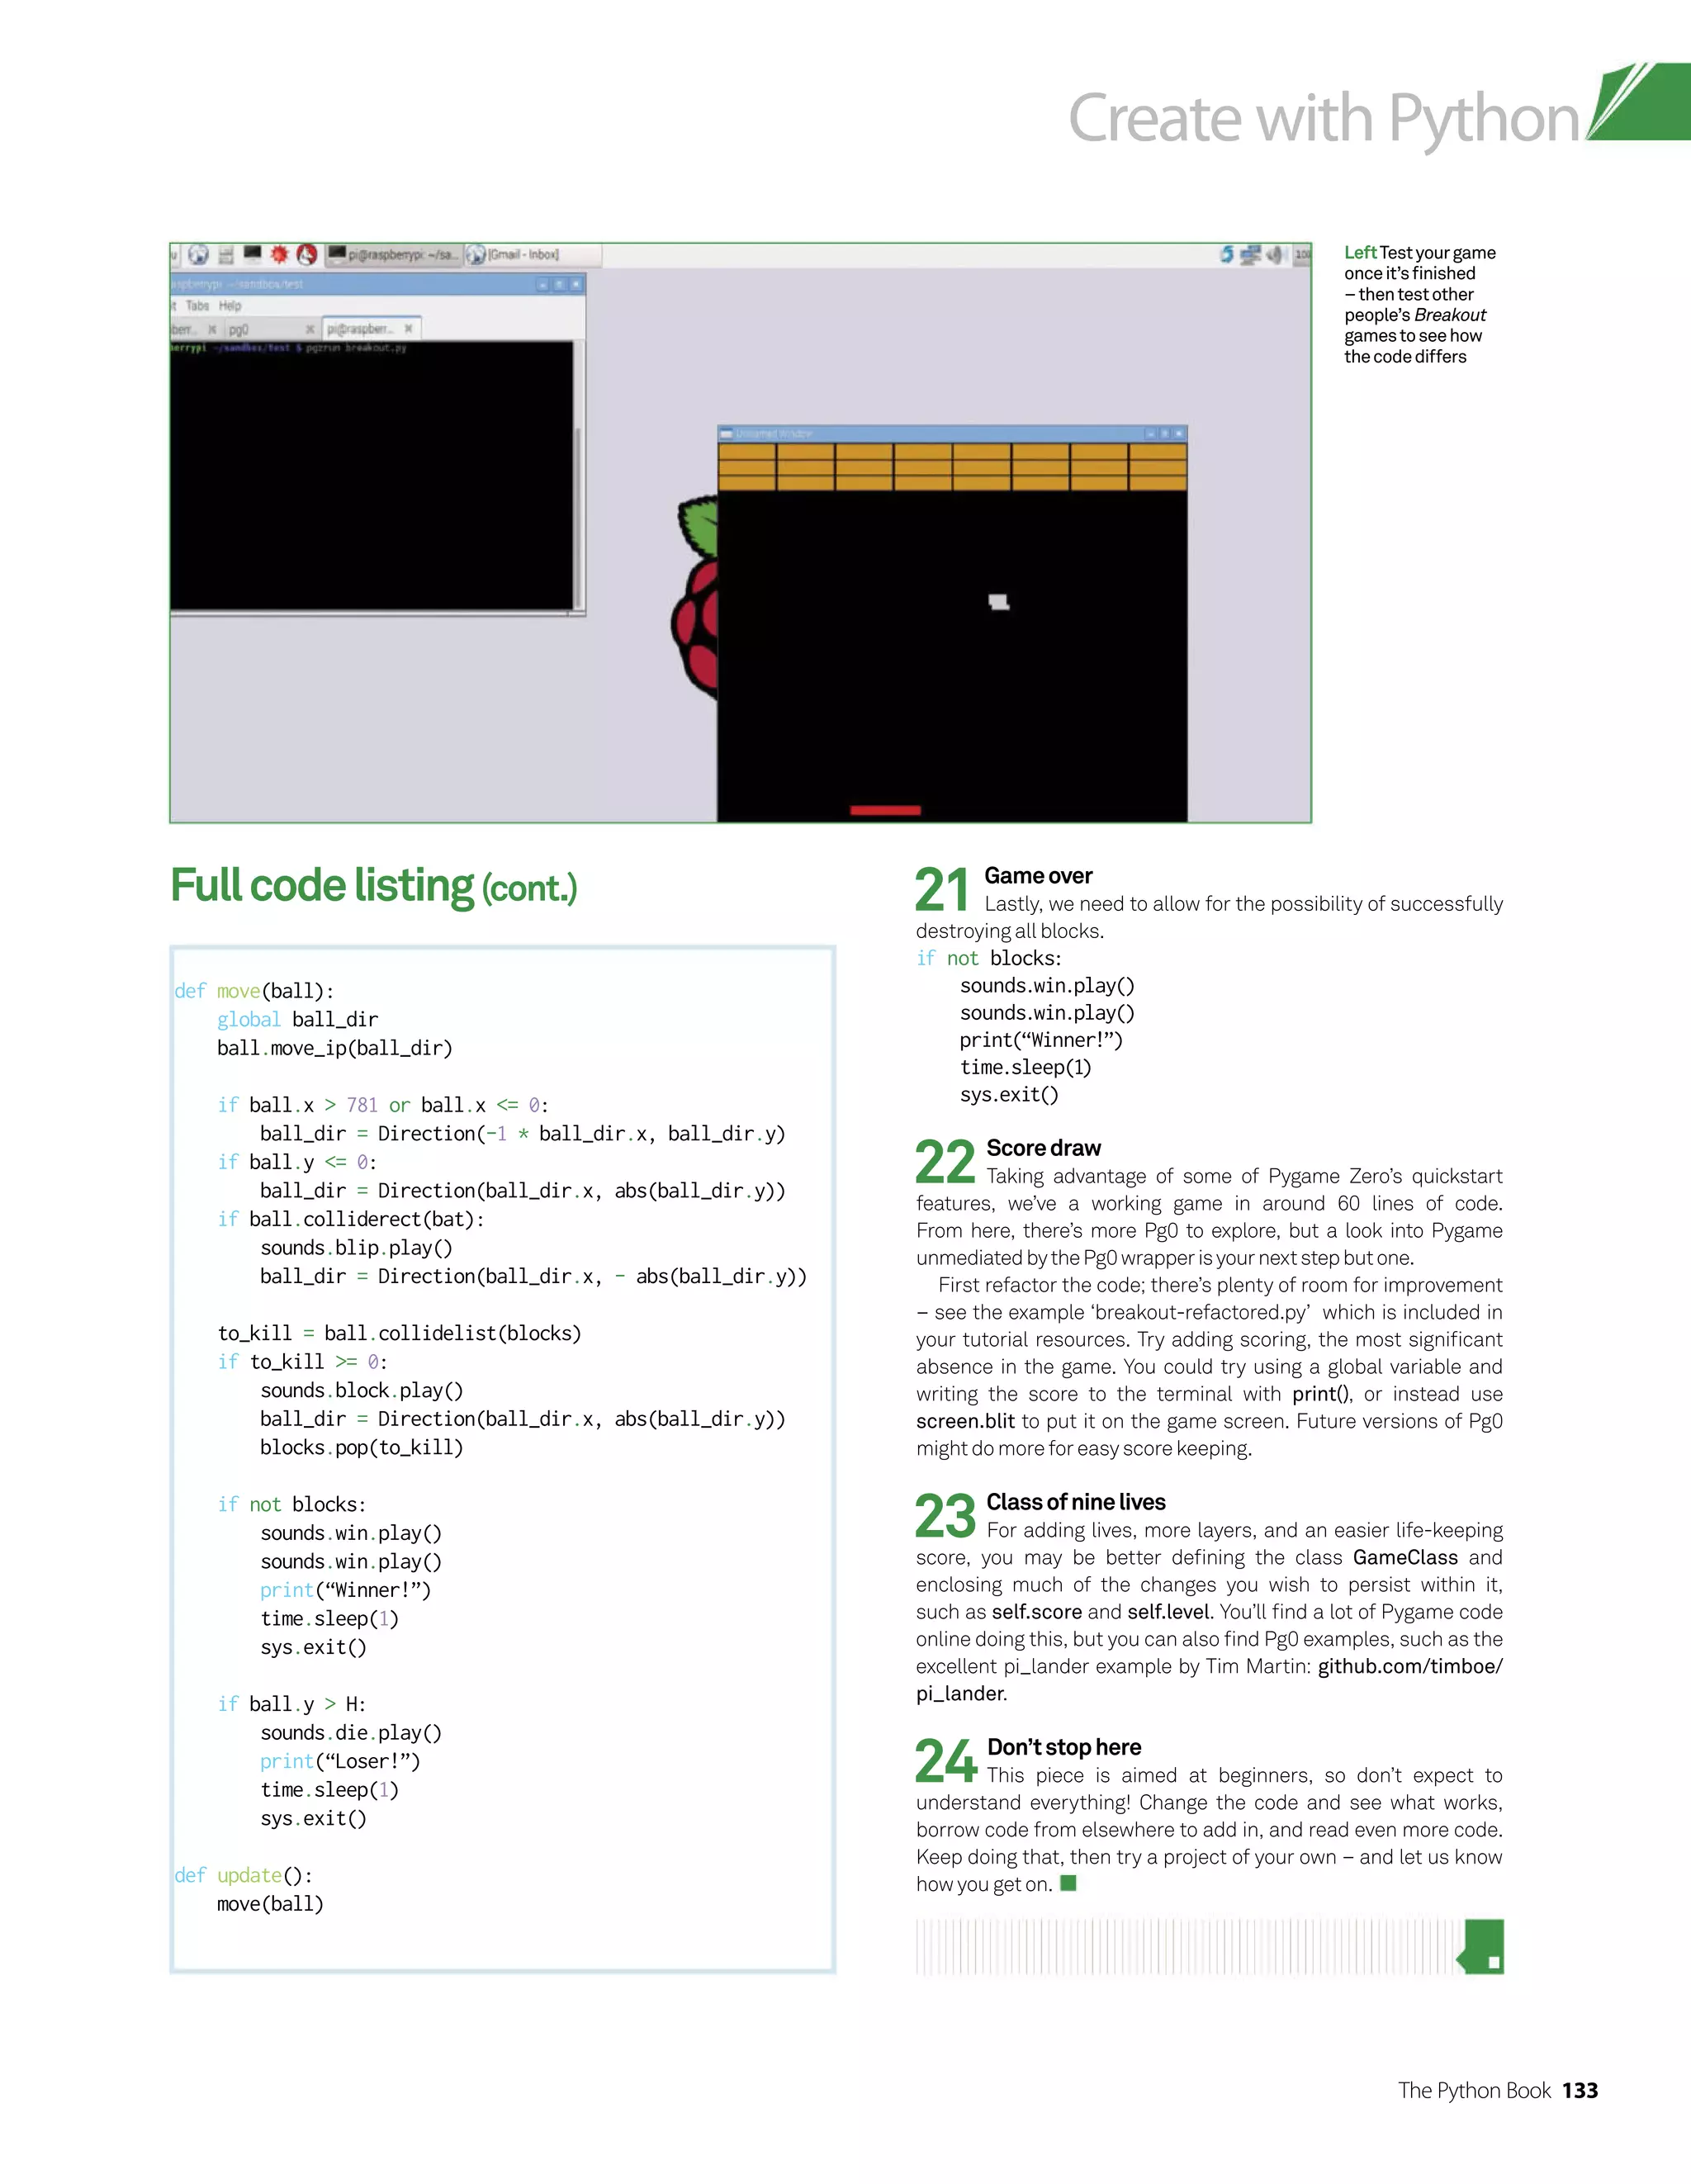


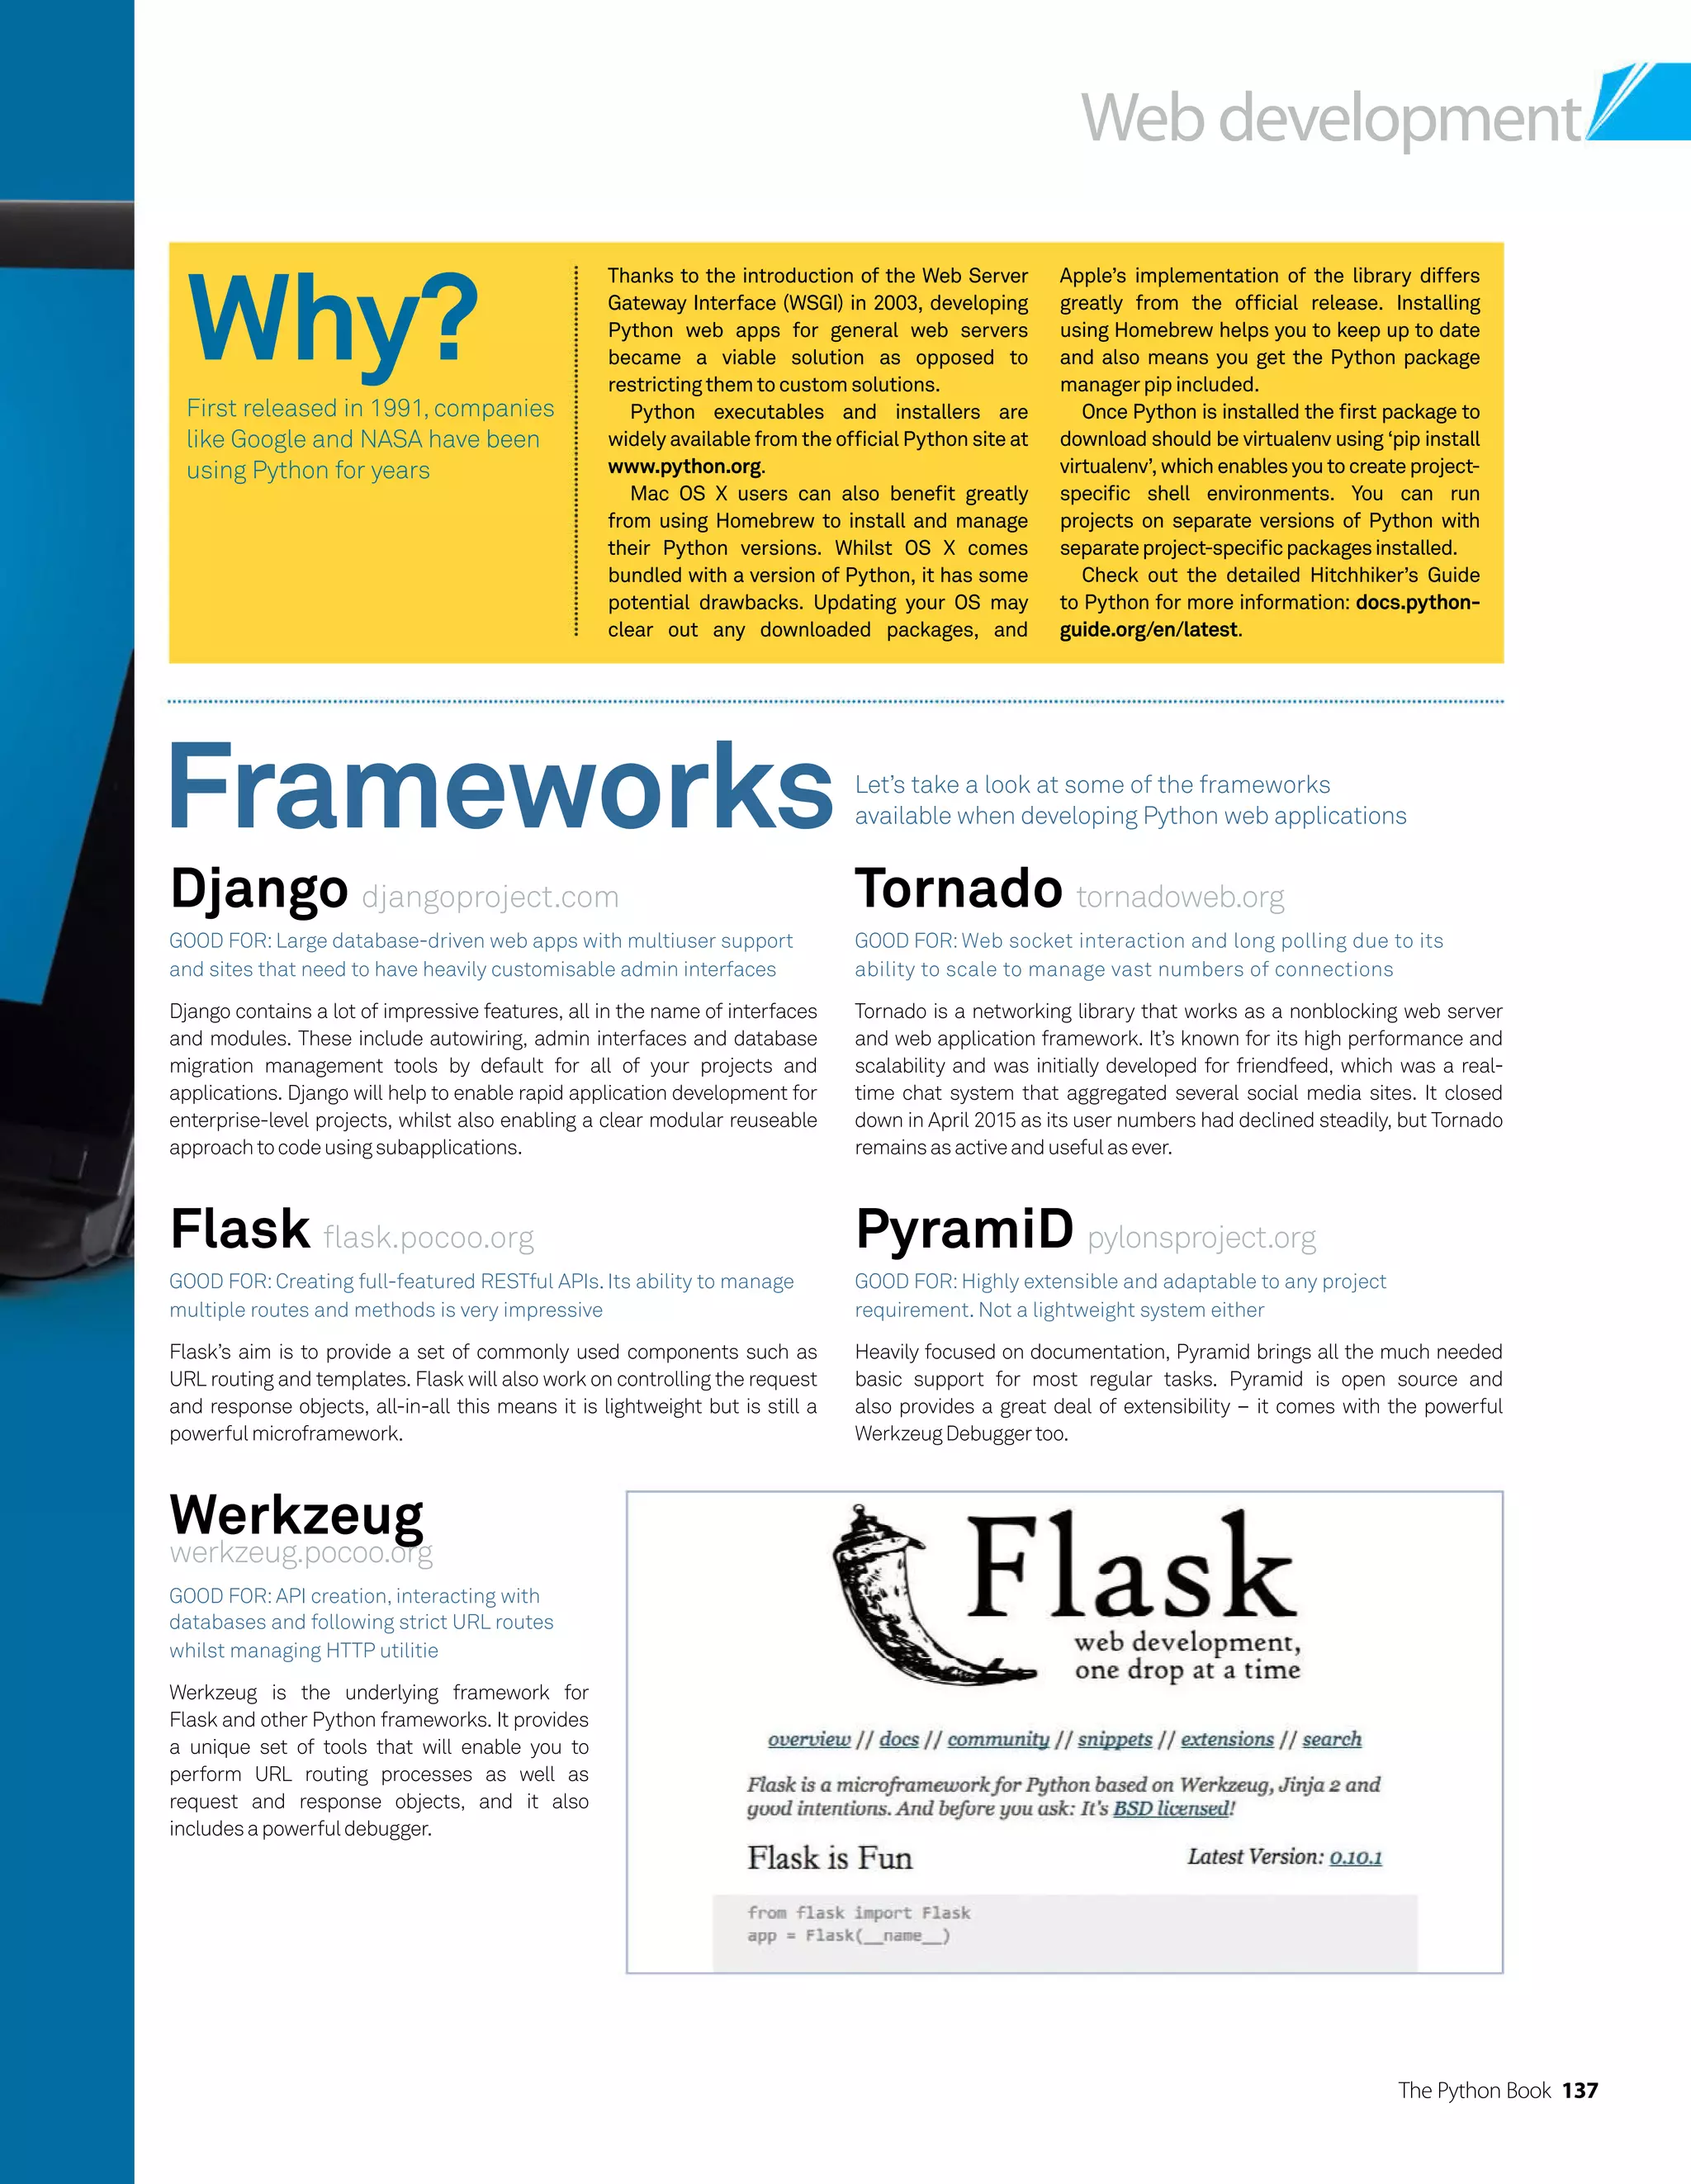
![Web development
138 The Python Book
Create an API Let us explore the Flask microframework and build a
simple yet powerful RESTful API with minimal code
01InstallFlask
Create a new directory inside of
which your project will live. Open a Terminal
window and navigate to be inside your new
directory. Create a new virtual environment
for this project, placed inside a new directory
called ‘venv’, and activate it. Once inside
the new virtual shell, proceed to installing
Flask using the ‘pip install Flask’ command.
virtualenv venv
. venv/bin/activate
pip install Flask
04ConnecttoDatabase
With the database path defined,
we need a way to create connection to the
database for the application to obtain data.
Create a new method called ‘connet_db’ to
manage this for us. As a method we can call it
when we set up a prerequest hook shortly. This
will return a new open connection using the
database details set in the configuration object.
def connect_db():
return sqlite3.connect(app.
config[‘DATABASE’])
07PopulatetheDatabase
To populate the database you
can now run the init_db inside an active
python shell. To do so enter a shell by typing
‘python’ inside your environment, and then
running the command below. Alternatively,
you can use the sqlite3 command and
pipe the schema.sql file into the database.
# Importing the database using the
init_db method
python
from index import init_db
init_db()
# Piping the schema using SQLite3
sqlite3 /tmp/api.db schema.sql
02CreateIndex
Create a new file in the root of the
project location called ‘index.py’. The sample API
will use a SQLite database, so we need to import
that module for use in the application. We’ll
also import some core components from the
Flask module to handle request management
and response formatting as well as some other
functions. The minimum import for a Flask
applicationisFlaskitself.
import sqlite3
from flask import Flask, request, g,
redirect, url_for
, render_template,
abort, jsonify
05DatabaseSchema
Our SQLite database will only contain
one table. Create a new file called ‘schema.sql’
in the root of the project directory. This fill will
contain the SQL commands required to create
the table and populate it with some sample
bootstrappeddata.
drop table if exists posts;
create table posts (
id integer primary key autoincrement,
title text not null,
text text not null
);
insert into posts (title, text) values
(‘First Entry’
, ‘This is some text’);
insert into posts (title, text) values
(‘Second Entry’
, ‘This is some more text’);
insert into posts (title, text) values
(‘Third Entry’
, ‘This is some more text
(again)’);
08RequestDBConnection
With the database created and
populated we need to be able to ensure
we have an open connection and close it
accordingly when finished. Flask has some
decorator methods to help us achieve this.
The before_request() method will establish
the connection and stores it in the g object
for use throughout the request cycle. We
can then close the connection after the
cycle using the teardown_request() method.
@app.before_request
def before_request():
g.db = connect_db();
03DeclareConfig
For a small application we can declare
configuration options as upper-casename value
pairsinsidethemainmodule,whichwe’lldonow.
Here we can define the path and name of the
SQLite database and also set the Flask debug
output to True for development work. Initialise
the Flask application to a namespace and then
import the config values set directly above it.
We then run the application. All routes must be
placedabovetheselasttwolines.
# Config
DATABASE = ‘
/tmp/api.db’
DEBUG = True
app = Flask(__name__)
app.config.from_object(__name__)
# Add methods and routes here
if __name__ == ‘__main__’
:
app.run()
06InstantiatetheDatabase
To populate the database with the new
table and any associated data, we will need to
import and apply the schema to the database.
Add a new module import at the top of the
project file to obtain the ‘contextlib.closing()’
method. What we will do next is create a method
that will initialise the database by reading the
contents of schema.sql and executing it against
theopendatabase.
from contextlib import closing
def init_db():
with closing(connect_db()) as db:
with app.open_resource(‘schema.sql’
,
mode=’r’) as f:
db.cursor().executescript(f.read())
db.commit()
“World-renowned image sharing service
Instagram and social pin board Pinterest
have also implemented Python as part of
their web stack, opting for Django”](https://image.slidesharecdn.com/thepythonbooktheultimateguidetocodingwithpythonpdfdrive-220527060944-728dd1fe/75/The-Python-Book_-The-ultimate-guide-to-coding-with-Python-PDFDrive-pdf-138-2048.jpg)
![The Python Book 139
Python in
the wild
Interested in Python development?
You’d be in good company with big
names currently using it
10TemplateOutput
Flask expects templates to be available
within the templates directory in the root of
the project, so make sure that you create that
directory now. Next, add a new file called
‘show_posts.html’. The dynamic values are
managed using Jinja2 template syntax, the
default templating engine for Flask applications.
Save this file in the templates directory.
ul class=posts
{% for post in posts %}
lih2{{ post.title }}/h2{{ post.
text|safe }}
{% else %}
liSorry, no post matches your
request.
{% endfor %}
/ul
13Runtheapplication
To run your Flask application, navigate
using the active Terminal window into the
root of the project. Ensuring you are in an
active virtual environment Python shell,
enter the command to run the main index
file. The built-in server will start and the site
will be accessible in the browser on default
port local address http://127.0.0.1:5000.
python index.py
11MakeanAPIResponse
To create an API response we can
define a new route with a specific API endpoint.
Once again, we query the database for all
posts. The data is then returned as JSON,
using the JSONify method to do so. We can
add specific values such as post count and
a custom message if you wish, as well as the
actual posts variable, formatted as JSON.
@app.route(‘
/api/v1/posts/’
,
methods=[‘GET’])
def show_entries():
cur = g.db.execute(‘select title, text
from posts order by id desc’)
14APIJSONOutput
The root of the application will render
the template we previously created. Multiple
routes can be generated to create a rich web
application. Visiting an API-specific URL in
the browser will return the requested data as
cleanly formatted JSON. The ability to define
custom routes like a versioned RESTful endpoint
isincrediblypowerful.
09DisplayPosts
Create your first route so that we can
return and display all available posts. To query
the database we execute a SQL statement
against the stored db connection. The results
are then mapped to values using Python’s
dict method and saved as the posts variable.
To render a template we then call render_
template() and pass in the file name and the
variable to display as the second argument.
Multiple variables can be passed through as a
comma-separatedlist.
@app.route(‘
/’)
def get_posts():
cur = g.db.execute(‘select title, text
from posts order by id desc’)
posts = [dict(title=row[0], text=row[1])
for row in cur
.fetchall()]
return render_template(‘show_posts.
html’
, posts=posts)
12GetaspecificPost
CTo obtain a specific post from the
API we need to create a new route, which will
accept a dynamic value as part of the URI. We
can also choose to use this route for multiple
request methods, which are in this case GET
and DELETE. We can determine the method
by checking the request.method value and
run it against a conditional if/else statement.
@app.route(‘
/api/v1/posts/int:post_id’
,
methods=[‘GET’
, ‘DELETE’])
def single_post(post_id):
method = request.method
if method == ‘GET’
:
cur = g.db.execute(‘select title,
text from posts where id =?’
, [post_id])
posts = [dict(title=row[0],
text=row[1]) for row in cur
.fetchall()]
return jsonify({‘count’
: len(posts),
‘posts’
: posts})
elif method == ‘DELETE’
:
g.db.execute(‘delete from posts
where id = ?’
, [post_id])
return jsonify({‘status’
: ‘Post
deleted’})
@app.teardown_request
def teardown_request(exception):
db = getattr(g, ‘db’
, None)
if db is not None:
db.close()
posts = [dict(title=row[0],
text=row[1]) for row in ur
.fetchall()]
return jsonify({‘count’
: len(posts),
‘posts’
: posts})
Disqus, the popular social interaction
comment service provider, has
been implementing their production
applications in Python for a very long time.
Python’s benefit for the development
team was its ability to scale effectively
and cater for a large number of consumers
whilst also providing an effective
underlying API for internal and external
use. The company are now starting to
run some production apps in Go, but the
majority of code still runs on Python.
World-renowned image sharing service
Instagram and social pin board Pinterest
have also implemented Python as part of
their web stack, opting for Django to assist
with the functionality and ability to cater
for the many thousands of content views
andrequestsmadetotheirservices.
Mozilla, Atlassian’s Bitbucket
repository service, and popular satire site
The Onion have all been noted as using
Django for their products.](https://image.slidesharecdn.com/thepythonbooktheultimateguidetocodingwithpythonpdfdrive-220527060944-728dd1fe/75/The-Python-Book_-The-ultimate-guide-to-coding-with-Python-PDFDrive-pdf-139-2048.jpg)
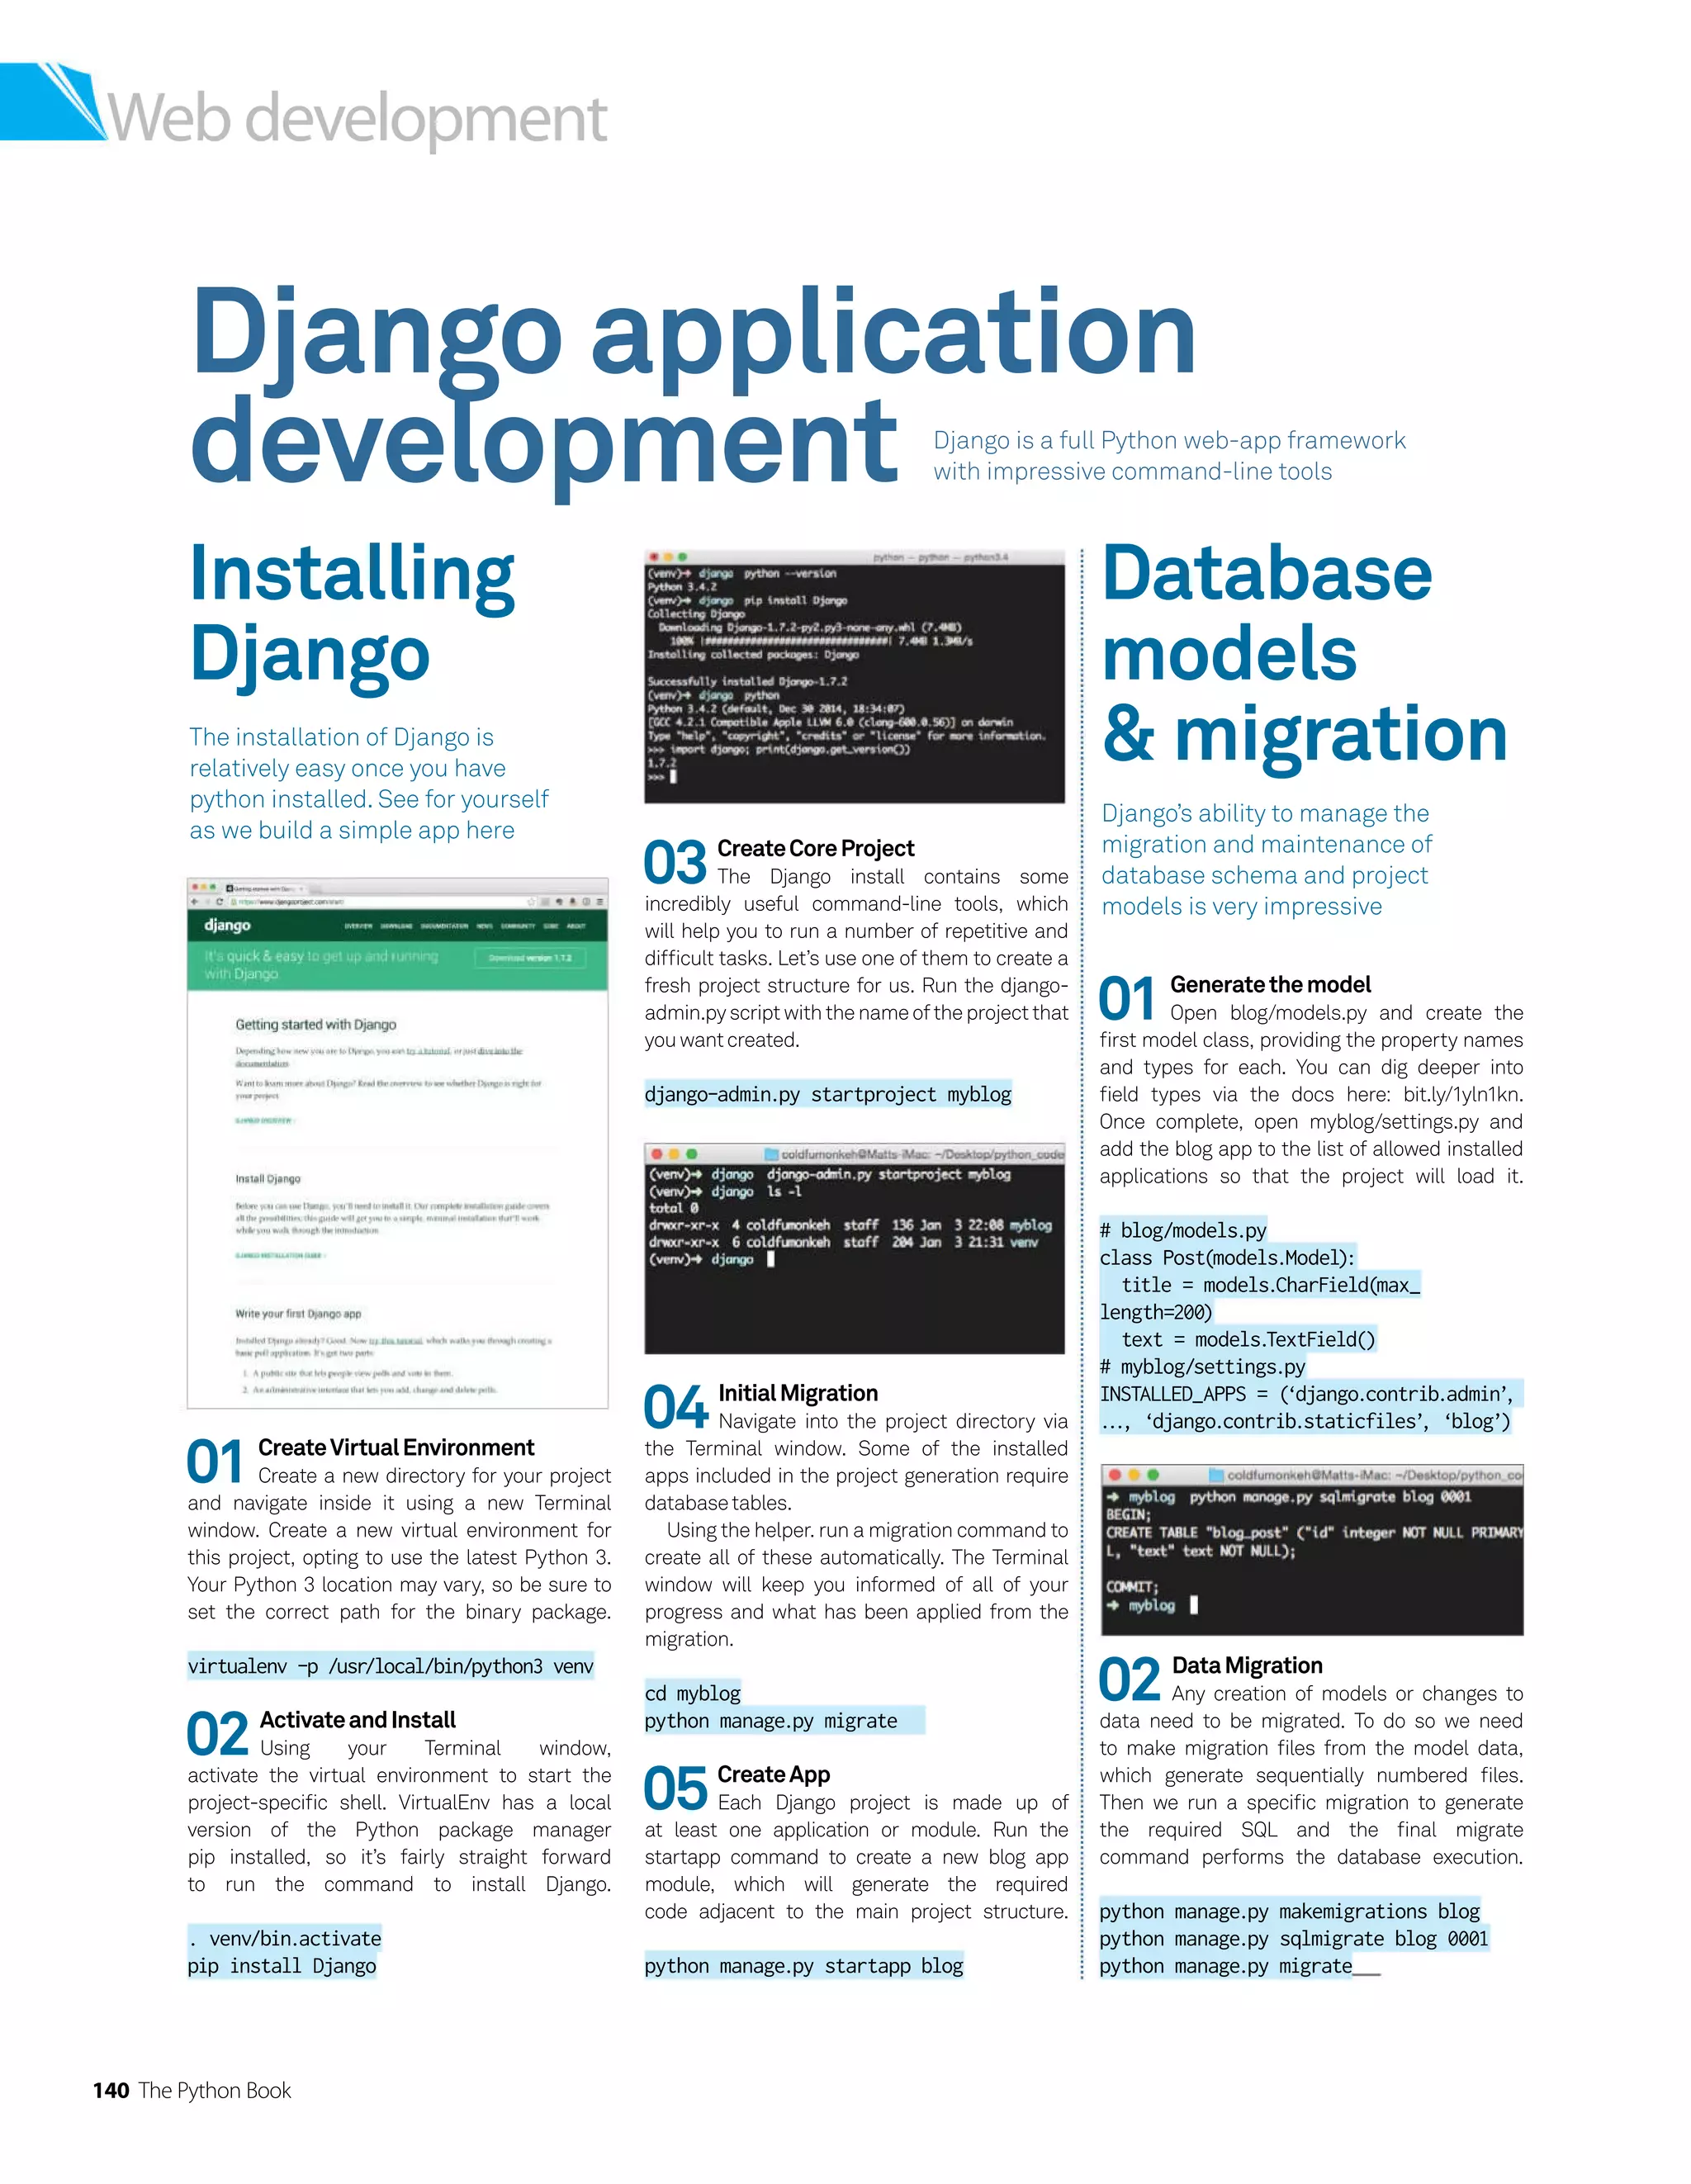
![Web development
The Python Book 141
01CreateAdminUser
Django makes content administration
incredibly easy and has an admin section
available in a default project as standard
at http://127.0.0.1:8000/admin. To log in you
need to create a superuser account. Run
the associated command and specify user
details as required to then proceed and log in.
python manage.py createsuperuser
04CreateaView
With the admin interface accepting
new submissions for our post class we’ll create
a view page to display them. Open blog/views.
py and import the Post class from the models.
Create a method to obtain all posts from the
databaseandoutputthemasastring.
from django.http import HttpResponse
from blog.models import Post
def index(request):
post_list = Post.objects.order_by(‘-id’)
[
:5]
output = ‘br /’
.join([p.title for p
in post_list])
return HttpResponse(output)
02Switchonblogmanagement
Having logged in to the administration
interface you will be greeted with features to
manage users and group roles and privileges,
which alone are very powerful and provided for
you by Django. There is not yet, however, any
access to manage our blog posts so let’s turn
thaton.
05ManagetheURLs
Create ‘blog/urls.py’ and add the code
to import the views that were just made in the
module and the accompanying URL patterns.
Open myblog/urls.py and add the URL function
call to implement a new URL for the app to
display the view. Visit http://127.0.0.1:5000/
blog in your browser to render the new view.
# blog/urls.py
from django.conf.urls import patterns,url
from blog import views
urlpatterns = patterns(‘’
,
url(r’^$’
, views.index, name=’index’),
)
# myblog/urls.py
urlpatterns = patterns(‘’
,
url(r’^blog/’
, include(‘blog.urls’)),
url(r’^admin/’
, include(admin.site.urls)),
)
03EnableAdminManagement
To enable our module and associated
models to be managed through the admin
interface, we need to register them with the
admin module. Open blog/admin.py and then go
on to import and register the models in turn (we
only have one of these currently though). Save
the file and refresh the admin site to see the
poststhatarenowavailabletomanage.
from django.contrib import admin
# Register your models here.
Autowiring the
admin interface
Hosting
Python
apps
Admin sections can be
problematic in their own right.
Django provides an extensible
admin interface for you
Admin sections can be
problematic in their own right.
Django provides an extensible
admin interface for you
Herokuheroku.com
This app is perhaps one of the most well-
known cloud hosting providers. Their stack
server environments support a number
of core web app languages including
Python as standard. Their unique Toolbelt
command-line features and integration
with Git repositories, as well as being
incredibly quick and easy to scale and
improve performance, makes them an
obvious choice. A free account will let you
run a Python web app on one dyno instance
withoutanycost.
PythonAnywhere
www.pythonanywhere.com
Another hosted option, and one created
specifically for Python applications in
general is Python Anywhere. The free
basic option plan has enough weight and
power behind it to get you up and running
with a Python web app without having to
scale, but as soon as your project gains
traction, you can switch plans and boost
yourplansperformance.
It offers an incredibly impressive range
of modules as standard, available to import
into your application immediately to get you
started, including Django and Flask should
youneedthem.
Using the
dev server
Django ships with a very helpful built-in
development server, which will help you
out by autocompiling and reloading
after you have completed all of your file
changes. All you have to do to start
the server is to run the ‘python
manage.py runserver’ command from
your Terminal window within
the project directory.](https://image.slidesharecdn.com/thepythonbooktheultimateguidetocodingwithpythonpdfdrive-220527060944-728dd1fe/75/The-Python-Book_-The-ultimate-guide-to-coding-with-Python-PDFDrive-pdf-141-2048.jpg)
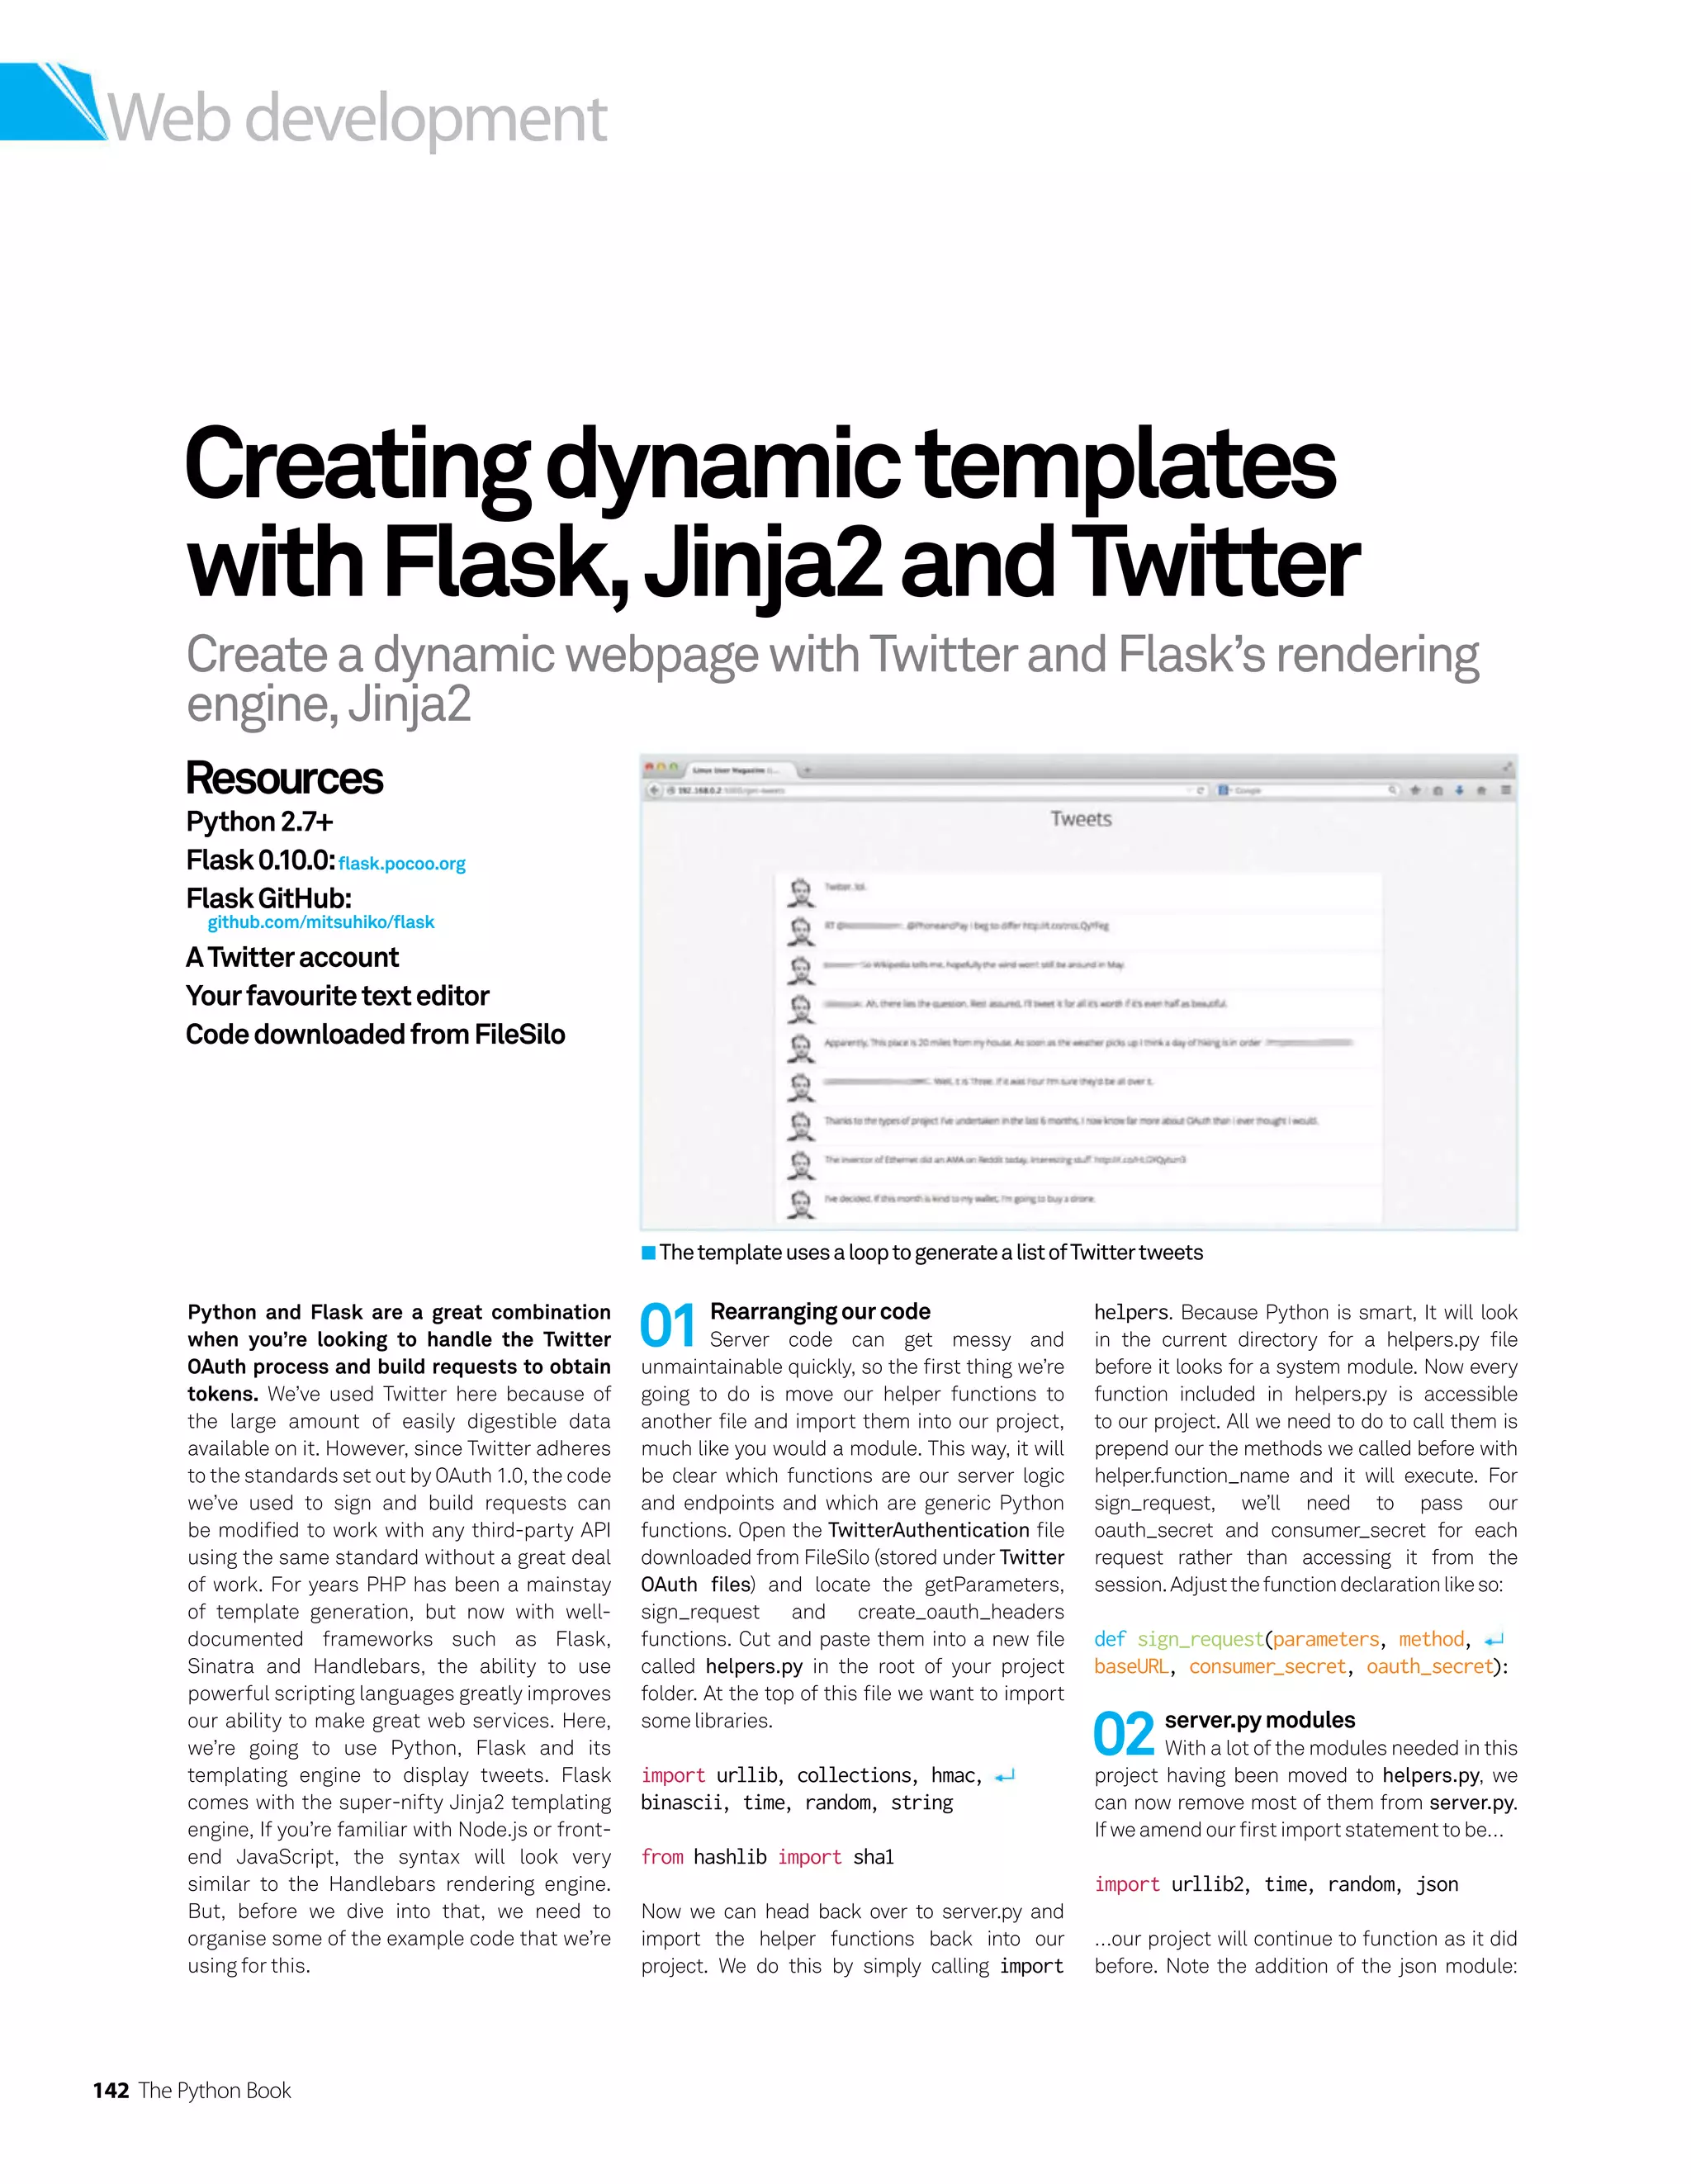
![The Python Book 143
Web development
QTheBSD-licensedFlaskiseasytosetup
anduse–checkoutthewebsiteformoreinfo
we’ll be using that later as we start handling
Twitter data.
Having Flask use a rendering engine is
super-simple. Flask comes packaged with
the Jinja2 template rendering engine, so we’ve
nothing to install – we just need to import the
package into the project. We can do this by
adding render_template to the end of our from
flask import […]statement.
03Ourfirsttemplate
Now that we have a rendering engine,
we need to create some templates for it to
use. In the root of our project’s folder, create
a new folder called templates. Whenever
we try to render a template, Flask will look in
this folder for the template specified. To get
to grips with templating, we’ll rewrite some
of our authentication logic to use a template,
rather than manually requesting endpoints. In
templates, create an index.html file. You can
treat this HTML file like any other – included in
the resources for this tutorial is an index.html
that includes all of the necessary head tags and
!DOCTYPEdeclarationsforthisfile.
04Renderingourtemplate
In server.py, let’s create a route for ‘/’ to
handletheauthorisationprocess.
@app.route(‘
/’)
def home():
if not ‘oauth_token’ in session:
session.clear()
session[‘oauth_secret’] = ‘’
session[‘oauth_token’] = ‘’
return render_template(‘index.html’)
It’s a simple function: all we want to do is check
whether or not we have an oauth_token already
and create those properties in the Flask session
so we don’t throw an error if we try to access
it erroneously. In order to send our generated
template in response to the request, we return
render_template(‘index.html’).
{% if session[‘oauth_token’] != “” %}
h1Already Authorised/h1
div class=”dialog”
pHello, You’ve authenticated!brLet’s a href=”
/get-tweets”get some tweets/a/p
/div
{% else %}
h1Authorisation required/h1
div class=”dialog”
pWe need to a href=”/authenticate”authenticate/a/p
/div
{% endif %}
Fig 01
05Templatevariables
We can choose to send variables to our
template with render_template(‘index.htm’
,
variableOne=value, variableTwo=Value) but
inthisinstancewedon’tneedtoaseachtemplate
hasaccesstotherequestandsessionvariables.
Codeon
FileSilo](https://image.slidesharecdn.com/thepythonbooktheultimateguidetocodingwithpythonpdfdrive-220527060944-728dd1fe/75/The-Python-Book_-The-ultimate-guide-to-coding-with-Python-PDFDrive-pdf-143-2048.jpg)
![144 The Python Book
Web development
Nowweknowhowtobuildtemplates,
let’sgrabsometweetstodisplay
09Checkingoursession
and buildingour request
Before we start grabbing tweets, we want to
run a quick check to make sure we have the
necessary credentials and if not, redirect the
user back the authorisation flow. We can do
this by having Flask respond to the request
with a redirection header, like so:
if session[‘oauth_token’] == “” or
session[‘oauth_secret’] == “”:
return redirect(rootURL)
Assuming we have all we need, we can start to
build the parameters for our request (Fig 02).
You’ll notice that the nonce value is different
from that in our previous requests. Where the
nonce value in our authenticate and authorise
requests can be any random arrangement of
characters that uniquely identify the request,
for all subsequent requests the nonce needs
to be a 32-character hexadecimal string using
only the characters a-f. If we add the following
function to our helpers.py file, we can quickly
build one for each request.
def nonce(size=32, chars=”abcdef” +
string.digits):
return ‘’
.join(random.choice
(chars) for x in range(size))
10Signingandsendingourrequest
We’ve built our parameters, So let’s
sign our request and then add the signature to
the parameters (Fig 03).
Before we create the authorisation headers,
we need to remove the count and user_id
values from the tweetRequestParams
dictionary, otherwise the signature we just
created won’t be valid for the request. We can
achieve this with the del keyword. Unlike our
token requests, this request is a GET request,
so instead of including the parameters
in the request body, we define them as
query parameters.
?count=tweetRequestParams[‘count’]
user_id=tweetRequestParams[‘user_id’]
11HandlingTwitter’sresponse
Now we’re ready to fire off the request
and we should get a JSON response back
from Twitter. This is where we’ll use the json
module we imported earlier. By using the
json.loads function, we can parse the JSON
into a dictionary that we can access and we’ll
pass through to our tweets.html template.
tweetResponse = json.
loads(httpResponse.read())
return render_template(‘tweets.html’
,
data=tweetResponse)
Whereas before, we accessed the session
to get data into our template, this time
we’re explicitly passing a value through to
our template.
12Displayingourtweets
Let’s create that template now, exactly
the same as index.html but this time, instead of
using a conditional, we’re going to create a loop
togeneratealistoftweetswe’vereceived.
First, we check that we actually received
some data from our request to Twitter. If we’ve
got something to render, we’re ready to work
through it, otherwise we’ll just print that we
didn’tgetanything.
Once again, any template logic that we want
to use to generate our page is included between
08Let’sgetsometweets
Sonowweknowhowtobuildtemplates,
let’s grab some tweets to display. In server.py
defineanewroute,get-tweets,likeso:
@app.route(‘/get-tweets’)
@app.route(‘/get-tweets/count’)
def getTweets(count=0):
You’ll notice that unlike our other authentication
endpoints, we’ve made two declarations.
The first is a standard route definition: it will
07Staticfiles
Pretty much every webpage uses
JavaScript, CSS and images, but where do we
keep them? With Flask we can define a folder
for use with static content. For Flask, we create
a static folder in the root of our project and
access files by calling /static/css/styles.css or
/static/js/core.js.Thetutorialresourcesincludea
CSSfileforstylingthisproject.
Open index.html. All code executed in a Flask
template is contained within {% %}. As this is our
homepage, we want to direct users accordingly,
Solet’scheckifwe’vegotanaccesstoken(Fig01).
Between the ifs and else of the template is
standard HTML. If we want to include some data
– for example, the access token – we can just add
{{ session[‘oauth_token’] }} in the HTML and it
will be rendered in the page. Previously, in our /
authorised endpoint, we would display the OAuth
token that we received from Twitter; however, now
thatwehaveatemplate,wecanredirectourusers
backourrootURLandhaveapagerenderedforus
thatexplainstheprogresswe’vemade.
06Getting lost
(andthenfoundagain)
With every server, some things get misplaced or
peoplegetlost.Sohowdowehandlethis?Rather
than defining a route, we can define a handler
thatdealswithgettinglost.
@app.errorhandler(404)
def fourOhFour(error):
return render_template(‘fourohfour
.html’)
If a page or endpoint is requested and triggers a
404, then the fourOhFour function will be fired. In
this case, we’ll generate a template that tells the
user,butwecouldalsoredirecttoanotherpageor
dumptheerrormessage.
intercept and handle the path get-tweets. The
second lets us define a parameter that we can
use as a value in our getTweets function. By
including count=0 in our function declaration,
we ensure that there will always be a default
value when the function is executed; this way we
don’t have to check the value is present before
we access it. If a value is included in the URL, it
will override the value in the function. The string
inside the variable name determines the
name of the variable. If you want the variable
passed to the function to have a specific type,
you can include a converter with the variable
name. For example, if we wanted to make sure
that count was always an integer instead of a
floatorstring,we’ddefineourroutelikeso:
@app.route(‘/get-tweets/int:count’)](https://image.slidesharecdn.com/thepythonbooktheultimateguidetocodingwithpythonpdfdrive-220527060944-728dd1fe/75/The-Python-Book_-The-ultimate-guide-to-coding-with-Python-PDFDrive-pdf-144-2048.jpg)
![The Python Book 145
Web development
tweetRequestParams = {
“oauth_consumer_key” : consumer_key,
“oauth_nonce” : helpers.nonce(32),
“oauth_signature_method” : “HMAC-SHA1”,
“oauth_timestamp” : int(time.time()),
“oauth_version” : “1.0”,
“oauth_token” : session[‚Äòoauth_token’],
“user_id” : session[‘user_id’],
“count” : str(count)
}
Fig 02
tweetRequest = helpers.sign_request(tweetRequestParams, “GET”,
“https://api.twitter
.com/1.1/statuses/user_timeline.json”, consumer_secret,
session[‘oauth_secret’])
tweetRequestParams[“oauth_signature”] = tweetRequest
makeRequest=urllib2.Request(“https://api.twitter
.com/1.1/statuses/
user_timeline.json?count=” + tweetRequestParams[‘count’] + “user_id=”
+ tweetRequestParams[‘user_id’])
del tweetRequestParams[‘user_id’], tweetRequestParams[‘count’]
makeRequest.add_header(“Authorization”, helpers.create_oauth_
headers(tweetRequestParams))
try:
httpResponse = urllib2.urlopen(makeRequest)
except urllib2.HTTPError
, e:
return e.read()
Fig 03
{% if data %}
ul id=”tweets”
{% for tweet in data %}
li
div class=”image”
img src=”{{ tweet[‘user’][‘profile_image_url_https’]
}}” alt=”User Profile Picture”
/div
div class=”text”
a{{ tweet[‘text’]|forceescape }}/a
/div
/li
{% endfor %}
/ul
{% else %}
pWe didn’t get any tweets :(/p
{% endif %}
Fig 04
13Flaskfilters
Sometimes, when parsing from JSON,
Python can generate erroneous characters
that don’t render particularly well in HTML.
You may notice that after tweet[‘text’] there
is |forceescape, This is an example of a Flask
filter; it allows us to effect the input before we
render – in this case it’s escaping our values
for us. There are many, many different built-
in filters that come included with Flask. Your
advisor recommends a full reading of all the
potential options.
14Wrappingup
That’s pretty much it for templating
with Flask. As we’ve seen, it’s insanely quick
and easy to build and deploy dynamic sites.
Flask is great tool for any Python developer
looking to run a web service. Although we’ve
used Twitter to demonstrate Flask’s power,
all of the techniques described can be used
with any third-party service or database
resource. Flask can work with other rendering
engines, such as Handlebars (which is
superb), but Jinja2 still needs to be present
to run Flask and conflicts can occur between
the two engines. With such great integration
between Flask and Jinja2, it makes little
sense to use another engine outside of very
specific circumstances.
{% %}. This time we’re creating a loop; inside the
loopwe’llbeabletoaccessanypropertywehave
of that object and print it out. In this template
we’re going to create an li element for each
tweet we received and display the user’s profile
pictureandtextofthetweet(Fig 04).
In our template we can access properties
using either dot notation (.) or with square
brackets ([]). They behave largely the same;
the [] notation will check for an attribute on
the dictionary or object defined whereas the
. notation will look for an item with the same
name. If either cannot find the parameter
specified, it will return undefined. If this occurs,
the template will not throw an error, it will simply
print an empty string. Keep this in mind if your
template does not render the expected data:
you’ve probably just mis-defined the property
you’retryingtoaccess.
Unlike traditional Python, we need to
tell the template where the for loop and if/
else statements end, so we do that with
{%endfor %}and{% endif %}.](https://image.slidesharecdn.com/thepythonbooktheultimateguidetocodingwithpythonpdfdrive-220527060944-728dd1fe/75/The-Python-Book_-The-ultimate-guide-to-coding-with-Python-PDFDrive-pdf-145-2048.jpg)
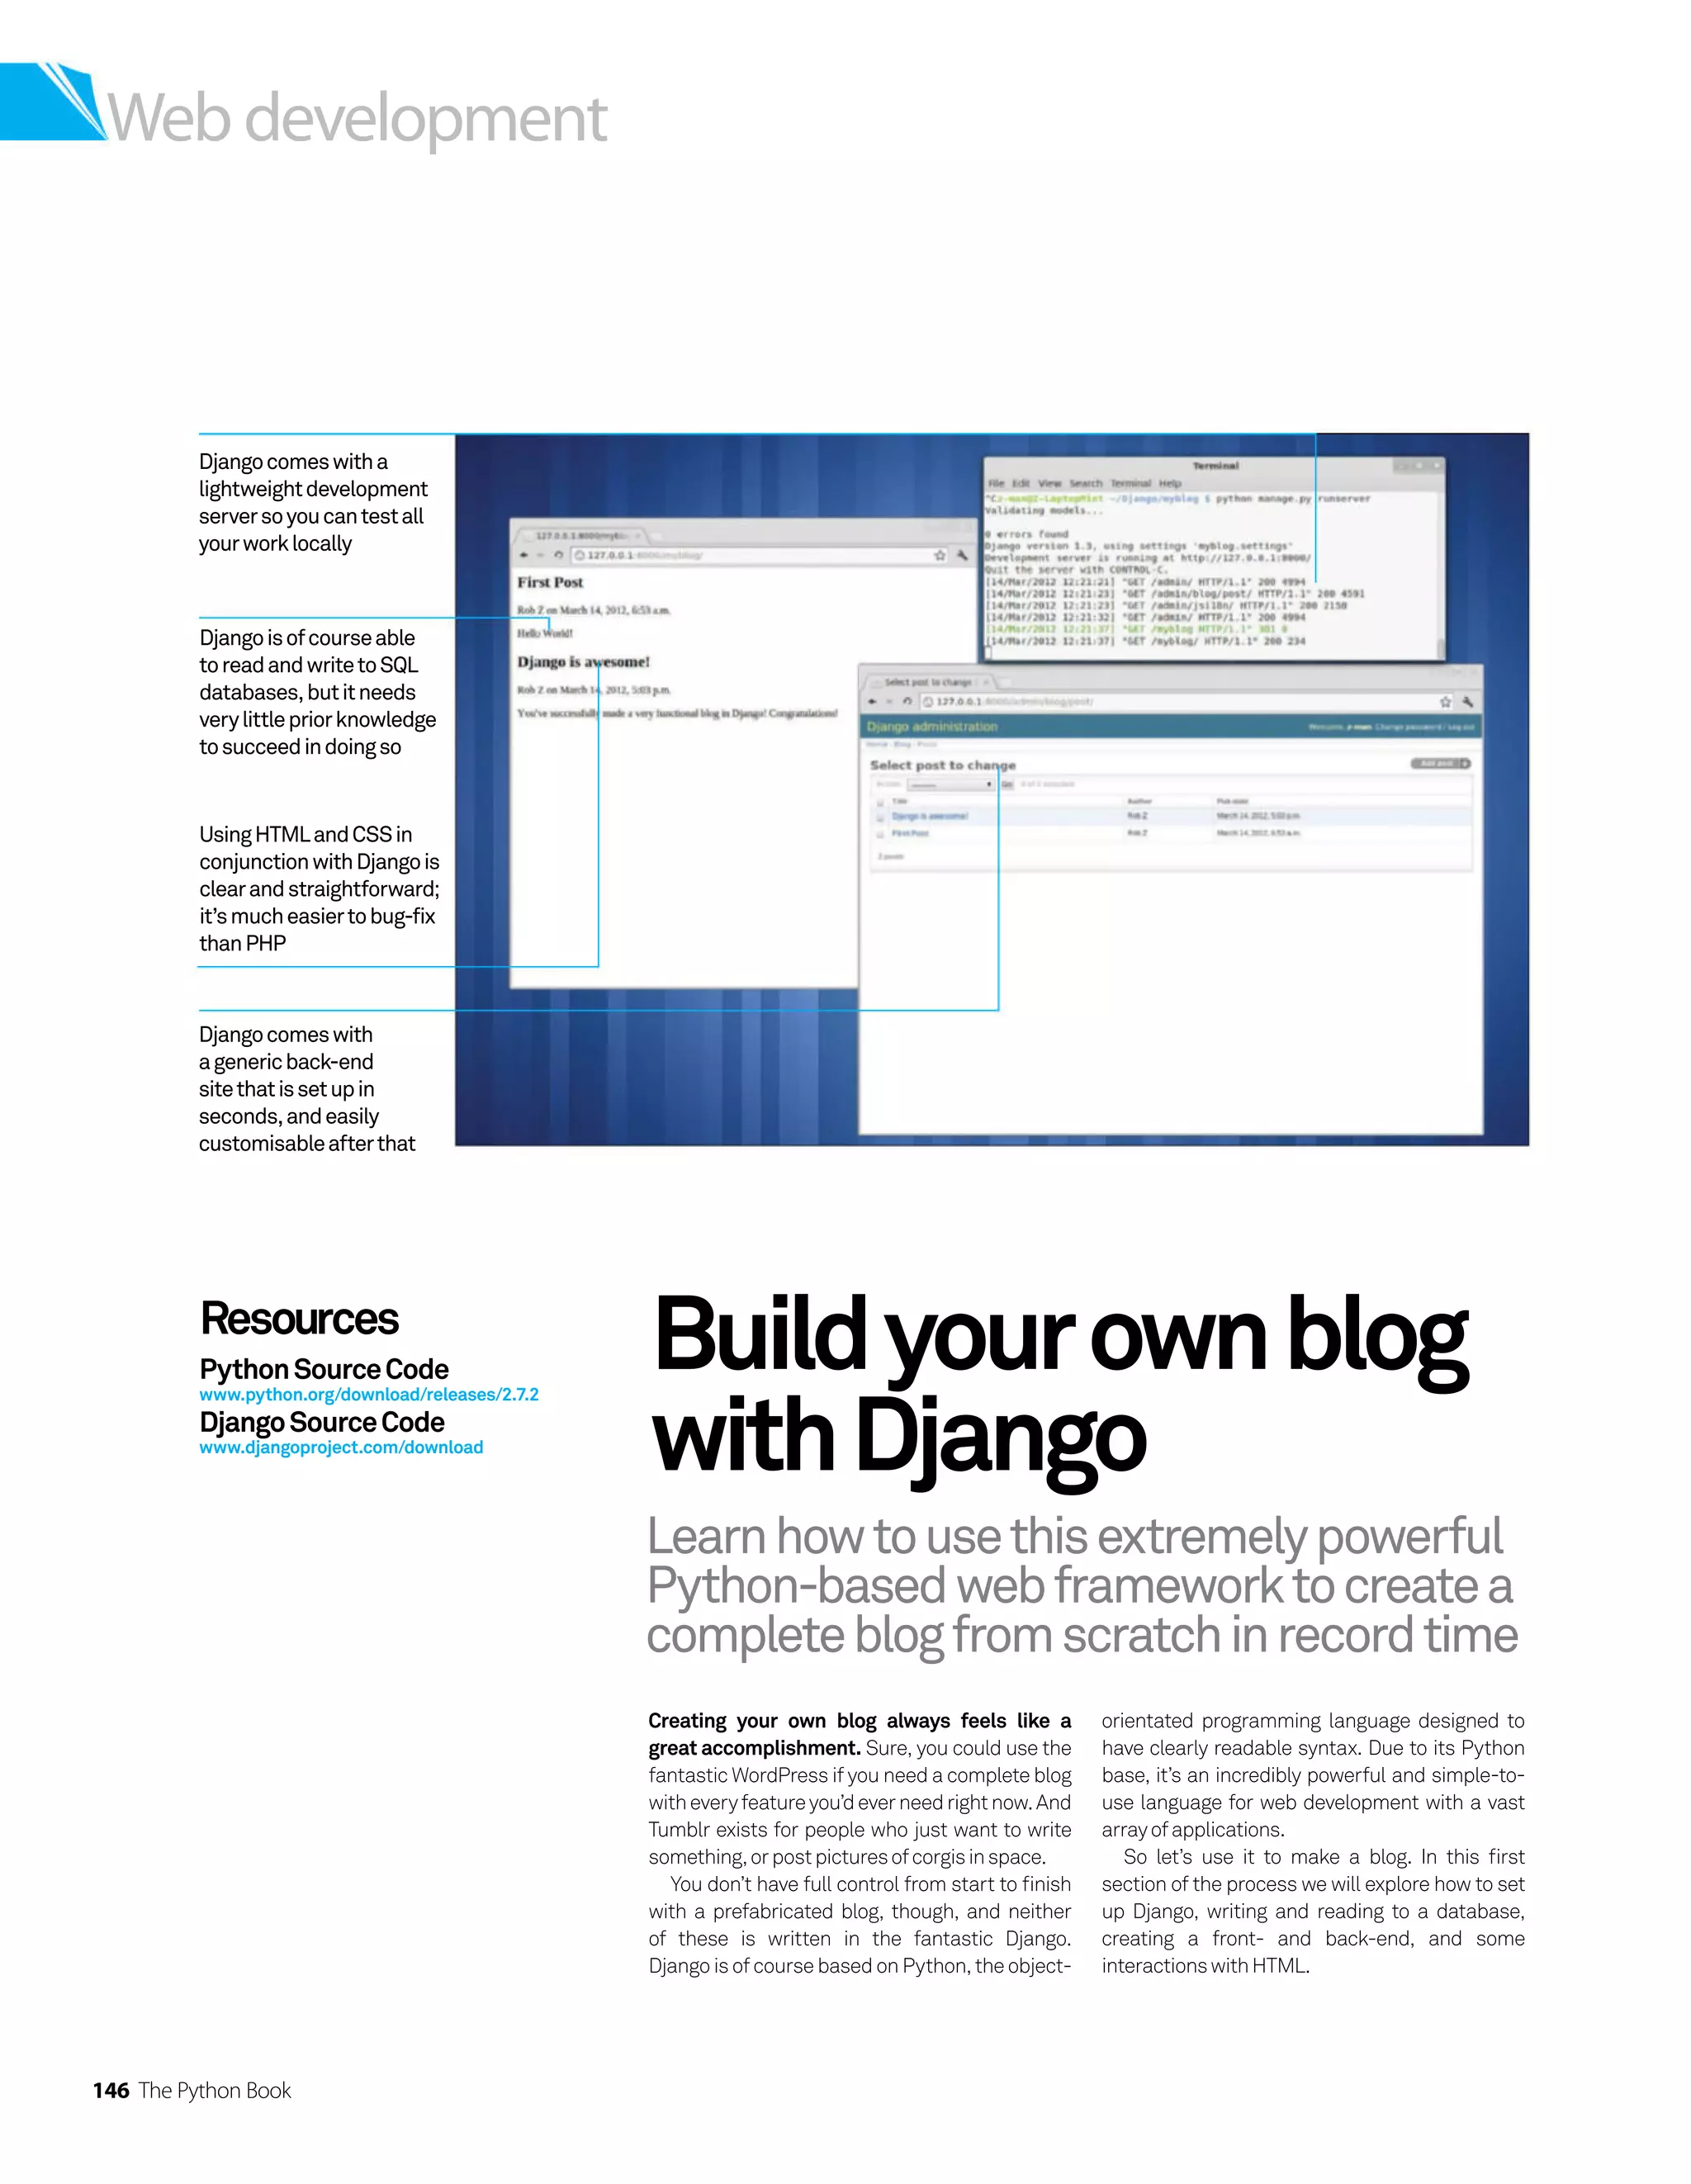
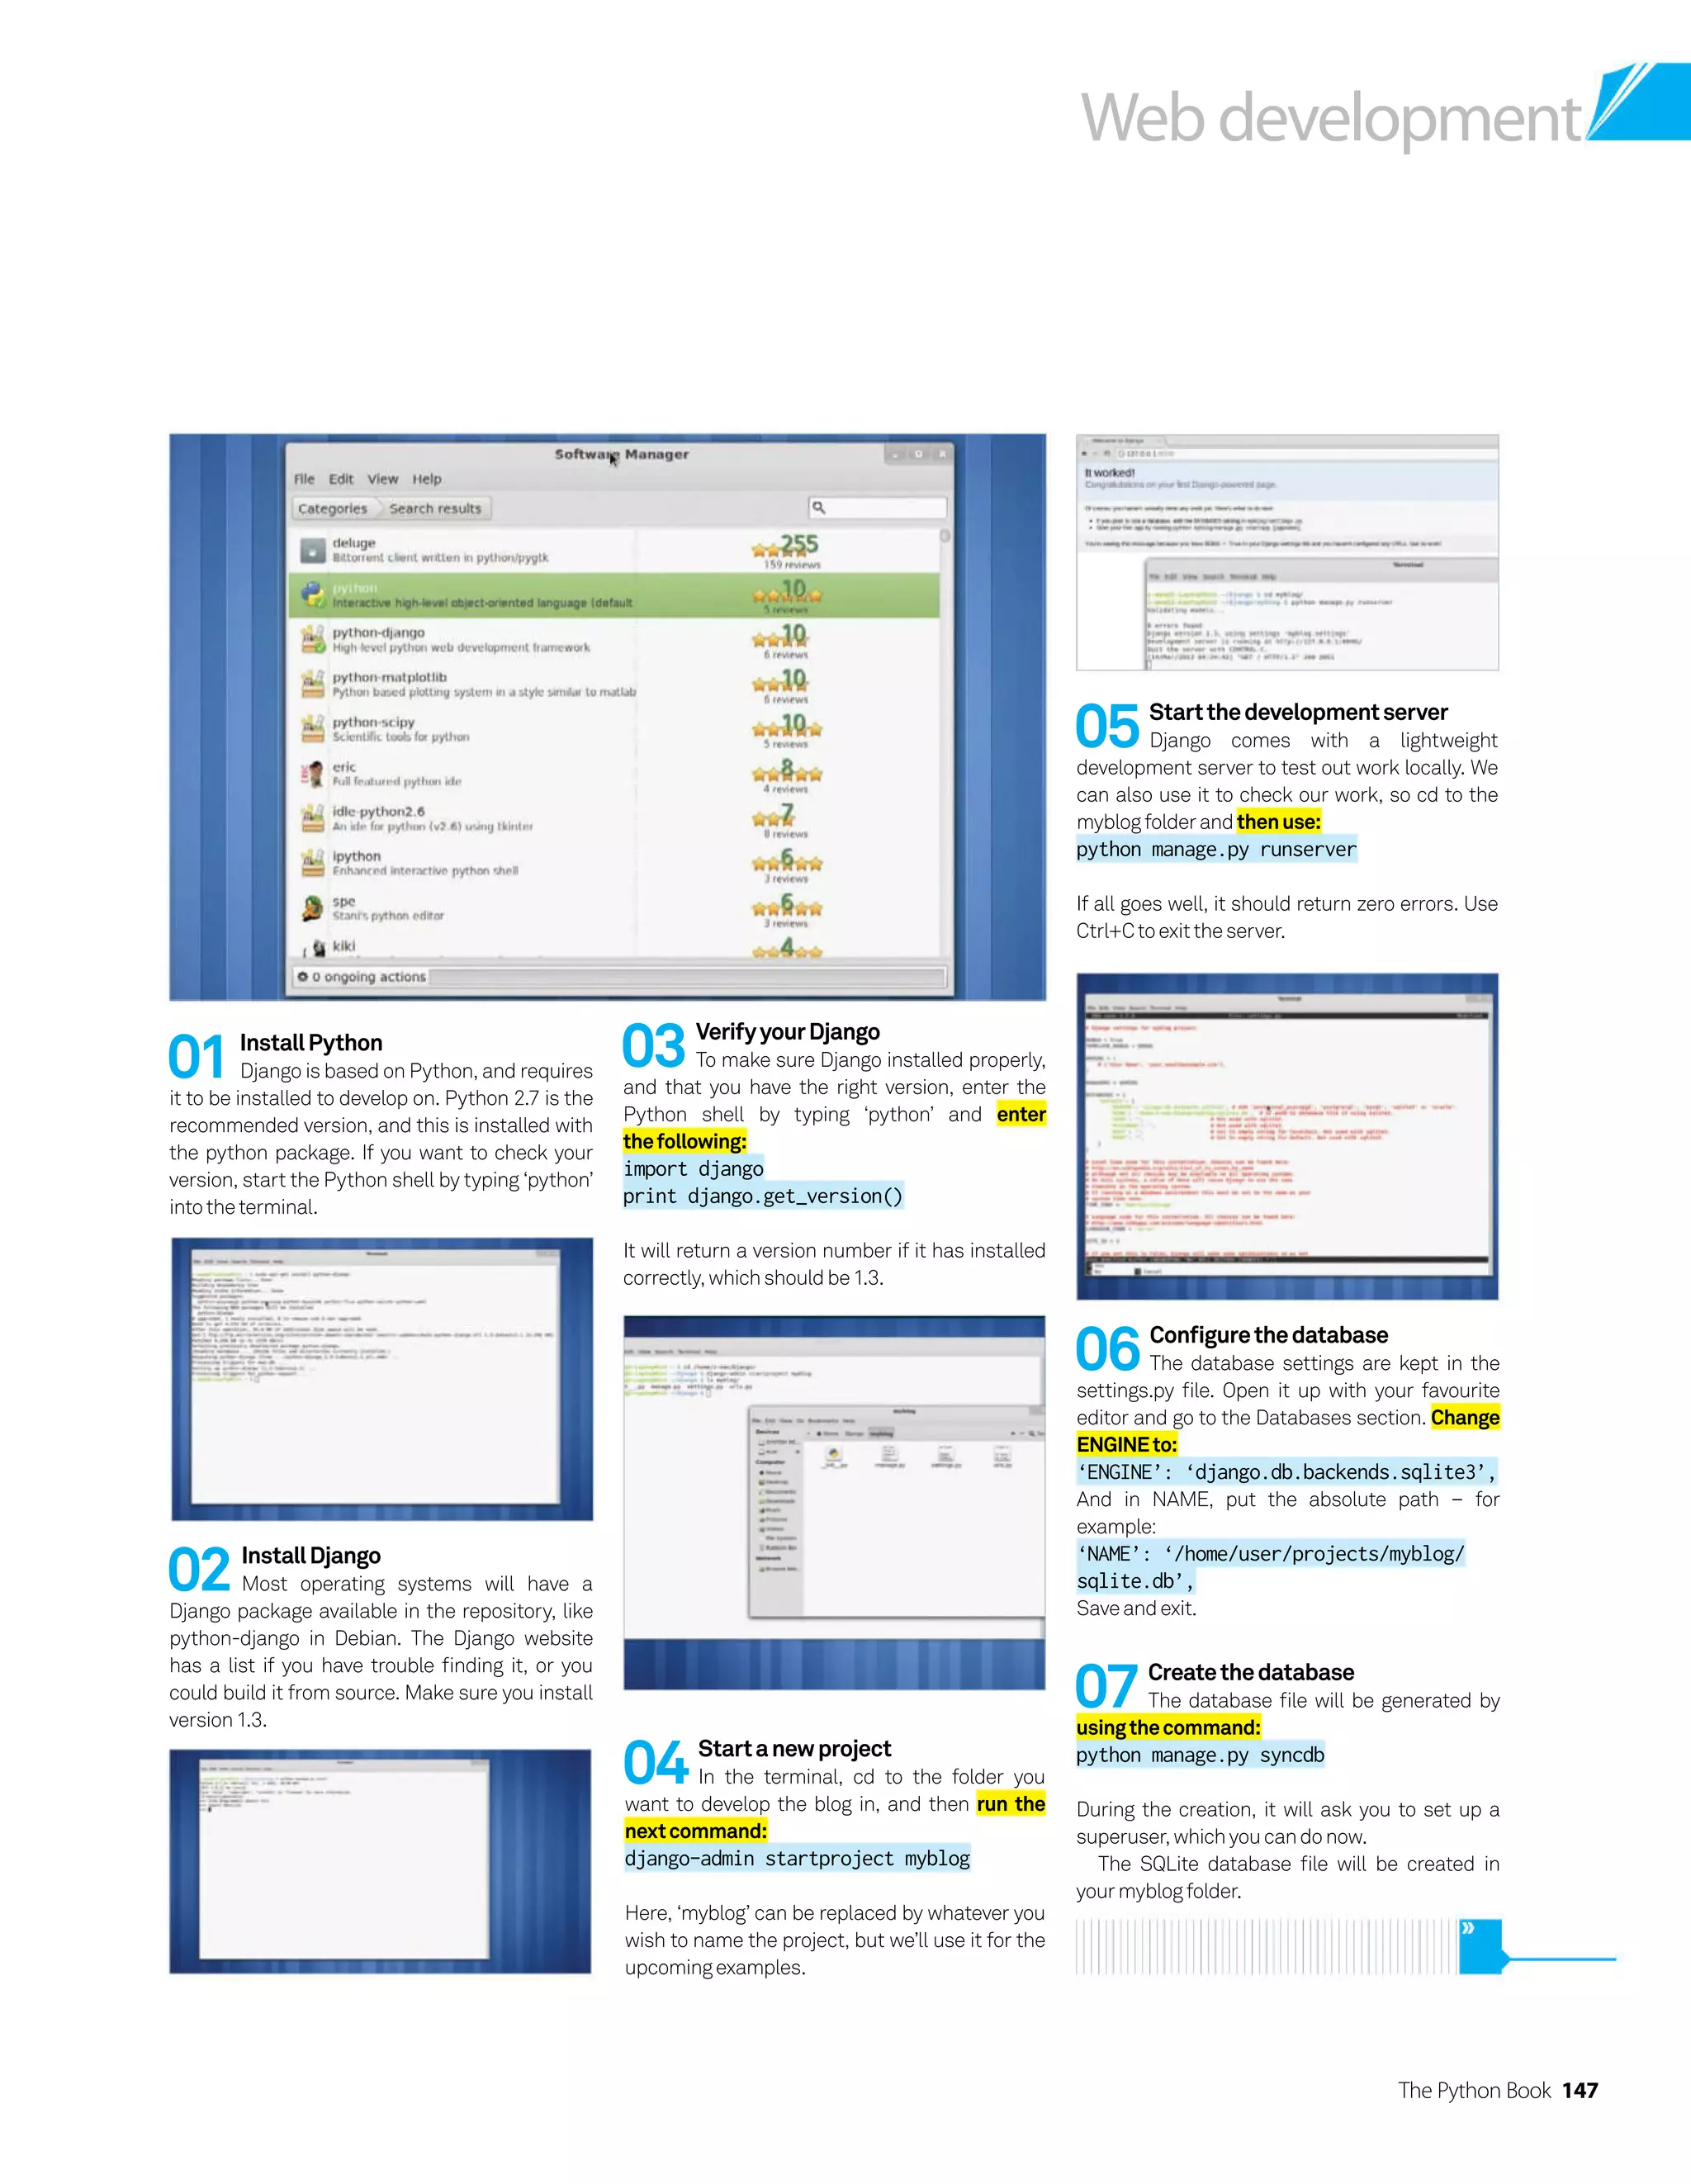
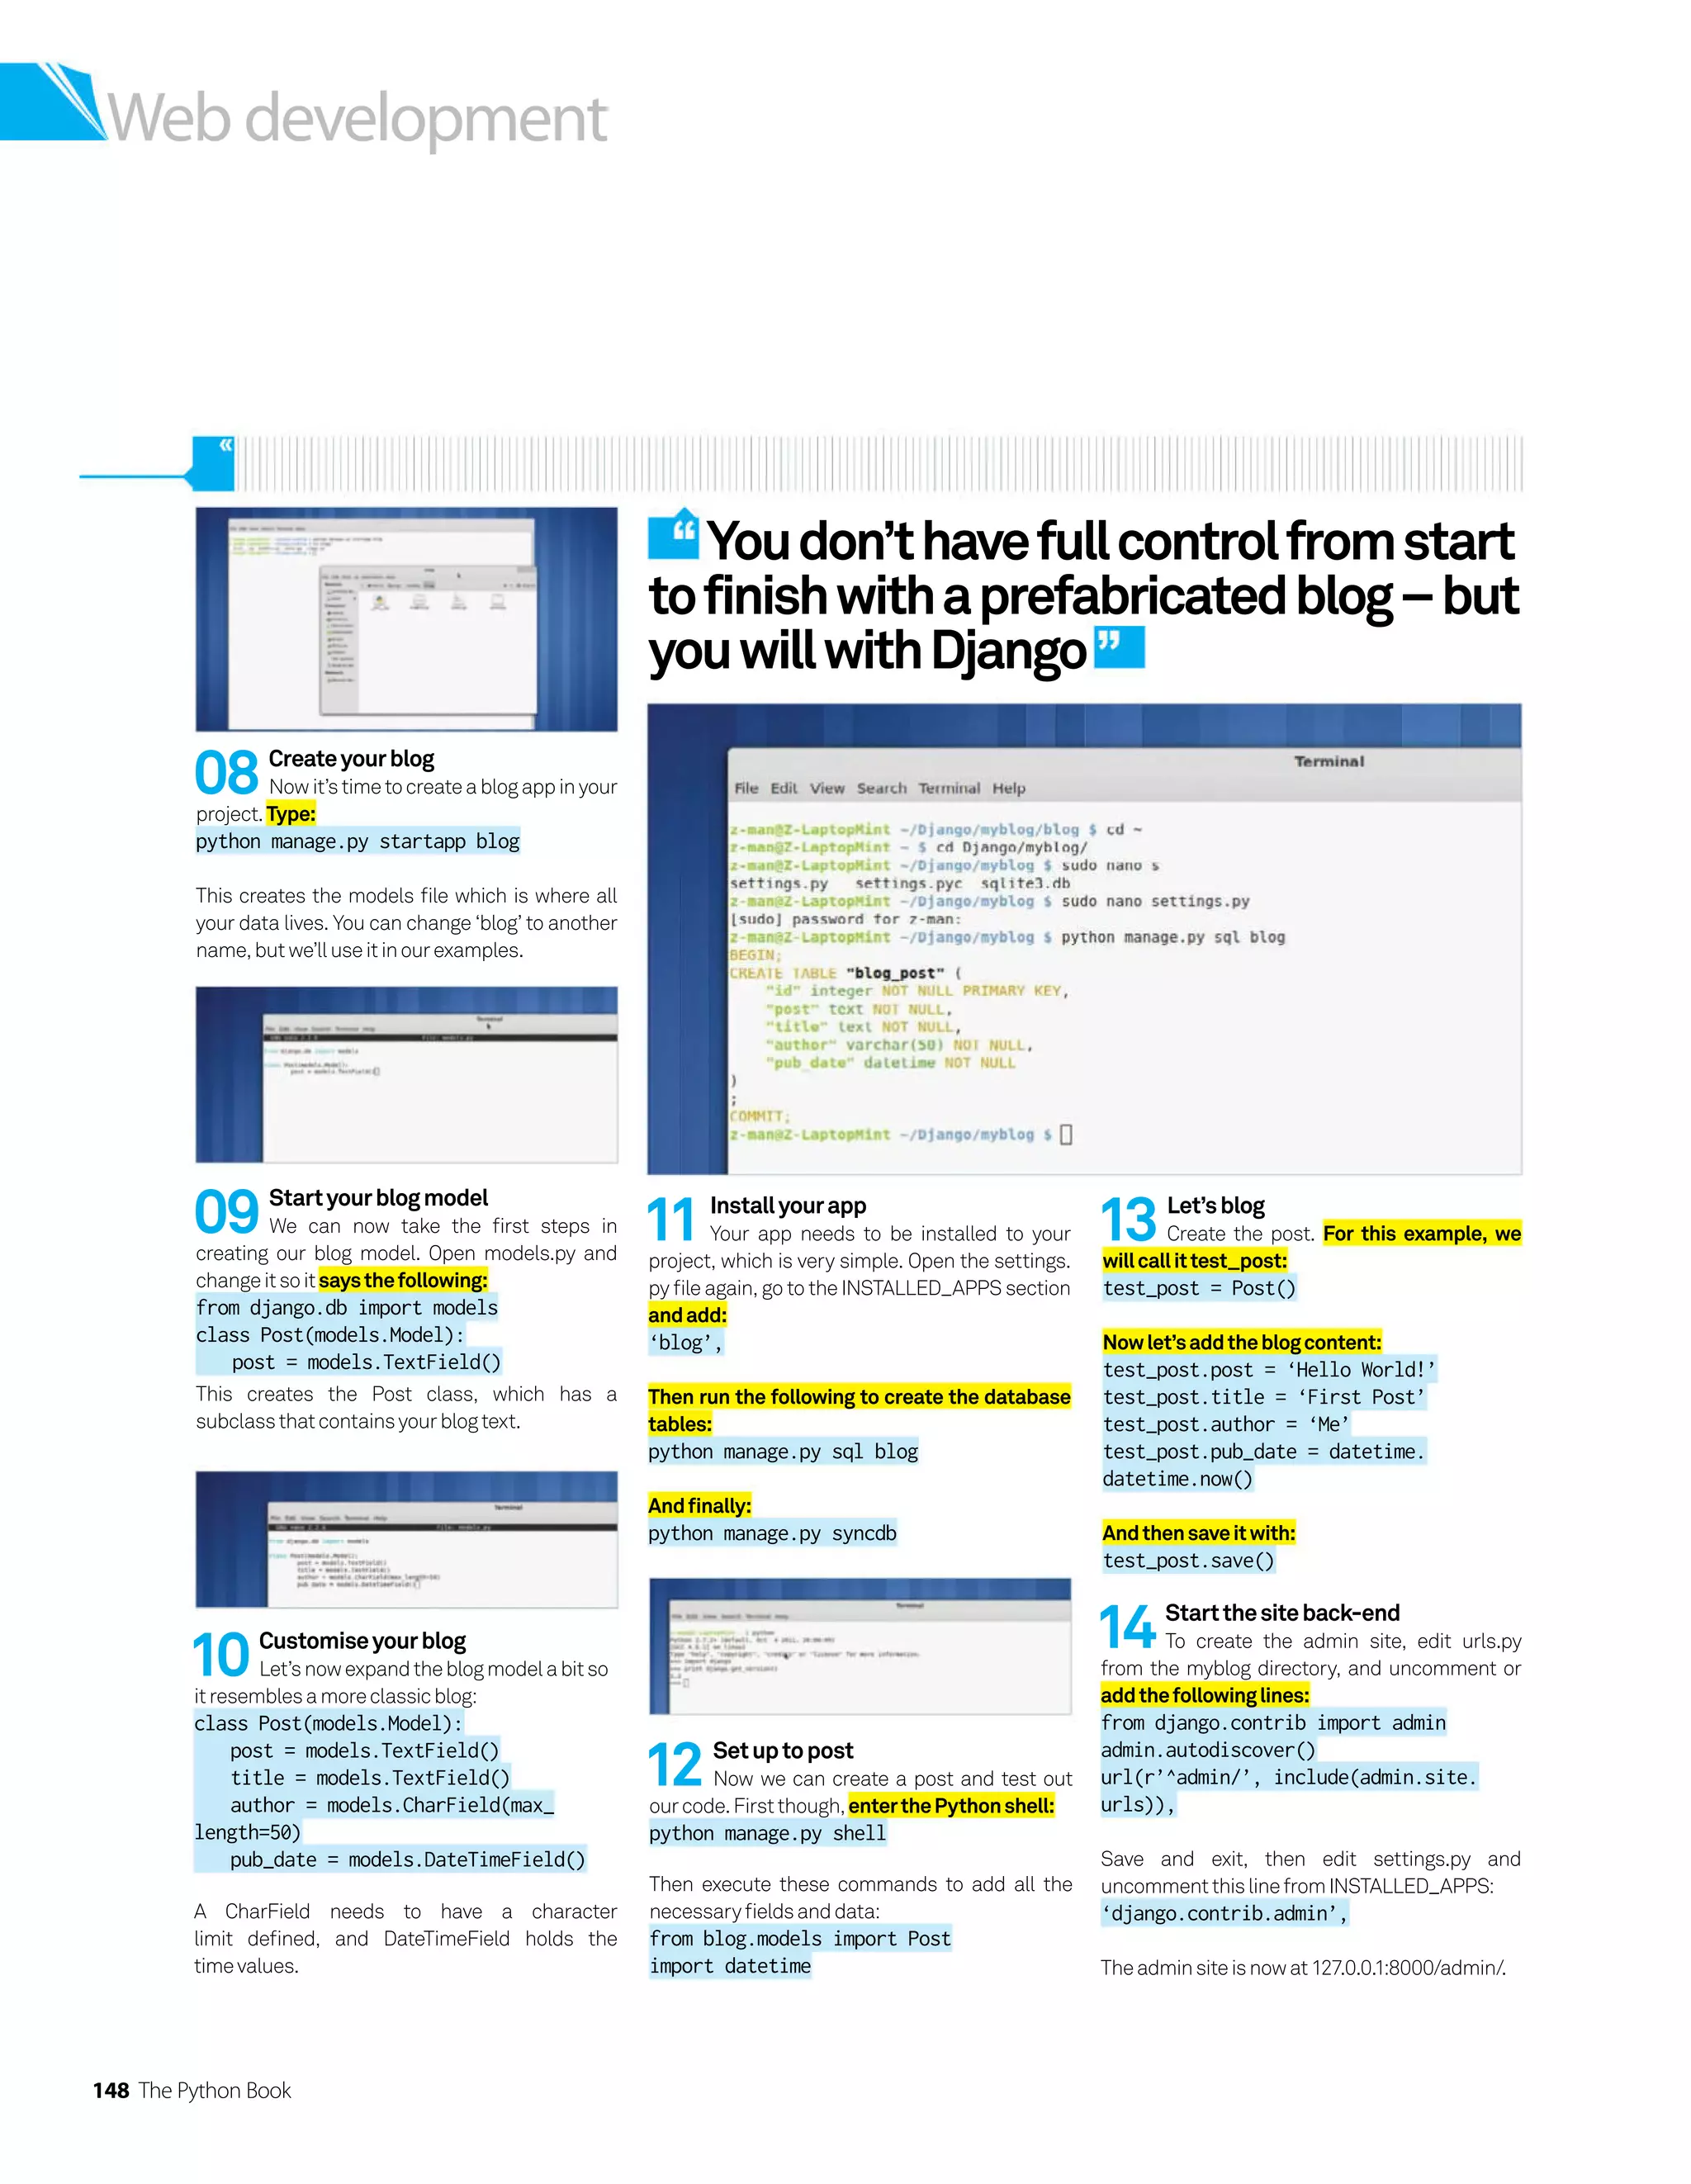
![The Python Book 149
Web development
24Afunctionalblog
So there you have it! Navigating to
127.0.0.1:8000/admin/ or 127.0.0.1:8000/myblog/
will show off the fine work you’ve created.
Django is dead easy to use once you know how,
and there are plenty of tweaks you should be
abletomakeafterthistutorial.
15Setuptheadminpage
The admin page has a generic, usable
template, but you need to configure it to view,
edit, create and delete posts. First, create a new
fileadmin.pyintheblogdirectoryandenter:
from blog.models import Post
from django.contrib import admin
admin.site.register(Post)
To have the posts display nicely on the site, edit
models.pyandadd:
class Post (models.Model):
…
def __unicode__(self):
return self.title
Save,andrun:
python manage.py syncdb
The admin page is now usable! You should be
able to see the other posts, and it’s now a lot
easiertoaddmore.
16Activatethefront-end
Open up urls.py from the myblog
directory in your editor and add the following to
theurlpatternssection:
url(r’^myblog/’, ‘blog.urls.index’)),
One of the examples in the file can be
uncommented and edited to this as well. It
pointstoamodelwewillnowcreate.
17Createanotherurlsfile
You need to create another urls file in the
app directory, in our case blog/urls.py. Create it
andaddthefollowing:
from django.template import Context,
loader
from blog.models import Post
from django.http import HttpResponse
def index(request):
post_list = Post.objects.all()
t = loader.get_template(‘blog/
index.html’)
c = Context({
‘post_list’: poll_list,
})
return HttpResponse(t.render(c))
18Startthetemplate
The code we’ve just written looks for a
template that currently doesn’t exist. We first
need to tell Django where templates are to be
lookedforinsettings.py:
TEMPLATE_DIRS = (
‘/home/user/projects/templates’,
)
You can put the template directory wherever you
want,aslongasit’sreferencedhere.
19Writeatemplate
Now to write the site template. In our
example,we’reusingindex.html:
{% for post in post_list %}
{{ post.title }}
{{ post.author }}
{{ post.pub_date }}
{{ post.post }}
{% endfor %}
This needs to be located in a folder with
the same name as your app within the
templatedirectory.
20Viewyourhandiwork
Let’s make sure this worked. Start the
developerserverwith:
python manage.py runserver
Andnavigateto127.0.0.1:8000/myblog/.
It’s not pretty, but you should have
successfully called upon your stored data. We’ll
spendthenextstepstidyingitupabit.
21Formatthefrontpage
Go back into the template file,
index.html,andaddthefollowinghtmltags:
{% for post in post_list %}
h2{{ post.title }}/h2
{{ post.author }} on {{ post.pub_
date }}
p{{ post.post }}/p
{% endfor %}
This is just an example – the post can be in any
orderwithanytags.
22Spruceuptheadminlist
We’ll do this in the admin.py file in our
blog directory; open it in your editor and make
thefollowingchanges:
from blog.models import Post
from django.contrib import admin
class Admin(admin.ModelAdmin):
list_display = [‘title’, ‘author’,
‘pub_date’]
admin.site.register(Post, Admin)
Inthiscase‘list_display’isafixedvariablename.
23Alogicalpostpage
The new post page on the site might
not be in an order you’re comfortable with.
We’ll change that now in admin.py with the
followingadditions:
class Admin(admin.ModelAdmin):
list_display = [‘title’, ‘author’,
‘pub_date’]
fields = [‘title’, ‘pub_date’,
‘author’, ‘post’]
admin.site.register(Post, Admin)
Remembertosave!
Djangoisanincrediblypowerful
andsimple-to-uselanguage](https://image.slidesharecdn.com/thepythonbooktheultimateguidetocodingwithpythonpdfdrive-220527060944-728dd1fe/75/The-Python-Book_-The-ultimate-guide-to-coding-with-Python-PDFDrive-pdf-149-2048.jpg)

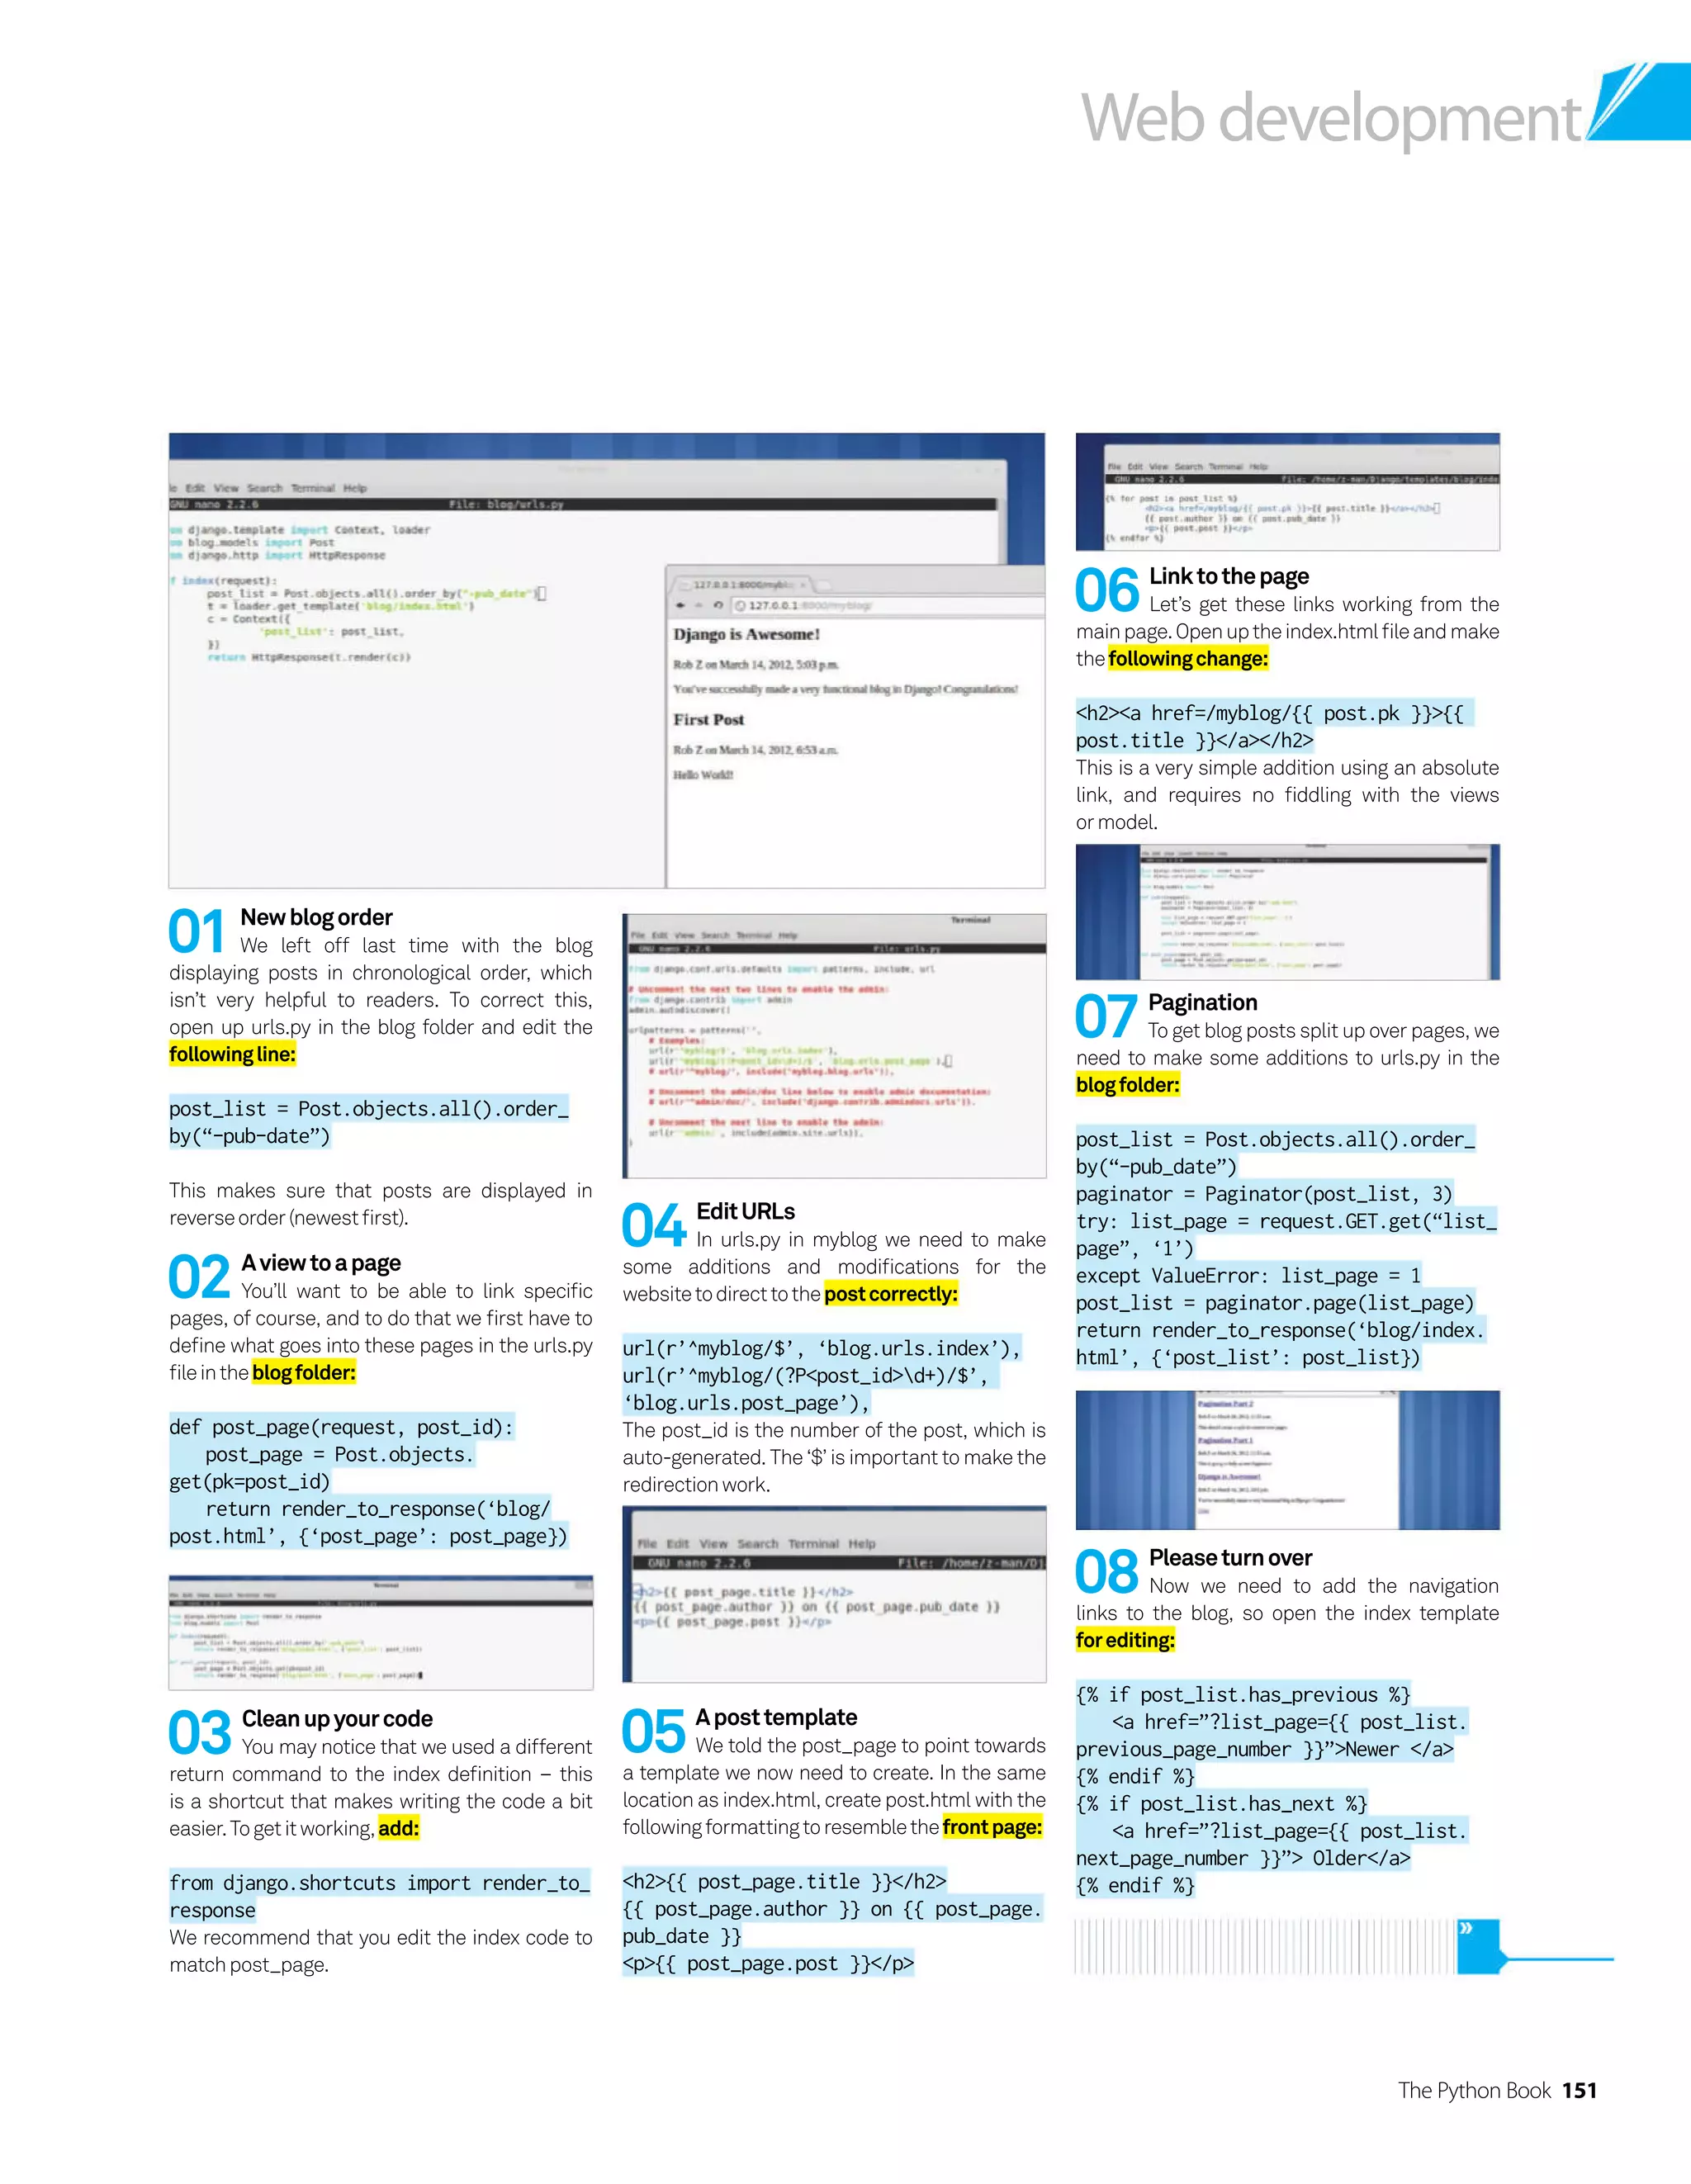
![152 The Python Book
Web development
Weneedtobeabletoprocessthe
dataandmetadataintheforms
09Wrongpage
Let’s add a quick bit of code to return
somebody to the previous page if they get the
URLwrong:
from django.core.paginator import
Paginator, EmptyPage, InvalidPage
try:
post_list = paginator.page(list_
page)
except (EmptyPage, InvalidPage):
post_list = paginator.
page(paginator.num_pages)
The last part replaces ‘post_list = paginator.
page(list_page)’.
10Haveyoursay
Everyone has their opinion on the
internet. You can give your readers the ability to
comment,andwe’llstartbyeditingmodels.py:
class Comment(models.Model):
author = models.CharField(max_
length=50)
text = models.TextField()
post = models.ForeignKey(Post)
def __unicode__(self):
return (self.post, self.text)
We’ve made it so they can put their name with
acomment.
11Backtothecomment
We now need to add a small line to the
urls.py file in myblog so the comment can be
postedthensentbacktotheoriginalpage:
url(r’^myblog/add_comment/(d+)/$’,
‘blog.urls.add_comment’),
This URL pattern calls the ID of the page that
you’reon.
12Formacomment
We need to be able to process the
data and metadata in the forms, so let’s add
a class to urls.py in the blog folder with the
followingadditions:
from django.forms import ModelForm
from blog.models import Post, Comment
class CommentForm(ModelForm):
class Meta:
model = Comment
exclude = [‘post’]
13Inthepost
We need to attribute the comments to
the post they’re being made on, so update the
post_pagedefinition:
from django.core.context_processors
import csrf
def post_page(request, post_id):
post_page = Post.objects.
get(pk=post_id)
comments = Comment.objects.
filter(post=post_page)
d = dict(post_page=post_page,
comments=comments, form=CommentForm())
d.update(csrf(request))
return render_to_response(‘blog/
post.html’, d)
The CSRF tag is to prevent cross-site
requestforgery.
14Commenttemplate
Let’s get the post page ready for
commentsbyaddingthistopost.html:
pComments:/p
{% for comment in comments %}
{{ comment.author }}
p{{ comment.text }}/p
{% endfor %}
strongAdd comment/strong
form action=”{% url blog.urls.
add_comment post_page.id %}”
method=”POST”{% csrf_token %}
Name {{ form.author }}
p{{ form.text }}/p
input type=”submit” value=”Submit”
/form
15Defineyourcomments
The final step is defining the comments
inblog/urls.py,andit’sabigone:
def add_comment(request, comment_id):
p = request.POST
if p.has_key(‘text’) and p[‘text’]:
author = ‘Anonymous’
if p[‘author’]: author =
p[‘author’]
comment = Comment(post=Post.
objects.get(pk=comment_id))
cf = CommentForm(p,
instance=comment)
cf.fields[‘author’].required =
False
comment =
cf.save(commit=False)
comment.author = author
comment.save()
return HttpResponseRedirect(reverse
(‘blog.urls.post_page’, args=[comment_
id]))
This ensures text has been entered, and if not
specified author is ‘Anonymous’. Before testing,
runsyncdbsocommenttablescanbecreated.](https://image.slidesharecdn.com/thepythonbooktheultimateguidetocodingwithpythonpdfdrive-220527060944-728dd1fe/75/The-Python-Book_-The-ultimate-guide-to-coding-with-Python-PDFDrive-pdf-152-2048.jpg)
![The Python Book 153
Web development
16Administrate
Like the posts, we can get the
Admin page to see comments. Start editing
blogs/admin.pytogetthisfeatureadded:
from blog.models import Post, Comment
from django.contrib import admin
class PostAdmin(admin.ModelAdmin):
list_display = [‘title’, ‘author’,
‘pub_date’]
fields = [‘title’, ‘pub_date’,
‘author’, ‘post’]
admin.site.register(Post, PostAdmin)
17Comment-specificadminfeatures
Now we can add the comment-specific
adminfeatureswithoutcausinganyclashes:
class CommentAdmin(admin.ModelAdmin):
list_display = [‘text’, ‘author’,
‘post’]
admin.site.register(Comment,
CommentAdmin)
This will show the comments on the admin site,
and you can see the comment, the author and
thepostit’sconnectedto.
18Sidebarbeginnings
Django makes it pretty easy to order
posts by years and months, but first we need to
importsomenewmodelsintoblog/urls.py:
import time
from calendar import month_name
We’re going to define two new functions,
month_timelineandmonth,tomakethesidebar.
19Starttodefinemonth_timeline
First we need to get all the information
fromtheposts:
def month_timeline():
year, month = time.localtime()[:2]
begin = Post.objects.order_by(‘pub_
date’)[0]
month_begin = begin.pub_date.month
year_begin = begin.pub_date.year
month_list = []
The ‘[:2]’ makes sure we only get the time
informationweneed.
20Finishyourdefinition
Now we will order the posts by month
andyearstartingfromourfirstmonth.
for y in range(year, year_begin-1, -1):
start, end = 12, 0
if y == year: start = month
if y == year_begin: end = month_
begin-1
for m in range(start, end, -1):
month_list.append((y, m,
month_name[m]))
return month_list
21Returntoreader
With the list organised, we can now
definemonthsowecandisplayitontheblog:
def month(request, year, month):
post_list = Post.objects.
filter(pub_date__year=year, pub_date__
month=month)
return render_to_response(‘blog/
index.html’, dict(sidebar_list=post_
list, month_list=month_timeline()))
Nowweneedtolinkituptotheindextemplate.
22Finaliseyoursidebardefinition
Edit the return command on the index
functiontoincludethesidebarinformation:
return render_to_response(‘blog/index.
html’, dict(post_list=post_list,
sidebar_list=post_list.object_list,
month_list=month_timeline()))
Then add this line to urls.py in myblog so a
monthpagecanberendered:
url(r’^myblog/month/(d+)/(d+)/$’,
‘blog.urls.month’),
All we need to do now is display the information
onthesite.
24Sidebarfinale
Obviously it’s not at the side right now
– that’s a job for the HTML and CSS. The info is
there, though, and you can manipulate it any
way you want. However, your blog is now a lot
morefriendlytoyourreaders.
23Sidebarontheweb
Go to the index template. First of all,
changethefirstlineofthepostforloopto:
{% for post in sidebar_list %}
Simple enough. Now we need to add the
sidebarinformation:
{% for month in month_list %}
pa href=”{% url blog.urls.month
month.0 month.1 %}”{{ month.2 }}/a/
p
{% endfor %}](https://image.slidesharecdn.com/thepythonbooktheultimateguidetocodingwithpythonpdfdrive-220527060944-728dd1fe/75/The-Python-Book_-The-ultimate-guide-to-coding-with-Python-PDFDrive-pdf-153-2048.jpg)
![154 The Python Book
Web development
01Summarise
On a normal blog we’re going to have
much longer articles. We can generate a
summary of each of these on the index page
templatelikeso:
p{{ post.post|truncatewords:3 }}/p
This automatically takes the first three words
ofthepost–ofcourse,youcanuseanynumber.
Toaddtotheprevioustutorials,we’ll
coversomeofthemoreadvanced
featuresyoucanutilisewiththe
powerofDjango
Enhanceyourblog
withextrafeatures
We’ve been building our Django blog to create
and display posts, allow people to make
comments, and filter posts by month like a
classic blog sidebar. We still have a bit of a
way to go until it looks and behaves more like a
classicblog,though.
In this tutorial, we’re going to add in
summaries, excerpts, categories and finally an
RSS feed. This allows us to look at a few things –
firstly we’ll get a better understanding of cross-
model referencing and how that works in the
admin site. We will also go through how to make
changes to the database, and how Django helps
whencreatinganSQLquery.
Finally, the RSS feed is part of a standard
feed library in Django itself. We will learn how
to import and use it to create a simple list of the
latest entries that click through to the posts. By
the end of the tutorial your Django blog will be
finallyfinished!
Resources
Pythonbase:
http://www.python.org/download/
Djangosource:https://www.
djangoproject.com/download/
03Writeanexcerpt
Towritetheexcerpt,orappendittothe
previousposts,we’llhavetoaddittotheadmin
page.Openupadmin.pyandeditthefields
sectionoftheAdminPostclasstoaddexcerpt:
fields = [‘title’, ‘pub_date’,
‘author’, ‘post’, ‘excerpt’]
02Manualexcerpt
Ifyoudon’twantanautomaticsummary,
wecanaddanexcerptfieldtoourpostmodelso
youcancraftonemanually:
excerpt = models.TextField()
Tolimitthecharactersinyourexcerpt,usea
CharFieldlikeforourauthorsection.
We’regoingtoaddsummaries,
excerptsandanRSSfeed](https://image.slidesharecdn.com/thepythonbooktheultimateguidetocodingwithpythonpdfdrive-220527060944-728dd1fe/75/The-Python-Book_-The-ultimate-guide-to-coding-with-Python-PDFDrive-pdf-154-2048.jpg)
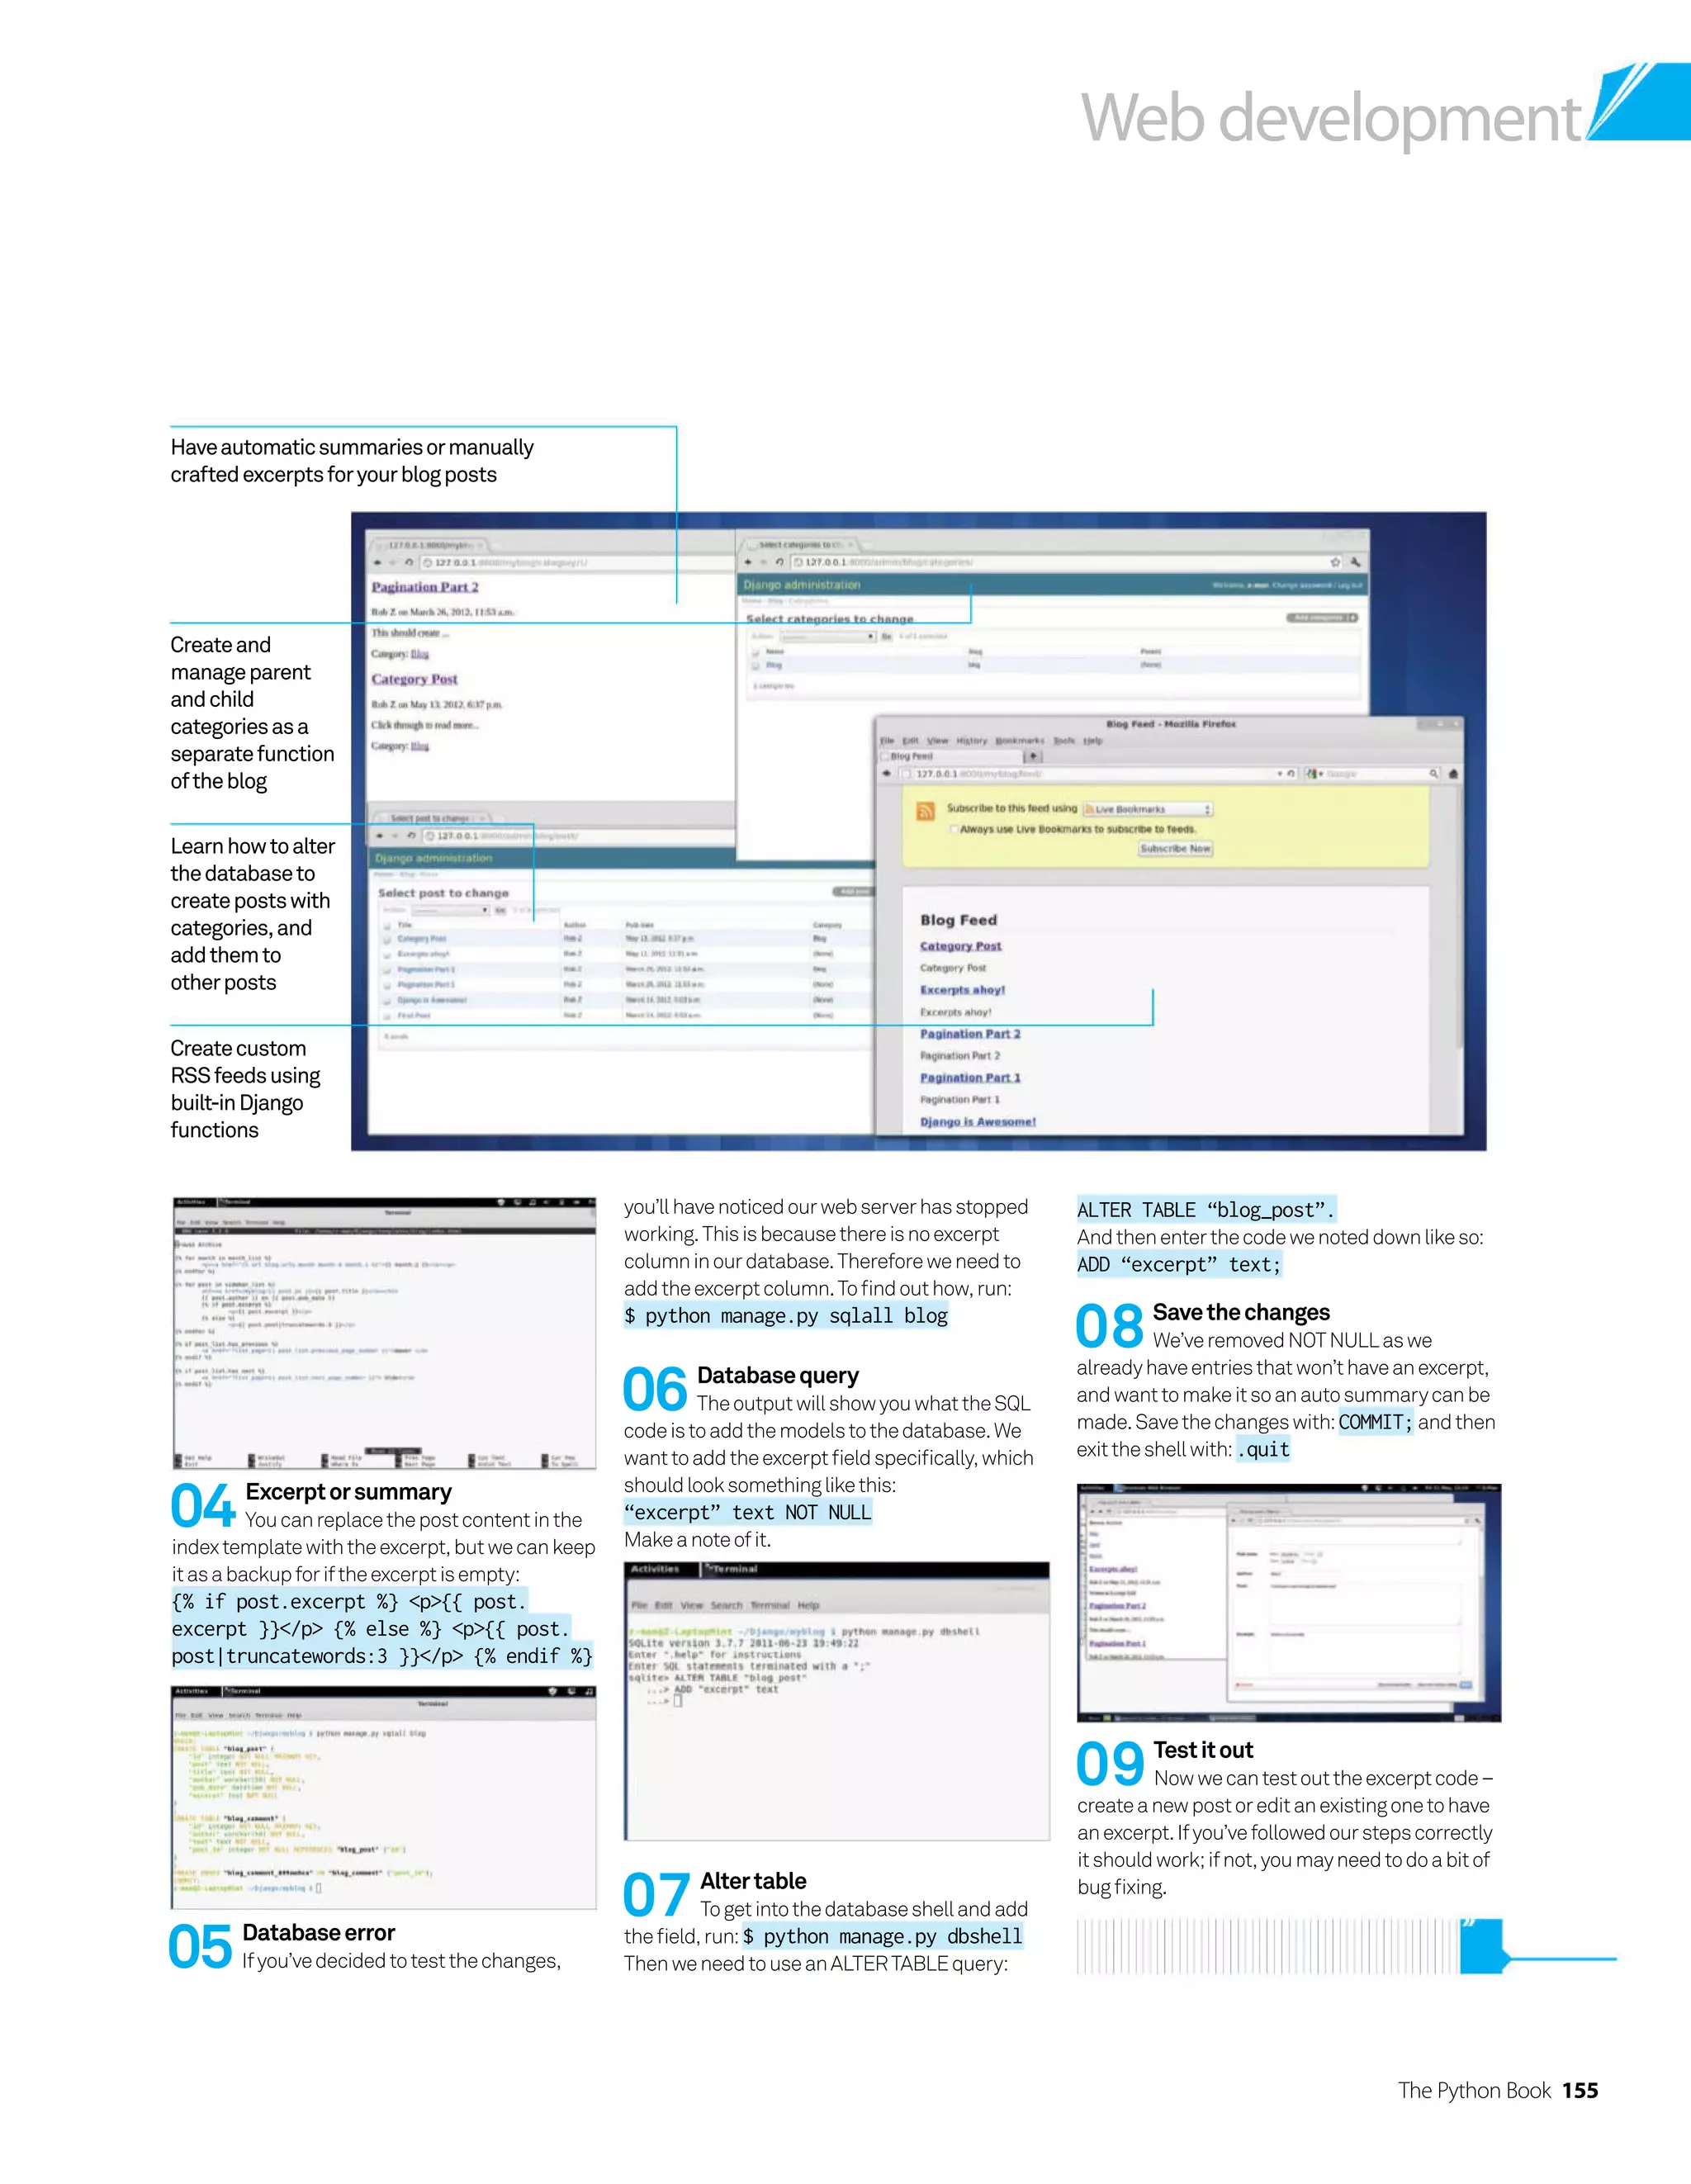
![156 The Python Book
Web development
10Categorymodel
Wecanaddamodelforblogcategories:
class Categories(models.Model): name
= models.CharField(unique=True,
max_length=200) slug = models.
SlugField(unique=True, max_length=100)
parent = models.ForeignKey(‘self’,
blank=True, null=True, related_
name=’child’) def __unicode__(self):
return (self.name)
Thisallowsforparentandchildcategories.
11Administratecategories
Wecanaddittotheadminsiteby
creatingaCategoriessectioninadmin.py:
class CategoriesAdmin(admin.
ModelAdmin): list_display = [‘name’,
‘slug’, ‘parent’] fields = [‘name’,
‘slug’, ‘parent’] admin.site.register
(Categories, CategoriesAdmin)
Beforewecanmakecategories,though,we
needtocreatethedatabasetable:
$ python manage.py syncdb
12Categorisetheposts
Similarlytowhatwedidwiththe
13Databasecategory
Likebefore,we’llfindouttheSQLneeded
toalterthetable:$ python manage.py sqlall
blogWhichforourexamplereturnsasomewhat
differentcodethanbefore:“category_id”
integer NOT NULL REFERENCES “blog_
categories” (“id”)It’sanIDwe’regetting,not
text,fromthecategoriestable.
14Altertable–part2
Againlet’senterthedatabaseshell:
python manage.py dbshellWe’llcontinue
muchlikebefore,butwiththenewcode:ALTER
TABLE “blog_post” ADD “category_id”
integer REFERENCES “blog_categories”
(“id”);Andfinally,tosave:COMMIT;
15Administratecategories–part2
Nowwecangobacktoadmin.pyandaddthenewcategoryfieldstothePostAdminmodel:
list_display = [‘title’, ‘author’, ‘pub_date’, ‘category’] fields = [‘title’,
‘pub_date’, ‘author’, ‘post’, ‘excerpt’, ‘category’]Ourpreviousblogpostswithno
categoryhavedisappeared!Tofixthis,gobacktomodels.pyandmakethischangetothePostmodel:
category = models.ForeignKey(Categories, blank=True, null=True)Sowecannowcreate
categoriesseparately,assignthemtoposts,andviewpostswithoutacategory.
16Categorydisplay
Asoururls.pyintheblogdirectorygets
allthepostfields,totheindextemplatewejust
add:pCategory: {{ post.category }}/
pAndtotheposttemplate:pCategory: {{
post_list.category }}/p
17Categorypage
Firstweneedtodefineourcategoryin
blog/urls.py.ImportCategoriesandthenadd:
def blog_categories(request, category_
id): categories = Categories.objects.
get(pk=category_id)Weneedthe
category_idtocallthecorrespondingposts.
comments,wewanttoaddaForeignKeyto
thePostmodelsowecanattributeaposttoa
category.Addthisline:category = models.
ForeignKey(Categories)
AndmoveCategoriestothetopofmodels.py.
Wecannow
createcategories
separately](https://image.slidesharecdn.com/thepythonbooktheultimateguidetocodingwithpythonpdfdrive-220527060944-728dd1fe/75/The-Python-Book_-The-ultimate-guide-to-coding-with-Python-PDFDrive-pdf-156-2048.jpg)
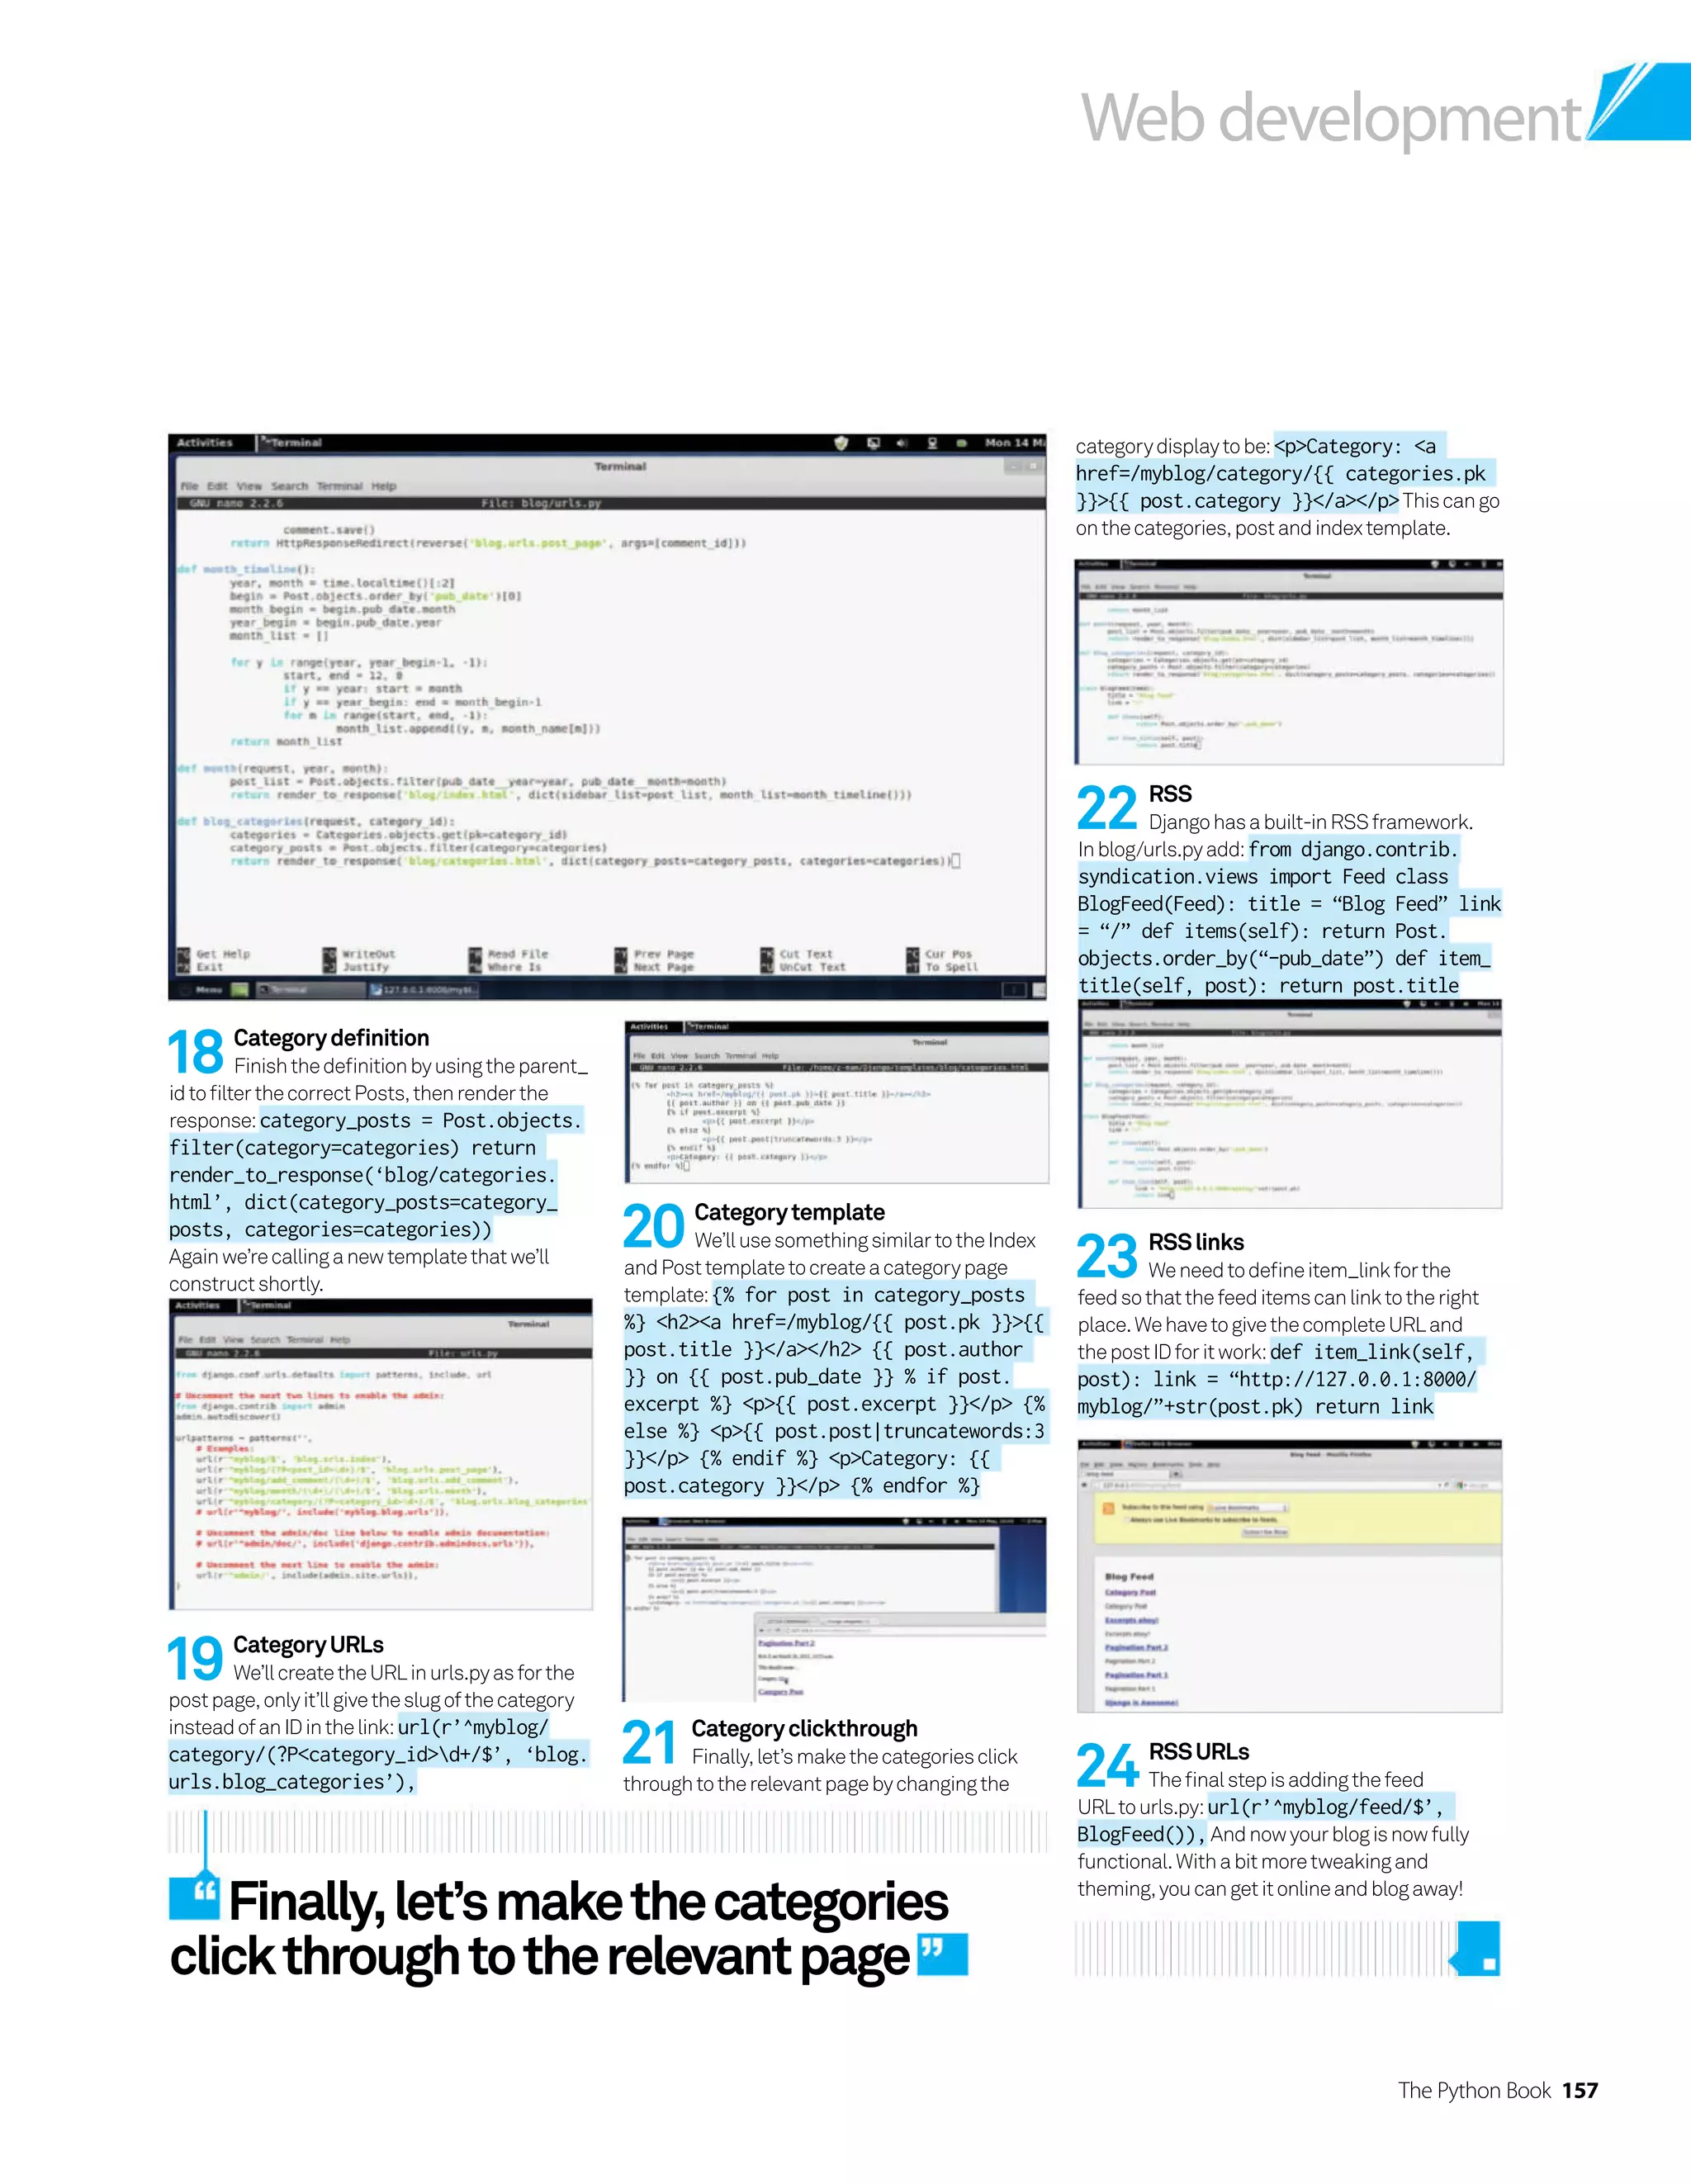
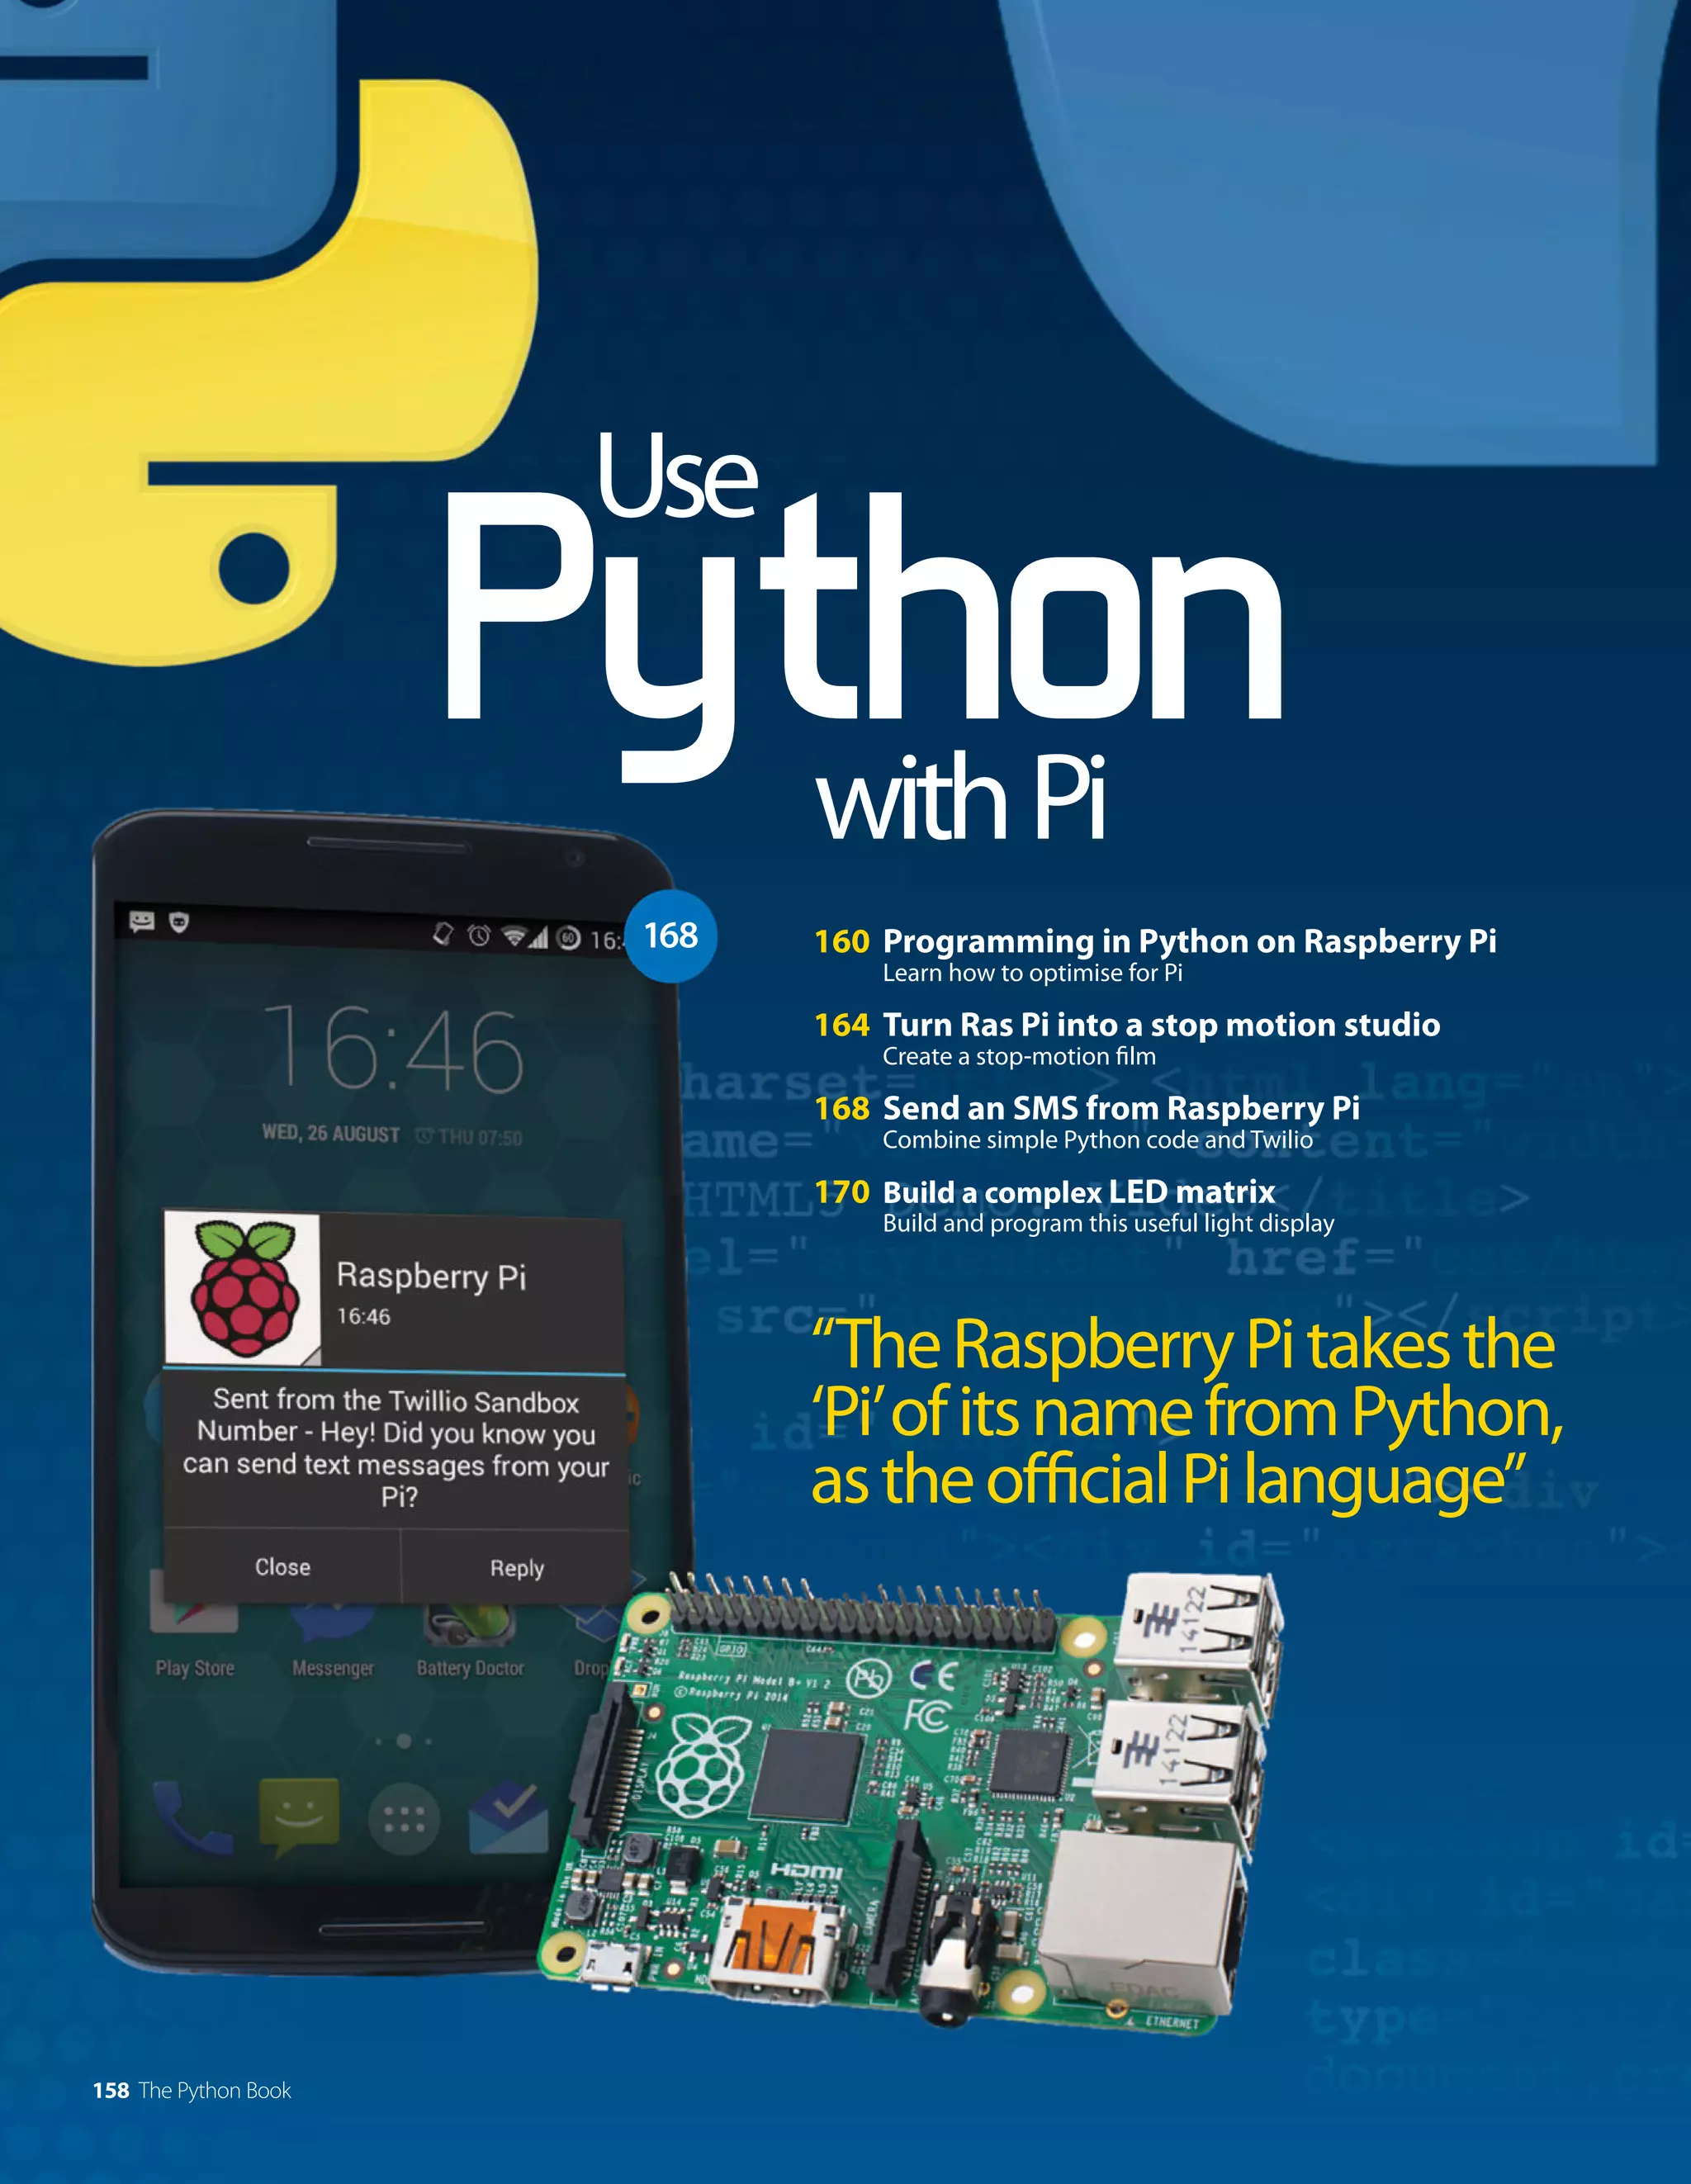

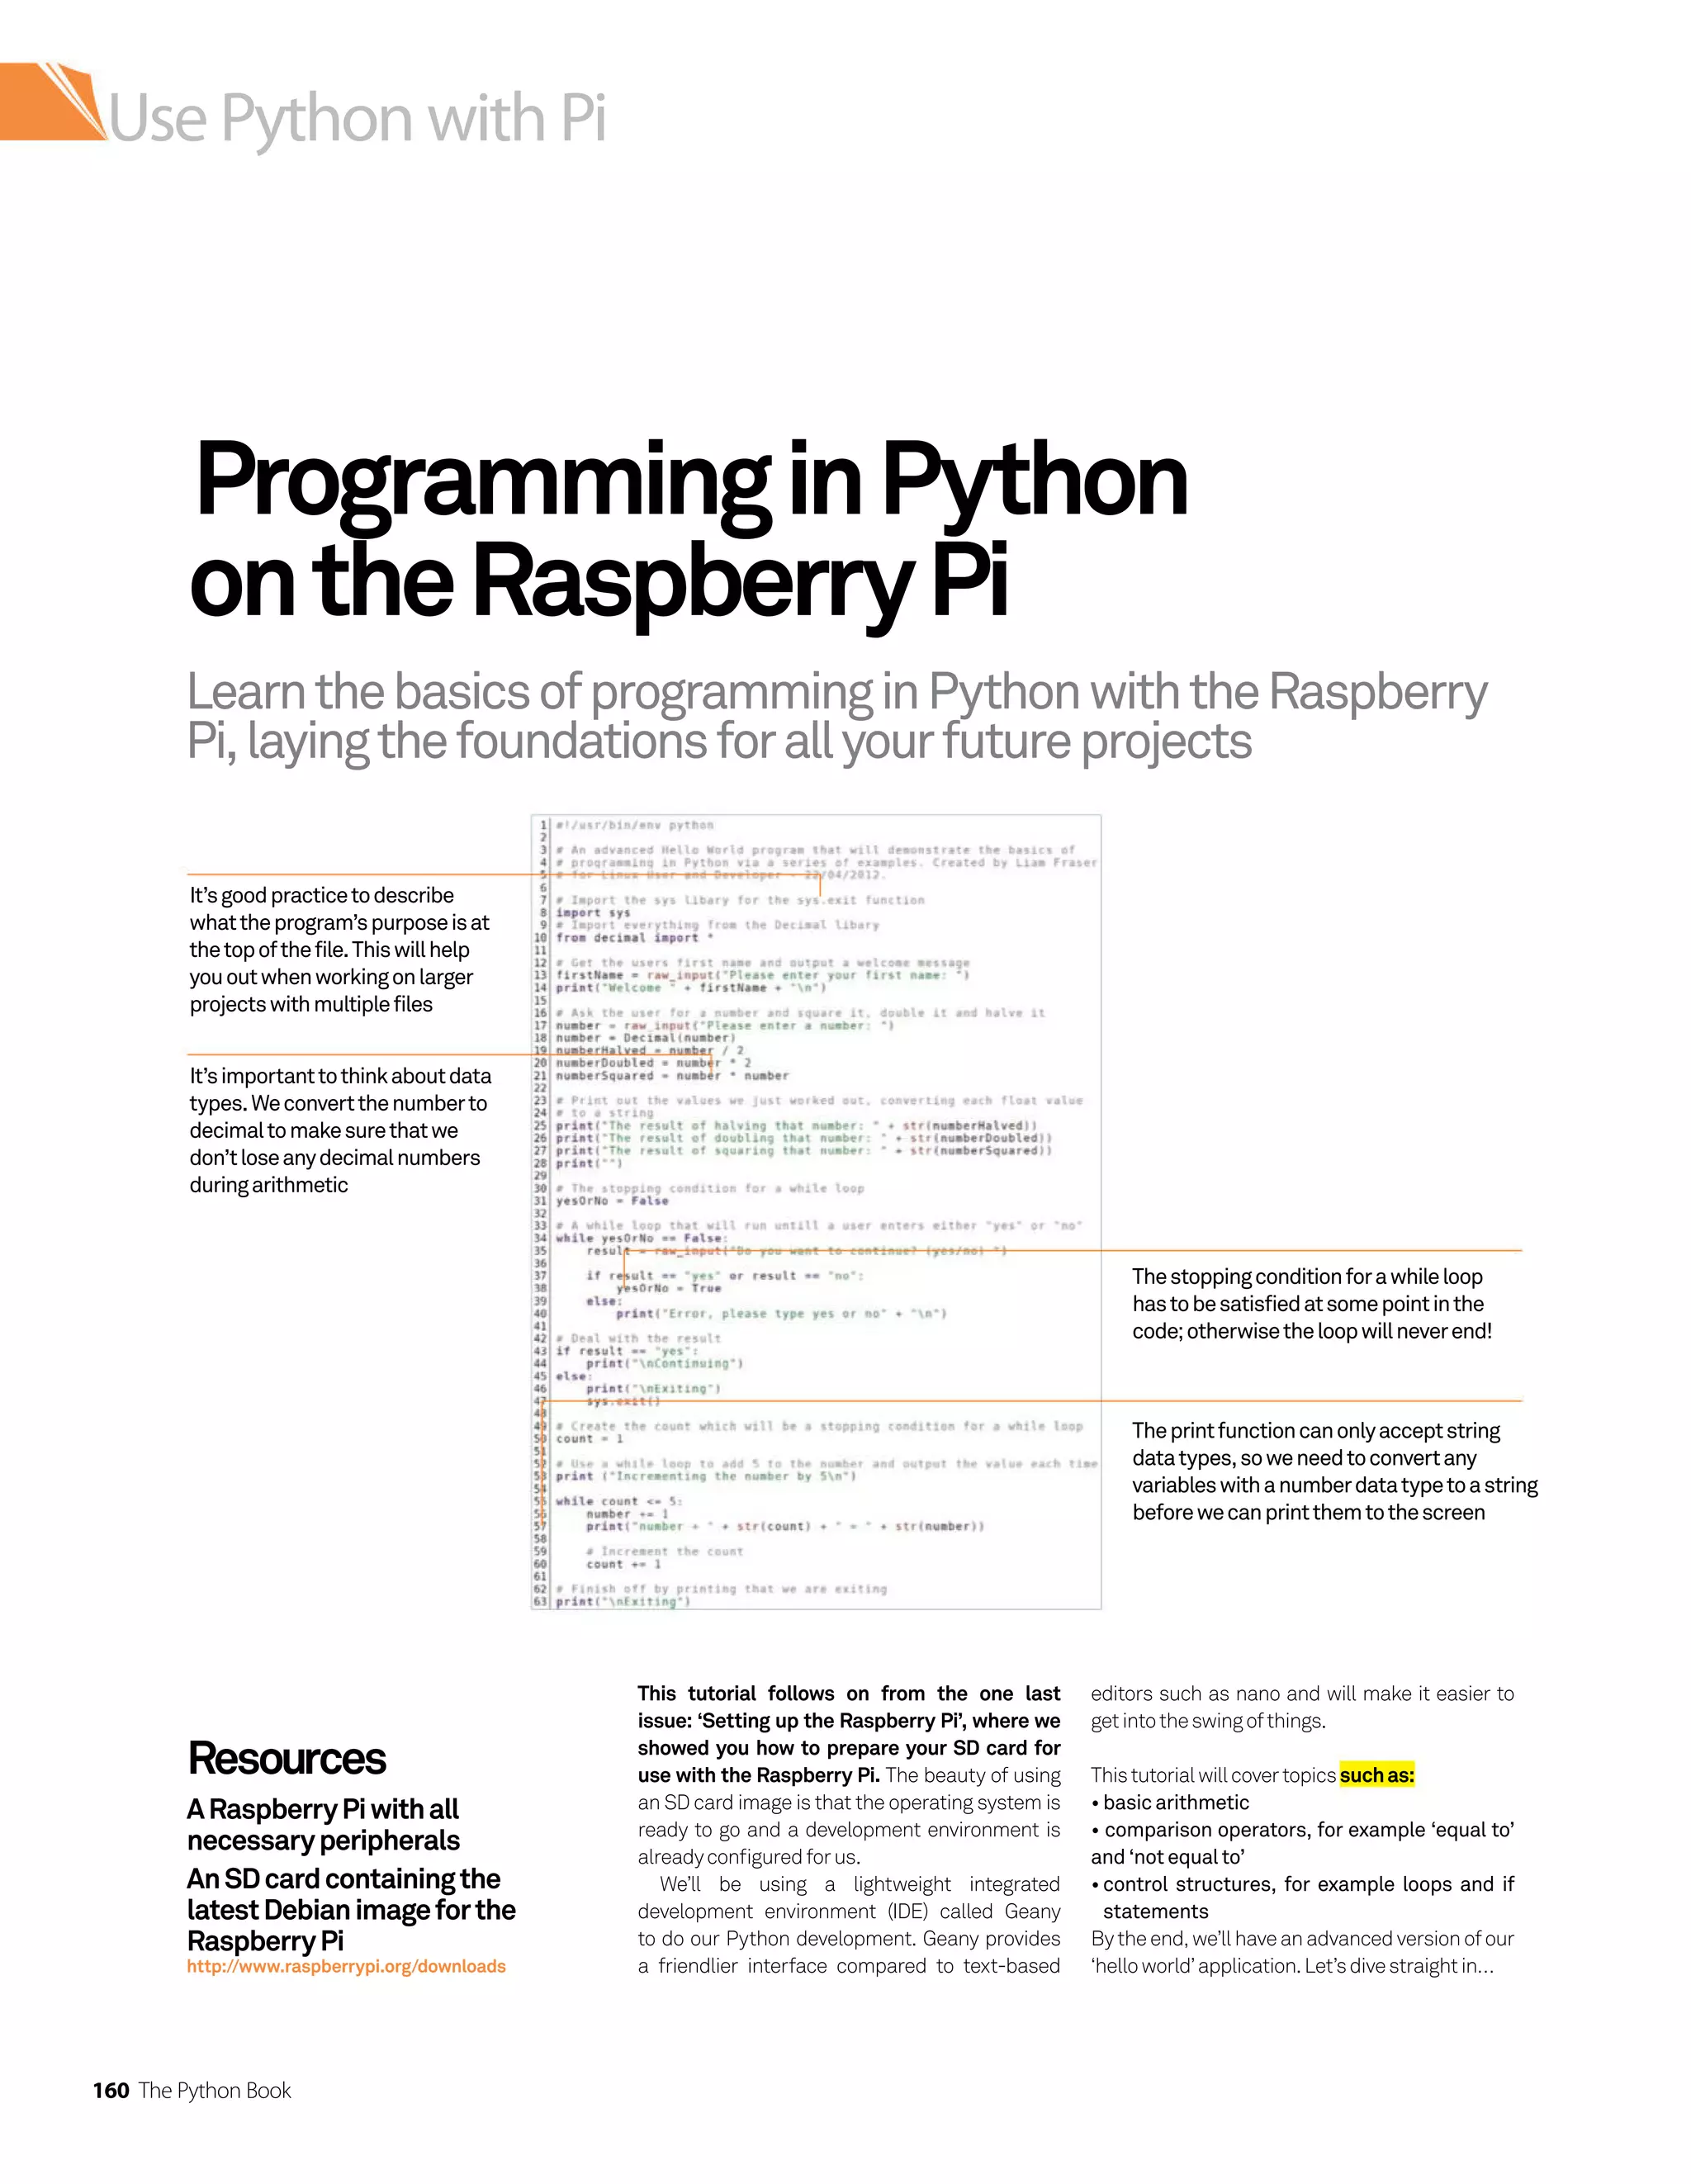
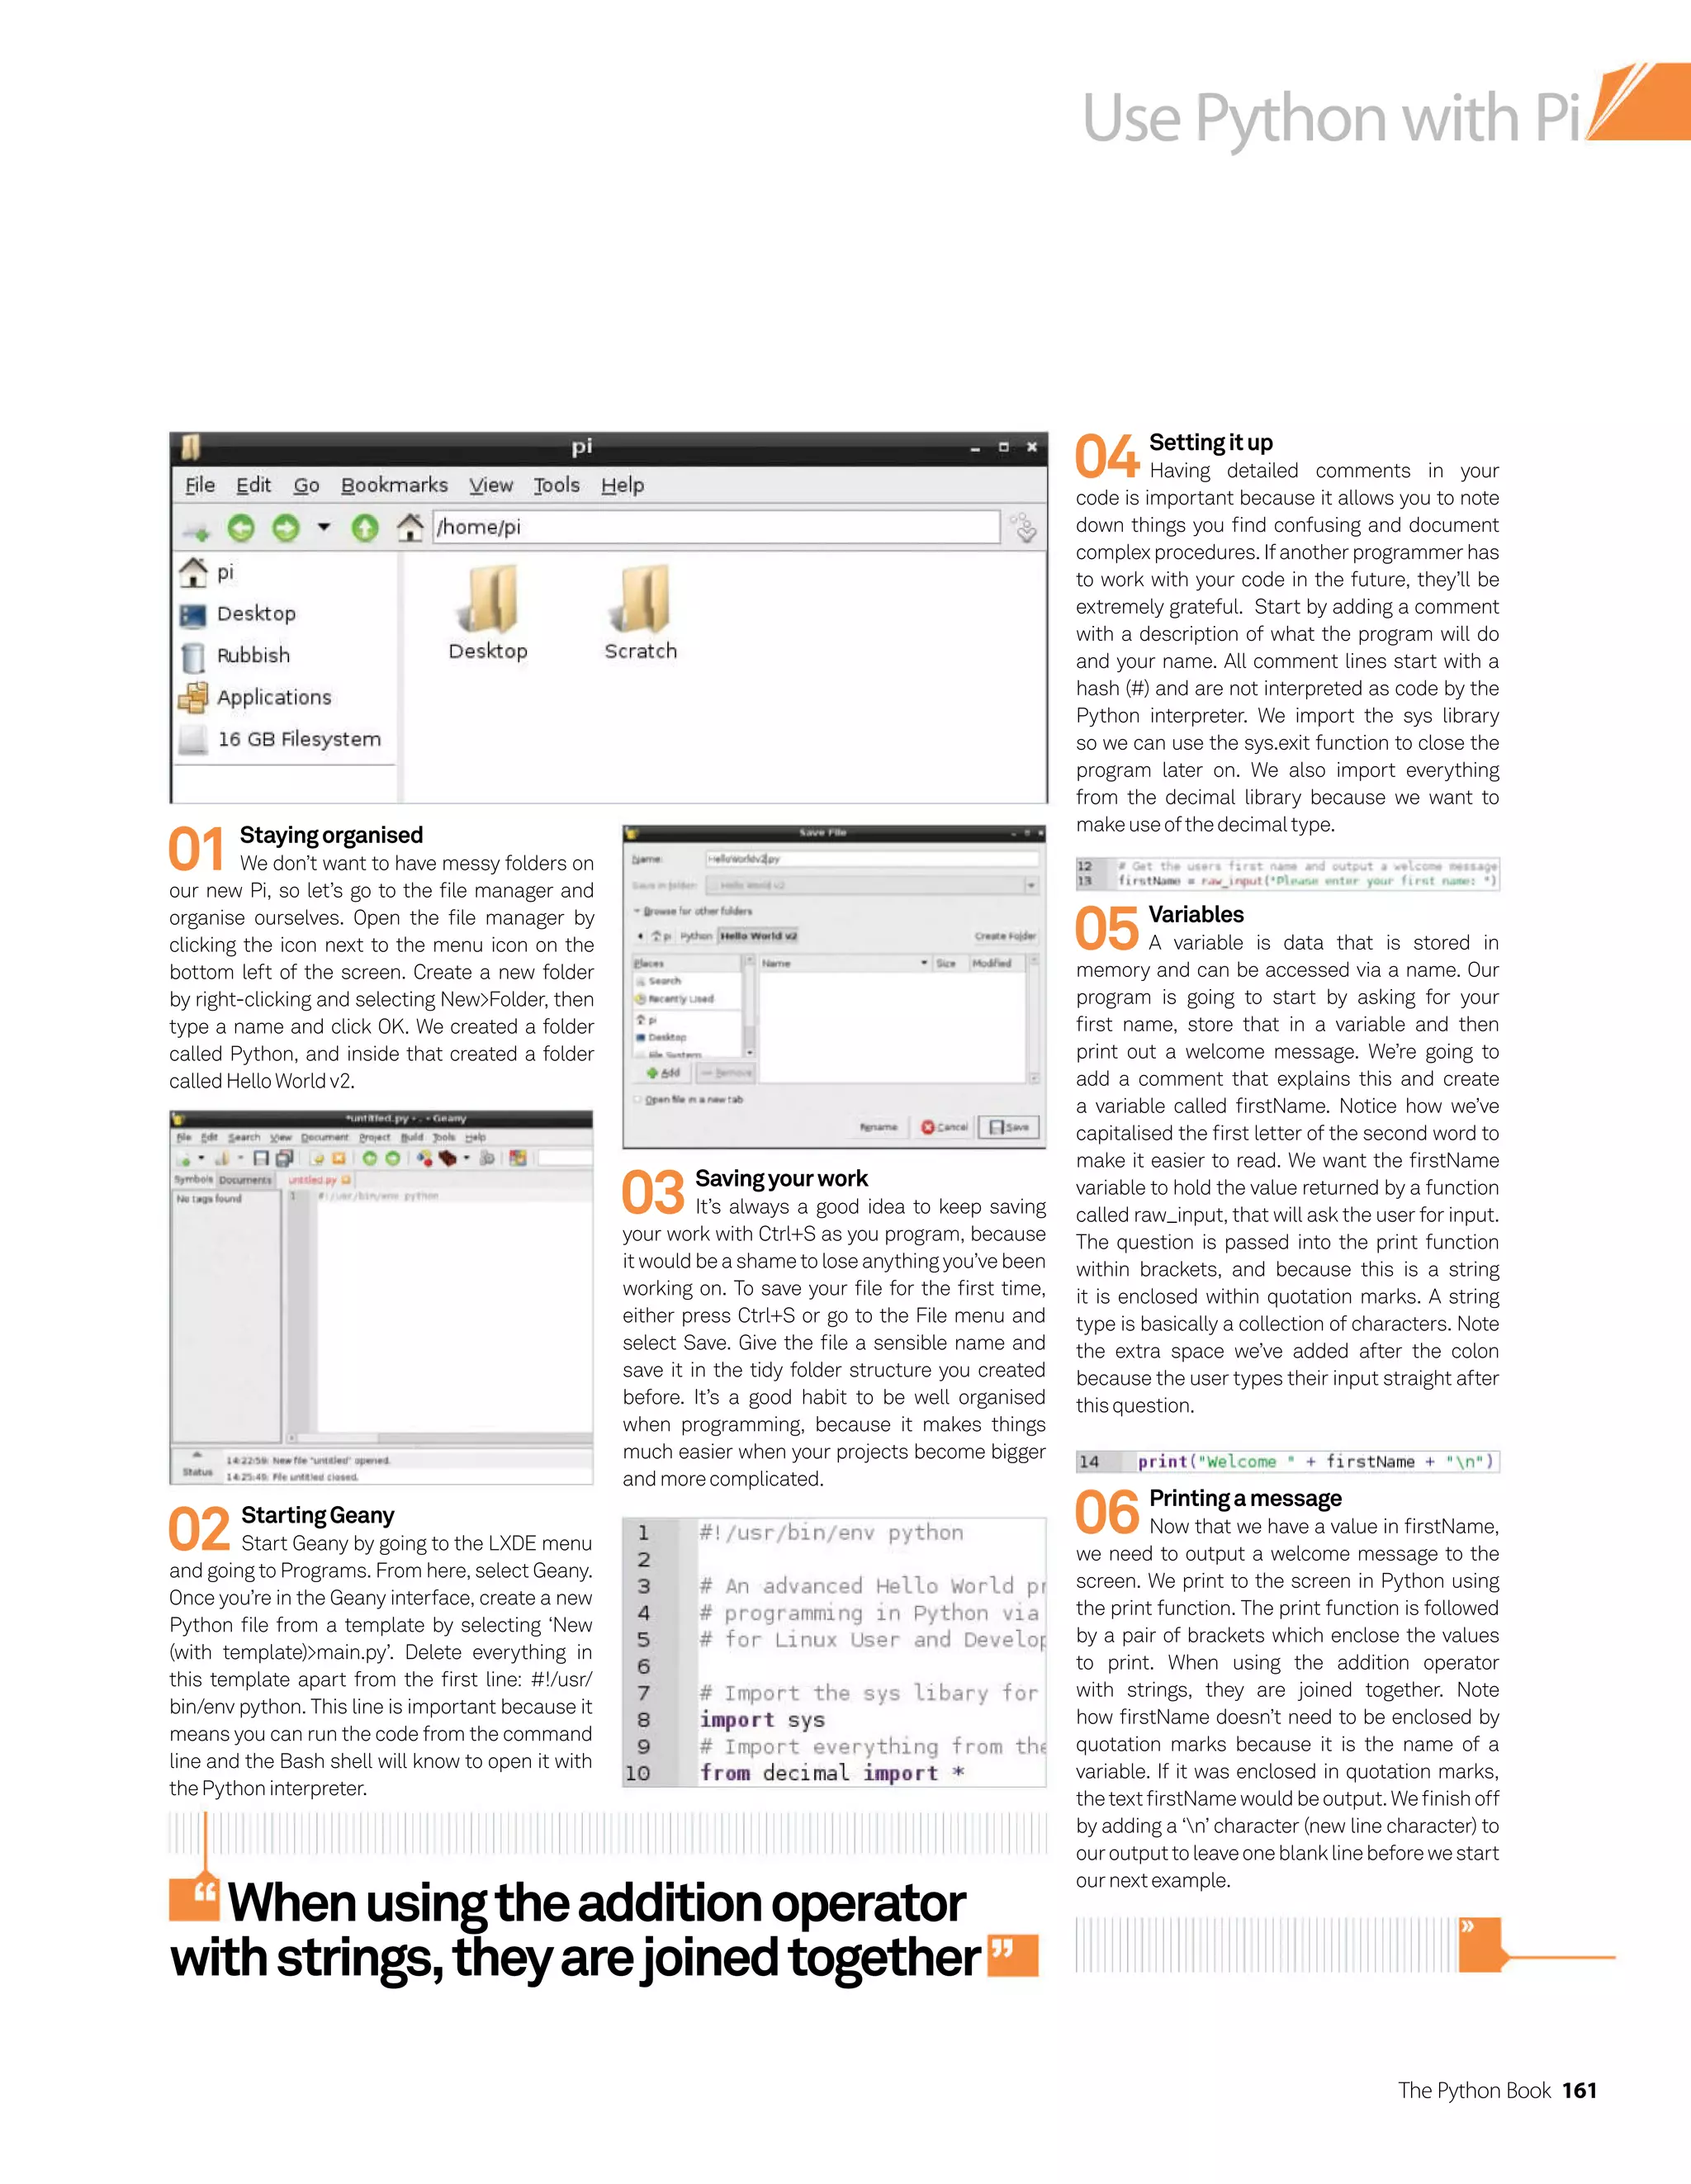
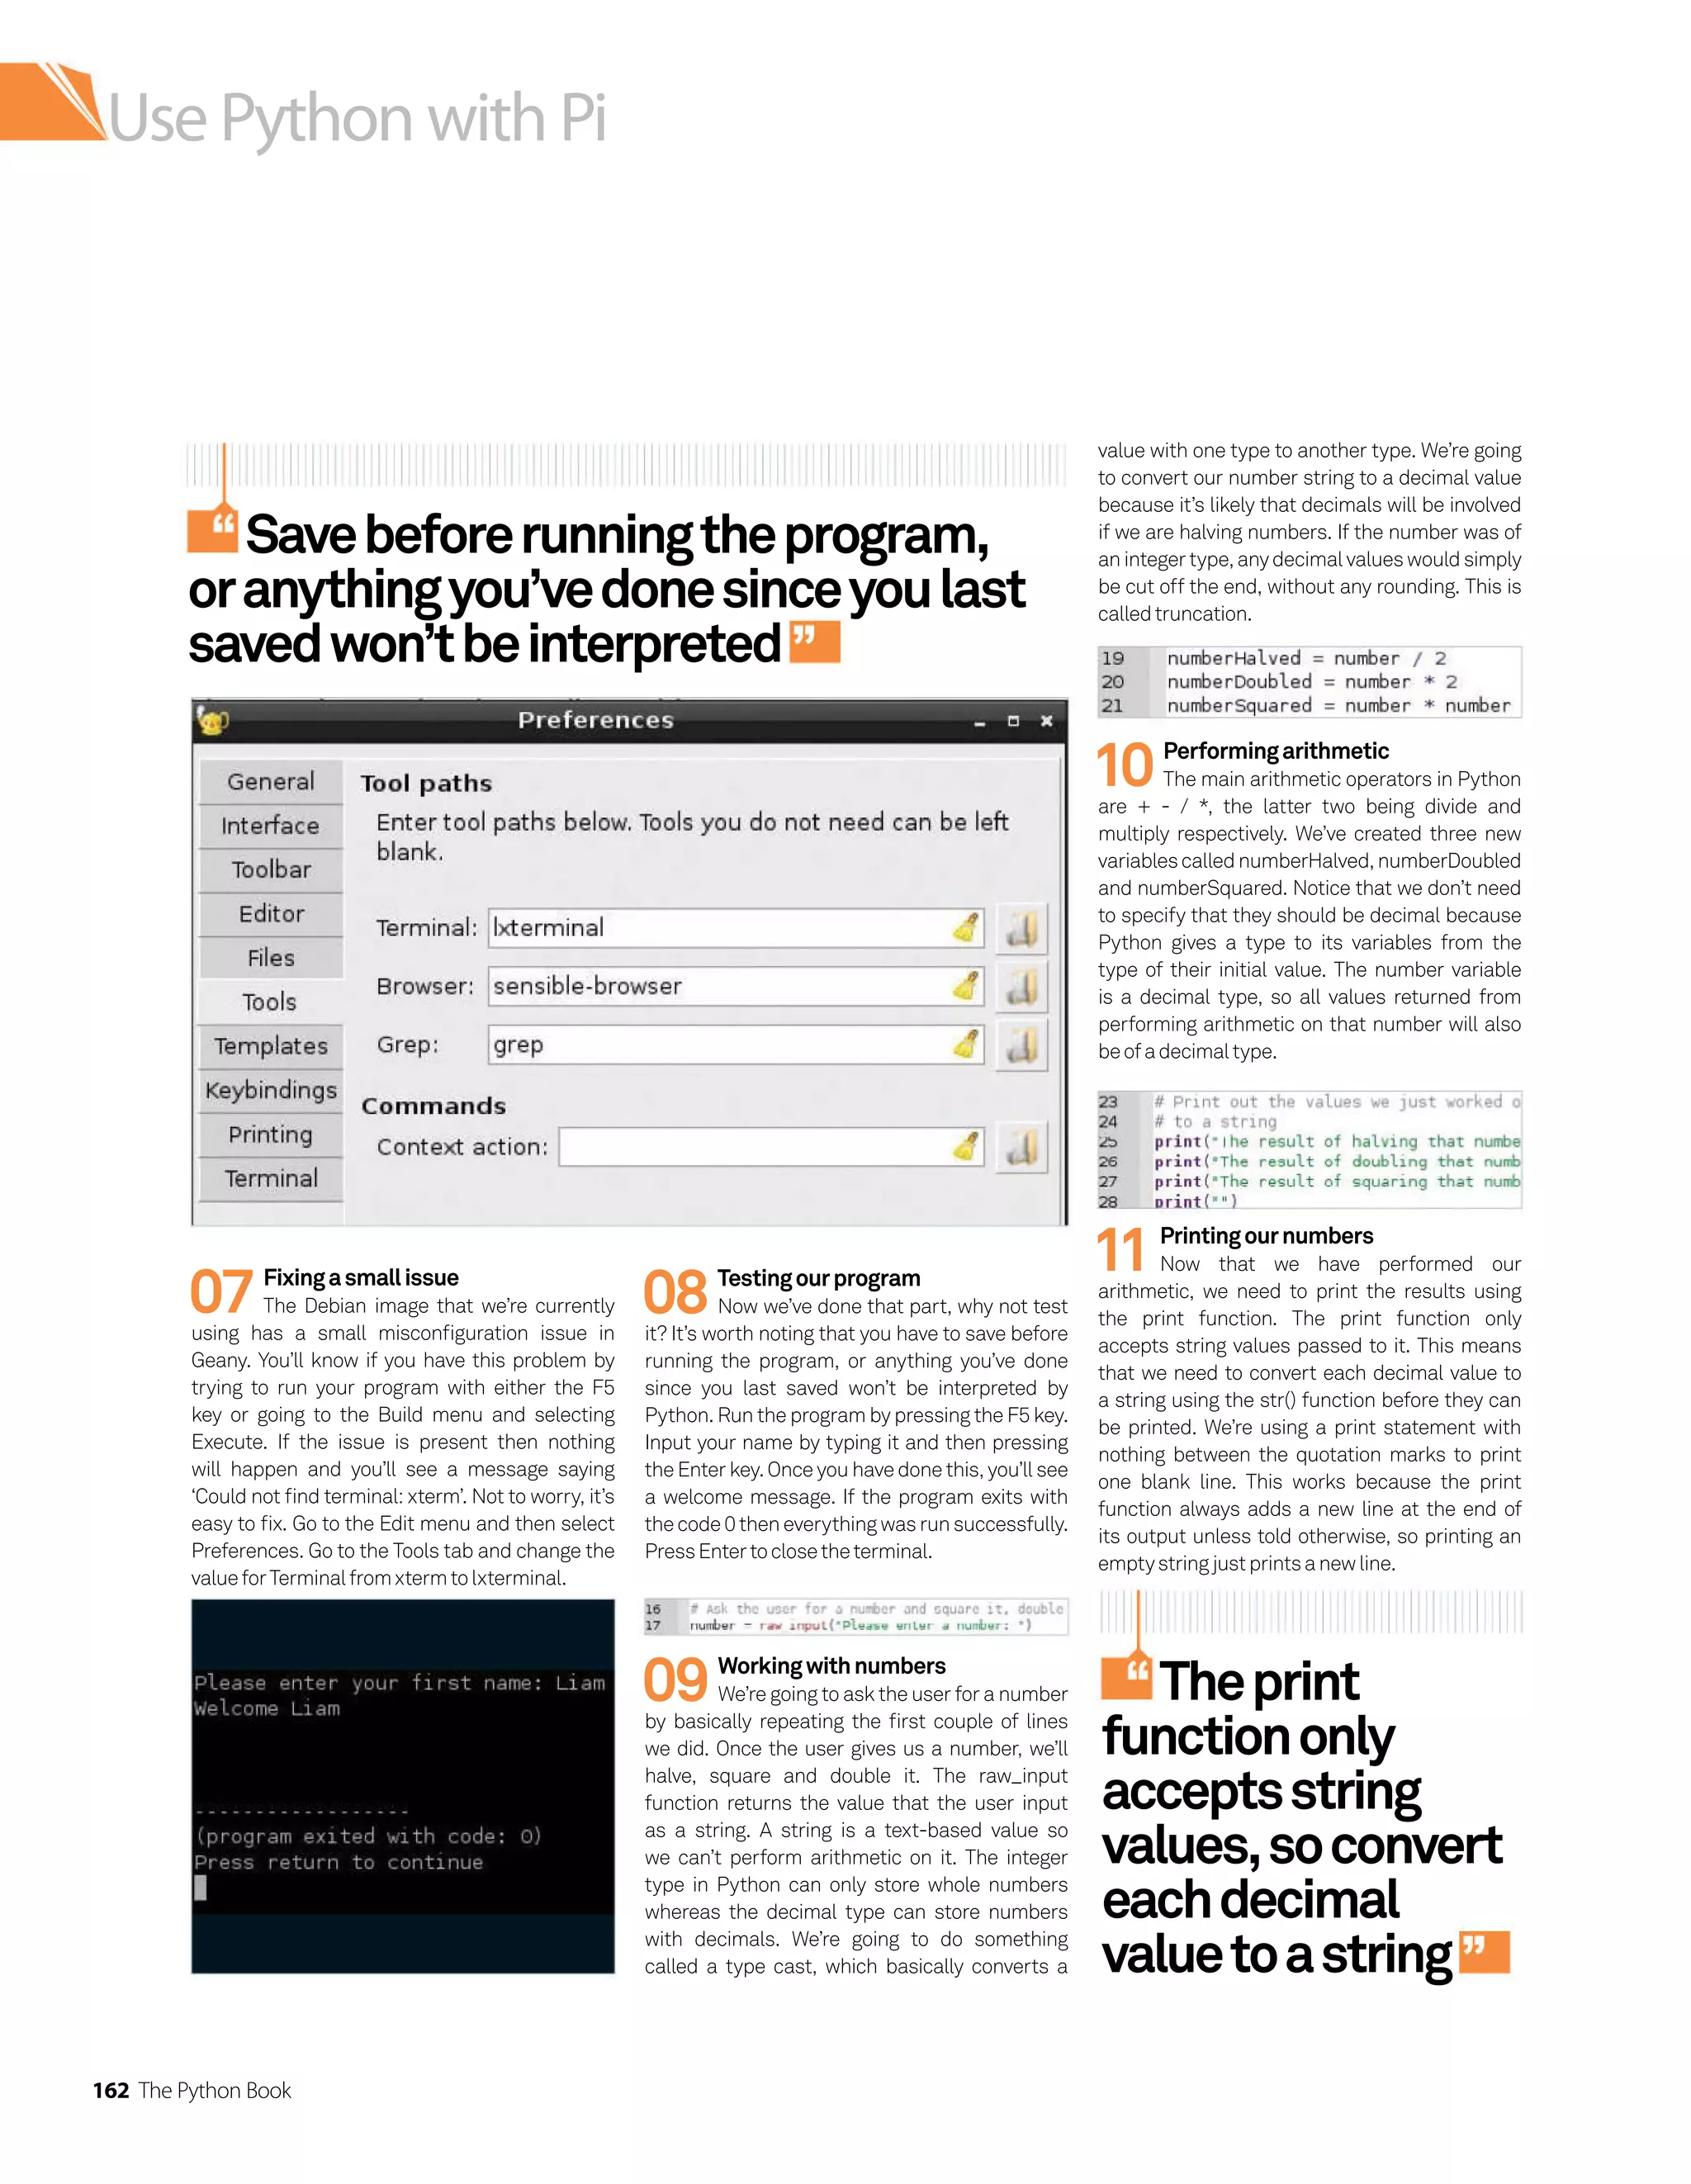
![The Python Book 163
Use Python with Pi
12InputvalidationwithWhileloops
andIfstatements
To demonstrate a while loop and if statements,
we will output a question to the user that
requires a yes or no answer. We’re going to ask
them if they want to continue – and for this we
require either a lower-case ‘yes’, or a lower-
case ‘no’. A while loop is a loop that runs until a
condition is met. In this case, we will create a
variable called yesOrNo and the while loop will
run while yesOrNo is false. The yesOrNo variable
will be a Boolean type that can be either True or
False. The variable will be initialised with a value
ofFalse,orthewhileloopwillnotrun.
A while loop has the format ‘while [condition]:’
– where any code that is part of the while loop
needs to be indented in the lines below the
colon. Any code that is not indented will not
be part of the while loop. This is the same for
an if statement. The condition is checked with
the comparison operator ‘==’. A single ‘=’ is an
assignment operator whereas a double equals
is a comparison operator. Another common
comparison operator is ‘!=’ – which means ‘not
equalto’.
We create a variable called ‘result’, which
holds the result of the question, do you want to
continue? We then check this result is valid with
an if statement. Notice the ‘or’ operator which
allows two conditions to be tested. If the user
inputs a correct value then we set yesOrNo to
True, which stops the while loop on the next run.
Otherwise, we output an error message and
the while loop will run again. The user can use
the Ctrl+C command at the terminal to exit the
programatanytime.
13Continueorexit?
Next we will deal with the result
that was stored during the while loop with if
statements. If the user typed ‘yes’ then we
will print ‘Continuing’. Otherwise, we will print
‘Exiting’ and then call the sys.exit function. You
don’t have to do anything else for the program
to continue because it will simply carry on if the
sys.exit function wasn’t called. This code also
shows that the newline character n can be
used anywhere in a string, not just in separate
quotationmarkslikeabove.
14Loopswithnumbers
We’ll be using a while loop that uses a
number and a = (less than or equal to) operator
as its stopping condition. The while loop will be
used to increment the number by 1, printing the
change on each loop until the stopping condition
is met. The count variable allows us to know
exactly how many times we have been through
thewhileloop.
15Incrementingnumberswithaloop
The while loop will run until the count is
6, meaning that it will run for a total of 5 times
because the count begins at 1. On each run, the
while loop increments the number variable and
then prints what is being added to the original
number, followed by the result. Finally, the count
isincremented.
16Finishingoff
The final step is to print that the
program is exiting. This is the last line and we
don’t have to do anything else because Python
simply finishes when there are no more lines
tointerpret.
17Admireyourwork
Now that we’ve finished coding, save any
changes you have made and run your program
withtheF5key.
Thecount
variableletsus
knowexactlyhow
manytimeswe
havebeenthrough
thewhileloop](https://image.slidesharecdn.com/thepythonbooktheultimateguidetocodingwithpythonpdfdrive-220527060944-728dd1fe/75/The-Python-Book_-The-ultimate-guide-to-coding-with-Python-PDFDrive-pdf-163-2048.jpg)

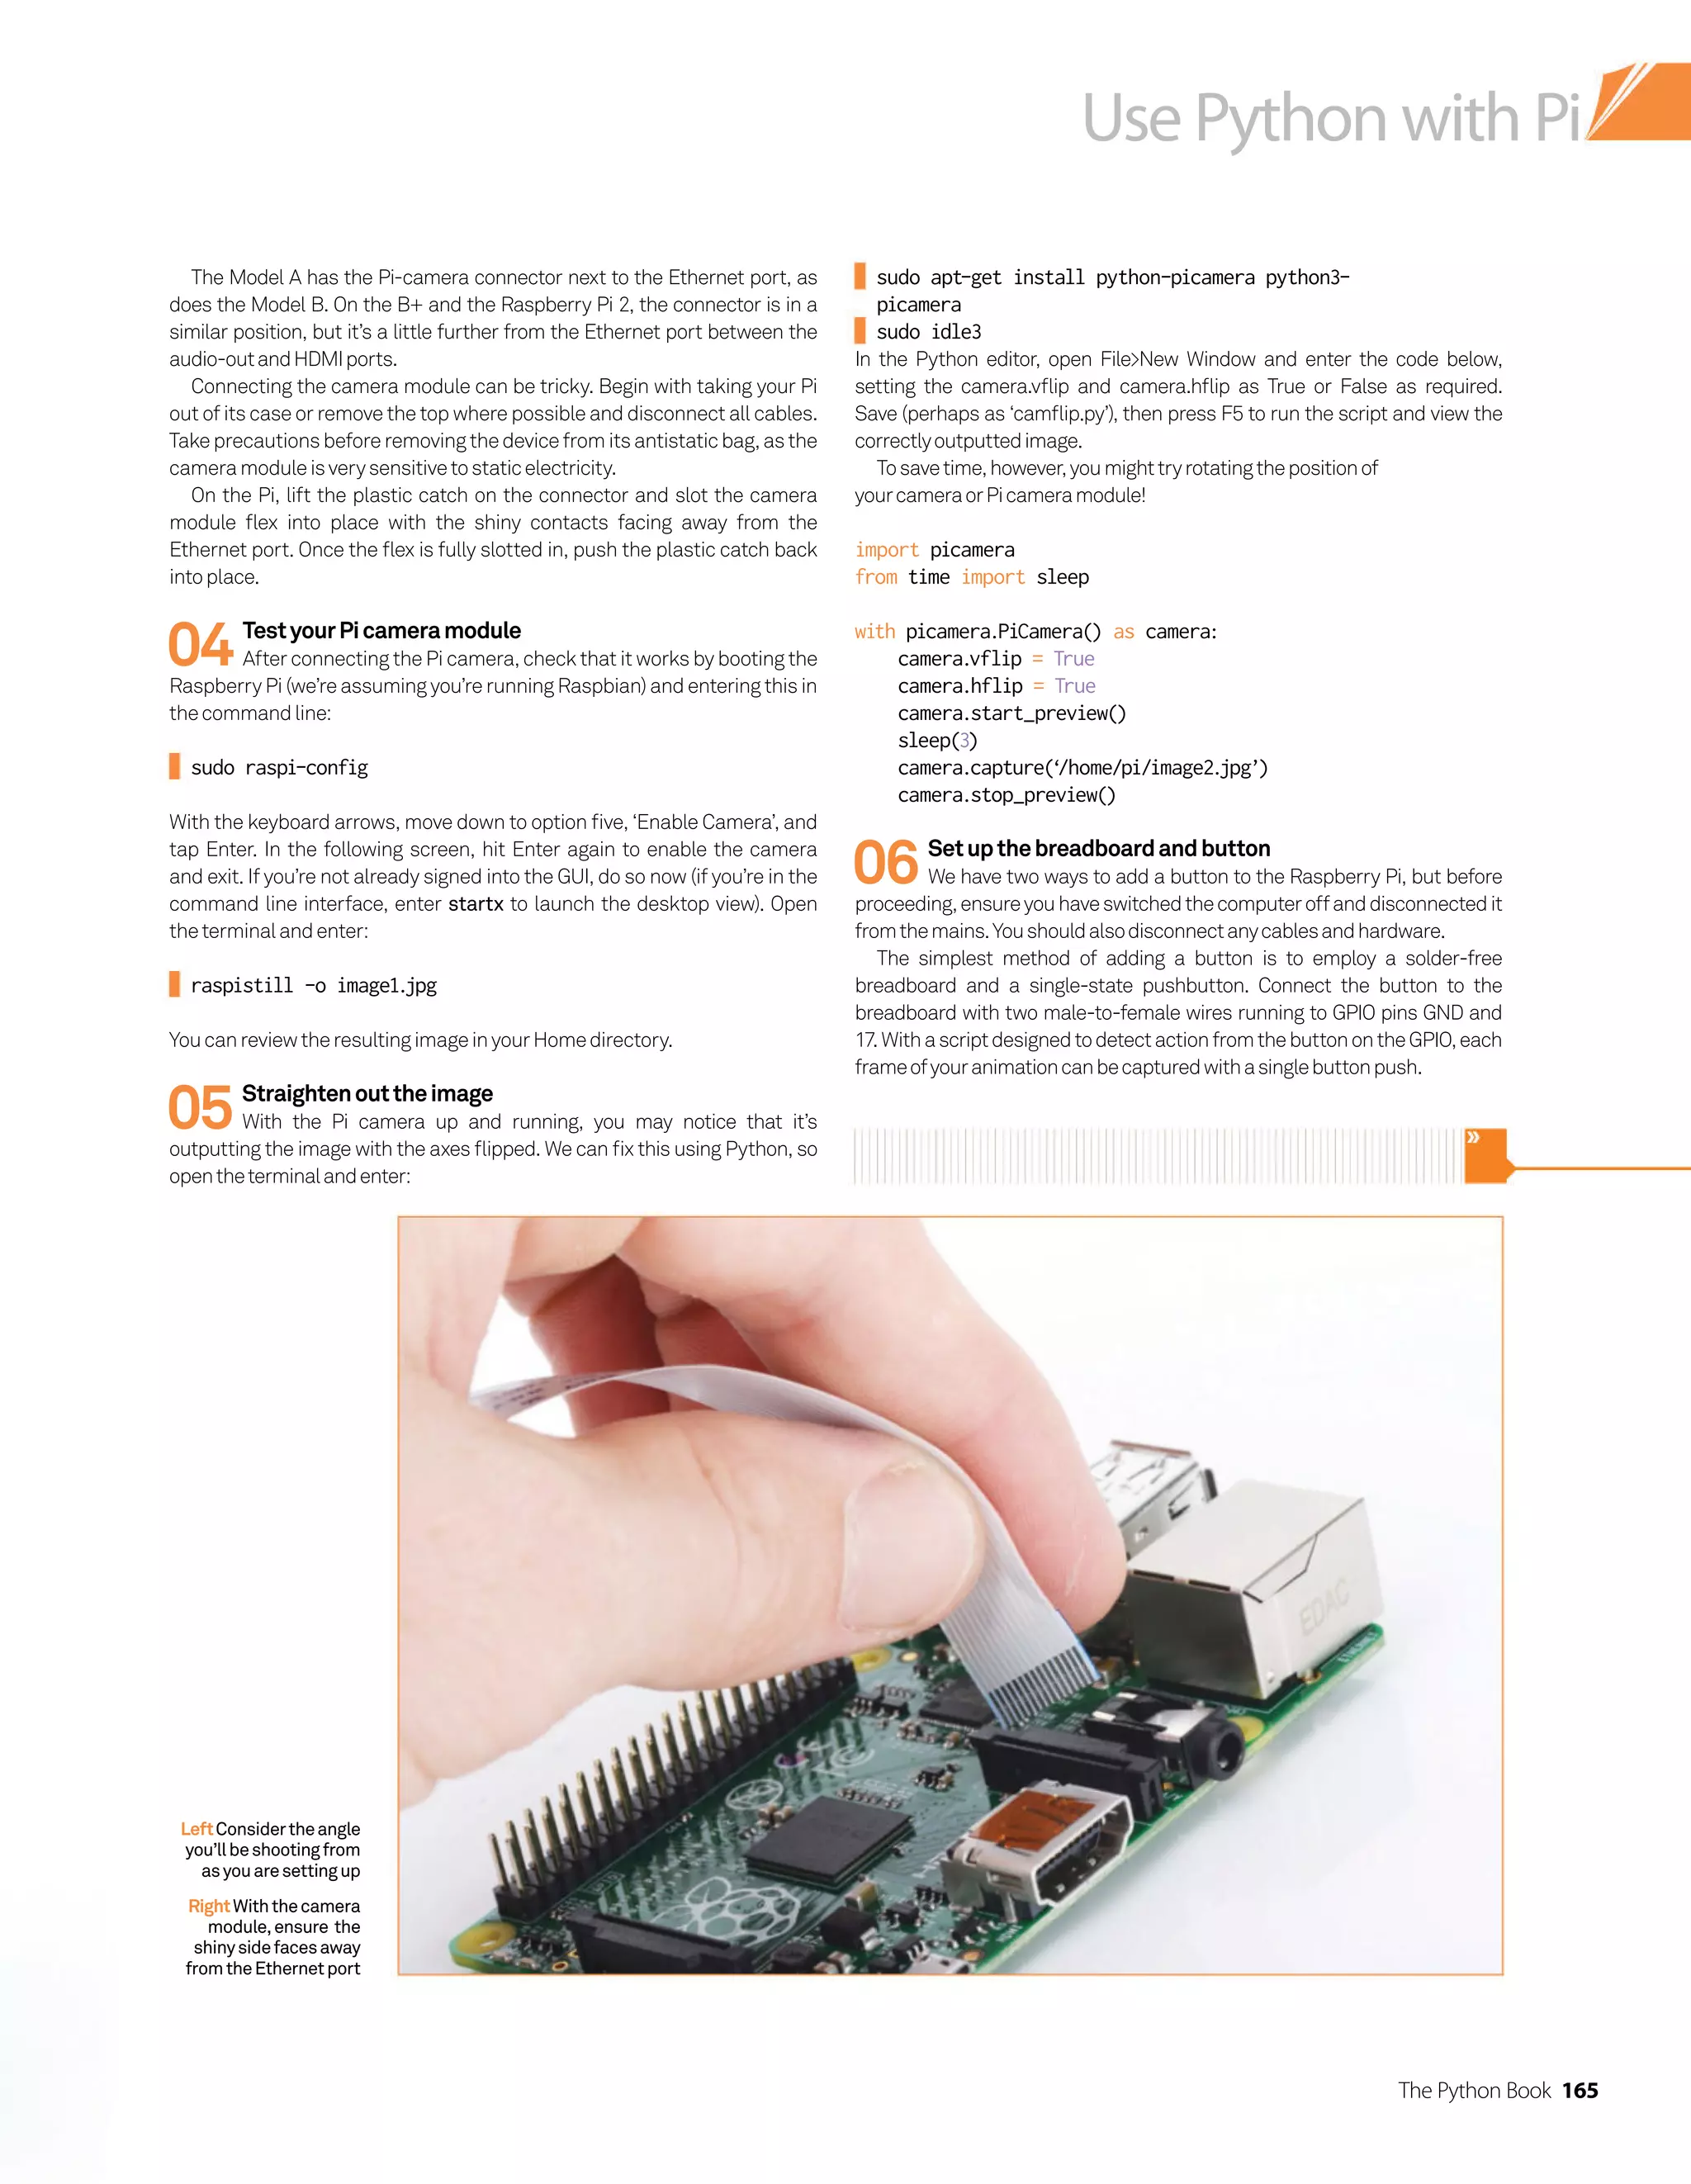
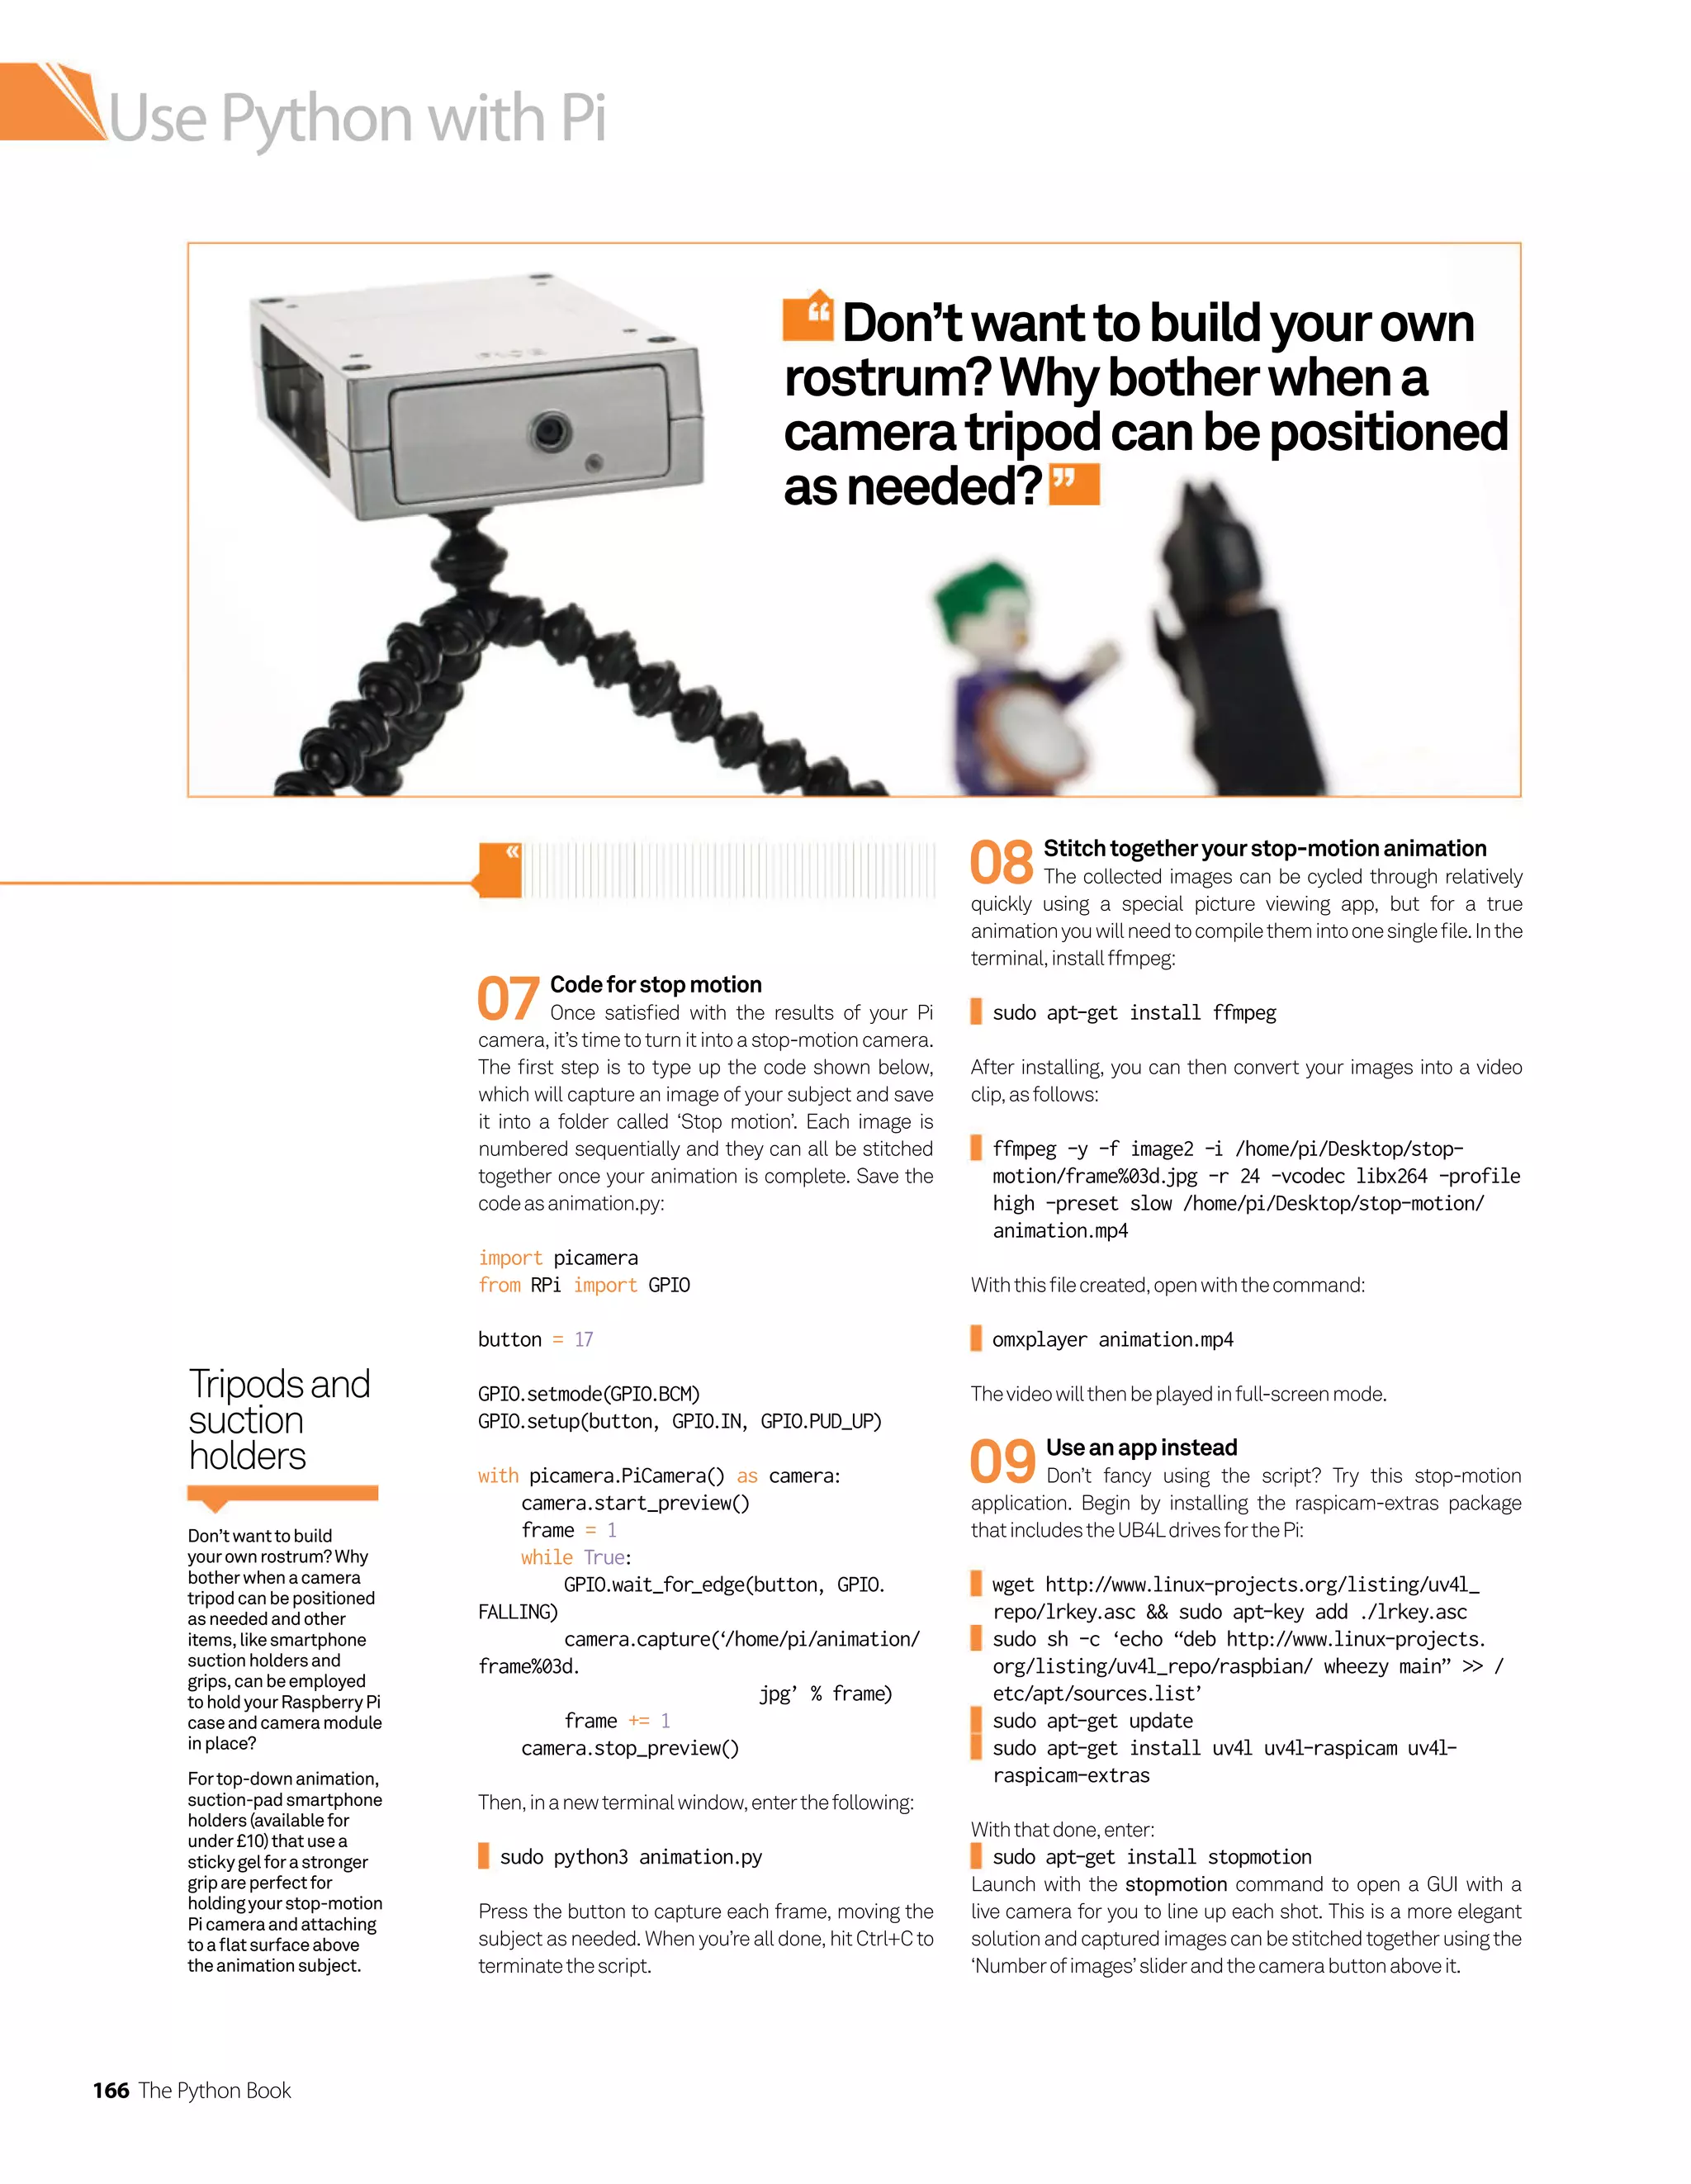
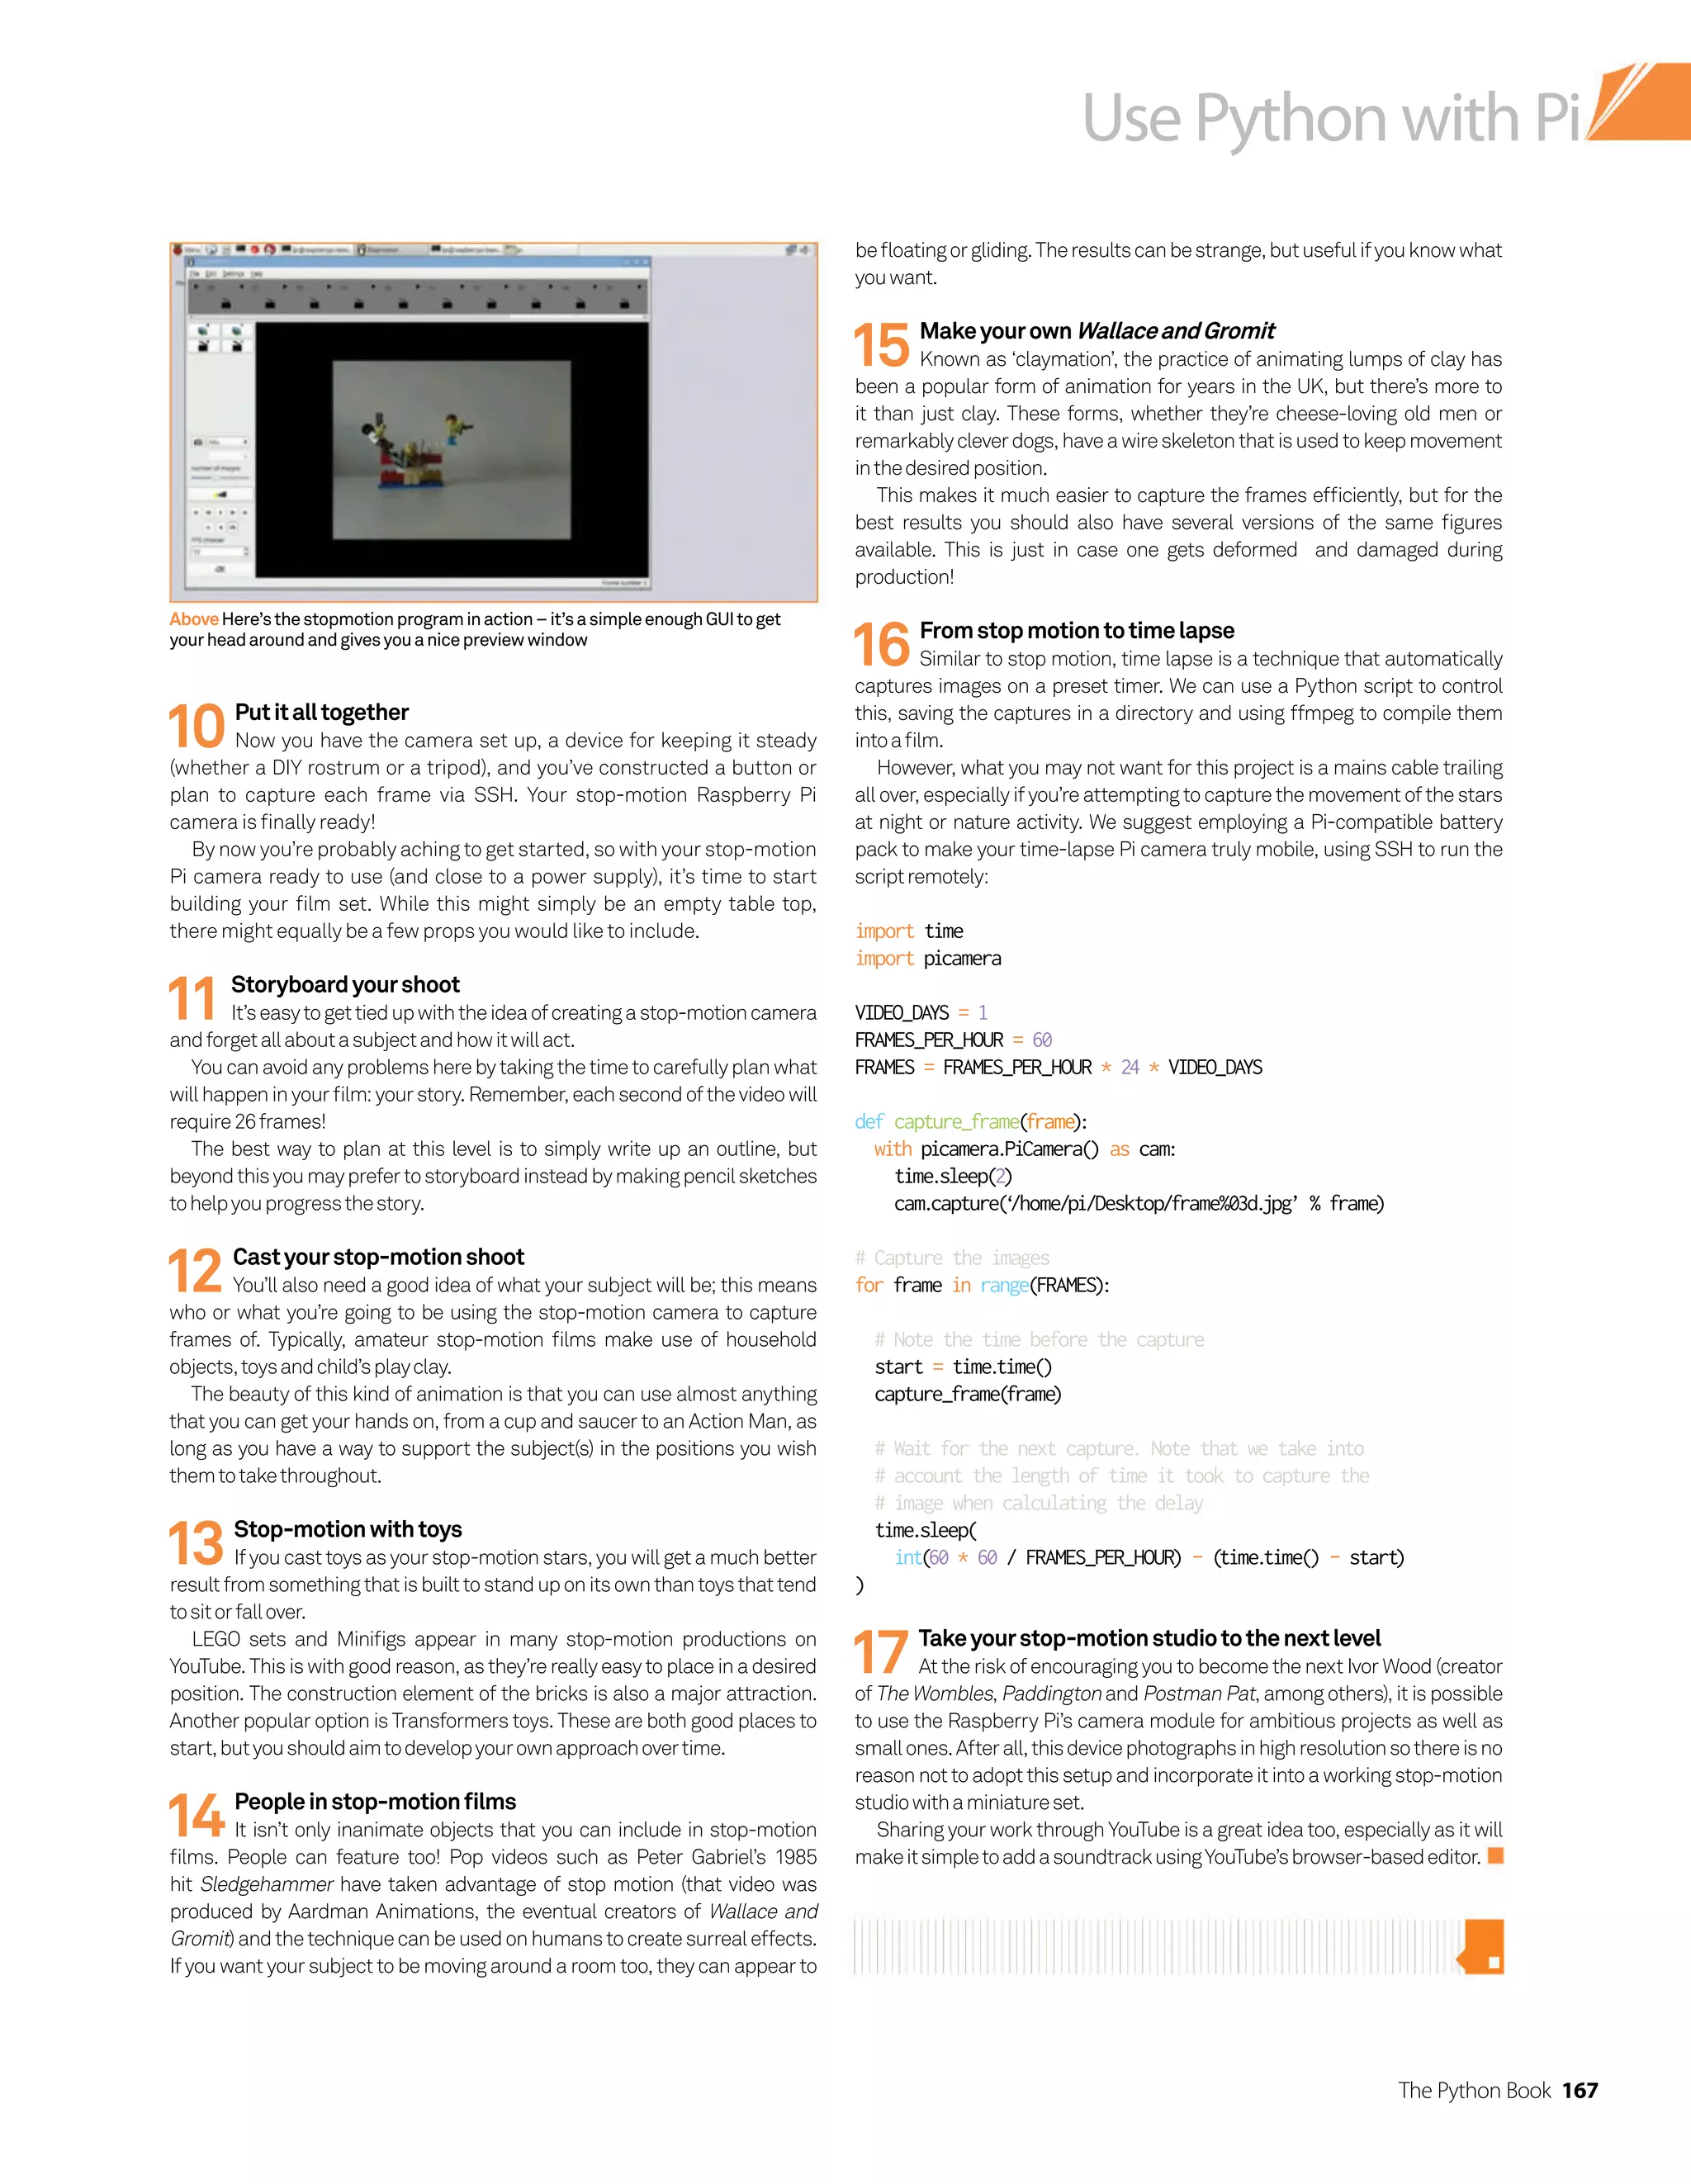
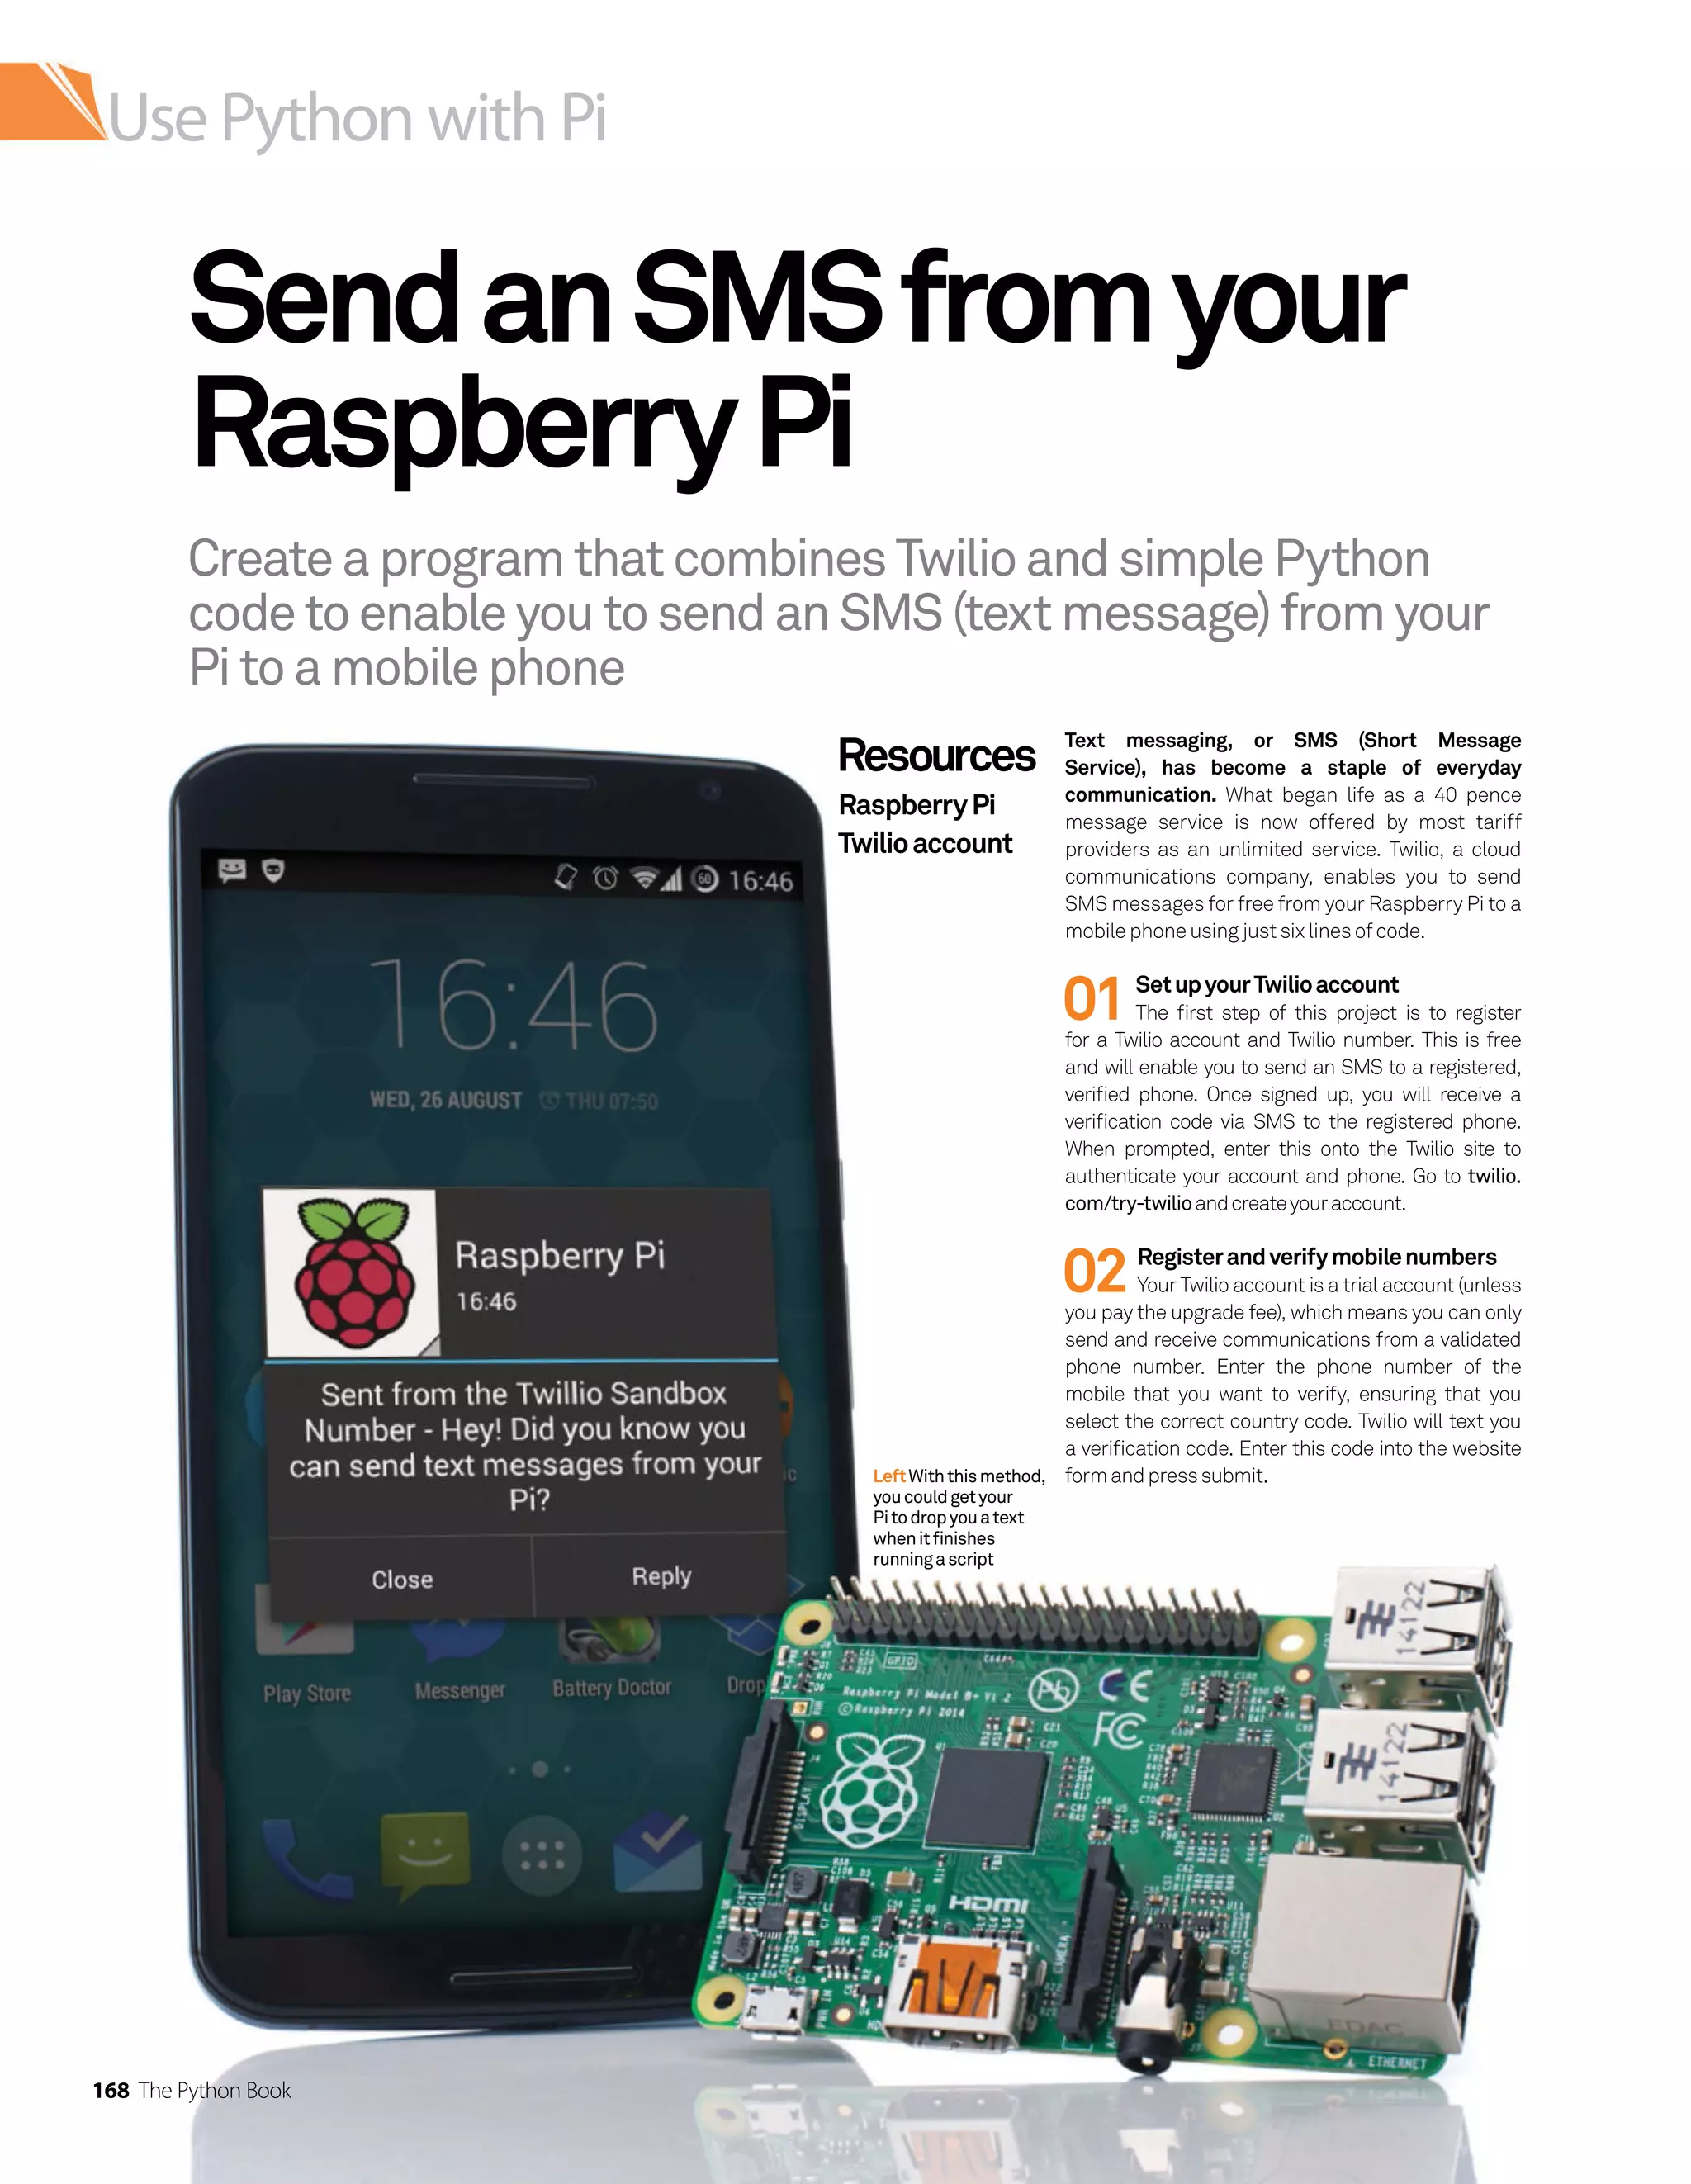
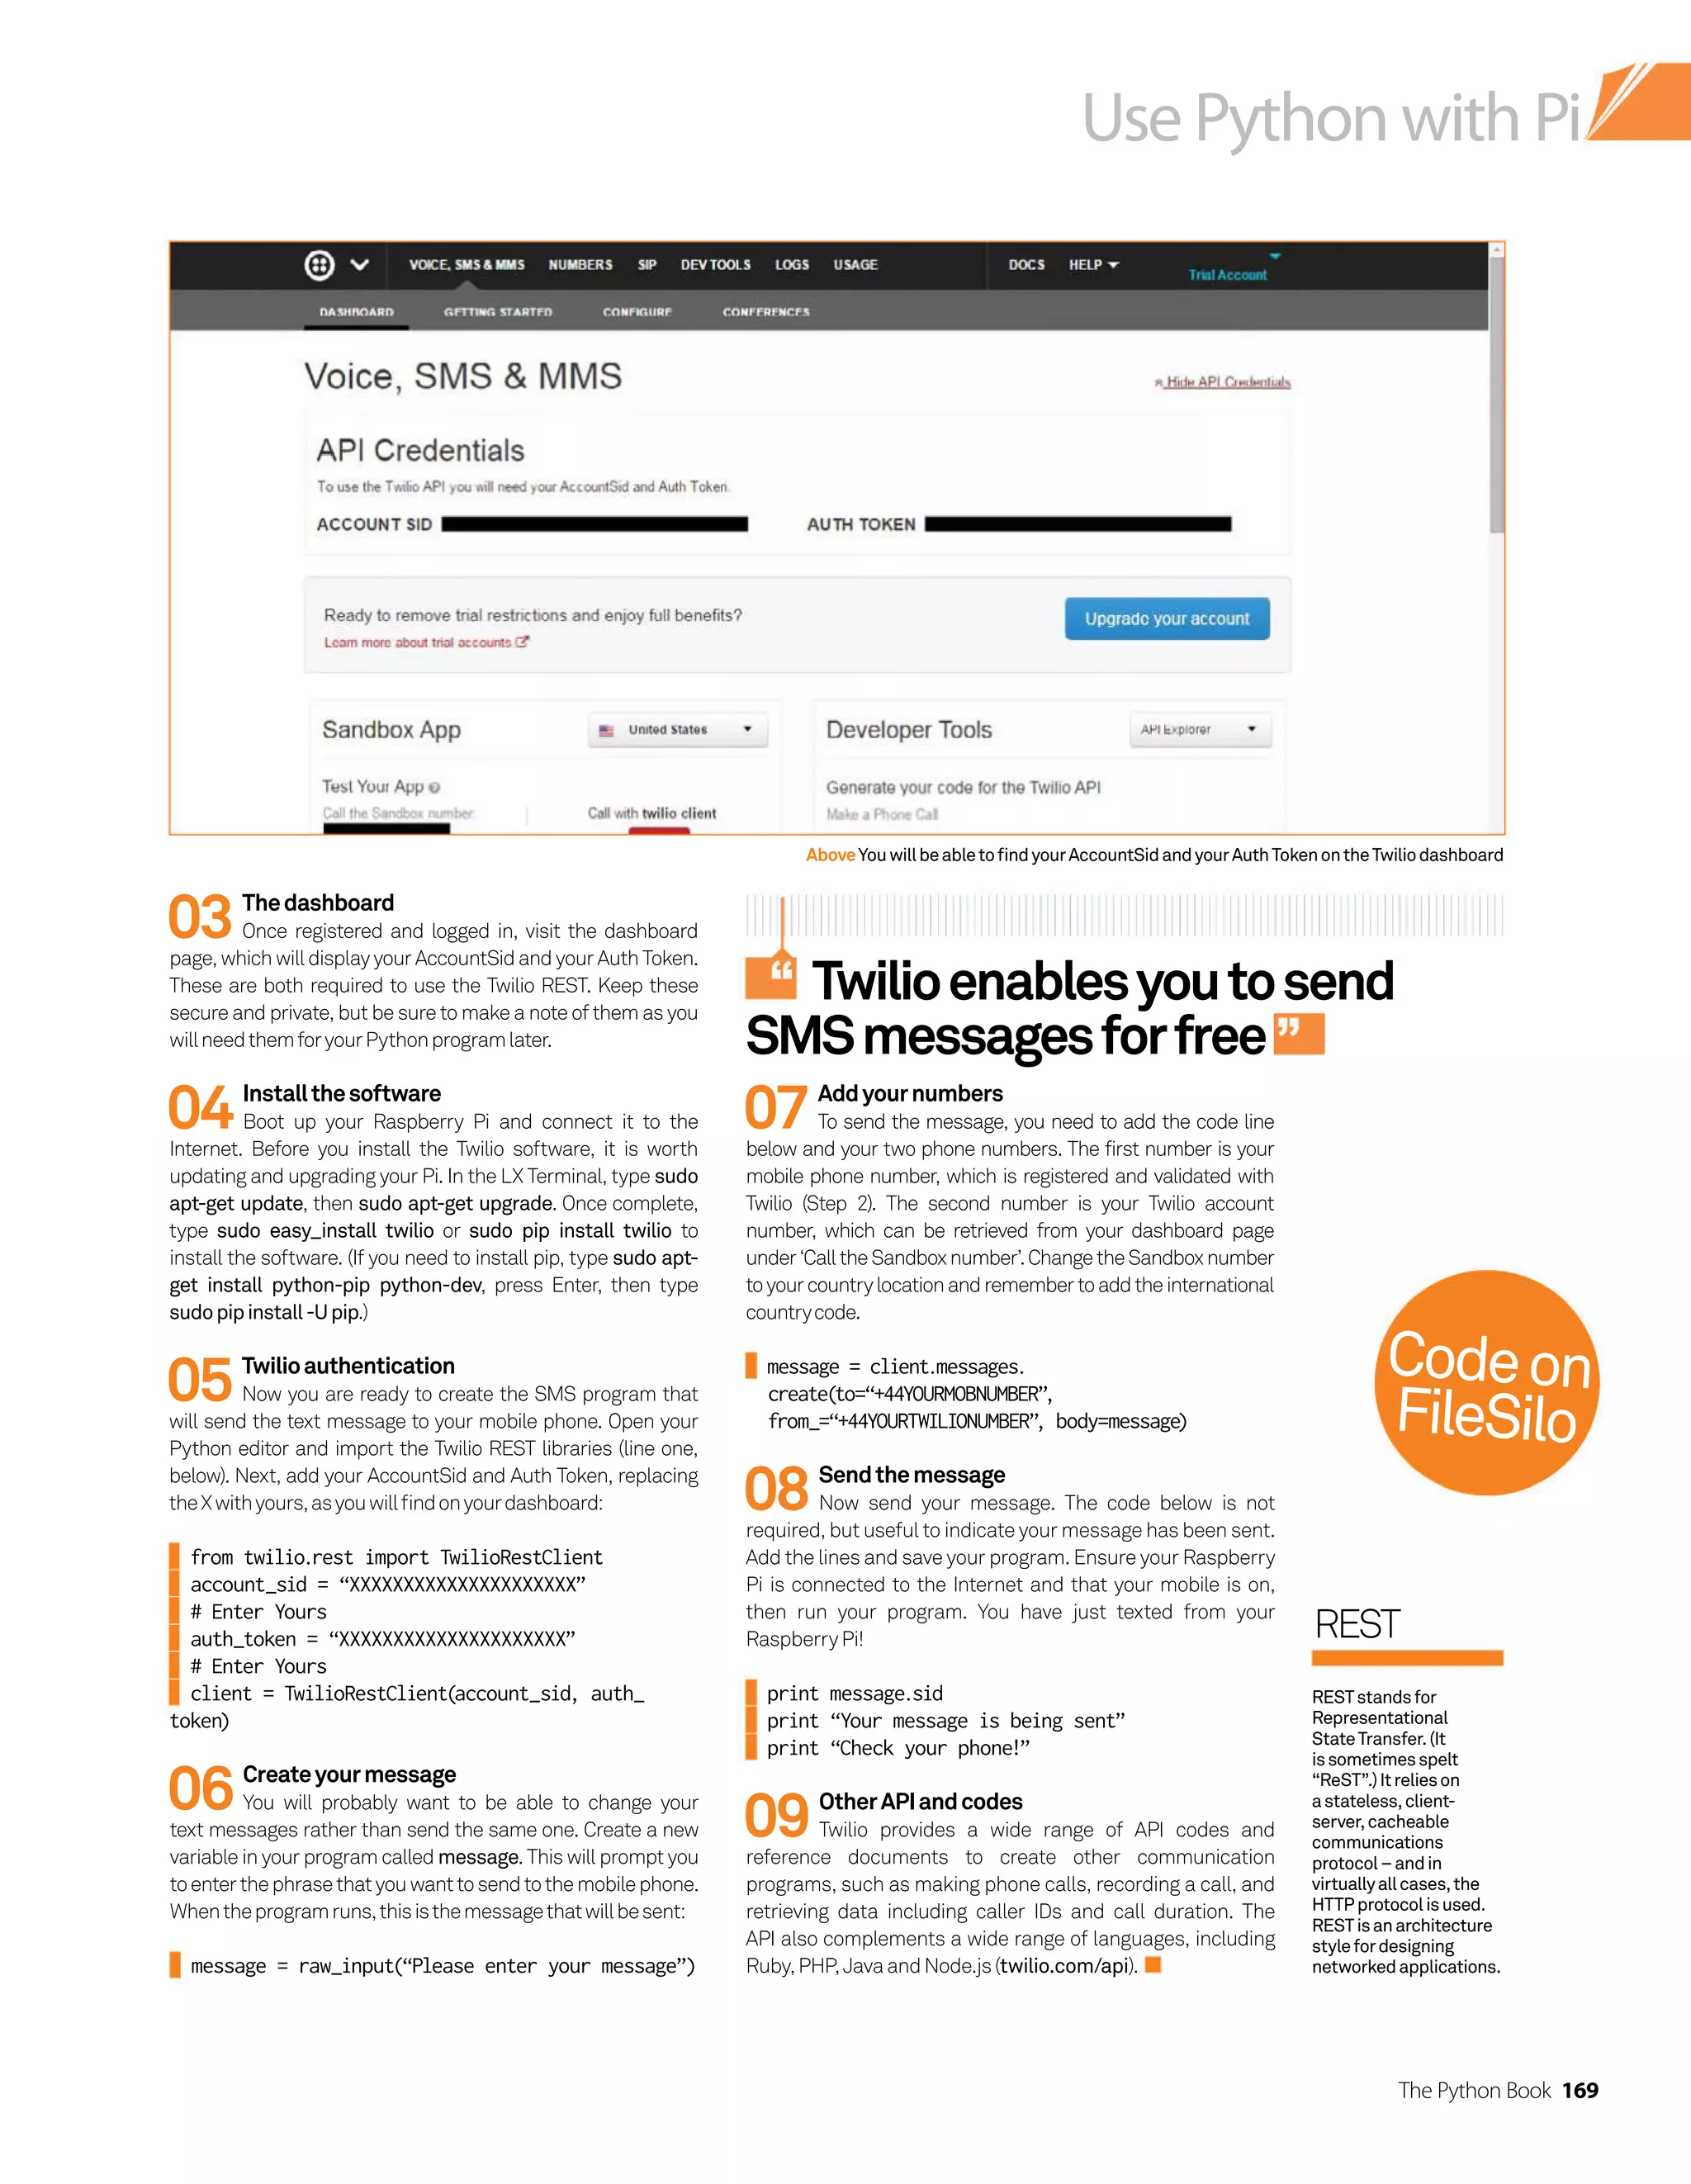

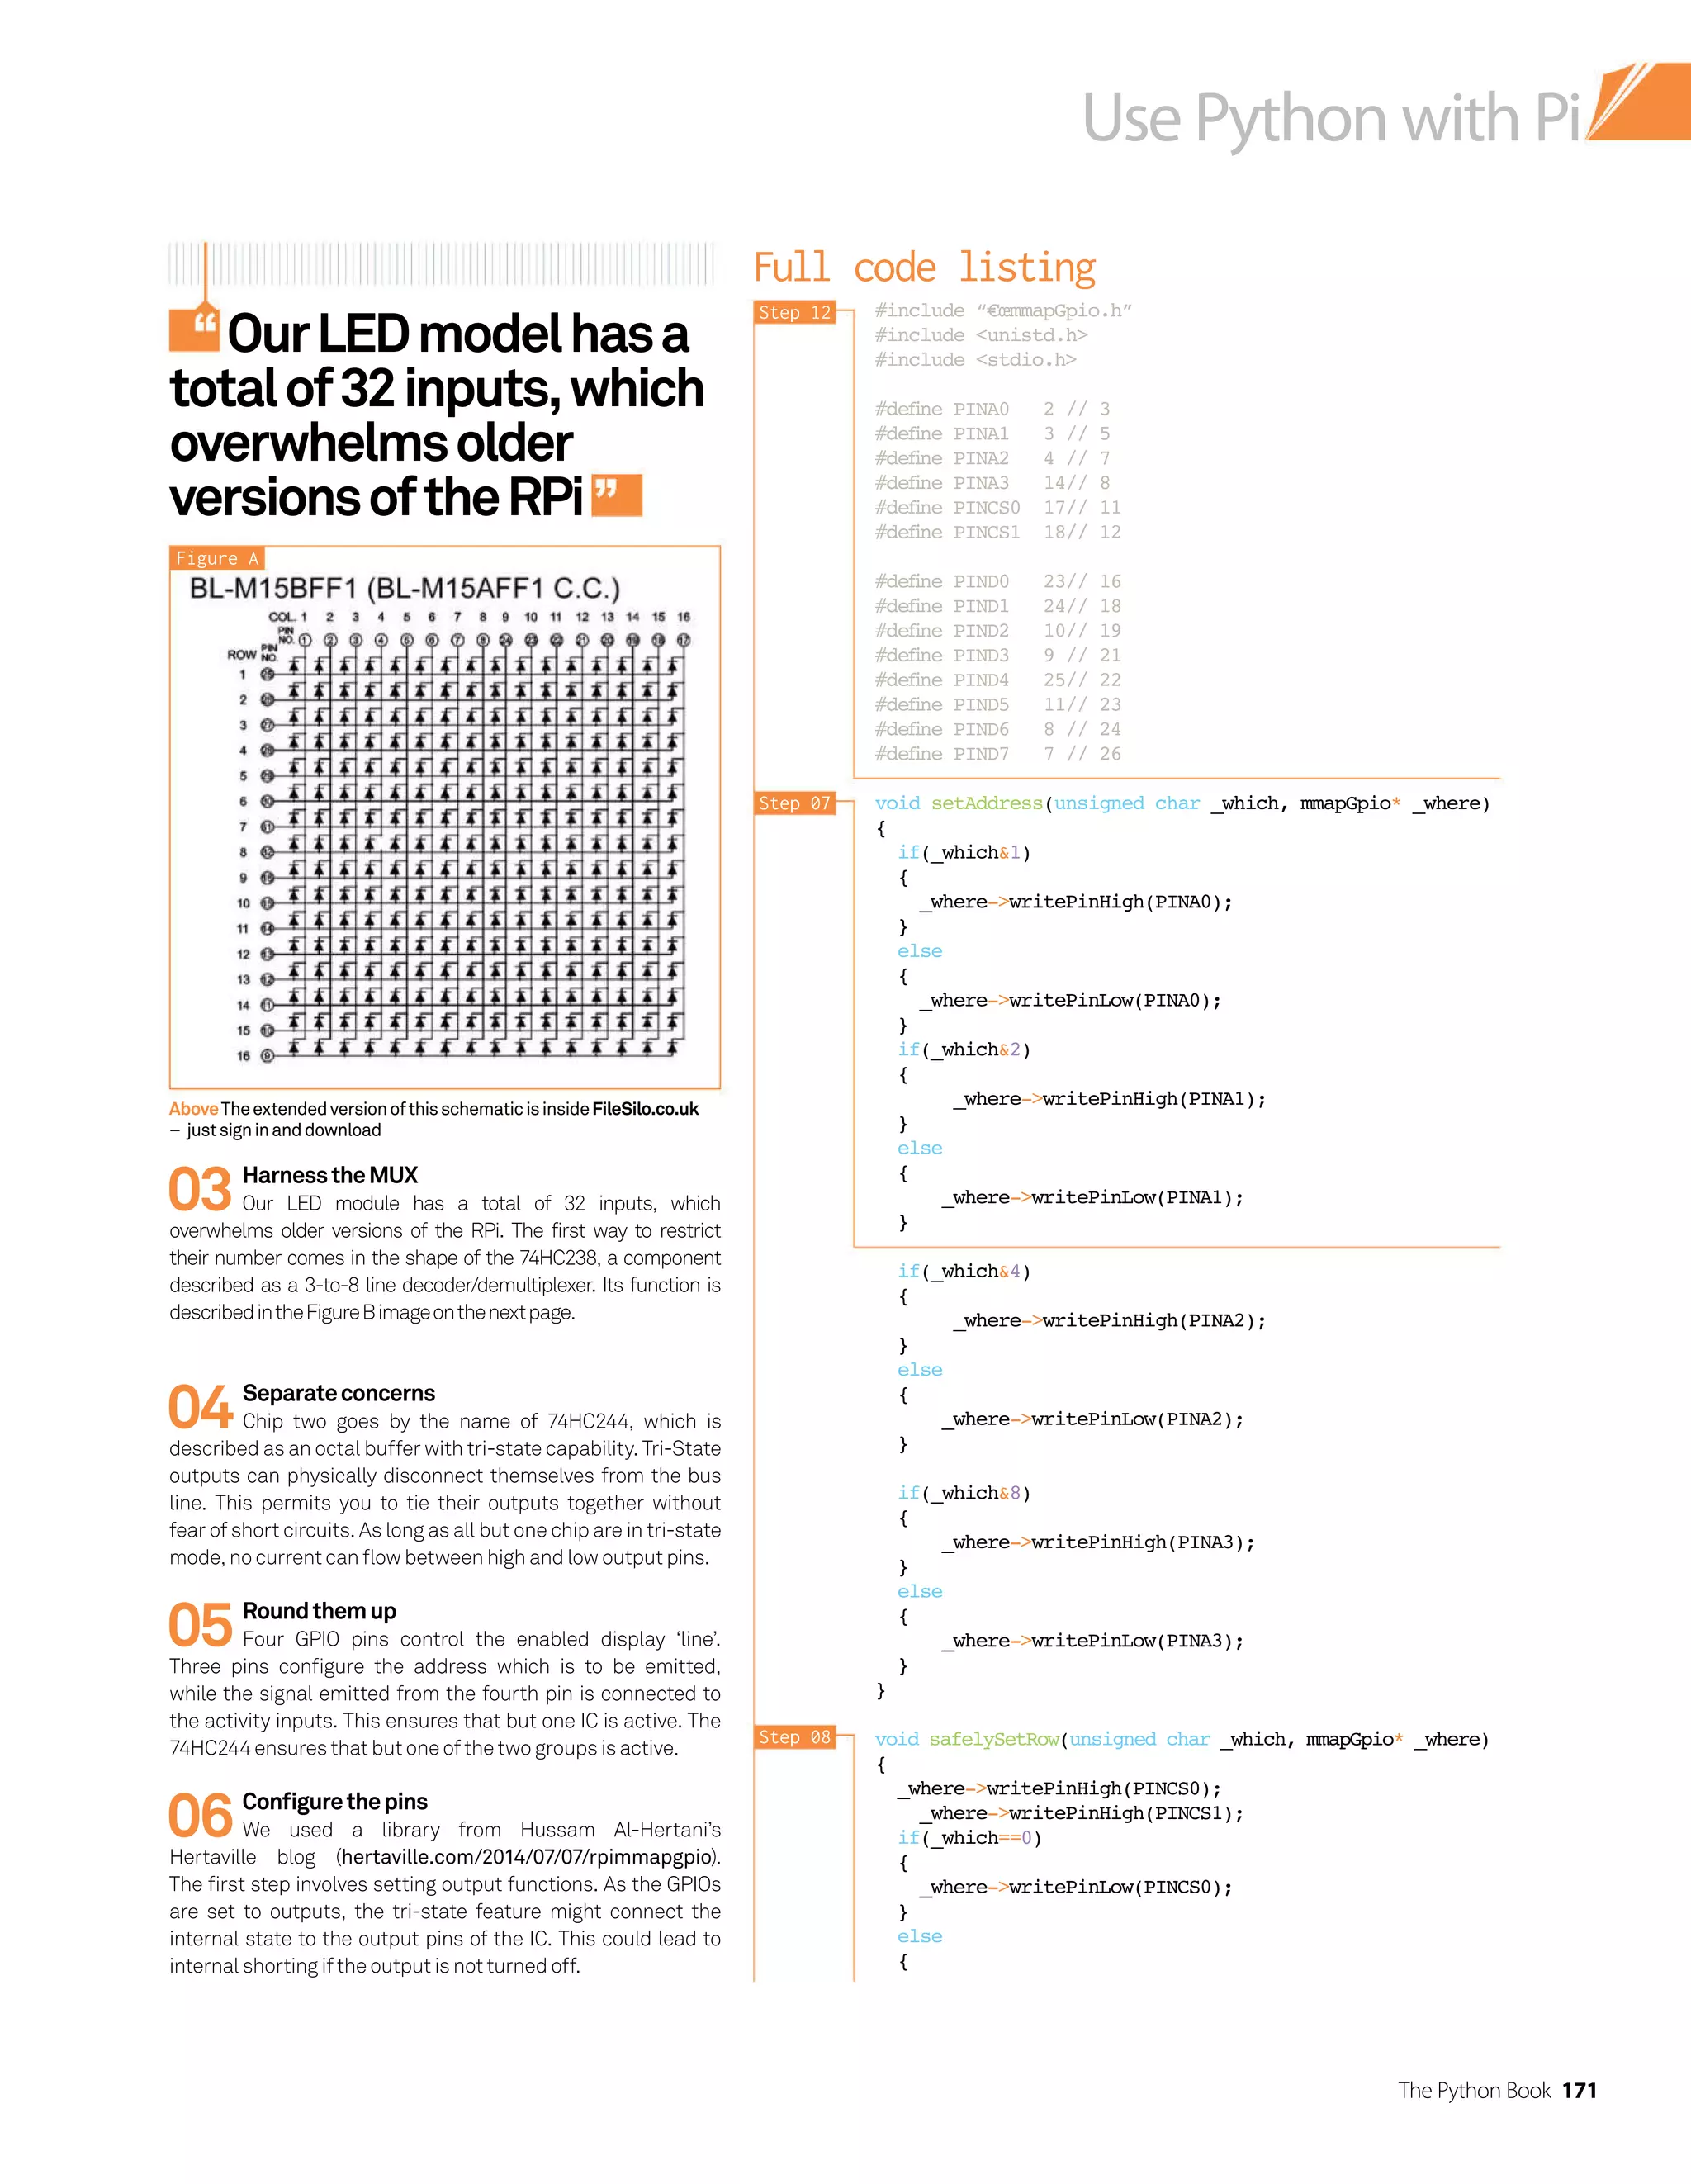
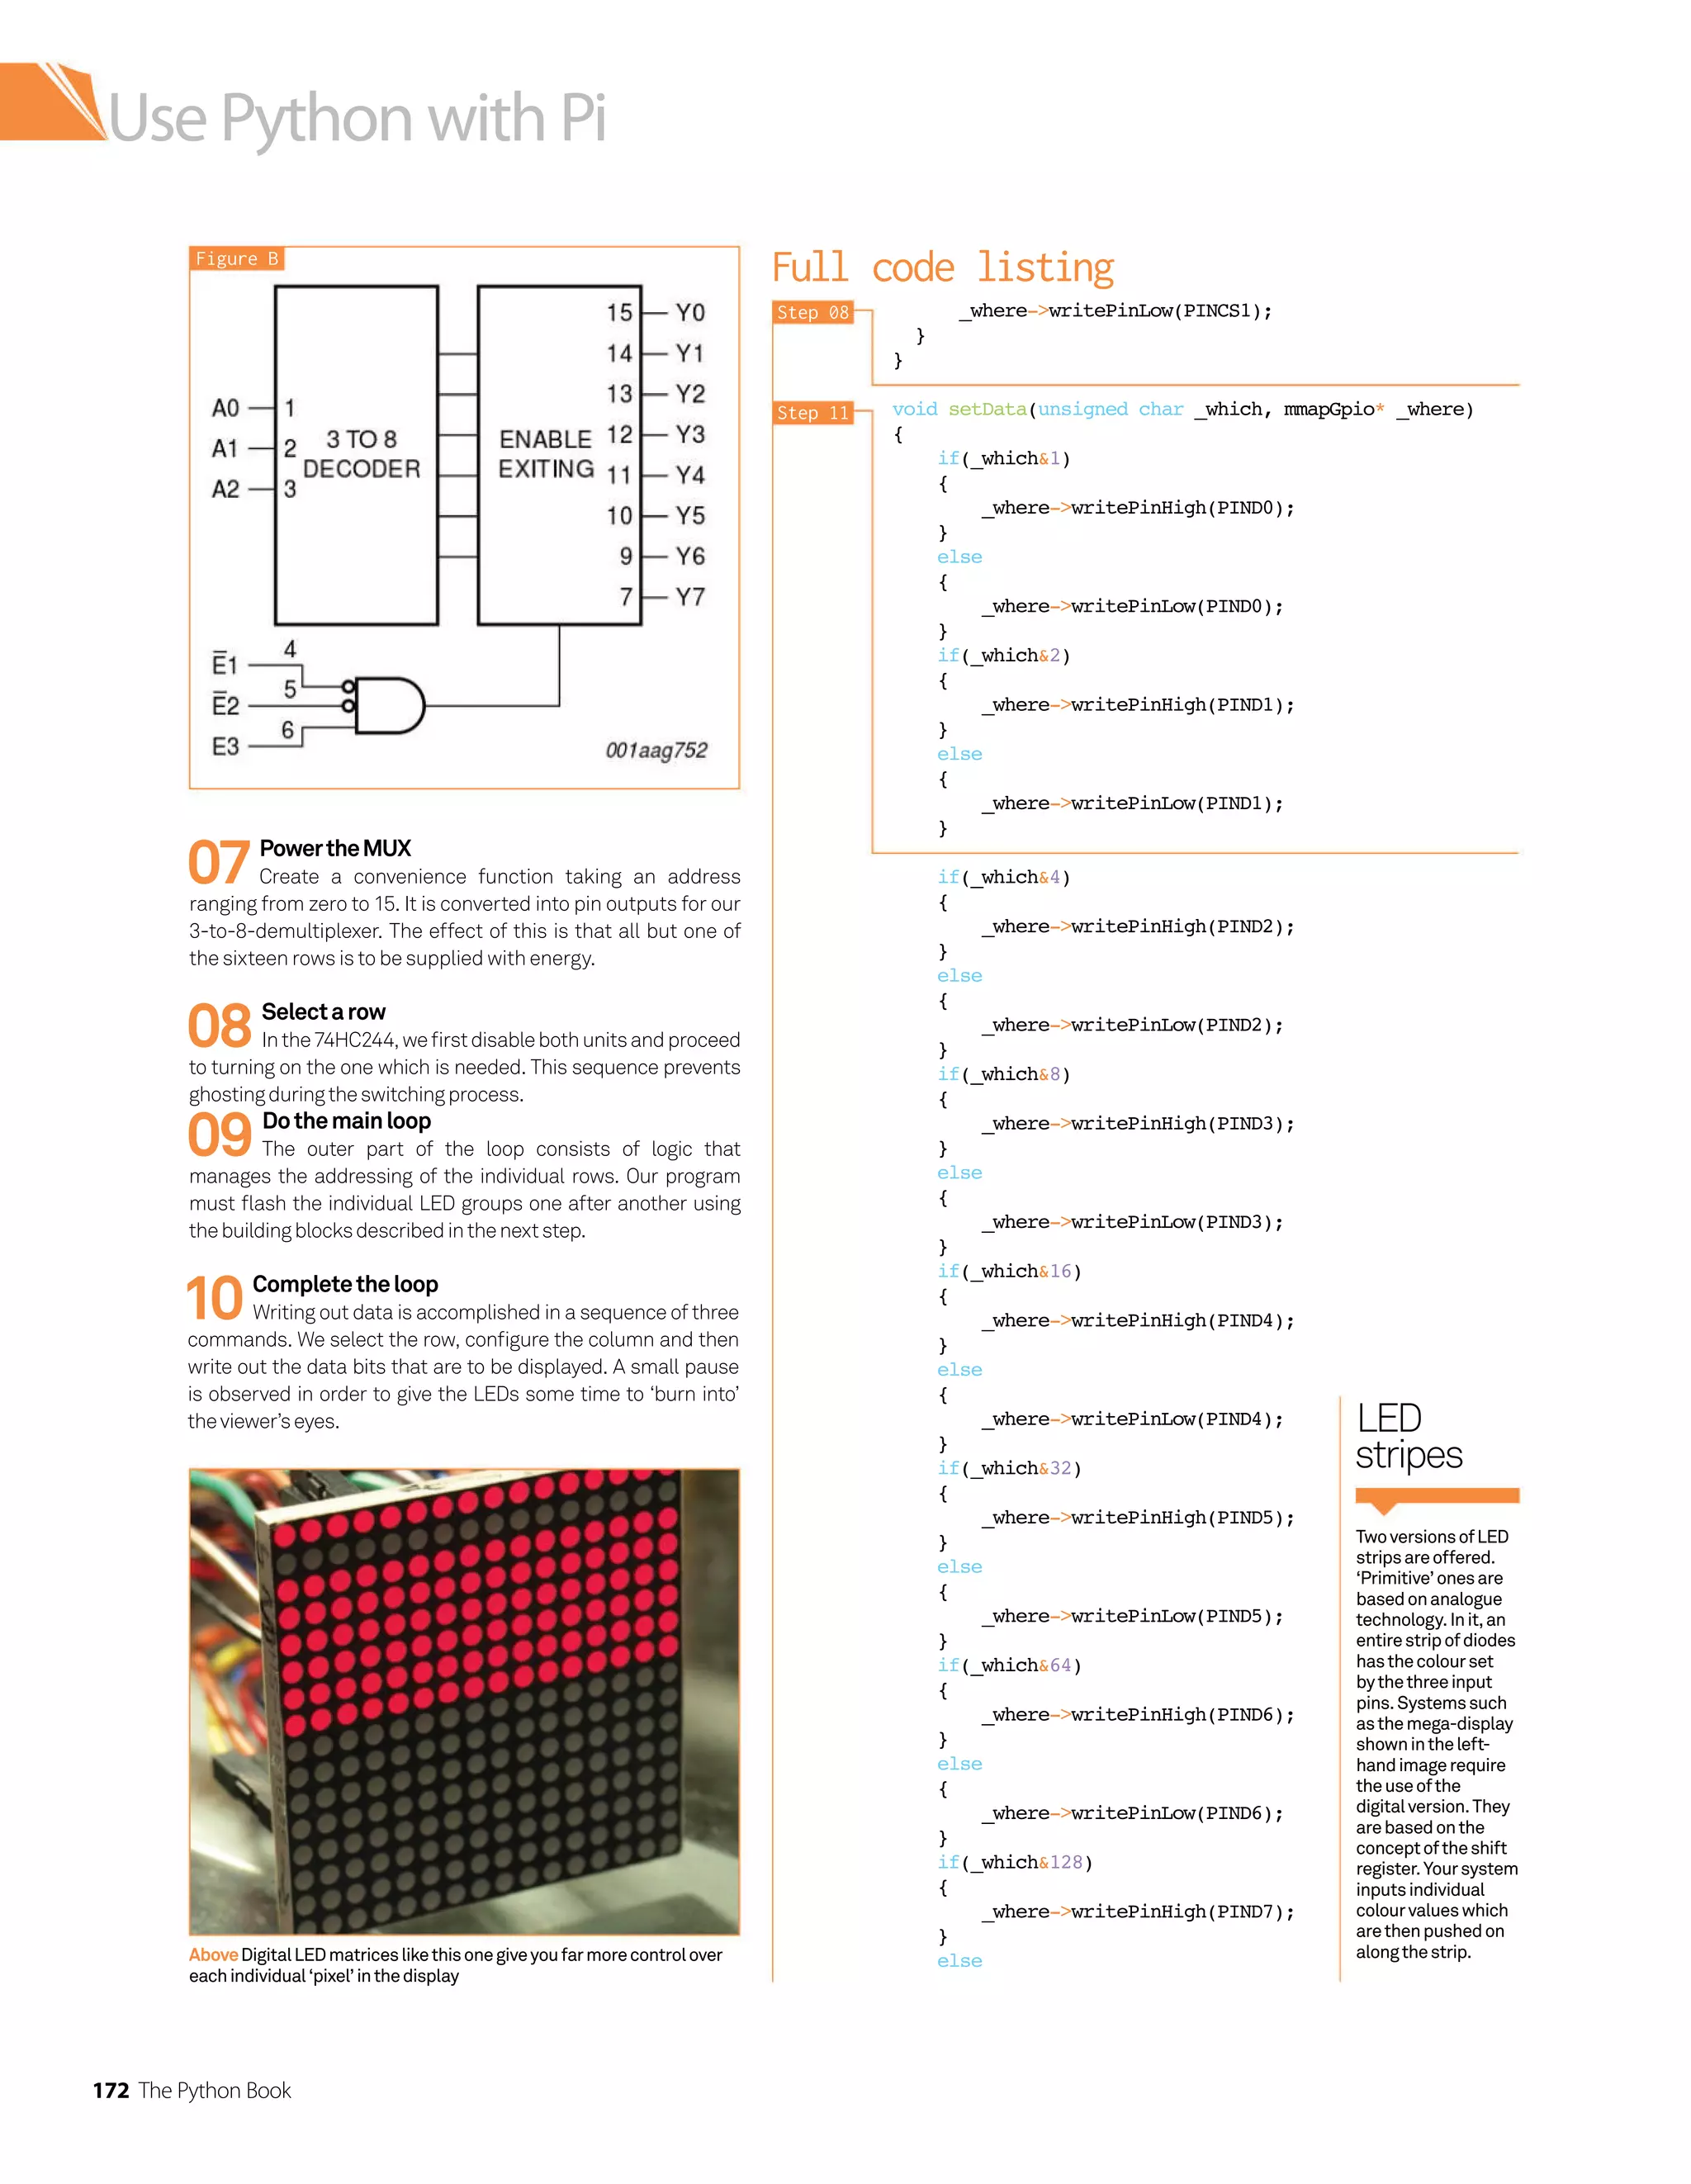
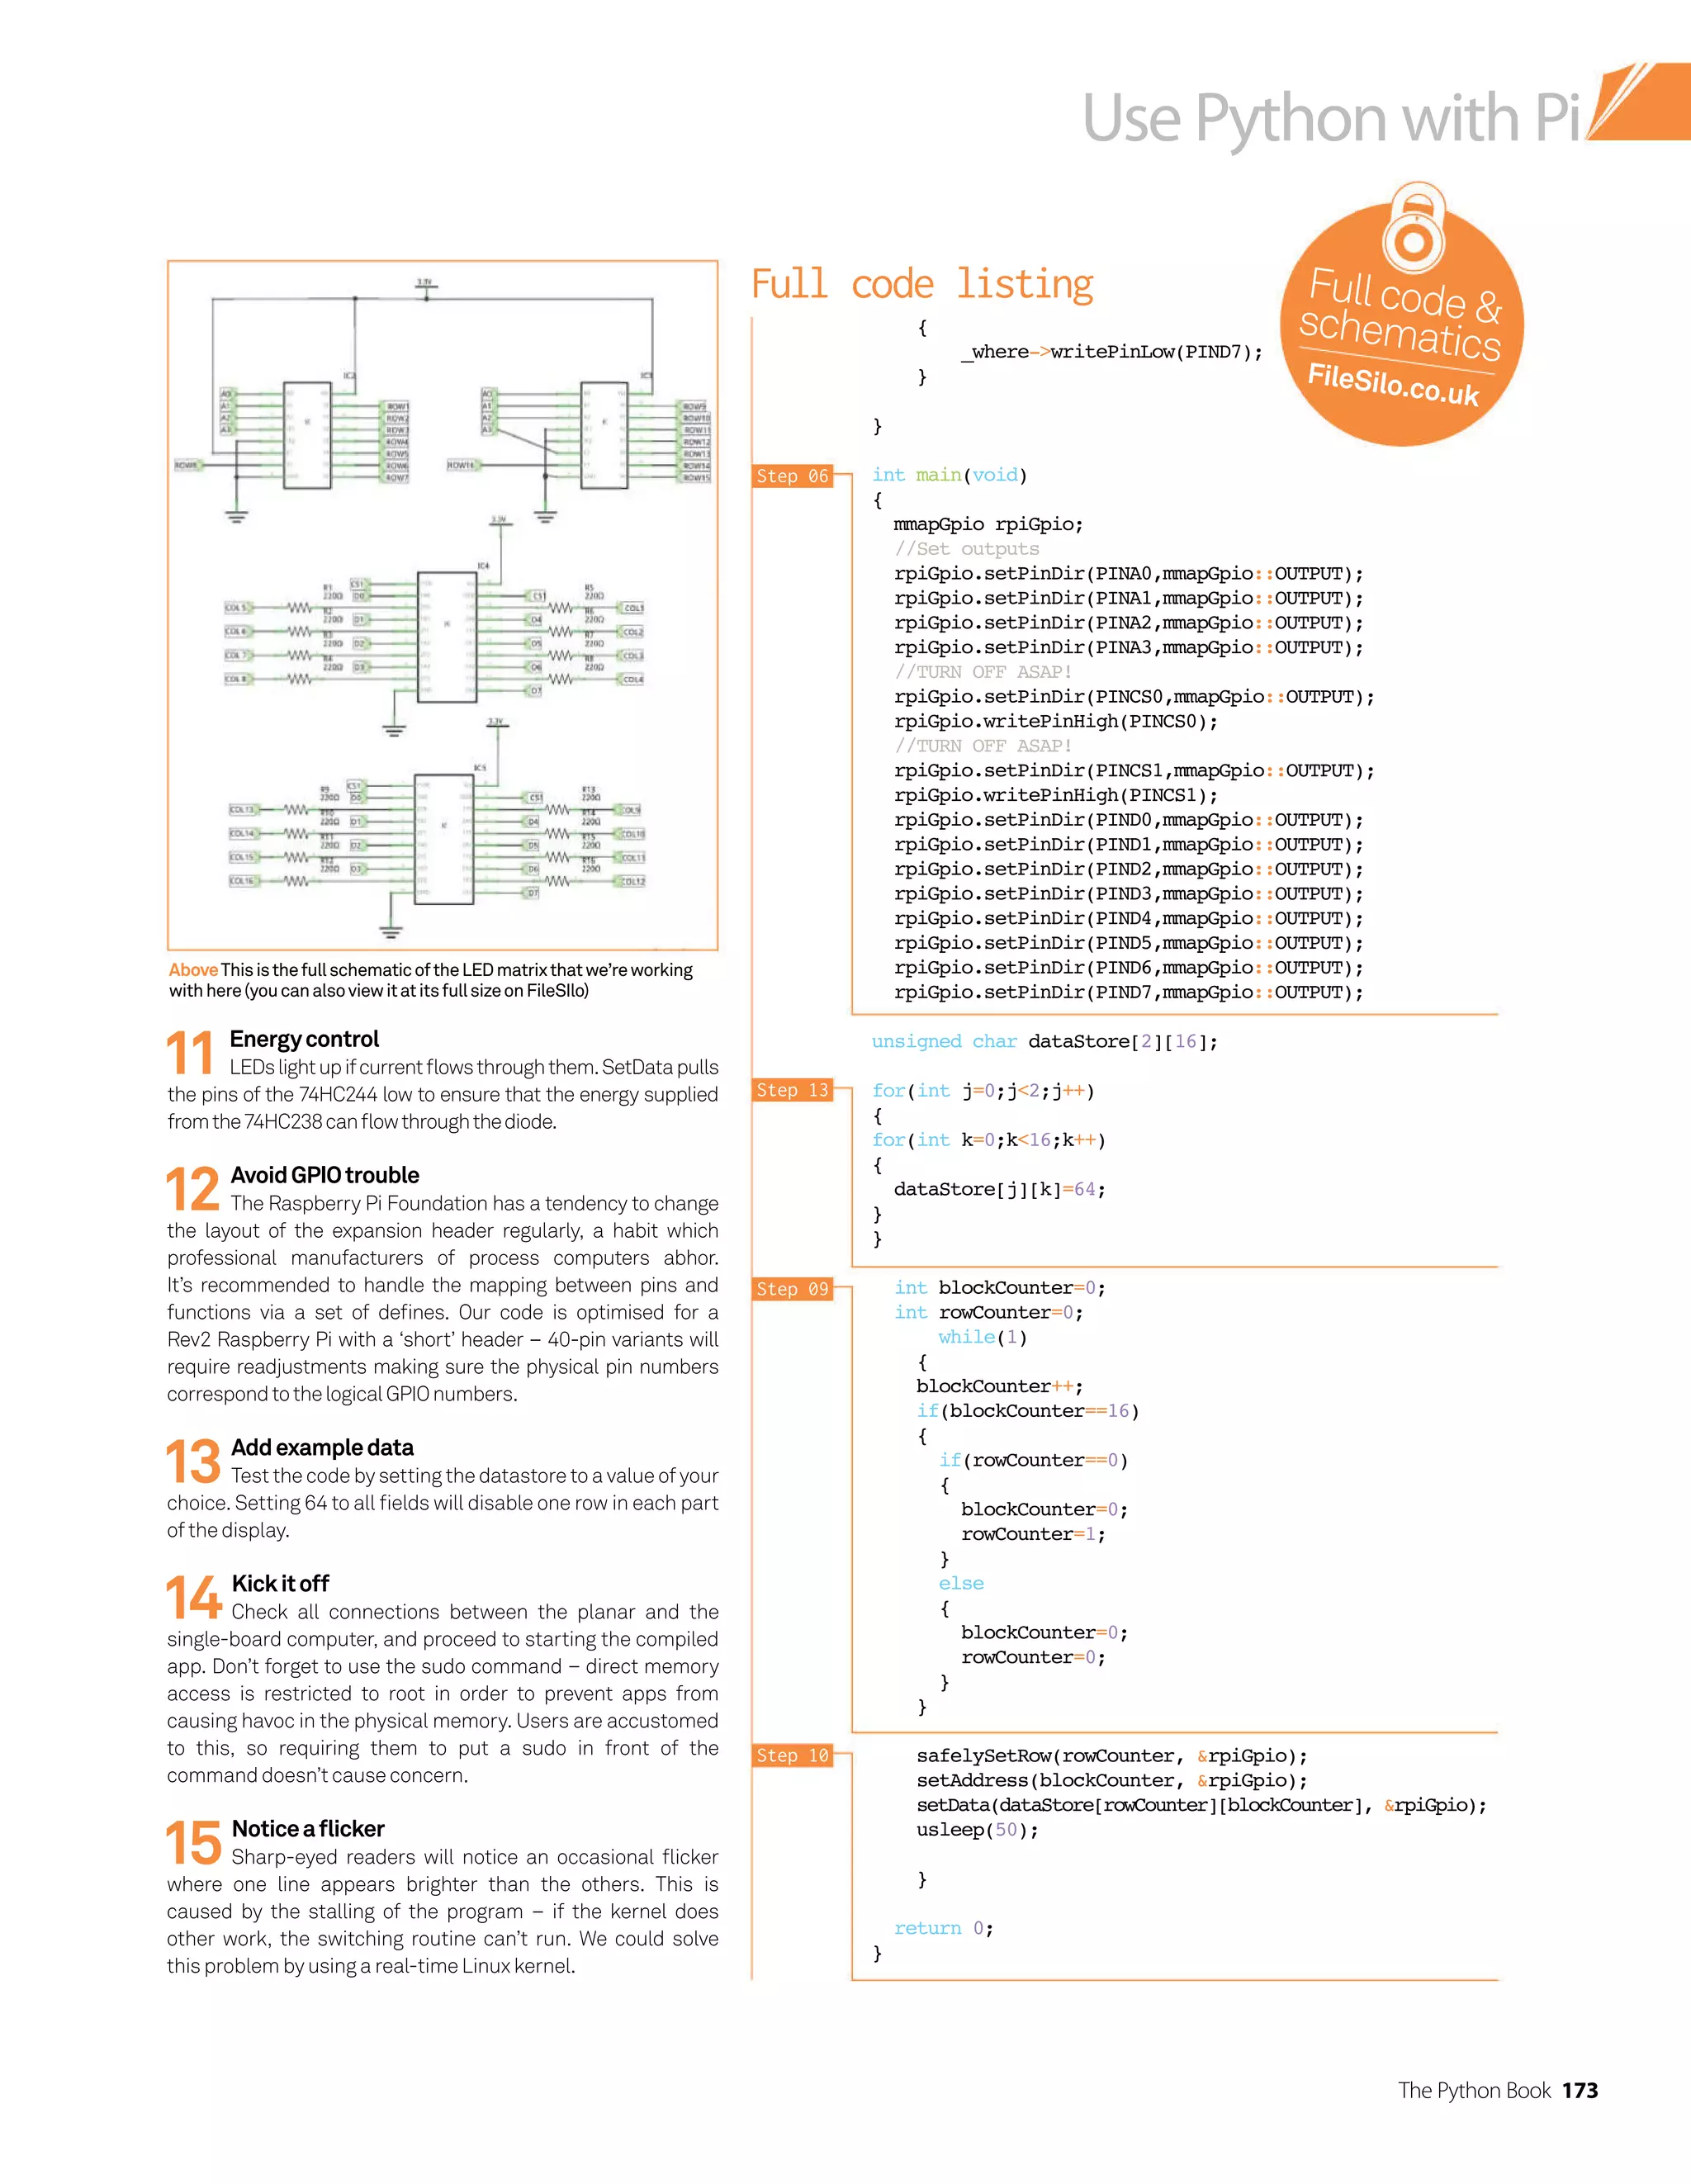


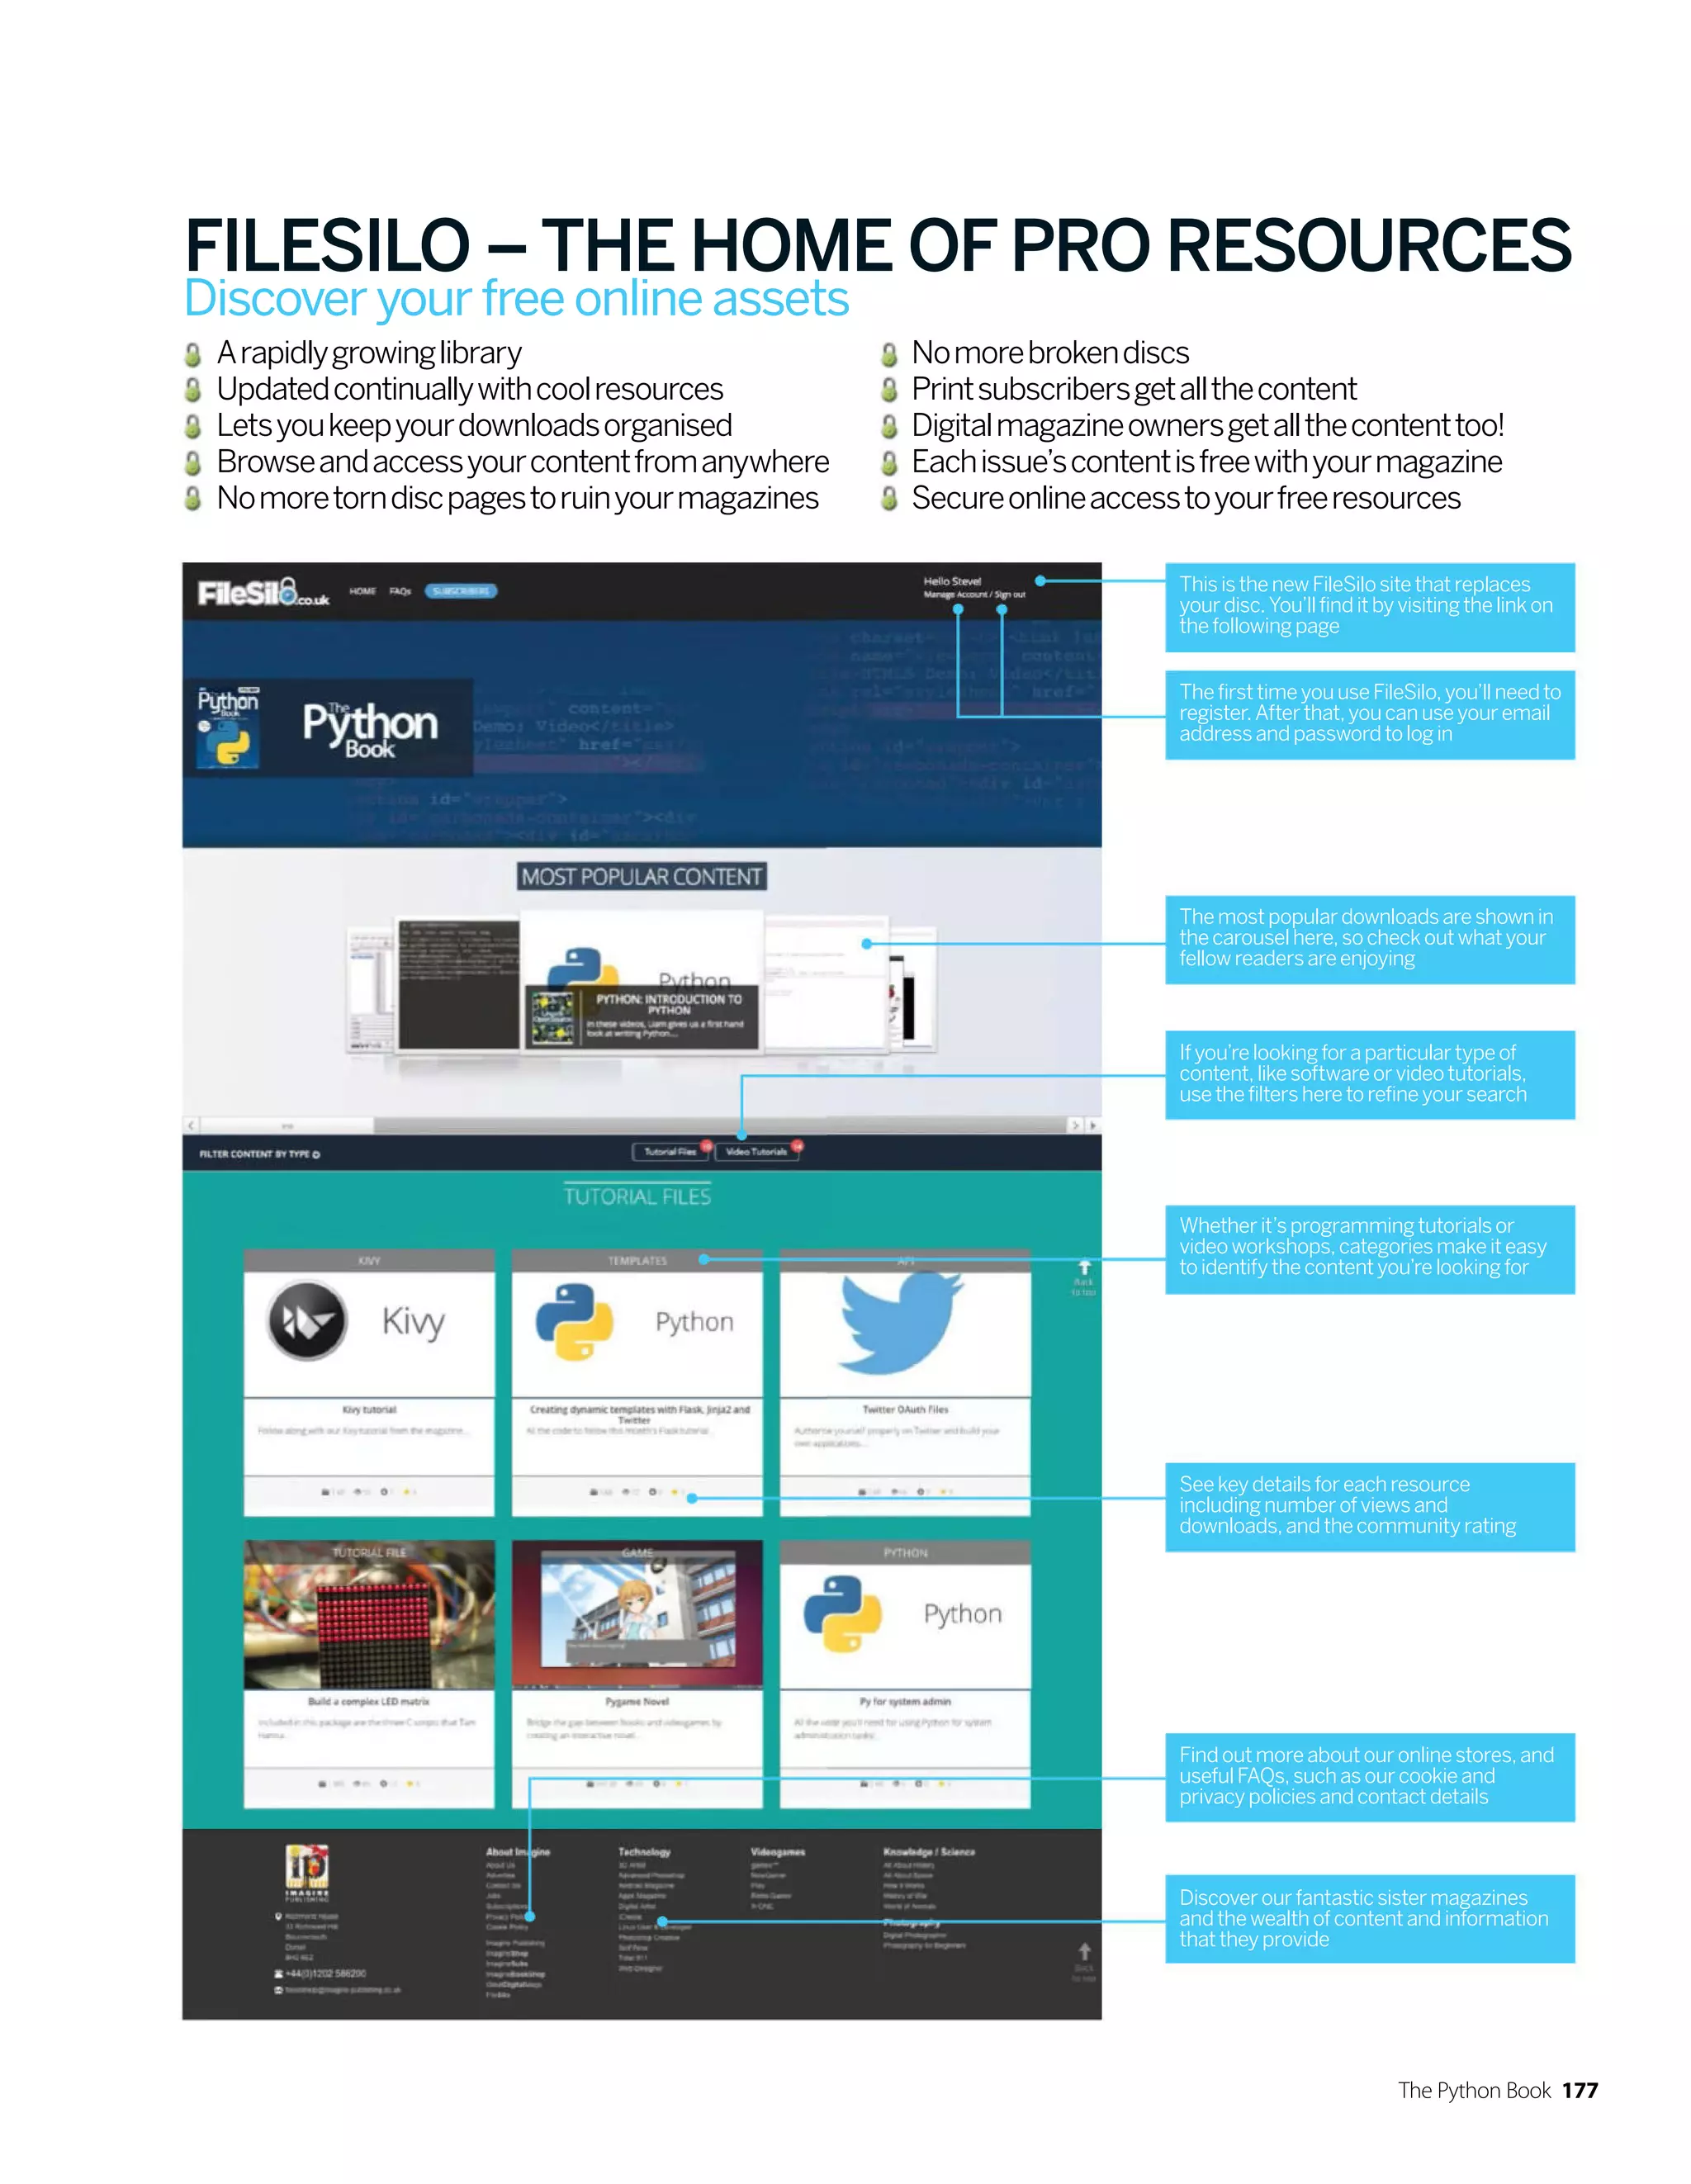


![Get started with Python
10 The Python Book
TIP
Ifyouwereusingagraphical
editorsuchasgedit,then
youwouldonlyhavetodo
thelaststepofmakingthe
fileexecutable.Youshould
onlyhavetomarkthefileas
executableonce.Youcan
freelyeditthefileonceit
isexecutable.
Interpretedvscompiledlanguages
AninterpretedlanguagesuchasPythonisonewherethesource
codeisconvertedtomachinecodeandthenexecutedeachtimethe
programruns.ThisisdiferentfromacompiledlanguagesuchasC,
wherethesourcecodeisonlyconvertedtomachinecodeonce–the
resultingmachinecodeisthenexecutedeachtimetheprogramruns.
HelloWorld
Let’s get stuck in, and what better way than with the
programmer’s best friend, the ‘Hello World’ application! Start
by opening a terminal. Its current working directory will be your
home directory. It’s probably a good idea to make a directory for
the files we’ll be creating in this tutorial, rather than having them
loose in your home directory. You can create a directory called
Python using the command mkdir Python. You’ll then want to
change into that directory using the command cdPython.
The next step is to create an empty file using the command
‘touch’ followed by the filename. Our expert used the command
touch hello_world.py. The final and most important part of
setting up the file is making it executable. This allows us to run
code inside the hello_world.py file. We do this with the command
chmod +x hello_world.py. Now that we have our file set up, we
can go ahead and open it up in nano, or any text editor of your
choice. Gedit is a great editor with syntax highlighting support
that should be available on any distribution. You’ll be able to
install it using your package manager ifyou don’t have it already.
[liam@liam-laptop ~]$ mkdir Python
[liam@liam-laptop ~]$ cd Python/
[liam@liam-laptop Python]$ touch hello_world.py
[liam@liam-laptop Python]$ chmod +x hello_world.py
[liam@liam-laptop Python]$ nano hello_world.py
Our Hello World program is very simple, it only needs two lines.
The first line begins with a ‘shebang’ (the symbol #! – also known
as a hashbang) followed by the path to the Python interpreter.
The program loader uses this line to work out what the rest of the
lines need to be interpreted with. If you’re running this in an IDE
likeIDLE, you don’t necessarily needto do this.
The code that is actually read by the Python interpreter is only
a single line. We’re passing the value Hello World to the print
function by placing it in brackets immediately after we’ve called
the print function. Hello World is enclosed in quotation marks to
indicate that it is a literal value and should not be interpreted as
source code. As expected, the print function in Python prints any
value that getspassedto it from the console.
You can save the changes you’ve just made to the file in nano
using the key combination Ctrl+O, followed by Enter. Use Ctrl+X
toexit nano.
#!/usr/bin/env python2
print(“Hello World”)
You can run the Hello World program by prefixing
its filename with ./ – in this case you’d type:
./hello_world.py.
[liam@liam-laptop Python]$ ./hello_world.py
Hello World
Variablesanddatatypes
A variable is a name in source code that is associated with an
area in memory that you can use to store data, which is then
called upon throughout the code. The data can be one of many
types,including:
Integer Stores whole numbers
Float Storesdecimalnumbers
Boolean Can havea value ofTrueorFalse
String Storesacollectionofcharacters.“Hello
World”is astring
As well as these main data types, there are sequence types
(technically, a string is a sequence type but is so commonly used
we’ve classed it asa main data type):
List Containsacollectionofdatainaspecificorder
Tuple Contains a collection immutable data in a
specific order
A tuple would be used for something like a co-ordinate,
containing an x and y value stored as a single variable, whereas
a list is typically used to store larger collections. The data
stored in a tuple is immutable because you aren’t able to
change values of individual elements in a tuple. However, you
can do so in a list.
It will also be useful to know about Python’s dictionary
type. A dictionary is a mapped data type. It stores data in
key-value pairs. This means that you access values stored in
the dictionary using that value’s corresponding key, which is
different to how you would do it with a list. In a list, you would
access an element of the list using that element’s index (a
number representing the element’s position in the list).
Let’s work on a program we can use to demonstrate how to
use variables and different data types. It’s worth noting at
this point that you don’t always have to specify data types
in Python. Feel free to create this file in any editor you like.
Everything will work just fine as long as you remember to make
the file executable. We’re going to call ours variables.py.
“A variable is a name
in source code that is
associated with an area in
memory that you can use to
store data”](https://crownmelresort.com/image.slidesharecdn.com/thepythonbooktheultimateguidetocodingwithpythonpdfdrive-220527060944-728dd1fe/75/The-Python-Book_-The-ultimate-guide-to-coding-with-Python-PDFDrive-pdf-10-2048.jpg)
![Get started with Python
The following line creates an
integer variable called hello_int
with the # value of 21. Notice
how it doesn’t need to go in
quotation marks
You could also create the
same list in the following way
We might as well create a
dictionary while we’re at it.
Notice how we’ve aligned the
colons below to make the
code tidy
The same principal is true of
Boolean values
We create a tuple in the
following way
And a list in this way
#!/usr/bin/env python2
# We create a variable by writing the name of the variable we want followed
# by an equals sign, which is followed by the value we want to store in the
# variable. For example, the following line creates a variable called
# hello_str, containing the string Hello World.
hello_str =“Hello World”
hello_int = 21
hello_bool = True
hello_tuple = (21, 32)
hello_list = [“Hello,”,“this”,“is”,“a”,“list”]
# This list now contains 5 strings. Notice that there are no spaces
# between these strings so if you were to join them up so make a sentence
# you’d have to add a space between each element.
hello_list = list()
hello_list.append(“Hello,”)
hello_list.append(“this”)
hello_list.append(“is”)
hello_list.append(“a”)
hello_list.append(“list”)
# The irst line creates an empty list and the following lines use the append
# function of the list type to add elements to the list. This way of using a
# list isn’t really very useful when working with strings you know of in
# advance, but it can be useful when working with dynamic data such as user
# input. This list will overwrite the irst list without any warning as we
# are using the same variable name as the previous list.
hello_dict = {“irst_name”:“Liam”,
“last_name” :“Fraser”,
“eye_colour”:“Blue”}
# Let’s access some elements inside our collections
# We’ll start by changing the value of the last string in our hello_list and
# add an exclamation mark to the end. The“list”string is the 5th element
# in the list. However, indexes in Python are zero-based, which means the
# irst element has an index of 0.
print(hello_list[4])
hello_list[4] +=“!”
# The above line is the same as
hello_list[4] = hello_list[4] +“!”
print(hello_list[4])
TIP
Atthispoint,it’sworth
explainingthatanytextin
aPythonfilethatfollows
a#characterwillbe
ignoredbytheinterpreter.
Thisissoyoucanwrite
commentsinyourcode.
Notice that there will now be
two exclamation marks when
we print the element
“Any text in a Python file that follows a #
character will be ignored”](https://crownmelresort.com/image.slidesharecdn.com/thepythonbooktheultimateguidetocodingwithpythonpdfdrive-220527060944-728dd1fe/75/The-Python-Book_-The-ultimate-guide-to-coding-with-Python-PDFDrive-pdf-11-2048.jpg)
![12 The Python Book
Get started with Python
Indentationindetail
Aspreviouslymentioned,thelevelofindentation
dictateswhichstatementablockofcodebelongs
to.IndentationismandatoryinPython,whereasin
otherlanguages,setsofbracesareusedtoorganise
codeblocks.Forthisreason,itisessentialthatyou
useaconsistentindentationstyle.Fourspaces
aretypicallyusedtorepresentasinglelevelof
indentationinPython.Youcanusetabs,buttabsare
notwelldefined,especiallyifyouhappentoopena
fileinmorethanoneeditor.
Moreabouta
Pythonlist
APythonlistissimilartoan
arrayinotherlanguages.A
list(ortuple)inPythoncan
containdataofmultiple
types,whichisnotusually
thecasewitharraysinother
languages.Forthisreason,
werecommendthatyou
onlystoredataofthesame
typeinalist.Thisshould
almostalwaysbethecase
anywayduetothenatureof
thewaydatainalistwould
beprocessed.
print(str(hello_tuple[0]))
# We can’t change the value of those elements like we just did with the list
# Notice the use of the str function above to explicitly convert the integer
# value inside the tuple to a string before printing it.
print(hello_dict[“irst_name”] +““ + hello_dict[“last_name”] +“ has“ +
hello_dict[“eye_colour”] +“ eyes.”)
print(“{0} {1} has {2} eyes.”.format(hello_dict[“irst_name”],
hello_dict[“last_name”],
hello_dict[“eye_colour”]))
Remember that tuples are
immutable, although we can
access the elements of them
like so
Let’s create a sentence using the
data in our hello_dict
A tidier way of doing this
would be to use Python’s
string formatter
Controlstructures
In programming, a control structure is any kind of statement that
can change the path that the code execution takes. For example, a
control structure that decided to end the program if a number was
less than 5 would looksomething like this:
#!/usr/bin/env python2
import sys # Used for the sys.exit function
int_condition = 5
if int_condition 6:
sys.exit(“int_condition must be = 6”)
else:
print(“int_condition was = 6 - continuing”)
The path that the code takes will depend on the value of
the integer int_condition. The code in the ‘if’ block will only be
executed if the condition is true. The import statement is used
to load the Python system library; the latter provides the exit
function, allowing you to exit the program, printing an error
message. Notice that indentation (in this case four spaces per
indent) is used to indicate which statement a block of code
belongs to.
‘If’ statements are probably the most commonly used control
structures. Othercontrol structures include:
•For statements, which allow you to iterate over items in
collections, or to repeat a piece of code a certain number
oftimes;
• While statements, a loop that continues while the condition
istrue.
We’re going to write a program that accepts user input from the
user to demonstrate how control structures work. We’re calling it
construct.py.
The ‘for’ loop is using a local copy of the current value, which
means any changes inside the loop won’t make any changes
affecting the list. On the other hand however, the ‘while’ loop is
directly accessing elements in the list, so you could change the list
there should you want to do so. We will talk about variable scope in
some more detail later on. The output from the above program is
as follows:
[liam@liam-laptop Python]$ ./construct.py
How many integers? acd
You must enter an integer
[liam@liam-laptop Python]$ ./construct.py
How many integers? 3
Please enter integer 1: t
You must enter an integer
Please enter integer 1: 5
Please enter integer 2: 2
Please enter integer 3: 6
Using a for loop
5
2
6
Using a while loop
5
2
6
“The ‘for‘ loop uses
a local copy, so
changes in the loop
won’t affect the list”](https://crownmelresort.com/image.slidesharecdn.com/thepythonbooktheultimateguidetocodingwithpythonpdfdrive-220527060944-728dd1fe/75/The-Python-Book_-The-ultimate-guide-to-coding-with-Python-PDFDrive-pdf-12-2048.jpg)

![14 The Python Book
Get started with Python
#!/usr/bin/env python2
# Below is a function called modify_string, which accepts a variable
# that will be called original in the scope of the function. Anything
# indented with 4 spaces under the function definition is in the
# scope.
def modify_string(original):
original += “ that has been modified.”
# At the moment, only the local copy of this string has been modified
def modify_string_return(original):
original += “ that has been modified.”
# However, we can return our local copy to the caller. The function
# ends as soon as the return statement is used, regardless of where it
# is in the function.
return original
test_string = “This is a test string”
modify_string(test_string)
print(test_string)
test_string = modify_string_return(test_string)
print(test_string)
# The function’s return value is stored in the variable test string,
# overwriting the original and therefore changing the value that is
# printed.
We are now outside of
the scope of the modify_
string function, as we
have reduced the level
of indentation
The test string won’t be
changed in this code
However, we can call the
function like this
TIP
Youcandefinedefaults
forvariablesifyouwant
tobeabletocallthe
functionwithoutpassing
anyvariablesthroughat
all.Youdothisbyputting
anequalssignafter
thevariablename.For
example,youcando:
def modify_string
(original=” Default
String”)
# Or with a while loop:
print(“Using a while loop”)
# We already have the total above, but knowing the len function is very
# useful.
total = len(ints)
count = 0
while count total:
print(str(ints[count]))
count += 1
Functionsandvariablescope
Functions are used in programming to break processes down into smaller
chunks. This often makes code much easier to read. Functions can also be
reusable if designed in a certain way. Functions can have variables passed
to them. Variables in Python are always passed by value, which means that
a copy of the variable is passed to the function that is only valid in the scope
of the function. Any changes made to the original variable inside the function
will be discarded. However, functions can also return values, so this isn’t
an issue. Functions are defined with the keyword def, followed by the
name of the function. Any variables that can be passed through are put in
brackets following the function’s name. Multiple variables are separated by
commas. The names given to the variables in these brackets are the ones
that they will have in the scope of the function, regardless of what
the variable that’s passed to the function is called. Let’s see this
in action.
Theoutputfromtheprogramoppositeisasfollows:
“Functions are used in
programming to break
processes down in”](https://crownmelresort.com/image.slidesharecdn.com/thepythonbooktheultimateguidetocodingwithpythonpdfdrive-220527060944-728dd1fe/75/The-Python-Book_-The-ultimate-guide-to-coding-with-Python-PDFDrive-pdf-14-2048.jpg)
![Get started with Python
[liam@liam-laptop Python]$ ./functions_and_scope.py
This is a test string
This is a test string that has been modified.
Scope is an important thing to get the hang of, otherwise it can get you
into some bad habits. Let’s write a quick program to demonstrate this. It’s
going to have a Boolean variable called cont, which will decide if a number
will be assigned to a variable in an if statement. However, the variable
hasn’t been defined anywhere apart from in the scope of the if statement.
We’ll finish off by trying to print the variable.
#!/usr/bin/env python2
cont = False
if cont:
var = 1234
print(var)
In the section of code above, Python will convert the integer to a string
before printing it. However, it’s always a good idea to explicitly convert
things to strings – especially when it comes to concatenating strings
together. If you try to use the + operator on a string and an integer, there
will be an error because it’s not explicitly clear what needs to happen.
The + operator would usually add two integers together. Having said that,
Python’s string formatter that we demonstrated earlier is a cleaner way of
doing that. Can you see the problem? Var has only been defined in the scope
of the if statement. This means that we get a very nasty error when we try to
access var.
[liam@liam-laptop Python]$ ./scope.py
Traceback (most recent call last):
File “./scope.py”, line 8, in module
print var
NameError: name ‘var’ is not defined
If cont is set to True, then the variable will be created and we can access
it just fine. However, this is a bad way to do things. The correct way is to
initialise the variable outside of the scope of the if statement.
#!/usr/bin/env python2
cont = False
var = 0
if cont:
var = 1234
if var != 0:
print(var)
The variable var is defined in a wider scope than the if statement, and
can still be accessed by the if statement. Any changes made to var inside
the if statement are changing the variable defined in the larger scope.
This example doesn’t really do anything useful apart from illustrate the
potential problem, but the worst-case scenario has gone from the program
crashing to printing a zero. Even that doesn’t happen because we’ve added
an extra construct to test the value of var before printing it.
Codingstyle
It’s worth taking a little time to talk about coding style. It’s simple to write
tidy code. The key is consistency. For example, you should always name
your variables in the same manner. It doesn’t matter if you want to use
camelCase or use underscores as we have. One crucial thing is to use
self-documenting identifiers for variables. You shouldn’t have to guess
what a variable does. The other thing that goes with this is to always
comment your code. This will help anyone else who reads your code,
and yourself in the future. It’s also useful to put a brief summary at
the top of a code file describing what the application does, or a part of
the application ifit’smadeup ofmultiplefiles.
Summary
This article should have introduced you to the basics of programming
in Python. Hopefully you are getting used to the syntax, indentation
and general look and feel of a Python program. The next step is
to learn how to come up with a problem that you want to solve, and
break it down into small enough steps that you can implement in a
programming language.
Google, or any other search engine, is very helpful. If you are stuck
with anything, or have an error message you can’t work out how to
fix, stick it into Google and you should be a lot closer to solving your
problem. For example, if we Google ‘play mp3 file with python’, the
first link takes us to a Stack Overflow thread with a bunch of useful
replies. Don’t be afraid to get stuck in – the real fun of programming is
solving problemsone manageablechunk ata time.
Happyprogramming!
Comparisonoperators
The common comparison operators available in Python include:
strictlylessthan
= lessthanorequal
strictlygreaterthan
= greaterthanorequal
== equal
!= notequal](https://crownmelresort.com/image.slidesharecdn.com/thepythonbooktheultimateguidetocodingwithpythonpdfdrive-220527060944-728dd1fe/75/The-Python-Book_-The-ultimate-guide-to-coding-with-Python-PDFDrive-pdf-15-2048.jpg)


![20 The Python Book
Printing
The most direct way of getting output
to the user is with the print command.
This will send text out to the console window. If you
are using version 2.X of Python, there are a couple
of ways you can use the print command. The most
common way had been simply call it as ‘print
“Some text”’. You can also use print with the same
syntax that you would use for any other function.
So, the above example would look like ‘print(“Some
text”)’. This is the only form available in version 3.X.
If you use the function syntax, you can add extra
parameters that give you finer control over this
output. For example, you can give the parameter
‘file=myfile.txt’ and get the output from the print
command being dumped into the given text file.
It also will accept any object that has some string
representation available.
With modules
The ‘with’ command provides the ability to
wrap a code block with methods defined
by a context manager. This can help clean up code
and make it easier to read what a given piece of
code is supposed to be doing months later. A classic
example of using ‘with’ is when dealing with files.
You could use something like ‘with open(“myfile.
txt”, “r”) as f:’. This will open the file and prepare it for
reading. You can then read the file in the code block
with ‘data=f.read()’. The best part of doing this is that
the file will automatically be closed when the code
block is exited, regardless of the reason. So, even if
the code block throws an exception, you don’t need to
worry about closing the file as part of your exception
handler. If you have a more complicated ‘with’
example, you can create a context manager class to
helpout.
32
31
Memoryview
Sometimes, you need to access the raw data of some object, usually as a buffer of bytes. You
can copy this data and put it into a bytearray, for example. But this means that you will be using extra
memory, and this might not be an option for large objects. The command ‘memoryview(object_name)’
wraps the object handed in to the command and provides an interface to the raw bytes. It gives access
to these bytes an element at a time. In many cases, elements are the size of one byte. But, depending
on the object details, you could end up with elements that are larger than that. You can find out the size
of an element in bytes with the property ‘itemsize’. Once you have your memory view created, you can
accesstheindividualelementsasyouwouldgetelementsfromalist(mem_view[1],forexample).
33
“A classic example of using ‘with’ is when dealing
with files. The best part of doing this is that the
file will automatically be closed when the code
block is exited, regardless of the reason”
Ranges
You may need a list of numbers, maybe in
a ‘for’ loop. The command ‘range()’ can create an
iterable list of integers. With one parameter, it
goes from 0 to the given number. You can provide
an optional start number, as well as a step size.
Negative numbers count down.
Xranges
One problem with ranges is that all of the
elements need to be calculated up front and
stored in memory. The command ‘xrange()’ takes
the same parameters and provides the same
result, but only calculates the next element as it
is needed.
27
Iterators
Iteration is a very Pythonic way of doing
things. For objects which are not intrinsically
iterable, you can use the command ‘iter(object_
name)’ to essentially wrap your object and provide
an iterable interface for use with other functions
and operators.
28
Sorted lists
You can use the command ‘sorted(list1)’
to sort the elements of a list. You can give it
a custom comparison function, and for more
complex elements you can include a key function
that pulls out a ranking property from each
element for comparison.
29
Summing items
Above, we saw the general reduction
function reduce. A specific type of reduction
operation, summation, is common enough to
warrant the inclusion of a special case, the
command ‘sum(iterable_object)’. You can include
a second parameter here that will provide a
starting value.
30
26](https://crownmelresort.com/image.slidesharecdn.com/thepythonbooktheultimateguidetocodingwithpythonpdfdrive-220527060944-728dd1fe/75/The-Python-Book_-The-ultimate-guide-to-coding-with-Python-PDFDrive-pdf-20-2048.jpg)

![22 The Python Book
50 Python commands
Slices
While not truly a command, slices are
too important a concept not to mention in this
list of essential commands. Indexing elements
in data structures, like lists, is one of the most
common things done in Python. You can select a
single element by giving a single index value. More
interestingly, you can select a range of elements by
giving a start index and an end index, separated by
a colon. This gets returned as a new list that you can
save in a new variable name. You can even change
the step size, allowing you to skip some number of
elements. So, you could grab every odd element from
the list ‘a’ with the slice ‘a[1::2]’. This starts at index 1,
continues until the end, and steps through the index
values 2 at a time. Slices can be given negative index
values. If you do, then they start from the end of the
listandcountbackwards.
43
Inputting data
Sometimes, you need to collect input
from an end user. The command ‘input()’ can
take a prompt string to display to the user, and
then wait for the user to type a response. Once
theuserisdonetypingandhitstheenterkey,the
text is returned to your program. If the readline
module was loaded before calling input, then
you will have enhanced line editing and history
functionality. This command passes the text
through eval first, and so may cause uncaught
errors. If you have any doubts, you can use the
command ‘raw_input()’ to skip this problem. This
command simply returns the unchanged string
inputted by the user. Again, you can use the
readlinemoduletogetenhancedlineediting.
40
Comparing objects
There are several ways to compare objects within Python, with several caveats. The first is that
you can test two things between objects: equality and identity. If you are testing identity, you are testing
to see if two names actually refer to the same instance object. This can be done with the command
‘cmp(obj1, obj2)’. You can also test this condition by using the ‘is’ keyword. For example, ‘obj1 is obj2’. If
you are testing for equality, you are testing to see whether the values in the objects referred to by the
two names are equal. This test is handled by the operator ‘==’, as in ‘obj1 == obj2’. Testing for equality
canbecomecomplexformorecomplicatedobjects.
42
Internal variables
Forpeoplecomingfromotherprogramminglanguages,thereisaconceptofhavingcertainvariables
or methods be only available internally within an object. In Python, there is no such concept. All elements of an
object are accessible. There is a style rule, however, that can mimic this type of behaviour. Any names that start
with an underscore are expected to be treated as if they were internal names and to be kept as private to the
object.Theyarenothidden,however,andthereisnoexplicitprotectionforthesevariablesormethods.Itisupto
theprogrammertohonourtheintentionfromtheauthortheclassandnotalteranyoftheseinternalnames.You
arefreetomakethesetypesofchangesifitbecomesnecessary,though.
41](https://crownmelresort.com/image.slidesharecdn.com/thepythonbooktheultimateguidetocodingwithpythonpdfdrive-220527060944-728dd1fe/75/The-Python-Book_-The-ultimate-guide-to-coding-with-Python-PDFDrive-pdf-22-2048.jpg)


![30 The Python Book
Python essentials
11Theresultfunctiononlytakesthevariables
playerandcomputerforthistask,whichis
why we set that in result(player, computer). We’re
starting off by having a countdown to the result.
The printed numbers are self-explanatory, but
we’ve also thrown in sleep from the time module
we imported. Sleep pauses the execution of the
lookupwhatthetextversionofthemoveiscalled
from the names we set earlier on, and then to
insertthatwhere{0}is.
13Here we’re simply calling the scores we
set earlier. Using the global function
allows for the variable to be changed and used
outside of the variable, especially after we’ve
appendedanumbertooneoftheirscores.
15Ifit’snotatie,weneedtokeepchecking,
as it could still be a win or a loss. Within
the else, we start another if statement. Here,
we use the rules list from earlier to see if the
losing move to the player’s move is the same
as the computer’s. If that’s the case, we print
the message saying so, and add one to the
player_scorevariablefrombefore.
code by the number of seconds in the brackets.
We’ve put a one-second pause between counts,
thenhalfasecondafterthattoshowtheresults.
12To print out what the computer threw,
we’re using string.format(). The {0} in the
printed text is where we’re inserting the move,
which we have previously defined as numbers.
Usingnames[computer],we’retellingthecodeto
14The way we’re checking the result is
basicallythroughaprocessofelimination.
Our first check is to see if the move the player
and computer used were the same, which is the
simplest part. We put it in an if statement so that
if it’s true, this particular section of the code ends
here.Itthenprintsourtiemessageandgoesback
tothegamefunctionforthenextstep.
16If we get to this point, the player has lost.
We print the losing message, give the
computer a point and it immediately ends the
resultfunction,returningtothegamefunction.
11
12
13
14
15
16
Thecodeinaction](https://crownmelresort.com/image.slidesharecdn.com/thepythonbooktheultimateguidetocodingwithpythonpdfdrive-220527060944-728dd1fe/75/The-Python-Book_-The-ultimate-guide-to-coding-with-Python-PDFDrive-pdf-30-2048.jpg)

![32 The Python Book
Python essentials
ThissectionimportstheextraPython
functions we’ll need for the code –
they’re still parts of the standard
Python libraries, just not part of the
defaultenvironment
We’re again providing variables so we
can keep score of the games played,
andthey’reupdatedeachround
Our very basic graphics involve ASCII
art of the game’s stages, printed out
aftereveryturn
LearnhowtodosomemorePython
codingbyfollowingourbreakdownofa
simpleHangmangame
Programa
gameof
Hangman
One of the best ways to get to know Python is
by building lots of simple projects so you can
understand a bit more about the programming
language. This time round, we’re looking at
Hangman, a multi-round game relying on if
and while loops and dealing with strings of text
in multiple ways. We’ll be using some of the
techniquesweimplementedlasttimeaswell,so
wecanbuilduponthem.
Hangman still doesn’t require the Pygame
set of modules, but it’s a little more advanced
than rock-paper-scissors. We’re playing
around with a lot more variables this time.
However, we’re still looking at comparisons,
random selections and human input, along
with splitting up a string, editing a list and even
displaying rudimentary graphics.
You should continue to use IDLE for these
tutorials. As we’ve mentioned before, its built-
in debugging tools are simple yet effective and
it can be used on any Linux system, as well as
the Raspberry Pi.
Codelisting
#!/usr/bin/env python2
from random import *
player_score = 0
computer_score = 0
def hangedman(hangman):
graphic = [
“””
+-------+
|
|
|
|
|
==============
“””,
“””
+-------+
| |
| O
|
|
|
===============
“””,
“””
“””,
“””
+-------+
| |
| O
| -|-
| /
|
===============
“””]
print graphic[hangman]
return
Resources
Python2:www.python.org/download
IDLE:www.python.org/idle](https://crownmelresort.com/image.slidesharecdn.com/thepythonbooktheultimateguidetocodingwithpythonpdfdrive-220527060944-728dd1fe/75/The-Python-Book_-The-ultimate-guide-to-coding-with-Python-PDFDrive-pdf-32-2048.jpg)
![The Python Book 33
Python essentials
The actual game starts here, with a while loop to
let you continually play the game until you decide
otherwise, thenending the program
The game rules are decided here, as well as the
setup for the word and keeping track of tries and
incorrectanswers
Each round of the game is played here, asking for
aninput,thentellingyouifyouwerecorrectornot.
It prints out the graphic and changes any variables
that need to be updated, especially incorrect and
correctguesses
After each round, the code checks if you’ve won or
lostyet–thewinconditionbeingthatyouguessed
theword,orlosingifyou’ve made sixguesses
The human input for the game takes the letter
and turns it into something the code can use. It’s
verified in the previous block of code and then
referred back to if you’ve entered an unsupported
or already used character
The same class as last time, which allows you to
selectwhether or not you wishto play again
Upon quitting the game, scores are given for the
durationoftheplaysession.Wealsoendthescript
withtheif__name__code like before
def start():
print “Let’s play a game of Linux Hangman.”
while game():
pass
scores()
def game():
dictionary = [“gnu”,”kernel”,”linux”,”mageia”,”penguin”,”ubuntu”]
word = choice(dictionary)
word_length = len(word)
clue = word_length * [“_”]
tries = 6
letters_tried = “”
guesses = 0
letters_right = 0
letters_wrong = 0
global computer_score, player_score
while (letters_wrong != tries) and (“”.join(clue) != word):
letter=guess_letter()
if len(letter)==1 and letter
.isalpha():
if letters_tried.find(letter) != -1:
print “You’ve already picked”, letter
else:
letters_tried = letters_tried + letter
first_index=word.find(letter)
if first_index == -1:
letters_wrong +=1
print “Sorry,”,letter
,”isn’t what we’re looking for
.”
else:
print”Congratulations,”,letter
,”is correct.”
for i in range(word_length):
if letter == word[i]:
clue[i] = letter
else:
print “Choose another
.”
hangedman(letters_wrong)
print “ “.join(clue)
print “Guesses: “, letters_tried
if letters_wrong == tries:
print “Game Over
.”
print “The word was”,word
computer_score += 1
break
if “”.join(clue) == word:
print “You Win!”
print “The word was”,word
player_score += 1
break
return play_again()
def guess_letter():
print
letter = raw_input(“Take a guess at our mystery word:”)
letter
.strip()
letter
.lower()
print
return letter
def play_again():
answer = raw_input(“Would you like to play again? y/n: “)
if answer in (“y”, “Y”, “yes”, “Yes”, “Of course!”):
return answer
else:
print “Thank you very much for playing our game. See you next time!”
def scores():
global player_score, computer_score
print “HIGH SCORES”
print “Player: “, player_score
print “Computer: “, computer_score
if __name__ == ‘__main__’:
start()
Codehighlighting
IDLEautomaticallyhighlightsthecodetomake
reading your work that bit easier. It also allows
youtochangethesecoloursandhighlightingin
IDLE’s Preferences, in case you’re colour blind
or are just used to a different colour scheme
in general.
Codelistingcontinued](https://crownmelresort.com/image.slidesharecdn.com/thepythonbooktheultimateguidetocodingwithpythonpdfdrive-220527060944-728dd1fe/75/The-Python-Book_-The-ultimate-guide-to-coding-with-Python-PDFDrive-pdf-33-2048.jpg)
![34 The Python Book
Python essentials
IseeASCII
Here’s a close-up of the seven
stages we’ve used for Hangman’s
graphics. You can change them
yourself, but you need to make
sure the quote marks are all in
the correct place so that the art
is considered a text string to be
printedout.
#!/usr/bin/env python2
from random import *
player_score = 0
computer_score = 0
def hangedman(hangman):
graphic = [
“””
+-------+
|
|
|
|
|
==============
“””,
“””
def start():
print “Let’s play a game of Linux Hangman.”
while game():
pass
scores()
01
02
03
04
05
01We begin by using this line to enter the path
to the Python interpreter. This allows us to
run the program inside a terminal or otherwise outside
of a Python-specific IDE like IDLE. Note that we’re
also using Python 2 for this particular script, as it is
installed by default on most Linux systems and will
thereforeensurecompatibility.
02We’re importing the ‘random’ module slightly
differently this time, importing the actual
names of the functions from random rather than just
the module itself. This allows us to use the functions
without having syntax like random.function. The
asterisk imports all the functions from random,
although you can switch that for specific names of
any of random’s functions. We’ll be using the random
functiontoselectawordfortheplayertoguess.
03Very simply, this creates a variable that can
be used throughout the code to keep track
of scores. We need to start it at zero now so that it
exists; otherwise if we defined it in a function, it would
only exist inside that function. The code adds a point
to the computer or player depending on the outcome
of the round.
04Our simple graphics consist of a series of
ASCII hanging man stages. We’re storing
these in a function as a list of separate string objects
so we can call upon them by passing on the number of
incorrect guesses to it. There are seven graphics in all,
like in the pen-and-paper version. We also include the
print command with the function, so when it’s called it
will completely handle the selection and display of the
hanging man, with the first one being printed after the
firstletterisguessed.
05Here we define the actual beginning of the
code, with the function we’ve called ‘start’.
It’s quite simple, printing our greeting to the player
and then starting a while loop that will allow us to keep
playing the game as many times as we wish. The pass
statement allows the while loop to stop once we’ve
finished, and could be used to perform a number
“””
+-------+
|
|
|
|
|
==============
“””,
“””
+-------+
| |
| O
|
|
|
===============
“””,
“””
+-------+
| |
| O
| |
|
|
===============
“””,
“””
+-------+
| O
| -|
|
|
|
===============
“””,
“””
+-------+
| |
| O
| -|-
|
|
===============
“””,
“””
+-------+
| |
| O
| -|-
| /
|
===============
“””,
“””
+-------+
| |
| O
| -|-
| /
|
===============
“””]
Therules
Although we’ve moved some of
the rules to the ‘game’ function
this month, you can always put
them back here and call upon
them using the global variable, as
we would do with the scores. For
thewords,youcouldalsocreatea
separatefileandimportthemlike
therandom module.](https://crownmelresort.com/image.slidesharecdn.com/thepythonbooktheultimateguidetocodingwithpythonpdfdrive-220527060944-728dd1fe/75/The-Python-Book_-The-ultimate-guide-to-coding-with-Python-PDFDrive-pdf-34-2048.jpg)
![The Python Book 35
Python essentials
of other tasks if so wished. If we do stop playing the
game, the score function is then called upon –we’ll go
overwhatthatdoeswhenwegettoit.
06We have put a majority of the game code
in the ‘game’ function this time around, as
there’s not as much that needs to be split up. You can
split it up further if you wish, using the style of code
from last issue, if it would make the code cleaner
for you or help you understand the building blocks a
bitmore.
07The first four lines quickly set up the word
for the player to guess. We’ve got a small
selection of words in a list here. However, these can be
imported via HTML or expanded upon. Choice is used
to select a random element from the list, which comes
from the random module we imported. Finally, we
ascertain how long the string is of the word to guess,
and then create the clue variable with a number of
underscores of that length. This is used to display the
wordasyoubuilditupfromguesses.
08We start to set up the rules and the individual
variables to keep track of during the game.
There can only be six incorrect guesses before the
hanging man is fully drawn, or in our case displayed,
so we set the tries variable to six. We’ll keep track of
the letters through letters_tried to make sure that not
only will the player know, but also the code for when
def game():
dictionary = [“gnu”,”kernel”,”linux”,”mageia”,”penguin”,”ubuntu”]
word = choice(dictionary)
word_length = len(word)
clue = word_length * [“_”]
tries = 6
letters_tried = “”
guesses = 0
letters_right = 0
letters_wrong = 0
global computer_score, player_score
while (letters_wrong != tries) and (“”.join(clue) != word):
letter=guess_letter()
if len(letter)==1 and letter
.isalpha():
if letters_tried.find(letter) != -1:
print “You’ve already picked”, letter
it’s checking against letters already played. Finally,
we create empty variables for the number of guesses
made, letters correct and letters incorrect, to make
the code slightly easier. We also import the global
scoreshere.
09We’re starting a while loop to perform the
player selection and check the status of the
game. This loop continues until the player wins or loses.
It starts by checking if all the tries have been used up
by seeing if letters_wrong is not equal to tries. As each
try will only add one point to wrong, it will never go
above six. It then concatenates ‘clue’ and sees if it’s the
same as the word the computer selected. If both these
statementsaretrue,itgoesontothenextturn.
10We call upon the function we’re using to
input a letter and give it the variable ‘letter’.
We check what it returns by first of all making sure
it’s only a single letter, with len(letter), then by
using isalpha to see if it’s one of the 26 letters of the
alphabet. If these conditions are satisfied, we start
a new if statement to make sure it’s a new guess,
and tell the player if it’s already been chosen so they
can start again. If all this is acceptable, we move on
to the next section of the code to see if it’s a correct
guess or not.
06
08
09
10
07
Indentations
While IDLE will keep track of the
indentsinthecode,ifyou’reusing
atexteditortowritesomePython,
you’ll have to make sure you’re
using them correctly. Python is
very sensitive to whether or not
indents are used correctly, and it
doesaid in readability aswell.](https://crownmelresort.com/image.slidesharecdn.com/thepythonbooktheultimateguidetocodingwithpythonpdfdrive-220527060944-728dd1fe/75/The-Python-Book_-The-ultimate-guide-to-coding-with-Python-PDFDrive-pdf-35-2048.jpg)
![36 The Python Book
Python essentials
11
12
13
14
16
15
11If it’s a new letter that we find acceptable,
the first thing we do is add it to the list
of letters tried. This is done simply by adding
the strings together. We then use the find
command to search the word string for the letter
entered, which will then return a number of the
placement of the letter in the string. If it doesn’t
find the letter, it returns a -1 value, which we use
in the next if statement to see if the first_index
variable is -1. If so, it adds one to the number of
letters_wrong and then prints a message to let
theplayerknowthatitwasanincorrectguess.
12If we’ve got this far and the letter is not
incorrect, than we can only assume
it is correct. Through this simple process of
elimination, we first print out a message to let
theplayerknowthatthey’vebeensuccessfuland
thenmakearecordofit.
13We’re going to start a small loop here so
we can update the clue with the correct
letter we’ve added. We use the range function to
tell the code how many times we wish to iterate
over the clue by using the word_length variable.
We then check to see which letter in the word
has been guessed correctly and change that
specific part of the clue to be that letter so it can
be printed out for the player to see, and for us to
checkwhetherornotthegameisover.
14We end the original if statement by telling
the player to choose again if they did not
enter a supported input. Before we go on to the
next round of choices, we print out the hanging
else:
letters_tried = letters_tried + letter
first_index=word.find(letter)
if first_index == -1:
letters_wrong +=1
print “Sorry,”
,letter
,”isn’t what we’re looking for
.”
else:
print”Congratulations,”
,letter
,”is correct.”
for i in range(word_length):
if letter == word[i]:
clue[i] = letter
else:
print “Choose another
.”
hangedman(letters_wrong)
print “ “.
join(clue)
print “Guesses: “, letters_tried
if letters_wrong == tries:
print “Game Over
.”
print “The word was”
,word
computer_score += 1
break
if “”
.
join(clue) == word:
print “You Win!”
print “The word was”
,word
player_score += 1
break
return play_again()
man graphic as it stands, by calling the graphic
in the list that corresponds to the number of
incorrect guesses that have been made. We then
print how the clue currently looks, with a space
in between each character, and then print the
numberofguessesthathavebeenmade.
15Here we check to see if the game is
over again, first of all comparing the
letters_wrong to the number of tries. If that’s
true, we print a message that the game has
endedandrevealthemysteryofthehiddenword.
We increase the computer’s score and break the
loop. The next loop checks to see if the full clue
concatenatedisthesameastheoriginalword–if
that’sthecase,weprintthewinmessage,thefull
wordandaddonepointtotheplayerscorebefore
breaking the loop again. This can also be done
withifsandelifstoavoidusingbreaks.
Continuation
This code is still part of the
game function we started on the
previous page, so make sure your
indentations are in alignment if
you’renotusinganIDE.Ifyouplan
to split this code up, we’d suggest
starting with the word selection
andresults.](https://crownmelresort.com/image.slidesharecdn.com/thepythonbooktheultimateguidetocodingwithpythonpdfdrive-220527060944-728dd1fe/75/The-Python-Book_-The-ultimate-guide-to-coding-with-Python-PDFDrive-pdf-36-2048.jpg)

![38 The Python Book
Python essentials
TheStart
Here we’re doing some minor setups so we can
get our code to run with some extra modules not
includedwiththe basics
TheRules
We’re setting names for each dice roll so they can
be properly identified to the player – much more
interesting than numbers
TheScore
Again we’ve got some basic variables set up so we
cankeepscoreofthe gamesifwe want to
TheScript
The game is handled here, passing the player onto
thenextfunctiontoactuallyplay,andhandlingthe
endofthesession aswell
TheGame
We access the full game loop via here, and the
function that allows us to play again if we’re
so inclined
TheThrow
The initial hand is dealt, so to speak, at the start of
the throws function. This function handles all the
decision making in the game, while passing off the
dicerollstoanother function
TheHand
We’ve also got a special function so we can inform
the player exactly whatstyle ofhandthey have
TheDecision
There are two rounds in this version of poker
dice, and you can select how many dice you wish
to re-roll in this small while loop that makes sure
you’realso usinga correct number
#!/usr/bin/env python2
import random
from itertools import groupby
nine = 1
ten = 2
jack = 3
queen = 4
king = 5
ace = 6
names = { nine: “9”, ten: “10”, jack: “J”, queen: “Q”, king: “K”, ace: “A” }
player_score = 0
computer_score = 0
def start():
print “Let’s play a game of Linux Poker Dice.”
while game():
pass
scores()
def game():
print “The computer will help you throw your 5 dice”
throws()
return play_again()
def throws():
roll_number = 5
dice = roll(roll_number)
dice.sort()
for i in range(len(dice)):
print “Dice”,i + 1,”:”,names[dice[i]]
result = hand(dice)
print “You currently have”, result
while True:
rerolls = input(“How many dice do you want to throw again? “)
try:
if rerolls in (1,2,3,4,5):
break
except ValueError:
pass
print “Oops! I didn’t understand that. Please enter 1, 2, 3, 4 or 5.”
Codelisting
Putonyourpokerfaceandgetreadytogambleasyouhone
yourprogrammingskillwithabitofpokerdice
PlaypokerdiceusingPython
So you’ve learnt how to program tic-tac-toe
and guessed your way to victory at hangman.
Now it’s time to head to Las Vegas and play our
cardsright.Orinthiscase,virtualdice,andmore
like Reno as we continue with our Python game
tutorialsandintroduceyoutosomepokerdice.
We’re again using some of the lessons we’ve
already learnt, including random number
generation, list creation and modification,
human input, rule setting, scoring and more.
But we’ll also be adding some new skills in this
tutorial.Namely,we’llbecreatingandappending
lists with random numbers, and using functions
multiple times in one block of code to cut down
onbloat.
Again, we recommend using IDLE, and we’re
using Python 2 to ensure compatibility with a
wider variety of distros, including the Raspberry
Pi. So, we hope luck is a lady for you and that the
odds are ever in your favour – just keep those
fingers crossed that you don’t roll a snake eyes
(wearecodinginPython,afterall)!
Resources
Python2:www.python.org/download
IDLE:www.python.org/idle](https://crownmelresort.com/image.slidesharecdn.com/thepythonbooktheultimateguidetocodingwithpythonpdfdrive-220527060944-728dd1fe/75/The-Python-Book_-The-ultimate-guide-to-coding-with-Python-PDFDrive-pdf-38-2048.jpg)
![The Python Book 39
Python essentials
TheRe-roll
We’re doing the second set of rolls and starting
the end of the game here by calling on the same
function as before, but we’re also aware that
choosing no re-rollsmeans the endofthe game
TheDice
Here we’re finding out which dice the player wants
to re-roll, and also making sure that they enter
a valid number. Just so they know they’re doing
something, weprint something after every turn
SecondHand
We change and display the new dice hand to end
the game. Again, we make sure to tell the player
what theactualhandtheyhaveis
TheRolls
The function we reuse to roll our virtual six dice
using a simple while loop. This allows us to keep
thecodebase smaller
TheAnalysis
There are eight possible types of hands in poker
dice, and we can use a bit of logic to work out all
but one of them without checking against all 7,776
outcomes – in fact, we only specifically have to
checkfortwo
TheQuestion
Our simple ‘play again’ function that parses player
input so wecan restart or end the script
TheEnd
Scores are displayed at the end of the script, and
the very final part allows us to import this into
otherPythonscriptsasa module
EXTRAFUNCTIONS
Splitting up actions into functions
makes it easier to not only perform
them multiple times, but reduce
the amount of code. On larger
projects,thiscanaidwithspeed.
if rerolls == 0:
print “You finish with”, result
else:
roll_number = rerolls
dice_rerolls = roll(roll_number)
dice_changes = range(rerolls)
print “Enter the number of a dice to reroll: “
iterations = 0
while iterations rerolls:
iterations = iterations + 1
while True:
selection = input(“”)
try:
if selection in (1,2,3,4,5):
break
except ValueError:
pass
print “Oops! I didn’t understand that. Please enter 1, 2, 3, 4 or 5.”
dice_changes[iterations-1] = selection-1
print “You have changed dice”, selection
iterations = 0
while iterations rerolls:
iterations = iterations + 1
replacement = dice_rerolls[iterations-1]
dice[dice_changes[iterations-1]] = replacement
dice.sort()
for i in range(len(dice)):
print “Dice”,i + 1,”:”,names[dice[i]]
result = hand(dice)
print “You finish with”, result
def roll(roll_number):
numbers = range(1,7)
dice = range(roll_number)
iterations = 0
while iterations roll_number:
iterations = iterations + 1
dice[iterations-1] = random.choice(numbers)
return dice
def hand(dice):
dice_hand = [len(list(group)) for key, group in groupby(dice)]
dice_hand.sort(reverse=True)
straight1 = [1,2,3,4,5]
straight2 = [2,3,4,5,6]
if dice == straight1 or dice == straight2:
return “a straight!”
elif dice_hand[0] == 5:
return “five of a kind!”
elif dice_hand[0] == 4:
return “four of a kind!”
elif dice_hand[0] == 3:
if dice_hand[1] == 2:
return “a full house!”
else:
return “three of a kind.”
elif dice_hand[0] == 2:
if dice_hand[1] == 2:
return “two pair.”
else:
return “one pair.”
else:
return “a high card.”
def play_again():
answer = raw_input(“Would you like to play again? y/n: “)
if answer in (“y”, “Y”, “yes”, “Yes”, “Of course!”):
return answer
else:
print “Thank you very much for playing our game. See you next time!”
def scores():
global player_score, computer_score
print “HIGH SCORES”
print “Player: “, player_score
print “Computer: “, computer_score
if __name__ == ‘__main__’:
start()
Codelistingcontinued](https://crownmelresort.com/image.slidesharecdn.com/thepythonbooktheultimateguidetocodingwithpythonpdfdrive-220527060944-728dd1fe/75/The-Python-Book_-The-ultimate-guide-to-coding-with-Python-PDFDrive-pdf-39-2048.jpg)

![The Python Book 41
Python essentials
def throws():
roll_number = 5
dice = roll(roll_number)
dice.sort()
for i in range(len(dice)):
print “Dice”,i + 1,”:”,names[dice[i]]
result = hand(dice)
print “You currently have”, result
while True:
rerolls = input(“How many dice do you want to throw again? “)
try:
if rerolls in (1,2,3,4,5):
break
except ValueError:
pass
print “Oops! I didn’t understand that. Please enter 1, 2, 3, 4 or 5.”
if rerolls == 0:
print “You finish with”, result
else:
roll_number = rerolls
dice_rerolls = roll(roll_number)
dice_changes = range(rerolls)
print “Enter the number of a dice to reroll: “
iterations = 0
while iterations rerolls:
iterations = iterations + 1
while True:
selection = input(“”)
try:
if selection in (1,2,3,4,5):
break
except ValueError:
pass
print “Oops! I didn’t understand that. Please enter 1, 2, 3, 4 or 5.”
dice_changes[iterations-1] = selection-1
print “You have changed dice”, selection
playerwantstorollagain.Westartthisbyasking
them how many re-rolls they want to do, which
allows us to create a custom while loop to ask
the user which dice to change that iterates the
correctnumberoftimes.
We also have to make sure it’s a number
within the scope of the game, which is why
we check using the try function, and print out
a message which tells the user if and how they
arewrong.
11Stick
One of the things we’ve been trying to do
in these tutorials is point out how logic can cut
down on a lot of coding by simply doing process
07
08
10
11
12
13
09
INDENTATIONS
Watch the indentations again as
we split the else function. The
following page’s code is on the
same level as roll roll_number,
dice_rerolls and dice_changes in
thecode.
WHITESPACE
The big if function at the end of
throws doesn’t have many line
breaks between sections – you
canaddtheseasmuchasyouwant
to break up the code into smaller
chunksvisually,aidingdebugging.
of eliminations or following flow charts. If the
userwantstore-rollzerotimes,thenthatmeans
they’re happy with their hand, and it must be the
end of the game. We print a message to indicate
thisanddisplaytheirhandagain.
12There-rolls
Here’s where we start the second roll
and the end of the game, using a long else to the
if statement we just started. We first of all make
sure to set our variables – updating roll_number
to pass onto the roll function with the re-roll
number the user set, and creating the list that’s
the exact length of the new set of rolls we wish to
usethankstorange(rerolls).
13Parse
We ask the player to enter the numbers
of the dice they wish to re-roll. By setting an
iterations variable, we can have the while loop
last the same number of times as we want re-
rolls by comparing it to the reroll variable itself.
We check each input to make sure it’s a number
thatcanbeused,andaddthevalidchoicestothe
dice_changes list. We use iterations-1 here as
Pythonlistsbeginat0ratherthan1.Wealsoprint
out a short message so the player knows the
selectionwassuccessful.](https://crownmelresort.com/image.slidesharecdn.com/thepythonbooktheultimateguidetocodingwithpythonpdfdrive-220527060944-728dd1fe/75/The-Python-Book_-The-ultimate-guide-to-coding-with-Python-PDFDrive-pdf-41-2048.jpg)
![42 The Python Book
Python essentials
14New dice
We’re resetting and reusing the iterations
variabletoperformasimilarwhilelooptoupdate
the rolls we’ve done to the original dice variable.
The main part of this while loop is using the
iterations-1 variable to find the number from
dice_changes list, and using that to change that
specific integer in the dice list with the number
from the replacement list. So if the first item on
the dice_changes list is two, then the second
item on the dices list is changed to the number
wewanttoreplaceitwith.
15Sorting
We’re ending the throw function in
basically the same way we ended the first throw.
First of all, we re-sort the dice list so that all the
numbers are in ascending order. Then we print
out the final cards that the dice correspond to,
before again passing it onto the hand function
so that we can fully determine the hand that the
player has. We print out this result and that ends
thefunction,sendingthewholethingbacktothe
gamefunctiontoaskifyouwanttoplayagain.
16Dicerolling
The roll function is used twice in the
code for both times that we roll the dice. Being
able to use the same code multiple times means
we can cut down on bloat in the rest of the
script, allowing it to run a little faster, as we’ve
explained. It also means in this case that we can
use it again if you want to change the game to
threerounds,ormodifyitforrealpoker.
17Numberofrolls
We begin the whole thing by bringing
over the roll_number variable into the function
– this is because while in the original roll it will
always be five, the second roll could between
one and the full five dice. We create a list with
the number of entries we need for each roll, and
again set an iterations variable for the upcoming
whileloop.
18Remember
Much like the while loops in the rest of the
code so far, we’re keeping it going until iterations
is the same as roll_number. Each entry in the
dice list is replaced with a random number using
the random.choice function and keeping it in the
range of the numbers variable, which is one to
six for each side of the dice. After this is done, we
return the dice variable to the throw function that
makesupthemajorityofthegame.
19Handanalysis
While not technically a hand of cards,
the poker terminology still applies. We start in
this function by setting up a few things. The first
part uses the groupby function we imported –
this is used in this case to count the numbers
that make up the dice variable. If there are three
twos,afourandafive,itwillreturn[3,1,1].We’re
using this to ascertain what kind of hand the
player has. As the output of this groupby won’t
be in any specific order, weuse thesortfunction
again to sort it; however, this time we use the
reverse=TRUE argument to make the analysis
easieragain.
20Straights
Straights and high cards are odd ones
out in poker dice, as they do not rely on being
able to count any repetitions in the cards.
There are, however, only two hands that create
a straight in poker dice, so we have created
two lists here that contain them. We can then
check first to see if the dice make these hands,
and then if all other checks fail, it has to be a
high card.
2
1Yourhand
While seemingly lengthy, this a fairly
simple if statement. As we stated before, we
check to see if it’s one of the two straight hands.
As there are no flushes or royal straight flushes
inpokerdice,wedon’thavetoworryaboutthose.
We then check to see if the first item in the list
is five, which can only result in five of a kind;
similarly, if the first item is four then the hand
mustbefourofakind.Ifthefirstnumberisthree,
thenitcanbeeitherafullhouseorthreeofakind,
iterations = 0
while iterations rerolls:
iterations = iterations + 1
replacement = dice_rerolls[iterations-1]
dice[dice_changes[iterations-1]] = replacement
dice.sort()
for i in range(len(dice)):
print “Dice”,i + 1,”:”,names[dice[i]]
result = hand(dice)
print “You finish with”, result
def roll(roll_number):
numbers = range(1,7)
dice = range(roll_number)
iterations = 0
while iterations roll_number:
iterations = iterations + 1
dice[iterations-1] = random.choice(numbers)
return dice
14
15
16
18
17
HIGHERORLOWER
Which hand is best? What are the
odds of getting certain hands in
the game? Some of the answers
are surprising, as the poker
hands they’re based on trump the
differing odds the dice produce.
We’ve ranked hands from highest
to lowest.
FiveofaKind .................6/7776
FourofaKind ............150/7776
FullHouse .................300/7776
Straight......................240/7776
ThreeofaKind ........1200/7776
TwoPairs .................1800/7776
OnePair ...................3600/7776
HighCard ...................480/7776](https://crownmelresort.com/image.slidesharecdn.com/thepythonbooktheultimateguidetocodingwithpythonpdfdrive-220527060944-728dd1fe/75/The-Python-Book_-The-ultimate-guide-to-coding-with-Python-PDFDrive-pdf-42-2048.jpg)
![The Python Book 43
Python essentials
def hand(dice):
dice_hand = [len(list(group)) for key, group in groupby(dice)]
dice_hand.sort(reverse=True)
straight1 = [1,2,3,4,5]
straight2 = [2,3,4,5,6]
if dice == straight1 or dice == straight2:
return “a straight!”
elif dice_hand[0] == 5:
return “five of a kind!”
elif dice_hand[0] == 4:
return “four of a kind!”
elif dice_hand[0] == 3:
if dice_hand[1] == 2:
return “a full house!”
else:
return “three of a kind.”
elif dice_hand[0] == 2:
if dice_hand[1] == 2:
return “two pair
.”
else:
return “one pair
.”
else:
return “a high card.”
def play_again():
answer = raw_input(“Would you like to play again? y/n: “)
if answer in (“y”, “Y”, “yes”, “Yes”, “Of course!”):
return answer
else:
print “Thank you very much for playing our game. See you next time!”
def scores():
global player_score, computer_score
print “HIGH SCORES”
print “Player: “, player_score
print “Computer: “, computer_score
if __name__ == ‘__main__’
:
start()
19
20
21
22
23
24
HOMEWORK
There is currently no scoring in
place for this version of the game.
Try adding a computer player, or
create a rule set that requires a
certain hand or higher. You could
even makeittwo-player.
so we nest an if statement. Again, we do this for
pairs, where that could be one or two pairs. If all
else fails then, by a process of elimination, it can
only be a high card. We give each outcome a text
stringtosendbacktothethrowfunctionsothatit
canbeprinted.
22Playagain
As before, we ask the player for raw input
with the text offering another game. Instead of
parsing it, we assume the player will choose a
specified yes response based on the text, and if
none of these versions is received, we print out
themessagethankingthemforplayingthegame.
Thisendsthegamefunction.
23Finalscores
Going all the way back to the start
function, after the game finishes we move onto
the results. This section is quite simple – it
calls the scores, which are integers, and then
prints them individually after the names of the
players. This is the end of the script, as far as the
player is concerned. Currently, the code will not
permanently save the scores, but you can have
Pythonwriteittoafiletokeepifyouwish.
24Modules
The final part of the code allows for
the script to be used in two ways. Firstly, we
can execute it in the command line and it will
work just fine. Secondly, we can import this into
another Python script, perhaps if you wanted to
add it as a game to a collection. This last piece of
code will prevent our script being executed when
imported by another module – it will only do so
whenbeingrundirectly.
TEXTEDITORS
Instead of the IDE we’ve suggested, you
should also try coding in a text editor. Some
of them are a little more lightweight and
format code similar to the way the IDE does,
separating functions and strings by colours
etc. Some of the ones we’d recommend are
the classic gedit, a popular text editor from
GNOME desktops; Geany, which has a few
IDE-esque features written into it; TEA, a
multifunctioning text editor and project
manager; and Jedit, a text editor that lives
in the command line for minimum resource
usage. These can also be used with multiple
programminglanguages,soyoucangetused
tothem with Python,thenmaketheswitch.](https://crownmelresort.com/image.slidesharecdn.com/thepythonbooktheultimateguidetocodingwithpythonpdfdrive-220527060944-728dd1fe/75/The-Python-Book_-The-ultimate-guide-to-coding-with-Python-PDFDrive-pdf-43-2048.jpg)

![The Python Book 45
Python essentials
Newimports
ImportnewmodulesthatallowustocreatetheGUI
part of Rock, Paper, Scissors, as well as removing
themoduleswenolonger need
Newinterface
Our new main function allows us to call the
majorityofthegamescriptwhentherps_buttonis
pressed. This contains the game components and
thegraphicalcomponents
Newstart
We’ve changed the start function so that it no
longergoestothescorefunctionafterit’sfinished.
We’vealsoremovedthescorefunction,aswetrack
thatdifferentlysoit can be displayedproperly
Newgame
We’ve changed the game function so that it now
takes the input from our graphical interface. We
use a new variable to do this that works with the
GUI,otherwiseitworksroughlythesameasbefore
Newresults
The result function remains largely unchanged,
only now it sends the outcome message to a
variable we use for the interface, and generally
usesthenewGUI’svariables
Newwindow
Wecreatethegamewindowwithaslightlydifferent
method due to already having a ‘mainloop’ root
window. We’re also giving it a name so you can
identify it properly
Newvariables
Ournewvariablesaresetupsotheycaninteractwith
boththegamecodeandtheinterfacecodeproperly.
We’ve also made sure to have a default selection for
theplayersothatthecoderunsproperly
Newframe
Determine the size and layout of the window for
the game using a slightly different method than
before. We’ve also allowed for elements to be
anchored in certain positions around the window
Newchoice
Here we place radio buttons in a specific
configuration in the window, giving the user the
choice of three moves. This is then passed along to
thevariableandusedbythegamecode
Newmove
Here we allow for the computer’s move to be
displayedunderthe‘Computer’ label
Newbutton
Pressing the Play button we’ve put here runs the
game script, prints out the scores and finally a
messagebasedonthe outcome
Newending
We’ve changed this so that the main script begins
withguinowratherthan the start function
#!/usr/bin/env python2
# Linux User Developer presents: Rock, Paper, Scissors: The Video Game: The Module
from Tkinter import *
from ttk import *
import random
def gui():
rock = 1
paper = 2
scissors = 3
names = { rock: “Rock”, paper: “Paper”, scissors: “Scissors” }
rules = { rock: scissors, paper: rock, scissors: paper }
def start():
while game():
pass
def game():
player = player_choice.get()
computer = random.randint(1, 3)
computer_choice.set(names[computer])
result(player, computer)
def result(player, computer):
new_score = 0
if player == computer:
result_set.set(“Tie game.”)
else:
if rules[player] == computer:
result_set.set(“Your victory has been assured.”)
new_score = player_score.get()
new_score += 1
player_score.set(new_score)
else:
result_set.set(“The computer laughs as you realise you have been defeated.”)
new_score = computer_score.get()
new_score += 1
computer_score.set(new_score)
rps_window = Toplevel()
rps_window.title (“Rock, Paper, Scissors”)
player_choice = IntVar()
computer_choice = StringVar()
result_set = StringVar()
player_choice.set(1)
player_score = IntVar()
computer_score = IntVar()
rps_frame = Frame(rps_window, padding = ‘3 3 12 12’
, width = 300)
rps_frame.grid(column=0, row = 0, sticky=(N,W,E,S))
rps_frame.columnconfigure(0, weight=1)
rps_frame.rowconfigure(0,weight=1)
Label(rps_frame, text=’Player’).grid(column=1, row = 1, sticky = W)
Radiobutton(rps_frame, text =’Rock’
, variable = player_choice, value = 1).grid(column=1,
row=2, sticky=W)
Radiobutton(rps_frame, text =’Paper’
, variable = player_choice, value = 2).grid(column=1,
row=3, sticky=W)
Radiobutton(rps_frame, text =’Scissors’
, variable = player_choice, value =
3).grid(column=1, row=4, sticky=W)
Label(rps_frame, text=’Computer’).grid(column=3, row = 1, sticky = W)
Label(rps_frame, textvariable = computer_choice).grid(column=3, row=3, sticky = W)
Button(rps_frame, text=”Play”, command = start).grid(column = 2, row = 2)
Label(rps_frame, text = “Score”).grid(column = 1, row = 5, sticky = W)
Label(rps_frame, textvariable = player_score).grid(column = 1, row = 6, sticky = W)
Label(rps_frame, text = “Score”).grid(column = 3, row = 5, sticky = W)
Label(rps_frame, textvariable = computer_score).grid(column = 3, row = 6, sticky = W)
Label(rps_frame, textvariable = result_set).grid(column = 2, row = 7)
if __name__ == ‘__main__’:
gui()
ModifiedRPSCodeListing](https://crownmelresort.com/image.slidesharecdn.com/thepythonbooktheultimateguidetocodingwithpythonpdfdrive-220527060944-728dd1fe/75/The-Python-Book_-The-ultimate-guide-to-coding-with-Python-PDFDrive-pdf-45-2048.jpg)
![46 The Python Book
Python essentials
01
02
03
04
07
08
09
06
05
01Firstline
We use this line to enter the path to the
Python interpreter. This lets us run the program
inside a terminal or otherwise outside of a
Python-specific IDE like IDLE. Note that we’re
alsousingPython2forthisparticularscript.
06Introductions
We create the intro variable as a label
that lives in the main frame. We give it text to
introduce the interface, using the triple quote
marks to have it go across multiple lines and
format better. We then use pack to display it, and
tellTkintertoputitatthetopoftheinterface.
07Rock,Paper,Scissors
We create a button for the Rock, Paper,
Scissors game using the Button function. We
attach to it the main frame, give it a label using
02Importgraphics
Tkinter is the graphical interface we’re
using and while it’s a standard Python function,
you’llneedtoimportthemodulesoyoucanuseit.
We’ve used the ‘from [module] import *’ method
so that we can use the functions from it without
havingtoaddTkinteratthebeginning.
04Rootwindow
Using the Tk() function creates the
window we’re going to be placing everything
into. We’ve decided to call it root for now;
however, you can call it anything you like, as
long as you’re consistent with it. We’ve also
named it using the title command from Tkinter
and a string of text.
05Mainframe
The first line has us set the variable
mainframe as a Frame in the interface. We’ve
attached it to root, the main window, and given
03Importgames
We’re importing the modules for the
three games. We added the line at the bottom
MAINWINDOW
The main interface window that
this code creates is fairly basic,
but contains the functions we
require. The window exit button
will do the same job as the Quit
button, and the Hangman and
Poker Dice buttons run the old
scripts in the Python shell.
#!/usr/bin/env python2
#Linux User Developer presents: Mega Microgrames Collection
from Tkinter import *
import rockpaperscissors
import hangman
import pokerdice
root = Tk()
root.title (“Linux User Developer’s Mega Microgames Collection”)
mainframe = Frame(root, height = 200, width = 500)
mainframe.pack_propagate(0)
mainframe.pack(padx = 5, pady = 5)
intro = Label(mainframe, text = “””Welcome to Linux User Developers Mega Microgames Collection.
Please select one of the following games to play:
“””)
intro.pack(side = TOP)
rps_button = Button(mainframe, text = “Rock, Paper
, Scissors”, command = rockpaperscissors.gui)
rps_button.pack()
hm_button = Button(mainframe, text = “Hangman”, command = hangman.start)
hm_button.pack()
pd_button = Button(mainframe, text = “Poker Dice”, command = pokerdice.start)
pd_button.pack()
exit_button = Button(mainframe, text = “Quit”, command = root.destroy)
exit_button.pack(side = BOTTOM)
root.mainloop()
it a minimum height and width in pixels. We
use pack_propogate to create the window, and
then make sure it’s the size that we’ve defined.
We’ve then used pack to pad the borders,
allowing the contents of the window to not
touch the sides of it.
of each script so we can do this. To make sure
to differentiate the functions in each game, we
will have to specify [module].[function] so there
are no errors in the code.](https://crownmelresort.com/image.slidesharecdn.com/thepythonbooktheultimateguidetocodingwithpythonpdfdrive-220527060944-728dd1fe/75/The-Python-Book_-The-ultimate-guide-to-coding-with-Python-PDFDrive-pdf-46-2048.jpg)
![The Python Book 47
Python essentials
#!/usr/bin/env python2
# Linux User Developer presents: Rock, Paper
, Scissors: The Video Game: The Module
from Tkinter import *
from ttk import *
import random
def gui():
rock = 1
paper = 2
scissors = 3
names = { rock: “Rock”, paper: “Paper”, scissors: “Scissors” }
rules = { rock: scissors, paper: rock, scissors: paper }
def start():
while game():
pass
def game():
player = player_choice.get()
computer = random.randint(1, 3)
computer_choice.set(names[computer])
result(player
, computer)
10
11
12
13
14
09Breaktheloop
The exit button works similarly to the
other buttons we’ve created, but instead it uses
the command root.destroy. This ends the loop
that we’ve created with root.mainloop(), which
allows the interface code to continue looping,
allowing us to continually use it. We place the
exit button at the bottom of the window with
‘side = BOTTOM’.
12Gamevariables
The variables are staying the same
so that we can do the same comparisons we
made in the original code. We’ve put them into
the function itself so that they don’t affect the
other imported code into the main interface –
and so that when calling just this function, we
don’t need to use global to bring them in.
14Gamefunction
The game function has had a few
modifications to make sure it works with
the interface. First of all, the player variable
is retried using get() on the special variable
we’ve created to contain the player choice.
We do a similar thing for the computer, using
‘set’ to change the variable in our interface-
friendly computer_choice value. We still use
the name variable to set the text that goes into
computer_choice. This then passes the player
and computer variables along in the same way
we did before.
13Startfunction
We’ve removed the part that calls
the score function from the start function,
as we have the interface handle the scoring
now. It still calls upon the game function,
though, putting it into a loop so it can be
used continuously. This function is called by
the interface to begin the game by setting a
computer move and then comparing it to the
player’s choice.
10Gamecode
Nothingmuchhaschangedinthestartof
this code, other than a few import changes. The
code for running it in the command line is still
PYTHONSHELL
Our other code will run in the shell
or via a command line in the same
way as before when the buttons
arepressed.
08Othergames
For the other two games, the code is
mostlythesame;however,wecalluponthestart
function in both of them. In the final interface,
this will cause the games to run in the shell or
commandlineasthey’vebeenrunningbefore.
11Gameinterface
One of the biggest changes we’re making
to this script is having it all contained in one
function, ‘def gui’. The interface code needs to
be put into a function, otherwise it will be run
during import. While we’ve chosen to put the
entirety of the code in a function, you can also
try just having the graphical interface code in
one. All our variables are kept in here so that
they still work properly.
there, and with a few modifications the code will
run independently of the main interface. We’ve
removed the time module, as we no longer need
it, and imported not only the Tkinter module,
but the ttk module. The ttk module allows us to
arrange the GUI in a grid, which will be slightly
easiertouseandunderstand.
text that appears on the button, and then have
it run a command. In this case, we use the
modified rockpapershotgun.py code that has a
gui function, hence rockpapershotgun.py. We
then use pack to place it in the window](https://crownmelresort.com/image.slidesharecdn.com/thepythonbooktheultimateguidetocodingwithpythonpdfdrive-220527060944-728dd1fe/75/The-Python-Book_-The-ultimate-guide-to-coding-with-Python-PDFDrive-pdf-47-2048.jpg)
![48 The Python Book
Python essentials
def result(player
, computer):
new_score = 0
if player == computer:
result_set.set(“Tie game.”)
else:
if rules[player] == computer:
result_set.set(“Your victory has been assured.”)
new_score = player_score.get()
new_score += 1
player_score.set(new_score)
else:
result_set.set(“The computer laughs as you realise you have been defeated.”)
new_score = computer_score.get()
new_score += 1
computer_score.set(new_score)
rps_window = Toplevel()
rps_window.title (“Rock, Paper
, Scissors”)
player_choice = IntVar()
computer_choice = StringVar()
result_set = StringVar()
player_choice.set(1)
player_score = IntVar()
computer_score = IntVar()
15
16
17
19
20
18
GAMEWINDOW
In its default state, the game
window will have rock selected
and no message will be displayed.
Once the player makes a move, the
message will be displayed at the
bottom and the computer’s move
will be printed. There’s no quit
button on this menu, but clicking
the window exit will bring you back
to the main interface.
15Resultfunction
The result function still takes the same
two variables as before, which we set in the
game function. While technically we can use
the variables set up for the interface, these
are not pure integers and can cause an error if
not handled correctly. With that in mind, we’ve
created an empty new_score variable that we
can use to effectively clean the interface value
beforeaddingitbackintoit.
20Interfacevariables
Here is the reason we had to call and
change the variables in a different manner.
For Tkinter, we need to let the interface know
whether or not a variable is an integer or a text
value. IntVar and StringVar allow for these
respectively. We’ve also set the player_choice
variable to be one, which we have already set as
thechoiceforrock.Thismeanstherewillatleast
be a default choice when the game is started,
anditwon’tcauseanerror.
21Gameframe
We’ve created the frame for our
interface items slightly differently. Instead
of using the pack command in the main
interface, we’re using grid to make sure they’re
orientated in such a way that makes sense
for the user. Padding does just that, setting
up values to make sure the items in the frame
don’t touch the edge of the window. Using the
.grid command, we then create this frame.
The row and column variables allow for rows
and columns to be included in the structure of
16Tie
The logic for determining the result is
the same as before. We first do the easy check –
whether or not the numeric value for the player
andcomputervariableisthesame.Whatchanges
this time is that, instead of printing the text,
we send the “Tie game” message to our result
variableusingthesetfunctionfromTkinter.
18Lose
This part of the overall if statement
works in the same way as before, by assuming
that if it isn’t a tie or a win, it’s a loss. Like the
new version of the win code, it then uses set
to change the message that will be displayed
to the player, and calls upon and changes
the computer score by putting it through the
new_score variable.
19New window
As the original window is part of the
mainloop, we cannot have the window be
created using Tk() like in the main interface
code. As this window is coming off it, though,
we instead create it using Toplevel(). This
allows the window to run separately and on
top of the main window. We’ve also given
17Win
The if statement continues by seeing if
the player has won. Like before, we use the rules
we set to make the comparison for the code to
it a name, which will not change the main
window’s name in the process.
make. We set the result_set like we did in the
tie game, with a different message to the user.
Finally, we set the new_score variable to be the
current player score, using the get function to
obtain it, plus one to the score, and then use
set again to put it back into the player_score
variable. We can’t use += with the player_score
variable,asitisnotastandardvariable.](https://crownmelresort.com/image.slidesharecdn.com/thepythonbooktheultimateguidetocodingwithpythonpdfdrive-220527060944-728dd1fe/75/The-Python-Book_-The-ultimate-guide-to-coding-with-Python-PDFDrive-pdf-48-2048.jpg)

![50 The Python Book
Python essentials
Completeyourtrioofgameswithagraphicalinterfaceforthe
hangmanandpokerdicecode
Bringgraphicstosimple
Pythongames
We have now created a simple selector for the
trio of Python games we made previously. This
interface was able to launch a GUI for our rock,
paper, scissors game, and run the other two in
the terminal. Now, we’re going to convert the
hangman and poker dice codes to work in a
similar way to rock, paper, scissors.
The trick with hangman comes in allowing
for a different type of input, text, and the ability
to have multiple rounds of the game. Tkinter
allows for text entry, and we rely a lot less on
‘while’ loops to play the game in its entirety.
Poker Dice needs to keep the dice analysis
code, and the option to change specific dice
using checkboxes.
We’ll be modifying a large amount of the
original code to fit in with the new graphical
scheme. This mainly involves cutting specific
parts and having the Tkinter-specific code
handle these itself. The code listings on these
pages include the modified code – we’ll discuss
the graphical part on the following pages.
Resources
Python2:www.python.org/download
IDLE:www.python.org/idle
1Imported
Herewe’re doing the
sameminorsetup,
including getting
theTkinter module
that helps us create
asimplegraphical
interface
2Words
We’re keeping
ourvariablesthat
determine the word to
guessheresoitcan
be easily accessed
anywhere in the code
3Function
Likelasttime,we’re
putting the majority of
our originalcodeinto a
newfunction,gui
4Analysis
Weselecttheword
andanalyseitbefore
continuingon with the
restofthecode
5Graphics
Thehangedman
functionislargely
unchanged,albeitwith
newcode todisplay
ourASCIIgraphicson
the interface
6Guesses
Wecheckthe number
ofmistakesmade,and
calltheguess_letter
function tocheck the
letter entered
from Tkinter import *
from ttk import *
from random import *
word = 0
word_length = 0
clue = 0
def gui():
global word, word_length, clue
dictionary = [“gnu”,”kernel”,”linux”,”magei
a”,”penguin”,”ubuntu”]
word = choice(dictionary)
word_length = len(word)
clue = word_length * [“_”]
tries = 6
def hangedman(hangman):
graphic = [
“””
+-------+
| |
| O
| -|-
| /
|
===============
“””]
graphic_set = graphic[hangman]
hm_graphic.set(graphic_set)
def game():
letters_wrong = incorrect_guesses.get()
letter=guess_letter()
first_index=word.find(letter)
if first_index == -1:
letters_wrong +=1
incorrect_guesses.set(letters_
wrong)
else:
for i in range(word_length):
if letter == word[i]:
clue[i] = letter
hangedman(letters_wrong)
clue_set = “ “.join(clue)
word_output.set(clue_set)
if letters_wrong == tries:
result_text = “Game Over. The word
was “ + word
result_set.set(result_text)
new_score = computer_score.get()
new_score += 1
computer_score.set(new_score)
if “”.join(clue) == word:
result_text = “You Win! The word
was “ + word
result_set.set(result_text)
new_score = player_score.get()
new_score += 1
player_score.set(new_score)
def guess_letter():
letter = letter_guess.get()
letter.strip()
letter.lower()
return letter
def reset_game():
global word, word_length, clue
incorrect_guesses.set(0)
hangedman(0)
result_set.set(“”)
letter_guess.set(“”)
word = choice(dictionary)
word_length = len(word)
clue = word_length * [“_”]
new_clue = “ “.join(clue)
word_output.set(new_clue)
if __name__ == ‘__main__’:
gui()
01
02
03
04
05
06
HangmanCodeListing](https://crownmelresort.com/image.slidesharecdn.com/thepythonbooktheultimateguidetocodingwithpythonpdfdrive-220527060944-728dd1fe/75/The-Python-Book_-The-ultimate-guide-to-coding-with-Python-PDFDrive-pdf-50-2048.jpg)
![The Python Book 51
Python essentials
1Moreimports
We’ve added the new imported
modulesweneedto make Tkinter
workandkeeptherest the same
2Dicelist
Thelistthatholdsthe dice iskept
outside the main function so that it
canbeaccessedeverywhere
3Rolls
Samegoesfortherollfunction.
It doesn’tspecificallyneed to be
inside the gui functionanyway
4Decisions
The checkboxes in the graphical
codewe’re going to createlater will
giveusnumberswecan analyse for
thecode.Weretrieve thesenumbers
andcheckthemtofindoutwhich
dicetheuser wishestore-roll
5Hands
Finally,ourhandanalysisfunction
isthe lastpartofthe originalcode
thatiskeptoutsidethe guifunction.
Boththis and the abovefunction
passthe necessary details back
upthe chain to thenbeaddedinto
thenewgraphicalelementsofthe
newinterface
6Nodice
Ifnodicehavebeenselectedto
re-roll, the hand output ischanged
to showa finalmessage
7Re-roll
Thispartisalmostthe same as
before–anewsetofdice are rolled
and then inserted into the list ofdice
likebefore,thenre-sortedtomake
the handanalysiseasier
8Morefunctions
The new gui functionisthe main
changetothePoker Dice code,
and asbeforeincludesthe Tkinter
elementsandotherpartsofthe
original code
9Gamestart
Asimplefunctionthat we can use to
activatethere-rollsofthedice
10Newhand
Thenewdicearenamed,analysed,
andeverythingisthen set for the gui
to display the finaloutcome
11Reset
Likewiththehangman code,we
haveafunctiontoreset allthe
variables,allowingyoutostart the
gameagain
from Tkinter import *
from ttk import *
import random
from itertools import groupby
dice = 0
def roll(roll_number):
numbers = range(1,7)
dice = range(roll_number)
iterations = 0
while iterations roll_number:
iterations = iterations + 1
dice[iterations-1] = random.
choice(numbers)
return dice
def hand(dice):
dice_hand = [len(list(group)) for key,
group in groupby(dice)]
dice_hand.sort(reverse=True)
straight1 = [1,2,3,4,5]
straight2 = [2,3,4,5,6]
if dice == straight1 or dice ==
straight2:
return “a straight!”
elif dice_hand[0] == 5:
return “five of a kind!”
elif dice_hand[0] == 4:
return “four of a kind!”
elif dice_hand[0] == 3:
if dice_hand[1] == 2:
return “a full house!”
else:
return “three of a kind.”
elif dice_hand[0] == 2:
if dice_hand[1] == 2:
return “two pair.”
else:
return “one pair.”
else:
return “a high card.”
def gui():
global dice
dice = roll(5)
dice.sort()
nine = 1
ten = 2
jack = 3
queen = 4
king = 5
ace = 6
names = { nine: “9”, ten: “10”, jack:
“J”, queen: “Q”, king: “K”, ace: “A” }
result = “You have “ + hand(dice)
def game():
throws()
def throws():
global dice
dice1_check = dice1.get()
dice2_check = dice2.get()
dice3_check = dice3.get()
dice4_check = dice4.get()
dice5_check = dice5.get()
dice_rerolls = [dice1_check,
dice2_check, dice3_check, dice4_check,
dice5_check]
for i in range(len(dice_rerolls)):
if 0 in dice_rerolls:
dice_rerolls.remove(0)
if len(dice_rerolls) == 0:
result = “You finish with “ +
hand(dice)
hand_output.set(result)
else:
roll_number = len(dice_rerolls)
number_rerolls = roll(roll_num-
ber)
dice_changes = range(len(dice_
rerolls))
iterations = 0
while iterations roll_number:
iterations = iterations + 1
dice_changes[iterations-1]
= number_rerolls[iterations-1]
iterations = 0
while iterations roll_number:
iterations = iterations + 1
replacement = number_
rerolls[iterations-1]
dice[dice_
changes[iterations-1]] = replacement
dice.sort()
new_dice_list = [0,0,0,0,0]
for i in range(len(dice)):
new_dice_list[i] =
names[dice[i]]
final_dice = “ “.join(new_dice_
list)
dice_output.set(final_dice)
final_result = “You finish with
“ + hand(dice)
hand_output.set(final_result)
def reset_game():
global dice
dice = roll(5)
dice.sort()
for i in range(len(dice)):
empty_dice[i] = names[dice[i]]
first_dice = “ “.join(empty_dice)
dice_output.set(first_dice)
result = “You have “ + hand(dice)
hand_output.set(result)
if __name__ == ‘__main__’:
gui()
01
02
03
04
05
11
10
09
08
07
06
PokerDiceCodeListing](https://crownmelresort.com/image.slidesharecdn.com/thepythonbooktheultimateguidetocodingwithpythonpdfdrive-220527060944-728dd1fe/75/The-Python-Book_-The-ultimate-guide-to-coding-with-Python-PDFDrive-pdf-51-2048.jpg)
![52 The Python Book
Python essentials
01
02
03
01Firstlines
As usual, we start off each program with
the code that lets us run it in the command line,
followed by importing the necessary modules:
random, to determine the word to use; Tkinter,
for the majority of the graphical code; and
06Gamesbegin
All the analysis of the letter we’ve
entered is done in this function. To that end, we
start by obtaining the incorrect guesses so far
from the variable we’ve set up so the interface
can access it if we want it to. The letter from
the entry field in the interface is then obtained
and cleaned up so it can be used with the rest of
thecode.
07Checktheletter
This section of the code is again largely
unchanged–theletteristakenandcomparedto
the word with find to see if it matches with one
of the letters. The if statement then adds one to
the incorrect guess variable, or updates the clue
variabletoaddtheletterintherightspot.
09Updatescores
Exactly as before, we check to see if the
player has won or lost yet. In the event of either,
a message is displayed to signify this, and the
winsandlossesscoreisupdatedusingset.
02Globalvariables
We have kept these three variables
outside of the gui function so they can be
04Randomword
We bring in the three variables with
global so we can modify them throughout
the code, and then set the word. As before, a
random item from the list of words is selected
with choice, the length is ascertained, and the
cluetodisplayisset.
08Updateinterface
These three lines set the graphic for this
round, join the current clue together as a string,
and then set it on the variable for the interface
toread.
03Graphicalfunction
We’re putting all the working code into
the gui function so it can be activated from the
main interface. This means we can import the
Hangman code into the interface without the
game window popping up, and only run it when
weactivatetheguifunctionfromhere.
05Thehangedman
The main difference this time for the
Hangman graphics is that instead of printing
these out, we’re going to display them in the
interface. When the function is called and the
graphic selected, it’s placed in the variable we’ve
set up in the interface code that we’re using to
displaytheresult.
ttk, for the grid code we’ll be using to align the
differentelements.
accessedatallpointsinthecode.Python2does
not allow you to call upon global variables when
you’re in a nested function, whereas in Python 3
thiscouldhavegoneintotheguifunction.
09
08
07
06
05
04
#!/usr/bin/env python2
from Tkinter import *
from ttk import *
from random import *
word = 0
word_length = 0
clue = 0
def gui():
global word, word_length, clue
dictionary = [“gnu”,”kernel”,”linux”,”mageia”,”penguin”,”ubuntu”]
word = choice(dictionary)
word_length = len(word)
clue = word_length * [“_”]
tries = 6
def hangedman(hangman):
graphic = [
“””
+-------+
| |
| O
| -|-
| /
|
===============
“””]
graphic_set = graphic[hangman]
hm_graphic.set(graphic_set)
def game():
letters_wrong = incorrect_guesses.get()
letter=guess_letter()
first_index=word.find(letter)
if first_index == -1:
letters_wrong +=1
incorrect_guesses.set(letters_wrong)
else:
for i in range(word_length):
if letter == word[i]:
clue[i] = letter
hangedman(letters_wrong)
clue_set = “ “.join(clue)
word_output.set(clue_set)
if letters_wrong == tries:
result_text = “Game Over. The word was “ + word
result_set.set(result_text)
new_score = computer_score.get()
new_score += 1
computer_score.set(new_score)
if “”.join(clue) == word:
result_text = “You Win! The word was “ + word
result_set.set(result_text)
new_score = player_score.get()
new_score += 1
player_score.set(new_score)
YOULOSE
When you’ve run out of guesses,
the game stops. From here, you
can also reset the game to play
againifyouwish.](https://crownmelresort.com/image.slidesharecdn.com/thepythonbooktheultimateguidetocodingwithpythonpdfdrive-220527060944-728dd1fe/75/The-Python-Book_-The-ultimate-guide-to-coding-with-Python-PDFDrive-pdf-52-2048.jpg)
![The Python Book 53
Python essentials
10
11
15
12
16
13
14
12Interfacevariables
Tkinter only works with specific variables
– we’ve created all the ones we need or can use
here. IntVars take integers, while StringVars take
strings. We’ve used get and set throughout the
restofthecodewiththesetogetandsetvalues.
14CluetoHangman
These labels are fairly straightforward
– we’re either giving them fixed text, or telling
them to use a specific textvariable so they can
beupdatedasweplaythegame.
13Framedwindow
The frame is set up the same way as
last time. We pad the frame from the edge of
the window, set a grid, give it sticky points at
compass points, and allow for setting objects
withspecificrowandcolumnpoints.
16Resultsandreset
The rest of the code is similar to what
we’ve done already: labels to display fixed text
and the scores/result text that change. The
button that activates the reset function is also
put at the bottom here. The final two lines allow
ustoimportthemoduleintotheinterfacecode.
10Sanitiseinput
The guess_letter function purely gets
the letter from the player input variable, strips it
of any formatting, makes it lower case, and then
returns it back to the game function. This is so
thelettercanbeusedproperly.
11New window
We use the Toplevel command from
Tkinter like last month to separate the loops of
the main interface and game window. We then
usetitletocallitHangman.
15Textentry
Entry here sets a text box we will add the
letters to. The exportselection option makes it
so selecting the letter won’t immediately copy it
to the clipboard, and the textvariable selection
is where the code stores the letter added. The
button activates the game function, analysing
thelettertheplayerentered.
Theframeisset
upasbefore
def guess_letter():
letter = letter_guess.get()
letter.strip()
letter.lower()
return letter
def reset_game():
global word, word_length, clue
incorrect_guesses.set(0)
hangedman(0)
result_set.set(“”)
letter_guess.set(“”)
word = choice(dictionary)
word_length = len(word)
clue = word_length * [“_”]
new_clue = “ “.join(clue)
word_output.set(new_clue)
hm_window = Toplevel()
hm_window.title (“Hangman”)
incorrect_guesses = IntVar()
incorrect_guesses.set(0)
player_score = IntVar()
computer_score = IntVar()
result_set = StringVar()
letter_guess = StringVar()
word_output = StringVar()
hm_graphic = StringVar()
hm_frame = Frame(hm_window, padding = ‘3 3 12 12’, width = 300)
hm_frame.grid(column=0, row = 0, sticky=(N,W,E,S))
hm_frame.columnconfigure(0, weight=1)
hm_frame.rowconfigure(0,weight=1)
Label(hm_frame, textvariable = hm_graphic).grid(column=2, row = 1)
Label(hm_frame, text=’Word’).grid(column=2, row = 2)
Label(hm_frame, textvariable = word_output).grid(column=2, row = 3)
Label(hm_frame, text=’Enter a letter’).grid(column=2, row = 4)
hm_entry = Entry(hm_frame, exportselection = 0, textvariable = letter_guess).grid(column = 2, row = 5)
hm_entry_button = Button(hm_frame, text = “Guess”, command = game).grid(column = 2, row = 6)
Label(hm_frame, text = “Wins”).grid(column = 1, row = 7, sticky = W)
Label(hm_frame, textvariable = player_score).grid(column = 1, row = 8, sticky = W)
Label(hm_frame, text = “Losses”).grid(column = 3, row = 7, sticky = W)
Label(hm_frame, textvariable = computer_score).grid(column = 3, row = 8, sticky = W)
Label(hm_frame, textvariable = result_set).grid(column = 2, row = 9)
replay_button = Button(hm_frame, text = “Reset”, command = reset_game).grid(column = 2, row = 10)
if __name__ == ‘__main__’:
gui()
THEHANGMANGUI
Press the updated Hangman
button to launch a new window.
Here we have the initial graphic,
wordclueandentryfortheplayer
to interact with. The scores
are set to zero, and no result
message is displayed as no
games havebeen played yet.
ORIGINALINTERFACE
You’ll also need the interface
code from last issue, which
already works with the modified
Rock, Paper, Scissors code. The
way it was left off means it won’t
work with the new code, so you’ll
have to change the command in
each button from [game].start
to [game].gui.](https://crownmelresort.com/image.slidesharecdn.com/thepythonbooktheultimateguidetocodingwithpythonpdfdrive-220527060944-728dd1fe/75/The-Python-Book_-The-ultimate-guide-to-coding-with-Python-PDFDrive-pdf-53-2048.jpg)
![54 The Python Book
Python essentials
17
19
24
22
20
18
21
23
22Firstroll
As the window opens, we immediately
make the first roll. This is then sorted, each
number is attributed to a card, and then the
result is created to be displayed in the main
window. This is similar to how it worked before,
but instead it’s now entered into the StringVars
fortheinterfacetowardstheendofthescript
23Startgame
When we activate the button that starts
game, it immediately sends us to the rest of the
code. This would also work if you had the button
go to the throws function instead; however, you
canaddotherfunctionstothispartifyouwish.
24Diceselection
The first thing we do is find out what
checkboxes have been ticked by the player. We
then put these in a list so we can change out the
correct dice numbers. We’ve also brought in dice
so we can check against that what the current
dicerollsare.
20Handofdice
Like roll, nothing has changed for the
hand function. It’s simply now placed outside
the gui function for the exact same reasons.
It also means that you can easily import this
functionintoanotherscriptifyouwish.
21GUIstart
As we’ve mentioned last month and in
the Hangman code, we put all the GUI code into
afunctionsothatwecancallonitwhenwewant
to. In this case, pressing the Poker Dice button
on the main interface activates pokerdice.gui,
whichisthisfunction.
18Outsidedice
For Poker Dice, there’s only one variable
to show at any one time, the dice. Again, due to
the nested functions, and because we’re using
Python2,weneedtocallitwithglobalfromhere
tomakesurethegamecanberesetproperly.
19Dicerolls
The roll function has been removed from
the gui function so as not to create any code
errors with some of its variables. It can be easily
called within the nested functions. It hasn’t
changedatallfromtheoriginalcode.
17Startover
The usual array of command-line
compatibility and module importing here. The
groupby function is specifically imported here
fordiceanalysis.
#!/usr/bin/env python2
from Tkinter import *
from ttk import *
import random
from itertools import groupby
dice = 0
def roll(roll_number):
numbers = range(1,7)
dice = range(roll_number)
iterations = 0
while iterations roll_number:
iterations = iterations + 1
dice[iterations-1] = random.choice(numbers)
return dice
def hand(dice):
dice_hand = [len(list(group)) for key, group in groupby(dice)]
dice_hand.sort(reverse=True)
straight1 = [1,2,3,4,5]
straight2 = [2,3,4,5,6]
if dice == straight1 or dice == straight2:
return “a straight!”
elif dice_hand[0] == 5:
return “five of a kind!”
elif dice_hand[0] == 4:
return “four of a kind!”
elif dice_hand[0] == 3:
if dice_hand[1] == 2:
return “a full house!”
else:
return “three of a kind.”
elif dice_hand[0] == 2:
if dice_hand[1] == 2:
return “two pair.”
else:
return “one pair.”
else:
return “a high card.”
def gui():
global dice
dice = roll(5)
dice.sort()
nine = 1
ten = 2
jack = 3
queen = 4
king = 5
ace = 6
names = { nine: “9”, ten: “10”, jack: “J”, queen: “Q”, king: “K”,
ace: “A” }
result = “You have “ + hand(dice)
def game():
throws()
def throws():
global dice
dice1_check = dice1.get()
dice2_check = dice2.get()
dice3_check = dice3.get()
dice4_check = dice4.get()
dice5_check = dice5.get()
dice_rerolls = [dice1_check, dice2_check, dice3_check, dice4_
check, dice5_check]
THEPOKERDICEGUI
Two things are being printed out
on the initial window. The first
set of dice, ordered in the way
we did last time, and the current
hand. The checkboxes activate
a specific number that is used
when re-rolling dice with the
Rerollbutton.
EXTRAGAMEFUNCTIONS
We mentioned that the game function
doesn’t necessarily need to be used right
now. You can either clean up the code and
remove it, or add extra functions, such
as being able to choose a random new
selection of dice, or making it two-player.
Experimentwith whatyouwanttodo!](https://crownmelresort.com/image.slidesharecdn.com/thepythonbooktheultimateguidetocodingwithpythonpdfdrive-220527060944-728dd1fe/75/The-Python-Book_-The-ultimate-guide-to-coding-with-Python-PDFDrive-pdf-54-2048.jpg)
![The Python Book 55
Python essentials
25Dicetore-roll
If a checkbox isn’t selected, we have
it set to give a zero value. We want to remove
these from the list so that the correct dice
are changed, so we use the for loop to check
each part of the list, and then use the remove
functionwhentheelementdoesequalzero.
26Earlyfinish
If no dice have been selected to re-roll,
the list will contain all 0s, which will then be
removed. The length of this list will then also be
zero,meaningwecanusethattoendthegameif
theplayerhitsRerollwithoutselectinganydice.
27New dice
This else function works roughly
the same as before. We start by getting the
necessary information for how many dice to roll,
andalisttoputthere-rolls.Wethenrollasmany
newdiceasweneedwiththefirstwhileloop
28Gameover
We use the same kind of while loop to
replace the new numbers into the original list,
much like last time. Then the dice are re-sorted,
analysed, joined as a string and then set into the
interface’s variable. The final hand message is
alsocreateandset.
29Graphicalvariables
As we’re rolling the dice as soon as
we launch the game, but the interface code
doesn’t start until the end, you can see that
after creating the necessary variables, we also
then set them. Of note, the dice have to be made
into a string separately with the for loop before
addingtothevariable.
30Checkbuttons
The main new addition to this code is
the check buttons with Checkbutton. You can
set an on and off value, with default off being 0.
We’ve made it so that the check buttons return
the same number as the dice they’re changing,
which we explained how we used earlier in the
code. The variable option sets whatever the
outcomeistothespecificTkintervariable.
25
26
27
28
29
30
Thecheck
buttonsarenew
for i in range(len(dice_rerolls)):
if 0 in dice_rerolls:
dice_rerolls.remove(0)
if len(dice_rerolls) == 0:
result = “You finish with “ + hand(dice)
hand_output.set(result)
else:
roll_number = len(dice_rerolls)
number_rerolls = roll(roll_number)
dice_changes = range(len(dice_rerolls))
iterations = 0
while iterations roll_number:
iterations = iterations + 1
dice_changes[iterations-1] = number_rerolls[iterations-1]
iterations = 0
while iterations roll_number:
iterations = iterations + 1
replacement = number_rerolls[iterations-1]
dice[dice_changes[iterations-1]] = replacement
dice.sort()
new_dice_list = [0,0,0,0,0]
for i in range(len(dice)):
new_dice_list[i] = names[dice[i]]
final_dice = “ “.join(new_dice_list)
dice_output.set(final_dice)
final_result = “You finish with “ + hand(dice)
hand_output.set(final_result)
def reset_game():
global dice
dice = roll(5)
dice.sort()
for i in range(len(dice)):
empty_dice[i] = names[dice[i]]
first_dice = “ “.join(empty_dice)
dice_output.set(first_dice)
result = “You have “ + hand(dice)
hand_output.set(result)
pd_window = Toplevel()
pd_window.title (“Poker Dice”)
dice_output = StringVar()
empty_dice = [0,0,0,0,0]
for i in range(len(dice)):
empty_dice[i] = names[dice[i]]
first_dice = “ “.join(empty_dice)
dice_output.set(first_dice)
hand_output = StringVar()
hand_output.set(result)
dice1 = IntVar()
dice2 = IntVar()
dice3 = IntVar()
dice4 = IntVar()
dice5 = IntVar()
result_set = StringVar()
player_score = IntVar()
computer_score = IntVar()
pd_frame = Frame(pd_window, padding = ‘3 3 12 12’, width = 300)
pd_frame.grid(column=0, row = 0, sticky=(N,W,E,S))
pd_frame.columnconfigure(0, weight=1)
pd_frame.rowconfigure(0,weight=1)
Label(pd_frame, text=’Dice’).grid(column=3, row = 1)
Label(pd_frame, textvariable = dice_output).grid(column=3, row = 2)
Label(pd_frame, textvariable = hand_output).grid(column=3, row = 3)
Label(pd_frame, text=’Dice to Reroll?’).grid(column=3, row = 4)
reroll1 = Checkbutton(pd_frame, text = “1”, variable = dice1, onvalue = 1, offvalue
= 0).grid(column=1, row = 5)
reroll2 = Checkbutton(pd_frame, text = “2”, variable = dice2, onvalue = 2, offvalue
= 0).grid(column=2, row = 5)
reroll3 = Checkbutton(pd_frame, text = “3”, variable = dice3, onvalue = 3, offvalue
= 0).grid(column=3, row = 5)
reroll4 = Checkbutton(pd_frame, text = “4”, variable = dice4, onvalue = 4, offvalue
= 0).grid(column=4, row = 5)
reroll5 = Checkbutton(pd_frame, text = “5”, variable = dice5, onvalue = 5, offvalue
= 0).grid(column=5, row = 5)
pd_reroll_button = Button(pd_frame, text = “Reroll”, command = game).grid(column =
3, row = 6)
replay_button = Button(pd_frame, text = “Reset”, command = reset_game).grid(column
= 3, row = 7)
if __name__ == ‘__main__’:
gui()
ONEWINDOW
Thewaywe’vemadetheseTkinter
interfaces is to have the games
launch in a separate window. You
can have them all running in one
window, though, by replacing the
labels and buttons of the original
interface by putting them as
different functions or classes.
Make sure to add a quit button to
the games that lets you go back
to the main page.](https://crownmelresort.com/image.slidesharecdn.com/thepythonbooktheultimateguidetocodingwithpythonpdfdrive-220527060944-728dd1fe/75/The-Python-Book_-The-ultimate-guide-to-coding-with-Python-PDFDrive-pdf-55-2048.jpg)

![The Python Book 57
Python essentials
from kivy.app import App
from kivy.uix.widget import Widget
from kivy.uix.floatlayout import FloatLayout
from kivy.uix.modalview import ModalView
__version__ = '0.1' # Used later during Android compilation
class BreakoutApp(App):
pass
BreakoutApp().run()
Fig. 01
from kivy.graphics.context_instructions import Color
from kivy.graphics.vertex_instructions import Rectangle
class Player(Widget):
def __init__(self
, **kwargs):
super(Player
, self).__init__(**kwargs)
with self
.canvas:
Color(1, 0, 0, 1) # r
, g, b, a - red
Rectangle(pos=self
.pos, size=self
.size)
# or without the with syntax, self
.canvas.add(...
)
Fig. 03
from kivy.properties import (ListProperty, NumericProperty,
ObjectProperty, StringProperty)
class Game(FloatLayout): # Will contain everything
blocks = ListProperty([])
player = ObjectProperty() # The game's Player instance
ball = ObjectProperty() # The game's Ball instance
class Player(Widget): # A moving paddle
position = NumericProperty(0.5)
direction = StringProperty('none')
class Ball(Widget): # A bouncing ball
# pos_hints are for proportional positioning, see below
pos_hint_x = NumericProperty(0.5)
pos_hint_y = NumericProperty(0.3)
proper_size = NumericProperty(0.
)
velocity = ListProperty([0.1, 0.5])
class Block(Widget): # Each coloured block to destroy
colour = ListProperty([1, 0, 0])
Fig. 02
problem, unfortunately, as the drawing is
static. When we later move the player widget,
the red rectangle will stay in the same place,
and the widget will be invisible when it is in its
real position.
We could fix this by keeping references to our
canvas instructions and repeatedly updating
their properties to track the player, but there's
actually an easier way to do all of this - we
can use the Kivy language we introduced last
time. It has a special syntax for drawing on
the widget canvas, which we can use to draw
each of our widget shapes:
Player:
canvas:
Color:
rgba: 1, 1, 1, 1
Rectangle:
pos: self.pos
size: self.size
Ball:
canvas:
Color:
rgb: 1, 0.55, 0
Rectangle:
pos: self.pos
size: self.size
Block:
canvas:
Color:
rgb: self.colour
# A property we predefined above
Rectangle:
pos: self.pos
size: self.size
Color:
rgb: 0.1, 0.1, 0.1
Line:
rectangle:
[self.x, self.y,
self.width, self.height]
The canvas declaration is special, underneath
it we can write any canvas instructions we
like. Don't get confused, canvas is not a
widget and nor are graphics instructions
like Line. This is just a special syntax that is
unique to the canvas. Instructions all have
different properties that can be set, like the
pos and size of the rectangle, and you can
check the Kivy documentation online for all
the possibilities. The biggest advantage is
that although we still declare simple canvas
instructions, kv language is able to detect
what Kivy properties we have referred to and
automatically track them, so when they are
updated (the widget moves or is resized) the
canvas instructions move to follow!
Onceyouhavethebasictechniques,
youaren’tlimitedtooneapp…your
imaginationistheonlylimit](https://crownmelresort.com/image.slidesharecdn.com/thepythonbooktheultimateguidetocodingwithpythonpdfdrive-220527060944-728dd1fe/75/The-Python-Book_-The-ultimate-guide-to-coding-with-Python-PDFDrive-pdf-57-2048.jpg)

![The Python Book 59
Python essentials
'none'
: 0}
self
.position += (0.5 * dt * dir_
dict[self
.direction])
These on_touch_ functions are Kivy's general
method for interacting with touch or mouse input,
they are automatically called when the input
is detected and you can do anything you like in
response to the touches you receive. In this case
we set the Player's direction property in response
to either keyboard and touch/mouse input, and
use this direction to move the Player when its
updatemethodiscalled.Wecanalsoaddtheright
behaviourfortheball(Fig.07).
This makes the ball bounce off every wall by
forcing its velocity to point back into the Game,
as well as bouncing from the player paddle –
but with an extra kick just to let the ball speed
change. It doesn't yet handle any interaction
with the blocks or any win/lose conditions,
but it does try to call Game.lose() if the
ball hits the bottom of the player's screen,
solet'snowaddinsomegameendcodetohandle
allofthis(Fig.08).AndthenaddthecodeinFig.09
toyour'breakout.kv'file.
This should fully handle the loss or win,
opening a pop-up with an appropriate message
and providing a button to try again. Finally, we
have to handle destroying blocks when the
ballhitsthem(Fig.10).
Thisfullycoverstheselastconditions,checking
collision via Kivy's built-in collide_widget method
that compares their bounding boxes (pos and
size). The bounce direction will depend on how far
the ball has penetrated, as this will tell us how it
firstcollidedwiththeBlock.
So there we have it, you can run the code to
play your simple Breakout game. Obviously it's
very simple right now, but hopefully you can
see lots of different ways to add whatever extra
behaviour you like – you could add different
types of blocks and power-ups, a lives system,
more sophisticated paddle/ball interaction, or
even build a full game interface with a menu and
settingsscreenaswell.
We’rejustgoingtofinishshowingonecoolthing
that you can already do – compile your game for
Android!GenerallyspeakingyoucantakeanyKivy
app and turn it straight into an Android APK that
will run on any of your Android devices. You can
even access the normal Android API to access
hardware or OS features such as vibration,
sensorsornativenotifications.
We'll build for Android using the Buildozer tool,
and a Kivy sister project wrapping other build
tools to create packages on different systems.
This takes care of downloading and running the
Android build tools (SDK, NDK, etc) and Kivy's
Python-for-AndroidtoolsthatcreatetheAPK.
import random
class Block(Widget):
def __init__(self
, **kwargs):
super(Block, self).__init__(**kwargs)
self
.colour = random.choice([
(0.78, 0.28, 0), )0.28, 0.63, 0.28), )0.25, 0.28, 0.78)])
Fig. 04
from kivy.clock import Clock
from kivy.core.window import Window
from kivy.utils import platform
class Game(FloatLayout):
def update(self
, dt):
self
.ball.update(dt) # Not defined yet
self
.player
.update(dt) # Not defined yet
def start(self
, *args):
Clock.schedule_interval(self
.update, 1./60.
)
def stop(self):
Clock.unschedule(self
.update)
def reset(self):
for block in self
.blocks:
self
.remove_widget(block)
self
.blocks = []
self
.setup_blocks()
self
.ball.velocity = [random.random(), 0.5]
self
.player
.position = 0.5
class BreakoutApp(App):
def build(self):
g = Game()
if platform() != 'android'
:
Window.bind(on_key_down=g.player
.on_key_down)
Window.bind(on_key_up=g.player
.on_key_up)
g.reset()
Clock.schedule_once(g.start, 0)
return g
Fig. 06
Block:
size_hint: 0.09, 0.05
# ... canvas part
Player:
size_hint: 0.1, 0.025
pos_hint: {'x'
: self
.position, 'y'
: 0.1}
# ... canvas part
Ball:
pos_hint: {'x'
: self
.pos_hint_x, 'y'
: self
.pos_hint_y}
size_hint: None, None
proper_size:
min(0.03*self
.parent.height, 0.03*self
.parent.width)
size: self
.proper_size, self
.proper_size
# ... canvas part
Fig. 05](https://crownmelresort.com/image.slidesharecdn.com/thepythonbooktheultimateguidetocodingwithpythonpdfdrive-220527060944-728dd1fe/75/The-Python-Book_-The-ultimate-guide-to-coding-with-Python-PDFDrive-pdf-59-2048.jpg)
![60 The Python Book
Python essentials
Here you will be needing some basic
dependencies, which can be installed with
ease just by using your distro's normal
repositories. The main ones to use are
OpenJDK7, zlib, an up-to-date Cython,
and Git. If you are using a 64-bit distro you will also
be in need of 32-bit compatibility libraries for zlib,
libstdc++,aswellaslibgcc.Youcanthengoonand
downloadandinstallBuildozer:
git clone git://github.com/kivy/buildozer
cd buildozer
sudo python2.7 setup.py install
When you’re done with that part you
can then go on and navigate to your
Kivyapp,andyou’llhavetonamethemaincodefile
‘main.py’, this is the access point that the Android
APKwillexpect.Then:
buildozer init
This creates a ‘buildozer.spec’ file, a settings file
containing all the information that Buildozer needs
to create your APK, from the name and version to
thespecificAndroidbuildoptions.Wesuggestthat
you check through the whole file just to see what's
available but most of the default settings will be
fine,theonlythingwesuggestchangingis(Fig.11).
There are various other options you will often
want to set, but none are really all that vital right
now, so you’re able to immediately tell Buildozer to
buildyourAPKandgetgoing!
buildozer android debug
This will take some time, so be patient and it will
workoutfine.Whenyoufirstrunit,itwilldownload
both the Android SDK and NDK, which are large
(at least hundreds of megabytes) but vital to the
build. It will also take time to build these and to
compile the Python components of your APK. A lot
ofthisonlyneedstobedoneonce, asfuturebuilds
will take a couple of minutes if you change the
buildozer.spec, or just a few seconds if you've only
changedyourcode.
The APK produced is a debug APK, and you can
install and use it but there are extra steps if you
wanttofullydigitallysignitsothatitcanbeposted
on the Play store. This isn't hard, and Buildozer
can do some of the work, but you can check the
documentationonlineforfulldetails.
Assuming everything goes fine (it should!),
your Android APK will be in a newly created 'bin'
directory with the name ‘KivyBreakout-0.1-debug.
apk’. You can send it to your phone any way you
like (eg email), though you may need to enable
application installation from unknown sources in
yourSettingsbeforeyoucaninstallit.
class Ball(Widget)
def update(self
, dt):
self
.pos_hint_x += self
.velocity[0] * dt
self
.pos_hint_y += self
.velocity[1] * dt
if self
.right self
.parent.right: # Bounce from right
self
.velocity[0] = -1 * abs(self
.velocity[0])
if self
.x self
.parent.x: # Bounce from left
self
.velocity[0] = abs(self
.velocity[0])
if self
.top self
.parent.top: # Bounce from top
self
.velocity[1] = -1 * abs(self
.velocity[1])
if self
.y self
.parent.y: # Lose at bottom
self
.parent.lose() # Not implemented yet
self
.bounce_from_player(self
.parent.player)
def bounce_from_player(self
, player):
if self
.collide_widget(player):
self
.velocity[1] = abs(self
.velocity[1])
self
.velocity[0] += (
0.1 * ((self
.center_x - player
.center_x) /
player
.width))
Fig. 07
class GameEndPopup(ModalView):
message = StringProperty()
game = ObjectProperty()
class Game(Widget):
def lose(self):
self
.stop()
GameEndPopup(message='[color=#ff0000]You lose![/color]'
,
game=self).open()
def win(self): # Not called yet, but we'll need it later
self
.stop()
GameEndPopup(message='[color=#00ff00]You win![/color]'
,
game=self).open()
Fig. 08
GameEndPopup:
size_hint: 0.8, 0.8
auto_dismiss: False # Don't close if player clicks outside
BoxLayout:
orientation: 'vertical'
Label:
text: root.message
font_size: 60
markup: True
halign: 'center'
Button:
size_hint_y: None
height: sp(80)
text: 'Play again?'
font_size: 60
on_release: root.game.start(); root.dismiss()
Fig. 09](https://crownmelresort.com/image.slidesharecdn.com/thepythonbooktheultimateguidetocodingwithpythonpdfdrive-220527060944-728dd1fe/75/The-Python-Book_-The-ultimate-guide-to-coding-with-Python-PDFDrive-pdf-60-2048.jpg)
![self
.parent.do_layout()
self
.parent.destroy_blocks(self)
class Game(FloatLayout):
def destroy_blocks(self
, ball):
for i, block in enumerate(self
.blocks):
if ball.collide_widget(block):
y_overlap = (
ball.top - block.y if ball.velocity[1] 0
else block.top - ball.y) / block.size_hint_y
x_overlap = (
ball.right - block.x if ball.velocity[0] 0
else block.right - ball.x) / block.size_hint_x
if x_overlap y_overlap:
ball.velocity[0] *= -1
else:
ball.velocity[1] *= -1
self
.remove_widget(block)
self
.blocks.pop(i)
if len(self
.blocks) == 0:
self
.win()
return # Only remove at most 1 block per frame
Fig. 10
title = Kivy Breakout # Displayed in your app drawer
package.name = breakout # Just a unique identifying string,
# along with the package.domain
fullscreen = 0 # This will mean the navbar is not covered
log_level = 2 # Not vital, but this will print a lot more debug
# information and may be useful if something
# goes wrong
Fig. 11
PuttingyourAPK
onthePlayStore
Findouthowtodigitallysignarelease
APKanduploadittoanappstoreof
yourchoice
1
BuildandsignareleaseAPK
First we have to begin by creating a personal
digital key, then using it to digitally sign a
special release version of the APK. Run these
commands, and follow the instructions they then
giveyou.
## Create your personal digital key
## You can choose your own
## keystore name, alias, and passwords.
$ keytool -genkey -v -keystore test-
release-key.keystore
-alias test-alias -keyalg RSA
-keysize 2048 -validity 10000
## Compile your app in release mode
$ buildozer android release
## Sign the APK with your new key
$ jarsigner -verbose -sigalg
SHA1withRSA -digestalg SHA1
-keystore ./test-release-key.keystore
./bin/KivyBreakout-0.1-release-
unsigned.apk test-alias
## Align the APK zip file
$ ~/
.buildozer/android/platform/android-
sdk-21/tools/zipalign -v 4
./bin/KivyBreakout-0.1-release-
unsigned.apk
./bin/KivyBreakout-0.1-release.apk
3
Uploadyourapptothestore
Click 'Add new application'
to submit your app the store,
including uploading your APK and
adding description text. When
everything is ready, simply click
Publish, and it should take just a few
hoursforyourapptogolive!
2
SignupasaGoogle
PlayDeveloper
Visit https://play.google.com/
apps/publish/signup, and follow
the instructions. You'll need to pay a
one-off $25 charge, but then you can
uploadasmanyappsasyoulike.
Python essentials
QYourgameshouldrunonanymodernAndroiddevice…you
canevenbuildareleaseversionandpublishtoanappstore!](https://crownmelresort.com/image.slidesharecdn.com/thepythonbooktheultimateguidetocodingwithpythonpdfdrive-220527060944-728dd1fe/75/The-Python-Book_-The-ultimate-guide-to-coding-with-Python-PDFDrive-pdf-61-2048.jpg)

![The Python Book 63
Python essentials
03Creatingludissuesapp
In this step we will create the primary
app for our site, called ludissues. To do that, we
willusethemanage.pyscript:
$ python manage.py startapp
ludissues
We will need to enable this app in the config file
aswell:
INSTALLED_APPS = (
.............
'django.contrib.admin',
‘ludissues’,
)
04Creatingthedatamodel
This is the part where we define the
data model for our app. Please see the inline
commentstounderstandwhatishappening.
Fromdjango.dbimportmodels:
# We are importing the user
authentication module so that we use
the built
# in authentication model in this
app
from django.contrib.auth.models
import User
# We would also create an admin
interface for our app
from django.contrib import admin
# A Tuple to hold the multi choice
char fields.
# First represents the field name
the second one repersents the
display name
ISSUE_STATUS_CHOICES = (
MEDIA_URL = ‘/media/’
Nowwewillneedtoenabletheadmininterface
forourDjangosite.ThisisaneatfeatureofDjango
which allows the automatic creation of an admin
interfaceofthesitebasedonthedatamodel.The
admin interface can be used to add and manage
contentforaDjangosite.
Uncommentthefollowingline:
INSTALLED_APPS = (
‘django.contrib.auth’,
‘django.contrib.contenttypes’,
‘django.contrib.sessions’,
‘django.contrib.sites’,
‘django.contrib.messages’,
‘django.contrib.staticfiles’,
‘django.contrib.admin’,
# ‘django.contrib.admindocs’,
)
('new', 'New'),
('accepted','Accepted'),
('reviewed','Reviewed'),
('started','Started'),
('closed','Closed'),
)
class Issue(models.Model):
# owner will be a foreign key
to the User model which is already
built-in Django
owner = models.ForeignKey(User,n
ull=True,blank=True)
# multichoice with defaulting to
new
status = models.CharField(max_
length=25,choices=ISSUE_STATUS_
CHOICES,default='new')
summary = models.TextField()
# date time field which will be
set to the date time when the record
is created
opened_on = models.
DateTimeField('date opened', auto_
now_add=True)
modified_on = models.
DateTimeField('date modified', auto_
now=True)
def name(self):
return self.summary.
split('n',1)[0]
# Admin front end for the app. We
are also configuring some of the
# built in attributes for the admin
interface on
# how to display the list, how it
will be sorted
# what are the search fields etc.
class IssueAdmin(admin.ModelAdmin):
date_hierarchy = 'opened_on'
list_filter = ('status','owner')
list_display = ('id','name','sta
tus','owner','modified_on')
search_fields =
['description','status']
# register our site with the Django
admin interface
admin.site.
register(Issue,IssueAdmin)
To have the created data model reflected in the
database,runthefollowingcommand:
$ python manage.py syncdb
You’llbealsoaskedtocreateasuperuserforit:
You just installed Django's auth
system, which means you don't have
any superusers defined.
Would you like to create one now?
(yes/no): yes
05Enablingtheadminsite
The admin site is already enabled,
but we need to enable it in the urls.py file – this
contains the regex-based URL mapping from
modeltoview.Updatetheurls.pyfileasfollows:
from django.conf.urls import
patterns, include, url
from django.contrib import admin
admin.autodiscover()
urlpatterns = patterns(‘’,
url(r’^admin/’, include(admin.
site.urls)),
)
06StartingtheDjangowebserver
Django includes a built-in web server
which is very handy to debug and test Django
applications. Let’s start it to see how our admin
interfaceworks…
Tostartthewebserver:
$ python manage.py runserver
If you do not have any errors in your code, the
server should be available on port 8000. To
launch the admin interface, navigate your
browsertohttp://localhost:8000/admin.
You will be asked to log in here. Enter the
username and password that you created while
syncingthedatabase.
After logging in, you will notice that all the apps
installedinyourprojectareavailablehere.Weare
onlyinterestedintheAuthandLudIssuesapp.
You can click the +Add to add a record. Click
the Add button next to Users and add a few
users to the site.
Once you have the users inside the system,
youcannowaddafewissuestothesystem.
Q Adminloginscreen](https://crownmelresort.com/image.slidesharecdn.com/thepythonbooktheultimateguidetocodingwithpythonpdfdrive-220527060944-728dd1fe/75/The-Python-Book_-The-ultimate-guide-to-coding-with-Python-PDFDrive-pdf-63-2048.jpg)


![66 The Python Book
Python essentials
Pythonisaprogramminglanguagethatletsyouworkmorequicklyand
integrateyoursystemsmoreeffectively.Today,Pythonisoneofthemost
popularprogramminglanguagesintheopensourcespace.Lookaround
andyouwillfinditrunningeverywhere,fromvariousconfigurationtools
toXMLparsing.Hereisthecollectionof50gemstomakeyourPython
experienceworthwhile…
Basics
1.RunningPythonscripts
On most of the UNIX systems, you can run
Pythonscriptsfromthecommandline.
$ python mypyprog.py
2.RunningPython
programsfrom
Pythoninterpreter
The Python interactive interpreter makes it
easy to try your first steps in programming and
using all Python commands. You just issue each
command at the command prompt (), one by
one,andtheanswerisimmediate.
Python interpreter can be started by issuing
thecommand:
$ python
kunal@ubuntu:~$ python
Python 2.6.2 (release26-maint, Apr
19 2009, 01:56:41)
[GCC 4.3.3] on linux2
Type “help”, “copyright”, “credits”
or “license” for more information.
type commands here
Inthisarticle,allthecodestartingatthe
symbolismeanttobegivenatthe
Pythonprompt.
It is also important to remember that Python
takes tabs very seriously – so if you are
receiving any error that mentions tabs, correct
thetabspacing.
3.Dynamictyping
In Java, C++, and other statically typed
languages, you must specify the data type of
the function return value and each function
argument. On the other hand, Python is
a dynamically typed language. In Python
you never have to explicitly specify the data
type of anything. Based on what value you
assign, Python will keep track of the data
typeinternally.
50
Python
tips](https://crownmelresort.com/image.slidesharecdn.com/thepythonbooktheultimateguidetocodingwithpythonpdfdrive-220527060944-728dd1fe/75/The-Python-Book_-The-ultimate-guide-to-coding-with-Python-PDFDrive-pdf-66-2048.jpg)
![The Python Book 67
Python essentials
x,y = my_function.minmax(25, 6.3)
9.Moduledefinednames
Example:
The built-in function ‘dir()’ can be used to find
out which names a module defines. It returns a
sortedlistofstrings.
import time
dir(time)
[‘__doc__’, ‘__file__’, ‘__name__’,
‘__package__’, ‘accept2dyear’,
‘altzone’, ‘asctime’, ‘clock’,
‘ctime’, ‘daylight’, ‘gmtime’,
‘localtime’, ‘mktime’, ‘sleep’,
‘strftime’, ‘strptime’, ‘struct_
time’, ‘time’, ‘timezone’, ‘tzname’,
‘tzset’]
10.Moduleinternal
documentation
You can see the internal documentation (if
available) of a module name by looking at
.__doc__.
Example:
import time
print time.clock.__doc__
clock() - floating point number
This example returns the CPU time or real time
since the start of the process or since the first
call to clock(). This has as much precision as the
systemrecords.
11.Passingarguments
toaPythonscript
Pythonletsyouaccesswhateveryouhavepassed
to a script while calling it. The ‘command line’
contentisstoredinthesys.argvlist.
import sys
print sys.argv
12.Loadingmodulesor
commandsatstartup
You can load predefined modules or
commands at the startup of any Python
script by using the environment variable
$PYTHONSTARTUP. You can set environment
variable $PYTHONSTARTUP to a file which
contains the instructions load necessary
modulesorcommands.
13.Convertingastring
todateobject
You can use the function ‘DateTime’ to convert a
stringtoadateobject.
Example:
from DateTime import DateTime
dateobj = DateTime(string)
14.Convertingalist
toastringfordisplay
You can convert a list to string in either of the
followingways.
1stmethod:
mylist = [‘spam’, ‘ham’, ‘eggs’]
print ‘, ‘.join(mylist)
spam, ham, eggs
2ndmethod:
print ‘n’.join(mylist)
spam
ham
eggs
15.Tabcompletion
inPythoninterpreter
You can achieve auto completion inside Python
interpreterbyaddingtheselinestoyour.pythonrc
file(oryourfileforPythontoreadonstartup):
import rlcompleter, readline
readline.parse_and_bind(‘tab: complete’)
This will make Python complete partially typed
function, method and variable names when you
presstheTabkey.
16.Python
documentationtool
Youcanpopupagraphicalinterfaceforsearching
thePythondocumentationusingthecommand:
$ pydoc -g
Youwillneedpython-tkpackageforthistowork.
17.Python
documentationserver
You can start an HTTP server on the given port on
thelocalmachine.Thiswillgiveyouanice-looking
access to all Python documentation, including
third-partymoduledocumentation.
$ pydoc -p portNumber
18.Pythondevelopment
software
There are plenty of tools to help with Python
development.Hereareafewimportantones:
IDLE: The Python built-in IDE, with
autocompletion, function signature popup help,
andfileediting.
IPython: Another enhanced Python shell with
tab-completionandotherfeatures.
Eric3: A GUI Python IDE with autocompletion,
classbrowser,built-inshellanddebugger.
WingIDE: Commercial Python IDE with
free licence available to open-source
developerseverywhere.
4.Pythonstatements
Python uses carriage returns to separate
statements, and a colon and indentation to
separate code blocks. Most of the compiled
programming languages, such as C and C++, use
semicolons to separate statements and curly
bracketstoseparatecodeblocks.
5. ==and=operators
Python uses ‘==’ for comparison and ‘=’ for
assignment. Python does not support inline
assignment, so there’s no chance of accidentally
assigning the value when you actually want to
compareit.
6.Concatenatingstrings
Youcanuse‘+’toconcatenatestrings.
print ‘kun’+’al’
kunal
7.The__init__method
The __init__ method is run as soon as
an object of a class is instantiated. The
method is useful to do any initialization
you want to do with your object. The
__init__ method is analogous to a constructor in
C++,C#orJava.
Example:
class Person:
def __init__(self, name):
self.name = name
def sayHi(self):
print ‘Hello, my name is’, self.name
p = Person(‘Kunal’)
p.sayHi()
Output:
[~/src/python $:] python initmethod.py
Hello, my name is Kunal
8.Modules
To keep your programs manageable as they
grow in size, you may want to break them up into
several files. Python allows you to put multiple
function definitions into a file and use them as a
modulethatcanbeimportedintootherscriptsand
programs.Thesefilesmusthavea.pyextension.
Example:
# file my_function.py
def minmax(a,b):
if a = b:
min, max = a, b
else:
min, max = b, a
return min, max
Module Usage
import my_function](https://crownmelresort.com/image.slidesharecdn.com/thepythonbooktheultimateguidetocodingwithpythonpdfdrive-220527060944-728dd1fe/75/The-Python-Book_-The-ultimate-guide-to-coding-with-Python-PDFDrive-pdf-67-2048.jpg)
![68 The Python Book
Python essentials
19.Executingfunctions
atthetimeofPython
interpretertermination
You can use ‘atexit’ module to execute functions
atthetimeofPythoninterpretertermination.
Example:
def sum():
print(4+5)
def message():
print(“Executing Now”)
import atexit
atexit.register(sum)
atexit.register(message)
Output:
Executing Now
9
20.Convertingfrominteger
tobinary,hexadecimal
andoctal
Python provides easy-to-use functions – bin(),
hex() and oct() – to convert from integer to binary,
decimalandoctalformatrespectively.
Example:
bin(24)
‘0b11000’
hex(24)
‘0x18’
oct(24)
‘030’
21.Convertingany
charsettoUTF-8
You can use the following function to convert any
charsettoUTF-8.
data.decode(“input_charset_here”).
encode(‘utf-8’)
22.Removing
duplicatesfromlists
If you want to remove duplicates from a list,
just put every element into a dict as a key (for
example with ‘none’ as value) and then check
dict.keys().
from operator import setitem
def distinct(l):
d = {}
map(setitem, (d,)*len(l), l, [])
return d.keys()
23.Do-whileloops
Since Python has no do-while or do-until loop
constructs (yet), you can use the following
methodtoachievesimilarresults:
while True:
do_something()
if condition():
break
24.Detectingsystem
platform
To execute platform-specific functions, it is very
usefultodetecttheplatformonwhichthePython
interpreter is running. You can use ‘sys.platform’
tofindoutthecurrentplatform.
Example:
OnUbuntuLinux
import sys
sys.platform
‘linux2’
OnMacOSXSnowLeopard
import sys
sys.platform
‘darwin’
25.Disablingandenabling
garbagecollection
Sometimes you may want to enable or disable
the garbage collector at runtime. You can
use the ‘gc’ module to enable or disable the
garbagecollection.
Example:
import gc
gc.enable
built-in function enable
gc.disable
built-in function disable
26.UsingC-basedmodules
forbetterperformance
Many Python modules ship with counterpart
C modules. Using these C modules will
give a significant performance boost in
complex applications.
Example:
cPickle instead of Pickle, cStringIO
instead of StringIO .
27.Calculatingmaximum,
minimumandsum
outofanylistoriterable
Youcanusethefollowingbuilt-infunctions.
max:Returnsthelargestelementinthelist.
min:Returnsthesmallestelementinthelist.
sum: This function returns the sum of all
elements in the list. It accepts an optional
second argument: the value to start with when
summing(defaultsto0).
28.Representing
fractionalnumbers
Fraction instance can be created using the
followingconstructor:
Fraction([numerator
[,denominator]])
29.Performing
mathoperations
The ‘math’ module provides a plethora of
mathematical functions. These work on integer
and float numbers, except complex numbers.
For complex numbers, a separate module is
used,called‘cmath’.
Forexample:
math.acos(x): Return arc cosine of
x.
math.cos(x): Returns cosine of x.
math.factorial(x) : Returns x
factorial.
30.Workingwitharrays
The ‘array’ module provides an efficient way to
use arrays in your programs. The ‘array’ module
definesthefollowingtype:
array(typecode [, initializer])
Once you have created an array object, say
myarray,youcanapplyabunchofmethodstoit.
Hereareafewimportantones:
myarray.count(x): Returns the
number of occurrences of x in a.
myarray.extend(x): Appends x at the
end of the array.
myarray.reverse(): Reverse the
order of the array.
31.Sortingitems
The ‘bisect’ module makes it very easy to keep
lists in any possible order. You can use the
following functions to order lists.
bisect.insort(list, item [, low [,
high]])
Inserts item into list in sorted order. If item is
already in the list, the new entry is inserted to
therightofanyexistingentries.
bisect.insort_left(list, item [, low
[, high]])
Inserts item into list in sorted order. If item is
already in the list, the new entry is inserted to
theleftofanyexistingentries.
Built-in
modules](https://crownmelresort.com/image.slidesharecdn.com/thepythonbooktheultimateguidetocodingwithpythonpdfdrive-220527060944-728dd1fe/75/The-Python-Book_-The-ultimate-guide-to-coding-with-Python-PDFDrive-pdf-68-2048.jpg)
![The Python Book 69
Python essentials
32.Usingregular
expression-based
search
The ‘re’ module makes it very easy to use regxp-
based searches. You can use the function
‘re.search()’ with a regexp-based expression.
Checkouttheexamplebelow.
Example:
import re
s = “Kunal is a bad boy”
if re.search(“K”, s): print
“Match!” # char literal
...
Match!
if re.search(“[@A-Z]”, s): print
“Match!” # char class
... # match either at-sign or capital
letter
Match!
if re.search(“d”, s): print
“Match!” # digits class
...
33.Workingwithbzip2(.bz2)
compressionformat
You can use the module ‘bz2’ to read and write
datausingthebzip2compressionalgorithm.
bz2.compress() : For bz2
compression
bz2.decompress() : For bz2
decompression
Example:
# File: bz2-example.py
import bz2
MESSAGE = “Kunal is a bad boy”
compressed_message = bz2.
compress(MESSAGE)
decompressed_message = bz2.
decompress(compressed_message)
print “original:”, repr(MESSAGE)
print “compressed message:”,
repr(compressed_message)
print “decompressed message:”,
repr(decompressed_message)
Output:
[~/src/python $:] python bz2-
example.py
original: ‘Kunal is a bad boy’
compressed message: ‘BZh91AYSYxc4
x0fGx98x00x00x02x15x80@x00
x00x084%x8a x00”x00x0cx84r
x03Cxa2xb0xd6sxa5xb3x19x00
xf8xbbx92)xc2x84x86 zxc0’
decompressed message: ‘Kunal is a
bad boy’
34.UsingSQLitedatabase
withPython
SQLiteisfastbecomingaverypopularembedded
database because of its zero configuration
needed, and superior levels of performance. You
can use the module ‘sqlite3’ in order to work with
SQLitedatabases.
Example:
import sqlite3
connection = sqlite.connect(‘test.
db’)
curs = connection.cursor()
curs.execute(‘’’create table item
... (id integer primary key, itemno
text unique,
... scancode text, descr text, price
real)’’’)
sqlite3.Cursor object at 0x1004a2b30
35.Workingwithzipfiles
You can use the module ‘zipfile’ to work with
zipfiles.
zipfile.ZipFile(filename [, mode [,
compression [,allowZip64]]])
Open a zip file, where the file can be either a path
toafile(astring)orafile-likeobject.
zipfile.close()
Closethearchivefile.Youmustcall‘close()’before
exiting your program or essential records will not
bewritten.
zipfile.extract(member[, path[,
pwd]])
Extract a member from the archive to the current
working directory; ‘member’ must be its full
name (or a zipinfo object). Its file information
is extracted as accurately as possible. ‘path’
specifies a different directory to extract to.
‘member’ can be a filename or a zipinfo object.
‘pwd’isthepasswordusedforencryptedfiles.
36.UsingUNIX-style
wildcardstosearch
forfilenames
You can use the module ‘glob’ to find all the
pathnames matching a pattern according to the
rules used by the UNIX shell. *, ?, and character
rangesexpressedwith[]willbe matched.
Example:
import glob
glob.glob(‘./[0-9].*’)
[‘./1.gif’, ‘./2.txt’]
glob.glob(‘*.gif’)
[‘1.gif’, ‘card.gif’]
glob.glob(‘?.gif’)
[‘1.gif’]
37.Performingbasicfile
operations(copy,delete
andrename)
You can use the module ‘shutil’ to perform basic
file operation at a high level. This module works
with your regular files and so will not work with
special files like named pipes, block devices, and
soon.
shutil.copy(src,dst)
Copiesthefilesrctothefileordirectorydst.
shutil.copymode(src,dst)
Copiesthefilepermissionsfromsrctodst.
shutil.move(src,dst)
Movesafileordirectorytodst.
shutil.copytree(src, dst, symlinks
[,ignore]])
Recursivelycopyanentiredirectoryatsrc.
shutil.rmtree(path [, ignore_errors
[, onerror]])
Deletesanentiredirectory.
38.ExecutingUNIX
commandsfromPython
You can use module commands to execute UNIX
commands. This is not available in Python3 –
insteadyouneedtousethemodule‘subprocess’.
Example:
import commands
commands.getoutput(‘ls’)
‘bz2-example.pyntest.py’
39.Readingenvironment
variables
You can use the module ‘os’ to gather operating-
system-specificinformation:
Example:
import os
os.path module ‘posixpath’
from ‘/usr/lib/python2.6/posixpath.
pyc’ os.environ {‘LANG’: ‘en_
IN’, ‘TERM’: ‘xterm-color’, ‘SHELL’:
‘/bin/bash’, ‘LESSCLOSE’:
‘/usr/bin/lesspipe %s %s’,
‘XDG_SESSION_COOKIE’:
‘925c4644597c791c704656354adf56d6-
1257673132.347986-1177792325’,
‘SHLVL’: ‘1’, ‘SSH_TTY’: ‘/dev/
pts/2’, ‘PWD’: ‘/home/kunal’,
‘LESSOPEN’: ‘| /usr/bin
lesspipe
......}
os.name
‘posix’
os.linesep
‘n’](https://crownmelresort.com/image.slidesharecdn.com/thepythonbooktheultimateguidetocodingwithpythonpdfdrive-220527060944-728dd1fe/75/The-Python-Book_-The-ultimate-guide-to-coding-with-Python-PDFDrive-pdf-69-2048.jpg)
![70 The Python Book
Python essentials
40.Sendingemail
You can use the module ‘smtplib’ to send email
using an SMTP (Simple Mail Transfer Protocol)
clientinterface.
smtplib.SMTP([host [, port]])
Example(sendanemailusingGoogleMail
SMTPserver):
import smtplib
# Use your own to and from email
address
fromaddr = ‘kunaldeo@gmail.com’
toaddrs = ‘toemail@gmail.com’
msg = ‘I am a Python geek. Here is
the proof.!’
# Credentials
# Use your own Google Mail
credentials while running the
program
username = ‘kunaldeo@gmail.com’
password = ‘xxxxxxxx’
# The actual mail send
server = smtplib.SMTP(‘smtp.gmail.
com:587’)
# Google Mail uses secure
connection for SMTP connections
server.starttls()
server.login(username,password)
server.sendmail(fromaddr, toaddrs,
msg)
server.quit()
41.Accessing
FTPserver
‘ftplib’ is a fully fledged client FTP module for
Python. To establish an FTP connection, you
canusethefollowingfunction:
ftplib.FTP([host [, user [, passwd
[, acct [, timeout]]]]])
Example:
host = “ftp.redhat.com”
username = “anonymous”
password = “kunaldeo@gmail.com”
import ftplib
import urllib2
ftp_serv = ftplib.
FTP(host,username,password)
# Download the file
u = urllib2.urlopen (“ftp://
ftp.redhat.com/pub/redhat/linux/
README”)
# Print the file contents
print (u.read())
Output:
[~/src/python $:] python
ftpclient.py
OlderversionsofRedHatLinuxhavebeenmoved
to the following location: ftp://archive.download.
redhat.com/pub/redhat/linux/
42.Launchingawebpage
withthedefaultweb
browser
The ‘webbrowser’ module provides a convenient
way to launch webpages using the default
webbrowser.
Example(launchgoogle.co.ukwithsystem’s
defaultwebbrowser):
import webbrowser
webbrowser.open(‘http://google.
co.uk’)
True
43.Creatingsecurehashes
The ‘hashlib’ module supports a plethora of
secure hash algorithms including SHA1, SHA224,
SHA256,SHA384,SHA512andMD5.
Example(createhexdigestofthegiventext):
import hashlib
# sha1 Digest
hashlib.sha1(“MI6 Classified
Information 007”).hexdigest()
‘e224b1543f229cc0cb935a1eb9593
18ba1b20c85’
# sha224 Digest
hashlib.sha224(“MI6 Classified
Information 007”).hexdigest()
‘3d01e2f741000b0224084482f905e9b7b97
7a59b480990ea8355e2c0’
# sha256 Digest
hashlib.sha256(“MI6 Classified
Information 007”).hexdigest()
‘2fdde5733f5d47b672fcb39725991c89
b2550707cbf4c6403e fdb33b1c19825e’
# sha384 Digest
hashlib.sha384(“MI6 Classified
Information 007”).hexdigest()
‘5c4914160f03dfbd19e14d3ec1e74bd8b99
dc192edc138aaf7682800982488daaf540be
9e0e50fc3d3a65c8b6353572d’
# sha512 Digest
hashlib.sha512(“MI6 Classified
Information 007”).hexdigest()
‘a704ac3dbef6e8234578482a31d5ad29d25
2c822d1f4973f49b850222edcc0a29bb89077
8aea807a0a48ee4ff8bb18566140667fbaf7
3a1dc1ff192febc713d2’
# MD5 Digest
hashlib.md5(“MI6 Classified
Information 007”).hexdigest()
‘8e2f1c52ac146f1a999a670c826f7126’
44.Seedingrandom
numbers
You can use the module ‘random’ to generate
a wide variety of random numbers. The most
used one is ‘random.seed([x])’. It initialises
the basic random number generator. If x is
omitted or None, current system time is used;
current system time is also used to initialise the
generatorwhenthemoduleisfirstimported.
45.WorkingwithCSV
(comma-separated
values)files
CSVfilesareverypopularfordataexchangeover
theweb.Usingthemodule‘csv’,youcanreadand
writeCSVfiles.
Example:
import csv
# write stocks data as comma-
separated values
writer = csv.writer(open(‘stocks.
csv’, ‘wb’, buffering=0))
writer.writerows([
(‘GOOG’, ‘Google, Inc.’, 505.24, 0.47,
0.09),
(‘YHOO’, ‘Yahoo! Inc.’, 27.38, 0.33,
1.22),
(‘CNET’, ‘CNET Networks, Inc.’, 8.62,
-0.13, -1.49)
])
# read stocks data, print status
messages
stocks = csv.reader(open(‘stocks.
csv’, ‘rb’))
status_labels = {-1: ‘down’, 0:
‘unchanged’, 1: ‘up’}
for ticker, name, price, change, pct
in stocks:
status = status_
labels[cmp(float(change), 0.0)]
print ‘%s is %s (%s%%)’ % (name,
status, pct)
46.Installingthird-
partymodulesusing
setuptools
‘setuptools’ is a Python package which lets you
download, build, install, upgrade and uninstall
packages very easily.
To use ‘setuptools’ you will need to install
from your distribution’s package manager.
After installation you can use the command
‘easy_install’ to perform Python package
management tasks.](https://crownmelresort.com/image.slidesharecdn.com/thepythonbooktheultimateguidetocodingwithpythonpdfdrive-220527060944-728dd1fe/75/The-Python-Book_-The-ultimate-guide-to-coding-with-Python-PDFDrive-pdf-70-2048.jpg)
![The Python Book 71
Python essentials
Example(installingsimplejsonusing
setuptools):
kunal@ubuntu:~$ sudo easy_install
simplejson
Searching for simplejson
Reading http://pypi.python.org/simple/
simplejson/
Reading http://undefined.org/
python/#simplejson
Best match: simplejson 2.0.9
Downloading http://pypi.python.
org/packages/source/s/simplejson/
simplejson-2.0.9.tar.gz#md5=af5e67a39c
a3408563411d357e6d5e47
Processing simplejson-2.0.9.tar.gz
Running simplejson-2.0.9/setup.py
-q bdist_egg --dist-dir /tmp/easy_
install-FiyfNL/simplejson-2.0.9/egg-
dist-tmp-3YwsGV
Adding simplejson 2.0.9 to easy-
install.pth file
Installed /usr/local/lib/python2.6/
dist-packages/simplejson-2.0.9-py2.6-
linux-i686.egg
Processing dependencies for simplejson
Finished processing dependencies for
simplejson
47.Loggingtosystemlog
Youcanusethemodule‘syslog’towritetosystem
log. ‘syslog’ acts as an interface to UNIX syslog
libraryroutines.
Example:
import syslog
syslog.syslog(‘mygeekapp: started
logging’)
for a in [‘a’, ‘b’, ‘c’]:
b = ‘mygeekapp: I found letter ‘+a
syslog.syslog(b)
syslog.syslog(‘mygeekapp: the script
goes to sleep now, bye,bye!’)
Output:
$ python mylog.py
$ tail -f /var/log/messages
Nov 8 17:14:34 ubuntu -- MARK --
Nov 8 17:22:34 ubuntu python:
mygeekapp: started logging
Nov 8 17:22:34 ubuntu python:
mygeekapp: I found letter a
Nov 8 17:22:34 ubuntu python:
mygeekapp: I found letter b
Nov 8 17:22:34 ubuntu python:
mygeekapp: I found letter c
Nov 8 17:22:34 ubuntu python:
mygeekapp: the script goes to sleep
now, bye,bye!
48.GeneratingPDF
documents
‘ReportLab’ is a very popular module for PDF
generationfromPython.
PerformthefollowingstepstoinstallReportLab
$ wget http://www.reportlab.org/ftp/
ReportLab_2_3.tar.gz
$ tar xvfz ReportLab_2_3.tar.gz
$ cd ReportLab_2_3
$ sudo python setup.py install
Forasuccessfulinstallation,youshouldseea
similarmessage:
############SUMMARY INFO###########
###################################
#Attempting install of _rl_accel, sgmlop
pyHnj
#extensions from ‘/home/kunal/python/
ReportLab_2_3/src/rl_addons/rl_accel’
###################################
#Attempting install of _renderPM
#extensions from ‘/home/kunal/python/
ReportLab_2_3/src/rl_addons/renderPM’
# installing with freetype version 21
###################################
Example:
from reportlab.pdfgen.canvas import
Canvas
# Select the canvas of letter page size
from reportlab.lib.pagesizes import
letter
pdf = Canvas(“bond.pdf”, pagesize =
letter)
# import units
from reportlab.lib.units import cm,
mm, inch, pica
pdf.setFont(“Courier”, 60)
pdf.setFillColorRGB(1, 0, 0)
pdf.drawCentredString(letter[0] / 2,
inch * 6, “MI6 CLASSIFIED”)
pdf.setFont(“Courier”, 40)
pdf.drawCentredString(letter[0] / 2,
inch * 5, “For 007’s Eyes Only”)
# Close the drawing for current page
pdf.showPage()
# Save the pdf page
pdf.save()
Output:
@image:pdf.png
@title: PDF Output
49.UsingTwitterAPI
You can connect to Twitter using the ‘Python-
Twitter’module.
Performthefollowingstepstoinstall
Python-Twitter:
$ wget http://python-twitter.
googlecode.com/files/python-twitter-
0.6.tar.gz
$ tar xvfz python-twitter*
$ cd python-twitter*
$ sudo python setup.py install
Example(fetchingfollowerslist):
import twitter
# Use you own twitter account here
mytwi = twitter.Api(username=’kunald
eo’,password=’xxxxxx’)
friends = mytwi.GetFriends()
print [u.name for u in friends]
[u’Matt Legend Gemmell’, u’jono wells’,
u’The MDN Big Blog’, u’Manish Mandal’,
u’iH8sn0w’, u’IndianVideoGamer.com’,
u’FakeAaron Hillegass’, u’ChaosCode’,
u’nileshp’, u’Frank Jennings’,..’]
50.DoingYahoo!news
search
You can use the Yahoo! search SDK to access
Yahoo!searchAPIsfromPython.
Performthefollowingstepstoinstallit:
$wget http://developer.yahoo.com/
download/files/yws-2.12.zip
$ unzip yws*
$ cd yws*/Python/pYsearch*/
$ sudo python setup.py install
Example:
# Importing news search API
from yahoo.search.news import
NewsSearch
srch = NewsSearch(‘YahooDemo’,
query=’London’)
# Fetch Results
info = srch.parse_results()
info.total_results_available
41640
info.total_results_returned
10
for result in info.results:
... print “’%s’, from %s” %
(result[‘Title’], result[‘NewsSource’])
...
‘Afghan Handover to Be Planned at London
Conference, Brown Says’, from Bloomberg
.................
Third-partymodules](https://crownmelresort.com/image.slidesharecdn.com/thepythonbooktheultimateguidetocodingwithpythonpdfdrive-220527060944-728dd1fe/75/The-Python-Book_-The-ultimate-guide-to-coding-with-Python-PDFDrive-pdf-71-2048.jpg)


![The Python Book 75
Work with Python
Systemadministration
System administration tasks are some of the most
annoying things that you need to deal with when you
have to maintain your own system. Because of this,
system administrators have constantly been trying to find
ways to automate these types of tasks to maximise their
time.Theystartedwithbasicshellscripts,andthenmoved
on to various scripting languages. For a long time, Perl had
been the language of choice for developing these types
of maintenance tools. However, Python is now growing in
popularity as the language to use. It has reached the point
where most Linux distributions have a Python interpreter
included in order to run system scripts, so you shouldn’t
haveanyexcusefornotwritingyourownscripts.
Because you will be doing a lot system level work, you
will have most need of a couple of key Python modules.
The first module is ‘os’. This module provides the bulk of
the interfaces to interacting with the underlying system.
The usual first step is to look at the environment your
script is running in to see what information might exist
there to help guide your script. The following code gives
you a mapping object where you can interact with the
environmentvariablesactiverightnow:
import os
os.environ
You can get a list of the available environment variables
with the function “os.environs.keys()”, and then access
individual variables with “os.environs[key]”. These
environment variables are used when you spawn a
subprocess, as well. So you will want to change values,
like the PATH or the current working directory, in order
for you to run these subprocesses correctly. While there
is a “putenv” function that edits these values for you, it
unfortunately does not exist on all systems. So the better
way to do this is to edit the values directly within the
environsmapping.
Another category of tasks you may want to automate
is when working with files. For example, you can get the
currentworkingdirectorywithcodelike
cwd = os.getcwd()
Youcanthengetalistofthefilesinthisdirectorywith
os.listdir(cwd)
You can move around the file system with the function
“os.chdir(new_path)”. Once you’ve found the file you are
interested in, you can open it with “os.open()” and open it
for reading, writing and/or appending. You can then read
or write to it with the functions “os.read()” and “os.write()”.
Oncedone,youcanclosethefilewith“os.close()”.
Left Pythonscripts
enableyoutoinstruct
andinteractwithyour
operatingsystem
GetthemostoutofPythoninhandlingalloftheday-to-day
upkeepthatkeepsyoursystemhealthy
RunningsubprocessesfromPython
The underlying philosophy of Unix is to build small, specialised
programs that do one job extremely well. You then chain these
together to build more complex behaviours. There is no reason
why you shouldn’t use the same philosophy within your Python
scripts. There are several utility programs available to use with
very little work on your part. The older way of handling this was
through using functions like “popen()” and “spawnl()” from the
os module, but a better way of running other programs is by
using the subprocess module instead. You can then launch a
program, like ls, by using:
import subprocess
subprocess.run([‘ls’
, ‘-l’])
This provides you with a long file listing for the current
directory. The function “run()” was introduced in Python
3.5 and is the suggested way of handling this. If you have an
older version, or if you require more control than that, then
you can employ the underlying “popen()” function that we
mentioned earlier instead. If you want to get the output, you
can use the following:
cmd_output = subprocess.run([‘ls’
, ‘-l’],
stdout=subprocess.PIPE)
The variable “cmd_output” is a CompletedProcess object that
containsthereturncodeandastringholdingthestdoutoutput.
SYSTEMADMINISTRATION
BASH,PERL,PYTHON
OPERATINGSYSTEM
CPU FILES/IO
Onceyouhaveyourscript
allwrittenup,youmaywant
toschedulethemtorun
automaticallywithoutyour
intervention.OnUnixsystems,
youcanhavecronrunyour
scriptonwhateverschedule
isnecessary.Theutility
“crontab-l”liststhecurrent
contentsofyourcronfile,and
“crontab-e”letsyoueditthe
scheduledjobsthatyouwant
crontorun.
Scheduling
withcron](https://crownmelresort.com/image.slidesharecdn.com/thepythonbooktheultimateguidetocodingwithpythonpdfdrive-220527060944-728dd1fe/75/The-Python-Book_-The-ultimate-guide-to-coding-with-Python-PDFDrive-pdf-75-2048.jpg)
![76 The Python Book
Work with Python
With the content and the bulk of the computing hosted
on a server, a web application can better guarantee
a consistent experience for the end user. The popular
Django framework provides a very complete environment
of plugins and works on the DRY principle (Don’t Repeat
Yourself). Because of this, you should be able to build
your web application very quickly. Since Django is built
on Python, you should be able to install it with “sudo pip
install Django”. Most distributions should have a package
for Django, too. Depending on what you want to do with
your app, you may need to install a database like MySQL or
postgresqltostoreyourapplicationdata.
There are Django utilities available to automatically
generateastartingpointforyournewproject’scode:
django-admin startproject newsite
This command creates a file named “manage.py” and
a subdirectory named “newsite”. The file “manage.py”
contains several utility functions you can use to administer
your new application. The newly created subdirectory
contains the files “__init__.py”, “settings.py”, “urls.py” and
“wsgi.py”. These files and the subdirectory they reside in
comprise a Python package that gets loaded when your
web site is started up. The core configuration for your site
can be found in the file “settings.py”. The URL declarations,
basically a table of contents for your site, are stored in the
file “urls.py”. The file “wsgi.py” contains an entry point for
WSGI-compatiblewebservers.
Once your application is done, it should be hosted on a
properly configured and hardened web server. But, this is
inconvenient if you are in the process of developing your
web application. To help you out, Django has a web server
built into the framework. You can start it up by changing
directory to the “newsite” project directory and running the
followingcommand:
Left Pythoninterpreterswork
withyourdatabasestopowera
webserver
Bottom TheModel-View-
Controllerarchitectureisoften
usedforUIs
python manage.py runserver
This will start up a server listening to port 8000 on your
local machine. Because this built in server is designed to
be used for development, it automatically reloads your
Python code for each request. This means that you don’t
needtorestarttheservertoseeyourcodechanges.
All of these steps get you to a working project. You are
now ready to start developing your applications. Within the
“newsite”subdirectory,youcantype:
python manage.py startapp newapp
This will create a new subdirectory named “newapp”, with
the files “models.py”, “tests.py” and “views.py”, among
others.Thesimplestpossibleviewconsistsofthecode:
from django.http import HttpResponse
def index(request):
return HttpResponse(“Hello world”)
This isn’t enough to make it available, however. You will
also need to create a URLconf for the view. If the file
“urls.py”doesn’texistyet,createitandthenaddthecode:
from django.conf.urls import url
from . Import views
urlpatterns = [ url(r’^$’
, views.index,
name=‘index’), ]
The last step is to get the URL registered within your
project.Youcandothiswiththecode
from django.conf.urls import include, url
from django.contrib import admin
urlpatterns = [ url(r’^newapp/’
, include(‘newapp.
urls’)
),
Webdevelopment
Pythonhas several frameworksavailable forallofyour
variouswebdevelopmenttasks. Wewilllook at someofthe
morepopularones
Whenyoustartdeveloping
yourownapplications,you
maybeginadescentinto
dependencyhell.Several
Pythonpackagesdepend
onotherPythonpackages.
Thisisitsstrength,butalso
itsweakness.Luckily,you
havevirtualenvavailable
tohelptamethisjungle.
Youcancreatenewvirtual
environmentsforeachofyour
projects.Thankfullywiththis,
youcanbesuretocaptureall
ofthedependenciesforyour
ownpackage.
Virtual
environments
USER
WEBSERVER
DATABASE
PYTHON
INTERPRETER
MODEL
USER
VIEW CONTROLLER
Manipulates
Sees
Updates
Uses](https://crownmelresort.com/image.slidesharecdn.com/thepythonbooktheultimateguidetocodingwithpythonpdfdrive-220527060944-728dd1fe/75/The-Python-Book_-The-ultimate-guide-to-coding-with-Python-PDFDrive-pdf-76-2048.jpg)
![The Python Book 77
Work with Python
url(r’^admin’
, admin.site.urls), ]
This needs to be put in the “urls.py” file for the main
project. You can now pull up your newly created
applicationwiththeURLhttp://localhost:8000/newapp/.
The last part of many applications is the database
side. The actual connection details to the database, like
the username and password, are contained in the file
“settings.py”. This connection information is used for
all of the applications that exist within the same project.
You can create the core database tables for your site with
thiscommand:
python manage.py migrate
For your own applications, you can define the data model
you need within the file “models.py”. Once the data
model is created, you can add your application to the
INSTALLED_APPS section of the “settings.py” so that
django knows to include it in any database activity. You
initializeitwith:
python manage.py makemigrations newapp
Once these migrations have been created, you need to
applythemtothedatabasebyusingthecommand:
python manage.py migrate
Any time you make changes to your model, you will need to
runthemakemigrationsandmigratestepsagain.
Once you have your application finished, you can make
the move to the final hosting server. Don’t forget to check
the available code within the Django framework before
puttingtoomuchworkintodevelopingyourowncode.
UsingthePyCharmIDE
THEEDITORPANE
Themaineditorpanecanbeconfiguredtomatchyour
ownstyle,orthestyleofoneoftheothermaineditors,
likeemacs.Ithandlessyntaxhighlighting,andeven
displayserrorlocations
THEPROJECTPANE
Thispaneisthecentrallocationforyourproject.Allof
yourfilesandlibrariesarelocatedhere.Right-clicking
inthepanebringsupadrop-downmenuwhereyoucan
addnewfilesorlibraries,rununittests,orevenstartup
adebugger
THESTATUSBARE
PyCharmdoesalotofworkbehindthescenes.
Thestatusbarhelpsyoukeeptrackofallofthese
backgroundprocesses
OtherPython
frameworks
WhileDjangoisoneofthemostpopularframeworksaround
fordoingwebdevelopment,itisbynomeanstheonlyone
around.Thereareseveralothersavailablethatmayproveto
beabetterfitforparticularproblemdomains.Forexample,
ifyouarelookingforareallyself-containedframework,you
couldlookatweb2py.Everythingyouneedtobeabletohave
acompletesystem,fromdatabasestowebserverstoa
ticketingsystem,areincludedaspartoftheframework.Itis
soself-containedthatitcanevenrunfromaUSBdrive
Ifyouneedevenlessofaframework,thereareseveral
mini-frameworksthatareavailable.Forexample,CherryPy
isapurelyPythonicmulti-threadedwebserverthatyou
canembedwithinyourownapplication.Thisisactually
theserverincludedwithTurboGearsandweb2py.Areally
popularmicroframeworkisaprojectcalledflask.Itincludes
integratedunittestingsupport,jinja2templatingandRESTful
requestdispatching.
Oneoftheoldestframeworksaroundiszope,nowupto
version3.ThislatestversionwasrenamedBlueBream.Zope
isfairlylow-level,however.Youmaybemoreinterestedin
lookingatsomeoftheotherframeworksthatarebuilton
topofwhatisprovidedbyzope.Forexample,pyramidisa
veryfast,easytouseframeworkthatfocusesonthemost
essentialfunctionsrequiredbymostwebapplications.To
thisend,itprovidestemplating,theservingofstaticcontent,
mappingofURLstocode,amongotherfunctions.Ithandles
thiswhileprovidingtoolsforapplicationsecurity.
Ifyouarelookingforsomeideas,thereareseveralopen
sourceprojectsthathavebeenbuiltusingtheseframeworks,
fromblogs,toforumstoticketingsystems.Theseprojectscan
providesomebest-practiceswhenyougotoconstructyour
ownapplication.
Whenyouareinthemiddleof
developingyourapplication,
youmayneedtohaveseveral
differentterminalwindows
openinordertohaveacode
editoropen,amonitoronthe
server,andpotentiallytesting
output.Ifyouaredoingthison
yourownmachine,thisisn’tan
issue.But,ifyouareworking
remotely,youshouldlookinto
usingtmux.Itcanprovidea
muchmorerobustterminal
environmentforyou.
Terminal
development
environments](https://crownmelresort.com/image.slidesharecdn.com/thepythonbooktheultimateguidetocodingwithpythonpdfdrive-220527060944-728dd1fe/75/The-Python-Book_-The-ultimate-guide-to-coding-with-Python-PDFDrive-pdf-77-2048.jpg)


![84 The Python Book
Work with Python
License.txt: This file contains the licence of
the distributed plug-in. The XBMC project
recommends the use of the Creative Commons
Attribution-ShareAlike 3.0 licence for skins,
and GPL 2.0 for add-ons. However, most of the
copyleftlicencescanbeused.
Note: For the purpose of packaging, extensions/
add-ons/themes/plug-insarethesame.
07Providingsettingsfortheplug-in
Settings can be provided by the file
resources/settings.xml.Thesearegreatforuser-
configurableoptions.
Partial:resources/settings.xml
settings
category label=30109
setting id=filter type=bool
label=30101 default=false/
setting type=sep /
setting id=showAll type=bool
label=30106 default=false/
setting id=showUnwatched
type=bool label=30107
default=true/
setting id=showUnfinished
type=bool label=30108
default=false/
setting type=sep /
setting id=forceViewMode
type=bool label=30102
default=true/
setting id=viewMode type=number
label=30103 default=504/
/category
category label=30110
setting id=cat_hot type=bool
label=30002 default=true/
setting id=cat_new type=bool
label=30003 default=true/
/category
/settings
Here, label defines the language id string which
will then be used to display the label. id defines
the name which will be used for programmatic
access. type defines the data type you want
to collect; it also affects the UI which will be
displayed for the element. default defines the
default value for the setting. You should always
useadefaultvaluewhereverpossibletoprovidea
betteruserexperience.
The following are a few important settings
typesthatyoucanuse…
text:Usedforbasicstringinputs.
ipaddress:Usedtocollectinternetaddresses.
number: Allows you enter a number. XBMC will
also provide an on-screen numeric keyboard for
theinput.
slider: This provides an elegant way to collect
integer, float and percentage values. You can get
theslidersettinginthefollowingformat:
setting label=21223 type=slider
id=sideinput default=10
range=1,1,10 option=int /
Intheaboveexamplewearecreatingasliderwith
min range 1, max range 10 and step as 1. In the
option field we are stating the data type we are
interested in – we can also set option to float
orpercent.
bool: Provides bool selection in the form of on
oroff.
file: Provides a way to input file paths. XBMC will
provideafilebrowsertomaketheselectionoffile.
If you are looking to make selection for a specific
type of file you can use audio, video, image or
executableinsteadoffile.
folder:Providesawaytobrowseforafolder…
Example:
setting label=12001 type=folder
id=folder source=auto
option=writeable/
Here, source sets the start location for the
folder, while option sets the write parameter for
theapplication.
sep lsep: sep is used to draw a horizontal line
in the setting dialog; lsep is used for drawing
a horizontal line with text. They do not collect
any input but are there for building better user
interfaceelements…
setting label=21212 type=lsep
/
08Languagesupport
Language support is provided in
the form of the strings.xml file located in
resources/languages/[language name]. This
approach is very similar to many large software
projects, including Android, where static strings
areneverused.
resource/language/english/string.xml
example:
?xml version=1.0 encoding=utf-8
standalone=yes?
strings
string id=30001Add subreddit/
string
string id=30002Hot/string
string id=30003New/string
string id=30004Top/string
string id=30005Controversial/
string
string id=30006Hour/string
string id=30007Day/string
string id=30008Week/string
string id=30009Month/string
string id=30010Year/string
/strings
As you may have seen in the settings.xml
example, all the labels are referring to string
ids. You can have many other languages as
well. Depending upon the language XBMC is
running in, the correct language file will be
loadedautomatically.
Post XBMC Frodo (12.1), strings.xml will be
deprecated. Post Frodo, XBMC will be moved
to a GNU gettext-based translation system;
gettext uses PO files. You can use a tool called
xbmc-xml2po to convert strings.xml into
equivalentPOfiles.
09Buildingdefault.py
Since our plug-in is small, it will all be
contained inside default.py. If you are developing
a more complex add-on then you can create
supporting files in the same directory. If your
library depends upon third-party libraries, you
have two ways to go about it. You can either place
the third-party libraries into the resources/lib
folder; or bundle the library itself into a plug-in,
then add that plug-in as the dependency in the
addon.xmlfile.
Our plug-in works with reddit.tv. This is the
website from Reddit which contains trending
videos shared by its readers. Videos posted on
Reddit are actually sourced from YouTube, Vimeo
andDailymotion.
We will be starting off default.py using the
followingimports:
import urllib
import urllib2
…
import xbmcplugin](https://crownmelresort.com/image.slidesharecdn.com/thepythonbooktheultimateguidetocodingwithpythonpdfdrive-220527060944-728dd1fe/75/The-Python-Book_-The-ultimate-guide-to-coding-with-Python-PDFDrive-pdf-84-2048.jpg)
![The Python Book 85
Work with Python
import xbmcgui
import xbmcaddon
Apart from xbmcplugin, xbmcgui and
xbmcaddon, the rest are all standard Python
libraries which are available on PyPI (Python
Package Index) via pip. You will not need to install
any library yourself since the Python runtime for
XBMChasallthecomponentsbuiltin.
urllib and urllib2 help in HTTP communication.
socket is used for network I/O; re is used
for regular expression matching; sqlite3 is
the Python module for accessing an SQLite
embedded database; xbmcplugin, xbmcgui and
xbmcaddoncontaintheXBMC-specificroutine.
10Initialising
During the initialisation process, we will
be reading various settings from settings.xml.
Settingscanbereadinthefollowingway:
addon = xbmcaddon.Addon()
filterRating = int(addon.
getSetting(filterRating))
filterVoteThreshold = int(addon.getS
etting(filterVoteThreshold))
Inordertoreadsettingsoftypeboolyouwillneed
todosomethinglike:
filter = addon.getSetting(filter)
== true
We are also setting the main URL, plug-in handle
andtheuseragentforit:
pluginhandle = int(sys.argv[1])
urlMain = http://www.reddit.com
userAgent = Mozilla/5.0 (Windows NT
6.2; WOW64; rv:22.0) Gecko/20100101
Firefox/22.0
opener = urllib2.build_opener()
opener.addheaders = [(‘User-Agent’,
userAgent)]
11Readinglocalisedstrings
As mentioned, XBMC uses strings.xml to
serve up the text. In order to read those strings,
youwillneedtousegetLocalizedString.
translation = addon.
getLocalizedString
translation(30002)
In this example, translation(30002) will
return the string Hot when it is running in an
Englishenvironment.
12Buildinghelperfunctions
In this step we will look at some of the
importanthelperfunctions.
getDbPath(): This returns the location of the
SQLite database file for videos. XBMC stores
library and playback information in SQLite DB
files. There are separate databases for videos
and music, located inside the .xbmc/userdata/
Database folder. We are concerned with the
videosDB.Itisprefixedwith‘MyVideos’…
def getDbPath():
path = xbmc.
translatePath(special://userdata/
Database)
files = os.listdir(path)
latest =
for file in files:
if file[:8] == ‘MyVideos’
and file[-3:] == ‘.db’:
if file latest:
latest = file
return os.path.join(path,
latest)
getPlayCount(url): Once we have the database
location, we can get the play count using a
simple SQL query. The MyVideo database
contains a table called files, which keeps a
record of all the video files played in XBMC by
filename.InthiscaseitwillbeURL.
dbPath = getDbPath()
conn = sqlite3.connect(dbPath)
c = conn.cursor()
def getPlayCount(url):
c.execute(‘SELECT playCount FROM
files WHERE strFilename=?’, [url])
result = c.fetchone()
if result:
result = result[0]
if result:
return int(result)
return 0
return -1
Theabovetableisanexampleofafilestable.
addSubreddit(): Our plug-in allows users to add
their own Subreddit. This function takes the
Subreddit input from the user, then saves it in
thesubredditsfileinsidetheaddondatafolder.
Thefollowingsetsthesubredditsfilelocation:
subredditsFile = xbmc.
translatePath(special://profile/
addon_data/+addonID+/subreddits)
this translates into .xbmc/userdata/
addon_data/plugin.video.ludent/
subreddits
def addSubreddit():
keyboard = xbmc.Keyboard(‘’,
translation(30001))
keyboard.doModal()
if keyboard.isConfirmed() and
keyboard.getText():
subreddit = keyboard.
getText()
fh = open(subredditsFile,
‘a’)
fh.write(subreddit+’n’)
fh.close()
This function also demonstrates how to take
a text input from the user. Here we are calling
the Keyboard function with a text title. Once it
detects the keyboard, it writes the input in the
subredditsfilewithanewlinecharacter.
getYoutubeUrl(id): When we locate a YouTube
URL to play, we pass it on to the YouTube plug-in
(plugin.video.youtube) to handle the playback. To
doso,weneedtocallitinacertainformat…
def getYoutubeUrl(id):
url = plugin://plugin.
video.youtube/?path=/root/
videoaction=play_videovideoid= +
id
return url
idFile idPath strFilename playCount lastPlayed dateAdded
1 1 plugin://plugin. 2013-08-0623:47
2 2 plugin://plugin. 1 2013-08-0722:42
3 2 plugin://plugin. 1 2013-08-0800:09
4 2 plugin://plugin. 1 2013-08-0800:55
5 2 plugin://plugin. 1 2013-08-0800:58](https://crownmelresort.com/image.slidesharecdn.com/thepythonbooktheultimateguidetocodingwithpythonpdfdrive-220527060944-728dd1fe/75/The-Python-Book_-The-ultimate-guide-to-coding-with-Python-PDFDrive-pdf-85-2048.jpg)
![86 The Python Book
Work with Python
SimilarlyforVimeo:
def getVimeoUrl(id):
url = plugin://plugin.video.
vimeo/?path=/root/videoaction=play_
videovideoid= + id
return url
AndforDailymotion:
def getDailyMotionUrl(id):
url = plugin://plugin.video.
dailymotion_com/?url= + id +
mode=playVideo
return url
Once we have the video URL resolved into the
respectiveplug-in,playingitisverysimple:
def playVideo(url):
listitem = xbmcgui.
ListItem(path=url)
xbmcplugin.
setResolvedUrl(pluginhandle, True,
listitem)
13Populatingplug-incontentlisting
xbmcplugin contains various routines
for handling the content listing inside the
plug-ins UI. The first step is to create directory
entries which can be selected from the XBMC
UI. For this we will use a function called
xbmcplugin.addDirectoryItem.
For our convenience we will be abstracting
addDirectoryItem to suit it to our purpose, so
that we can set name, URL, mode, icon image
andtypeeasily.
def addDir(name, url, mode,
iconimage, type=):
u = sys.argv[0]+?url=+urllib.
quote_plus(url)+mode=+str(mode)+
type=+str(type)
ok = True
liz = xbmcgui.ListItem(name,
iconImage=DefaultFolder.png,
thumbnailImage=iconimage)
liz.setInfo(type=Video,
infoLabels={Title: name})
ok = xbmcplugin.
addDirectoryItem(handle=int(sys.
argv[1]), url=u, listitem=liz,
isFolder=True)
return ok
On the same lines, we can build a function to
placelinksaswell…
def addLink(name, url, mode,
iconimage, description, date):
u = sys.argv[0]+?url=+urllib.
quote_plus(url)+mode=+str(mode)
ok = True
liz = xbmcgui.ListItem(name,
iconImage=DefaultVideo.png,
thumbnailImage=iconimage)
liz.setInfo(type=Video,
infoLabels={Title: name, Plot:
description, Aired: date})
liz.setProperty(‘IsPlayable’,
‘true’)
ok = xbmcplugin.
addDirectoryItem(handle=int(sys.
argv[1]), url=u, listitem=liz)
return ok
Based on the abstractions we have just created,
we can create the base functions which will
populate the content. But before we do that,
let’s first understand how Reddit works. Most of
the Reddit content filters are provided through
something called Subreddits. This allows you to
view discussions related to a particular topic. In
our plug-in we are interested in showing videos;
we also want to show trailers, documentaries
etc. We access these using Subreddits. For
example, for trailers it would be reddit.com/r/
trailers. For domains we can use /domain; for
example, to get all the YouTube videos posted
on Reddit, we will call reddit.com/domain/
youtube.com. Now you may ask what is the
guarantee that this Subreddit will only list
videos? The answer is that it may not. For that
reason we scrape the site ourselves to find
videos.Moreonthisinthenextstep.
The first base function we’ll define is index().
Thisiscalledwhentheuserstartstheplug-in.
def index():
defaultEntries = [videos,
trailers, documentaries,
music]
entries = defaultEntries[:]
if os.path.
exists(subredditsFile):
fh = open(subredditsFile,
‘r’)
content = fh.read()
fh.close()
spl = content.split(‘n’)
for i in range(0, len(spl),
1):
if spl[i]:
subreddit = spl[i]
entries.
append(subreddit)
entries.sort()
for entry in entries:
if entry in defaultEntries:
addDir(entry.title(),
r/+entry, ‘listSorting’, )
else:
addDirR(entry.title(),
r/+entry, ‘listSorting’, )
addDir([ Vimeo.com ],
domain/vimeo.com, ‘listSorting’,
)
addDir([ Youtu.be ], domain/
youtu.be, ‘listSorting’, )
addDir([ Youtube.com
], domain/youtube.com,
‘listSorting’, )
addDir([ Dailymotion.com
], domain/dailymotion.com,
‘listSorting’, )
addDir([B]-
+translation(30001)+ -[/B], ,
‘addSubreddit’, )
xbmcplugin.
endOfDirectory(pluginhandle)
Here, the penultimate entry makes a call to
addSubreddit. listSorting takes care of sorting
out the data based on criteria such as Hot,
New etc. It also calls in Reddit’s JSON function,
whichreturnsniceeasy-to-parseJSONdata.
We have created a settings entry for all the
sorting criteria. Based on what is set, we go
aheadandbuildoutthesortedlist.
def listSorting(subreddit):
if cat_hot:
addDir(translation(30002),
urlMain+/+subreddit+/hot/.
json?limit=100, ‘listVideos’, )
if cat_new:
addDir(translation(30003),
urlMain+/+subreddit+/new/.
json?limit=100, ‘listVideos’, )
if cat_top_d:
addDir(translation(30004)+:
+translation(30007),
urlMain+/+subreddit+/
top/.json?limit=100t=day,
‘listVideos’, )
xbmcplugin.
endOfDirectory(pluginhandle)](https://crownmelresort.com/image.slidesharecdn.com/thepythonbooktheultimateguidetocodingwithpythonpdfdrive-220527060944-728dd1fe/75/The-Python-Book_-The-ultimate-guide-to-coding-with-Python-PDFDrive-pdf-86-2048.jpg)
![The Python Book 87
Work with Python
In the code listed to the left here, we are
opening the URL, then – based on regular
expression matches – we are discovering
the location title, description, date, ups,
downs and rating. We are also locating
video thumbnails and then passing them on
to XBMC.
Later in the code, we also try to match the
URL to a video provider. With our plug-in we are
supporting YouTube, Vimeo and Dailymotion.
If this is detected successfully, we call the
helper functions to locate the XBMC plug-
in based playback URL. During this whole
parsing process, if any exception is raised, the
whole loop is ignored and the next JSON item
is parsed.
15Installing running theadd-on
You can install the add-on using one of
thefollowing two methods:
• You can copy the plug-in directory to
.xbmc/addons.
• You can install the plug-in from the zip file. To
do so, compress the add-on folder into a zip file
using the command:
$ zip -r plugin.video.ludent.zip
plugin.video.ludent
To install the plug-in from the zip file, open
XBMC, go to System then Add-ons, then click
‘Install from zip file’. The benefit of installing
from a zip file is that XBMC will automatically
try to install all the dependent plug-ins as well.
Once you have the plug-in installed, you can
run it by going to the Videos Add-ons section of
XBMC, selecting Get More… and then clicking
on LUD Reddit Viewer.
You can access the settings dialog of the
plug-in by right-clicking the LUD Reddit Viewer,
then selecting ‘Add-on settings’.
So, you have seen how robust and powerful
XBMC’s extension system is. In this example,
we were able to leverage the full power of
Python (including those magical regular
expression matches) from within XBMC.
XBMC itself also offers a robust UI framework,
which provides a very professional look for
our add-on.
As powerful as it may seem, we have only
built a video plug-in. XBMC’s extension system
also provides a framework for building fully
fledged programs (called Programs). We will
coverthisinalaterissue.
14Populatingtheepisodeview(listingvideos)
At this point we have the URL in hand, which returns JSON data; now we need to extract the
dataoutofitwhichwillmakesensetous.
By looking at the JSON data, you can see there’s a lot of interesting information present here. For
example, url is set to youtube.com/watch?v=n4rTztvVx8E; title is set to ‘The Counselor – Official
Trailer’. There also many other bits of data that we will use, such as ups, downs, num_comments,
thumbnail_urlandsoon.Inordertofilteroutthedatathatweneed,wewilluseregularexpressions.
There is one more thing to note: since we are not presenting directories any more but are ready to
placecontent,wehavetosetthexbmcplugin.setContenttoepisodesmode.
def listVideos(url):
currentUrl = url
xbmcplugin.setContent(pluginhandle, episodes)
content = opener
.open(url).read()
spl = content.split(‘content’)
for i in range(1, len(spl), 1):
entry = spl[i]
try:
match = re.compile(‘title: (
.+?)’
, re.DOTALL).findall(entry)
title = match[0].replace(amp;
, )
match = re.compile(‘description: (
.+?)’
, re.DOTALL).
findall(entry)
description = match[0]
match = re.compile(‘created_utc: (
.+?),
’
, re.DOTALL).findall(entry)
downs = int(match[0].replace(}
, ))
rating = int(ups*100/(ups+downs))
if filter and (ups+downs) filterVoteThreshold and rating
filterRating:
continue
title = title+ (+str(rating)+%)
match = re.compile(‘num_comments: (
.+?),
’
, re.DOTALL).
findall(entry)
comments = match[0]
description = dateTime+ | +str(ups+downs)+ votes:
+str(rating)+% Up | +comments+ commentsn+description
match = re.compile(‘thumbnail_url: (
.+?)’
, re.DOTALL).
findall(entry)
thumb = match[0]
matchYoutube = re.compile(‘url: http://www.youtube.com/
watch?v=(
.+?)’
, re.DOTALL).findall(entry)
matchVimeo = re.compile(‘url: http://vimeo.com/(
.+?)’
,
re.DOTALL).findall(entry)
url =
if matchYoutube:
url = getYoutubeUrl(matchYoutube[0])
elif matchVimeo:
url = getVimeoUrl(matchVimeo[0].replace(#
, ))
if url:
addLink(title, url, ‘playVideo’
, thumb, description, date)
except:
pass
match = re.compile(‘after: (
.+?)’
, re.DOTALL).findall(entry)
xbmcplugin.endOfDirectory(pluginhandle)
if forceViewMode:
xbmc.executebuiltin(‘Container
.SetViewMode(‘+viewMode+’)’)](https://crownmelresort.com/image.slidesharecdn.com/thepythonbooktheultimateguidetocodingwithpythonpdfdrive-220527060944-728dd1fe/75/The-Python-Book_-The-ultimate-guide-to-coding-with-Python-PDFDrive-pdf-87-2048.jpg)
![88 The Python Book
Work with Python
Powerfulcalculationswith
NumPy,SciPyandMatplotlib
Scientificcomputing
withNumPy
NumPy is the primary Python package for
performing scientific computing. It has a
powerful N-dimensional array object, tools
for integrating C/C++ and Fortran code, linear
algebra, Fourier transform, and random
number capabilities, among other things.
NumPy also supports broadcasting, which is
a clever way for universal functions to deal in
a meaningful way with inputs that do not have
exactly the same form.
Apart from its capabilities, the other
advantage of NumPy is that it can be integrated
into Python programs. In other words, you may
get your data from a database, the output of
another program, an external file or an HTML
pageandthenprocessitusingNumPy.
This article will show you how to install
NumPy, make calculations, plot data, read and
write external files, and it will introduce you to
some Matplotlib and SciPy packages that work
wellwithNumPy.
NumPy also works with Pygame, a Python
package for creating games, though explaining
itsuseisbeyondofthescopeofthisarticle.
It is considered good practice to try the
various NumPy commands inside the Python
shellbeforeputtingthemintoPythonprograms.
The examples in this article are using either
PythonshelloriPython.
AsimplePython
programfor
PolynomialFitting!
APythonscript
thatusesSciPyto
processanimage
Matplotlib
generatedoutput
Findinghelp
iseasy
Resources
NumPy:
www.numpy.org
SciPy:
www.scipy.org
Matplotlib:
www.matplotlib.org
01 Installing NumPy
Most Linux distributions have a
ready-to-install package you can use. After
installation, you can find out the NumPy version
youareusingbyexecutingthefollowing:
$ python
Python 2.7
.3 (default, Mar 13 2014, 11:03:55)
[GCC 4.7
.2] on linux2
Type help
, copyright
, credits or
license for more information.
numpy.version.version](https://crownmelresort.com/image.slidesharecdn.com/thepythonbooktheultimateguidetocodingwithpythonpdfdrive-220527060944-728dd1fe/75/The-Python-Book_-The-ultimate-guide-to-coding-with-Python-PDFDrive-pdf-88-2048.jpg)
![The Python Book 89
Work with Python
Traceback (most recent call last):
File stdin
, line 1, in module
NameError: name 'numpy' is not defined
import numpy
numpy.version.version
'1.6.2'
Not only have you found the NumPy version but
you also know that NumPy is properly installed.
02AboutNumPy
Despite its simplistic name, NumPy is
a powerful Python package that is mainly for
working with arrays and matrices.
There are many ways to create an array but
the simplest is by using the array() function:
oneD = array([1,2,3,4])
The aforementioned command creates a
one-dimensional array. If you want to create a
two-dimensional array, you can use the array()
functionasfollows:
twoD = array([ [1,2,3],
... [3,3,3],
... [-1,-0.5,4],
... [0,1,0]] )
Youcanalsocreatearrayswithmoredimensions.
03Making simple calculations
using NumPy
Given an array named myArray, you can find
the minimum and maximum values in it by
executing the following commands:
myArray.min()
myArray.max()
Should you wish to find the mean value of all
array elements, run the next command:
myArray.mean()
Similarly, you can find the median of the array
by running the following command:
median(myArray)
The median value of a set is an element that
divides the data set into two subsets (left
and right subsets) with the same number of
elements. If the data set has an odd number of
elements, then the median is part of the data
set. On the other side, if the data set has an
even number of elements, then the median is
the mean value of the two centre elements of
the sorted data set.
04UsingarrayswithNumPy
NumPy not only embraces the indexing
methods used in typical Python for strings and
lists but also extends them. If you want to select
a given element from an array, you can use the
followingnotation:
twoD[1,2]
You can also select a part of an array (a slice)
usingthefollowingnotation:
twoD[
:1,1:3]
Finally, you can convert an array into a Python
listusingthetolist()function.
05Readingfiles
Imaginethatyouhavejustextracted
informationfromanApachelogfileusingAWKand
youwanttoprocessthetextfileusingNumPy.
The following AWK code finds out the total
numberofrequestsperhour:
$ cat access.log | cut -d[ -f2 | cut -d]
-f1 | awk -F: '{print $2}
' | sort -n | uniq
-c | awk '{print $2, $1}
' timeN.txt
The format of the text file (timeN.txt) with the
data is the following:
00 191
01 225
02 121
03 104
Reading the timeN.txt file and assigning it to a
new array variable can be done as follows:
aa = np.loadtxt(timeN.txt)
06Writingtofiles
Writing variables to a file is largely
similar to reading a file. If you have an array
variable named aa1, you can easily save its
contents into a file called aa1.txt by using the
followingcommand:
In [17]: np.savetxt(aa1.txt, aa1)
As you can easily imagine, you can read
the contents of aa1.txt later by using the
loadtxt()function.
07Commonfunctions
NumPy supports many numerical and
statistical functions. When you apply a function
to an array, the function is automatically applied
toallarrayelements.
When working with matrices, you can find the
inverse of a matrix AA by typing “AA.I”. You can
also find its eigenvalues by typing “np.linalg.
eigvals(AA)” and its eigenvector by typing “np.
linalg.eig(BB)”.
08Workingwithmatrices
A special subtype of a two-dimensional
NumPy array is a matrix. A matrix is like an
array except that matrix multiplication replaces
element-by-element multiplication. Matrices
are generated using the matrix (or mat) function
asfollows:
In [2]: AA = np.mat('0 1 1; 1 1 1; 1 1 1
')
You can add two matrices named AA and BB by
typing AA + BB. Similarly, you can multiply them
bytypingAA*BB.
03Makingsimple
calculations](https://crownmelresort.com/image.slidesharecdn.com/thepythonbooktheultimateguidetocodingwithpythonpdfdrive-220527060944-728dd1fe/75/The-Python-Book_-The-ultimate-guide-to-coding-with-Python-PDFDrive-pdf-89-2048.jpg)
![90 The Python Book
Work with Python
SciPyisbuiltontopofNumPy
andismoreadvanced
09PlottingwithMatplotlib
The first move you should make is to
install Matplotlib. As you can see, Matplotlib has
manydependenciesthatyoushouldalsoinstall.
The first thing you will learn is how to
plot a polynomial function. The necessary
commands for plotting the 3x^2-x+1
polynomial are the following:
import numpy as np
import matplotlib.pyplot as plt
myPoly = np.poly1d(np.array([3, -1, 1]).
astype(float))
x = np.linspace(-5, 5, 100)
y = myPoly(x)
plt.xlabel('x values')
plt.ylabel('f(x) values')
xticks = np.arange(-5, 5, 10)
yticks = np.arange(0, 100, 10)
plt.xticks(xticks)
plt.yticks(yticks)
plt.grid(True)
plt.plot(x,y)
The variable that holds the polynomial
is myPoly. The range of values that will
be plotted for x is defined using “x =
np.linspace(-5, 5, 100)”. The other important
variable is y, which calculates and holds the
values of f(x) for each x value.
It is important that you start ipython using
the “ipython --pylab=qt” parameters in order
to see the output on your screen. If you are
interested in plotting polynomial functions,
you should experiment more, as NumPy can
also calculate the derivatives of a function and
plot multiple functions in the same output.
10AboutSciPy
SciPy is built on top of NumPy and
is more advanced than NumPy. It supports
numerical integration, optimisations, signal
processing, image and audio processing,
and statistics. The example in Fig. 01 (to the left)
uses a small part of the scipy.stats package that
isaboutstatistics.
The example uses two statistics distributions
and may be difficult to understand even if you
know mathematics, but it is presented in order
togiveyouabettertasteofSciPycommands.
11UsingSciPyforimageprocessing
Now we will show you how to process
and transform a PNG image using SciPy.
The most important part of the code is the
following line:
In [36]: from scipy.stats import poisson, lognorm
In [37]: mySh = 10;
In [38]: myMu = 10;
In [39]: ln = lognorm(mySh)
In [40]: p = poisson(myMu)
In [41]: ln.rvs((10,))
Out[41]:
array([ 9.29393114e-02, 1.15957068e+01, 9.78411983e+01,
8.26370734e-07, 5.64451441e-03, 4.61744055e-09,
4.98471222e-06, 1.45947948e+02, 9.25502852e-06,
5.87353720e-02])
In [42]: p.rvs((10,))
Out[42]: array([12, 11, 9, 9, 9, 10, 9, 4, 13, 8])
In [43]: ln.pdf(3)
Out[43]: 0.013218067177522842
Fig 01
09Plottingwith
Matplotlib](https://crownmelresort.com/image.slidesharecdn.com/thepythonbooktheultimateguidetocodingwithpythonpdfdrive-220527060944-728dd1fe/75/The-Python-Book_-The-ultimate-guide-to-coding-with-Python-PDFDrive-pdf-90-2048.jpg)
![The Python Book 91
Work with Python
ProcessandtransformaPNG
imageusingSciPy
12Otherusefulfunctions
It is very useful to be able to find out
the data type of the elements in an array; it
can be done using the dtype() function.
Similarly, the ndim() function returns the
number of dimensions of an array.
When reading data from external files, you
can save their data columns into separate
variables using the following way:
In [10]: aa1,aa2 = np.loadtxt(timeN.txt,
usecols=(0,1), unpack=True)
The aforementioned command saves column
1 into variable aa1 and column 2 into variable
aa2. The “unpack=True” allows the data to be
assigned to two different variables. Please
note that the numbering of columns starts
with 0.
14ArraybroadcastinginNumPy
To close, we will talk more about
array broadcasting because it is a very
useful characteristic. First, you should know
that array broadcasting has a rule: in order
for two arrays to be considered for array
broadcasting, “the size of the trailing axes for
both arrays in an operation must either be the
same size or one of them must be one.”
Put simply, array broadcasting allows
NumPy to “change” the dimensions of an array
by filling it with data in order to be able to do
calculations with another array. Nevertheless,
you cannot stretch both dimensions of an
array to do your job.
13Fittingtopolynomials
The NumPy polyfit() function tries to fit
a set of data points to a polynomial. The data
was found from the timeN.txt file, created
earlier in this article.
The Python script uses a fifth degree
polynomial, but if you want to use a different
degree instead then you only have to change
the following line:
coefficients = np.polyfit(aa1, aa2, 5)
image = np.array(Image.open('SA.png').
convert('L
'))
This line allows you to read a usual PNG
file and convert it into a NumPy array for
additional processing. The program will
also separate the output into four parts and
displays a different image for each of these
four parts.
11UsingSciPyfor
imageprocessing
13Fittingto
Polynomials](https://crownmelresort.com/image.slidesharecdn.com/thepythonbooktheultimateguidetocodingwithpythonpdfdrive-220527060944-728dd1fe/75/The-Python-Book_-The-ultimate-guide-to-coding-with-Python-PDFDrive-pdf-91-2048.jpg)

![The Python Book 93
Work with Python
01Theserver
The server will do the following jobs:
• Listen for new clients
• Notify all clients when a new client joins
• Notify all clients when a client leaves
• Receive and deliver messages to all clients
We’re going to write the server side of the
instant messenger first, as the client requires
it. There will be two code files, so it’s a good
idea to make a folder to keep them inside. You
can create an empty file with the command
touch [filename], and mark that file as
executable using chmod +x [filename]. This
file is now ready to edit in your favourite editor.
[liam@liam-laptop Python]$ mkdir
Python-IM
[liam@liam-laptop Python]$ cd
Python-IM/
[liam@liam-laptop Python-IM]$ touch
IM-Server.py
[liam@liam-laptop Python-IM]$ chmod
+x IM-Server.py
02Startingoff
As usual, we need to start off with the
line that tells the program loader what it needs
to interpret the rest of the file with. In your
advisor’s case, that line is:
#!/usr/bin/env python2.
On your system, it may need to be changed to
#!/usr/bin/env/ python2.6 or #!/usr/
bin/env python2.7
After that, we’ve written a short comment about
what the application does, and imported the
required libraries. We’ve already mentioned
what the threading and socket libraries are
for. The re library is used for searching strings
with regular expressions. The signal library is
used for dealing with signals that will kill the
program, such as SIGINT. SIGINT is sent when
Ctrl+C is pressed. We handle these signals so
that the program can tell the clients that it’s
exiting rather than dying unexpectedly. The sys
library is used to exit the program. Finally, the
timelibraryisusedtoputasensiblelimitonhow
frequentlythebodyofwhileloopsexecute.
#!/usr/bin/env python2
# The server side of an instant
messaging application. Written as
part of a Linux User Developer
tutorial by Liam Fraser in 2013.
import threading
03TheServerclass
TheServerclassisthemainclassofour
instant messenger server. The initialiser of this
class accepts a port number to start listening
for clients on. It then creates a socket, binds the
socket to the specified port on all interfaces,
and then starts to listen on that port. You can
optionally include an IP address in the tuple that
contains the port. Passing in a blank string like
wehavedonecausesittolistenonallinterfaces.
The value of 1 passed to the listen function
specifies the maximum number of queued
connections we can accept. This shouldn’t be
a problem as we’re not expecting a bunch of
clientstoconnectatexactlythesametime.
Now that we have a socket, we’ll create an
empty array that will be later used to store a
collection of client sockets that we can echo
messages to. The final part is to tell the signal
library to run the self.signal_handler function,
which we have yet to write, when a SIGINT or
SIGTERM is sent to the application so that we
cantidyupnicely.
class Server():
def __init__(self, port):
# Create a socket and bind it to a
port
self.listener = socket.
socket(socket.AF_INET, socket.SOCK_
STREAM)
self.listener.bind((‘’,
port))
self.listener.listen(1)
print “Listening on port
{0}”.format(port)
# Used to store all of the client
sockets we have, for echoing
to them
self.client_sockets = []
# Run the function self.signal_
handler when Ctrl+C is pressed
signal.signal(signal.SIGINT,
self.signal_handler)
signal.signal(signal.
SIGTERM, self.signal_handler)
04Theserver’smainloop
The server’s main loop essentially
accepts new connections from clients,
adds that client’s socket to the collection of
import socket
import re
import signal
import sys
import time Threading:docs.python.org/2/library/
threading.html
Sockets: docs.python.org/2/library/
socket.html
Regular expressions:docs.python.
org/2/library/re.html
Thesignalhandler:docs.python.org/
2/library/signal.html
PyGTK: www.pygtk.org/
pygtk2reference
GObject: www.pygtk.org/
pygtk2reference/gobject-functions.html
Useful
documentation
sockets and then starts an instance of the
ClientListener class, which we have yet to
write, in a new thread. Sometimes, defining
interfaces you are going to call before you’ve
written them is good, because it can give an
overview of how the program will work without
worrying about the details.
Note that we’re printing information as we go
along, to make debugging easier should we need
to do it. Sleeping at the end of the loop is useful
to make sure the while loop can’t run quickly
enough to hang the machine. However, this is
unlikely to happen as the line that accepts new
connections is blocking, which means that the
program waits for a connection before moving
on from that line. For this reason, we need to
enclose the line in a try block, so that we can
catch the socket error and exit when we can no
longer accept connections. This will usually be
whenwe’veclosedthesocketduringtheprocess
ofquittingtheprogram.
def run(self):
while True:
# Listen for clients, and create a
ClientThread for each new client
print “Listening for
more clients”
try:
(client_socket,
client_address) = self.listener.
accept()
except socket.error:
sys.exit(“Could not](https://crownmelresort.com/image.slidesharecdn.com/thepythonbooktheultimateguidetocodingwithpythonpdfdrive-220527060944-728dd1fe/75/The-Python-Book_-The-ultimate-guide-to-coding-with-Python-PDFDrive-pdf-93-2048.jpg)


![Work with Python
The Python Book 97
17Runningafunctionasathread
The listener function above will be run
as a thread. This is trivial to do. Enabling the
daemon option on the thread means that it will
dieifthemainthreadunexpectedlyends.
def listen(self):
# Start the listening thread
self.listen_thread =
threading.Thread(target=self.
listener)
# Stop the child thread from keeping
the application open
self.listen_thread.daemon =
True
self.listen_thread.start()
18FinishingtheNetworkingclass
Again, most of this code is similar to
the code in the server’s Networking class. One
19Startingtheclient
The main window is started by initialising
an instance of the class. Notice that we don’t
need to store anything that is returned. We then
starttheGTKthreadbycallinggtk.main().
if __name__ == __main__:
# Create an instance of the main
window and start the gtk main loop
MainWindow()
gtk.main()
21That’sit!
So, it’s not perfect and could be a little
more robust in terms of error handling, but we
have a working instant messenger server that
can accept multiple clients and relay messages
between them. More importantly, we have
learned a bunch of new concepts and methods
ofworking.
20Tryingitout
You’ll want a few terminals: one to
start the server, and some to run clients. Once
you’ve started the server, open an instance of
the client and enter 127.0.0.1:port, where
‘port’ is the port you decided to use. The server
will print the port it’s listening on to make this
easy. Then enter a username and click OK. Here
is an example output from the server with two
clients. You can use the client over a network
by replacing 127.0.0.1 with the IP address of the
server. You may have to let the port through your
computer’sfirewallifit’snotworking.
[liam@liam-laptop Python]$ ./IM-
Server.py
Listening on port 59091
Listening for more clients
Starting client thread for
('127.0.0.1', 38726)
('127.0.0.1', 38726) sent: USERNAME
client1
echoing: client1 has joined.
Listening for more clients
Starting client thread for
('127.0.0.1', 38739)
('127.0.0.1', 38739) sent: USERNAME
client2
echoing: client2 has joined.
Listening for more clients
('127.0.0.1', 38739) sent: client2
says: Hi
echoing: client2 says: Hi
('127.0.0.1', 38726) sent: client1
says: Hi
echoing: client1 says: Hi
('127.0.0.1', 38726) sent: QUIT
echoing: client1 has quit.
Ending client thread for
('127.0.0.1', 38726)
^CTidying up
echoing: QUIT
Could not accept any more
connections
('127.0.0.1', 38739) sent:
echoing: client2 has quit.
Ending client thread for
('127.0.0.1', 38739)
difference is that we want to add some things to
the text view of our window. We do this by using
the idle_add function of GObject. This allows
us to call a function that will update the window
runninginthemainthreadwhenitisnotbusy.
def send(self, message):
# Send a message to the server
print Sending: {0}.
format(message)
try:
self.socket.
sendall(message)
except socket.error:
print Unable to send
message
def tidy_up(self):
# We'll be tidying up if either we are
quitting or the server is quitting
self.listening = False
self.socket.close()
# We won't see this if it's us
that's quitting as the window will
be gone shortly
gobject.idle_add(self.
window.add_text, Server has
quit.n)
def handle_msg(self, data):
if data == QUIT:
# Server is quitting
self.tidy_up()
elif data == :
# Server has probably closed
unexpectedly
self.tidy_up()
else:
# Tell the GTK thread to add some
text when it's ready
gobject.idle_add(self.
window.add_text, data)
16Theclient’sNetworkingclass
Much of the client’s Networking class is
similar to that of the server’s. One difference is
that the class doesn’t inherit the Thread class –
wejuststartoneofitsfunctionsasathread.
class Networking():
def __init__(self, window,
username, server, port):
# Set up the networking class
self.window = window
self.socket = socket.
socket(socket.AF_INET, socket.SOCK_
STREAM)
self.socket.connect((server,
port))
self.listening = True
# Tell the server that a new user
has joined
self.send(USERNAME {0}.
format(username))
def listener(self):
# A function run as a thread that
listens for new messages
while self.listening:
data =
try:
data = self.socket.
recv(1024)
except socket.error:
Unable to recieve
data
self.handle_msg(data)
# Don't need the while loop to be
ridiculously fast
time.sleep(0.1)](https://crownmelresort.com/image.slidesharecdn.com/thepythonbooktheultimateguidetocodingwithpythonpdfdrive-220527060944-728dd1fe/75/The-Python-Book_-The-ultimate-guide-to-coding-with-Python-PDFDrive-pdf-97-2048.jpg)

![The Python Book 99
Work with Python
Youcaneasilywritealiasestothe
equivalentoftheBashcommandthat
youintendtoreplace
SECTION1:Completingbasicshell
tasksinPython
1.Filemanagement
The Python module shutil provides support for
file and directory operations. It provides support
for file attributes, directory copying, archiving
etc.Let’slookatsomeofitsimportantfunctions.
shutil module
copy (src,dst): Copy the src file to
the destination directory. In this
mode permissions bits are copied but
metadata is not copied.
copy2 (src,dst): Same as copy() but
also copies the metadata.
copytree(src, dst[, symlinks=False[,
ignore=None]]): This is similar to ‘cp
-r’, it allows you to copy an entire
directory.
ignore_patterns (*patterns): ignore_
patterns is an interesting function
that can be used as a callable for
copytree(), it allows you to ignore
files and directories specified by the
glob-style patterns.
rmtree(path[, ignore_errors[,
onerror]]): rmtree() is used to delete
an entire directory.
move(src,dst): Similar to mv command it
allows you to recessively move a file
or directory to a new location.
Example:
from shutil import copytree, ignore_
patterns
copytree(source, destination,
ignore=ignore_patterns(‘*.pyc’,
‘tmp*’))
make_archive(base_name, format[, root_
dir[, base_dir[, verbose[, dry_run[,
owner[, group[, logger]]]]]]] : Think
of this as a replacement for tar, zip,
bzip etc. make_archive() creates an
archive file in the given format
such as zip, bztar, tar , gztar.
Archive support can be extended via
Python modules.
Example
from shutil import make_archive
import os
archive_name = os.path.
expanduser(os.path.join(‘~’,
‘ludarchive’))
root_dir = os.path.expanduser(os.
path.join(‘~’, ‘.ssh’))
make_archive(archive_name, ‘gztar’,
root_dir)
‘/Users/kunal/ludarchive.tar.gz’
2.Interfacingoperatingsystem
subprocesses
Python provides two modules to interface
with the OS and to manage processes, called
os and subprocess. These modules allow you
to interact with the core operating system
shell and let you work with the environment,
processes,usersandfiledescriptors.
The subprocess module was introduced to
support better management of subprocesses
(part of which already exists in the os
module) in Python and is aimed to replace
os.system, os.spawn*, os.popen, popen2.* and
commands.*modules.
osmodule
environ: environment represents the OS
environmentvariablesinastringobject.
example:
import os
os.environ
{‘VERSIONER_PYTHON_PREFER_32_BIT’:
‘no’, ‘LC_CTYPE’: ‘UTF-8’, ‘TERM_
PROGRAM_VERSION’: ‘297’, ‘LOGNAME’:
‘kunaldeo’, ‘USER’: ‘kunaldeo’, ‘PATH’:
‘/System/Library/Frameworks/Python.
framework/Versions/2.7/bin:/Users/
kunaldeo/narwhal/bin:/opt/local/sbin:/
usr/local/bin:/usr/bin:/bin:/usr/sbin:/
sbin:/usr/local/bin:/usr/X11/bin:/opt/
local/bin:/Applications/MOTODEV_Studio_
For_Android_2.0.0_x86/android_sdk/
tools:/Applications/MOTODEV_Studio_For_
Android_2.0.0_x86/android_sdk/platform-
tools:/Volumes/CyanogenModWorkspace/
bin’, ‘HOME’: ‘/Users/kunaldeo’,
‘PS1’: ‘[e[0;32m]u[e[m]
[e[1;34m]w[e[m]
[e[1;32m]$[e[m]
[e[1;37m]’, ‘NARWHAL_ENGINE’:
‘jsc’, ‘DISPLAY’: ‘/tmp/launch-s2LUfa/
org.x:0’, ‘TERM_PROGRAM’: ‘Apple_
Terminal’, ‘TERM’: ‘xterm-color’,
‘Apple_PubSub_Socket_Render’: ‘/tmp/
launch-kDul5P/Render’, ‘VERSIONER_
PYTHON_VERSION’: ‘2.7’, ‘SHLVL’:
‘1’, ‘SECURITYSESSIONID’: ‘186a5’,
‘ANDROID_SDK’: ‘/Applications/MOTODEV_
Studio_For_Android_2.0.0_x86/android_
sdk’,’_’: ‘/System/Library/Frameworks/
Python.framework/Versions/2.7/bin/
python’, ‘TERM_SESSION_ID’: ‘ACFE2492-
BB5C-418E-8D4F-84E9CF63B506’, ‘SSH_
AUTH_SOCK’: ‘/tmp/launch-dj6Mk4/
Listeners’, ‘SHELL’: ‘/bin/bash’,
‘TMPDIR’: ‘/var/folders/6s/pgknm8b118
737mb8psz8x4z80000gn/T/’, ‘LSCOLORS’:
‘ExFxCxDxBxegedabagacad’, ‘CLICOLOR’:
‘1’, ‘__CF_USER_TEXT_ENCODING’:
‘0x1F5:0:0’, ‘PWD’: ‘/Users/kunaldeo’,
‘COMMAND_MODE’: ‘unix2003’}
You can also find out the value for an
environmentvalue:
os.environ[‘HOME’]
‘/Users/kunaldeo’
putenv(varname,value) : Adds or sets
an environment variable with the given
variable name and value.
getuid() : Return the current process’s
user id.
getlogin() : Returns the username of
currently logged in user
getpid(pid) : Returns the process group
id of given pid. When used without
any parameters it simply returns the
current process id.
getcwd() : Return the path of the
current working directory.
chdir(path) : Change the current
working directory to the given path.](https://crownmelresort.com/image.slidesharecdn.com/thepythonbooktheultimateguidetocodingwithpythonpdfdrive-220527060944-728dd1fe/75/The-Python-Book_-The-ultimate-guide-to-coding-with-Python-PDFDrive-pdf-99-2048.jpg)
![100 The Python Book
Work with Python
listdir(path) : Similar to ls, returns
a list with the content of directories
and file available on the given path.
Example:
os.listdir(“/home/homer”)
[‘.gnome2’, ‘.pulse’, ‘.gconf’,
‘.gconfd’, ‘.beagle’, ‘.gnome2_
private’, ‘.gksu.lock’, ‘Public’,
‘.ICEauthority’, ‘.bash_history’,
‘.compiz’, ‘.gvfs’, ‘.update-
notifier’, ‘.cache’, ‘Desktop’,
‘Videos’, ‘.profile’, ‘.config’,
‘.esd_auth’, ‘.viminfo’, ‘.sudo_
as_admin_successful’, ‘mbox’,
‘.xsession-errors’, ‘.bashrc’, ‘Music’,
‘.dbus’, ‘.local’, ‘.gstreamer-0.10’,
‘Documents’, ‘.gtk-bookmarks’,
‘Downloads’, ‘Pictures’, ‘.pulse-
cookie’, ‘.nautilus’, ‘examples.
desktop’, ‘Templates’, ‘.bash_logout’]
mkdir(path[, mode]) : Creates a
directory with the given path with the
numeric code mode. The default mode is
0777.
makedirs(path[, mode]) : Creates given
path (inclusive of all its directories)
recursively. The default mode is 0777.
:
Example:
import os
path = “/home/kunal/greatdir”
os.makedirs( path, 0755 );
rename (old,new) : The file or
directory “old” is renamed to “new”
If “new” is a directory, an error
will be raised. On Unix and Linux, if
“new” exists and is a file, it will
be replaced silently if the user has
permission to do so.
renames (old,new) : Similar to rename
but also creates any directories
recessively if necessary.
rmdir(path) : Remove directory from the
path mentioned. If the path already
has files you will need to use shutil.
rmdtree()
subprocess:
call(*popenargs, **kwargs) : Runs the
command with arguments. On process
completion it returns the returncode
attribute.
Example:
import subprocess
print subprocess.call([“ls”,”-l”])
total 3684688
drwx------+ 5 kunaldeo staff
170 Aug 19 01:37 Desktop
drwx------+ 10 kunaldeo staff
340 Jul 26 08:30 Documents
drwx------+ 50 kunaldeo staff
1700 Aug 19 12:50 Downloads
drwx------@ 127 kunaldeo staff
4318 Aug 19 01:43 Dropbox
drwx------@ 42 kunaldeo staff
1428 Aug 12 15:17 Library
drwx------@ 3 kunaldeo staff
102 Jul 3 23:23 Movies
drwx------+ 4 kunaldeo staff
136 Jul 6 08:32 Music
drwx------+ 5 kunaldeo staff
170 Aug 12 11:26 Pictures
drwxr-xr-x+ 5 kunaldeo staff
170 Jul 3 23:23 Public
-rwxr-xr-x 1 kunaldeo staff
1886555648 Aug 16 21:02 androidsdk.tar
drwxr-xr-x 5 kunaldeo staff
170 Aug 16 21:05 sdk
drwxr-xr-x 19 kunaldeo staff
646 Aug 19 01:47 src
-rw-r--r-- 1 root staff
367 Aug 16 20:36 umbrella0.log
STD_INPUT_HANDLE: The standard input
device.Initially,thisistheconsoleinputbuffer.
STD_OUTPUT_HANDLE: The standard output
device. Initially, this is the active console
screenbuffer.
STD_ERROR_HANDLE: The standard error
device. Initially, this is the active console
screenbuffer.
SECTION2:IPython:aready-made
Pythonsystemshellreplacement
In section 1 we have introduced you to the
Python modules which allow you to do system
shell-related tasks very easily using vanilla
Python. Using the same features, you can build
a fully featured shell and remove a lot of Python
boilerplate code along the way. However, if
you are kind of person who wants everything
ready-made, you are in luck. IPython provides a
powerful and interactive Python shell which you
can use as your primary shell. IPython supports
Python 2.6 to 2.7 and 3.1 to 3.2 . It supports
two type of Python shells: Terminal based and
Qtbased.
Just to reiterate, IPython is purely implemented
in Python and provides a 100% Python-
compliant shell interface, so everything you
have learnt in section 1 can be run inside
IPythonwithoutanyproblems.
IPython is already available in most Linux
distributions. Search your distro’s repositories to
look for it. In case you are not able to find it, you
canalsoinstallitusingeasy_installorPyPI.
IPython provides a lot of interesting features
whichmakesitagreatshellreplacement…
Tab completion: Tab completion provides an
excellent way to explore any Python object that
you are working with. It also helps you to avoid
makingtypos.
Example:
In [3]: import o {hit tab}
objc opcode operator
optparse os os2emxpath
In [3]: import os
In [4]: os.p {hit tab}
os.pardir os.pathconf_names
os.popen os.popen4
os.path os.pathsep
os.popen2 os.putenv
os.pathconf os.pipe
os.popen3
Built In Object Explorer: You can add
‘?’ after any Python object to view
its details such as Type, Base Class,
String Form, Namespace, File and
Docstring.
Example:
In [28]: os.path?
Type: module
Base Class: type ‘module’
String Form:module ‘posixpath’ from
‘/System/Library/Frameworks/Python.
framework/Versions/2.7/lib/python2.7/
posixpath.pyc’
Namespace: Interactive
File: /System/Library/Frameworks/](https://crownmelresort.com/image.slidesharecdn.com/thepythonbooktheultimateguidetocodingwithpythonpdfdrive-220527060944-728dd1fe/75/The-Python-Book_-The-ultimate-guide-to-coding-with-Python-PDFDrive-pdf-100-2048.jpg)
![The Python Book 101
Work with Python
As you can see, it’s easy to tailor Python
for all your shell environment needs.
Python modules like os, subprocess
and shutil are available at your
disposal to do just about everything
you need using Python. IPython turns
this whole experience into an even
more complete package. You get to do
everything a standard Python shell
does and with much more convenient
features. IPython’s magic functions
really do provide a magical Python shell
experience. So next time you open a
Bash session, think again: why settle for
goldwhen platinum is a stepaway?
IPythonalsocomeswithitsown
Qt-basedconsole
Python.framework/Versions/2.7/lib/
python2.7/posixpath.py
Docstring:
Common operations on POSIX pathnames.
Instead of importing this module directly, import
os and refer to this module as os.path. The
‘os.path’ name is an alias for this module on
POSIX systems; on other systems (eg Mac,
Windows),os.pathprovidesthesameoperations
in a manner specific to that platform, and is an
aliastoanothermodule(egmacpath,ntpath).
Some of this can actually be useful on non-
POSIX systems too, eg for manipulation of the
pathnamecomponentofURLs.
You can also use double question marks (??) to
viewthesourcecodefortherelevantobject.
Magic functions: IPython comes with a set of
predefined ‘magic functions’ that you can call
with a command-line-style syntax. IPython
‘magic’ commands are conventionally prefaced
by %, but if the flag %automagic is set to on,
then you can call magic commands without the
preceding%.
To view a list of available magic functions,
you can use ‘magic function %lsmagic’. Magic
functions include functions that work with code
such as %run, %edit, %macro, %recall etc;
functions that affect shell such as %colors,
%xmode, %autoindent etc; and other functions
such as %reset, %timeit, %paste etc. Most of
the cool features of IPython are powered using
magicfunctions.
Example:
In [45]: %lsmagic
Available magic functions:
%alias %autocall %autoindent
%automagic %bookmark %cd %colors
%cpaste %debug %dhist %dirs
%doctest_mode %ed %edit %env %gui
%hist %history %install_default_
config %install_profiles %load_ext
%loadpy %logoff %logon %logstart
%logstate %logstop %lsmagic %macro
%magic %page %paste %pastebin %pdb
%pdef %pdoc %pfile %pinfo %pinfo2
%popd %pprint %precision %profile
%prun %psearch %psource %pushd %pwd
%pycat %pylab %quickref %recall
%rehashx %reload_ext %rep %rerun
%reset %reset_selective %run %save
%sc %sx %tb %time %timeit %unalias
%unload_ext %who %who_ls %whos
%xdel %xmode
Automagic is OFF, % prefix IS needed
for magic functions
To view help on any Magic Function, call
‘%somemagic?’toreaditsdocstring.
Python script execution and runtime code
editing: You can use %run to run any Python
script. You can also control-run the Python
script with pdb debugger using -d, or pdn
profiler using -p. You can also edit a Python
script using the %edit command. %edit will
open the given Python script in the editor
definedbythe$EDITORenvironmentvariable.
Shell command support: If you are in the mood
to just run a shell command, you can do it very
easilybyprefixingthecommandwith!.
Example:
In [5]: !ps
PID TTY TIME CMD
4508 ttys000 0:00.07 -bash
84275 ttys001 0:00.03 -bash
17958 ttys002 0:00.18 -bash
In [8]: !clang prog.c -o prog
prog.c:2:1: warning: type specifier
missing, defaults to ‘int’ [-Wimplicit-
int]
main()
^~~~
1 warning generated.
Qt console : IPython also comes with its own
Qt-based console. This provides a number of
features that are only available in a GUI, such
as inline figures, multiline editing with syntax
highlighting,andgraphicalcalltips.
YoucanstarttheQtconsolewith:
$ ipython qtconsole
If you get errors related to missing modules,
makesurethatyouhaveinstalledthedependent
packages, such as PyQt, pygments, pyexpect
andZeroMQ.
QIPythonQtconsolewithGUIcapabilities](https://crownmelresort.com/image.slidesharecdn.com/thepythonbooktheultimateguidetocodingwithpythonpdfdrive-220527060944-728dd1fe/75/The-Python-Book_-The-ultimate-guide-to-coding-with-Python-PDFDrive-pdf-101-2048.jpg)
![102 The Python Book
Work with Python
LearnhowPythoncanhelpinsystemadministrationasitdaresto
replacetheusualshellscripting…
Pythonforsystem
administrators
Parsingconfigurationfiles
Configurationfilesprovideawayforapplications
to store various settings. In order to write a
script that allows you to modify settings of a
particular application, you should be able to
parse the configuration file of the application.
In this section we learn how to parse INI-style
configuration files. Although old, the INI file
format is very popular with much modern open
sourcesoftware,suchasPHPandMySQL.
Excerptforphp.iniconfigurationfile:
[PHP]
engine = On
zend.ze1_compatibility_mode = Off
short_open_tag = On
asp_tags = Off
precision = 14
y2k_compliance = On
output_buffering = 4096
;output_handler =
zlib.output_compression = Off
[MySQL]
; Allow or prevent persistent links.
mysql.allow_persistent = On
mysql.max_persistent = 20
mysql.max_links = -1
mysql.default_port = 3306
mysql.default_socket =
mysql.default_host = localhost
mysql.connect_timeout = 60
mysql.trace_mode = Off
Python provides a built-in module called
ConfigParser (known as configparser in Python
3.0).Youcanusethismoduletoparseandcreate
configurationfiles.
@code:writeconfig.py
@description: The following demonstrates
addingMySQLsectiontothephp.inifile.
@warning: Do not use this script with the
actual php.ini file, as it’s not designed to
handleallaspectsofacompletephp.inifile.
import ConfigParser
config = ConfigParser.
RawConfigParser()
config.add_section(‘MySQL’)
config.set(‘MySQL’,’mysql.trace_
mode’,’Off’)
config.set(‘MySQL’,’mysql.connect_
timeout’,’60’)
config.set(‘MySQL’,’mysql.default_
host’,’localhost’)
config.set(‘MySQL’,’mysql.default_
port’,’3306’)
config.set(‘MySQL’,’mysql.allow_
persistent’, ‘On’ )
config.set(‘MySQL’,’mysql.max_
persistent’,’20’)
with open(‘php.ini’, ‘ap’) as
configfile:
config.write(configfile)
Output:php.ini
[MySQL]
mysql.max_persistent = 20
mysql.allow_persistent = On
mysql.default_port = 3306
mysql.default_host = localhost
mysql.trace_mode = Off
mysql.connect_timeout = 60
@code:parseconfig.py
@description: Parsing and updatingthe config
file
import ConfigParser
config = ConfigParser.ConfigParser()
config.read(‘php.ini’)
# Print config values
print config.get(‘MySQL’,’mysql.
System administration is an important part of
our computing environment. It does not matter
whether you are managing systems at your work
our home. Linux, being a UNIX-based operating
system, already has everything a system
administrator needs, such as the world-class
shells(notjustonebutmany,includingBash,csh,
zsh etc), handy tools, and many other features
which make the Linux system an administrator’s
dream. So why do we need Python when Linux
already has everything built-in? Being a dynamic
scripting language, Python is very easy to read
and learn. That’s just not us saying that, but
many Linux distributions actually use Python
in core administrative parts. For example, Red
Hat (and Fedora) system setup tool Anaconda
is written in Python (read this line again, got the
snakeconnection?).Also,toolslikeGNUMailman,
CompizConfig Settings Manager (CCSM) and
hundreds of tiny GUI and non-GUI configuration
tools are written using Python. Python does not
limit you on the choice of user interface to follow
–youcanbuildcommand-line,GUIandwebapps
using Python. This way, it has got covered almost
allthepossibleinterfaces.
Here we will look into executing sysadmin-
relatedtasksusingPython.
Python-develPython development
libraries, required for compiling
third-party Python module
setuptoolssetuptools allows you to
download, build, install, upgrade,
and uninstall Python packages
with ease
Resources
Note
This is written for the Python 2.X series,
as it is still the most popular and default
Python distribution across all the
platforms (including all Linux distros,
BSDsandMacOSX).](https://crownmelresort.com/image.slidesharecdn.com/thepythonbooktheultimateguidetocodingwithpythonpdfdrive-220527060944-728dd1fe/75/The-Python-Book_-The-ultimate-guide-to-coding-with-Python-PDFDrive-pdf-102-2048.jpg)
![The Python Book 103
Work with Python
default_host’)
print config.get(‘MySQL’,’mysql.
default_port’)
config.remove_option(‘MySQL’,’mysql.
trace_mode’)
with open(‘php.ini’, ‘wb’) as
configfile:
config.write(configfile)
ParsingJSONdata
JSON (also known as JavaScript Object
Notation) is a lightweight modern data-
interchange format. JSON is an open standard
under ECMA-262. It is a text format and is
completely language-independent. JSON
is also used as the configuration file format
for modern applications such as Mozilla
Firefox and Google Chrome. JSON is also
very popular with modern web services such
as Facebook, Twitter, Amazon EC2 etc. In
this section we will use the Python module
‘simplejson’ to access Yahoo Search (using
the Yahoo Web Services API), which outputs
JSONdata.
To use this section, you should have the
following:
1.Pythonmodule:simplejson.
Note: You can install Python modules using the
command ‘easy_install module name’. This
command assumes that you have a working
internetconnection.
2. Yahoo App ID: The Yahoo App ID can be
created from https://developer.apps.yahoo.
com/dashboard/createKey.html. The Yahoo
App ID will be generated on the next page. See
thescreenshotbelowfordetails.
QGeneratingtheYahooAppID
simplejson is very easy to use. In the following
example we will use the capability of mapping
JSON data structures directly to Python data
types. This gives us direct access to the JSON
datawithoutdevelopinganyXMLparsingcode.
JSONPYTHONDATAMAPPING
JSON Python
object dict
array list
string unicode
number(int) int,long
number(real) float
TRUE TRUE
FALSE FALSE
null None
For this section we will use the simplejson.
load function, which allows us to deserialise a
JSONobjectintoaPythonobject.
@code:LUDSearch.py
import simplejson, urllib
APP_ID = ‘xxxxxxxx’ # Change this to
your APP ID
SEARCH_BASE = ‘http://search.
yahooapis.com/WebSearchService/V1/
webSearch’
class YahooSearchError(Exception):
pass
def search(query, results=20,
start=1, **kwargs):
kwargs.update({
‘appid’: APP_ID,
‘query’: query,
‘results’: results,
‘start’: start,
‘output’: ‘json’
})
url = SEARCH_BASE + ‘?’ +
urllib.urlencode(kwargs)
result = simplejson.load(urllib.
urlopen(url))
if ‘Error’ in result:
# An error occurred; raise
an exception
raise YahooSearchError,
result[‘Error’]
return result[‘ResultSet’]
Let’s use the above code from the Python shell
to see how it works. Change to the directory
where you have saved the LUDYSearch.py and
openaPythonshell.
@code: Python Shell Output. Lines starting
with‘’indicateinput
execfile(“LUDYSearch.py”)
results = search(‘Linux User and
Developer’)
results[‘totalResultsAvailable’]
123000000
results[‘totalResultsReturned’]
20
items = results[‘Result’]
for Result in items:
... print
Result[‘Title’],Result[‘Url’]
...
Linux User http://www.linuxuser.
co.uk/
Linux User and Developer -
Wikipedia, the free encyclopedia
http://en.wikipedia.org/wiki/Linux_
User_and_Developer
Linux User amp;amp; Developer |
Linux User http://www.linuxuser.
co.uk/tag/linux-user-developer/
Gatheringsystem
information
One of the important jobs of a system
administrator is gathering system information.
In this section we will use the SIGAR (System
Information Gatherer And Reporter) API to
demonstrate how we can gather system
information using Python. SIGAR is a very
complete API and it can provide lot of
information,includingthefollowing:
1. System memory, swap, CPU, load average,
uptime,logins.
2. Per-process memory, CPU, credential info,
state,arguments,environment,openfiles.
3.Filesystemdetectionandmetrics.
4. Network interface detection, configuration
infoandmetrics.
5.TCPandUDPconnectiontables.
6.Networkroutetable.
InstallingSIGAR
The first step is to build and install SIGAR. SIGAR
is hosted at GitHub, so make sure that you have
Git installed in your system. Then perform
the following steps to install SIGAR and its
Pythonbindings:
$ git clone git://github.com/
hyperic/sigar.git sigar.git
$ cd sigar.git/bindings/python
$ sudo python setup.py install
Pythondoesn’t
limityourchoice
ofinterface](https://crownmelresort.com/image.slidesharecdn.com/thepythonbooktheultimateguidetocodingwithpythonpdfdrive-220527060944-728dd1fe/75/The-Python-Book_-The-ultimate-guide-to-coding-with-Python-PDFDrive-pdf-103-2048.jpg)
![104 The Python Book
Work with Python
At the end you should see a output similar to
thefollowing:
Writing /usr/local/lib/python2.6/
dist-packages/pysigar-0.1.egg-info
SIGAR is a very easy-to-use library and can be
usedtogetinformationonalmosteveryaspectof
asystem.Thenextexampleshowsyouhow.
The following code shows the memory and the
filesysteminformation
@code:PySysInfo.py
import os
import sigar
sg = sigar.open()
mem = sg.mem()
swap = sg.swap()
fslist = sg.file_system_list()
print “==========Memory
Information==============”
print “tTotaltUsedtFree”
print “Mem:t”,
(mem.total() / 1024),
(mem.used() / 1024),
(mem.free() / 1024)
print “Swap:t”,
(swap.total() / 1024),
(swap.used() / 1024),
(swap.free() / 1024)
print “RAM:t”, mem.ram(), “MB”
print “==========File System
Information===============”
def format_size(size):
return sigar.format_size(size *
1024)
print ‘FilesystemtSizetUsed
tAvailtUse%tMounted ontTypen’
for fs in fslist:
dir_name = fs.dir_name()
usage = sg.file_system_
usage(dir_name)
total = usage.total()
used = total - usage.free()
avail = usage.avail()
pct = usage.use_percent() * 100
if pct == 0.0:
pct = ‘-’
print fs.dev_name(), format_
size(total), format_size(used),
format_size(avail),
pct, dir_name, fs.sys_type_
name(), ‘/’, fs.type_name()
@Output
==========Memory
Information==============
Total Used Free
Mem: 8388608 6061884 2326724
Swap: 131072 16048 115024
RAM: 8192 MB
==========File System
Information===============
Filesystem Size Used Avail
Use% Mounted on Type
/dev/disk0s2 300G 175G 124G 59.0 / hfs
/ local
devfs 191K 191K 0 - /dev devfs /
none
AccessingSecureShell
(SSH)services
SSH (Secure Shell) is a modern replacement for an
old remote shell system called Telnet. It allows data
to be exchanged using a secure channel between
two networked devices. System administrators
frequently use SSH to administrate networked
systems. In addition to providing remote shell, SSH
is also used for secure file transfer (using SSH File
Transfer Protocol, or SFTP) and remote X server
forwarding (allows you to use SSH clients as X
server). In this section we will learn how to use the
SSH protocol from Python using a Python module
called paramiko, which implements the SSH2
protocolforPython.
paramiko can be installed using the following
steps:
$ git clone https://github.com/robey/
paramiko.git
$ cd paramiko
$ sudo python setup.py install
To the core of paramiko is the
SSHClient class. This class
wraps L{Transport},L{Channel},andL{SFTPClient}
to handle most of the aspects of SSH. You can use
SSHClientas:
client = SSHClient()
client.load_system_host_keys()
client.connect(‘some.host.com’)
stdin, stdout, stderr = client.exec_
command(‘dir’)
The following example demonstrates a full SSH
clientwrittenusingtheparamikomodule.
@code:PySSHClient.py
import base64, getpass, os, socket, sys,
socket, traceback
import paramiko
import interactive
# setup logging
paramiko.util.log_to_file(‘demo_simple.
log’)
# get hostname
username = ‘’
if len(sys.argv) 1:
hostname = sys.argv[1]
if hostname.find(‘@’) = 0:
username, hostname = hostname.
Note
If you are confused with the tab spacing of
thecode,lookforthecodefilesonFileSilo.
split(‘@’)
else:
hostname = raw_input(‘Hostname: ‘)
if len(hostname) == 0:
print ‘*** Hostname required.’
sys.exit(1)
port = 22
if hostname.find(‘:’) = 0:
hostname, portstr = hostname.
split(‘:’)
port = int(portstr)
# get username
if username == ‘’:
default_username = getpass.
getuser()
username = raw_input(‘Username
[%s]: ‘ % default_username)
if len(username) == 0:
username = default_username
password = getpass.getpass(‘Password
for %s@%s: ‘ % (username, hostname))
# now, connect and use paramiko
Client to negotiate SSH2 across the
connection
try:
client = paramiko.SSHClient()
client.load_system_host_keys()
client.set_missing_host_key_
policy(paramiko.WarningPolicy)
print ‘*** Connecting...’
client.connect(hostname, port,
username, password)
chan = client.invoke_shell()
print repr(client.get_transport())
print ‘*** SSH Server Connected!
***’
print
interactive.interactive_
shell(chan)
chan.close()
client.close()
except Exception, e:
print ‘*** Caught exception: %s:
%s’ % (e.__class__, e)
traceback.print_exc()
try:
client.close()
except:
pass
sys.exit(1)
To run this code you will also need a custom
Python class interactive.py which implements](https://crownmelresort.com/image.slidesharecdn.com/thepythonbooktheultimateguidetocodingwithpythonpdfdrive-220527060944-728dd1fe/75/The-Python-Book_-The-ultimate-guide-to-coding-with-Python-PDFDrive-pdf-104-2048.jpg)
![The Python Book 105
Work with Python
Administrators are comfortable with running raw
scripts by hand, but end-users are not. So if you
are writing a script that is supposed to be used by
common users, it is a good idea to create a user-
friendly interface on top of the script. This way
end-users can run the scripts just like any other
application. To demonstrate this, we will create
a simple GRUB configuration tool which allows
userstoselectdefaultbootentryandthetimeout.
We will be creating a TUI (text user interface)
application and will use the Python module
‘snack’ to facilitate this (not to be confused with
thePythonaudiolibrary,tksnack).
Thisappconsistsoftwofiles…
grub.py: GRUB Config File (grub.conf) Parser
(available on FileSilo). It implements two main
functions, readBootDB() and writeBootFile(),
which are responsible for reading and writing the
GRUBconfigurationfile.
grub_tui.py: Text user interface file for
manipulating the GRUB configuration file using
thefunctionsavailableingrub.py.
@code:grub_tui.py
import sys
from snack import *
from grub import (readBootDB,
writeBootFile)
def main(entry_
value=’1’,kernels=[]):
try:
(default_value, entry_
value, kernels)=readBootDB()
except:
print sys.stderr,
(“Error reading /boot/grub/grub.
conf.”)
sys.exit(10)
screen=SnackScreen()
while True:
g=GridForm(screen, (“Boot
configuration”),1,5)
if len(kernels)0 :
li=Listbox(height=len(kernels),
width=20, returnExit=1)
for i, x in
enumerate(kernels):
li.append(x,i)
g.add(li, 0, 0)
li.setCurrent(default_value)
bb = ButtonBar(screen,
WritingauserinterfaceusingPython
Learnhowtocreateauser-friendlyinterfaceusingPython
(((“Ok”), “ok”), ((“Cancel”),
“cancel”)))
e=Entry(3, str(entry_
value))
l=Label((“Timeout (in
seconds):”))
gg=Grid(2,1)
gg.setField(l,0,0)
gg.setField(e,1,0)
g.add(Label(‘’),0,1)
g.add(gg,0,2)
g.add(Label(‘’),0,3)
g.add(bb,0,4,growx=1)
result = g.runOnce()
if
bb.buttonPressed(result) ==
‘cancel’:
screen.finish()
sys.exit(0)
else:
entry_value =
e.value()
try :
c = int(entry_
value)
break
except ValueError:
continue
writeBootFile(c,
li.current())
screen.finish()
if __name__== ‘__main__’:
main()
Start the tool using the sudo
command (as it reads the grub.
conf file)
$ sudo grub_tui.py
the interactive shell for the SSH session. Look
for this file on FileSilo and copy it into the same
folderwhereyouhavecreatedPySSHClient.py.
@code_Output
kunal@ubuntu-vm-kdeo:~/src/paramiko/
demos$ python demo_simple.py
Hostname: 192.168.1.2
Username [kunal]: luduser
Password for luduser@192.168.1.2:
*** Connecting...
paramiko.Transport at 0xb76201acL
(cipher aes128-ctr, 128 bits)
(active; 1 open channel(s))
*** SSH Server Connected! ***
Last login: Thu Jan 13 02:01:06 2011
from 192.168.1.9
[~ $:]
If the host key for the SSH server is not added
to your $HOME/.ssh/known_hosts file, the
clientwillthrowthefollowingerror:
*** Caught exception: type
‘exceptions.TypeError’: unbound
method missing_host_key() must be
called with WarningPolicy instance
as first argument (got SSHClient
instance instead)
This means that the client cannot verify the
authenticity of the server you are connected
to. To add the host key to known_hosts, you
can use the ssh command. It is important
to remember that this is not the ideal way to
add the host key; instead you should use ssh-
keygen. But for simplicity’s sake we are using
thesshclient.
kunal@ubuntu-vm-kdeo:~/.ssh$ ssh
luduser@192.168.1.2
The authenticity of host
‘192.168.1.2 (192.168.1.2)’ can’t be
established.
RSA key fingerprint is be:01:76:6a:b
9:bb:69:64:e3:dc:37:00:a4:36:33:d1.
Are you sure you want to continue
connecting (yes/no)? yes
Warning: Permanently added
‘192.168.1.2’ (RSA) to the list of
known hosts.
So now you’ve seen how easy it can be to
carry out the complex sysadmin tasks using
Python’sversatilelanguage.
As is the case with all Python coding, the
code that is presented here can easily be
adoptedintoyourGUIapplication(withsoftware
such as PyGTK or PyQt) or a web application
(usingaframeworksuchasDjangoorGrok).](https://crownmelresort.com/image.slidesharecdn.com/thepythonbooktheultimateguidetocodingwithpythonpdfdrive-220527060944-728dd1fe/75/The-Python-Book_-The-ultimate-guide-to-coding-with-Python-PDFDrive-pdf-105-2048.jpg)


![The Python Book 109
Create with Python
QAtic-tac-toegridnowacceptinginput,addingaOorXalternately
the former, creating a rule for the ‘TicTacToeGrid’
widget by declaring that every ‘TicTacToeGrid’
instantiatedshouldhaveits‘cols’propertysetto3.
We’ll use some more kv language features later,
but for now let’s go back to Python to create the
buttonsthatwillbetheentriesinourtic-tac-toegrid.
from kivy.uix.button import Button
from kivy.properties import ListProperty
class GridEntry(Button):
coords = ListProperty([0, 0])
This inherits from Kivy’s ‘Button’ widget, which
interacts with mouse or touch input, dispatching
events when interactions toggle it. We can hook
into these events to call our own functions when a
user presses the button, and can set the button’s
‘text’ property to display the ‘X’ or ‘O’. We also
createdanewKivypropertyforourwidget,‘coords’
– we’ll show how this is useful later on. It’s almost
identical to making a normal Python attribute by
writing‘self.coords=[0,0]’in‘GridEntry.__init__’.
As with the ‘TicTacToeGrid’, we’ll style our new
class with kv language, but this time we get to see
amoreinterestingfeature.
GridEntry:
font_size: self
.height
As before, this syntax defines a rule for how a
‘GridEntry’ widget should be constructed, this
time setting the ‘font_size’ property that controls
the size of the text in the button’s label. The extra
magic is that kv language automatically detects
thatwe’vereferencedtheButton’sownheightand
will create a binding to update this relationship
– when a ‘GridEntry’ widget’s height changes, its
‘font_size’ will change so the text fits perfectly.
We could have made these bindings straight
from Python (another usage of the ‘bind’ method
used later on), but that’s rarely as convenient as
referencingthepropertywewanttobindto.
Let’s now populate our ‘TicTacToeGrid’ with
‘GridEntry’ widgets (Fig.01). This introduces a
few new concepts: When we instantiated our
‘GridEntry’ widgets, we were able to set their
‘coords’ property by simply passing it in as a
kwarg.Thisisaminorfeaturethatisautomatically
handledbyKivyproperties.
We used the ‘bind’ method to call the
grid’s ‘button_pressed’ method whenever
the `GridEntry` widget dispatches an
‘on_release’ event. This is automatically
handled by its ‘Button’ superclass, and
will occur whenever a user presses, then
releases a ‘GridEntry’ button. We could also
bind to ‘on_press’, which is dispatched when the
button is first clicked, or to any Kivy property of
the button, which is dispatched dynamically
wheneverthepropertyismodified.
We added each ‘GridEntry’ widget to our ‘Grid’
via the ‘add_widget’ method. That means each
one is a child widget of the ‘TicTacToeGrid’, and
so it will display them and knows it should
automatically arrange them into a grid with the
numberofcolumnswesetearlier.
Nowallwehavetodoisreplaceourrootwidget
(returned from ‘App.build’) with a ‘TicTacToeGrid’
andwecanseewhatourapplookslike.
automatically arrange any child widgets to fit
nicelywithasmanyrowsasnecessary.Tic-tac-toe
requiresthreecolumnsandninechildren.
Here we introduce the Kivy language (kv), a
special domain-specific language for making
rules describing Kivy widget trees. It’s very simple
but removes a lot of necessary boilerplate for
manipulatingtheGUIwithPythoncode-asaloose
analogy you might think of it as the HTML/CSS to
Python’s JavaScript. Python gives us the dynamic
powertodoanything,butallthatpowergetsinthe
way if we just want to declare the basic structure
of our GUI. Note that you never need kv language,
youcanalwaysdothesamethinginPythonalone,
but the rest of the example may show why Kivy
programmersusuallyliketousekv.
Kivy comes with all the tools needed to use kv
language;thesimplestwayistowriteitinafilewith
anamebasedonourAppclass.Thatis,weshould
placethefollowinginafilenamed‘tictactoe.kv’:
TicTacToeGrid:
cols: 3 # Number of columns
This is the basic syntax of kv language; for each
widget type we may write a rule defining its
behaviour, including setting its properties and
adding child widgets. This example demonstrates
Kivycomes
withallthetools
neededtousekv
language](https://crownmelresort.com/image.slidesharecdn.com/thepythonbooktheultimateguidetocodingwithpythonpdfdrive-220527060944-728dd1fe/75/The-Python-Book_-The-ultimate-guide-to-coding-with-Python-PDFDrive-pdf-109-2048.jpg)
![110 The Python Book
Create with Python
def build(self):
return TicTacToeGrid()
# Replaces the previous label
With this complete you can run your main Python
file again and enjoy your new program. All being
well, the single Label is replaced by a grid of
nine buttons, each of which you can click (it will
automatically change colour) and release (you’ll
see the printed output information from our
binding). We could customise the appearance by
modifying other properties of the Button, but for
nowwe’llleavethemastheyare.
Hasanyonewonyet?
We’llwanttokeeptrackofthestateoftheboardto
check if anyone has won, which we can do with a
couplemoreKivyproperties:
from kivy.properties import
(ListProperty, NumericProperty)
class TicTacToeGrid(GridLayout):
status = ListProperty([0, 0, 0,
0, 0, 0,
0, 0, 0])
current_player = NumericProperty(1)
This adds an internal status list representing who
has played where, and a number to represent the
current player (1 for ‘O’, -1 for ‘X’). By placing these
numbers in our status list, we’ll know if somebody
winsbecausethesumofarow,columnordiagonal
will be +-3. Now we can update our graphical grid
whenamoveisplayed(Fig.02).
You can run your app again to see exactly what
this did, and you’ll find that clicking each button
now places an ‘O’ or ‘X’ as well as a coloured
background depending on whose turn it is to
play. Not only that, but you can only play one
move in each button thanks to our status
arraykeepingtrackofexistingmoves.
This is enough to play the game but there’s one
vital element missing... a big pop-up telling you
when you’ve won! Before we can do that, we need
toaddsomecodetocheckifthegameisover.
Kivy properties have another useful feature
here, whenever they change they automatically
call an ‘on_propertyname’ method if it exists
and dispatch a corresponding event in Kivy’s
event system. That makes it very easy to write
code that will run when a property changes,
both in Python and kv language. In our case
we can use it to check the status list every time
it is updated, doing something special if a player
hasfilledacolumn,rowordiagonal.
def on_status(self
, instance, new_value):
status = new_value
# Sum each row, column and diagonal.
# Could be shorter
, but let’s be extra
# clear what’s going on
sums = [sum(status[0:3]), # rows
sum(status[3:6]),
sum(status[6:9]),
sum(status[0:
:3]), # columns
sum(status[1:
:3]),
sum(status[2:
:3]),
sum(status[
:
:4]), # diagonals
sum(status[2:-2:2])]
# Sums can only be +-3 if one player
# filled the whole line
if 3 in sums:
print(‘Os win!’)
elif -3 in sums:
print(‘Xs win!’)
elif 0 not in self
.status: # Grid full
print(‘Draw!’)
This covers the basic detection of a won or drawn
board, but itonlyprintsthe result tostdout. At this
stage we probably want to reset the board so that
the players can try again, along with displaying a
graphicalindicatoroftheresult(Fig.03).
Finally, we can modify the `on_status` method
to both reset the board and display the winner
ina‘ModalView’widget.
from kivy.uix.modalview import ModalView
This is a pop-up widget that draws itself on top of
everything else rather than as part of the normal
widget tree. It also automatically closes when the
userclicksortapsoutsideit.
winner = None
if -3 in sums:
winner = ‘Xs win!’
elif 3 in sums:
winner = ‘Os win!’
elif 0 not in self
.status:
winner = ‘Draw.
.
.nobody wins!’
if winner:
popup = ModalView(size_hint=0.75, 0.5))
victory_label = Label(text=winner
,
QThegamewithfinaladditions,makingthegridsquareandextendingtheinterface](https://crownmelresort.com/image.slidesharecdn.com/thepythonbooktheultimateguidetocodingwithpythonpdfdrive-220527060944-728dd1fe/75/The-Python-Book_-The-ultimate-guide-to-coding-with-Python-PDFDrive-pdf-110-2048.jpg)
![The Python Book 111
Create with Python
Tryswappingoutthedifferentwidget
typestoseehowotherwidgetsbehave
font_size=50)
popup.add_widget(victory_label)
popup.bind(on_dismiss=self
.reset)
popup.open()
This mostly uses the same ideas we already
covered, adding the ‘Label’ widget to the
‘ModalView’ then letting the ‘ModalView’ take
care of drawing itself and its children on top of
everything else. We also use another binding; this
time to ‘on_dismiss’, which is an event dispatched
by the ‘ModalView’ when it is closed. Finally, we
made use of the ‘size_hint’ property common
to all widgets, which in this case is used to set
the ‘ModalView’ size proportional to the window
– while a ‘ModalView’ is open you can resize
the window to see it dynamically resize, always
maintainingtheseproportions.Thisisanothertrick
madepossiblebyabindingwiththe‘size_hint’Kivy
property,thistimemanagedinternallybyKivy.
That’s it, a finished program! We can now
not only play tic-tac-toe, but our program
automatically tells us when somebody has won,
and resets the board so we can play again. Simply
runyourprogramandenjoyhoursoffun!
Timetoexperiment
This has been a quick tour through some of Kivy’s
features, but hopefully it demonstrates how
to think about building a Kivy application. Our
programs are built from individual Kivy widgets,
interacting by having Python code run when their
properties change (eg our ‘on_status’ method)
or when they dispatch events (eg ‘Button’ ‘on_
release’). We also briefly saw kv language and
experienced how it can automatically create
bindingsbetweenproperties.
You can find a copy of the full program on
FileSilo, which you can reference to check you’ve
followed everything correctly. We’ve also added
an extra widget, the ‘Interface’, with a structure
coded entirely in kv language that demonstrates
how to add child widgets this way. You can test
it by uncommenting the ‘return Interface()’ line
in ‘TicTacToeGrid.build’. It doesn’t do anything
fundamentally different to what we already
covered, but it does make extensive use of kv
language’s binding ability to automatically update
a label showing the current player, and to resize
the TicTacToeGrid so that it is always square to
fit within its parent. You can play with all these
settings to see exactly how it fits together, or try
thingslikeswappingoutthedifferentwidgettypes
toseehowotherwidgetsbehave.
class TicTacToeGrid(GridLayout):
def __init__(self
, *args, **kwargs):
super(TicTacToeGrid, self).__init__(*args, **kwargs)
for row in range(3):
for column in range(3):
grid_entry = GridEntry(
coords=(row, column))
grid_entry.bind(on_release=self
.button_pressed)
self
.add_widget(grid_entry)
def button_pressed(self
, instance):
# Print output just to see what’s going on
print(‘{} button clicked!’
.format(instance.coords))
Fig 01
# Note the *args parameter! It’s important later when we make a binding
# to reset, which automatically passes an argument that we don’t care about
def reset(self
, *args):
self
.status = [0 for _ in range(9)]
# self
.children is a list containing all child widgets
for child in self
.children:
child.text = ‘’
child.background_color = (1, 1, 1, 1)
self
.current_player = 1
Fig 03
def button_pressed(self
, button):
# Create player symbol and colour lookups
player = {1: ‘O’
, -1: ‘X’}
colours = {1: (1, 0, 0, 1), -1: (0, 1, 0, 1)} # (r
, g, b, a)
row, column = button.coords # The pressed button is automatically
# passed as an argument
# Convert 2D grid coordinates to 1D status index
status_index = 3*row + column
already_played = self
.status[status_index]
# If nobody has played here yet, make a new move
if not already_played:
self
.status[status_index] = self
.current_player
button.text = {1: ‘O’
, -1: ‘X’}[self
.current_player]
button.background_color = colours[self
.current_player]
self
.current_player *= -1 # Switch current player
Fig 02
Codeon
FileSilo](https://crownmelresort.com/image.slidesharecdn.com/thepythonbooktheultimateguidetocodingwithpythonpdfdrive-220527060944-728dd1fe/75/The-Python-Book_-The-ultimate-guide-to-coding-with-Python-PDFDrive-pdf-111-2048.jpg)

![The Python Book 113
Create with Python
import MySQLdb
from flask import Flask, redirect, request, session, render_template
from twilio.rest import TwilioRestClient as twilio
import string, random, time
db = MySQLdb.connect(host=127.0.0.1, user=SQLUSER,
passwd=SQLPASS, db=two-step, port=3306)
expirationLength = 300
account_sid = YOUR ACCOUNT SID
auth_token = YOUR ACCOUNT AUTH TOKEN
client = twilio(account_sid, auth_token)
@app.route('/')
def index():
return index page
@app.route('/login', methods=['GET'])
def login():
return login page
@app.route('/check-user', methods=['POST'])
def checkUser():
return check user page
@app.route('/logout')
def logout():
return logout page
@app.route('/verify', methods=['GET'])
def twoStep():
return verify page
@app.route('/check-code', methods=['POST'])
def checkCode():
return check code page
if __name__ == '__main__':
app.secret_key = 'R4nDOMCRypt0gr4ph1cK3yf0R5355i0N'
app.run(host='0.0.0.0', debug=True)
Fig 01
03InstalltheTwilioHelperLibrary
andMySQLDB
The Twilio helper library is a fantastic piece of
codethatletsyoujumpstraightintosendingand
handling text messages in no time at all. There
areacoupleofwaystoinstallthelibrary:youcan
useeitherPIPorEasy_Install,likeso
$ pip install twilio
$ easy_install twilio
Or you can download the source code for the
helper library and run the ‘setup.py’ file. It
really is as simple as that. Now, for storing the
verification tokens we’re going to use a MySQL
database. To get Python talking to our SQL
server, we’ll use the Python module MySQLDB,
thepackageforwhichyoucangrablikeso…
apt-get install python-mysqldb
In the tutorial resources we have included an
SQL dump with the table structure. Import it
into a database of your choosing. Assuming
everything so far has gone swimmingly, you can
create a new project folder/environment and
addanewfile‘server.py’.
04Serversetup
Open the ‘server.py’ file for editing. The
firstthingwe'regoingtodoisimportthelibraries
we need for our authentication flow, create the
endpoints for our server and assign some of the
variablesneededtorunourFlaskserver.(Fig 01)
You may have noticed the account_sid and
auth_token variable we’ve set after the import
statements. We’ll use these with our Twilio
client so we can interact with Twilio and our
mobile phones. These settings can be found
on the Twilio account dashboard, right below
the header. We’ve also connected to our SQL
database, so make sure your SQL server is
running before you fire up the app, otherwise
you’ll have an error thrown. Save, now if you run
your ‘server.py’ file, you should be able to access
theindexpageofyourserverat127.0.0.1:5000/.
05Serverlogic
If you’ve hit all of your server endpoints
already, so far all you will see are the strings we
returned at the end of endpoint declarations.
These are not all that good-looking, so let’s
add some Flask templates to pretty things
up a little. The focus of this tutorial is not on
the intricacies of Flask and as such, included
on the DVD is a folder called ‘templates’ and
another called ‘static’; copy them both to the
root of your current project folder and amend
your endpoints as in Fig 02. If you revisit the
pages again, things might seem a little out of
whack at the moment, but don’t worry about
that for the time being. It’s mostly because
we’ve not put together the server logic to help
the templates figure out what to do.
Let’s deal with the ‘/’ path first. All we’re
doing here is checking the state of our session
cookies and effecting how the index.html
page renders according to that state. If the
user isn’t logged in, we’ll give them a link to the
login page, if the user is logged in but hasn’t
verified, then we’ll give them a link to the
code verification page. Before we deliver the
template we need to check that our session has
its particular variables set, otherwise we’ll end
up getting KeyErrors.
@app.route(‘/’)
def index():
checkSessionState()
return render_template(‘index.
html’)
def checkSessionState():](https://crownmelresort.com/image.slidesharecdn.com/thepythonbooktheultimateguidetocodingwithpythonpdfdrive-220527060944-728dd1fe/75/The-Python-Book_-The-ultimate-guide-to-coding-with-Python-PDFDrive-pdf-113-2048.jpg)
![114 The Python Book
Create with Python
try:
session[‘verified’] == True
except KeyError:
session[‘verified’] = ’’
try:
session[‘loggedin’] == True
except KeyError:
session[‘loggedin’] = ’’
try:
session[‘user’] == True
except KeyError:
session[‘user’] = ’’
result = cur.fetchone()
returnedPassword = result[2]
returnedPhoneNumber = result[3]
We can then build an SQL statement using cur.
execute().Noticethe%s;thiswillbereplacedwith
the value passed through in the next variable. We
execute the statement with cur.fetchone(), which
will get us the first row that the query returns – if
there is no result we’ll get None and we can then
return the user to the login page with an error
message. Let’s assume we’ve requested a valid
user–we’llnextcheckthatthepasswordassigned
tothatuseristhesameastheonesubmitted.Ifso,
we’ll generate the validation code to send to the
user, which we’ll store in the verification table of
ourdatabaseuntilit’susedorexpires.We’llneedto
createanewcursortoinserttheverificationcode
intoourtable.Afterwe’veexecutedthestatement
we need to commit the changes to the database,
wedothiswithdb.commit() –we’llthenaddthe
resultsofthequerytooursessionsowecancheck
againstthemlater.(Fig03)
that will make up the body of our message,
the number that we want to send it to and the
number that we want to send it from. When
inputting the number that we want to send it
to, it’s best to use the +CountryCode type of
phone number to avoid any ambiguity about
the intended recipient. The number that we’re
sending from is our Twilio number; you can
use any Twilio number you have assigned to
your account, so long as it has credit. As soon
as we execute that code, the message will be
sent and your SMS will go straight through to
the telephone. The SID is the unique identifier
for the message/call sent; receiving it means
the message has been executed successfully.
After that, we can redirect our user to the
verification page with return redirect(‘/
verify’) at the end of /check-user.
06Loggingin
The first step in two-step authentication
is logging in with a traditional username/email
and password. Access your database and create
anewuserwiththefollowingquery:
INSERT INTO users (username, password,
phonenumber) VALUES (‘A USERNAME', ‘A
PASSWORD', ‘+44YOURUSERSPHONENUMBER')
For the purposes of this tutorial, the password
is plain text – but we implore you, when you’re
implementing passwords in a live environment,
makesurethatyouhashthem.Still,fornowwe’re
goingtouseaplaintextpassword.Ourlogin.html
template has a form that’s going to POST itself
to check-user; here we'll check the validity of
the credentials and then trigger the verification
if needed. So we’re going to use the MySQLDB
moduletogetdetailsfromourdatabase.
In order to query our database we need to
create a cursor from which to execute our MySQL
statements.Wedothiswithcur = db.cursor():
@app.route(‘/check-user',
methods=[‘POST'])
def checkUser():
#session.clear()
if request.method == ‘POST':
#print request.form['username']
cur = db.cursor()
cur.execute(SELECT * FROM
users WHERE username = %s,
(request.form[‘username'],))
07Sendtheverificationcode
Now that we believe we’re dealing with
a valid user, it’s time for the second step of our
two-step process. On the line after where we
stored a variable in our session, we make a call
to sendVerificationCode (VERIFICATION
CODE, USER PHONE NUMBER) and pass
through the code we want to send to our user
and the user’s phone number. So what does
that function actually look like? It must be
big, long and complicated because it deals
with the telecommunications network, right?
Wrong. It’s actually incredibly simple to send
an SMS with Twilio. In fact, part of the inherent
beauty of Twilio lies in its simplicity. To send a
text, all we have to do is:
def sendVerificationCode(code,
number):
text = client.messages.create(
body=“Your verification code
is: + code,
to=number,
from_=“+YOURTWILIONUMBER
)
return text.sid
Using the client variable we used to instantiate
the Twilio REST module, we can access the
messages class and execute the create
method. All we need to pass through is the text
08Checkverificationcode
At this point the user will have received
a text message with something along the lines
of ‘Your verification code is: 12cd56’ and will
be presented with the verification page. If, at
this point, they choose to browse around our
site, they won’t be able to access anything that
we don't want them to. Still, we’ll know that
they’ve logged in, so if they head back to the
verification page, we can just let them input
their code. Once they submit their code, it will
be sent to the /check-code endpoint.
Just like before when we checked for our
user’s validity, we’re going to attempt to retrieve
the verification code and check it. (Fig 04)
First we’re simply going to retrieve the code
and check the user it has assigned to it. If that
user assigned to the code matches the user
in our session, then we can be certain that
the right person is logging in with the right
code – if not we can redirect them accordingly.
Assuming the code is correct, we need to
check it’s still valid. Back in Step 6, we created
an expiration time that was five minutes in the
future from when the code was generated. If it’s
been more than five minutes (or whatever time
you’ve set on it) then we’re going to consider it
invalid, delete the code from our table and then
log out our user so they can start over, like so.
elif time.time() expirationTime:
expirySQL = db.cursor()
expirySQL.execute(DELETE FROM
verification WHERE code=%s,
(codeToCheck,))](https://crownmelresort.com/image.slidesharecdn.com/thepythonbooktheultimateguidetocodingwithpythonpdfdrive-220527060944-728dd1fe/75/The-Python-Book_-The-ultimate-guide-to-coding-with-Python-PDFDrive-pdf-114-2048.jpg)
![The Python Book 115
Create with Python
expirySQL.close()
session['loggedin'] == False
return redirect('/logout')
If we manage to pass the tests so far, then
we’ve two-step verified our user – hooray!
Surprisingly easy, eh? Before we give our user
free reign around our service, we still want
to get rid of that token – we don’t need it any
more and we don’t want to risk someone else
using it maliciously in the future.
else:
delSql = db.cursor()
delSql.execute(DELETE FROM
verification WHERE code=%s,
(codeToCheck,))
delSql.close()
db.commit()
session['verified'] = True
return redirect('/')
else:
return redirect('/
verify?error=true')
And that’s it! Now we redirect our user to
wherever we want them to be at the end of the
process. In this instance we’re sending them
back to our index page, which will render a
success message and give the user a link to
log out whenever they like – but they could be
redirectedtotheiruserpage,andsoon.
09Conclusion
In every web-based service, security
is king. Users entrust more and more personal
data and trends to services every day and it’s
the responsibility of those services to maintain
the privacy of that data as best they can. It’s no
wonder that services such as Amazon, Google
and Facebook have all implemented two-
step verification across their services. With
two-step authentication, a user can tie their
account to one of the most personal things they
own: their phone. With services like Twilio and
some simple code, they contain people’s keys –
or at least a part of them.
@app.route('/')
def index():
return render_template('index.html')
@app.route('/login', methods=['GET'])
def login():
return render_template('login.html')
@app.route('/check-user', methods=['POST'])
def checkUser():
return check user page
@app.route('/logout')
def logout():
return logout page
@app.route('/verify', methods=['GET'])
def twoStep():
return render_template('verify.html')
@app.route('/check-code', methods=['POST'])
def checkCode():
return check code page
Fig 02
verficationCode = generateVerificationCode(size=6)
ins = db.cursor()
expiration = int(time.time() + expirationLength)
sql = INSERT INTO verification (code, expiration, username) VALUES ('%s',
'%s', '%s') % (verficationCode, expiration, request.form['username'])
ins.execute(sql)
ins.close()
db.commit()
session['user'] = request.form['username']
session['loggedin'] = True
Fig 03
@app.route('/check-code', methods=['POST'])
def checkCode():
if request.method == 'POST':
codeToCheck = request.form['code']
if not 'user' in session:
return redirect('/login')
else:
cur = db.cursor()
cur.execute(SELECT * FROM verification WHERE code = %s, (codeToCheck,))
result = cur.fetchone()
cur.close()
if result != None:
returnedUser = result[3]
expirationTime = int(result[2])
if returnedUser != session['user']:
return redirect('/verify?error=true')
Fig 04](https://crownmelresort.com/image.slidesharecdn.com/thepythonbooktheultimateguidetocodingwithpythonpdfdrive-220527060944-728dd1fe/75/The-Python-Book_-The-ultimate-guide-to-coding-with-Python-PDFDrive-pdf-115-2048.jpg)

![The Python Book 117
Create with Python
#!/usr/bin/env python2
import pygame, random
BLACK = (0, 0, 0)
BLUE = (0, 0, 255)
WHITE = (255, 255, 255)
RED = (255, 0, 0)
ALIEN_SIZE = (30, 40)
ALIEN_SPACER = 20
BARRIER_ROW = 10
BARRIER_COLUMN = 4
BULLET_SIZE = (5, 10)
MISSILE_SIZE = (5, 5)
BLOCK_SIZE = (10, 10)
RES = (800, 600)
class Player(pygame.sprite.Sprite):
def __init__(self):
pygame.sprite.Sprite.__init__(self)
self.size = (60, 55)
self.rect = self.image.get_rect()
self.rect.x = (RES[0] / 2) - (self.size[0] / 2)
self.rect.y = 520
self.travel = 7
self.speed = 350
self.time = pygame.time.get_ticks()
def update(self):
self.rect.x += GameState.vector * self.travel
if self.rect.x 0:
self.rect.x = 0
elif self.rect.x RES[0] - self.size[0]:
self.rect.x = RES[0] - self.size[0]
class Alien(pygame.sprite.Sprite):
def __init__(self):
pygame.sprite.Sprite.__init__(self)
self.size = (ALIEN_SIZE)
self.rect = self.image.get_rect()
self.has_moved = [0, 0]
self.vector = [1, 1]
self.travel = [(ALIEN_SIZE[0] - 7), ALIEN_SPACER]
self.speed = 700
self.time = pygame.time.get_ticks()
def update(self):
if GameState.alien_time - self.time self.speed:
if self.has_moved[0] 12:
self.rect.x += self.vector[0] * self.travel[0]
self.has_moved[0] +=1
else:
if not self.has_moved[1]:
self.rect.y += self.vector[1] * self.travel[1]
self.vector[0] *= -1
self.has_moved = [0, 0]
self.speed -= 20
if self.speed = 100:
self.speed = 100
self.time = GameState.alien_time
class Ammo(pygame.sprite.Sprite):
def __init__(self, color, (width, height)):
pygame.sprite.Sprite.__init__(self)
self.image = pygame.Surface([width, height])
self.image.fill(color)
self.rect = self.image.get_rect()
self.speed = 0
self.vector = 0
def update(self):
self.rect.y += self.vector * self.speed
if self.rect.y 0 or self.rect.y RES[1]:
self.kill()
class Block(pygame.sprite.Sprite):
def __init__(self, color, (width, height)):
pygame.sprite.Sprite.__init__(self)
self.image = pygame.Surface([width, height])
self.image.fill(color)
self.rect = self.image.get_rect()
class GameState:
pass
class Game(object):
def __init__(self):
pygame.init()
pygame.font.init()
self.clock = pygame.time.Clock()
self.game_font = pygame.font.Font(
‘data/Orbitracer.ttf’, 28)
self.intro_font = pygame.font.Font(
‘data/Orbitracer.ttf’, 72)
self.screen = pygame.display.set_mode([RES[0], RES[1]])
self.time = pygame.time.get_ticks()
self.refresh_rate = 20
self.rounds_won = 0
self.level_up = 50
self.score = 0
self.lives = 2
self.player_group = pygame.sprite.Group()
self.alien_group = pygame.sprite.Group()
self.bullet_group = pygame.sprite.Group()
self.missile_group = pygame.sprite.Group()
self.barrier_group = pygame.sprite.Group()
self.all_sprite_list = pygame.sprite.Group()
self.intro_screen = pygame.image.load(
‘data/start_screen.jpg’).convert()
self.background = pygame.image.load(
‘data/Space-Background.jpg’).convert()
pygame.display.set_caption(‘Pivaders - ESC to exit’)
pygame.mouse.set_visible(False)
Player.image = pygame.image.load(
‘data/ship.png’).convert()
Player.image.set_colorkey(BLACK)
Alien.image = pygame.image.load(
‘data/Spaceship16.png’).convert()
Alien.image.set_colorkey(WHITE)
GameState.end_game = False
GameState.start_screen = True
GameState.vector = 0
GameState.shoot_bullet = False
def control(self):
for event in pygame.event.get():
if event.type == pygame.QUIT:
GameState.start_screen = False
GameState.end_game = True
if event.type == pygame.KEYDOWN
and event.key == pygame.K_ESCAPE:
if GameState.start_screen:
GameState.start_screen = False
GameState.end_game = True
self.kill_all()
else:
GameState.start_screen = True
self.keys = pygame.key.get_pressed()
if self.keys[pygame.K_LEFT]:
GameState.vector = -1
elif self.keys[pygame.K_RIGHT]:
GameState.vector = 1
else:
GameState.vector = 0
if self.keys[pygame.K_SPACE]:
if GameState.start_screen:
GameState.start_screen = False
self.lives = 2
self.score = 0
self.make_player()
self.make_defenses()
self.alien_wave(0)
else:
GameState.shoot_bullet = True
def splash_screen(self):
while GameState.start_screen:
self.kill_all()
self.screen.blit(self.intro_screen, [0, 0])
self.screen.blit(self.intro_font.render(
“PIVADERS”, 1, WHITE), (265, 120))
self.screen.blit(self.game_font.render(
“PRESS SPACE TO PLAY”, 1, WHITE), (274, 191))
GroupsThis
longlistofgroups
we’recreatingare
essentiallysets.Each
timewecreateone
oftheseitems,it’s
addedtothesetso
itcanbetestedfor
collisionsanddrawn
withease.
Cleanclode
Havingallthemost
regularlyused
globalvariables
clearlylabelled
heremakesour
codelateroneasier
toread.Also,ifwe
wanttochangethe
sizeofsomething,
weonlyneedtodo
ithereanditwill
workeverywhere.
ControlTaking
careofkeyboard
inputisthecontrol
method.Itchecks
forkeyeventsand
actsaccordingly
dependingwhether
we’reonthestart
screenorplaying
thegame.
Rainbullets
TheAmmoclassis
shortandsweet.
Weonlyneedafew
initialisingattributes
andtheupdate
methodchecksifit’s
stillonthescreen.If
not,it’sdestroyed.
Get
thecode:
bit.ly/
11k5f2x](https://crownmelresort.com/image.slidesharecdn.com/thepythonbooktheultimateguidetocodingwithpythonpdfdrive-220527060944-728dd1fe/75/The-Python-Book_-The-ultimate-guide-to-coding-with-Python-PDFDrive-pdf-117-2048.jpg)

![The Python Book 119
Create with Python
DeadoraliveProbablytwoofthemost
importantquestionsareansweredhere–is
theplayerdeadordidyouwintheround?
StartthegameTheverylastthing
wedoiscreateaGameobjectandcallthe
mainloop.Besidesourconstants,thisis
theonlycodethatsitsoutsideaclass.
pygame.display.flip()
self.control()
def make_player(self):
self.player = Player()
self.player_group.add(self.player)
self.all_sprite_list.add(self.player)
def refresh_screen(self):
self.all_sprite_list.draw(self.screen)
self.refresh_scores()
pygame.display.flip()
self.screen.blit(self.background, [0, 0])
self.clock.tick(self.refresh_rate)
def refresh_scores(self):
self.screen.blit(self.game_font.render(
“SCORE “ + str(self.score), 1, WHITE), (10, 8))
self.screen.blit(self.game_font.render(
“LIVES “ + str(self.lives + 1), 1, RED), (355, 575))
def alien_wave(self, speed):
for column in range(BARRIER_COLUMN):
for row in range(BARRIER_ROW):
alien = Alien()
alien.rect.y = 65 + (column * (
ALIEN_SIZE[1] + ALIEN_SPACER))
alien.rect.x = ALIEN_SPACER + (
row * (ALIEN_SIZE[0] + ALIEN_SPACER))
self.alien_group.add(alien)
self.all_sprite_list.add(alien)
alien.speed -= speed
def make_bullet(self):
if GameState.game_time - self.player.time self.player.speed:
bullet = Ammo(BLUE, BULLET_SIZE)
bullet.vector = -1
bullet.speed = 26
bullet.rect.x = self.player.rect.x + 28
bullet.rect.y = self.player.rect.y
self.bullet_group.add(bullet)
self.all_sprite_list.add(bullet)
self.player.time = GameState.game_time
GameState.shoot_bullet = False
def make_missile(self):
if len(self.alien_group):
shoot = random.random()
if shoot = 0.05:
shooter = random.choice([
alien for alien in self.alien_group])
missile = Ammo(RED, MISSILE_SIZE)
missile.vector = 1
missile.rect.x = shooter.rect.x + 15
missile.rect.y = shooter.rect.y + 40
missile.speed = 10
self.missile_group.add(missile)
self.all_sprite_list.add(missile)
def make_barrier(self, columns, rows, spacer):
for column in range(columns):
for row in range(rows):
barrier = Block(WHITE, (BLOCK_SIZE))
barrier.rect.x = 55 + (200 * spacer) + (row * 10)
barrier.rect.y = 450 + (column * 10)
self.barrier_group.add(barrier)
self.all_sprite_list.add(barrier)
def make_defenses(self):
for spacing, spacing in enumerate(xrange(4)):
self.make_barrier(3, 9, spacing)
def kill_all(self):
for items in [self.bullet_group, self.player_group,
self.alien_group, self.missile_group, self.barrier_group]:
for i in items:
i.kill()
def is_dead(self):
if self.lives 0:
self.screen.blit(self.game_font.render(
“The war is lost! You scored: “ + str(
self.score), 1, RED), (250, 15))
self.rounds_won = 0
self.refresh_screen()
pygame.time.delay(3000)
return True
def win_round(self):
if len(self.alien_group) 1:
self.rounds_won += 1
self.screen.blit(self.game_font.render(
“You won round “ + str(self.rounds_won) +
“ but the battle rages on”, 1, RED), (200, 15))
self.refresh_screen()
pygame.time.delay(3000)
return True
def defenses_breached(self):
for alien in self.alien_group:
if alien.rect.y 410:
self.screen.blit(self.game_font.render(
“The aliens have breached Earth defenses!”,
1, RED), (180, 15))
self.refresh_screen()
pygame.time.delay(3000)
return True
def calc_collisions(self):
pygame.sprite.groupcollide(
self.missile_group, self.barrier_group, True, True)
pygame.sprite.groupcollide(
self.bullet_group, self.barrier_group, True, True)
if pygame.sprite.groupcollide(
self.bullet_group, self.alien_group, True, True):
self.score += 10
if pygame.sprite.groupcollide(
self.player_group, self.missile_group, False, True):
self.lives -= 1
def next_round(self):
for actor in [self.missile_group,
self.barrier_group, self.bullet_group]:
for i in actor:
i.kill()
self.alien_wave(self.level_up)
self.make_defenses()
self.level_up += 50
def main_loop(self):
while not GameState.end_game:
while not GameState.start_screen:
GameState.game_time = pygame.time.get_ticks()
GameState.alien_time = pygame.time.get_ticks()
self.control()
self.make_missile()
for actor in [self.player_group, self.bullet_group,
self.alien_group, self.missile_group]:
for i in actor:
i.update()
if GameState.shoot_bullet:
self.make_bullet()
self.calc_collisions()
if self.is_dead() or self.defenses_breached():
GameState.start_screen = True
if self.win_round():
self.next_round()
self.refresh_screen()
self.splash_screen()
pygame.quit()
if __name__ == ‘__main__’:
pv = Game()
pv.main_loop()
Refreshing
thescreenYou
needtocarefully
considerthewayin
whichyouupdate
thescreen.Blitting
thebackground
betweenactor
movementsisvital
forcleananimation.
MainloopThis
isthebusinessend
ofourapplication.
Thisloopexecutes
20timesasecond.It
needstobelogical
andeasyforanother
codertounderstand.
Guns’n’ammo
Bulletsandmissiles
usethesameparent
class.Wechangea
fewkeyattributes
originallyinitialised
tocreatethe
behaviourweneed;
egthevectorforeach
isopposite.
Get
thecode:
bit.ly/
11k5f2x
Aclassisessentiallyablueprint](https://crownmelresort.com/image.slidesharecdn.com/thepythonbooktheultimateguidetocodingwithpythonpdfdrive-220527060944-728dd1fe/75/The-Python-Book_-The-ultimate-guide-to-coding-with-Python-PDFDrive-pdf-119-2048.jpg)

![The Python Book 121
Create with Python
class Game(object):
def __init__(self):
pygame.init()
pygame.font.init()
self.clock = pygame.time.Clock()
self.game_font = pygame.font.Font(
‘data/Orbitracer
.ttf’
, 28)
self.intro_font = pygame.font.Font(
‘data/Orbitracer
.ttf’
, 72)
self.screen = pygame.display.set_mode([RES[0], RES[1]])
self.time = pygame.time.get_ticks()
self.refresh_rate = 20; self.rounds_won = 0
self.level_up = 50; self.score = 0
self.lives = 2
self.player_group = pygame.sprite.Group()
self.alien_group = pygame.sprite.Group()
self.bullet_group = pygame.sprite.Group()
self.missile_group = pygame.sprite.Group()
self.barrier_group = pygame.sprite.Group()
self.all_sprite_list = pygame.sprite.Group()
self.intro_screen = pygame.image.load(
‘data/graphics/start_screen.jpg’).convert()
self.background = pygame.image.load(
‘data/graphics/Space-Background.jpg’).convert()
pygame.display.set_caption(‘Pivaders - ESC to exit’)
pygame.mouse.set_visible(False)
Alien.image = pygame.image.load(
‘data/graphics/Spaceship16.png’).convert()
Alien.image.set_colorkey(WHITE)
self.ani_pos = 5 # 11 images of ship
self.ship_sheet = pygame.image.load(
‘data/graphics/ship_sheet_final.png’).convert_alpha()
Player
.image = self.ship_sheet.subsurface(
self.ani_pos*64, 0, 64, 61)
self.animate_right = False
self.animate_left = False
self.explosion_sheet = pygame.image.load(
‘data/graphics/explosion_new1.png’).convert_alpha()
self.explosion_image = self.explosion_sheet.subsurface(0, 0,
79, 96)
self.alien_explosion_sheet = pygame.image.load(
‘data/graphics/alien_explosion.png’)
self.alien_explode_graphics = self.alien_explosion_sheet.
subsurface(0, 0, 94, 96)
self.explode = False
self.explode_pos = 0; self.alien_explode = False
self.alien_explode_pos = 0
pygame.mixer
.music.load(‘data/sound/10_Arpanauts.ogg’)
pygame.mixer
.music.play(-1)
pygame.mixer
.music.set_volume(0.7)
self.bullet_fx = pygame.mixer
.Sound(
‘data/sound/medetix__pc-bitcrushed-lazer-beam.ogg’)
self.explosion_fx = pygame.mixer
.Sound(
‘data/sound/timgormly__8-bit-explosion.ogg’)
self.explosion_fx.set_volume(0.5)
self.explodey_alien = []
GameState.end_game = False
GameState.start_screen = True
GameState.vector = 0
GameState.shoot_bullet = False
def control(self):
for event in pygame.event.get():
if event.type == pygame.QUIT:
GameState.start_screen = False
GameState.end_game = True
if event.type == pygame.KEYDOWN
and event.key == pygame.K_ESCAPE:
if GameState.start_screen:
GameState.start_screen = False
GameState.end_game = True
self.kill_all()
else:
GameState.start_screen = True
self.keys = pygame.key.get_pressed()
if self.keys[pygame.K_LEFT]:
GameState.vector = -1
self.animate_left = True
self.animate_right = False
elif self.keys[pygame.K_RIGHT]:
GameState.vector = 1
self.animate_right = True
self.animate_left = False
else:
GameState.vector = 0
self.animate_right = False
self.animate_left = False
if self.keys[pygame.K_SPACE]:
if GameState.start_screen:
GameState.start_screen = False
self.lives = 2
self.score = 0
self.make_player()
self.make_defenses()
self.alien_wave(0)
else:
GameState.shoot_bullet = True
self.bullet_fx.play()
def animate_player(self):
if self.animate_right:
if self.ani_pos 10:
Player
.image = self.ship_sheet.subsurface(
self.ani_pos*64, 0, 64, 61)
self.ani_pos += 1
else:
if self.ani_pos 5:
self.ani_pos -= 1
Player
.image = self.ship_sheet.subsurface(
self.ani_pos*64, 0, 64, 61)
if self.animate_left:
if self.ani_pos 0:
self.ani_pos -= 1
Player
.image = self.ship_sheet.subsurface(
self.ani_pos*64, 0, 64, 61)
else:
if self.ani_pos 5:
Player
.image = self.ship_sheet.subsurface(
self.ani_pos*64, 0, 64, 61)
self.ani_pos += 1
def player_explosion(self):
if self.explode:
if self.explode_pos 8:
self.explosion_image = self.explosion_sheet.
subsurface(0, self.explode_pos*96, 79, 96)
self.explode_pos += 1
self.screen.blit(self.explosion_image, [self.player
.
rect.x -10, self.player
.rect.y - 30])
else:
self.explode = False
self.explode_pos = 0
def alien_explosion(self):
if self.alien_explode:
if self.alien_explode_pos 9:
self.alien_explode_graphics = self.alien_explosion_
sheet.subsurface(0, self.alien_explode_pos*96, 94, 96)
self.alien_explode_pos += 1
self.screen.blit(self.alien_explode_graphics,
[int(self. explodey_alien[0]) - 50 , int(self.explodey_alien[1]) - 60])
else:
self.alien_explode = False
self.alien_explode_pos = 0
self.explodey_alien = []
def splash_screen(self):
while GameState.start_screen:
self.kill_all()
self.screen.blit(self.intro_screen, [0, 0])
self.screen.blit(self.intro_font.render(
“PIVADERS”, 1, WHITE), (265, 120))
self.screen.blit(self.game_font.render(
“PRESS SPACE TO PLAY”, 1, WHITE), (274, 191))
pygame.display.flip()
self.control()
self.clock.tick(self.refresh_rate / 2)
def make_player(self):
self.player = Player()
Pivaders.py listing from line 86 (continued on next page)
ship_sheet
Wesettheplayer
imagetobeequalto
onesmallsegment
ofthespritesheetby
usingthe‘ani_pos’
variable.Changethe
variabletochange
thepicture
SetflagsWe’ve
added‘animate_left’
and‘animate_right’
Booleanflagsto
thecontrolmethod.
Whenthey’retrue,
theactualanimation
codeiscalledviaa
separatemethod
fx.play()
Havingalready
loadedthesound
effectwewantwhen
weshoot,wenow
justneedtocallit
whenwepressthe
spacebar
Get
thecode:
bit.ly/
1xPvY1F](https://crownmelresort.com/image.slidesharecdn.com/thepythonbooktheultimateguidetocodingwithpythonpdfdrive-220527060944-728dd1fe/75/The-Python-Book_-The-ultimate-guide-to-coding-with-Python-PDFDrive-pdf-121-2048.jpg)

![The Python Book 123
Create with Python
self.player_group.add(self.player)
self.all_sprite_list.add(self.player)
def refresh_screen(self):
self.all_sprite_list.draw(self.screen)
self.animate_player()
self.player_explosion()
self.alien_explosion()
self.refresh_scores()
pygame.display.flip()
self.screen.blit(self.background, [0, 0])
self.clock.tick(self.refresh_rate)
def refresh_scores(self):
self.screen.blit(self.game_font.render(
“SCORE “ + str(self.score), 1, WHITE), (10, 8))
self.screen.blit(self.game_font.render(
“LIVES “ + str(self.lives + 1), 1, RED), (355, 575))
def alien_wave(self, speed):
for column in range(BARRIER_COLUMN):
for row in range(BARRIER_ROW):
alien = Alien()
alien.rect.y = 65 + (column * (
ALIEN_SIZE[1] + ALIEN_SPACER))
alien.rect.x = ALIEN_SPACER + (
row * (ALIEN_SIZE[0] + ALIEN_SPACER))
self.alien_group.add(alien)
self.all_sprite_list.add(alien)
alien.speed -= speed
def make_bullet(self):
if GameState.game_time - self.player
.time self.player
.speed:
bullet = Ammo(BLUE, BULLET_SIZE)
bullet.vector = -1
bullet.speed = 26
bullet.rect.x = self.player
.rect.x + 28
bullet.rect.y = self.player
.rect.y
self.bullet_group.add(bullet)
self.all_sprite_list.add(bullet)
self.player
.time = GameState.game_time
GameState.shoot_bullet = False
def make_missile(self):
if len(self.alien_group):
shoot = random.random()
if shoot = 0.05:
shooter = random.choice([
alien for alien in self.alien_group])
missile = Ammo(RED, MISSILE_SIZE)
missile.vector = 1
missile.rect.x = shooter
.rect.x + 15
missile.rect.y = shooter
.rect.y + 40
missile.speed = 10
self.missile_group.add(missile)
self.all_sprite_list.add(missile)
def make_barrier(self, columns, rows, spacer):
for column in range(columns):
for row in range(rows):
barrier = Block(WHITE, (BLOCK_SIZE))
barrier
.rect.x = 55 + (200 * spacer) + (row * 10)
barrier
.rect.y = 450 + (column * 10)
self.barrier_group.add(barrier)
self.all_sprite_list.add(barrier)
def make_defenses(self):
for spacing, spacing in enumerate(xrange(4)):
self.make_barrier(3, 9, spacing)
def kill_all(self):
for items in [self.bullet_group, self.player_group,
self.alien_group, self.missile_group, self.barrier_group]:
for i in items:
i.kill()
def is_dead(self):
if self.lives 0:
self.screen.blit(self.game_font.render(
“The war is lost! You scored: “ + str(
self.score), 1, RED), (250, 15))
self.rounds_won = 0
self.refresh_screen()
self.level_up = 50
self.explode = False
self.alien_explode = False
pygame.time.delay(3000)
return True
def defenses_breached(self):
for alien in self.alien_group:
if alien.rect.y 410:
self.screen.blit(self.game_font.render(
“The aliens have breached Earth defenses!”,
1, RED), (180, 15))
self.refresh_screen()
self.level_up = 50
self.explode = False
self.alien_explode = False
pygame.time.delay(3000)
return True
def win_round(self):
if len(self.alien_group) 1:
self.rounds_won += 1
self.screen.blit(self.game_font.render(
“You won round “ + str(self.rounds_won) +
“ but the battle rages on”, 1, RED), (200, 15))
self.refresh_screen()
pygame.time.delay(3000)
return True
def next_round(self):
self.explode = False
self.alien_explode = False
for actor in [self.missile_group,
self.barrier_group, self.bullet_group]:
for i in actor:
i.kill()
self.alien_wave(self.level_up)
self.make_defenses()
self.level_up += 50
def calc_collisions(self):
pygame.sprite.groupcollide(
self.missile_group, self.barrier_group, True, True)
pygame.sprite.groupcollide(
self.bullet_group, self.barrier_group, True, True)
for z in pygame.sprite.groupcollide(
self.bullet_group, self.alien_group, True, True):
self.alien_explode = True
self.explodey_alien.append(z.rect.x)
self.explodey_alien.append(z.rect.y)
self.score += 10
self.explosion_fx.play()
if pygame.sprite.groupcollide(
self.player_group, self.missile_group, False, True):
self.lives -= 1
self.explode = True
self.explosion_fx.play()
def main_loop(self):
while not GameState.end_game:
while not GameState.start_screen:
GameState.game_time = pygame.time.get_ticks()
GameState.alien_time = pygame.time.get_ticks()
self.control()
self.make_missile()
self.calc_collisions()
self.refresh_screen()
if self.is_dead() or self.defenses_breached():
GameState.start_screen = True
for actor in [self.player_group, self.bullet_group,
self.alien_group, self.missile_group]:
for i in actor:
i.update()
if GameState.shoot_bullet:
self.make_bullet()
if self.win_round():
self.next_round()
self.splash_screen()
pygame.quit()
if __name__ == ‘__main__’
:
pv = Game()
pv.main_loop()
Get
thecode:
bit.ly/
1xPvY1F](https://crownmelresort.com/image.slidesharecdn.com/thepythonbooktheultimateguidetocodingwithpythonpdfdrive-220527060944-728dd1fe/75/The-Python-Book_-The-ultimate-guide-to-coding-with-Python-PDFDrive-pdf-123-2048.jpg)


![130 The Python Book
Create with Python
09Mousemove
We want to move the bat, and the mouse is closer to an
arcadepaddlethanthearrowkeys.Addthefollowing:
def on_mouse_move(pos):
x, y = pos
bat.center = (x, bat.center[1])
Usepgzruntotestthatyouhaveascreen,batandmovement.
08Batty
You can think of Breakout as essentially being a
moving bat – that is, you’re hitting a moving ball in order to
knock out blocks. The bat is a rectangle, and Pygame’s Rect
objects store and manipulate rectangular areas – we use
Rect((left, top), (width, height)), before which we define the bat
colour and then call upon the draw function to put the bat on
thescreen,usingthescreenfunction.
W = 800
H = 600
RED = 200, 0, 0
bat = Rect((W/2, 0.96 * H), (150, 15))
def draw():
screen.clear()
screen.draw.filled_rect(bat, RED)
07BreakoutviaPong
While the Pi is something of a tribute to 1980s 8-bit
computers, Breakout comes from the 1970s and is a direct
descendant of the early arcade classic Pong. We’ll follow the
route from Pong to Breakout (which historically involved Apple
founders Steve Wozniak and Steve Jobs) in the steps to creating
our code, leaving you with the option of developing the Pong
elements into a proper game, as well as refining the finished
Breakoutclone.
06Sprite
The intro example from the Pg0 docs expands on that
with the Actor class, which will automatically load the named
sprite (Pg0 will hunt around for a .jpg or .png in a subdirectory
calledimages).
alien = Actor(‘alien’)
alien.pos = 100, 56
WIDTH = 500
HEIGHT = alien.height + 20
def draw():
screen.clear()
alien.draw()
You can download the alien from the Pg0 documentation (bit.
ly/1Sm5lM7) and try out the animation shown there, but we’re
takingadifferentapproachinourgame.
Right Thebat
andballcome
first–they’rethe
cornerstonesof
PongandBreakout
DavidAmes,who
usesPg0toteach
youngerchildren
tocodeatevents
acrosstheUK,
toldus:“Onething
toavoidwhenit
comestoteaching
kidsisObject
Orientation.”OOP
(object-oriented
programming)is
partlyabstracted
awaybyPg0,butit
can’tbeignored.
Perhapsthebest
approachisusing
Pg0andsome
simplecodeto
start,thendropping
inapieceofOO
whenit’sneededto
solveaparticular
problem.
WiththeCodeClub
agegroup–about
eighttoeleven–
feedinginformation
tosolvepractical
problemsworks
well.Itcanwork
withadults,too–
butthere’salways
someonewho’s
readaheadand
hasafewtricky
questions.
Program
objects](https://crownmelresort.com/image.slidesharecdn.com/thepythonbooktheultimateguidetocodingwithpythonpdfdrive-220527060944-728dd1fe/75/The-Python-Book_-The-ultimate-guide-to-coding-with-Python-PDFDrive-pdf-130-2048.jpg)
![The Python Book 131
Create with Python
## Breakout type game to demonstrate Pygame Zero library
## Based originally upon Tim Viner’s London Python Dojo
## demonstration
## Licensed under MIT License - see file COPYING
from collections import namedtuple
import pygame
import sys
import time
W = 804
H = 600
RED = 200, 0, 0
WHITE = 200,200,200
GOLD = 205,145,0
ball = Rect((W/2, H/2), (30, 30))
Direction = namedtuple(‘Direction’, ‘x y’)
ball_dir = Direction(5, -5)
bat = Rect((W/2, 0.96 * H), (120, 15))
class Block(Rect):
def __init__(self, colour, rect):
Rect.__init__(self, rect)
self.colour = colour
blocks = []
for n_block in range(24):
block = Block(GOLD, ((((n_block % 8)* 100) + 2, ((n_block //
8) * 25) + 2), (96, 23)))
blocks.append(block)
def draw_blocks():
for block in blocks:
screen.draw.filled_rect(block, block.colour)
def draw():
screen.clear()
screen.draw.filled_rect(ball, WHITE)
screen.draw.filled_rect(bat, RED)
draw_blocks()
def on_mouse_move(pos):
x, y = pos
bat.center = (x, bat.center[1])
def on_mouse_down():
global ball_dir
ball_dir = Direction(ball_dir.x * 1.5, ball_dir.y * 1.5)
Fullcodelisting
Togettheballtomoveweneed
todefinemove(ball)foreachcase
wheretheballmeetsawall
10Squareball
In properly retro graphics-style, we define a square
ball too – another rectangle, essentially, with the (30, 30) size
makingitthatsubsetofrectanglesthatwecallasquare.
We’re doing this because Rect is another built-in in Pg0. If we
wanted a circular ball, we’d have to define a class and then use
Pygame’s draw.filled_circle(pos, radius, (r, g, b)) - but Rect we
cancalldirectly.Simplyadd:
WHITE = 200,200,200
ball = Rect((W/2, H/2), (30, 30))
…totheinitialvariableassignments,and:
screen.draw.filled_rect(ball, WHITE)
…tothedef draw()block.
12defmove(ball)
To get the ball to move within the screen we need to
define move(ball) for each case where the ball meets a wall.
For this we use if statements to reverse the ball’s direction at
eachoftheboundaries.Refertothefullcodelistingonpage67.
Note the hardcoded value of 781 for the width of screen,
minus the width of ball – it’s okay to hardcode values in
early versions of code, but it’s the kind of thing that will need
changing if your project expands. For example, a resizable
screenwouldneedavalueofW - 30.
13Absolutevalues
You might expect multiplying y by minus one to work for
reversingthedirectionoftheballwhenithitsthebat:
ball_dir = Direction(ball_dir
.x, -1 * ball_dir
.y)
… but you actually need to use abs, which removes any minus
signs,thenminus:
ball_dir = Direction(ball_dir
.x, - abs(ball_dir
.y))
Try it without in the finished code and see if you get some
strangebehaviour.Yourhomeworkistoworkoutwhy.
11Action!
Now let’s make the ball move. Download the tutorial
resources in FileSilo.co.uk and then add the code inside the
‘move.py’ file to assign movement and velocity. Change the 5 in
ball_dir = Direction(5, -5) if you want the ball slower or faster,
as your processor (and dexterity) demands – but it’s hard to
tell now because the ball goes straight off the screen! Pg0 will
call the update() function you define once per frame, giving the
illusionofsmooth(ish)scrollingifyou’renotrunningmuchelse.](https://crownmelresort.com/image.slidesharecdn.com/thepythonbooktheultimateguidetocodingwithpythonpdfdrive-220527060944-728dd1fe/75/The-Python-Book_-The-ultimate-guide-to-coding-with-Python-PDFDrive-pdf-131-2048.jpg)
![132 The Python Book
Create with Python
19Drawingblocks
Draw_blocks() is added to def draw() after defining:
def draw_blocks():
for block in blocks:
screen.draw.filled_rect(block, block.colour)
20Blockbashing
All that remains with the blocks is to expand def
move(ball) – to destroy a block when the ball hits it.
to_kill = ball.collidelist(blocks)
if to_kill = 0:
sounds.block.play()
ball_dir = Direction(ball_dir
.x, abs(ball_dir
.y))
blocks.pop(to_kill)
17Goingforgold
CreateaBlockclass:
class Block(Rect):
def __init__(self, colour
, rect):
Rect.__init__(self, rect)
self.colour = colour
…andpickanicecolourforyourblocks:
GOLD = 205,145,0
18Lineuptheblocks
Thisbuildsanarrayof24blocks,threerowsofeight:
blocks = []
for n_block in range(24):
block = Block(GOLD, ((((n_block % 8)* 100) + 2,
((n_block // 8) * 25) + 2), (96, 23)))
blocks.append(block)
16Buildingblocks
There are many ways of defining blocks and distributing
them onto the screen. In Tom Viner’s team’s version, from
the London Python Dojo – which was the code that originally
inspired this author to give this a go – the blocks are sized in
relationtonumberacrossthescreen,thus:
N_BLOCKS = 8
BLOCK_W = W / N_BLOCKS
BLOCK_H = BLOCK_W / 4
BLOCK_COLOURS = RED, GREEN, BLUE
Using multicoloured blocks which are then built into an
array means that blocks can join without needing a border.
With its defining variables in terms of screen width, it’s good
sustainable code, which will be easy to amend for different
screensizes–seegithub.com/tomviner/breakout.
However, the array of colour bricks in a single row is not
enough for a full game screen, so we’re going to build our array
fromhard-codedvalues…
15Blockhead!
If you’re not very familiar with the ancient computer
game Breakout, then:
apt-get install lbreakout2
… and have a play. Now, we haven’t set our sights on building
something quite so ambitious in just these six pages, but we
do need blocks.
14Sounds
Also upon bat collision, sounds.blip.play() looks in
the sounds subdirectory for a sound file called blip. You can
download the sounds (and finished code) from FileSilo.co.uk.
Actually, now we think about it, ignore the previous
comment about homework – your real homework is to turn
what we’ve written so far into a proper game of Pong! But first
let’s finish turning it into Breakout!
RightTomViner’s
arrayofblocks
negatestheneedfor
borderedrectangles
There’sanew
versionofPg0in
development–it
mayevenbeout
asyoureadthis.
Pg0creatorDaniel
Popetellsus“atone
generationAPIisin
theworks,”andthat
atthePg0PyConUK
sprint,“wefinished
Actorrotation.”
Contributionsare
welcome–notonly
tothePg0code,but
moreexamplesare
needednotjustto
showwhatcanbe
done,buttogive
teacherstoolsto
enthusechildren
aboutthecreative
actofprogramming.
Pg0hasalso
inspiredGPIO
Zero,tomake
GPIOprogramming
easieronthe
RaspberryPi,with
rapiddevelopment
occurringonthis
newlibraryaswego
topress.
Pg0+1](https://crownmelresort.com/image.slidesharecdn.com/thepythonbooktheultimateguidetocodingwithpythonpdfdrive-220527060944-728dd1fe/75/The-Python-Book_-The-ultimate-guide-to-coding-with-Python-PDFDrive-pdf-132-2048.jpg)


![Web development
138 The Python Book
Create an API Let us explore the Flask microframework and build a
simple yet powerful RESTful API with minimal code
01InstallFlask
Create a new directory inside of
which your project will live. Open a Terminal
window and navigate to be inside your new
directory. Create a new virtual environment
for this project, placed inside a new directory
called ‘venv’, and activate it. Once inside
the new virtual shell, proceed to installing
Flask using the ‘pip install Flask’ command.
virtualenv venv
. venv/bin/activate
pip install Flask
04ConnecttoDatabase
With the database path defined,
we need a way to create connection to the
database for the application to obtain data.
Create a new method called ‘connet_db’ to
manage this for us. As a method we can call it
when we set up a prerequest hook shortly. This
will return a new open connection using the
database details set in the configuration object.
def connect_db():
return sqlite3.connect(app.
config[‘DATABASE’])
07PopulatetheDatabase
To populate the database you
can now run the init_db inside an active
python shell. To do so enter a shell by typing
‘python’ inside your environment, and then
running the command below. Alternatively,
you can use the sqlite3 command and
pipe the schema.sql file into the database.
# Importing the database using the
init_db method
python
from index import init_db
init_db()
# Piping the schema using SQLite3
sqlite3 /tmp/api.db schema.sql
02CreateIndex
Create a new file in the root of the
project location called ‘index.py’. The sample API
will use a SQLite database, so we need to import
that module for use in the application. We’ll
also import some core components from the
Flask module to handle request management
and response formatting as well as some other
functions. The minimum import for a Flask
applicationisFlaskitself.
import sqlite3
from flask import Flask, request, g,
redirect, url_for
, render_template,
abort, jsonify
05DatabaseSchema
Our SQLite database will only contain
one table. Create a new file called ‘schema.sql’
in the root of the project directory. This fill will
contain the SQL commands required to create
the table and populate it with some sample
bootstrappeddata.
drop table if exists posts;
create table posts (
id integer primary key autoincrement,
title text not null,
text text not null
);
insert into posts (title, text) values
(‘First Entry’
, ‘This is some text’);
insert into posts (title, text) values
(‘Second Entry’
, ‘This is some more text’);
insert into posts (title, text) values
(‘Third Entry’
, ‘This is some more text
(again)’);
08RequestDBConnection
With the database created and
populated we need to be able to ensure
we have an open connection and close it
accordingly when finished. Flask has some
decorator methods to help us achieve this.
The before_request() method will establish
the connection and stores it in the g object
for use throughout the request cycle. We
can then close the connection after the
cycle using the teardown_request() method.
@app.before_request
def before_request():
g.db = connect_db();
03DeclareConfig
For a small application we can declare
configuration options as upper-casename value
pairsinsidethemainmodule,whichwe’lldonow.
Here we can define the path and name of the
SQLite database and also set the Flask debug
output to True for development work. Initialise
the Flask application to a namespace and then
import the config values set directly above it.
We then run the application. All routes must be
placedabovetheselasttwolines.
# Config
DATABASE = ‘
/tmp/api.db’
DEBUG = True
app = Flask(__name__)
app.config.from_object(__name__)
# Add methods and routes here
if __name__ == ‘__main__’
:
app.run()
06InstantiatetheDatabase
To populate the database with the new
table and any associated data, we will need to
import and apply the schema to the database.
Add a new module import at the top of the
project file to obtain the ‘contextlib.closing()’
method. What we will do next is create a method
that will initialise the database by reading the
contents of schema.sql and executing it against
theopendatabase.
from contextlib import closing
def init_db():
with closing(connect_db()) as db:
with app.open_resource(‘schema.sql’
,
mode=’r’) as f:
db.cursor().executescript(f.read())
db.commit()
“World-renowned image sharing service
Instagram and social pin board Pinterest
have also implemented Python as part of
their web stack, opting for Django”](https://crownmelresort.com/image.slidesharecdn.com/thepythonbooktheultimateguidetocodingwithpythonpdfdrive-220527060944-728dd1fe/75/The-Python-Book_-The-ultimate-guide-to-coding-with-Python-PDFDrive-pdf-138-2048.jpg)
![The Python Book 139
Python in
the wild
Interested in Python development?
You’d be in good company with big
names currently using it
10TemplateOutput
Flask expects templates to be available
within the templates directory in the root of
the project, so make sure that you create that
directory now. Next, add a new file called
‘show_posts.html’. The dynamic values are
managed using Jinja2 template syntax, the
default templating engine for Flask applications.
Save this file in the templates directory.
ul class=posts
{% for post in posts %}
lih2{{ post.title }}/h2{{ post.
text|safe }}
{% else %}
liSorry, no post matches your
request.
{% endfor %}
/ul
13Runtheapplication
To run your Flask application, navigate
using the active Terminal window into the
root of the project. Ensuring you are in an
active virtual environment Python shell,
enter the command to run the main index
file. The built-in server will start and the site
will be accessible in the browser on default
port local address http://127.0.0.1:5000.
python index.py
11MakeanAPIResponse
To create an API response we can
define a new route with a specific API endpoint.
Once again, we query the database for all
posts. The data is then returned as JSON,
using the JSONify method to do so. We can
add specific values such as post count and
a custom message if you wish, as well as the
actual posts variable, formatted as JSON.
@app.route(‘
/api/v1/posts/’
,
methods=[‘GET’])
def show_entries():
cur = g.db.execute(‘select title, text
from posts order by id desc’)
14APIJSONOutput
The root of the application will render
the template we previously created. Multiple
routes can be generated to create a rich web
application. Visiting an API-specific URL in
the browser will return the requested data as
cleanly formatted JSON. The ability to define
custom routes like a versioned RESTful endpoint
isincrediblypowerful.
09DisplayPosts
Create your first route so that we can
return and display all available posts. To query
the database we execute a SQL statement
against the stored db connection. The results
are then mapped to values using Python’s
dict method and saved as the posts variable.
To render a template we then call render_
template() and pass in the file name and the
variable to display as the second argument.
Multiple variables can be passed through as a
comma-separatedlist.
@app.route(‘
/’)
def get_posts():
cur = g.db.execute(‘select title, text
from posts order by id desc’)
posts = [dict(title=row[0], text=row[1])
for row in cur
.fetchall()]
return render_template(‘show_posts.
html’
, posts=posts)
12GetaspecificPost
CTo obtain a specific post from the
API we need to create a new route, which will
accept a dynamic value as part of the URI. We
can also choose to use this route for multiple
request methods, which are in this case GET
and DELETE. We can determine the method
by checking the request.method value and
run it against a conditional if/else statement.
@app.route(‘
/api/v1/posts/int:post_id’
,
methods=[‘GET’
, ‘DELETE’])
def single_post(post_id):
method = request.method
if method == ‘GET’
:
cur = g.db.execute(‘select title,
text from posts where id =?’
, [post_id])
posts = [dict(title=row[0],
text=row[1]) for row in cur
.fetchall()]
return jsonify({‘count’
: len(posts),
‘posts’
: posts})
elif method == ‘DELETE’
:
g.db.execute(‘delete from posts
where id = ?’
, [post_id])
return jsonify({‘status’
: ‘Post
deleted’})
@app.teardown_request
def teardown_request(exception):
db = getattr(g, ‘db’
, None)
if db is not None:
db.close()
posts = [dict(title=row[0],
text=row[1]) for row in ur
.fetchall()]
return jsonify({‘count’
: len(posts),
‘posts’
: posts})
Disqus, the popular social interaction
comment service provider, has
been implementing their production
applications in Python for a very long time.
Python’s benefit for the development
team was its ability to scale effectively
and cater for a large number of consumers
whilst also providing an effective
underlying API for internal and external
use. The company are now starting to
run some production apps in Go, but the
majority of code still runs on Python.
World-renowned image sharing service
Instagram and social pin board Pinterest
have also implemented Python as part of
their web stack, opting for Django to assist
with the functionality and ability to cater
for the many thousands of content views
andrequestsmadetotheirservices.
Mozilla, Atlassian’s Bitbucket
repository service, and popular satire site
The Onion have all been noted as using
Django for their products.](https://crownmelresort.com/image.slidesharecdn.com/thepythonbooktheultimateguidetocodingwithpythonpdfdrive-220527060944-728dd1fe/75/The-Python-Book_-The-ultimate-guide-to-coding-with-Python-PDFDrive-pdf-139-2048.jpg)

![Web development
The Python Book 141
01CreateAdminUser
Django makes content administration
incredibly easy and has an admin section
available in a default project as standard
at http://127.0.0.1:8000/admin. To log in you
need to create a superuser account. Run
the associated command and specify user
details as required to then proceed and log in.
python manage.py createsuperuser
04CreateaView
With the admin interface accepting
new submissions for our post class we’ll create
a view page to display them. Open blog/views.
py and import the Post class from the models.
Create a method to obtain all posts from the
databaseandoutputthemasastring.
from django.http import HttpResponse
from blog.models import Post
def index(request):
post_list = Post.objects.order_by(‘-id’)
[
:5]
output = ‘br /’
.join([p.title for p
in post_list])
return HttpResponse(output)
02Switchonblogmanagement
Having logged in to the administration
interface you will be greeted with features to
manage users and group roles and privileges,
which alone are very powerful and provided for
you by Django. There is not yet, however, any
access to manage our blog posts so let’s turn
thaton.
05ManagetheURLs
Create ‘blog/urls.py’ and add the code
to import the views that were just made in the
module and the accompanying URL patterns.
Open myblog/urls.py and add the URL function
call to implement a new URL for the app to
display the view. Visit http://127.0.0.1:5000/
blog in your browser to render the new view.
# blog/urls.py
from django.conf.urls import patterns,url
from blog import views
urlpatterns = patterns(‘’
,
url(r’^$’
, views.index, name=’index’),
)
# myblog/urls.py
urlpatterns = patterns(‘’
,
url(r’^blog/’
, include(‘blog.urls’)),
url(r’^admin/’
, include(admin.site.urls)),
)
03EnableAdminManagement
To enable our module and associated
models to be managed through the admin
interface, we need to register them with the
admin module. Open blog/admin.py and then go
on to import and register the models in turn (we
only have one of these currently though). Save
the file and refresh the admin site to see the
poststhatarenowavailabletomanage.
from django.contrib import admin
# Register your models here.
Autowiring the
admin interface
Hosting
Python
apps
Admin sections can be
problematic in their own right.
Django provides an extensible
admin interface for you
Admin sections can be
problematic in their own right.
Django provides an extensible
admin interface for you
Herokuheroku.com
This app is perhaps one of the most well-
known cloud hosting providers. Their stack
server environments support a number
of core web app languages including
Python as standard. Their unique Toolbelt
command-line features and integration
with Git repositories, as well as being
incredibly quick and easy to scale and
improve performance, makes them an
obvious choice. A free account will let you
run a Python web app on one dyno instance
withoutanycost.
PythonAnywhere
www.pythonanywhere.com
Another hosted option, and one created
specifically for Python applications in
general is Python Anywhere. The free
basic option plan has enough weight and
power behind it to get you up and running
with a Python web app without having to
scale, but as soon as your project gains
traction, you can switch plans and boost
yourplansperformance.
It offers an incredibly impressive range
of modules as standard, available to import
into your application immediately to get you
started, including Django and Flask should
youneedthem.
Using the
dev server
Django ships with a very helpful built-in
development server, which will help you
out by autocompiling and reloading
after you have completed all of your file
changes. All you have to do to start
the server is to run the ‘python
manage.py runserver’ command from
your Terminal window within
the project directory.](https://crownmelresort.com/image.slidesharecdn.com/thepythonbooktheultimateguidetocodingwithpythonpdfdrive-220527060944-728dd1fe/75/The-Python-Book_-The-ultimate-guide-to-coding-with-Python-PDFDrive-pdf-141-2048.jpg)

![The Python Book 143
Web development
QTheBSD-licensedFlaskiseasytosetup
anduse–checkoutthewebsiteformoreinfo
we’ll be using that later as we start handling
Twitter data.
Having Flask use a rendering engine is
super-simple. Flask comes packaged with
the Jinja2 template rendering engine, so we’ve
nothing to install – we just need to import the
package into the project. We can do this by
adding render_template to the end of our from
flask import […]statement.
03Ourfirsttemplate
Now that we have a rendering engine,
we need to create some templates for it to
use. In the root of our project’s folder, create
a new folder called templates. Whenever
we try to render a template, Flask will look in
this folder for the template specified. To get
to grips with templating, we’ll rewrite some
of our authentication logic to use a template,
rather than manually requesting endpoints. In
templates, create an index.html file. You can
treat this HTML file like any other – included in
the resources for this tutorial is an index.html
that includes all of the necessary head tags and
!DOCTYPEdeclarationsforthisfile.
04Renderingourtemplate
In server.py, let’s create a route for ‘/’ to
handletheauthorisationprocess.
@app.route(‘
/’)
def home():
if not ‘oauth_token’ in session:
session.clear()
session[‘oauth_secret’] = ‘’
session[‘oauth_token’] = ‘’
return render_template(‘index.html’)
It’s a simple function: all we want to do is check
whether or not we have an oauth_token already
and create those properties in the Flask session
so we don’t throw an error if we try to access
it erroneously. In order to send our generated
template in response to the request, we return
render_template(‘index.html’).
{% if session[‘oauth_token’] != “” %}
h1Already Authorised/h1
div class=”dialog”
pHello, You’ve authenticated!brLet’s a href=”
/get-tweets”get some tweets/a/p
/div
{% else %}
h1Authorisation required/h1
div class=”dialog”
pWe need to a href=”/authenticate”authenticate/a/p
/div
{% endif %}
Fig 01
05Templatevariables
We can choose to send variables to our
template with render_template(‘index.htm’
,
variableOne=value, variableTwo=Value) but
inthisinstancewedon’tneedtoaseachtemplate
hasaccesstotherequestandsessionvariables.
Codeon
FileSilo](https://crownmelresort.com/image.slidesharecdn.com/thepythonbooktheultimateguidetocodingwithpythonpdfdrive-220527060944-728dd1fe/75/The-Python-Book_-The-ultimate-guide-to-coding-with-Python-PDFDrive-pdf-143-2048.jpg)
![144 The Python Book
Web development
Nowweknowhowtobuildtemplates,
let’sgrabsometweetstodisplay
09Checkingoursession
and buildingour request
Before we start grabbing tweets, we want to
run a quick check to make sure we have the
necessary credentials and if not, redirect the
user back the authorisation flow. We can do
this by having Flask respond to the request
with a redirection header, like so:
if session[‘oauth_token’] == “” or
session[‘oauth_secret’] == “”:
return redirect(rootURL)
Assuming we have all we need, we can start to
build the parameters for our request (Fig 02).
You’ll notice that the nonce value is different
from that in our previous requests. Where the
nonce value in our authenticate and authorise
requests can be any random arrangement of
characters that uniquely identify the request,
for all subsequent requests the nonce needs
to be a 32-character hexadecimal string using
only the characters a-f. If we add the following
function to our helpers.py file, we can quickly
build one for each request.
def nonce(size=32, chars=”abcdef” +
string.digits):
return ‘’
.join(random.choice
(chars) for x in range(size))
10Signingandsendingourrequest
We’ve built our parameters, So let’s
sign our request and then add the signature to
the parameters (Fig 03).
Before we create the authorisation headers,
we need to remove the count and user_id
values from the tweetRequestParams
dictionary, otherwise the signature we just
created won’t be valid for the request. We can
achieve this with the del keyword. Unlike our
token requests, this request is a GET request,
so instead of including the parameters
in the request body, we define them as
query parameters.
?count=tweetRequestParams[‘count’]
user_id=tweetRequestParams[‘user_id’]
11HandlingTwitter’sresponse
Now we’re ready to fire off the request
and we should get a JSON response back
from Twitter. This is where we’ll use the json
module we imported earlier. By using the
json.loads function, we can parse the JSON
into a dictionary that we can access and we’ll
pass through to our tweets.html template.
tweetResponse = json.
loads(httpResponse.read())
return render_template(‘tweets.html’
,
data=tweetResponse)
Whereas before, we accessed the session
to get data into our template, this time
we’re explicitly passing a value through to
our template.
12Displayingourtweets
Let’s create that template now, exactly
the same as index.html but this time, instead of
using a conditional, we’re going to create a loop
togeneratealistoftweetswe’vereceived.
First, we check that we actually received
some data from our request to Twitter. If we’ve
got something to render, we’re ready to work
through it, otherwise we’ll just print that we
didn’tgetanything.
Once again, any template logic that we want
to use to generate our page is included between
08Let’sgetsometweets
Sonowweknowhowtobuildtemplates,
let’s grab some tweets to display. In server.py
defineanewroute,get-tweets,likeso:
@app.route(‘/get-tweets’)
@app.route(‘/get-tweets/count’)
def getTweets(count=0):
You’ll notice that unlike our other authentication
endpoints, we’ve made two declarations.
The first is a standard route definition: it will
07Staticfiles
Pretty much every webpage uses
JavaScript, CSS and images, but where do we
keep them? With Flask we can define a folder
for use with static content. For Flask, we create
a static folder in the root of our project and
access files by calling /static/css/styles.css or
/static/js/core.js.Thetutorialresourcesincludea
CSSfileforstylingthisproject.
Open index.html. All code executed in a Flask
template is contained within {% %}. As this is our
homepage, we want to direct users accordingly,
Solet’scheckifwe’vegotanaccesstoken(Fig01).
Between the ifs and else of the template is
standard HTML. If we want to include some data
– for example, the access token – we can just add
{{ session[‘oauth_token’] }} in the HTML and it
will be rendered in the page. Previously, in our /
authorised endpoint, we would display the OAuth
token that we received from Twitter; however, now
thatwehaveatemplate,wecanredirectourusers
backourrootURLandhaveapagerenderedforus
thatexplainstheprogresswe’vemade.
06Getting lost
(andthenfoundagain)
With every server, some things get misplaced or
peoplegetlost.Sohowdowehandlethis?Rather
than defining a route, we can define a handler
thatdealswithgettinglost.
@app.errorhandler(404)
def fourOhFour(error):
return render_template(‘fourohfour
.html’)
If a page or endpoint is requested and triggers a
404, then the fourOhFour function will be fired. In
this case, we’ll generate a template that tells the
user,butwecouldalsoredirecttoanotherpageor
dumptheerrormessage.
intercept and handle the path get-tweets. The
second lets us define a parameter that we can
use as a value in our getTweets function. By
including count=0 in our function declaration,
we ensure that there will always be a default
value when the function is executed; this way we
don’t have to check the value is present before
we access it. If a value is included in the URL, it
will override the value in the function. The string
inside the variable name determines the
name of the variable. If you want the variable
passed to the function to have a specific type,
you can include a converter with the variable
name. For example, if we wanted to make sure
that count was always an integer instead of a
floatorstring,we’ddefineourroutelikeso:
@app.route(‘/get-tweets/int:count’)](https://crownmelresort.com/image.slidesharecdn.com/thepythonbooktheultimateguidetocodingwithpythonpdfdrive-220527060944-728dd1fe/75/The-Python-Book_-The-ultimate-guide-to-coding-with-Python-PDFDrive-pdf-144-2048.jpg)
![The Python Book 145
Web development
tweetRequestParams = {
“oauth_consumer_key” : consumer_key,
“oauth_nonce” : helpers.nonce(32),
“oauth_signature_method” : “HMAC-SHA1”,
“oauth_timestamp” : int(time.time()),
“oauth_version” : “1.0”,
“oauth_token” : session[‚Äòoauth_token’],
“user_id” : session[‘user_id’],
“count” : str(count)
}
Fig 02
tweetRequest = helpers.sign_request(tweetRequestParams, “GET”,
“https://api.twitter
.com/1.1/statuses/user_timeline.json”, consumer_secret,
session[‘oauth_secret’])
tweetRequestParams[“oauth_signature”] = tweetRequest
makeRequest=urllib2.Request(“https://api.twitter
.com/1.1/statuses/
user_timeline.json?count=” + tweetRequestParams[‘count’] + “user_id=”
+ tweetRequestParams[‘user_id’])
del tweetRequestParams[‘user_id’], tweetRequestParams[‘count’]
makeRequest.add_header(“Authorization”, helpers.create_oauth_
headers(tweetRequestParams))
try:
httpResponse = urllib2.urlopen(makeRequest)
except urllib2.HTTPError
, e:
return e.read()
Fig 03
{% if data %}
ul id=”tweets”
{% for tweet in data %}
li
div class=”image”
img src=”{{ tweet[‘user’][‘profile_image_url_https’]
}}” alt=”User Profile Picture”
/div
div class=”text”
a{{ tweet[‘text’]|forceescape }}/a
/div
/li
{% endfor %}
/ul
{% else %}
pWe didn’t get any tweets :(/p
{% endif %}
Fig 04
13Flaskfilters
Sometimes, when parsing from JSON,
Python can generate erroneous characters
that don’t render particularly well in HTML.
You may notice that after tweet[‘text’] there
is |forceescape, This is an example of a Flask
filter; it allows us to effect the input before we
render – in this case it’s escaping our values
for us. There are many, many different built-
in filters that come included with Flask. Your
advisor recommends a full reading of all the
potential options.
14Wrappingup
That’s pretty much it for templating
with Flask. As we’ve seen, it’s insanely quick
and easy to build and deploy dynamic sites.
Flask is great tool for any Python developer
looking to run a web service. Although we’ve
used Twitter to demonstrate Flask’s power,
all of the techniques described can be used
with any third-party service or database
resource. Flask can work with other rendering
engines, such as Handlebars (which is
superb), but Jinja2 still needs to be present
to run Flask and conflicts can occur between
the two engines. With such great integration
between Flask and Jinja2, it makes little
sense to use another engine outside of very
specific circumstances.
{% %}. This time we’re creating a loop; inside the
loopwe’llbeabletoaccessanypropertywehave
of that object and print it out. In this template
we’re going to create an li element for each
tweet we received and display the user’s profile
pictureandtextofthetweet(Fig 04).
In our template we can access properties
using either dot notation (.) or with square
brackets ([]). They behave largely the same;
the [] notation will check for an attribute on
the dictionary or object defined whereas the
. notation will look for an item with the same
name. If either cannot find the parameter
specified, it will return undefined. If this occurs,
the template will not throw an error, it will simply
print an empty string. Keep this in mind if your
template does not render the expected data:
you’ve probably just mis-defined the property
you’retryingtoaccess.
Unlike traditional Python, we need to
tell the template where the for loop and if/
else statements end, so we do that with
{%endfor %}and{% endif %}.](https://crownmelresort.com/image.slidesharecdn.com/thepythonbooktheultimateguidetocodingwithpythonpdfdrive-220527060944-728dd1fe/75/The-Python-Book_-The-ultimate-guide-to-coding-with-Python-PDFDrive-pdf-145-2048.jpg)


![The Python Book 149
Web development
24Afunctionalblog
So there you have it! Navigating to
127.0.0.1:8000/admin/ or 127.0.0.1:8000/myblog/
will show off the fine work you’ve created.
Django is dead easy to use once you know how,
and there are plenty of tweaks you should be
abletomakeafterthistutorial.
15Setuptheadminpage
The admin page has a generic, usable
template, but you need to configure it to view,
edit, create and delete posts. First, create a new
fileadmin.pyintheblogdirectoryandenter:
from blog.models import Post
from django.contrib import admin
admin.site.register(Post)
To have the posts display nicely on the site, edit
models.pyandadd:
class Post (models.Model):
…
def __unicode__(self):
return self.title
Save,andrun:
python manage.py syncdb
The admin page is now usable! You should be
able to see the other posts, and it’s now a lot
easiertoaddmore.
16Activatethefront-end
Open up urls.py from the myblog
directory in your editor and add the following to
theurlpatternssection:
url(r’^myblog/’, ‘blog.urls.index’)),
One of the examples in the file can be
uncommented and edited to this as well. It
pointstoamodelwewillnowcreate.
17Createanotherurlsfile
You need to create another urls file in the
app directory, in our case blog/urls.py. Create it
andaddthefollowing:
from django.template import Context,
loader
from blog.models import Post
from django.http import HttpResponse
def index(request):
post_list = Post.objects.all()
t = loader.get_template(‘blog/
index.html’)
c = Context({
‘post_list’: poll_list,
})
return HttpResponse(t.render(c))
18Startthetemplate
The code we’ve just written looks for a
template that currently doesn’t exist. We first
need to tell Django where templates are to be
lookedforinsettings.py:
TEMPLATE_DIRS = (
‘/home/user/projects/templates’,
)
You can put the template directory wherever you
want,aslongasit’sreferencedhere.
19Writeatemplate
Now to write the site template. In our
example,we’reusingindex.html:
{% for post in post_list %}
{{ post.title }}
{{ post.author }}
{{ post.pub_date }}
{{ post.post }}
{% endfor %}
This needs to be located in a folder with
the same name as your app within the
templatedirectory.
20Viewyourhandiwork
Let’s make sure this worked. Start the
developerserverwith:
python manage.py runserver
Andnavigateto127.0.0.1:8000/myblog/.
It’s not pretty, but you should have
successfully called upon your stored data. We’ll
spendthenextstepstidyingitupabit.
21Formatthefrontpage
Go back into the template file,
index.html,andaddthefollowinghtmltags:
{% for post in post_list %}
h2{{ post.title }}/h2
{{ post.author }} on {{ post.pub_
date }}
p{{ post.post }}/p
{% endfor %}
This is just an example – the post can be in any
orderwithanytags.
22Spruceuptheadminlist
We’ll do this in the admin.py file in our
blog directory; open it in your editor and make
thefollowingchanges:
from blog.models import Post
from django.contrib import admin
class Admin(admin.ModelAdmin):
list_display = [‘title’, ‘author’,
‘pub_date’]
admin.site.register(Post, Admin)
Inthiscase‘list_display’isafixedvariablename.
23Alogicalpostpage
The new post page on the site might
not be in an order you’re comfortable with.
We’ll change that now in admin.py with the
followingadditions:
class Admin(admin.ModelAdmin):
list_display = [‘title’, ‘author’,
‘pub_date’]
fields = [‘title’, ‘pub_date’,
‘author’, ‘post’]
admin.site.register(Post, Admin)
Remembertosave!
Djangoisanincrediblypowerful
andsimple-to-uselanguage](https://crownmelresort.com/image.slidesharecdn.com/thepythonbooktheultimateguidetocodingwithpythonpdfdrive-220527060944-728dd1fe/75/The-Python-Book_-The-ultimate-guide-to-coding-with-Python-PDFDrive-pdf-149-2048.jpg)


![152 The Python Book
Web development
Weneedtobeabletoprocessthe
dataandmetadataintheforms
09Wrongpage
Let’s add a quick bit of code to return
somebody to the previous page if they get the
URLwrong:
from django.core.paginator import
Paginator, EmptyPage, InvalidPage
try:
post_list = paginator.page(list_
page)
except (EmptyPage, InvalidPage):
post_list = paginator.
page(paginator.num_pages)
The last part replaces ‘post_list = paginator.
page(list_page)’.
10Haveyoursay
Everyone has their opinion on the
internet. You can give your readers the ability to
comment,andwe’llstartbyeditingmodels.py:
class Comment(models.Model):
author = models.CharField(max_
length=50)
text = models.TextField()
post = models.ForeignKey(Post)
def __unicode__(self):
return (self.post, self.text)
We’ve made it so they can put their name with
acomment.
11Backtothecomment
We now need to add a small line to the
urls.py file in myblog so the comment can be
postedthensentbacktotheoriginalpage:
url(r’^myblog/add_comment/(d+)/$’,
‘blog.urls.add_comment’),
This URL pattern calls the ID of the page that
you’reon.
12Formacomment
We need to be able to process the
data and metadata in the forms, so let’s add
a class to urls.py in the blog folder with the
followingadditions:
from django.forms import ModelForm
from blog.models import Post, Comment
class CommentForm(ModelForm):
class Meta:
model = Comment
exclude = [‘post’]
13Inthepost
We need to attribute the comments to
the post they’re being made on, so update the
post_pagedefinition:
from django.core.context_processors
import csrf
def post_page(request, post_id):
post_page = Post.objects.
get(pk=post_id)
comments = Comment.objects.
filter(post=post_page)
d = dict(post_page=post_page,
comments=comments, form=CommentForm())
d.update(csrf(request))
return render_to_response(‘blog/
post.html’, d)
The CSRF tag is to prevent cross-site
requestforgery.
14Commenttemplate
Let’s get the post page ready for
commentsbyaddingthistopost.html:
pComments:/p
{% for comment in comments %}
{{ comment.author }}
p{{ comment.text }}/p
{% endfor %}
strongAdd comment/strong
form action=”{% url blog.urls.
add_comment post_page.id %}”
method=”POST”{% csrf_token %}
Name {{ form.author }}
p{{ form.text }}/p
input type=”submit” value=”Submit”
/form
15Defineyourcomments
The final step is defining the comments
inblog/urls.py,andit’sabigone:
def add_comment(request, comment_id):
p = request.POST
if p.has_key(‘text’) and p[‘text’]:
author = ‘Anonymous’
if p[‘author’]: author =
p[‘author’]
comment = Comment(post=Post.
objects.get(pk=comment_id))
cf = CommentForm(p,
instance=comment)
cf.fields[‘author’].required =
False
comment =
cf.save(commit=False)
comment.author = author
comment.save()
return HttpResponseRedirect(reverse
(‘blog.urls.post_page’, args=[comment_
id]))
This ensures text has been entered, and if not
specified author is ‘Anonymous’. Before testing,
runsyncdbsocommenttablescanbecreated.](https://crownmelresort.com/image.slidesharecdn.com/thepythonbooktheultimateguidetocodingwithpythonpdfdrive-220527060944-728dd1fe/75/The-Python-Book_-The-ultimate-guide-to-coding-with-Python-PDFDrive-pdf-152-2048.jpg)
![The Python Book 153
Web development
16Administrate
Like the posts, we can get the
Admin page to see comments. Start editing
blogs/admin.pytogetthisfeatureadded:
from blog.models import Post, Comment
from django.contrib import admin
class PostAdmin(admin.ModelAdmin):
list_display = [‘title’, ‘author’,
‘pub_date’]
fields = [‘title’, ‘pub_date’,
‘author’, ‘post’]
admin.site.register(Post, PostAdmin)
17Comment-specificadminfeatures
Now we can add the comment-specific
adminfeatureswithoutcausinganyclashes:
class CommentAdmin(admin.ModelAdmin):
list_display = [‘text’, ‘author’,
‘post’]
admin.site.register(Comment,
CommentAdmin)
This will show the comments on the admin site,
and you can see the comment, the author and
thepostit’sconnectedto.
18Sidebarbeginnings
Django makes it pretty easy to order
posts by years and months, but first we need to
importsomenewmodelsintoblog/urls.py:
import time
from calendar import month_name
We’re going to define two new functions,
month_timelineandmonth,tomakethesidebar.
19Starttodefinemonth_timeline
First we need to get all the information
fromtheposts:
def month_timeline():
year, month = time.localtime()[:2]
begin = Post.objects.order_by(‘pub_
date’)[0]
month_begin = begin.pub_date.month
year_begin = begin.pub_date.year
month_list = []
The ‘[:2]’ makes sure we only get the time
informationweneed.
20Finishyourdefinition
Now we will order the posts by month
andyearstartingfromourfirstmonth.
for y in range(year, year_begin-1, -1):
start, end = 12, 0
if y == year: start = month
if y == year_begin: end = month_
begin-1
for m in range(start, end, -1):
month_list.append((y, m,
month_name[m]))
return month_list
21Returntoreader
With the list organised, we can now
definemonthsowecandisplayitontheblog:
def month(request, year, month):
post_list = Post.objects.
filter(pub_date__year=year, pub_date__
month=month)
return render_to_response(‘blog/
index.html’, dict(sidebar_list=post_
list, month_list=month_timeline()))
Nowweneedtolinkituptotheindextemplate.
22Finaliseyoursidebardefinition
Edit the return command on the index
functiontoincludethesidebarinformation:
return render_to_response(‘blog/index.
html’, dict(post_list=post_list,
sidebar_list=post_list.object_list,
month_list=month_timeline()))
Then add this line to urls.py in myblog so a
monthpagecanberendered:
url(r’^myblog/month/(d+)/(d+)/$’,
‘blog.urls.month’),
All we need to do now is display the information
onthesite.
24Sidebarfinale
Obviously it’s not at the side right now
– that’s a job for the HTML and CSS. The info is
there, though, and you can manipulate it any
way you want. However, your blog is now a lot
morefriendlytoyourreaders.
23Sidebarontheweb
Go to the index template. First of all,
changethefirstlineofthepostforloopto:
{% for post in sidebar_list %}
Simple enough. Now we need to add the
sidebarinformation:
{% for month in month_list %}
pa href=”{% url blog.urls.month
month.0 month.1 %}”{{ month.2 }}/a/
p
{% endfor %}](https://crownmelresort.com/image.slidesharecdn.com/thepythonbooktheultimateguidetocodingwithpythonpdfdrive-220527060944-728dd1fe/75/The-Python-Book_-The-ultimate-guide-to-coding-with-Python-PDFDrive-pdf-153-2048.jpg)
![154 The Python Book
Web development
01Summarise
On a normal blog we’re going to have
much longer articles. We can generate a
summary of each of these on the index page
templatelikeso:
p{{ post.post|truncatewords:3 }}/p
This automatically takes the first three words
ofthepost–ofcourse,youcanuseanynumber.
Toaddtotheprevioustutorials,we’ll
coversomeofthemoreadvanced
featuresyoucanutilisewiththe
powerofDjango
Enhanceyourblog
withextrafeatures
We’ve been building our Django blog to create
and display posts, allow people to make
comments, and filter posts by month like a
classic blog sidebar. We still have a bit of a
way to go until it looks and behaves more like a
classicblog,though.
In this tutorial, we’re going to add in
summaries, excerpts, categories and finally an
RSS feed. This allows us to look at a few things –
firstly we’ll get a better understanding of cross-
model referencing and how that works in the
admin site. We will also go through how to make
changes to the database, and how Django helps
whencreatinganSQLquery.
Finally, the RSS feed is part of a standard
feed library in Django itself. We will learn how
to import and use it to create a simple list of the
latest entries that click through to the posts. By
the end of the tutorial your Django blog will be
finallyfinished!
Resources
Pythonbase:
http://www.python.org/download/
Djangosource:https://www.
djangoproject.com/download/
03Writeanexcerpt
Towritetheexcerpt,orappendittothe
previousposts,we’llhavetoaddittotheadmin
page.Openupadmin.pyandeditthefields
sectionoftheAdminPostclasstoaddexcerpt:
fields = [‘title’, ‘pub_date’,
‘author’, ‘post’, ‘excerpt’]
02Manualexcerpt
Ifyoudon’twantanautomaticsummary,
wecanaddanexcerptfieldtoourpostmodelso
youcancraftonemanually:
excerpt = models.TextField()
Tolimitthecharactersinyourexcerpt,usea
CharFieldlikeforourauthorsection.
We’regoingtoaddsummaries,
excerptsandanRSSfeed](https://crownmelresort.com/image.slidesharecdn.com/thepythonbooktheultimateguidetocodingwithpythonpdfdrive-220527060944-728dd1fe/75/The-Python-Book_-The-ultimate-guide-to-coding-with-Python-PDFDrive-pdf-154-2048.jpg)

![156 The Python Book
Web development
10Categorymodel
Wecanaddamodelforblogcategories:
class Categories(models.Model): name
= models.CharField(unique=True,
max_length=200) slug = models.
SlugField(unique=True, max_length=100)
parent = models.ForeignKey(‘self’,
blank=True, null=True, related_
name=’child’) def __unicode__(self):
return (self.name)
Thisallowsforparentandchildcategories.
11Administratecategories
Wecanaddittotheadminsiteby
creatingaCategoriessectioninadmin.py:
class CategoriesAdmin(admin.
ModelAdmin): list_display = [‘name’,
‘slug’, ‘parent’] fields = [‘name’,
‘slug’, ‘parent’] admin.site.register
(Categories, CategoriesAdmin)
Beforewecanmakecategories,though,we
needtocreatethedatabasetable:
$ python manage.py syncdb
12Categorisetheposts
Similarlytowhatwedidwiththe
13Databasecategory
Likebefore,we’llfindouttheSQLneeded
toalterthetable:$ python manage.py sqlall
blogWhichforourexamplereturnsasomewhat
differentcodethanbefore:“category_id”
integer NOT NULL REFERENCES “blog_
categories” (“id”)It’sanIDwe’regetting,not
text,fromthecategoriestable.
14Altertable–part2
Againlet’senterthedatabaseshell:
python manage.py dbshellWe’llcontinue
muchlikebefore,butwiththenewcode:ALTER
TABLE “blog_post” ADD “category_id”
integer REFERENCES “blog_categories”
(“id”);Andfinally,tosave:COMMIT;
15Administratecategories–part2
Nowwecangobacktoadmin.pyandaddthenewcategoryfieldstothePostAdminmodel:
list_display = [‘title’, ‘author’, ‘pub_date’, ‘category’] fields = [‘title’,
‘pub_date’, ‘author’, ‘post’, ‘excerpt’, ‘category’]Ourpreviousblogpostswithno
categoryhavedisappeared!Tofixthis,gobacktomodels.pyandmakethischangetothePostmodel:
category = models.ForeignKey(Categories, blank=True, null=True)Sowecannowcreate
categoriesseparately,assignthemtoposts,andviewpostswithoutacategory.
16Categorydisplay
Asoururls.pyintheblogdirectorygets
allthepostfields,totheindextemplatewejust
add:pCategory: {{ post.category }}/
pAndtotheposttemplate:pCategory: {{
post_list.category }}/p
17Categorypage
Firstweneedtodefineourcategoryin
blog/urls.py.ImportCategoriesandthenadd:
def blog_categories(request, category_
id): categories = Categories.objects.
get(pk=category_id)Weneedthe
category_idtocallthecorrespondingposts.
comments,wewanttoaddaForeignKeyto
thePostmodelsowecanattributeaposttoa
category.Addthisline:category = models.
ForeignKey(Categories)
AndmoveCategoriestothetopofmodels.py.
Wecannow
createcategories
separately](https://crownmelresort.com/image.slidesharecdn.com/thepythonbooktheultimateguidetocodingwithpythonpdfdrive-220527060944-728dd1fe/75/The-Python-Book_-The-ultimate-guide-to-coding-with-Python-PDFDrive-pdf-156-2048.jpg)


![The Python Book 163
Use Python with Pi
12InputvalidationwithWhileloops
andIfstatements
To demonstrate a while loop and if statements,
we will output a question to the user that
requires a yes or no answer. We’re going to ask
them if they want to continue – and for this we
require either a lower-case ‘yes’, or a lower-
case ‘no’. A while loop is a loop that runs until a
condition is met. In this case, we will create a
variable called yesOrNo and the while loop will
run while yesOrNo is false. The yesOrNo variable
will be a Boolean type that can be either True or
False. The variable will be initialised with a value
ofFalse,orthewhileloopwillnotrun.
A while loop has the format ‘while [condition]:’
– where any code that is part of the while loop
needs to be indented in the lines below the
colon. Any code that is not indented will not
be part of the while loop. This is the same for
an if statement. The condition is checked with
the comparison operator ‘==’. A single ‘=’ is an
assignment operator whereas a double equals
is a comparison operator. Another common
comparison operator is ‘!=’ – which means ‘not
equalto’.
We create a variable called ‘result’, which
holds the result of the question, do you want to
continue? We then check this result is valid with
an if statement. Notice the ‘or’ operator which
allows two conditions to be tested. If the user
inputs a correct value then we set yesOrNo to
True, which stops the while loop on the next run.
Otherwise, we output an error message and
the while loop will run again. The user can use
the Ctrl+C command at the terminal to exit the
programatanytime.
13Continueorexit?
Next we will deal with the result
that was stored during the while loop with if
statements. If the user typed ‘yes’ then we
will print ‘Continuing’. Otherwise, we will print
‘Exiting’ and then call the sys.exit function. You
don’t have to do anything else for the program
to continue because it will simply carry on if the
sys.exit function wasn’t called. This code also
shows that the newline character n can be
used anywhere in a string, not just in separate
quotationmarkslikeabove.
14Loopswithnumbers
We’ll be using a while loop that uses a
number and a = (less than or equal to) operator
as its stopping condition. The while loop will be
used to increment the number by 1, printing the
change on each loop until the stopping condition
is met. The count variable allows us to know
exactly how many times we have been through
thewhileloop.
15Incrementingnumberswithaloop
The while loop will run until the count is
6, meaning that it will run for a total of 5 times
because the count begins at 1. On each run, the
while loop increments the number variable and
then prints what is being added to the original
number, followed by the result. Finally, the count
isincremented.
16Finishingoff
The final step is to print that the
program is exiting. This is the last line and we
don’t have to do anything else because Python
simply finishes when there are no more lines
tointerpret.
17Admireyourwork
Now that we’ve finished coding, save any
changes you have made and run your program
withtheF5key.
Thecount
variableletsus
knowexactlyhow
manytimeswe
havebeenthrough
thewhileloop](https://crownmelresort.com/image.slidesharecdn.com/thepythonbooktheultimateguidetocodingwithpythonpdfdrive-220527060944-728dd1fe/75/The-Python-Book_-The-ultimate-guide-to-coding-with-Python-PDFDrive-pdf-163-2048.jpg)


![Support, Monitoring, Continuous Improvement & Scaling Agentic Automation [3/3]](https://cdn.slidesharecdn.com/ss_thumbnails/agenticcommunityseries-day3-cfd-251120170304-ddef8112-thumbnail.jpg?width=640&height=640&fit=bounds)


