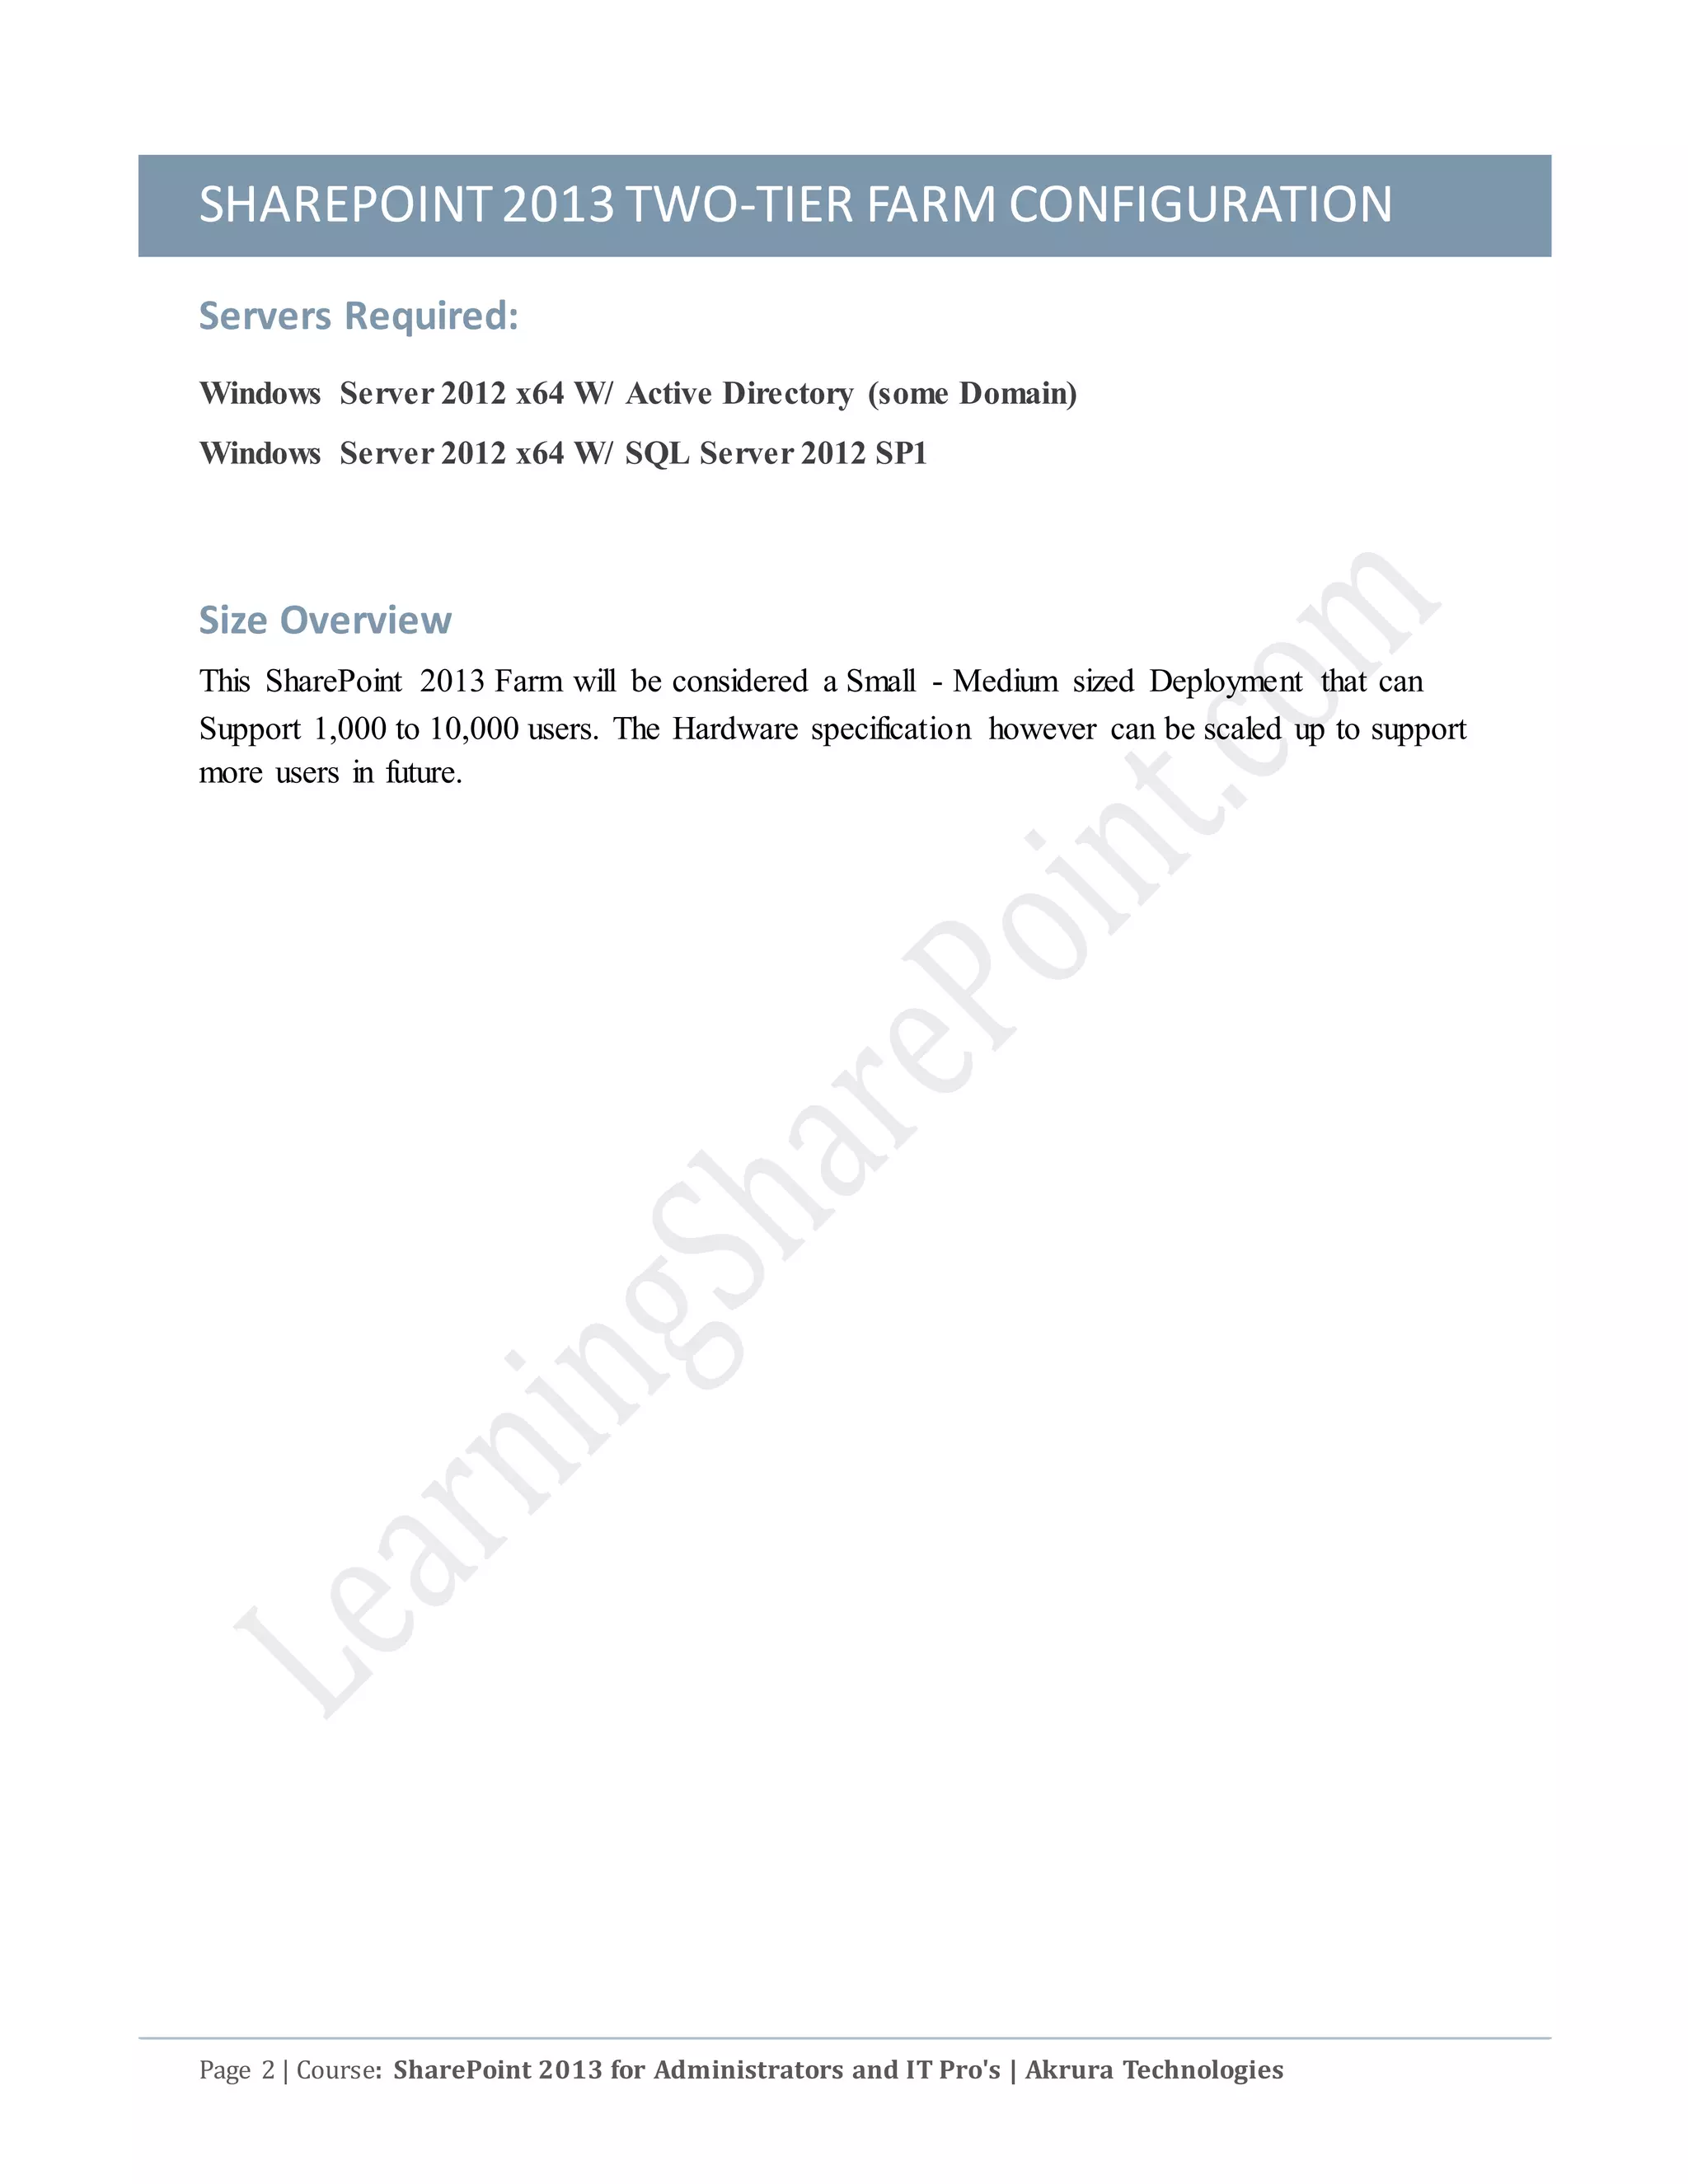
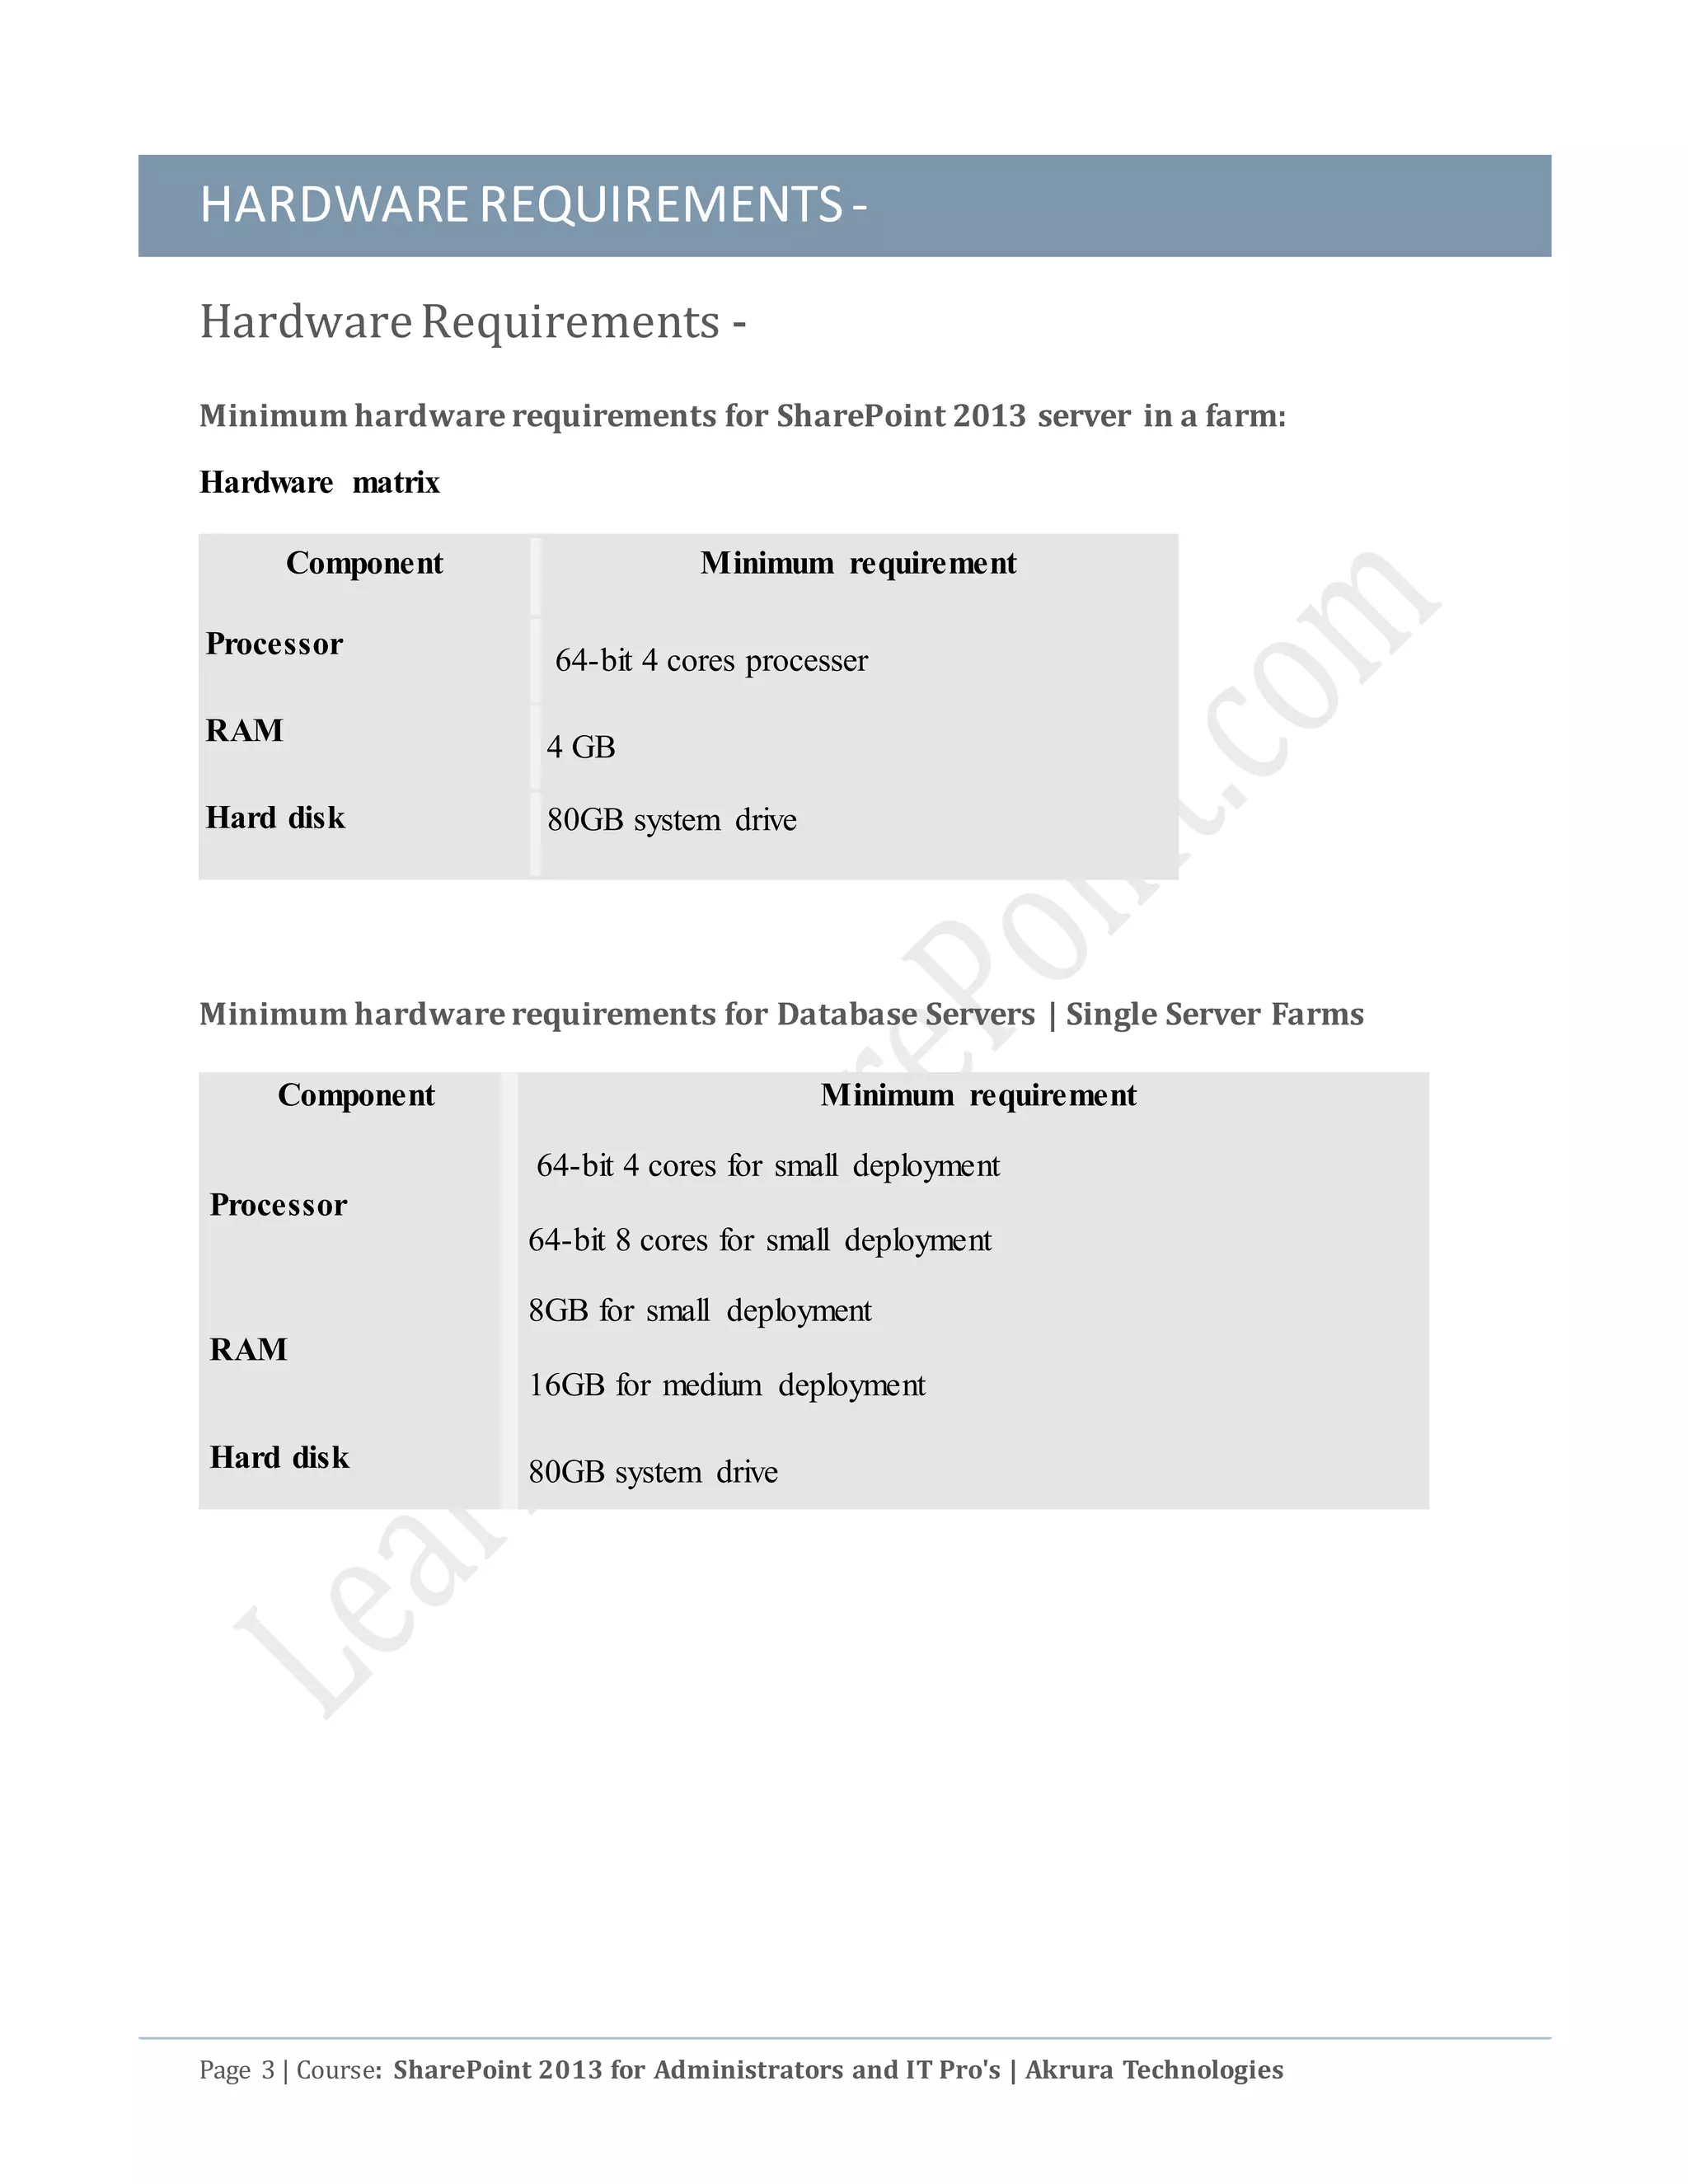
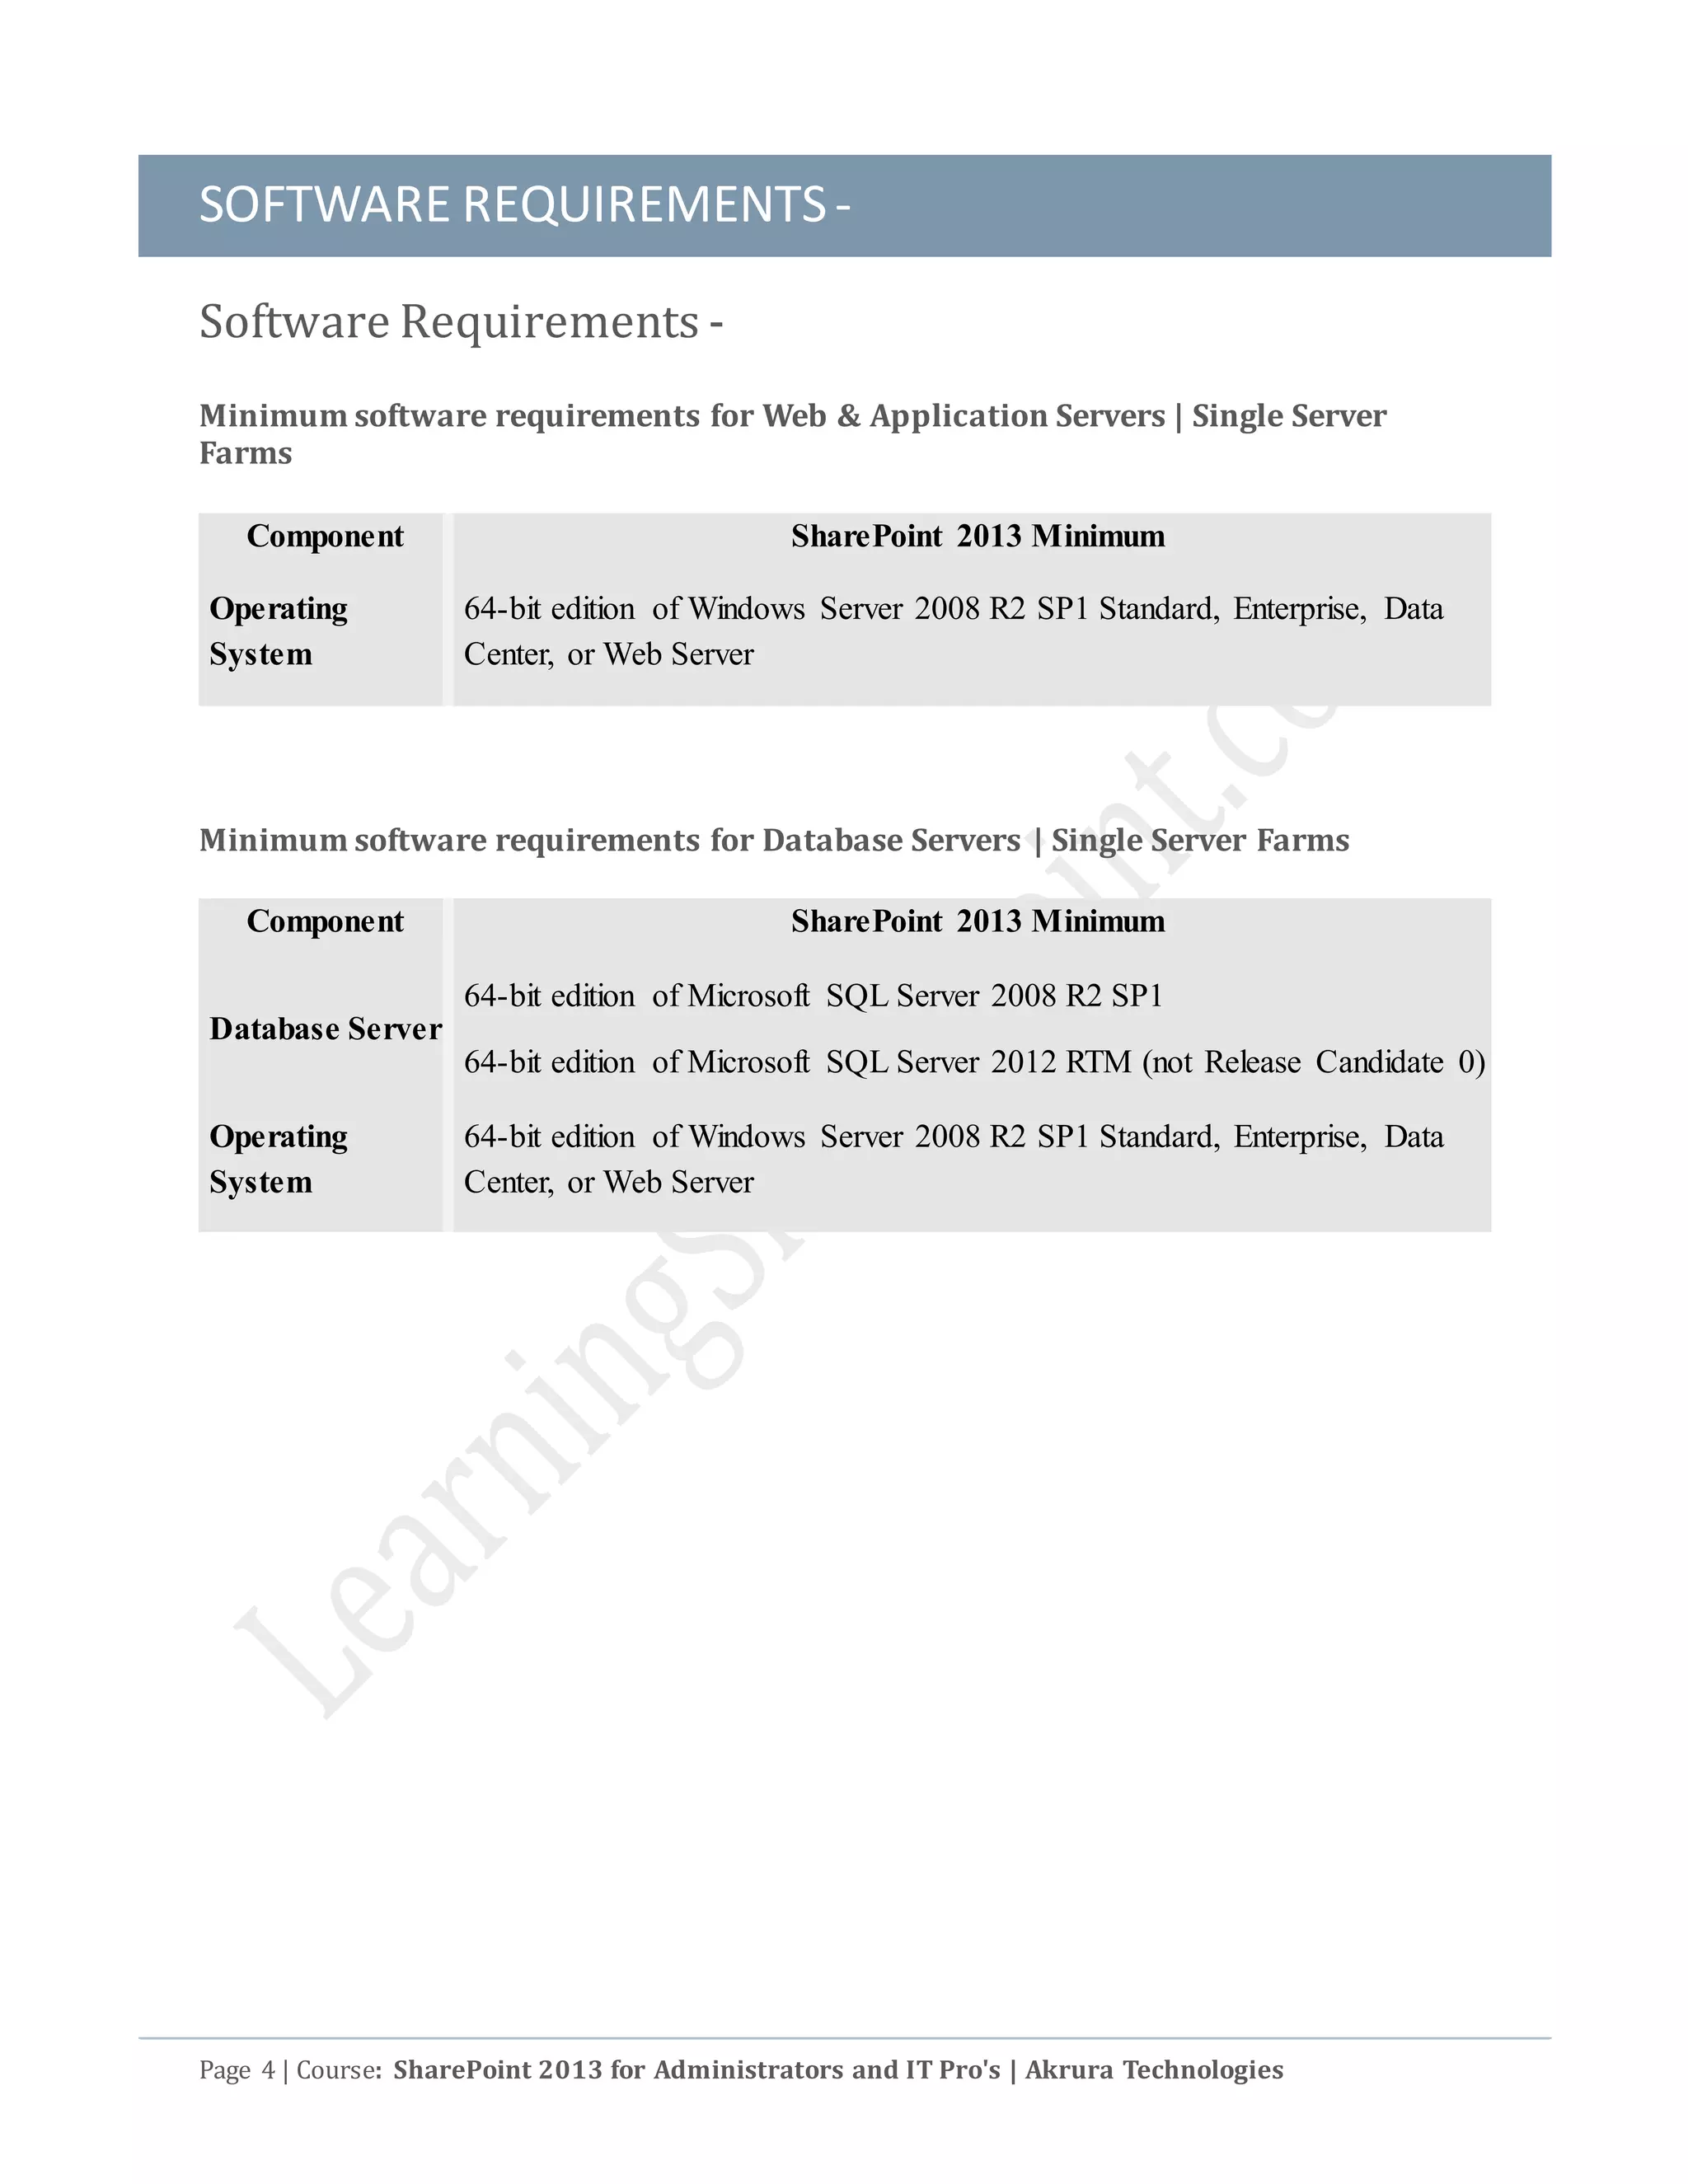
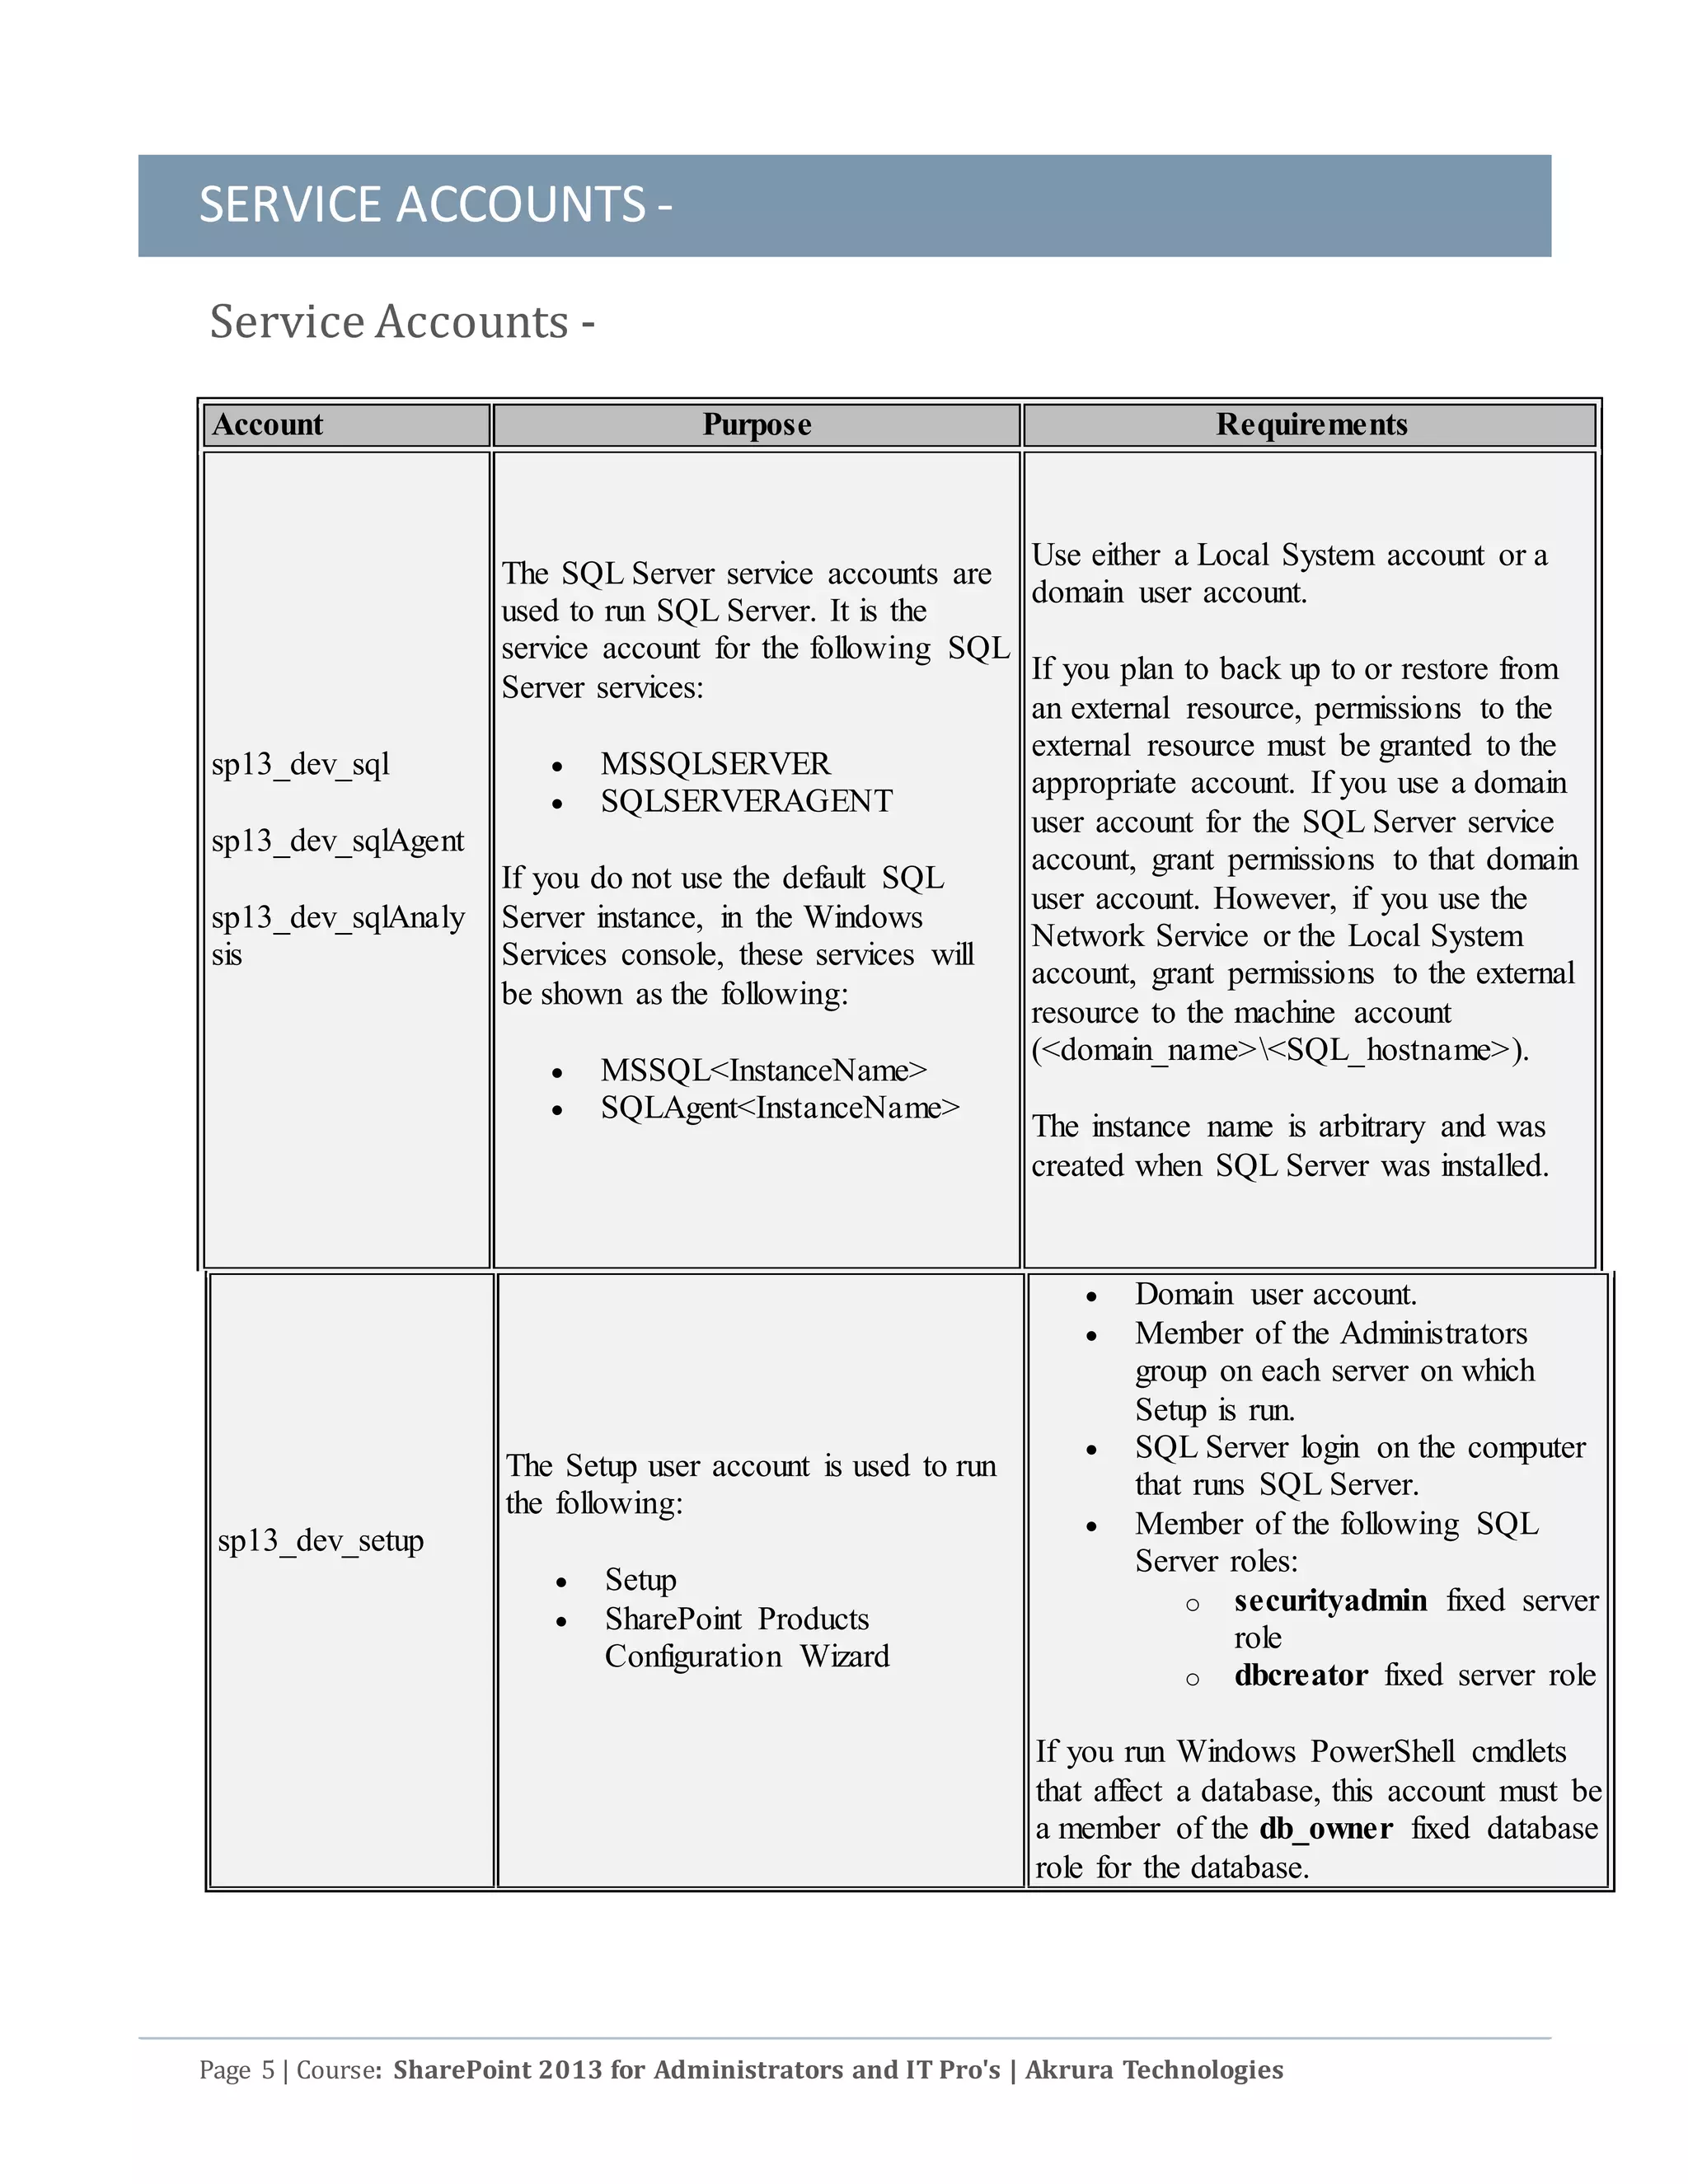
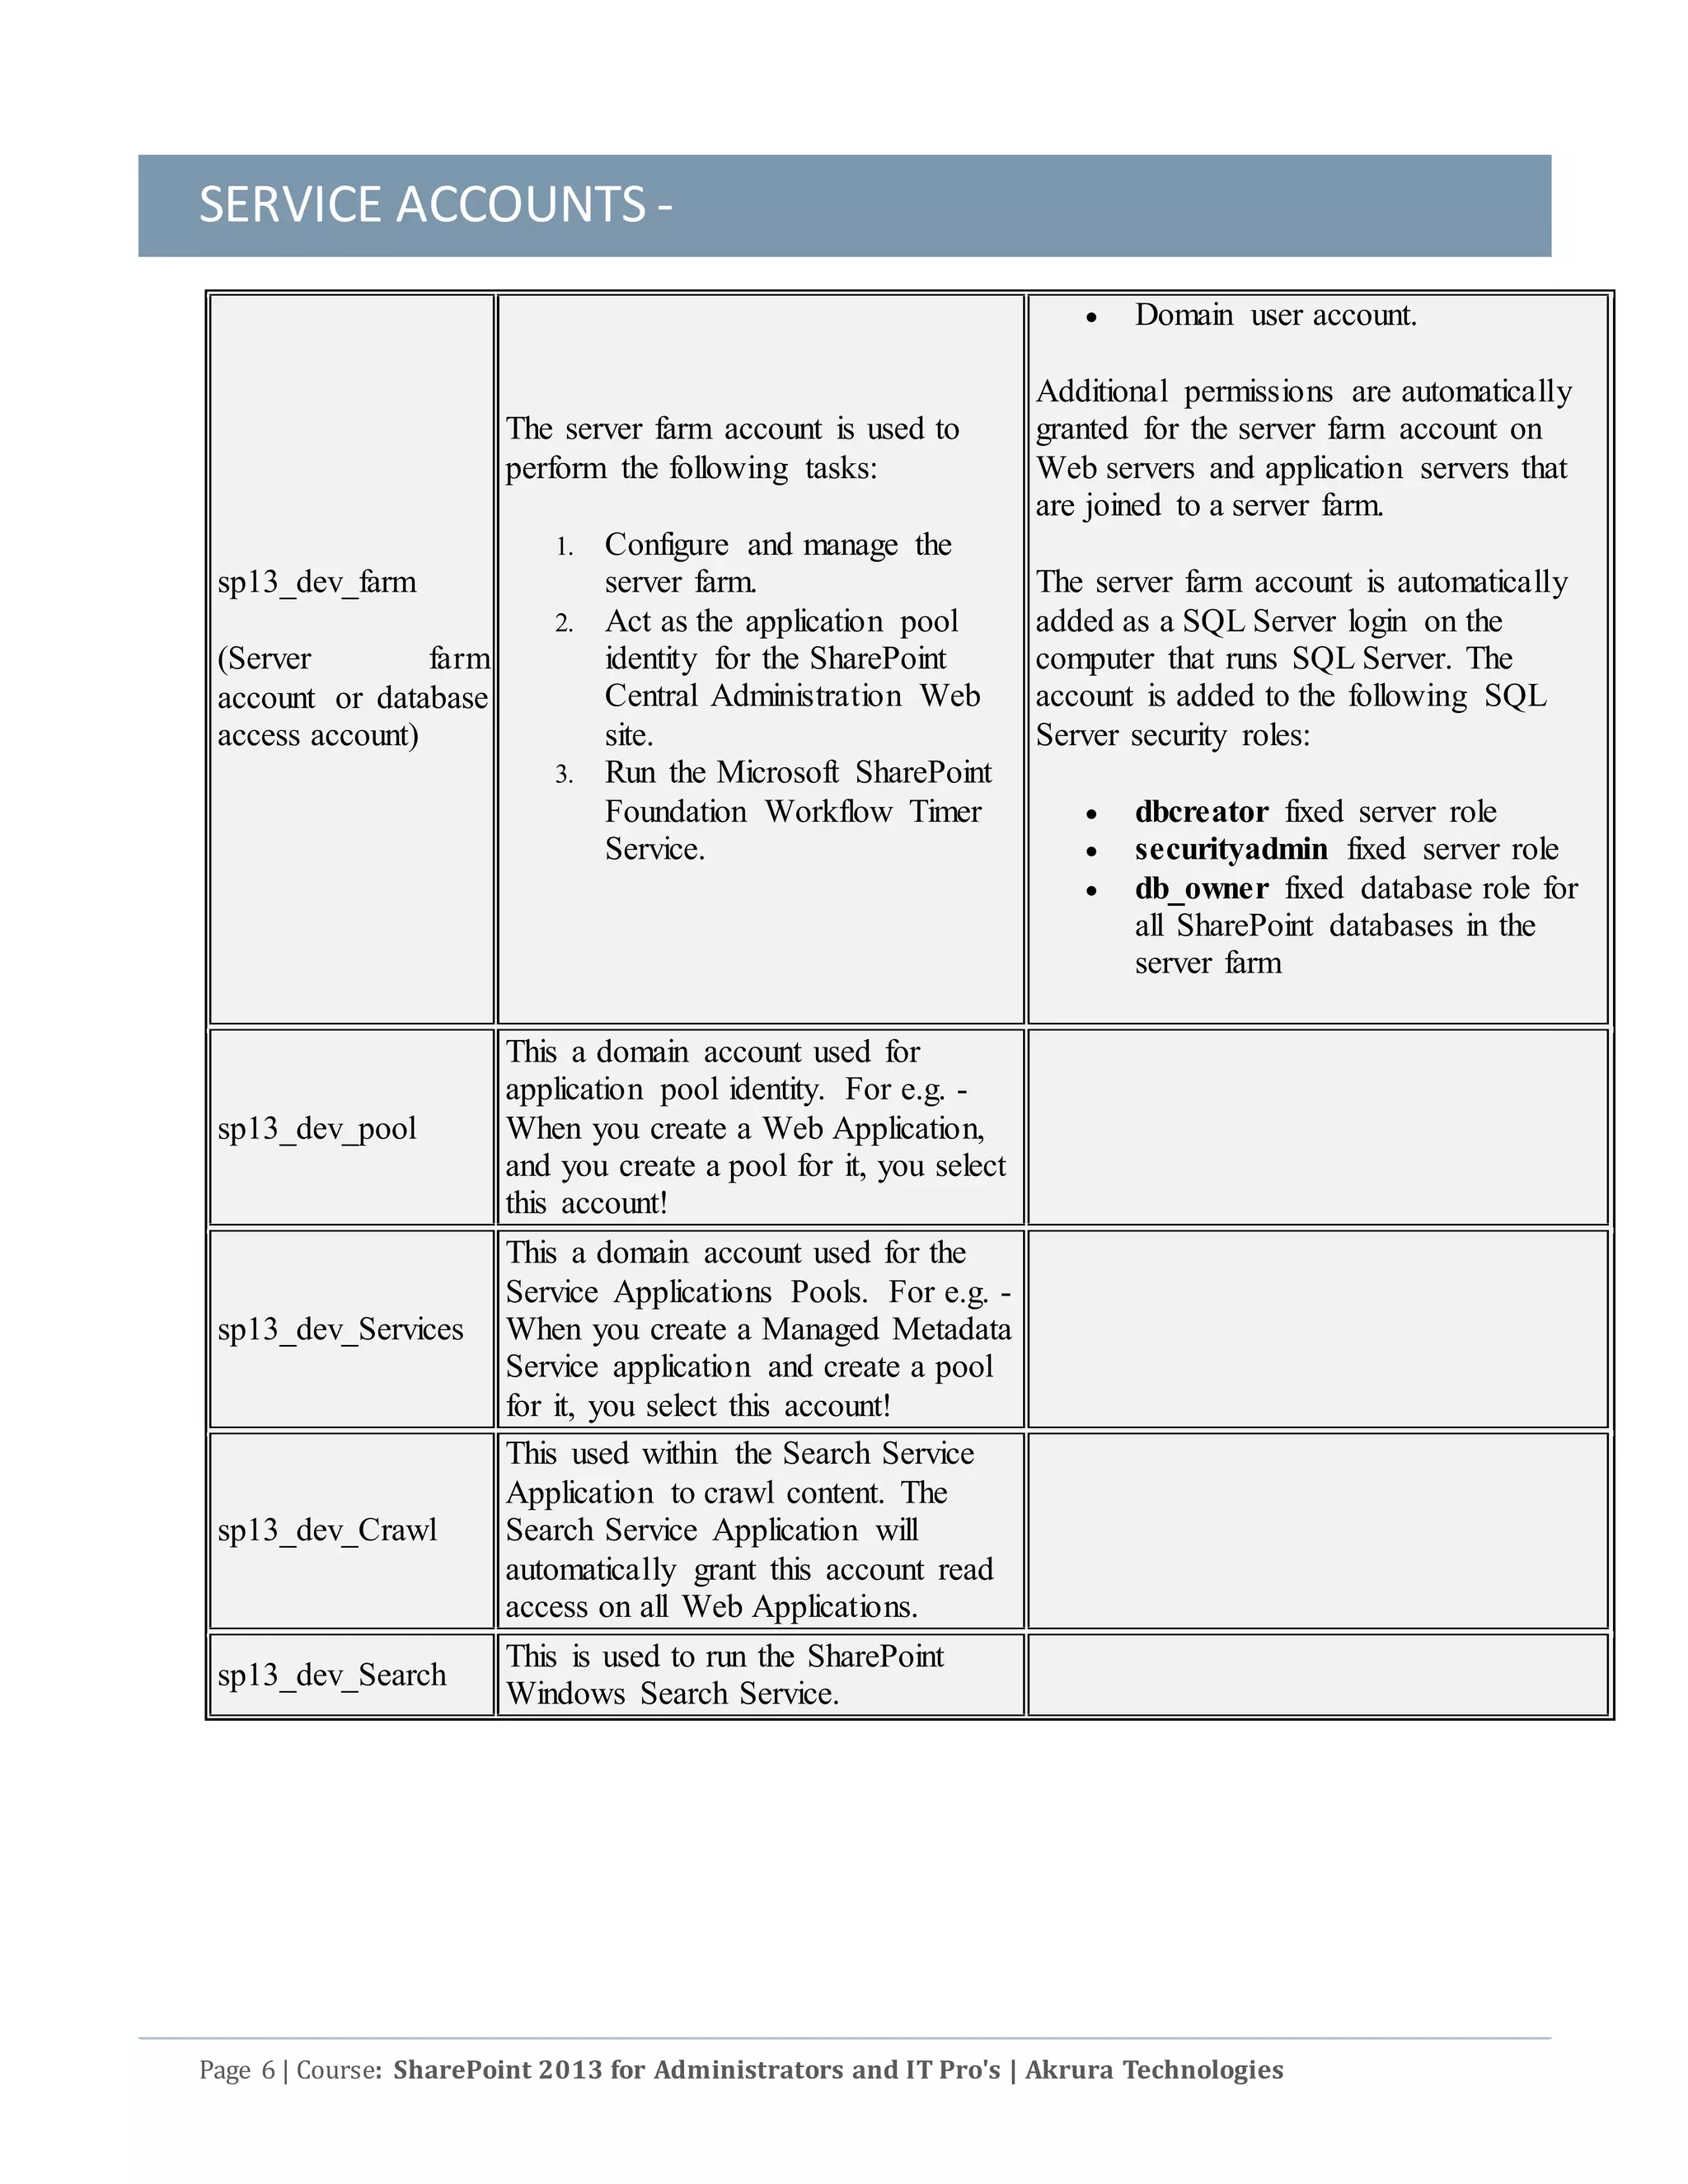
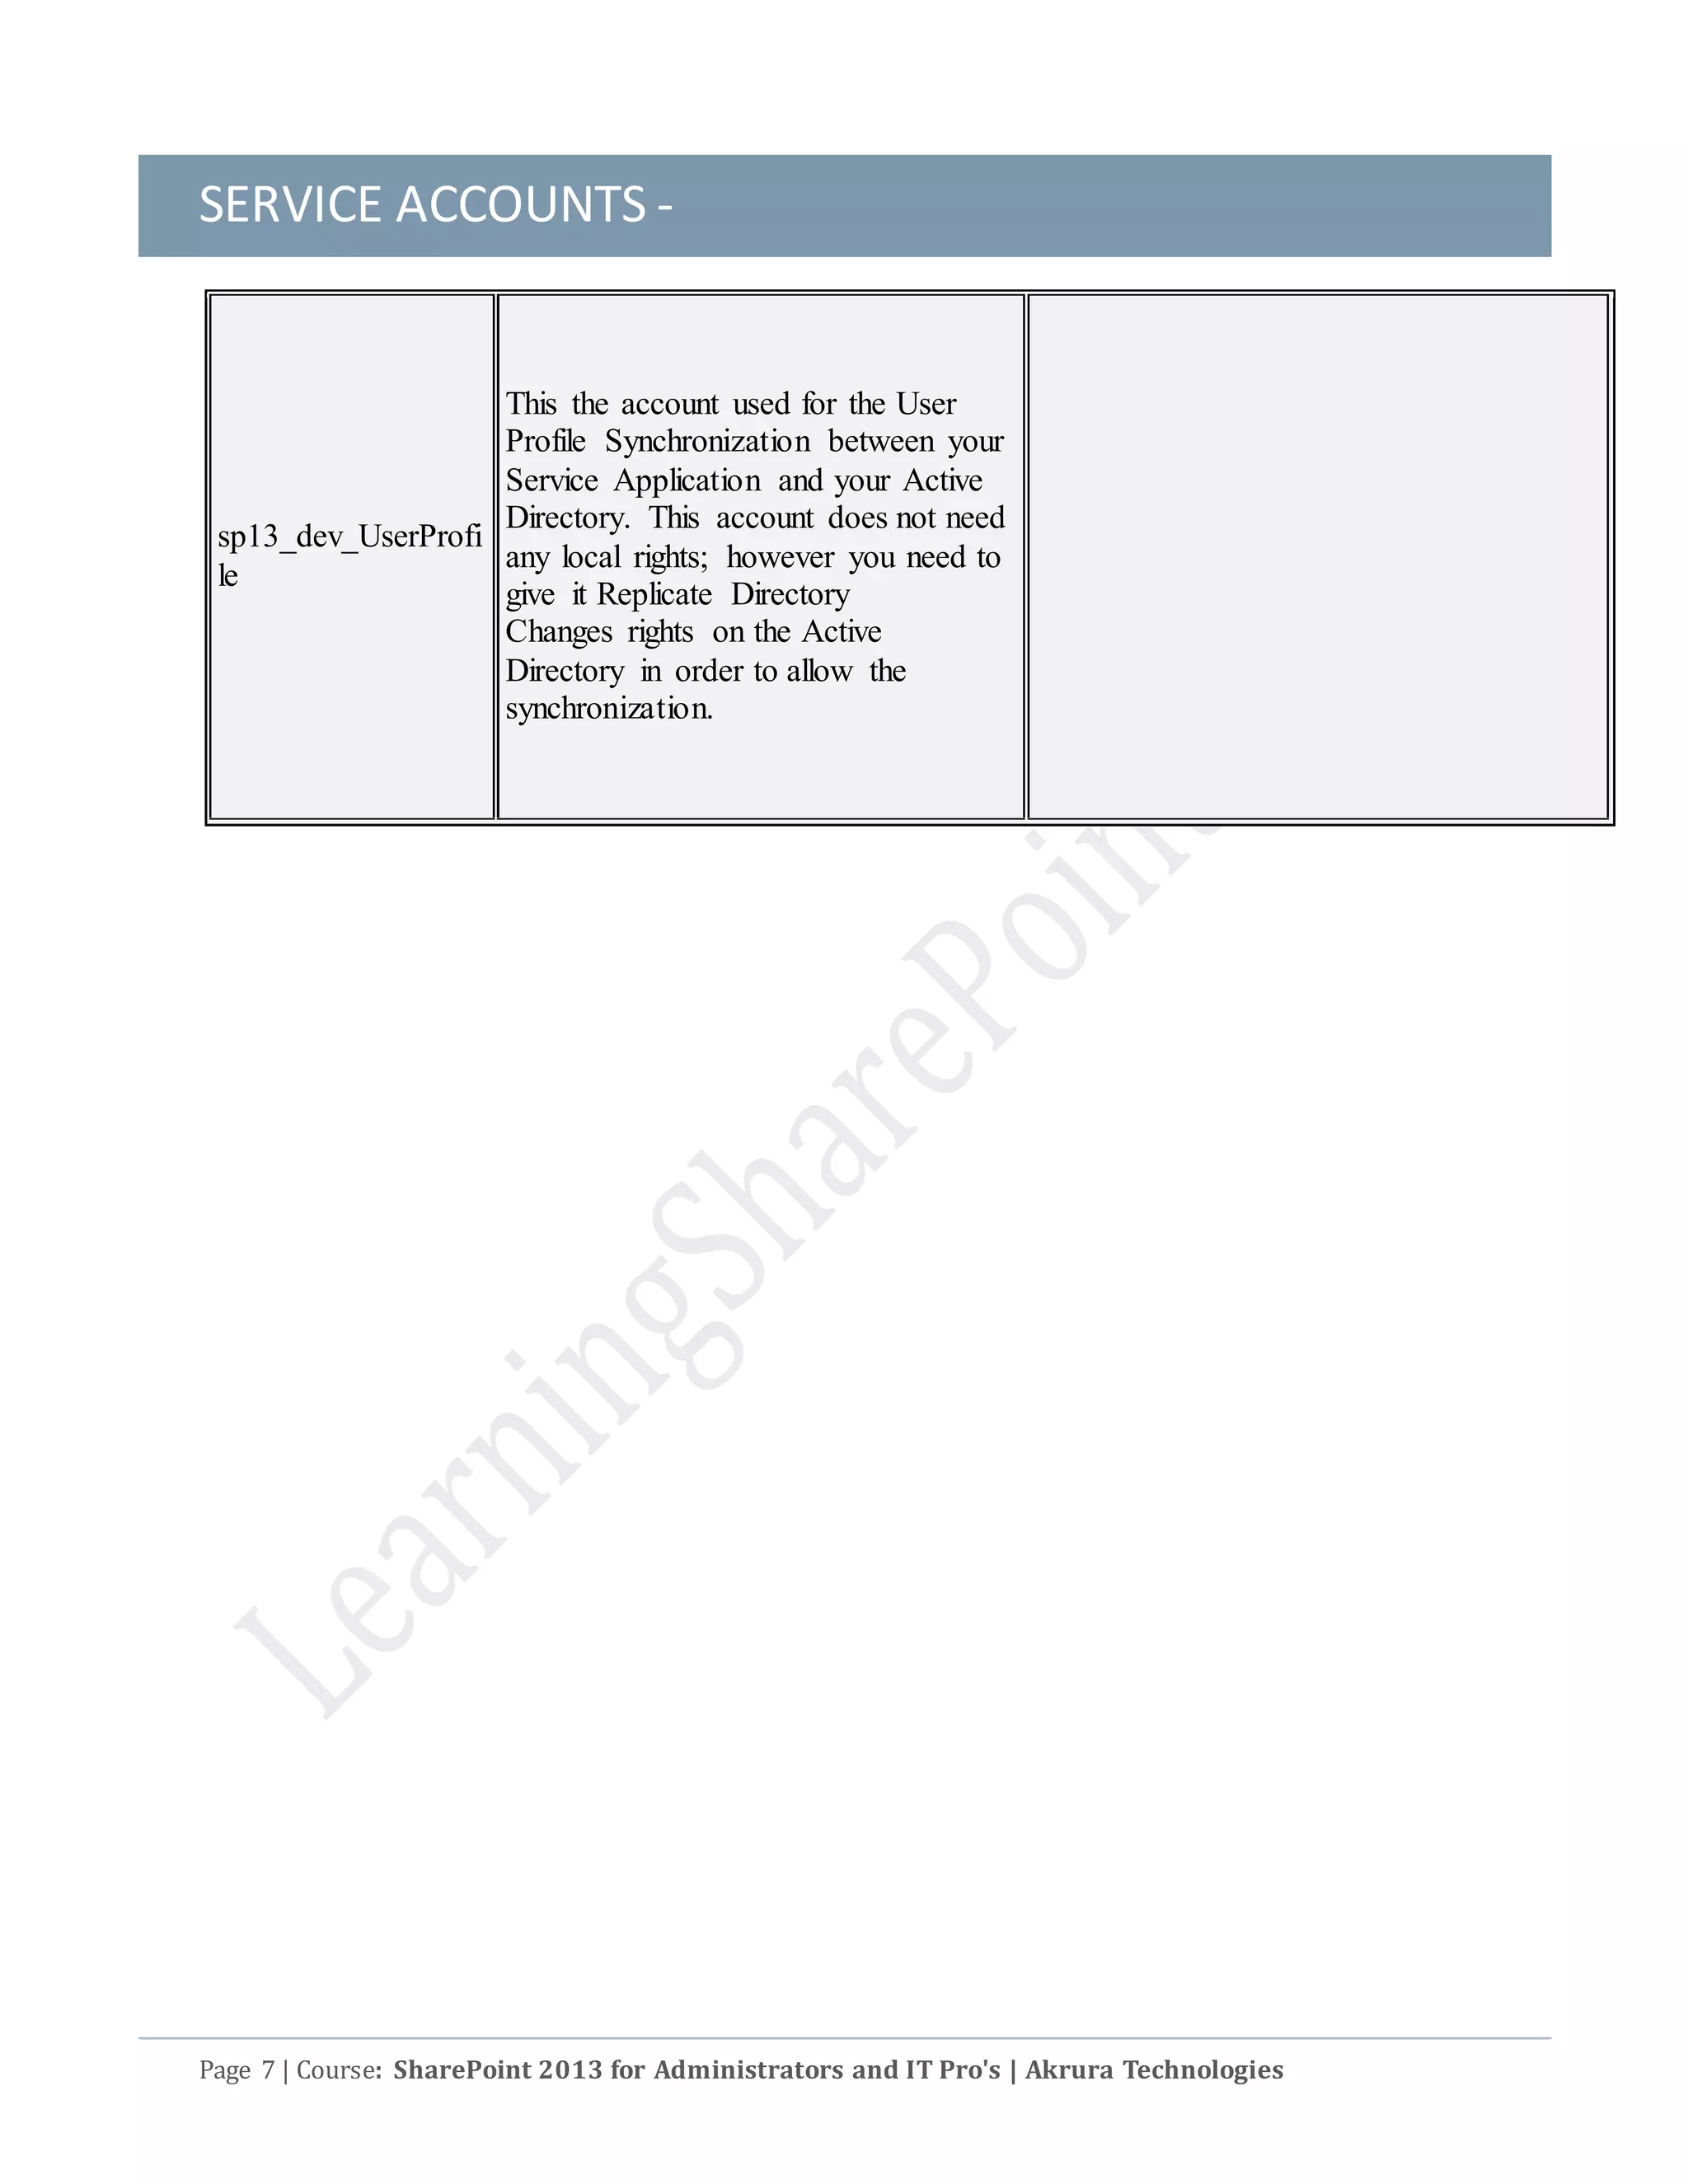
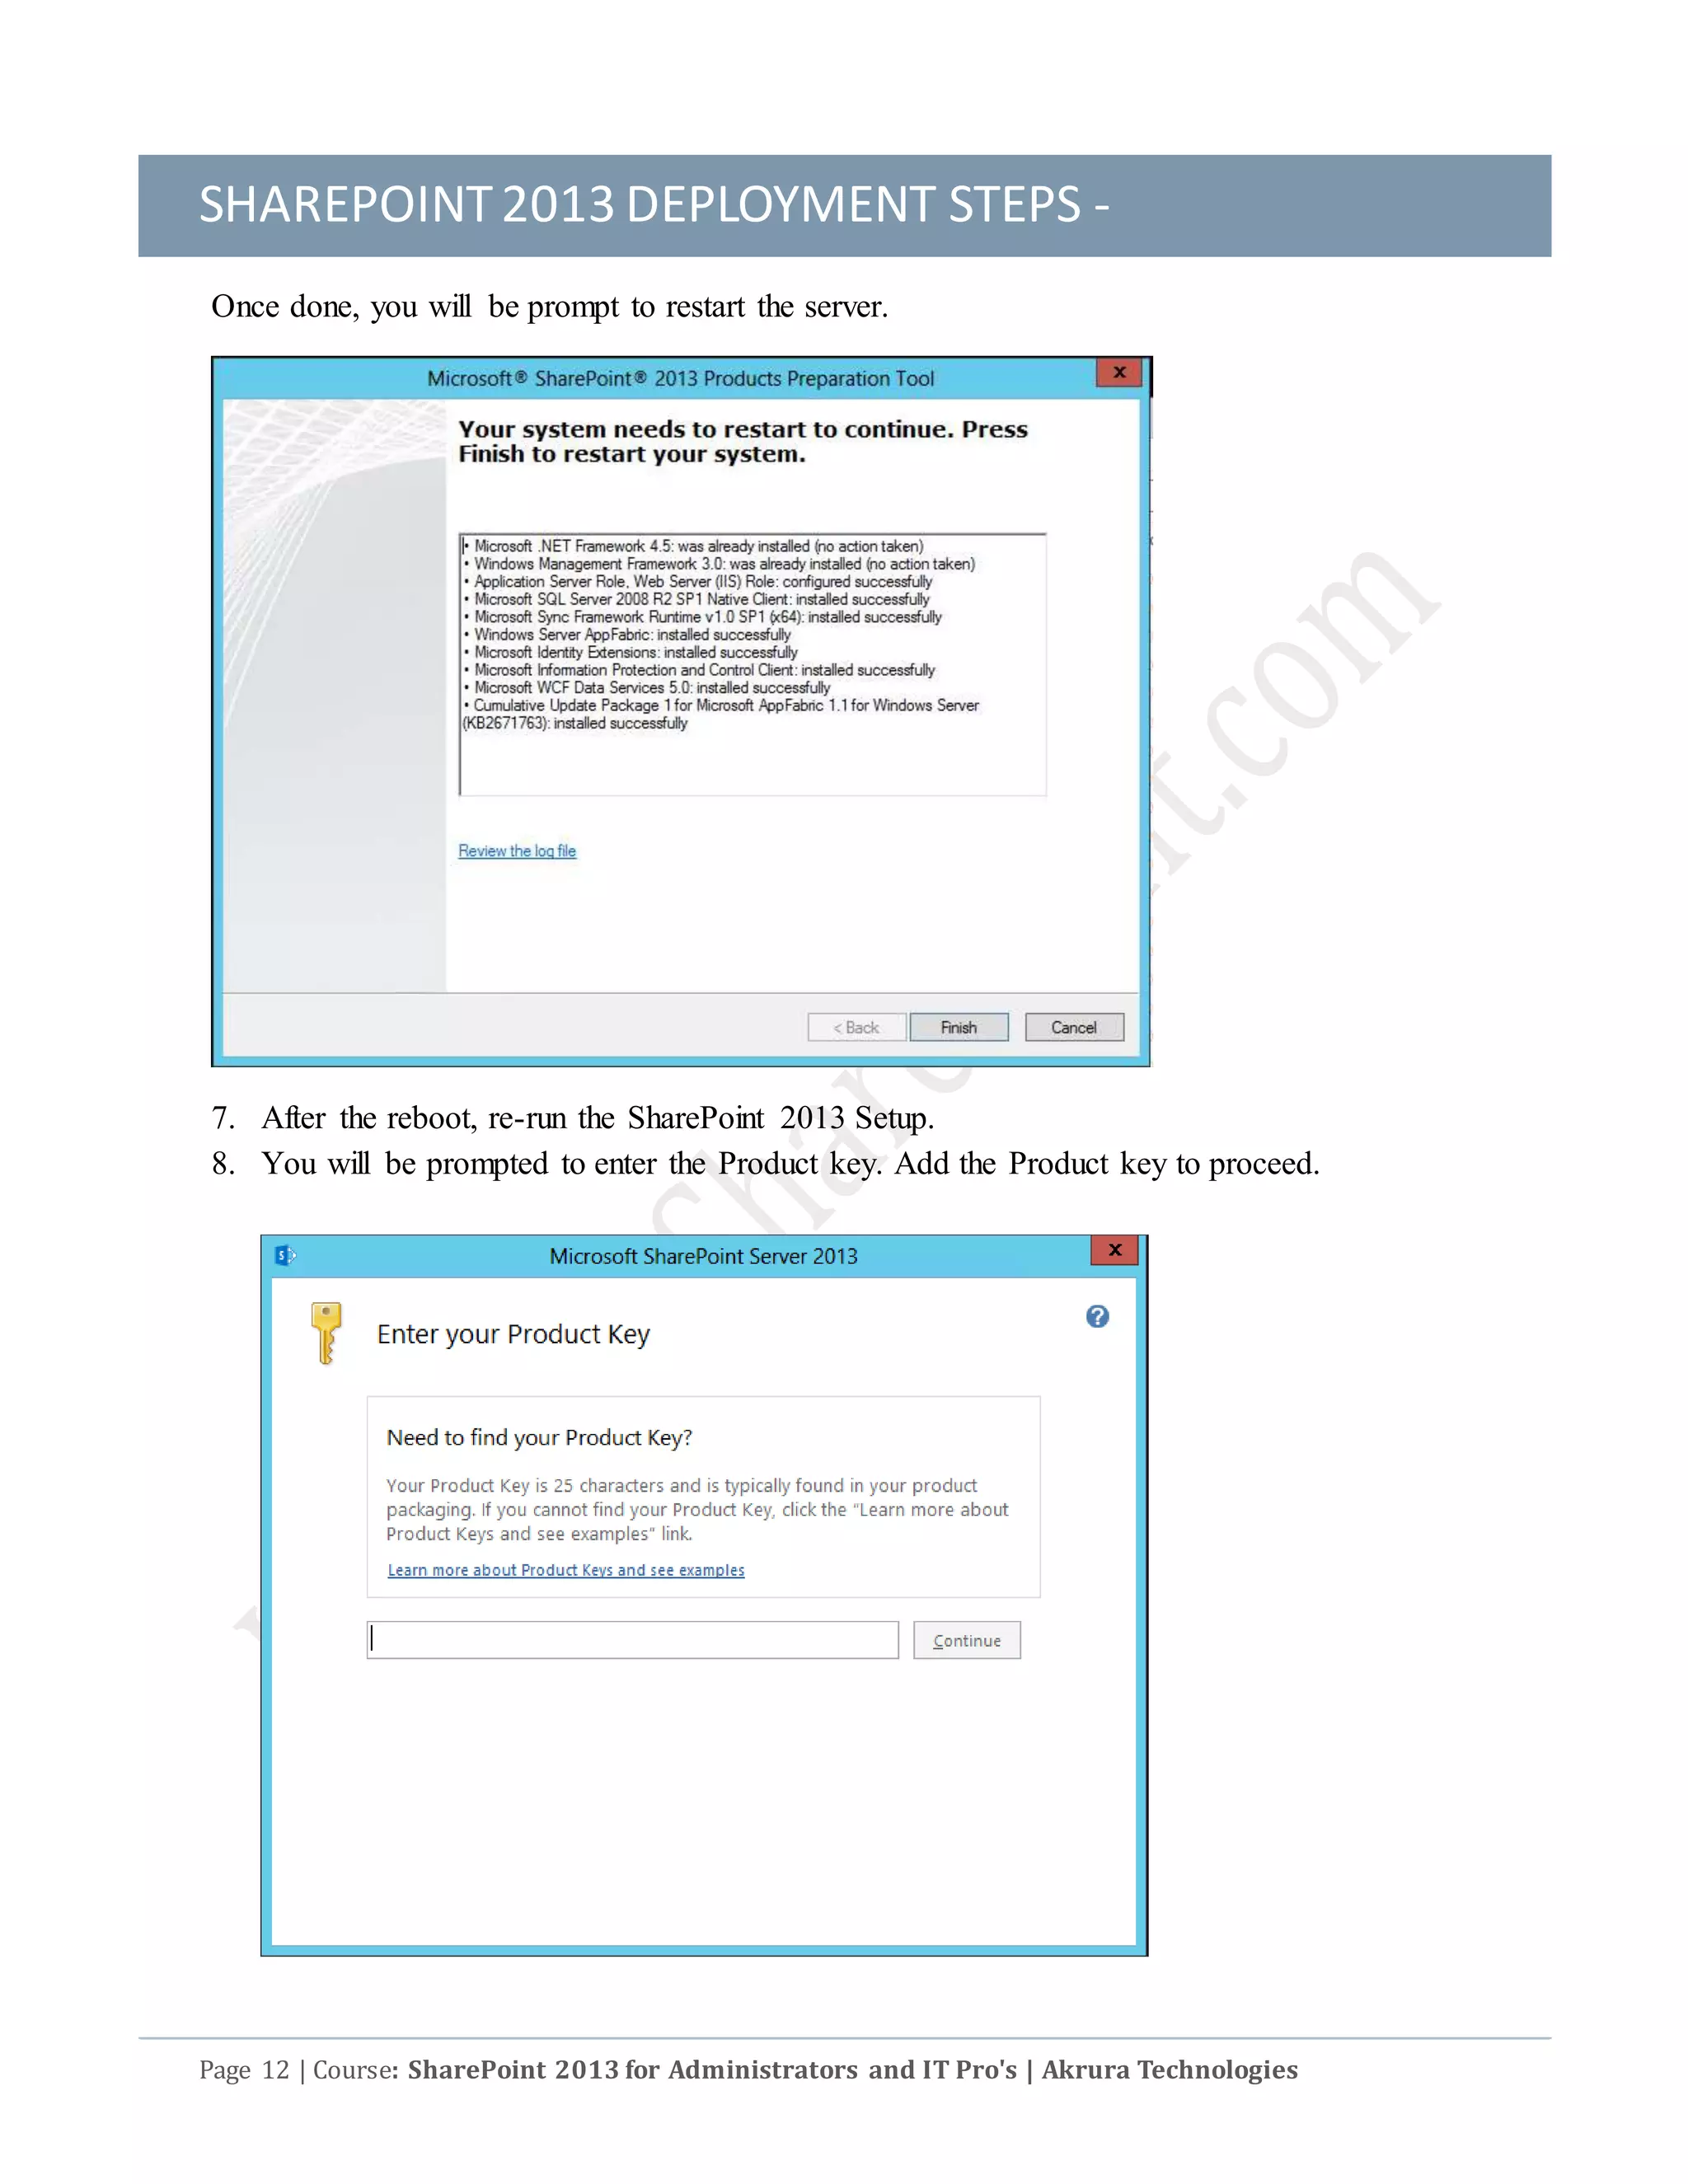
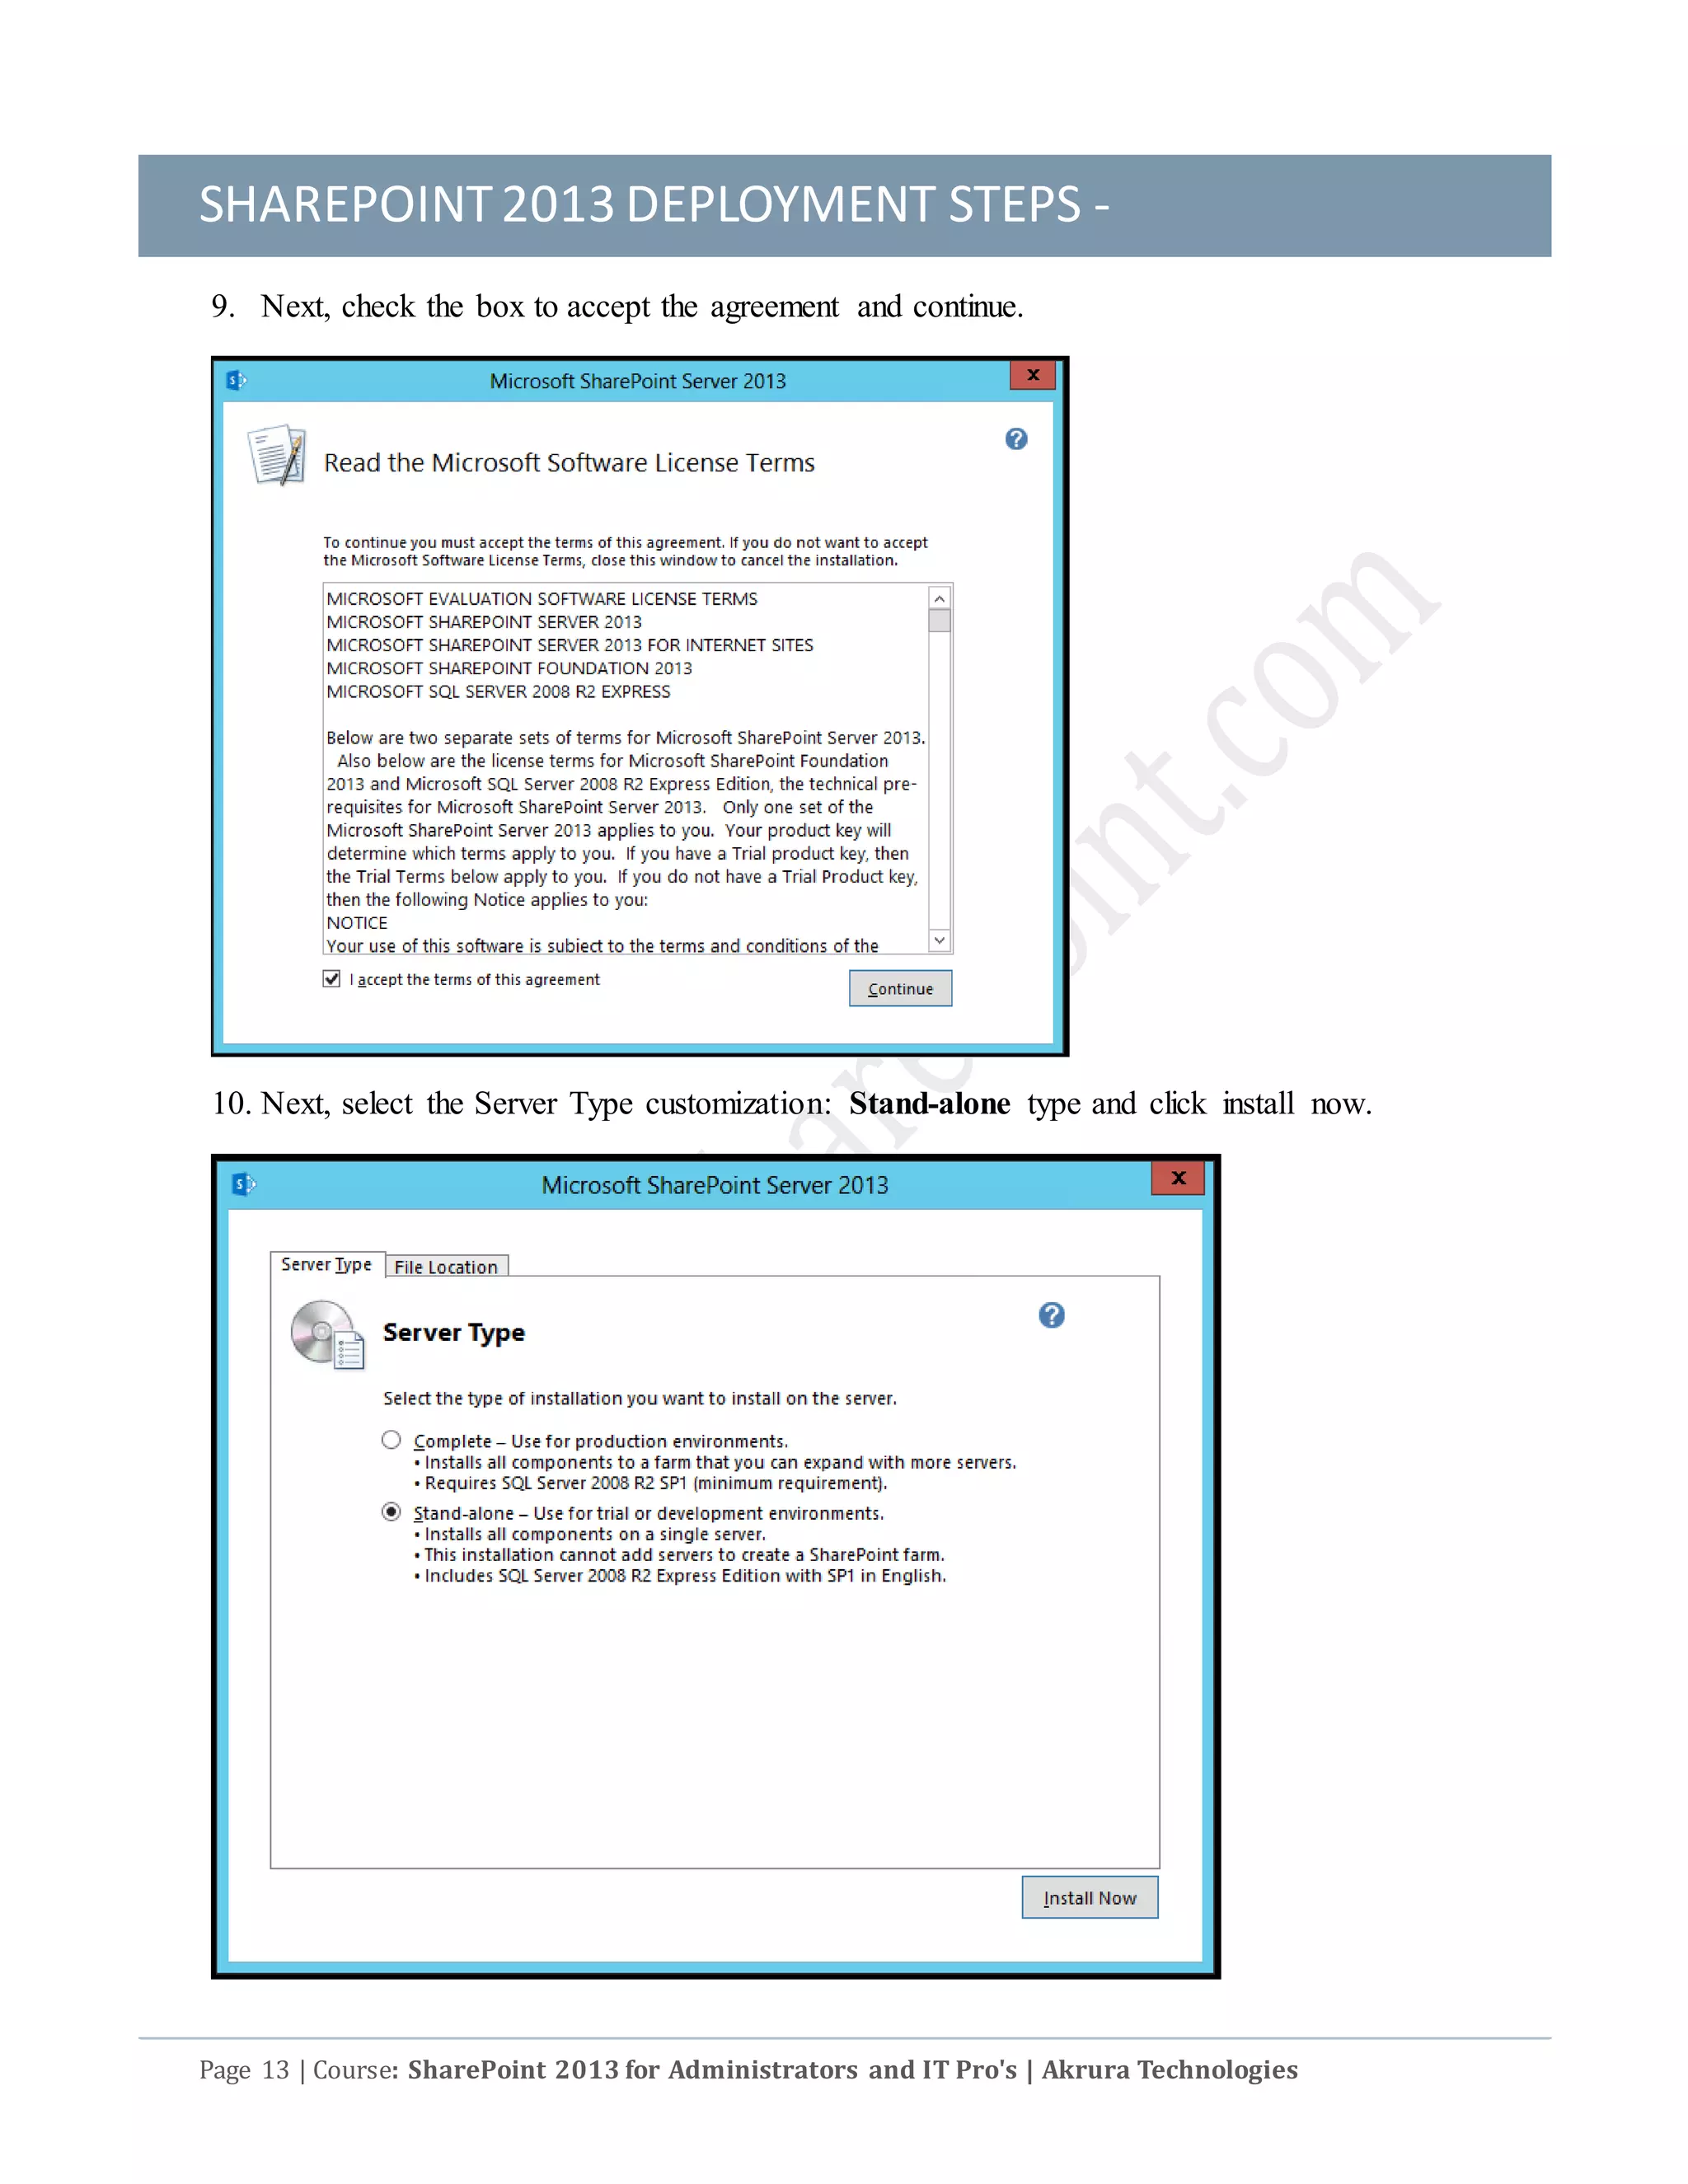
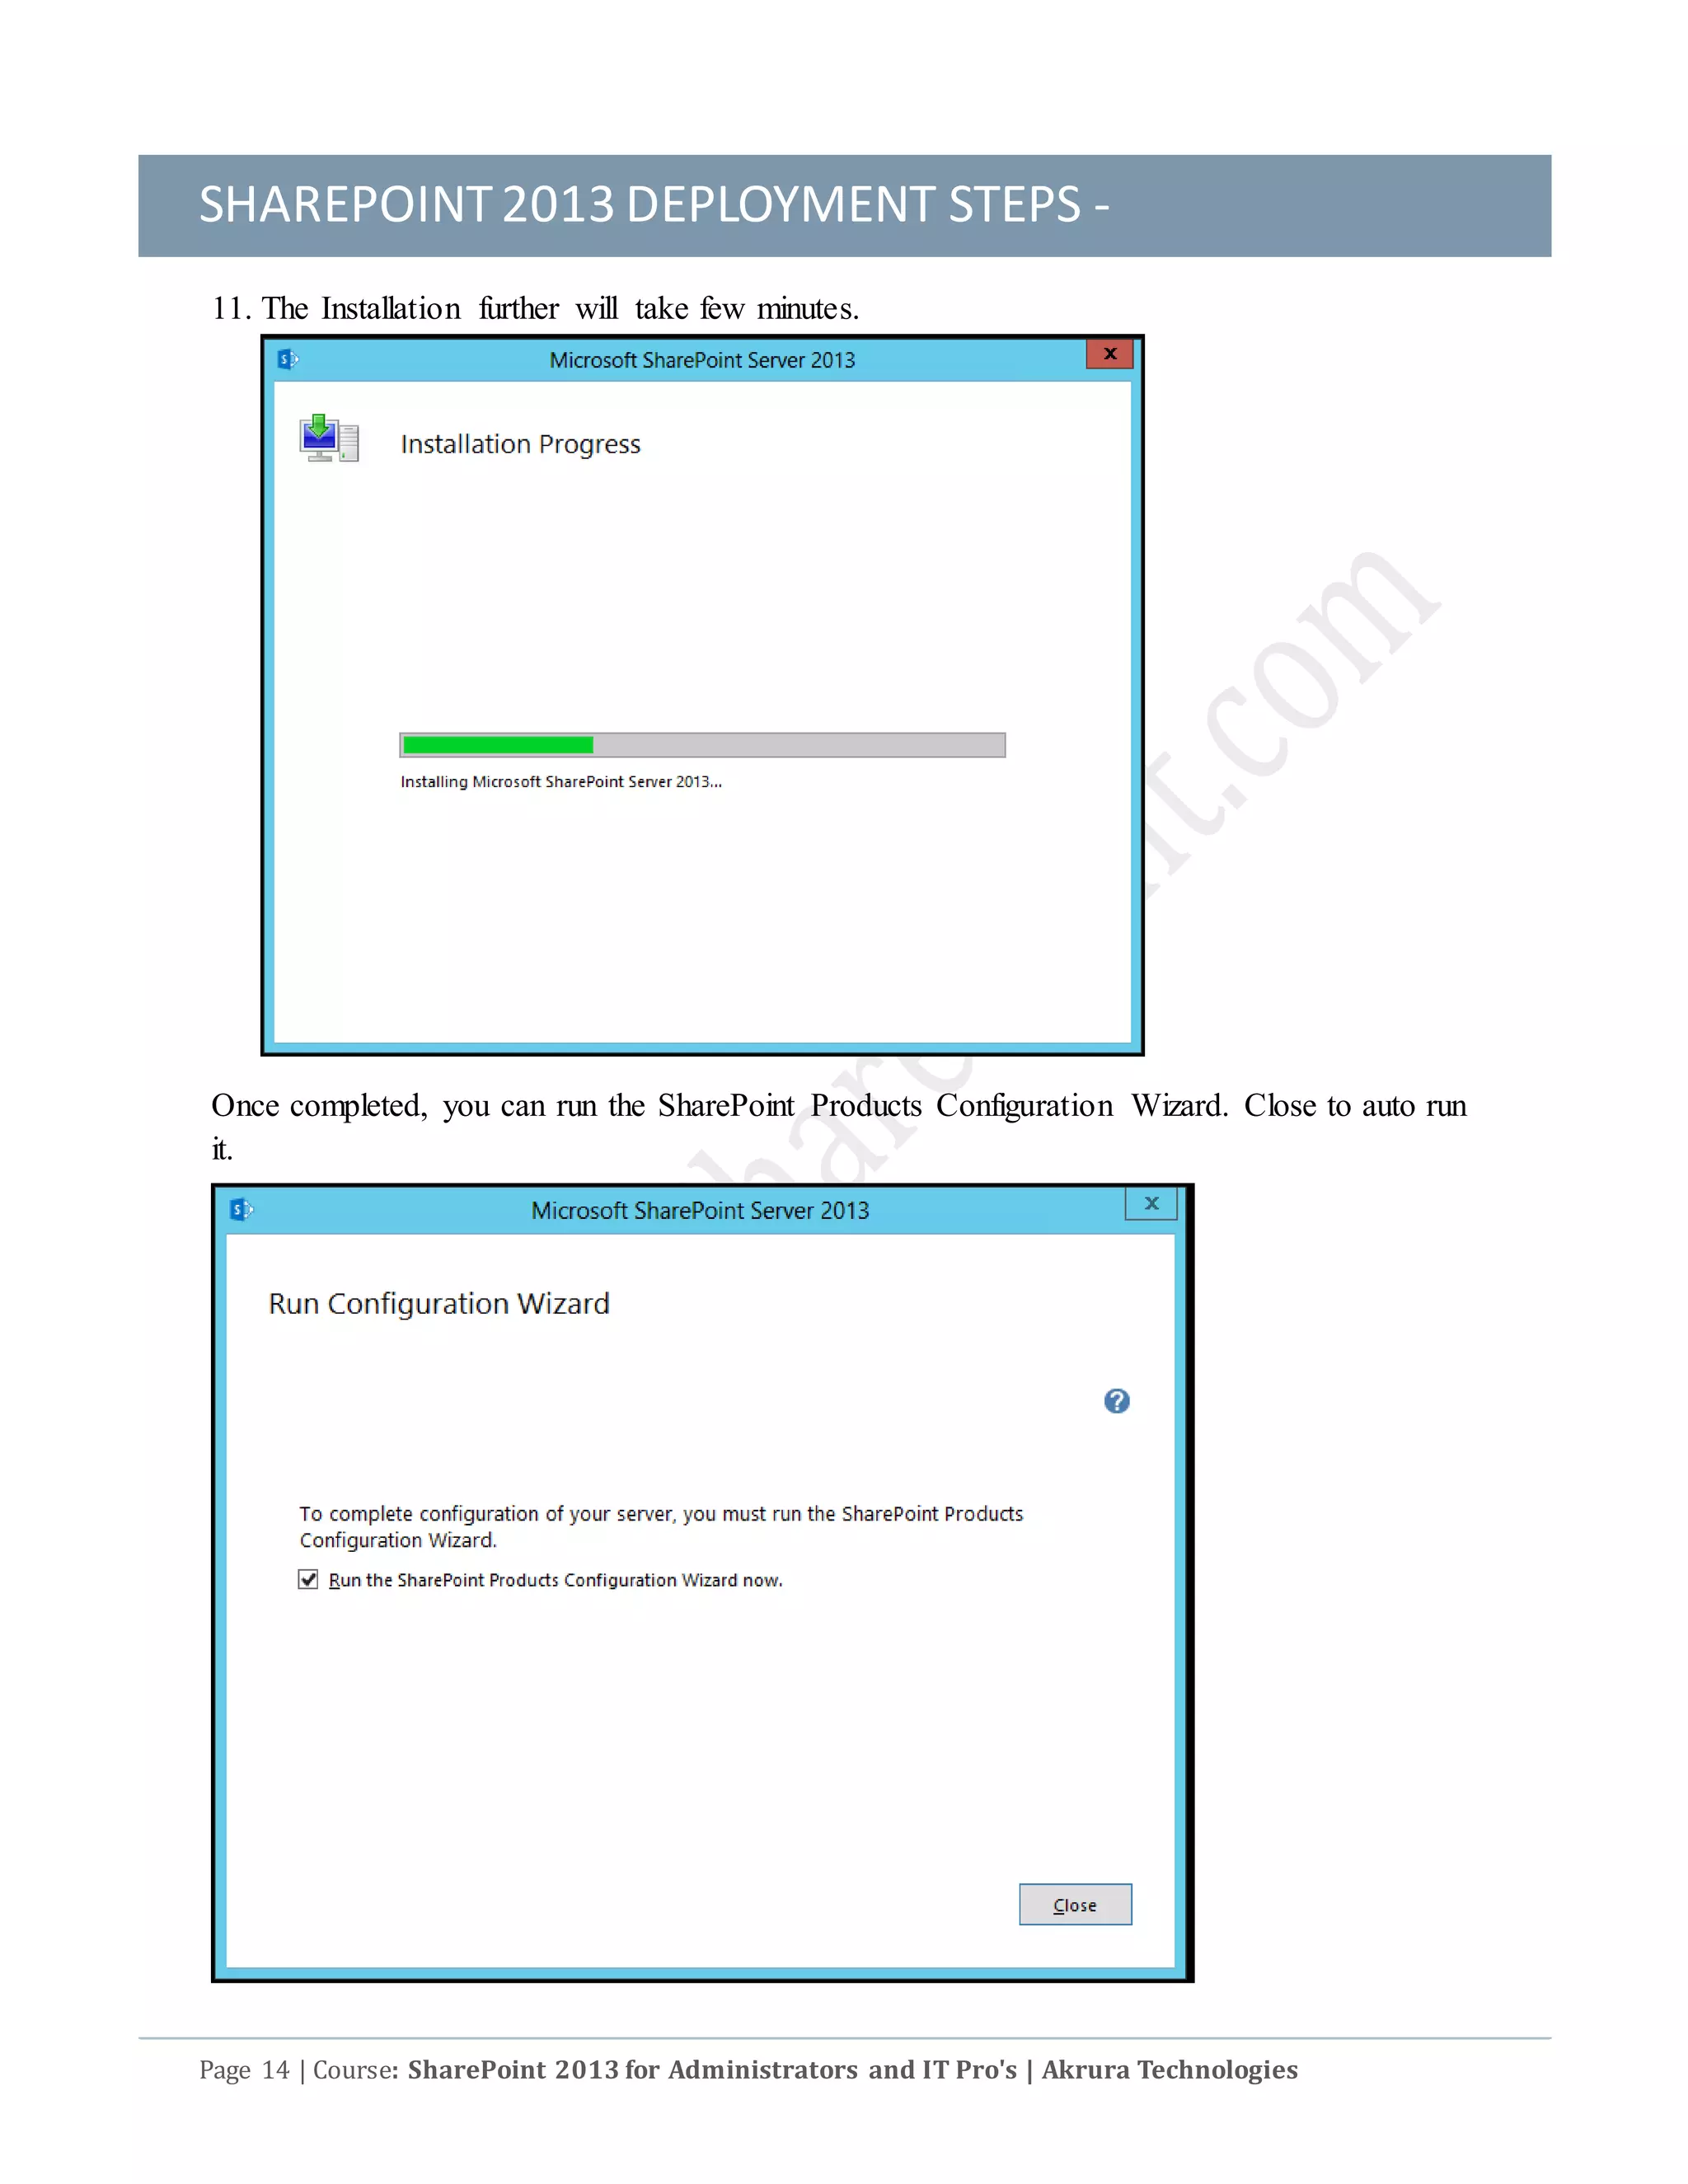
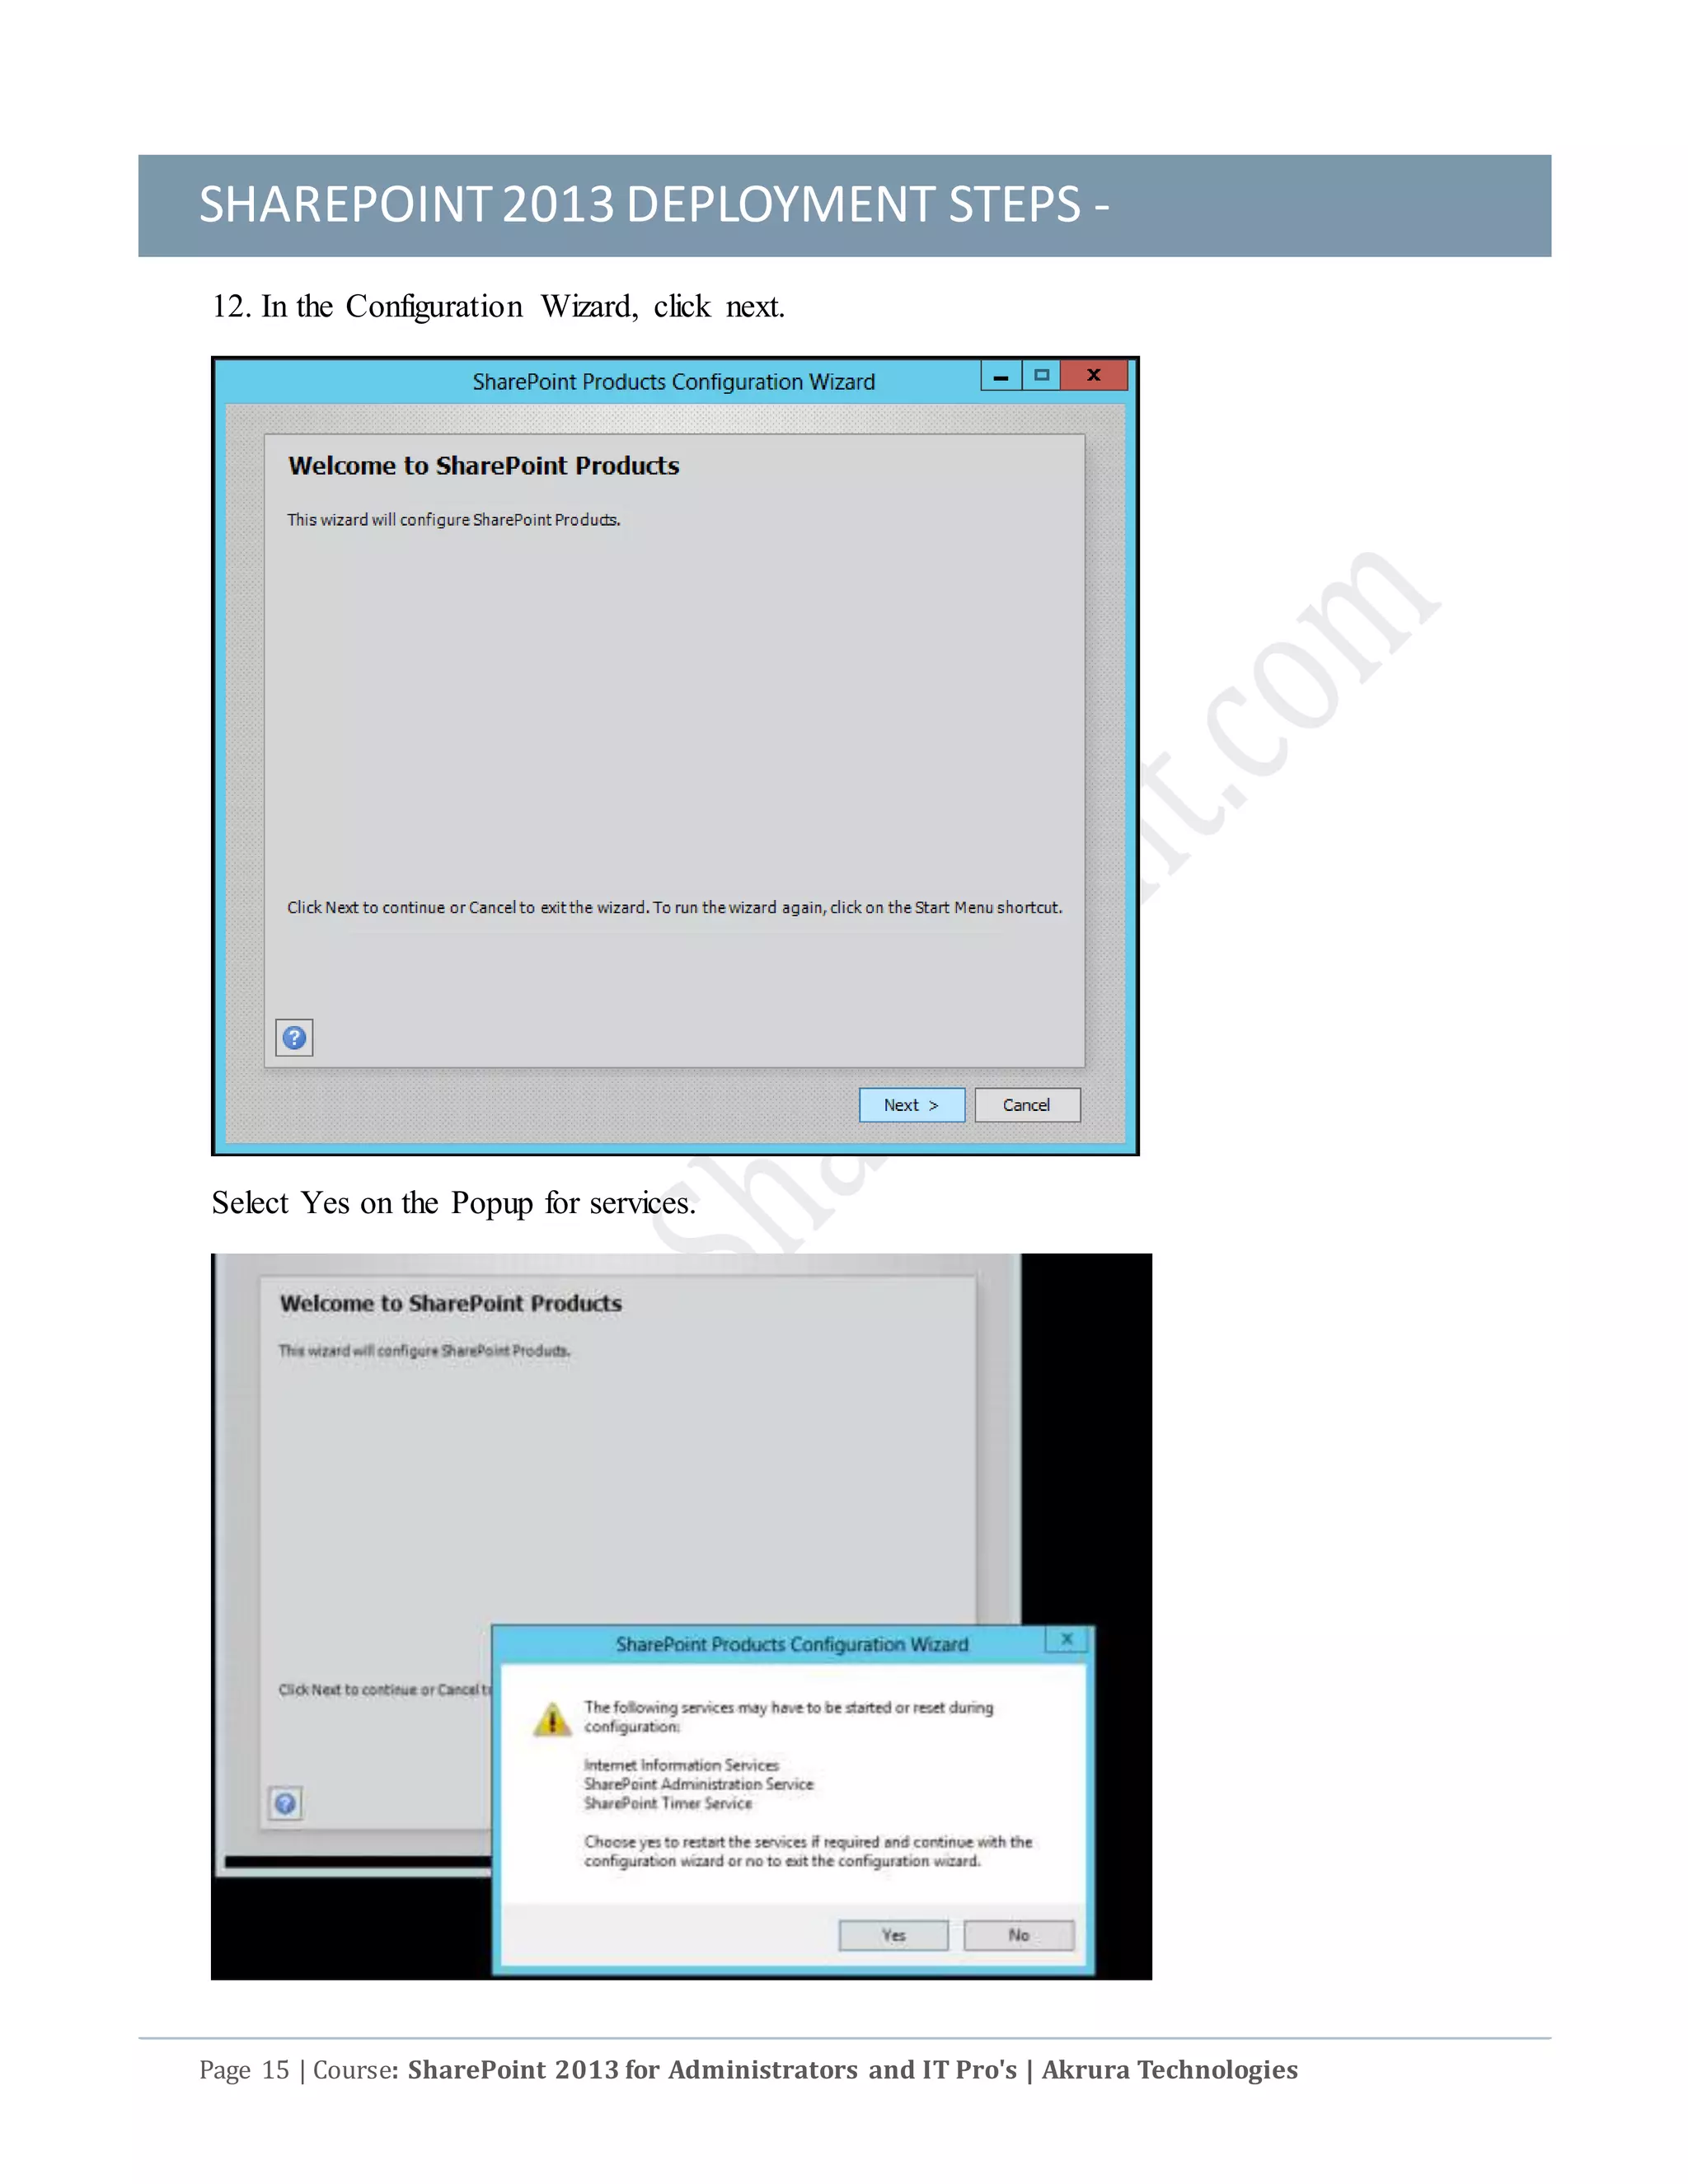
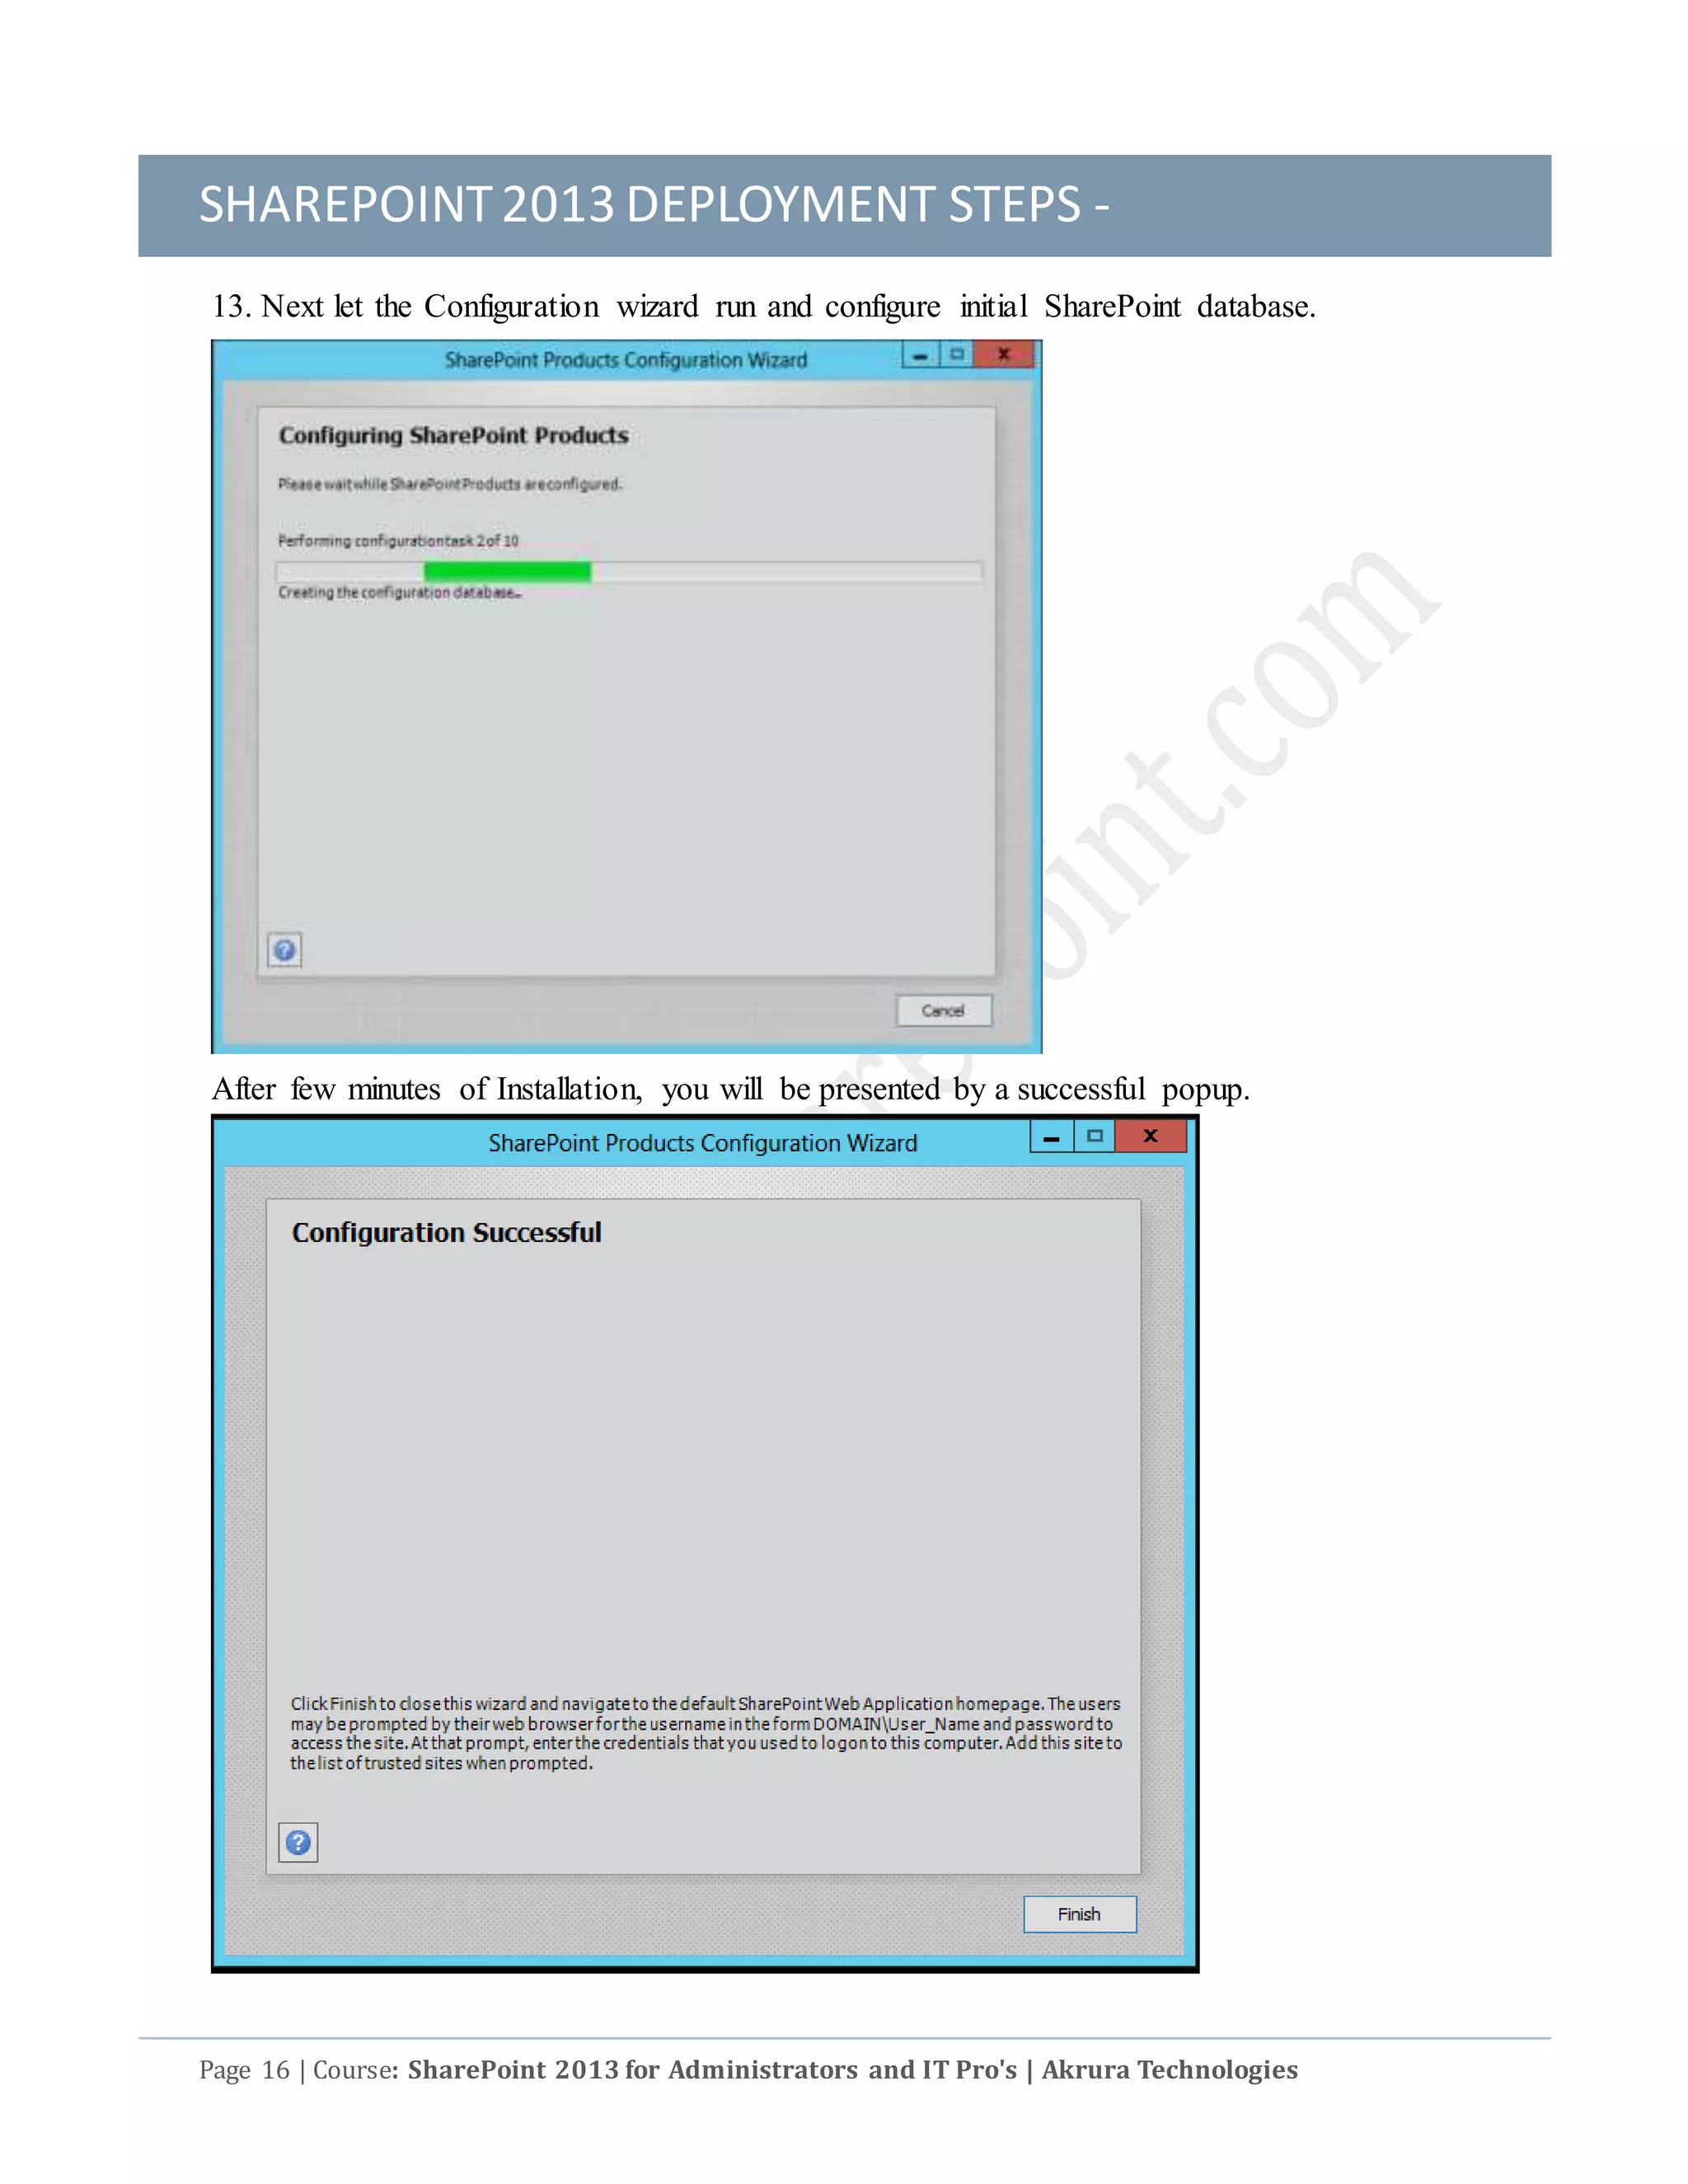
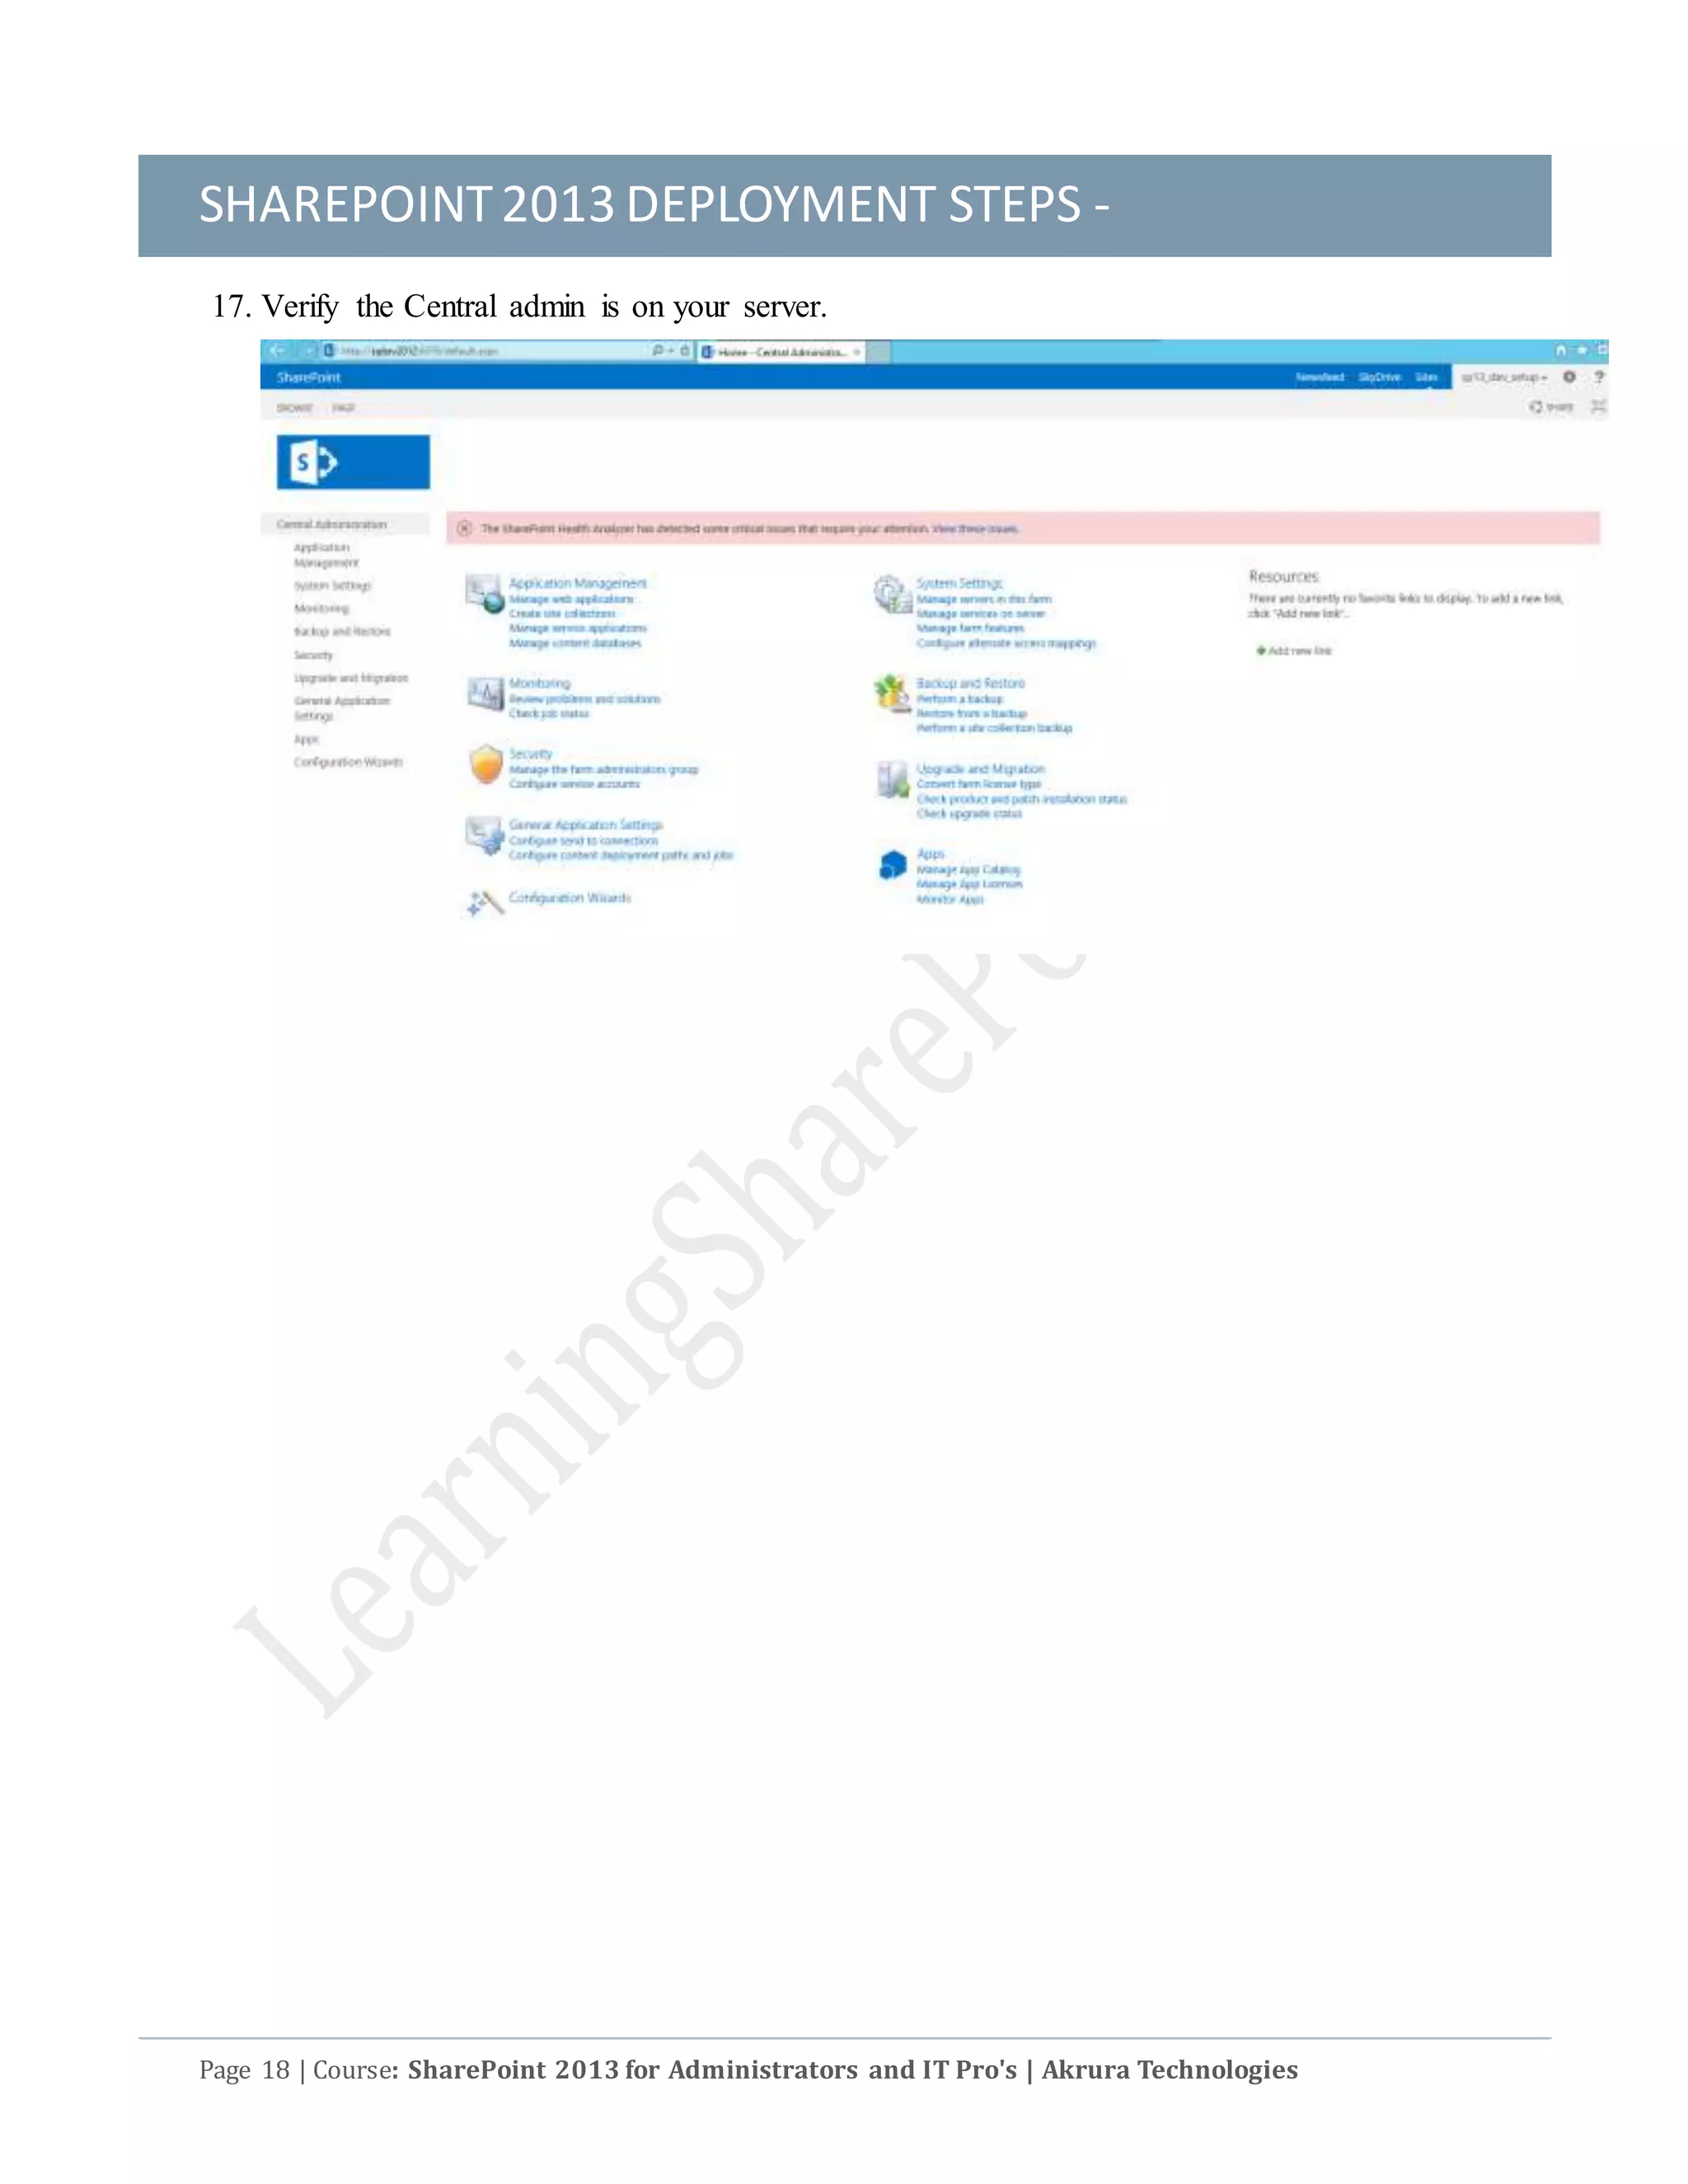
Author:
Isha Kapoor
SHAREPOINT 2013 DEPLOYMENT DOCUMENT
Contents
SharePoint 2013 Two-tierfarm configuration____________________________________________________ 1
Hardware Requirements -________________________________________________________________________ 3
Software Requirements -_________________________________________________________________________ 4
Service Accounts -________________________________________________________________________________ 5
SharePoint 2013 Deployment Steps -_____________________________________________________________ 8
Setup a Domain Controller on your SharePointSQL server–_______________________________________25
SHAREPOINT2013 TWO-TIER FARM CONFIGURATION
Page 1 | Course: SharePoint 2013 for Administrators and IT Pro's | Akrura Technologies
SharePoint 2013 Two-tier farm configuration
Topology overview
For this test deployment, a SharePoint 2013 Two-tier farm configuration is recommended.
In a two-tier deployment, there will be -
Web server with Active Directory (Domain Controller) - on the first tier.
SharePoint 2013 & Database server - on the second tier.
An additional SharePoint Front-end Web server can be added later to scale up the environment.
This two-tier deployment will be considered a small to medium SharePoint farm for the purpose
of Testing or Training only.
Note: For a development or test environment, you can create a SharePoint 2013 server with a
Domain Controller and SQL server installed on it but for the production, the Domain Controller
must be installed on a separate server.
Typical Three-tier farm configuration Diagram
SHAREPOINT2013 TWO-TIER FARM CONFIGURATION
Page 2 | Course: SharePoint 2013 for Administrators and IT Pro's | Akrura Technologies
Servers Required:
Windows Server 2012 x64 W/ Active Directory (some Domain)
Windows Server 2012 x64 W/ SQL Server 2012 SP1
Size Overview
This SharePoint 2013 Farm will be considered a Small - Medium sized Deployment that can
Support 1,000 to 10,000 users. The Hardware specification however can be scaled up to support
more users in future.
HARDWAREREQUIREMENTS-
Page 3 | Course: SharePoint 2013 for Administrators and IT Pro's | Akrura Technologies
HardwareRequirements -
Minimum hardware requirements for SharePoint 2013 server in a farm:
Hardware matrix
Component Minimum requirement
Processor
64-bit 4 cores processer
RAM
4 GB
Hard disk 80GB system drive
Minimum hardware requirements for Database Servers | Single Server Farms
Component Minimum requirement
Processor
64-bit 4 cores for small deployment
64-bit 8 cores for small deployment
RAM
8GB for small deployment
16GB for medium deployment
Hard disk 80GB system drive
SOFTWARE REQUIREMENTS-
Page 4 | Course: SharePoint 2013 for Administrators and IT Pro's | Akrura Technologies
Software Requirements -
Minimum software requirements for Web & Application Servers | Single Server
Farms
Component SharePoint 2013 Minimum
Operating
System
64-bit edition of Windows Server 2008 R2 SP1 Standard, Enterprise, Data
Center, or Web Server
Minimum software requirements for Database Servers | Single Server Farms
Component SharePoint 2013 Minimum
Database Server
64-bit edition of Microsoft SQL Server 2008 R2 SP1
64-bit edition of Microsoft SQL Server 2012 RTM (not Release Candidate 0)
Operating
System
64-bit edition of Windows Server 2008 R2 SP1 Standard, Enterprise, Data
Center, or Web Server
SERVICE ACCOUNTS -
Page 5 | Course: SharePoint 2013 for Administrators and IT Pro's | Akrura Technologies
Service Accounts -
Account Purpose Requirements
sp13_dev_sql
sp13_dev_sqlAgent
sp13_dev_sqlAnaly
sis
The SQL Server service accounts are
used to run SQL Server. It is the
service account for the following SQL
Server services:
 MSSQLSERVER
 SQLSERVERAGENT
If you do not use the default SQL
Server instance, in the Windows
Services console, these services will
be shown as the following:
 MSSQL<InstanceName>
 SQLAgent<InstanceName>
Use either a Local System account or a
domain user account.
If you plan to back up to or restore from
an external resource, permissions to the
external resource must be granted to the
appropriate account. If you use a domain
user account for the SQL Server service
account, grant permissions to that domain
user account. However, if you use the
Network Service or the Local System
account, grant permissions to the external
resource to the machine account
(<domain_name><SQL_hostname>).
The instance name is arbitrary and was
created when SQL Server was installed.
sp13_dev_setup
The Setup user account is used to run
the following:
 Setup
 SharePoint Products
Configuration Wizard
 Domain user account.
 Member of the Administrators
group on each server on which
Setup is run.
 SQL Server login on the computer
that runs SQL Server.
 Member of the following SQL
Server roles:
o securityadmin fixed server
role
o dbcreator fixed server role
If you run Windows PowerShell cmdlets
that affect a database, this account must be
a member of the db_owner fixed database
role for the database.
SERVICE ACCOUNTS -
Page 6 | Course: SharePoint 2013 for Administrators and IT Pro's | Akrura Technologies
sp13_dev_farm
(Server farm
account or database
access account)
The server farm account is used to
perform the following tasks:
1. Configure and manage the
server farm.
2. Act as the application pool
identity for the SharePoint
Central Administration Web
site.
3. Run the Microsoft SharePoint
Foundation Workflow Timer
Service.
 Domain user account.
Additional permissions are automatically
granted for the server farm account on
Web servers and application servers that
are joined to a server farm.
The server farm account is automatically
added as a SQL Server login on the
computer that runs SQL Server. The
account is added to the following SQL
Server security roles:
 dbcreator fixed server role
 securityadmin fixed server role
 db_owner fixed database role for
all SharePoint databases in the
server farm
sp13_dev_pool
This a domain account used for
application pool identity. For e.g. -
When you create a Web Application,
and you create a pool for it, you select
this account!
sp13_dev_Services
This a domain account used for the
Service Applications Pools. For e.g. -
When you create a Managed Metadata
Service application and create a pool
for it, you select this account!
sp13_dev_Crawl
This used within the Search Service
Application to crawl content. The
Search Service Application will
automatically grant this account read
access on all Web Applications.
sp13_dev_Search
This is used to run the SharePoint
Windows Search Service.
SERVICE ACCOUNTS -
Page 7 | Course: SharePoint 2013 for Administrators and IT Pro's | Akrura Technologies
sp13_dev_UserProfi
le
This the account used for the User
Profile Synchronization between your
Service Application and your Active
Directory. This account does not need
any local rights; however you need to
give it Replicate Directory
Changes rights on the Active
Directory in order to allow the
synchronization.
SHAREPOINT2013 DEPLOYMENT STEPS -
Page 8 | Course: SharePoint 2013 for Administrators and IT Pro's | Akrura Technologies
SharePoint 2013 Deployment Steps -
1. Add the following service accounts (specified above) in the Active directory.
 sp13_dev_setup
 sp13_dev_sql
 sp13_dev_sqlAgent
 sp13_dev_sqlAnalysis
Created the following accounts:
Account Password
sp13_dev_setup SPdemo123
sp13_dev_sql SPdemo123
sp13_dev_sqlAgent SPdemo123
sp13_dev_sqlAnalysis SPdemo123
2. Give the farm account & SQL accounts the following access to Windows and SQL server.
Note: Before you proceed, you need to setup the domain for your service accounts in your
SharePointSQL server. See the section “Setup a Domain Controller on your
SharePointSQL server” below for instructions.
a) Domainsp13_dev_setup -
 Member of the Local Administrators group on SharePoint server and SQL server.
(Go to Local Users and Groups -> Administratorsgroup Properties -> Add)
 Access to server that runs SQL Server.
 Member of the following SQL Server roles:
o securityadmin fixed server role
o dbcreator fixed server role
o Public fixed server role
b) Domainsp13_dev_sql, sp13_dev_sqlAgent and sp13_dev_sqlAnalysis –
 Member of the Local Administrators group on SharePoint server and SQL server.
 Access to server that runs SQL Server.
 Make the above accounts as member of the following SQL Server roles
o sysadmin server role
o Public fixed server role
SHAREPOINT2013 DEPLOYMENT STEPS -
Page 9 | Course: SharePoint 2013 for Administrators and IT Pro's | Akrura Technologies
3. Login with the Setup account in your SharePoint server (In our case we used
domainsp13_dev_setup)
4. Once in the server, run the SharePoint setup from Cloud folders on desktop.
You might see the below error.
SHAREPOINT2013 DEPLOYMENT STEPS -
Page 10 | Course: SharePoint 2013 for Administrators and IT Pro's | Akrura Technologies
5. Close the popup are re-run the Prerequisiteinstaller.exe from the Setup folder.
SHAREPOINT2013 DEPLOYMENT STEPS -
Page 11 | Course: SharePoint 2013 for Administrators and IT Pro's | Akrura Technologies
Select next to Install the Prerequisite.
6. In the Next screen Agree to the terms and conditions and keep installing the required
Prerequisites.
SHAREPOINT2013 DEPLOYMENT STEPS -
Page 12 | Course: SharePoint 2013 for Administrators and IT Pro's | Akrura Technologies
Once done, you will be prompt to restart the server.
7. After the reboot, re-run the SharePoint 2013 Setup.
8. You will be prompted to enter the Product key. Add the Product key to proceed.
SHAREPOINT2013 DEPLOYMENT STEPS -
Page 13 | Course: SharePoint 2013 for Administrators and IT Pro's | Akrura Technologies
9. Next, check the box to accept the agreement and continue.
10. Next, select the Server Type customization: Stand-alone type and click install now.
SHAREPOINT2013 DEPLOYMENT STEPS -
Page 14 | Course: SharePoint 2013 for Administrators and IT Pro's | Akrura Technologies
11. The Installation further will take few minutes.
Once completed, you can run the SharePoint Products Configuration Wizard. Close to auto run
it.
SHAREPOINT2013 DEPLOYMENT STEPS -
Page 15 | Course: SharePoint 2013 for Administrators and IT Pro's | Akrura Technologies
12. In the Configuration Wizard, click next.
Select Yes on the Popup for services.
SHAREPOINT2013 DEPLOYMENT STEPS -
Page 16 | Course: SharePoint 2013 for Administrators and IT Pro's | Akrura Technologies
13. Next let the Configuration wizard run and configure initial SharePoint database.
After few minutes of Installation, you will be presented by a successful popup.
SHAREPOINT2013 DEPLOYMENT STEPS -
Page 17 | Course: SharePoint 2013 for Administrators and IT Pro's | Akrura Technologies
14. Click Finish to open the SharePoint site.
15. On the first SharePoint screen, select the Template to use for your first SharePointn site.
16. Next select the Groups to use.
Click Ok to provision. A new SharePoint site will open.
SHAREPOINT2013 DEPLOYMENT STEPS -
Page 18 | Course: SharePoint 2013 for Administrators and IT Pro's | Akrura Technologies
17. Verify the Central admin is on your server.
CREATE AND CONFIGURE USER PROFILE SERVICE
APPLICATION
Page 19 | Course: SharePoint 2013 for Administrators and IT Pro's | Akrura Technologies
Createand Configure User Profile Service Application
Following are the steps of creating and configuring the User Profile Service Application and
setup a synchronization connection in SharePoint 2013.
1. Creating Managed Accounts required for User Profile Service. (User Profile account and
SPpool should be less than 20 Characters)
2. Navigate to Central Administration page, Click on Manage Service Application
3. Click on New from the Ribbon bar and Select User Profile Service Application
4. In the Create UPS page, enter the following :
Provide the following details:
 Name
 Application Pool Name : Generic Account for Pool
 Service Account: User Profile Account
 Database Server Name: populated
 My Site Managed path: populated
 Site Naming Format: populated
5. Click on Ok to Provision the Service Application.
6. Once done, Start the following Services (on Manage services on Farm) and perform an
IISreset on the server.
 User Profile Service
 User Profile Synchronization Service
7. Once the IISreset is complete, go to the UPS service in Manage Services in the farm and
click on the UPS service.
8. Next, to configure a synchronization connection, select Configure Synchronization
Settings from the Synchronization Section.
9. Then, under Synchronization Options, Instead of “Use SharePoint Active Directory
Import” use “SharePoint Profile Synchronization”, select, and click OK.
10. Next click on Configure Synchronization Connections.
CREATE AND CONFIGURE USER PROFILE SERVICE
APPLICATION
Page 20 | Course: SharePoint 2013 for Administrators and IT Pro's | Akrura Technologies
11. Click on Create New Connection and add the following.
 Enter the Sync Connection Name
 Select Active Directory or enter the Domain Controller Name or Forest name as
AD2012.loc and select Auto identify domain.
 Select the Authentication Provider as Windows Authentication
 Enter the Service Account details – User Profile Account
Note: The synchronization account for a connection to Active Directory Domain Services
(AD DS) must have the following permissions:
 It must have Replicate Directory Changes permission on the domain with which you'll
synchronize. The Replicate Directory Changes permission allows an account to query for
the changes in the directory. This permission does not allow an account to make any
changes in the directory.
To grant Replicate Directory Changes permission on a domain
a) On the domain controller, click Start, click Administrative Tools, and then click
Active Directory Users and Computers.
b) In Active Directory Users and Computers, right-click the domain, and then click
Delegate Control.
c) On the first page of the Delegation of Control Wizard, click Next.
d) On the Users or Groups page, click Add.
e) Type the name of the synchronization account, and then click OK.
f) Click Next.
g) On the Tasks to Delegate page, select create a custom task to delegate, and then
click Next.
h) On the Active Directory Object Type page, select this folder, existing objects in this
folder, and creation of new objects in this folder, and then click Next.
i) On the Permissions page, in the Permissions box, select Replicating Directory
Changes (select Replicate Directory Changes on Windows Server 2003), and then
click Next.
j) Click Finish.
12. Next click on Populate Containers. Select the Containers where you have got users i.e.
Users and select OK.
CREATE AND CONFIGURE USER PROFILE SERVICE
APPLICATION
Page 21 | Course: SharePoint 2013 for Administrators and IT Pro's | Akrura Technologies
13. Finally, navigate back to the Profile Service Application page, and select “Start Profile
Synchronization”.
Run a Full Synchronization for User Profile import here. You can also set the duration
for Import using “Configure Synchronization Timer Job”.
Here you can set your sync intervals.
Delete UserProfile Application
Add-PSSnapin "Microsoft.SharePoint.PowerShell"
Remove-SPServiceApplication -id (Get-SPServiceApplication | Where-Object
{$_.typename -like “User Profile*”} | Select-Object id).id.tostring()
Remove-SPServiceApplicationPool UserProfile_AppPool
Remove-SPManagedAccount -Identity AD2012sp13_dev_UserProfile
MANAGINGUSER PROFILES AND AUDIENCES
Page 22 | Course: SharePoint 2013 for Administrators and IT Pro's | Akrura Technologies
Managing User Profiles and Audiences
Once the sync is finished, the status changes back to “Idle”, and you have the sync results in the
Profiles section.
Go back to User Profile Service Application and click on “Manage User Profiles”.
Select the ViewsFilters to see your imported users.
Audience
SharePoint provides an option called audience targeting by which you can specify that certain
page components be displayed to selected users and groups.
To configure Audience follow the Steps below –
1. Navigate to Central Administration -> Application Management -> User Profile Service.
2. Under People section select “Manage Audiences”.
This will show you audiences if created already.
3. Click New Audience -> specify name, description, owner.
4. Select an option based on requirement (i.e. we chose "Satisfy any of the Rules").
5. Click Ok to go next page.
6. Here Add a new Rule for the Audience and then specify the value to compare. Once done it'll
show the Audience properties.
7. Finally Click "Compile Audience" link to validate that Users are added based on the details
specified in the Condition.
CREATE AND CONFIGURE SEARCH APPLICATION
Page 23 | Course: SharePoint 2013 for Administrators and IT Pro's | Akrura Technologies
Createand Configure Search Application
There are many improvements related to enterprise search in SharePoint 2013. We will see those
soon in coming posts.
Perform the following steps to configure SharePoint Search in SharePoint 2013
1. Creating managed accounts required for Search.
2. Navigate to Central Administration page, Click on Manage Service Application
3. Click on New from the Ribbon bar and Select Search Service Application
4. In the Create Search Service Application page, enter the following :
Provide the following details:
 Name
 Search Service Account
 Create a new Search Service Application Pool
Once you have entered all the required values, hit the OK button.
5. A dialog box “Please wait while your changes are processed for search service application”.
6. Once the success message is displayed, to verify navigate to Central Admin and check under
the “Manage Service Applications” section. Check if the new service “Search Service
Application” is created.
Configure search service application:
1. Open the newly created “Search Service Application”.
2. Next Create a Content Source for the search to Crawl.
To do this, navigate to search central administration and click on content sources under Crawling
section.
By default, the SSA Creates Local SharePoint sites as a Content source. You will however need
to add a Content source for each new web application that you create.
3. Once the Content source is setup, you will need to add the Crawl schedules.
CREATE AND CONFIGURE SEARCH APPLICATION
Page 24 | Course: SharePoint 2013 for Administrators and IT Pro's | Akrura Technologies
For Crawl schedules, create Incremental Crawl and Full Crawl based on your requirement.
4. Finally, create the required Search center.
a) To Create a Search Center, Navigate to Create Site Collection for you primary Web
application and create a “Search Center type” site collection.
SETUP A DOMAINCONTROLLER ON YOUR
SHAREPOINTSQL SERVER–
Page 25 | Course: SharePoint 2013 for Administrators and IT Pro's | Akrura Technologies
Setup a Domain Controller on your SharePointSQL server–
Click on Ethernet connections -> Internet Protocol Version 4 -> Properties.
Add the Domain Controller server as the preferred DNS server address. Click OK to accept
the changes and continue.
I click Close to close the Ethernet Properties dialog box.
I click Close to close the Ethernet Status dialog box.
I close the Network Connections window and I am returned to the Local Server dashboard. I
can see the change applied.
SETUP A DOMAINCONTROLLER ON YOUR
SHAREPOINTSQL SERVER–
Page 26 | Course: SharePoint 2013 for Administrators and IT Pro's | Akrura Technologies
I click on WORKGROUP in the Properties display.
The System Properties screen is displayed again.
SETUP A DOMAINCONTROLLER ON YOUR
SHAREPOINTSQL SERVER–
Page 27 | Course: SharePoint 2013 for Administrators and IT Pro's | Akrura Technologies
I click on Change… and the Computer Name / Domain Changes screen is displayed. I select
Domain and enter contoso.com (or whatever you Domain is).
Click OK to continue.
SETUP A DOMAINCONTROLLER ON YOUR
SHAREPOINTSQL SERVER–
Page 28 | Course: SharePoint 2013 for Administrators and IT Pro's | Akrura Technologies
The Windows Security screen appears. I enter the Administrator account on the domain
controller and click OK to continue.
SETUP A DOMAINCONTROLLER ON YOUR
SHAREPOINTSQL SERVER–
Page 29 | Course: SharePoint 2013 for Administrators and IT Pro's | Akrura Technologies
A Welcome screen appears. I click OK to close the screen.
I click OK to restart the computer.
SETUP A DOMAINCONTROLLER ON YOUR
SHAREPOINTSQL SERVER–
Page 30 | Course: SharePoint 2013 for Administrators and IT Pro's | Akrura Technologies

Share point 2013 deployment document

  • 1.
  • 2.
    Contents SharePoint 2013 Two-tierfarmconfiguration____________________________________________________ 1 Hardware Requirements -________________________________________________________________________ 3 Software Requirements -_________________________________________________________________________ 4 Service Accounts -________________________________________________________________________________ 5 SharePoint 2013 Deployment Steps -_____________________________________________________________ 8 Setup a Domain Controller on your SharePointSQL server–_______________________________________25
  • 3.
    SHAREPOINT2013 TWO-TIER FARMCONFIGURATION Page 1 | Course: SharePoint 2013 for Administrators and IT Pro's | Akrura Technologies SharePoint 2013 Two-tier farm configuration Topology overview For this test deployment, a SharePoint 2013 Two-tier farm configuration is recommended. In a two-tier deployment, there will be - Web server with Active Directory (Domain Controller) - on the first tier. SharePoint 2013 & Database server - on the second tier. An additional SharePoint Front-end Web server can be added later to scale up the environment. This two-tier deployment will be considered a small to medium SharePoint farm for the purpose of Testing or Training only. Note: For a development or test environment, you can create a SharePoint 2013 server with a Domain Controller and SQL server installed on it but for the production, the Domain Controller must be installed on a separate server. Typical Three-tier farm configuration Diagram
  • 4.
    SHAREPOINT2013 TWO-TIER FARMCONFIGURATION Page 2 | Course: SharePoint 2013 for Administrators and IT Pro's | Akrura Technologies Servers Required: Windows Server 2012 x64 W/ Active Directory (some Domain) Windows Server 2012 x64 W/ SQL Server 2012 SP1 Size Overview This SharePoint 2013 Farm will be considered a Small - Medium sized Deployment that can Support 1,000 to 10,000 users. The Hardware specification however can be scaled up to support more users in future.
  • 5.
    HARDWAREREQUIREMENTS- Page 3 |Course: SharePoint 2013 for Administrators and IT Pro's | Akrura Technologies HardwareRequirements - Minimum hardware requirements for SharePoint 2013 server in a farm: Hardware matrix Component Minimum requirement Processor 64-bit 4 cores processer RAM 4 GB Hard disk 80GB system drive Minimum hardware requirements for Database Servers | Single Server Farms Component Minimum requirement Processor 64-bit 4 cores for small deployment 64-bit 8 cores for small deployment RAM 8GB for small deployment 16GB for medium deployment Hard disk 80GB system drive
  • 6.
    SOFTWARE REQUIREMENTS- Page 4| Course: SharePoint 2013 for Administrators and IT Pro's | Akrura Technologies Software Requirements - Minimum software requirements for Web & Application Servers | Single Server Farms Component SharePoint 2013 Minimum Operating System 64-bit edition of Windows Server 2008 R2 SP1 Standard, Enterprise, Data Center, or Web Server Minimum software requirements for Database Servers | Single Server Farms Component SharePoint 2013 Minimum Database Server 64-bit edition of Microsoft SQL Server 2008 R2 SP1 64-bit edition of Microsoft SQL Server 2012 RTM (not Release Candidate 0) Operating System 64-bit edition of Windows Server 2008 R2 SP1 Standard, Enterprise, Data Center, or Web Server
  • 7.
    SERVICE ACCOUNTS - Page5 | Course: SharePoint 2013 for Administrators and IT Pro's | Akrura Technologies Service Accounts - Account Purpose Requirements sp13_dev_sql sp13_dev_sqlAgent sp13_dev_sqlAnaly sis The SQL Server service accounts are used to run SQL Server. It is the service account for the following SQL Server services:  MSSQLSERVER  SQLSERVERAGENT If you do not use the default SQL Server instance, in the Windows Services console, these services will be shown as the following:  MSSQL<InstanceName>  SQLAgent<InstanceName> Use either a Local System account or a domain user account. If you plan to back up to or restore from an external resource, permissions to the external resource must be granted to the appropriate account. If you use a domain user account for the SQL Server service account, grant permissions to that domain user account. However, if you use the Network Service or the Local System account, grant permissions to the external resource to the machine account (<domain_name><SQL_hostname>). The instance name is arbitrary and was created when SQL Server was installed. sp13_dev_setup The Setup user account is used to run the following:  Setup  SharePoint Products Configuration Wizard  Domain user account.  Member of the Administrators group on each server on which Setup is run.  SQL Server login on the computer that runs SQL Server.  Member of the following SQL Server roles: o securityadmin fixed server role o dbcreator fixed server role If you run Windows PowerShell cmdlets that affect a database, this account must be a member of the db_owner fixed database role for the database.
  • 8.
    SERVICE ACCOUNTS - Page6 | Course: SharePoint 2013 for Administrators and IT Pro's | Akrura Technologies sp13_dev_farm (Server farm account or database access account) The server farm account is used to perform the following tasks: 1. Configure and manage the server farm. 2. Act as the application pool identity for the SharePoint Central Administration Web site. 3. Run the Microsoft SharePoint Foundation Workflow Timer Service.  Domain user account. Additional permissions are automatically granted for the server farm account on Web servers and application servers that are joined to a server farm. The server farm account is automatically added as a SQL Server login on the computer that runs SQL Server. The account is added to the following SQL Server security roles:  dbcreator fixed server role  securityadmin fixed server role  db_owner fixed database role for all SharePoint databases in the server farm sp13_dev_pool This a domain account used for application pool identity. For e.g. - When you create a Web Application, and you create a pool for it, you select this account! sp13_dev_Services This a domain account used for the Service Applications Pools. For e.g. - When you create a Managed Metadata Service application and create a pool for it, you select this account! sp13_dev_Crawl This used within the Search Service Application to crawl content. The Search Service Application will automatically grant this account read access on all Web Applications. sp13_dev_Search This is used to run the SharePoint Windows Search Service.
  • 9.
    SERVICE ACCOUNTS - Page7 | Course: SharePoint 2013 for Administrators and IT Pro's | Akrura Technologies sp13_dev_UserProfi le This the account used for the User Profile Synchronization between your Service Application and your Active Directory. This account does not need any local rights; however you need to give it Replicate Directory Changes rights on the Active Directory in order to allow the synchronization.
  • 10.
    SHAREPOINT2013 DEPLOYMENT STEPS- Page 8 | Course: SharePoint 2013 for Administrators and IT Pro's | Akrura Technologies SharePoint 2013 Deployment Steps - 1. Add the following service accounts (specified above) in the Active directory.  sp13_dev_setup  sp13_dev_sql  sp13_dev_sqlAgent  sp13_dev_sqlAnalysis Created the following accounts: Account Password sp13_dev_setup SPdemo123 sp13_dev_sql SPdemo123 sp13_dev_sqlAgent SPdemo123 sp13_dev_sqlAnalysis SPdemo123 2. Give the farm account & SQL accounts the following access to Windows and SQL server. Note: Before you proceed, you need to setup the domain for your service accounts in your SharePointSQL server. See the section “Setup a Domain Controller on your SharePointSQL server” below for instructions. a) Domainsp13_dev_setup -  Member of the Local Administrators group on SharePoint server and SQL server. (Go to Local Users and Groups -> Administratorsgroup Properties -> Add)  Access to server that runs SQL Server.  Member of the following SQL Server roles: o securityadmin fixed server role o dbcreator fixed server role o Public fixed server role b) Domainsp13_dev_sql, sp13_dev_sqlAgent and sp13_dev_sqlAnalysis –  Member of the Local Administrators group on SharePoint server and SQL server.  Access to server that runs SQL Server.  Make the above accounts as member of the following SQL Server roles o sysadmin server role o Public fixed server role
  • 11.
    SHAREPOINT2013 DEPLOYMENT STEPS- Page 9 | Course: SharePoint 2013 for Administrators and IT Pro's | Akrura Technologies 3. Login with the Setup account in your SharePoint server (In our case we used domainsp13_dev_setup) 4. Once in the server, run the SharePoint setup from Cloud folders on desktop. You might see the below error.
  • 12.
    SHAREPOINT2013 DEPLOYMENT STEPS- Page 10 | Course: SharePoint 2013 for Administrators and IT Pro's | Akrura Technologies 5. Close the popup are re-run the Prerequisiteinstaller.exe from the Setup folder.
  • 13.
    SHAREPOINT2013 DEPLOYMENT STEPS- Page 11 | Course: SharePoint 2013 for Administrators and IT Pro's | Akrura Technologies Select next to Install the Prerequisite. 6. In the Next screen Agree to the terms and conditions and keep installing the required Prerequisites.
  • 14.
    SHAREPOINT2013 DEPLOYMENT STEPS- Page 12 | Course: SharePoint 2013 for Administrators and IT Pro's | Akrura Technologies Once done, you will be prompt to restart the server. 7. After the reboot, re-run the SharePoint 2013 Setup. 8. You will be prompted to enter the Product key. Add the Product key to proceed.
  • 15.
    SHAREPOINT2013 DEPLOYMENT STEPS- Page 13 | Course: SharePoint 2013 for Administrators and IT Pro's | Akrura Technologies 9. Next, check the box to accept the agreement and continue. 10. Next, select the Server Type customization: Stand-alone type and click install now.
  • 16.
    SHAREPOINT2013 DEPLOYMENT STEPS- Page 14 | Course: SharePoint 2013 for Administrators and IT Pro's | Akrura Technologies 11. The Installation further will take few minutes. Once completed, you can run the SharePoint Products Configuration Wizard. Close to auto run it.
  • 17.
    SHAREPOINT2013 DEPLOYMENT STEPS- Page 15 | Course: SharePoint 2013 for Administrators and IT Pro's | Akrura Technologies 12. In the Configuration Wizard, click next. Select Yes on the Popup for services.
  • 18.
    SHAREPOINT2013 DEPLOYMENT STEPS- Page 16 | Course: SharePoint 2013 for Administrators and IT Pro's | Akrura Technologies 13. Next let the Configuration wizard run and configure initial SharePoint database. After few minutes of Installation, you will be presented by a successful popup.
  • 19.
    SHAREPOINT2013 DEPLOYMENT STEPS- Page 17 | Course: SharePoint 2013 for Administrators and IT Pro's | Akrura Technologies 14. Click Finish to open the SharePoint site. 15. On the first SharePoint screen, select the Template to use for your first SharePointn site. 16. Next select the Groups to use. Click Ok to provision. A new SharePoint site will open.
  • 20.
    SHAREPOINT2013 DEPLOYMENT STEPS- Page 18 | Course: SharePoint 2013 for Administrators and IT Pro's | Akrura Technologies 17. Verify the Central admin is on your server.
  • 21.
    CREATE AND CONFIGUREUSER PROFILE SERVICE APPLICATION Page 19 | Course: SharePoint 2013 for Administrators and IT Pro's | Akrura Technologies Createand Configure User Profile Service Application Following are the steps of creating and configuring the User Profile Service Application and setup a synchronization connection in SharePoint 2013. 1. Creating Managed Accounts required for User Profile Service. (User Profile account and SPpool should be less than 20 Characters) 2. Navigate to Central Administration page, Click on Manage Service Application 3. Click on New from the Ribbon bar and Select User Profile Service Application 4. In the Create UPS page, enter the following : Provide the following details:  Name  Application Pool Name : Generic Account for Pool  Service Account: User Profile Account  Database Server Name: populated  My Site Managed path: populated  Site Naming Format: populated 5. Click on Ok to Provision the Service Application. 6. Once done, Start the following Services (on Manage services on Farm) and perform an IISreset on the server.  User Profile Service  User Profile Synchronization Service 7. Once the IISreset is complete, go to the UPS service in Manage Services in the farm and click on the UPS service. 8. Next, to configure a synchronization connection, select Configure Synchronization Settings from the Synchronization Section. 9. Then, under Synchronization Options, Instead of “Use SharePoint Active Directory Import” use “SharePoint Profile Synchronization”, select, and click OK. 10. Next click on Configure Synchronization Connections.
  • 22.
    CREATE AND CONFIGUREUSER PROFILE SERVICE APPLICATION Page 20 | Course: SharePoint 2013 for Administrators and IT Pro's | Akrura Technologies 11. Click on Create New Connection and add the following.  Enter the Sync Connection Name  Select Active Directory or enter the Domain Controller Name or Forest name as AD2012.loc and select Auto identify domain.  Select the Authentication Provider as Windows Authentication  Enter the Service Account details – User Profile Account Note: The synchronization account for a connection to Active Directory Domain Services (AD DS) must have the following permissions:  It must have Replicate Directory Changes permission on the domain with which you'll synchronize. The Replicate Directory Changes permission allows an account to query for the changes in the directory. This permission does not allow an account to make any changes in the directory. To grant Replicate Directory Changes permission on a domain a) On the domain controller, click Start, click Administrative Tools, and then click Active Directory Users and Computers. b) In Active Directory Users and Computers, right-click the domain, and then click Delegate Control. c) On the first page of the Delegation of Control Wizard, click Next. d) On the Users or Groups page, click Add. e) Type the name of the synchronization account, and then click OK. f) Click Next. g) On the Tasks to Delegate page, select create a custom task to delegate, and then click Next. h) On the Active Directory Object Type page, select this folder, existing objects in this folder, and creation of new objects in this folder, and then click Next. i) On the Permissions page, in the Permissions box, select Replicating Directory Changes (select Replicate Directory Changes on Windows Server 2003), and then click Next. j) Click Finish. 12. Next click on Populate Containers. Select the Containers where you have got users i.e. Users and select OK.
  • 23.
    CREATE AND CONFIGUREUSER PROFILE SERVICE APPLICATION Page 21 | Course: SharePoint 2013 for Administrators and IT Pro's | Akrura Technologies 13. Finally, navigate back to the Profile Service Application page, and select “Start Profile Synchronization”. Run a Full Synchronization for User Profile import here. You can also set the duration for Import using “Configure Synchronization Timer Job”. Here you can set your sync intervals. Delete UserProfile Application Add-PSSnapin "Microsoft.SharePoint.PowerShell" Remove-SPServiceApplication -id (Get-SPServiceApplication | Where-Object {$_.typename -like “User Profile*”} | Select-Object id).id.tostring() Remove-SPServiceApplicationPool UserProfile_AppPool Remove-SPManagedAccount -Identity AD2012sp13_dev_UserProfile
  • 24.
    MANAGINGUSER PROFILES ANDAUDIENCES Page 22 | Course: SharePoint 2013 for Administrators and IT Pro's | Akrura Technologies Managing User Profiles and Audiences Once the sync is finished, the status changes back to “Idle”, and you have the sync results in the Profiles section. Go back to User Profile Service Application and click on “Manage User Profiles”. Select the ViewsFilters to see your imported users. Audience SharePoint provides an option called audience targeting by which you can specify that certain page components be displayed to selected users and groups. To configure Audience follow the Steps below – 1. Navigate to Central Administration -> Application Management -> User Profile Service. 2. Under People section select “Manage Audiences”. This will show you audiences if created already. 3. Click New Audience -> specify name, description, owner. 4. Select an option based on requirement (i.e. we chose "Satisfy any of the Rules"). 5. Click Ok to go next page. 6. Here Add a new Rule for the Audience and then specify the value to compare. Once done it'll show the Audience properties. 7. Finally Click "Compile Audience" link to validate that Users are added based on the details specified in the Condition.
  • 25.
    CREATE AND CONFIGURESEARCH APPLICATION Page 23 | Course: SharePoint 2013 for Administrators and IT Pro's | Akrura Technologies Createand Configure Search Application There are many improvements related to enterprise search in SharePoint 2013. We will see those soon in coming posts. Perform the following steps to configure SharePoint Search in SharePoint 2013 1. Creating managed accounts required for Search. 2. Navigate to Central Administration page, Click on Manage Service Application 3. Click on New from the Ribbon bar and Select Search Service Application 4. In the Create Search Service Application page, enter the following : Provide the following details:  Name  Search Service Account  Create a new Search Service Application Pool Once you have entered all the required values, hit the OK button. 5. A dialog box “Please wait while your changes are processed for search service application”. 6. Once the success message is displayed, to verify navigate to Central Admin and check under the “Manage Service Applications” section. Check if the new service “Search Service Application” is created. Configure search service application: 1. Open the newly created “Search Service Application”. 2. Next Create a Content Source for the search to Crawl. To do this, navigate to search central administration and click on content sources under Crawling section. By default, the SSA Creates Local SharePoint sites as a Content source. You will however need to add a Content source for each new web application that you create. 3. Once the Content source is setup, you will need to add the Crawl schedules.
  • 26.
    CREATE AND CONFIGURESEARCH APPLICATION Page 24 | Course: SharePoint 2013 for Administrators and IT Pro's | Akrura Technologies For Crawl schedules, create Incremental Crawl and Full Crawl based on your requirement. 4. Finally, create the required Search center. a) To Create a Search Center, Navigate to Create Site Collection for you primary Web application and create a “Search Center type” site collection.
  • 27.
    SETUP A DOMAINCONTROLLERON YOUR SHAREPOINTSQL SERVER– Page 25 | Course: SharePoint 2013 for Administrators and IT Pro's | Akrura Technologies Setup a Domain Controller on your SharePointSQL server– Click on Ethernet connections -> Internet Protocol Version 4 -> Properties. Add the Domain Controller server as the preferred DNS server address. Click OK to accept the changes and continue. I click Close to close the Ethernet Properties dialog box. I click Close to close the Ethernet Status dialog box. I close the Network Connections window and I am returned to the Local Server dashboard. I can see the change applied.
  • 28.
    SETUP A DOMAINCONTROLLERON YOUR SHAREPOINTSQL SERVER– Page 26 | Course: SharePoint 2013 for Administrators and IT Pro's | Akrura Technologies I click on WORKGROUP in the Properties display. I click on WORKGROUP in the Properties display. The System Properties screen is displayed again.
  • 29.
    SETUP A DOMAINCONTROLLERON YOUR SHAREPOINTSQL SERVER– Page 27 | Course: SharePoint 2013 for Administrators and IT Pro's | Akrura Technologies I click on Change… and the Computer Name / Domain Changes screen is displayed. I select Domain and enter contoso.com (or whatever you Domain is). Click OK to continue.
  • 30.
    SETUP A DOMAINCONTROLLERON YOUR SHAREPOINTSQL SERVER– Page 28 | Course: SharePoint 2013 for Administrators and IT Pro's | Akrura Technologies The Windows Security screen appears. I enter the Administrator account on the domain controller and click OK to continue.
  • 31.
    SETUP A DOMAINCONTROLLERON YOUR SHAREPOINTSQL SERVER– Page 29 | Course: SharePoint 2013 for Administrators and IT Pro's | Akrura Technologies A Welcome screen appears. I click OK to close the screen. I click OK to restart the computer.
  • 32.
    SETUP A DOMAINCONTROLLERON YOUR SHAREPOINTSQL SERVER– Page 30 | Course: SharePoint 2013 for Administrators and IT Pro's | Akrura Technologies