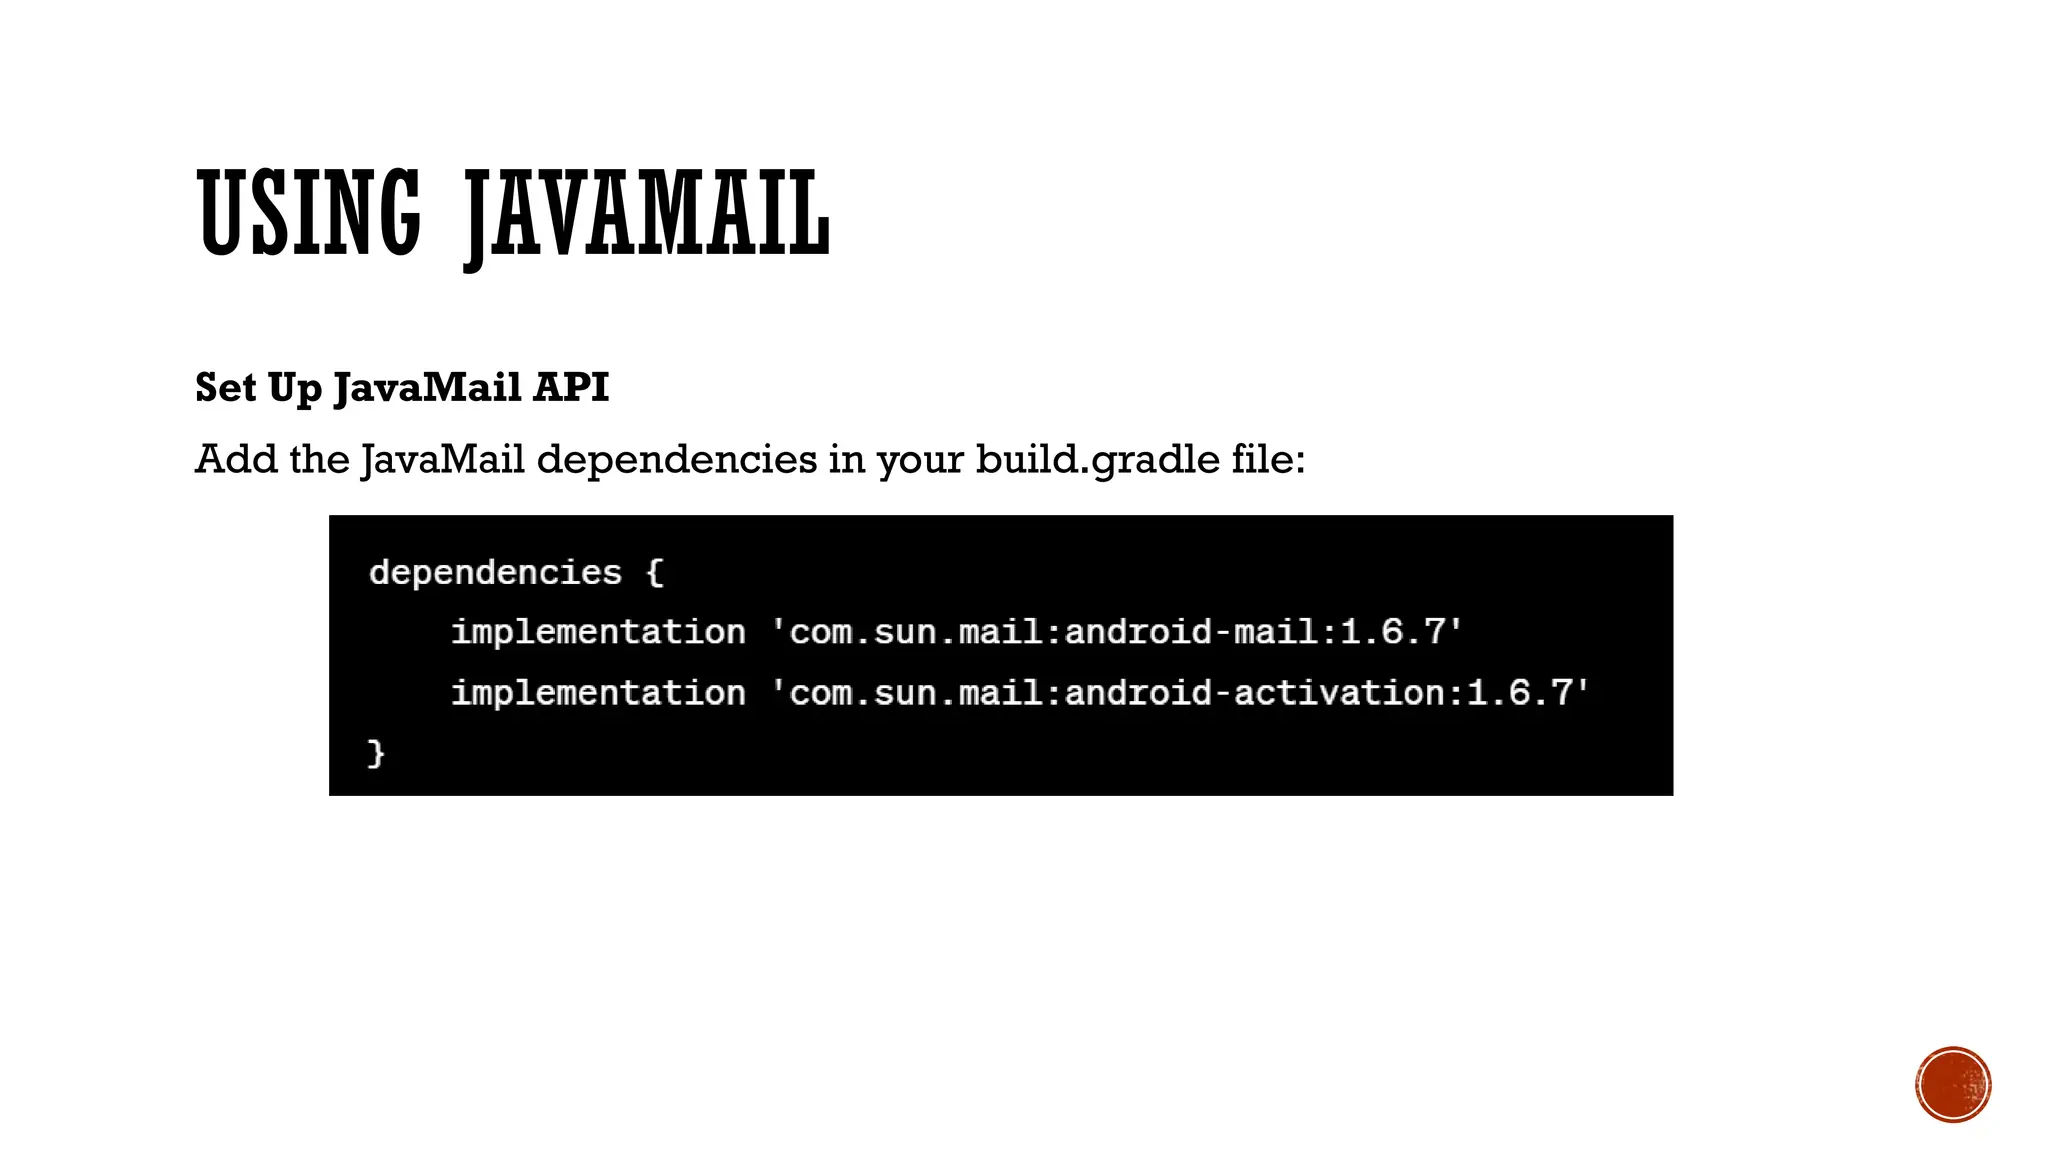
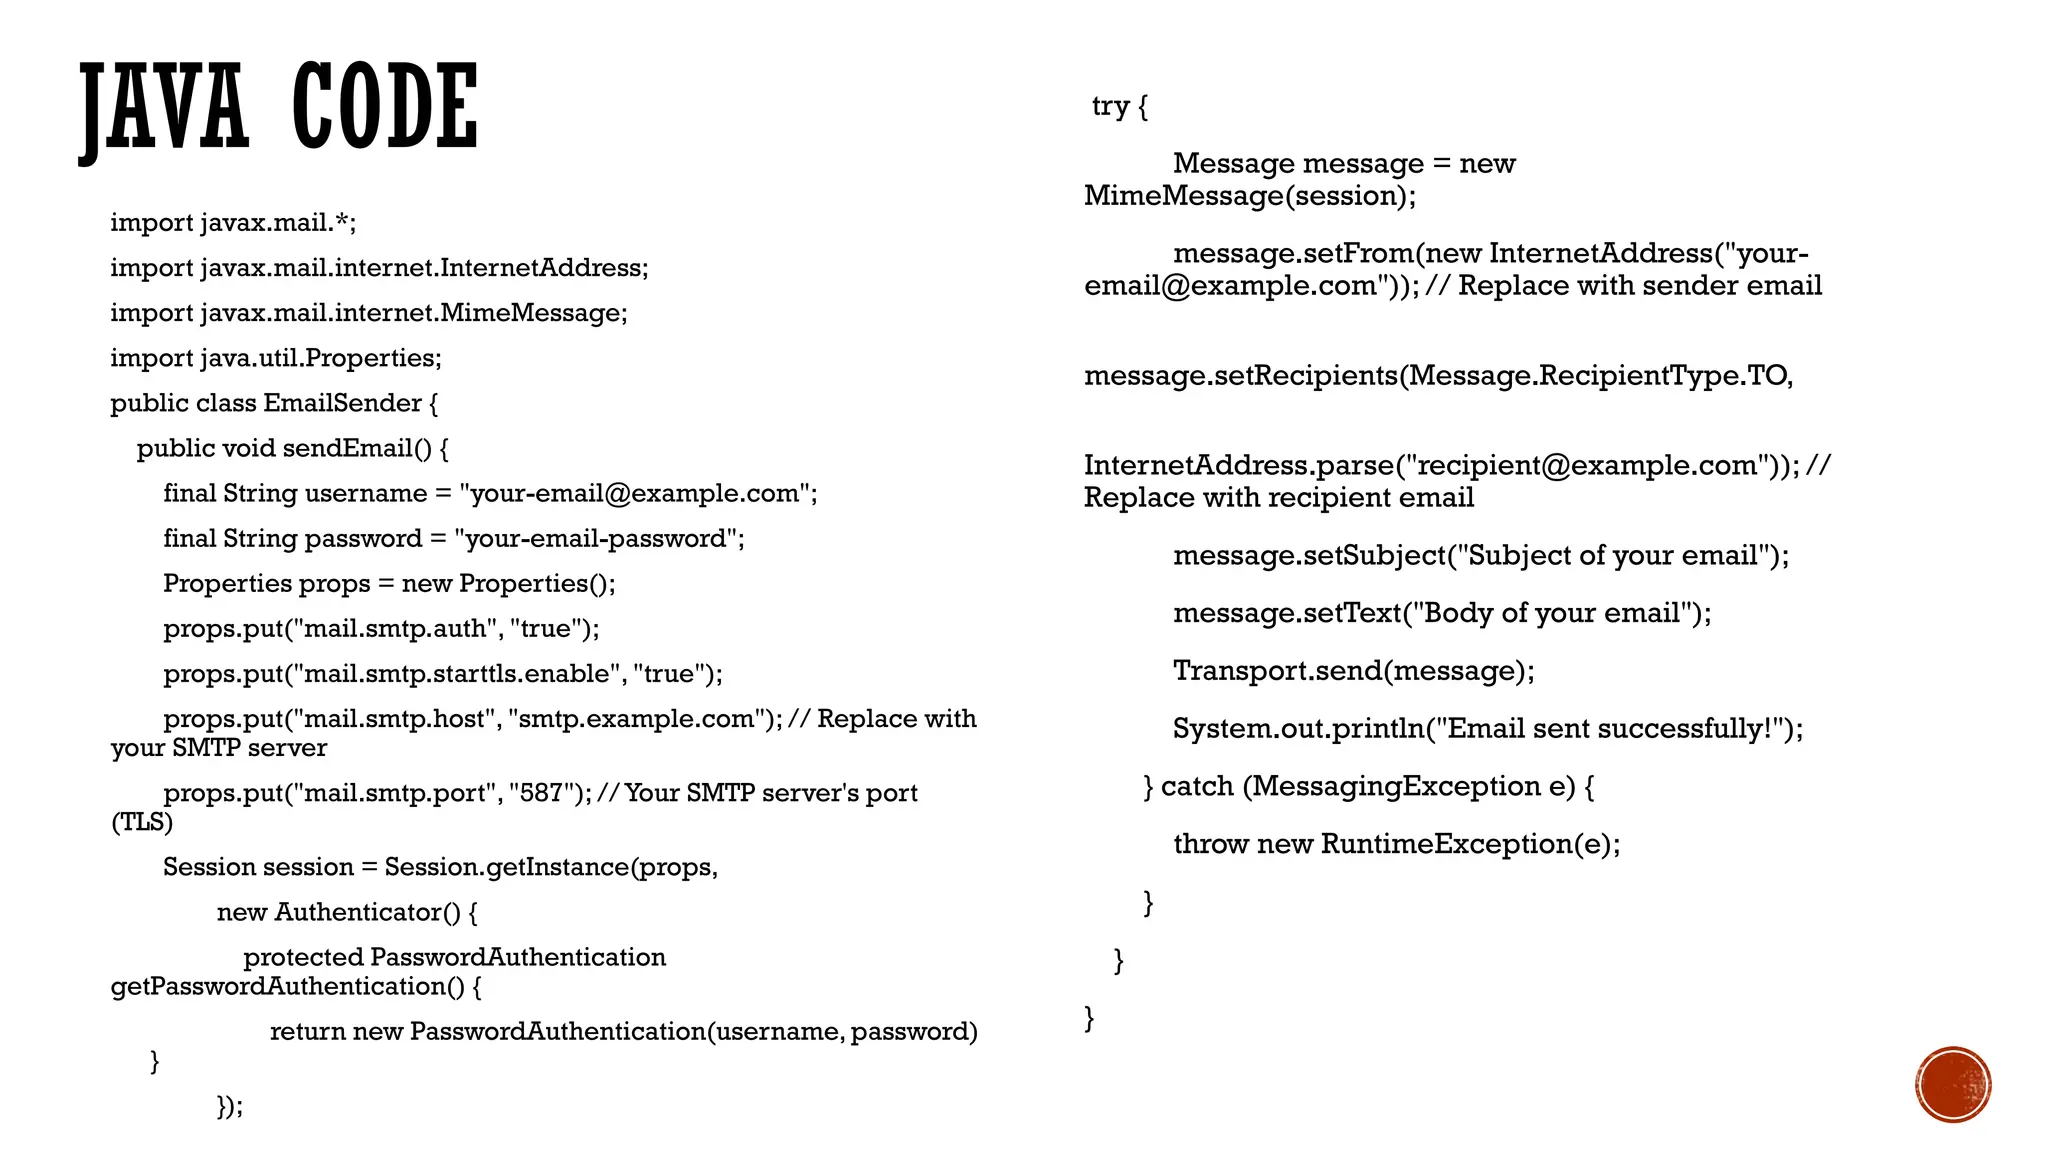
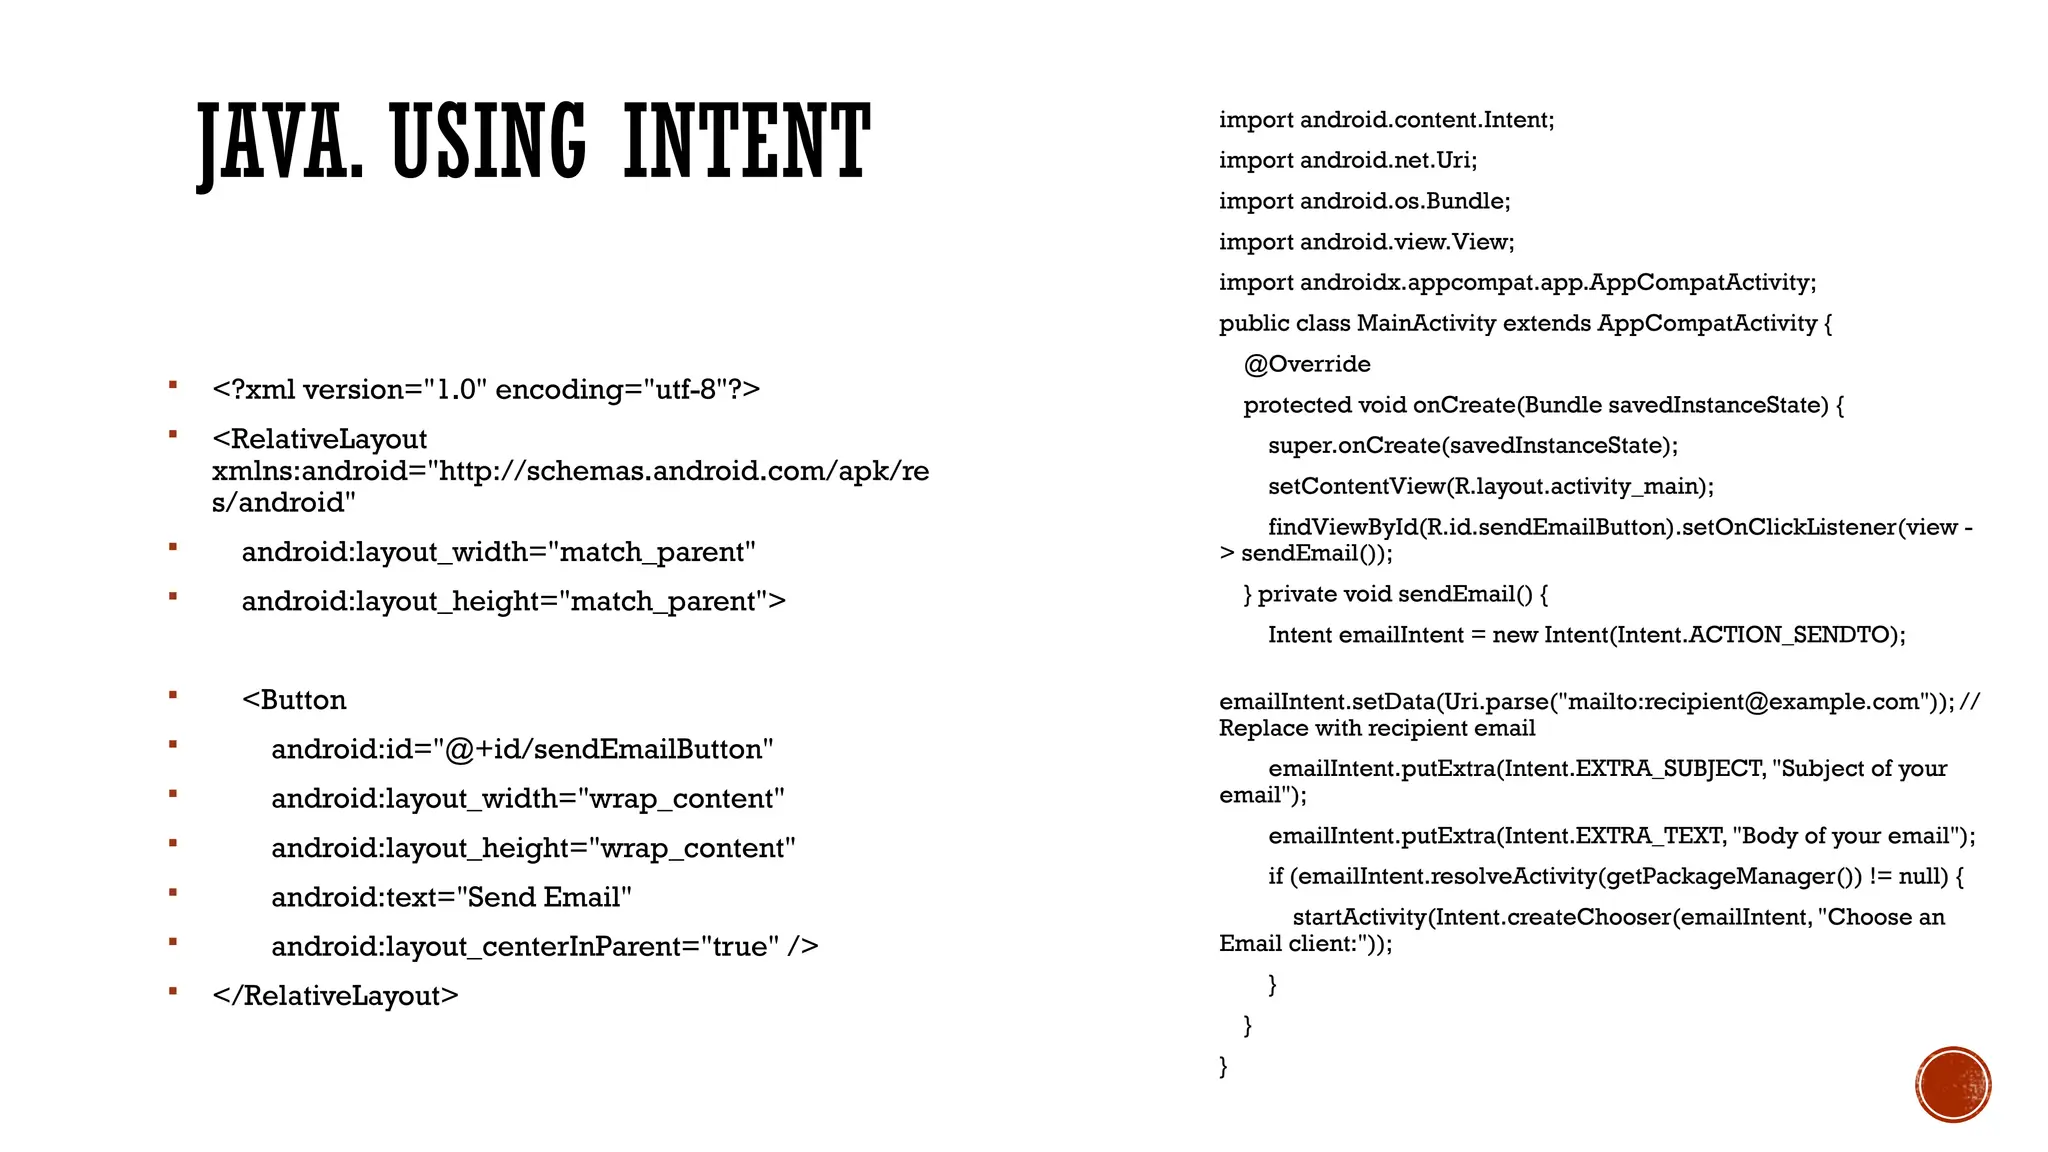
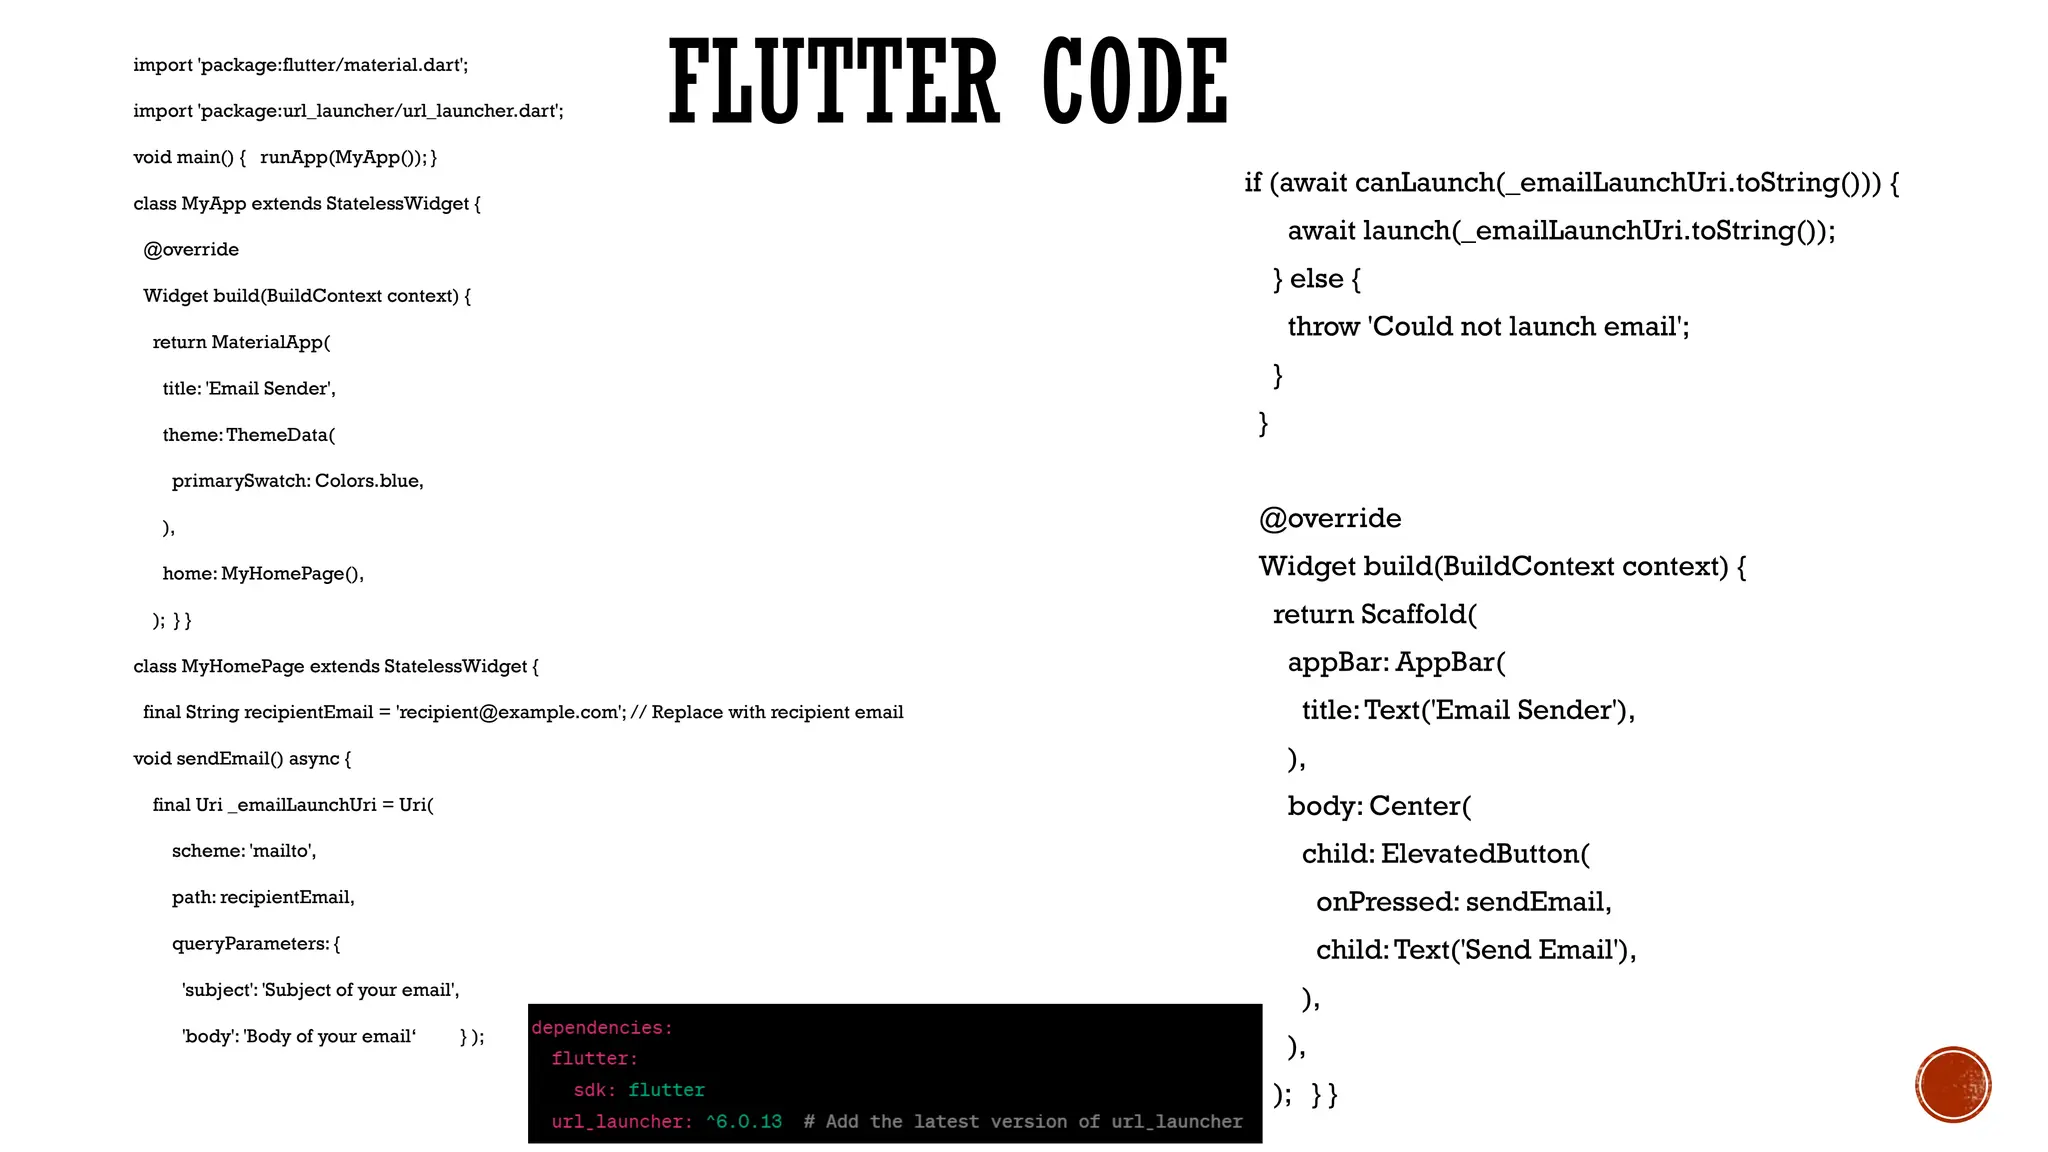
MOBILE APPLICATION
DEVELOPMENT
Sending Emails Programmatically from an Android App
E-MAIL SENDING PROCESS
 The email sending process in Android apps involves several steps to compose an
email, specify its recipients, subject, body, and potentially include attachments.
 There are primarily two main approaches:
1. using Intents to open the device's default email client for the user to compose an email
2. sending emails programmatically by connecting to an SMTP server
SMTP
 SMTP (Simple Mail Transfer Protocol) is a widely used standard protocol for
sending emails over the internet.
 It operates on the application layer of the TCP/IP protocol suite and is responsible
for the transmission of emails between servers.
SMTP in Email Communication:
 Protocol for Email Transfer: SMTP is primarily responsible for the transmission of
outgoing mail between email clients and servers. It uses a client-server
architecture, where the client (email sender) establishes a connection with the
server (email service provider) to send emails.
 Communication Flow: The sender's email client initiates a connection to the
SMTP server on port 25 (or other designated ports for secure connections like 465
or 587). Through a series of commands defined by the SMTP protocol, the sender
communicates with the server to relay the email.
 Email Format and Transfer: SMTP defines the format of the email messages and
the rules for their transfer. It separates the email into header and body sections,
specifying sender and recipient addresses, subject, content, and attachments.
INTENTS FOR EMAIL COMPOSITION
 Android provides an Intent mechanism to launch activities and perform various
actions, including sending emails.
 Developers can create an Intent with the ACTION_SEND action to compose an
email.
 The Intent can specify the data type (message/rfc822 for email) and include extras
to set the email's subject, recipients, body, and attachments if needed.
 When the Intent is fired, it prompts the device's default email client to open, pre-
filling the fields with the provided data.
 The user can then review, edit, and send the email using their chosen email app.
SENDING EMAILS PROGRAMMATICALLY VIA
SMTP
 For more control over the email-sending process, developers can send emails
directly from the app by connecting to an SMTP server.
 This method involves using libraries like JavaMail API or other third-party libraries
to establish a connection to an SMTP server.
 Developers need to configure the SMTP server details such as host, port, and
authentication (username, password).
 After setting up the connection, an email message object is created, specifying the
sender, recipients, subject, body, and attachments.
 The app then sends this email message through the established SMTP connection,
which forwards the email to the recipient's mail server for delivery.
HANDLING USER PERMISSIONS AND DATA
INPUT
 Android apps requiring email functionality need appropriate permissions
declared in the AndroidManifest.xml, such as internet access permissions.
 To compose emails using Intents, the app collects user input or retrieves necessary
data within the app to pre-fill email fields (subject, body, recipients, attachments).
 When sending emails programmatically, the app must securely handle sensitive
user information like email credentials, ensuring privacy and security.
SETTING UP PERMISSIONS IN
ANDROIDMANIFEST.XML
Declaring permissions for sending emails within the AndroidManifest.xml file.
 <uses-permission> tags, such as
<uses-permission android:name="android.permission.INTERNET" /> for
internet access
and <uses-permission android:name="android.permission.SEND_EMAIL" />
for sending emails.
USING JAVAMAIL
Set Up JavaMail API
Add the JavaMail dependencies in your build.gradle file:
JAVA CODE
import javax.mail.*;
import javax.mail.internet.InternetAddress;
import javax.mail.internet.MimeMessage;
import java.util.Properties;
public class EmailSender {
public void sendEmail() {
final String username = "your-email@example.com";
final String password = "your-email-password";
Properties props = new Properties();
props.put("mail.smtp.auth", "true");
props.put("mail.smtp.starttls.enable", "true");
props.put("mail.smtp.host", "smtp.example.com"); // Replace with
your SMTP server
props.put("mail.smtp.port", "587"); // Your SMTP server's port
(TLS)
Session session = Session.getInstance(props,
new Authenticator() {
protected PasswordAuthentication
getPasswordAuthentication() {
return new PasswordAuthentication(username, password)
}
});
try {
Message message = new
MimeMessage(session);
message.setFrom(new InternetAddress("your-
email@example.com")); // Replace with sender email
message.setRecipients(Message.RecipientType.TO,
InternetAddress.parse("recipient@example.com")); //
Replace with recipient email
message.setSubject("Subject of your email");
message.setText("Body of your email");
Transport.send(message);
System.out.println("Email sent successfully!");
} catch (MessagingException e) {
throw new RuntimeException(e);
}
}
}
JAVA. USING INTENT import android.content.Intent;
import android.net.Uri;
import android.os.Bundle;
import android.view.View;
import androidx.appcompat.app.AppCompatActivity;
public class MainActivity extends AppCompatActivity {
@Override
protected void onCreate(Bundle savedInstanceState) {
super.onCreate(savedInstanceState);
setContentView(R.layout.activity_main);
findViewById(R.id.sendEmailButton).setOnClickListener(view -
> sendEmail());
} private void sendEmail() {
Intent emailIntent = new Intent(Intent.ACTION_SENDTO);
emailIntent.setData(Uri.parse("mailto:recipient@example.com")); //
Replace with recipient email
emailIntent.putExtra(Intent.EXTRA_SUBJECT, "Subject of your
email");
emailIntent.putExtra(Intent.EXTRA_TEXT, "Body of your email");
if (emailIntent.resolveActivity(getPackageManager()) != null) {
startActivity(Intent.createChooser(emailIntent, "Choose an
Email client:"));
}
}
}
 <?xml version="1.0" encoding="utf-8"?>
 <RelativeLayout
xmlns:android="http://schemas.android.com/apk/re
s/android"
 android:layout_width="match_parent"
 android:layout_height="match_parent">
 <Button
 android:id="@+id/sendEmailButton"
 android:layout_width="wrap_content"
 android:layout_height="wrap_content"
 android:text="Send Email"
 android:layout_centerInParent="true" />
 </RelativeLayout>
FLUTTER CODE
import 'package:flutter/material.dart';
import 'package:url_launcher/url_launcher.dart';
void main() { runApp(MyApp()); }
class MyApp extends StatelessWidget {
@override
Widget build(BuildContext context) {
return MaterialApp(
title: 'Email Sender',
theme:ThemeData(
primarySwatch: Colors.blue,
),
home: MyHomePage(),
); } }
class MyHomePage extends StatelessWidget {
final String recipientEmail = 'recipient@example.com'; // Replace with recipient email
void sendEmail() async {
final Uri _emailLaunchUri = Uri(
scheme: 'mailto',
path: recipientEmail,
queryParameters: {
'subject': 'Subject of your email',
'body': 'Body of your email‘ } );
if (await canLaunch(_emailLaunchUri.toString())) {
await launch(_emailLaunchUri.toString());
} else {
throw 'Could not launch email';
}
}
@override
Widget build(BuildContext context) {
return Scaffold(
appBar: AppBar(
title:Text('Email Sender'),
),
body: Center(
child: ElevatedButton(
onPressed: sendEmail,
child:Text('Send Email'),
),
),
); } }
CODE USING INTENT

Mobile Application Development (Sending emails)

  • 1.
    MOBILE APPLICATION DEVELOPMENT Sending EmailsProgrammatically from an Android App
  • 2.
    E-MAIL SENDING PROCESS The email sending process in Android apps involves several steps to compose an email, specify its recipients, subject, body, and potentially include attachments.  There are primarily two main approaches: 1. using Intents to open the device's default email client for the user to compose an email 2. sending emails programmatically by connecting to an SMTP server
  • 3.
    SMTP  SMTP (SimpleMail Transfer Protocol) is a widely used standard protocol for sending emails over the internet.  It operates on the application layer of the TCP/IP protocol suite and is responsible for the transmission of emails between servers. SMTP in Email Communication:  Protocol for Email Transfer: SMTP is primarily responsible for the transmission of outgoing mail between email clients and servers. It uses a client-server architecture, where the client (email sender) establishes a connection with the server (email service provider) to send emails.  Communication Flow: The sender's email client initiates a connection to the SMTP server on port 25 (or other designated ports for secure connections like 465 or 587). Through a series of commands defined by the SMTP protocol, the sender communicates with the server to relay the email.  Email Format and Transfer: SMTP defines the format of the email messages and the rules for their transfer. It separates the email into header and body sections, specifying sender and recipient addresses, subject, content, and attachments.
  • 4.
    INTENTS FOR EMAILCOMPOSITION  Android provides an Intent mechanism to launch activities and perform various actions, including sending emails.  Developers can create an Intent with the ACTION_SEND action to compose an email.  The Intent can specify the data type (message/rfc822 for email) and include extras to set the email's subject, recipients, body, and attachments if needed.  When the Intent is fired, it prompts the device's default email client to open, pre- filling the fields with the provided data.  The user can then review, edit, and send the email using their chosen email app.
  • 5.
    SENDING EMAILS PROGRAMMATICALLYVIA SMTP  For more control over the email-sending process, developers can send emails directly from the app by connecting to an SMTP server.  This method involves using libraries like JavaMail API or other third-party libraries to establish a connection to an SMTP server.  Developers need to configure the SMTP server details such as host, port, and authentication (username, password).  After setting up the connection, an email message object is created, specifying the sender, recipients, subject, body, and attachments.  The app then sends this email message through the established SMTP connection, which forwards the email to the recipient's mail server for delivery.
  • 6.
    HANDLING USER PERMISSIONSAND DATA INPUT  Android apps requiring email functionality need appropriate permissions declared in the AndroidManifest.xml, such as internet access permissions.  To compose emails using Intents, the app collects user input or retrieves necessary data within the app to pre-fill email fields (subject, body, recipients, attachments).  When sending emails programmatically, the app must securely handle sensitive user information like email credentials, ensuring privacy and security.
  • 7.
    SETTING UP PERMISSIONSIN ANDROIDMANIFEST.XML Declaring permissions for sending emails within the AndroidManifest.xml file.  <uses-permission> tags, such as <uses-permission android:name="android.permission.INTERNET" /> for internet access and <uses-permission android:name="android.permission.SEND_EMAIL" /> for sending emails.
  • 8.
    USING JAVAMAIL Set UpJavaMail API Add the JavaMail dependencies in your build.gradle file:
  • 9.
    JAVA CODE import javax.mail.*; importjavax.mail.internet.InternetAddress; import javax.mail.internet.MimeMessage; import java.util.Properties; public class EmailSender { public void sendEmail() { final String username = "your-email@example.com"; final String password = "your-email-password"; Properties props = new Properties(); props.put("mail.smtp.auth", "true"); props.put("mail.smtp.starttls.enable", "true"); props.put("mail.smtp.host", "smtp.example.com"); // Replace with your SMTP server props.put("mail.smtp.port", "587"); // Your SMTP server's port (TLS) Session session = Session.getInstance(props, new Authenticator() { protected PasswordAuthentication getPasswordAuthentication() { return new PasswordAuthentication(username, password) } }); try { Message message = new MimeMessage(session); message.setFrom(new InternetAddress("your- email@example.com")); // Replace with sender email message.setRecipients(Message.RecipientType.TO, InternetAddress.parse("recipient@example.com")); // Replace with recipient email message.setSubject("Subject of your email"); message.setText("Body of your email"); Transport.send(message); System.out.println("Email sent successfully!"); } catch (MessagingException e) { throw new RuntimeException(e); } } }
  • 10.
    JAVA. USING INTENTimport android.content.Intent; import android.net.Uri; import android.os.Bundle; import android.view.View; import androidx.appcompat.app.AppCompatActivity; public class MainActivity extends AppCompatActivity { @Override protected void onCreate(Bundle savedInstanceState) { super.onCreate(savedInstanceState); setContentView(R.layout.activity_main); findViewById(R.id.sendEmailButton).setOnClickListener(view - > sendEmail()); } private void sendEmail() { Intent emailIntent = new Intent(Intent.ACTION_SENDTO); emailIntent.setData(Uri.parse("mailto:recipient@example.com")); // Replace with recipient email emailIntent.putExtra(Intent.EXTRA_SUBJECT, "Subject of your email"); emailIntent.putExtra(Intent.EXTRA_TEXT, "Body of your email"); if (emailIntent.resolveActivity(getPackageManager()) != null) { startActivity(Intent.createChooser(emailIntent, "Choose an Email client:")); } } }  <?xml version="1.0" encoding="utf-8"?>  <RelativeLayout xmlns:android="http://schemas.android.com/apk/re s/android"  android:layout_width="match_parent"  android:layout_height="match_parent">  <Button  android:id="@+id/sendEmailButton"  android:layout_width="wrap_content"  android:layout_height="wrap_content"  android:text="Send Email"  android:layout_centerInParent="true" />  </RelativeLayout>
  • 11.
    FLUTTER CODE import 'package:flutter/material.dart'; import'package:url_launcher/url_launcher.dart'; void main() { runApp(MyApp()); } class MyApp extends StatelessWidget { @override Widget build(BuildContext context) { return MaterialApp( title: 'Email Sender', theme:ThemeData( primarySwatch: Colors.blue, ), home: MyHomePage(), ); } } class MyHomePage extends StatelessWidget { final String recipientEmail = 'recipient@example.com'; // Replace with recipient email void sendEmail() async { final Uri _emailLaunchUri = Uri( scheme: 'mailto', path: recipientEmail, queryParameters: { 'subject': 'Subject of your email', 'body': 'Body of your email‘ } ); if (await canLaunch(_emailLaunchUri.toString())) { await launch(_emailLaunchUri.toString()); } else { throw 'Could not launch email'; } } @override Widget build(BuildContext context) { return Scaffold( appBar: AppBar( title:Text('Email Sender'), ), body: Center( child: ElevatedButton( onPressed: sendEmail, child:Text('Send Email'), ), ), ); } }
  • 12.