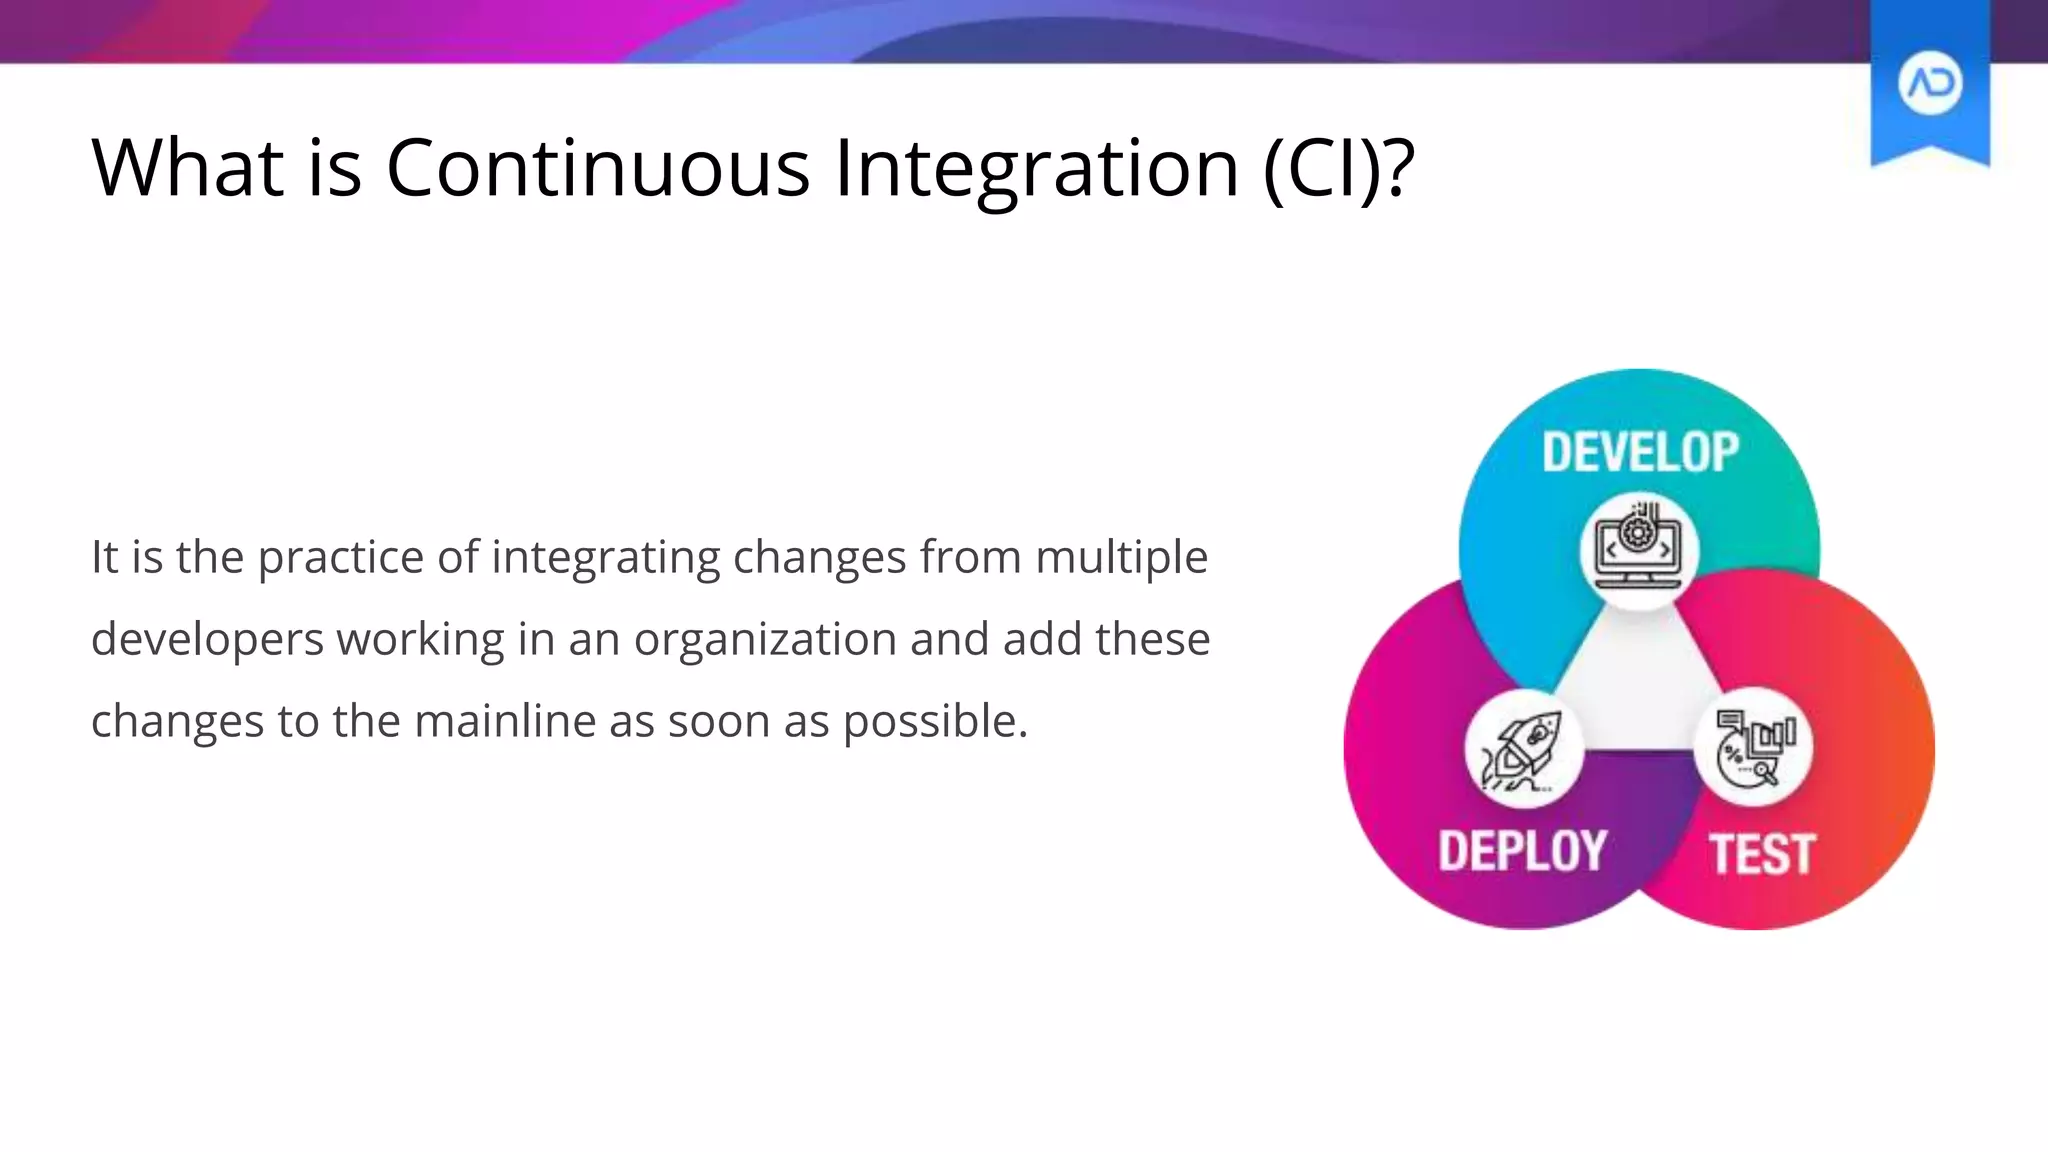
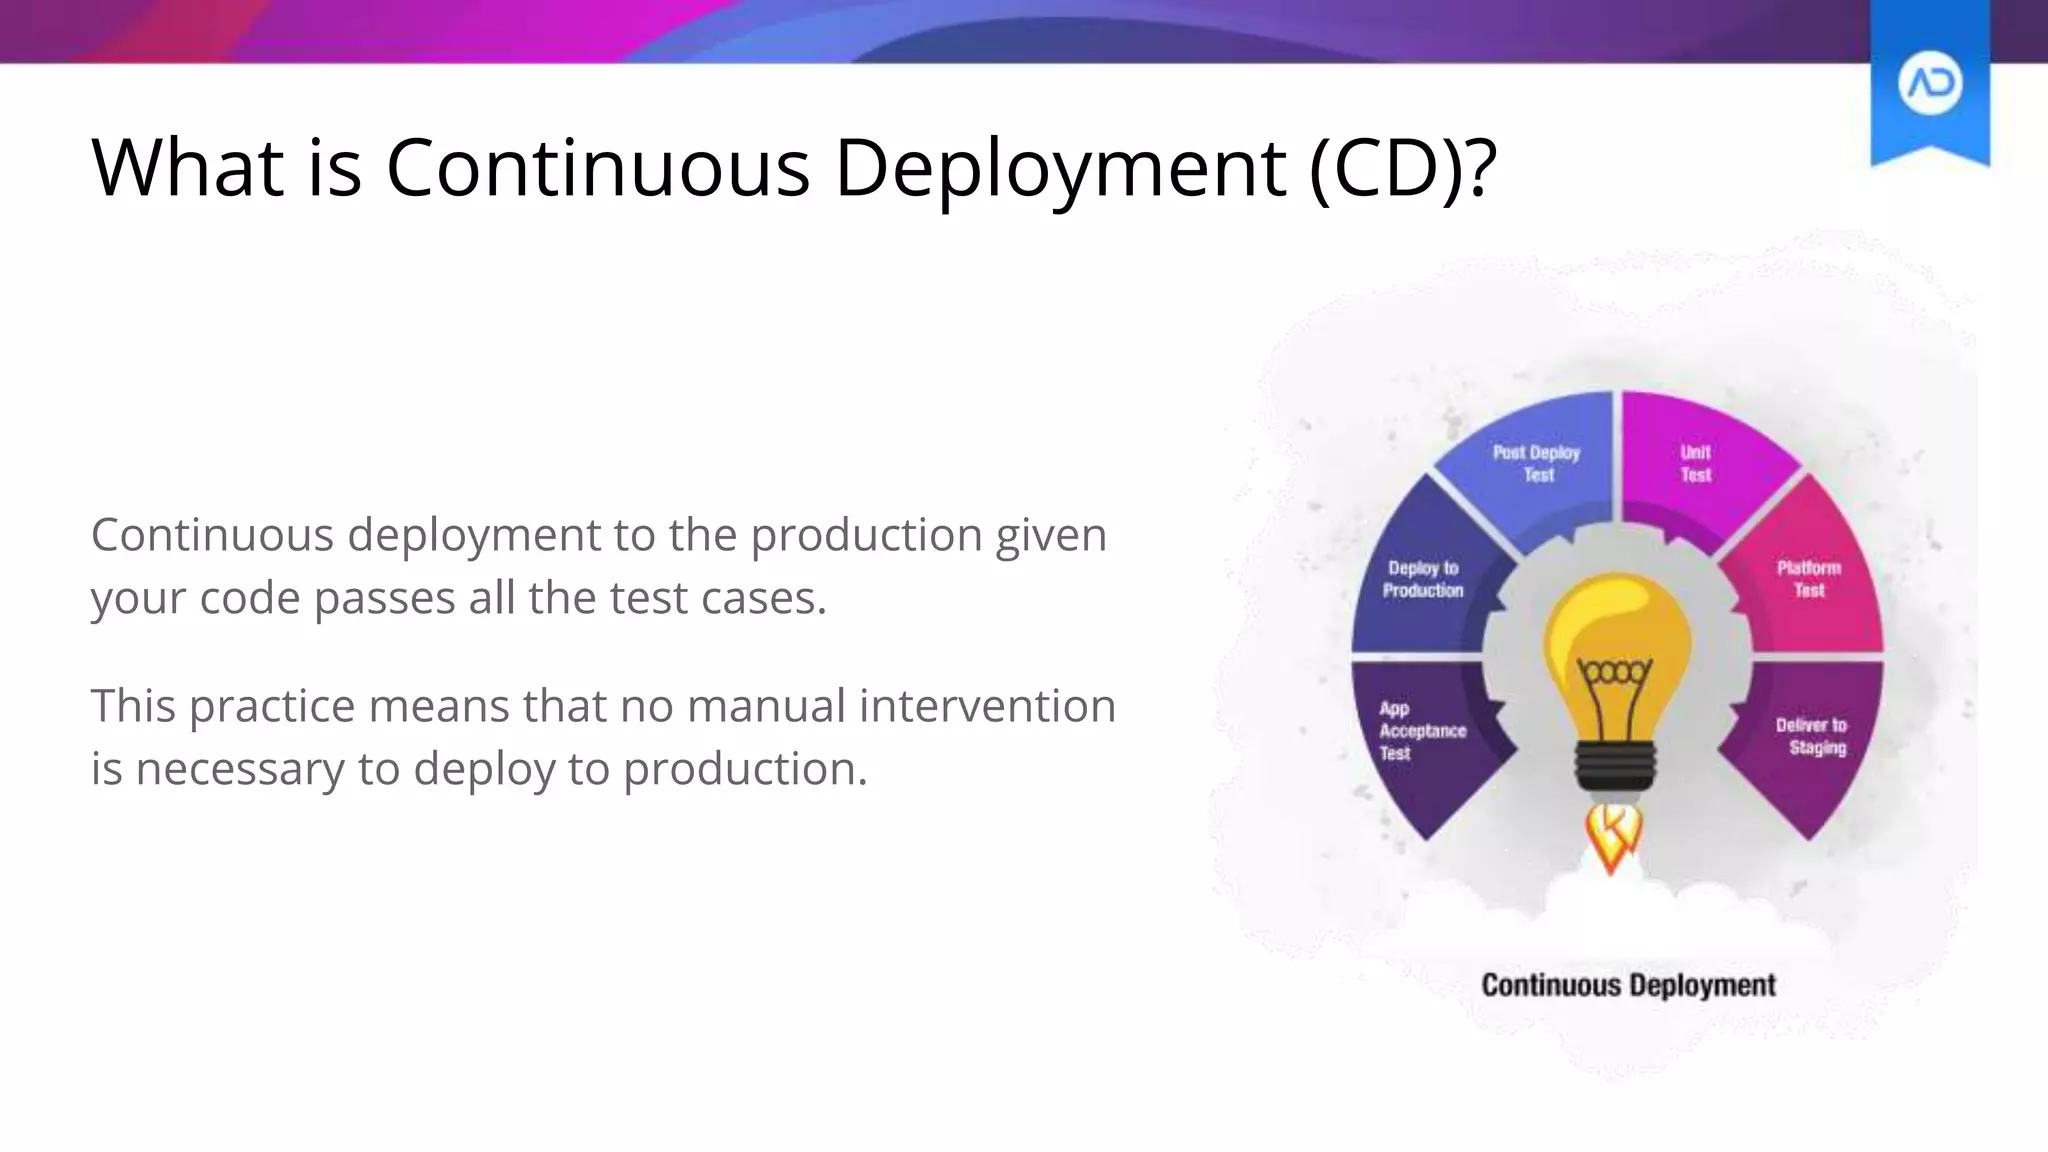
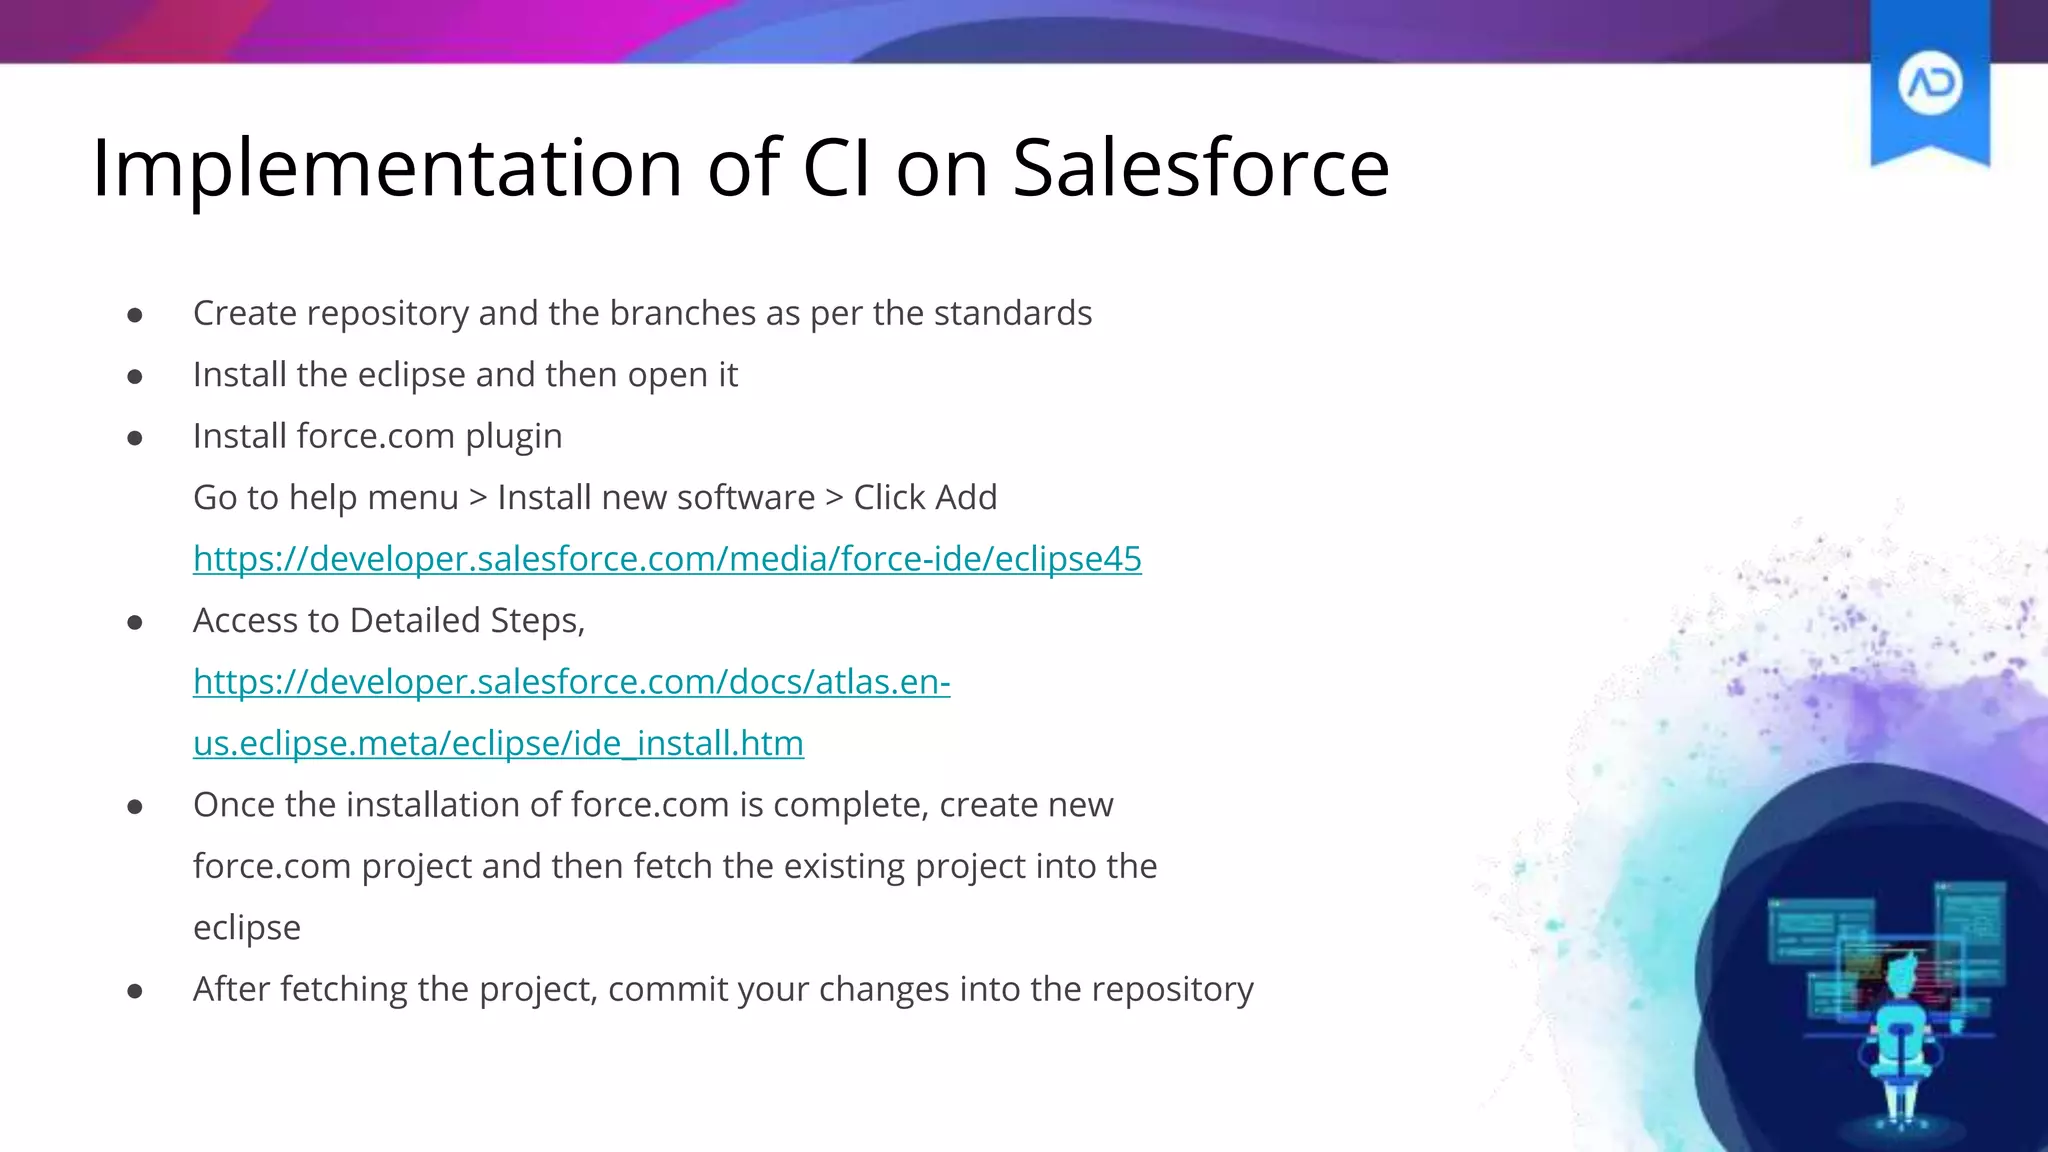
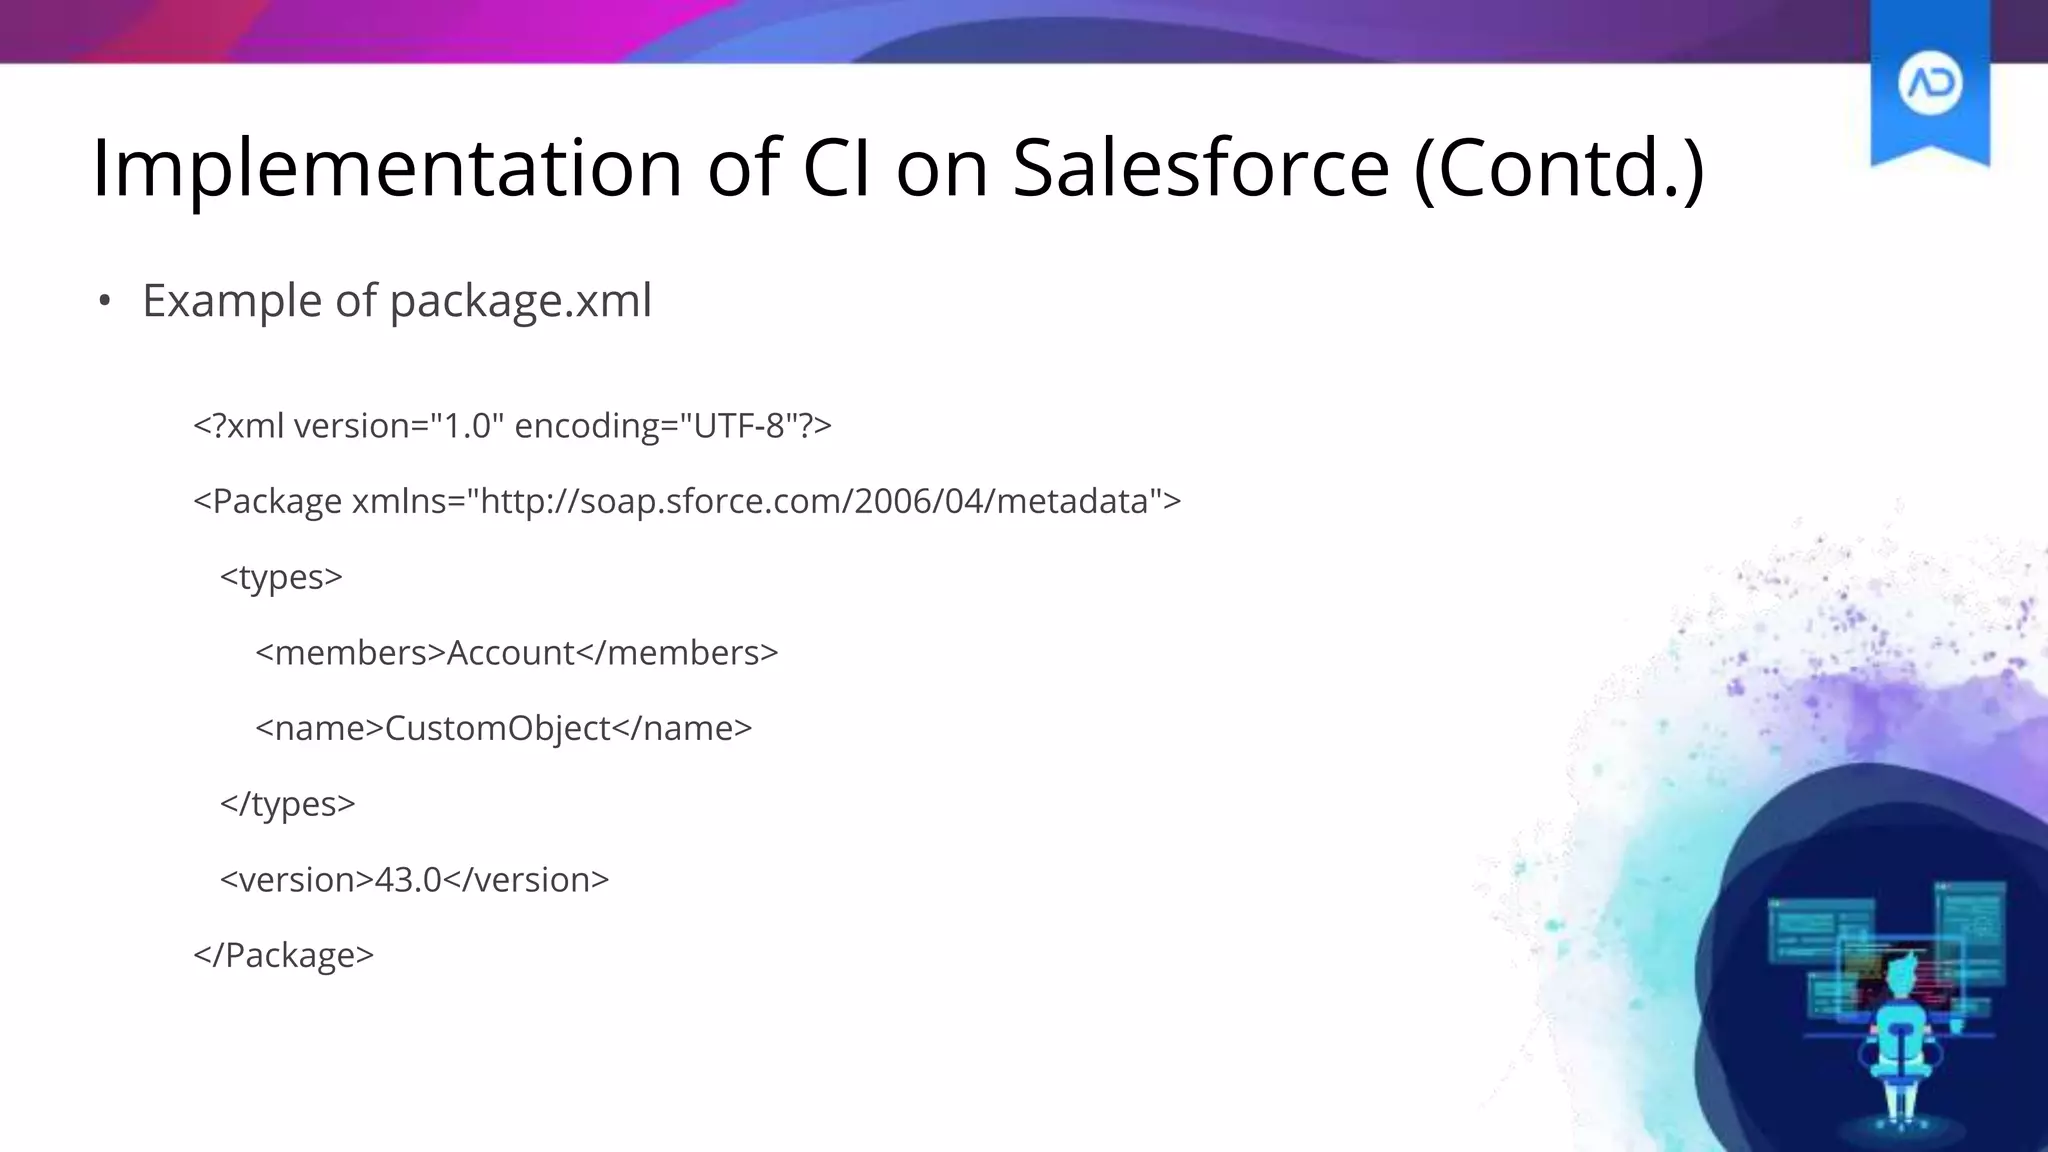
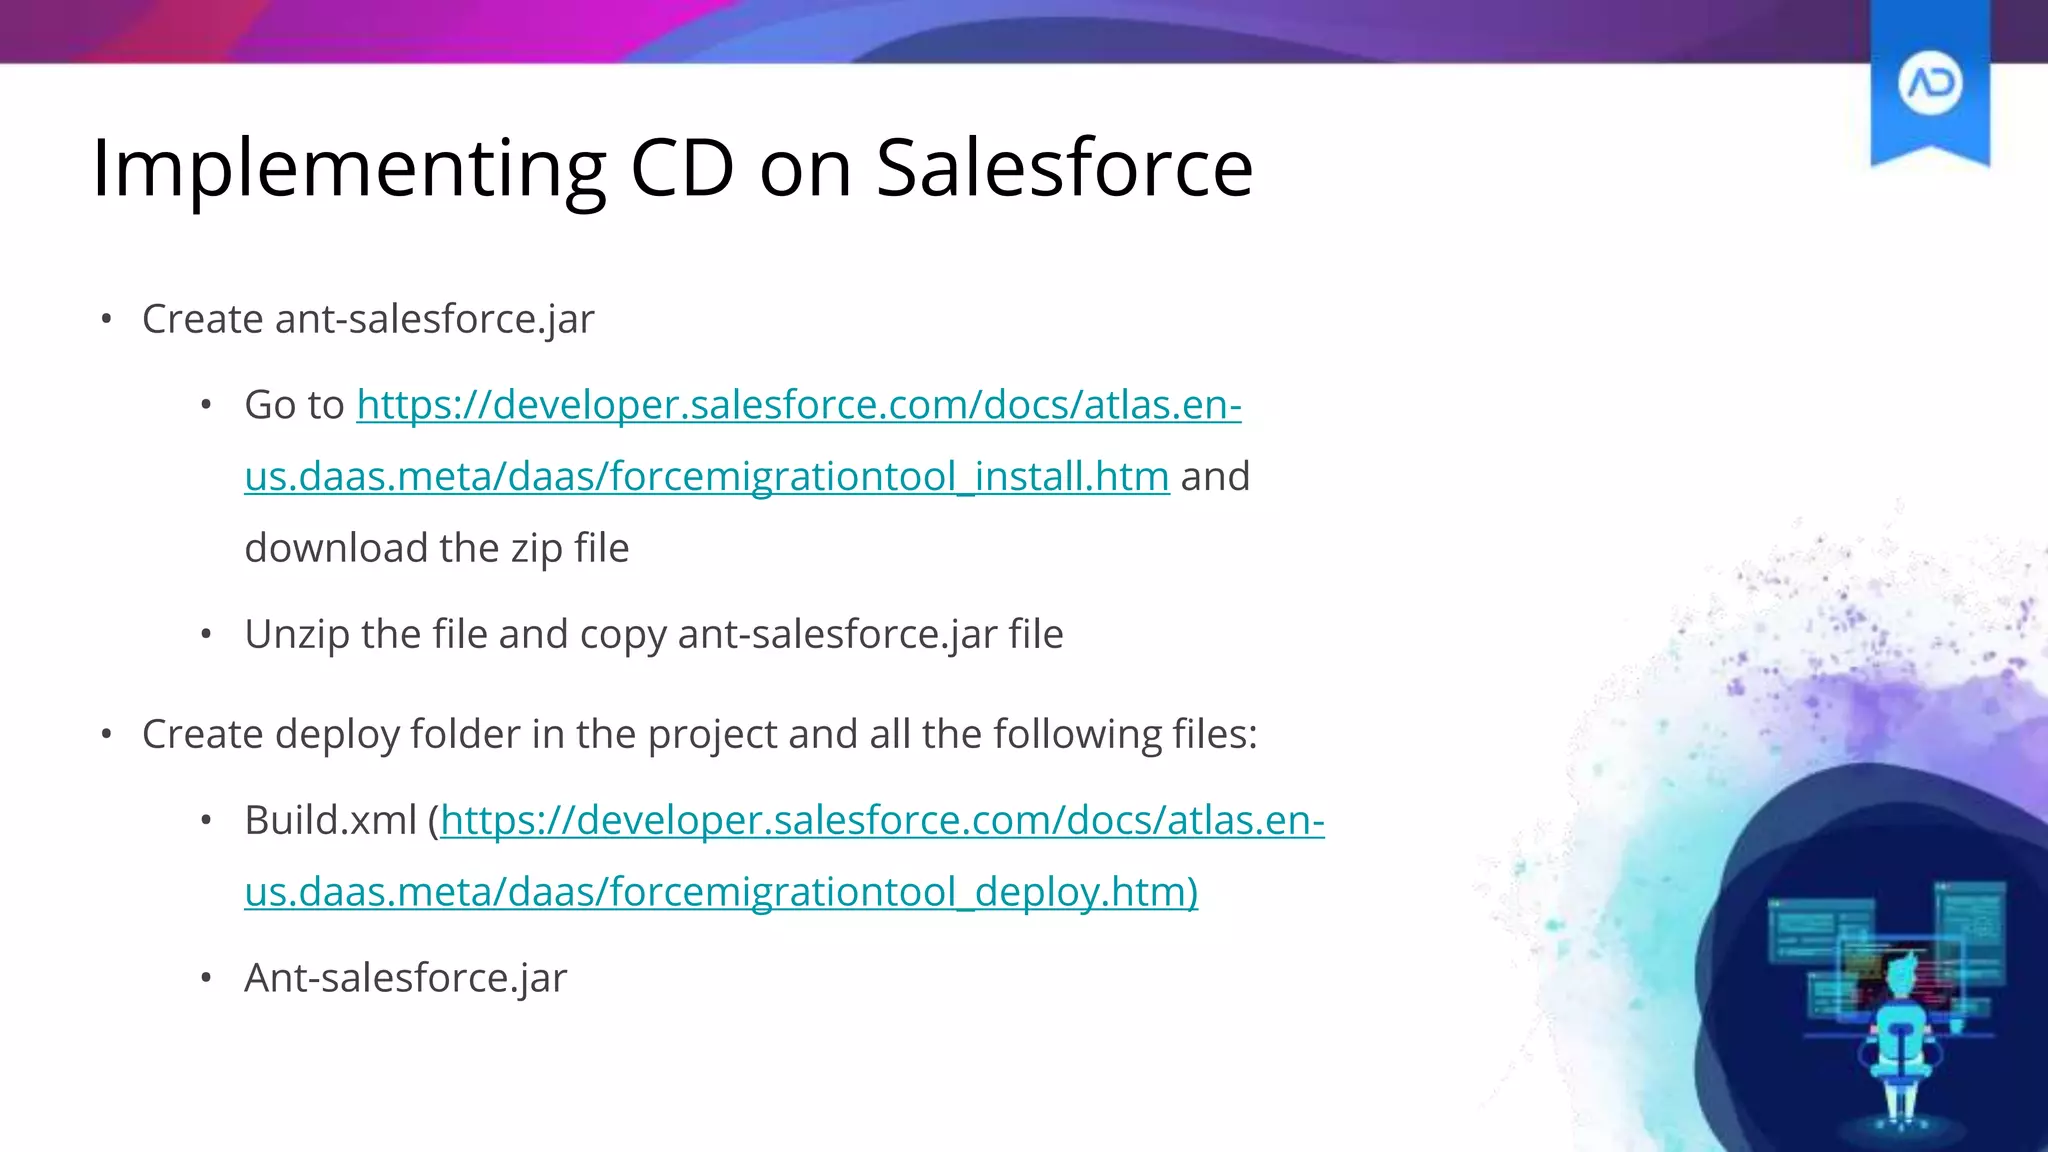
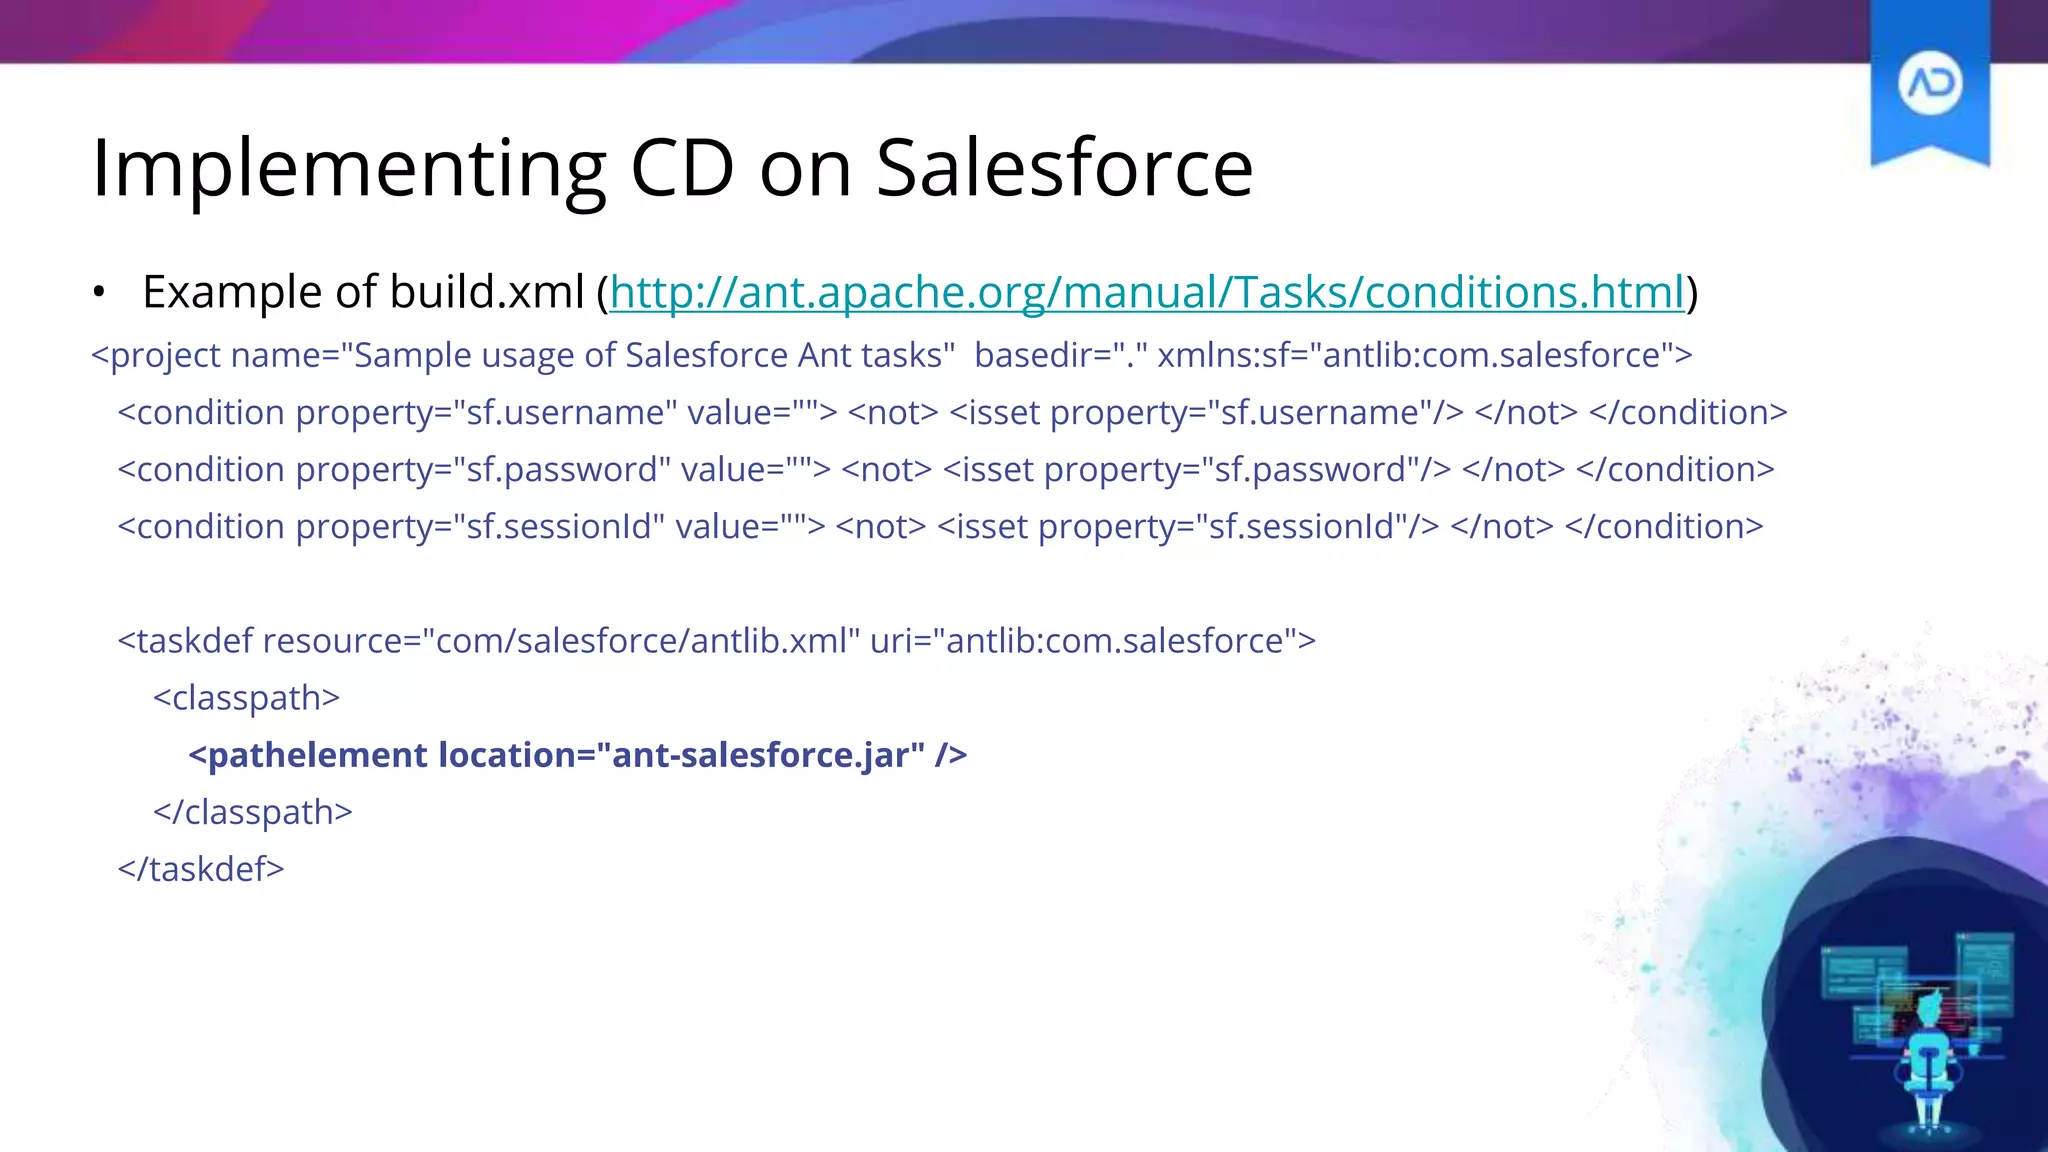
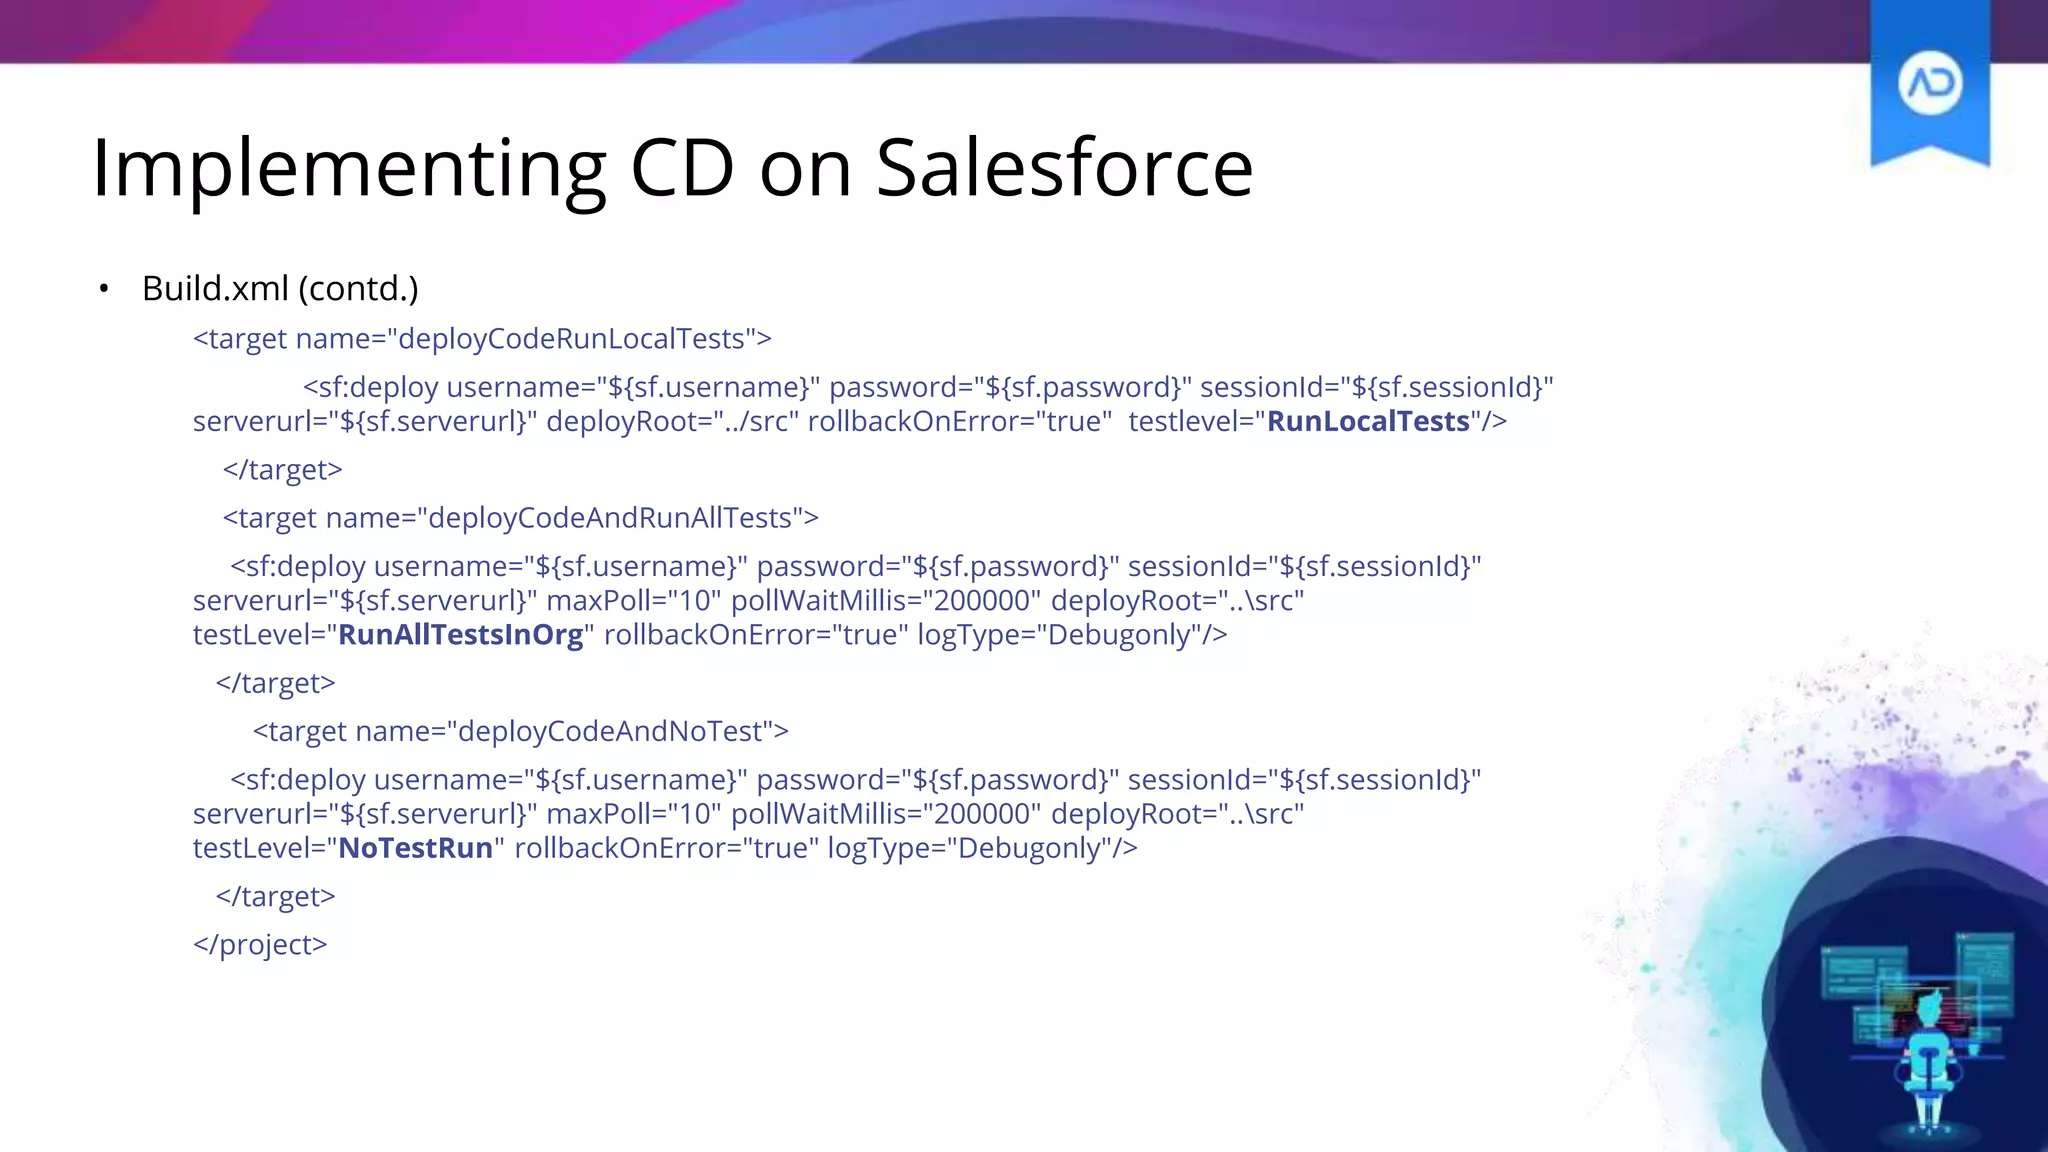
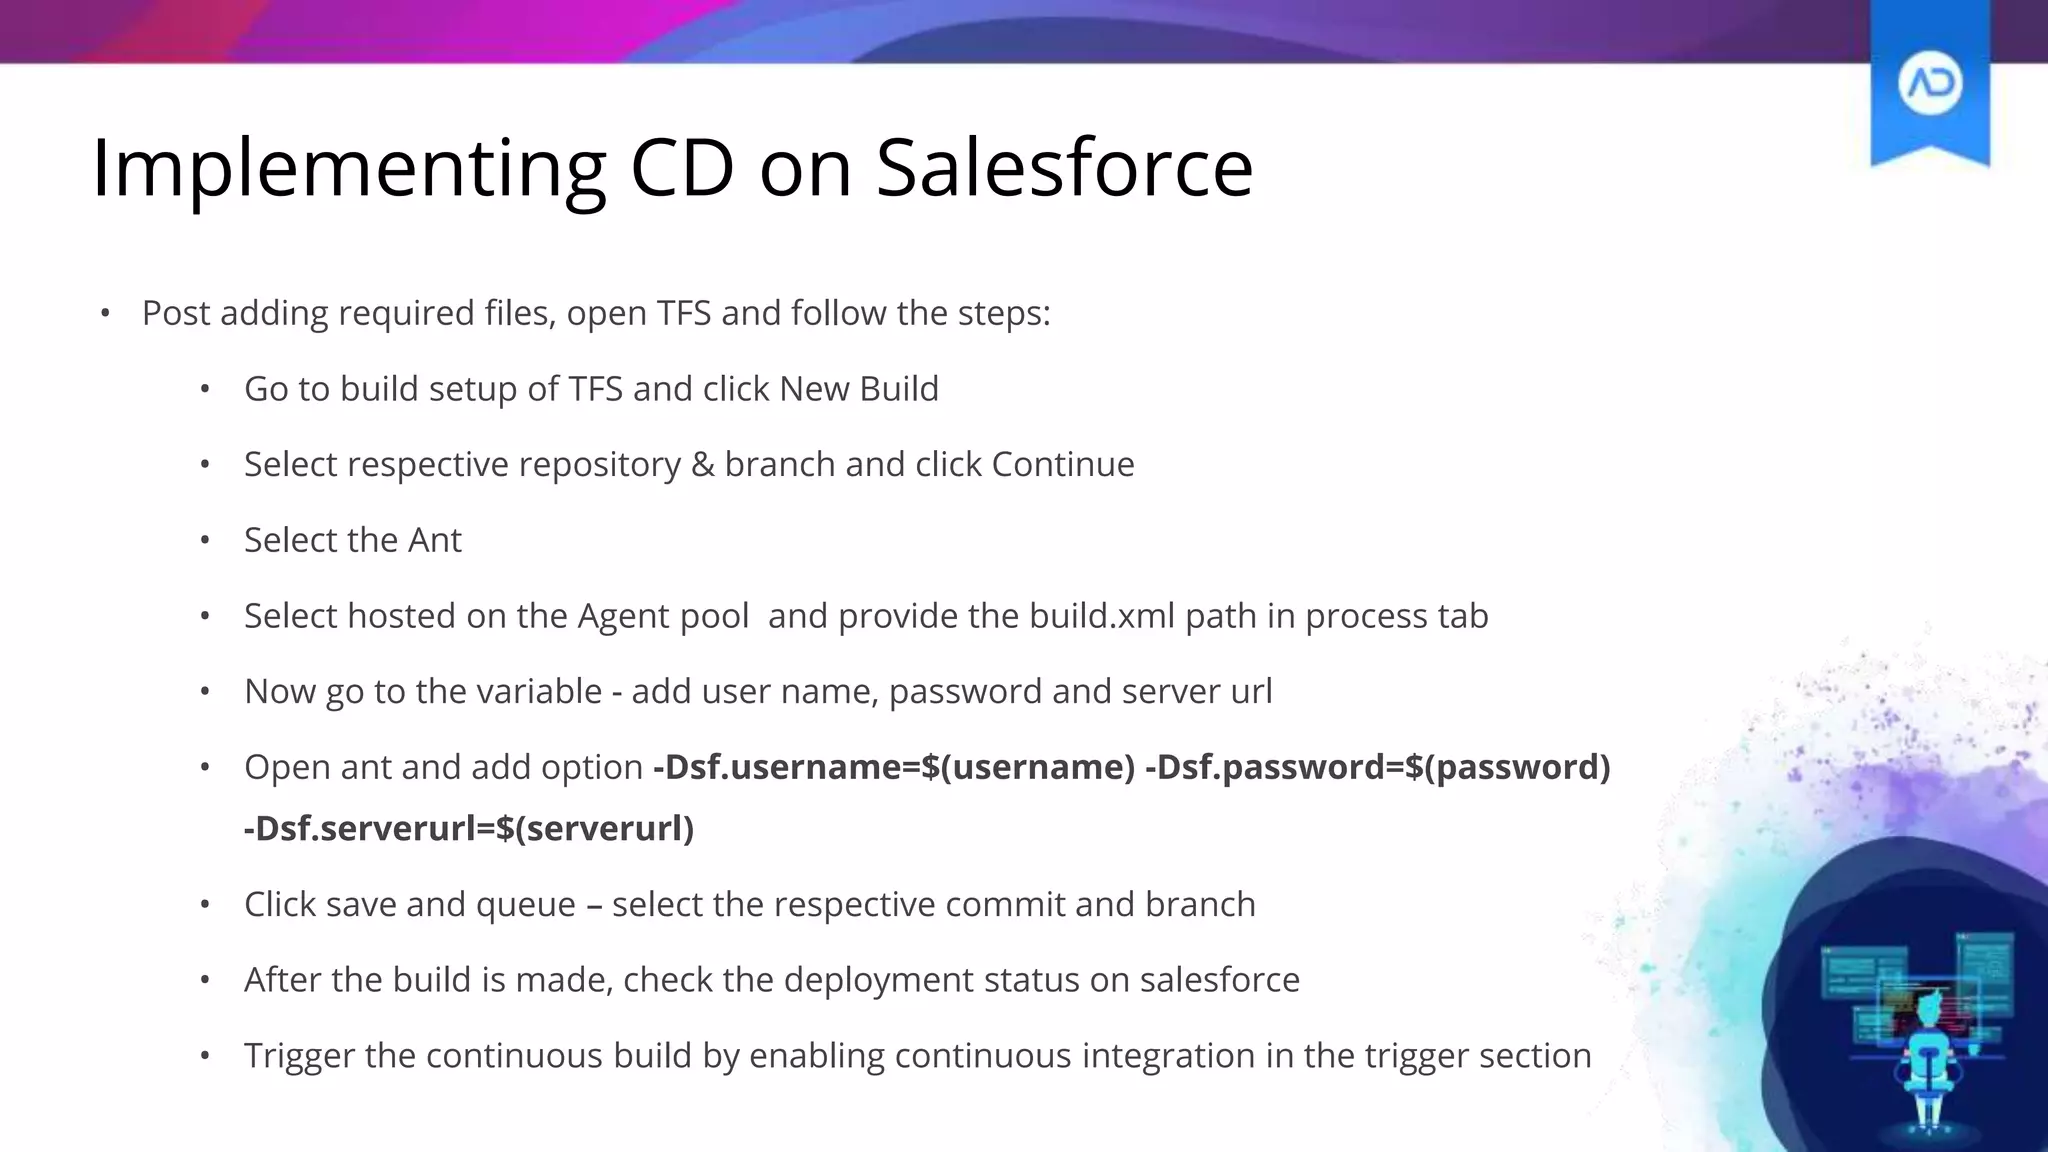
Agenda of webinar
● Introduction to Continuous Integration (CI) and Continuous Deployment (CD)
● Introduction to Importance and Drawbacks of CI/CD
● Salesforce CI/CD Best Practices
● Implementation of CI/CD on Salesforce
Presenters
Devarshi Chokshi
Salesforce Practice Lead
Subhash Shah
Sr. Solutions Architect
Introduction to AIMDek Technologies
● Software Development Company
● End-to-End Services & Solution Implementations.
● Assist with enterprise portal development, consulting
services, software update & migration, integration services to
transform your business with digital experience.
● 150+ years of cumulative experience, delivered 40+ projects
● Implemented solutions to various industries including
healthcare, automotive, sports & fitness, manufacturing,
eCommerce, education & insurance.
What is Continuous Integration (CI)?
It is the practice of integrating changes from multiple
developers working in an organization and add these
changes to the mainline as soon as possible.
What is Continuous Deployment (CD)?
Continuous deployment to the production given
your code passes all the test cases.
This practice means that no manual intervention
is necessary to deploy to production.
Why CI/CD?
● Avoid checking for broken code or broken
functionality deployed.
● Automatically deploy code to production.
● Increases visibility across the team
● Retain quality
Any Challenges?
● Initial setup can be a challenge
● May be expensive depending on the tool and the
package.
Best Practices for
Implementing CI/CD on
Salesforce
Best Practices
• Use of version control
• Manage source code, files, data and metadata
• Versioning will make code auditing easy
• Commit frequently
• Commit as soon as the development is completed
• Smaller commits help avoiding conflicts later
• Build faster
• Under 10 min
• Larger builds need to be broken down into multiple smaller builds
and executed parallelly
Best Practices
• Smoke test
• Making sure the most critical functionalities work after every build
• Quick and can be run frequently
• Deploy on staging server
• Deploy to an environment which is replica of the production environment
• It will avoid last minute errors or bugs
• Deployment on the production server will be error free.
Traditional Way of Deployment In Salesforce
• Change sets
• Salesforce gives you a tool to move configuration from a Salesforce Sandbox (test) environment through to
another Sandbox or your Production environment.
• The change set tool is very straightforward, however, items need to be added one by one,
it is easy to miss components, and change sets can only be sent between orgs that are affiliated with your
production org.
• Package
• A Salesforce developer can also package up changes to an unmanaged package. This would allow you to
take some code from Salesforce Environment 1 and deploy it to an unrelated Salesforce Environment 2.
• Need to manually create the package, adding in components one step at a time. You then need to upload
the package to Salesforce. You then have to wait whilst that package synchronises across all of the
Salesforce servers/nodes.
Environments
• Sandbox: A virtual space in which new or untested software or
coding can be run securely.
• Dev: the development environment is the set of processes and
programming tools used to create the program or software product.
• QA: QA server is suitable for testing, measuring the quality of the
software/hardware. unit tests/regression tests are meant to run on
this server.
• Staging: A stage or staging environment is an environment for testing
that exactly resembles the production environment
CI/CD Process
1. Developers work on their local filesystem and push their work on
sandbox
2. Any config changes done in the sandbox are pulled down to the local
filesystem
3. Once a unit of work is complete, the developer pushes their work to a
remote repository
4. An automated process watches the “DEV” git branch and pushes new
commits out to “Dev” sandbox
5. When the environment is ready, commits are merged to the “QA”
branch and are pushed to the “QA” sandbox
6. When the environment is ready, commits are merged to the “STAGE”
and are pushed to the “Stage” sandbox
7. When “Stage” is verified then a push to production can happen. This
can either be a manual or automatic deploy.
What is Force Migration Tool?
● It is also known as ANT.
● It is a tool that help you move the metadata between the different salesforce
environments.
Implementation of CI on Salesforce
● Create repository and the branches as per the standards
● Install the eclipse and then open it
● Install force.com plugin
Go to help menu > Install new software > Click Add
https://developer.salesforce.com/media/force-ide/eclipse45
● Access to Detailed Steps,
https://developer.salesforce.com/docs/atlas.en-
us.eclipse.meta/eclipse/ide_install.htm
● Once the installation of force.com is complete, create new
force.com project and then fetch the existing project into the
eclipse
● After fetching the project, commit your changes into the repository
Implementation of CI on Salesforce (Contd.)
• Example of package.xml
<?xml version="1.0" encoding="UTF-8"?>
<Package xmlns="http://soap.sforce.com/2006/04/metadata">
<types>
<members>Account</members>
<name>CustomObject</name>
</types>
<version>43.0</version>
</Package>
Implementing CD on Salesforce
• Create ant-salesforce.jar
• Go to https://developer.salesforce.com/docs/atlas.en-
us.daas.meta/daas/forcemigrationtool_install.htm and
download the zip file
• Unzip the file and copy ant-salesforce.jar file
• Create deploy folder in the project and all the following files:
• Build.xml (https://developer.salesforce.com/docs/atlas.en-
us.daas.meta/daas/forcemigrationtool_deploy.htm)
• Ant-salesforce.jar
Implementing CD on Salesforce
• Example of build.xml (http://ant.apache.org/manual/Tasks/conditions.html)
<project name="Sample usage of Salesforce Ant tasks" basedir="." xmlns:sf="antlib:com.salesforce">
<condition property="sf.username" value=""> <not> <isset property="sf.username"/> </not> </condition>
<condition property="sf.password" value=""> <not> <isset property="sf.password"/> </not> </condition>
<condition property="sf.sessionId" value=""> <not> <isset property="sf.sessionId"/> </not> </condition>
<taskdef resource="com/salesforce/antlib.xml" uri="antlib:com.salesforce">
<classpath>
<pathelement location="ant-salesforce.jar" />
</classpath>
</taskdef>
Implementing CD on Salesforce
• Build.xml (contd.)
<target name="deployCodeRunLocalTests">
<sf:deploy username="${sf.username}" password="${sf.password}" sessionId="${sf.sessionId}"
serverurl="${sf.serverurl}" deployRoot="../src" rollbackOnError="true" testlevel="RunLocalTests"/>
</target>
<target name="deployCodeAndRunAllTests">
<sf:deploy username="${sf.username}" password="${sf.password}" sessionId="${sf.sessionId}"
serverurl="${sf.serverurl}" maxPoll="10" pollWaitMillis="200000" deployRoot="..src"
testLevel="RunAllTestsInOrg" rollbackOnError="true" logType="Debugonly"/>
</target>
<target name="deployCodeAndNoTest">
<sf:deploy username="${sf.username}" password="${sf.password}" sessionId="${sf.sessionId}"
serverurl="${sf.serverurl}" maxPoll="10" pollWaitMillis="200000" deployRoot="..src"
testLevel="NoTestRun" rollbackOnError="true" logType="Debugonly"/>
</target>
</project>
Implementing CD on Salesforce
• Post adding required files, open TFS and follow the steps:
• Go to build setup of TFS and click New Build
• Select respective repository & branch and click Continue
• Select the Ant
• Select hosted on the Agent pool and provide the build.xml path in process tab
• Now go to the variable - add user name, password and server url
• Open ant and add option -Dsf.username=$(username) -Dsf.password=$(password)
-Dsf.serverurl=$(serverurl)
• Click save and queue – select the respective commit and branch
• After the build is made, check the deployment status on salesforce
• Trigger the continuous build by enabling continuous integration in the trigger section
If we don’t get to your question during today’s webinar, we will
be sure to follow up afterward over the mail.
Q&A Session
Thank you!
Follow us on our social accounts and feel free to reach out at
hello@aimdek.com
INDIA
AIMDek Technologies Pvt. Ltd.
203, Shivam Complex, Science City Road, Sola, Ahmedabad,
380060, India
Sales: sales@aimdek.com | General: hello@aimdek.com
+91 78747 88766 | +1 84474 44423
AIMDek Technologies Inc.
7030 Woodbine Avenue, Suite 500, Markham, Ontario, L3R 6G2,
Canada
Sales: sales@aimdek.com | General: hello@aimdek.com
+1 64724 36116
CANADA

Best practices for implementing CI/CD on Salesforce

  • 2.
    Agenda of webinar ●Introduction to Continuous Integration (CI) and Continuous Deployment (CD) ● Introduction to Importance and Drawbacks of CI/CD ● Salesforce CI/CD Best Practices ● Implementation of CI/CD on Salesforce
  • 3.
    Presenters Devarshi Chokshi Salesforce PracticeLead Subhash Shah Sr. Solutions Architect
  • 4.
    Introduction to AIMDekTechnologies ● Software Development Company ● End-to-End Services & Solution Implementations. ● Assist with enterprise portal development, consulting services, software update & migration, integration services to transform your business with digital experience. ● 150+ years of cumulative experience, delivered 40+ projects ● Implemented solutions to various industries including healthcare, automotive, sports & fitness, manufacturing, eCommerce, education & insurance.
  • 5.
    What is ContinuousIntegration (CI)? It is the practice of integrating changes from multiple developers working in an organization and add these changes to the mainline as soon as possible.
  • 6.
    What is ContinuousDeployment (CD)? Continuous deployment to the production given your code passes all the test cases. This practice means that no manual intervention is necessary to deploy to production.
  • 7.
    Why CI/CD? ● Avoidchecking for broken code or broken functionality deployed. ● Automatically deploy code to production. ● Increases visibility across the team ● Retain quality
  • 8.
    Any Challenges? ● Initialsetup can be a challenge ● May be expensive depending on the tool and the package.
  • 9.
  • 10.
    Best Practices • Useof version control • Manage source code, files, data and metadata • Versioning will make code auditing easy • Commit frequently • Commit as soon as the development is completed • Smaller commits help avoiding conflicts later • Build faster • Under 10 min • Larger builds need to be broken down into multiple smaller builds and executed parallelly
  • 11.
    Best Practices • Smoketest • Making sure the most critical functionalities work after every build • Quick and can be run frequently • Deploy on staging server • Deploy to an environment which is replica of the production environment • It will avoid last minute errors or bugs • Deployment on the production server will be error free.
  • 12.
    Traditional Way ofDeployment In Salesforce • Change sets • Salesforce gives you a tool to move configuration from a Salesforce Sandbox (test) environment through to another Sandbox or your Production environment. • The change set tool is very straightforward, however, items need to be added one by one, it is easy to miss components, and change sets can only be sent between orgs that are affiliated with your production org. • Package • A Salesforce developer can also package up changes to an unmanaged package. This would allow you to take some code from Salesforce Environment 1 and deploy it to an unrelated Salesforce Environment 2. • Need to manually create the package, adding in components one step at a time. You then need to upload the package to Salesforce. You then have to wait whilst that package synchronises across all of the Salesforce servers/nodes.
  • 13.
    Environments • Sandbox: Avirtual space in which new or untested software or coding can be run securely. • Dev: the development environment is the set of processes and programming tools used to create the program or software product. • QA: QA server is suitable for testing, measuring the quality of the software/hardware. unit tests/regression tests are meant to run on this server. • Staging: A stage or staging environment is an environment for testing that exactly resembles the production environment
  • 14.
    CI/CD Process 1. Developerswork on their local filesystem and push their work on sandbox 2. Any config changes done in the sandbox are pulled down to the local filesystem 3. Once a unit of work is complete, the developer pushes their work to a remote repository 4. An automated process watches the “DEV” git branch and pushes new commits out to “Dev” sandbox 5. When the environment is ready, commits are merged to the “QA” branch and are pushed to the “QA” sandbox 6. When the environment is ready, commits are merged to the “STAGE” and are pushed to the “Stage” sandbox 7. When “Stage” is verified then a push to production can happen. This can either be a manual or automatic deploy.
  • 15.
    What is ForceMigration Tool? ● It is also known as ANT. ● It is a tool that help you move the metadata between the different salesforce environments.
  • 16.
    Implementation of CIon Salesforce ● Create repository and the branches as per the standards ● Install the eclipse and then open it ● Install force.com plugin Go to help menu > Install new software > Click Add https://developer.salesforce.com/media/force-ide/eclipse45 ● Access to Detailed Steps, https://developer.salesforce.com/docs/atlas.en- us.eclipse.meta/eclipse/ide_install.htm ● Once the installation of force.com is complete, create new force.com project and then fetch the existing project into the eclipse ● After fetching the project, commit your changes into the repository
  • 17.
    Implementation of CIon Salesforce (Contd.) • Example of package.xml <?xml version="1.0" encoding="UTF-8"?> <Package xmlns="http://soap.sforce.com/2006/04/metadata"> <types> <members>Account</members> <name>CustomObject</name> </types> <version>43.0</version> </Package>
  • 18.
    Implementing CD onSalesforce • Create ant-salesforce.jar • Go to https://developer.salesforce.com/docs/atlas.en- us.daas.meta/daas/forcemigrationtool_install.htm and download the zip file • Unzip the file and copy ant-salesforce.jar file • Create deploy folder in the project and all the following files: • Build.xml (https://developer.salesforce.com/docs/atlas.en- us.daas.meta/daas/forcemigrationtool_deploy.htm) • Ant-salesforce.jar
  • 19.
    Implementing CD onSalesforce • Example of build.xml (http://ant.apache.org/manual/Tasks/conditions.html) <project name="Sample usage of Salesforce Ant tasks" basedir="." xmlns:sf="antlib:com.salesforce"> <condition property="sf.username" value=""> <not> <isset property="sf.username"/> </not> </condition> <condition property="sf.password" value=""> <not> <isset property="sf.password"/> </not> </condition> <condition property="sf.sessionId" value=""> <not> <isset property="sf.sessionId"/> </not> </condition> <taskdef resource="com/salesforce/antlib.xml" uri="antlib:com.salesforce"> <classpath> <pathelement location="ant-salesforce.jar" /> </classpath> </taskdef>
  • 20.
    Implementing CD onSalesforce • Build.xml (contd.) <target name="deployCodeRunLocalTests"> <sf:deploy username="${sf.username}" password="${sf.password}" sessionId="${sf.sessionId}" serverurl="${sf.serverurl}" deployRoot="../src" rollbackOnError="true" testlevel="RunLocalTests"/> </target> <target name="deployCodeAndRunAllTests"> <sf:deploy username="${sf.username}" password="${sf.password}" sessionId="${sf.sessionId}" serverurl="${sf.serverurl}" maxPoll="10" pollWaitMillis="200000" deployRoot="..src" testLevel="RunAllTestsInOrg" rollbackOnError="true" logType="Debugonly"/> </target> <target name="deployCodeAndNoTest"> <sf:deploy username="${sf.username}" password="${sf.password}" sessionId="${sf.sessionId}" serverurl="${sf.serverurl}" maxPoll="10" pollWaitMillis="200000" deployRoot="..src" testLevel="NoTestRun" rollbackOnError="true" logType="Debugonly"/> </target> </project>
  • 21.
    Implementing CD onSalesforce • Post adding required files, open TFS and follow the steps: • Go to build setup of TFS and click New Build • Select respective repository & branch and click Continue • Select the Ant • Select hosted on the Agent pool and provide the build.xml path in process tab • Now go to the variable - add user name, password and server url • Open ant and add option -Dsf.username=$(username) -Dsf.password=$(password) -Dsf.serverurl=$(serverurl) • Click save and queue – select the respective commit and branch • After the build is made, check the deployment status on salesforce • Trigger the continuous build by enabling continuous integration in the trigger section
  • 22.
    If we don’tget to your question during today’s webinar, we will be sure to follow up afterward over the mail. Q&A Session
  • 23.
    Thank you! Follow uson our social accounts and feel free to reach out at hello@aimdek.com
  • 24.
    INDIA AIMDek Technologies Pvt.Ltd. 203, Shivam Complex, Science City Road, Sola, Ahmedabad, 380060, India Sales: sales@aimdek.com | General: hello@aimdek.com +91 78747 88766 | +1 84474 44423 AIMDek Technologies Inc. 7030 Woodbine Avenue, Suite 500, Markham, Ontario, L3R 6G2, Canada Sales: sales@aimdek.com | General: hello@aimdek.com +1 64724 36116 CANADA