Downloaded 148 times


![CHAPTER 3 ■ CONFIGURING YOUR DEVELOPMENT ENVIRONMENT
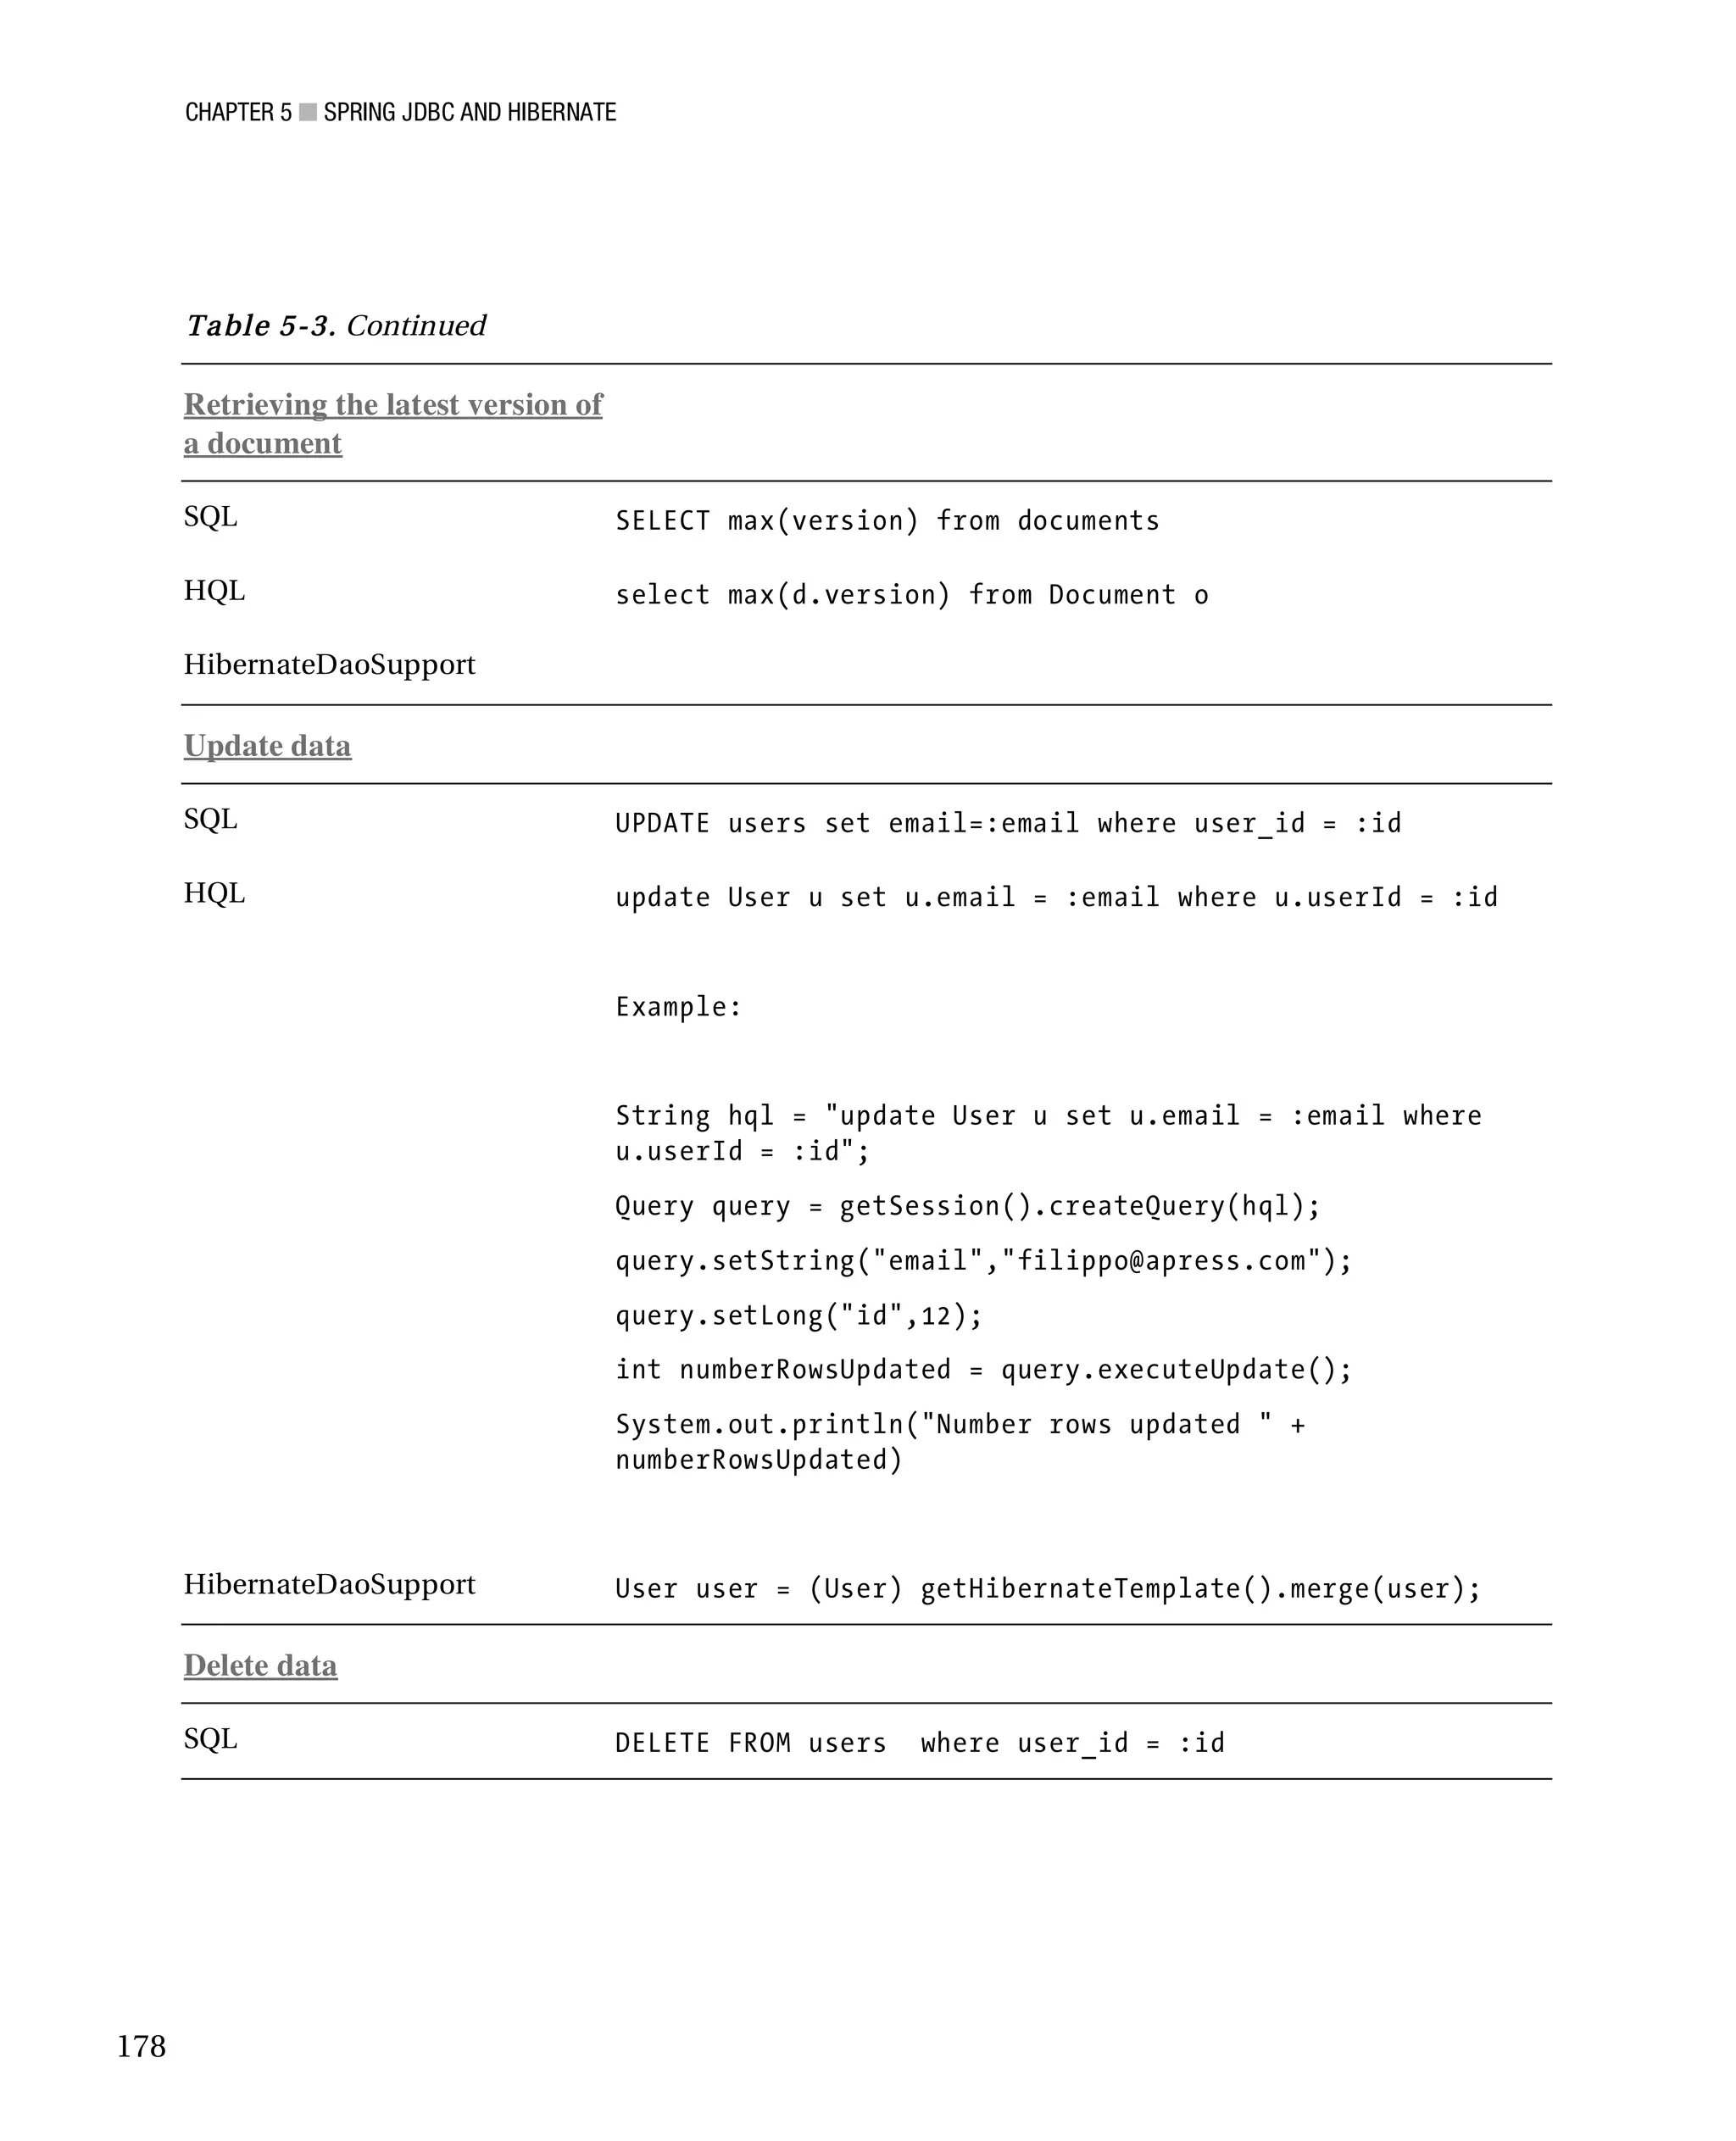
Table 3-1. Continued
svn export Exports a clean directory tree from the
repository or from your working copy to a
Example exporting from the repository local directory.
svn export http://localhost/repo/test
testwithoutsvn
A testwithoutsvn/test
Exported revision <revision_number>
Example exporting from the working copy
svn export test testwithoutsvn
Export complete.
svn help The SVN help for command and
subcommands, it will retrieve a list of all
Example help command subcommands.
svn help
Example help subcommand
svn help ci
commit (ci): Send changes from your working copy
to the repository.
usage: commit [PATH...]
svn import Imports a local directory into the
Subversion server.
Examples
svn import -m "my message" myproject
http://localhost/repo/myproject
Adding myproject/foo.java
…
Transmitting file data .........
Committed revision 21.
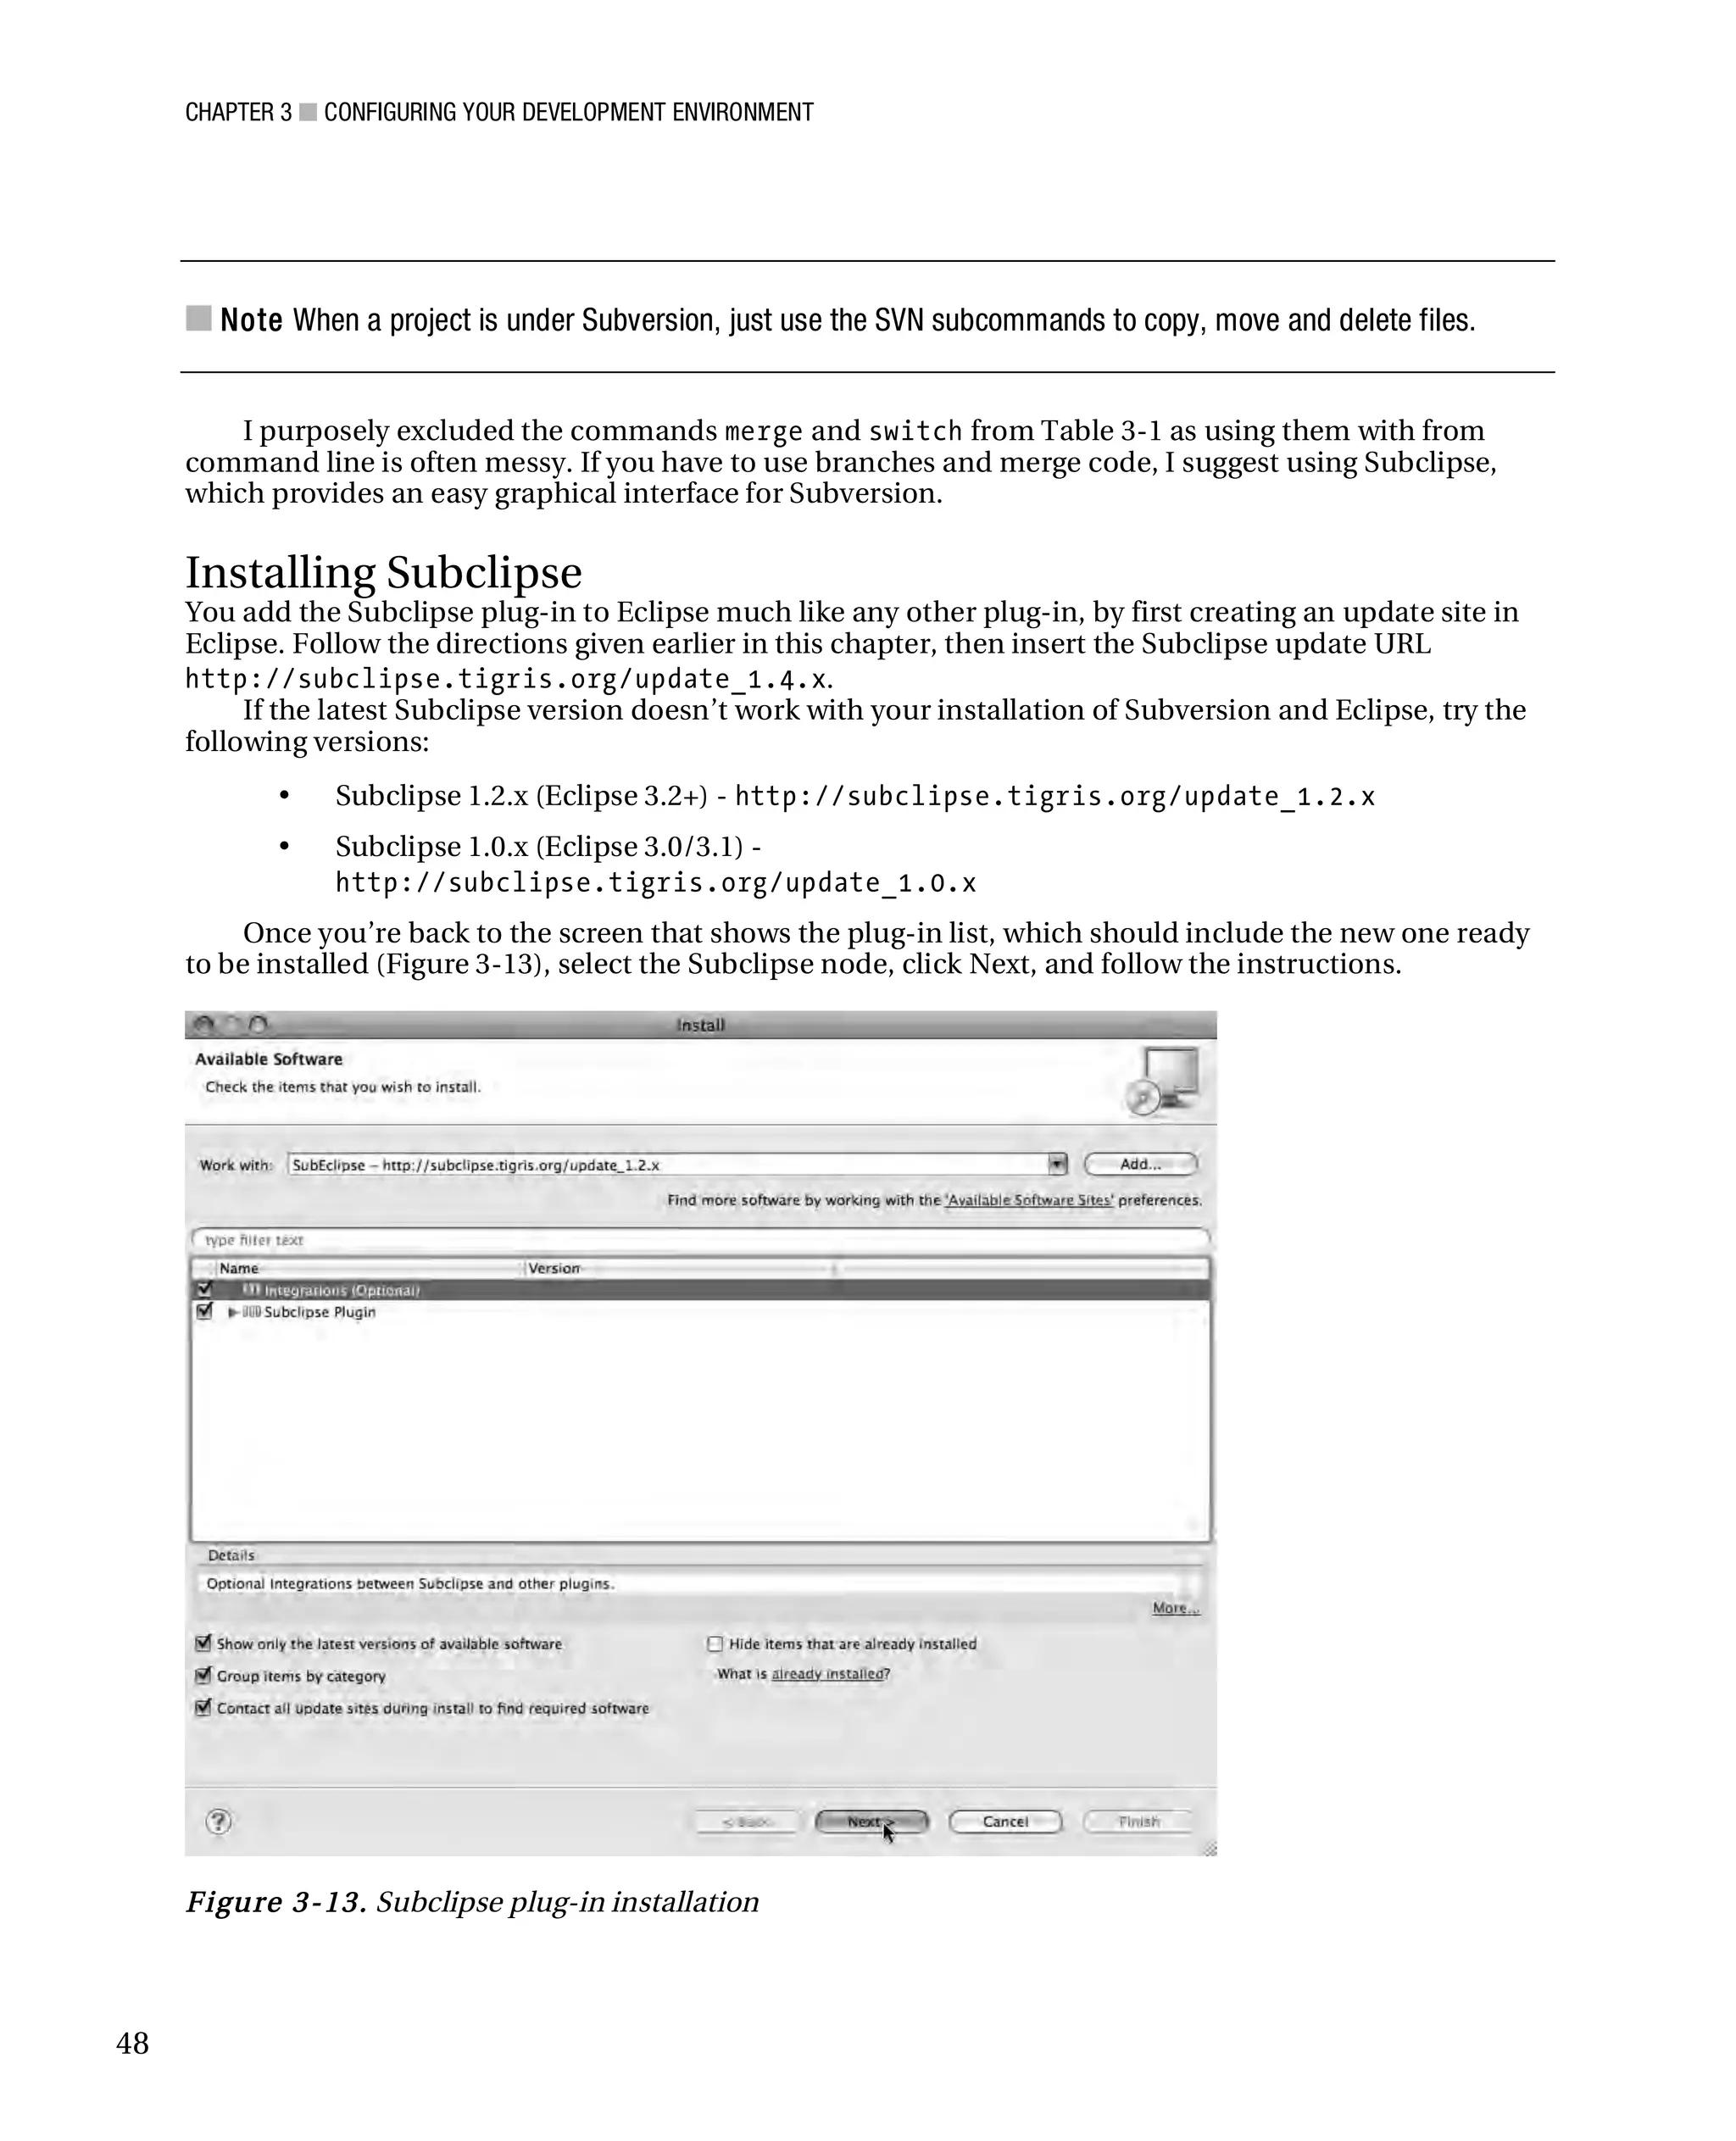
45](https://image.slidesharecdn.com/beginningjavaandflex-migratingjavaspringhibernateandmavendeveloperstoadobeflex-100821073507-phpapp01/75/Beginning-java-and-flex-migrating-java-spring-hibernate-and-maven-developers-to-adobe-flex-64-2048.jpg)

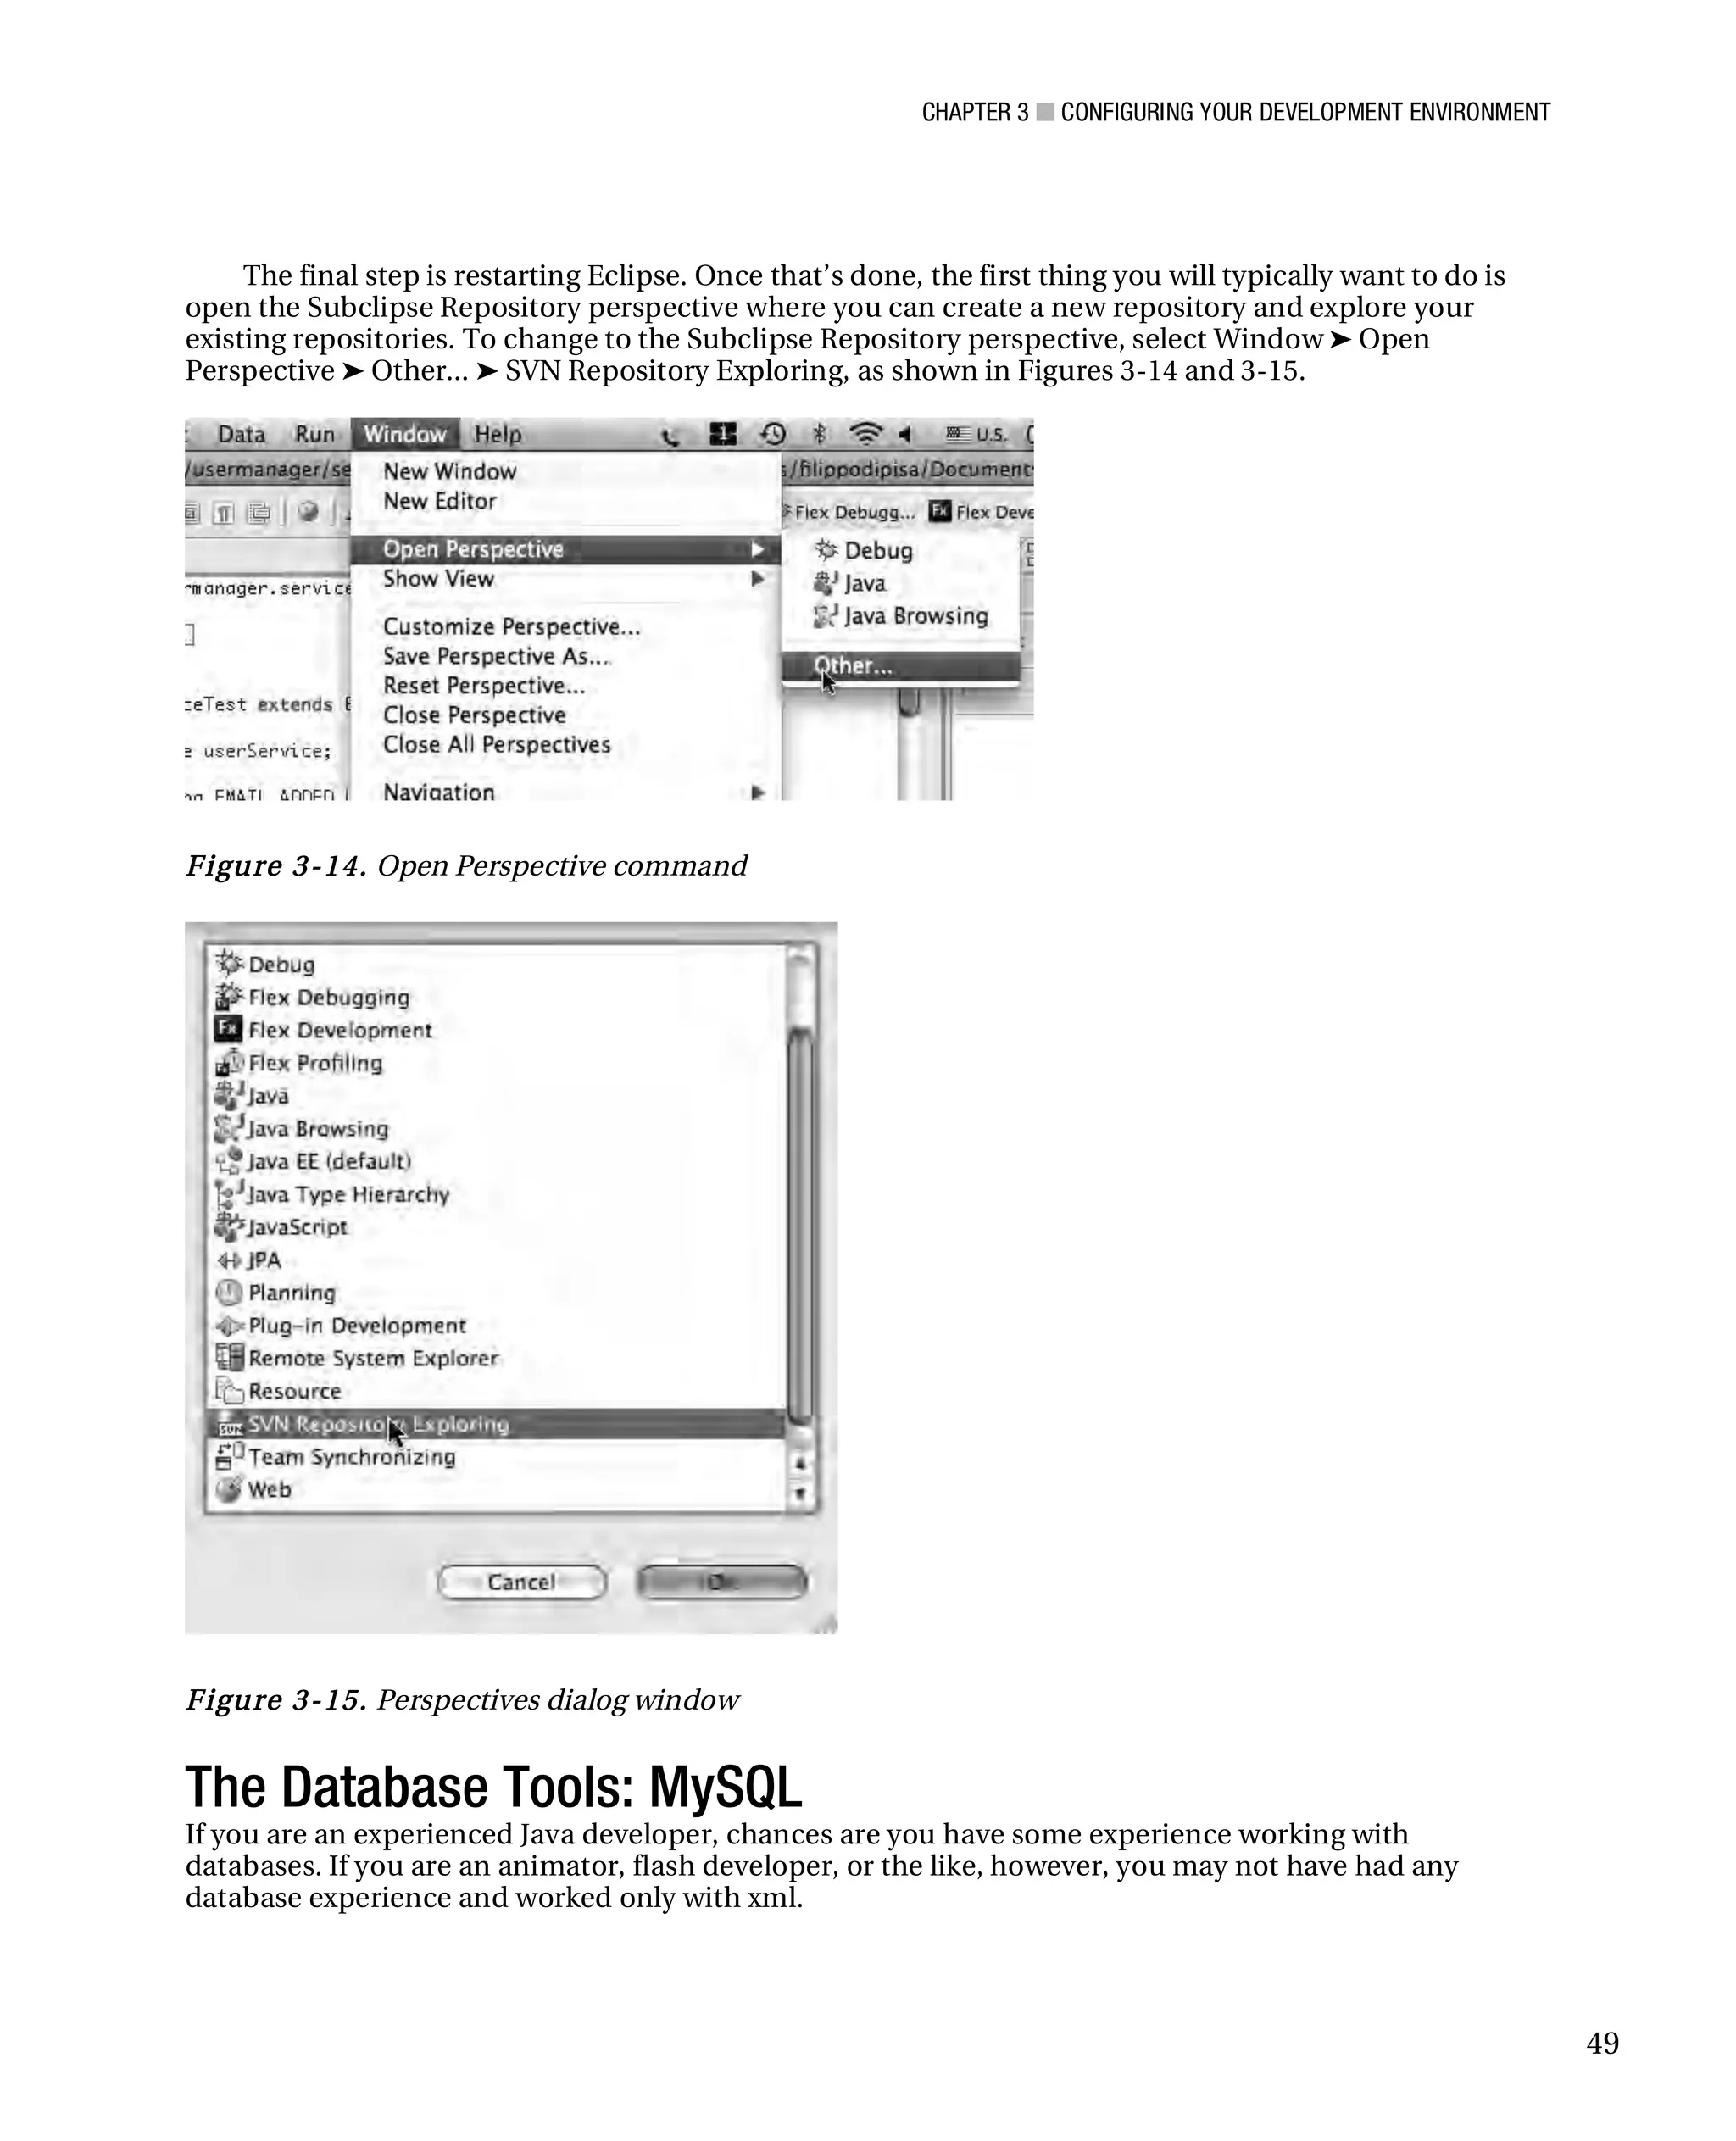
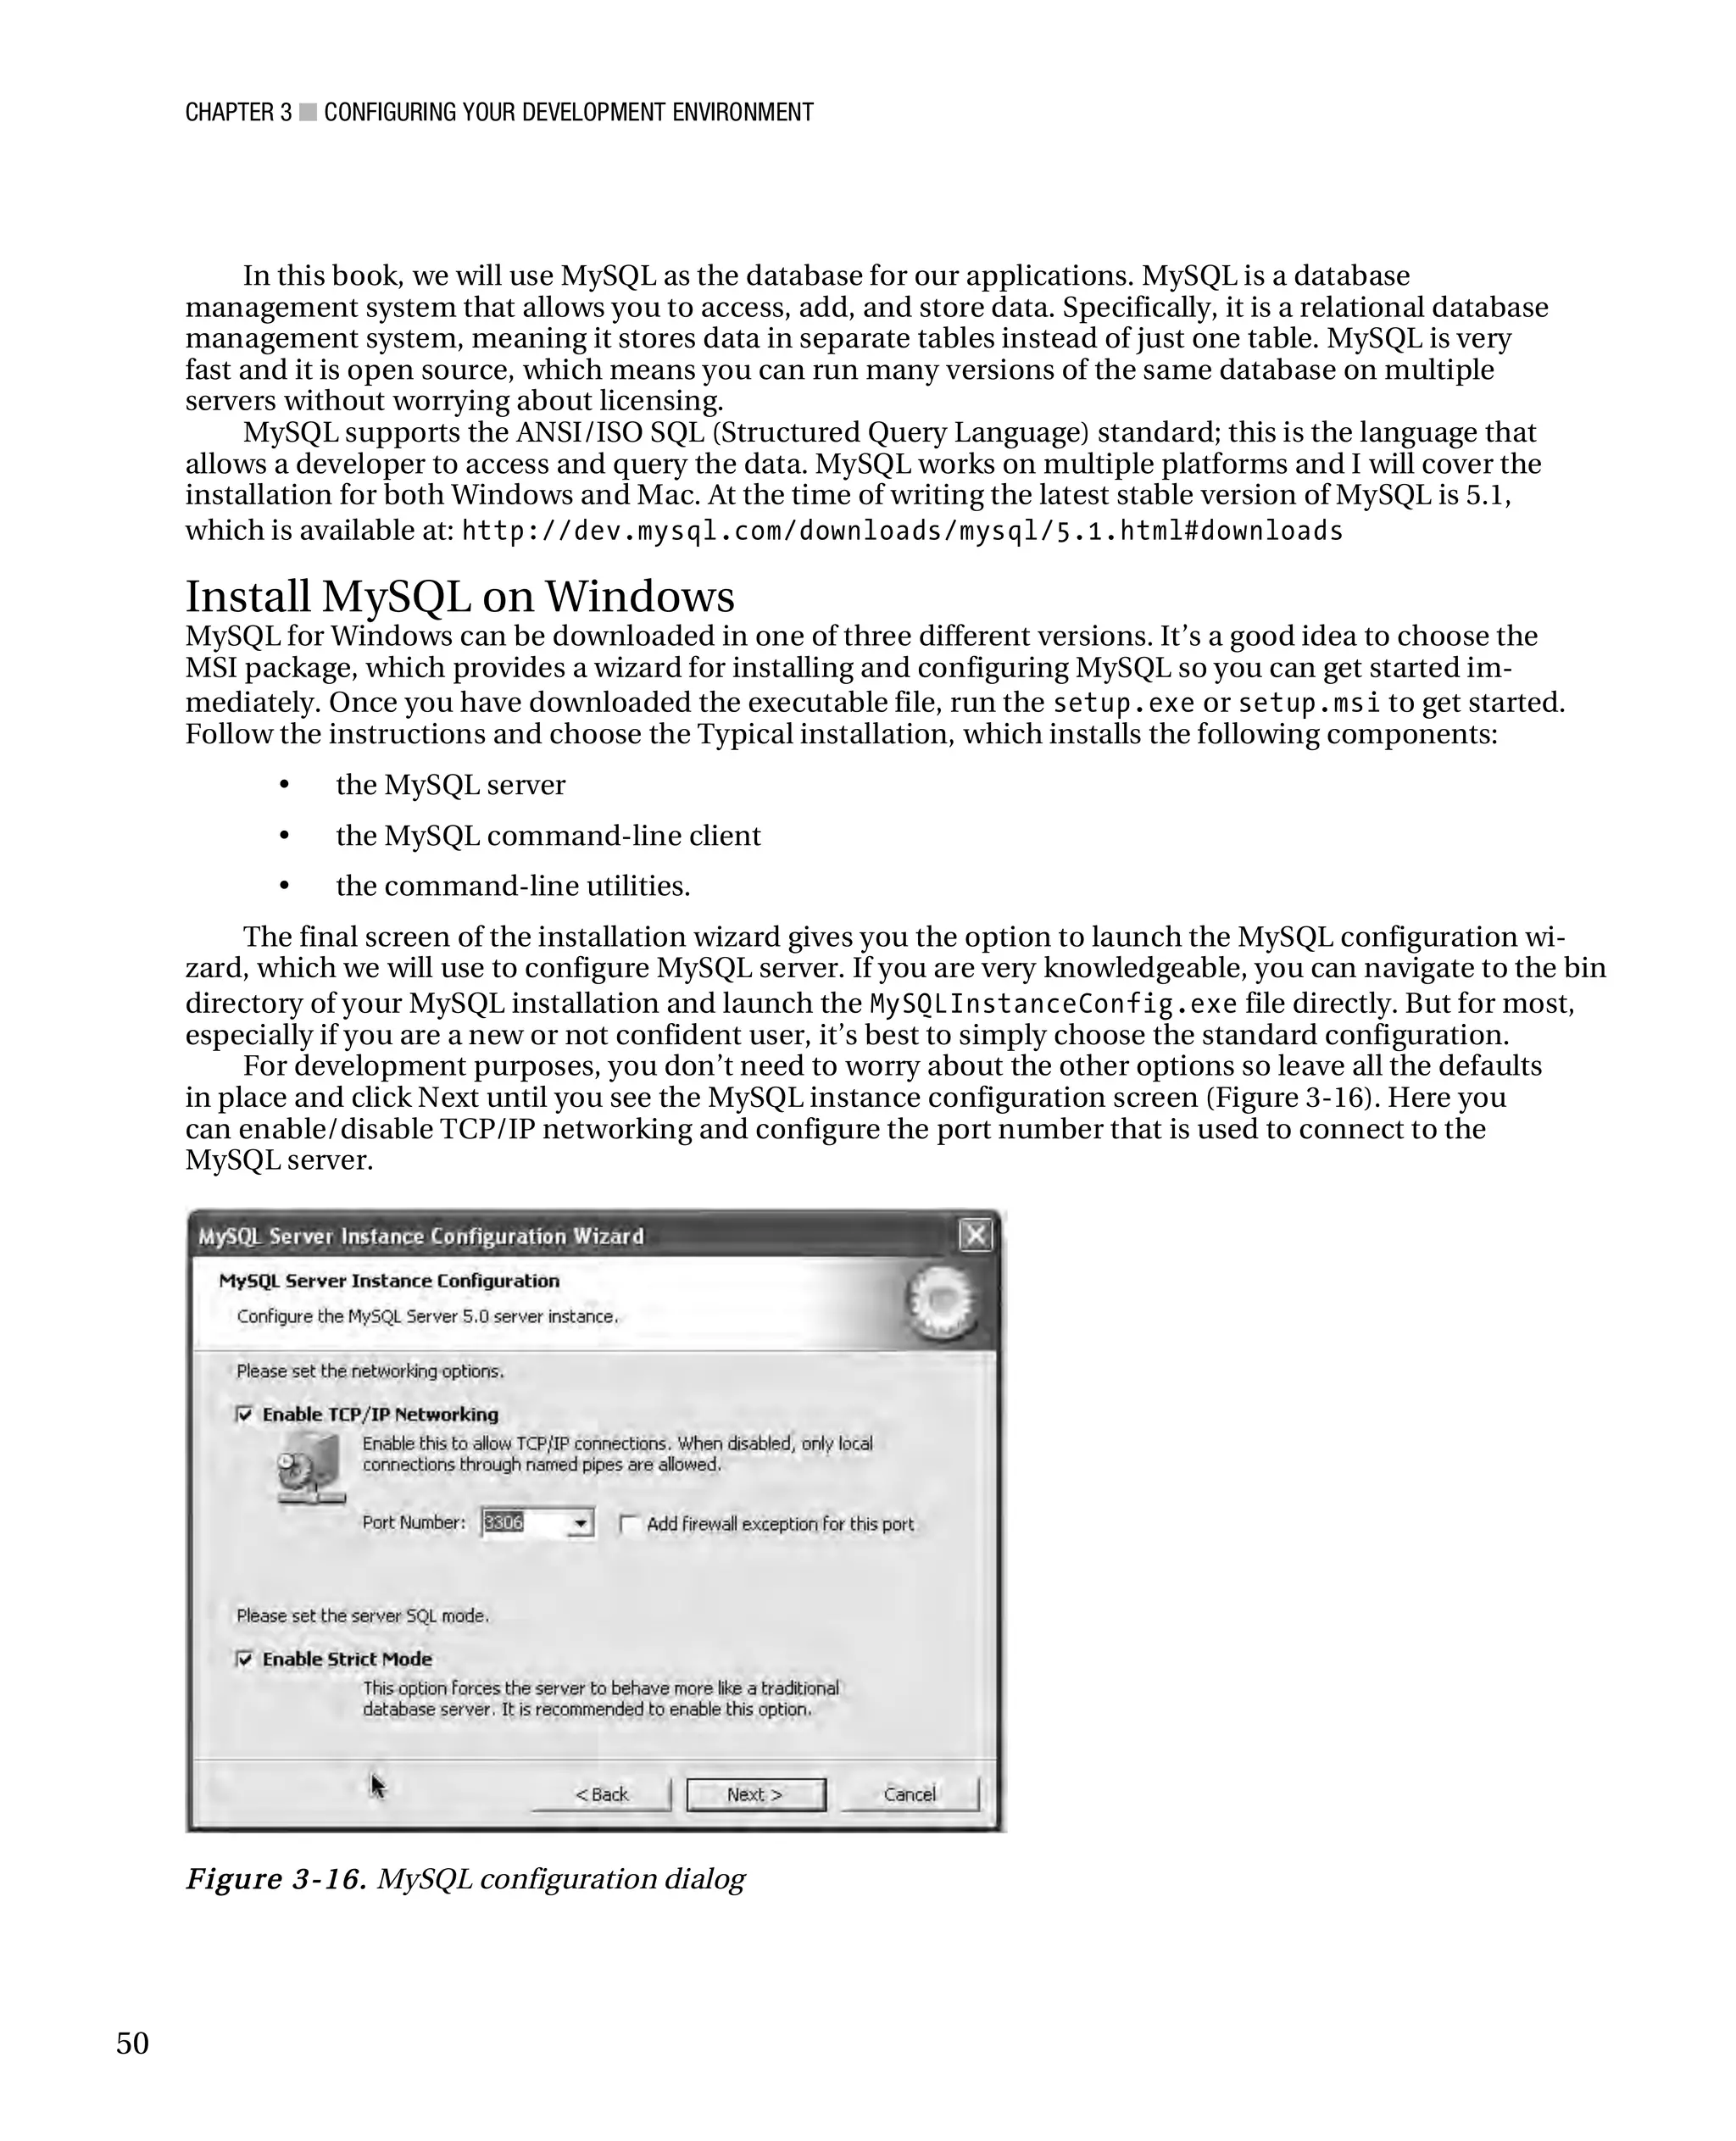
![CHAPTER 3 ■ CONFIGURING YOUR DEVELOPMENT ENVIRONMENT
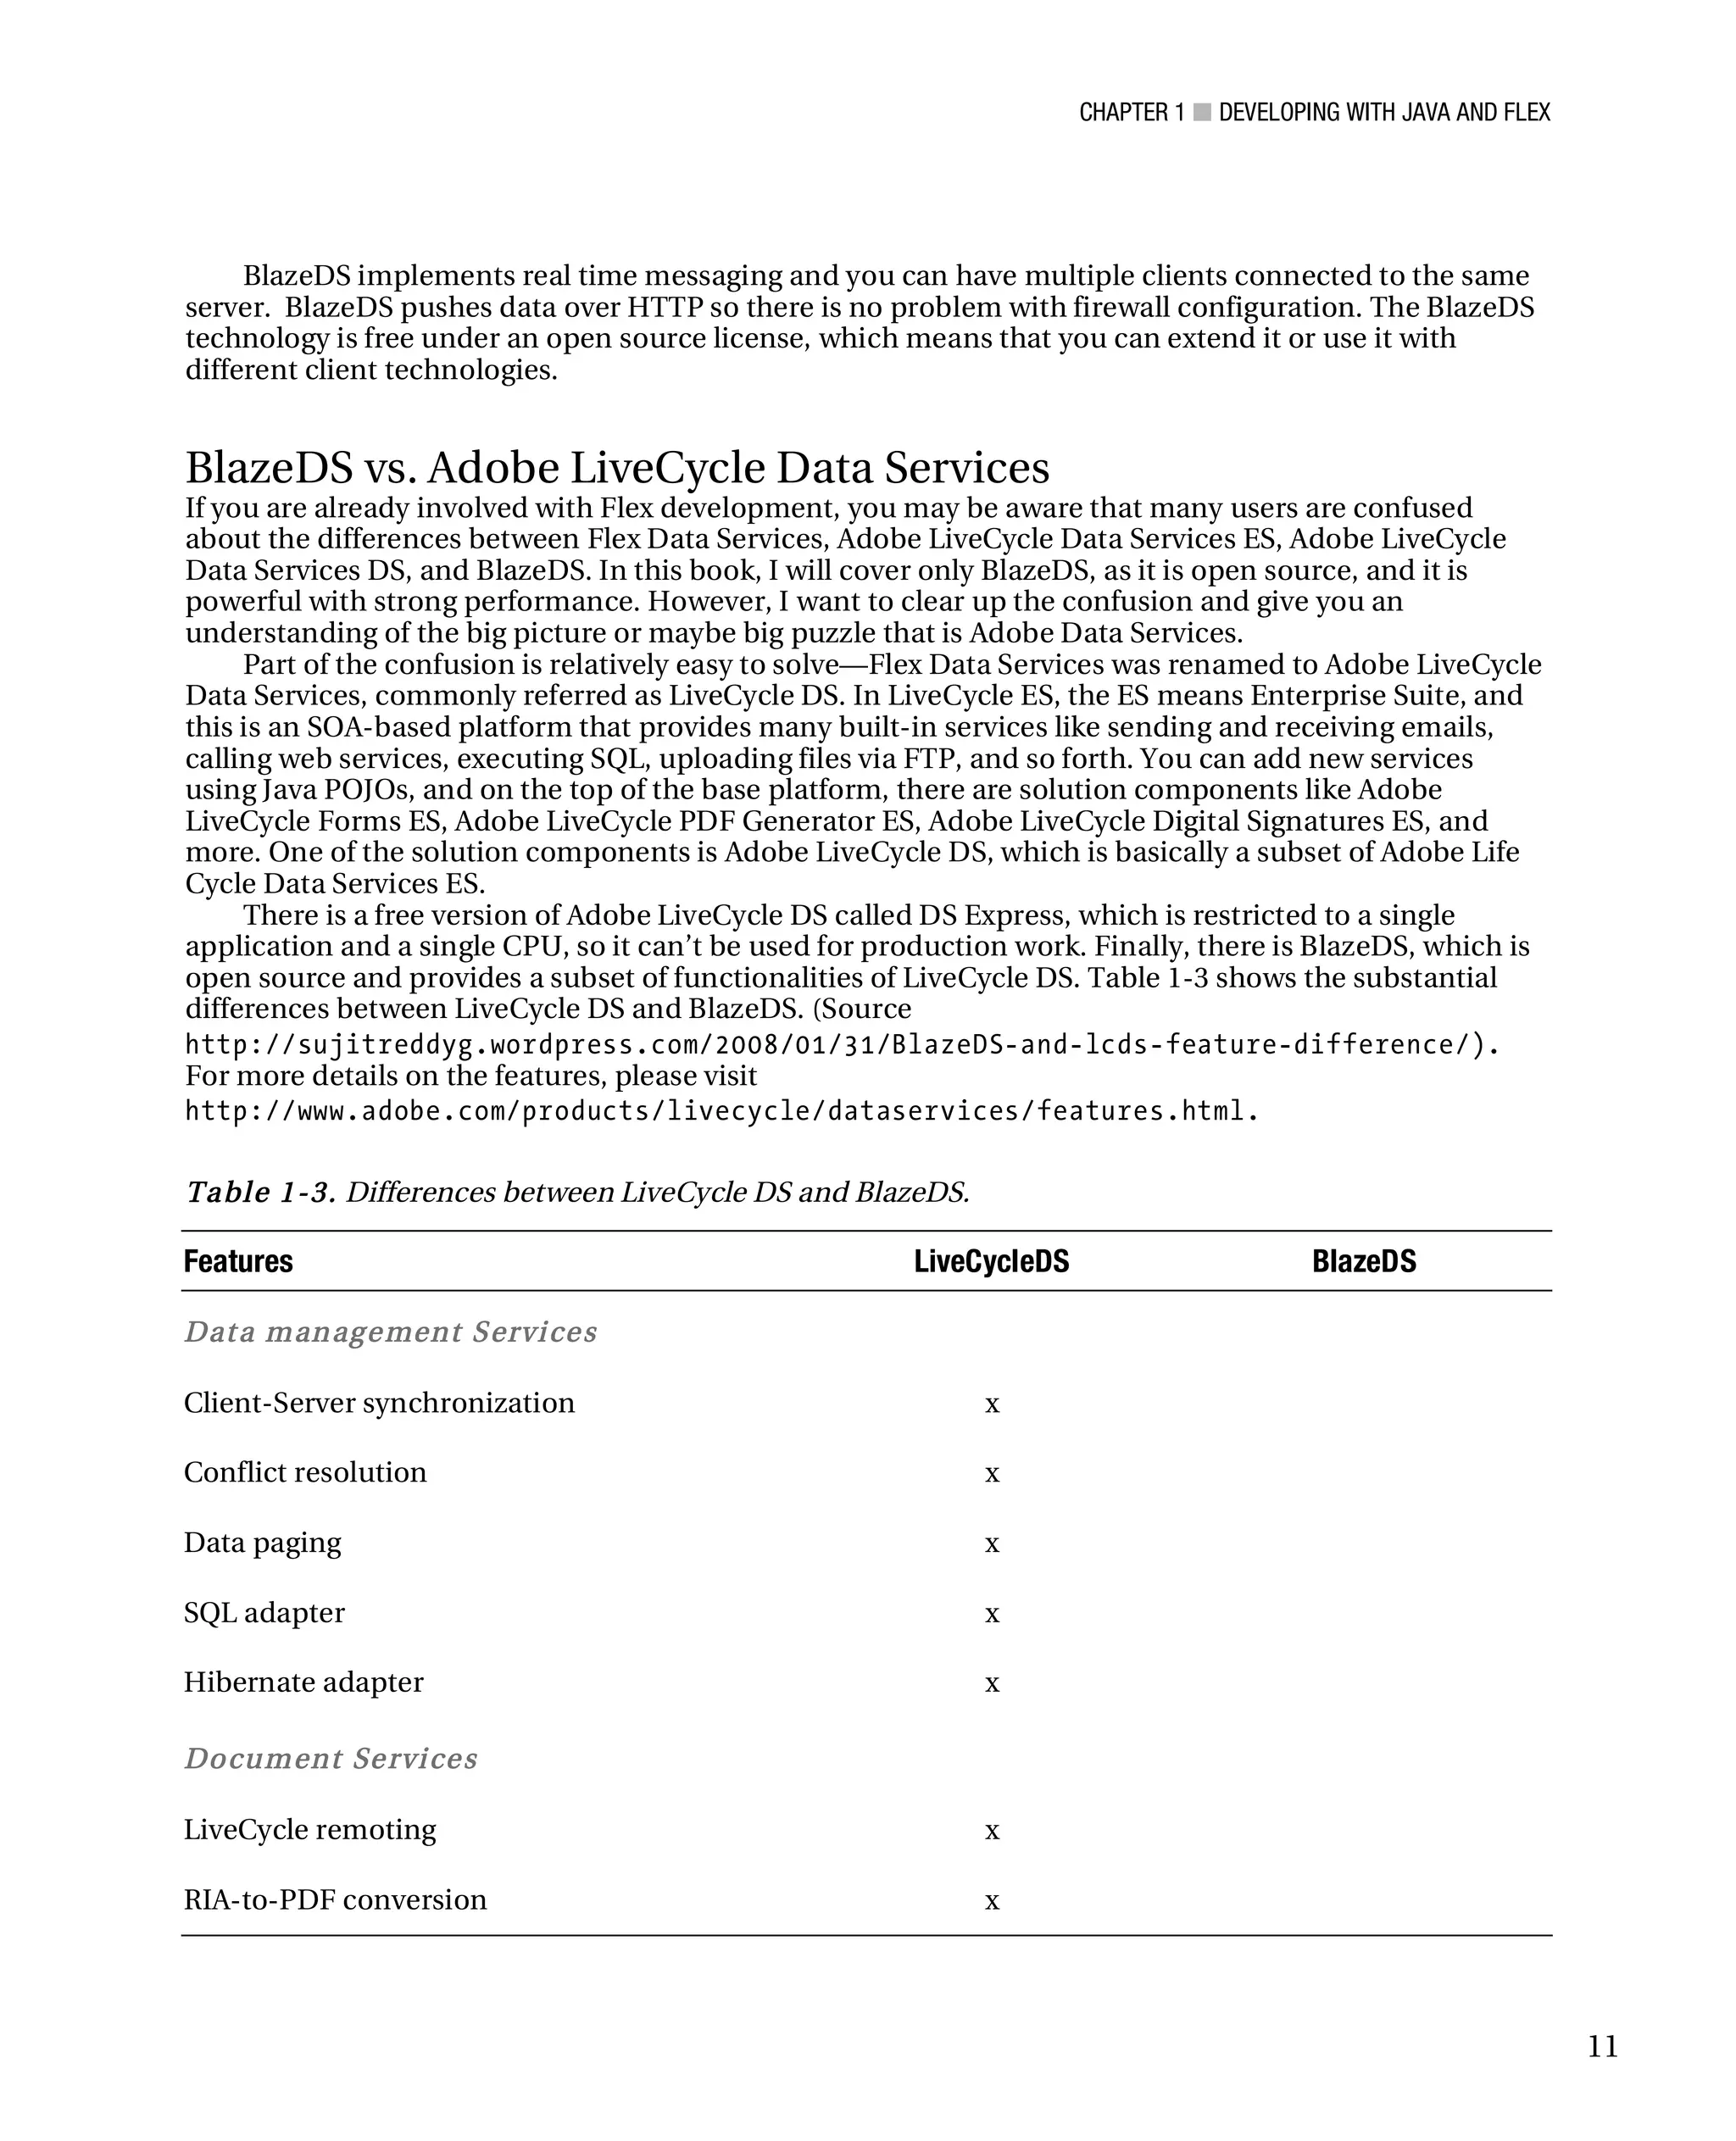
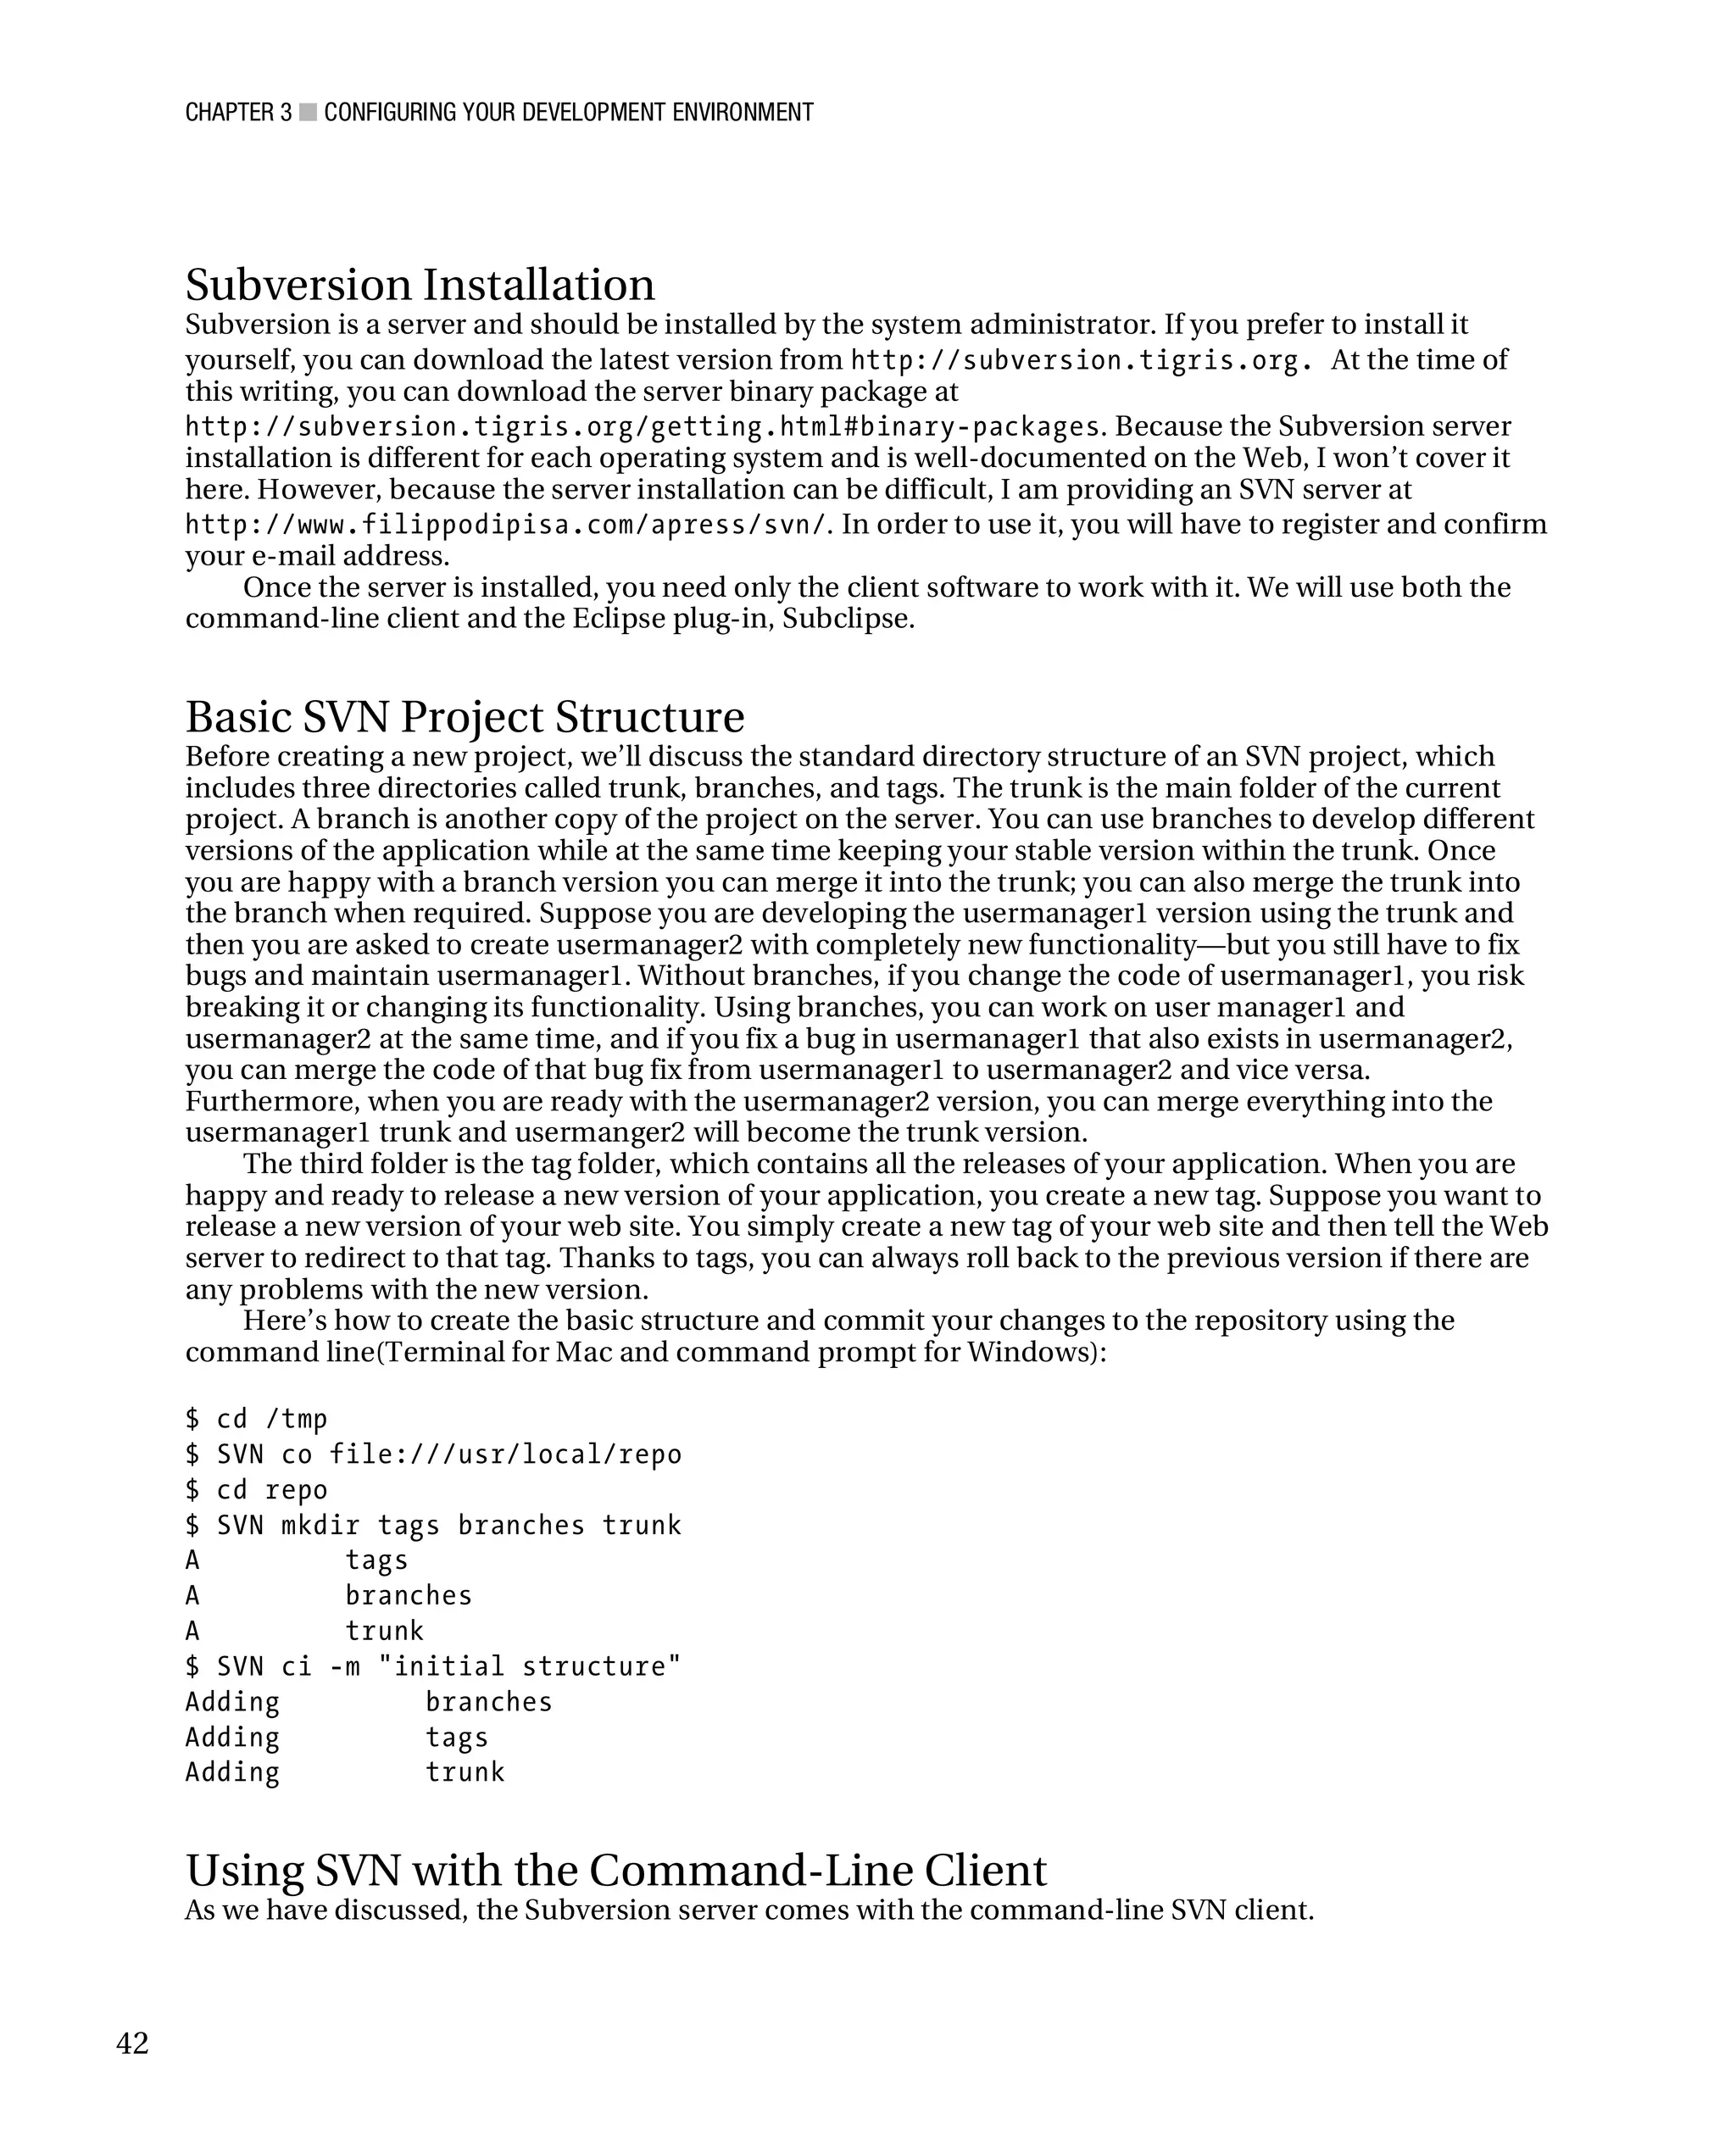
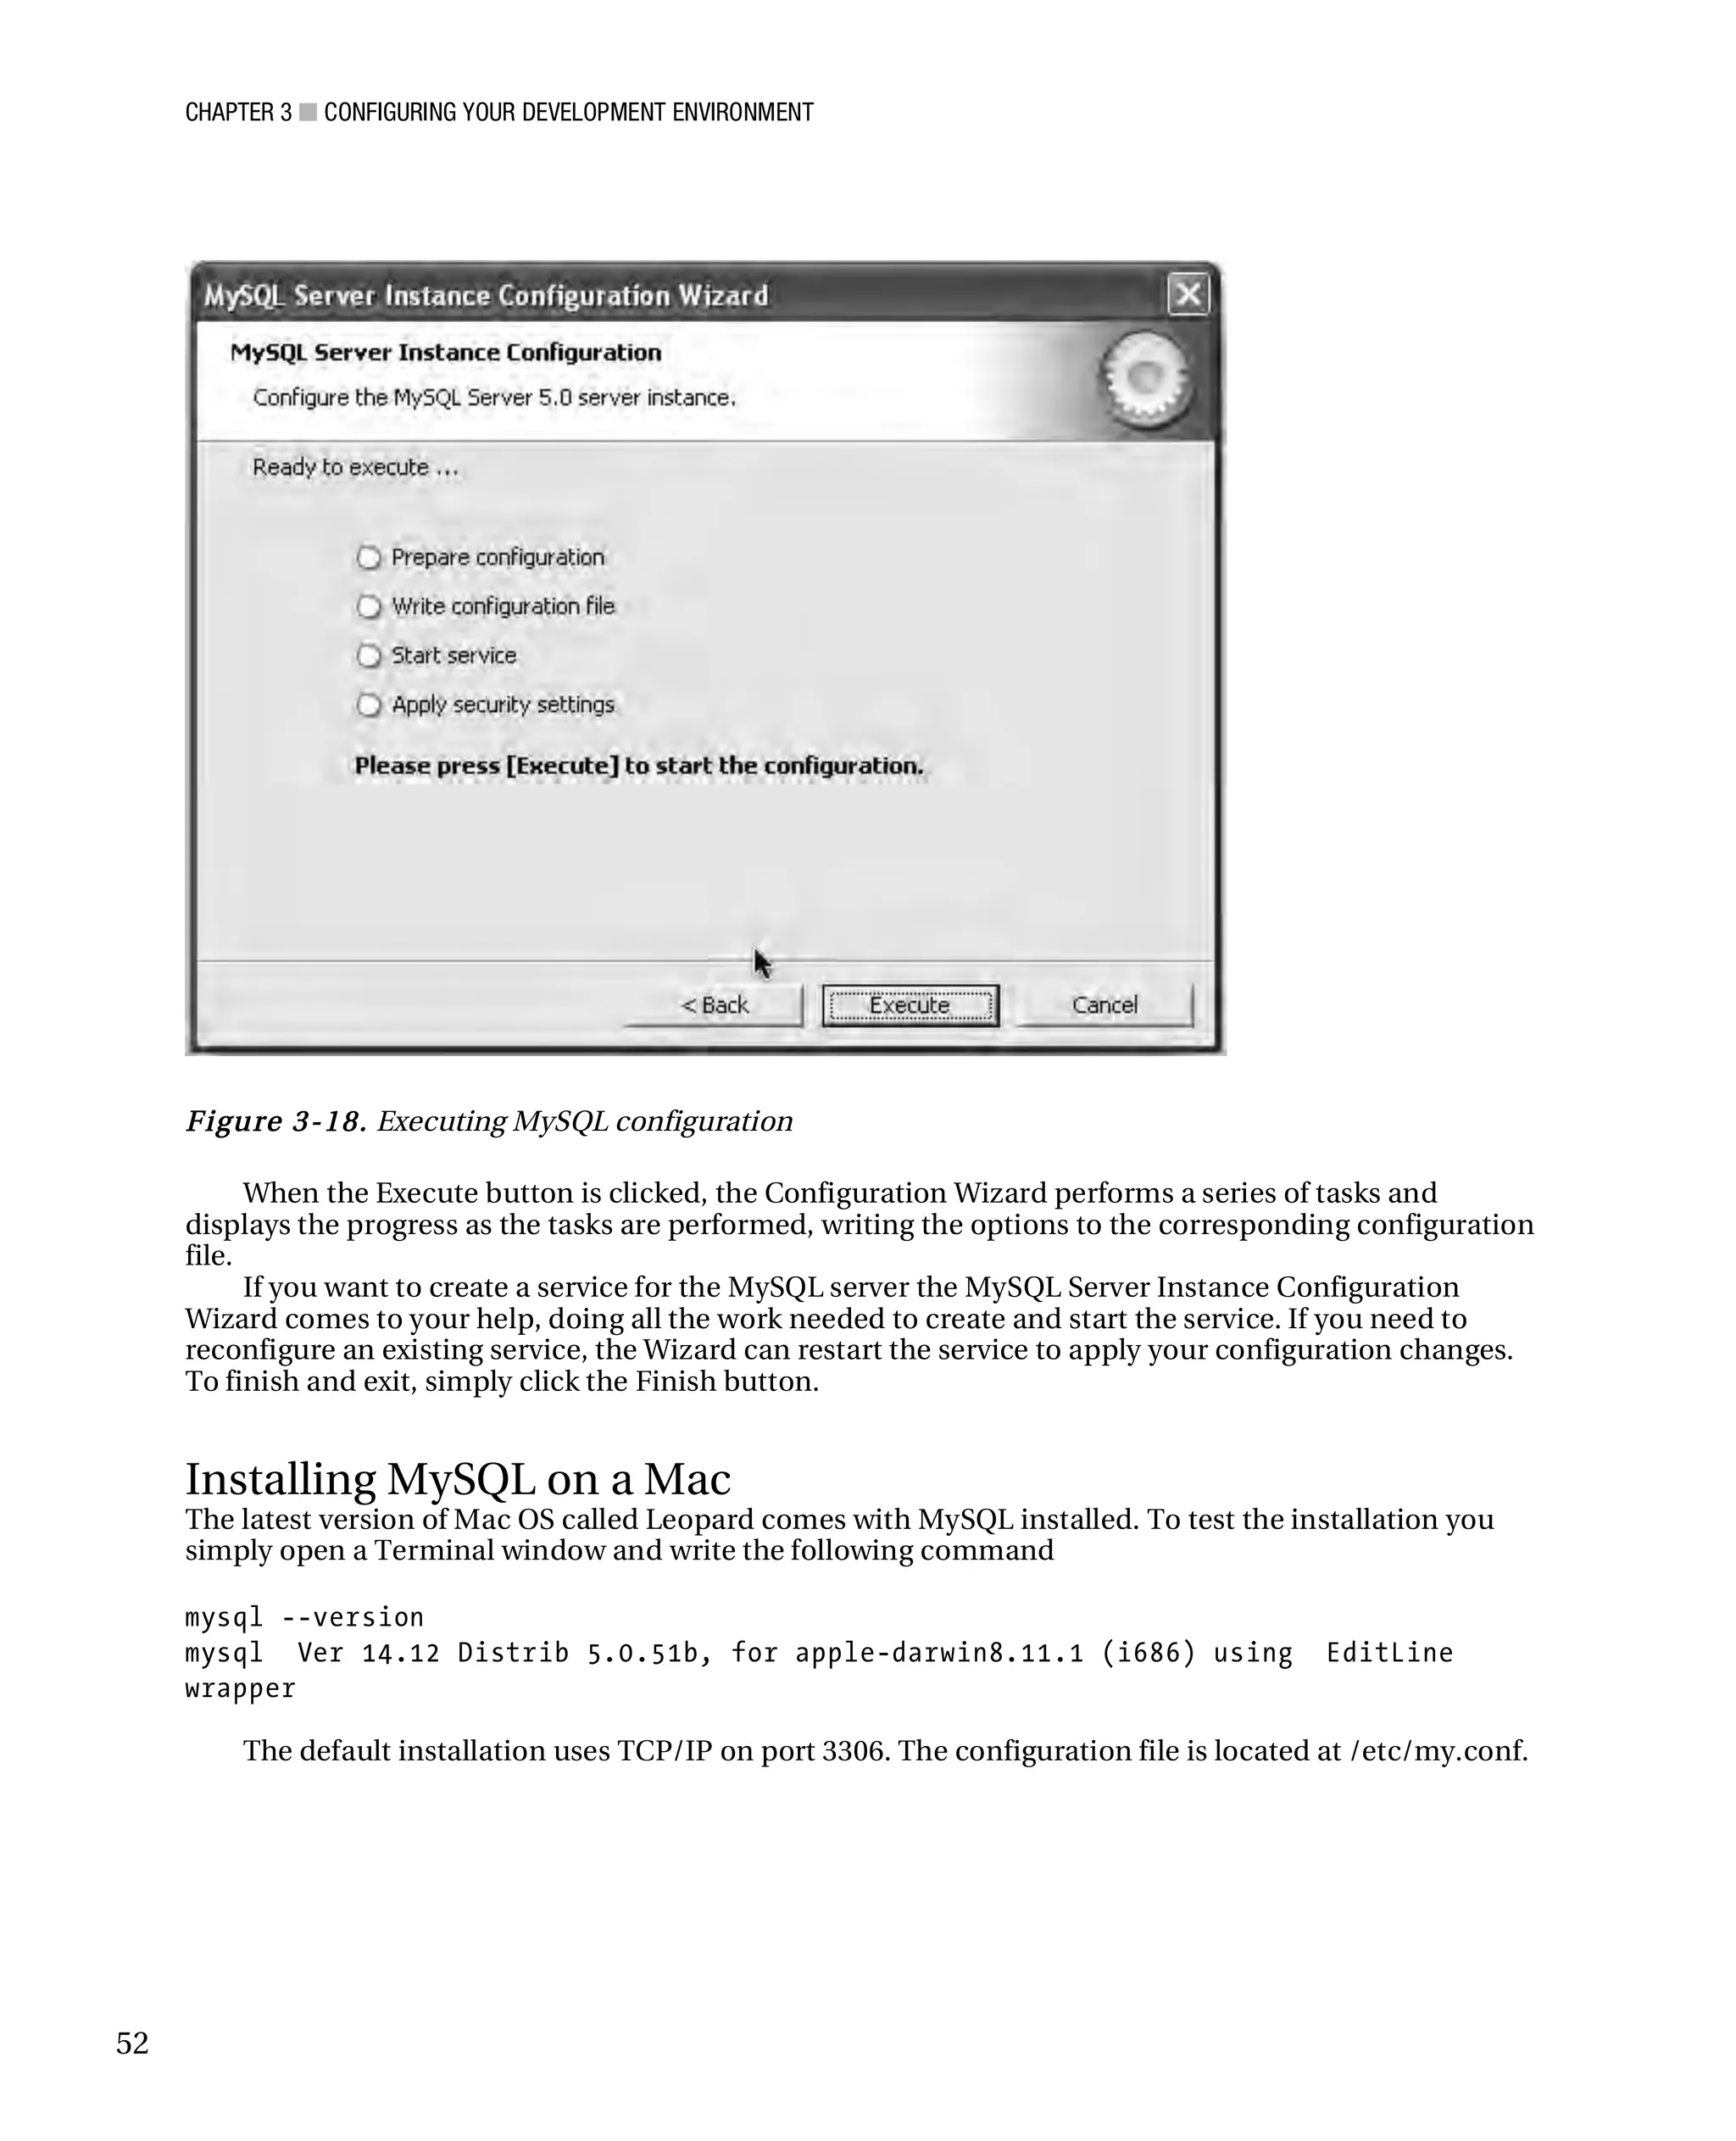
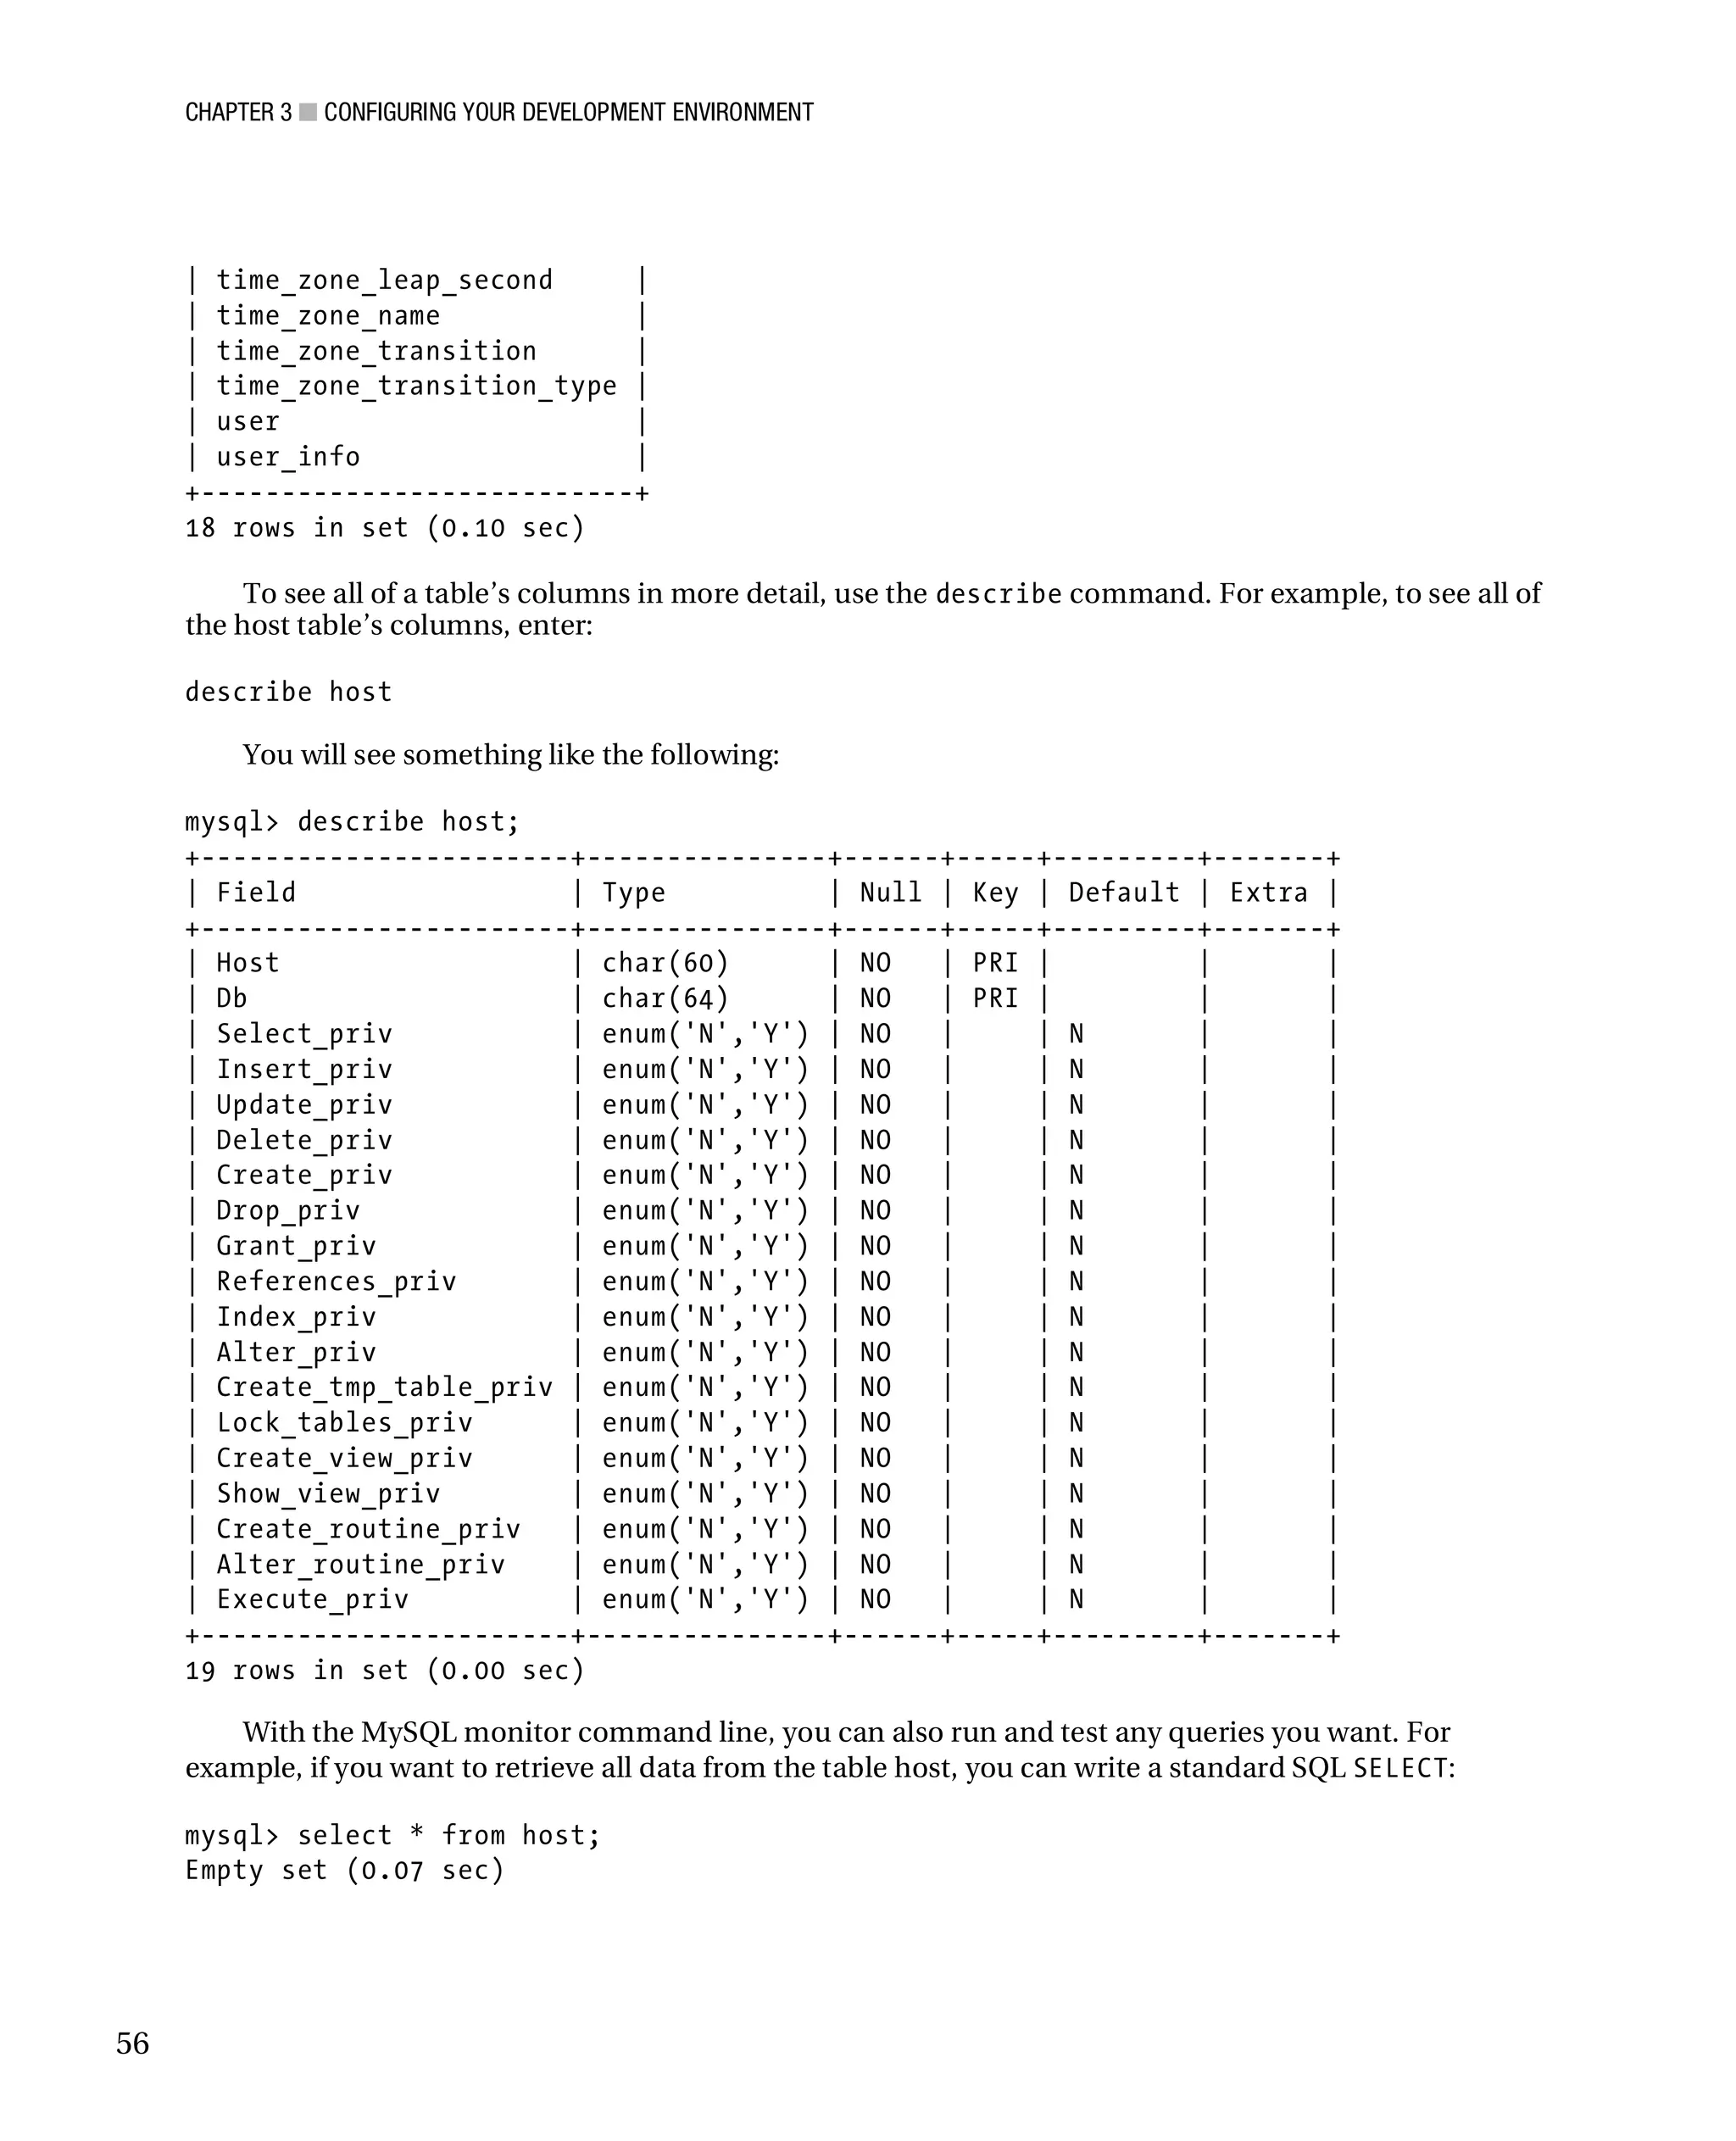
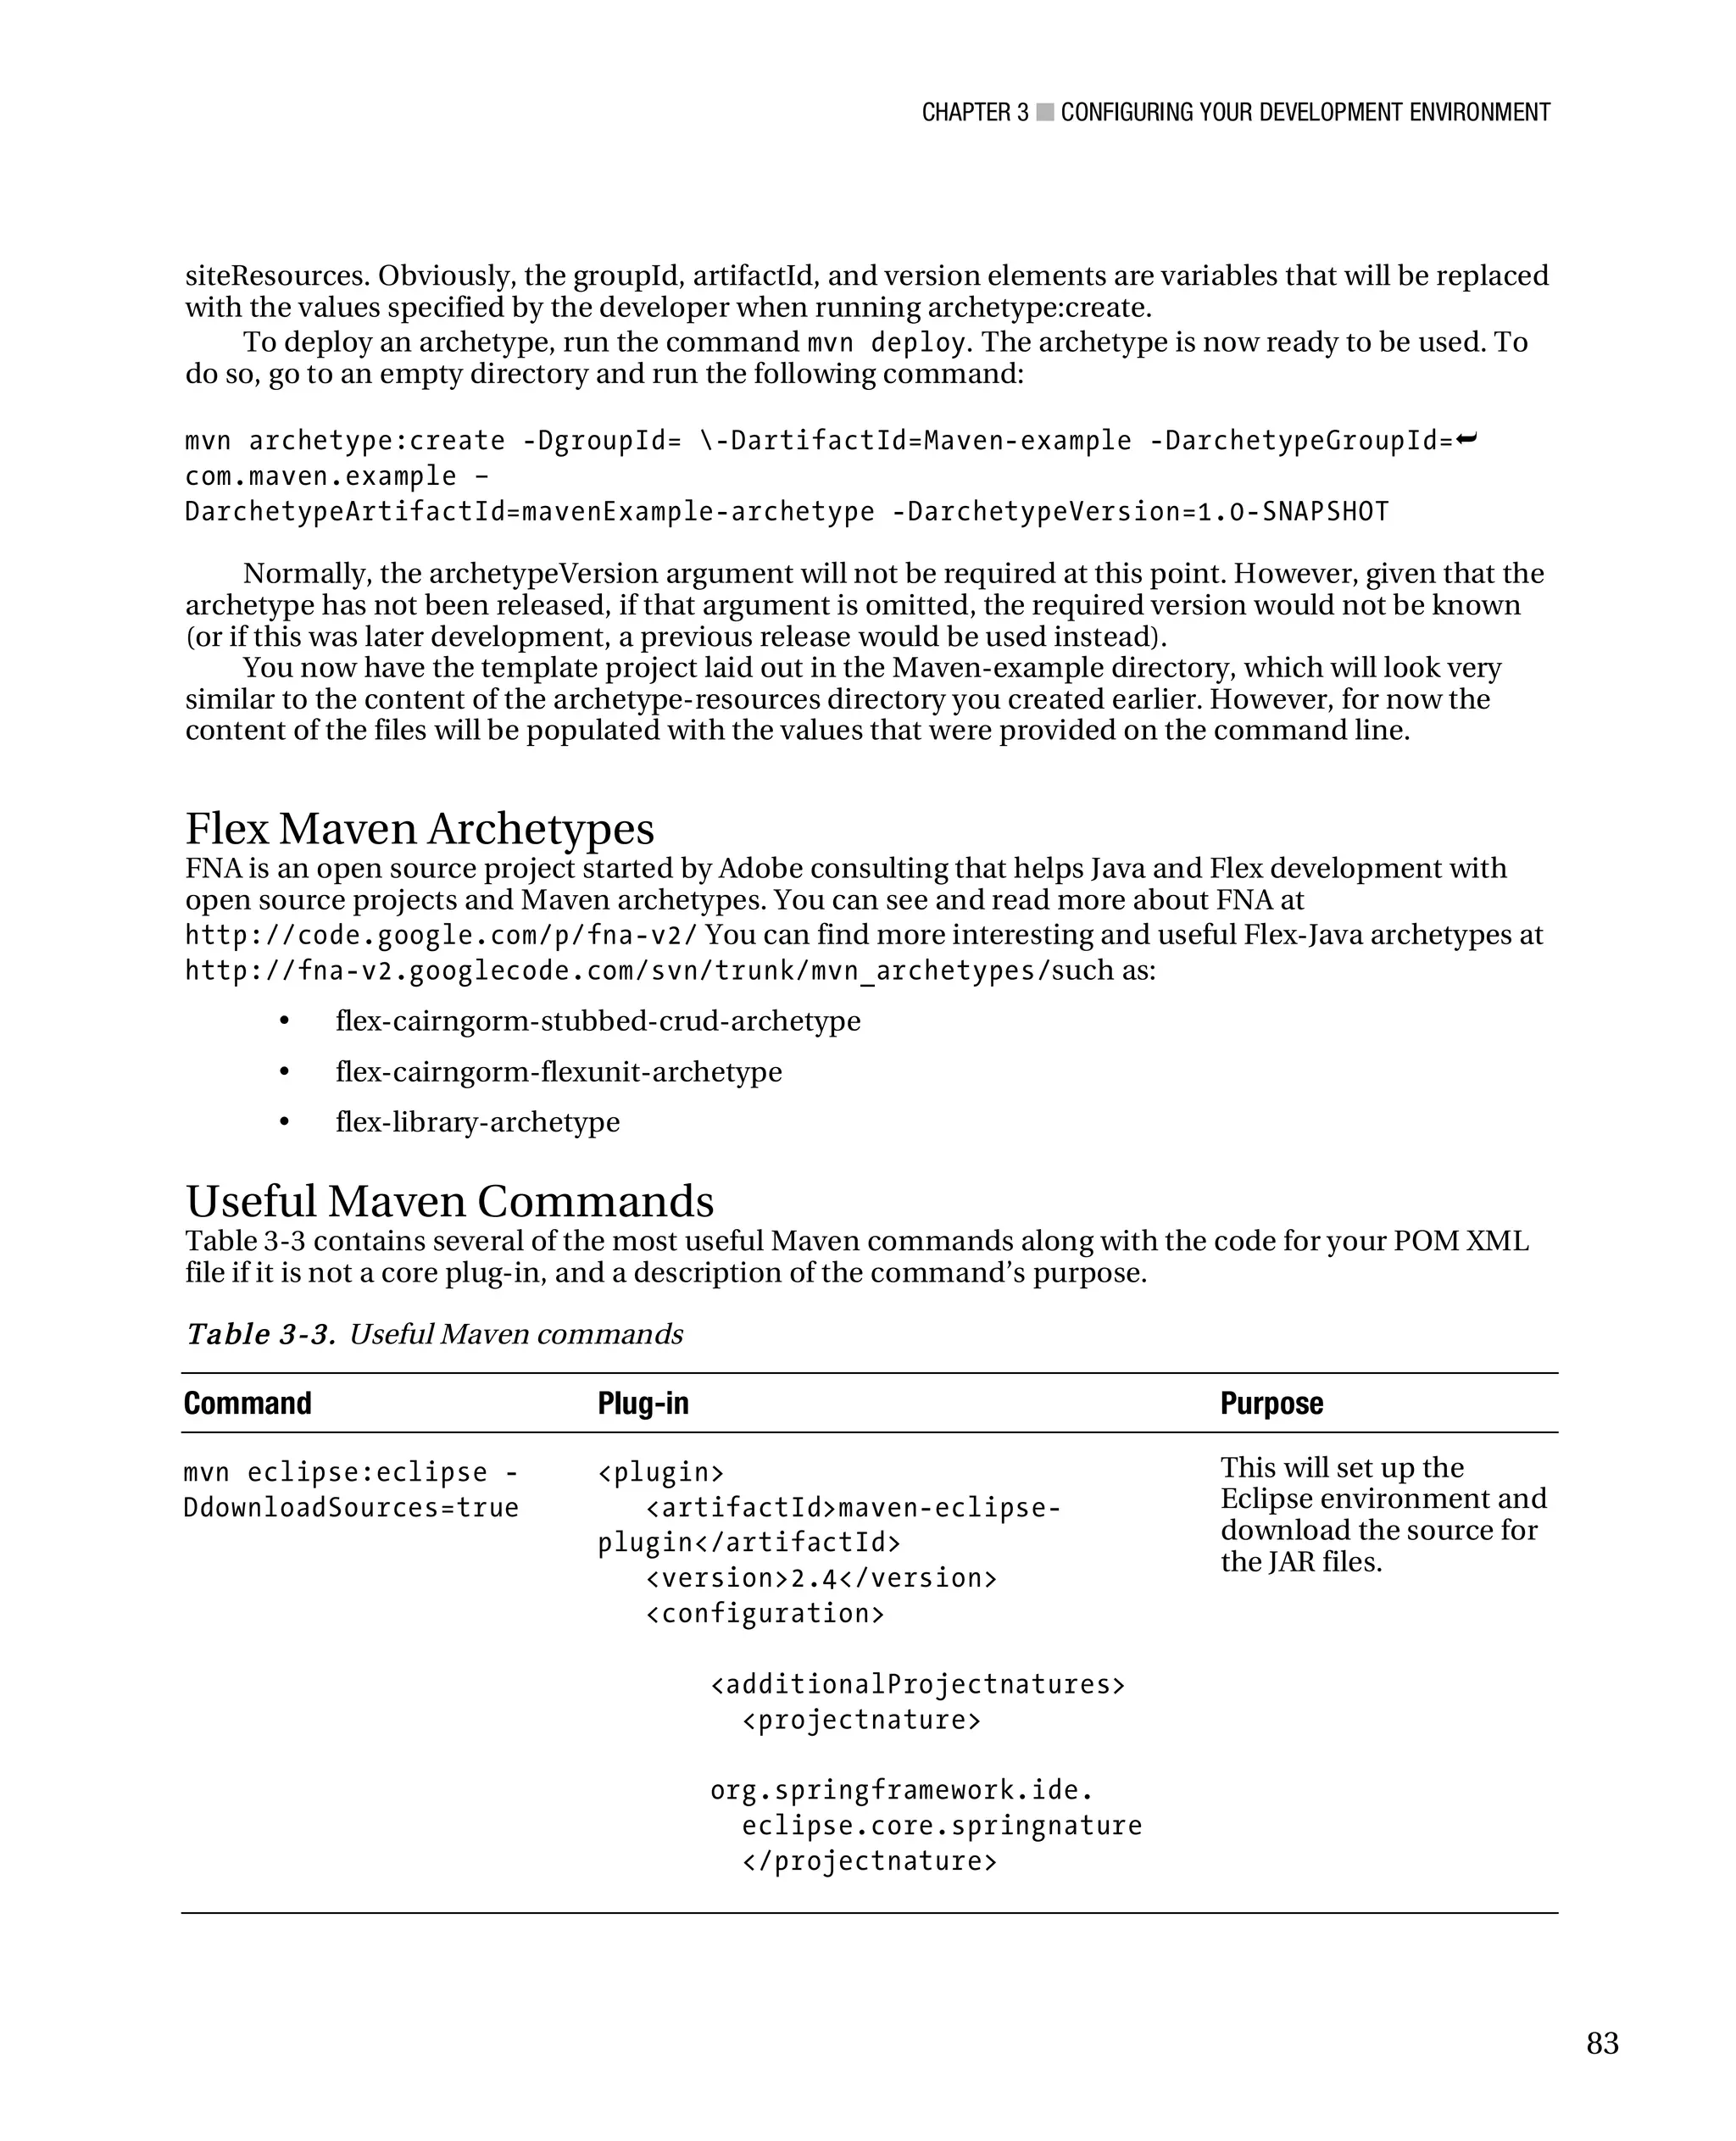
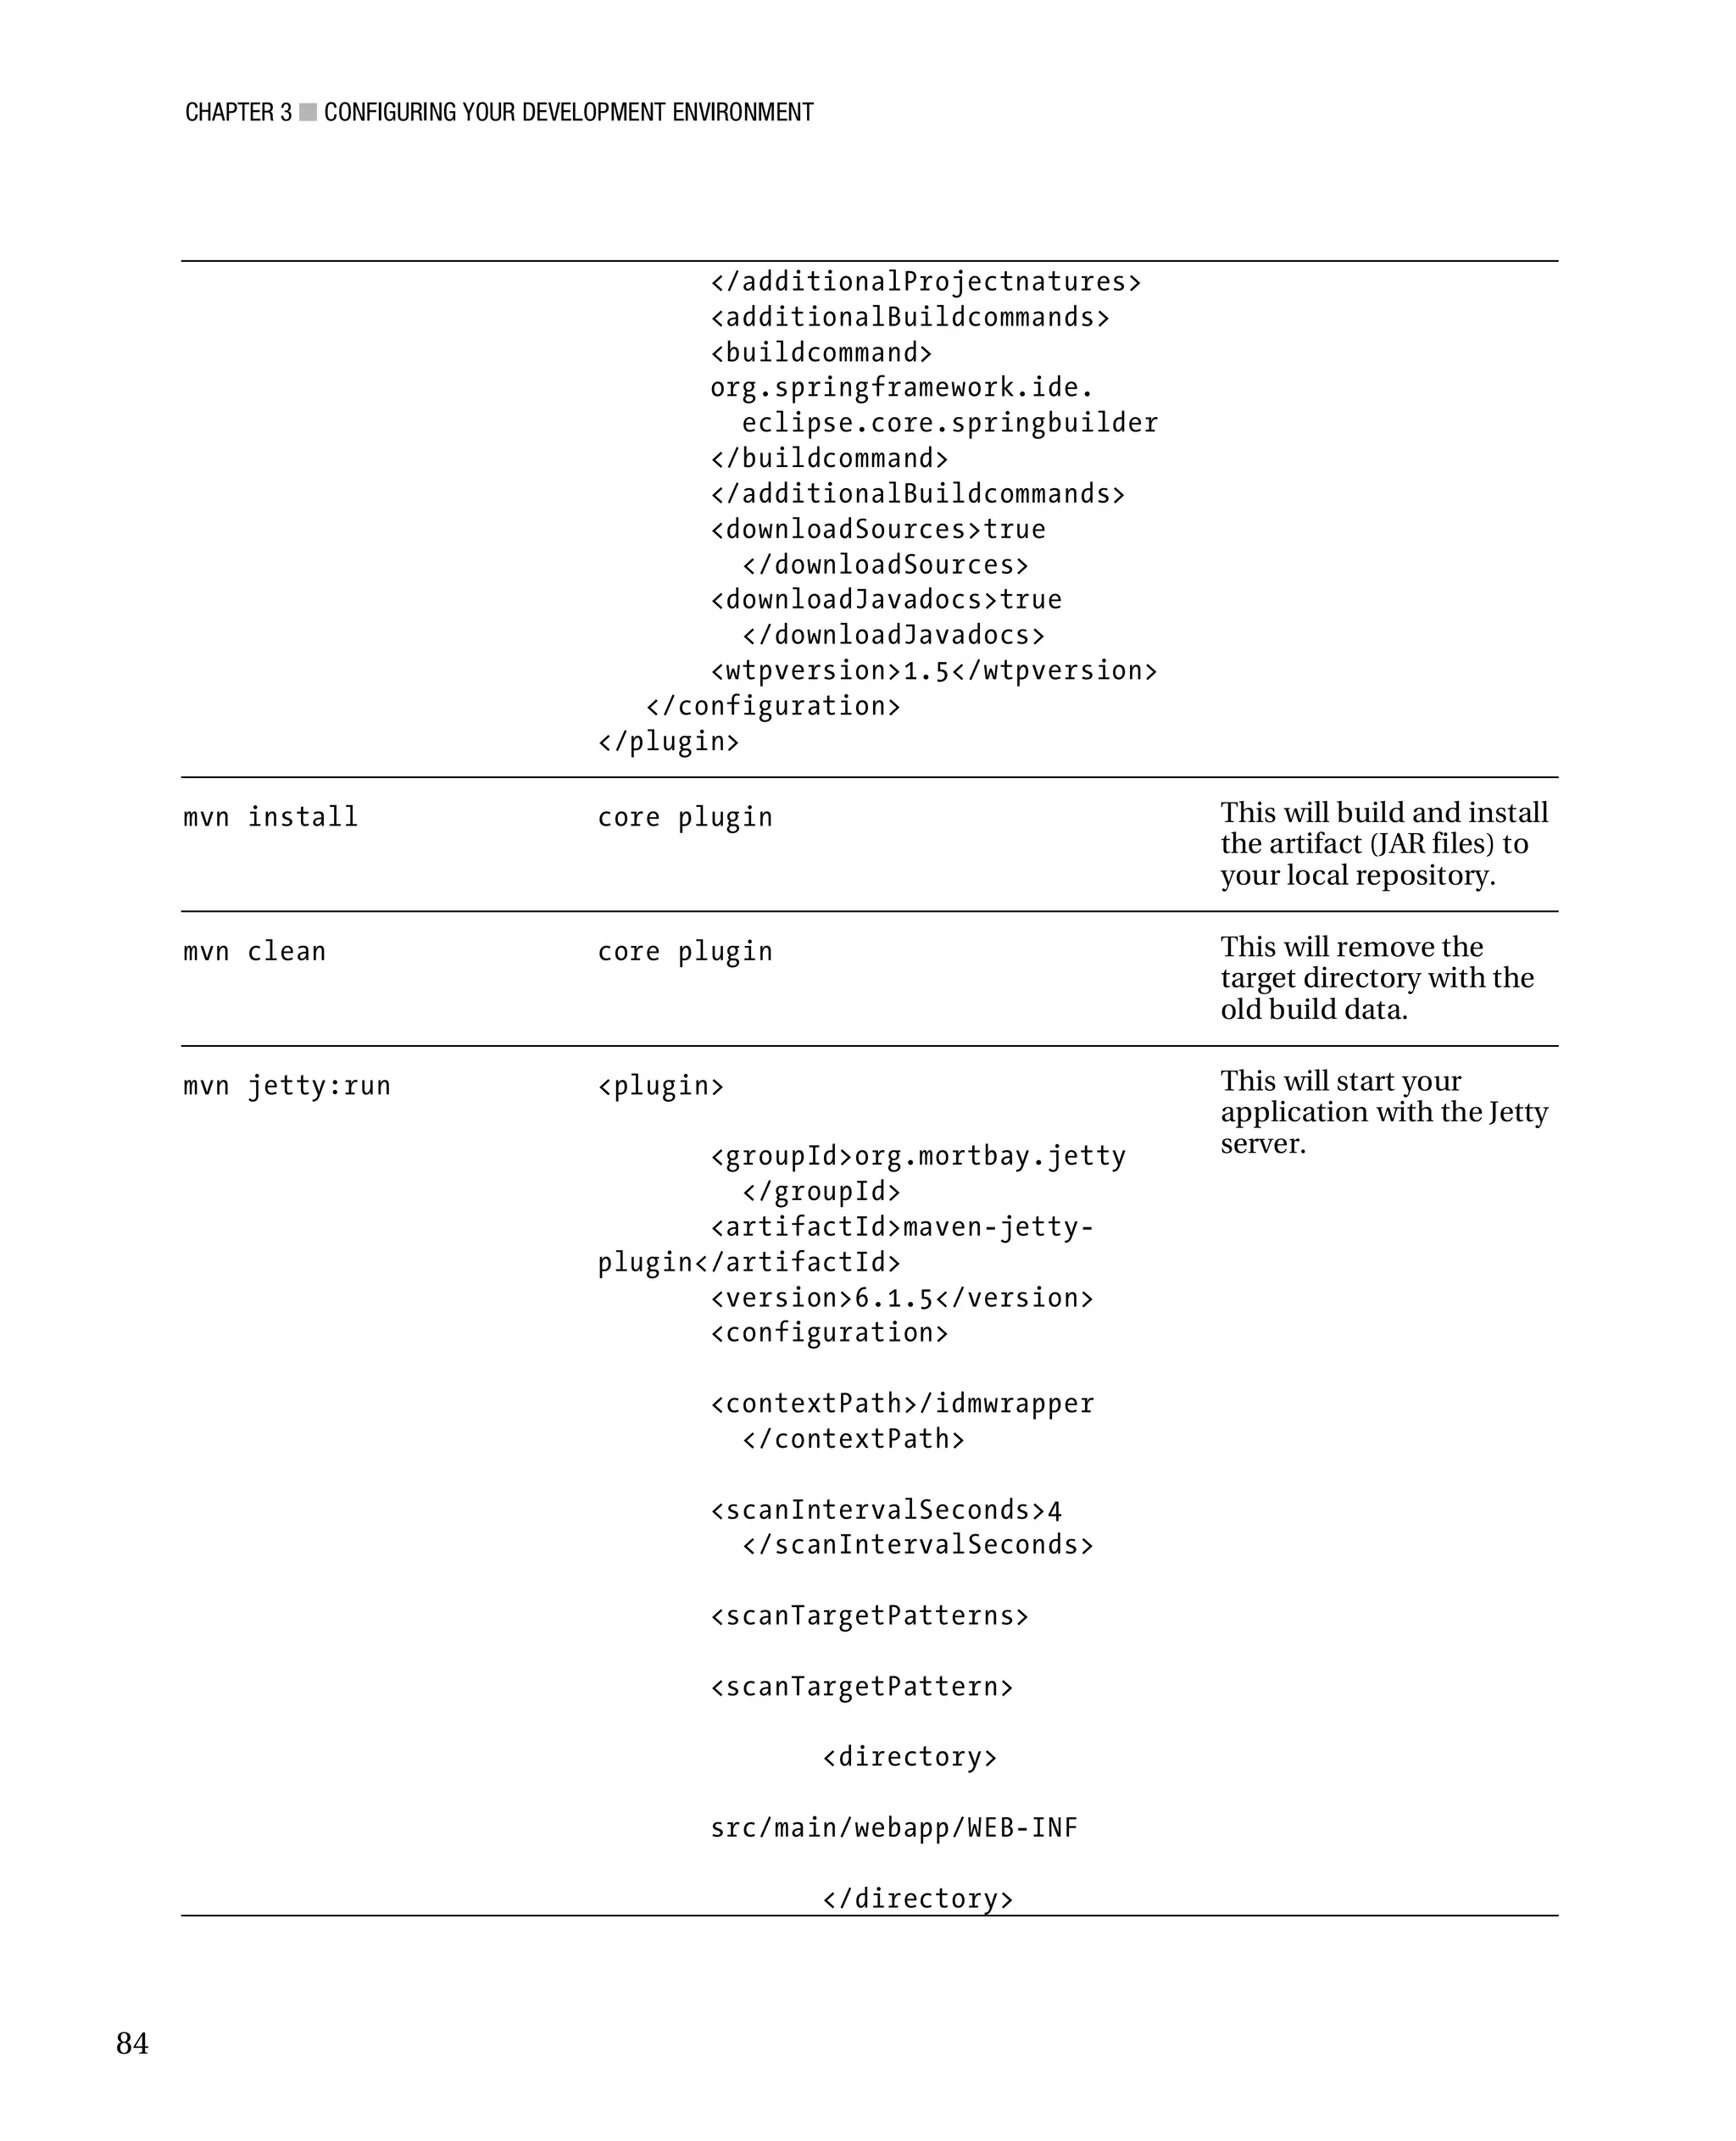
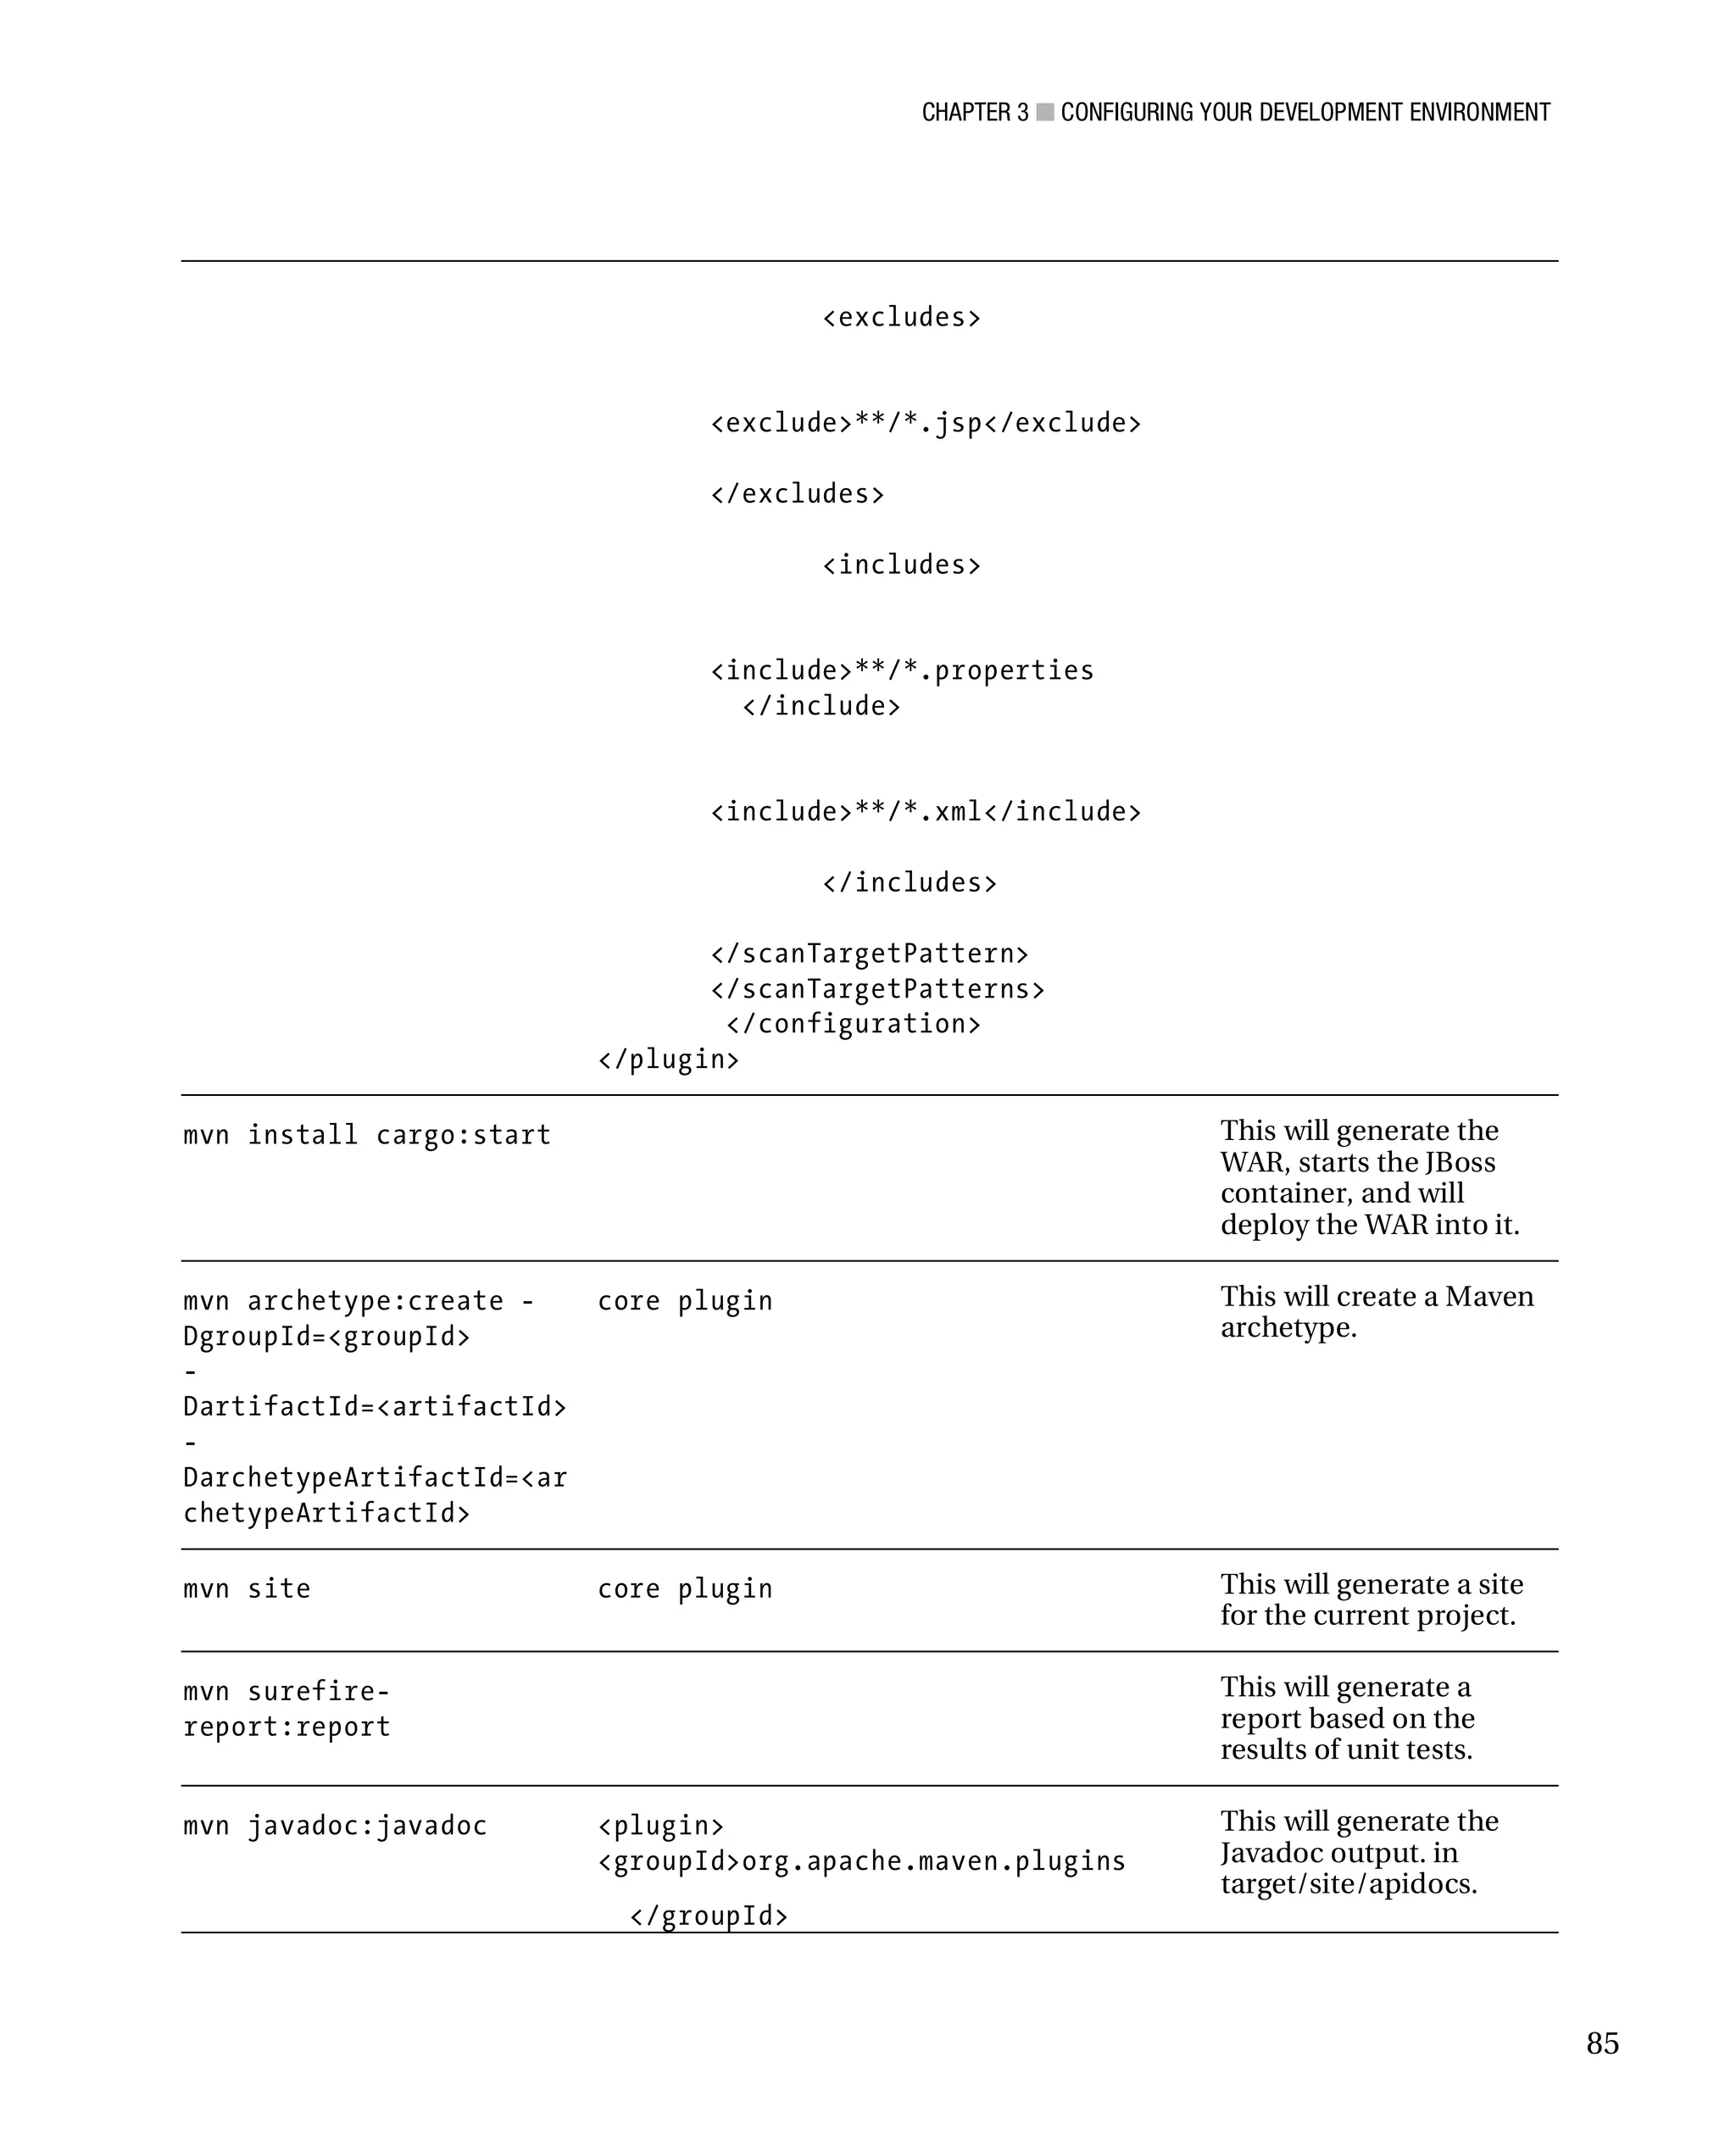
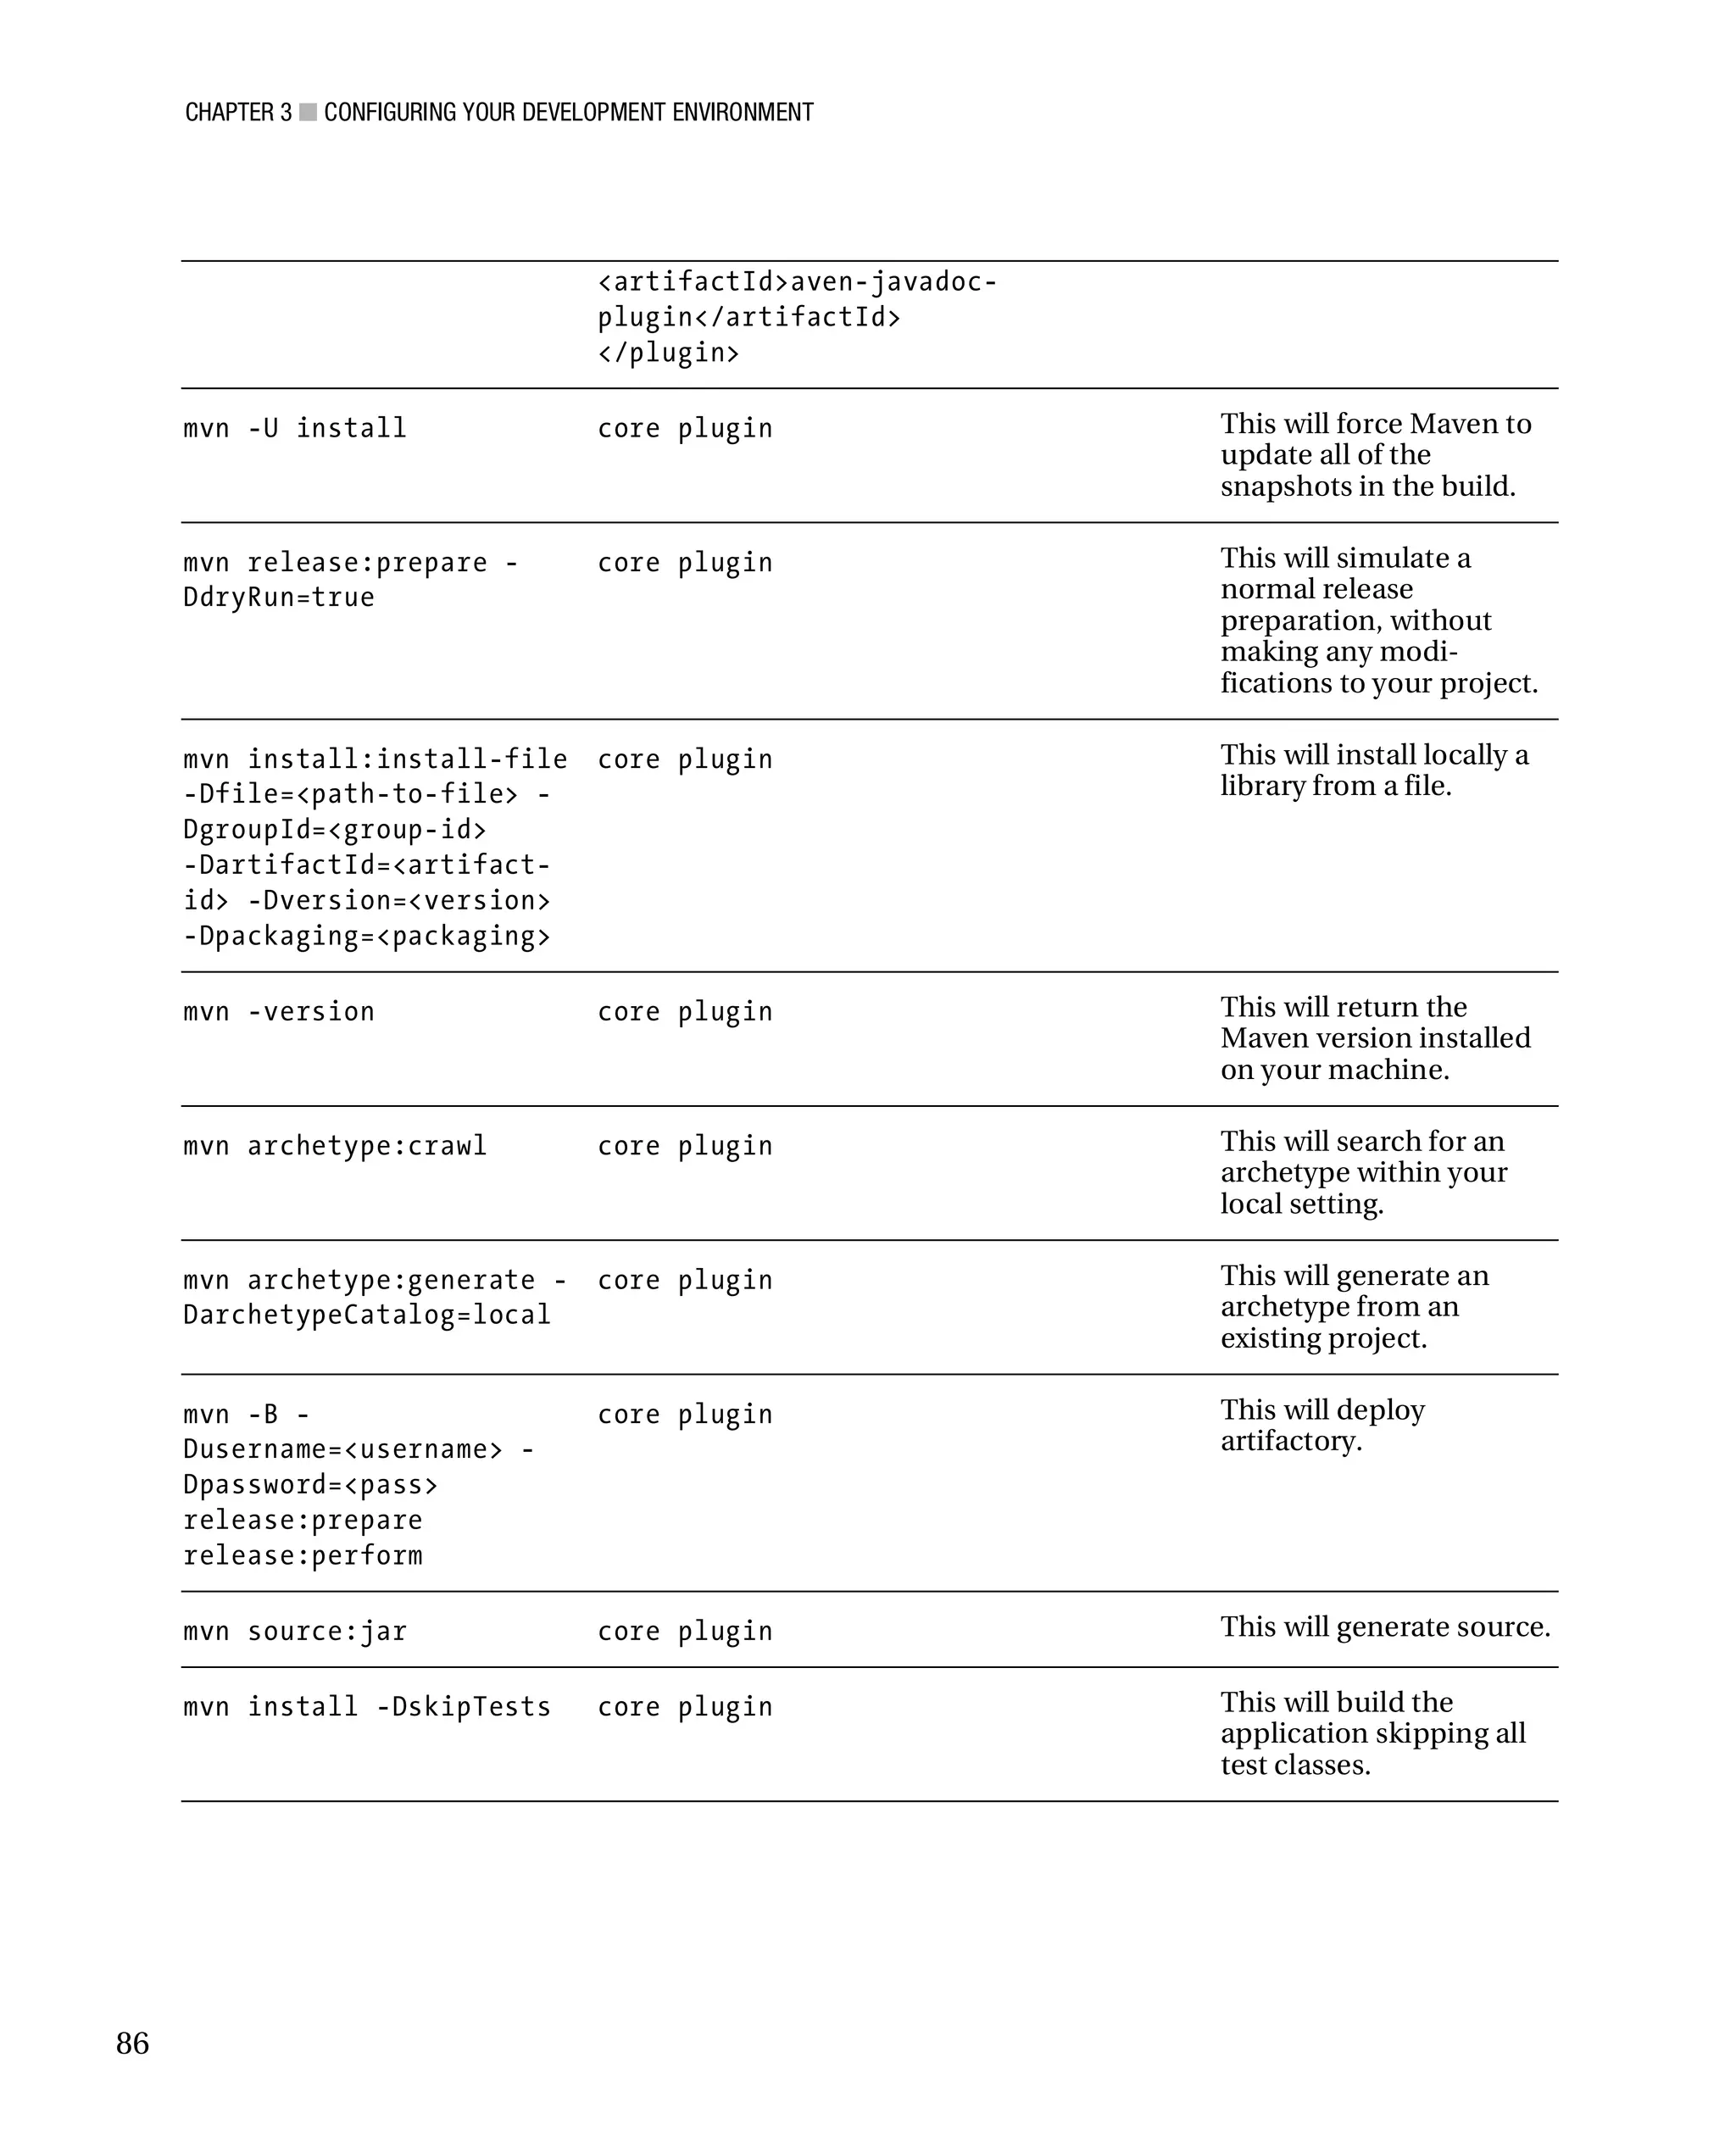
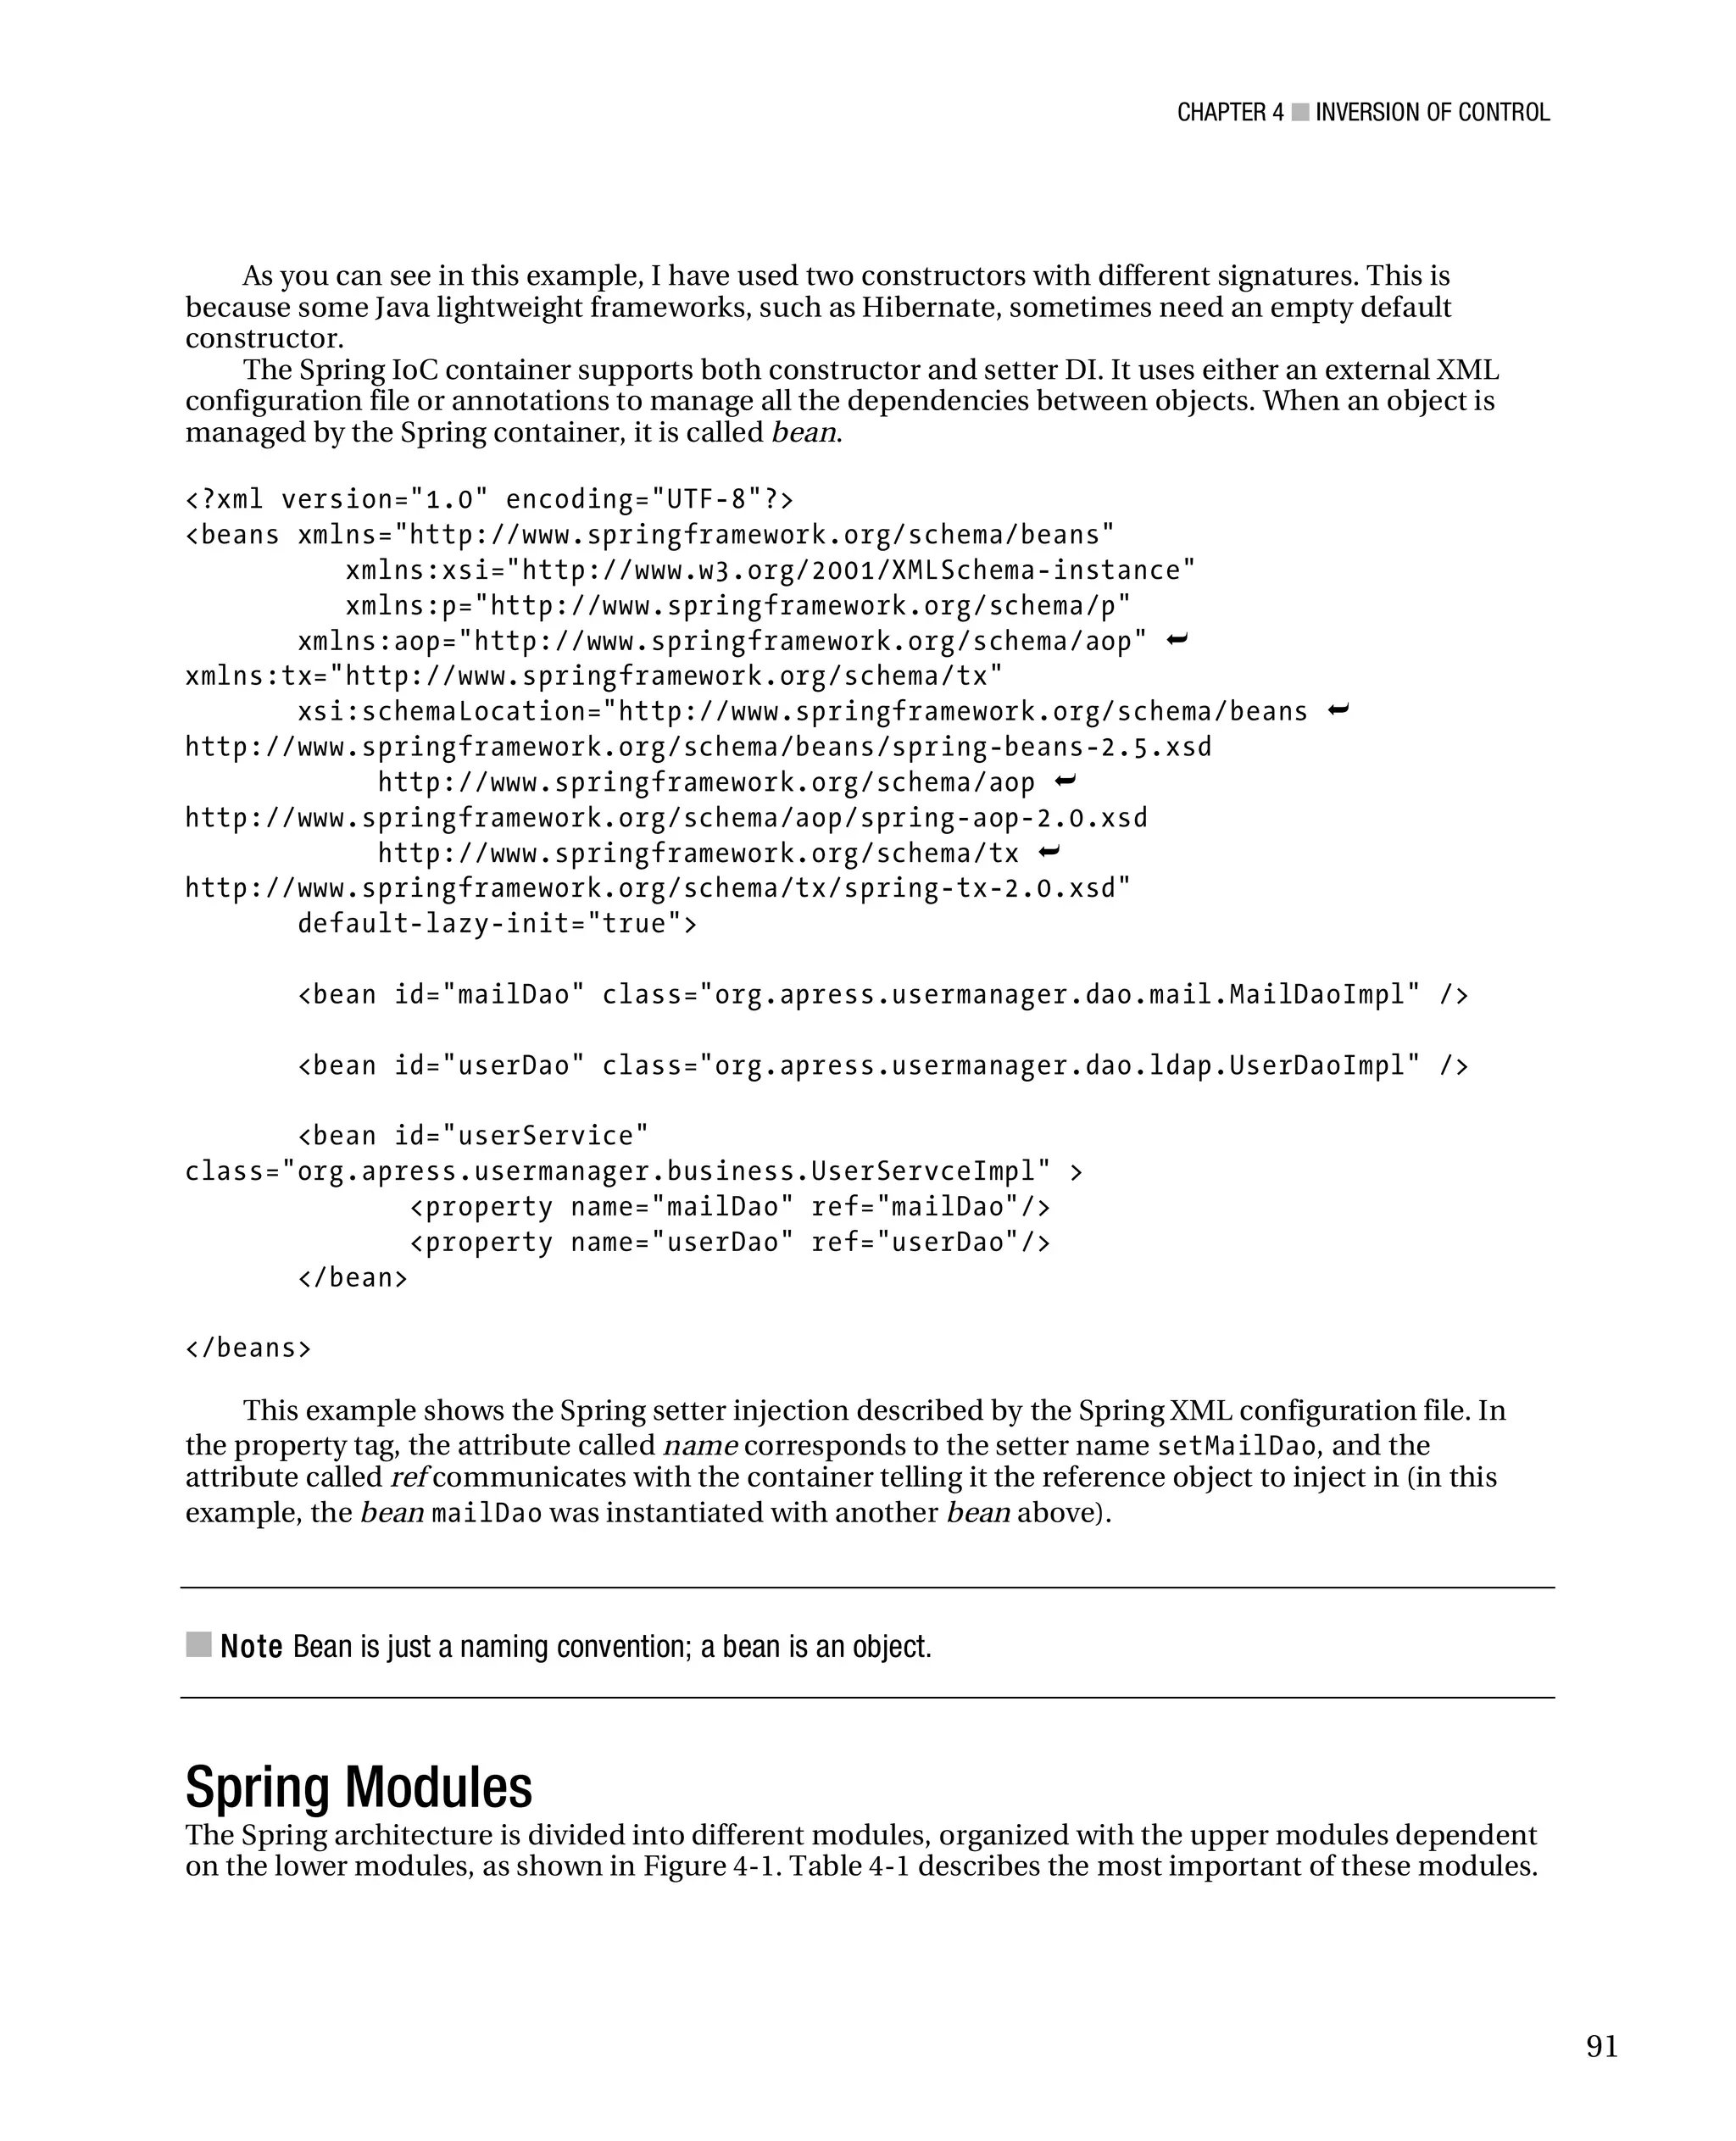
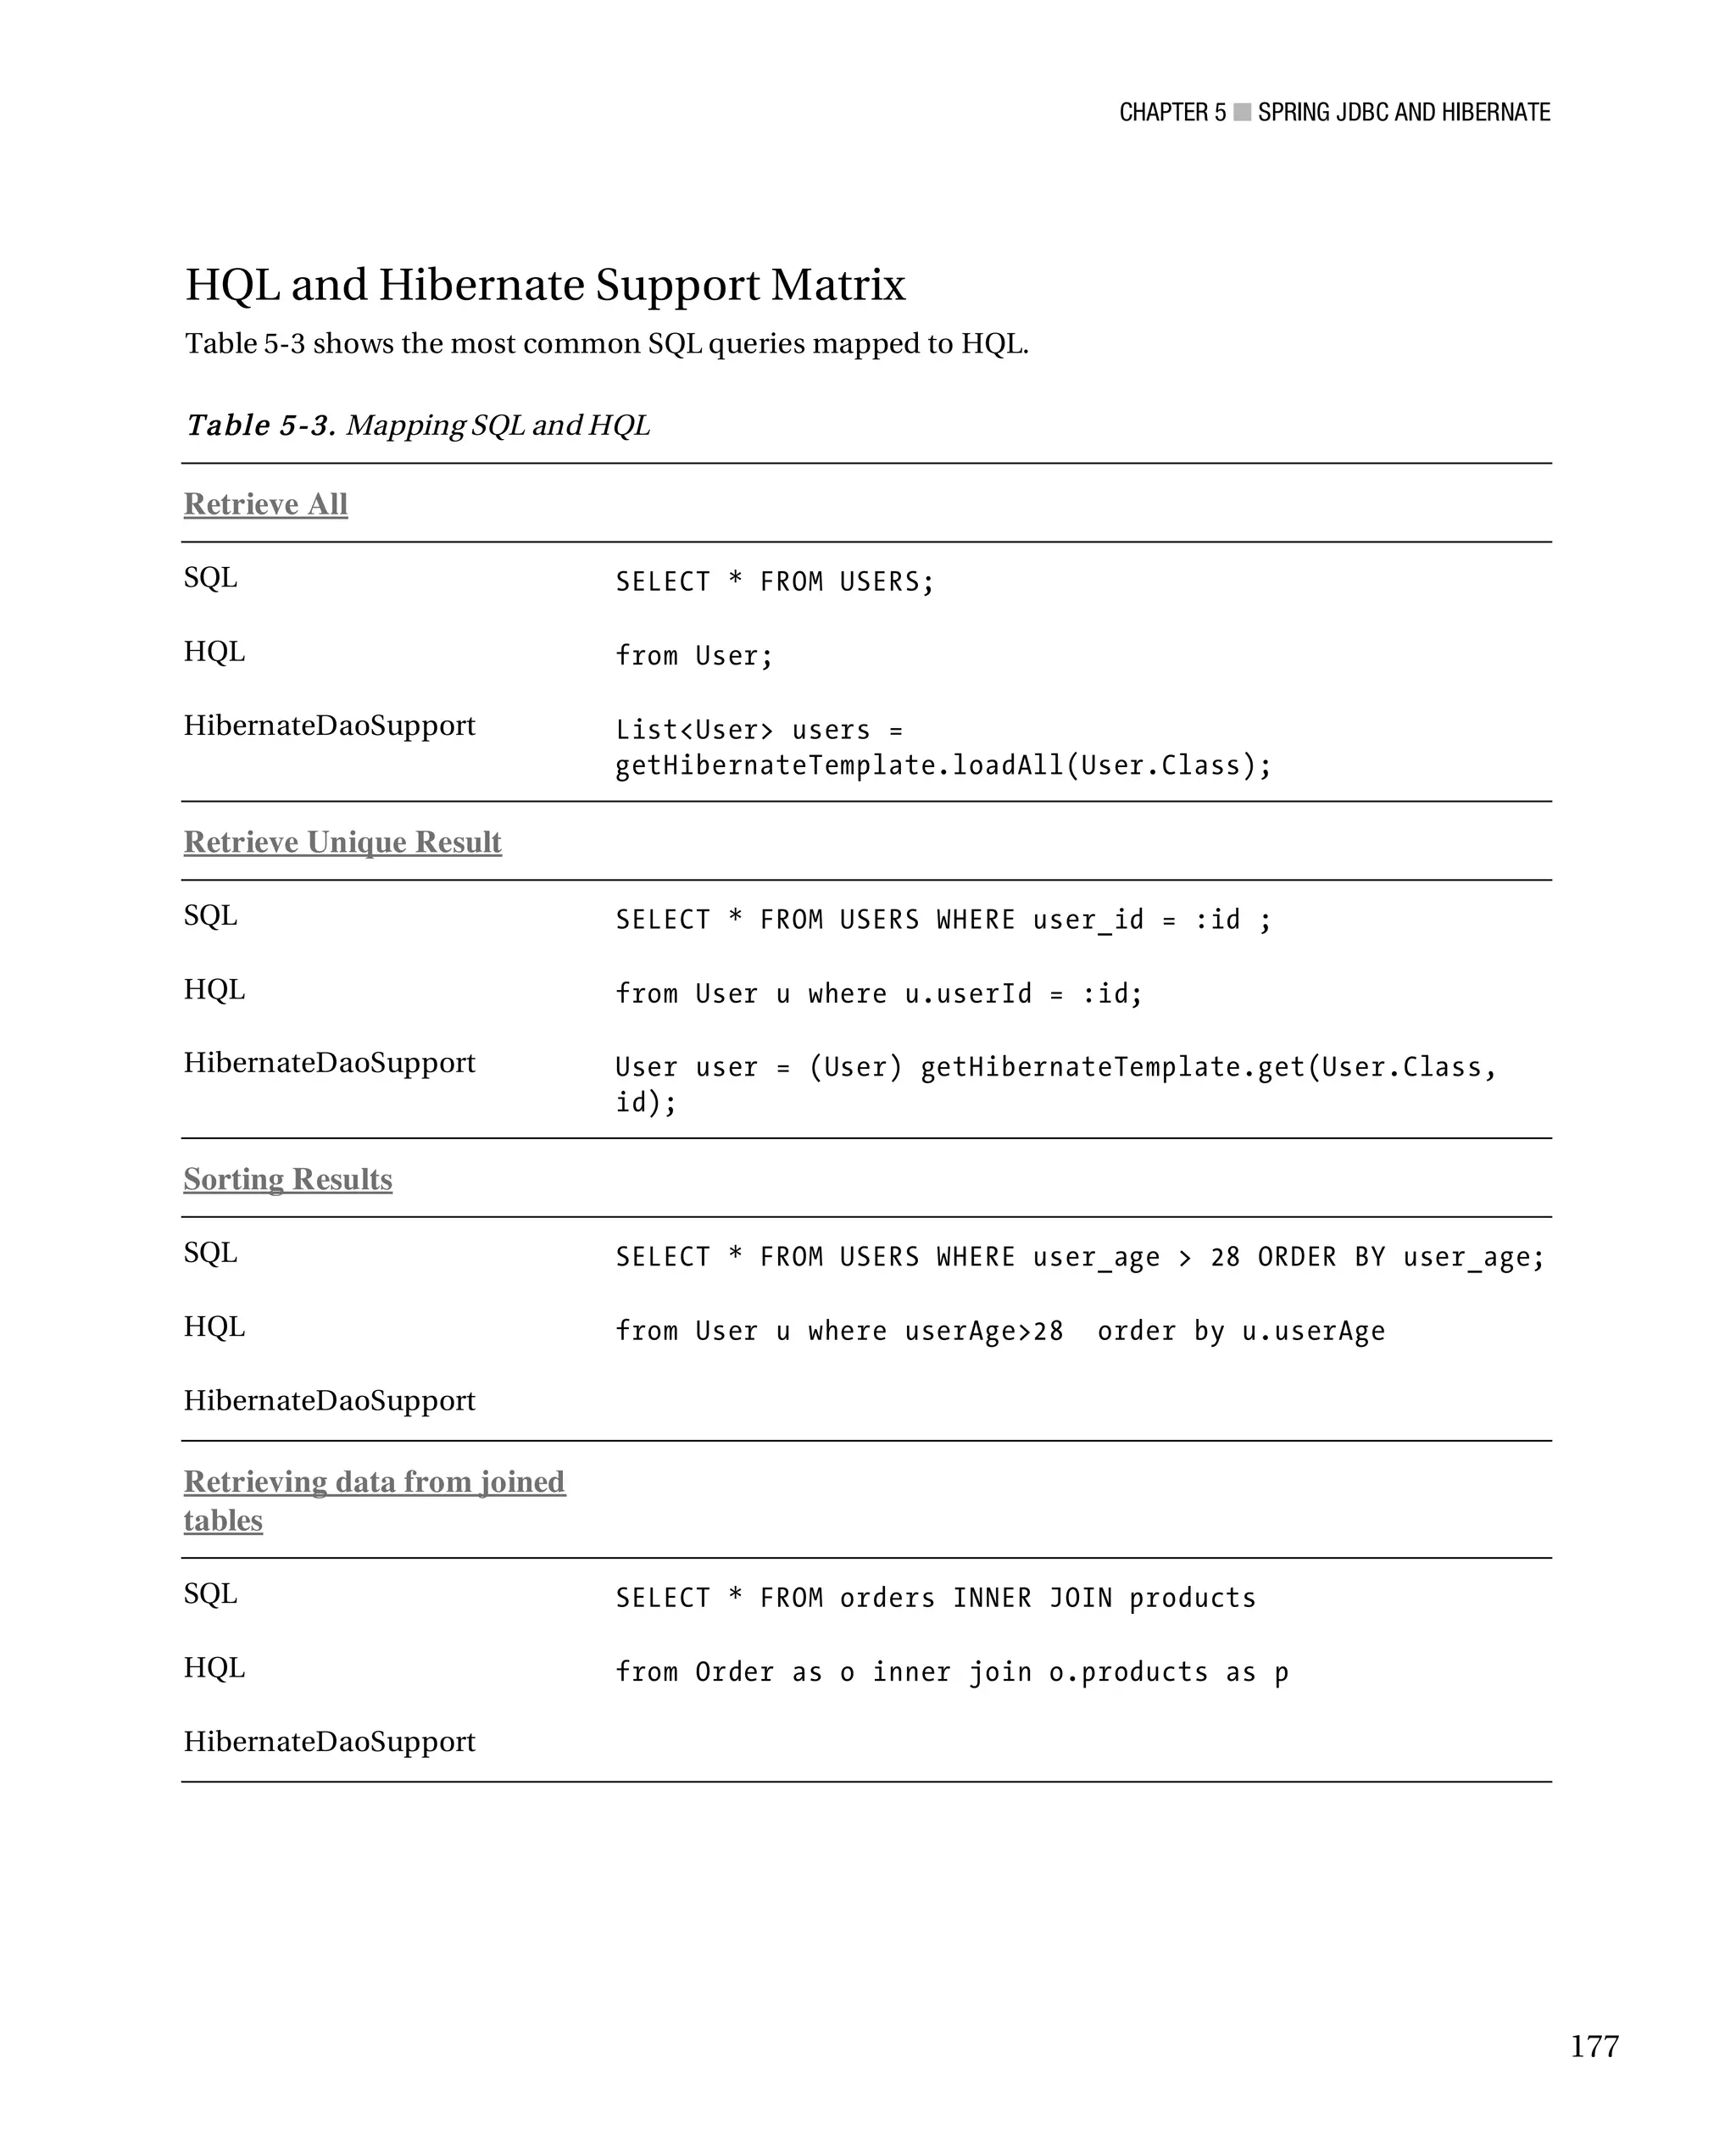
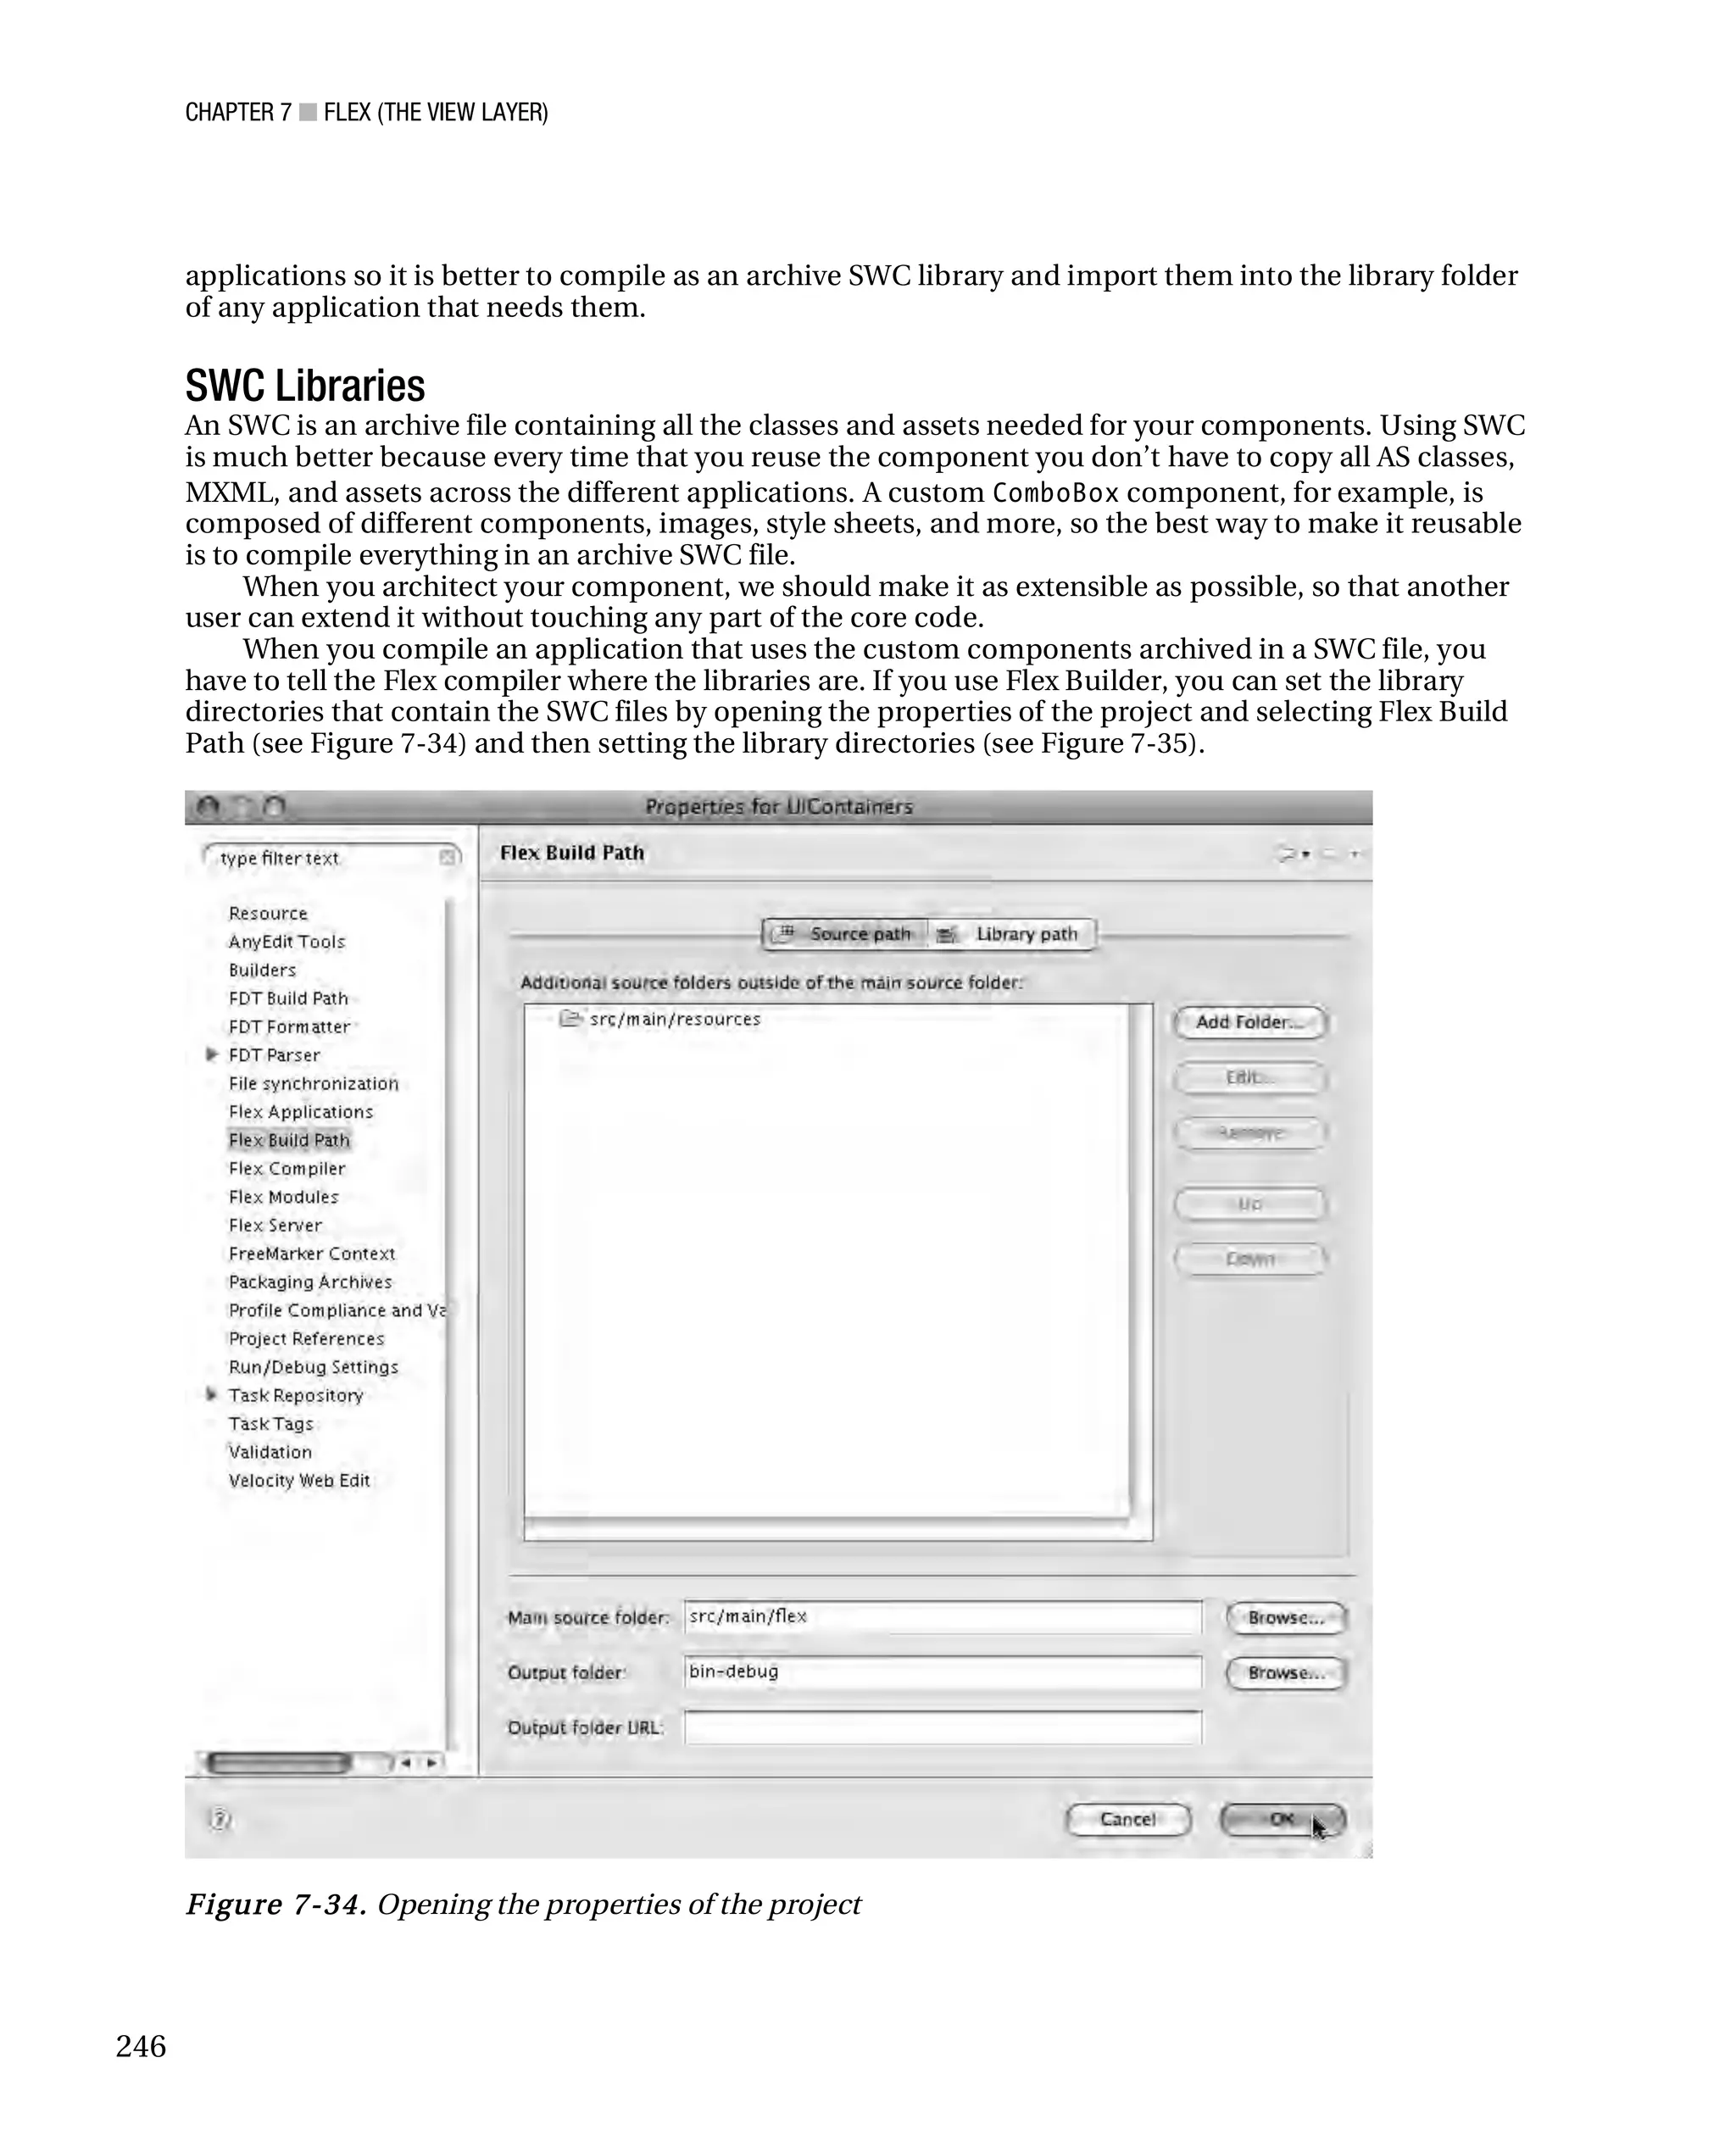
Table 3-2 lists the most important commands used with the MySQL monitor command-line tool.
Table 3-2. Important MySQL monitor commands
Action Command
Logging in mysql -u [username] -p
Logging in to a specific database mysql -u [username] -p [database name]
Running queries select * from my_example_table_name;
Selecting/change database use [database name];
Listing available databases how databases;
Back up a database mysqldump -c --create-options DB > file
Restore a database mysql -p dbname < db.sql
Create a database create database
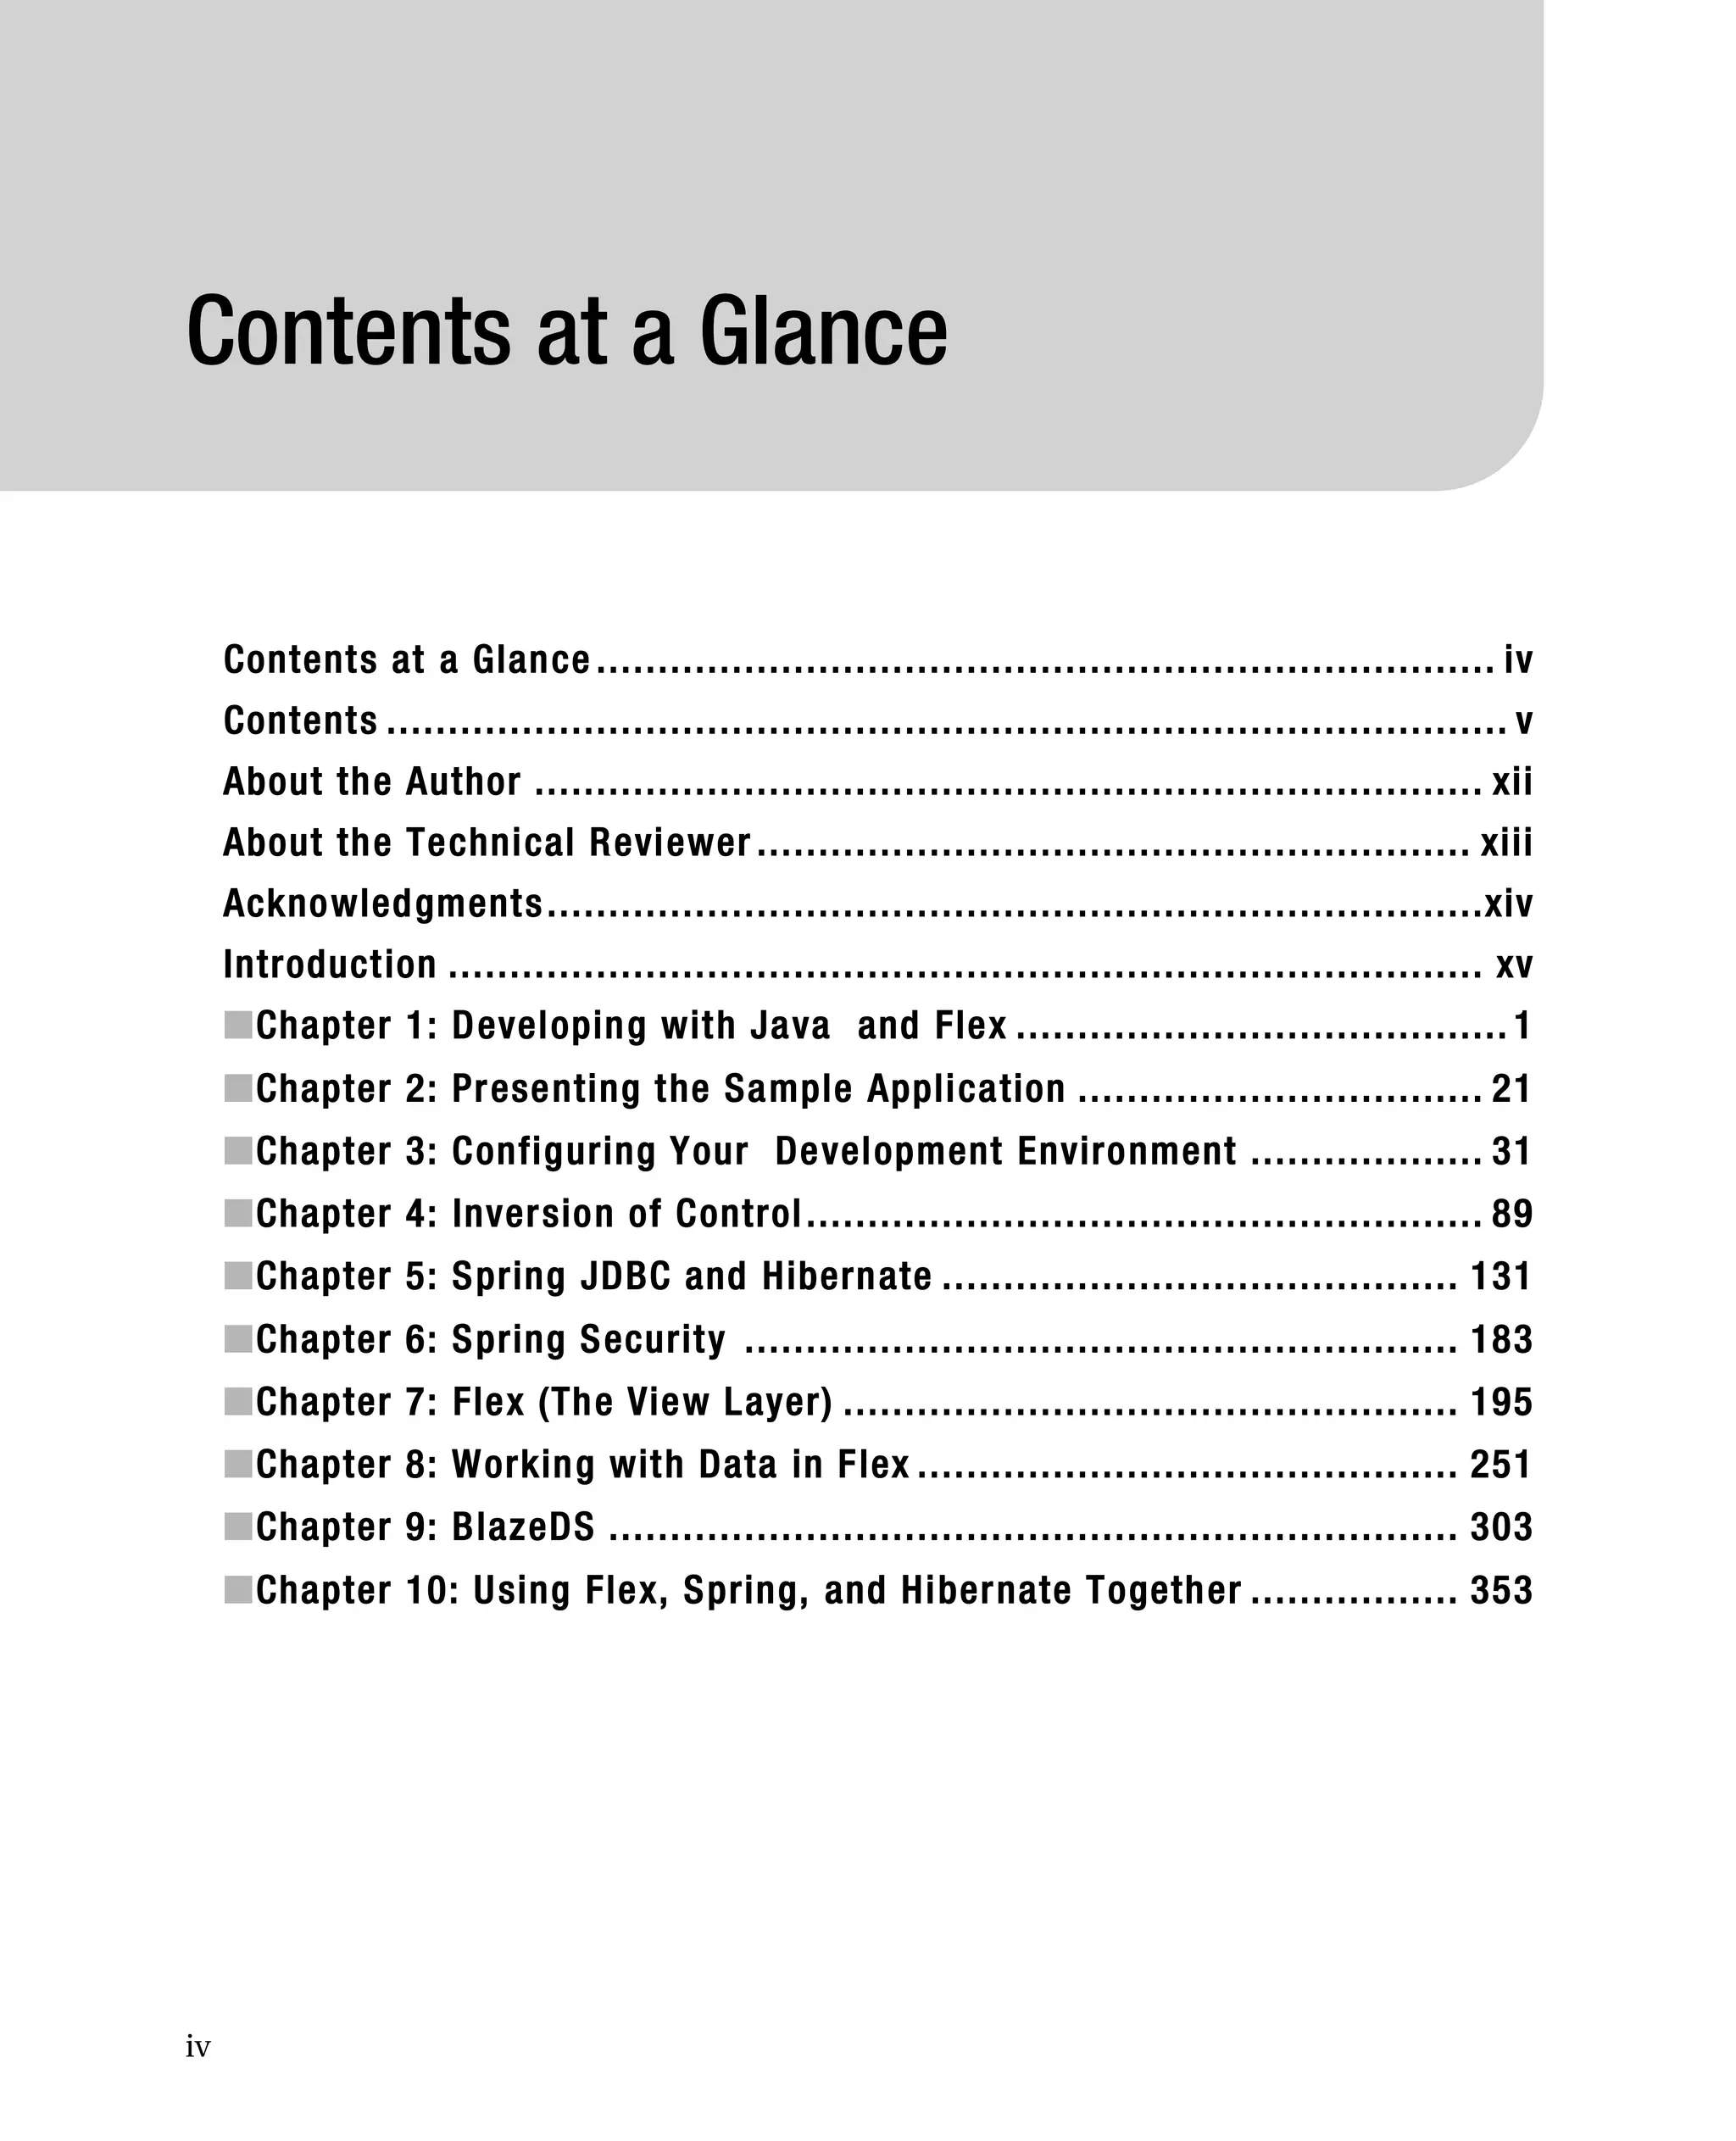
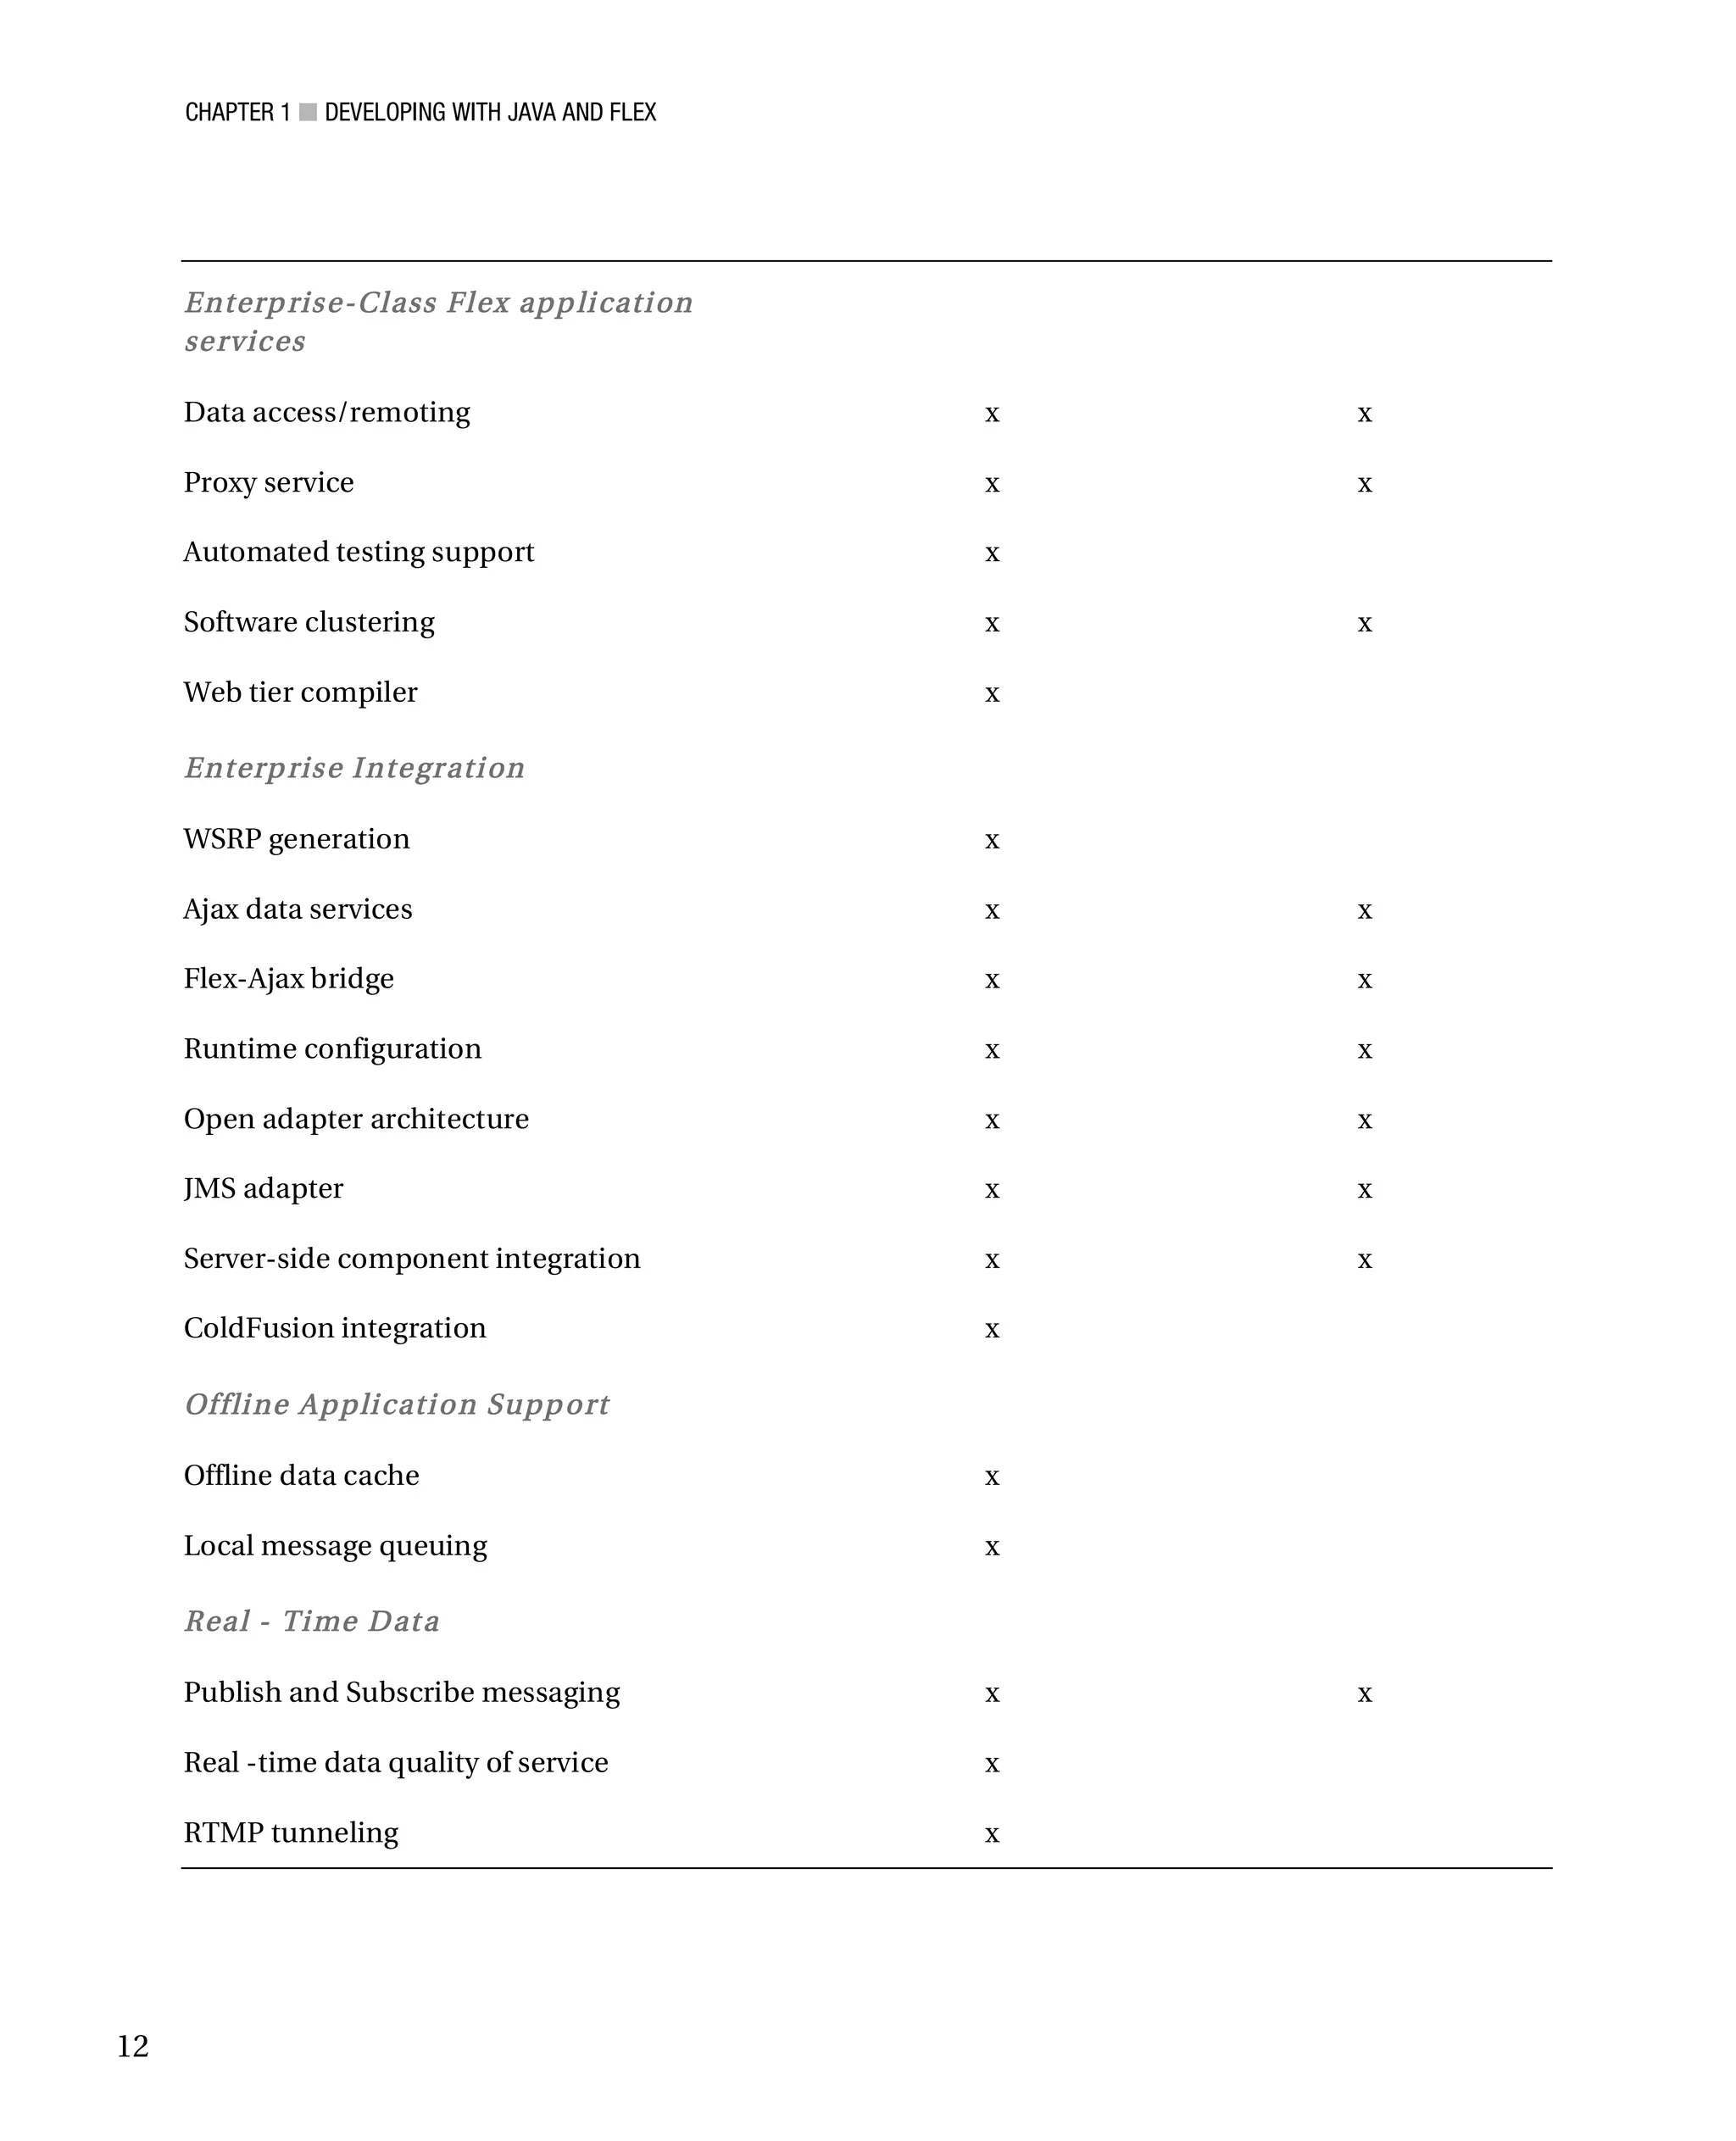
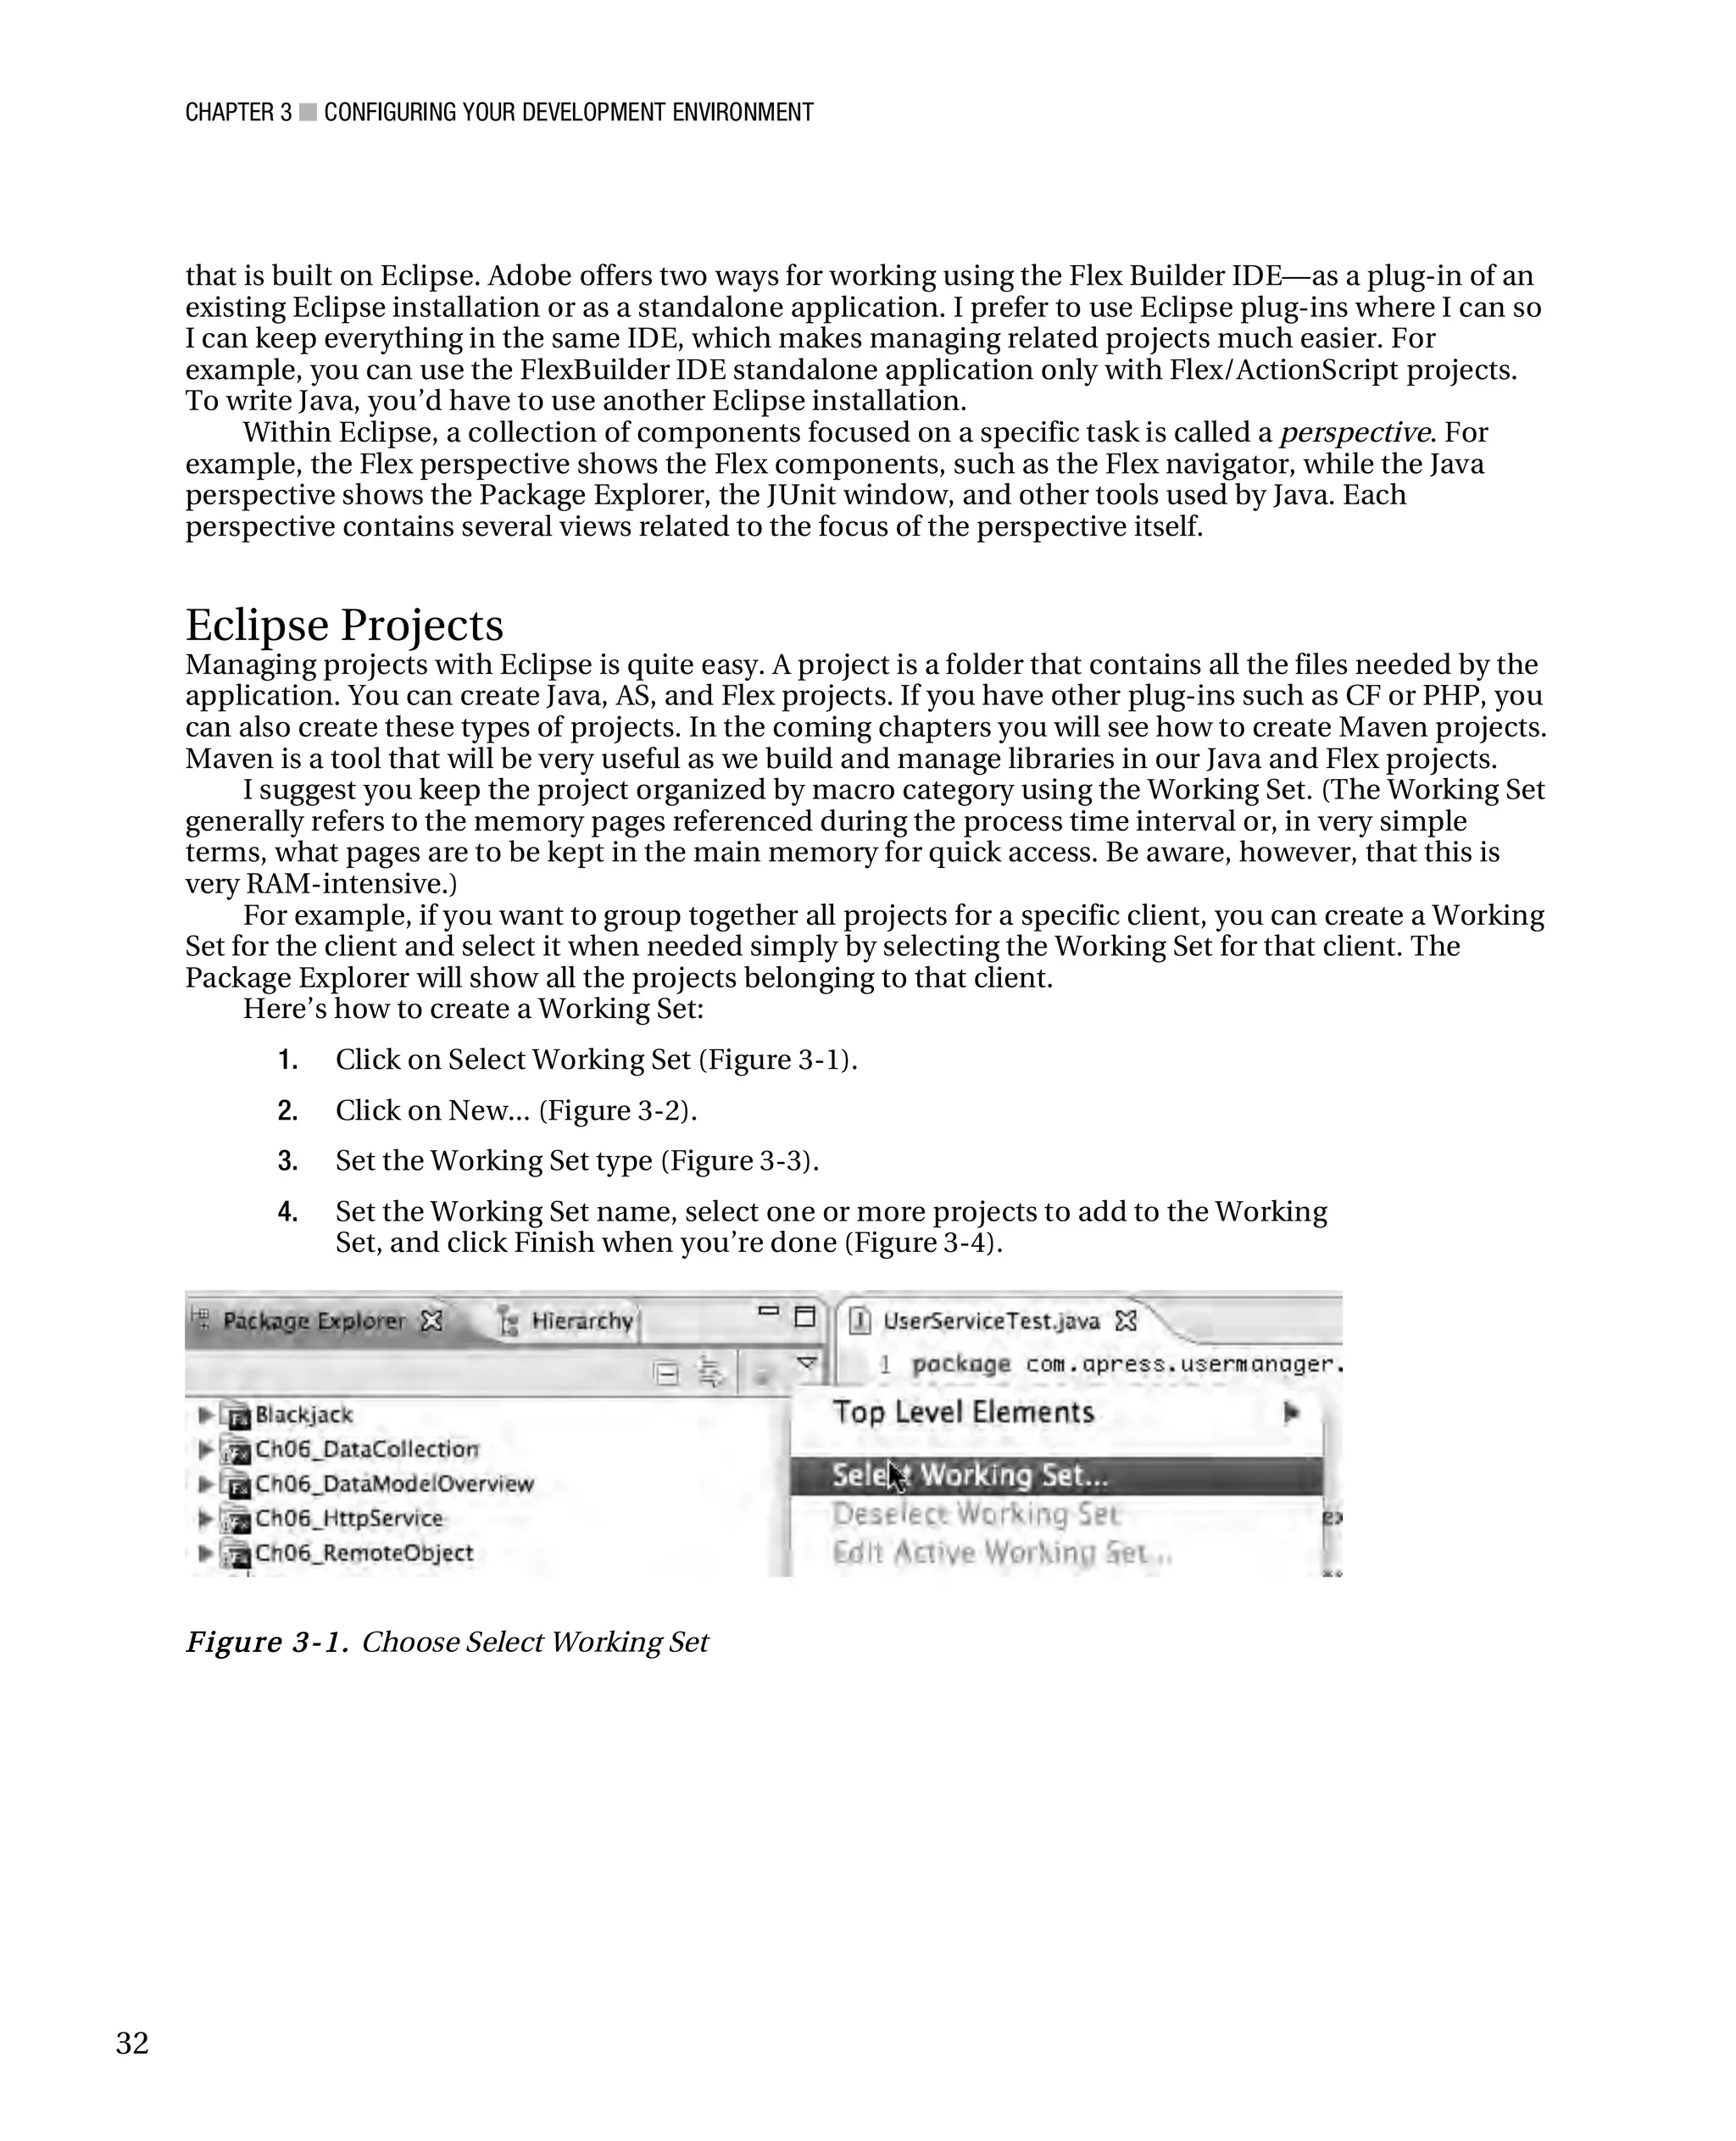
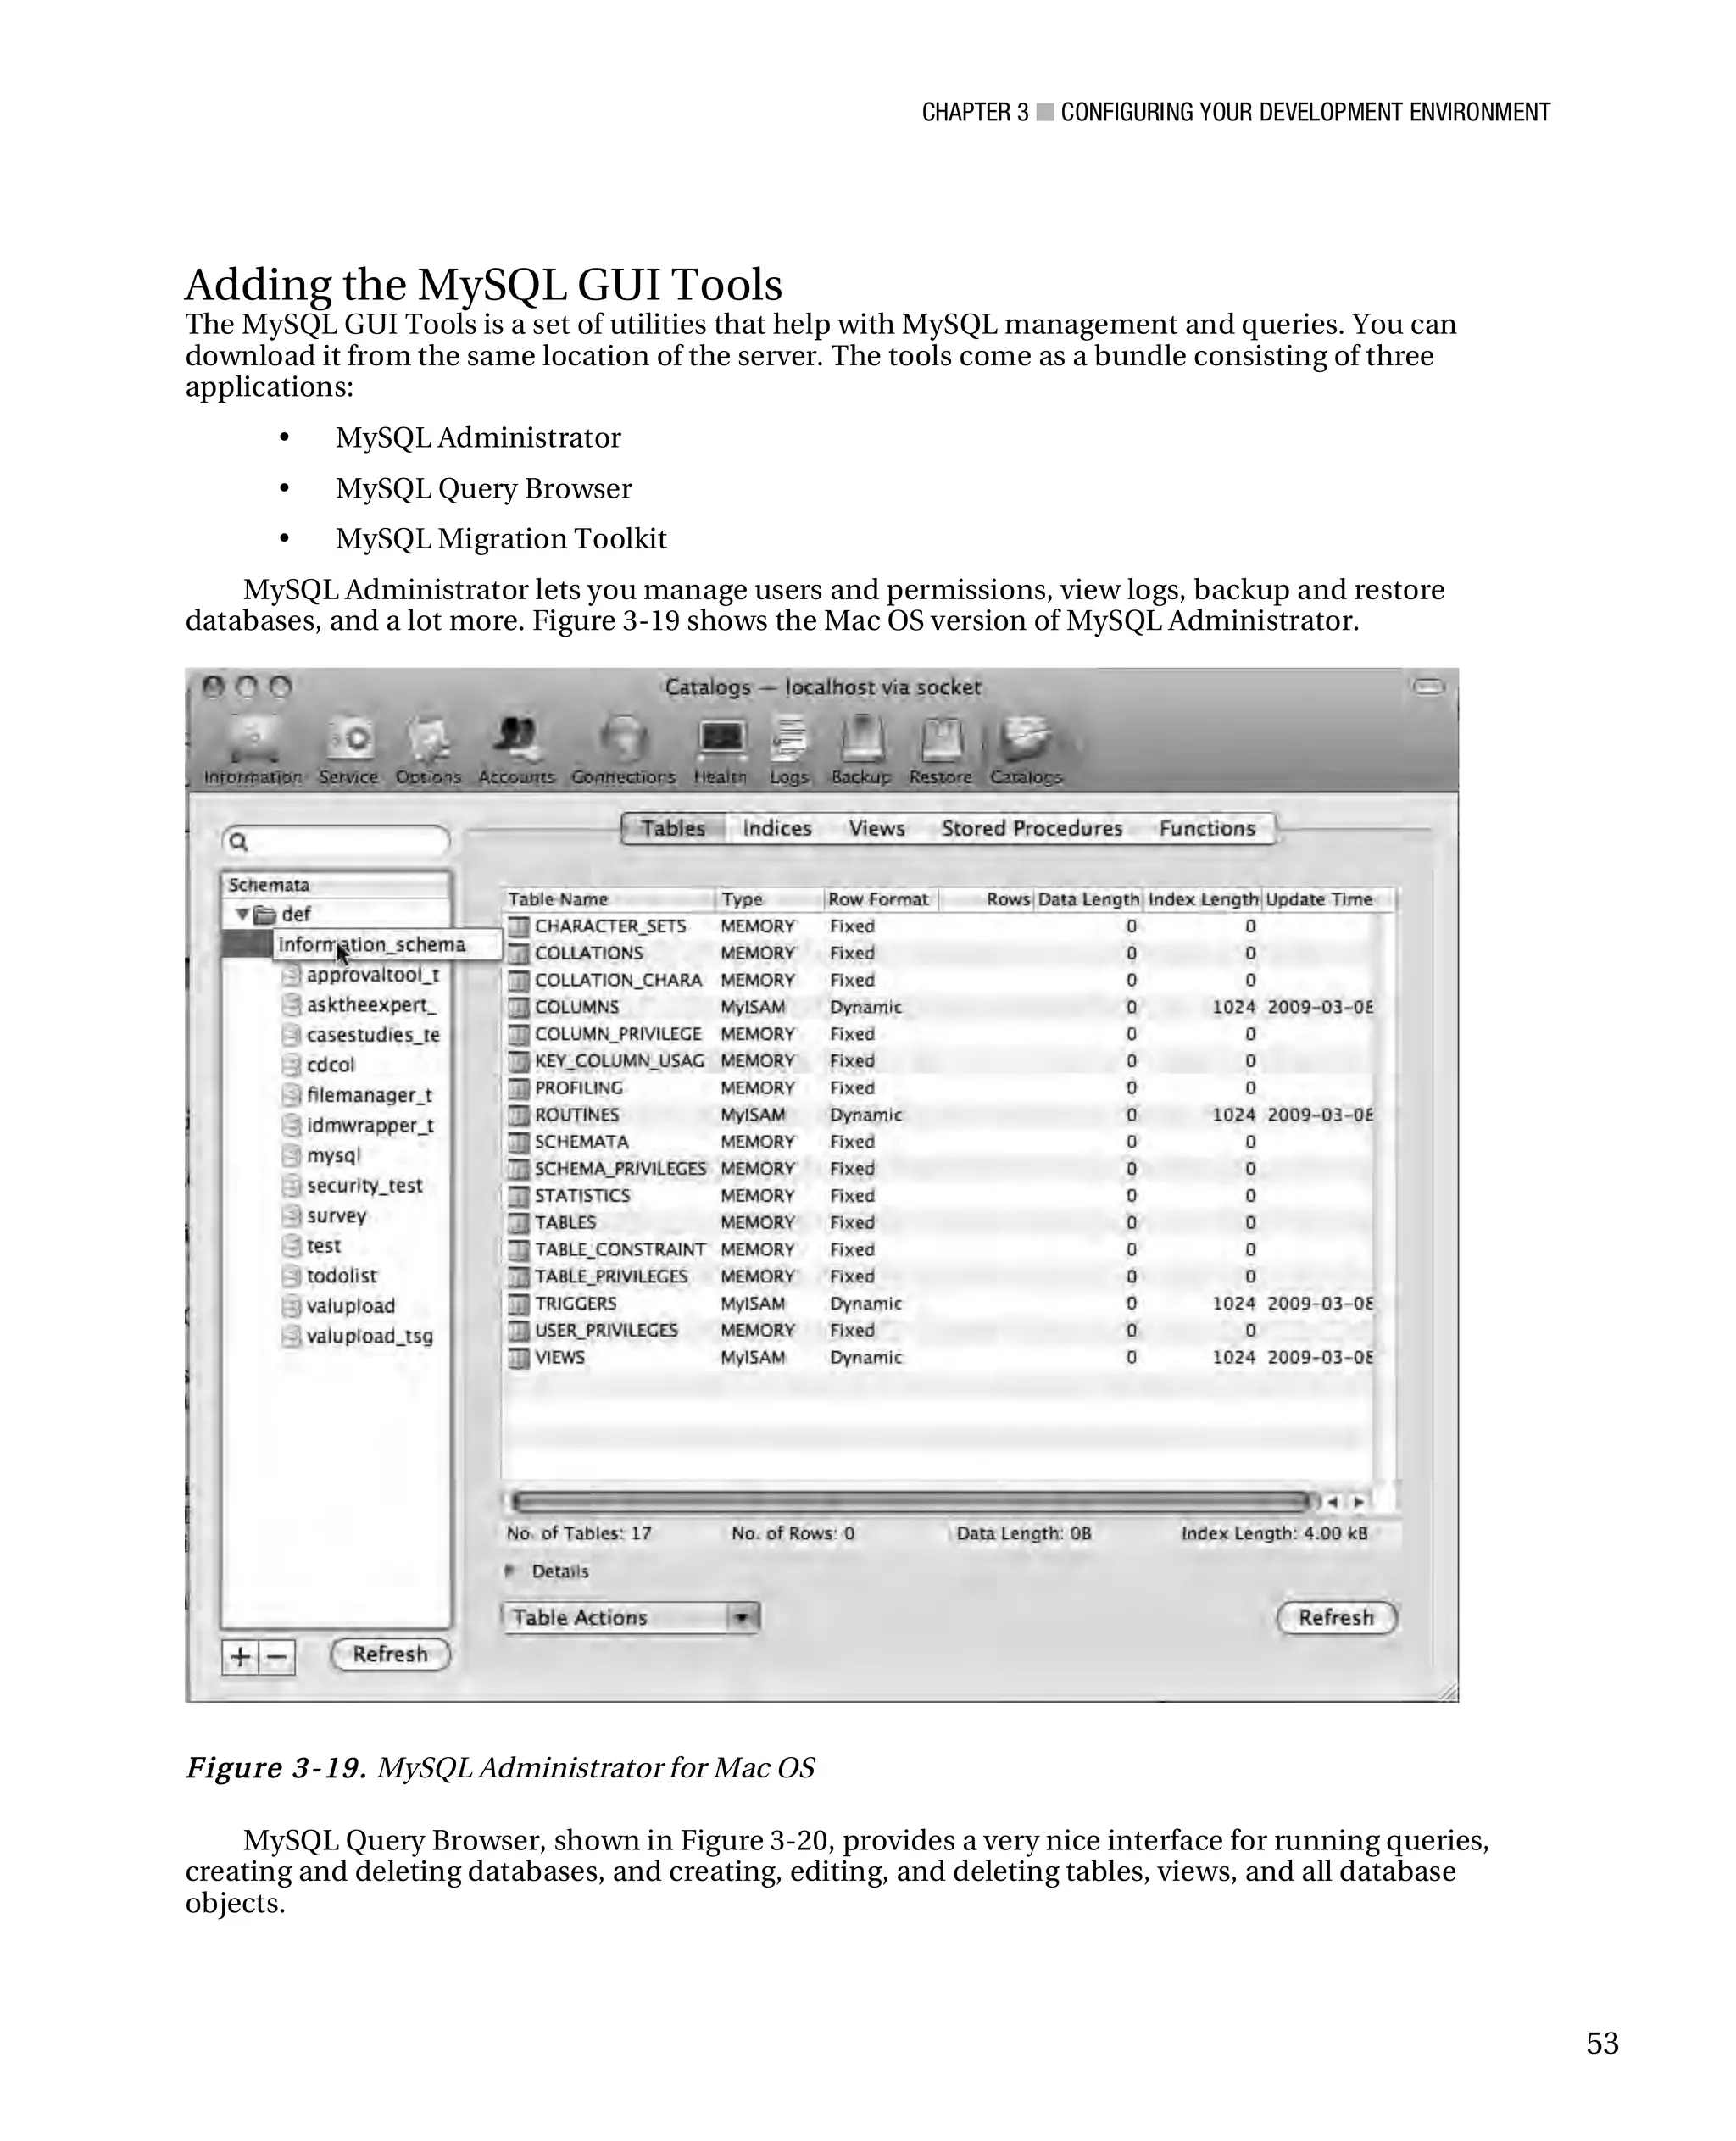
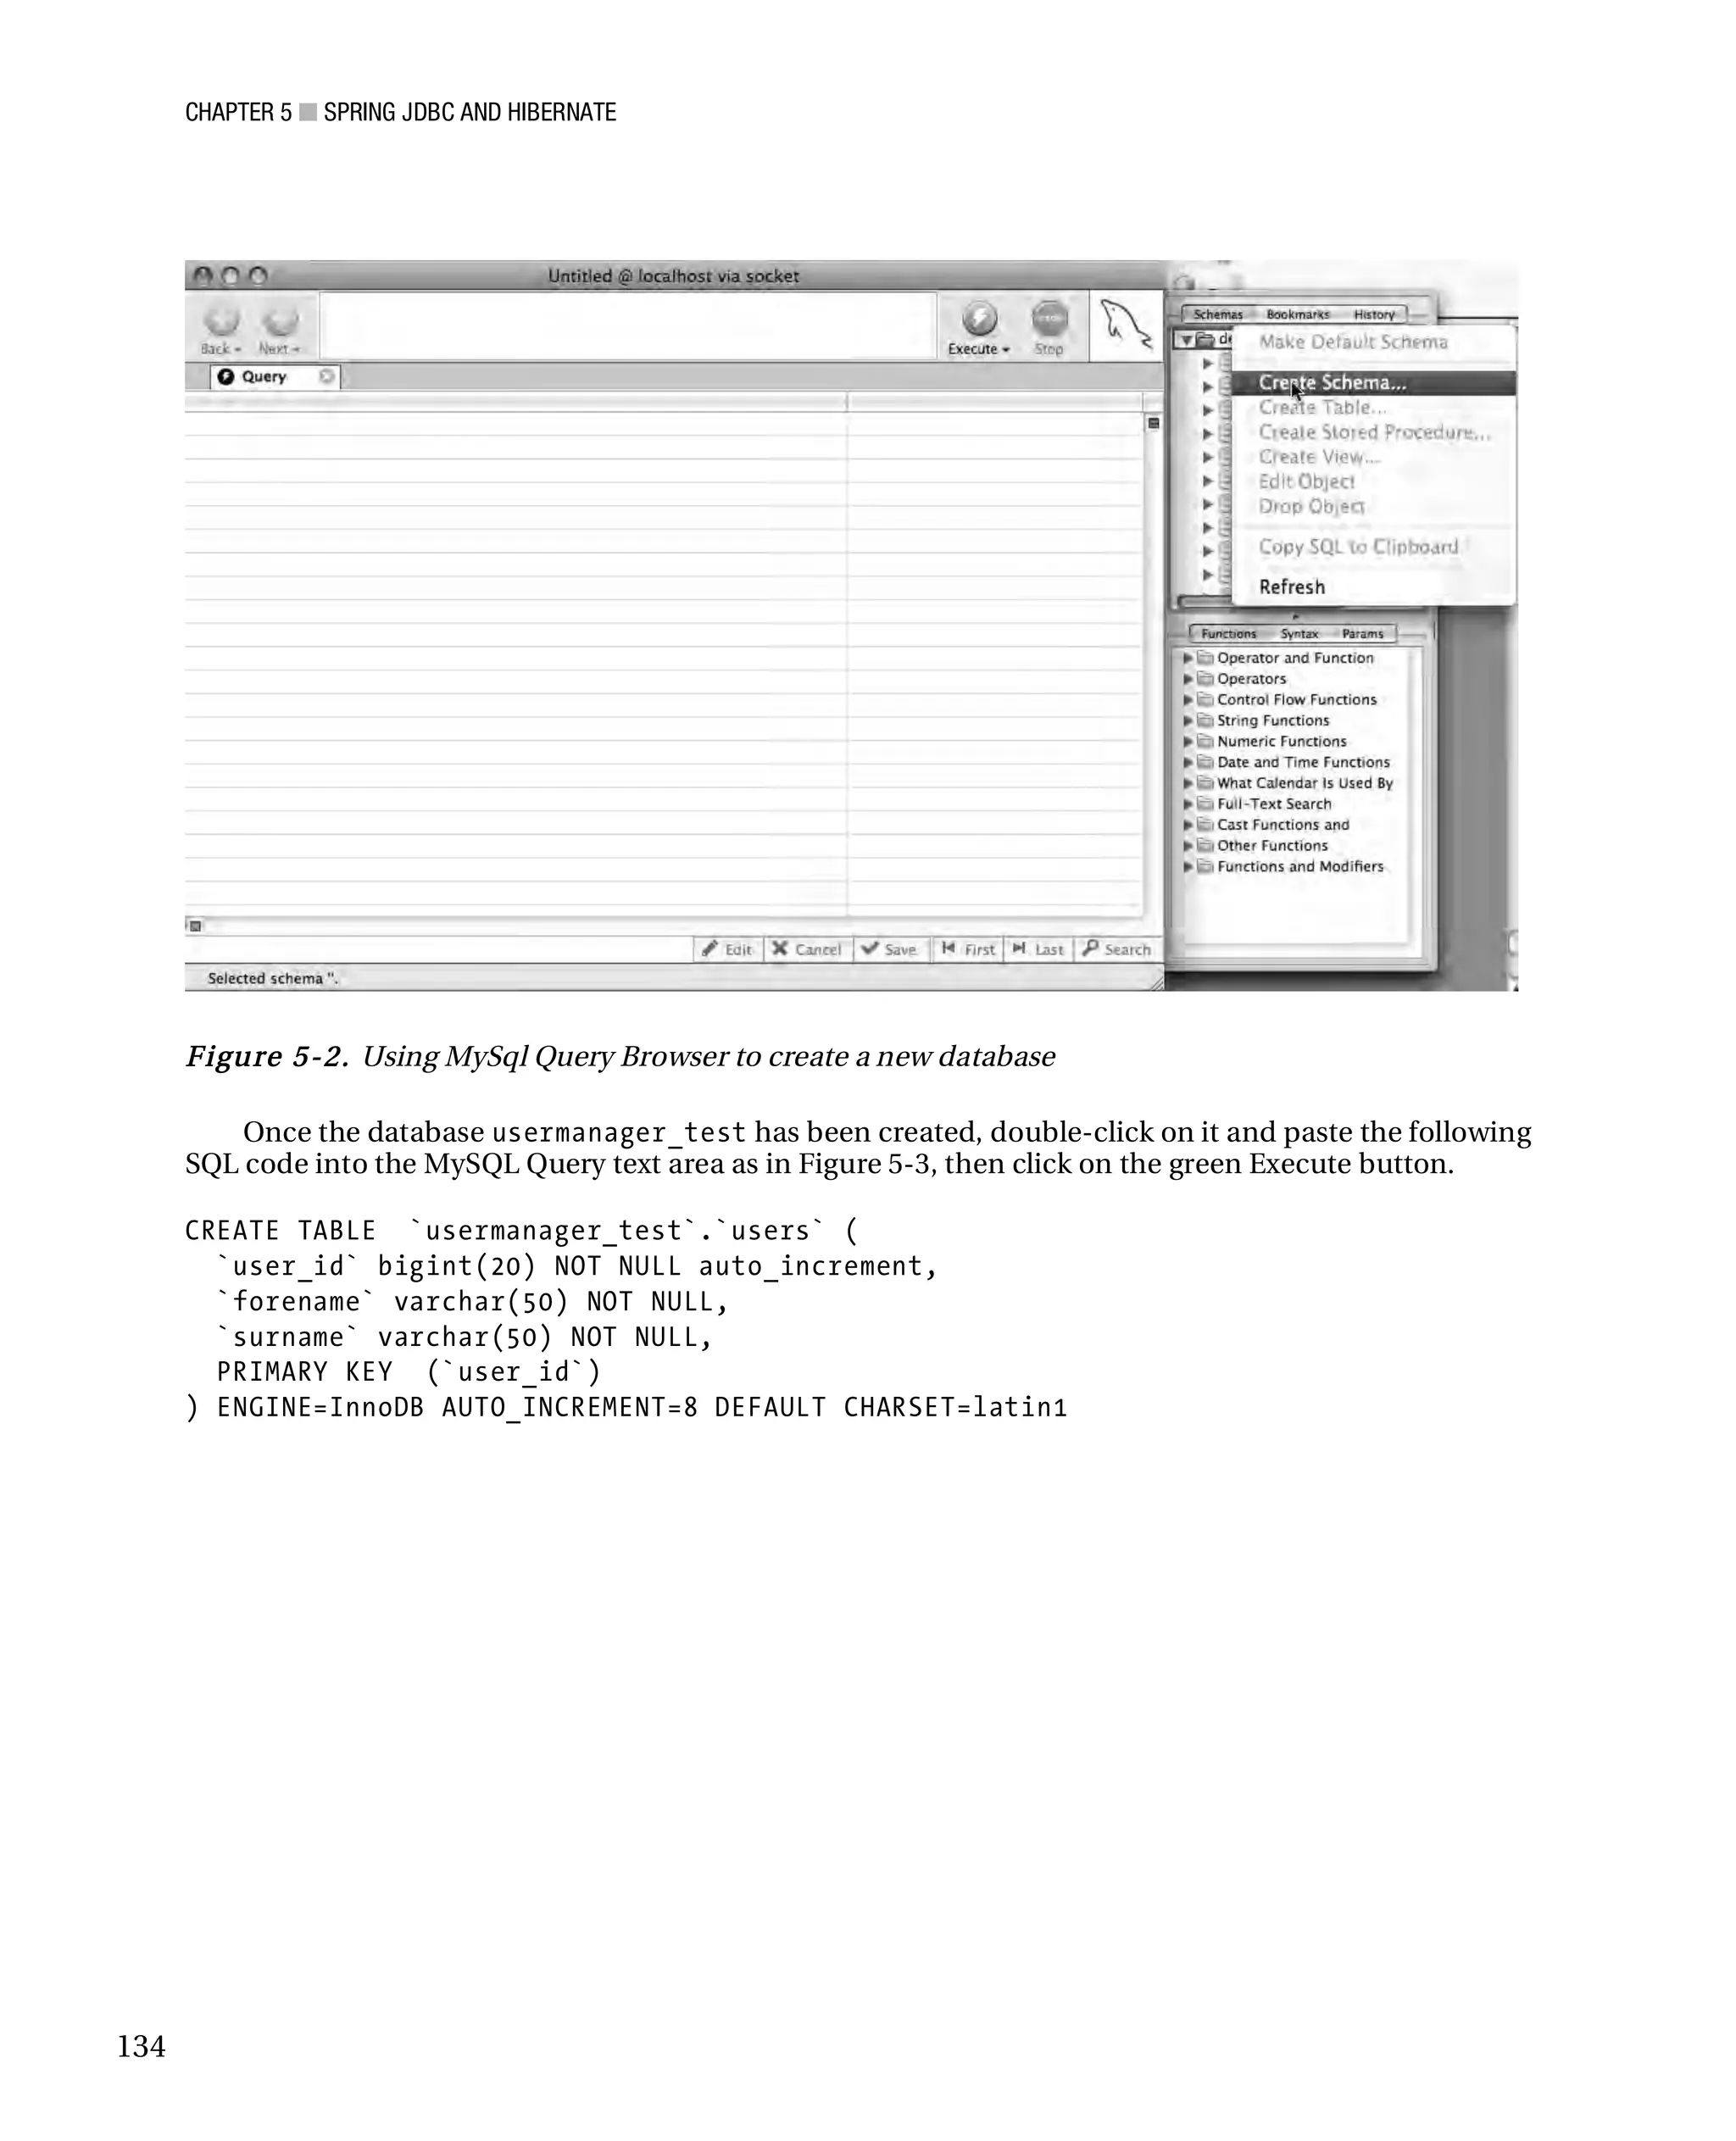
Basic MySQL Operations Using MySQL Query Browser
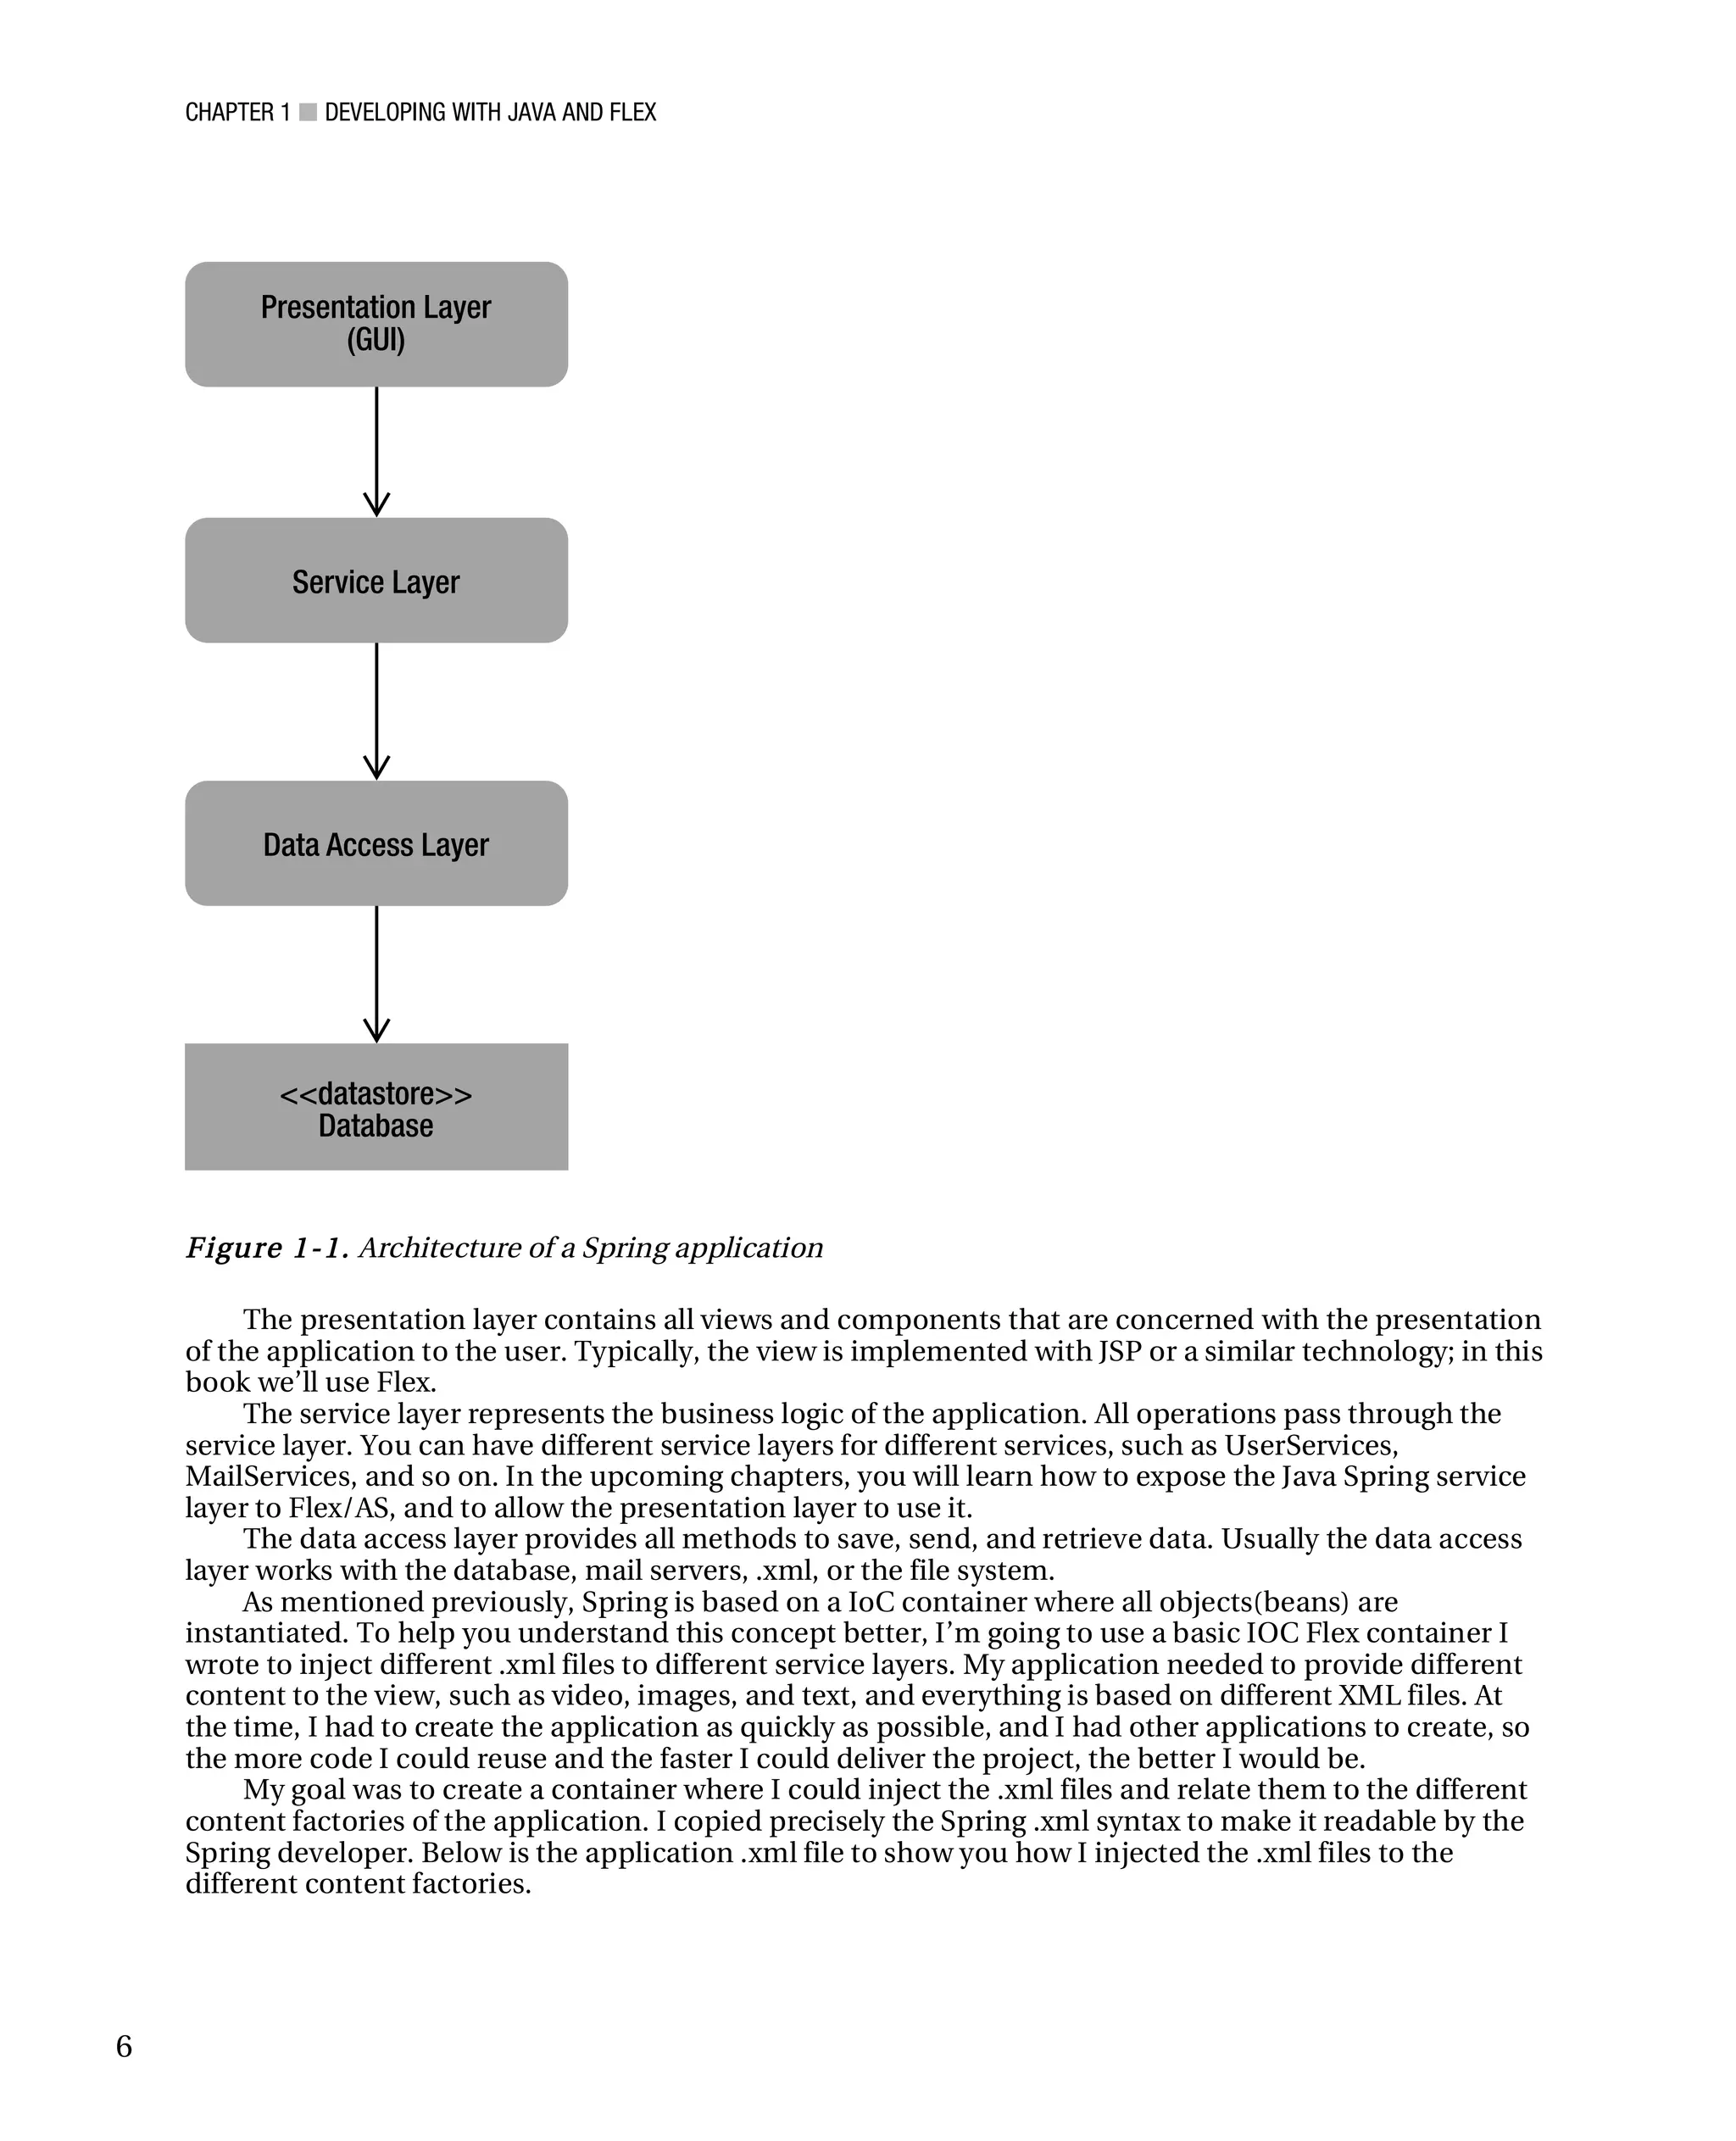
MySQL Query Browser provides the same functionality as the MySQL command-line monitor, but its
graphical interface makes it easier for beginners. For example, to create a database, you simply right-
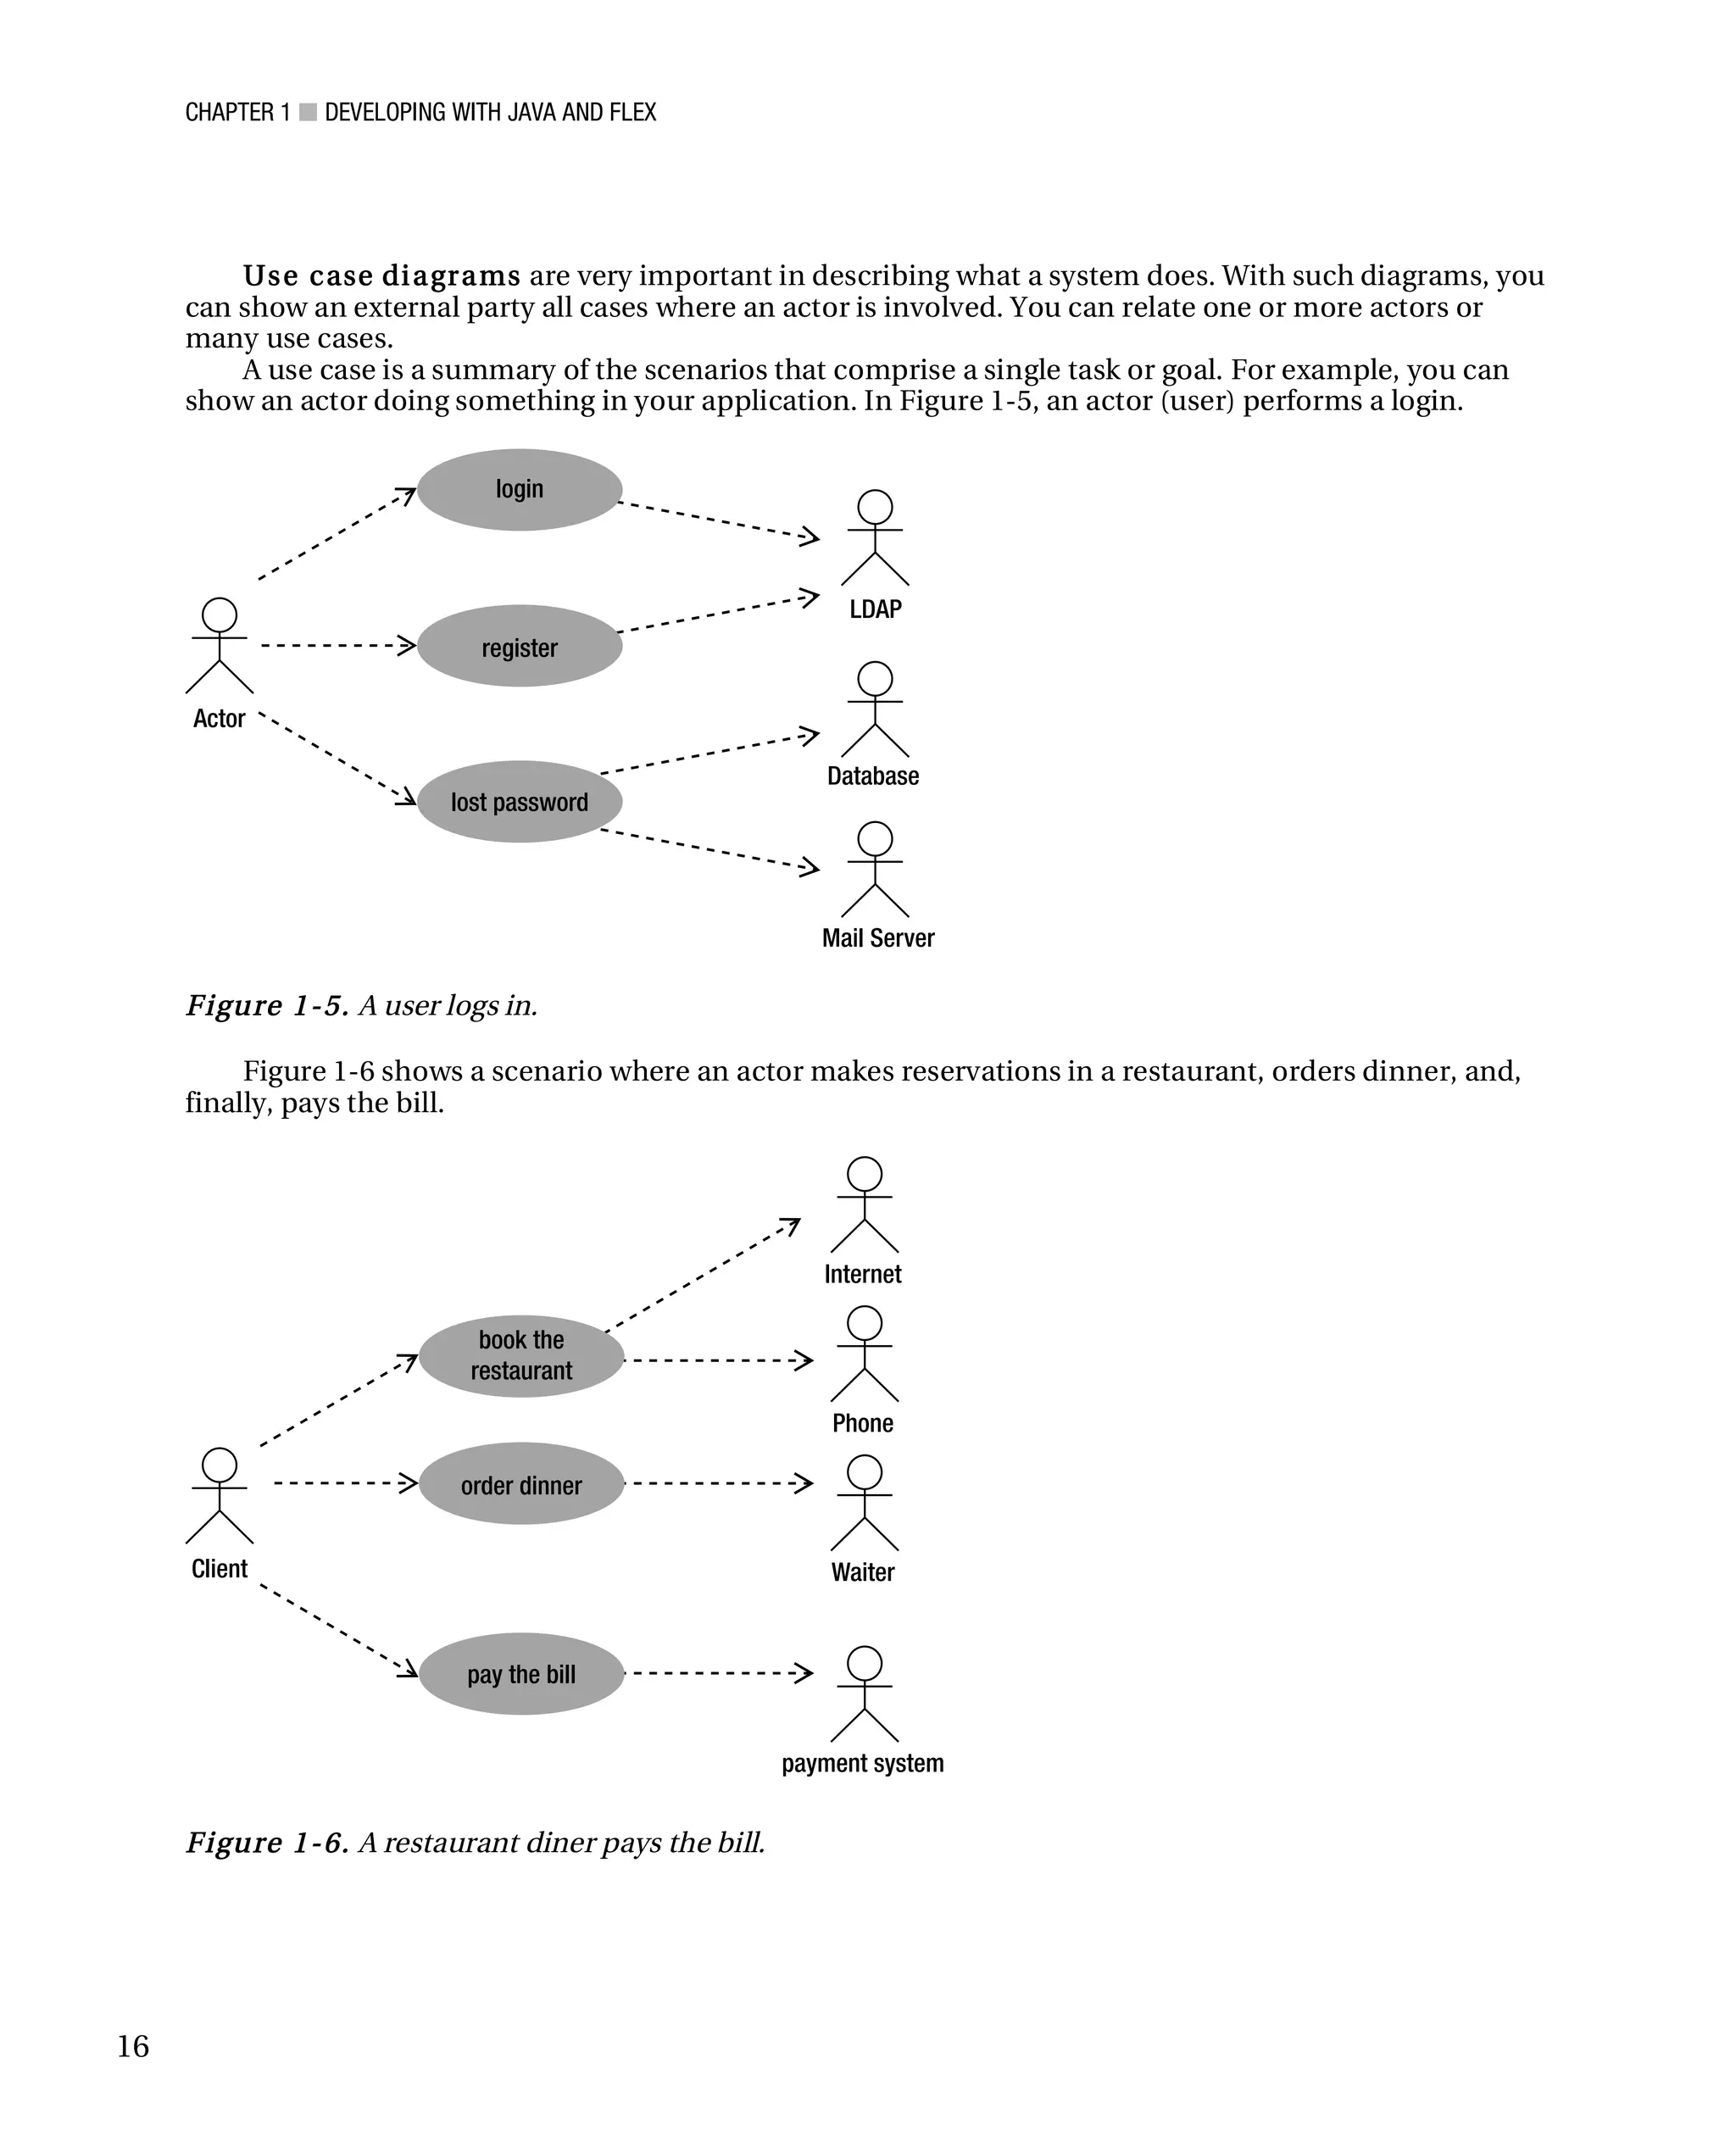
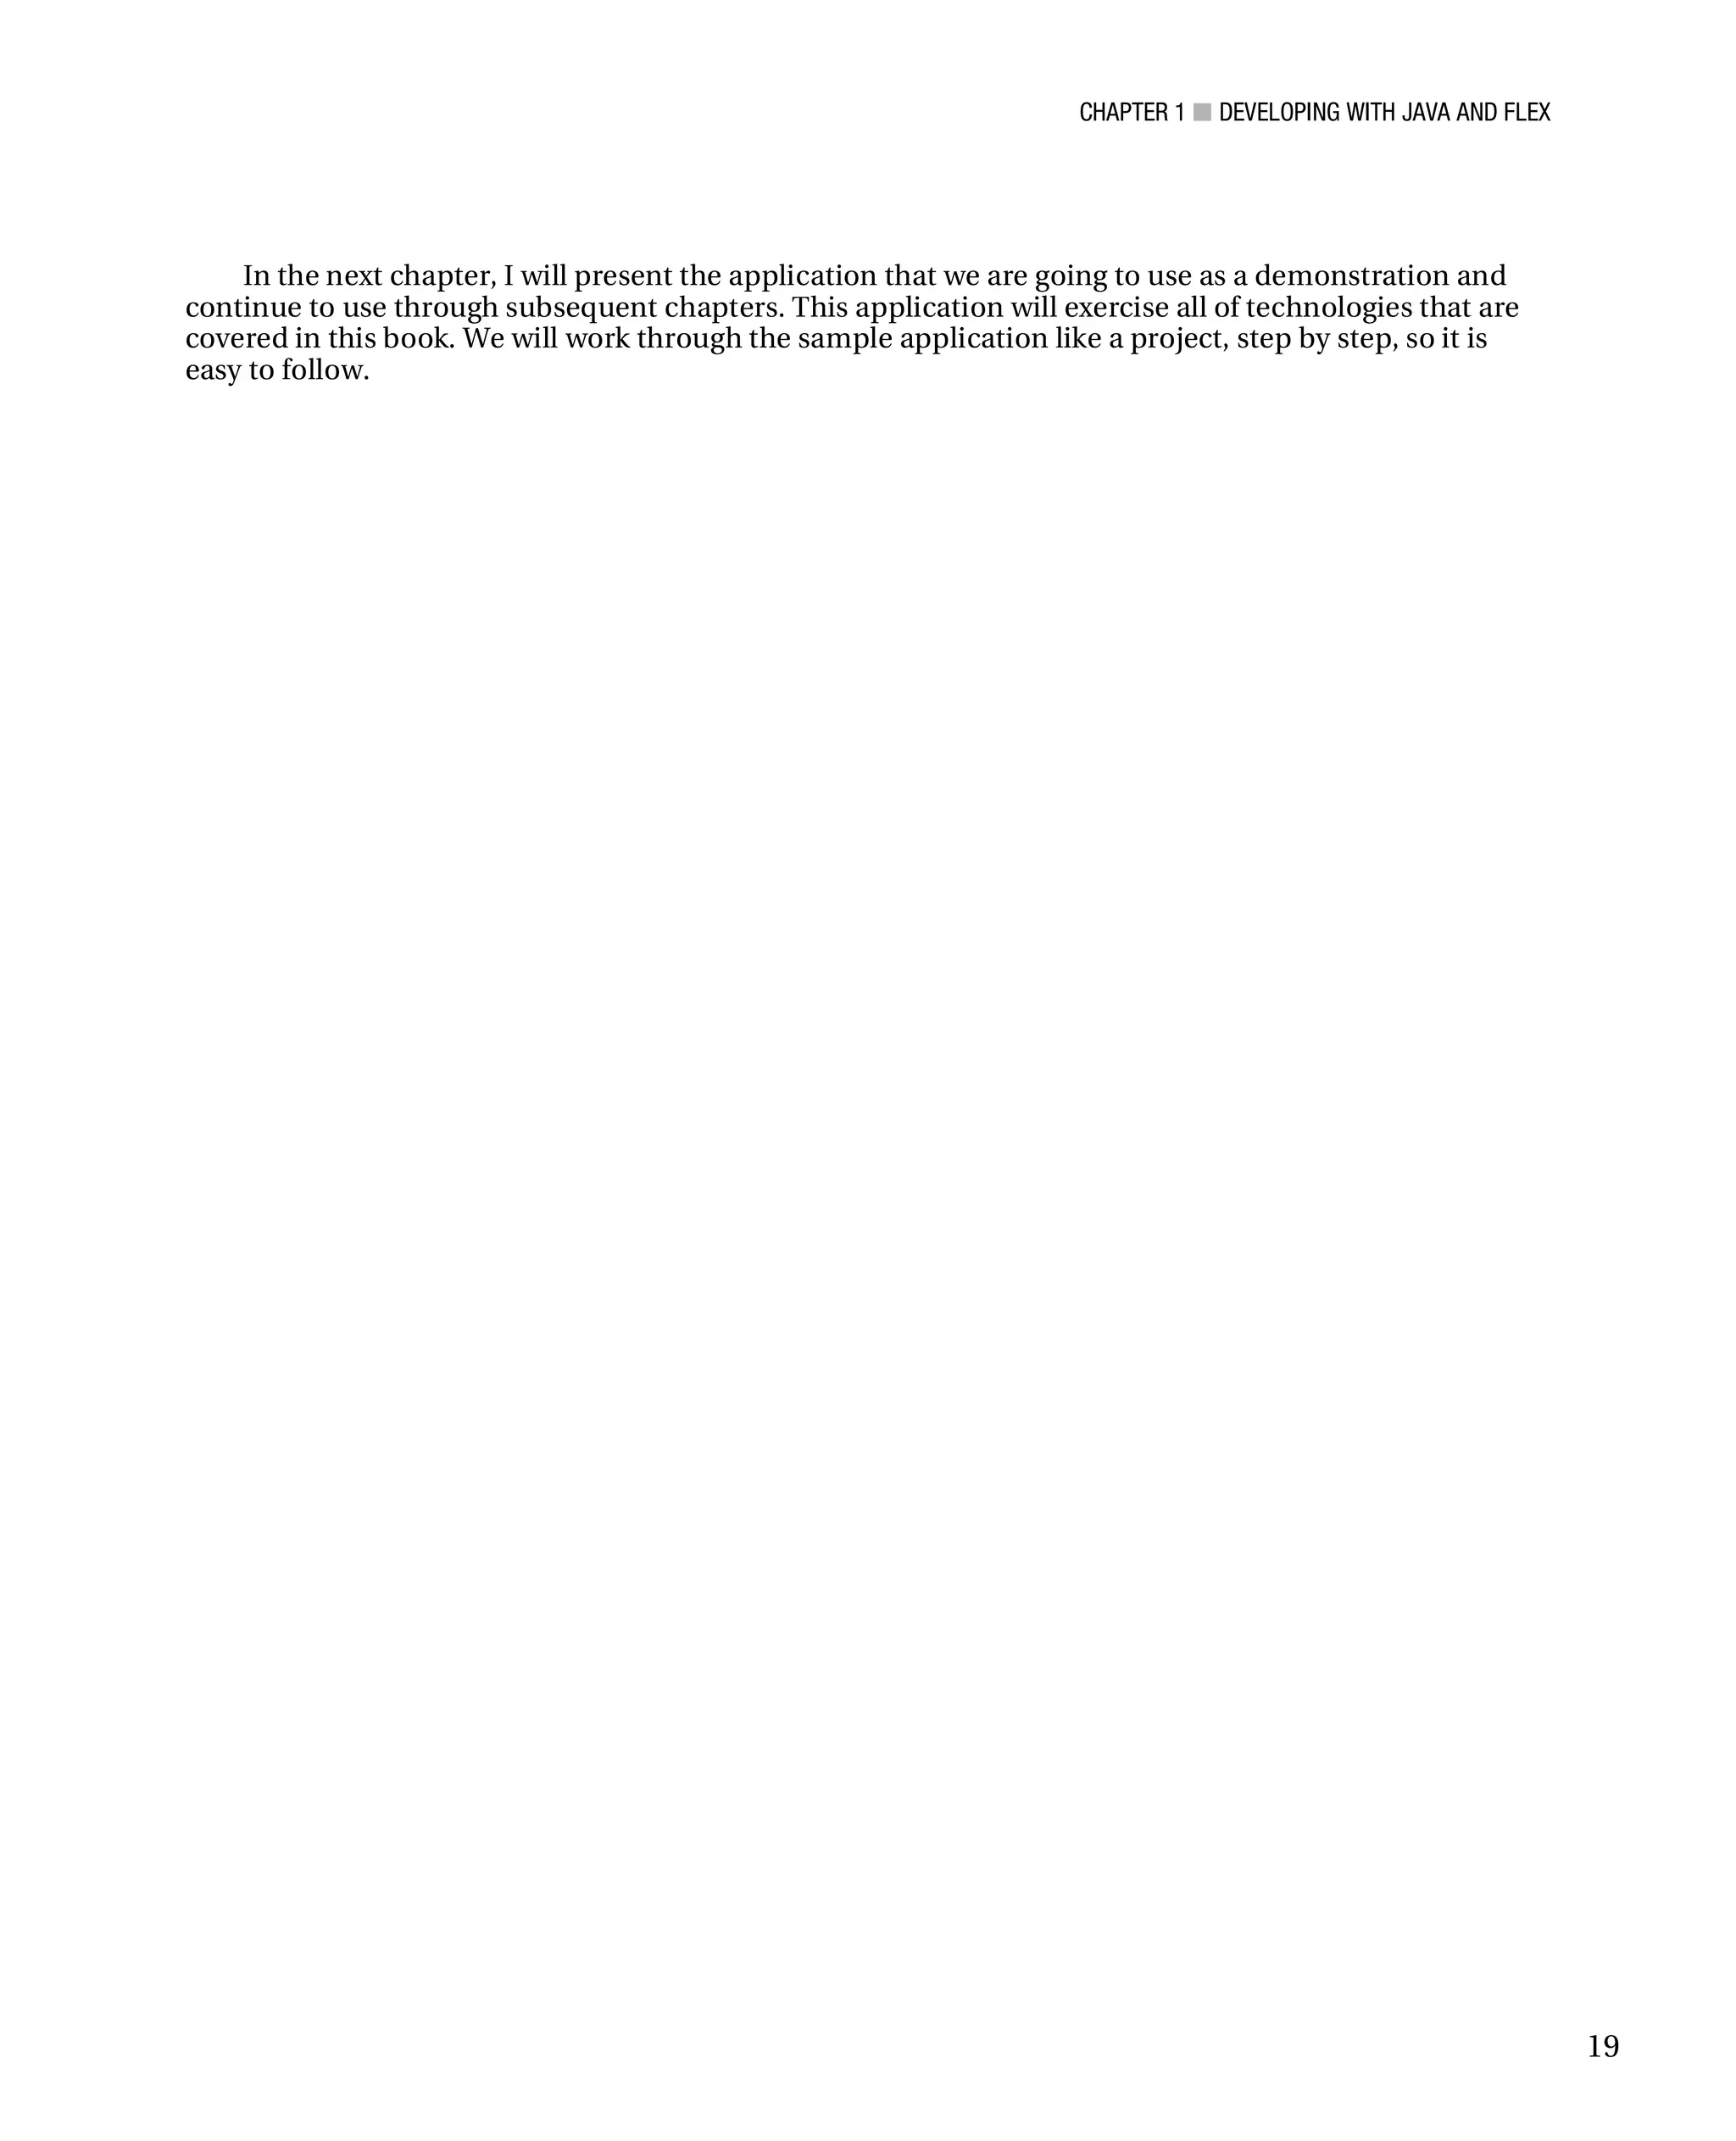
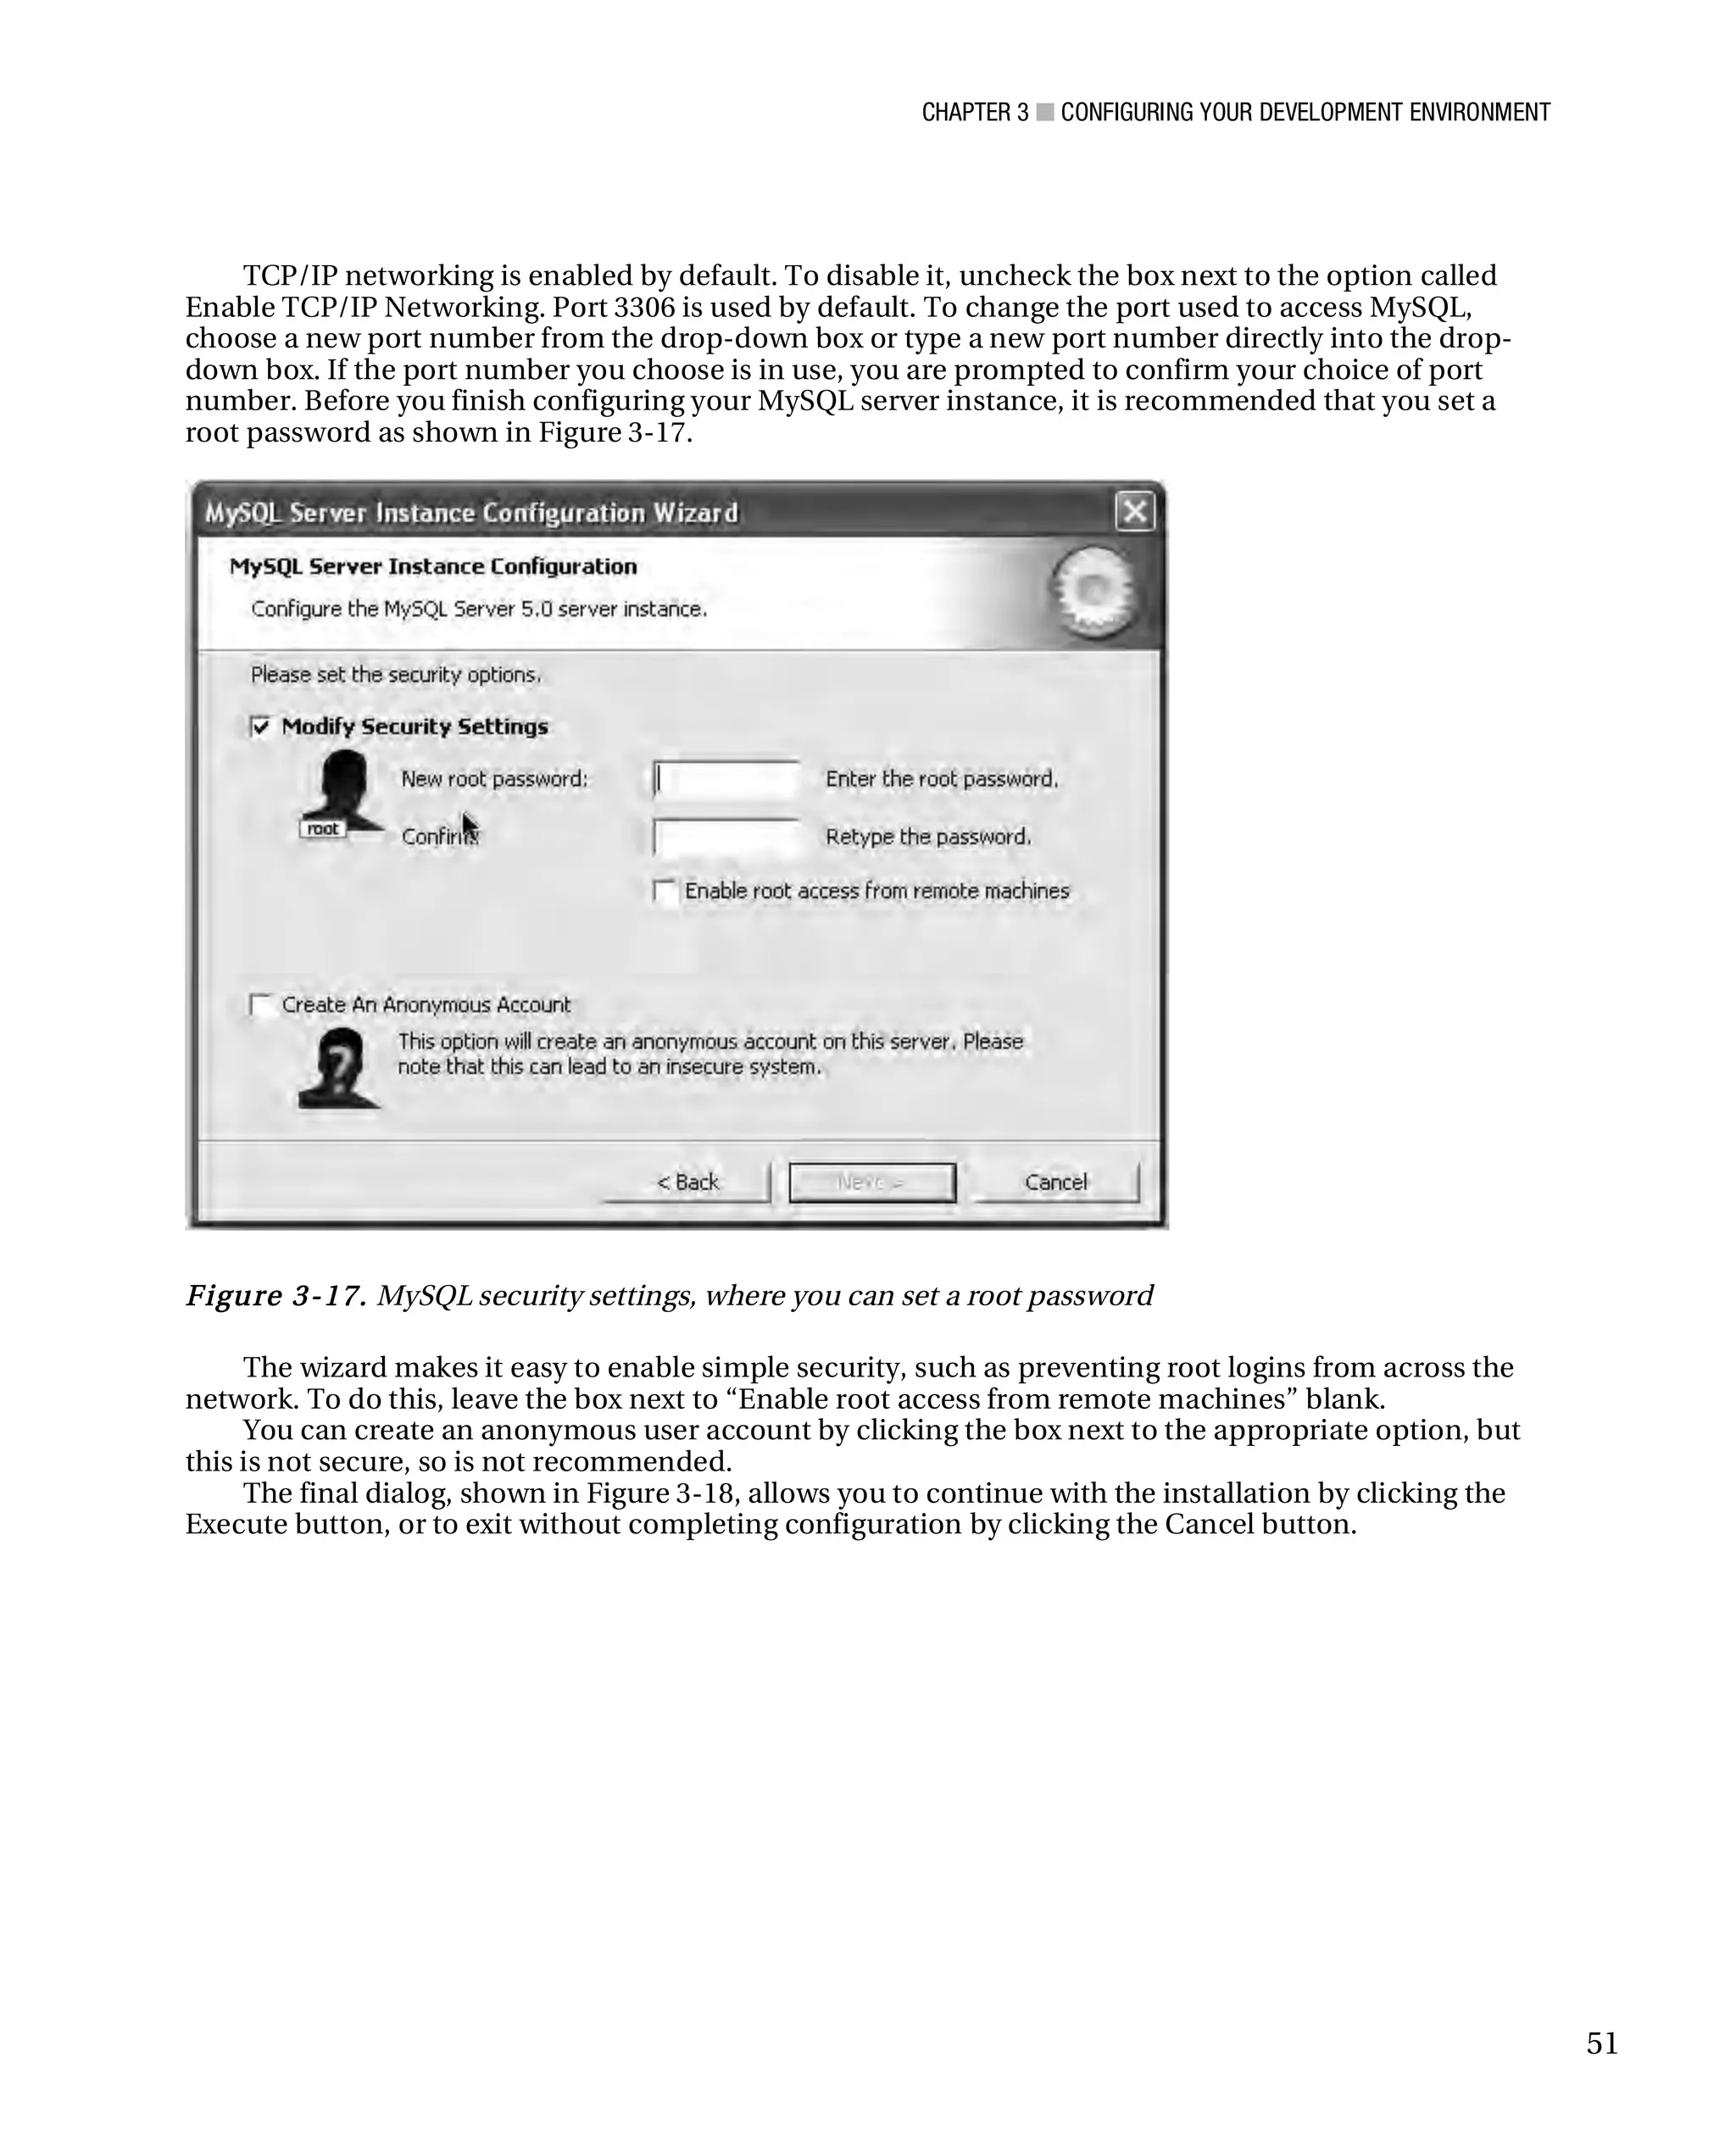
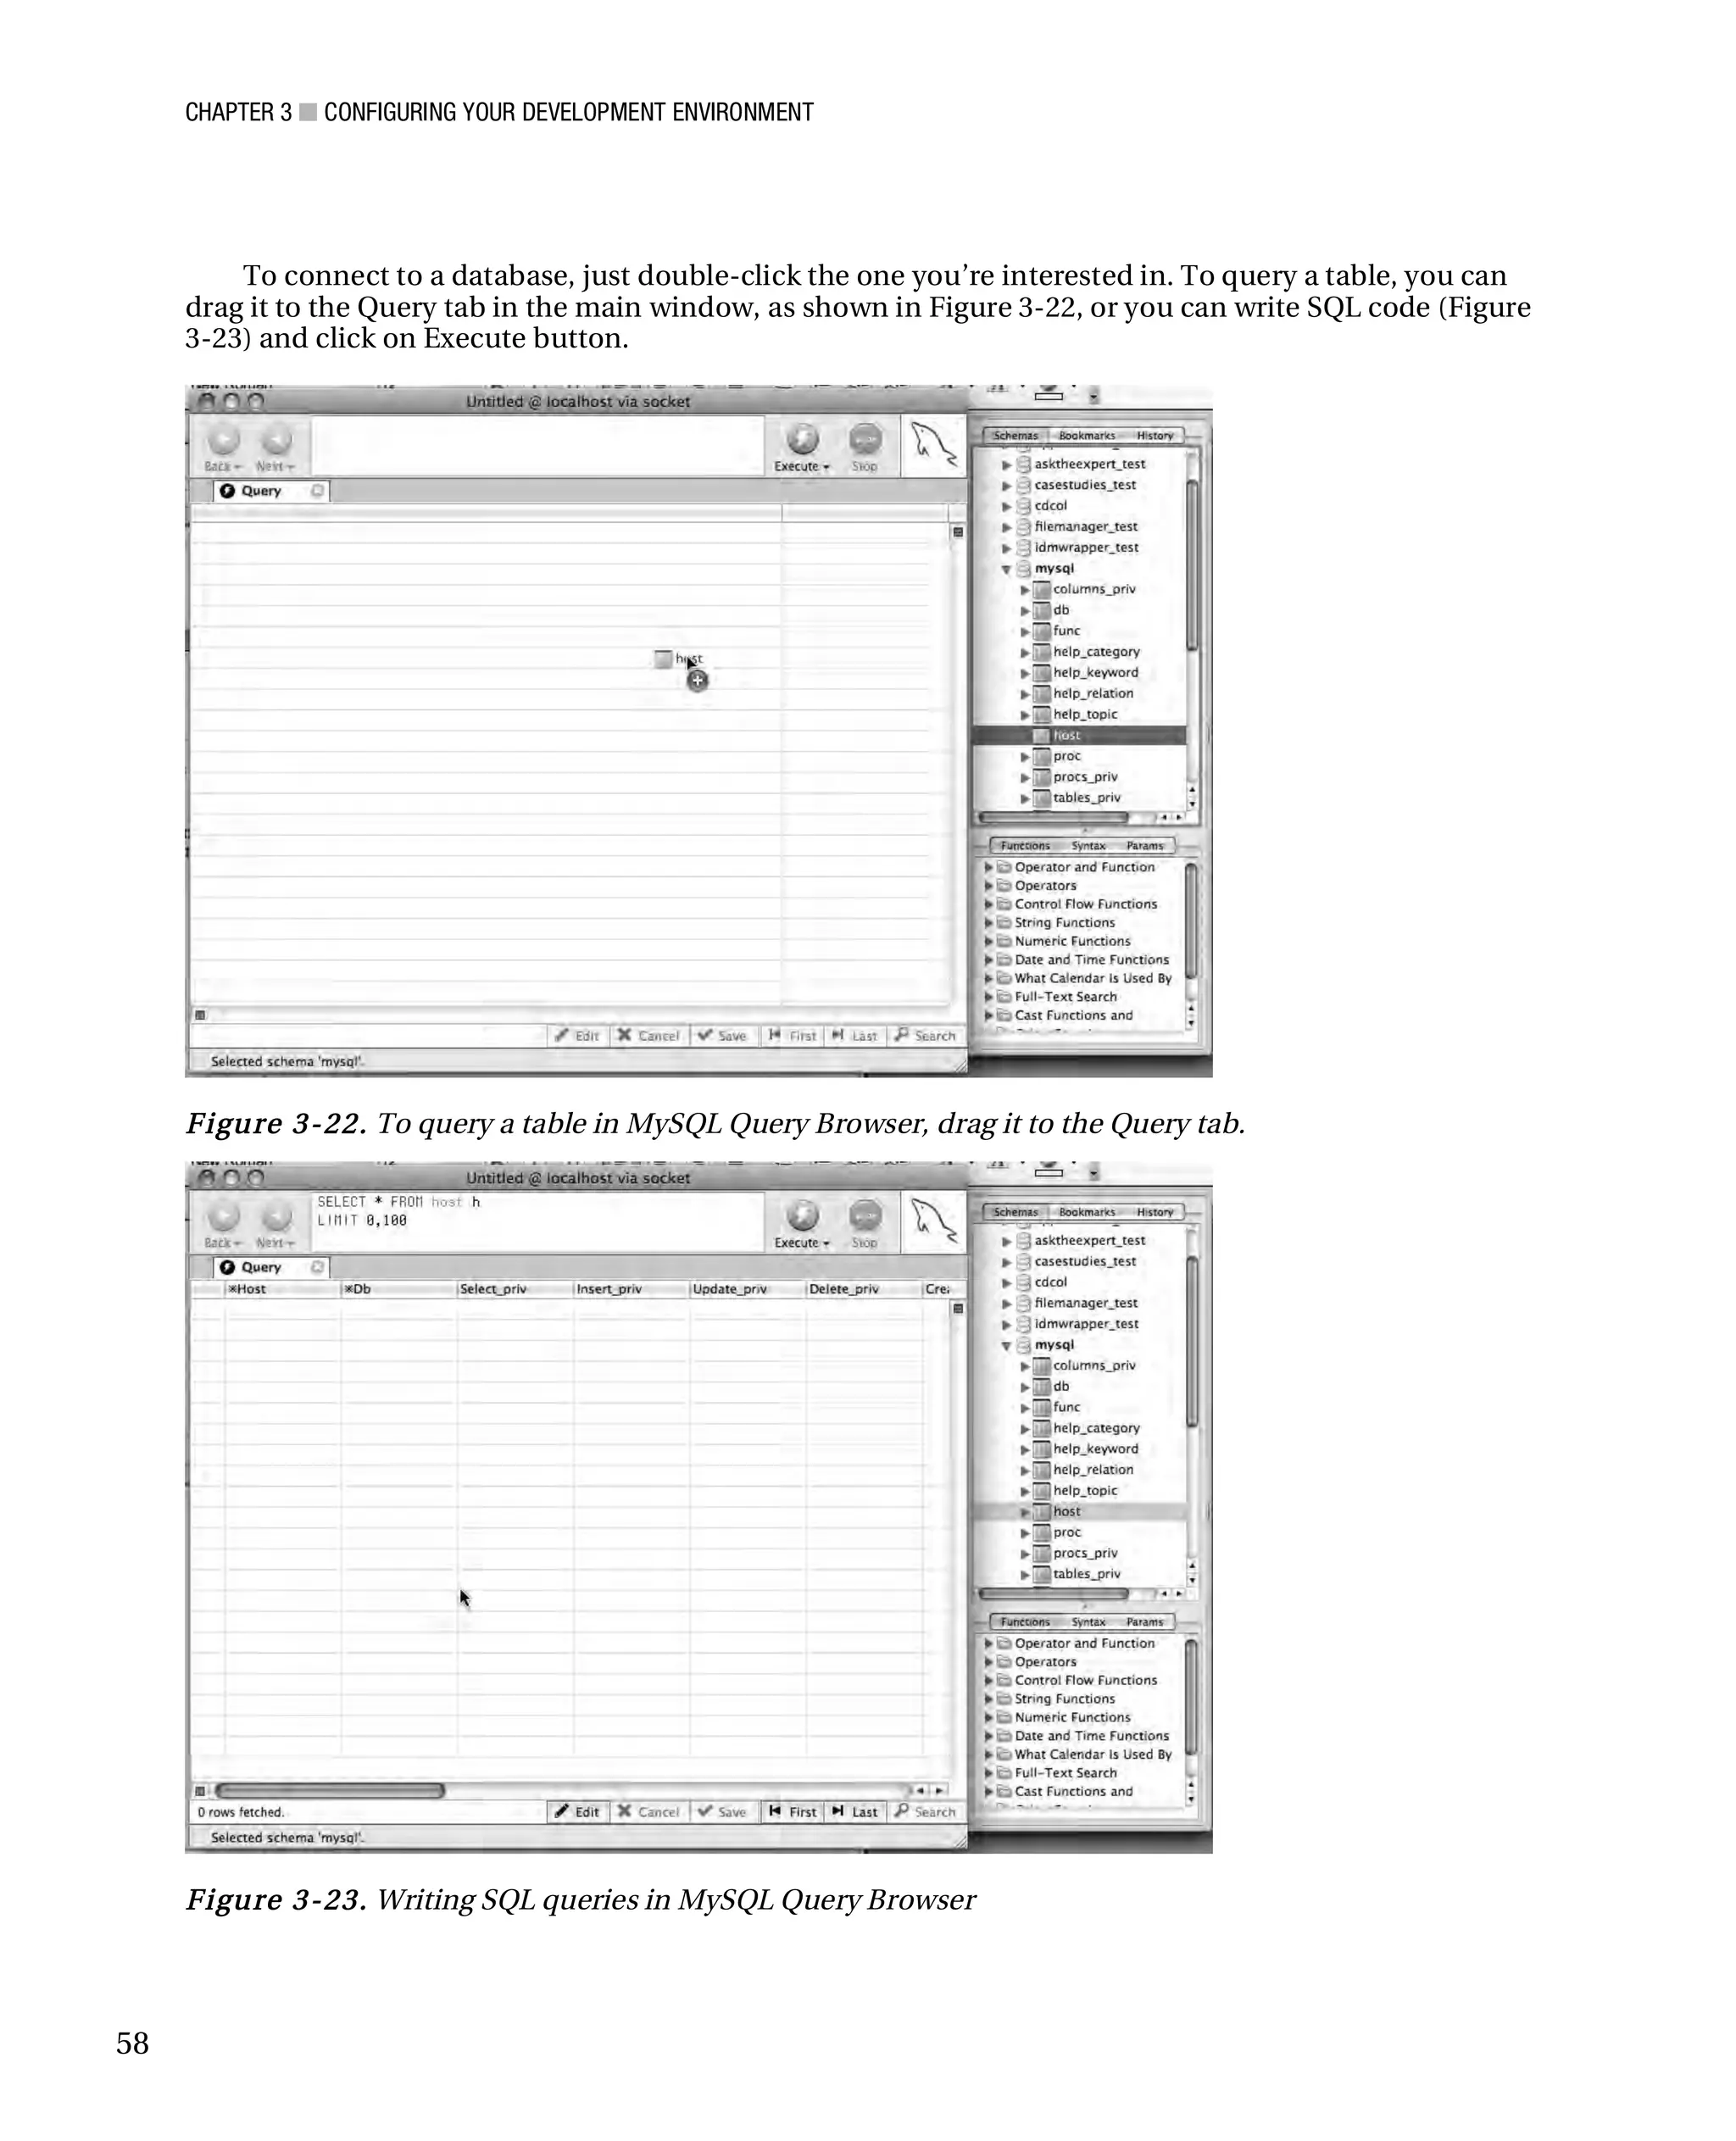
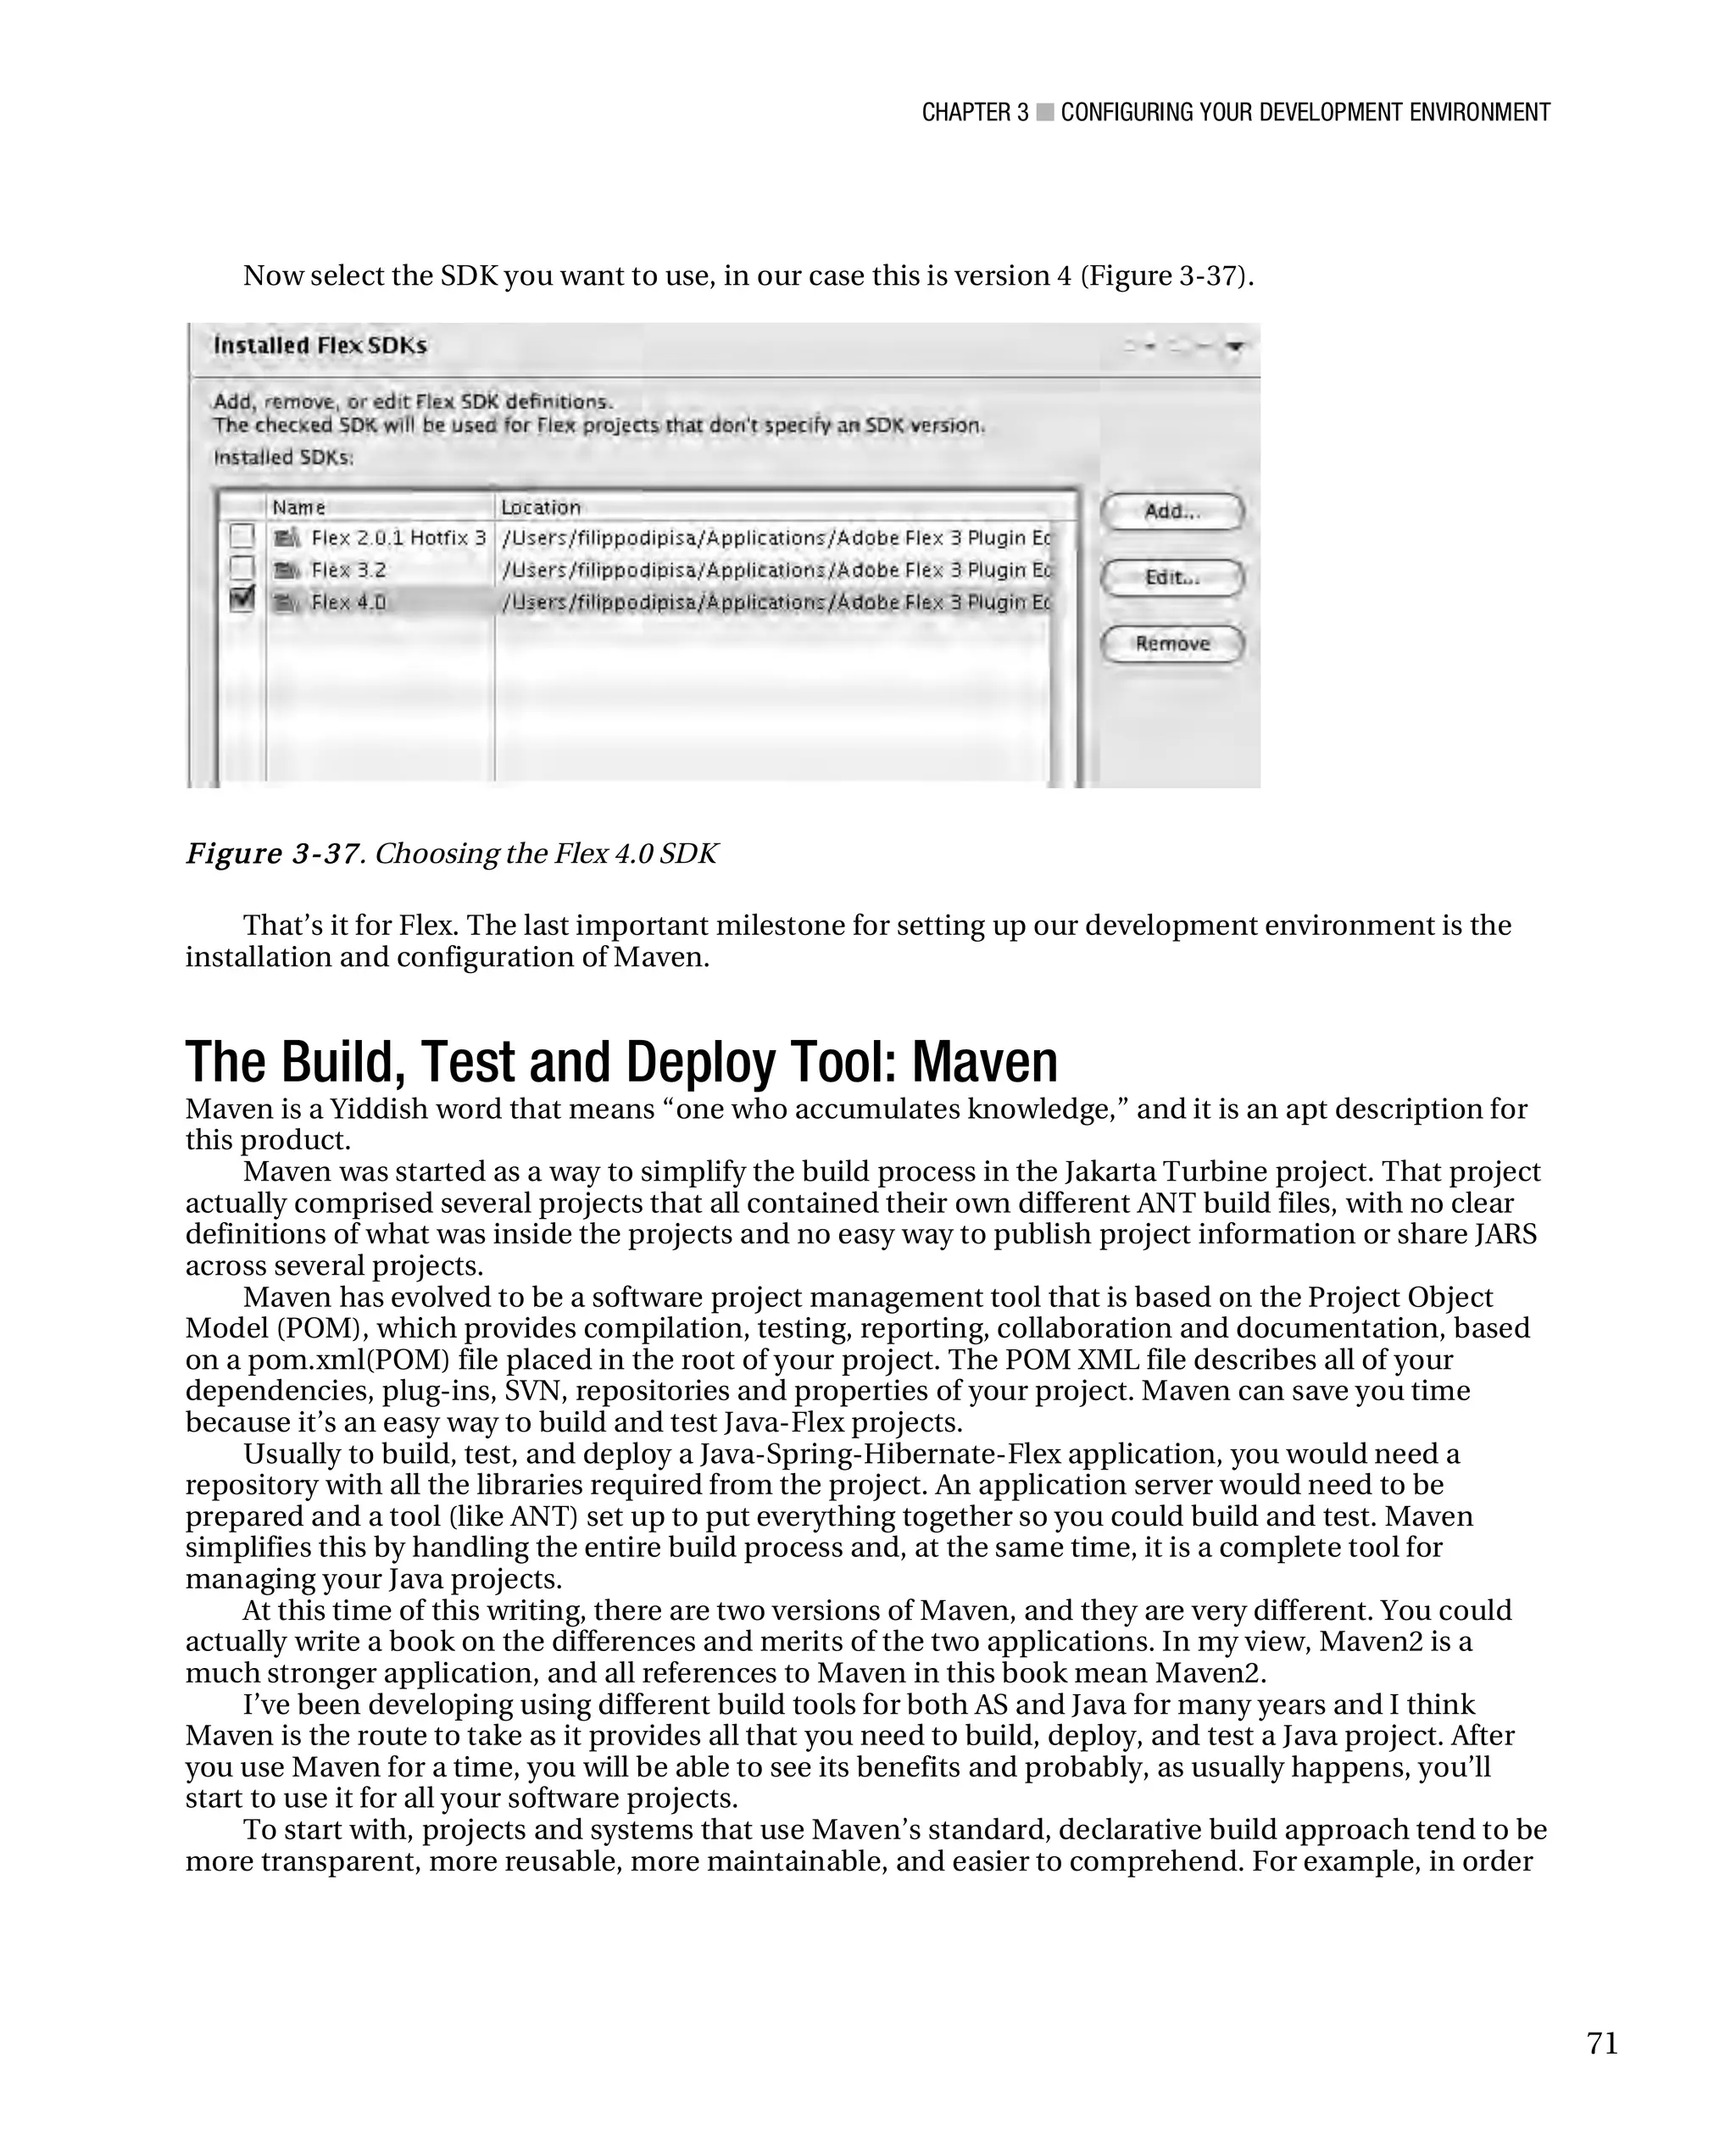
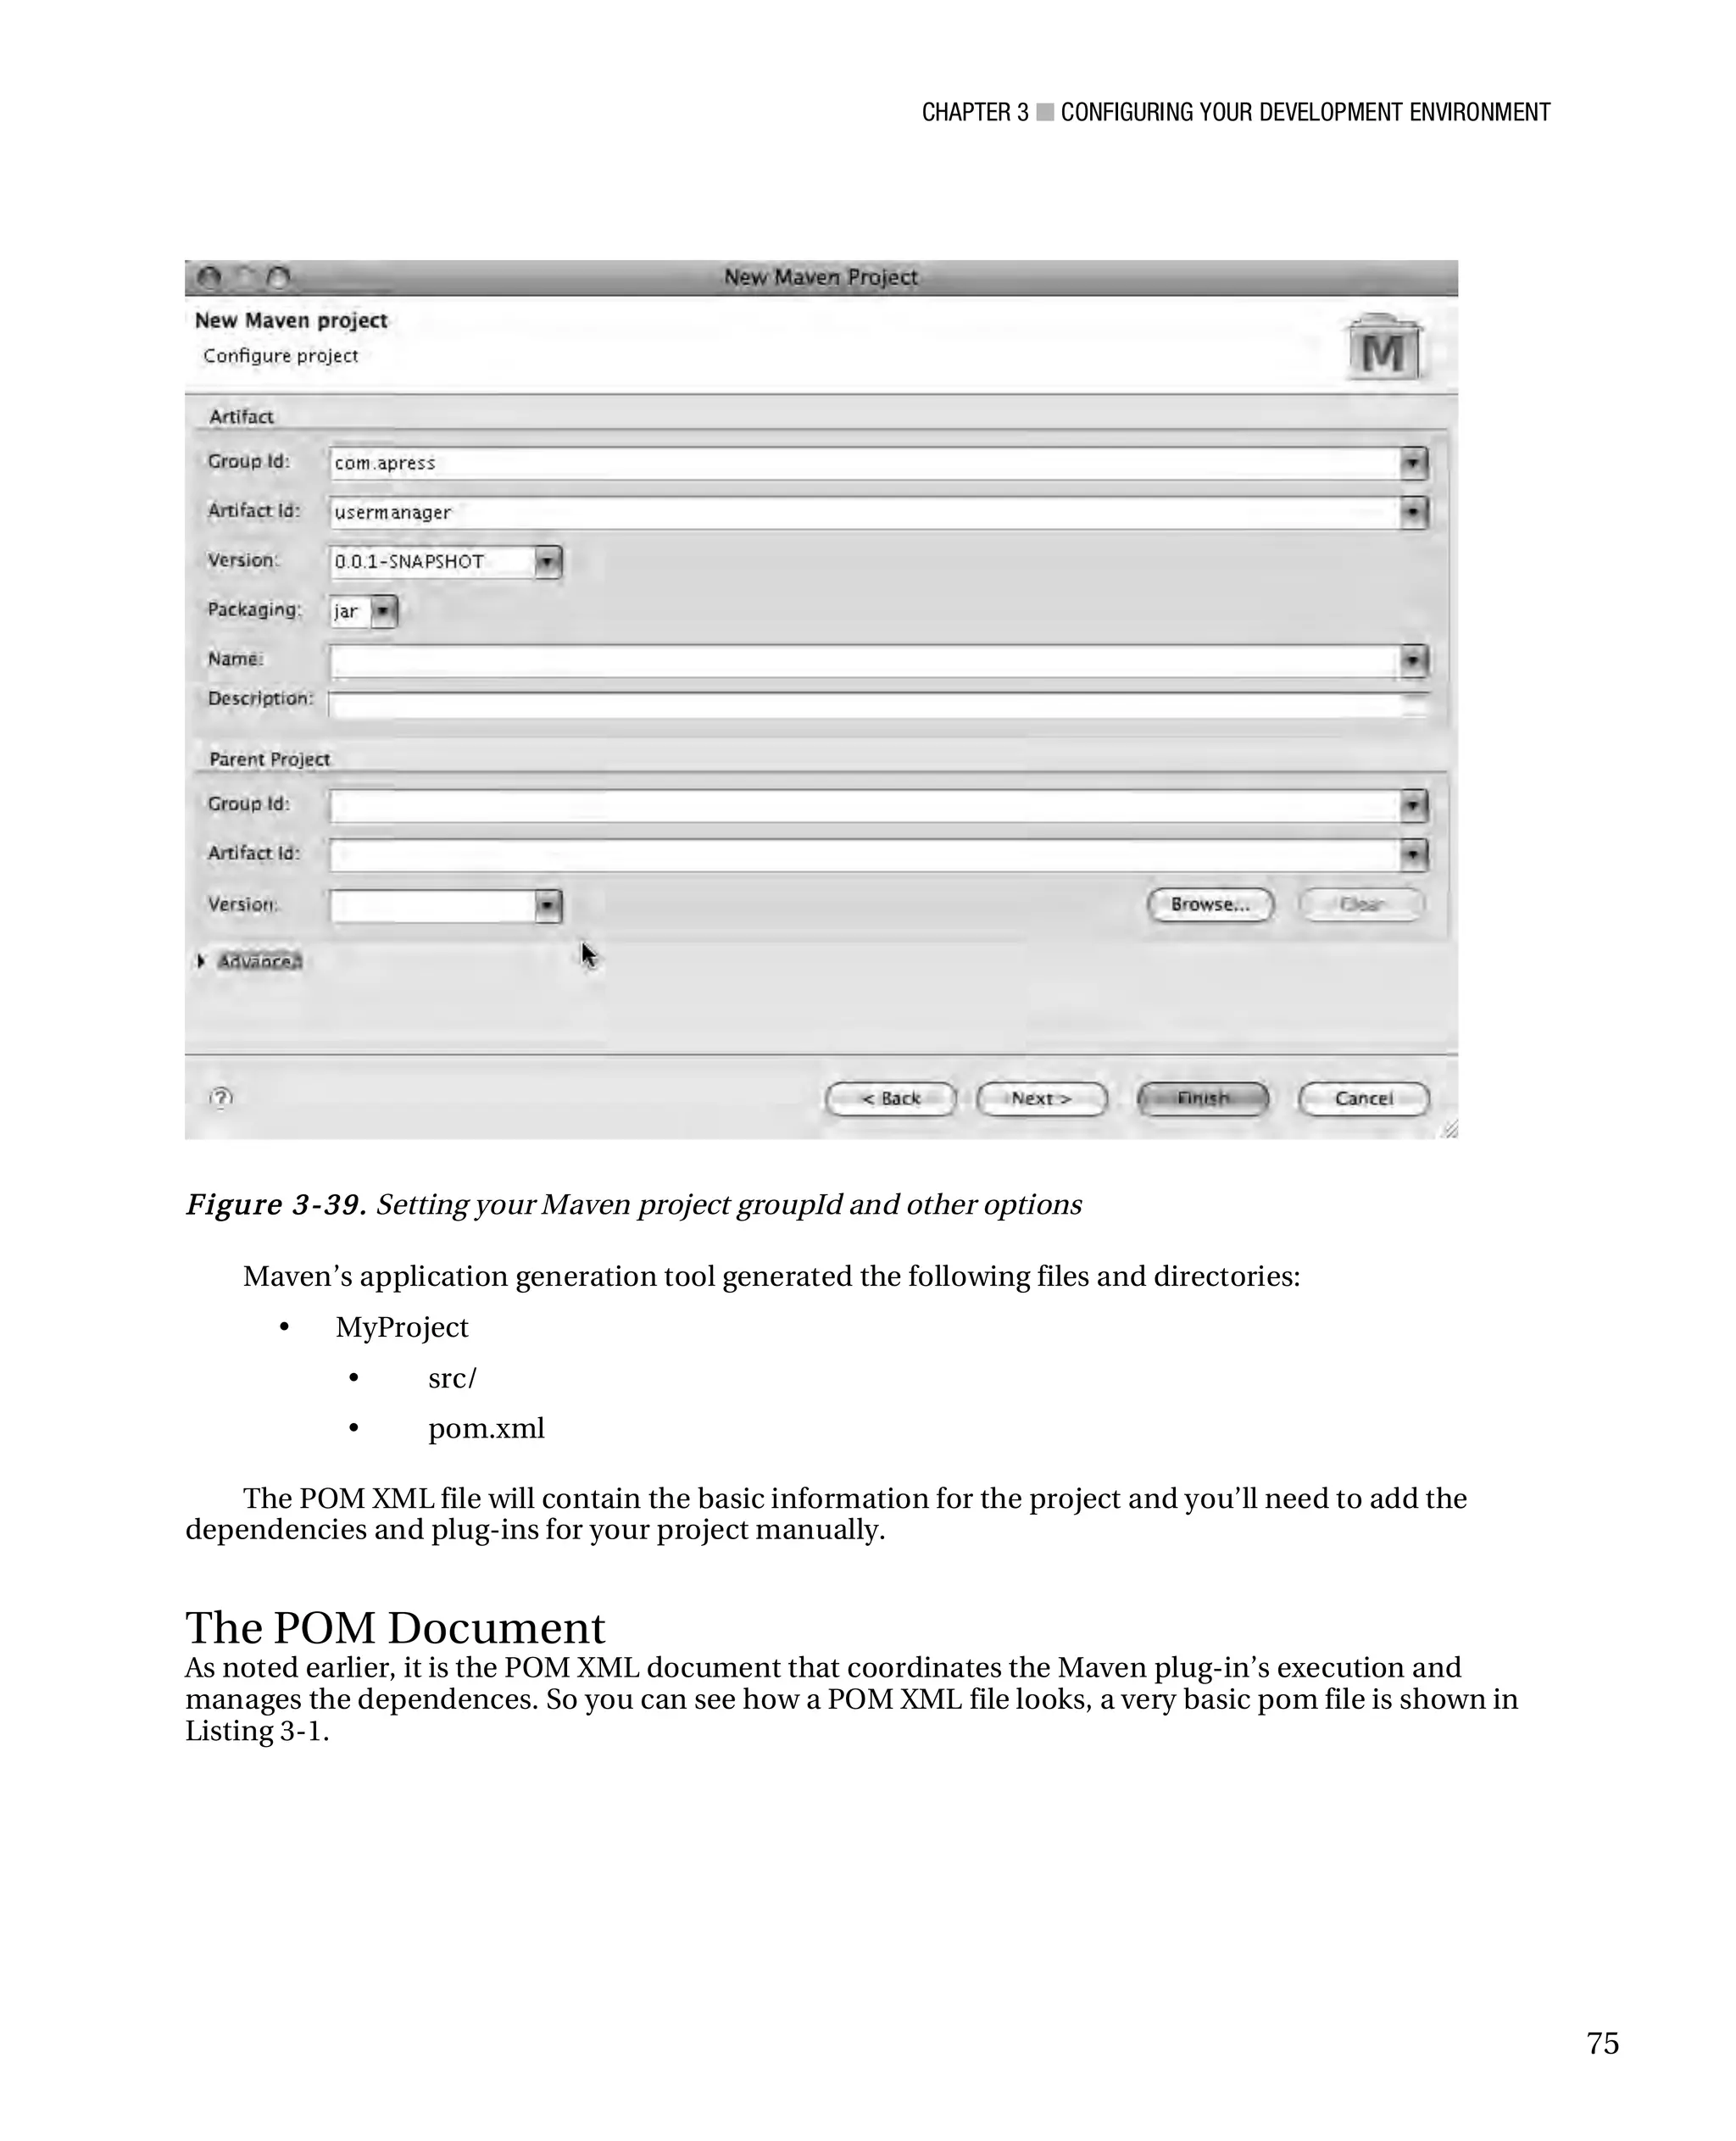
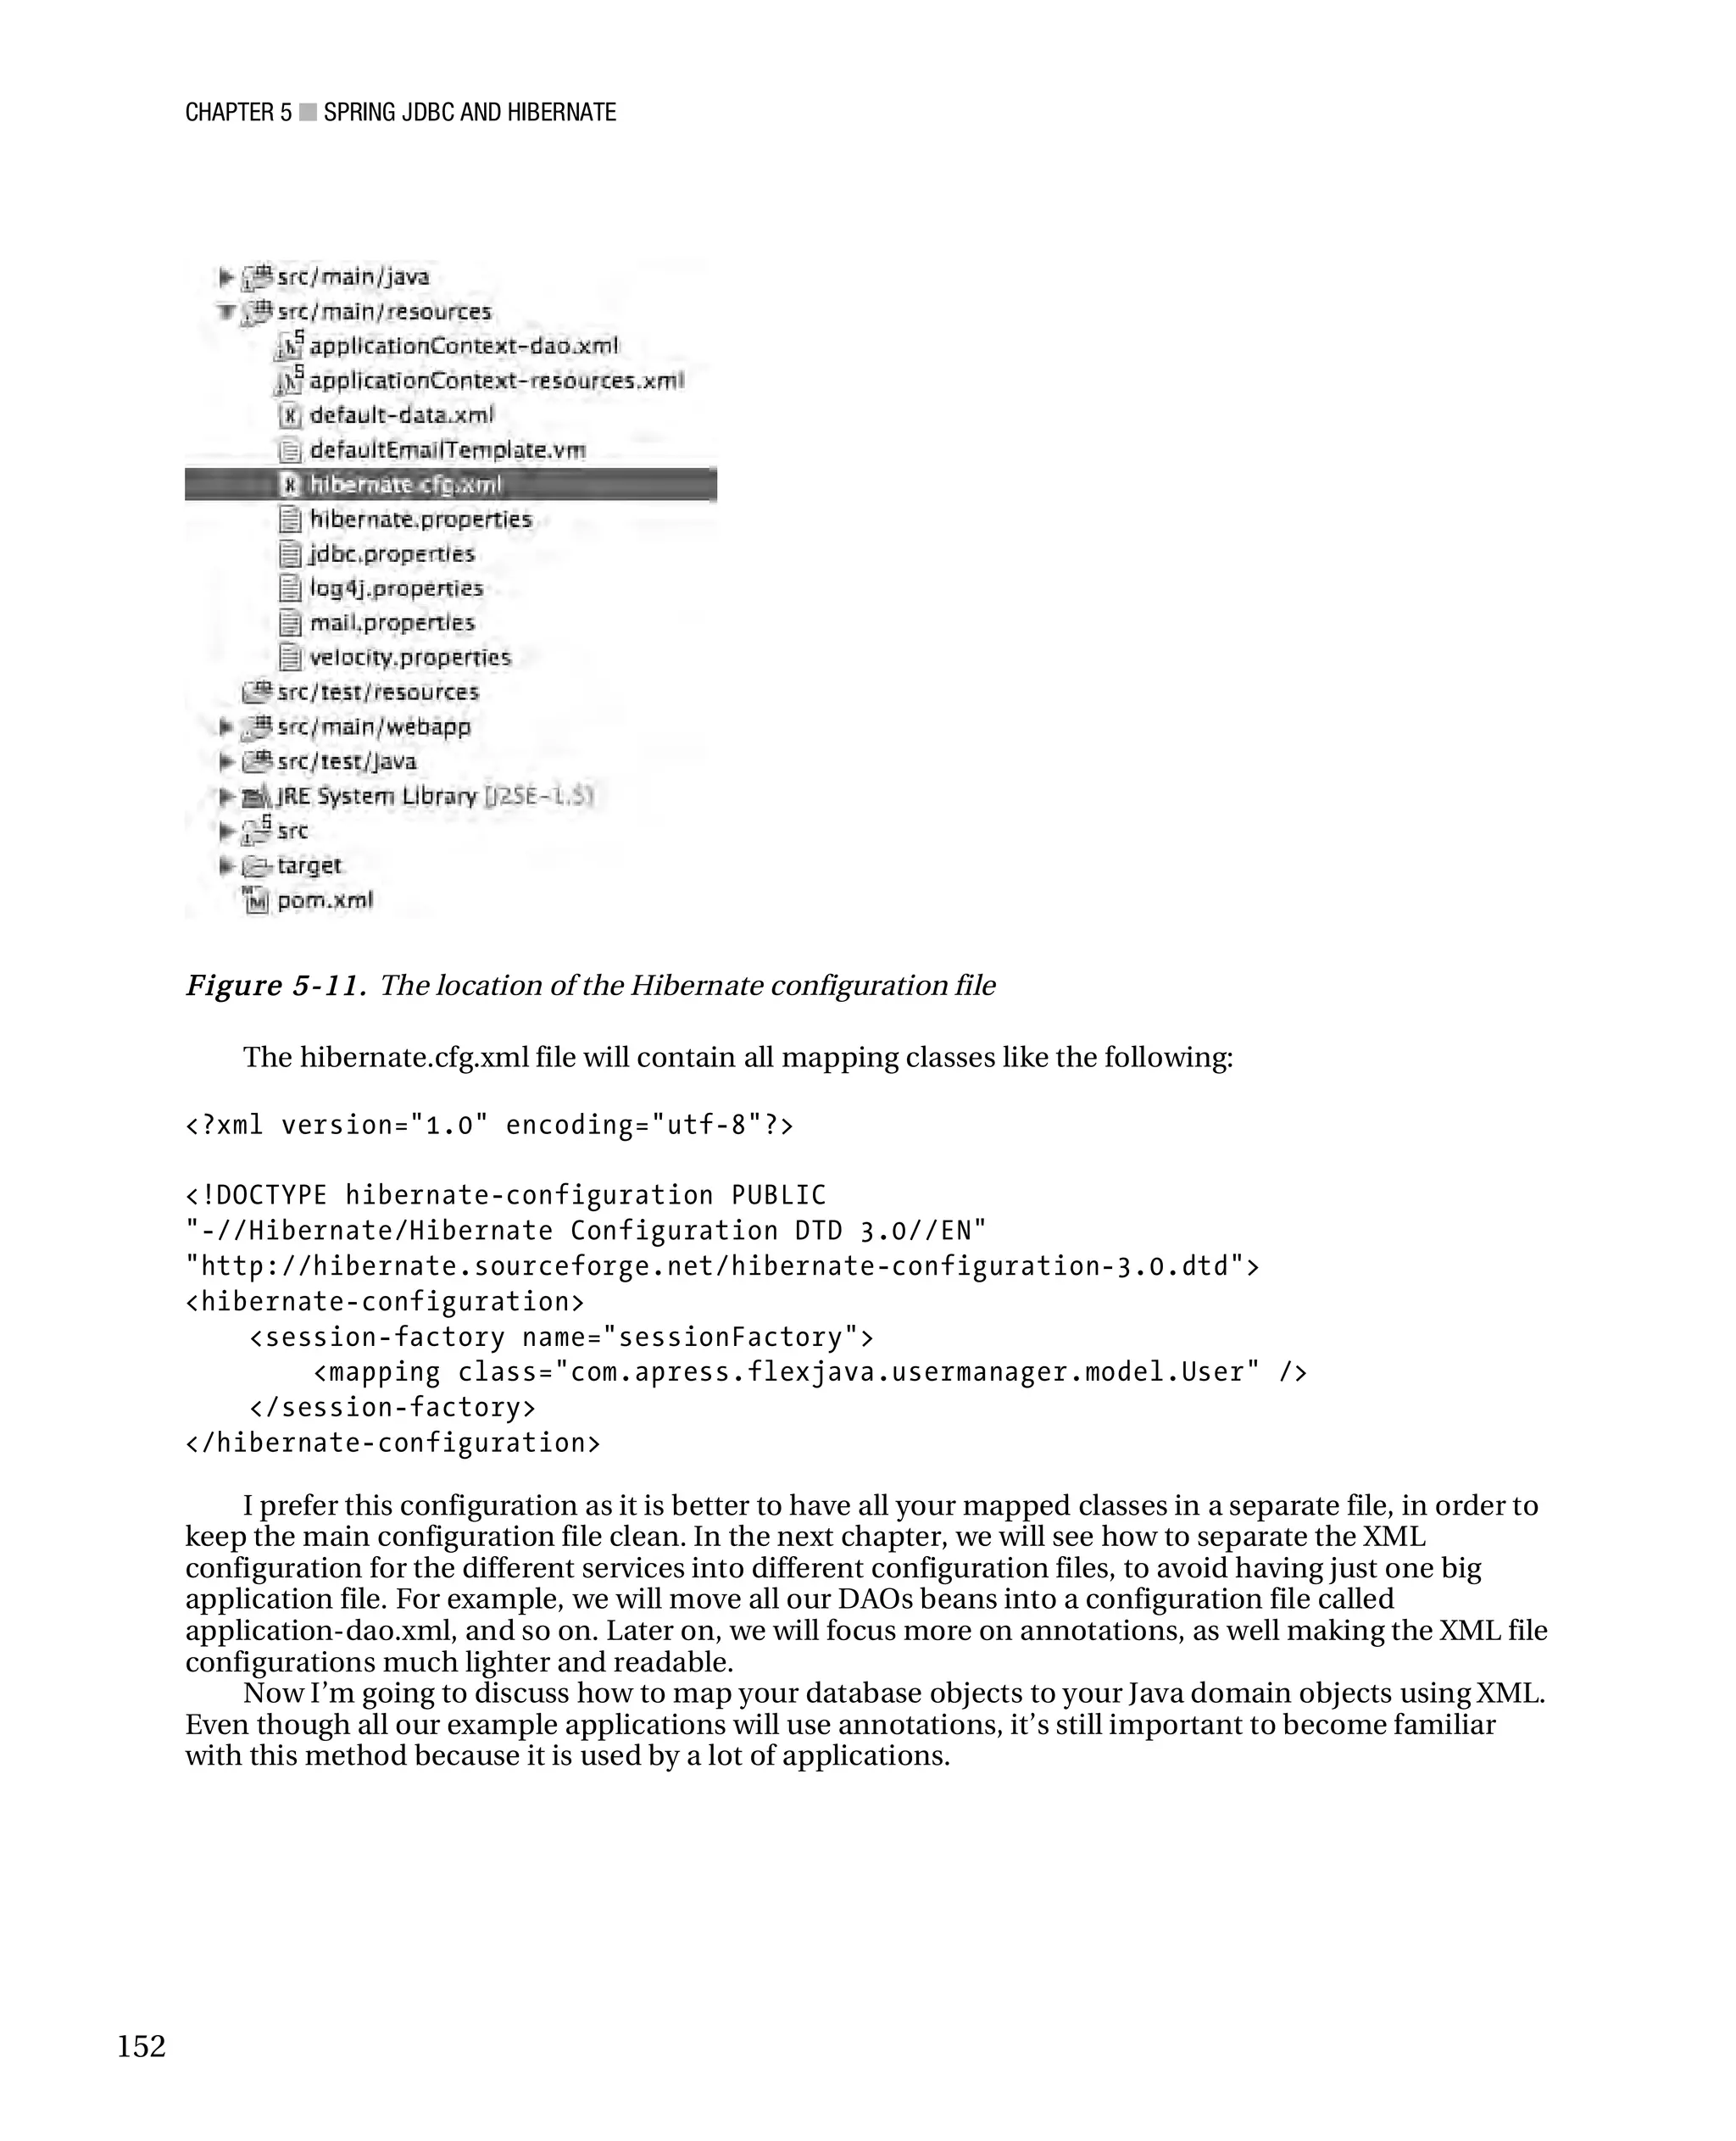
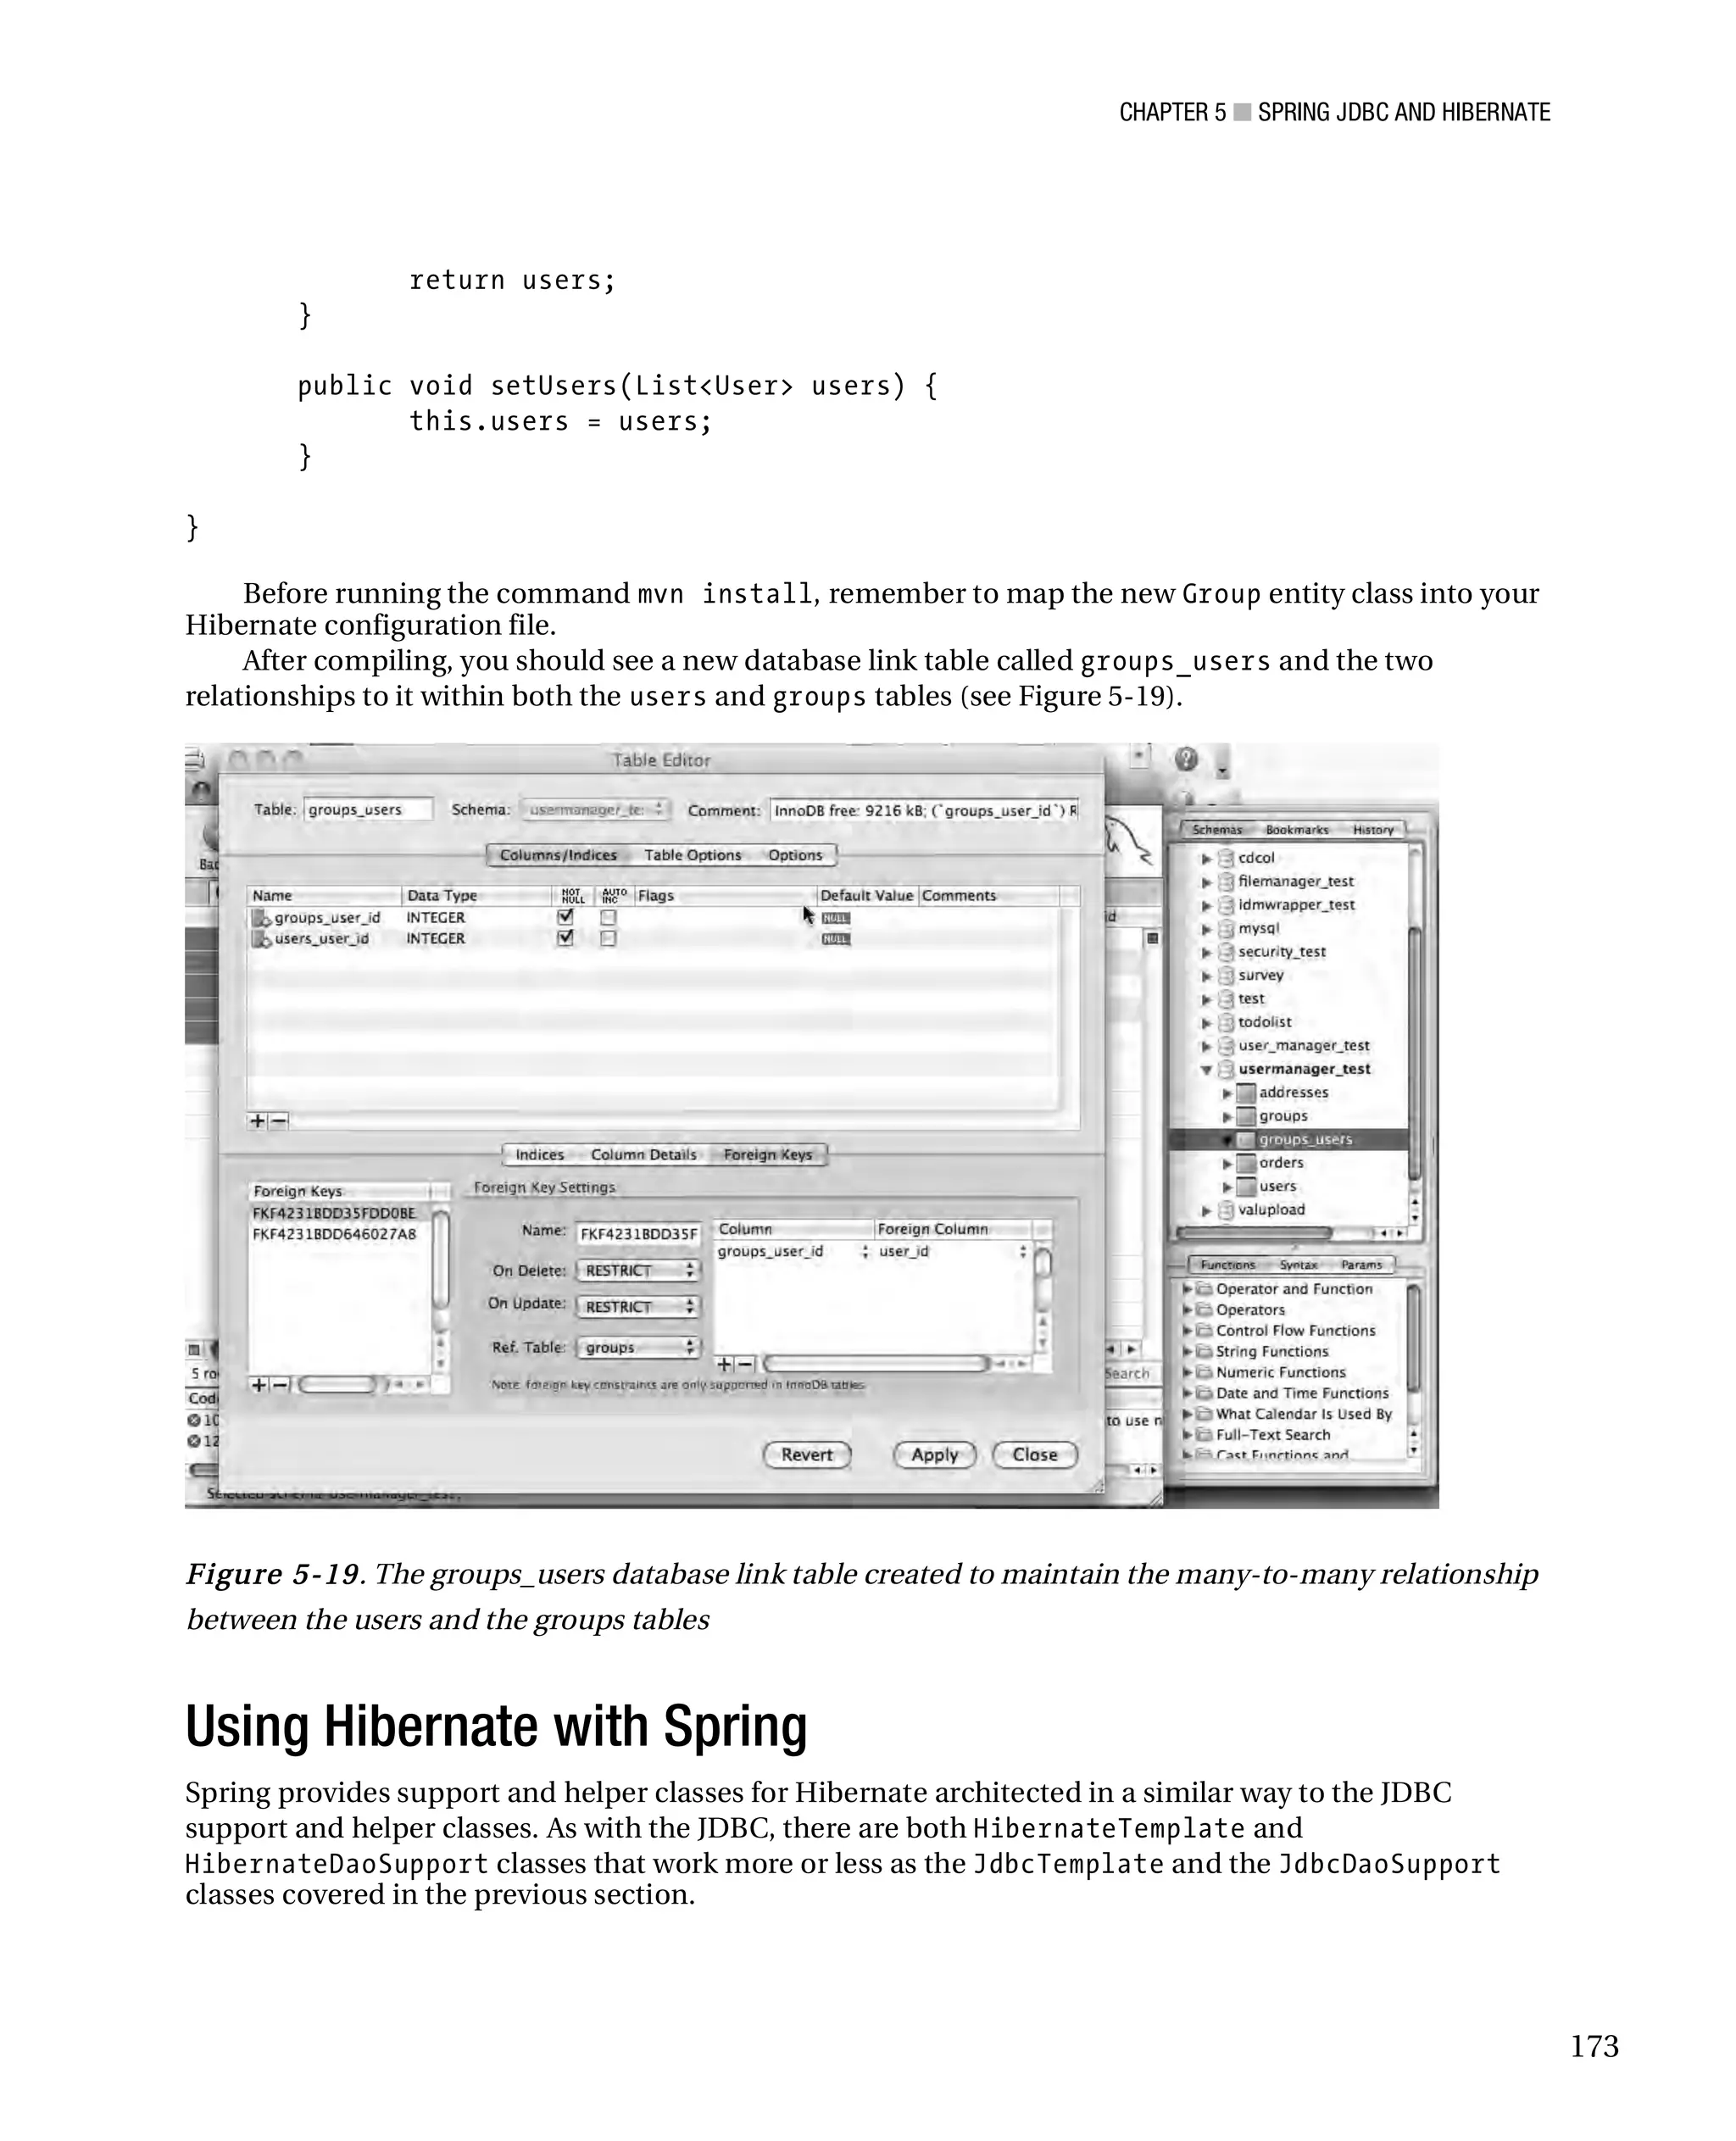
click and select the Create Schema item, as shown in Figure 3-21.
Figure 3-21. MySQL Query Browser create new database
57](https://image.slidesharecdn.com/beginningjavaandflex-migratingjavaspringhibernateandmavendeveloperstoadobeflex-100821073507-phpapp01/75/Beginning-java-and-flex-migrating-java-spring-hibernate-and-maven-developers-to-adobe-flex-76-2048.jpg)
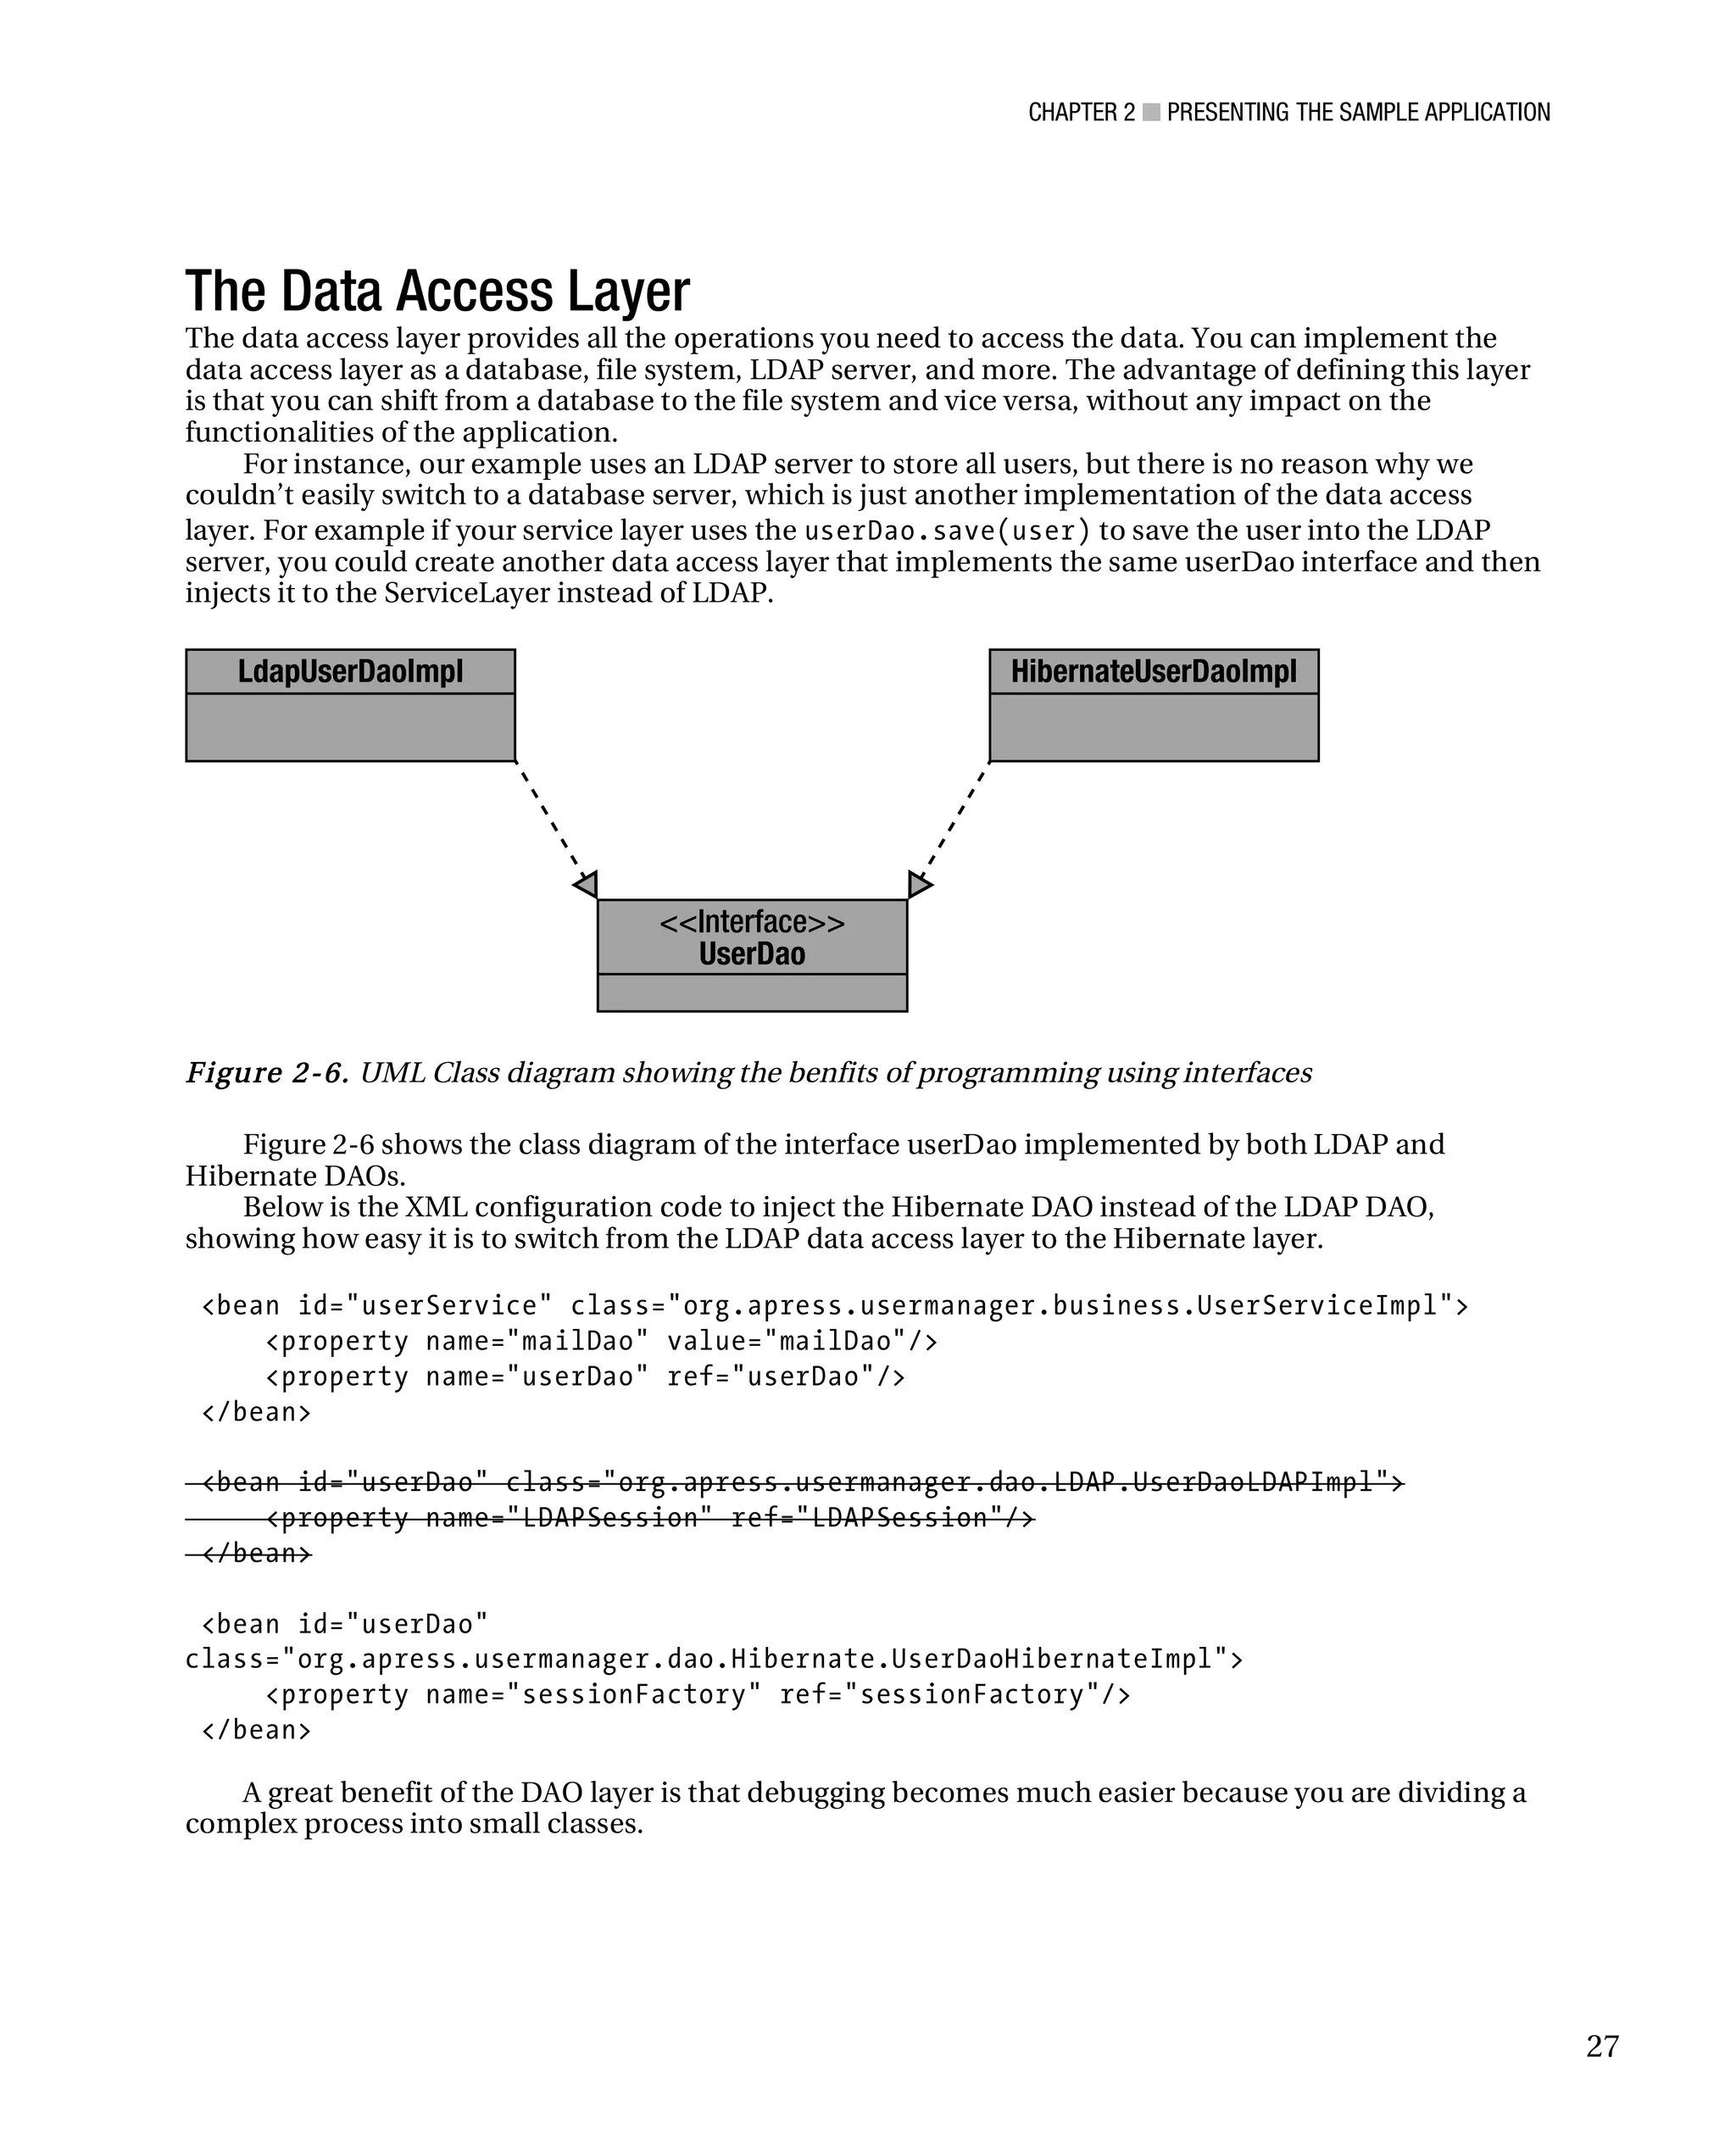
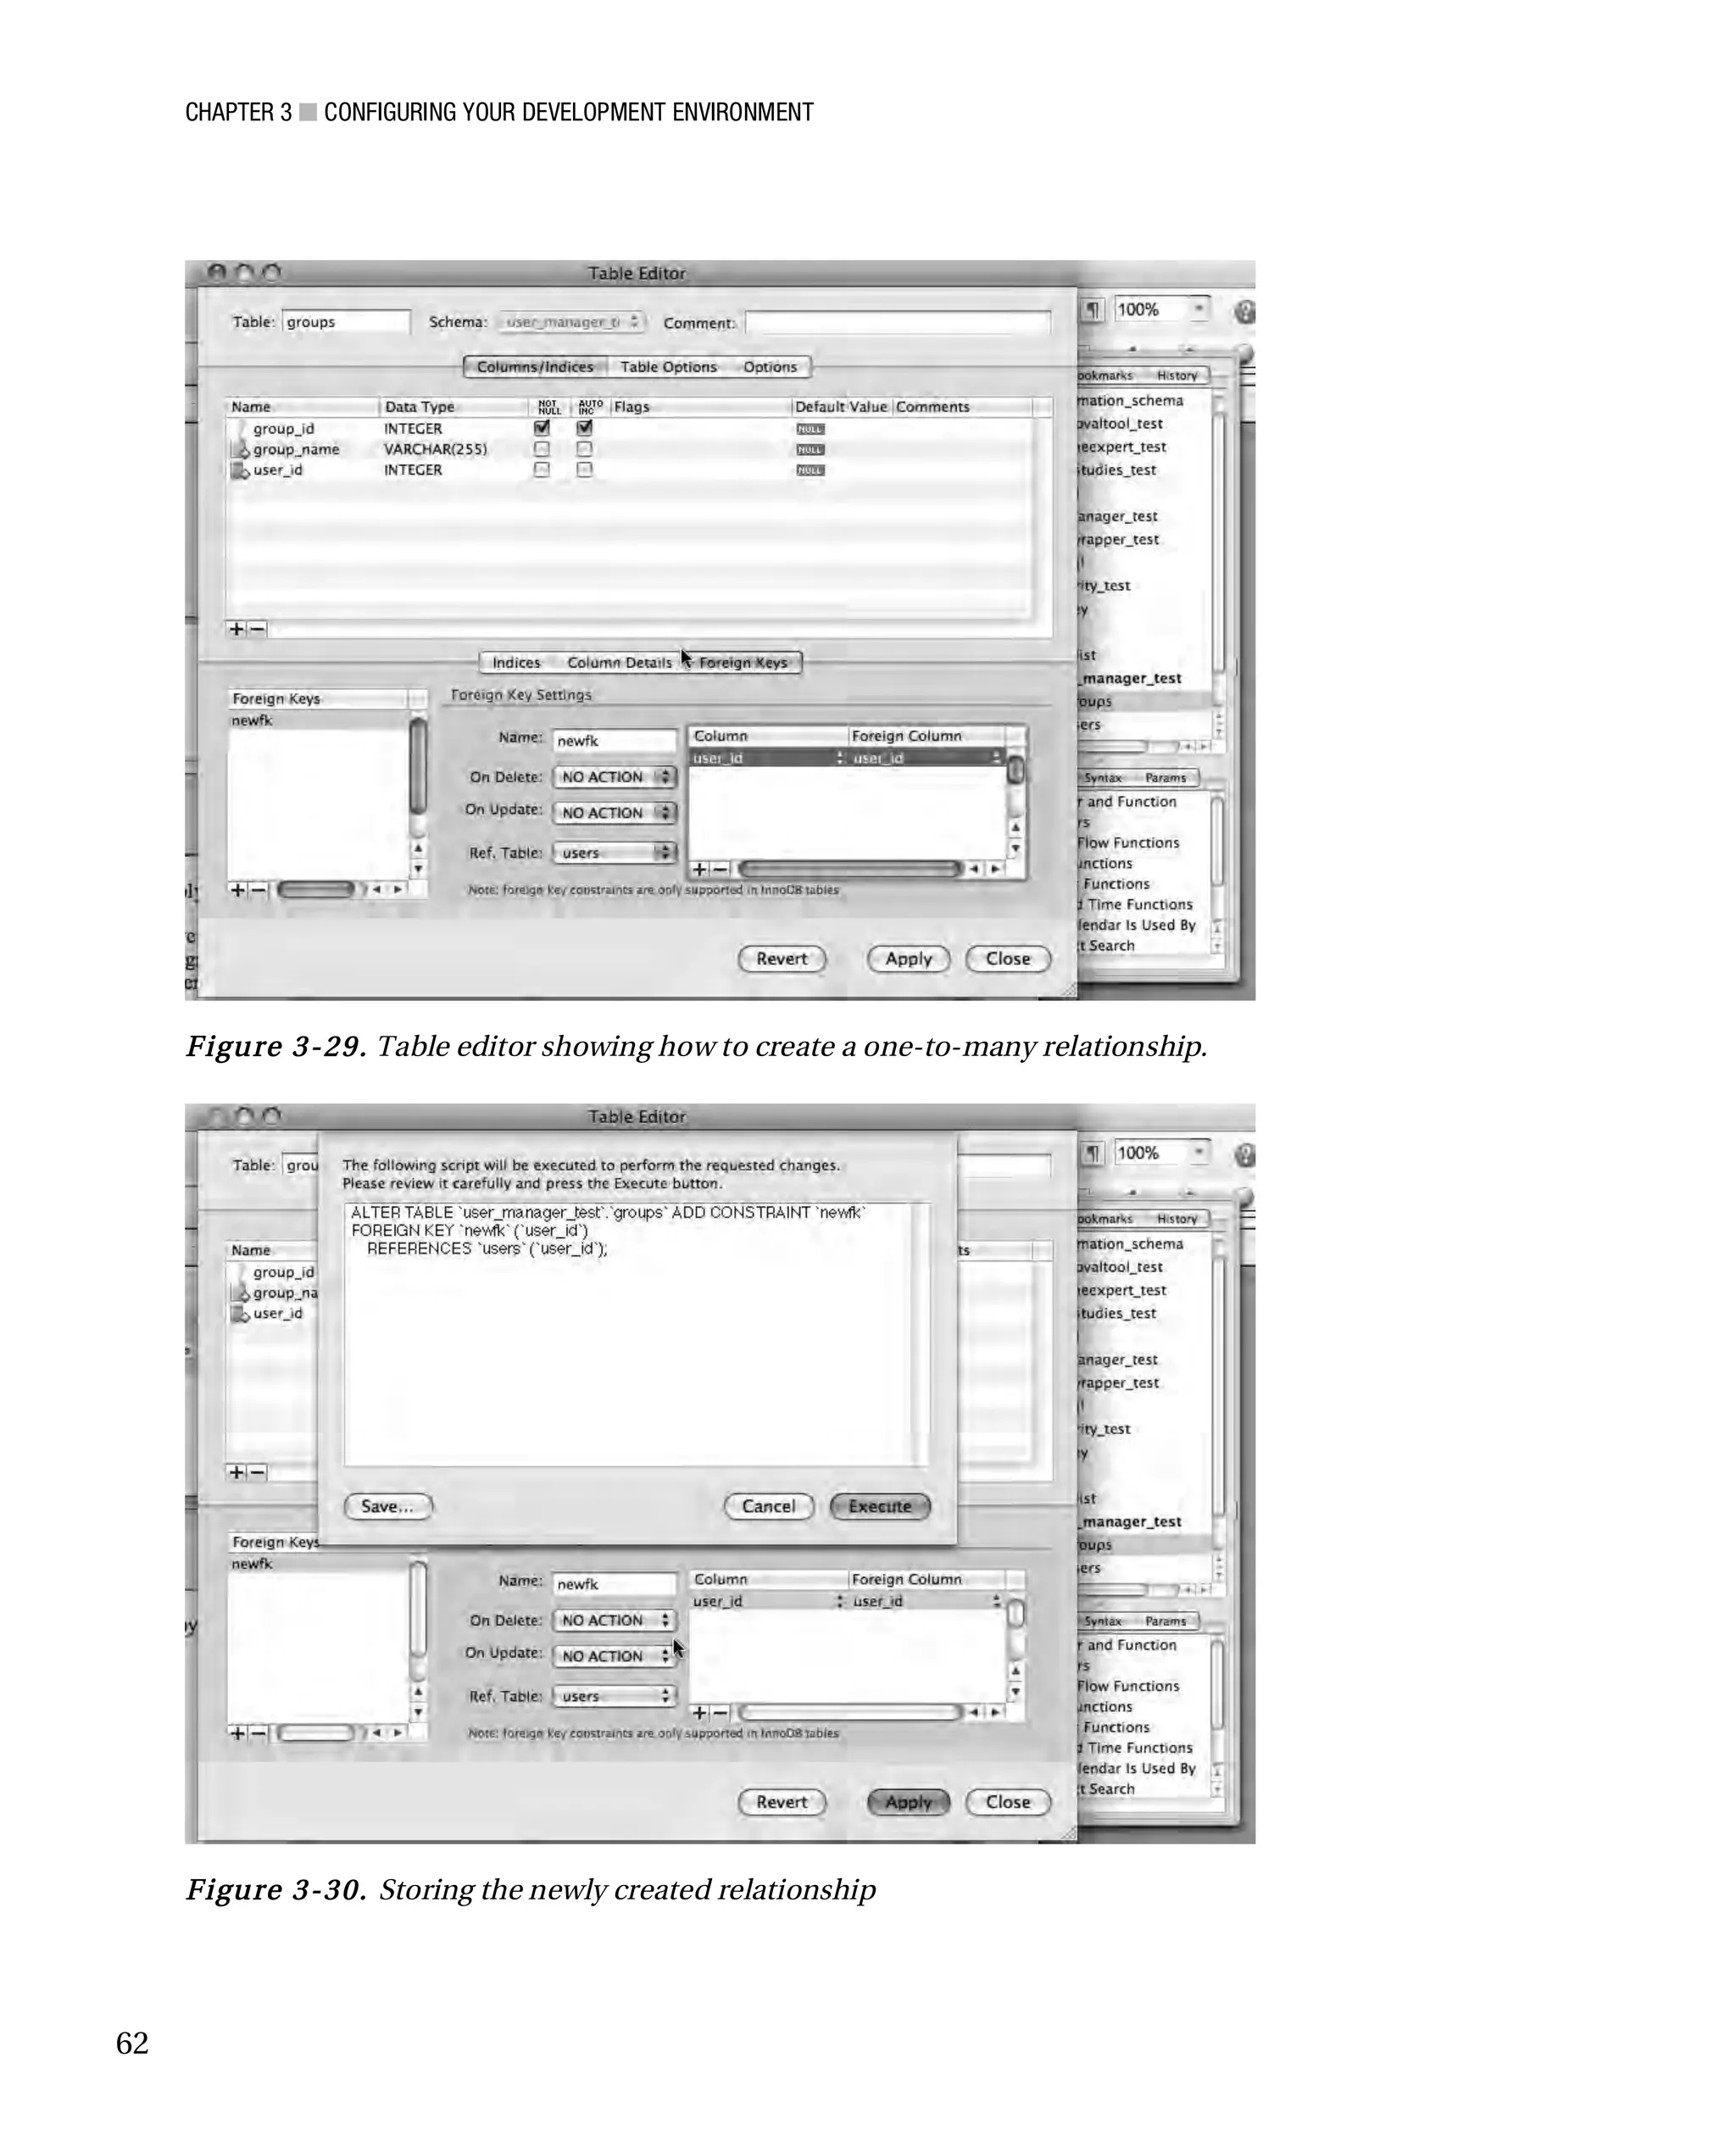
![CHAPTER 3 ■ CONFIGURING YOUR DEVELOPMENT ENVIRONMENT
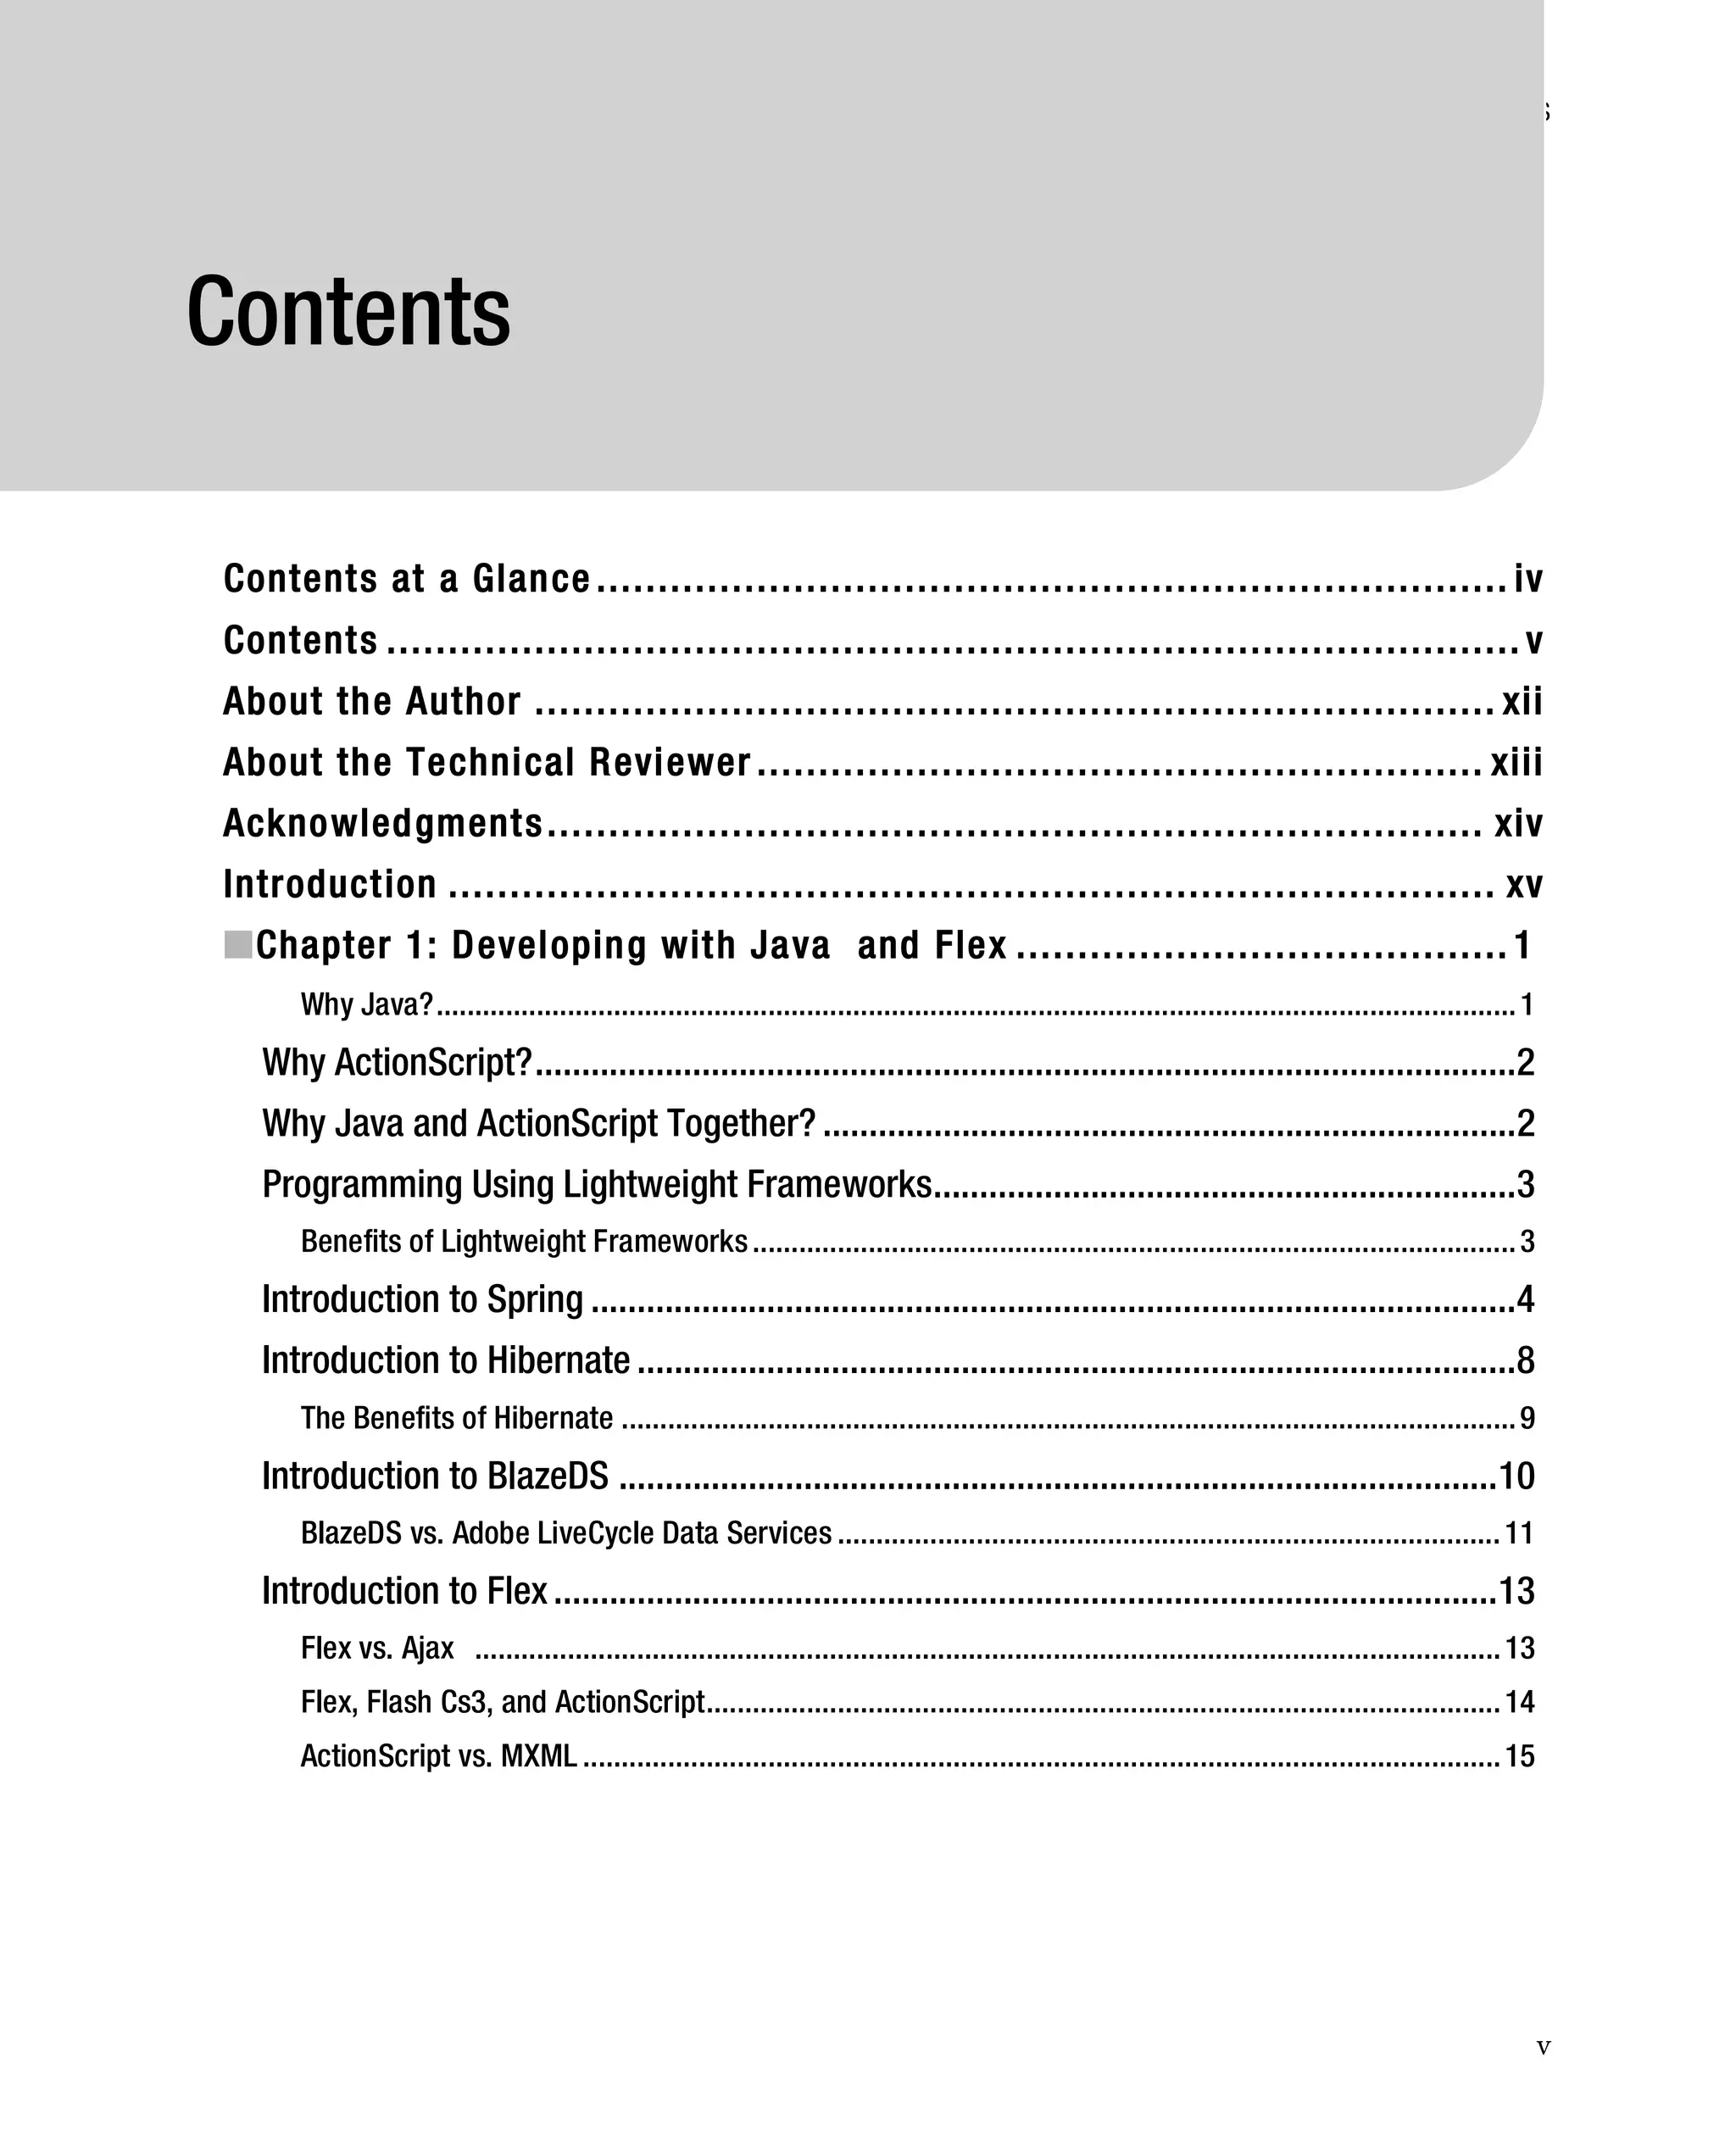
One group can have many users, so the relationship to create is one-to-many. To create the relation
using MySQL query browser, edit the groups table, adding a column called user_id, as shown in Figure
3-28.
Figure 3-28. Adding a column to the groups table
When you’ve added the necessary information, click on Apply, then click on Execute to store your
changes.
Now we have to relate the user_id fields from both users and groups. Click on the symbol [+] on the
Foreign Keys section and select the users table in the box with the label Ref.Table (Figure 3-29). Now
select the user_id fields for both Column and Foreign Column in the grid on the right and again, click
on Apply and then Execute to store your changes (Figure 3-30).
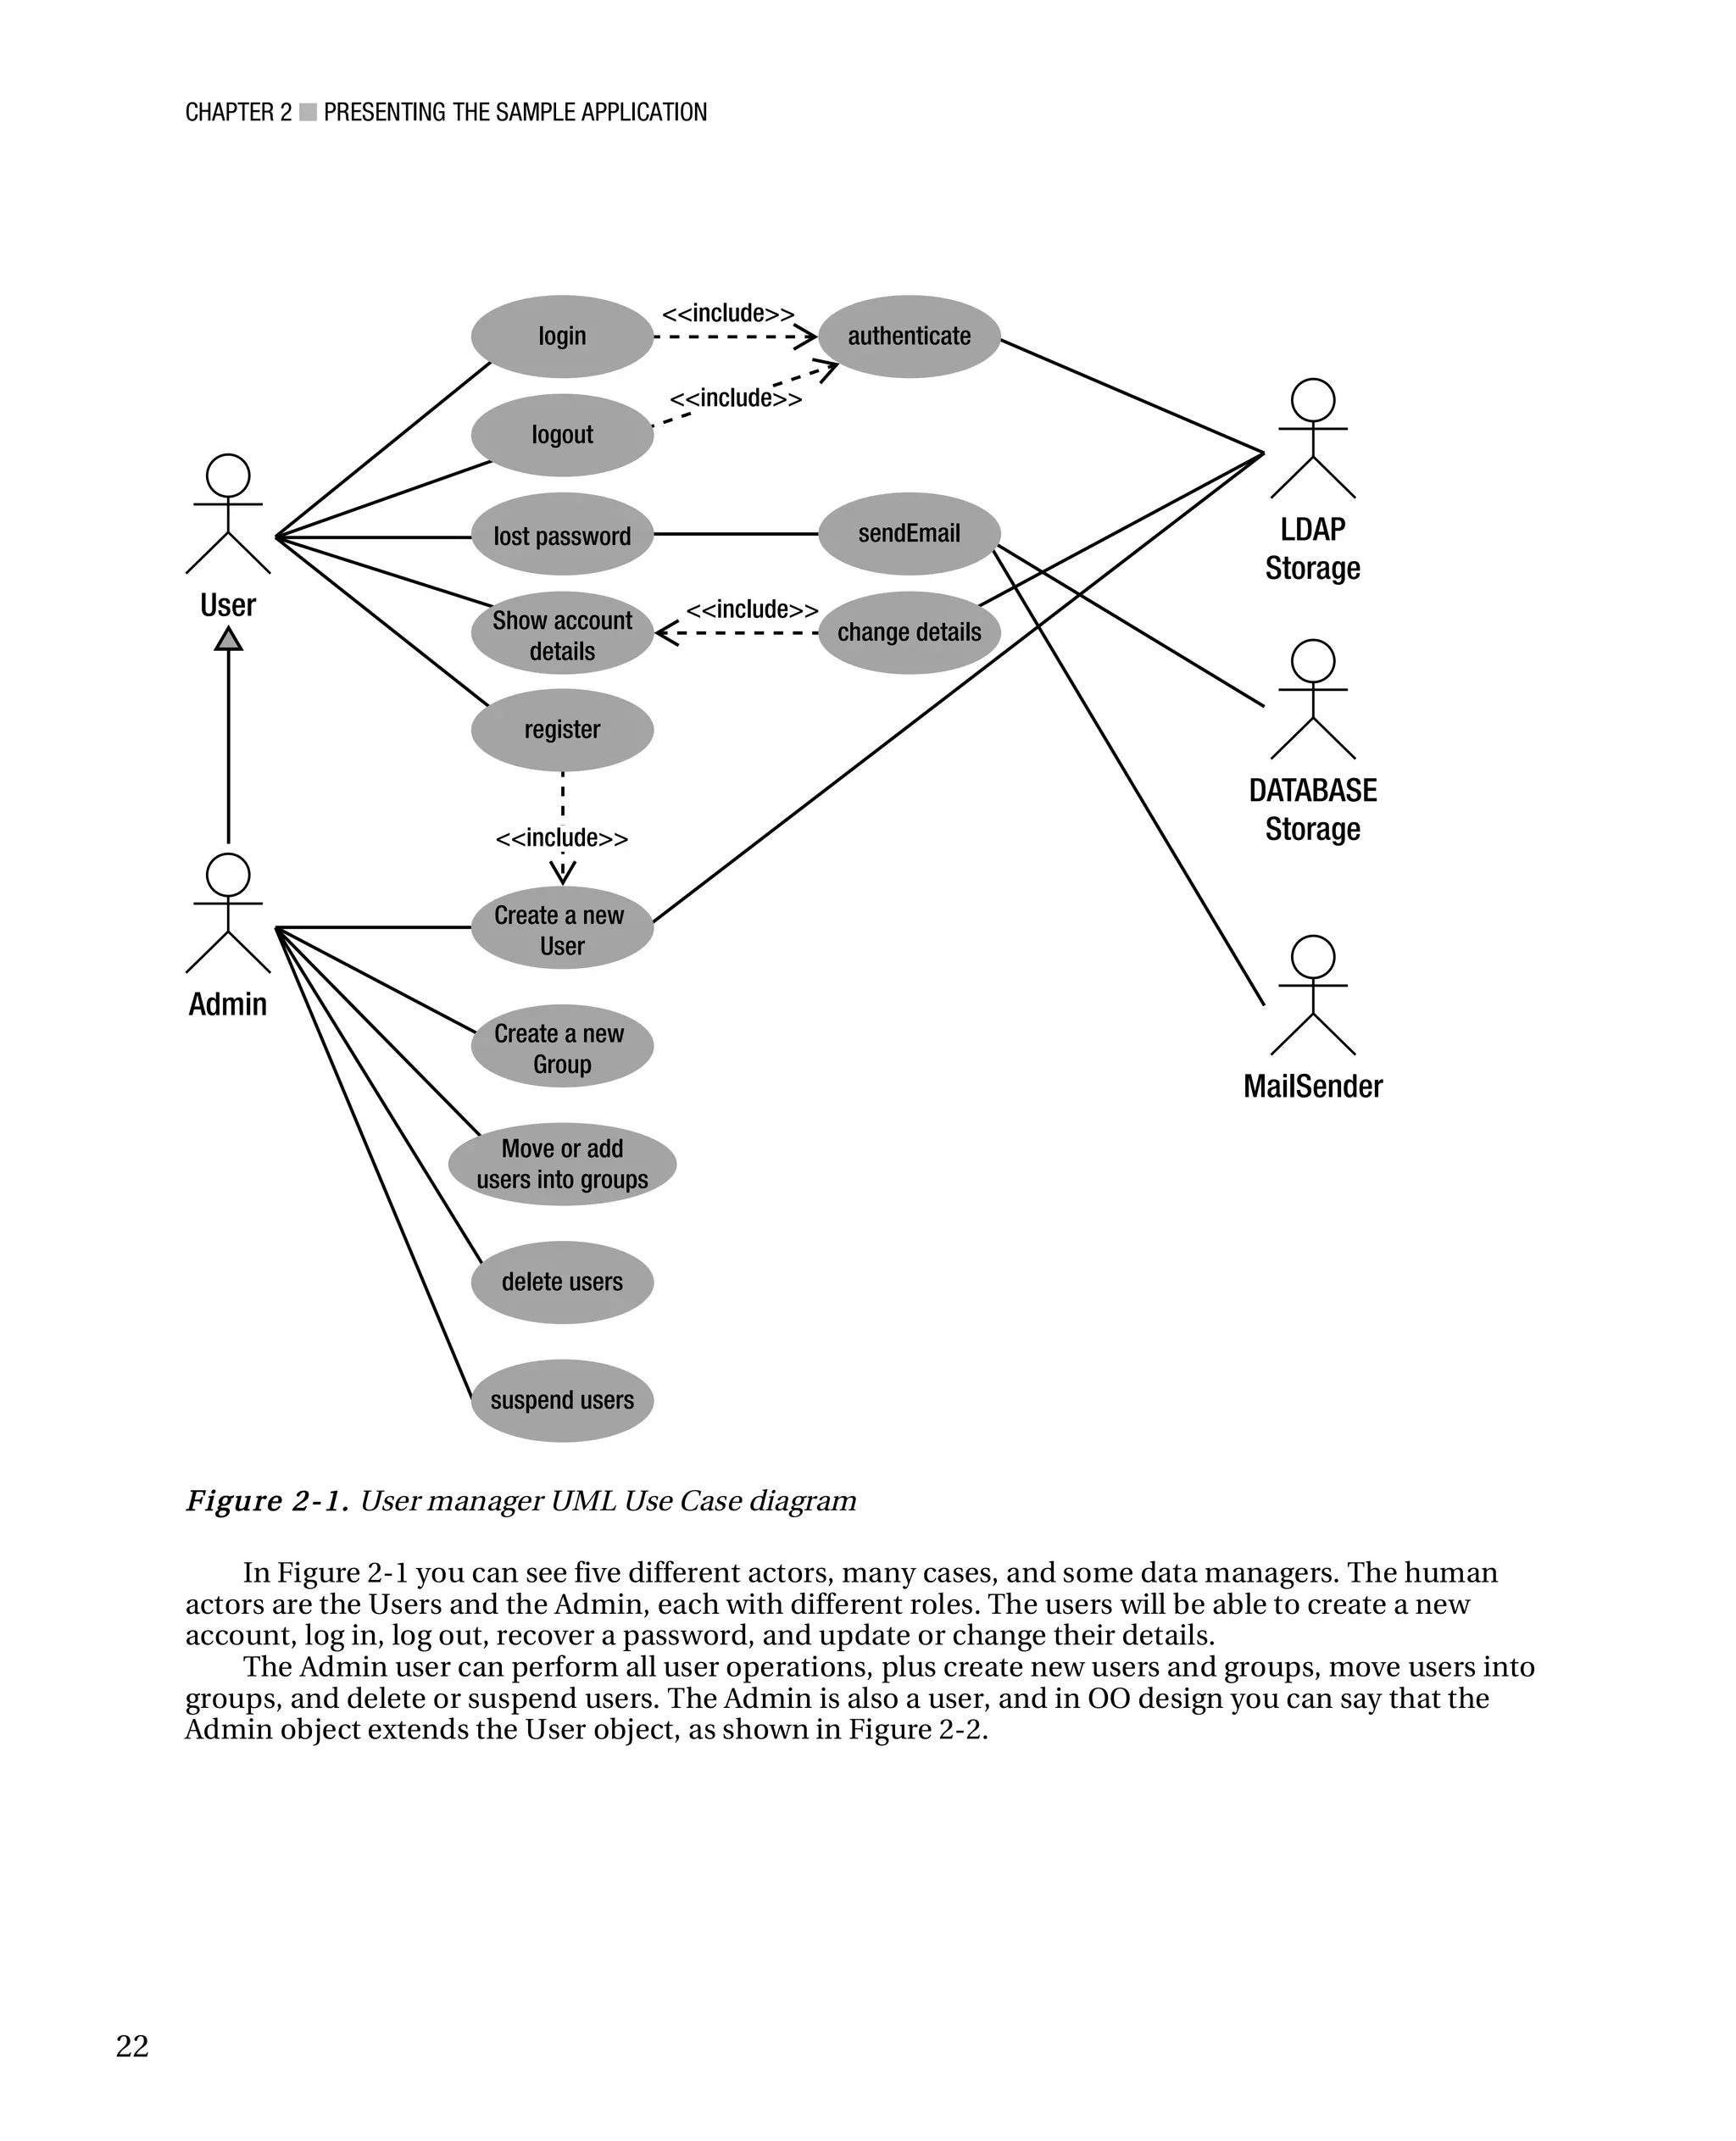
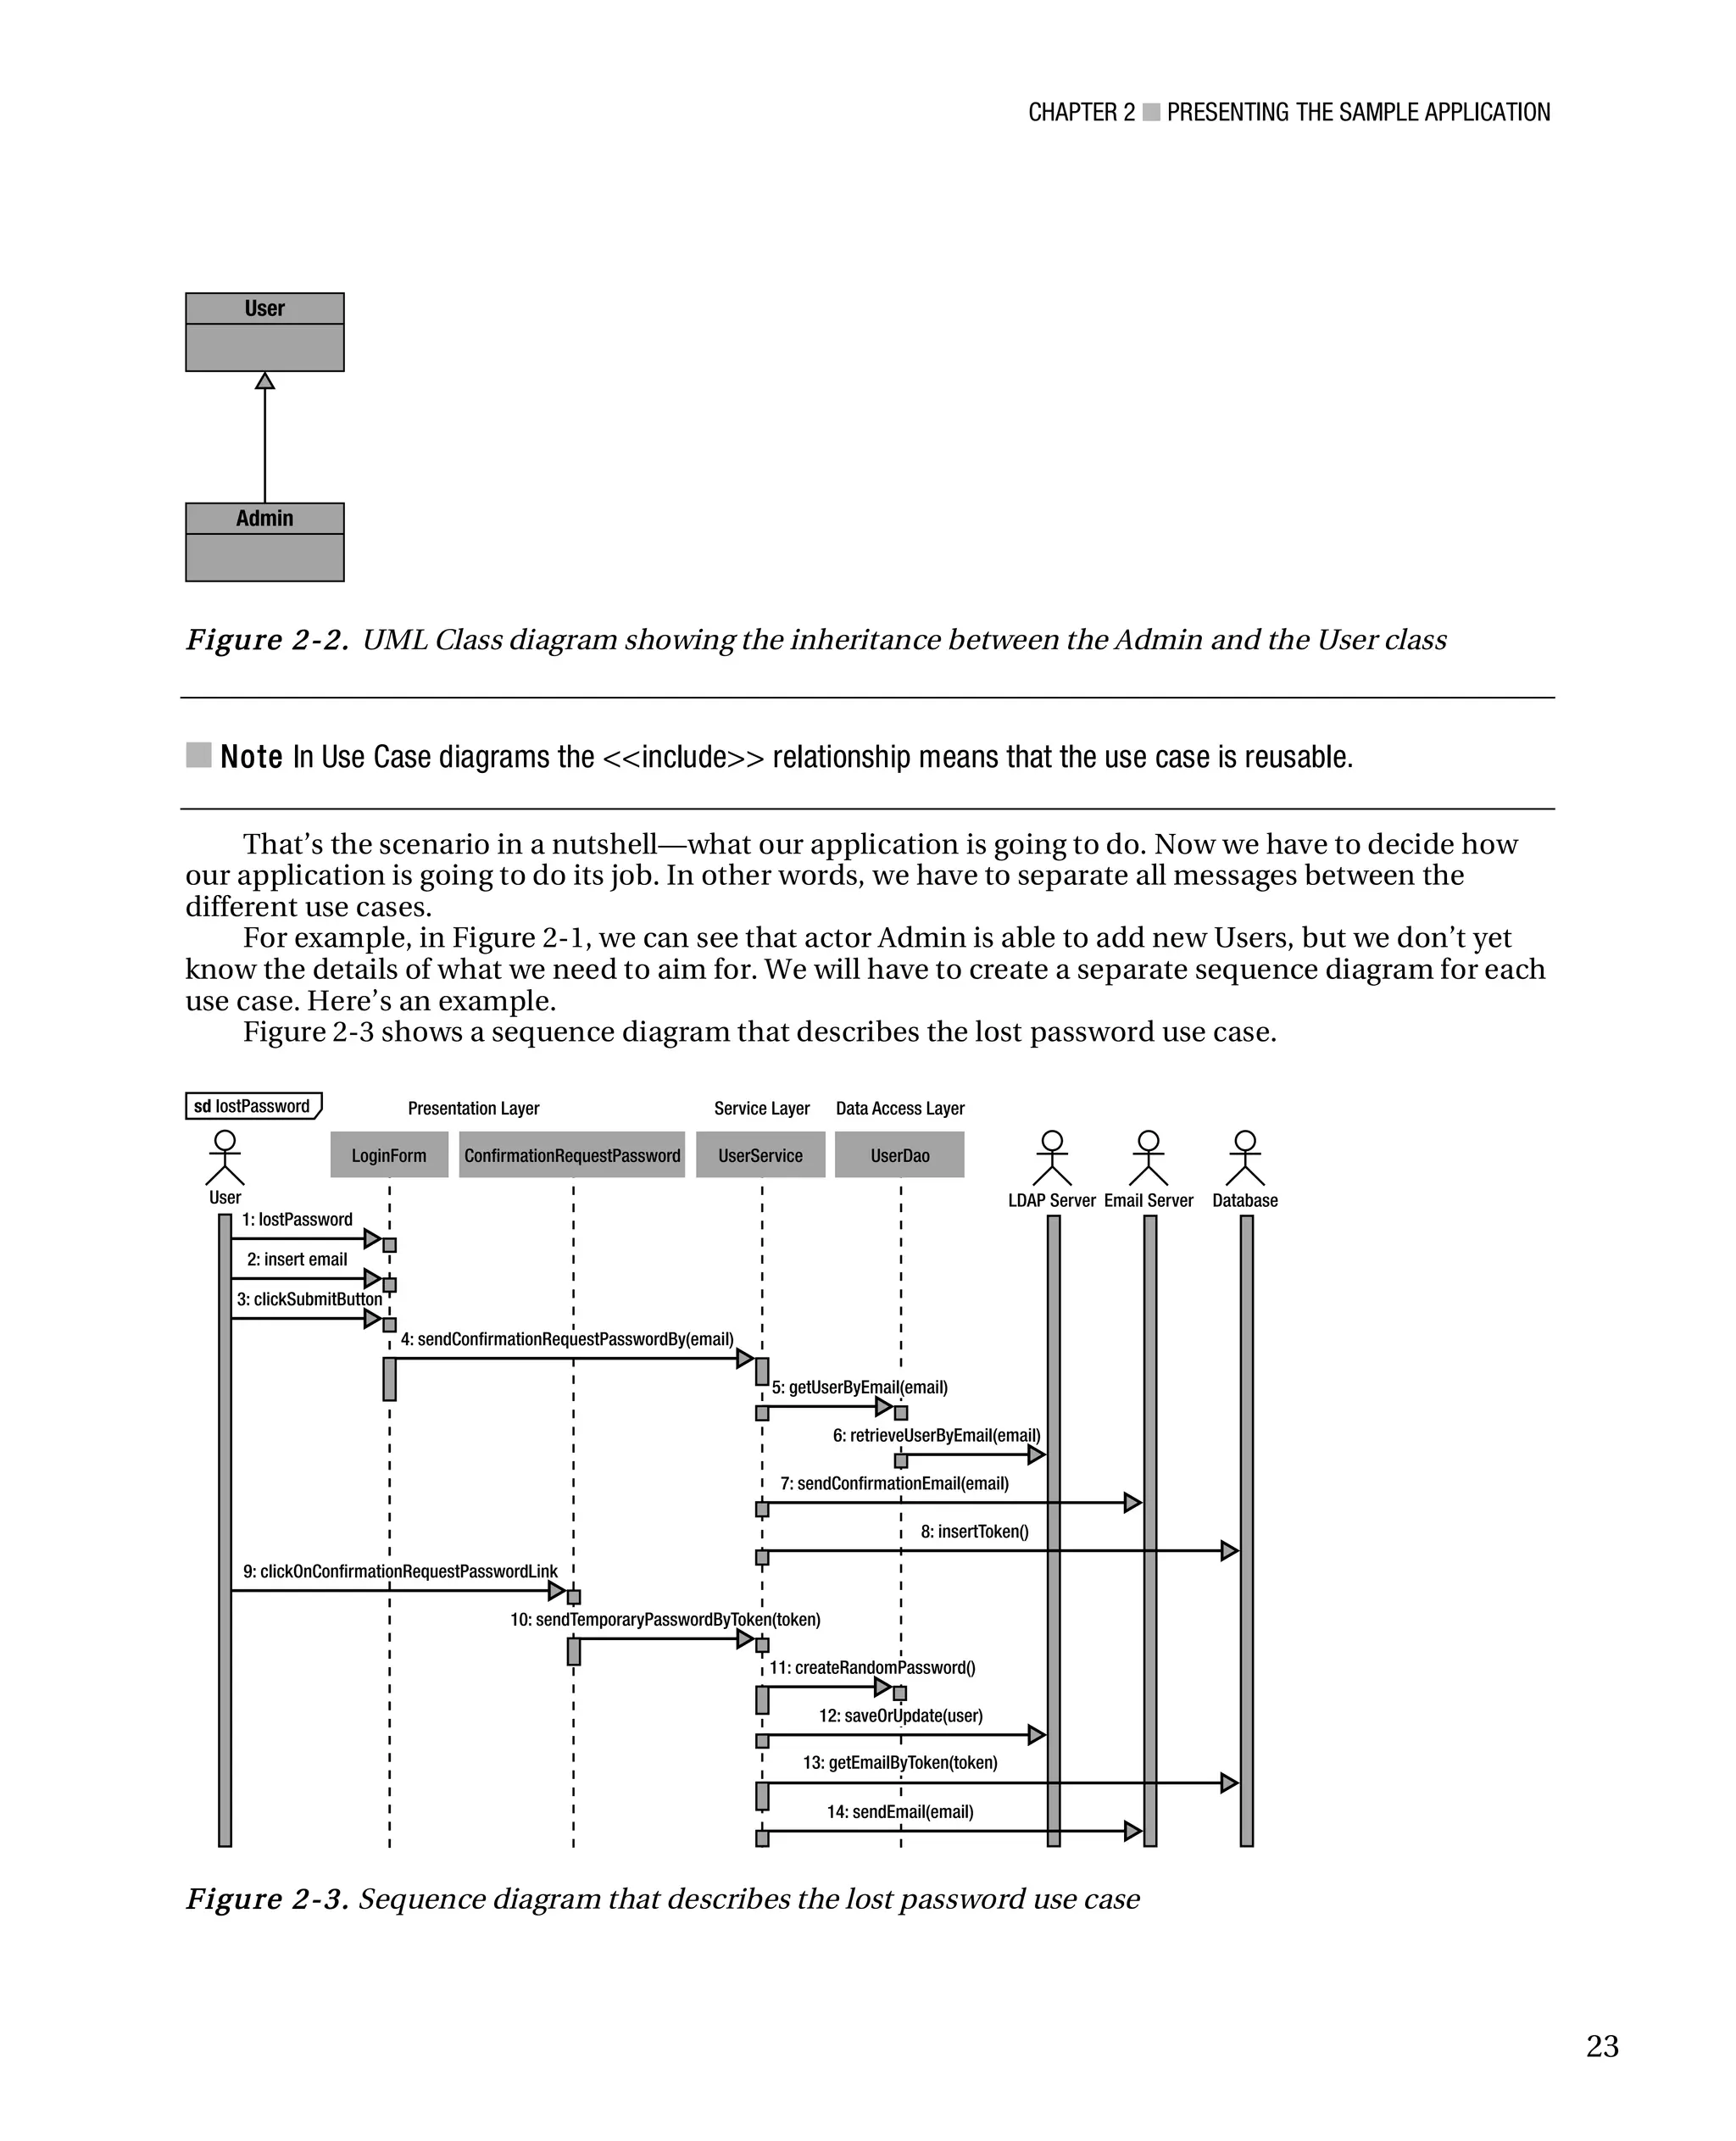
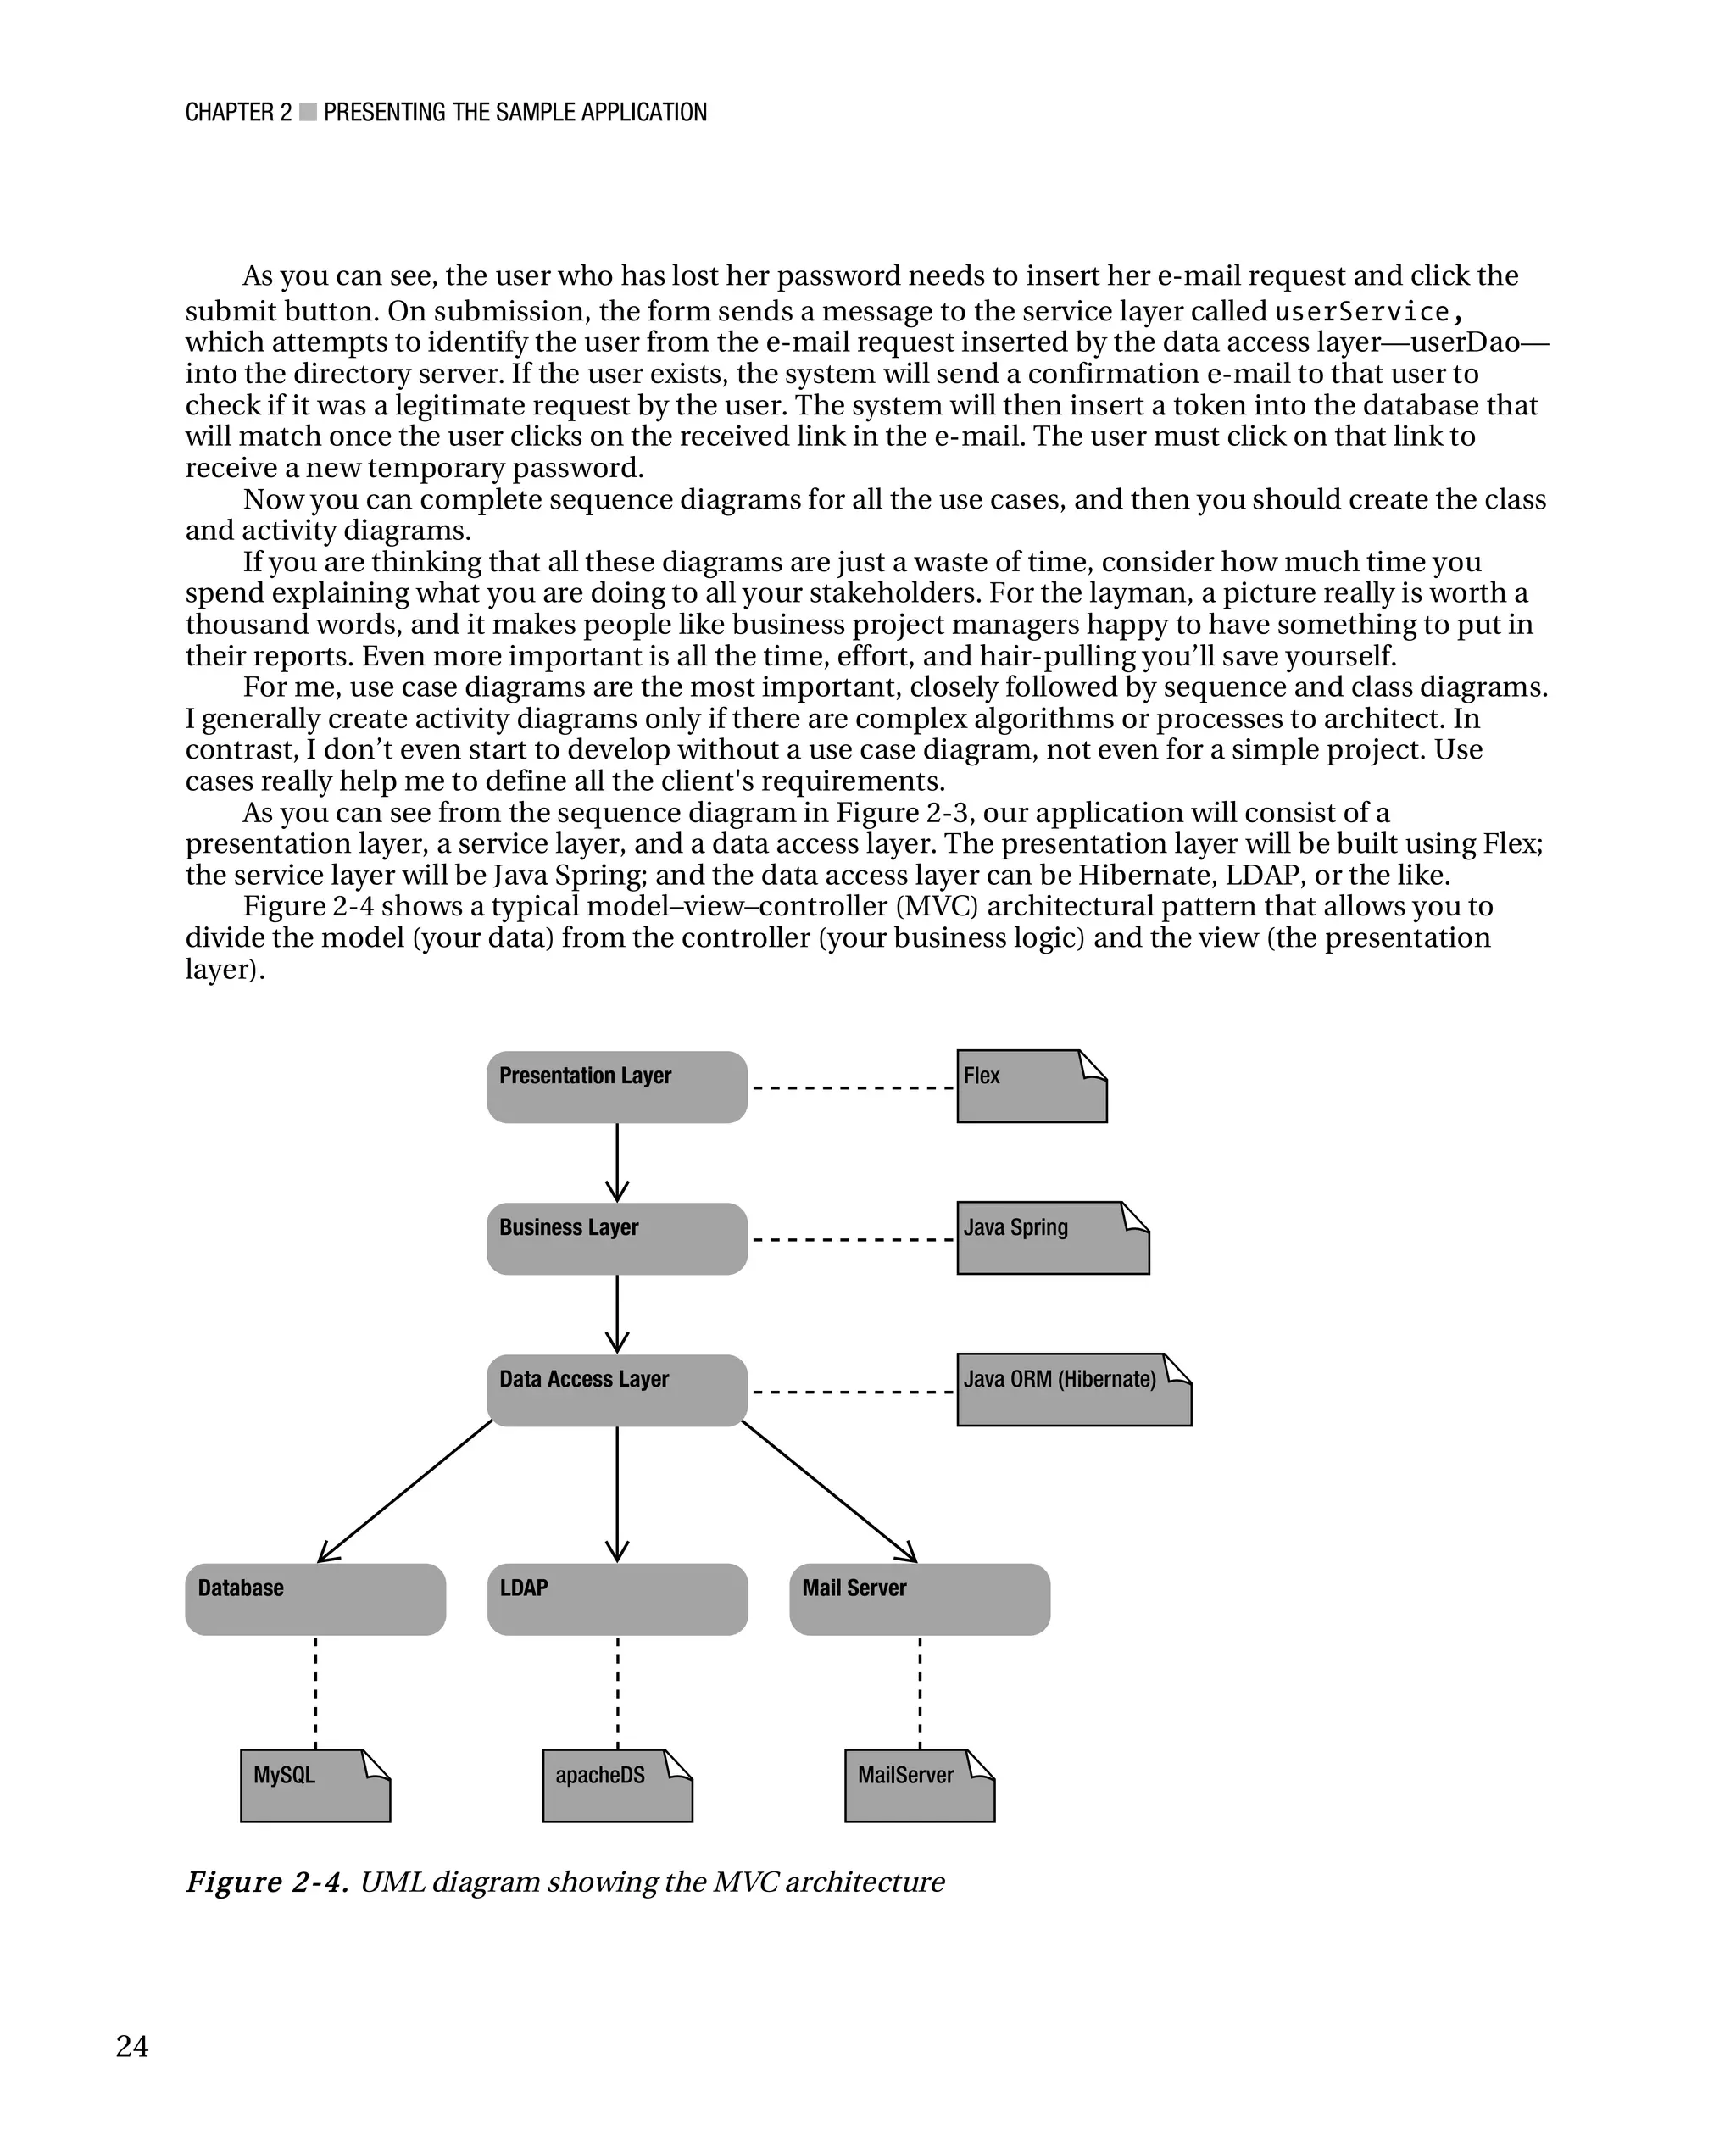
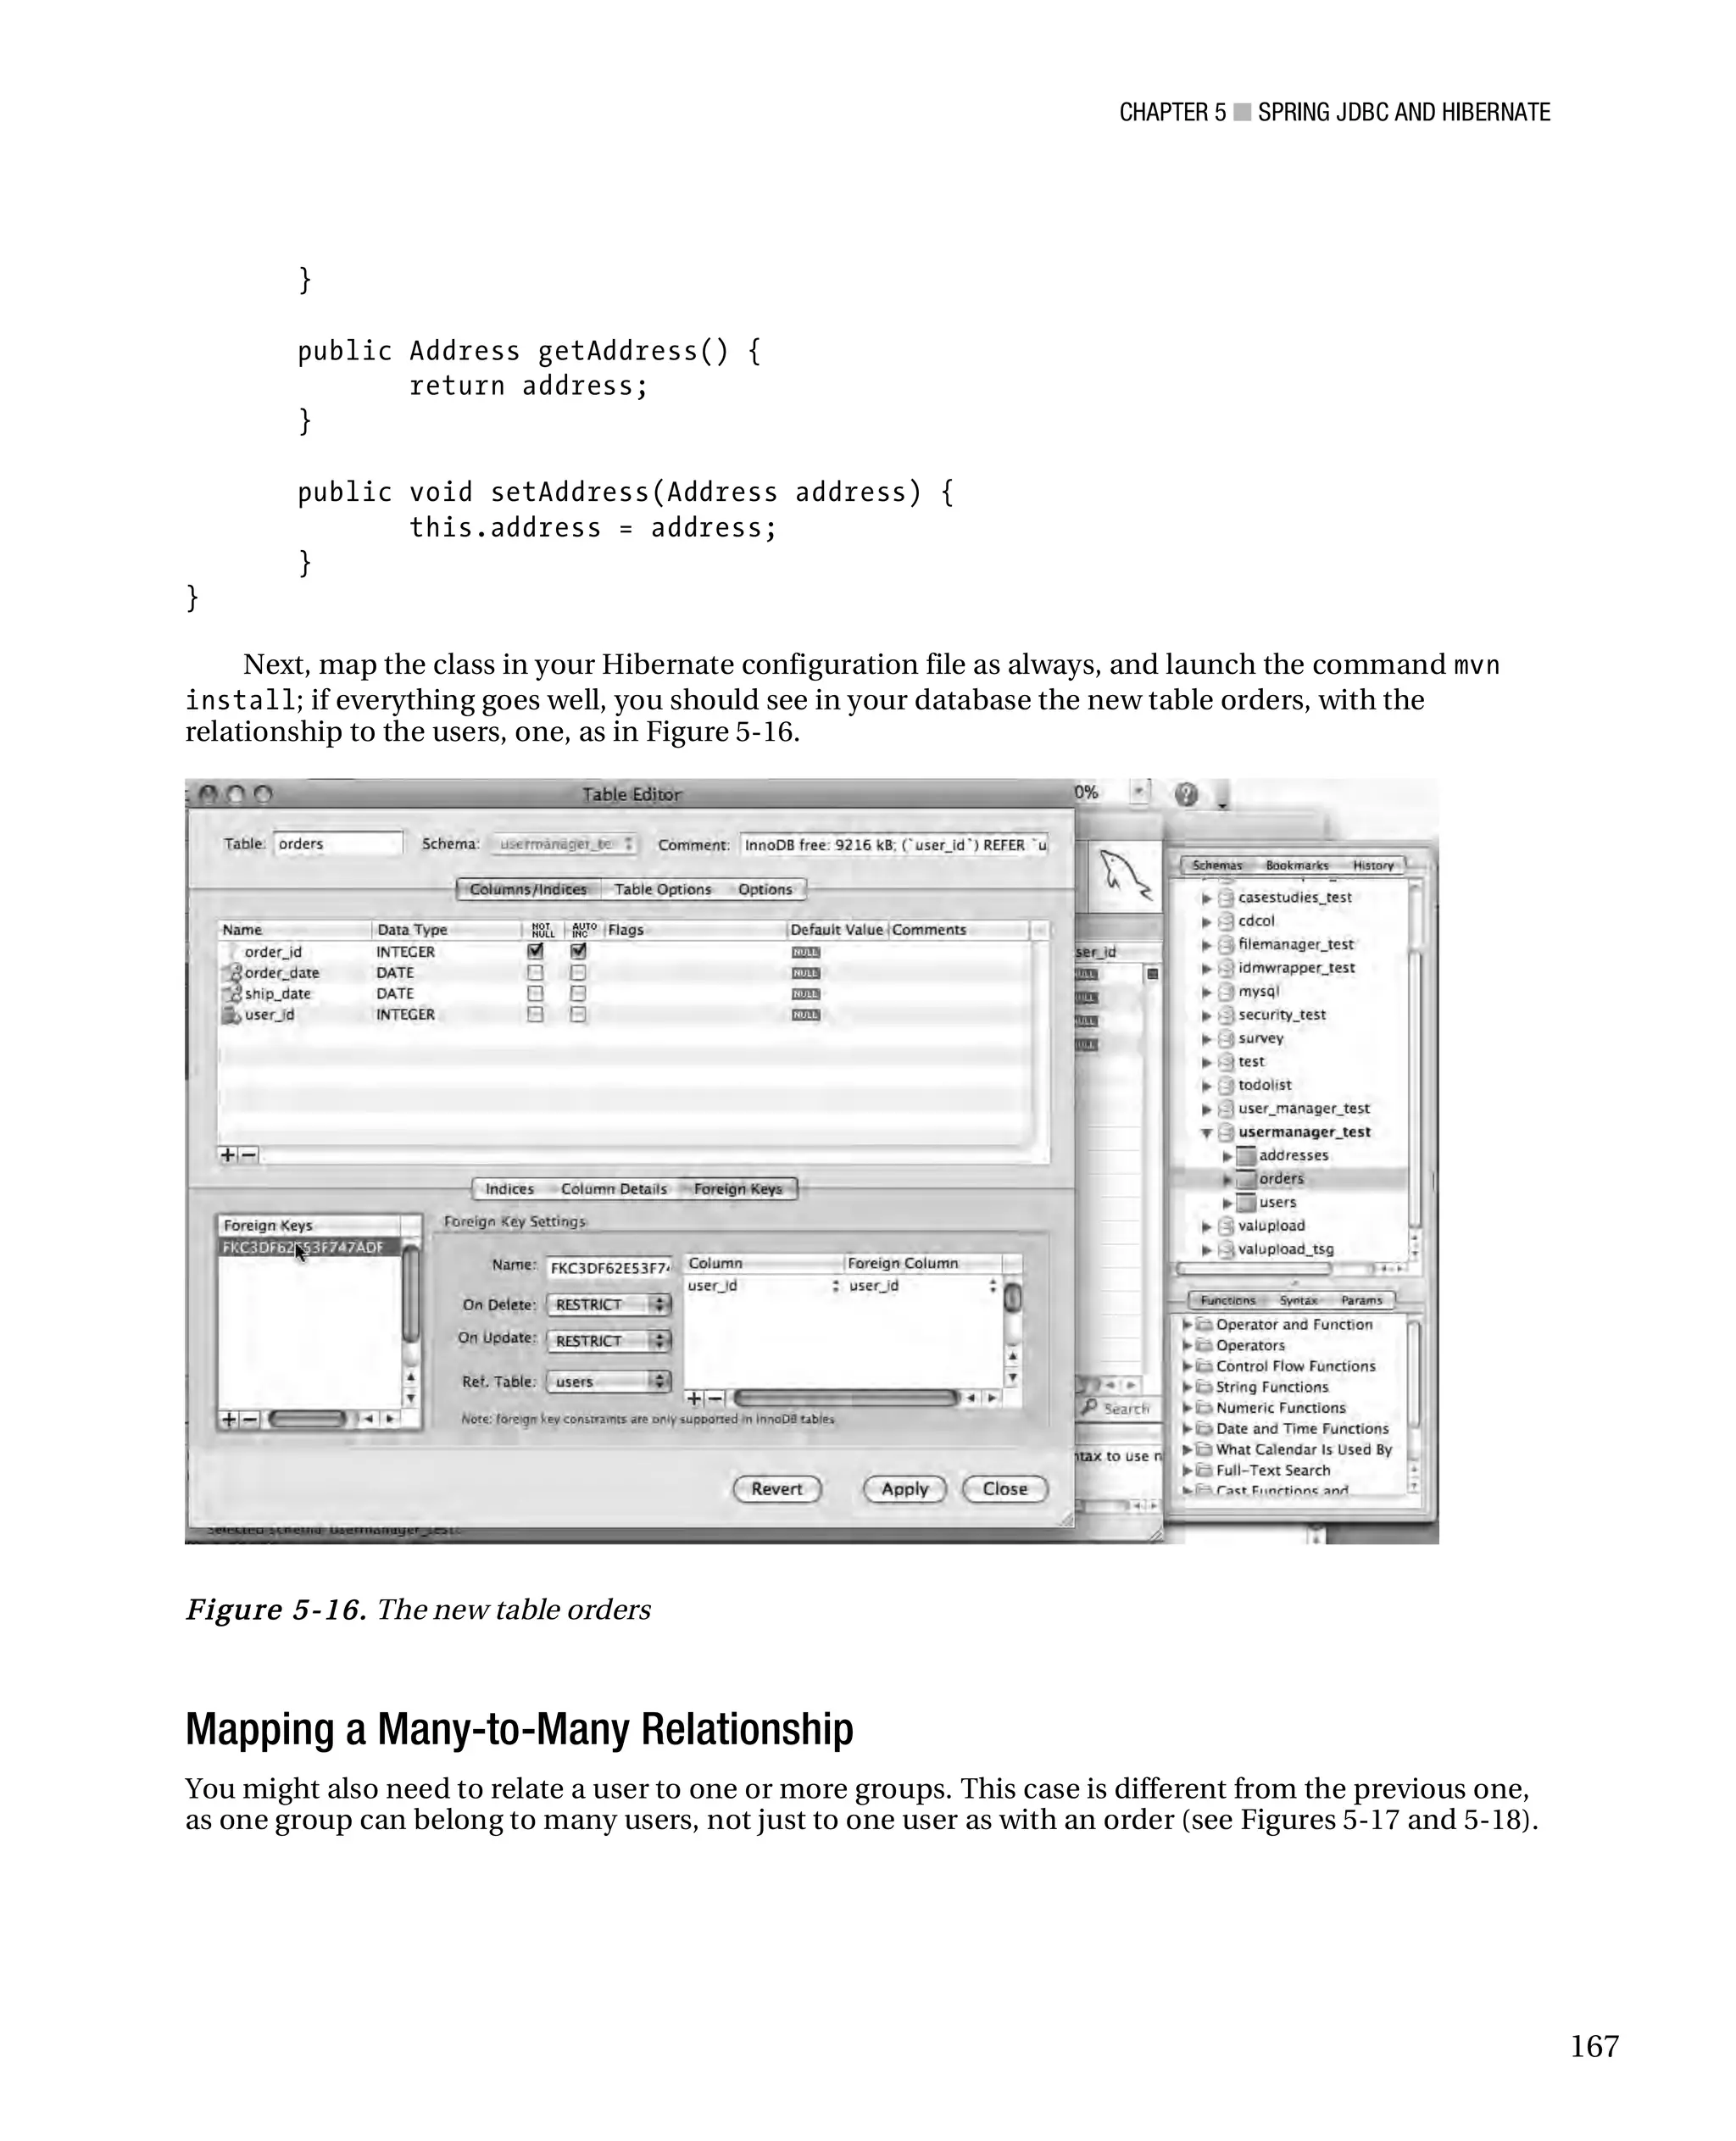
61](https://image.slidesharecdn.com/beginningjavaandflex-migratingjavaspringhibernateandmavendeveloperstoadobeflex-100821073507-phpapp01/75/Beginning-java-and-flex-migrating-java-spring-hibernate-and-maven-developers-to-adobe-flex-80-2048.jpg)
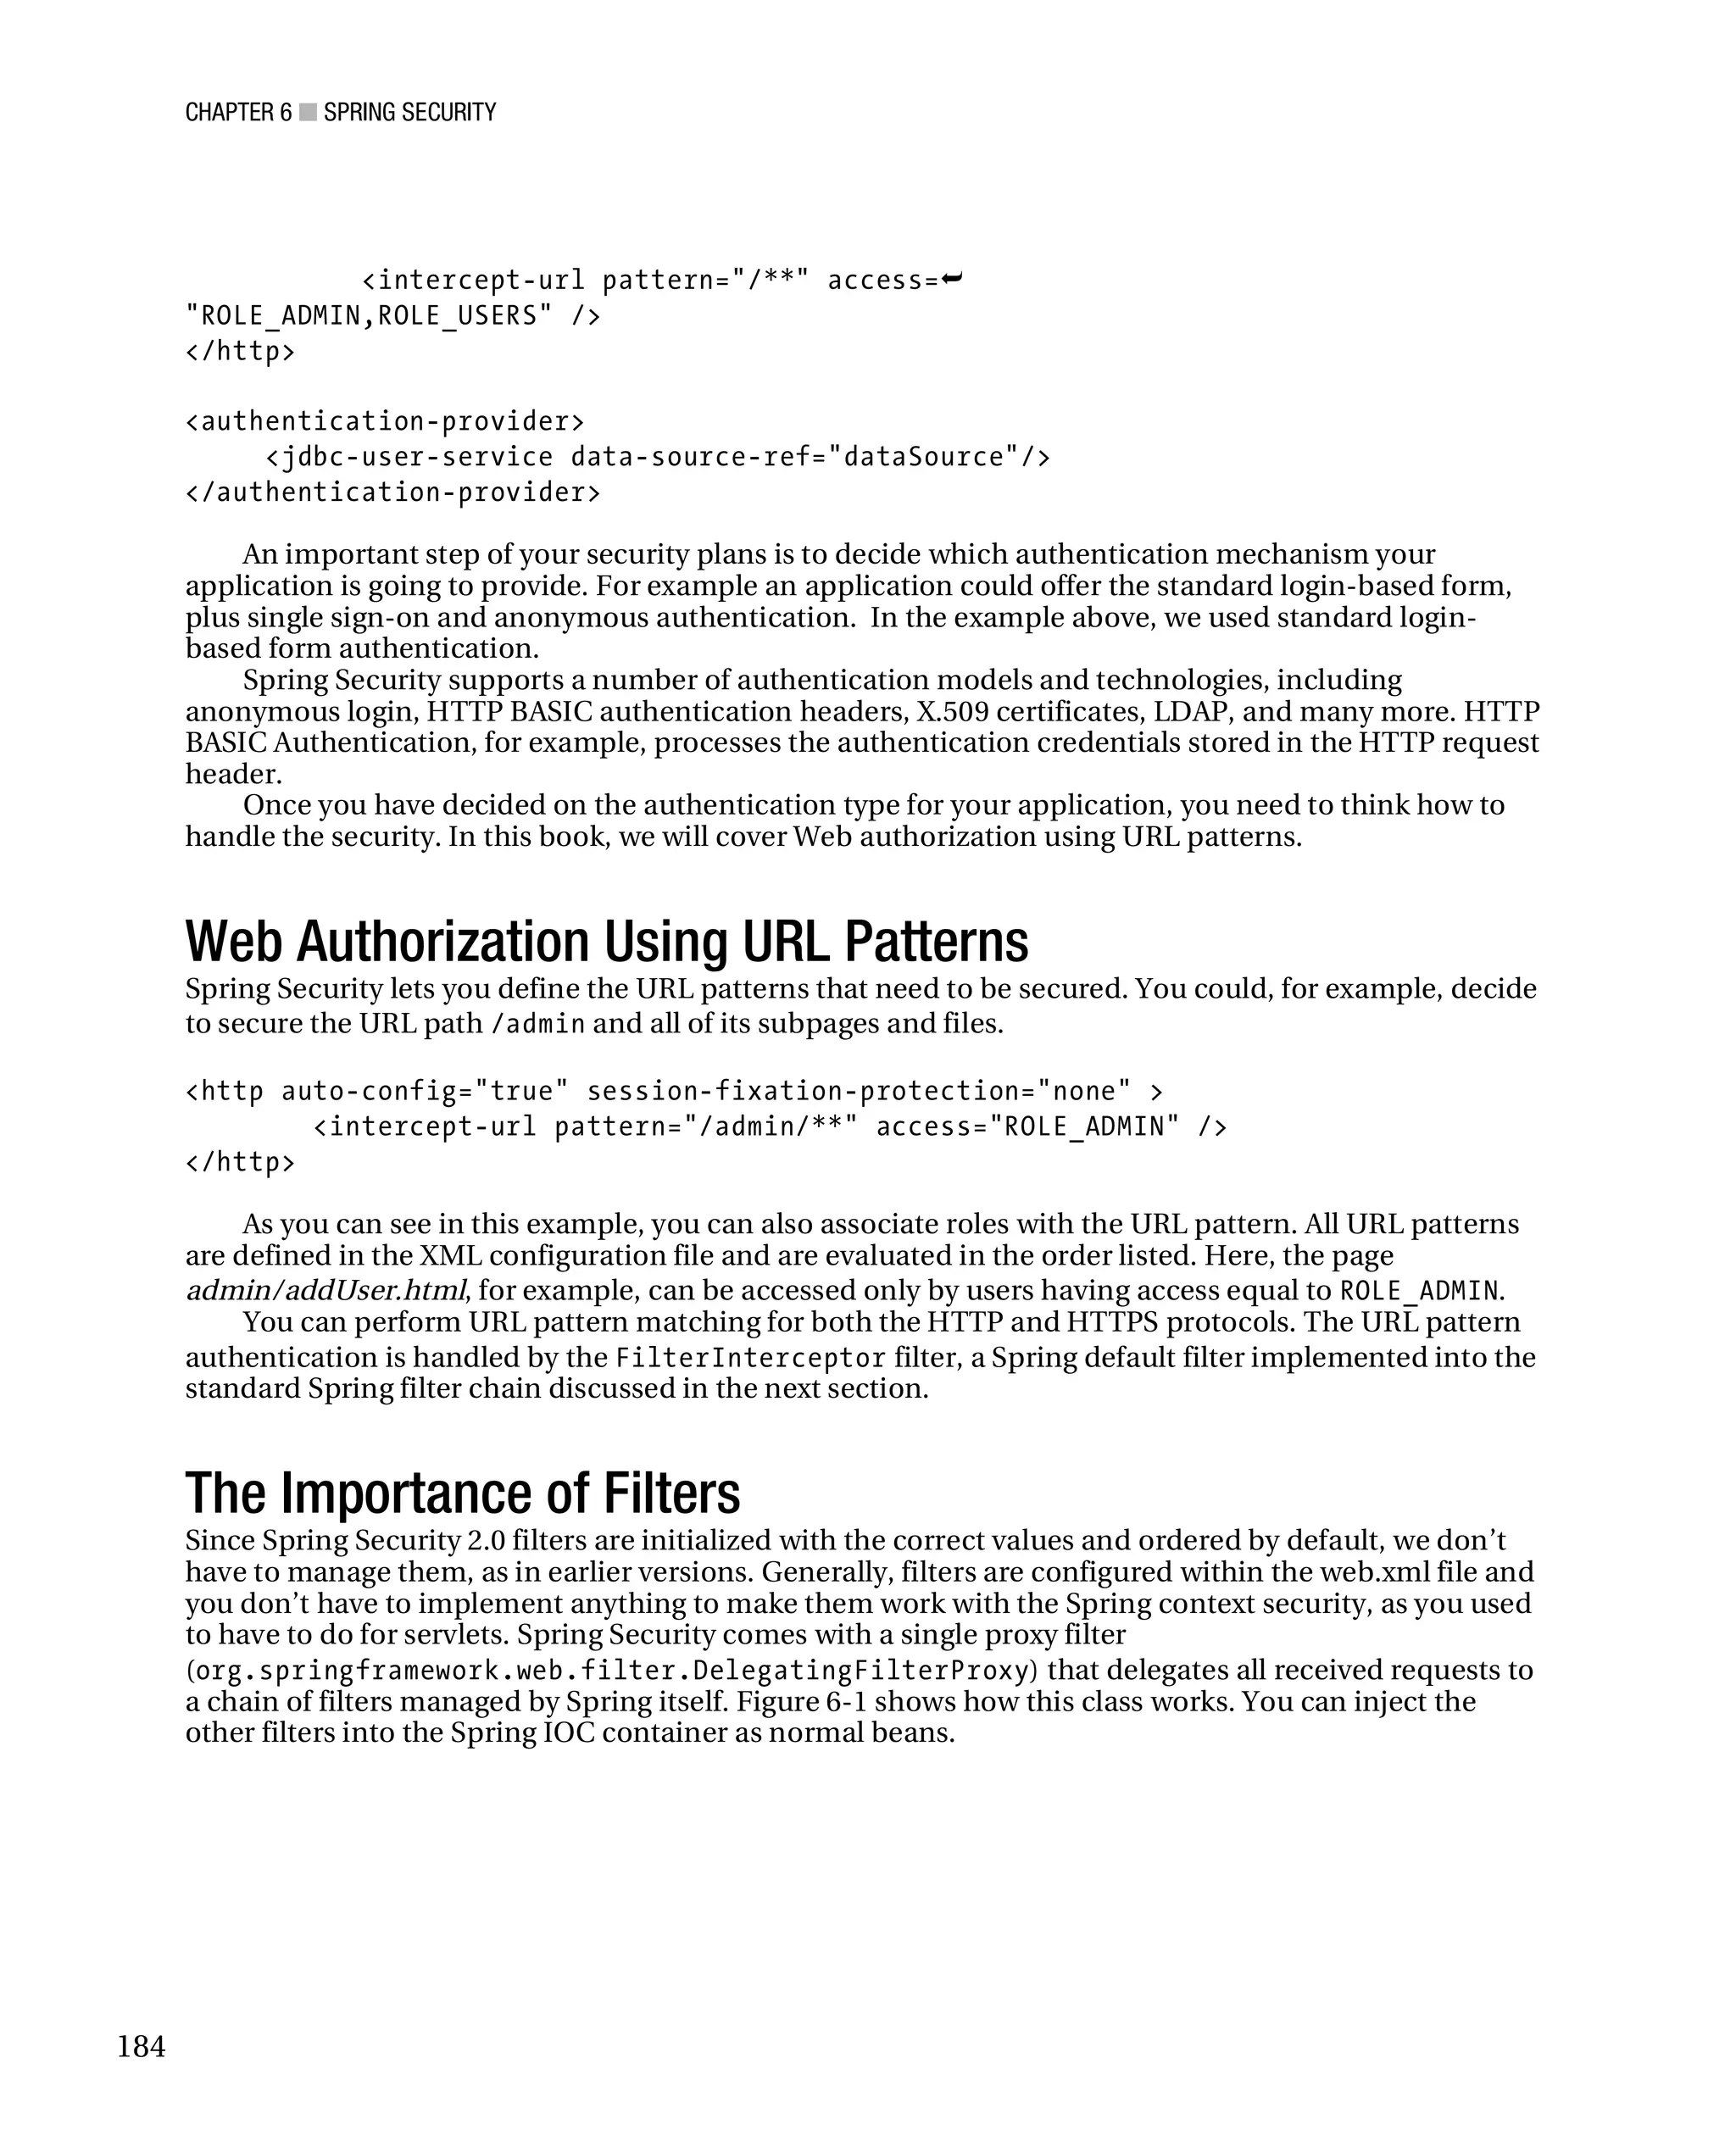
![CHAPTER 3 ■ CONFIGURING YOUR DEVELOPMENT ENVIRONMENT
• Lib: A directory that contains JAR archives of libraries (tag libraries and any utility
libraries called by server-side classes).
You can create application-specific subdirectories (package directories) in either the document root
or the WEB-INF/classes directory.
Installing Tomcat
Installing Tomcat on your machine requires a JVM. Tomcat 6 is designed to run on JDK 1.5, so it is
logical to use that. You can download the JVM Java installer from
http://java.sun.com/j2se/downloads
On Win d ows: You can download the Tomcat package for Windows from
http://tomcat.apache.org/download-60.cgi. Simply download the package and double-click to
start the installation. The Tomcat installation for Windows is pretty straightforward—you just follow the
wizard. Be aware that Tomcat will be installed as a Window service no matter what setting you use, and
the installation will determine your Java location automatically from either the registry or the
JAVA_HOME environment variable. After the installation, you can check it at
http://localhost:8080.You can start or stop the server easily by double-clicking on the tray icon or
through the Windows Service Manager.
On Linux or Mac O S: Installing Tomcat on Linux or Mac OS is as straightforward as the Windows
installation. Simply download the Tomcat 6 Binary Distribution Core (tar.gz) at
http://tomcat.apache.org/download-60.cgi. Create a Tomcat folder in /usr/local/. (I use
/usr/local as it is standard, but Tomcat can be installed in other directories if you assign them the
appropriate permissions.)
cd /usr/local/
sudo mkdir tomcat
Now go to the new Tomcat directory and unpack the tar.gz file
cd tomcat/
sudo tar -xvzf ~/Downloads/apache-tomcat-6.0.x.tar.gz
Before you can test the installation, you have to configure the tomcat-users.xml configuration file to
access the Tomcat administration page. This file is located in the conf directory (tomcat/conf).
sudo vi conf/tomcat-users.xml
<?xml version='1.0' encoding='utf-8'?>
<tomcat-users>
<role rolename="standard"/>
<role rolename="manager"/>
<user username="username" password="password" roles="standard,manager"/>
</tomcat-users>
Save the tomcat-users.xml and quit the vi editor
[esc] : wq
64](https://image.slidesharecdn.com/beginningjavaandflex-migratingjavaspringhibernateandmavendeveloperstoadobeflex-100821073507-phpapp01/75/Beginning-java-and-flex-migrating-java-spring-hibernate-and-maven-developers-to-adobe-flex-83-2048.jpg)


![CHAPTER 4 ■ INVERSION OF CONTROL
The bean message will have a property called text with the value “How are you?” The bean
helloFilippo will have a reference property to the bean with the id=message.
<bean id="message" class="com.apress.flexjava.hellofilippo.Message" >
<property name="text" value="How are you?" />
</bean>
<bean id="helloFilippo" class="com.apress.flexjava.hellofilippo.HelloFilippo">
<property name="message" ref="message" />
</bean>
As you can see from the preceding code, we inject into the container the two classes with their
properties. In practice, the property with name=“text” corresponds to the setter method setText with
the class Message, and the property message corresponds to the setter method setMessage in the class
HelloFilippo.
The last piece of our puzzle is to write a Main class to instantiate the IoC container with its
configuration file ApplicationBean.xml; once the container has instantiated we get the bean
helloFilippo that is needed for our test.
package com.apress.flexjava.hellofilippo;
import org.springframework.context.ApplicationContext;
import org.springframework.context.support.ClassPathXmlApplicationContext;
public class Main {
public static void main(String[] args) {
ApplicationContext context =
new ClassPathXmlApplicationContext("ApplicationBeans.xml");
HelloFilippo helloFilippo = (HelloFilippo)
context.getBean("helloFilippo");
helloFilippo.hello();
}
}
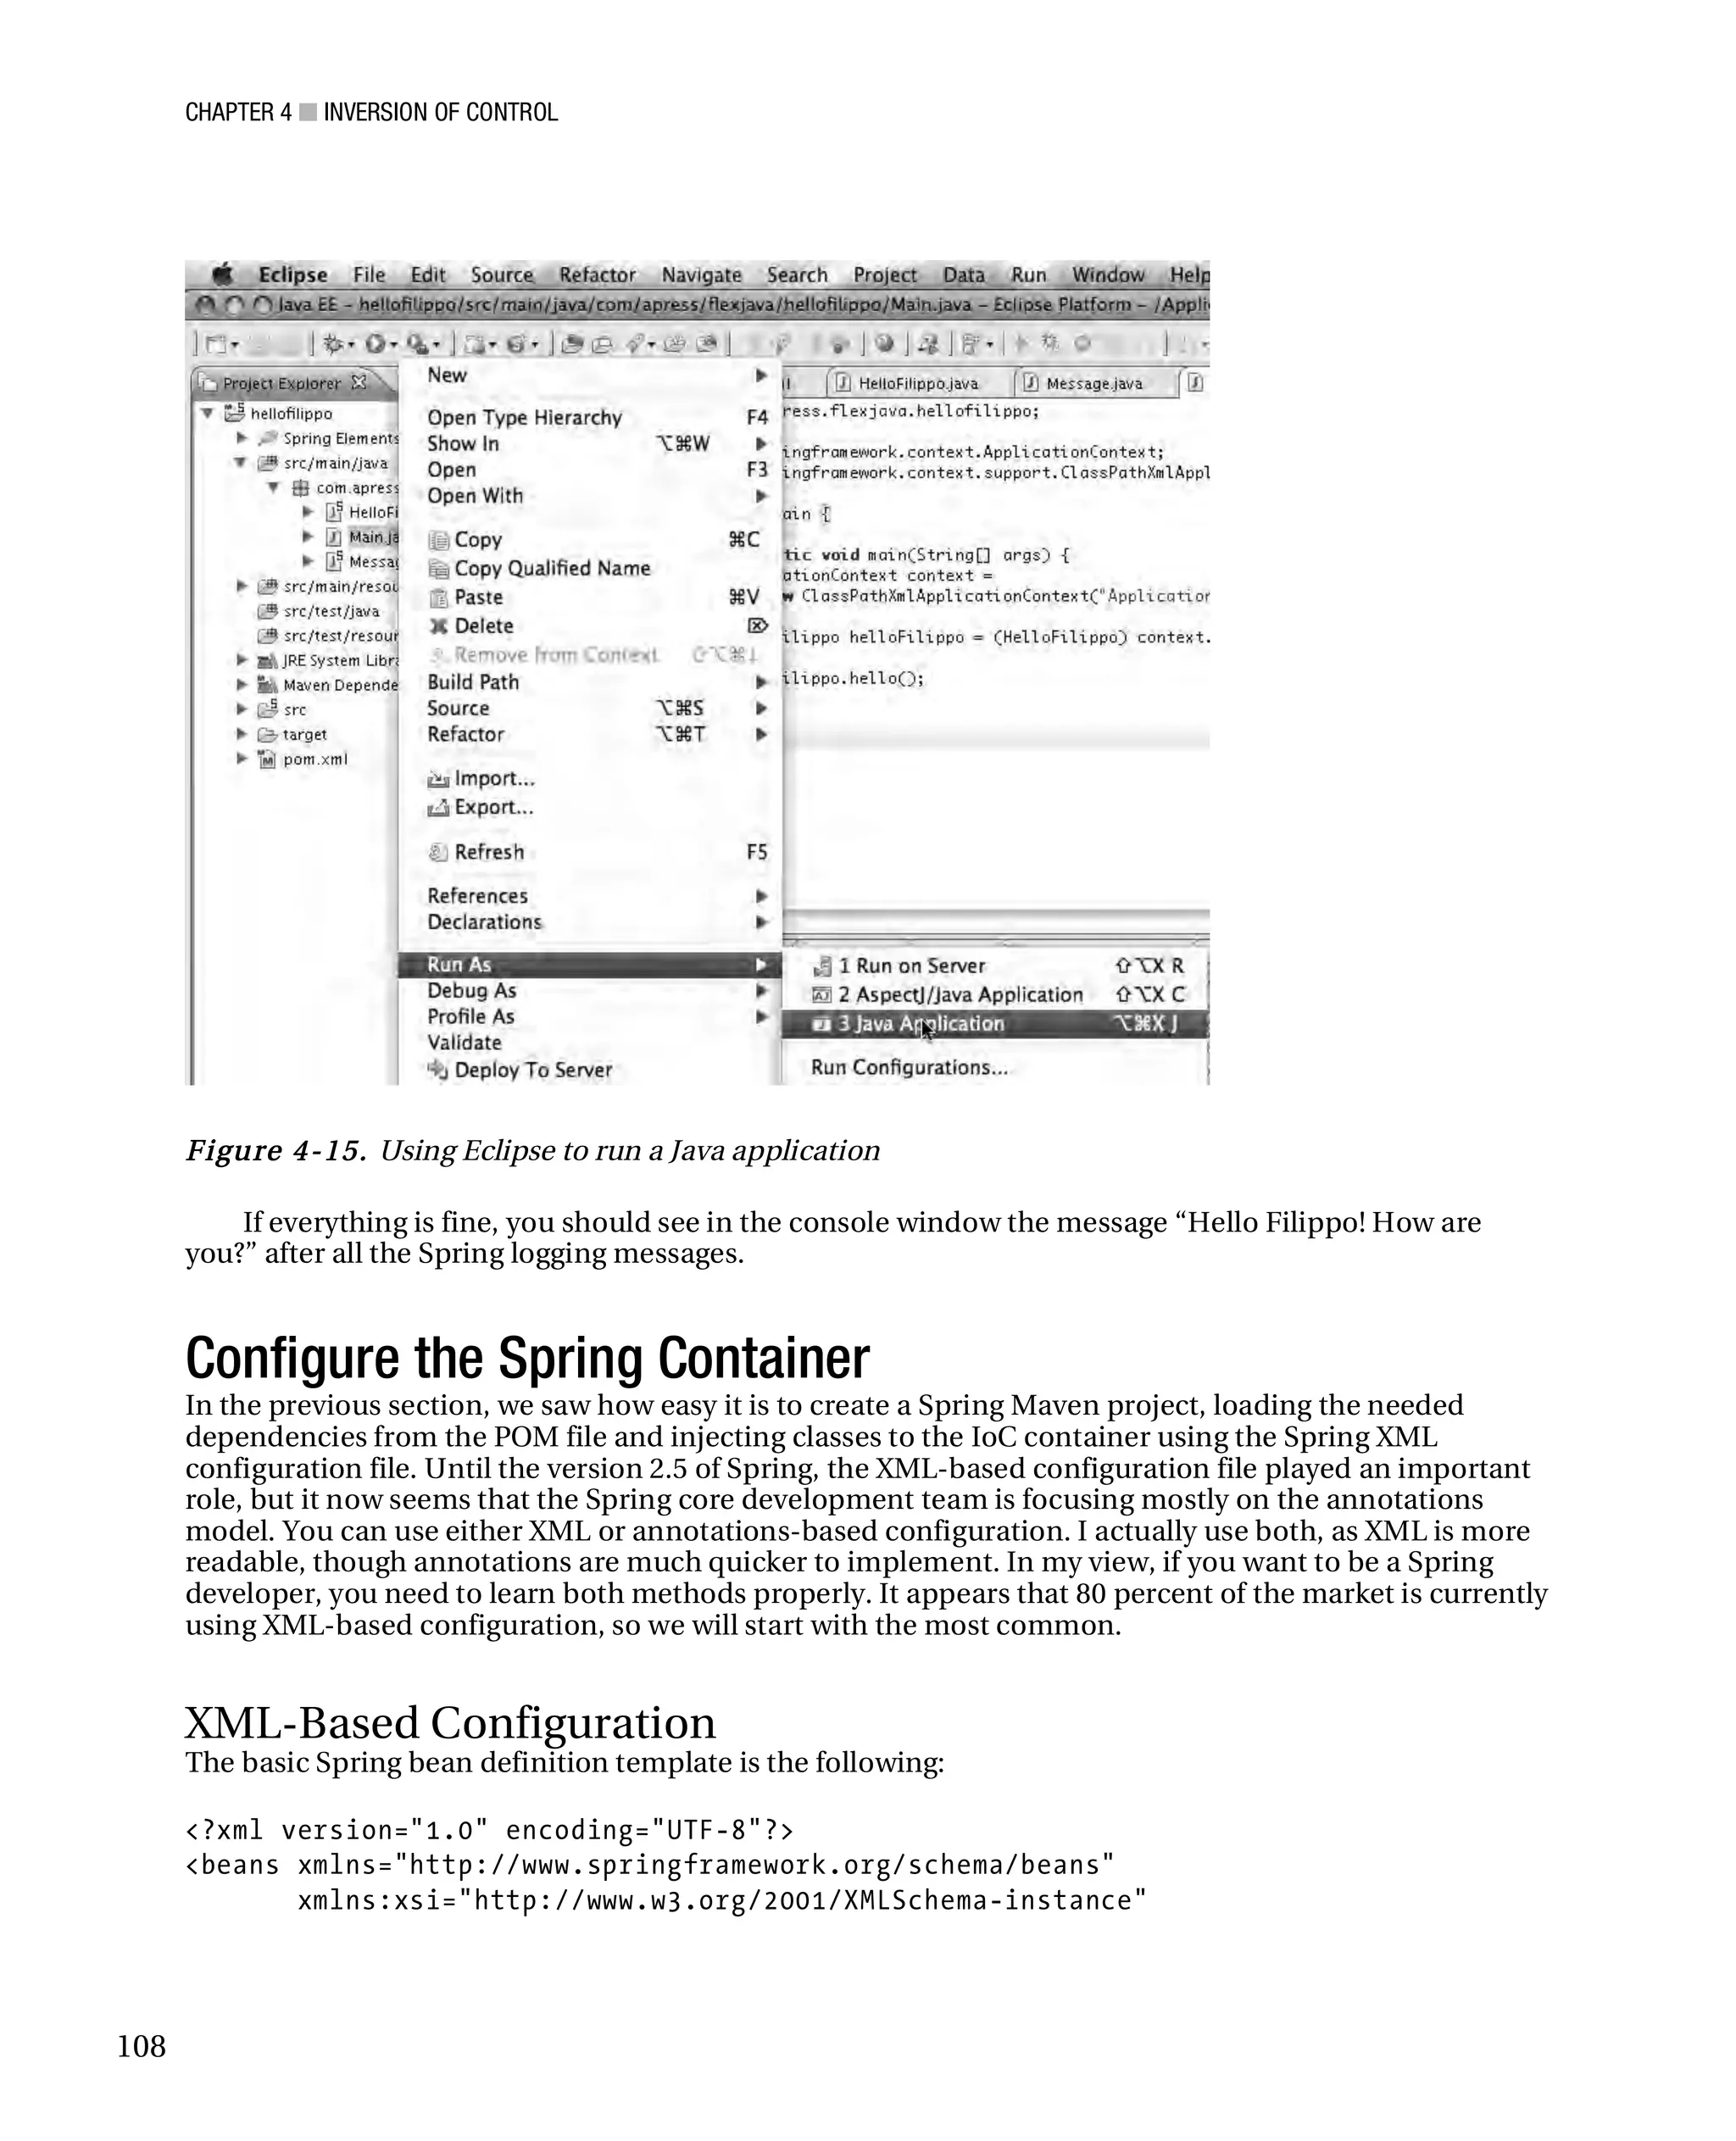
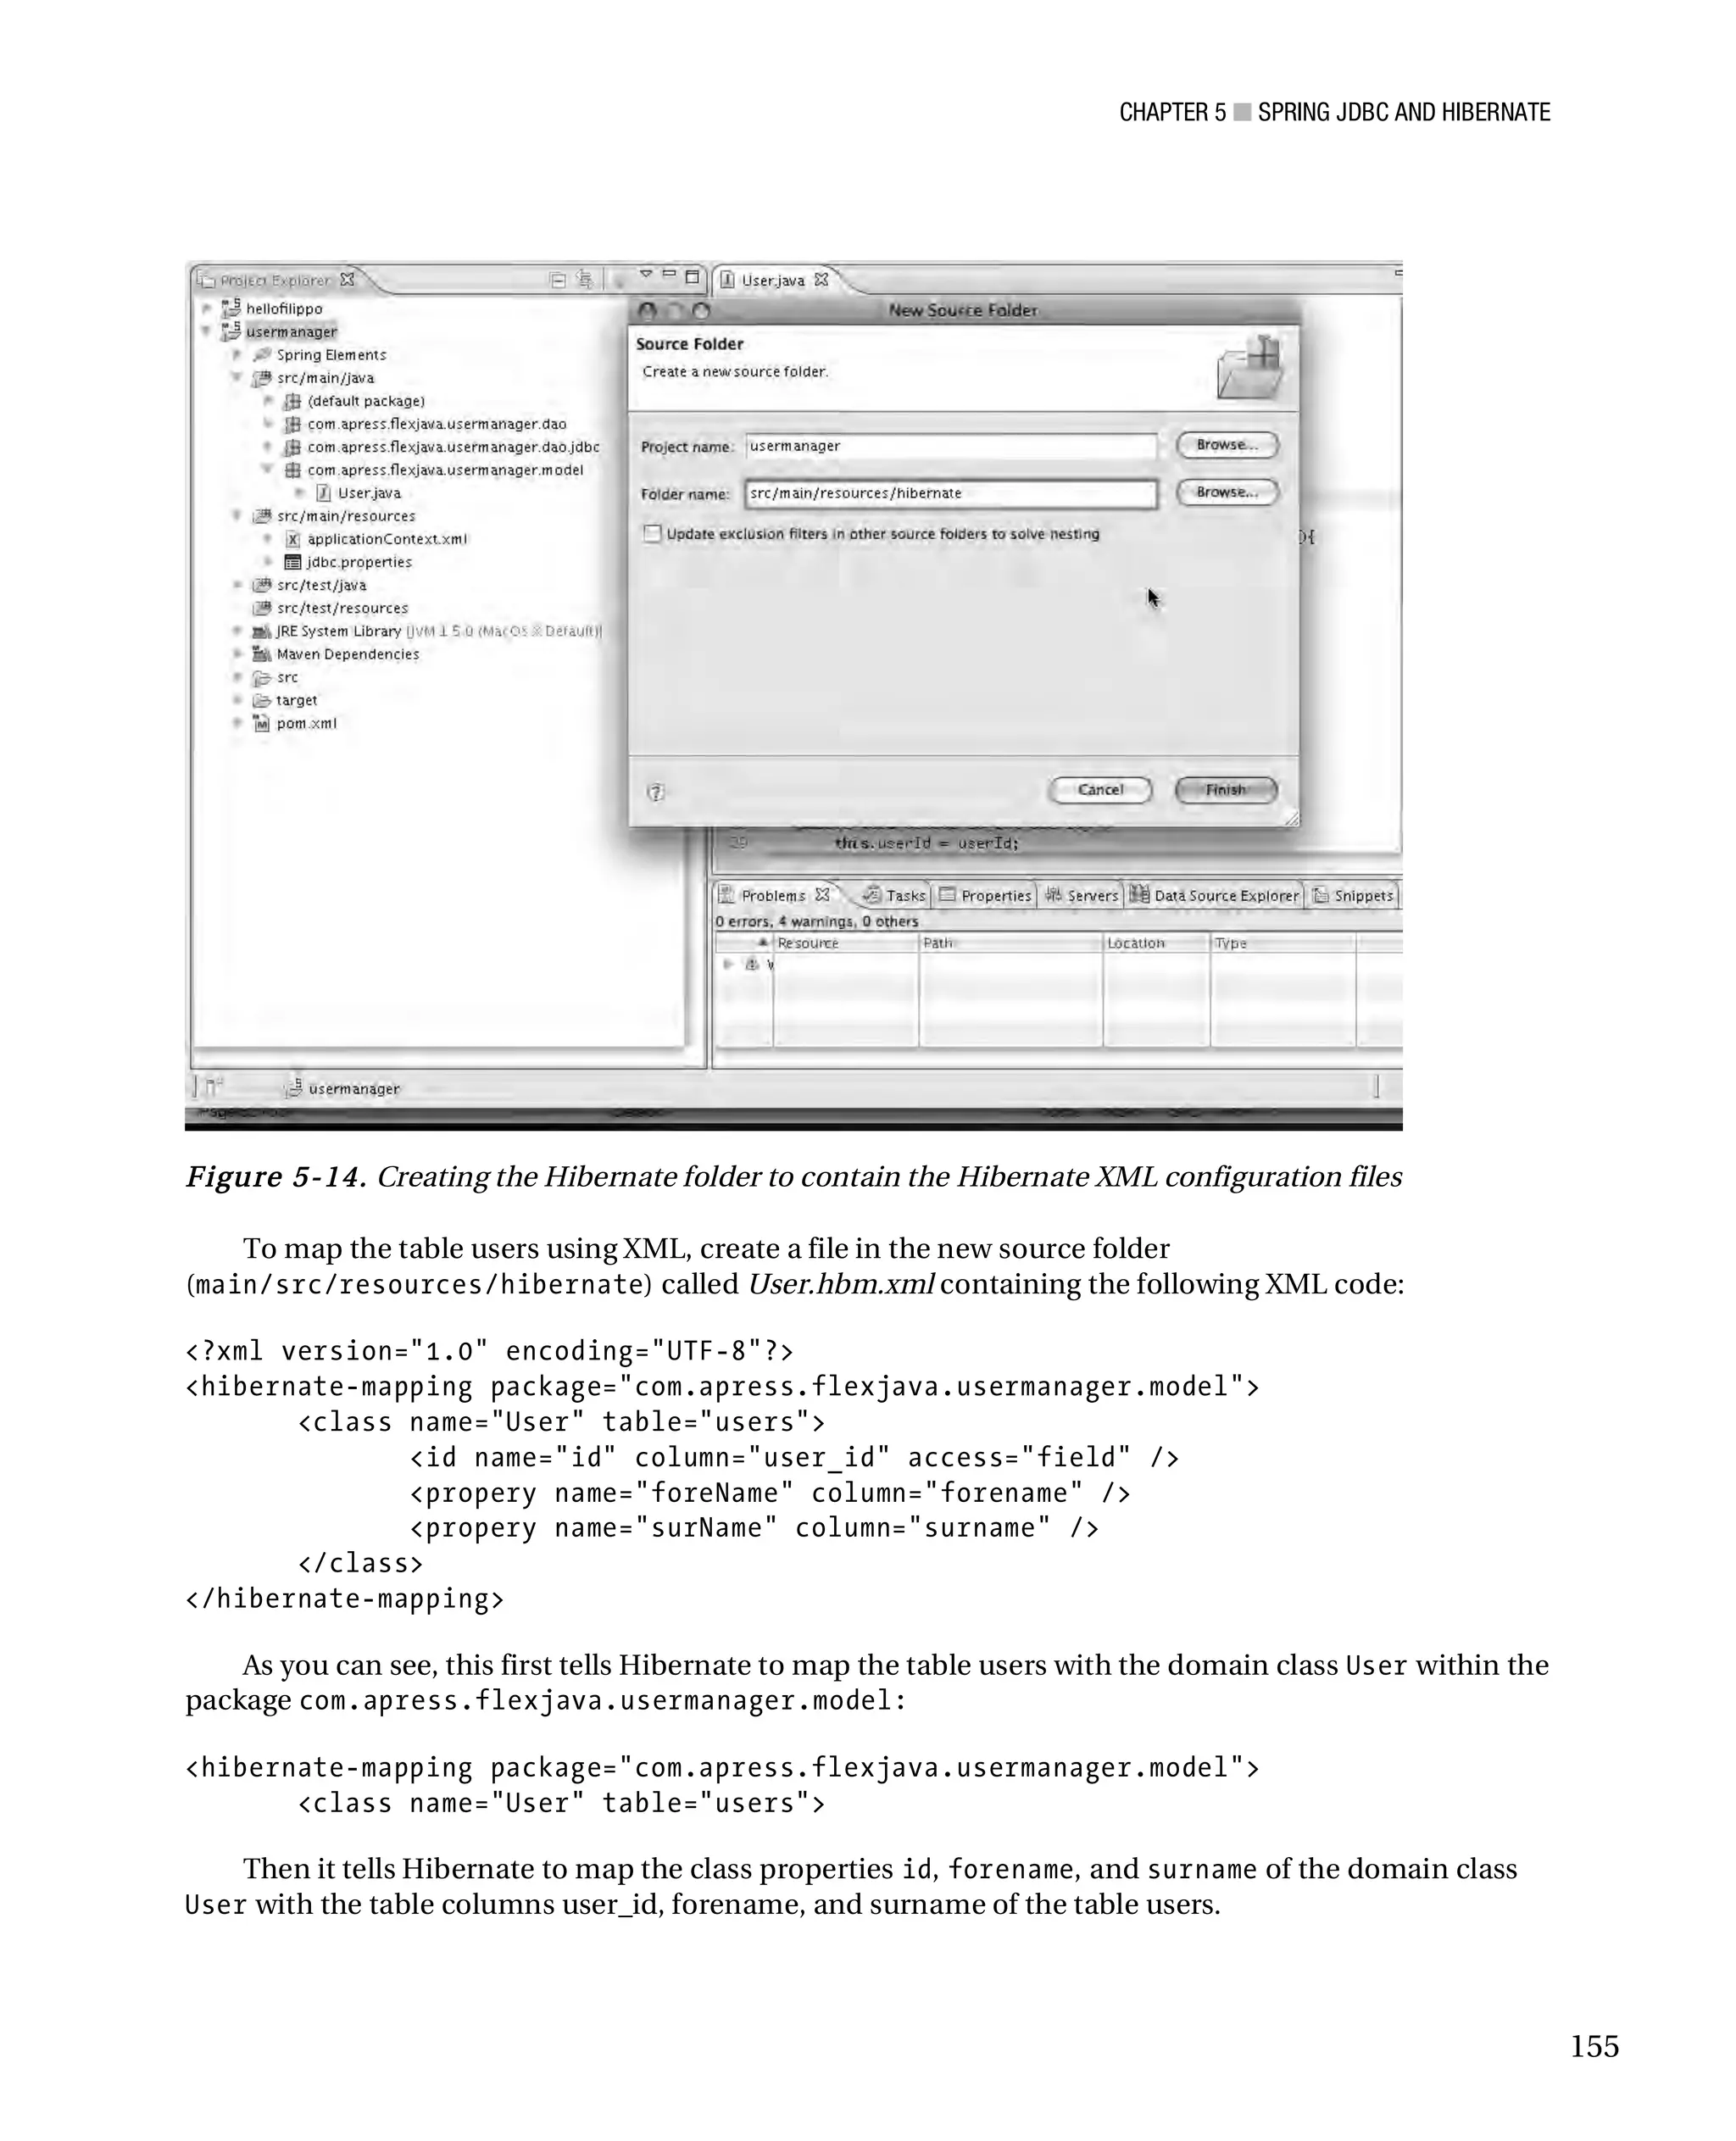
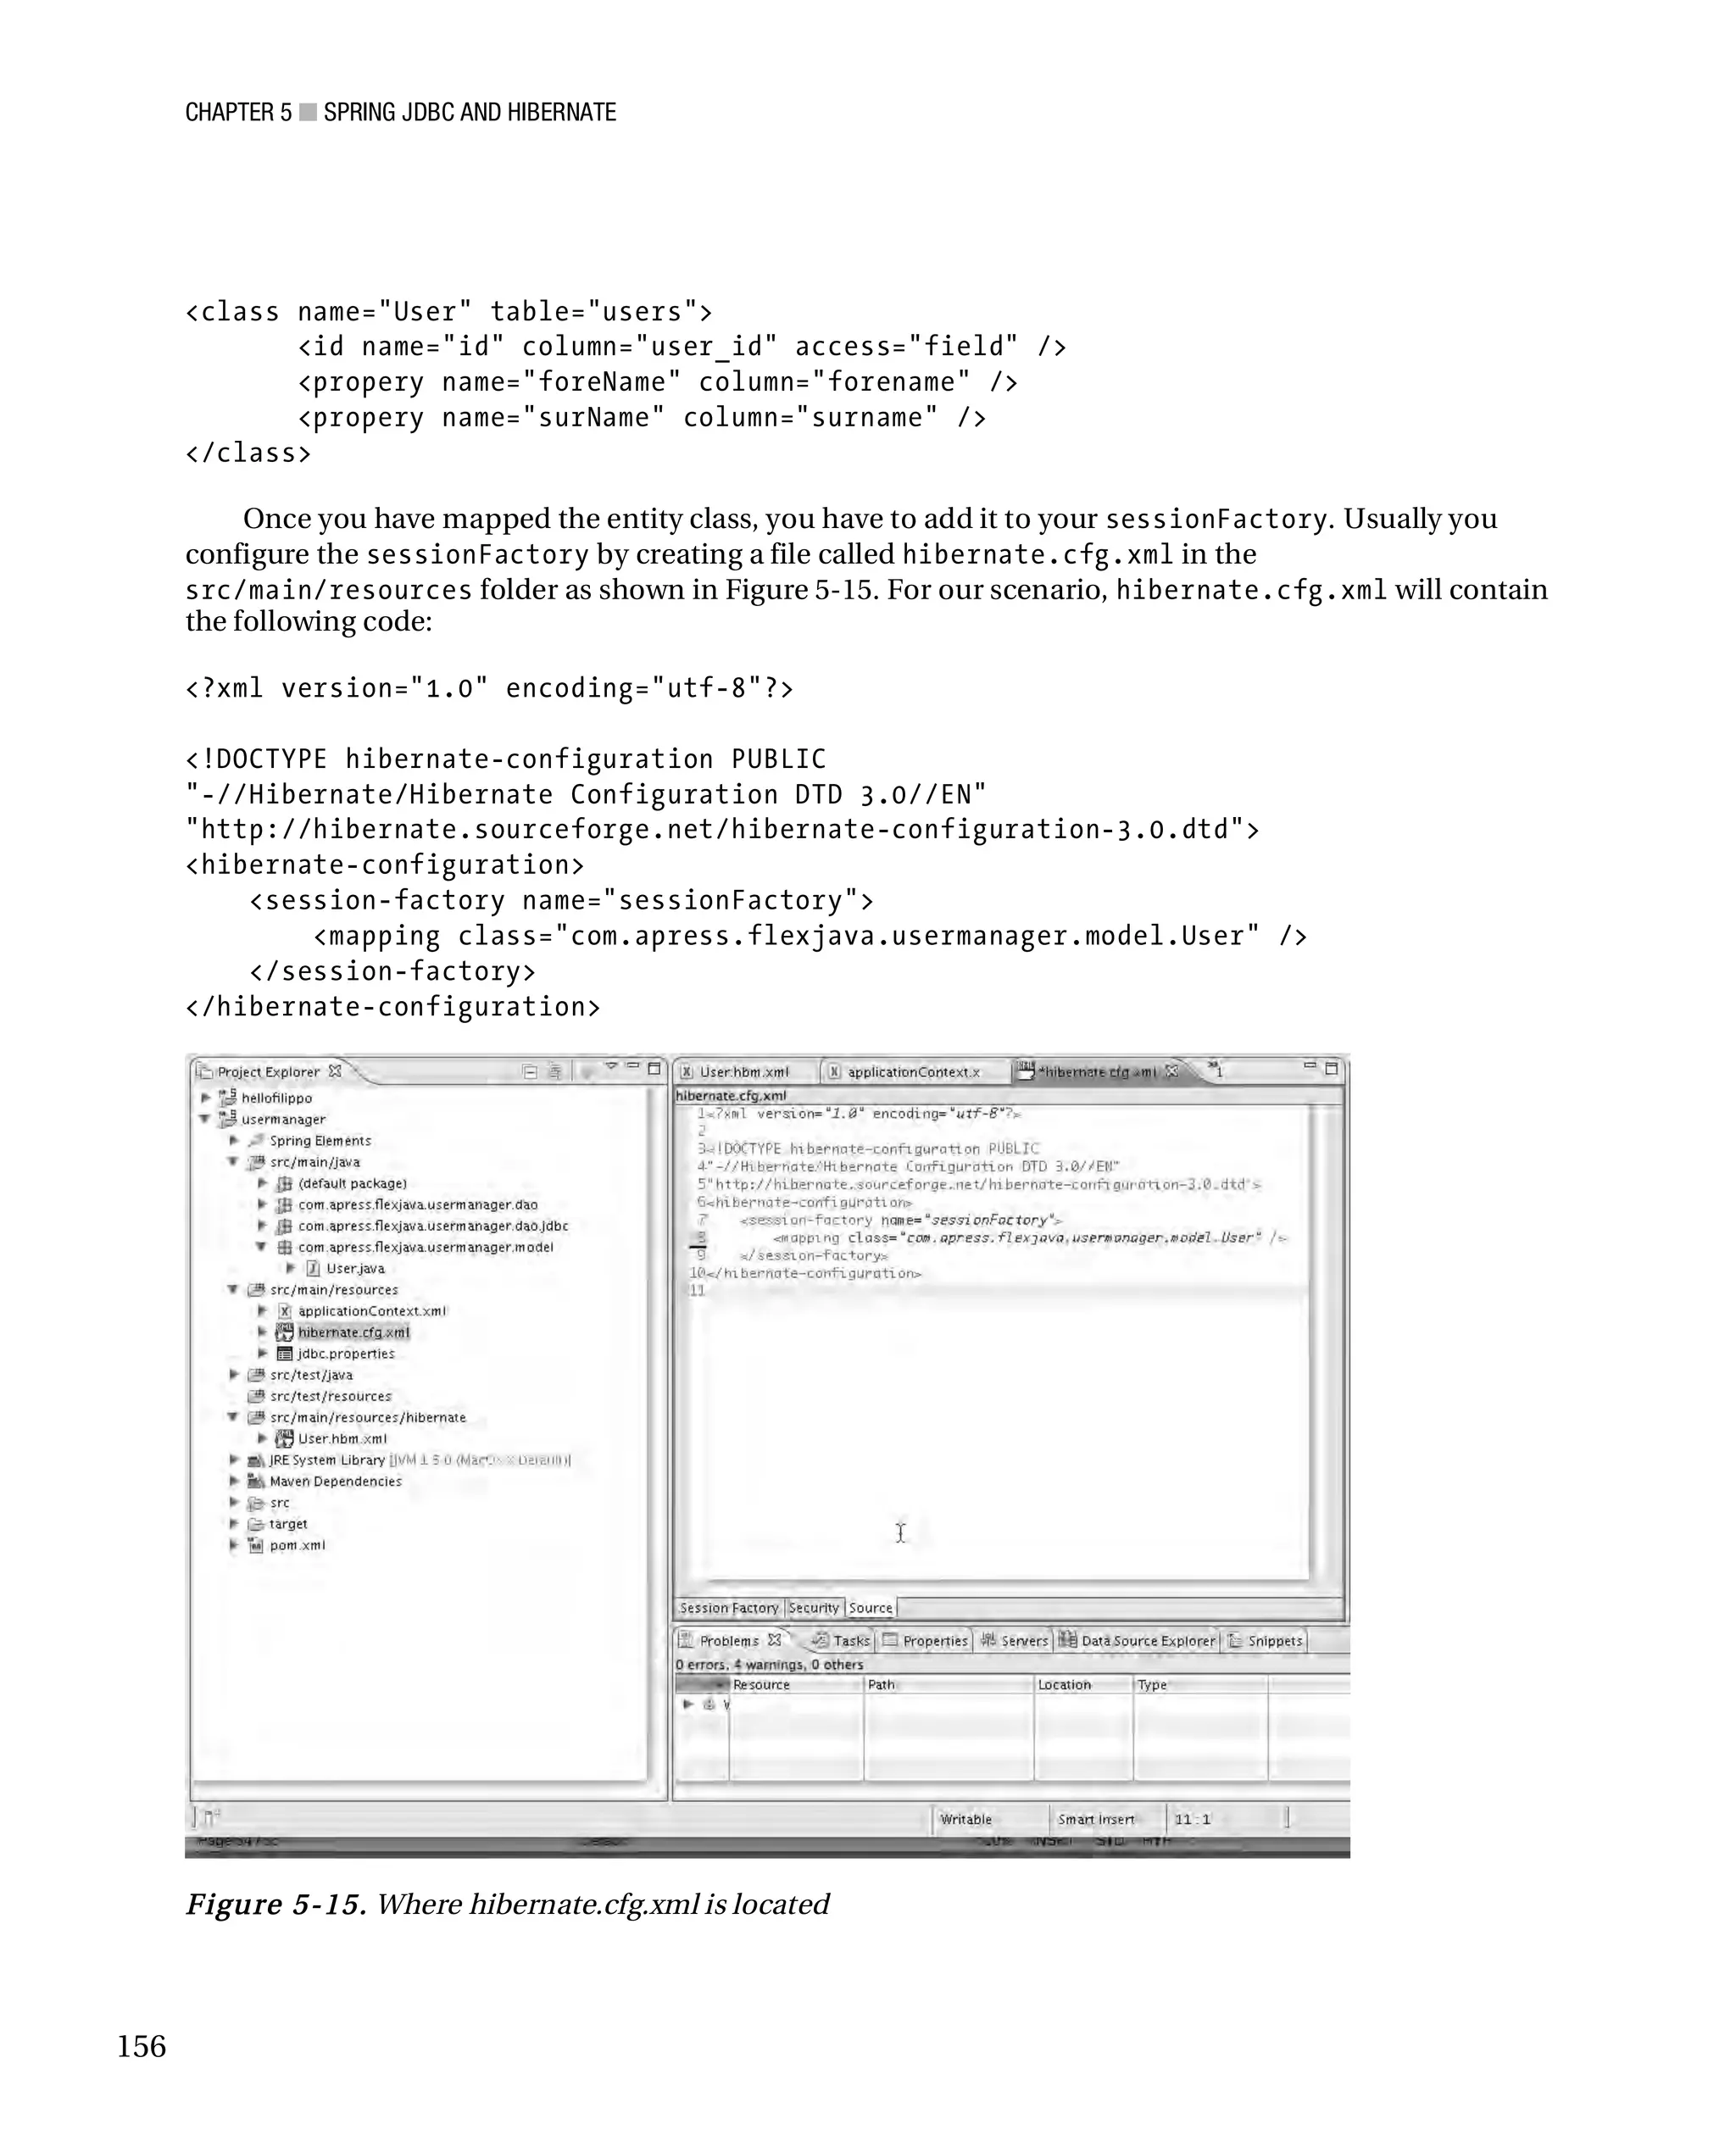
To test the code, right click on the Main.java class and select Run As ➤ Java Application (see Figure
4-15).
107](https://image.slidesharecdn.com/beginningjavaandflex-migratingjavaspringhibernateandmavendeveloperstoadobeflex-100821073507-phpapp01/75/Beginning-java-and-flex-migrating-java-spring-hibernate-and-maven-developers-to-adobe-flex-126-2048.jpg)
![CHAPTER 4 ■ INVERSION OF CONTROL
public void hello() {
System.out.println("Hello Filippo!" + message.getText());
}
@Autowired
public void setMessage(MessageForAnnotationConfiguration message) {
this.message = message;
}
}
As you can see, both classes are annotated with @Component. The HelloFilippoForAnnotation
class has the @Autowire annotation, which automatically injects the message object. Now I have to
create a Main class in which to instantiate the beans and the context.
package com.apress.flexjava.hellofilippo.testannotations;
import org.springframework.context.ApplicationContext;
import org.springframework.context.support.ClassPathXmlApplicationContext;
public class Main {
public static void main(String[] args) {
ApplicationContext context =
new ClassPathXmlApplicationContext
("ApplicationForAnnotationsConfiguration.xml");
HelloFilippoForAnnotationsConfiguration helloFilippo =
(HelloFilippoForAnnotationsConfiguration)
context.getBean("helloFilippoForAnnotationsConfiguration");
helloFilippo.hello();
}
}
In the Main class, I have instantiated the context loading the new Application XML configuration
file, and then I get the bean helloFilippoForAnnotationsConfiguration from the IoC container. As
you can see, the annotation @Component has informed Spring to inject the component with the same
name of the class in lowercase. If you want to give a different name, you can specify within the
@Component annotation.
@Component("myName")
However, I suggest you keep the default name. Using annotations is helpful for most scenarios, but
again you will need to use XML configuration as it is more readable by everybody, centralized, and more
scalable.
In the next section we are going to talk in more detail about the life cycle of a bean, so you will have
the full picture.
124](https://image.slidesharecdn.com/beginningjavaandflex-migratingjavaspringhibernateandmavendeveloperstoadobeflex-100821073507-phpapp01/75/Beginning-java-and-flex-migrating-java-spring-hibernate-and-maven-developers-to-adobe-flex-143-2048.jpg)

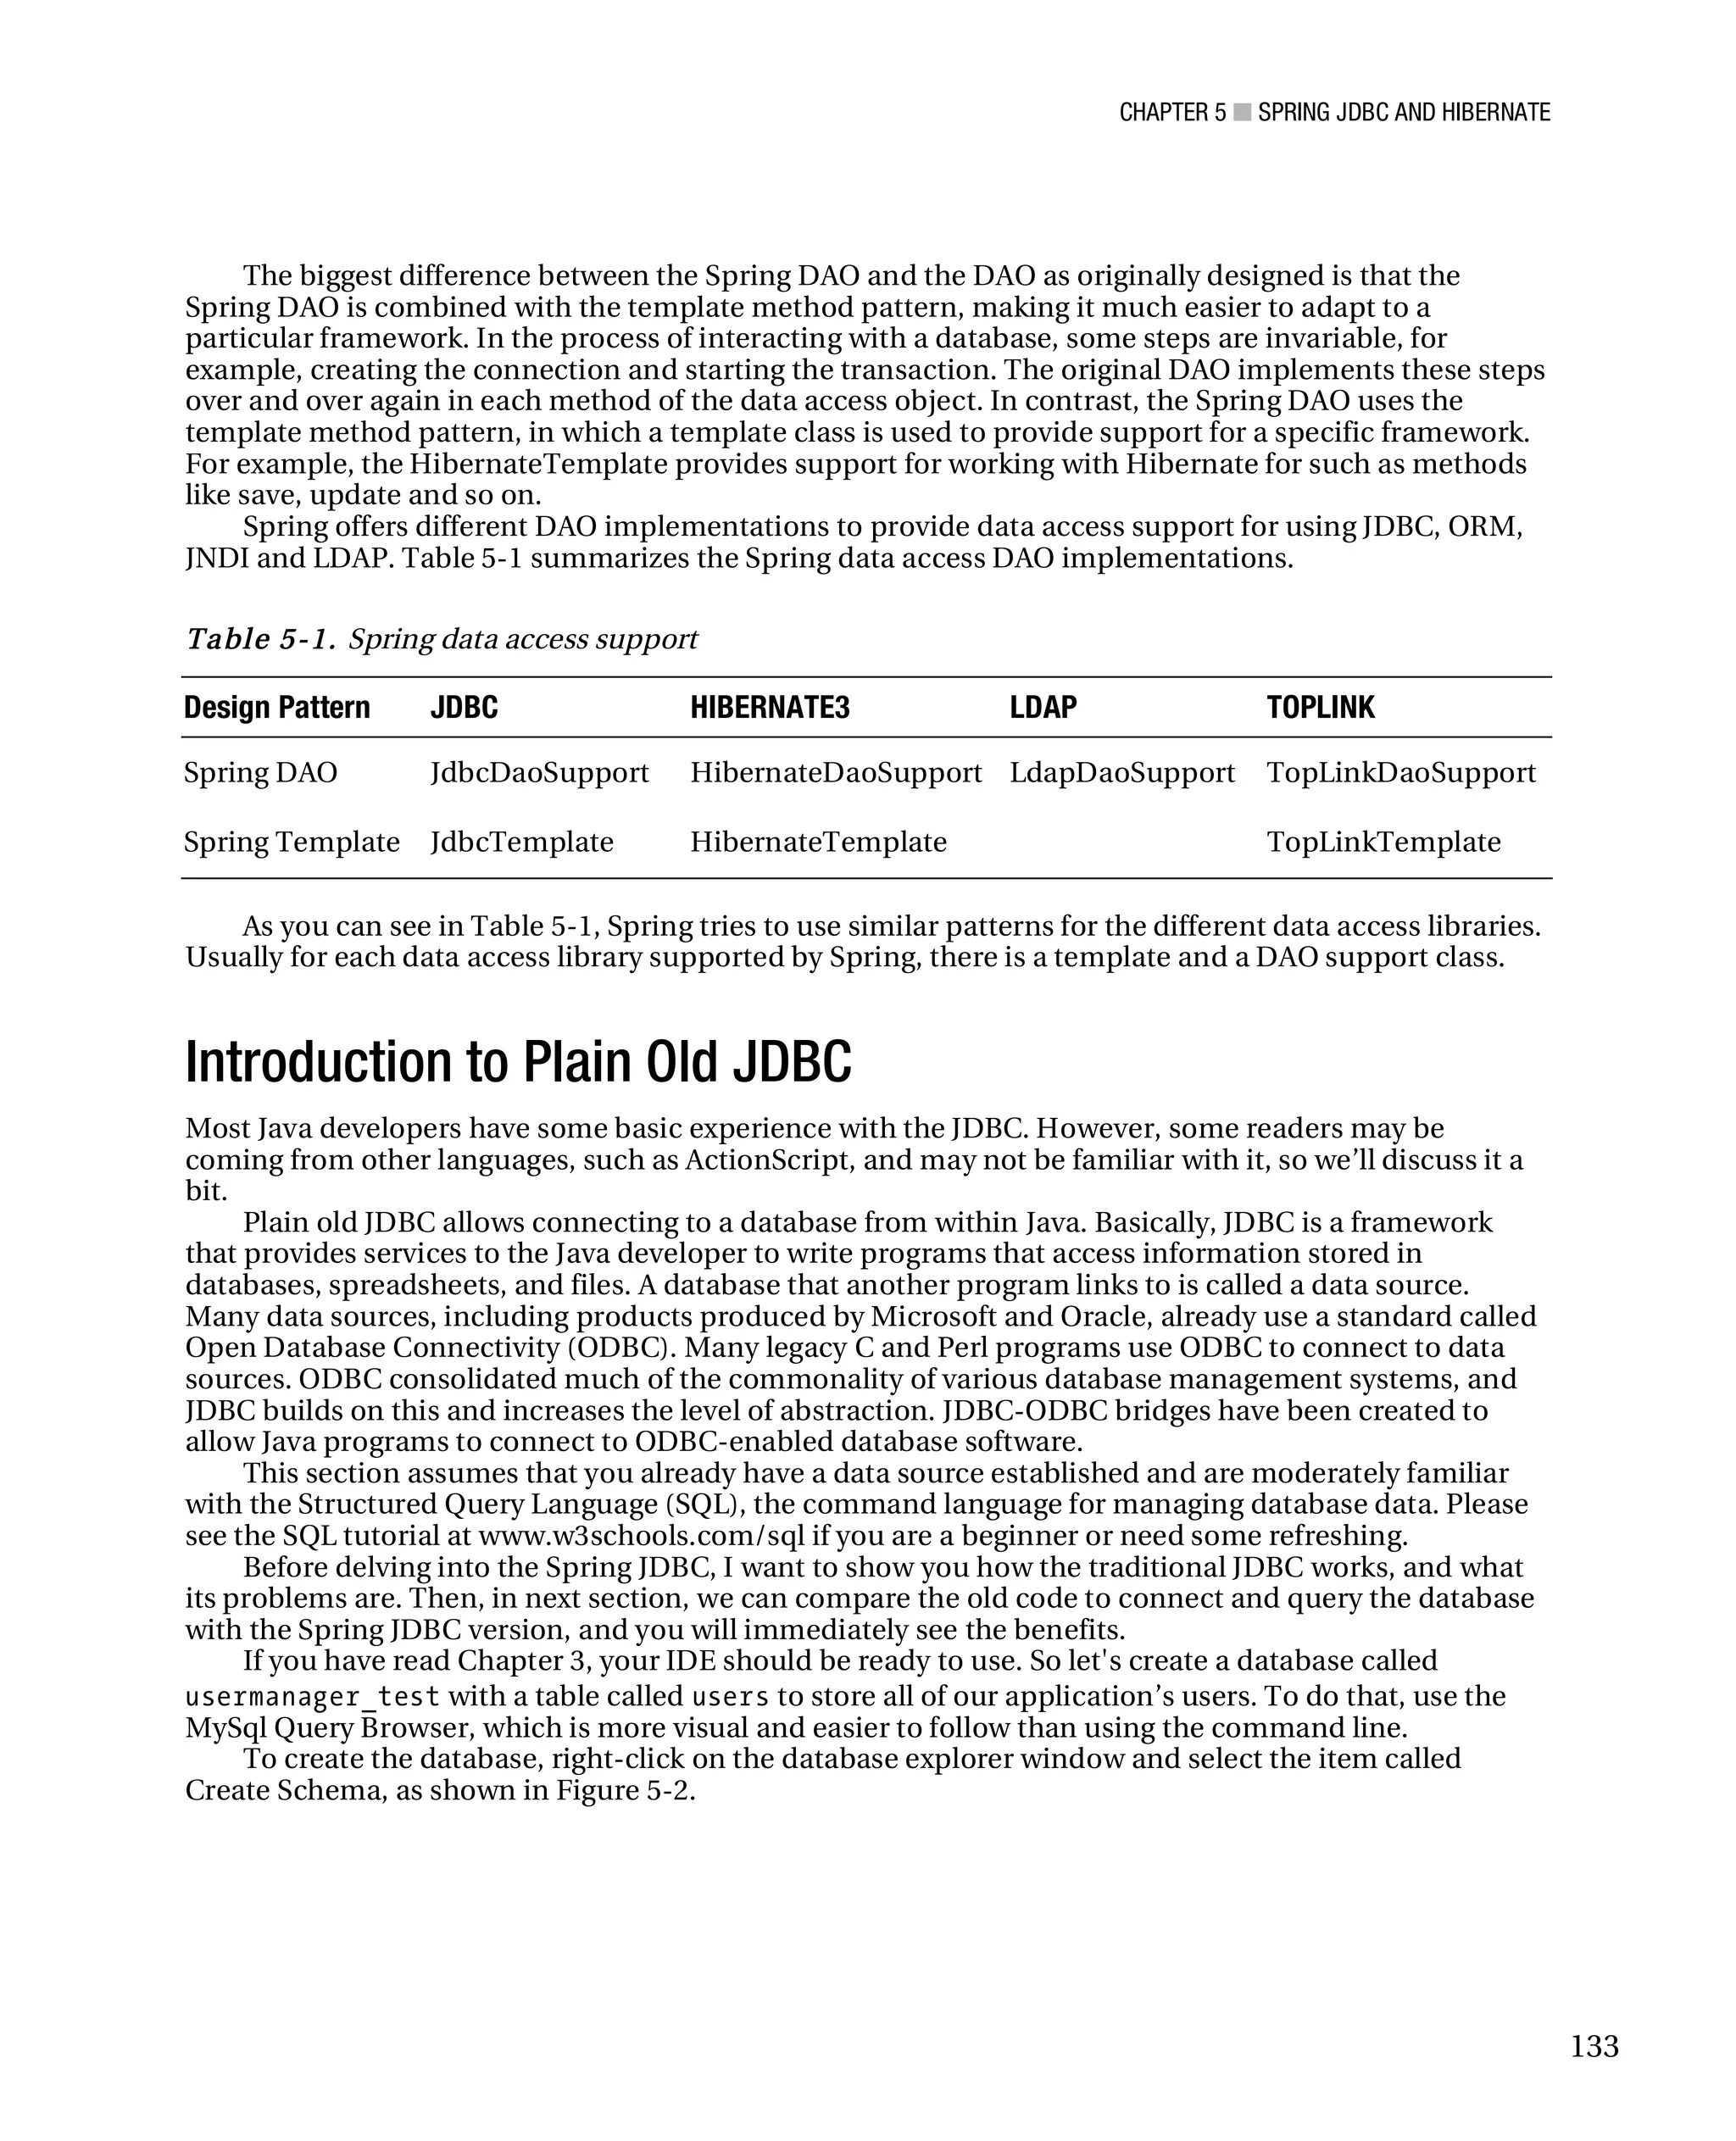
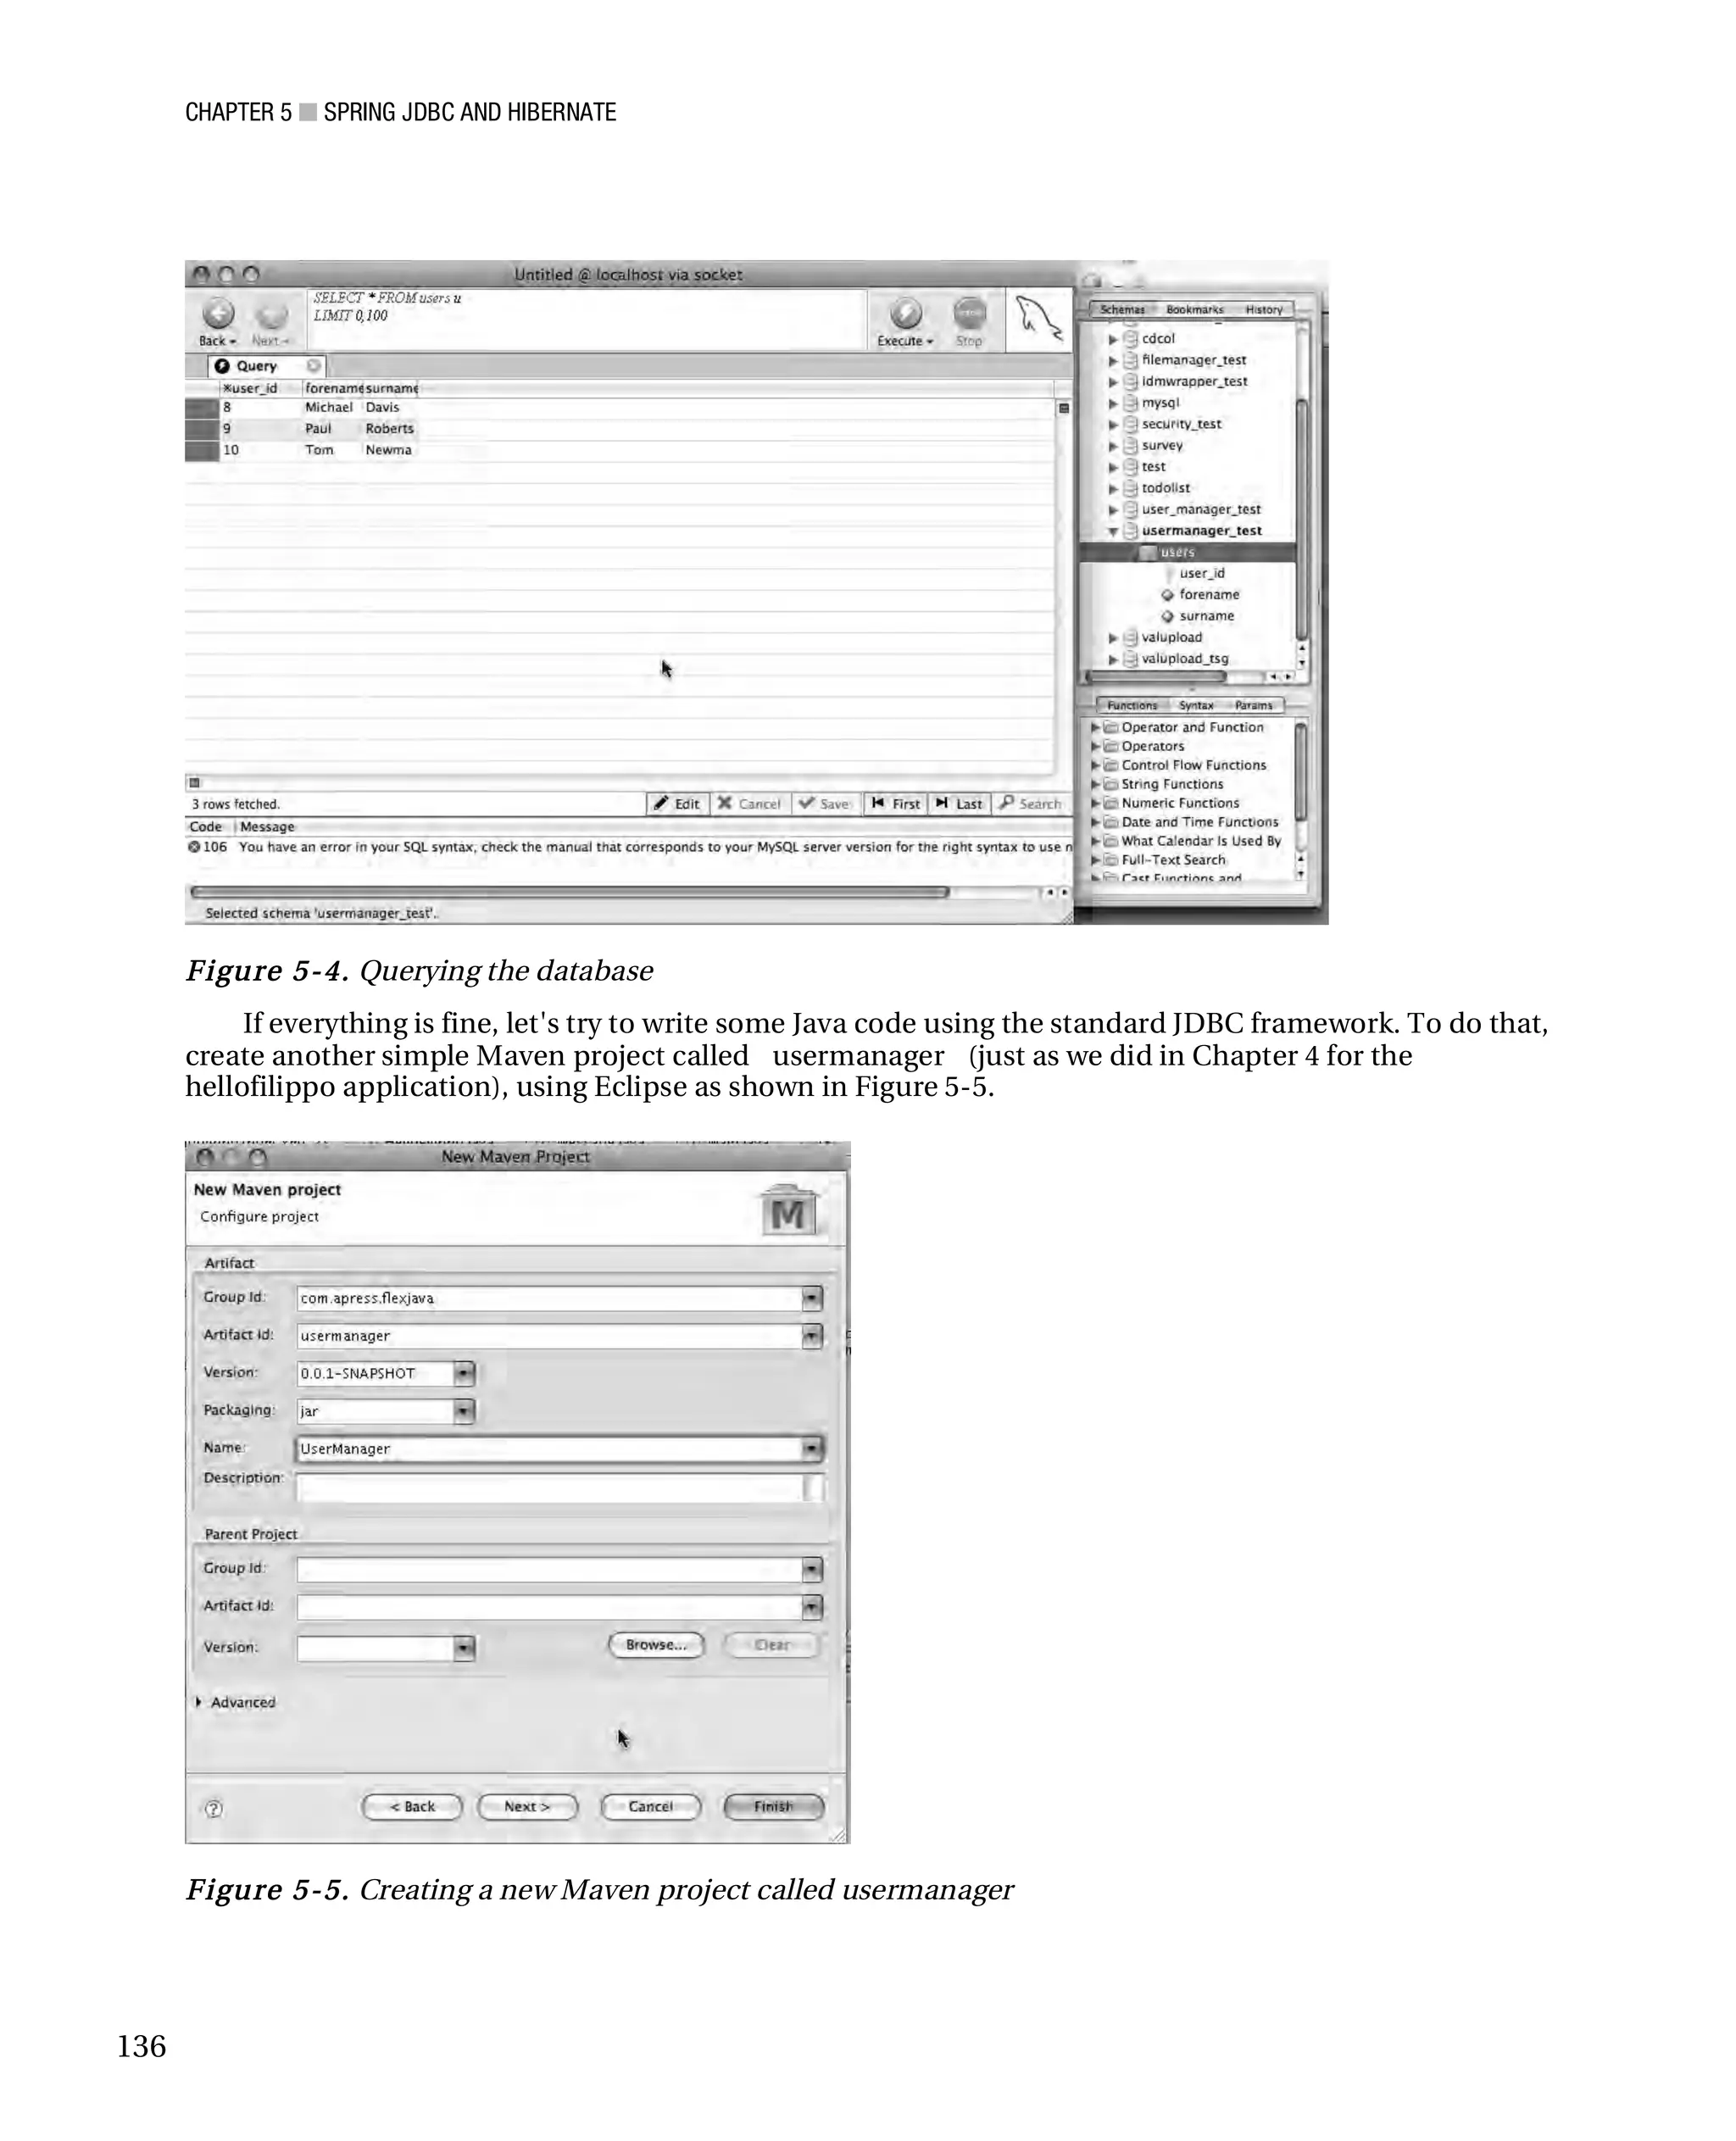
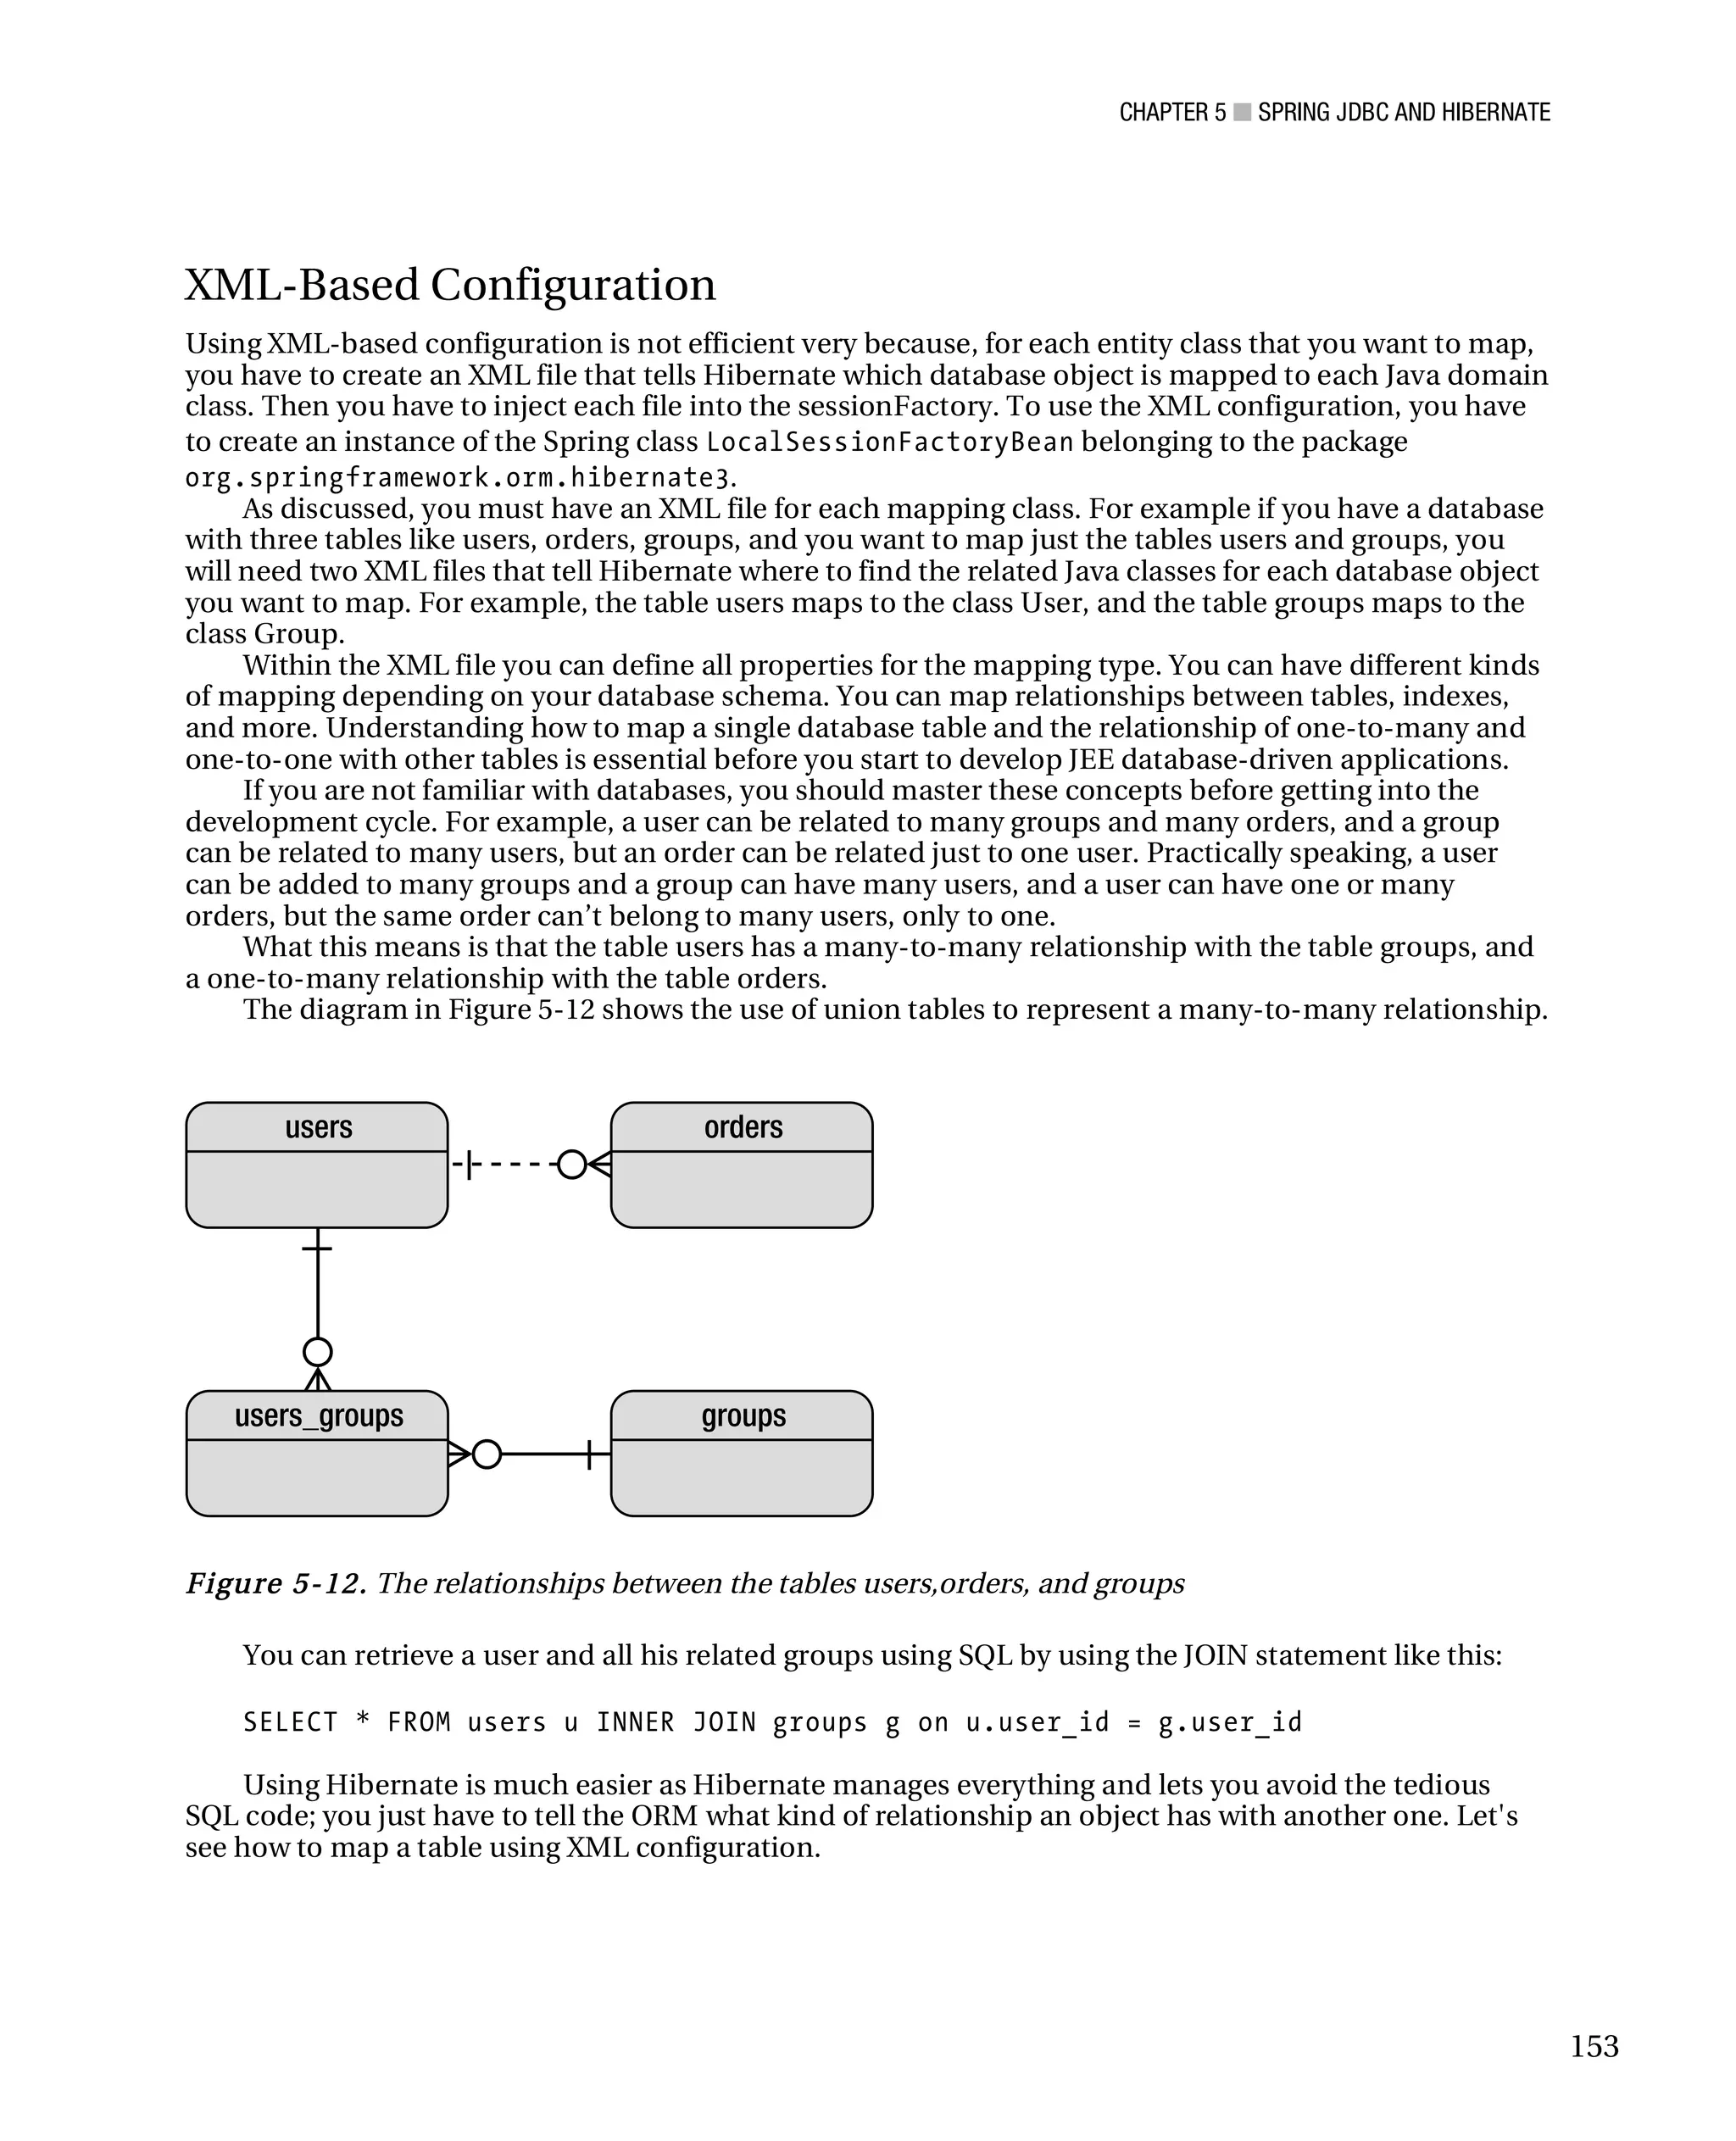
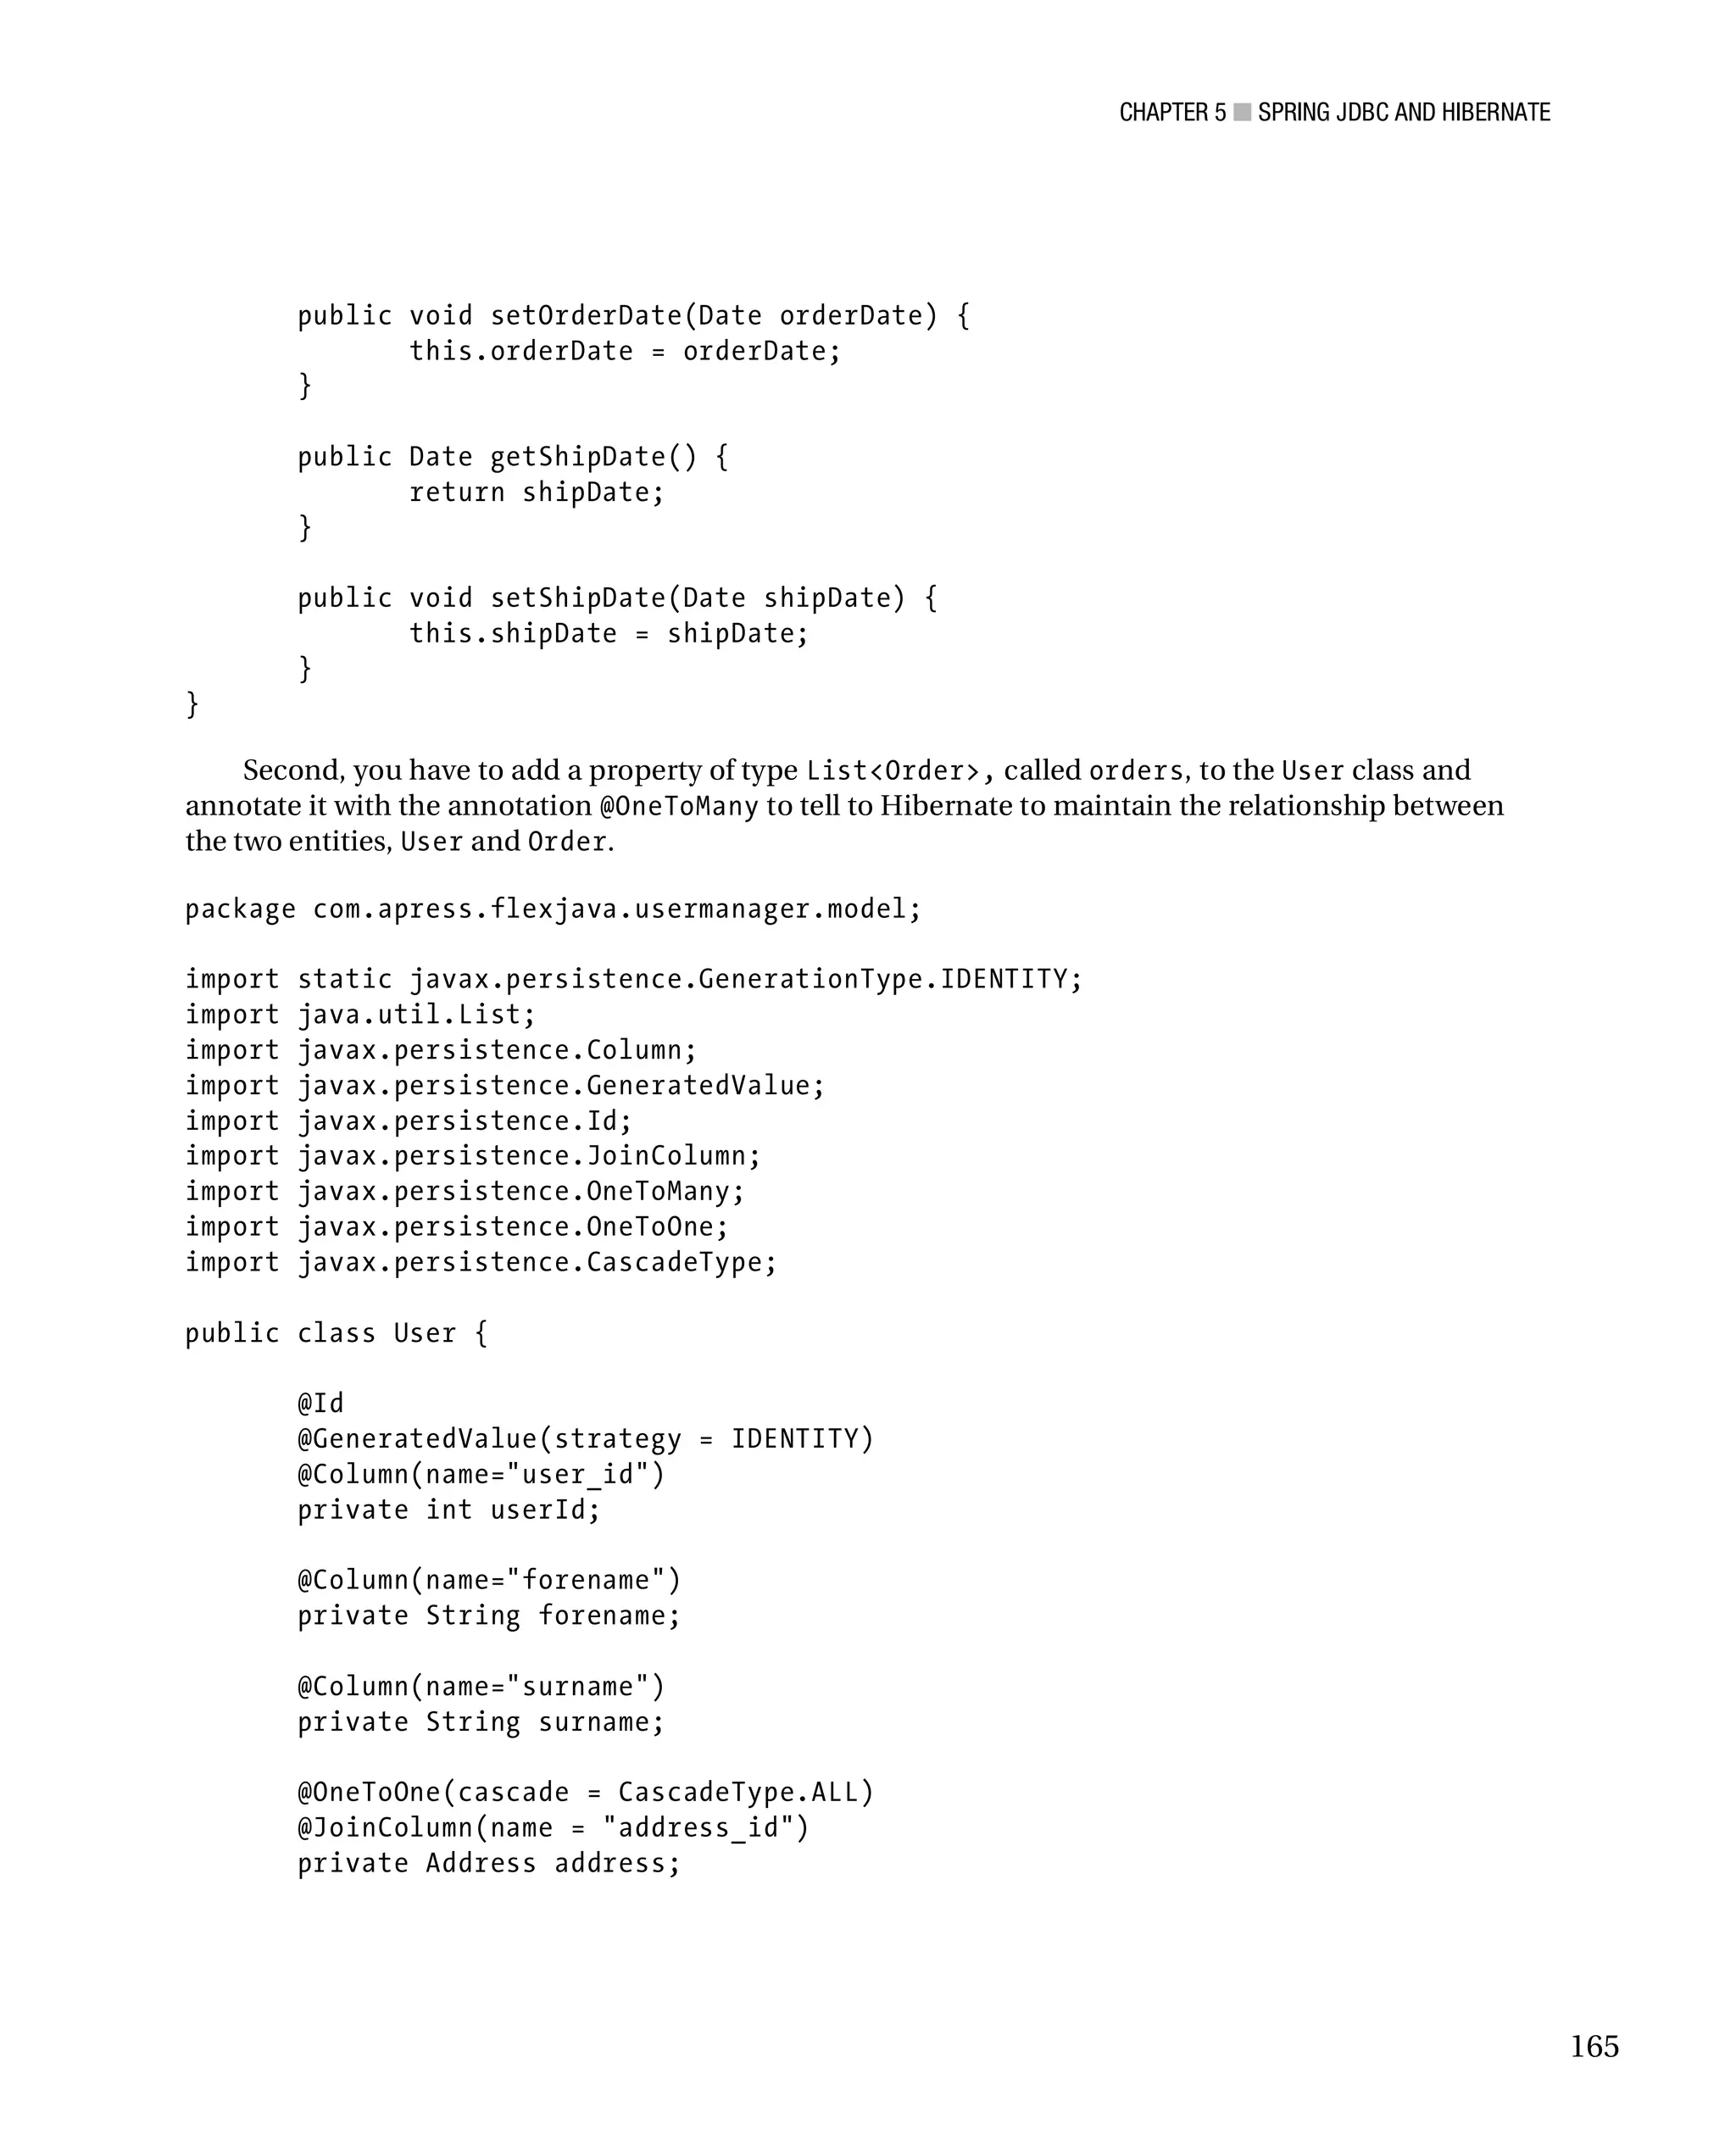
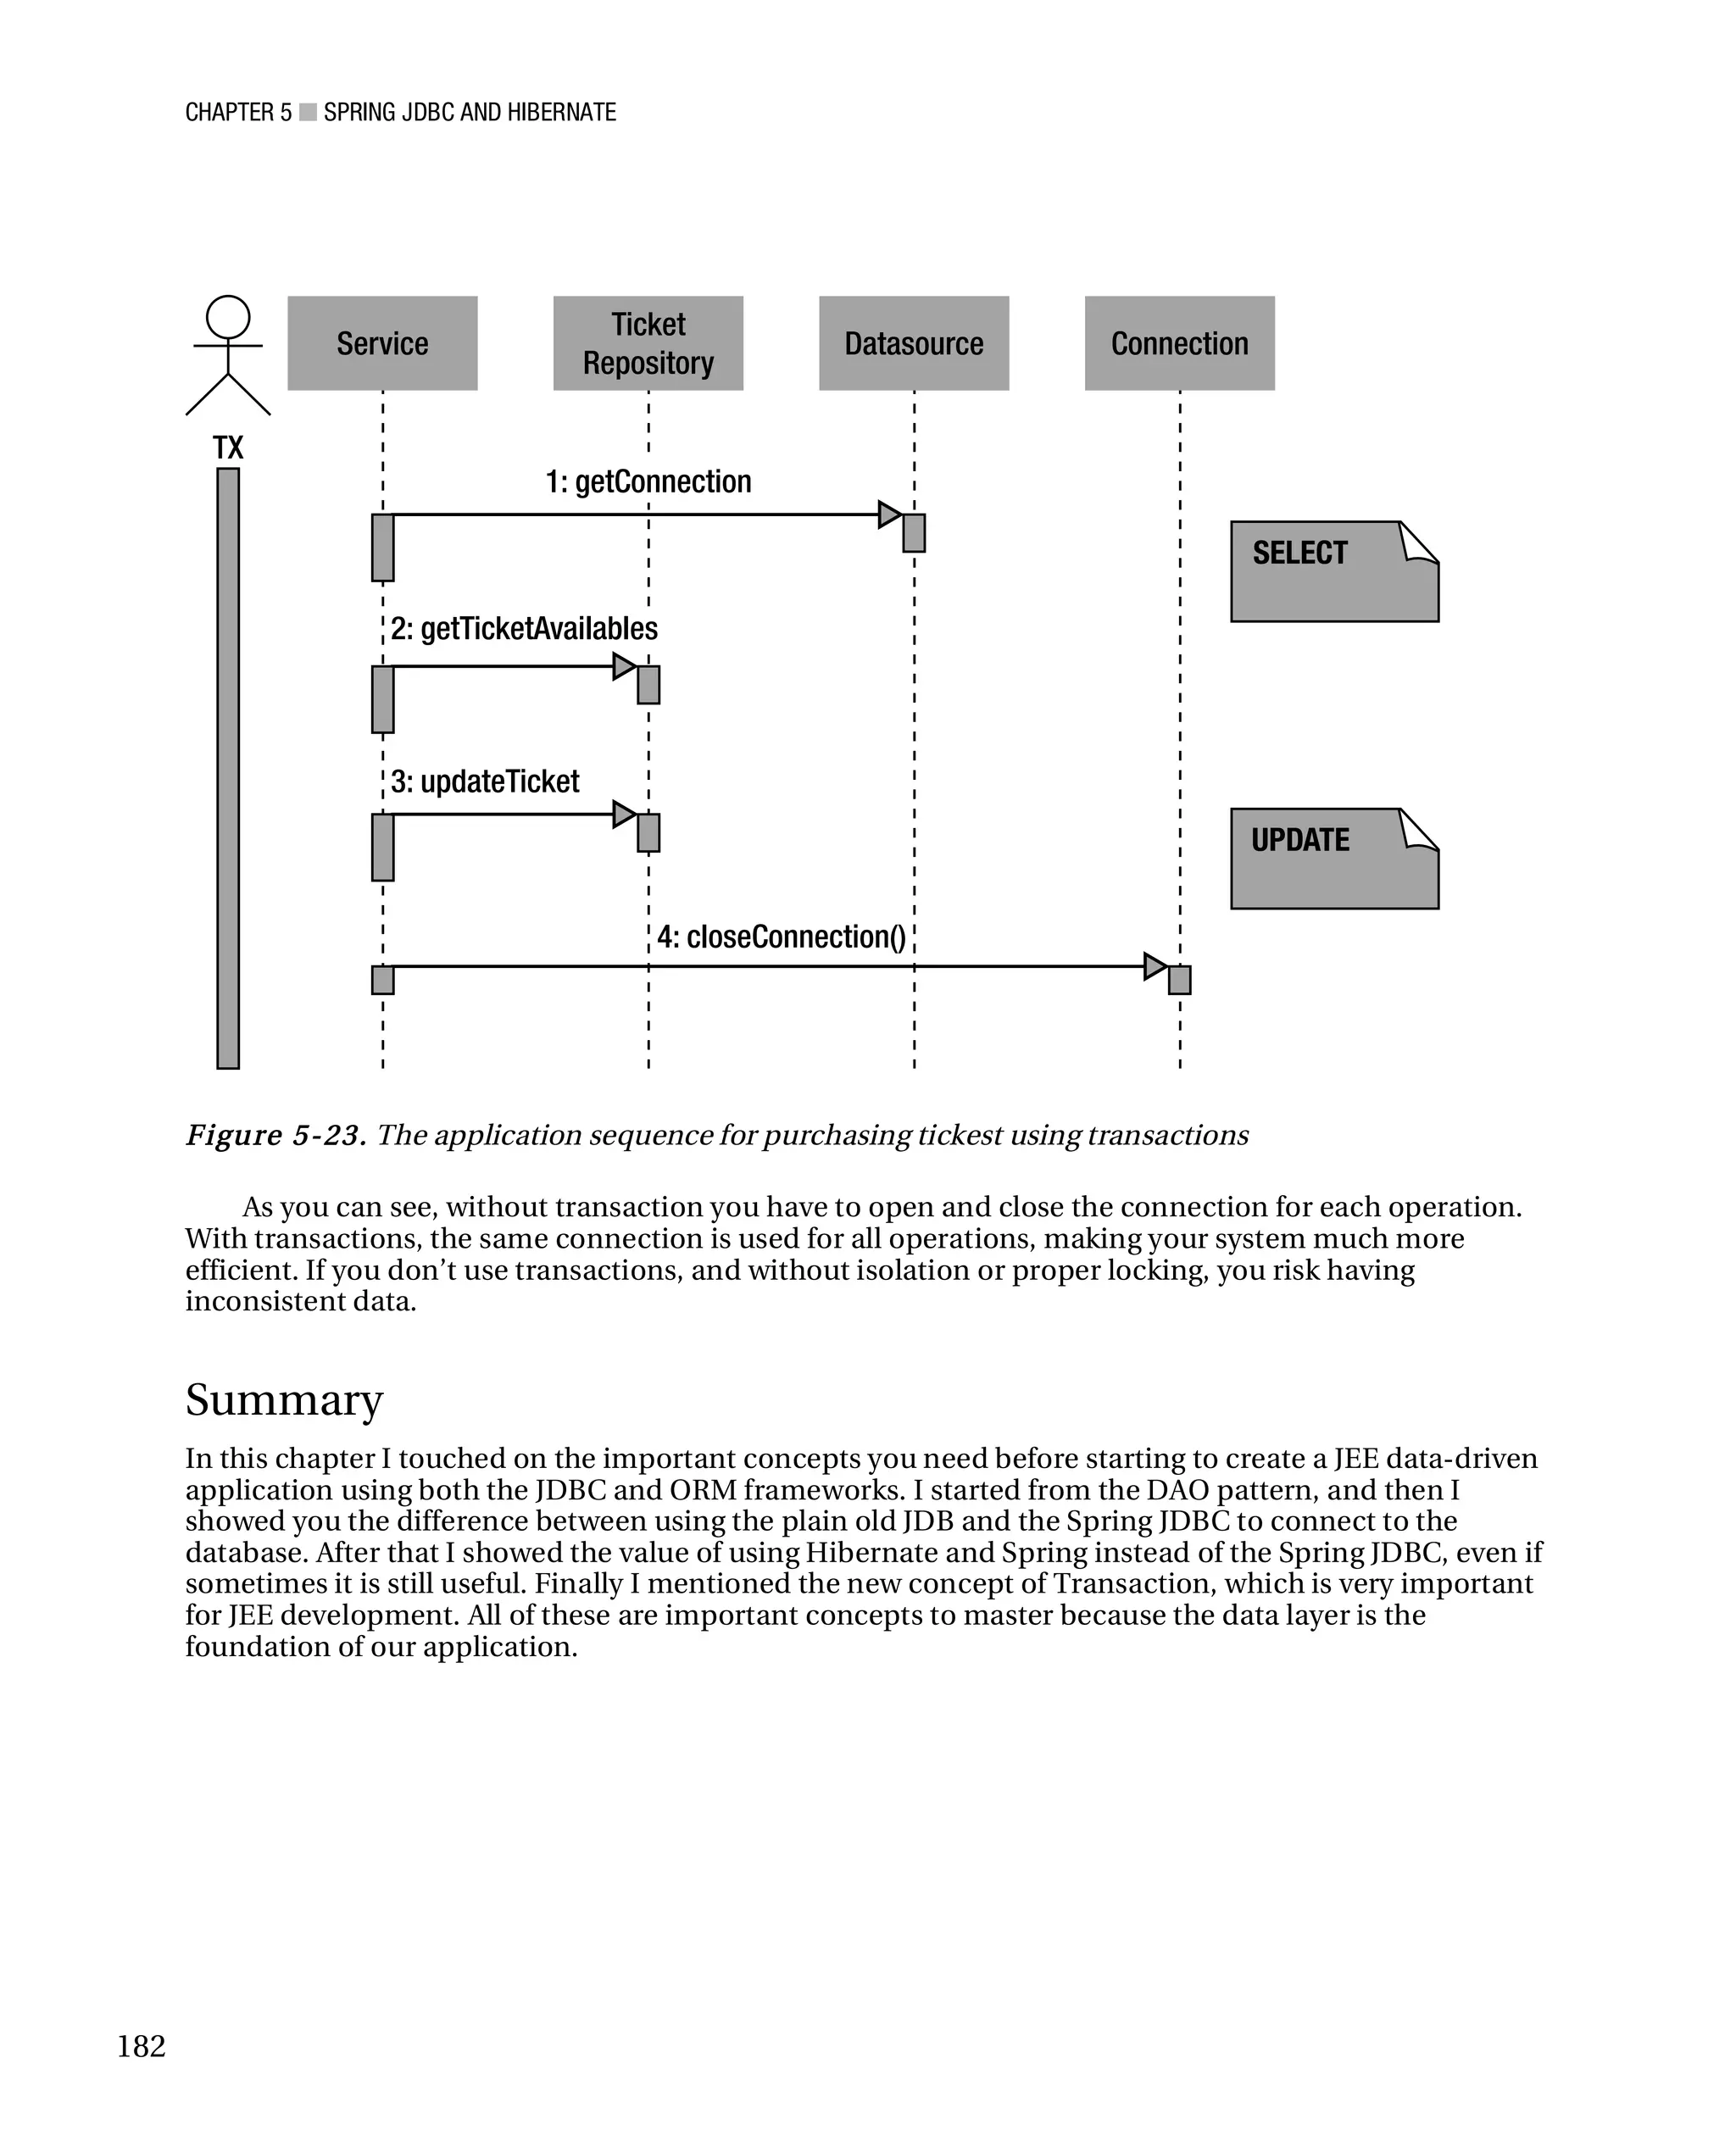
![CHAPTER 5 ■ SPRING JDBC AND HIBERNATE
Figure 5-1. Two different implementations of the UserDao interface
The differences between the two classes will be the code inside each method. For example, the save
method of the class LdapUserDaoImpl will contain different code from the save method implemented
by the class HibernateUserDaoImpl, because one class must work with a database and the other class
with an LDAP directory server. The following code shows the save method implemented by
HibernateUserDaoImpl:
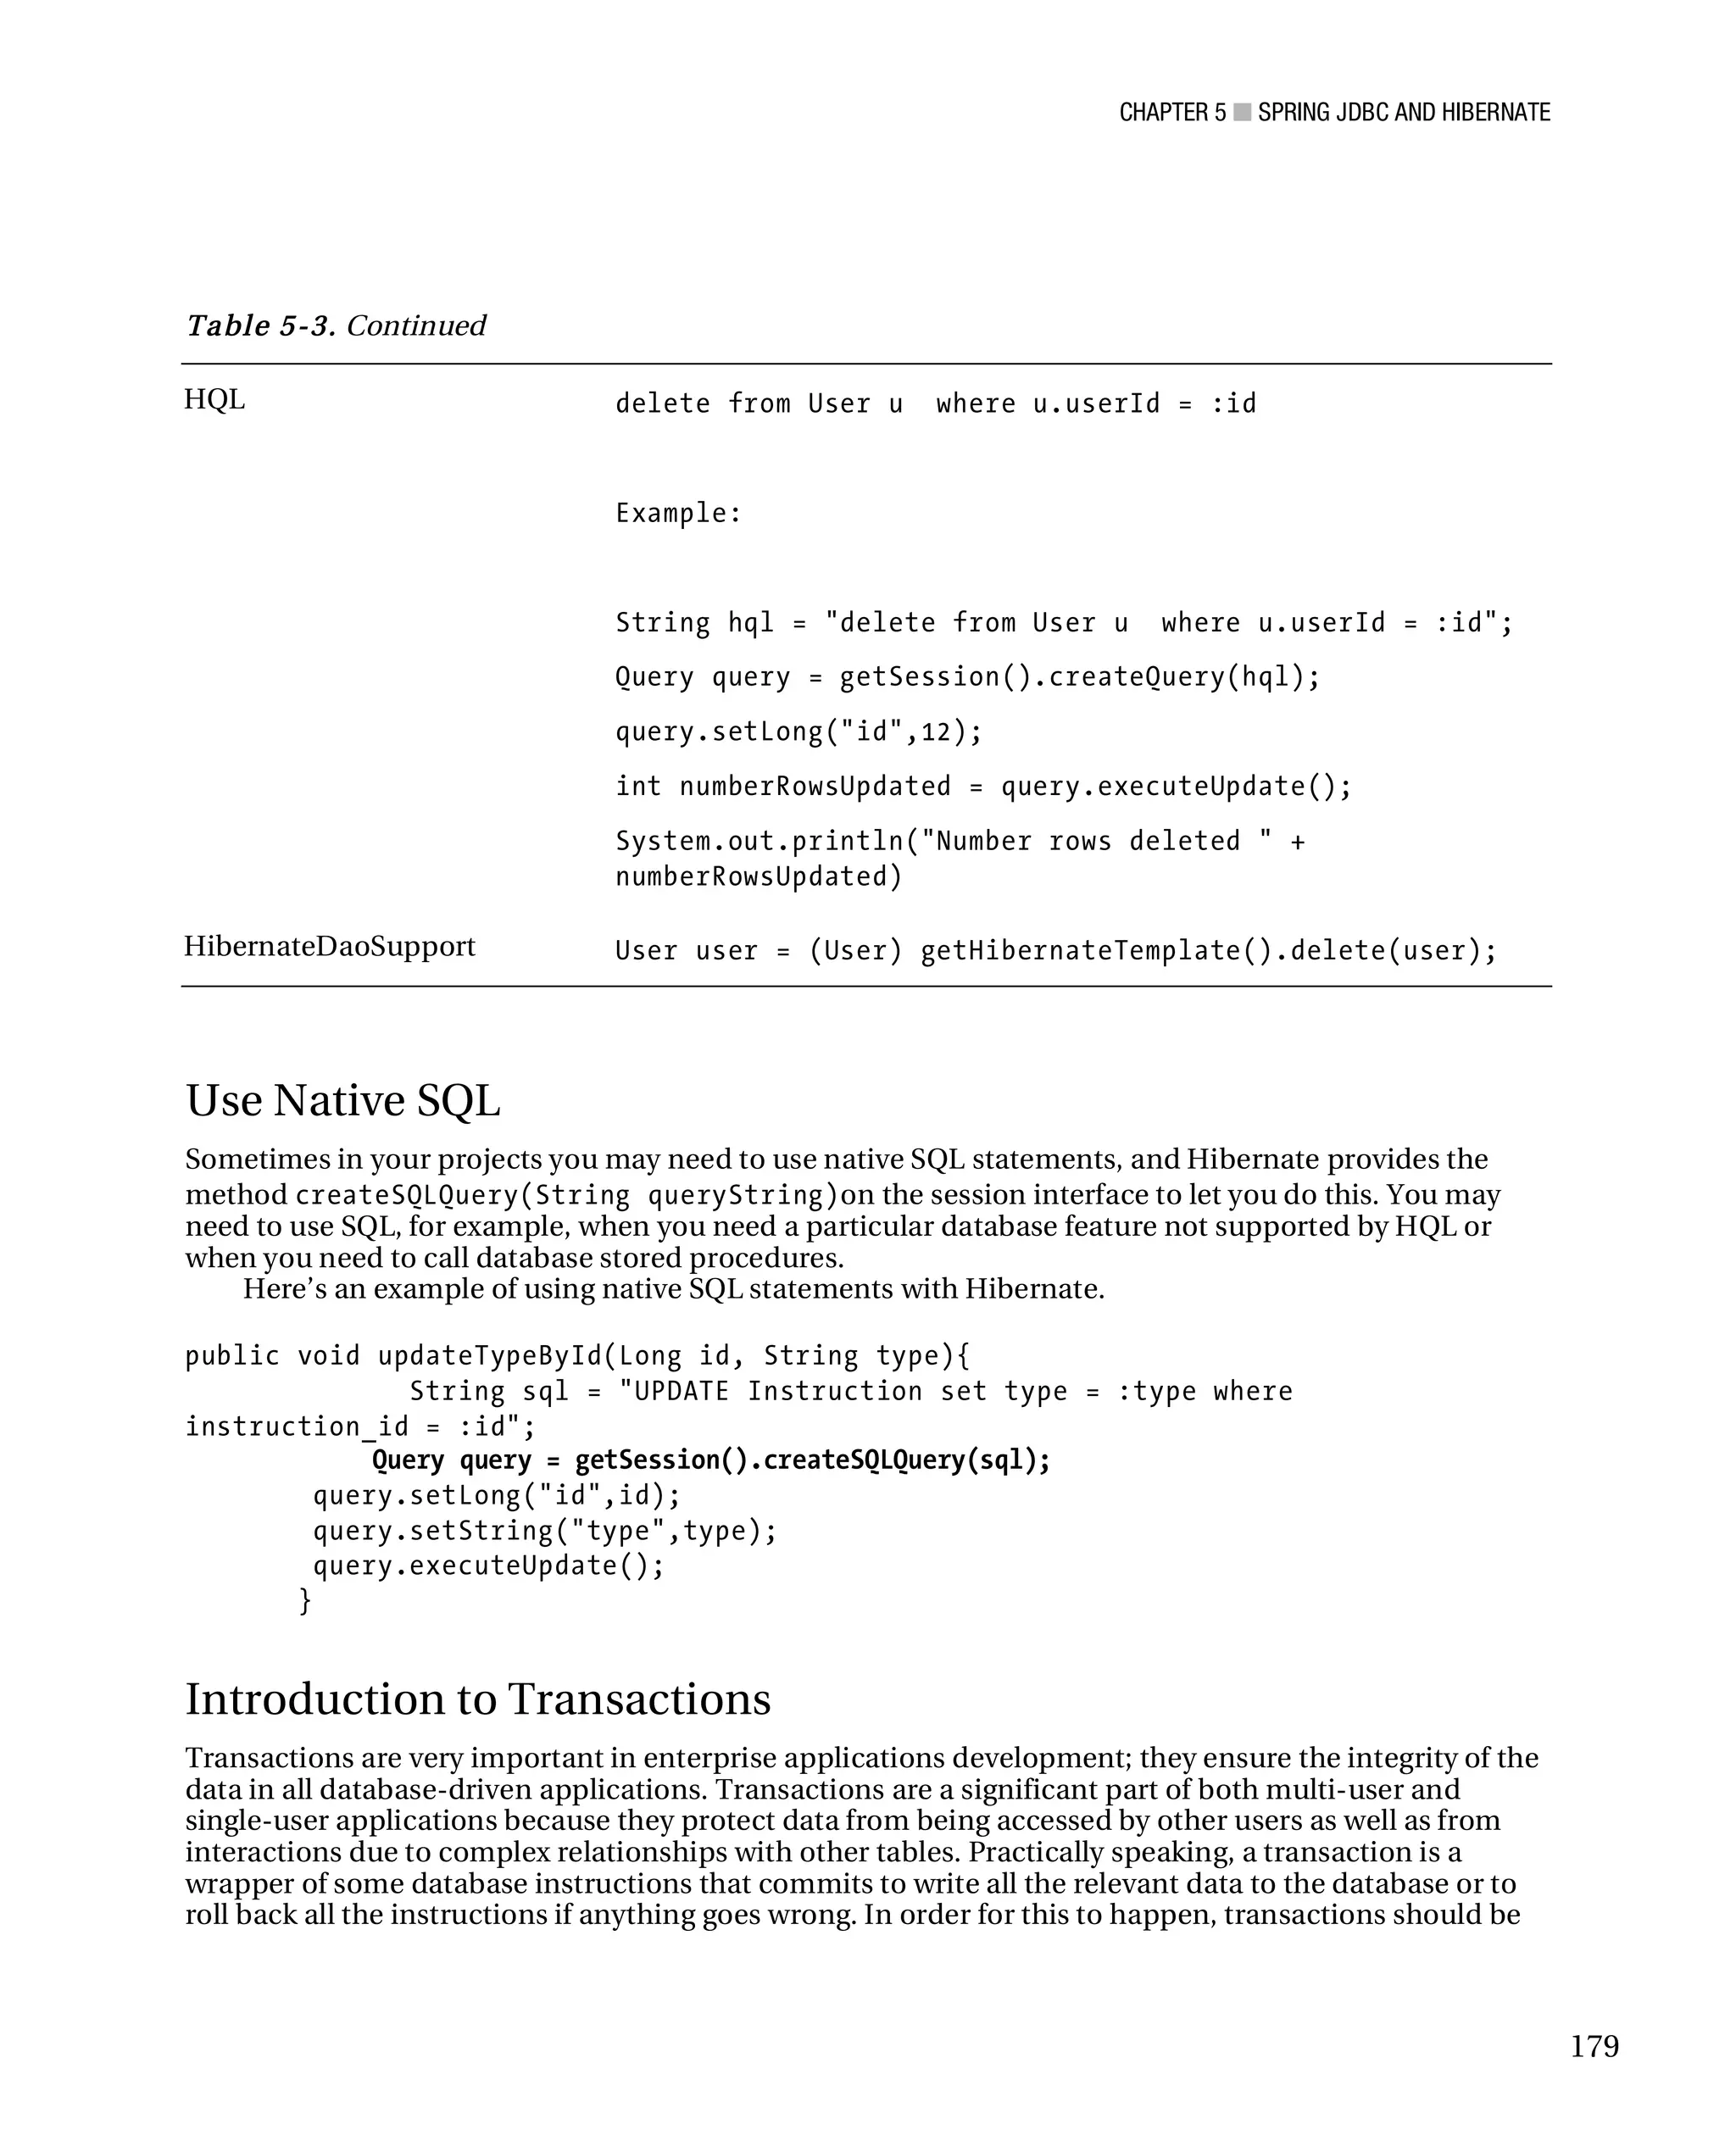
HibernateUserDaoImpl save method implemented
public void save(User user) {
getHibernateTemplate().saveOrUpdate(user);
}
And here’s the save method implemented by LdapUserDaoImpl:
public void save(User user) {
DirContextAdapter ctx = new DirContextAdapter();
ctx.setAttributeValues("objectclass", new String[]
{"top",
"person", "organizationalPerson", "inetOrgPerson"} );
HashMap<String,String> map = new LdapUserAttributeMapper
(ldapAttributesDto).mapFromLdapUserDto(ldapUserDto);
for(String key : map.keySet() ){
ctx.setAttributeValue(key, map.get(key));
}
ldapTemplate.bind(this.buildRdn(ldapContactDto.getUid()), ctx, null);
}
Our business layer will refer to the UserDao interface and not to its implementation classes; by
referring to the interface, it will be very easy to port our application from using a database to using LDAP
storage. All we have to do is inject into our container the new class LdapUserDaoImpl. Easy!
132](https://image.slidesharecdn.com/beginningjavaandflex-migratingjavaspringhibernateandmavendeveloperstoadobeflex-100821073507-phpapp01/75/Beginning-java-and-flex-migrating-java-spring-hibernate-and-maven-developers-to-adobe-flex-151-2048.jpg)

![CHAPTER 5 ■ SPRING JDBC AND HIBERNATE
<type>jar</type>
<scope>compile</scope>
</dependency>
Finally, we need to create a Main class where we are going to instantiate our
UserDaoTraditionalJdbcImpl,call the findAll method to retrieve all users stored into our database,
and print them to the console.
Your Main class is like this:
package com.apress.flexjava.usermanager.business;
import java.util.List;
import com.apress.flexjava.usermanager.dao.UserDao;
import com.apress.flexjava.usermanager.dao.jdbc.UserDaoTraditionalJdbcImpl;
import com.apress.flexjava.usermanager.model.User;
public class Main {
private static final String JDBC_DRIVE_CLASS_NAME = "com.mysql.jdbc.Driver";
private static final String JDBC_URL = "jdbc:mysql://localhost:
3306/usermanager_test";
private static final String JDBC_USERNAME = " apress ";
private static final String JDBC_PASSWORD = " sserpa ";
public static void main(String[] args) {
UserDao userDao = new
UserDaoTraditionalJdbcImpl( JDBC_DRIVE_CLASS_NAME ,
JDBC_URL , JDBC_USERNAME , JDBC_PASSWORD );
List<User> users = userDao.findAll();
for (User user : users){
System. out .println(user.getForename() + " " +
user.getSurname() );
}
}
}
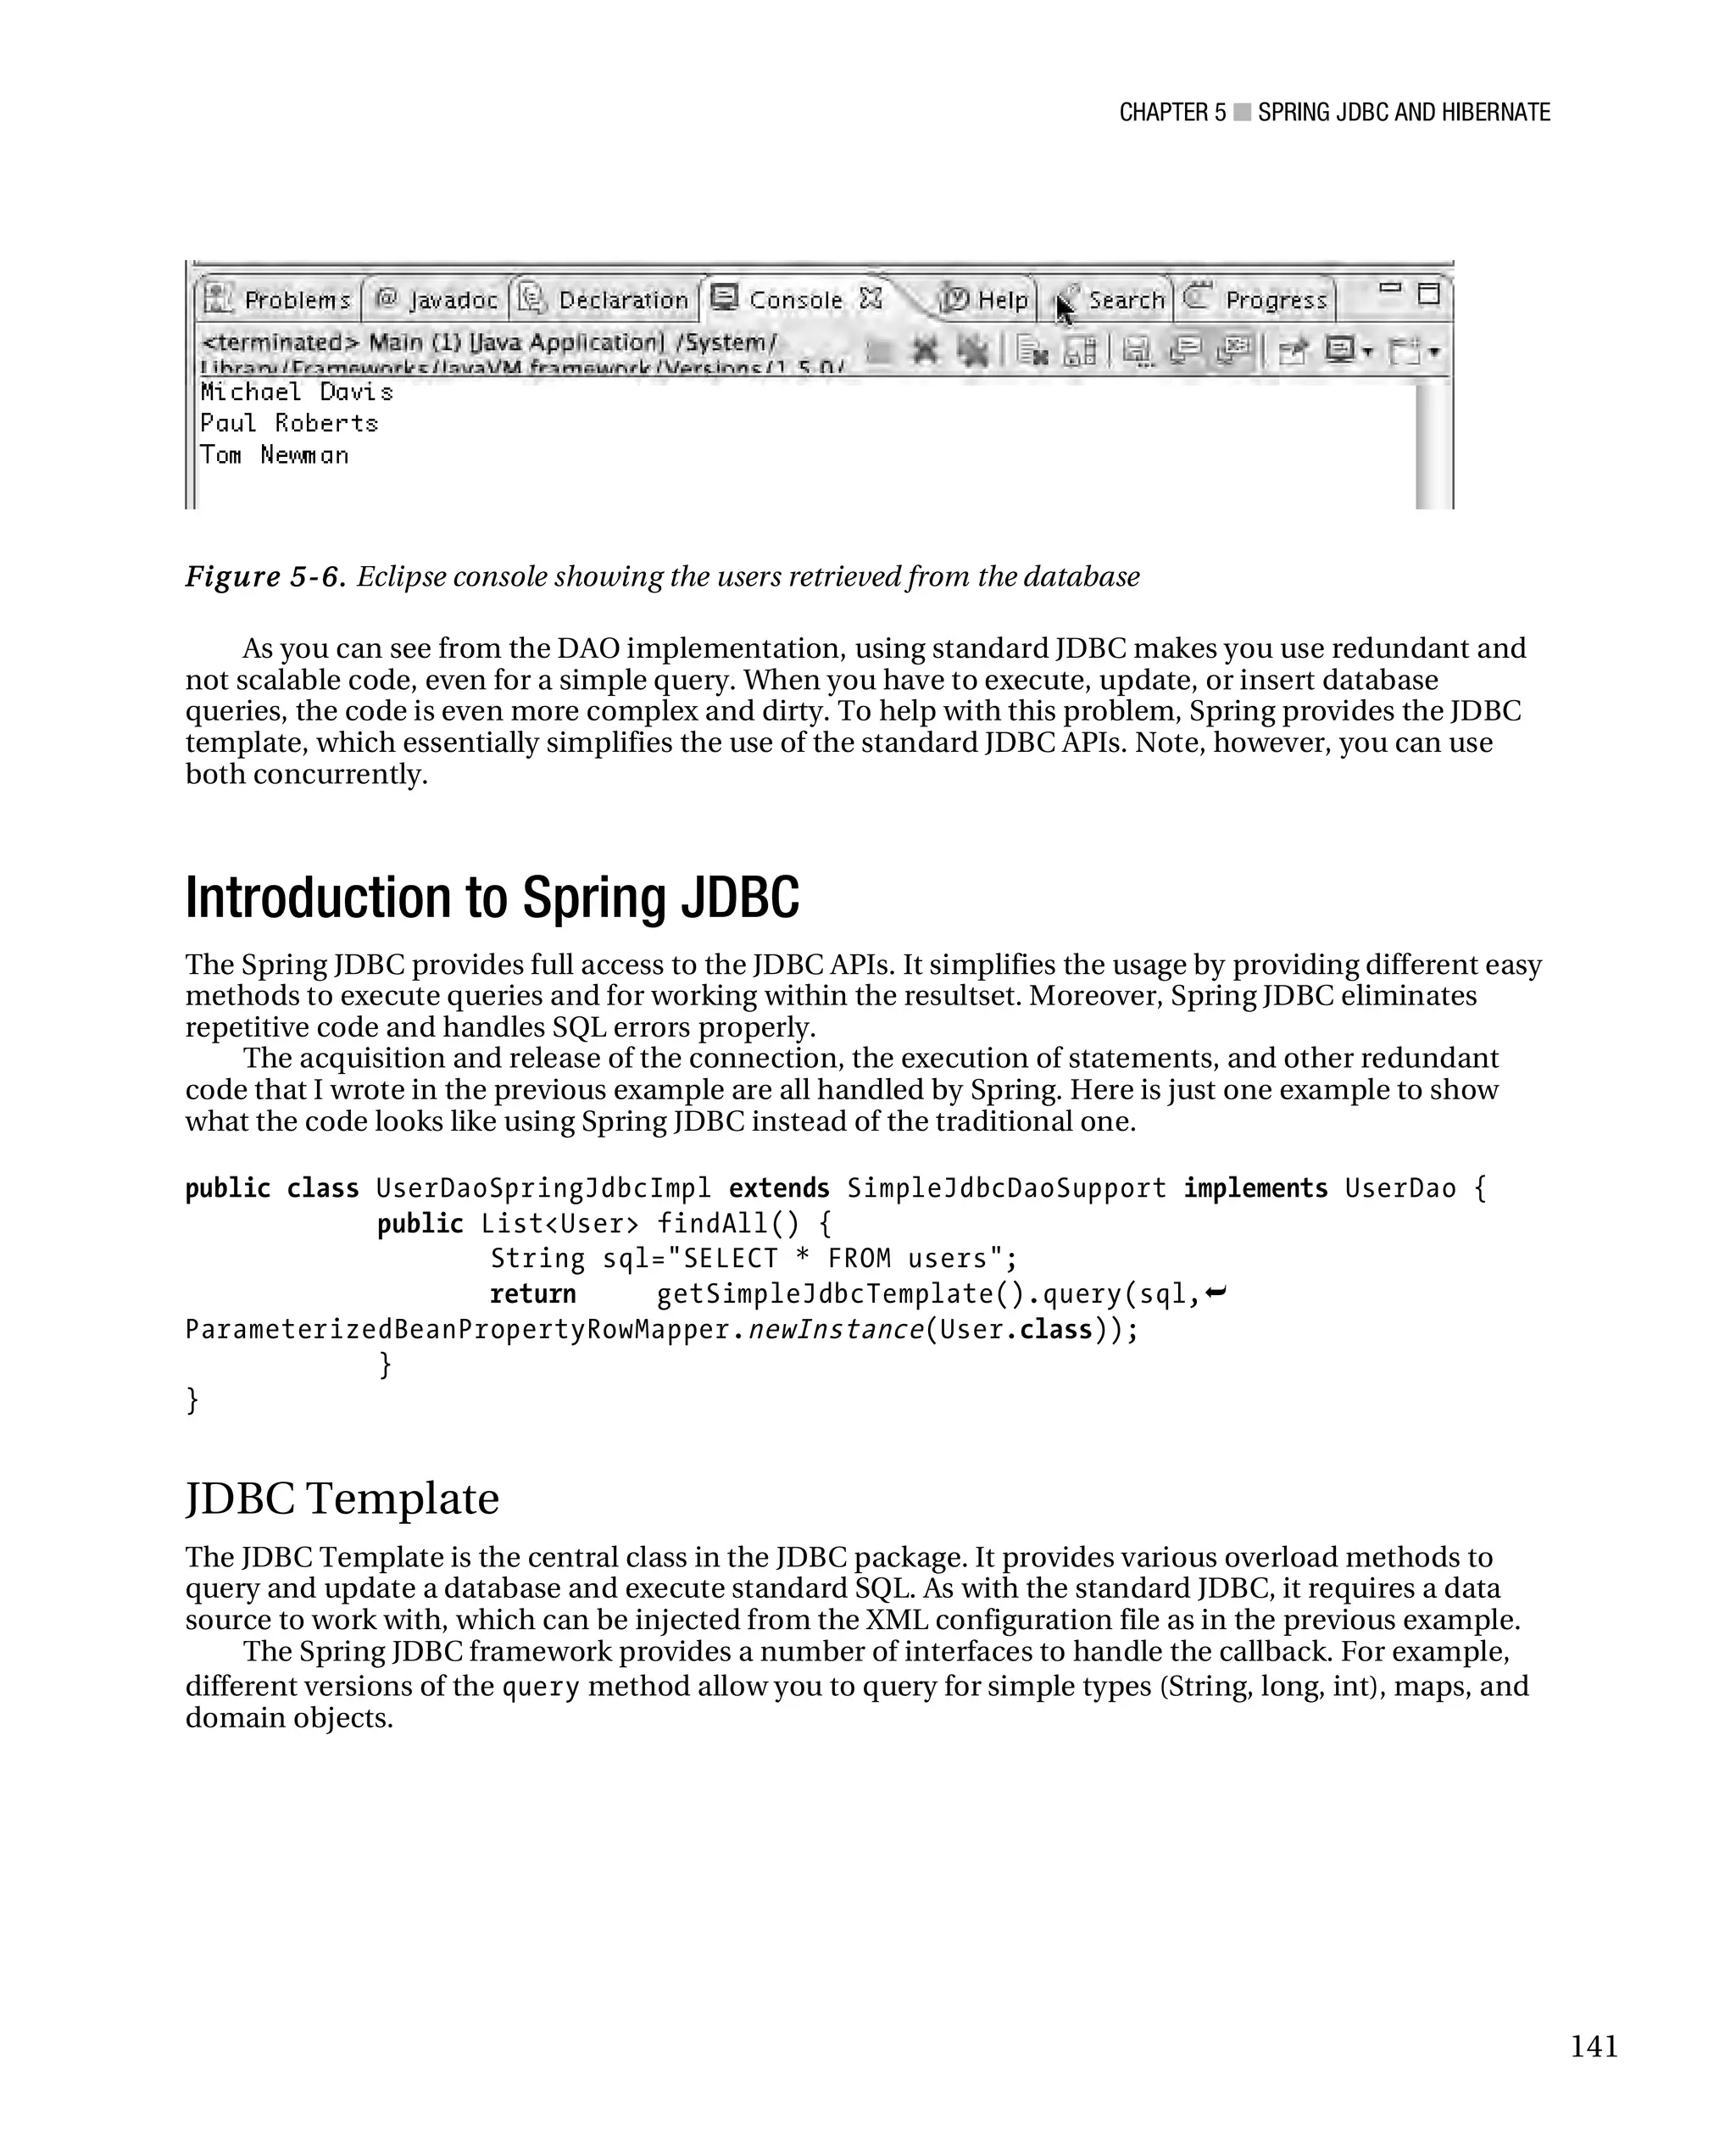
Now you can run the application using Eclipse by right-clicking on the Main class and choosing the
item run as Java application ; if everything is correct, you should see in your Eclipse console the result
shown in Figure 5-6.
140](https://image.slidesharecdn.com/beginningjavaandflex-migratingjavaspringhibernateandmavendeveloperstoadobeflex-100821073507-phpapp01/75/Beginning-java-and-flex-migrating-java-spring-hibernate-and-maven-developers-to-adobe-flex-159-2048.jpg)
![CHAPTER 5 ■ SPRING JDBC AND HIBERNATE
Finally, you need to create a Main class where you instantiate your beanfactory to get the userDao
bean and call the findAll method to retrieve all users stored into the database and print them to the
console.
Here is the complete code for the Main class:
package com.apress.flexjava.usermanager.business;
import java.util.List;
import org.springframework.context.ApplicationContext;
import org.springframework.context.support.ClassPathXmlApplicationContext;
import com.apress.flexjava.usermanager.dao.UserDao;
import com.apress.flexjava.usermanager.model.User;
public class Main {
public static void main(String[] args) {
ApplicationContext context = new ClassPathXmlApplicationContext
("applicationContext.xml");
UserDao userDao = (UserDao)context.getBean("userDao");
List<User> users = userDao.findAll();
for (User user : users){
System.out.println(user.getForename() + " " +
user.getSurname() );
}
}
}
Now you can run the application using Eclipse as shown before by right-clicking on the Main class
and choosing run as Java application; if everything is correct, you should see the information(INFO) logs
of the Spring container and then the query result, as shown in Figure 5-7.
Figure 5-7. Eclipse console showing the users retrieved from the database plus the Spring INFO logs
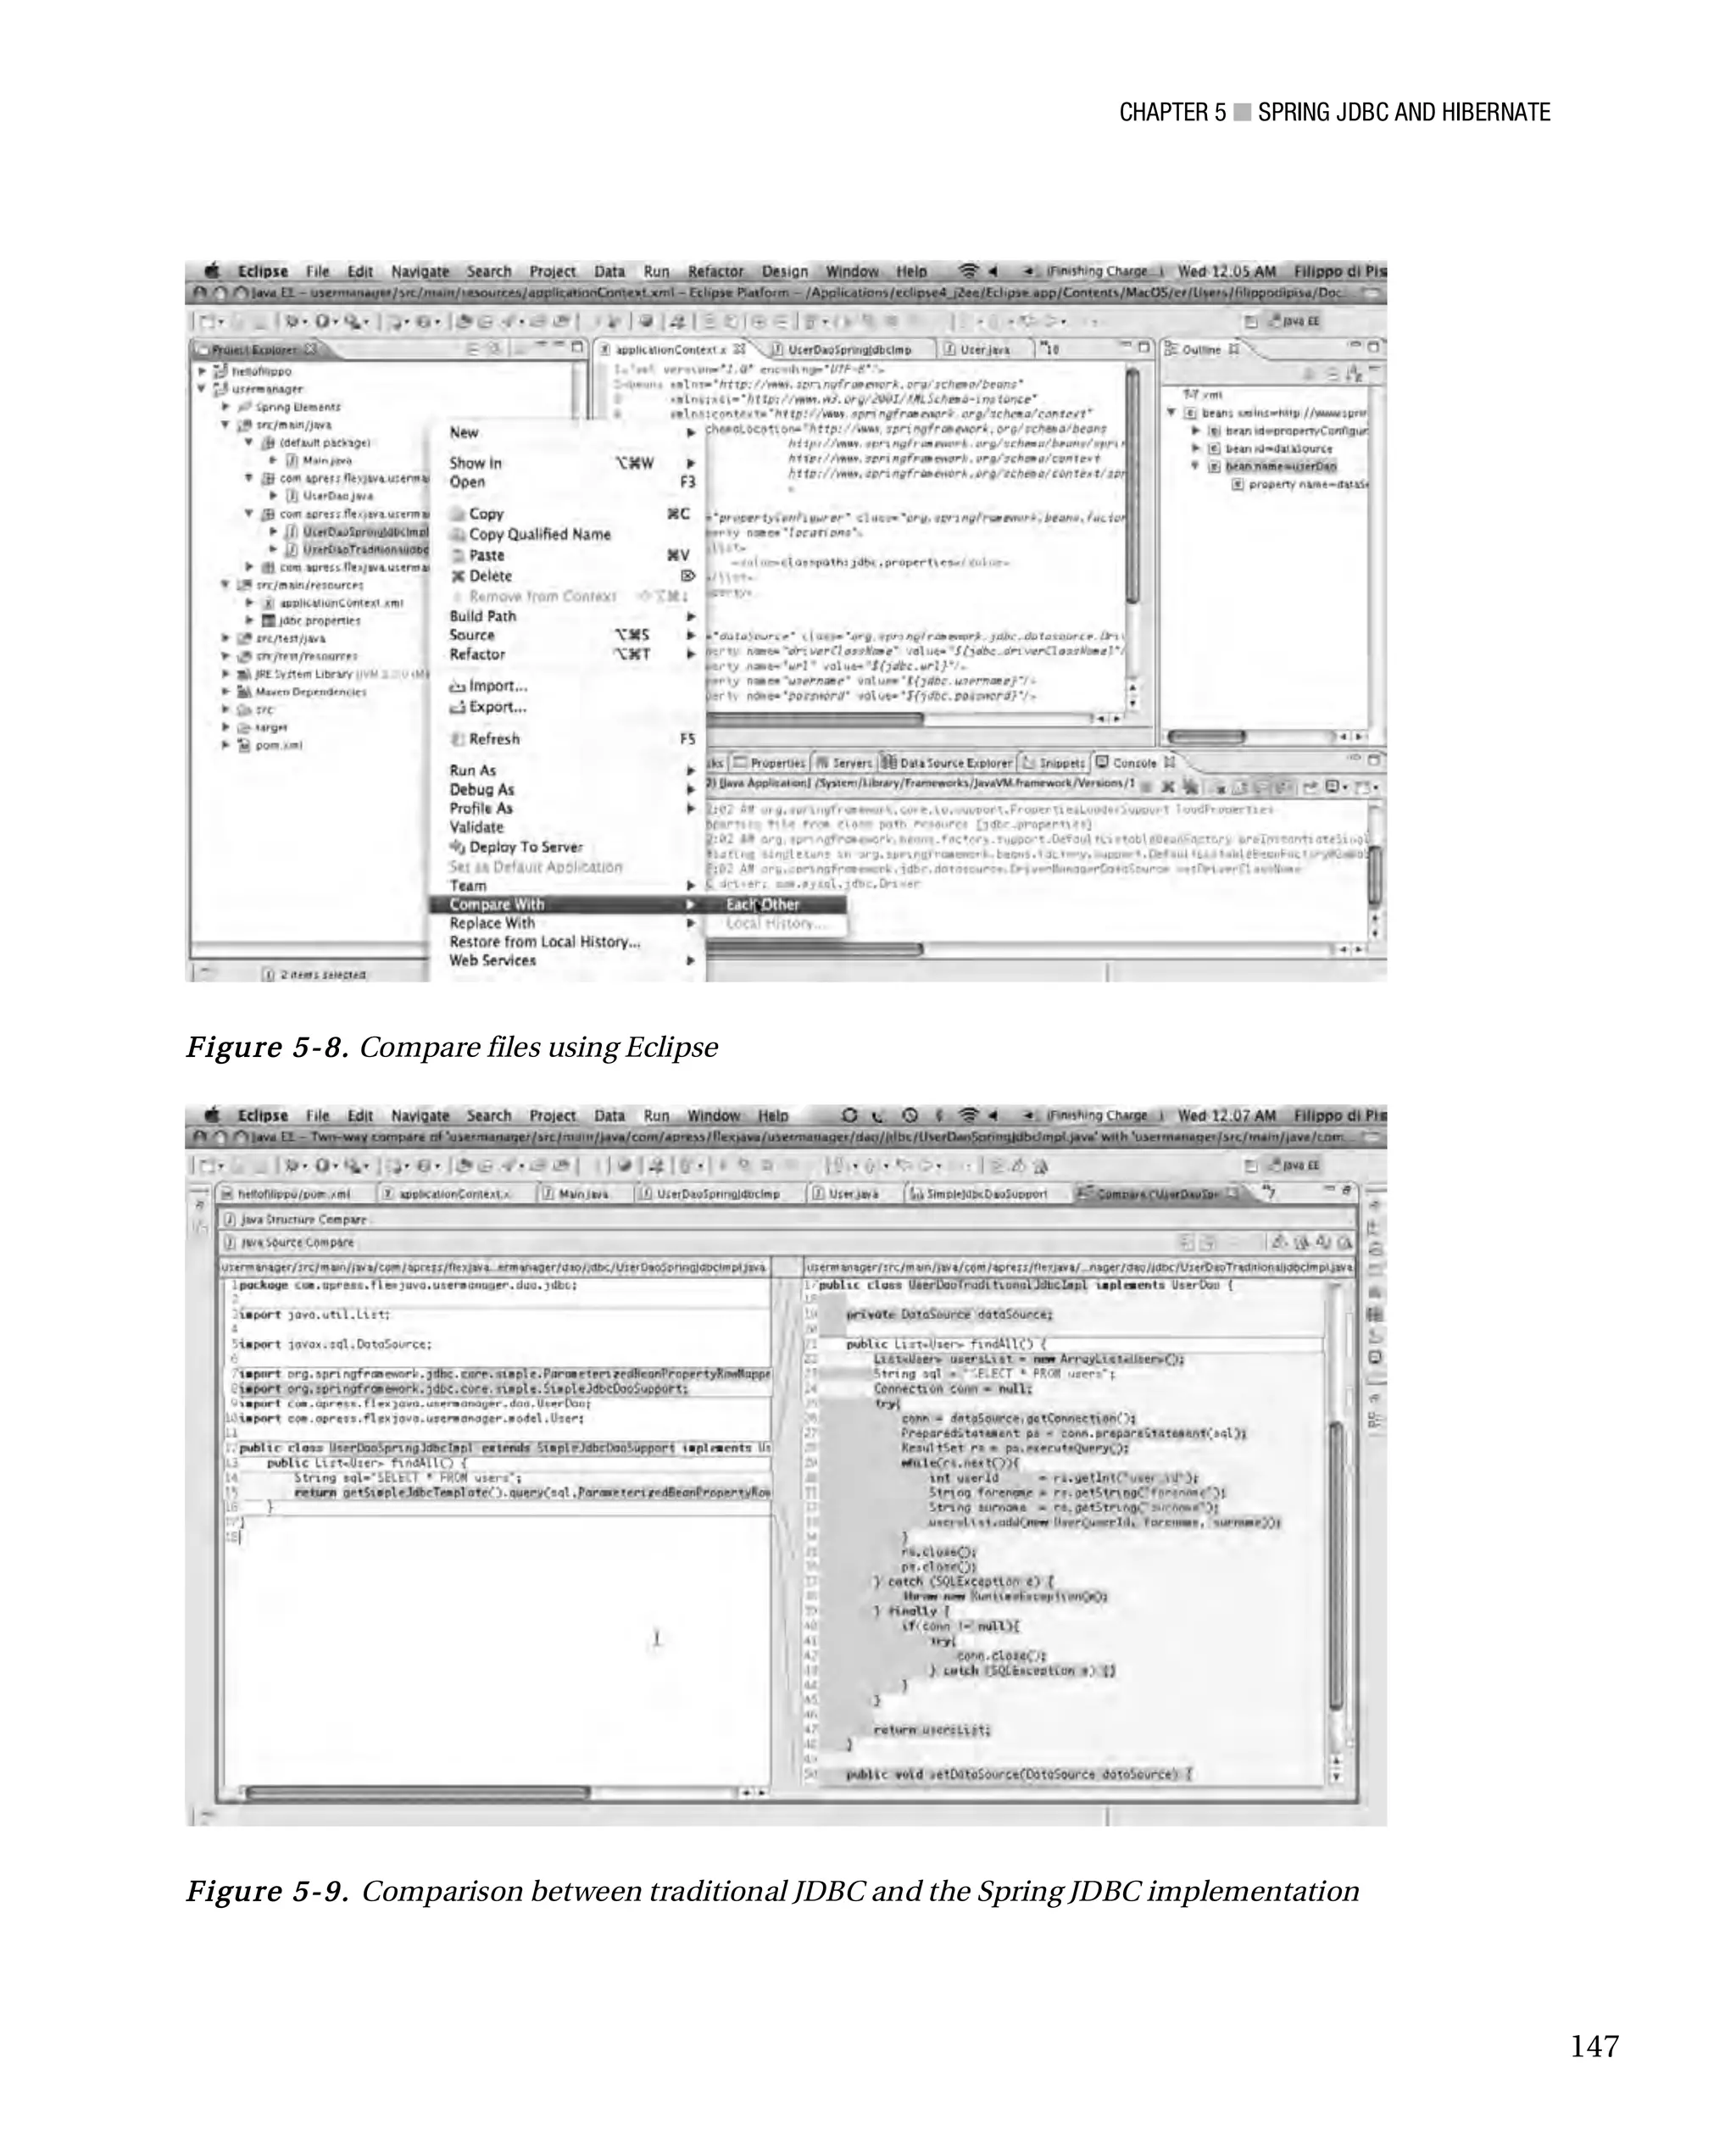
You can see the differences between the class that uses the Standard JDBC and the class that uses
the Spring JDBC by using the Eclipse compare tool. Select the two classes to compare, right-click on one
of them to bring up the context menu, then choose Compare With ➤ Each Other (see Figure 5-8). The
results of the comparison are shown in Figure 5-9. I leave it to you to judge which is better!
146](https://image.slidesharecdn.com/beginningjavaandflex-migratingjavaspringhibernateandmavendeveloperstoadobeflex-100821073507-phpapp01/75/Beginning-java-and-flex-migrating-java-spring-hibernate-and-maven-developers-to-adobe-flex-165-2048.jpg)

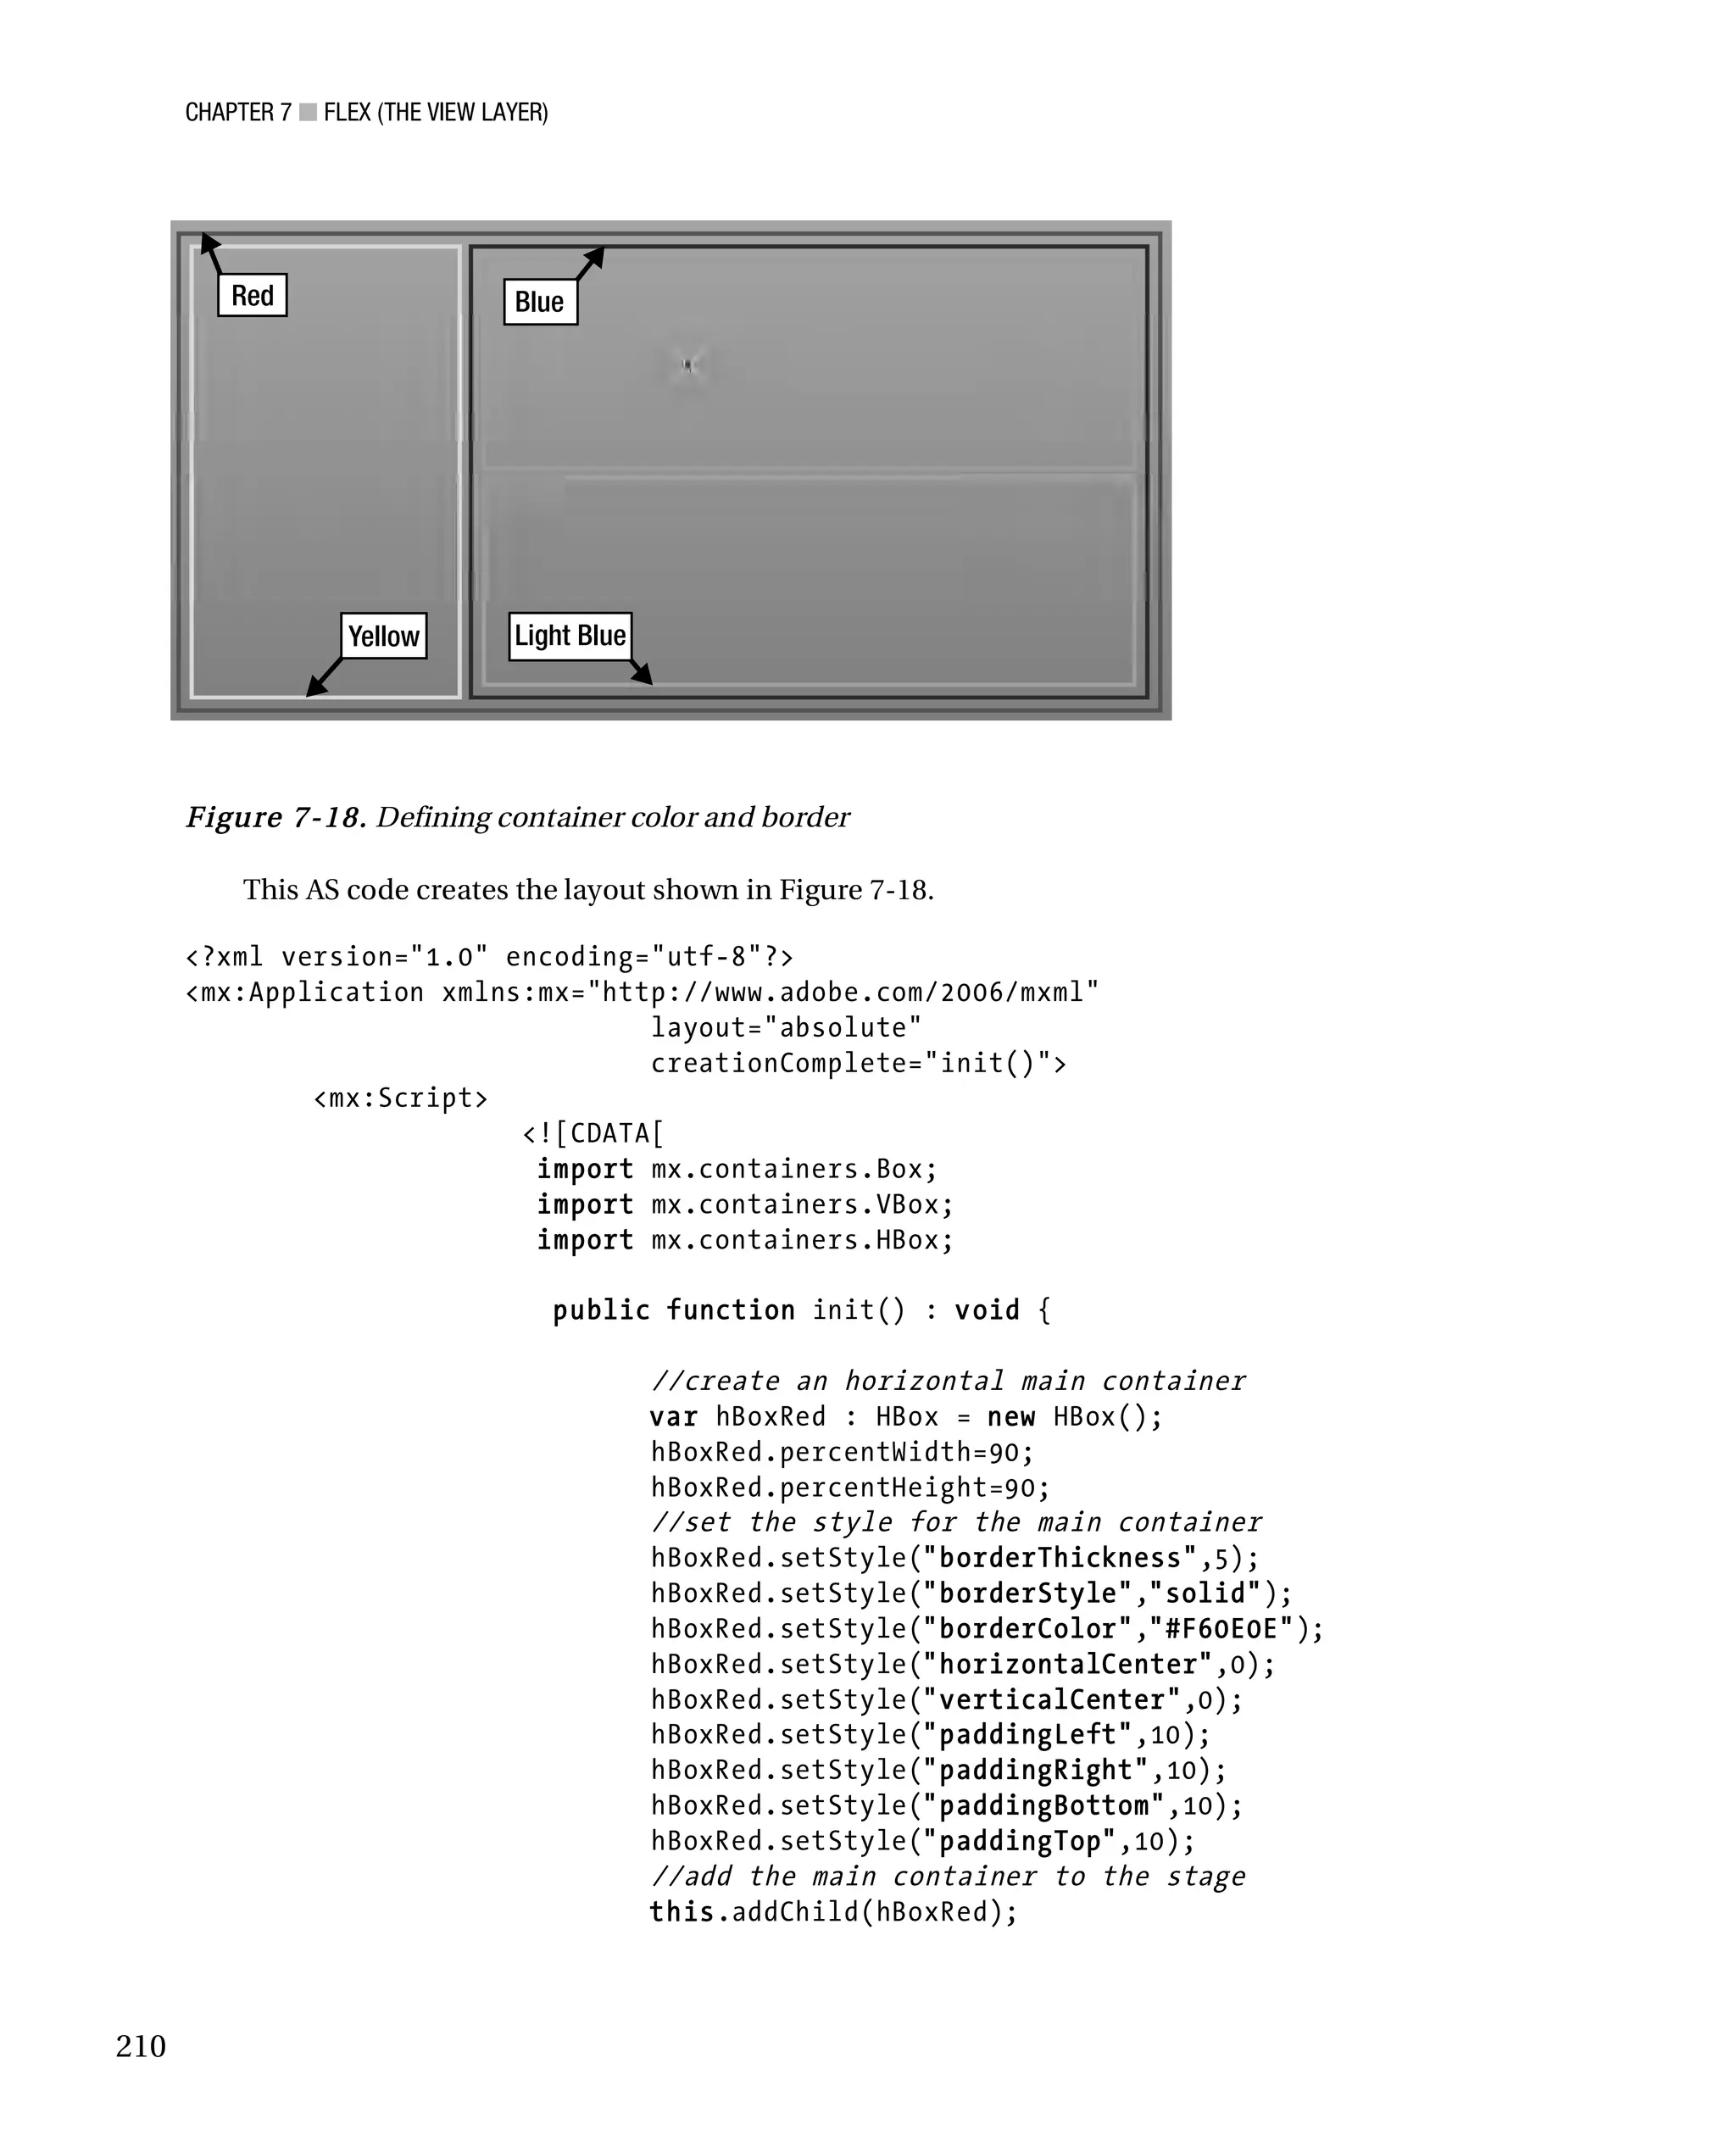
![CHAPTER 7 ■ FLEX (THE VIEW LAYER)
boxYellow.percentWidth = 40;
boxYellow.percentHeight = 100;
boxYellow.setStyle("borderThickness",5);
boxYellow.setStyle("borderStyle","solid");
boxYellow.setStyle("borderColor","#F6EE0E");
//add the first child to the main container
hBoxRed.addChild(boxYellow);
//create the second child of the the main container that will
contain other 2 boxes
var vBoxBlue : VBox = new VBox();
vBoxBlue.percentWidth=100;
vBoxBlue.percentHeight=100;
//set the style for the container
vBoxBlue.setStyle("borderThickness",5);
vBoxBlue.setStyle("borderStyle","solid");
vBoxBlue.setStyle("borderColor","#0E14F6");
vBoxBlue.setStyle("horizontalAlign","center");
vBoxBlue.setStyle("verticalAlign","middle");
vBoxBlue.setStyle("paddingLeft",10);
vBoxBlue.setStyle("paddingRight",10);
vBoxBlue.setStyle("paddingBottom",10);
vBoxBlue.setStyle("paddingTop",10);
//add the second child to the main container
hBoxRed.addChild(vBoxBlue);
//create the first child of the BoxBlue
var boxLightBlue : Box = new Box();
boxLightBlue.percentWidth = 100;
boxLightBlue.percentHeight = 50;
boxLightBlue.setStyle("borderThickness",5);
boxLightBlue.setStyle("borderStyle","solid");
boxLightBlue.setStyle("borderColor","#05DBEE");
//add the first chidl to the BoxBlue
vBoxBlue.addChild(boxLightBlue);
//create the second child of the BoxBlue
var boxGreen: Box = new Box();
boxGreen.percentWidth = 100;
boxGreen.percentHeight = 50;
boxGreen.setStyle("borderThickness",5);
boxGreen.setStyle("borderStyle","solid");
boxGreen.setStyle("borderColor","#05EEA4");
//add the second child of the BoxBlue
vBoxBlue.addChild(boxGreen);
}
]]>
</mx:Script>
</mx:Application>
211](https://image.slidesharecdn.com/beginningjavaandflex-migratingjavaspringhibernateandmavendeveloperstoadobeflex-100821073507-phpapp01/75/Beginning-java-and-flex-migrating-java-spring-hibernate-and-maven-developers-to-adobe-flex-230-2048.jpg)
![CHAPTER 7 ■ FLEX (THE VIEW LAYER)
//add the second child of the BoxBlue
vBoxBlue.addChild(boxGreen);
}
]]>
</mx:Script>
</mx:Application>
As you can see, I created a function init() and added it to the application event listener
creationComplete, which is triggered when the application has been created. The init() function
creates all container instances and will add them to the application container and then to the other
containers that we want to nest. As noted, I used the property setStyle to set borders and colors for
each container.
In MXML you can do the same thing, and the code will be more readable for designers and those not
familiar with coding. Another advantage of using MXML for laying out objects is that you can use the
Flex Builder design perspective and see your changes in real time before compiling the code. This is
great for getting approval from those managers. Also, in source mode in MXML, you have access to all
code help to add more styles, while in AS you don’t. Here’s the MXML code.
<?xml version="1.0" encoding="utf-8"?>
<mx:Application xmlns:mx="http://www.adobe.com/2006/mxml" layout="absolute">
<mx:HBox id="hBoxRed"
borderThickness="5"
borderStyle="solid"
borderColor="#F60E0E"
width="90%"
height="90%"
horizontalCenter="0"
verticalCenter="0"
horizontalAlign="center"
verticalAlign="middle"
paddingLeft="10"
paddingRight="10"
paddingBottom="10"
paddingTop="10">
<mx:Box id="boxYellow"
borderThickness="5"
borderStyle="solid"
borderColor="#F6EE0E"
width="40%"
height="100%">
</mx:Box>
<mx:VBox id="vBoxBlue"
borderThickness="5"
borderStyle="solid"
borderColor="#0E14F6"
width="100%"
212](https://image.slidesharecdn.com/beginningjavaandflex-migratingjavaspringhibernateandmavendeveloperstoadobeflex-100821073507-phpapp01/75/Beginning-java-and-flex-migrating-java-spring-hibernate-and-maven-developers-to-adobe-flex-231-2048.jpg)

![CHAPTER 7 ■ FLEX (THE VIEW LAYER)
Figure 7-29. Clicking on a button
Using events with MXML is very easy. Here’s an example of how to handle a click event using
MXML.
<?xml version="1.0" encoding="utf-8"?>
<mx:Application xmlns:mx="http://www.adobe.com/2006/mxml" layout="vertical">
<mx:Button id="myButton" label="click me!" click="doSomething(event)" />
<mx:Script>
<![CDATA[
i mport mx.controls.Alert;
p rivate f unction doSomething(event : Event) : v oid {
Alert.show(" The button dispatch the event of type "
"
+ event.type);
}
]]>
</mx:Script>
</mx:Application>
As you can see from the code, all you have to do is set the event handler function within the MXML
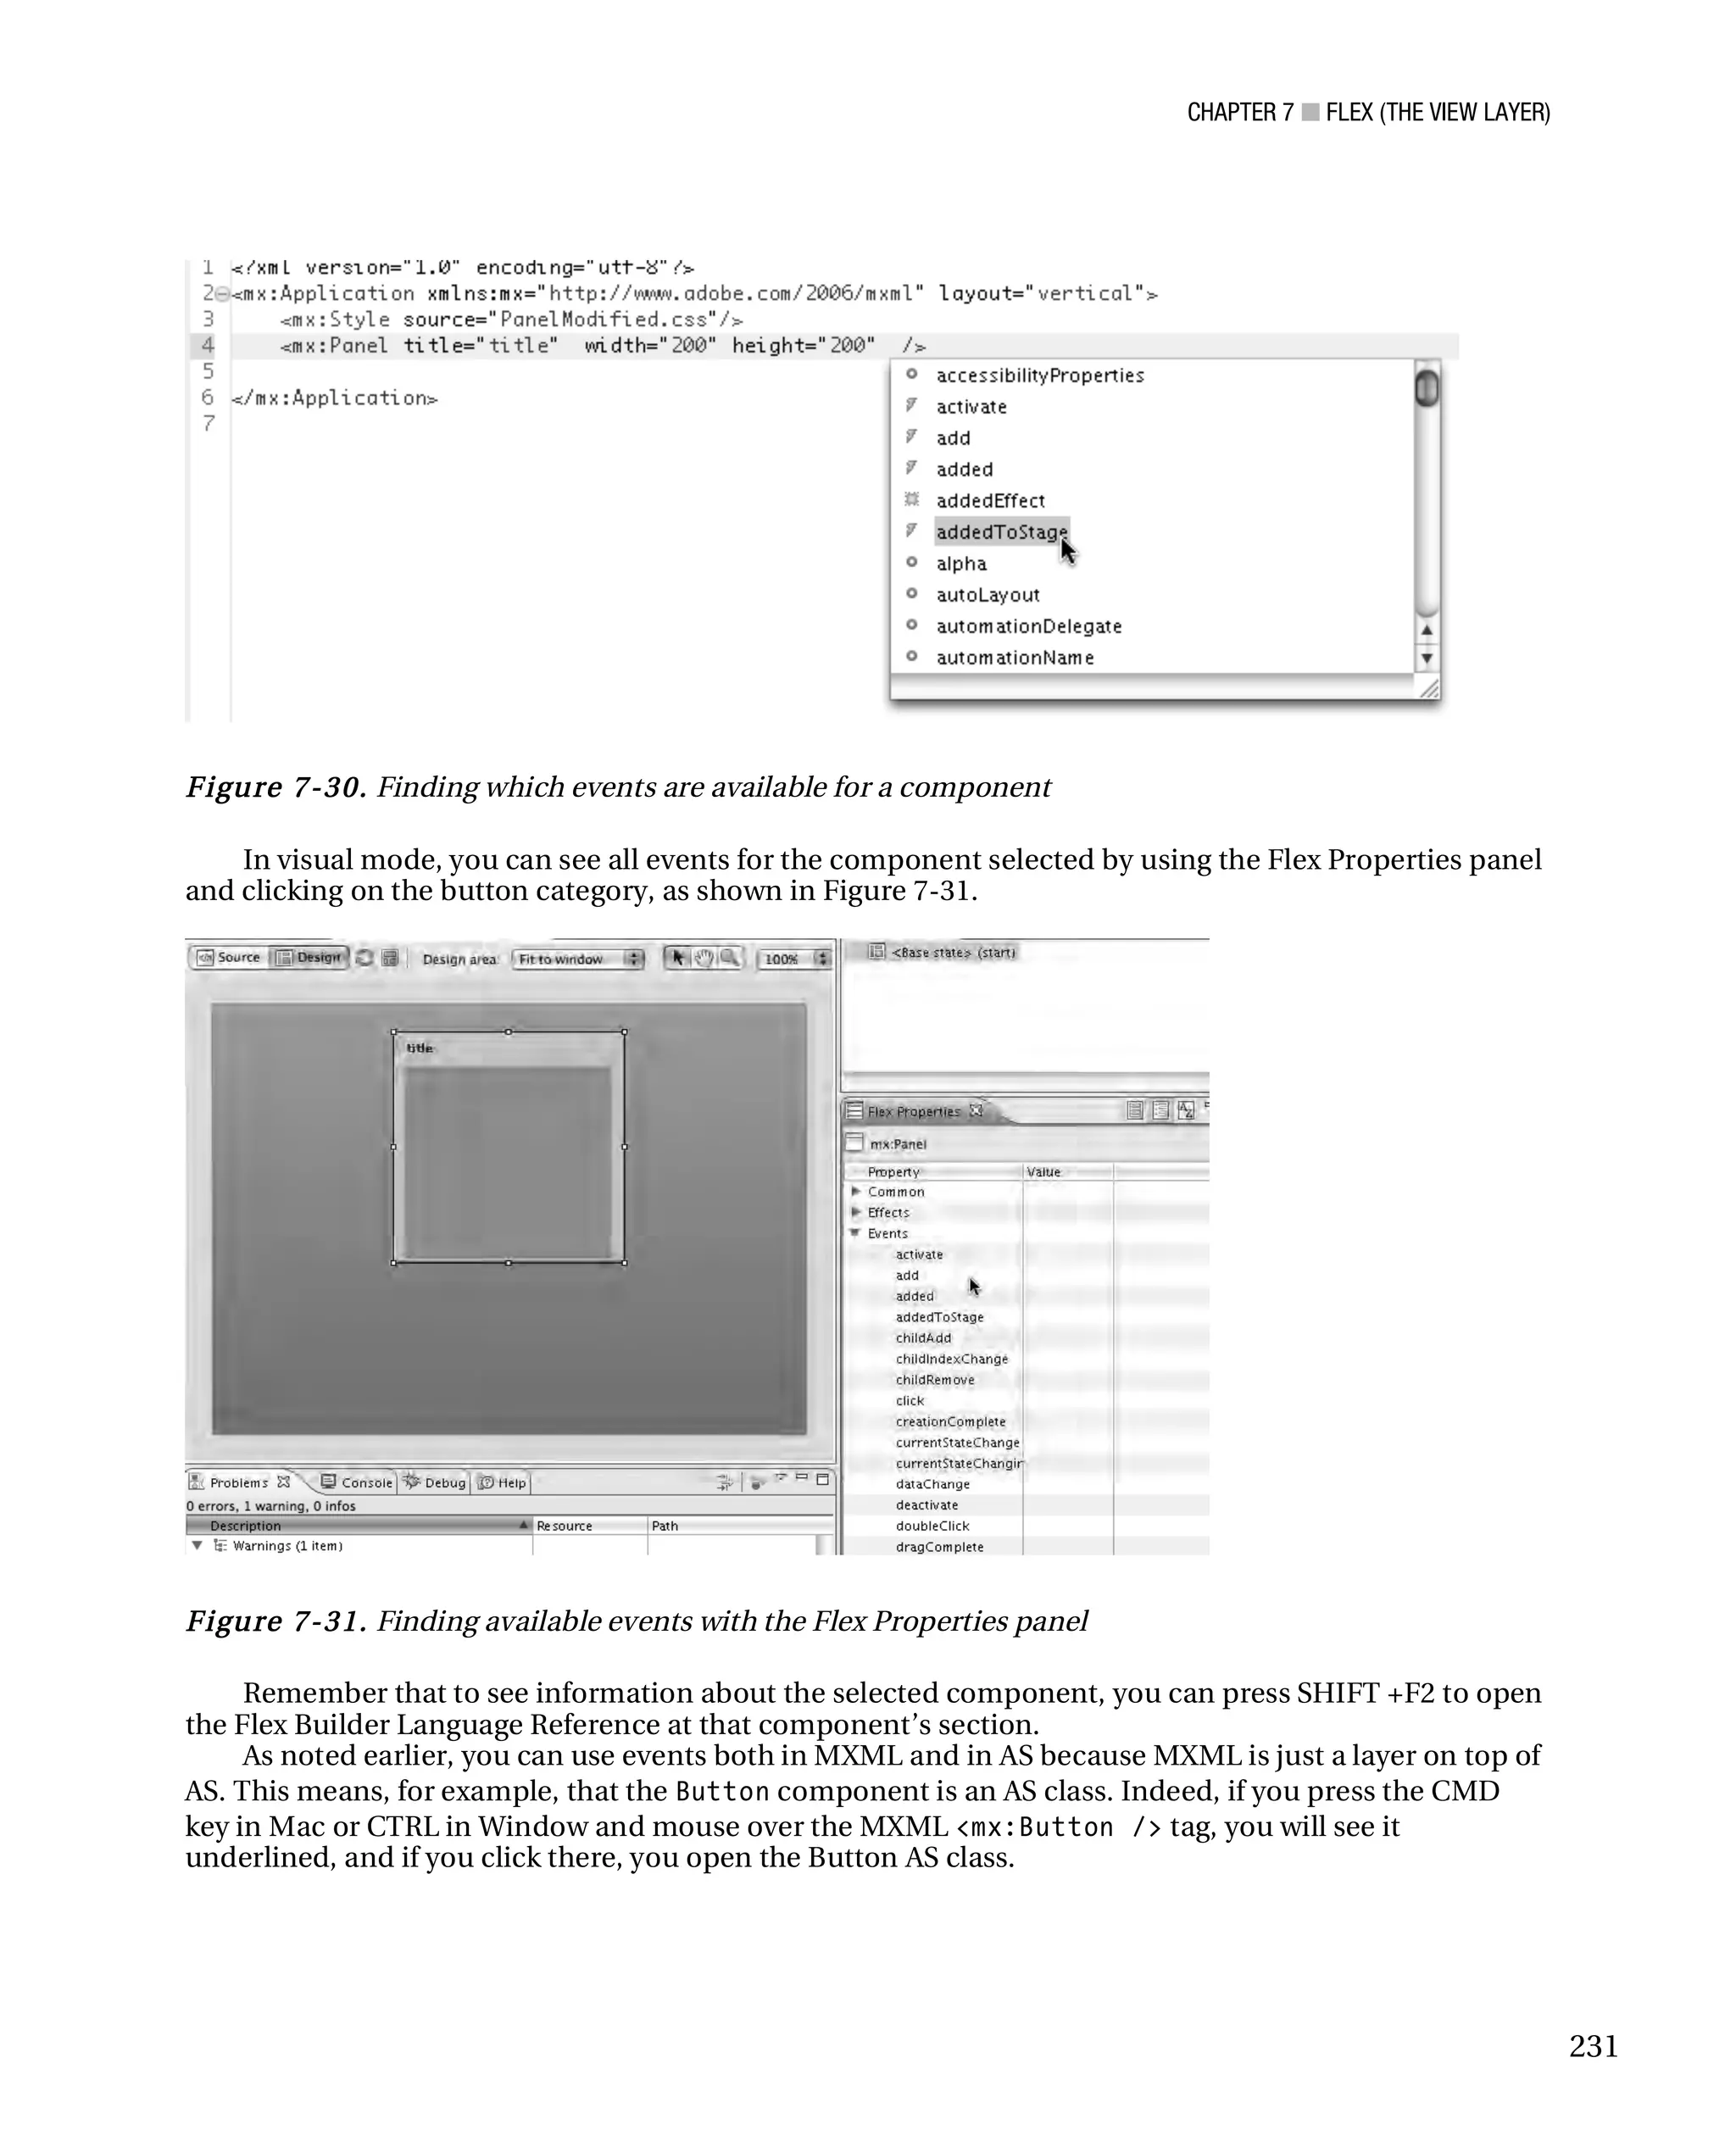
event property and pass the event to the handler. To see which events are available for each component,
you can use the syntax code helper, or the Flex Builder properties in visual mode, or the Flex Builder
Reference under the events section.
To open the syntax help, just press [CTRL+spacebar] within the MXML component tag as shown in
Figure 7-30. The event is identified by the thunder yellow icon.
230](https://image.slidesharecdn.com/beginningjavaandflex-migratingjavaspringhibernateandmavendeveloperstoadobeflex-100821073507-phpapp01/75/Beginning-java-and-flex-migrating-java-spring-hibernate-and-maven-developers-to-adobe-flex-249-2048.jpg)
![CHAPTER 7 ■ FLEX (THE VIEW LAYER)
■ N ote You can instantiate each component created with MXML or with AS within both MXML and AS. For
example, if you create a class MyButton.mxml, you can use it like this:
<classpath:MyButton id="myButton"… />
or like this:
var myButton : MyButton = new MyButton();
And the reverse is also true—you can create the AS class MyButton.as and use at the same way as above.
To listen for an event in AS is a little bit different than in MXML because you have to use the
addEventListener method that each component based on the event model provides. You don’t have to
pass the event to the handler, as we did in MXML, though, because the event listener will do it for us.
Here’s an example of how to listen for the click event of a button in AS:
<?xml version="1.0" encoding="utf-8"?>
<mx:Application xmlns:mx="http://www.adobe.com/2006/mxml"
layout="vertical"
creationComplete="init()">
<mx:Script>
<![CDATA[
i mport mx.controls.Button;
i mport mx.controls.Alert;
p ublic f unction init() : v oid {
v ar myButton : Button = n ew Button();
myButton.label = " Click Me!";
m yButton.addEventListener(MouseEvent.CLICK,doSomething);
t his.addChild(myButton);
}
p ublic f unction doSomething(event : Event) : v oid {
Alert.show(" The button dispatch the event of type "
"
+
event.type);
}
]]>
</mx:Script>
</mx:Application>
232](https://image.slidesharecdn.com/beginningjavaandflex-migratingjavaspringhibernateandmavendeveloperstoadobeflex-100821073507-phpapp01/75/Beginning-java-and-flex-migrating-java-spring-hibernate-and-maven-developers-to-adobe-flex-251-2048.jpg)
![CHAPTER 7 ■ FLEX (THE VIEW LAYER)
public static const BUTTON_MOVE_EVENT : String = "buttonMoveEvent";
public function ButtonMoveEvent(type:String, direction : String){
super(type);
this.direction = direction;
}
override public function clone():Event{
return new ButtonMoveEvent(type, direction);
}
}
}
In the custom event class, I store the direction as a public property, and provide a static constant to
use within both dispatcher and listener to tell to the compiler which type of event we are dealing with.
dispatchEvent(n ew ButtonMoveEvent(B uttonMoveEvent.BUTTON_MOVE_EVENT,direction));
n B
or
myButton.addEventListener(B uttonMoveEvent.BUTTON_MOVE_EVENT,buttonMoveHandler);
B
Now I must override the clone() method of the superclass Event to clone a copy of the event object
in order to have a new instance of the event. Practically speaking, when you dispatch the
ButtonMoveEvent, it will create an object containing the event type and the property direction that you
want to pass to the listener.
Once the custom event class has been created, you have to create the custom component that will
dispatch this event. The custom component ButtonJoker will extend the class Button because, at the
end of the day, ButtonJoker is a button with extra functionality.
Listin g 7-1. ButtonJoker Custom Event Class
package
{
import flash.events.MouseEvent;
import mx.controls.Button;
[Event(name="buttonMoveEvent", type="ButtonMoveEvent")]
public class ButtonJoker extends Button
{
private var moved : int = 1;
public var direction : String;
234](https://image.slidesharecdn.com/beginningjavaandflex-migratingjavaspringhibernateandmavendeveloperstoadobeflex-100821073507-phpapp01/75/Beginning-java-and-flex-migrating-java-spring-hibernate-and-maven-developers-to-adobe-flex-253-2048.jpg)
![CHAPTER 7 ■ FLEX (THE VIEW LAYER)
[Event(name="buttonMoveEvent", type="ButtonMoveEvent")]
If you don’t specify the event metatag, you won’t be able to use it as an attribute within the MXML
new component tag, and the Flex compiler will return an error in the MXML class where you want to use
the event attribute; the error returns a message like “Cannot use the attribute buttonMoveEvent for the
component type ButtonJoker.
The ButtonJoker class will extend the Button class to inherit all Button properties, events and
methods. Then I add a private function called moveButtonJoker that will move the button and dispatch
the ButtonMoveEvent event once the MouseEvent.ROLL_OVER event has dispatched (see Figure 7-32).
Figure 7-32. Button and ButtonJoker class diagram
Now that we have our ButtonJoker custom component and our custom event ButtonMoveEvent,
we can create the application file where we’ll test the new custom component and handle the new
custom ButtonMoveEvent. Let’s create an application file called CustomEventTest.mxml and then add
the ButtonJoker component, a TextArea, and the event handler function for the custom Event
ButtonMoveEvent created previously. Our goal is to write a message containing the direction of the
ButtonJoker once it has moved. Here’s the code that does all this.
<?xml version="1.0" encoding="utf-8"?>
<mx:Application xmlns:mx="http://www.adobe.com/2006/mxml" xmlns:myComponents="*"
layout="vertical" >
<myComponents:ButtonJoker label="click me!"
buttonMoveEvent="buttonMoveHandler(event)" />
<mx:TextArea text="{message}" />
<mx:Script>
<
![CHAPTER 7 ■ FLEX (THE VIEW LAYER)
[Bindable]
private var message : String;
public function init() : void {
var myButton : ButtonJoker = new ButtonJoker();
myButton.label = "Click Me!";
myButton.addEventListener
(ButtonMoveEvent.BUTTON_MOVE_EVENT,buttonMoveHandler);
this.addChild(myButton);
}
public function buttonMoveHandler(event : ButtonMoveEvent) :
void {
message = "The button has moved to "+ event.direction;
}
]]>
</mx:Script>
</mx:Application>
■ N ote To use a custom component in your MXML, you have to add the namespace within the root tag of the
MXML class. In our case, we have to add xmlns:myComponents=”*”.
The ButtonJoker class is very easy to understand. We create an instance of our new custom
component ButtonJoker that passes the function buttonMoveHandler within the listener
buttonMoveEvent. The event handler sets the variable message with the direction dispatched by the
ButtonMoveEvent. The variable message is bound with the attribute text of the TextArea component,
which means that every time that the variable message changes, the TextArea text property will be
updated automatically.
In this example that explains how to create and dispatch a custom event, I also introduced the new
concepts of custom components and data binding, both important in Flex/AS development. Let’s
discuss data binding in more detail.
Data Binding
Data binding is a process that keeps the values of components or data sources in sync. In other words, if
you set an object as bindable it will dispatch any change to the others objects that are referring it.
In the example, we bind the variable countValue from the button component with id “count” to the
TextInput component with the id “counter”.
<?xml version="1.0" encoding="utf-8"?>
<mx:Application xmlns:mx="http://www.adobe.com/2006/mxml" layout="vertical">
237](https://image.slidesharecdn.com/beginningjavaandflex-migratingjavaspringhibernateandmavendeveloperstoadobeflex-100821073507-phpapp01/75/Beginning-java-and-flex-migrating-java-spring-hibernate-and-maven-developers-to-adobe-flex-256-2048.jpg)
![CHAPTER 7 ■ FLEX (THE VIEW LAYER)
<mx:Button id="count" label="count" click="{countValue++}" />
<mx:TextInput id="counter" text="{countValue}" editable="false" />
<mx:Script>
<![CDATA[
[B indable]
B
p rivate v ar countValue : uint = 0;
]]>
</mx:Script>
</mx:Application>
Every time the button click event is dispatched, we increase countValue. Because we set the
variable countValue as Bindable, Flex will also update automatically the value in the TexInput
component. If we didn’t set the Bindable metatag, the value shown in TexInput would always remain 0.
Flex provides four different solutions to bind data:
• using the [Bindable] metatag
• using <mx:Binding> metatag as follows:
<?xml version="1.0" encoding="utf-8"?>
<mx:Application xmlns:mx="http://www.adobe.com/2006/mxml" layout="vertical">
< mx:Binding source="count.value.toString()" destination="counter.text" />
<mx:NumericStepper id="count" />
<mx:TextInput id="counter" editable="false" />
</mx:Application>
The Binding metatag manages the binding between a source and a destination value.
• bind data directly to component properties as follows:
<?xml version="1.0" encoding="utf-8"?>
<mx:Application xmlns:mx="http://www.adobe.com/2006/mxml" layout="vertical">
<mx:NumericStepper id="count" />
<mx:TextInput id="counter" text="{c ount.value}" editable="false" />
c
</mx:Application>
Here, the value properties of the NumericStepper component is bound to the property text of the
TextInput component.
• using mx.binding.utils.BindingUtils class as follows:
<?xml version="1.0" encoding="utf-8"?>
<mx:Application xmlns:mx="http://www.adobe.com/2006/mxml" layout="vertical"
creationComplete="init()">
<mx:NumericStepper id="count" />
<mx:TextInput id="counter" editable="false" />
<mx:Script>
<
![CHAPTER 7 ■ FLEX (THE VIEW LAYER)
}
]]>
</mx:Script>
</mx:Application>
BindingUtils is useful when you have to bind values within AS classes, but please don’t use mixed
with MXML; I only did this here for example purposes.
The best way to bind data is using the [Bindable] metatag.
In upcoming chapters I will show how to use data binding to set the state of your workflow.
Practically speaking, I will show you how to use data binding to set the current view of your application,
which means to open or change a screen after an event or a request has been dispatched by the user or
by another process.
The second important concept introduced with the CustomEventTest example is the creation of a
CustomComponent.
Creating Custom Components
Creating custom components makes an application more modular and easier to maintain. You can
reuse the custom components for different parts of the application without have to rewrite the same
code again and again. Another reason to create custom components is the need to personalize an
existing Flex component to meet your application requirements.
■ N ote A custom component is not just a class like the ButtonJoker shown in the previous example. It can also
be a set of classes, assets, and style sheets.
All existing visual components in Flex are derived from the UIComponent AS class.
To create a new visual component, you have to extend that class. To customize an existing Flex
component, you have to extend the component as we did with the Button in our ButtonJoker
component.
You can create a custom component by using MXML or AS, as shown in Figure 7-33.
Figure 7-33. Creating a custom component in MXML or AS
239](https://image.slidesharecdn.com/beginningjavaandflex-migratingjavaspringhibernateandmavendeveloperstoadobeflex-100821073507-phpapp01/75/Beginning-java-and-flex-migrating-java-spring-hibernate-and-maven-developers-to-adobe-flex-258-2048.jpg)
![CHAPTER 7 ■ FLEX (THE VIEW LAYER)
[I nspectable]
I
p ublic v ar collection : ArrayCollection;
[I nspectable]
I
p ublic v ar columnSearchable : String;
p rotected f unction search():v oid {
v
i f (t his .text !=' ' ) {
t '
filter()
} e lse {
filterReset()
}
}
p rivate f unction filter():v oid {
v
collection.filterFunction = filterRecords;
collection.refresh();
}
p rivate f unction filterReset():v oid {
v
collection.filterFunction = n ull ;
collection.refresh();
}
p rivate f unction filterRecords(item:Object):Boolean {
v ar tags : String = item[columnSearchable];
i f ( tags != n ull ) {
r eturn tags.match(n ew RegExp(t his.text, " i" ));
n t
} e lse {
r eturn f alse ;
}
}
]]>
</mx:Script>
</mx:TextInput>
AS Custom Components
Probably for the most complex components it is better to use AS for the component logic and MXML for
the view as a normal application. However, you can use AS also for the view by just creating a normal AS
class that extends an existing component or the UIComponent class, or a set of classes with the main
class extending the UIComponent class. You can create visual and nonvisual components. An extension
of the Formatter class would be an example of a nonvisual component.
241](https://image.slidesharecdn.com/beginningjavaandflex-migratingjavaspringhibernateandmavendeveloperstoadobeflex-100821073507-phpapp01/75/Beginning-java-and-flex-migrating-java-spring-hibernate-and-maven-developers-to-adobe-flex-260-2048.jpg)

![CHAPTER 7 ■ FLEX (THE VIEW LAYER)
• updateDisplayList()—this method is called when a call to the
invalidateDisplayList occurs; a component doesn't not appear on the screen
until the updateDisplayList function is executed. For example, you can override
the updateDisplayList method to change the position of all children of a
component or to draw any visual elements need by the component. Practically
speaking, you can draw a shape and add to the component at run time, or you can
reorder all children added to a VBox container.
In the next example, we will create a calculator AS custom component that dispatches the contents
of the display TextInput when it changes. To show the usage of the UIComponent
updateDisplayList() method, I made the calculator component not resizable.
package com.apress.flexandjava.components
{
i mport flash.events.Event;
i mport flash.events.MouseEvent;
i mport mx.containers.Panel;
i mport mx.containers.Tile;
i mport mx.controls.Button;
i mport mx.controls.TextInput;
[E vent (name=" displayChange", type=" flash.events.Event")]
E " "
p ublic c lass Calculator e xtends Panel
{
p rivate v ar tile : Tile;
p ublic v ar textInput : TextInput;
p rivate v ar operator : String;
p rivate c onst CALCULATOR_WIDTH : uint = 230;
p rivate c onst CALCULATOR_HEIGHT : uint = 230;
p ublic f unction Calculator() {
s uper();
setStyle (" paddingLeft", 10);
"
setStyle (" paddingRight", 10);
"
setStyle (" paddingTop", 10);
"
setStyle (" paddingBottom", 10);
"
}
o verride p rotected f unction createChildren():v oid{
v
s uper.createChildren();
243](https://image.slidesharecdn.com/beginningjavaandflex-migratingjavaspringhibernateandmavendeveloperstoadobeflex-100821073507-phpapp01/75/Beginning-java-and-flex-migrating-java-spring-hibernate-and-maven-developers-to-adobe-flex-262-2048.jpg)
![CHAPTER 7 ■ FLEX (THE VIEW LAYER)
textInput = n ew TextInput();
textInput.percentWidth = 100;
addChild(textInput);
tile = n ew Tile();
addChild (tile);
f or (v ar i:uint = 0; i < 10; i++) {
v
v ar button:Button = n ew Button();
button.label = i.toString();
button.addEventListener(MouseEvent.CLICK, buttonClickHandler);
tile.addChild (button);
}
v ar mathOperatorsList : Array = [" +" ," -"," *" ," /" ];
" " " "
f or (v ar j:uint = 0; j < mathOperatorsList.length; j++){
v
v ar operatorButton : Button = n ew Button();
operatorButton.label = mathOperatorsList[j];
operatorButton.addEventListener(MouseEvent.CLICK,
operatorButtonClickHandler);
tile.addChild(operatorButton);
}
v ar calculateButton : Button = n ew Button();
calculateButton.label = ' =' ;
calculateButton.addEventListener(MouseEvent.CLICK,
calculateButtonClickHandler);
tile.addChild(calculateButton);
}
p rivate f unction buttonClickHandler(event : MouseEvent):v oid {
v
textInput.text += Button(event.currentTarget).label;
dispatchEvent(n ew Event(" displayChange"));
n "
}
p rivate f unction operatorButtonClickHandler(event : MouseEvent):v oid{
v
//implement the logic
}
p rivate f unction calculateButtonClickHandler(event :
MouseEvent):v oid {
v
//implement the logic
}
244](https://image.slidesharecdn.com/beginningjavaandflex-migratingjavaspringhibernateandmavendeveloperstoadobeflex-100821073507-phpapp01/75/Beginning-java-and-flex-migrating-java-spring-hibernate-and-maven-developers-to-adobe-flex-263-2048.jpg)

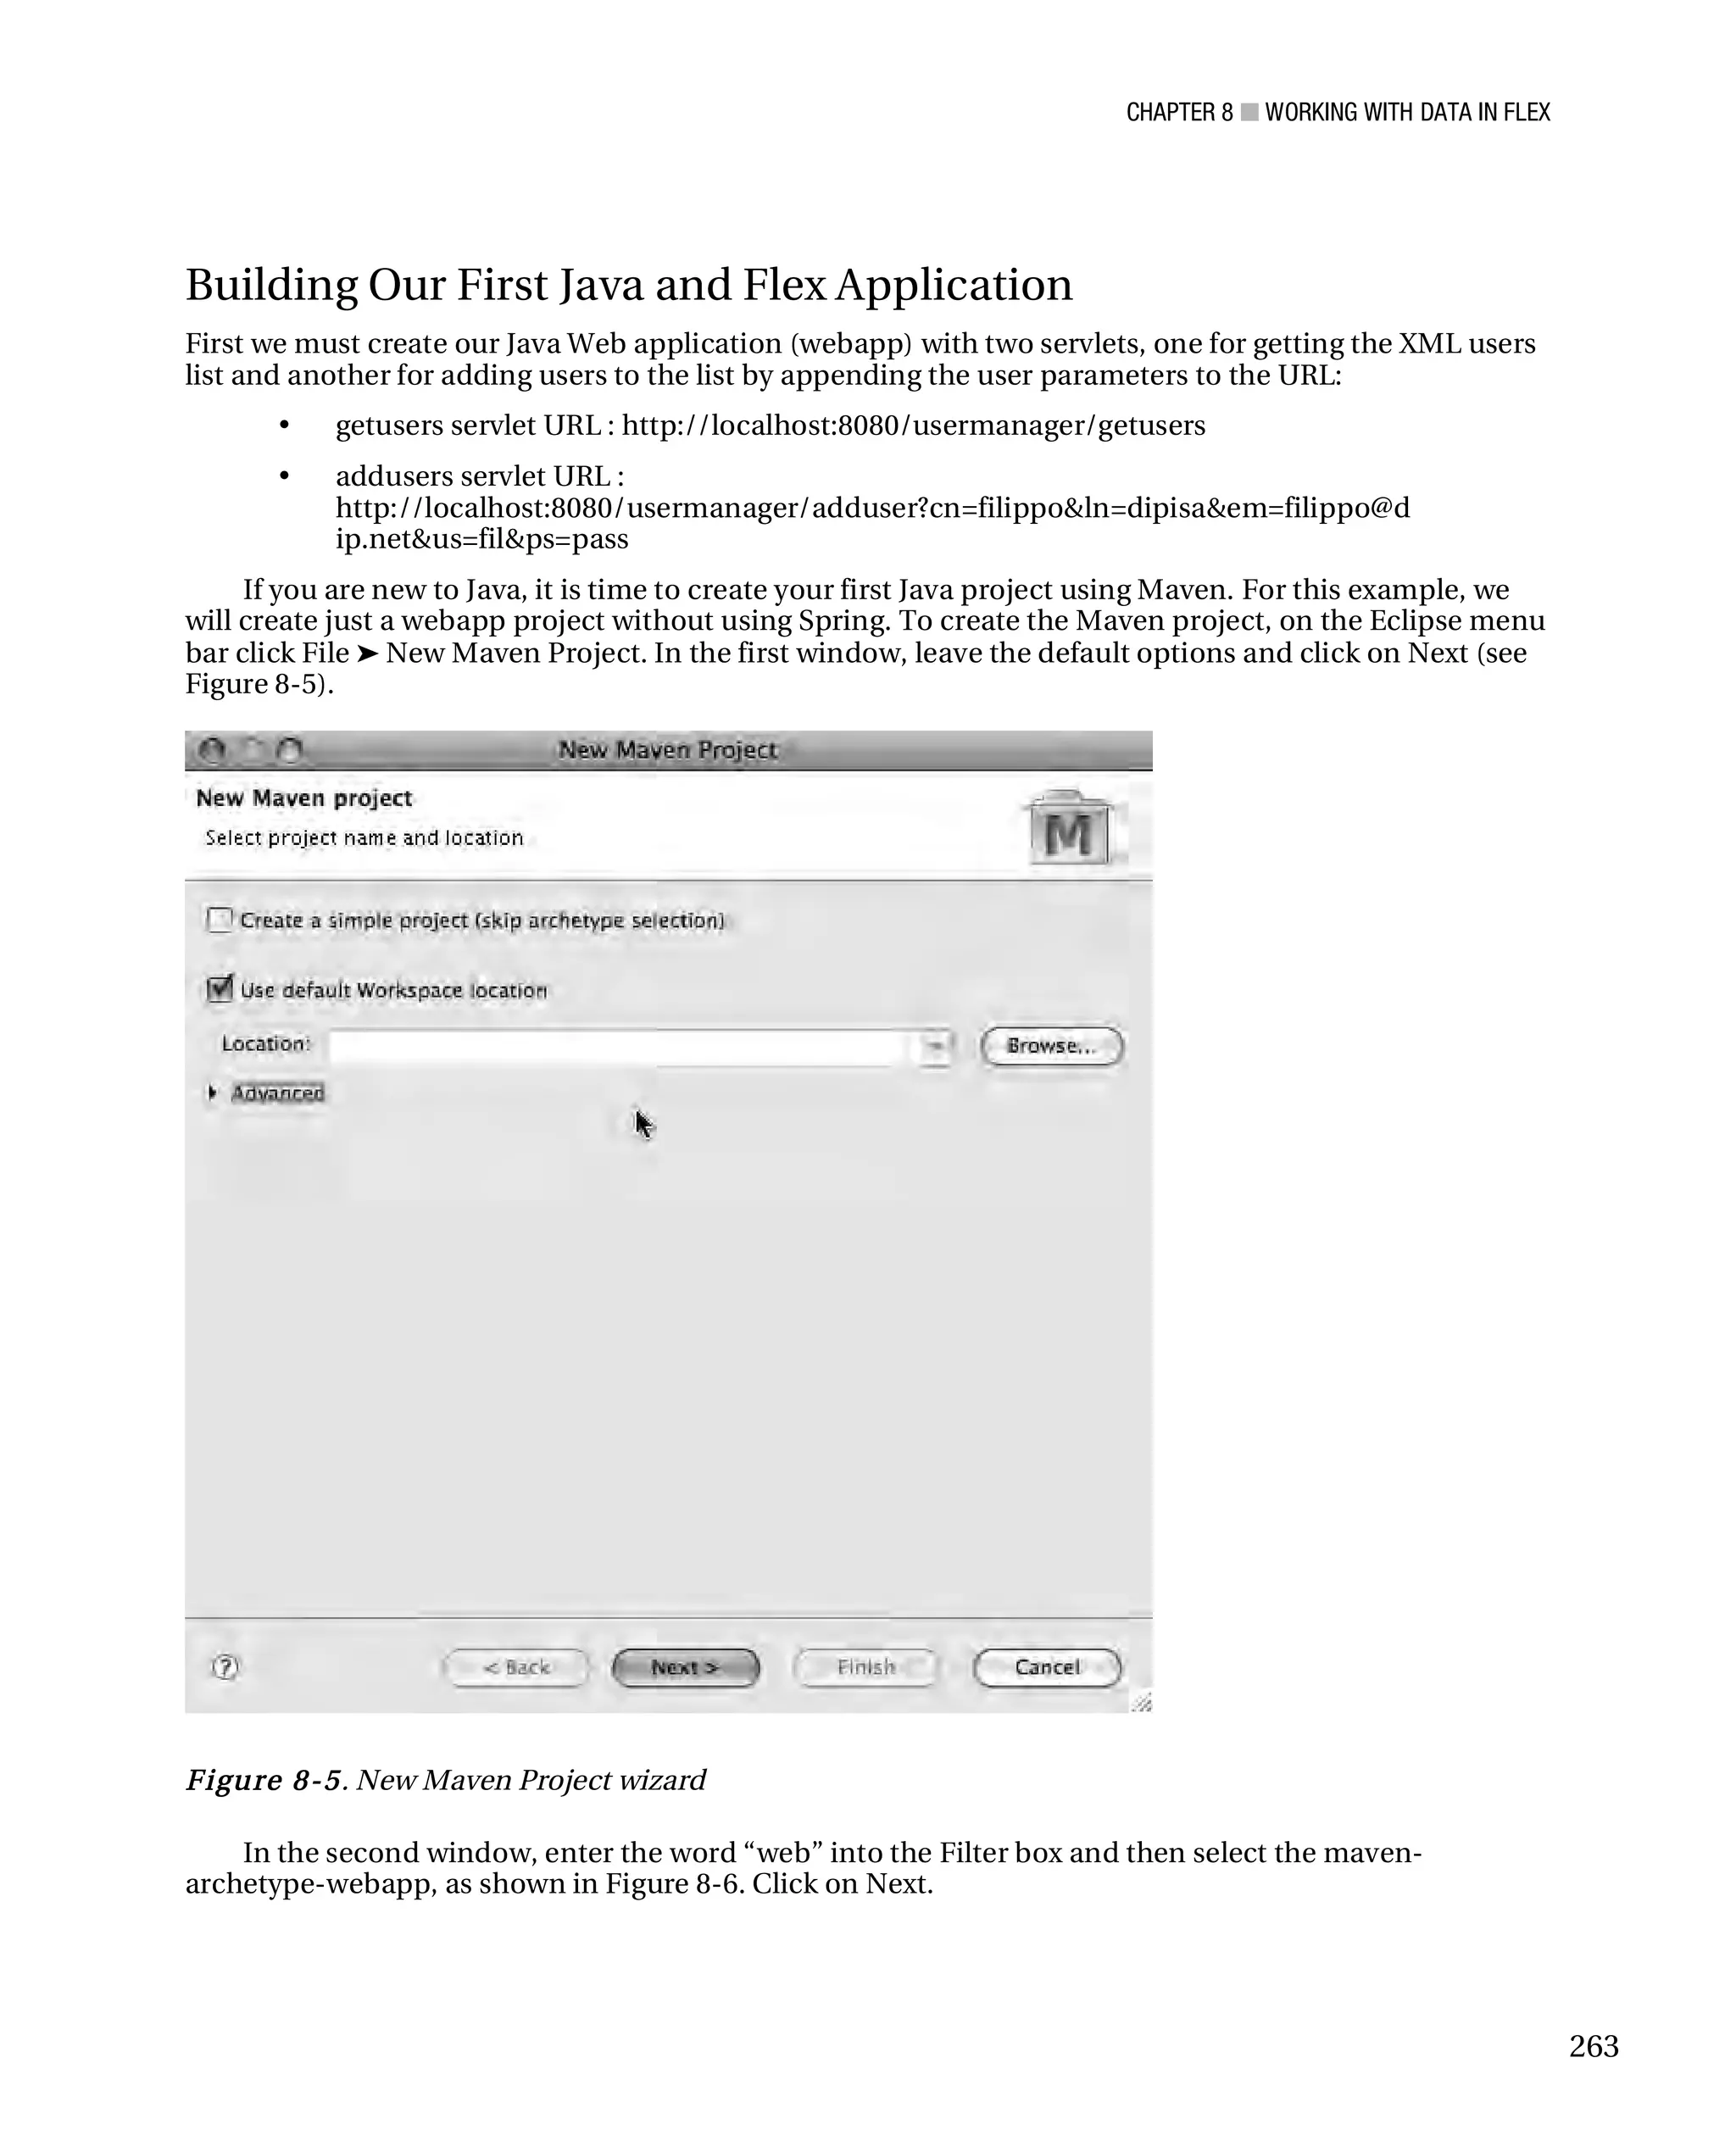
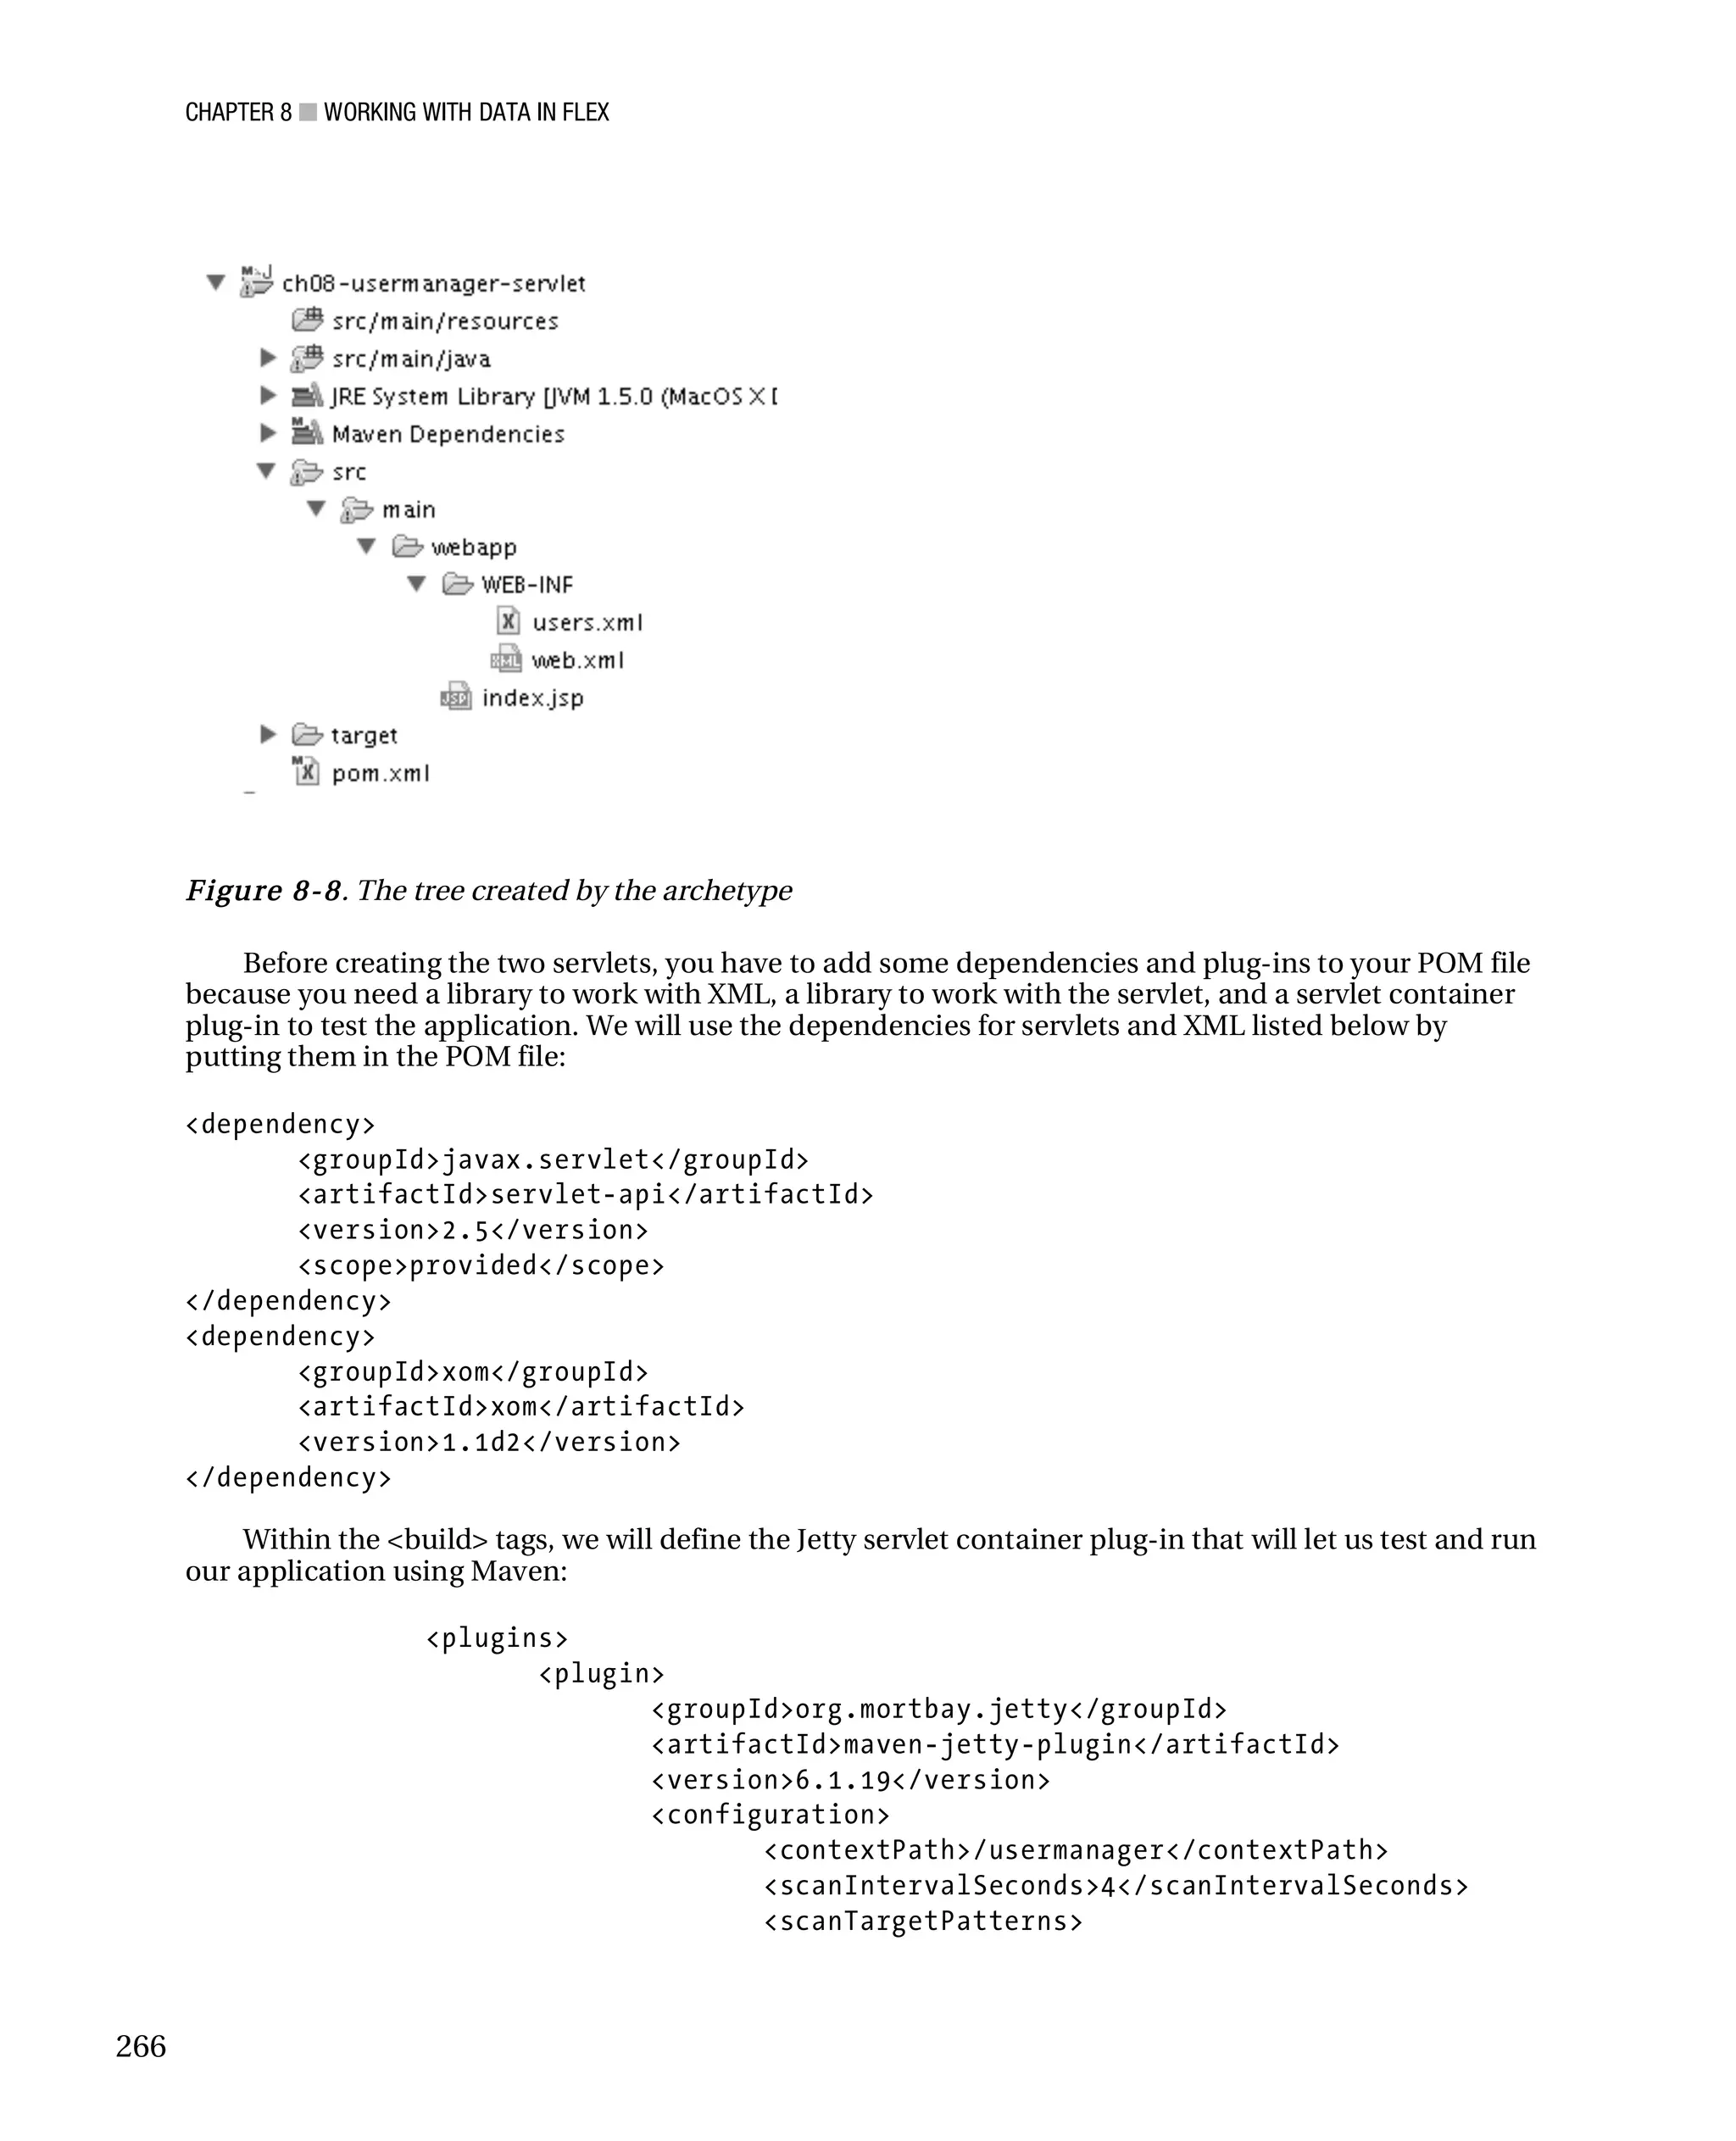
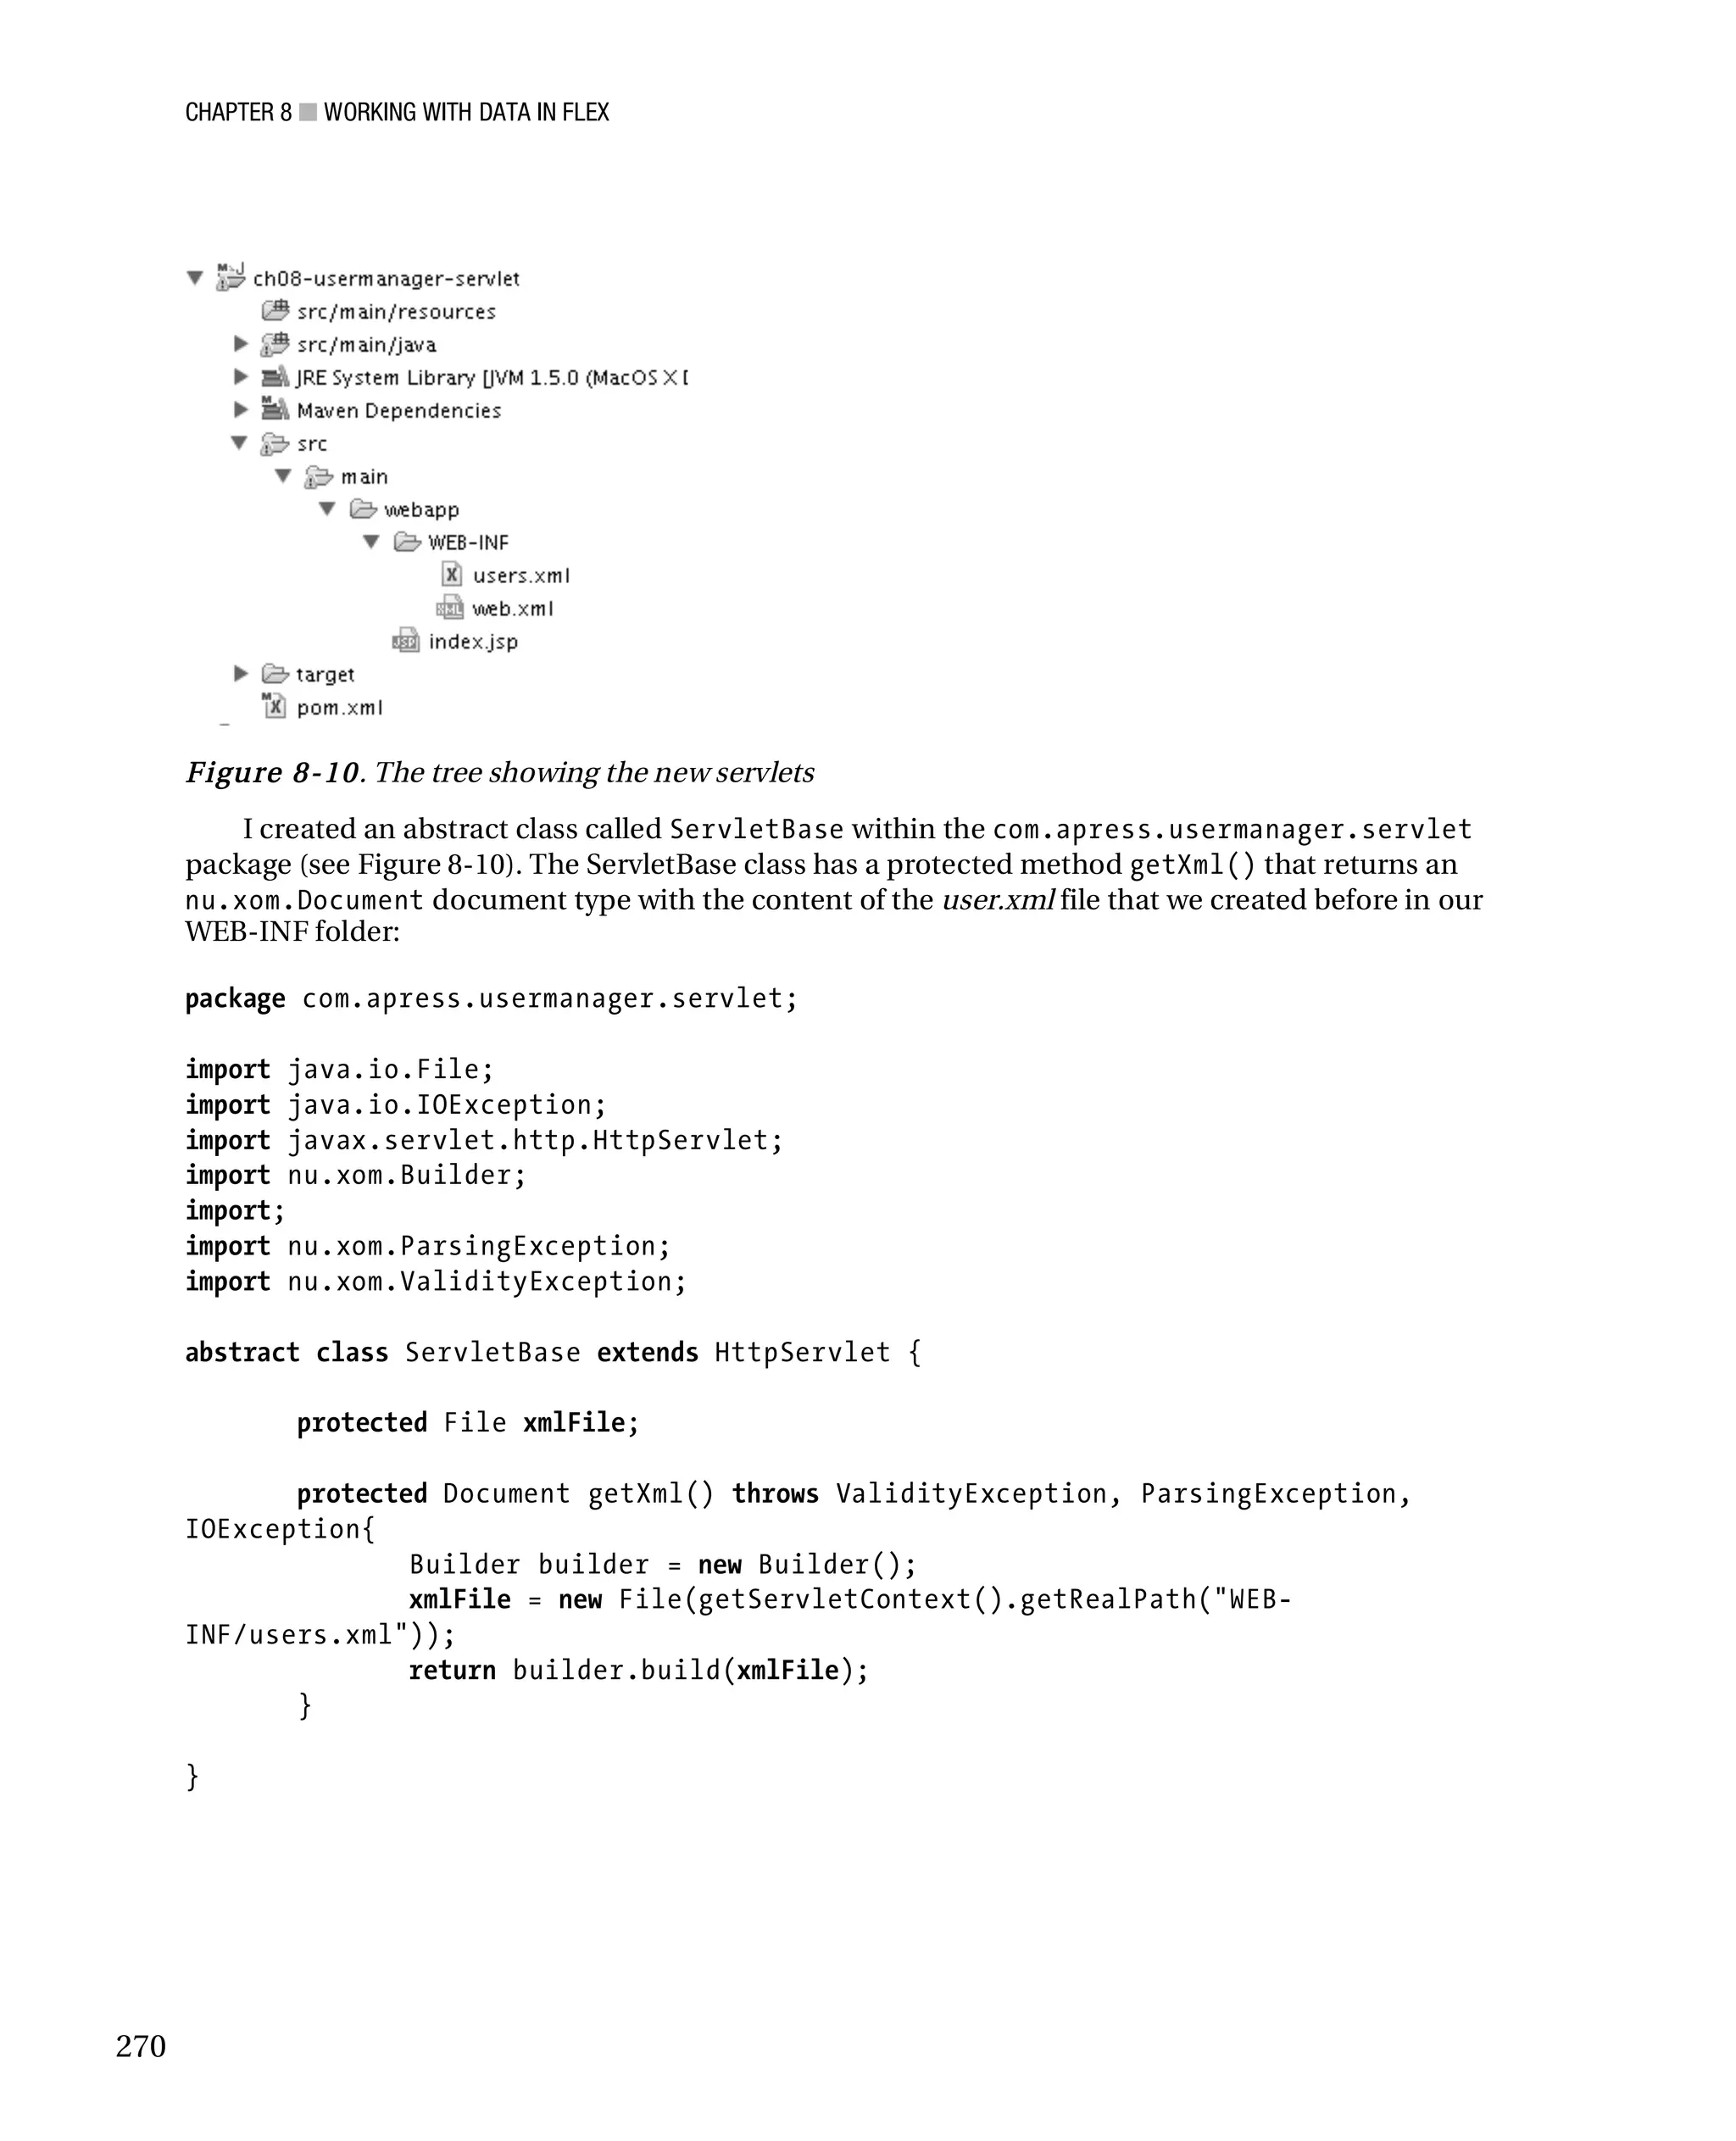
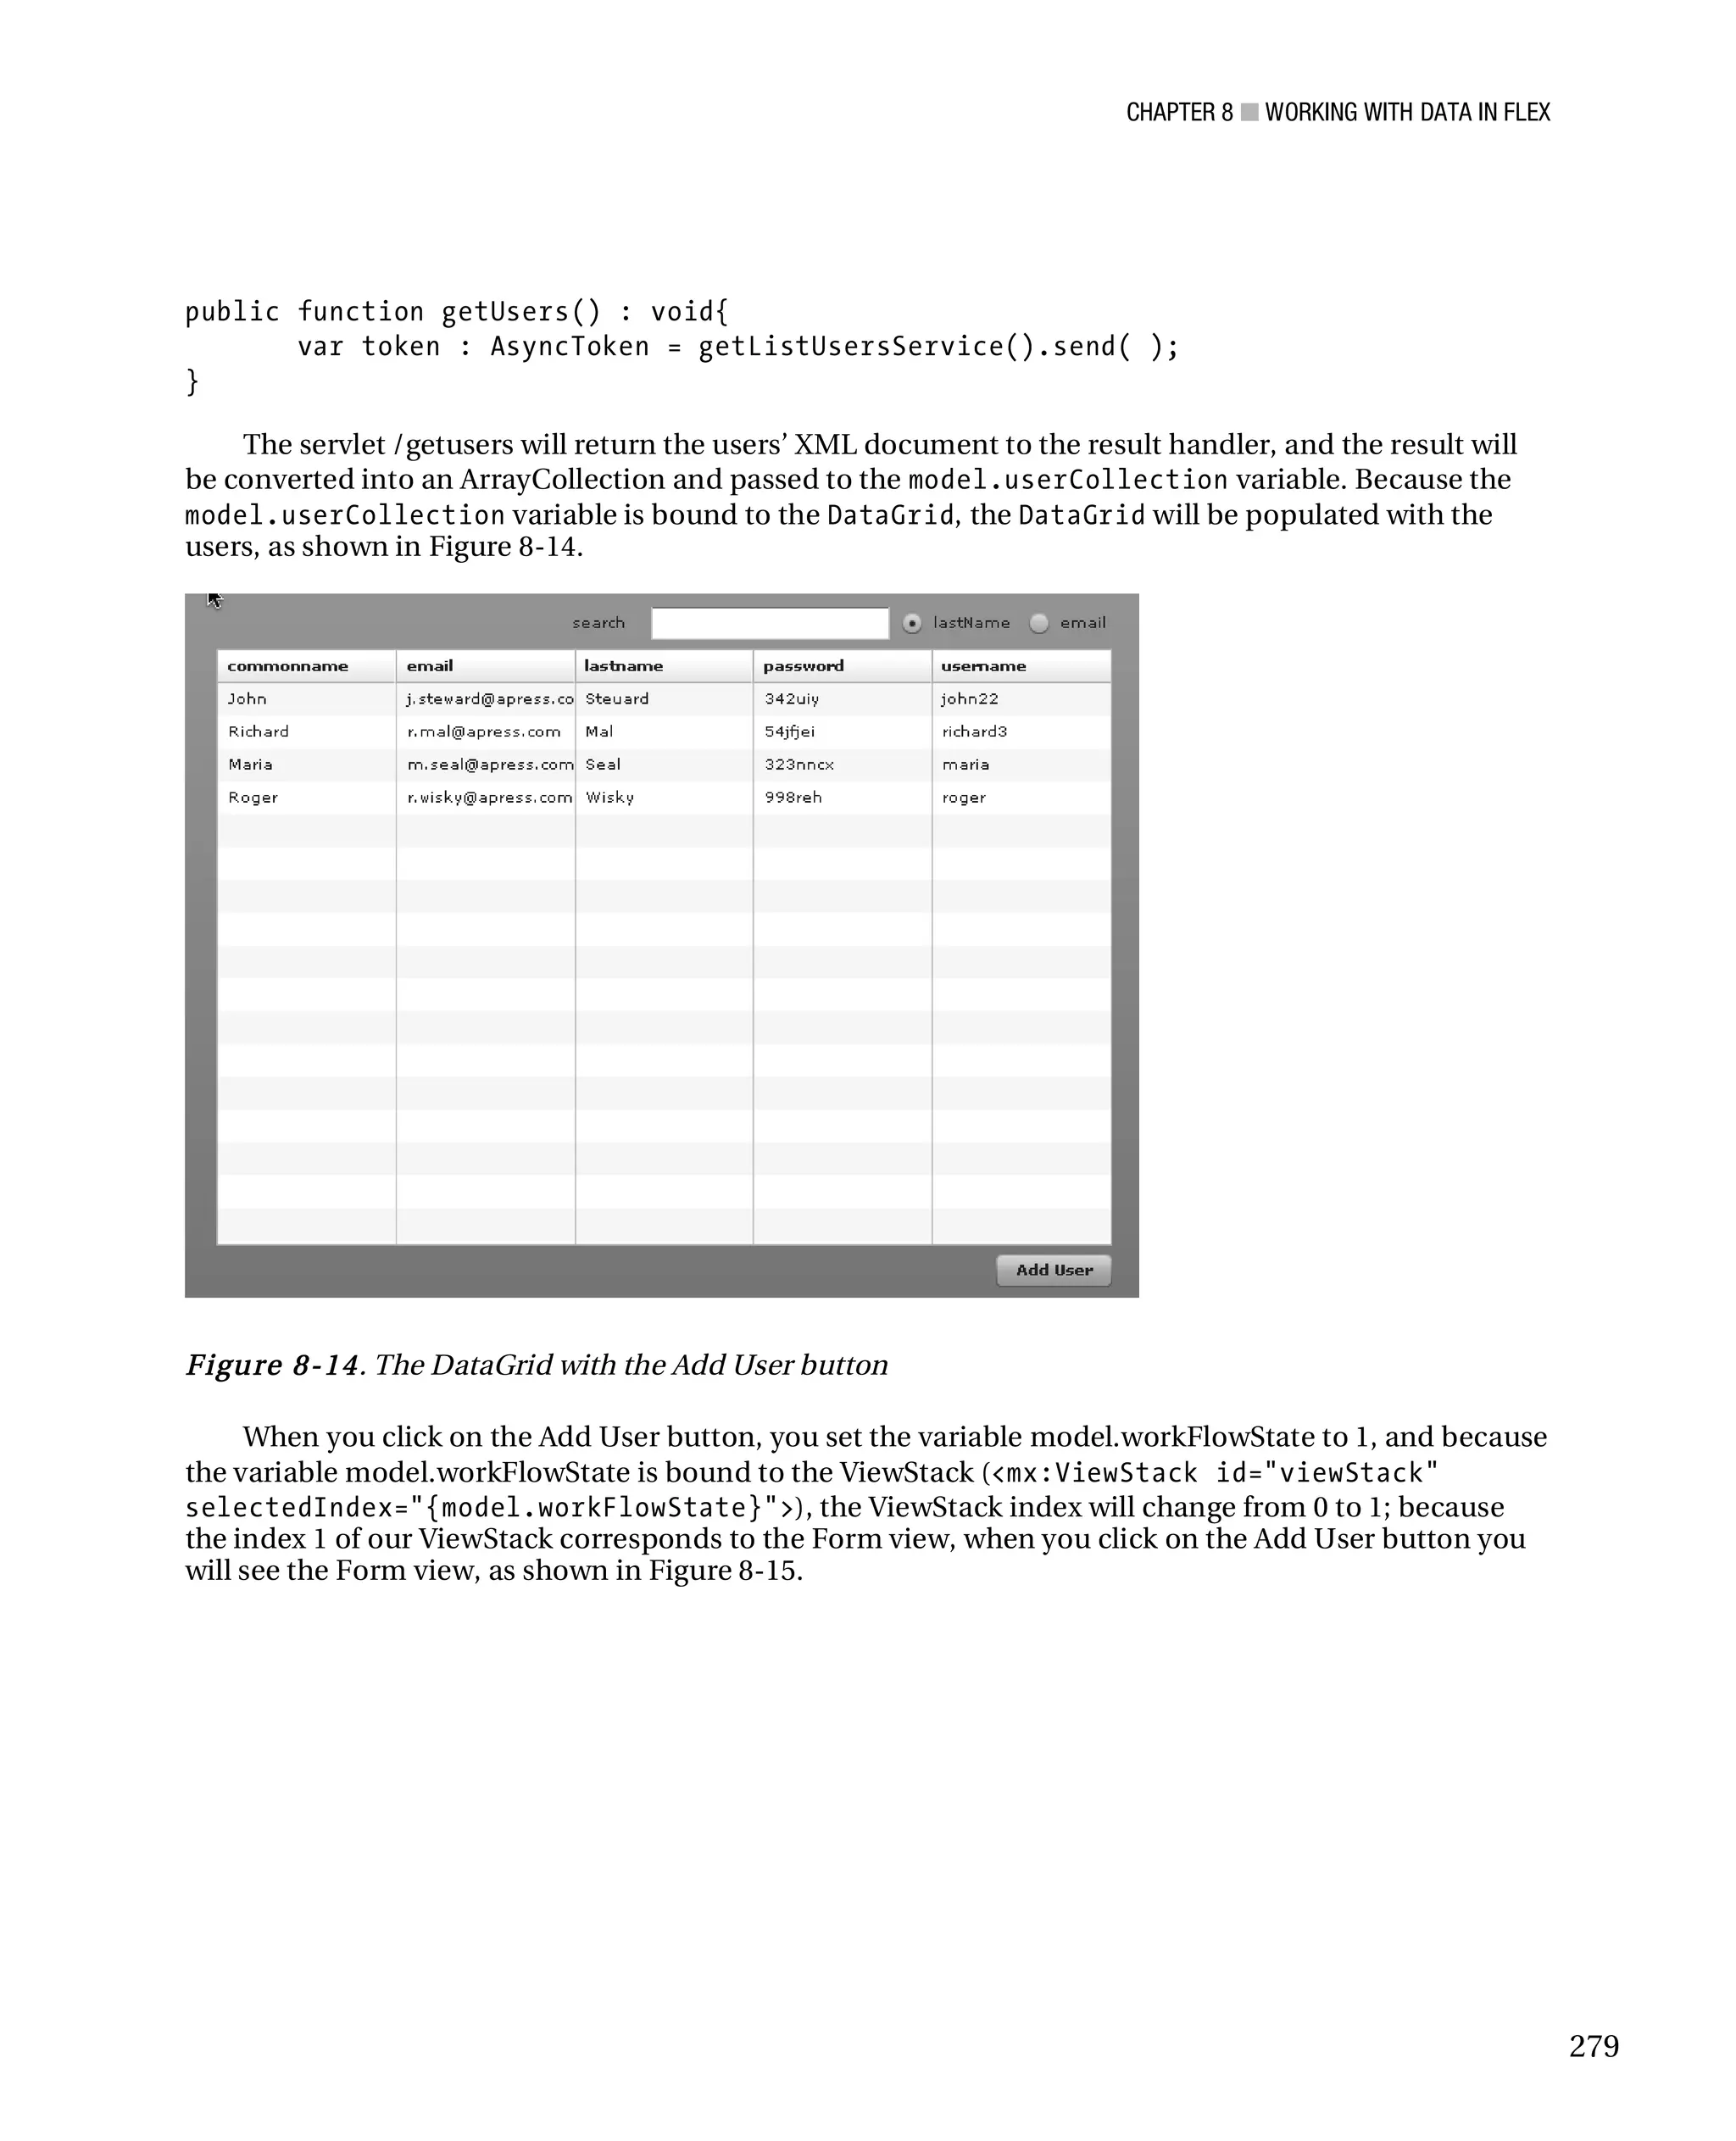
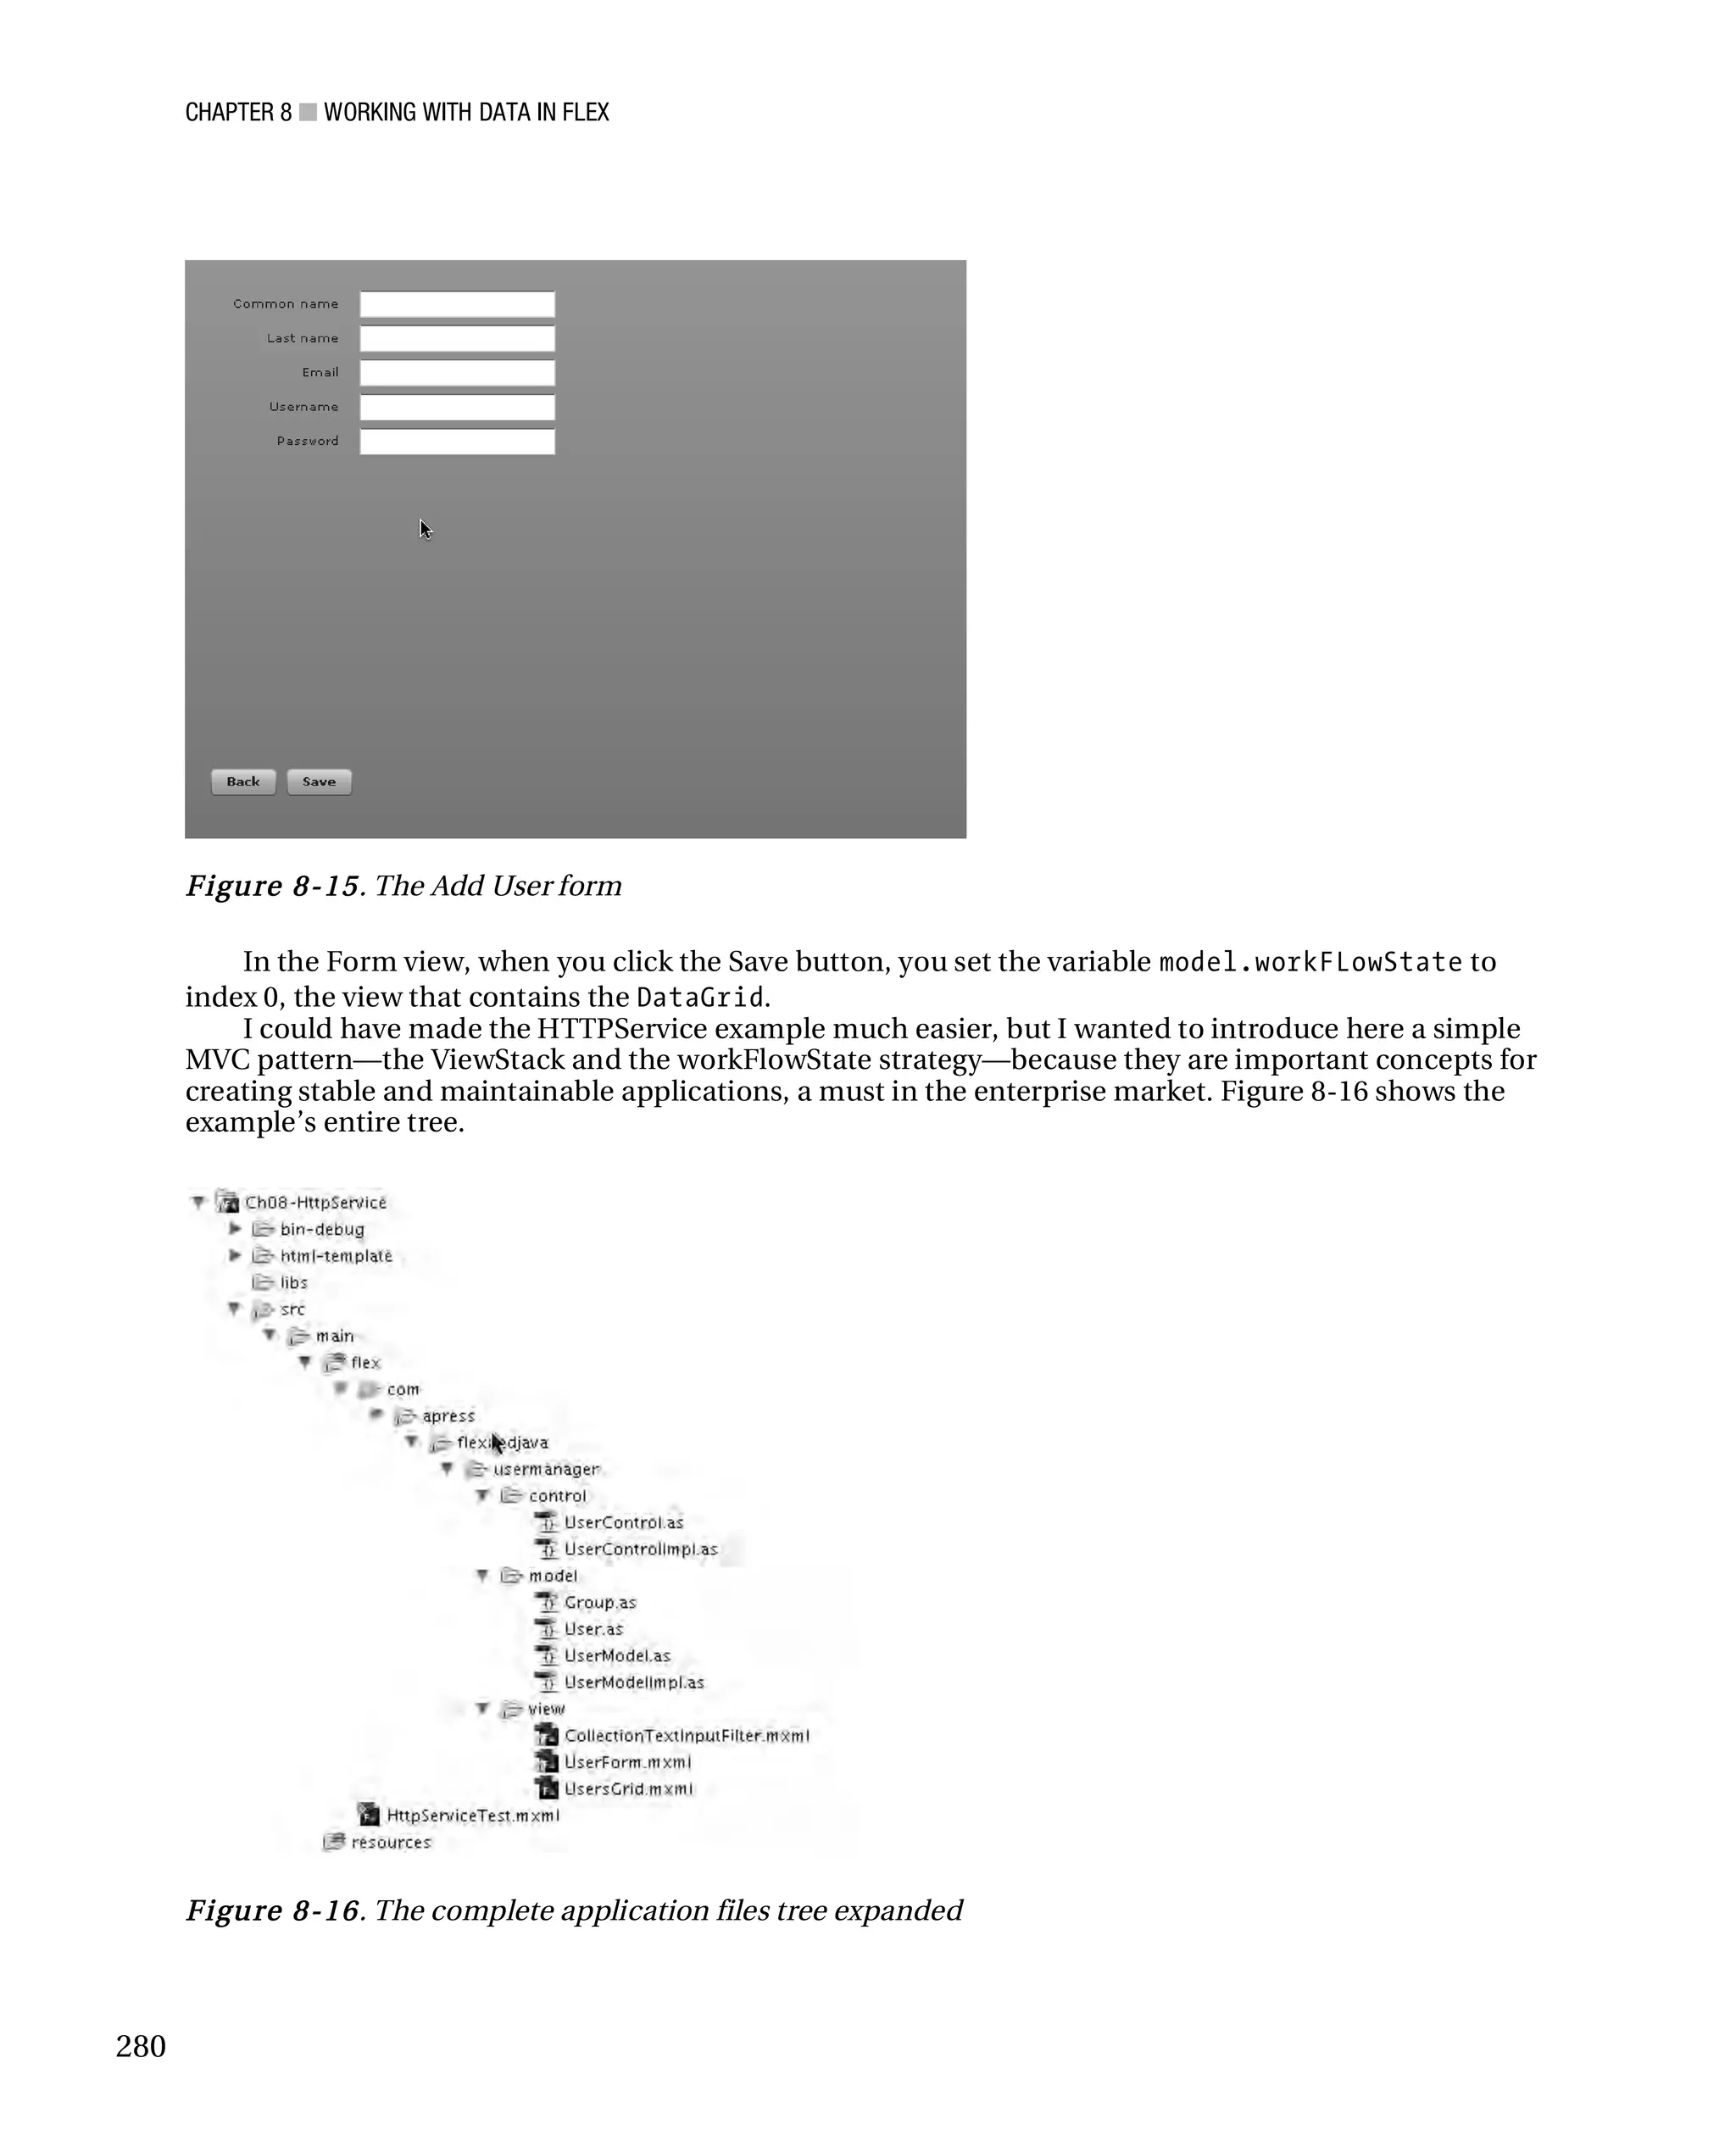
![CHAPTER 8 ■ WORKING WITH DATA IN FLEX
In the MVC (Model-View-Controller) design pattern, the data model is the model layer. In the
upcoming HTTPService section, I will show you how to make the model layer interact with the view and
controller layers.
You can bind the data model to a view, or store it in a collection and bind the collection to a
component. For example, you might have a registration form that, when submitted, creates a User
object with the information sent by the form. Then you can bind all the User properties with the form
fields to give the user another form with the confirmation data (see Figure 8-1). Here is the listing of the
UserForm.mxml view:
<?xml version="1.0" encoding="utf-8"?>
<mx:Form xmlns:mx="http://www.adobe.com/2006/mxml" width="100%" height="100%">
<mx:FormItem label="Common name">
<mx:TextInput id=”commonNameText” text="{user.commonName}"/>
</mx:FormItem>
<mx:FormItem label="Last name">
<mx:TextInput id=”lastNameText” text="{user.lastName}" />
</mx:FormItem>
<mx:FormItem label="Email">
<mx:TextInput id=”emailText” text="{user.email} />
</mx:FormItem>
<mx:FormItem label="Username">
<mx:TextInput id=”usernameText” text="{user.username} />
</mx:FormItem>
<mx:FormItem label="Password">
<mx:TextInput id=”passwordText” text="{user.password}" />
</mx:FormItem>
<mx:Script>
<![CDATA[
import com.apress.flexjava.usermanager.model.User;
[Bindable]
public var user : User;
]]>
</mx:Script>
</mx:Form>
Figure 8-1. The user form created with the UserForm.mxml class
253](https://image.slidesharecdn.com/beginningjavaandflex-migratingjavaspringhibernateandmavendeveloperstoadobeflex-100821073507-phpapp01/75/Beginning-java-and-flex-migrating-java-spring-hibernate-and-maven-developers-to-adobe-flex-272-2048.jpg)
![CHAPTER 8 ■ WORKING WITH DATA IN FLEX
You can also create a collection of Users and bind it to a DataGrid component. Here is the listing for
the UsersGrid.mxml view:
<?xml version="1.0" encoding="utf-8"?>
<mx:DataGrid xmlns:mx="http://www.adobe.com/2006/mxml" >
<mx:columns>
<mx:DataGridColumn dataField="commonName" headerText="Common Name" />
<mx:DataGridColumn dataField="lastName" headerText="Last Name" />
<mx:DataGridColumn dataField="email" headerText="Email" />
<mx:DataGridColumn dataField="username" headerText="Username" />
<mx:DataGridColumn dataField="password" headerText="Password" />
</mx:columns>
<mx:Script>
<![CDATA[
import mx.collections.ArrayCollection;
[Bindable]
[Inspectable]
public function set users(usersCollection : ArrayCollection)
: void {
this.dataProvider = usersCollection;
}
]]>
</mx:Script>
</mx:DataGrid>
And here is the Main MXML class where you can test the User collection bound to the DataGrid
component. You can call the Main class DataCollectionTest.mxml:
<?xml version="1.0" encoding="utf-8"?>
<mx:Application xmlns:mx="http://www.adobe.com/2006/mxml"
xmlns:view="com.apress.flexjava.usermanager.view.*"
layout="horizontal"
creationComplete="init()"
horizontalAlign="center"
verticalAlign="middle">
<view:UsersGrid dataProvider="{usersCollectionTest}" width="600"
height="400" />
<mx:Script>
<![CDATA[
import mx.collections.ArrayCollection;
import com.apress.flexjava.usermanager.model.User;
[Bindable]
public var usersCollectionTest : ArrayCollection;
254](https://image.slidesharecdn.com/beginningjavaandflex-migratingjavaspringhibernateandmavendeveloperstoadobeflex-100821073507-phpapp01/75/Beginning-java-and-flex-migrating-java-spring-hibernate-and-maven-developers-to-adobe-flex-273-2048.jpg)
![CHAPTER 8 ■ WORKING WITH DATA IN FLEX
public function init() : void{
createUsersCollectionTest();
}
private function createUsersCollectionTest() : void {
usersCollectionTest = new ArrayCollection();
for(var i:int = 0; i<10; i++){
usersCollectionTest.addItem(userFactory("commonName"+i,
"lastName"+i,
"email"+i,
"username"+i,
"password"+i));
}
}
private function userFactory(commonName : String,
lastName : String,
email : String,
username : String,
password : String) : User
{
var user : User = new User();
user.commonName = commonName;
user.lastName = lastName;
user.email = email;
user.username = username;
user.password = password;
return user;
}
]]>
</mx:Script>
</mx:Application>
Because we don’t yet have a database or an XML list of users, in the application test code I created a
loop to add 10 users to the collection:
private function createUsersCollectionTest() : void {
usersCollectionTest = new ArrayCollection();
for(var i:int = 0; i<10; i++){
usersCollectionTest.addItem(userFactory("commonName"+i,
"lastName"+i,
255](https://image.slidesharecdn.com/beginningjavaandflex-migratingjavaspringhibernateandmavendeveloperstoadobeflex-100821073507-phpapp01/75/Beginning-java-and-flex-migrating-java-spring-hibernate-and-maven-developers-to-adobe-flex-274-2048.jpg)
![CHAPTER 8 ■ WORKING WITH DATA IN FLEX
In the next example, I will bind an ArrayCollection with a DataGrid component. I’ll then use the
ICollectionView methods to sort and filter data, and because collections support notification changes,
I will also allow adding a new user to the collection—and see the result in real time within the DataGrid.
The goal of this example is to add a search TextInput control to the user’s DataGrid, as shown in
Figure 8-2. When you change value within the TextInput control, the DataGrid content will be filtered
by the value input into the search control. I’ll also add two RadioButton controls to select which
DataGrid column to search in.
Figure 8-2. The user manager sample application DataGrid
Starting with the code we used for the previous example, we just have to add a custom component
that extends the TextInput control with the filter collection functionality. Basically, the new custom
component will have two new properties to allow passing to the component the collection that we want
to filter and the column of the DataGrid we want to search in. Below, the two public attributes are
exposed by the component:
[Inspectable]
public var collection : ArrayCollection;
[Inspectable]
public var columnSearchable : String;
The [Inspectable] metatag defines information about an attribute of the Flex component. It
means that we will be able to see the attribute within the Flex builder code hints and property inspector.
For this component I will use MXML because it is a view component. Moreover, I want to make sure
you see how to use MXML to extend other components. I will call the component
CollectionTextInputFilter.mxml and save it into the view package
com.apress.flexjava.usermanager.view:
<?xml version="1.0" encoding="utf-8"?>
<mx:TextInput xmlns:mx="http://www.adobe.com/2006/mxml" change="search()">
</mx:TextInput>
The code above is the equivalent of
public class CollectionTextInputFilter extends TextInput{
}
257](https://image.slidesharecdn.com/beginningjavaandflex-migratingjavaspringhibernateandmavendeveloperstoadobeflex-100821073507-phpapp01/75/Beginning-java-and-flex-migrating-java-spring-hibernate-and-maven-developers-to-adobe-flex-276-2048.jpg)
![CHAPTER 8 ■ WORKING WITH DATA IN FLEX
The body of the CollectionTextInputFilter.mxml custom component contains the methods
needed to filter the collection. First you pass to the collection the filter function filterRecords , then
you refresh the collection with the data filtered:
<?xml version="1.0" encoding="utf-8"?>
<mx:TextInput xmlns:mx="http://www.adobe.com/2006/mxml" change="search()">
<mx:Script>
<![CDATA[
import mx.collections.ArrayCollection;
[Inspectable]
public var collection : ArrayCollection;
[Inspectable]
public var columnSearchable : String;
protected function search():void {
if(this.text !='') {
filter()
} else {
filterReset()
}
}
private function filter():void {
collection.filterFunction = filterRecords;
collection.refresh();
}
private function filterReset():void {
collection.filterFunction = null;
collection.refresh();
}
private function filterRecords(item:Object):Boolean {
var tags : String = item[columnSearchable];
if( tags != null ) {
return tags.match(new RegExp(this.text, "i"));
} else {
return false;
}
}
]]>
</mx:Script>
</mx:TextInput>
258](https://image.slidesharecdn.com/beginningjavaandflex-migratingjavaspringhibernateandmavendeveloperstoadobeflex-100821073507-phpapp01/75/Beginning-java-and-flex-migrating-java-spring-hibernate-and-maven-developers-to-adobe-flex-277-2048.jpg)
![CHAPTER 8 ■ WORKING WITH DATA IN FLEX
<![CDATA[
import mx.events.ItemClickEvent;
import mx.collections.ArrayCollection;
import com.apress.flexjava.usermanager.model.User;
[Bindable]
public var usersCollectionTest : ArrayCollection;
[Bindable]
private var columnNameToSearch : String = "lastName";
public function init() : void{
createUsersCollectionTest();
}
private function createUsersCollectionTest() : void {
usersCollectionTest = new ArrayCollection();
for(var i:int = 0; i<10; i++){
usersCollectionTest.addItem(userFactory("commonName"+i,
"lastName"+i,
"email"+i,
"username"+i,
"password"+i ));
}
}
private function userFactory(commonName : String,
lastName : String,
email : String,
username : String,
password : String) : User
{
var user : User = new User();
user.commonName = commonName;
user.lastName = lastName;
user.email = email;
user.username = username;
user.password = password;
return user;
}
private function handleSearchMethod
(event:ItemClickEvent):void {
columnNameToSearch =
260](https://image.slidesharecdn.com/beginningjavaandflex-migratingjavaspringhibernateandmavendeveloperstoadobeflex-100821073507-phpapp01/75/Beginning-java-and-flex-migrating-java-spring-hibernate-and-maven-developers-to-adobe-flex-279-2048.jpg)
![CHAPTER 8 ■ WORKING WITH DATA IN FLEX
event.currentTarget.selectedValue as String;
}
]]>
</mx:Script>
</mx:Application>
Now it’s time to test and run the application. If everything is okay, you should see the list of users,
and if you try to write lastName0 in the search box, it will filter the DataGrid in real time, as shown in
Figure 8-3.
Figure 8-3. Real-time search
Collections are more complete than a simple array, of course, because they don’t just provide new
sort and filter functionality, but also dispatch events when changes are made. You can then bind those
events with the data-driven Flex controls through the dataProvider property.
Access to Remote Data
In the last example we created a DataGrid containing a list of users, and we added search functionality
to the collection. But a problem arises when you add new data—if you close the browser you will lose all
your data.
The solution is to store the data on a server so it can be shared over the network/Internet. When you
architect your application, you have to choose server-side storage, which can be a database, XML, or a
directory server (LDAP). Flex provides different ways of accessing server-side data:
• HTTP GET or POST, by using the HTTPService components;
• Adobe Action Message Format (AMF), by using the RemoteObject components;
• SOAP by using the WebService components;
These three methods can be used in both AS and MXML. Let’s explore these now.
261](https://image.slidesharecdn.com/beginningjavaandflex-migratingjavaspringhibernateandmavendeveloperstoadobeflex-100821073507-phpapp01/75/Beginning-java-and-flex-migrating-java-spring-hibernate-and-maven-developers-to-adobe-flex-280-2048.jpg)


![CHAPTER 8 ■ WORKING WITH DATA IN FLEX
com.apress.usermanager.servlet.AddUserServlet
</servlet-class>
</servlet>
<servlet-mapping>
<servlet-name>GetUserServlet</servlet-name>
<url-pattern>/getusers</url-pattern>
</servlet-mapping>
<servlet-mapping>
<servlet-name>AddUserServlet</servlet-name>
<url-pattern>/adduser</url-pattern>
</servlet-mapping>
<welcome-file-list>
<welcome-file>index.jsp</welcome-file>
</welcome-file-list>
</web-app>
As you can see, I mapped GetUserServlet as /getusers and AddUserServlet as /adduser. Finally,
we can test the application by running the command mvn jetty:run from the command line within the
root of our project where the pom.xml file resides:
$ mvn jetty:run
If everything goes well, you should see the following message that indicates the application is ready
on port 8080:
2009-08-26 00:57:53.936::INFO: Started SelectChannelConnector@0.0.0.0:8080
[INFO] Started Jetty Server
[INFO] Starting scanner at interval of 4 seconds.
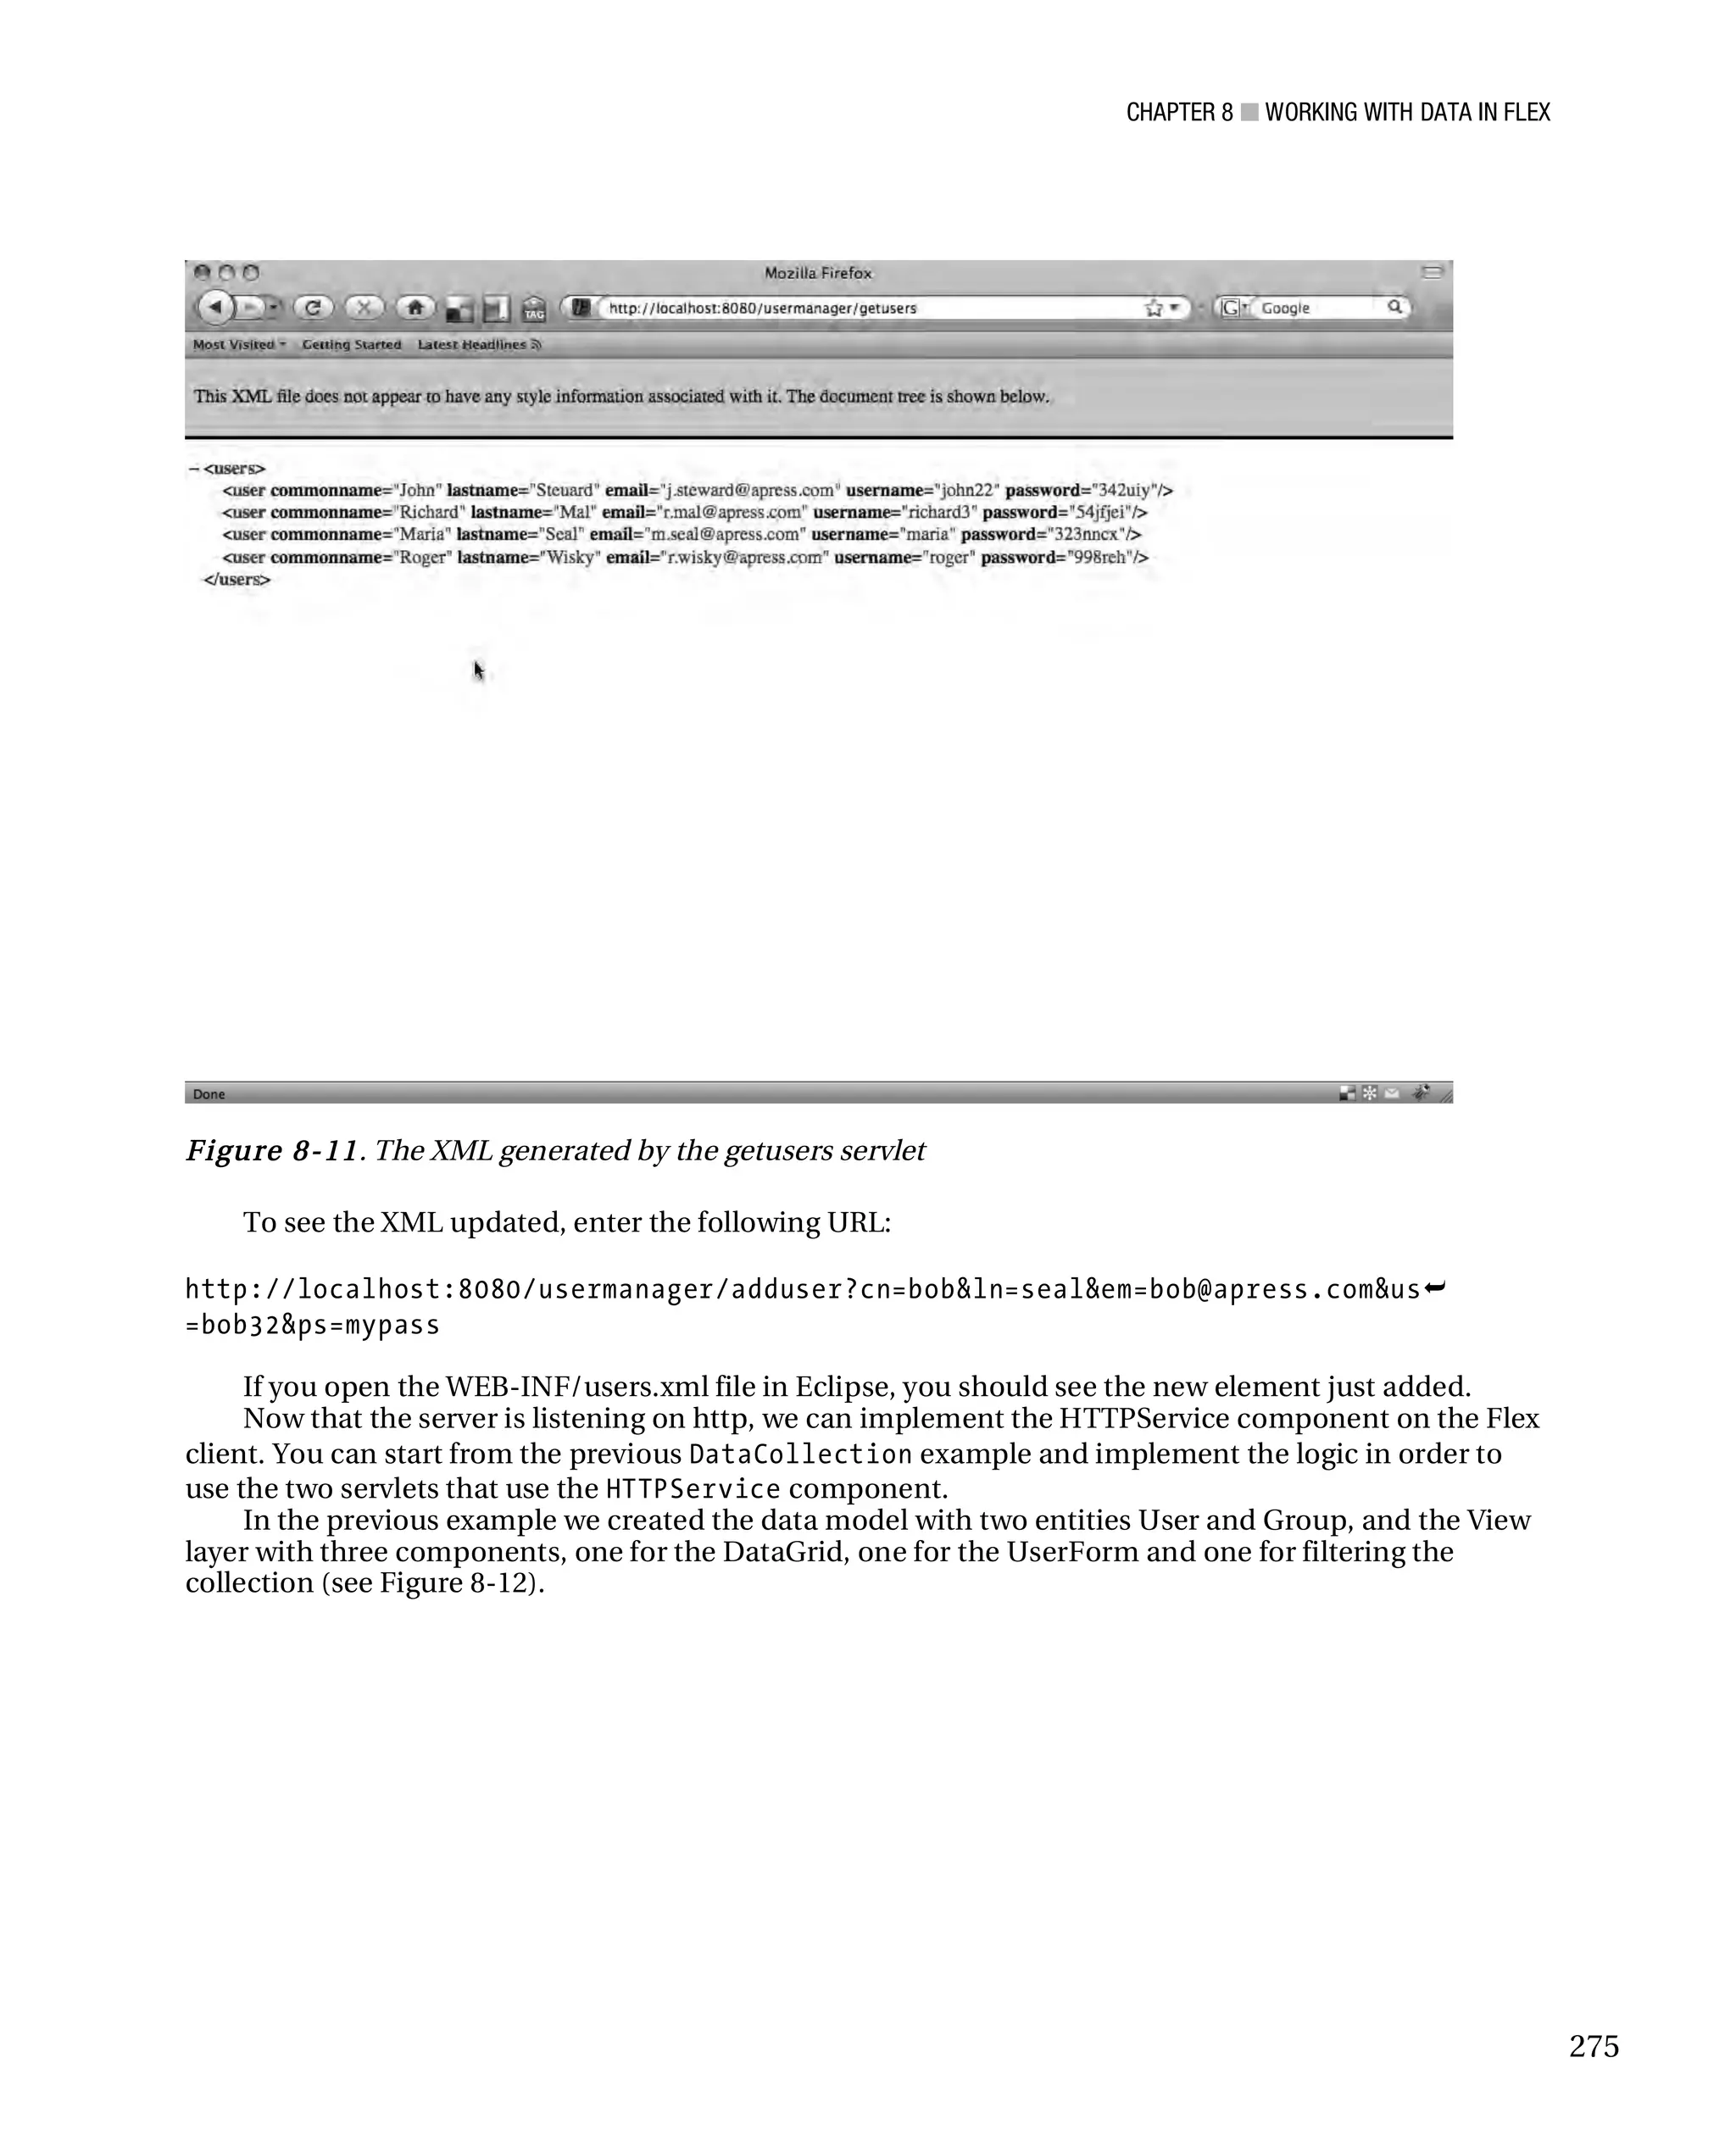
Now open a browser, type the URL http://localhost:8080/usermanager/getusers, and you
should see the XML from the users.xml file, as shown in Figure 8-11.
274](https://image.slidesharecdn.com/beginningjavaandflex-migratingjavaspringhibernateandmavendeveloperstoadobeflex-100821073507-phpapp01/75/Beginning-java-and-flex-migrating-java-spring-hibernate-and-maven-developers-to-adobe-flex-293-2048.jpg)
![CHAPTER 8 ■ WORKING WITH DATA IN FLEX
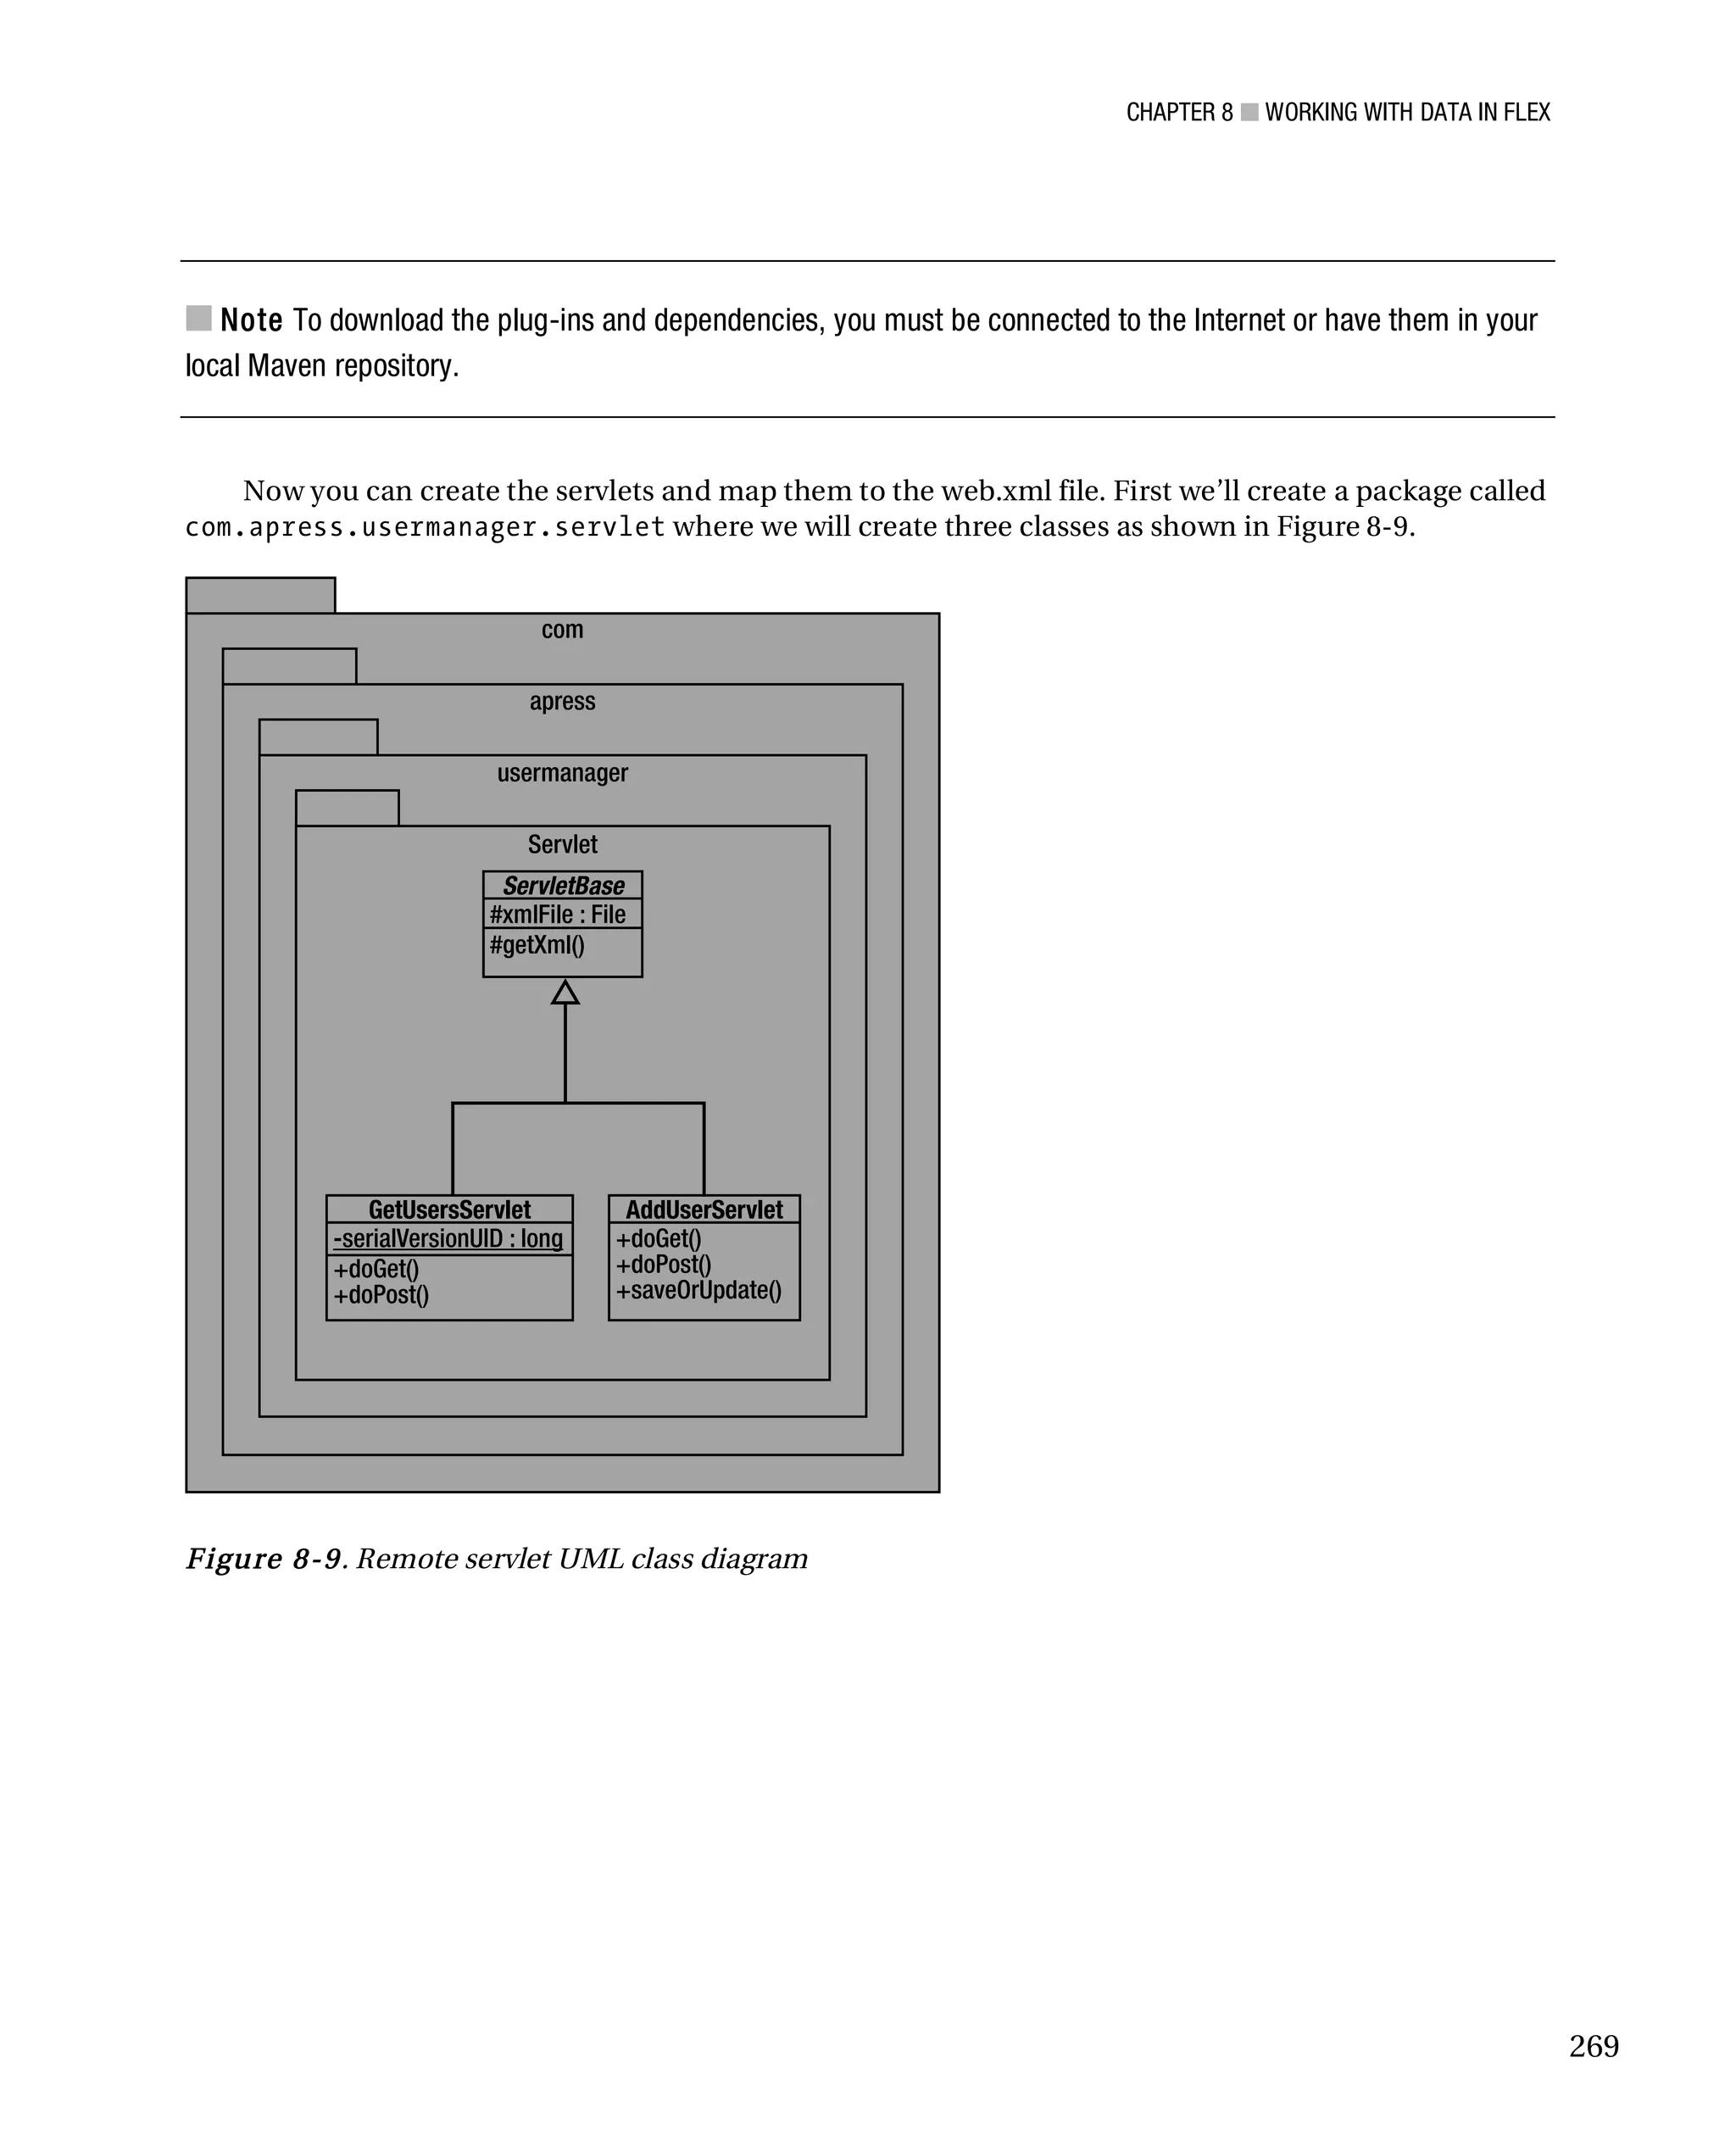
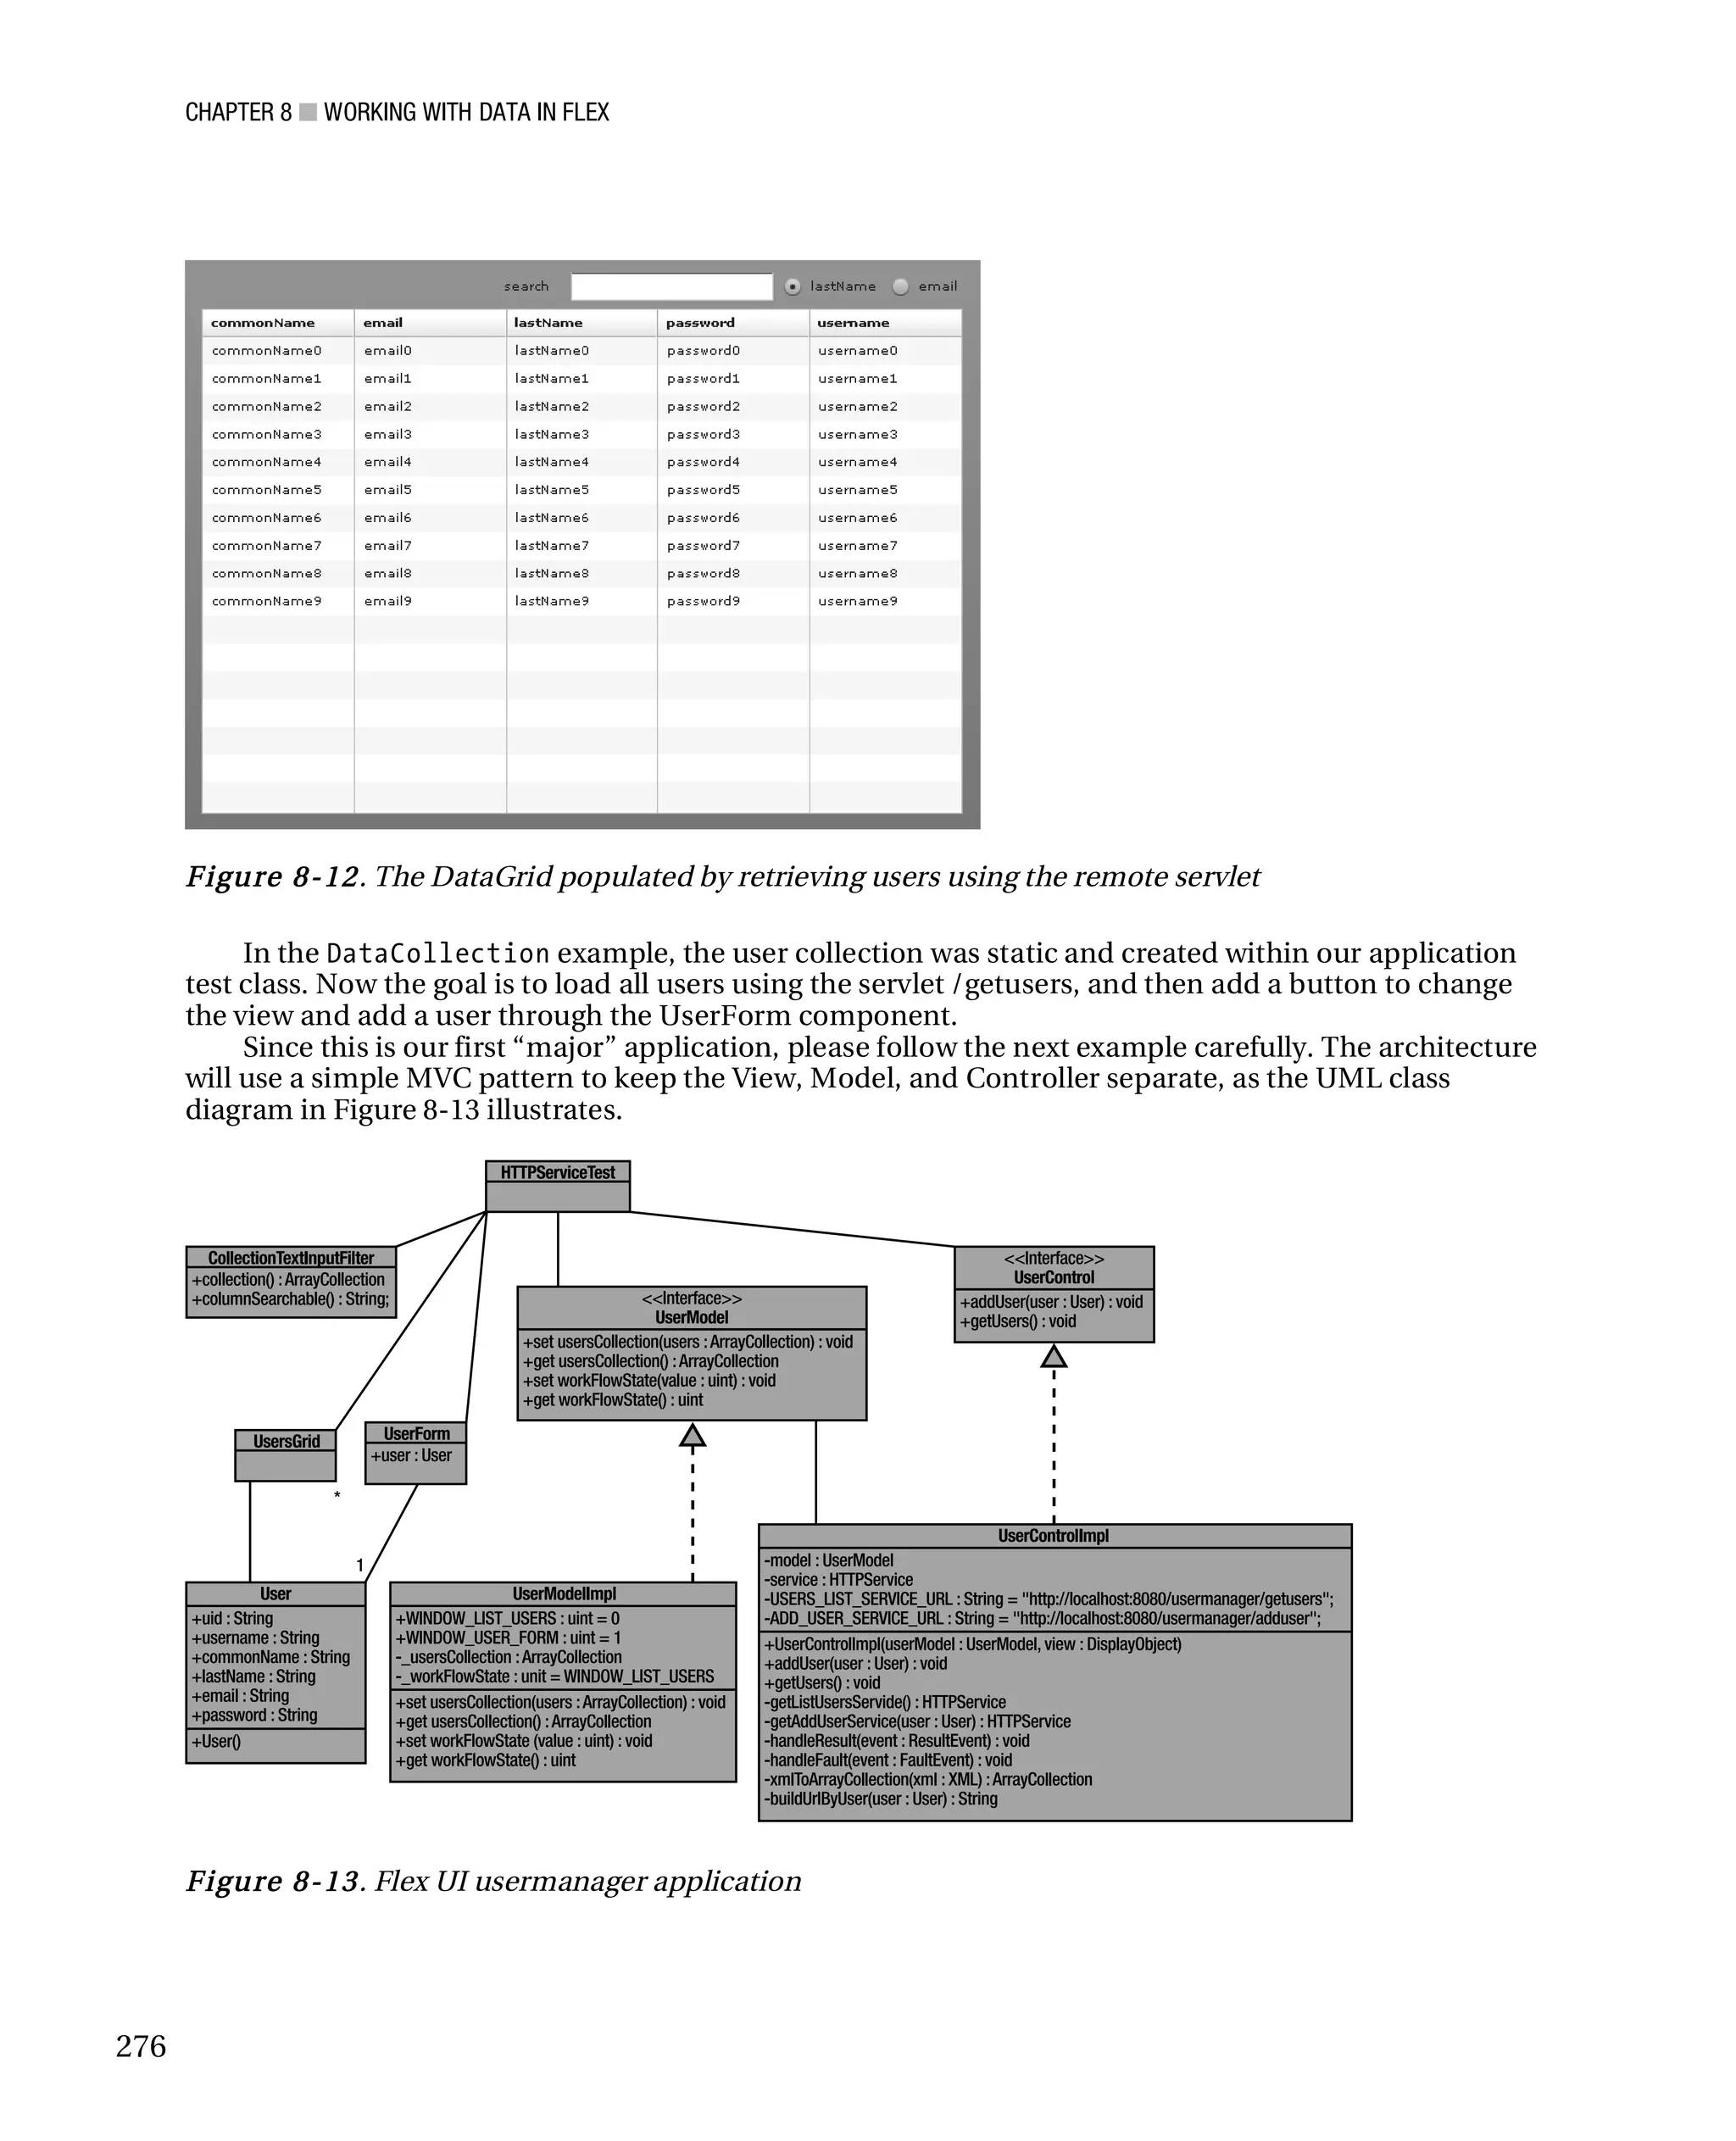
As you can see here, we have created an interface and its implementation for each object. As I have
already mentioned, this programming methodology is called “programming to interface.” I will show
just the classes added to the previous example. The classes CollectionTextInputFilter,
UserForm,UsersDataGrid, User and Group have not been changed. Here is the complete code for the
user implementation model—UserModelImpl.as and its interface UserModel.as:
package com.apress.flexjava.usermanager.model
{
import flash.events.EventDispatcher;
import mx.collections.ArrayCollection;
[Bindable]
public class UserModelImpl extends EventDispatcher implements UserModel
{
private var _usersCollection: ArrayCollection;
private var _workFlowState : uint = WINDOW_LIST_USERS
public function set usersCollection (users : ArrayCollection) :
void{
_usersCollection = users;
}
public function get usersCollection() : ArrayCollection{
return _ usersCollection;
}
public function set workFlowState(value : uint) : void{
_workFlowState = value;
}
public function get workFlowState() : uint{
return _workFlowState;
}
public static const WINDOW_LIST_USERS : uint = 0;
public static const WINDOW_USER_FORM : uint = 1;
}
}
And here is UserModel.as:
package com.apress.flexjava.usermanager.model
{
import flash.events.IEventDispatcher;
281](https://image.slidesharecdn.com/beginningjavaandflex-migratingjavaspringhibernateandmavendeveloperstoadobeflex-100821073507-phpapp01/75/Beginning-java-and-flex-migrating-java-spring-hibernate-and-maven-developers-to-adobe-flex-300-2048.jpg)
![CHAPTER 8 ■ WORKING WITH DATA IN FLEX
import mx.collections.ArrayCollection;
[Bindable]
public interface UserModel extends IEventDispatcher
{
function set usersCollection(users : ArrayCollection) : void;
function get usersCollection() : ArrayCollection;
function set workFlowState(value : uint) : void;
function get workFlowState() : uint;
}
}
}
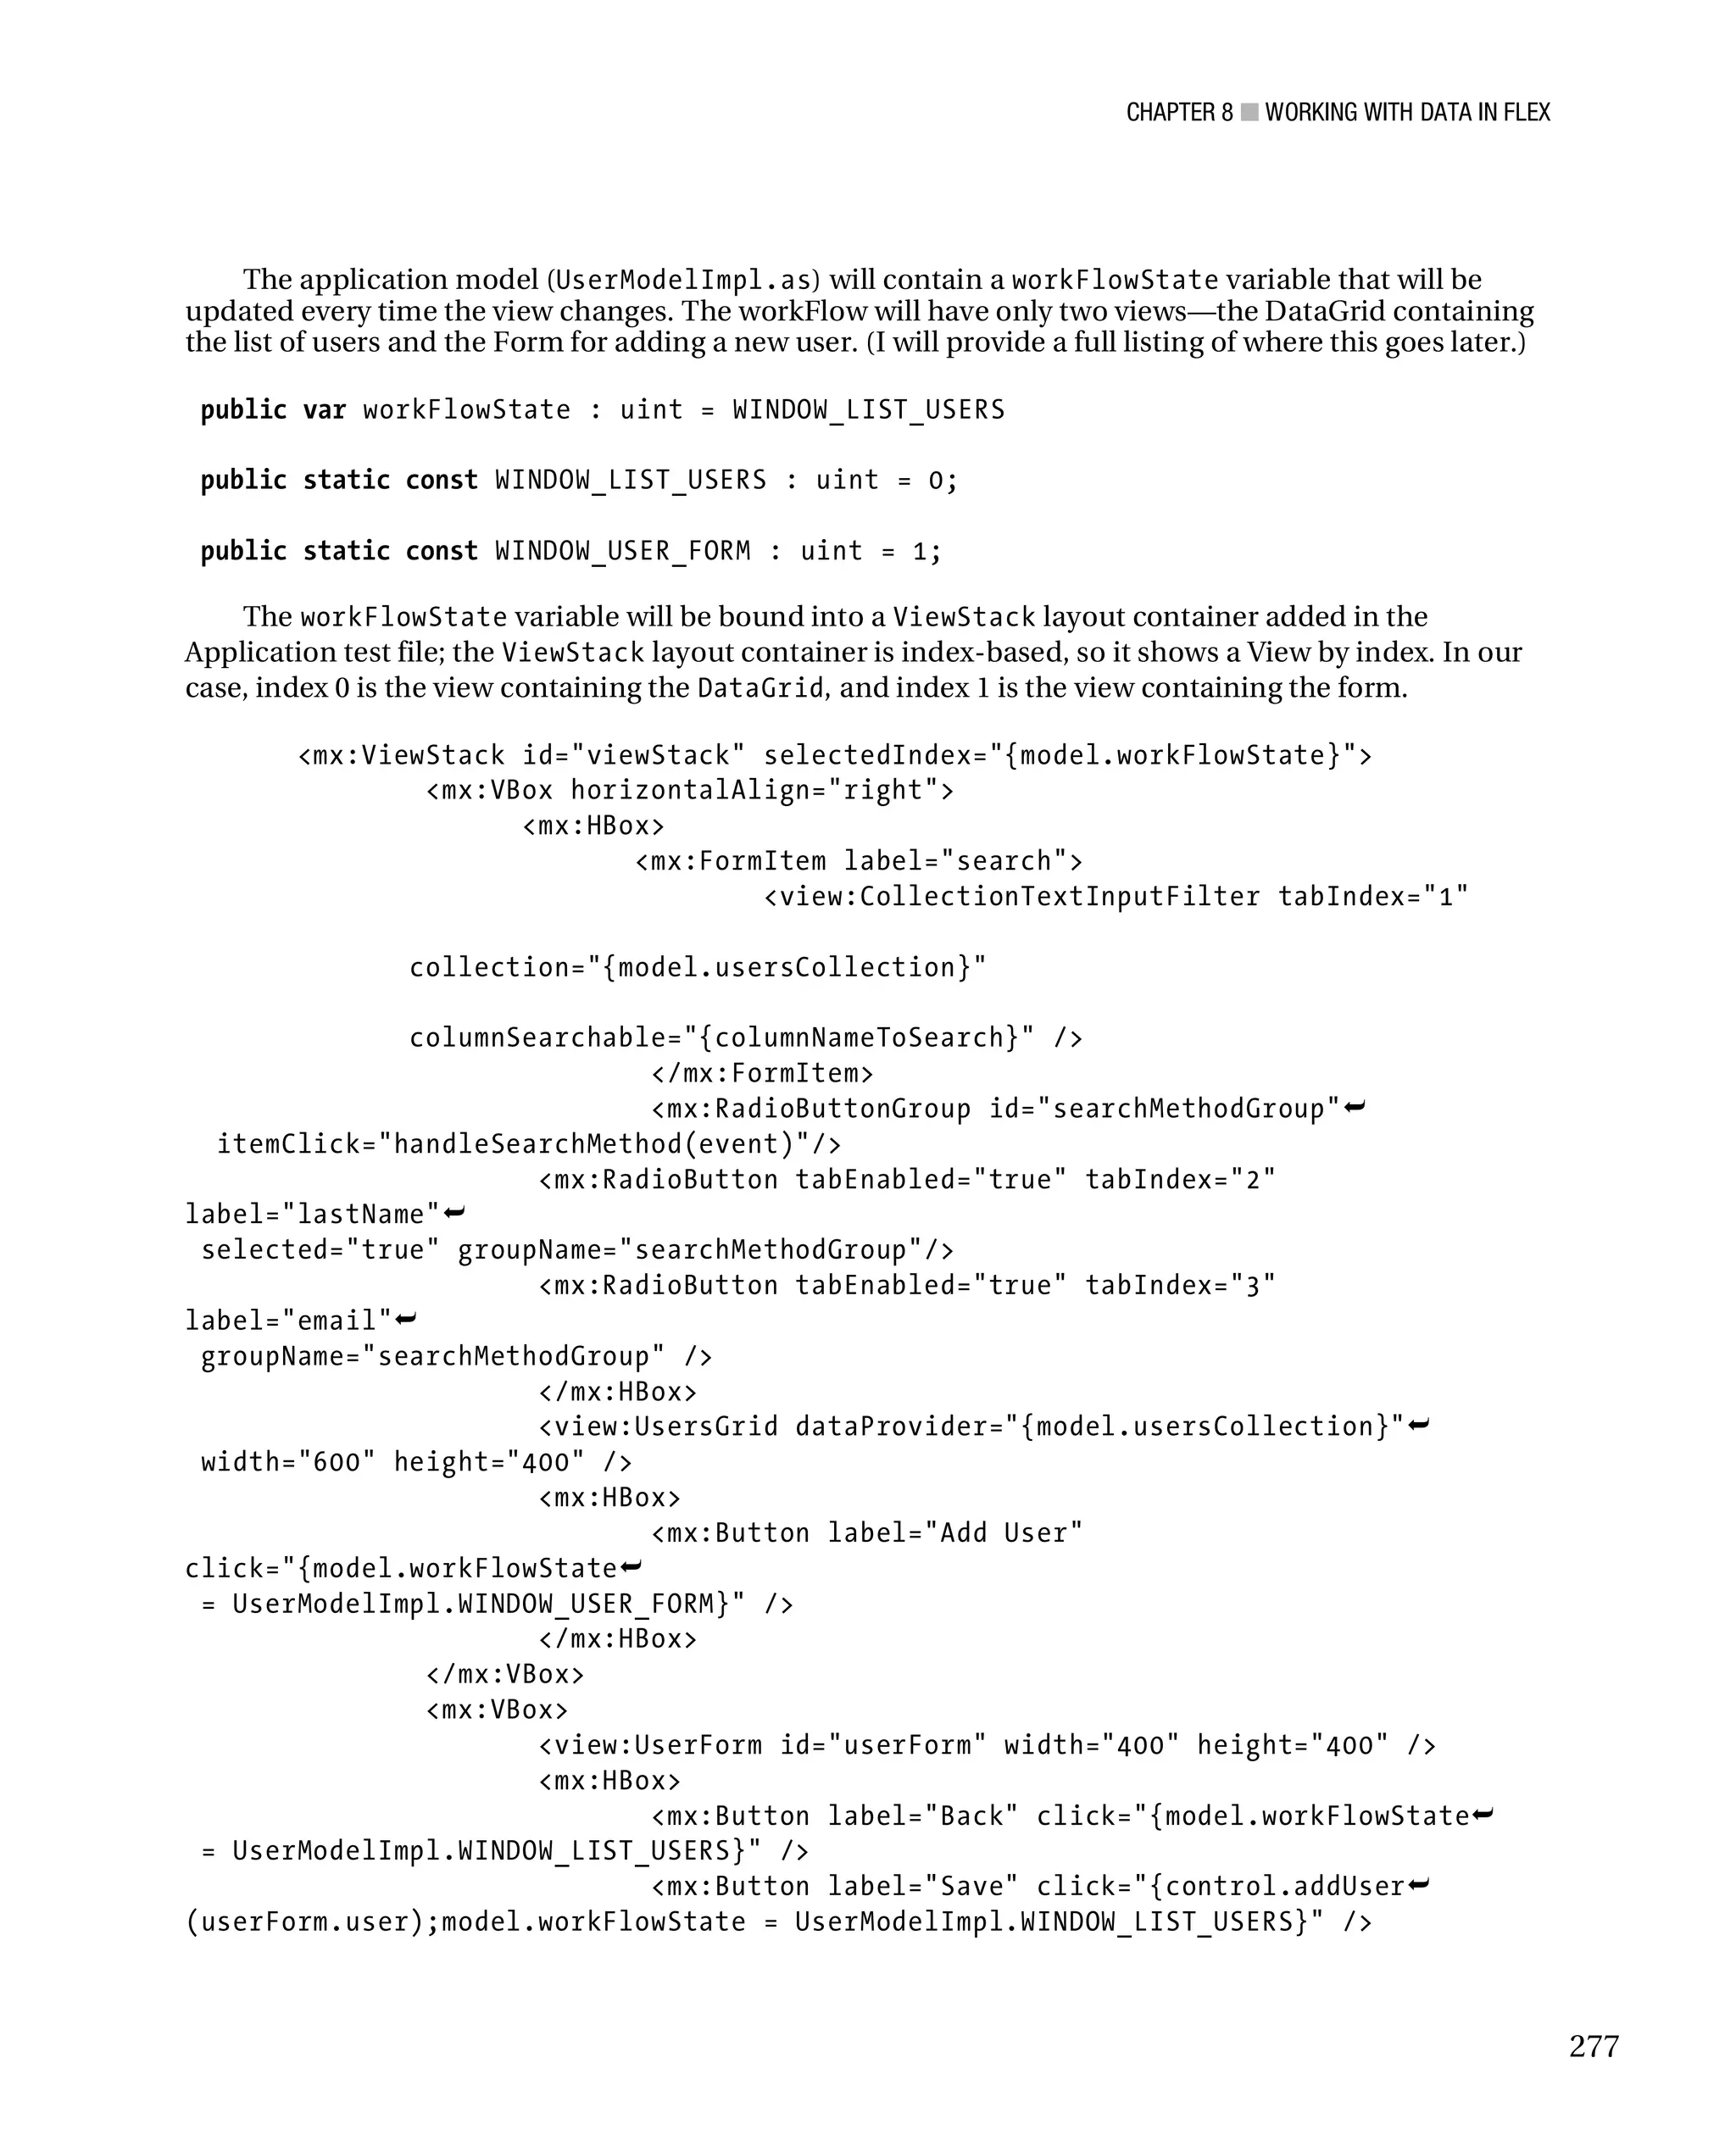
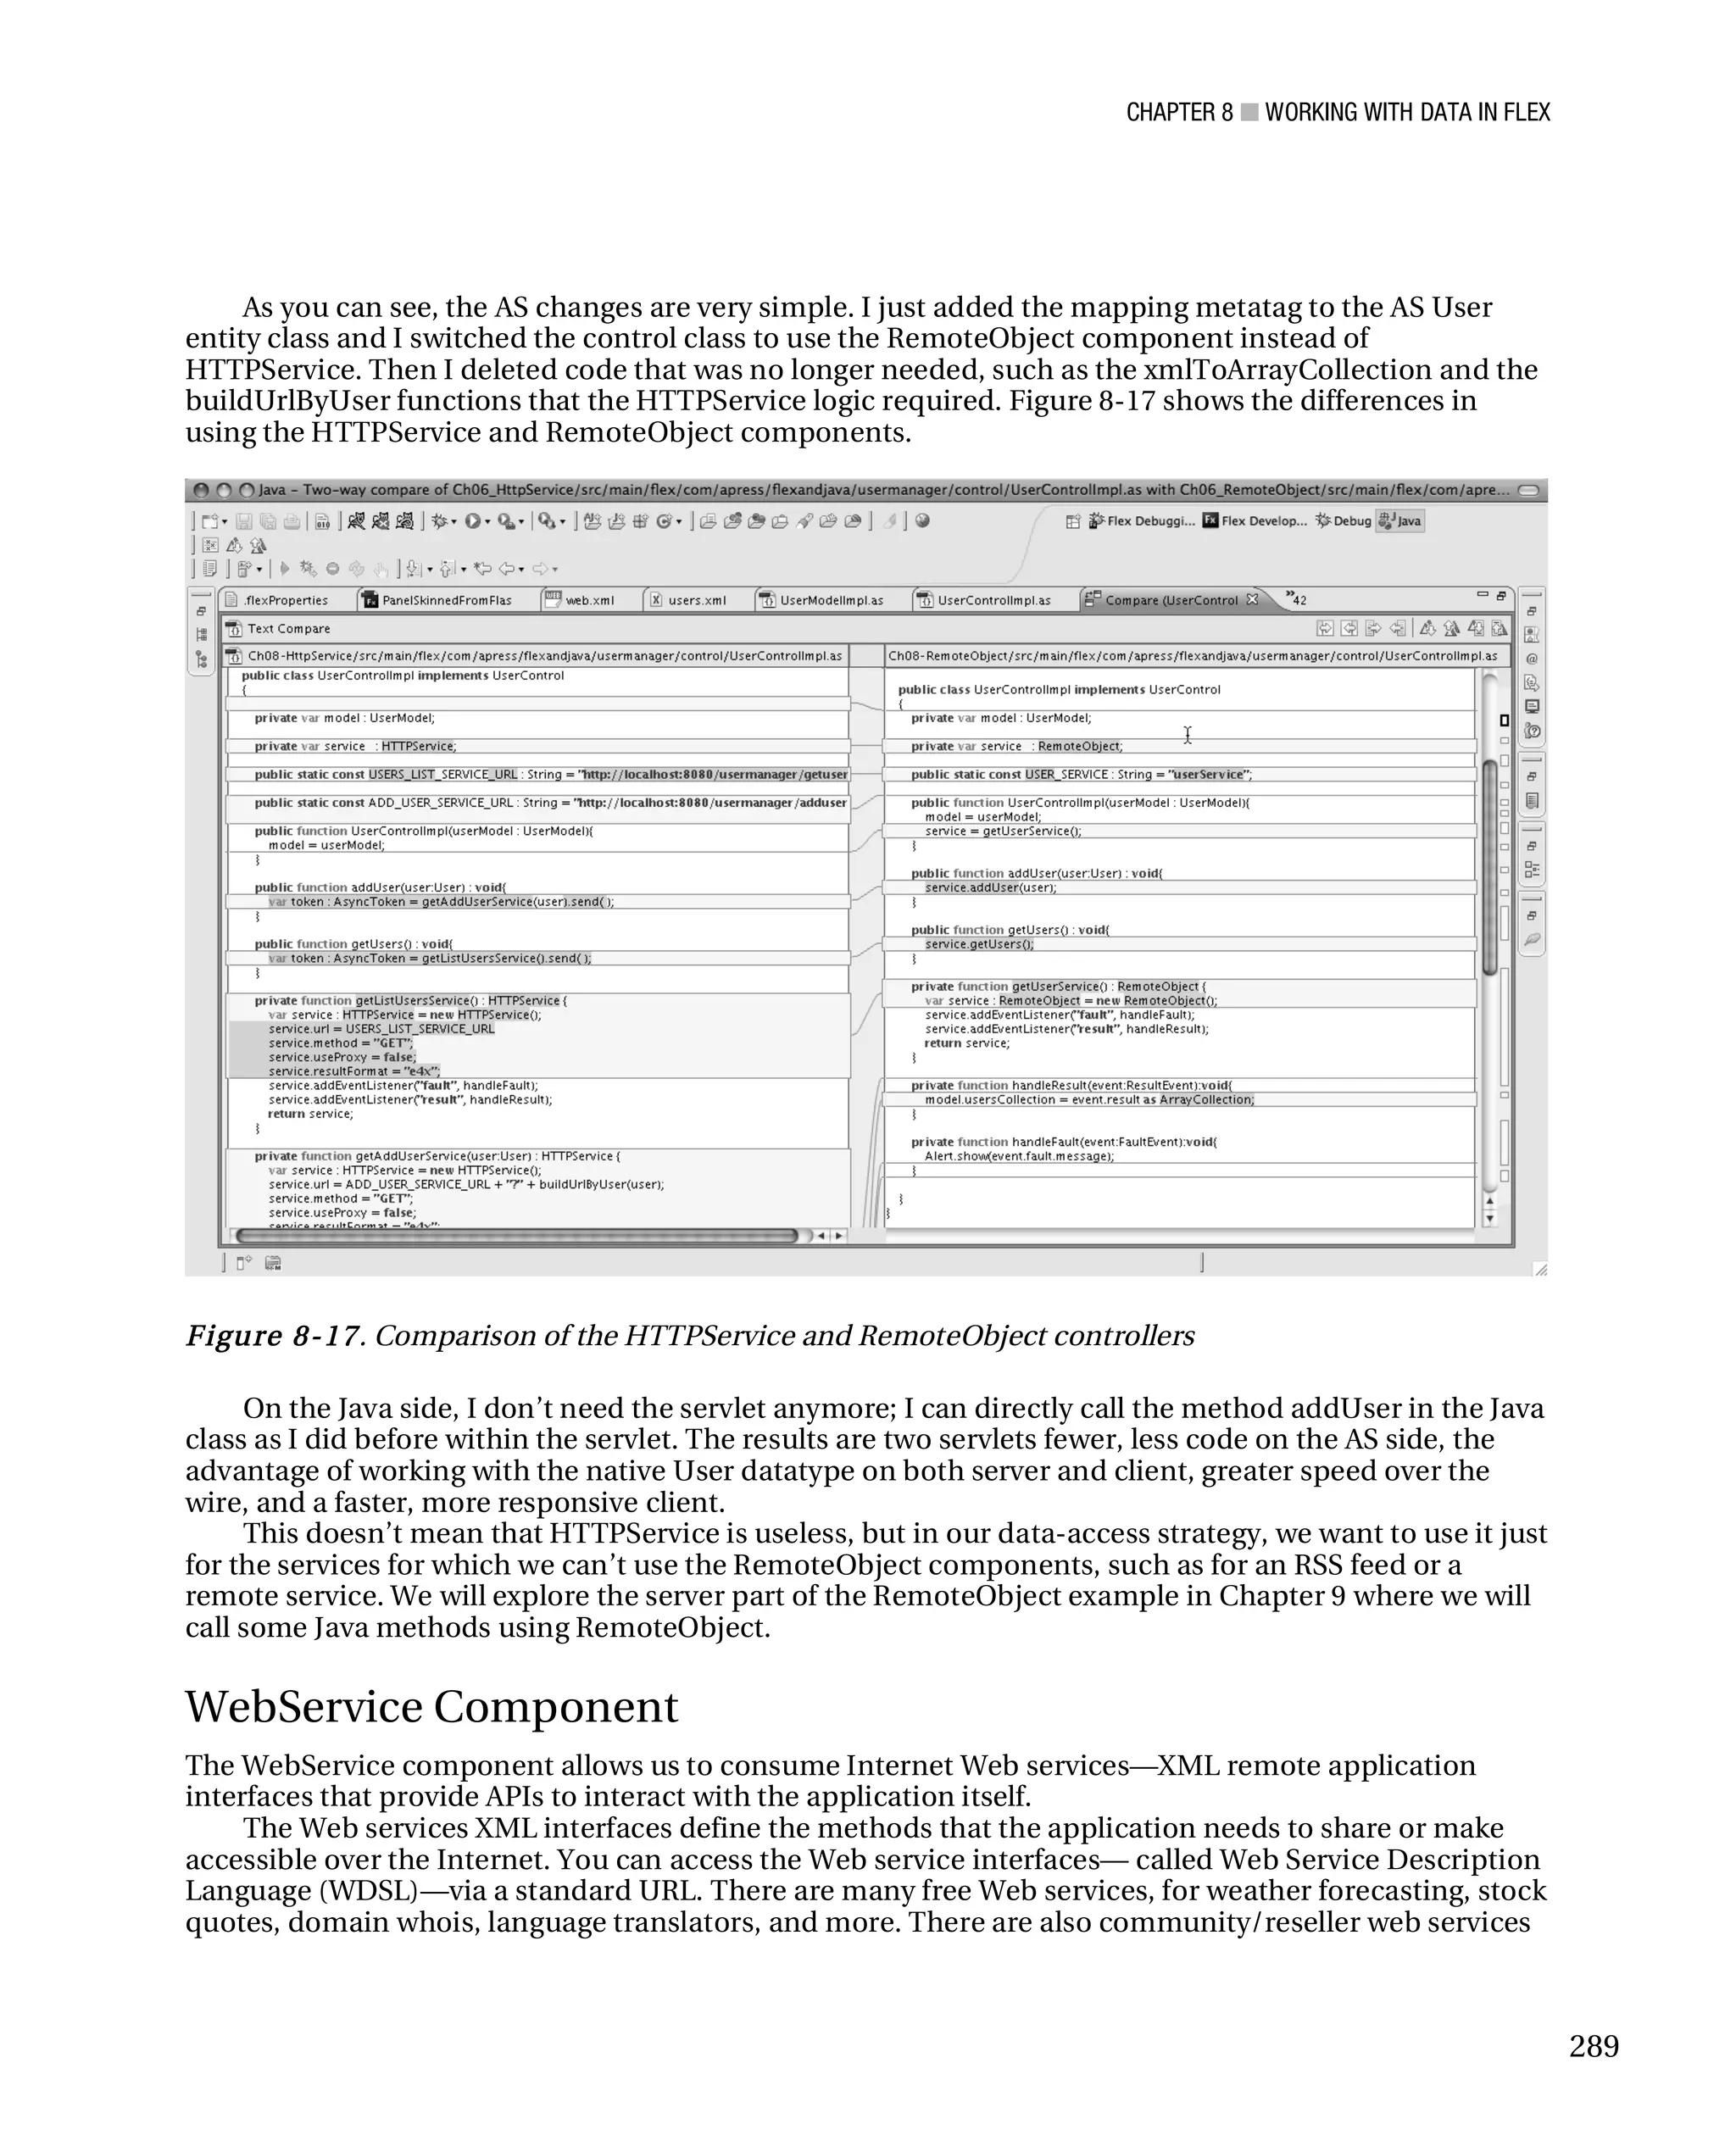
This is the complete code for the controller—the user implementation controller
UserControlImpl.as and its interface UserControl.as:
package com.apress.flexjava.usermanager.control
{
import com.apress.flexjava.usermanager.model.User;
import com.apress.flexjava.usermanager.model.UserModel;
import flash.xml.XMLDocument;
import mx.collections.ArrayCollection;
import mx.controls.Alert;
import mx.rpc.AsyncToken;
import mx.rpc.events.FaultEvent;
import mx.rpc.events.ResultEvent;
import mx.rpc.http.HTTPService;
import mx.rpc.xml.SimpleXMLDecoder;
public class UserControlImpl implements UserControl
{
private var model : UserModel;
private var service : HTTPService;
public static const USERS_LIST_SERVICE_URL : String =
"http://localhost:8080/usermanager/getusers";
282](https://image.slidesharecdn.com/beginningjavaandflex-migratingjavaspringhibernateandmavendeveloperstoadobeflex-100821073507-phpapp01/75/Beginning-java-and-flex-migrating-java-spring-hibernate-and-maven-developers-to-adobe-flex-301-2048.jpg)
![CHAPTER 8 ■ WORKING WITH DATA IN FLEX
[Bindable]
private var columnNameToSearch : String = "lastName";
[Bindable]
private var model : UserModel;
[Bindable]
private var control : UserControl;
public function init():void{
model = new UserModelImpl();
control = new UserControlImpl(model);
control.getUsers();
}
private function handleSearchMethod(event:ItemClickEvent):void {
columnNameToSearch = event.currentTarget.selectedValue as
String;
}
]]>
</mx:Script>
</mx:Application>
■ N ote As I mentioned, I “program to interface,” and for that approach I use an interface for each implemented
class. It is common in AS to identify an interface with a capital I at the beginning of the name. For example
IUserModel.as and UserModel.as should be the implementation. In Java, you add “Impl” at the end of the
implemented class. I prefer the Java way, not because I’m a Java addict, but it seems cleaner, and it’s good to
keep the same style for both the server and the client.
In this section, I introduced many new concepts that are the basis of our Flex-Java development. In
the next section I will show you how to use the RemoteObject instead of the HTTPService component.
RemoteObject Component
RemoteObject lets you access your server-side objects in a native way, which means you can access the
Java object while maintaining its data type in AS and vice versa.
To use the RemoteObject, you need a data service server such as Adobe BlazeDS; this allows you to
map a server-side object to your client-side object, and it automatically serializes them. For example, if
you want to pass the AS User object to a Java method that takes the User as an argument and inserts it
into a database or into an XML file, you just have to tell the compiler the mapping path between the AS
and the Java User entity.
286](https://image.slidesharecdn.com/beginningjavaandflex-migratingjavaspringhibernateandmavendeveloperstoadobeflex-100821073507-phpapp01/75/Beginning-java-and-flex-migrating-java-spring-hibernate-and-maven-developers-to-adobe-flex-305-2048.jpg)
![CHAPTER 8 ■ WORKING WITH DATA IN FLEX
To Map an AS object to a server-side object, you can use the [RemoteClass] metatag, giving it the
server-side object class path that you want to map. In the code listed below, you map the Java User
entity (User.java), which is stored in the com.apress.usermanager.model Java package, with the AS User
entity (User.as) stored in the AS com.apress.flexjava.usermanager.model package.
package com.apress.flexjava.usermanager.model
{
[RemoteClass(alias="com.apress.usermanager.model.User")]
public class User
{
public function User(){
}
public var uid : String ;
public var username : String;
public var commonName : String;
public var lastName : String;
public var email : String;
public var password : String;
}
}
The object on the server can interact in its native datatype for both requests and responses.
RemoteObject saves a lot of development time because you don’t have to expose the logic of the
application as XML as you do when using the HTTPService component. Even if RemoteObject still uses
HTTP to exchange data, communication is faster than using HTTPService because the data has
serialized itself into a binary representation. This means that the object processing time is reduced, and
the client memory use and the transfer rate are also less.
In the previous example, we dealt with server-side objects through a Java servlet consumed by the
HTTPService component, appending all user properties on the URL. The next example shows how to get
the same results using the RemoteObject component.
■ N ote In this chapter I will show you just the difference between the two UserControlImpl classes using the
HTTPService and the RemoteObject components. To see how to actually use this class, I refer you to chapters 9
and 10 where I will show how to configure the remote server to allow the use of the RemoteObject component.
package com.apress.flexjava.usermanager.control
{
287](https://image.slidesharecdn.com/beginningjavaandflex-migratingjavaspringhibernateandmavendeveloperstoadobeflex-100821073507-phpapp01/75/Beginning-java-and-flex-migrating-java-spring-hibernate-and-maven-developers-to-adobe-flex-306-2048.jpg)
![CHAPTER 8 ■ WORKING WITH DATA IN FLEX
[Bindable]
private var ip : String;
public function init() : void {
myService.GetGeoIPContext.send();
}
public function getGeoIPContextHandler(event : ResultEvent) : void{
ip = event.result.IP;
}
]]>
</mx:Script>
</mx:Application>
When I run the code, it will obtain my public IP address as shown in Figure 8-24.
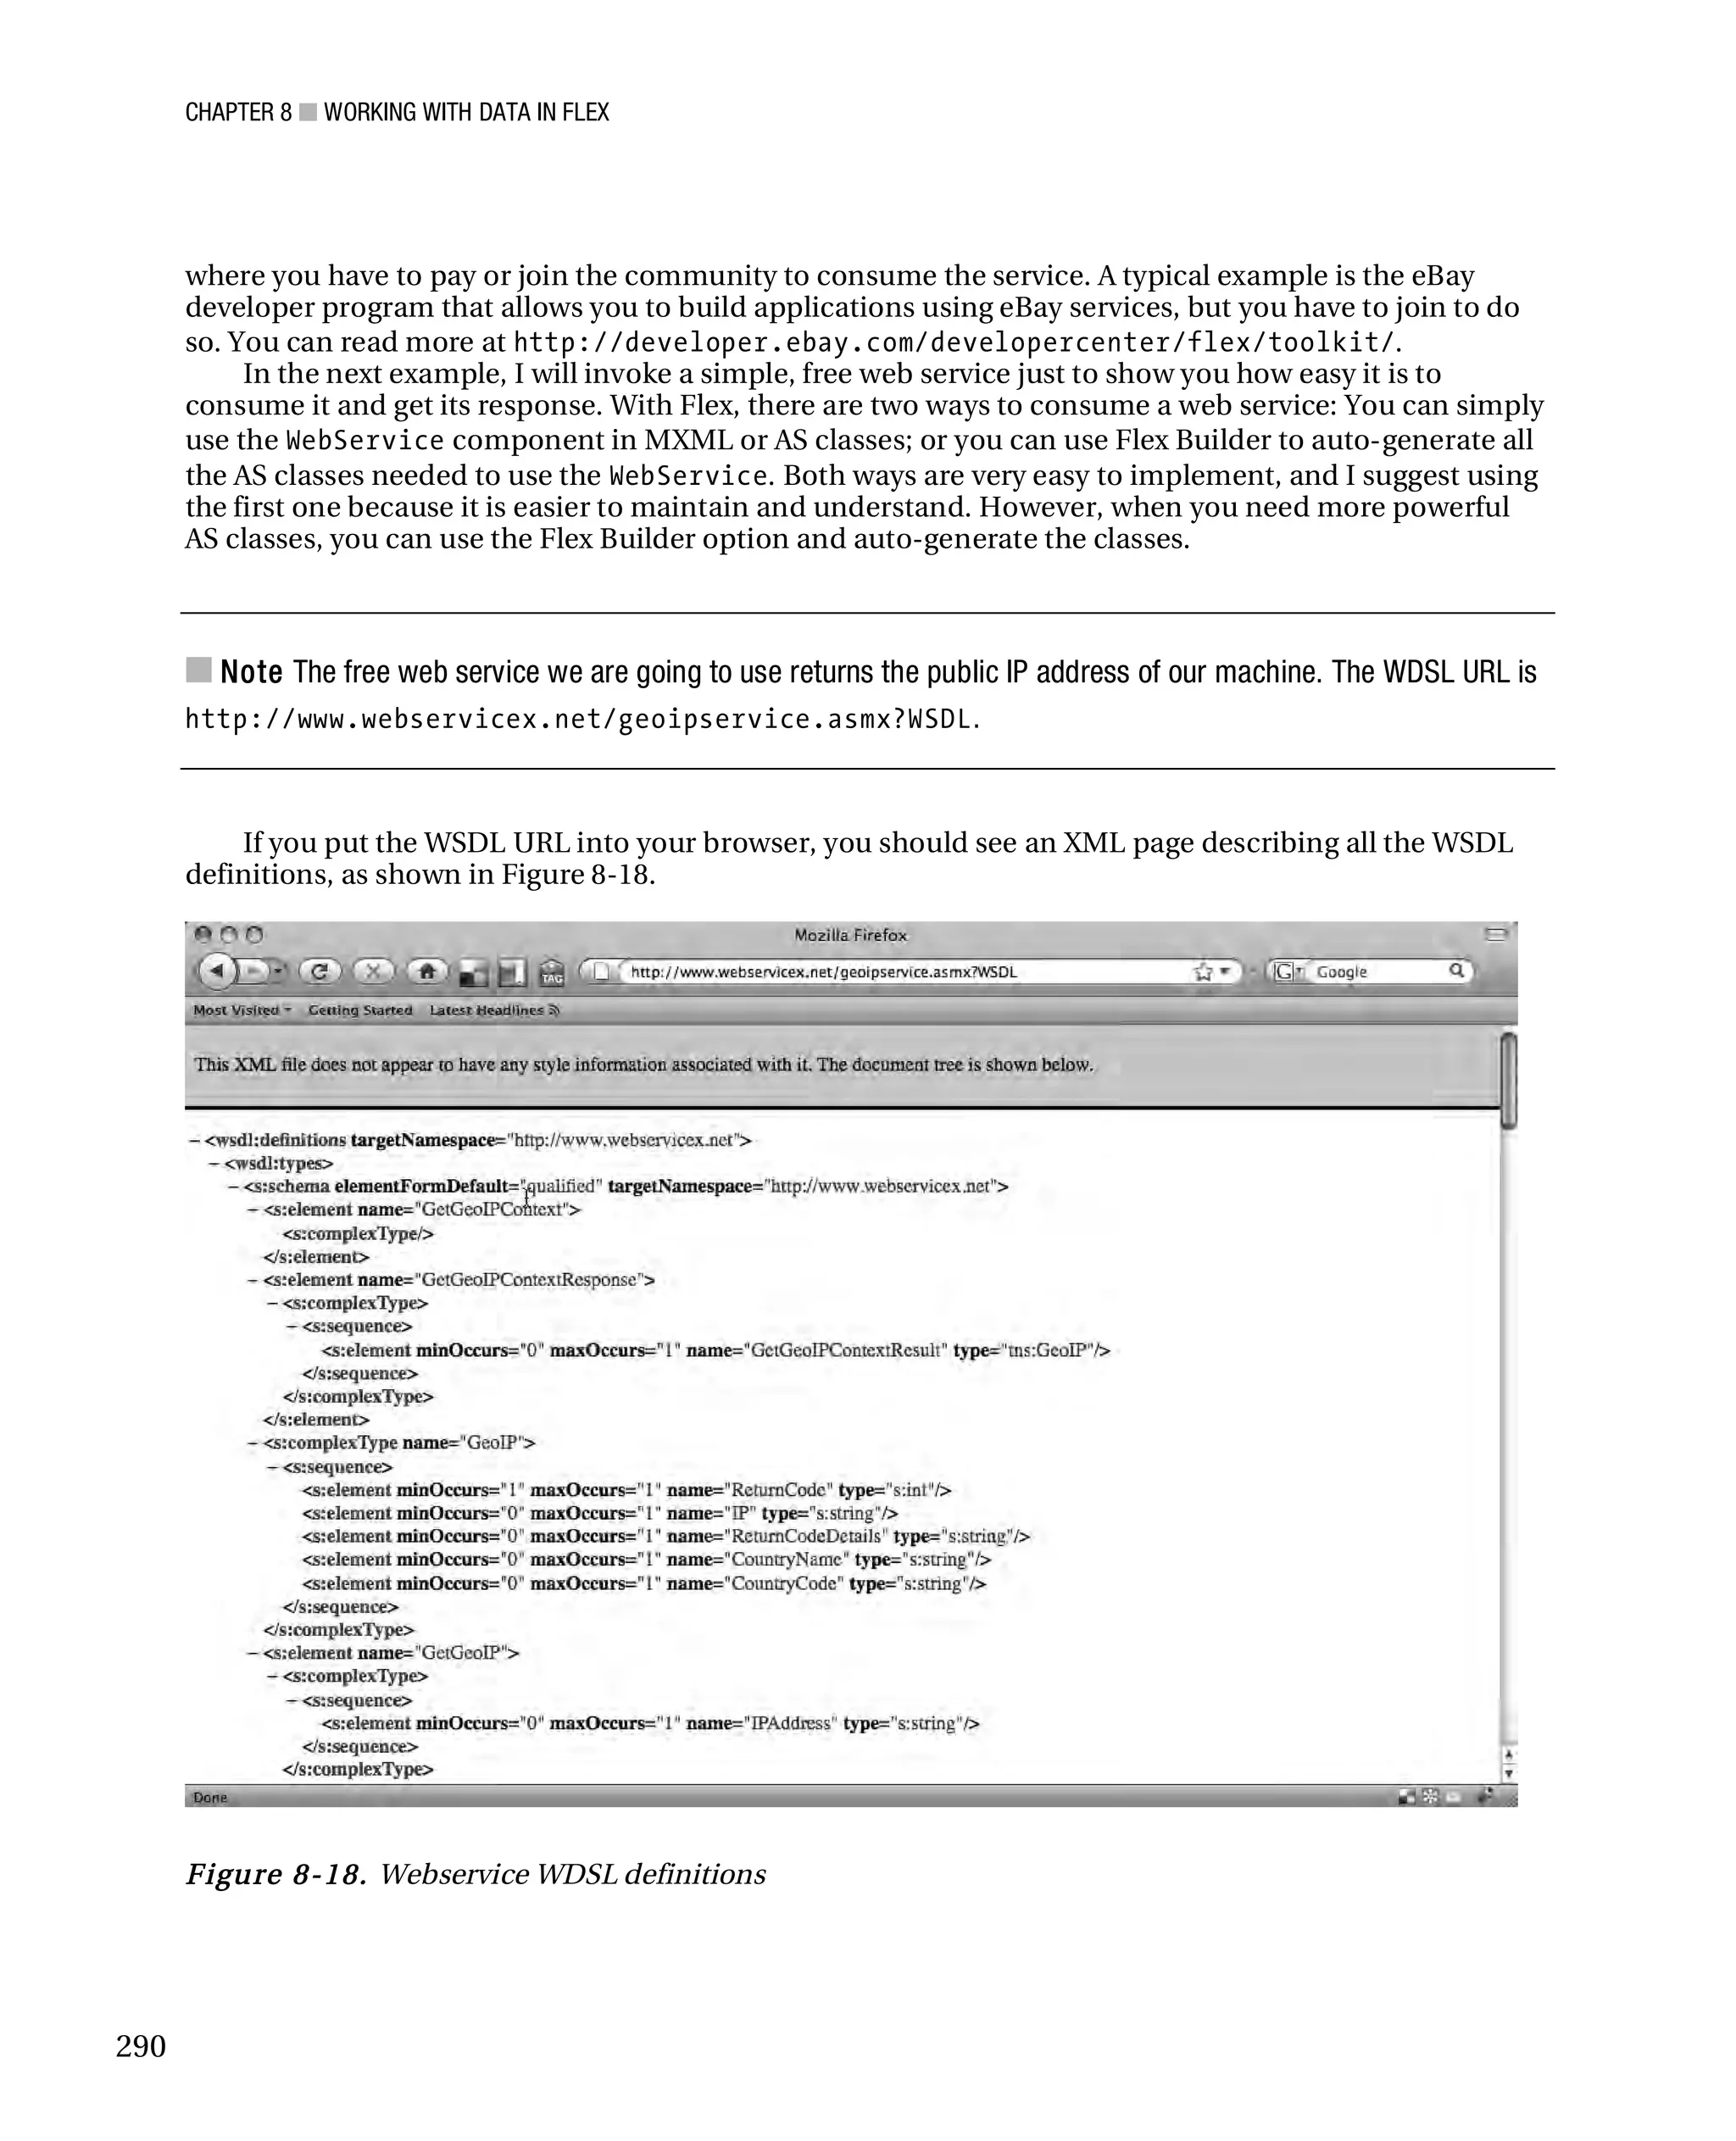
Figure 8-24. The public IP address retrieved using the WebServices APIs
Creating ActionScript Code to Consume a Web Service using Flex
Builder
The other way to use the Web services is through Flex Builder. Let’s create another application class
called ASWebserviceTest.mxml. You know the routine: File ➤ New ➤ MXML Application. Then click on
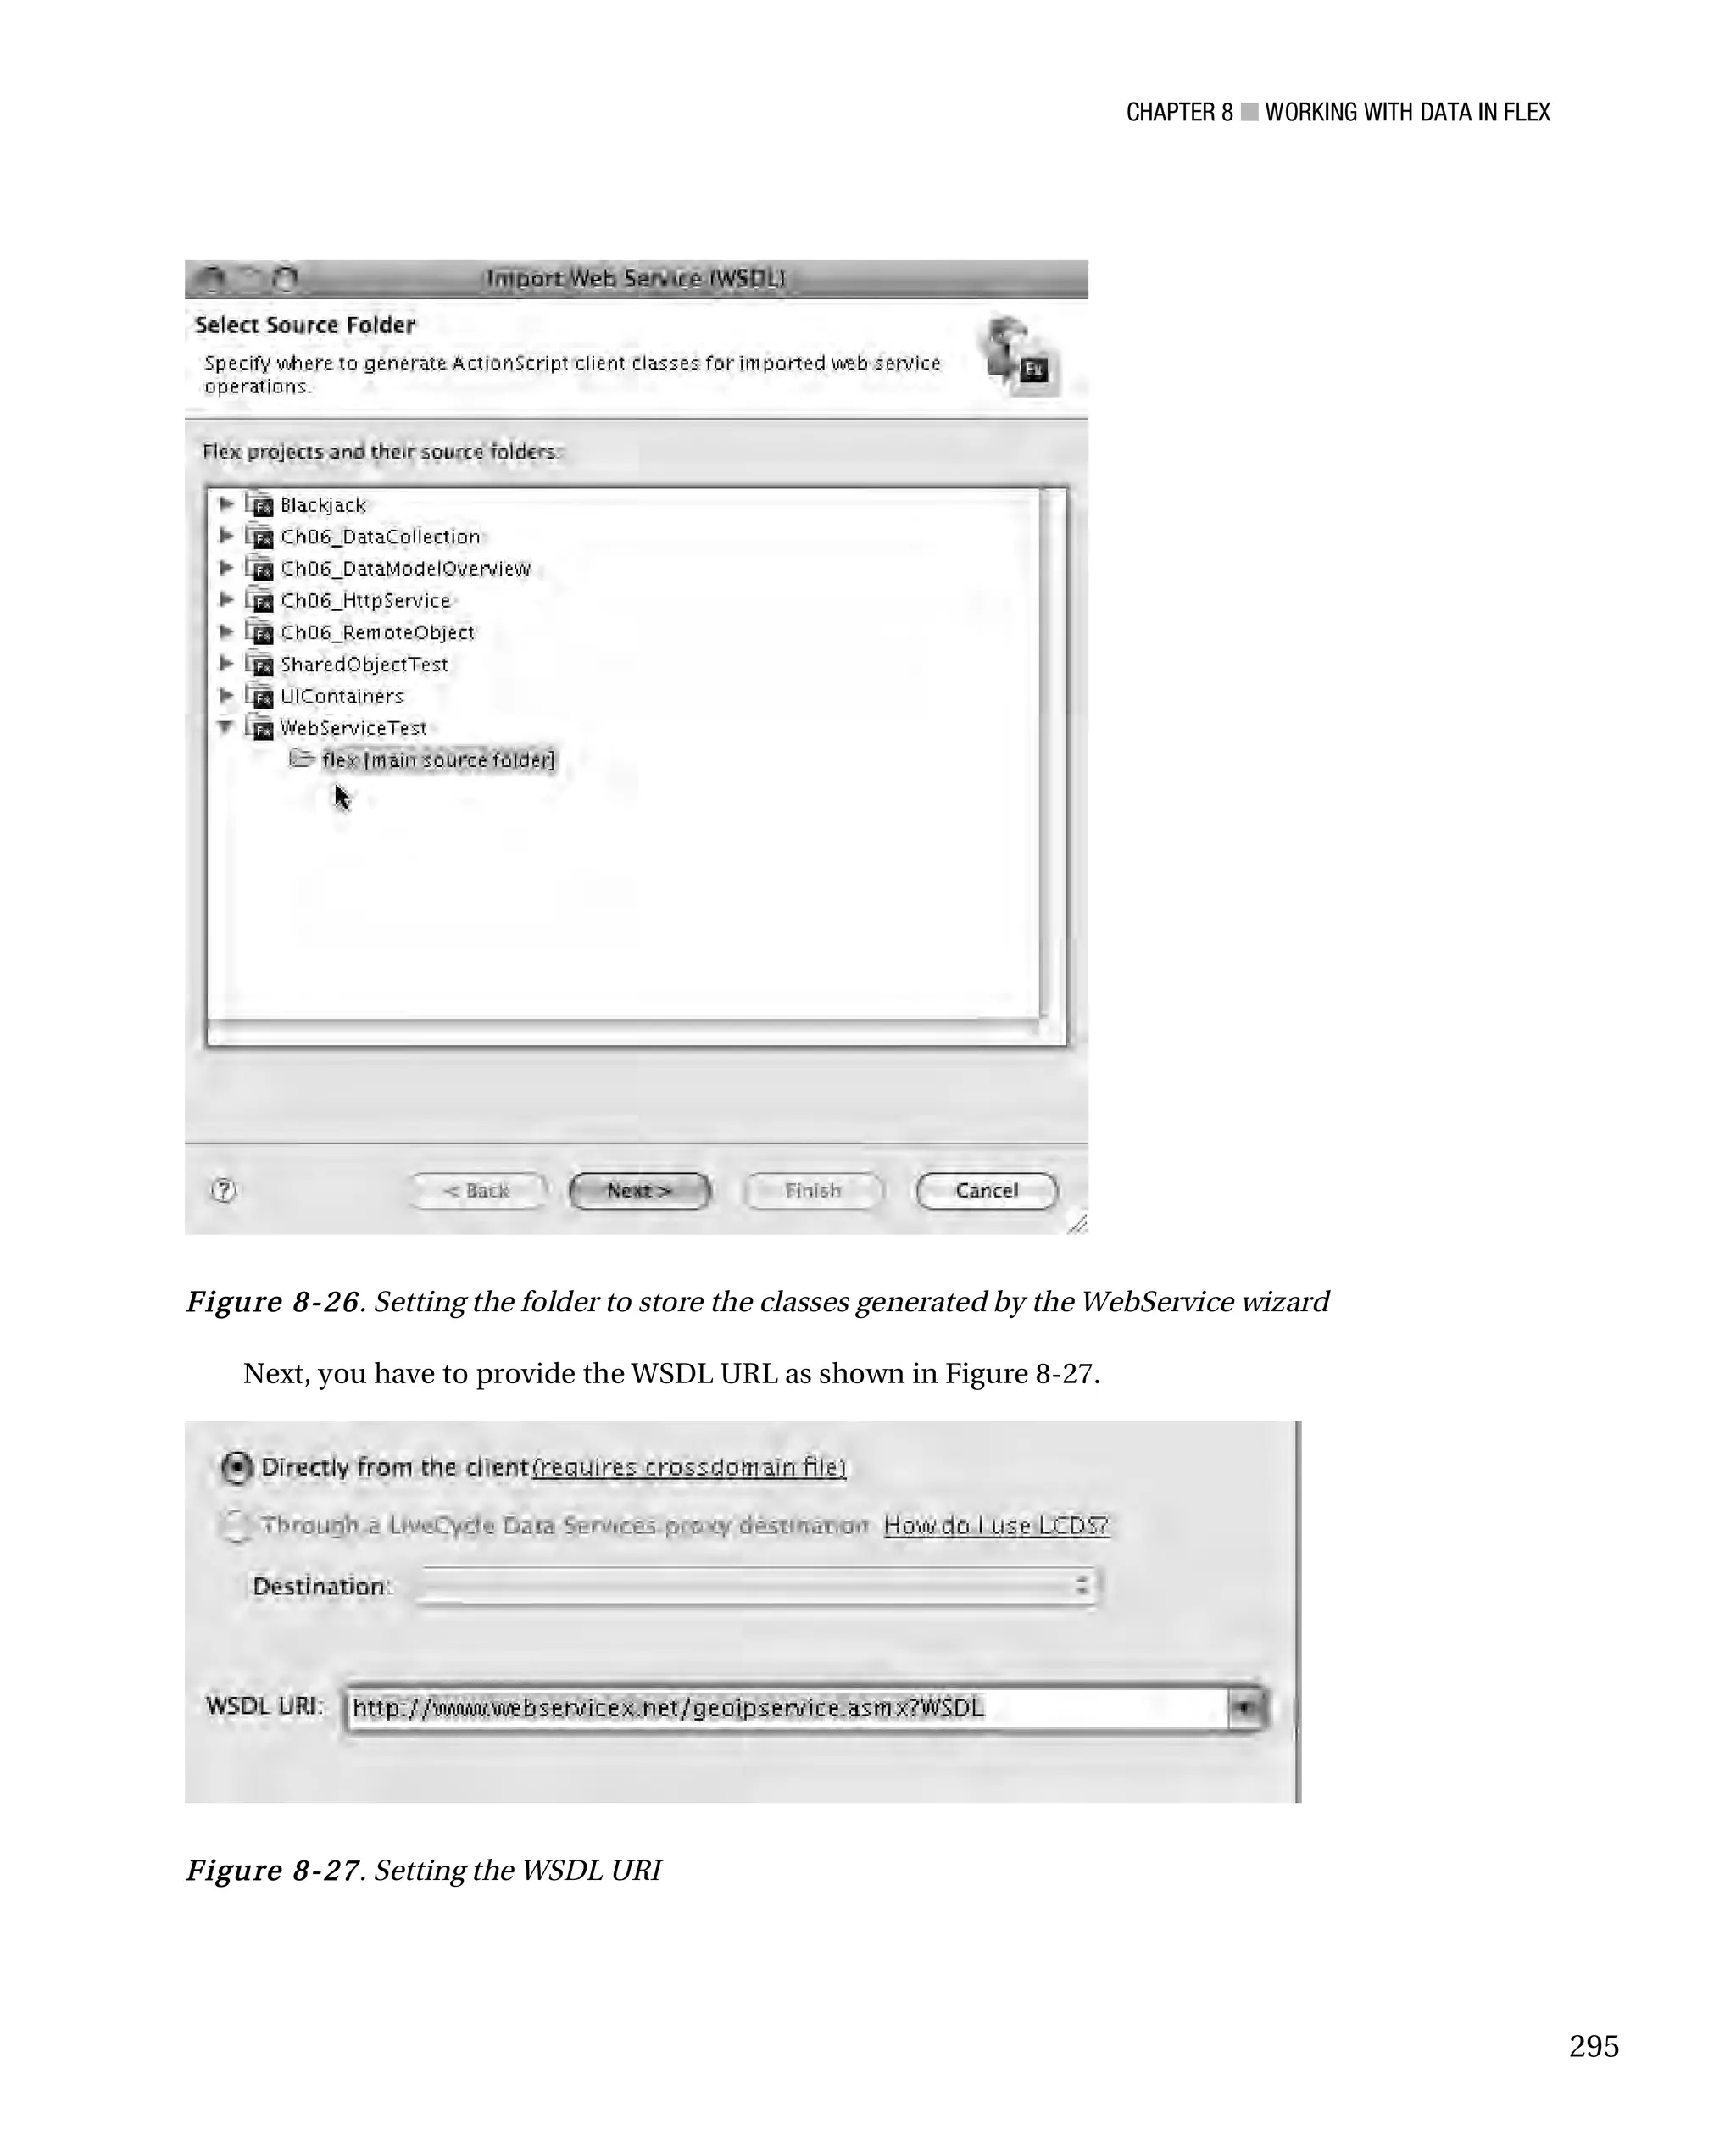
the menu bar and select Data ➤ Import Web Service (WSDL) as in Figure 8-25.
Figure 8-25.The Eclipse “Import Web Service” wizard
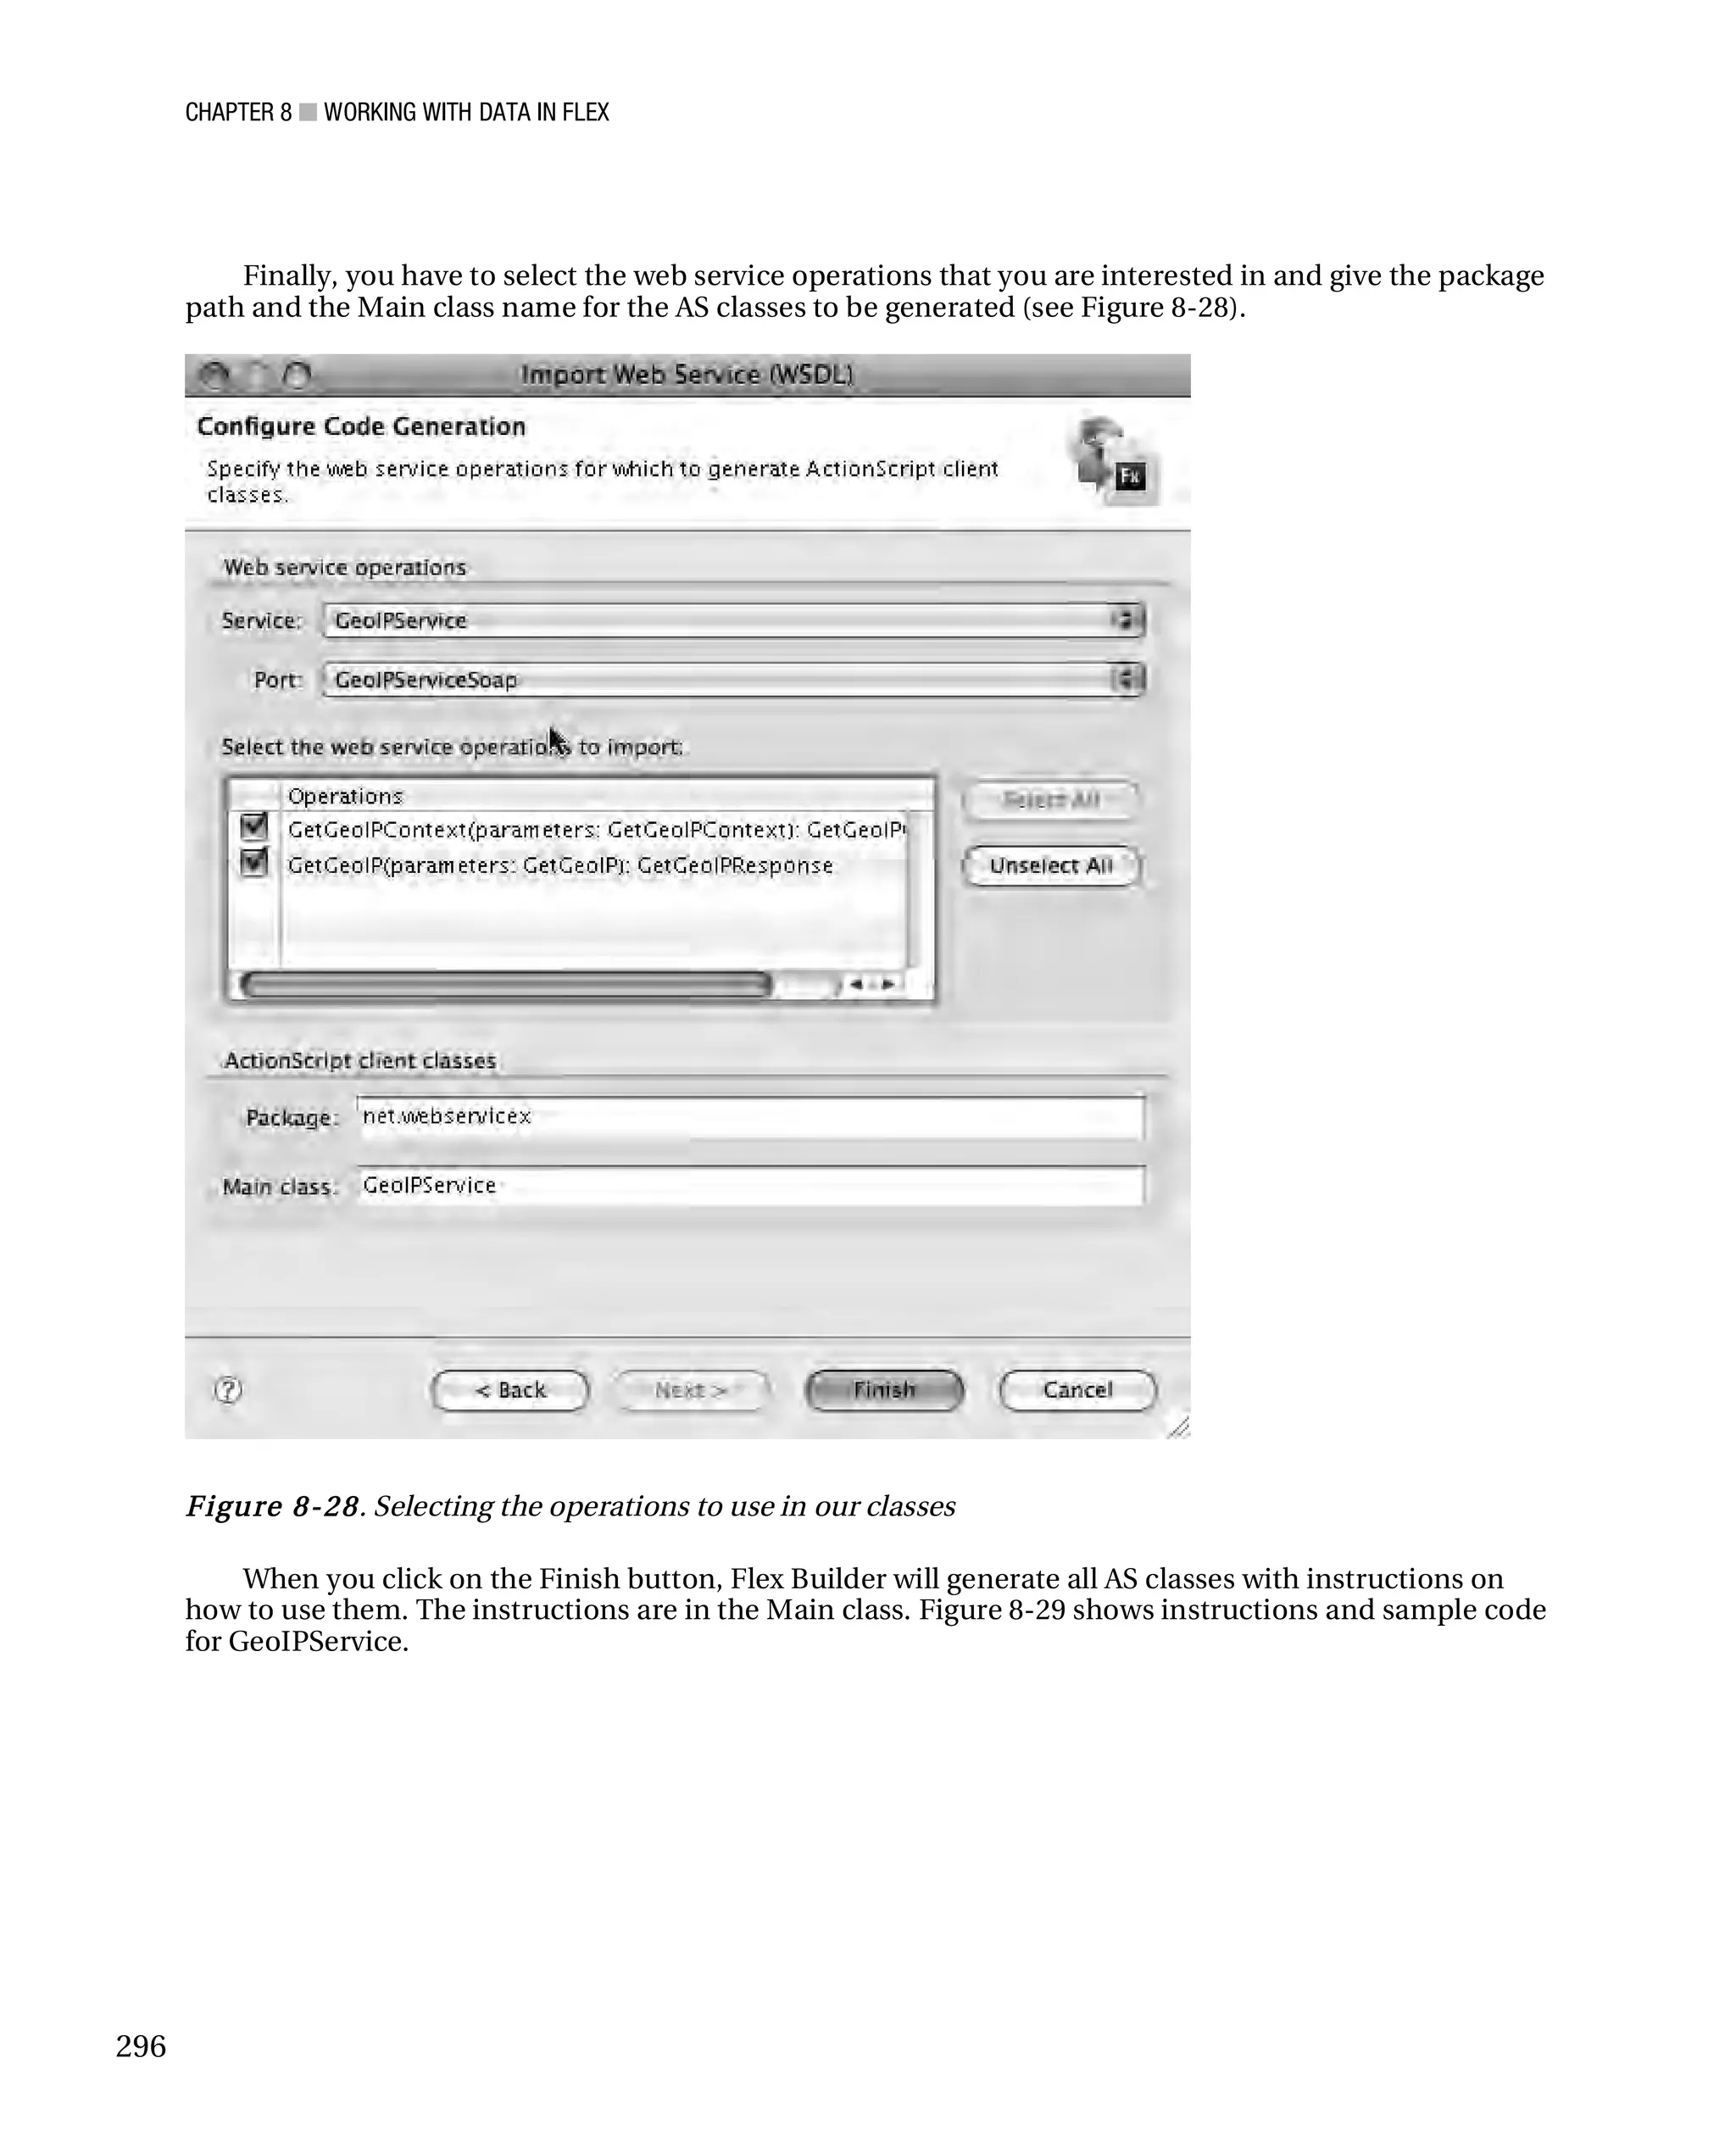
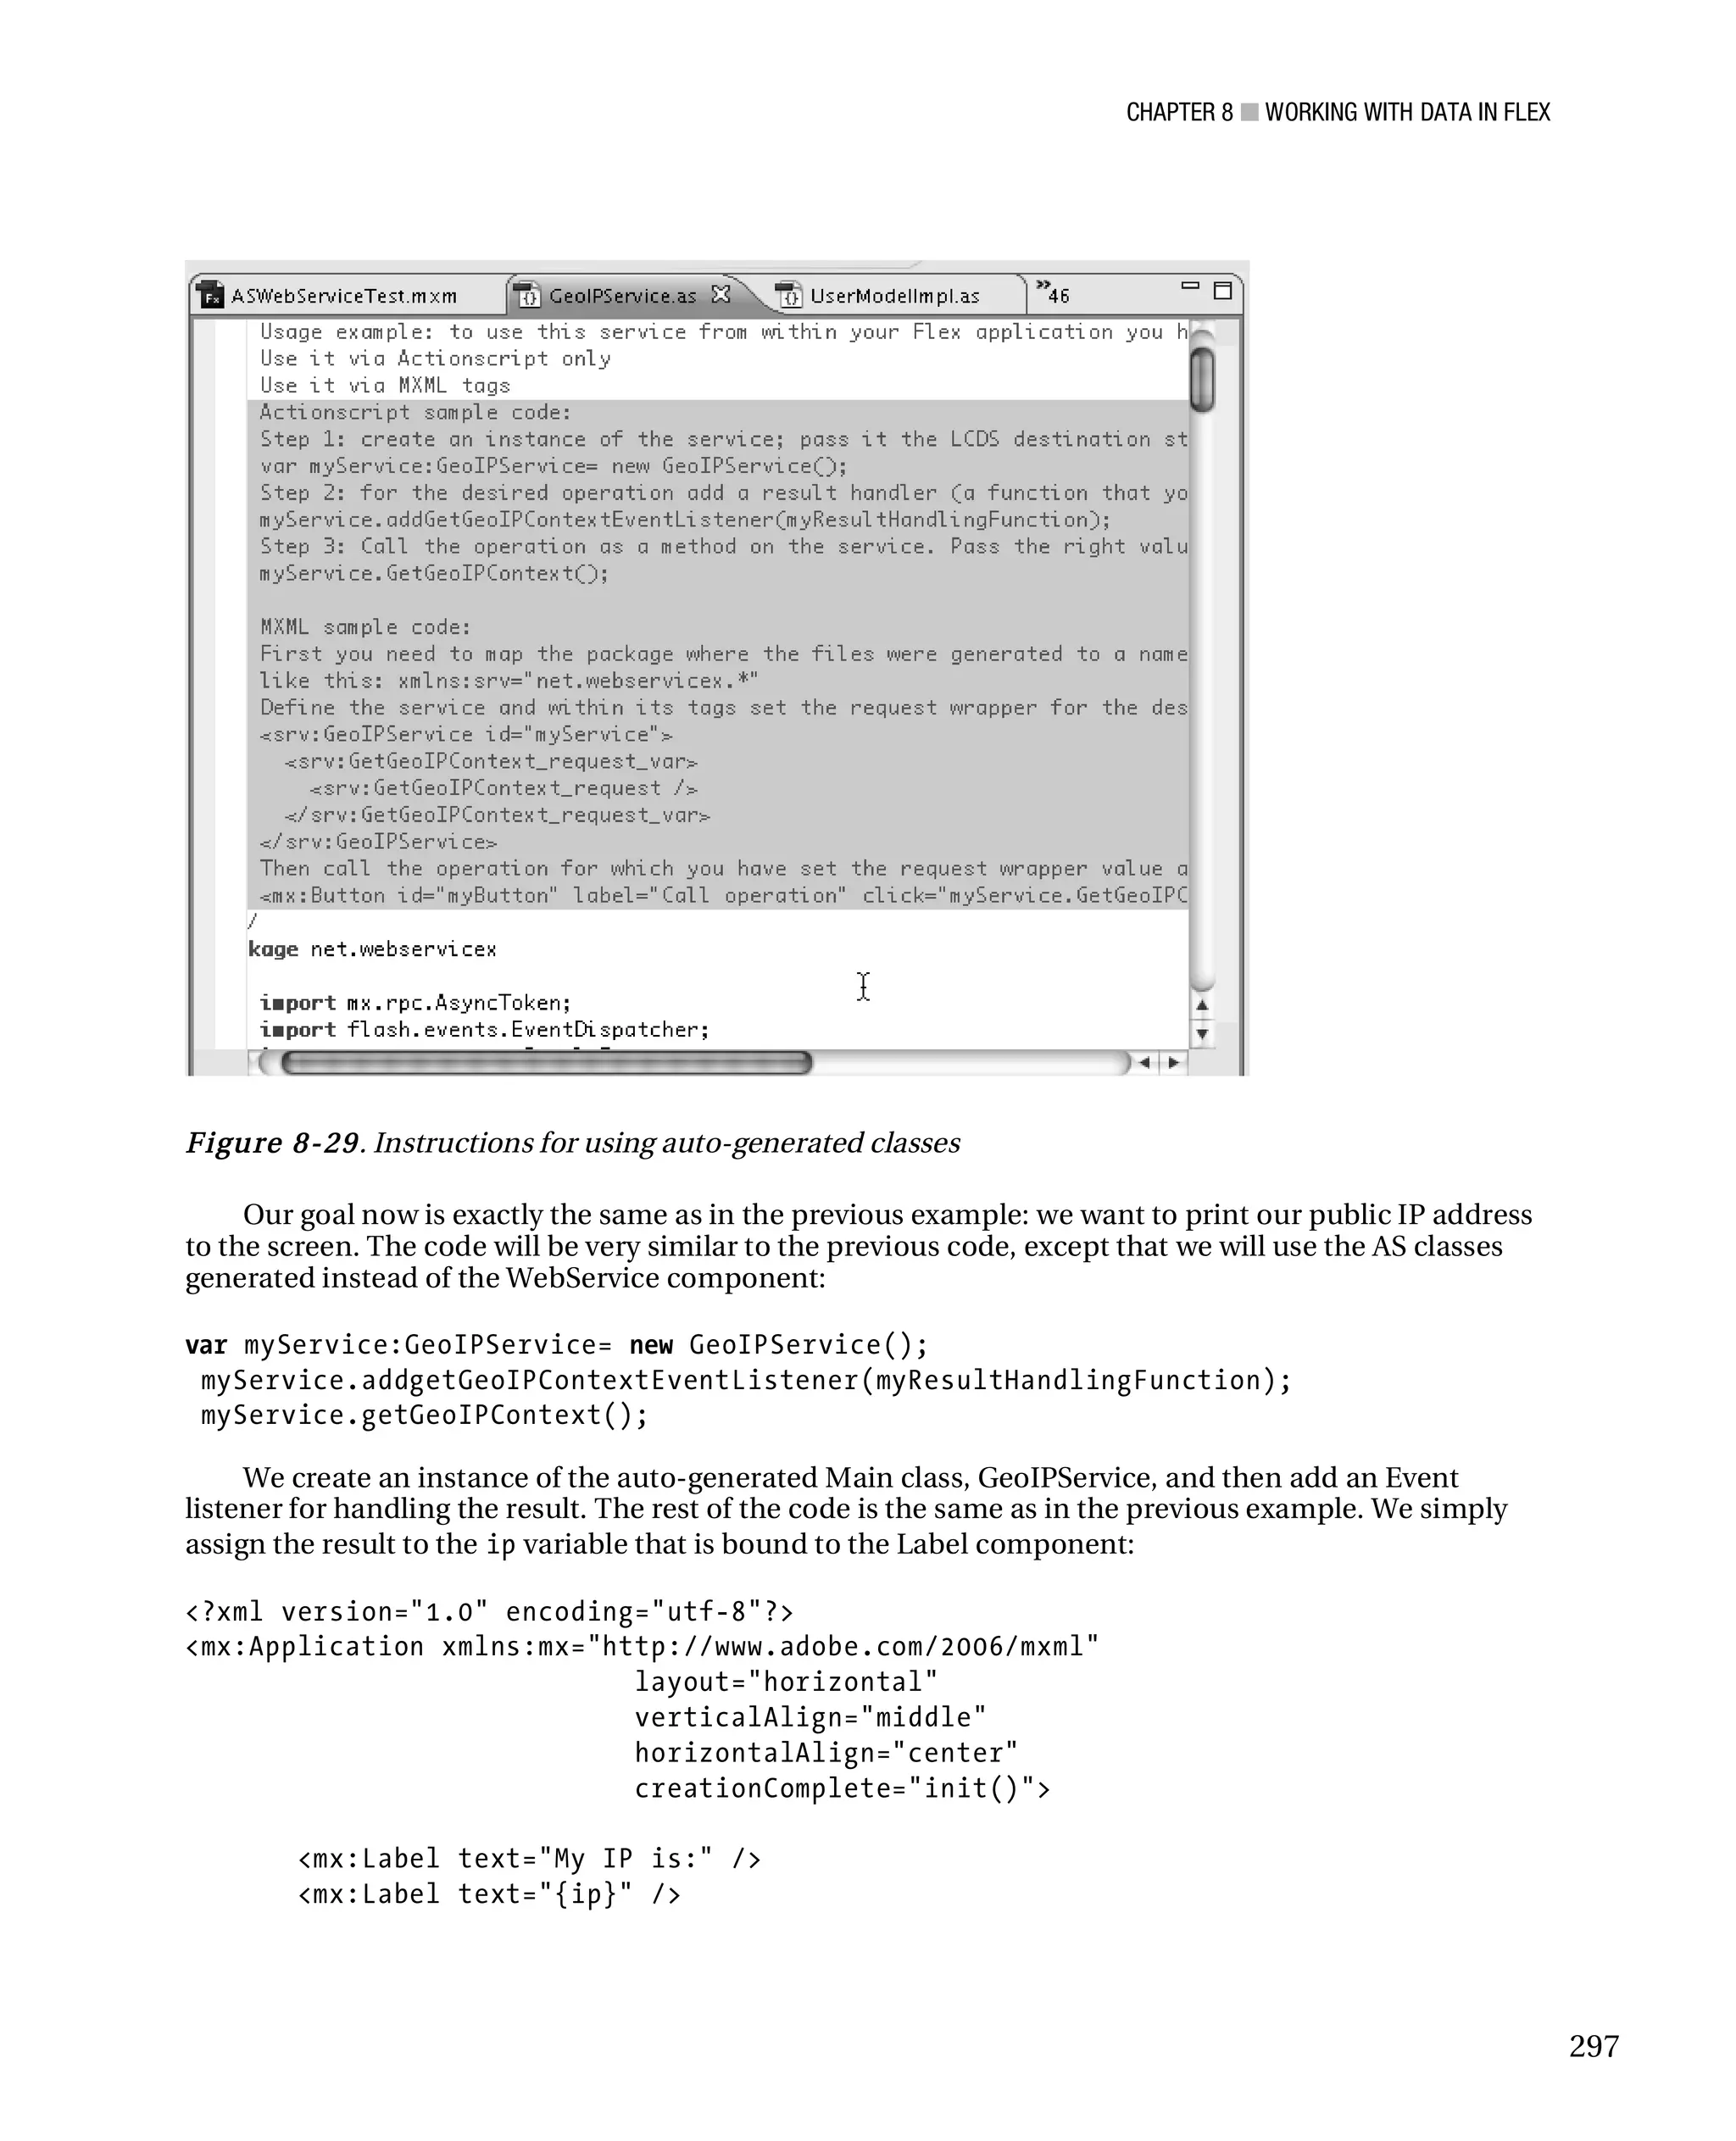
The Import Web Service wizard will prompt where you need to insert information. First, you have to
confirm the project source folder, as shown in Figure 8-26.
294](https://image.slidesharecdn.com/beginningjavaandflex-migratingjavaspringhibernateandmavendeveloperstoadobeflex-100821073507-phpapp01/75/Beginning-java-and-flex-migrating-java-spring-hibernate-and-maven-developers-to-adobe-flex-313-2048.jpg)
![CHAPTER 8 ■ WORKING WITH DATA IN FLEX
<mx:Script>
<![CDATA[
import net.webservicex.GetGeoIPContextResultEvent;
import net.webservicex.GeoIP;
import net.webservicex.GeoIPService;
[Bindable]
private var ip : String;
public function init() : void{
var myService:GeoIPService= new GeoIPService();
myService.addgetGeoIPContextEventListener(myResultHandlingFunction);
myService.getGeoIPContext();
}
public function myResultHandlingFunction
(event:GetGeoIPContextResultEvent):void{
ip = event.result.IP;
}
]]>
</mx:Script>
</mx:Application>
Both ways are fine and easy to use. I prefer to use the first approach, instantiating the WebService
component in AS rather than in MXML. The auto-generated classes solution is nice, even if the auto-
generated code is not in the same style of your application. In the next section, I will show how to store
data directly on the client machine.
Storing Data on the Local Machine
Flex provides a SharedObject class to store data on the hard drive of the user’s machine. This solution is
not suitable for our needs because the data is stored only on the user’s local machine, not shared over
the network/Internet. We could have used this solution in our previous example, but if we tried to see
the application from another machine, we would get different results. Also, you can save only a defined
amount on a user’s local machine, depending on the FlashPlayer settings. For example, if the user
configured his FlashPlayer to store just 10 KB, you can save a maximum of 10 KB and no more.
The shared object becomes useful when you have to store custom application settings or data on
the client. It works like a browser cookie. Each application owns its shared objects and can access them
only if they are running in the same domain. This is different from a cookie’s shared object as it doesn’t
expire by default and is limited to a size of 100 KB compared to the much smaller browser cookie size of
4 KB.
298](https://image.slidesharecdn.com/beginningjavaandflex-migratingjavaspringhibernateandmavendeveloperstoadobeflex-100821073507-phpapp01/75/Beginning-java-and-flex-migrating-java-spring-hibernate-and-maven-developers-to-adobe-flex-317-2048.jpg)
![CHAPTER 8 ■ WORKING WITH DATA IN FLEX
■ N ote If you use Flash Media Server, you can also store the shared object on the server for other clients to
retrieve.
The next example will use the SharedObject class to store a shared object to the user’s local machine
in order to see the dates and how many times the user used the application. To show how the
SharedObejct works, I have added a button that calls a function to delete the shared object from the local
machine. To test it, refresh the browser repeatedly and you will see the date and the visit counter
changing.
For the example, I created a Label component to which I bind the variable lastVisitMessage, and a
Button that handles the function to delete the shared object from the user’s local machine:
<mx:Label text="{lastVisitMessage}"/>
<mx:Button label="Delete Shared Object" click="deleteSharedObject()"/>
The variable lastVisitMessage will be set when the application has loaded, then the application will
call the setSharedObject methods that create or update the shared object on the local machine:
private function setSharedObjet():void {
sharedObject.data.lastVisitDate = new Date();
sharedObject.data.counter = (getSharedObjet().counter ==
null)?1:getSharedObjet().counter + 1;
sharedObject.flush();
}
Here is the complete code:
<?xml version="1.0"?>
<mx:Application xmlns:mx="http://www.adobe.com/2006/mxml"
creationComplete="init()">
<mx:Label text="{lastVisitMessage}"/>
<mx:Button label="Delete Shared Objed" click="deleteSharedObject()"/>
<mx:Script>
<![CDATA[
public var sharedObject:SharedObject;
[Bindable]
public var lastVisitMessage:String;
public function init():void {
sharedObject = SharedObject.getLocal("sharedObjectTest");
if (sharedObject.data.lastVisitDate==null) {
lastVisitMessage = "This is the first time that you
use this application."
299](https://image.slidesharecdn.com/beginningjavaandflex-migratingjavaspringhibernateandmavendeveloperstoadobeflex-100821073507-phpapp01/75/Beginning-java-and-flex-migrating-java-spring-hibernate-and-maven-developers-to-adobe-flex-318-2048.jpg)
![CHAPTER 8 ■ WORKING WITH DATA IN FLEX
} else {
lastVisitMessage = "This is the " + getSharedObjet().counter
+
" time that you used this application. Your last visit was on " +
getSharedObjet().lastVisitDate;
}
setSharedObjet();
}
private function getSharedObjet():Object {
return sharedObject.data;
}
private function setSharedObjet():void {
sharedObject.data.lastVisitDate = new Date();
sharedObject.data.counter = (getSharedObjet().counter ==
null)?1:getSharedObjet().counter + 1;
sharedObject.flush();
}
private function deleteSharedObject():void {
sharedObject.clear();
}
]]>
</mx:Script>
</mx:Application>
On refreshing your browser, you should see the counter and the date keep changing, as in Figure 8-
30.
Figure 8-30. Storing a “cookie” on the local machine through the Flex ShareObject APIs
Summary
In this chapter I showed you the most important ways to structure the data on the client and to access
data on a remote server. First, I showed you how to bind AS data collection to AS DataGrid components
and how to create a real time search into the collection using filters. Next, I created a Java application
that provided a list of users through servlets. The Flex client retrieved the XML using the HTTPService
component. Finally, I showed you how you can use the Flex RemoteObject component.
300](https://image.slidesharecdn.com/beginningjavaandflex-migratingjavaspringhibernateandmavendeveloperstoadobeflex-100821073507-phpapp01/75/Beginning-java-and-flex-migrating-java-spring-hibernate-and-maven-developers-to-adobe-flex-319-2048.jpg)

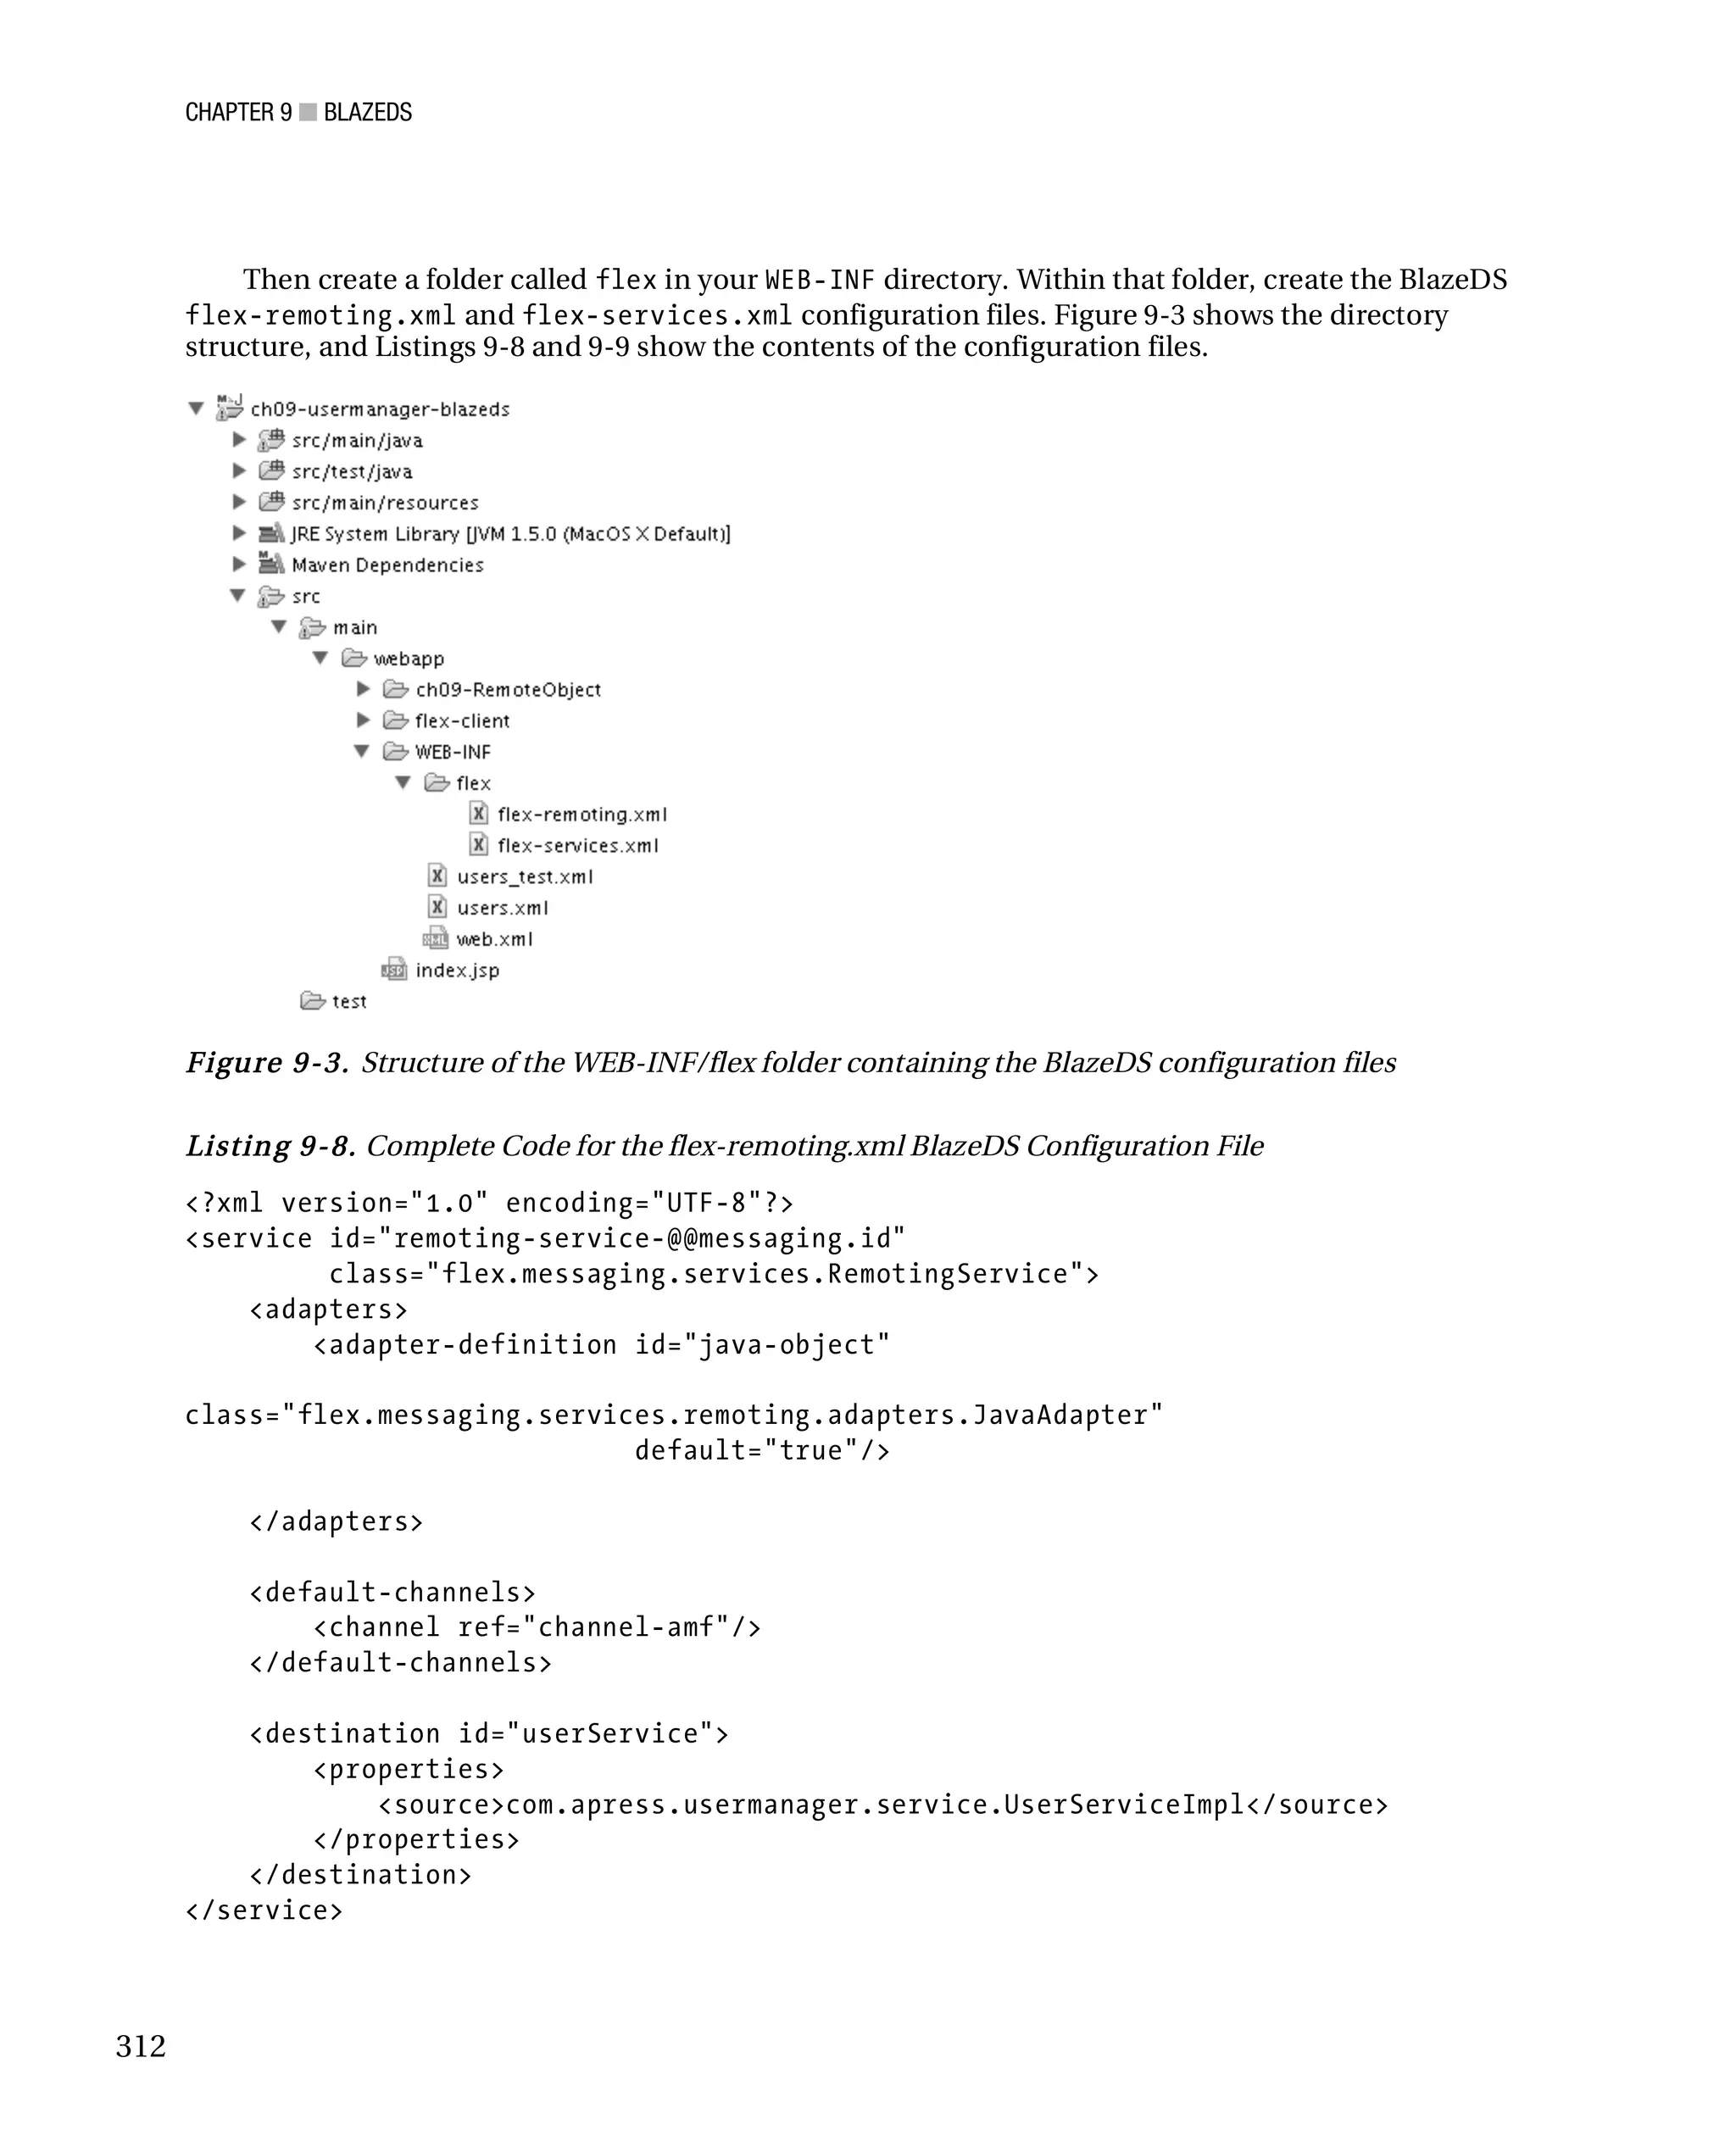
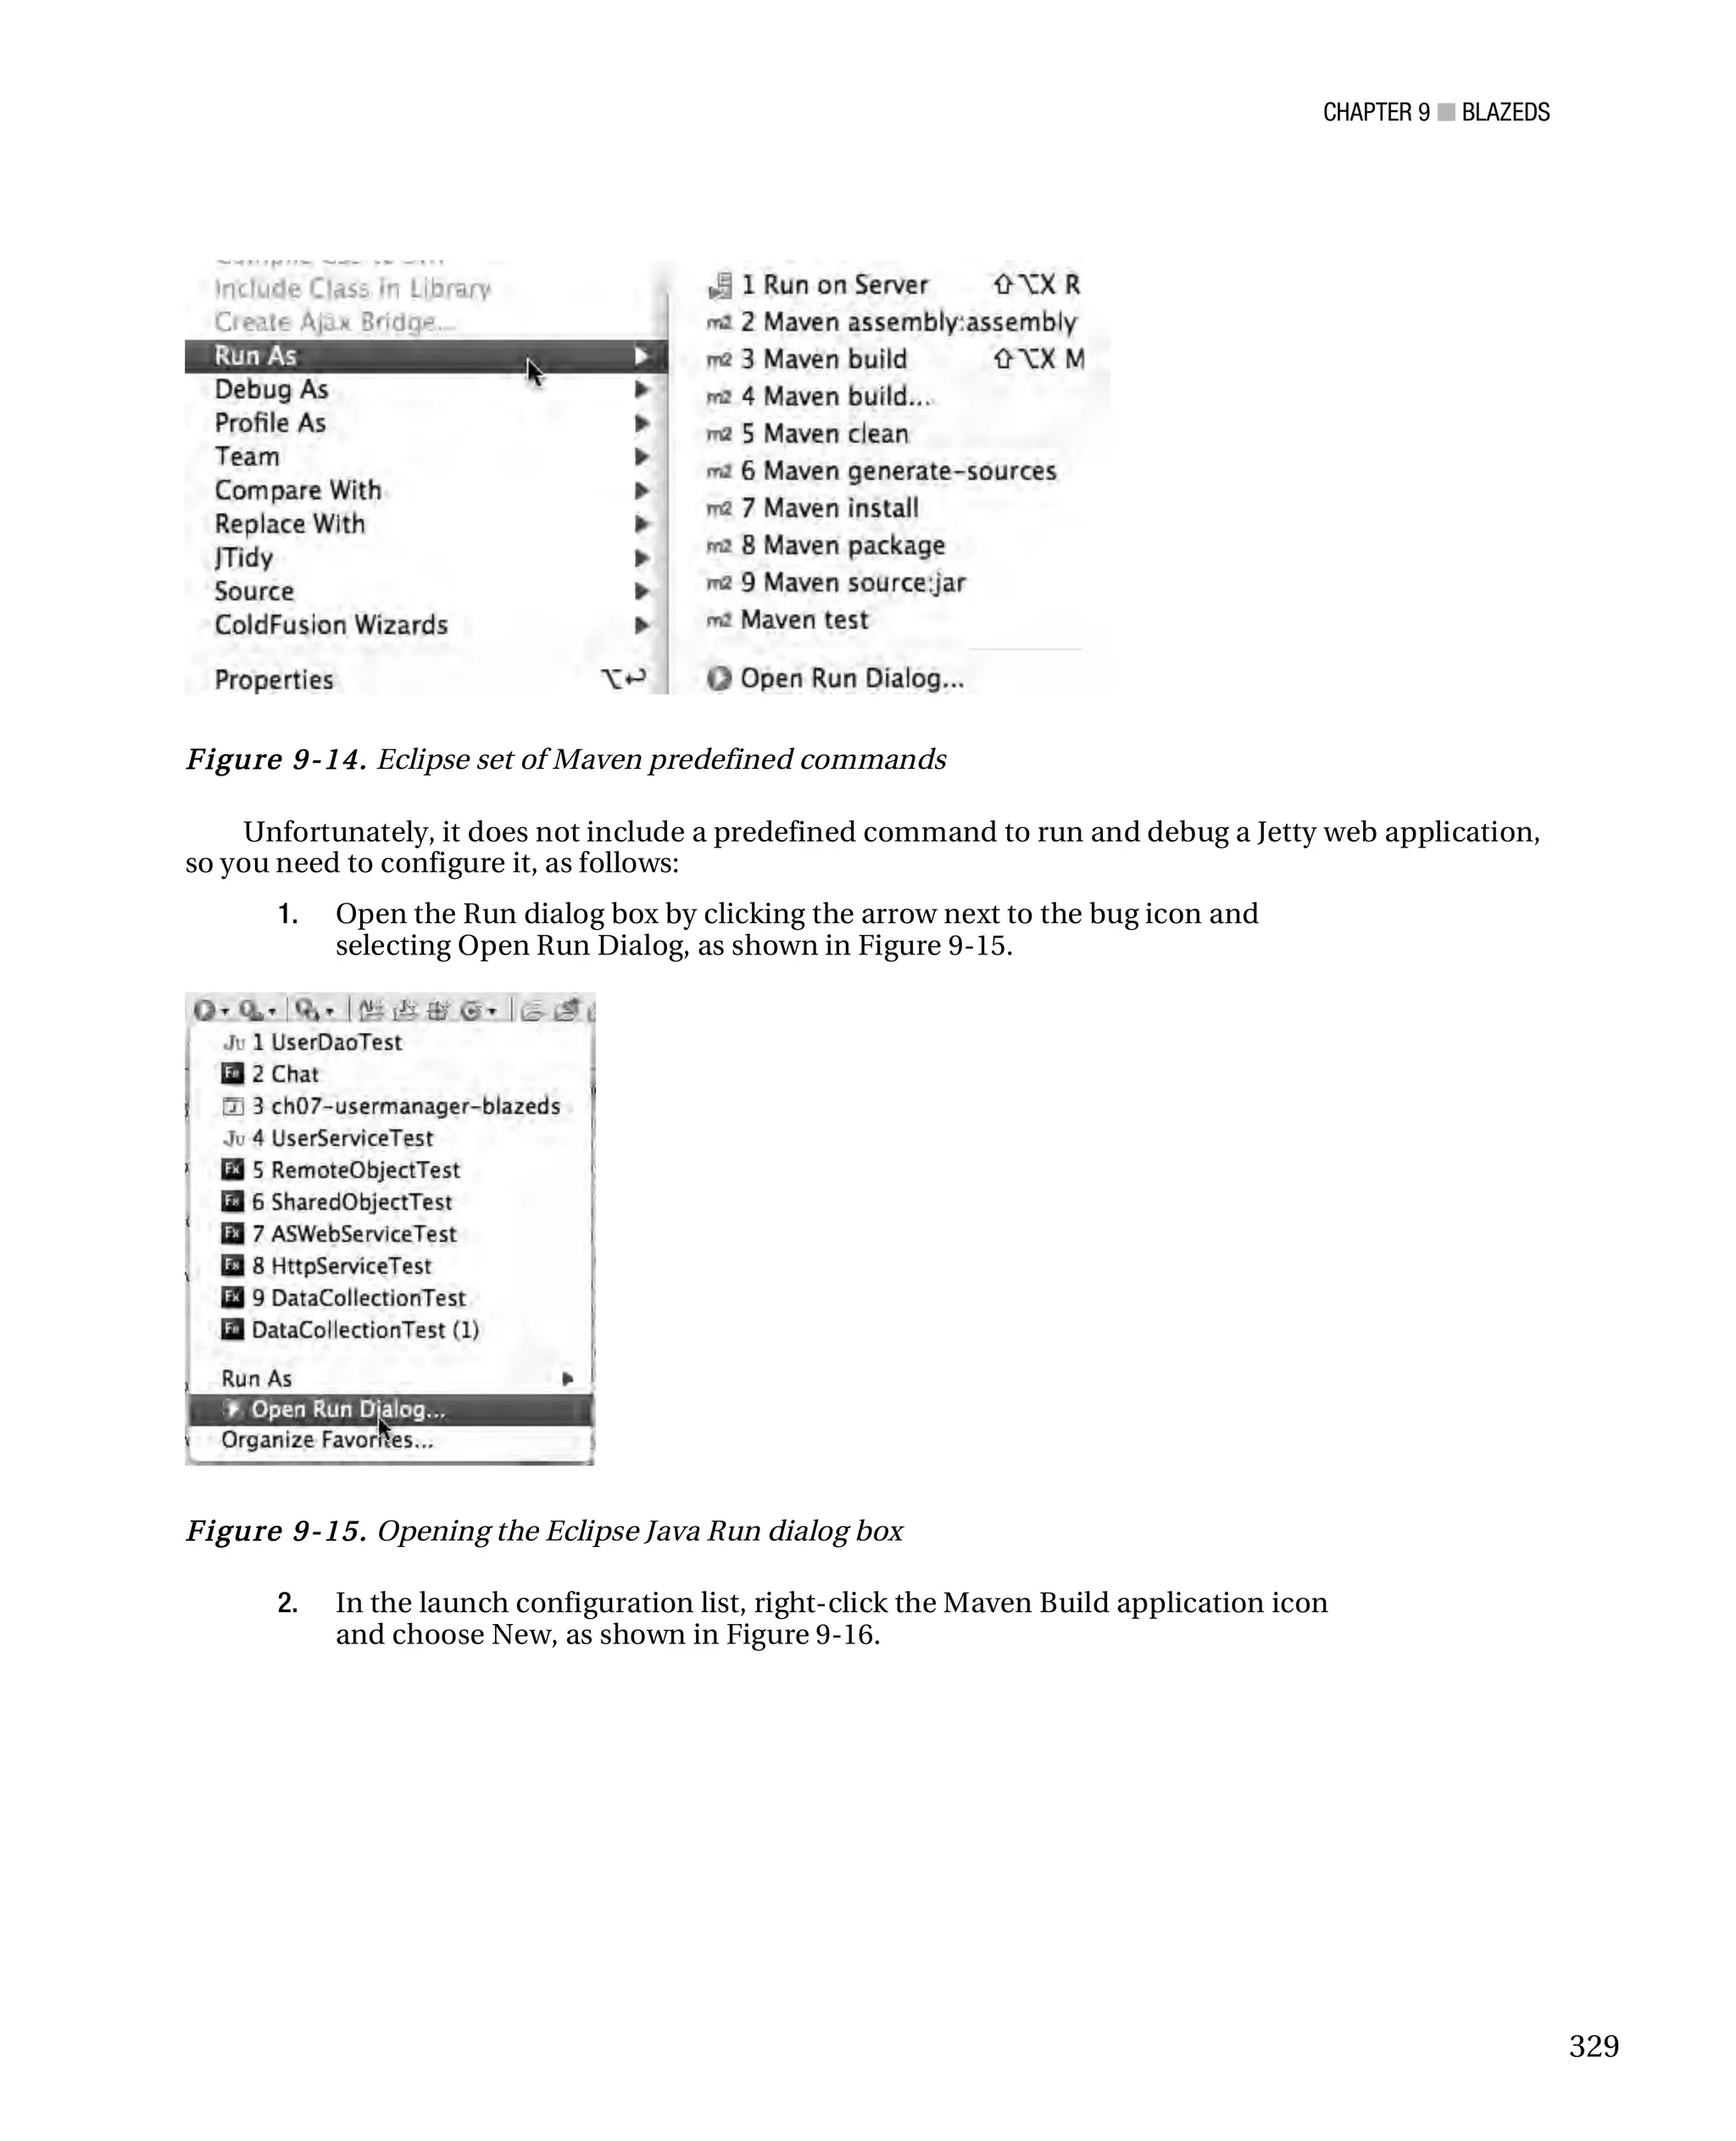
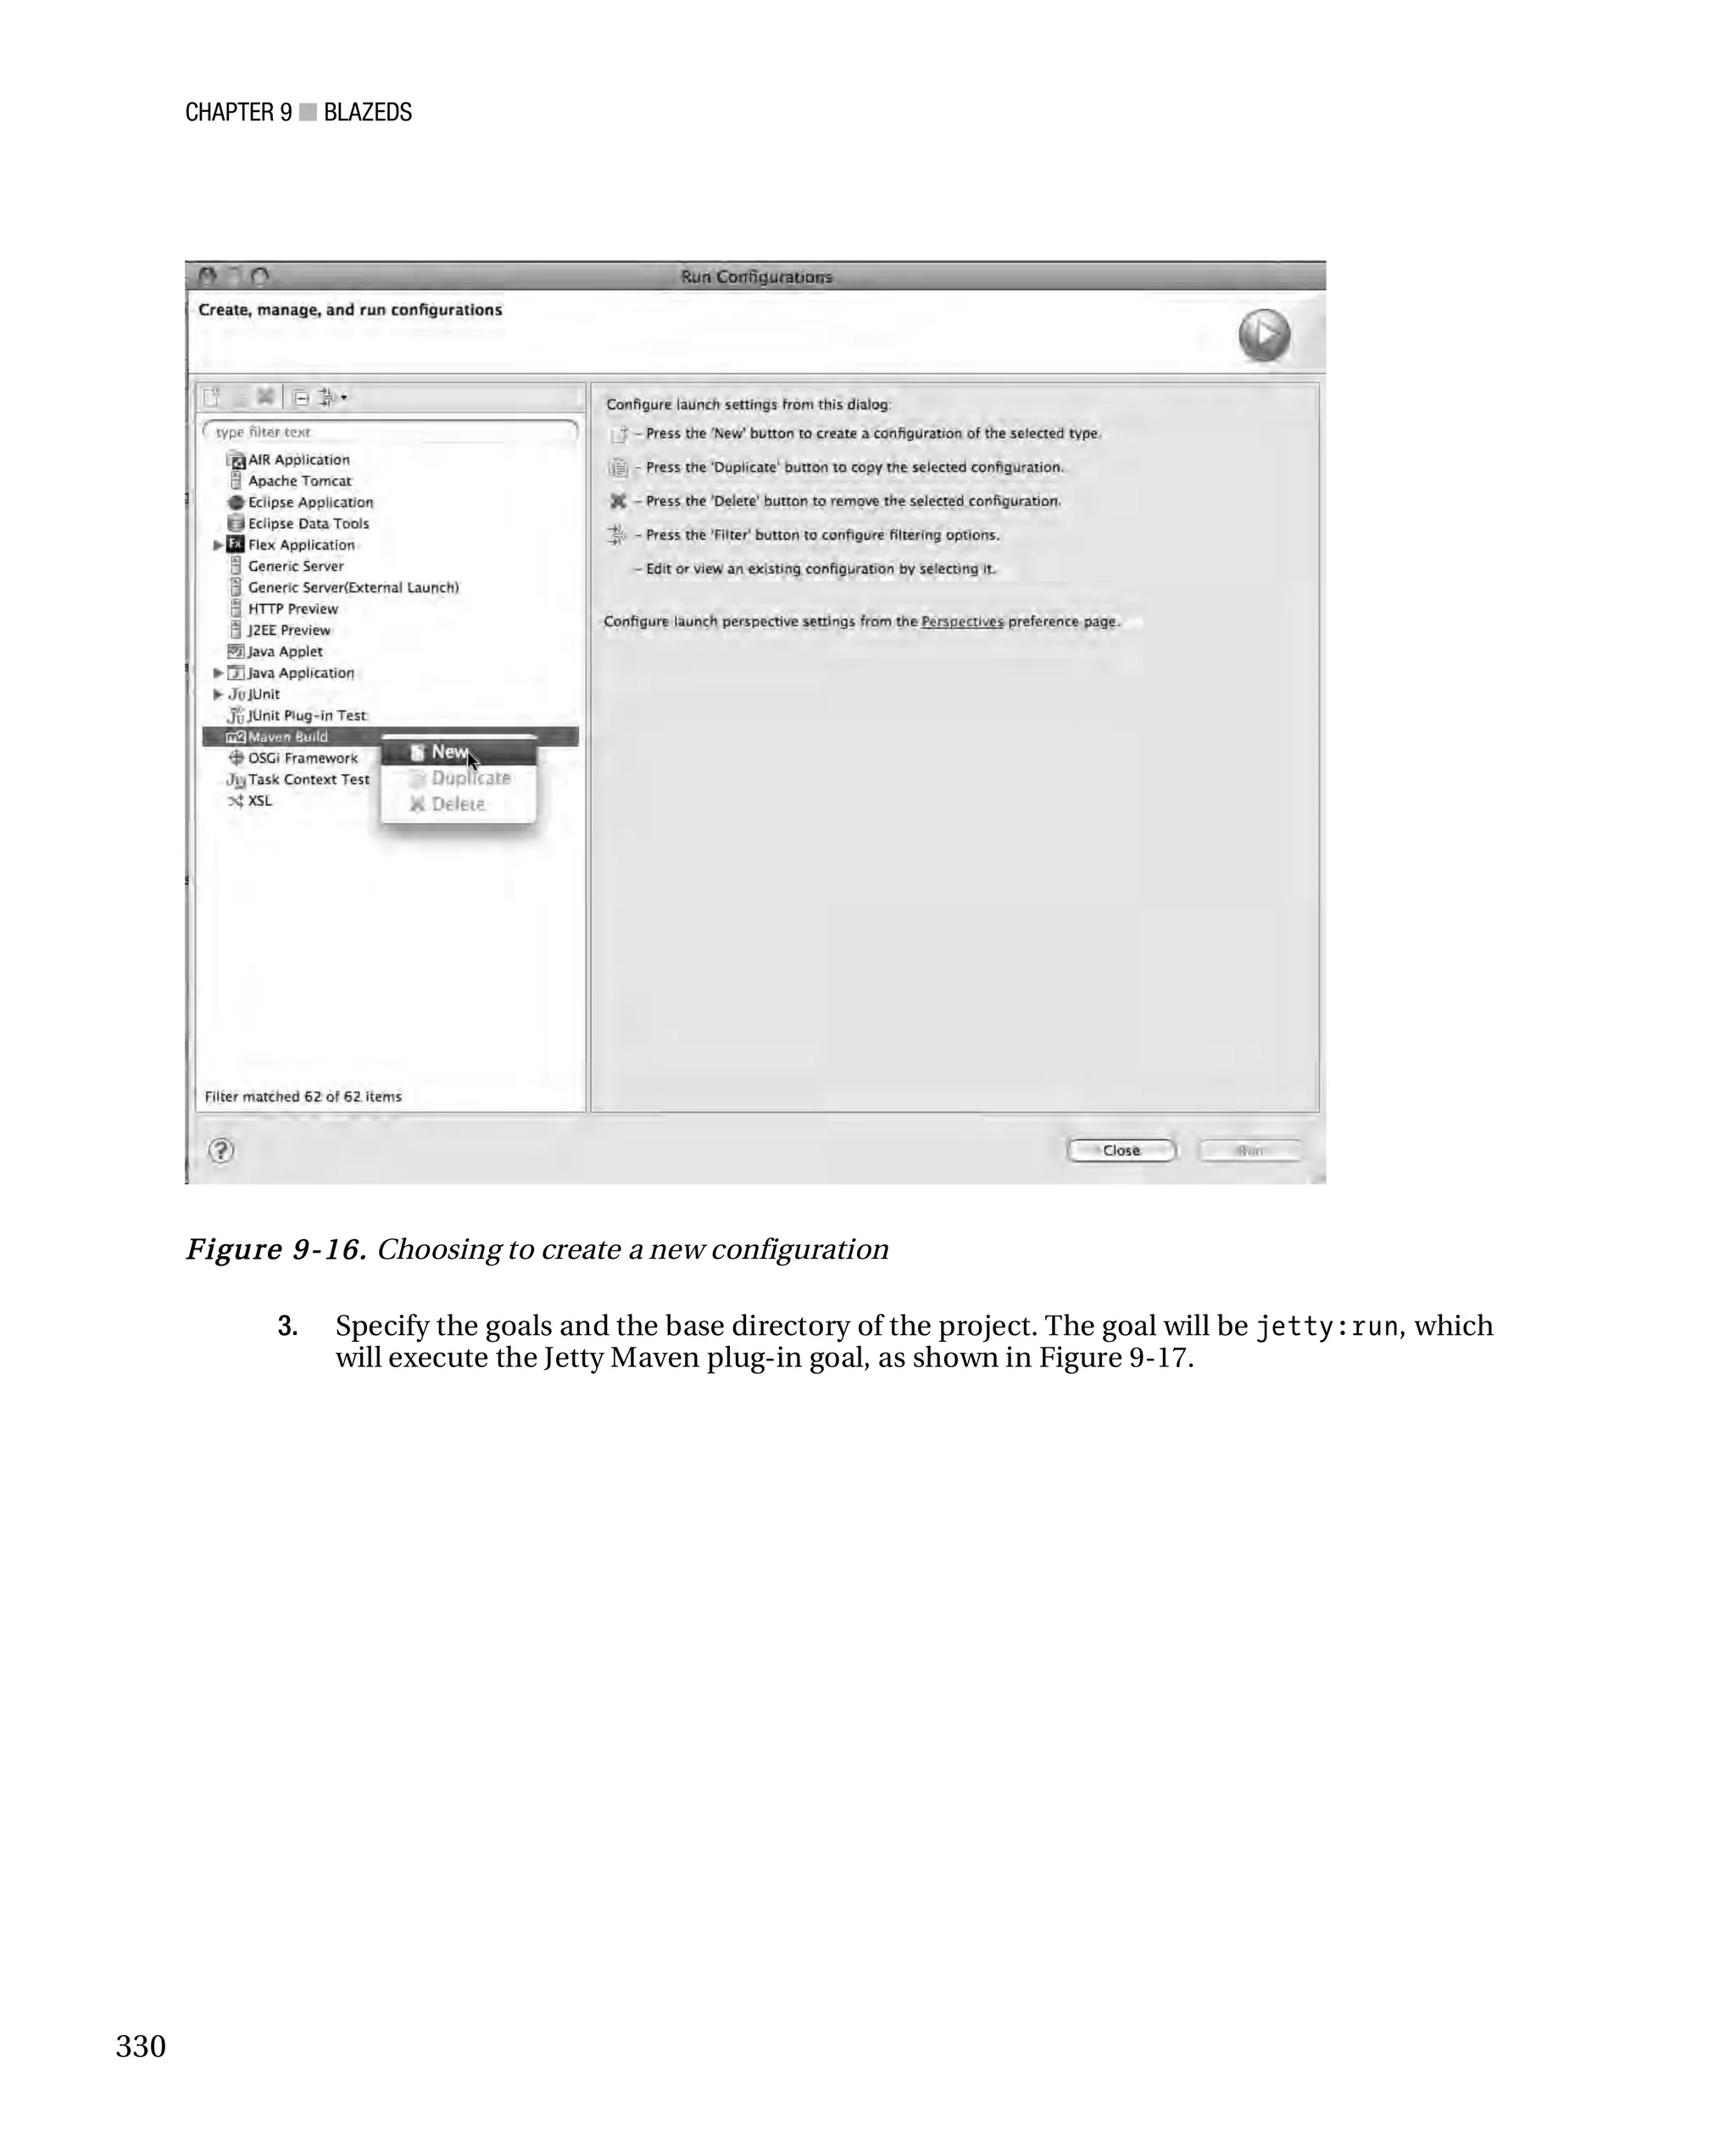
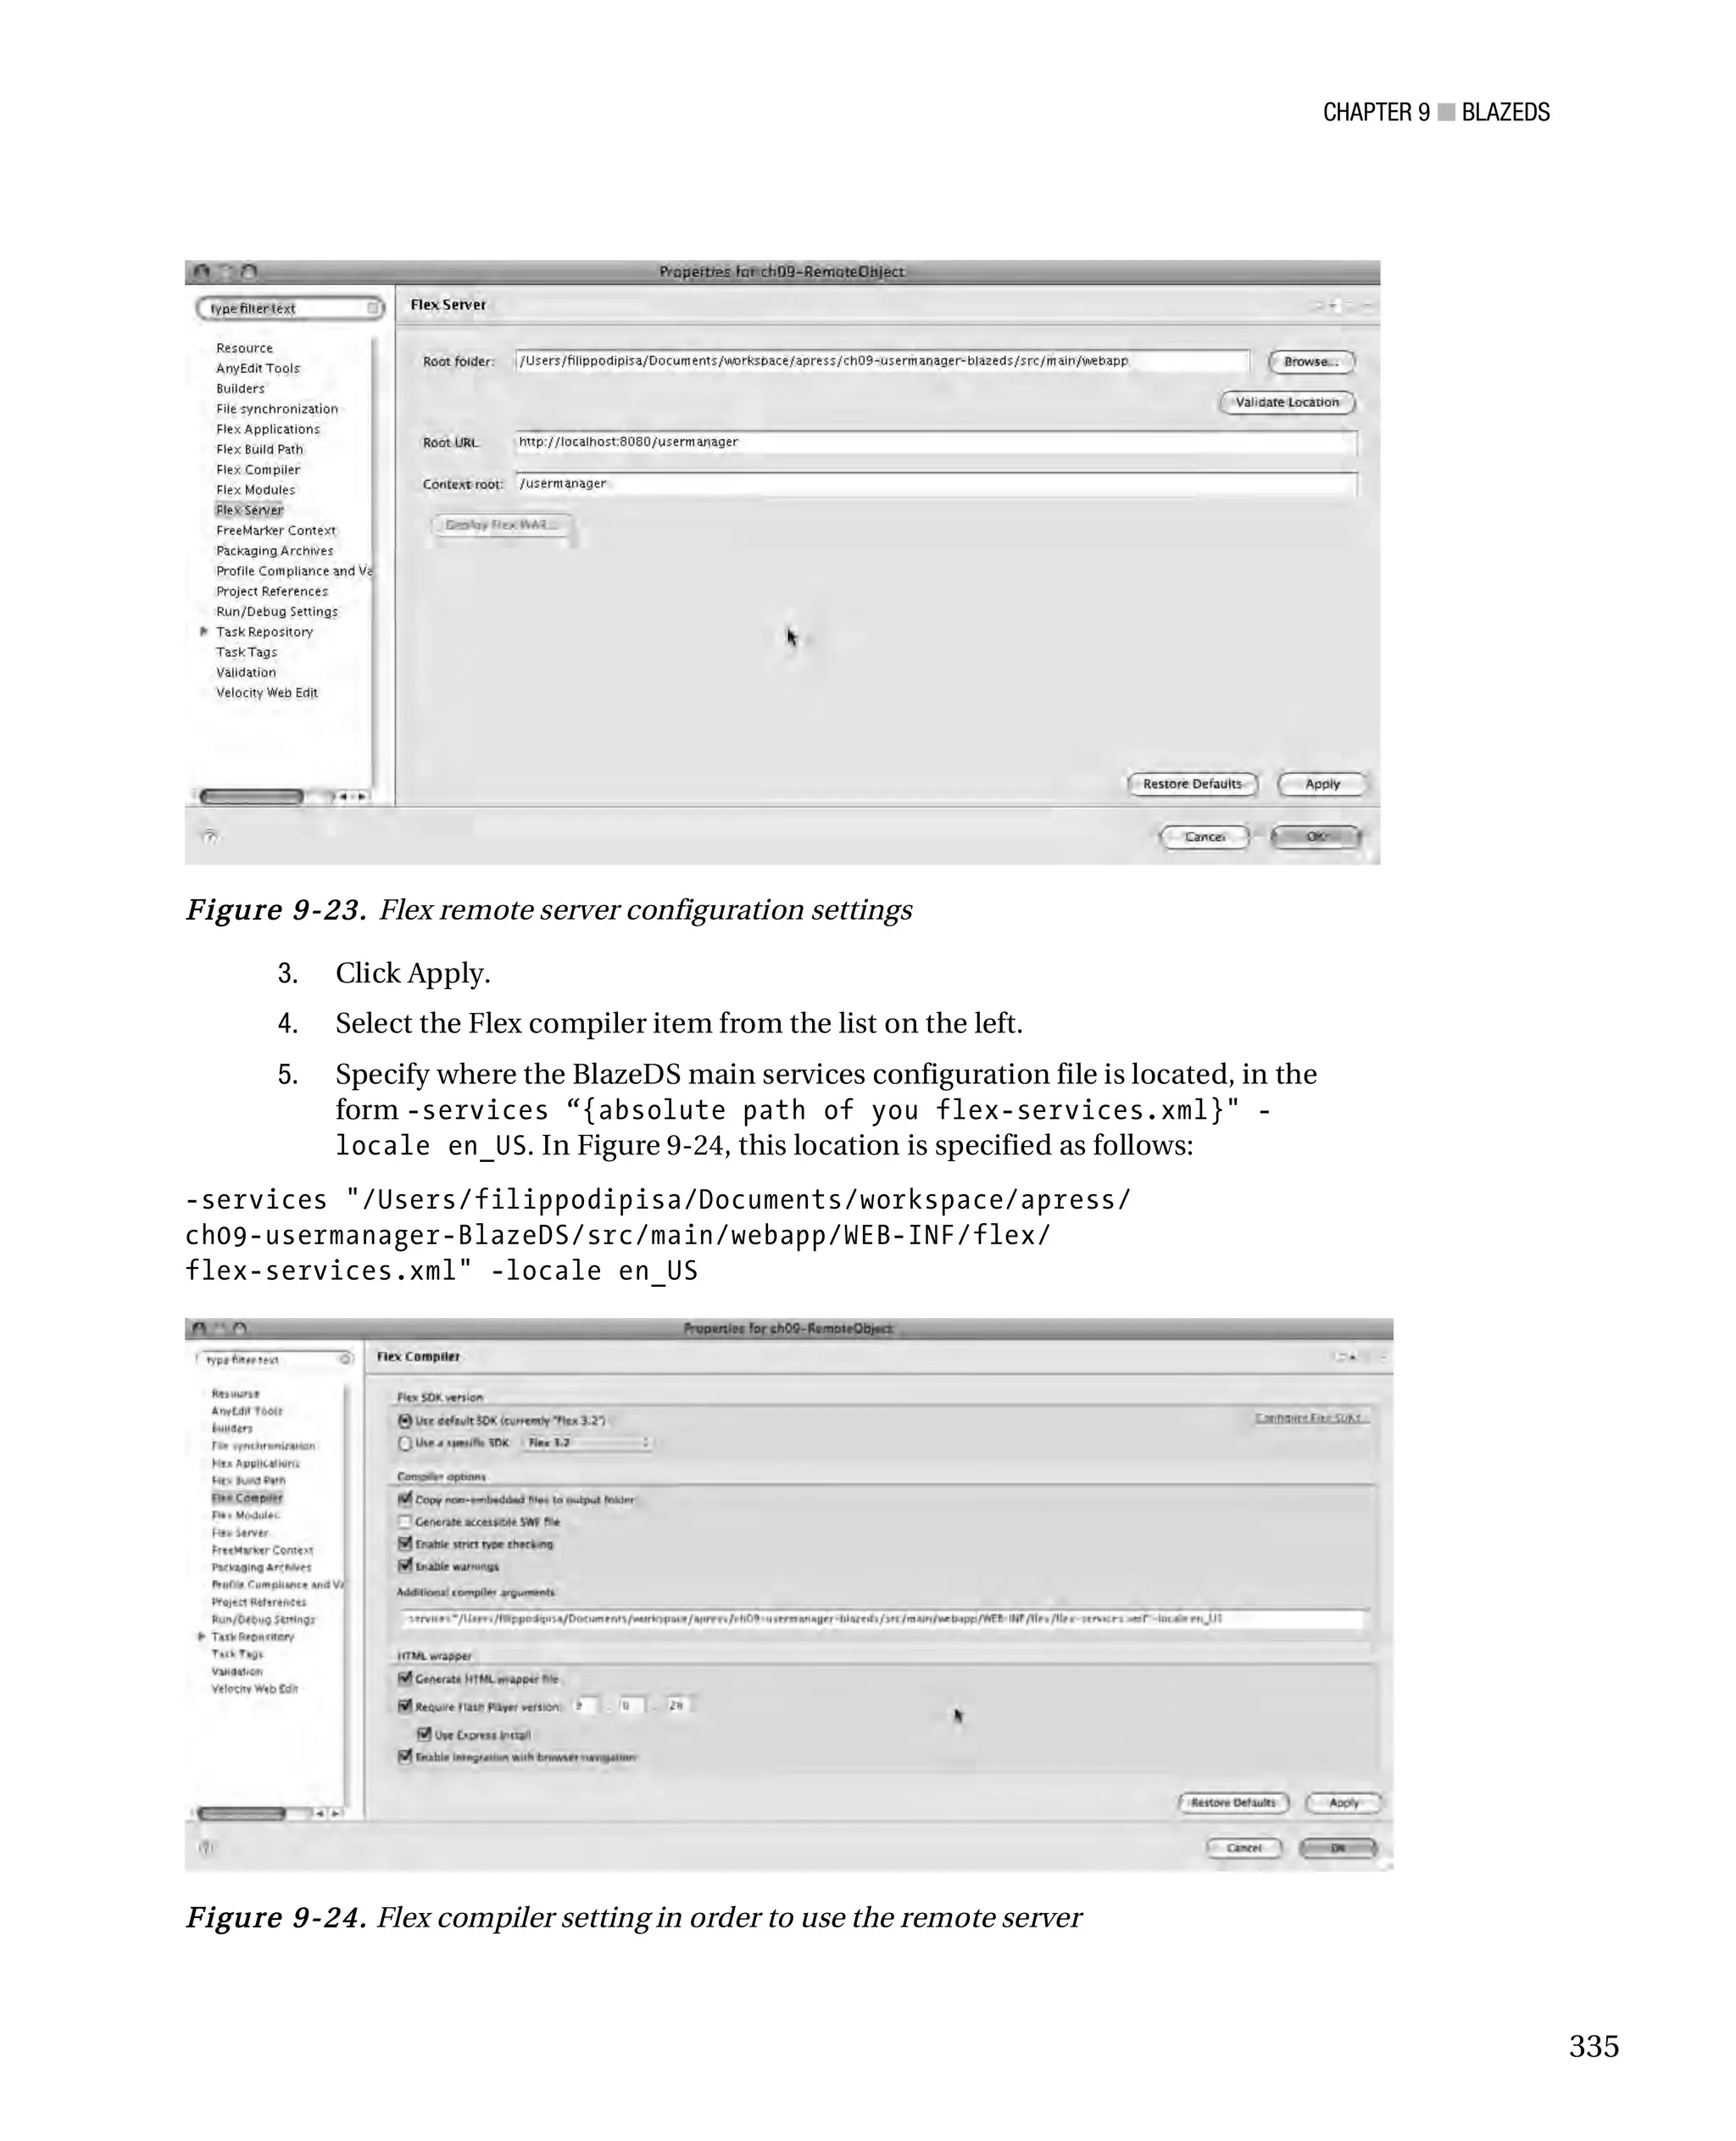
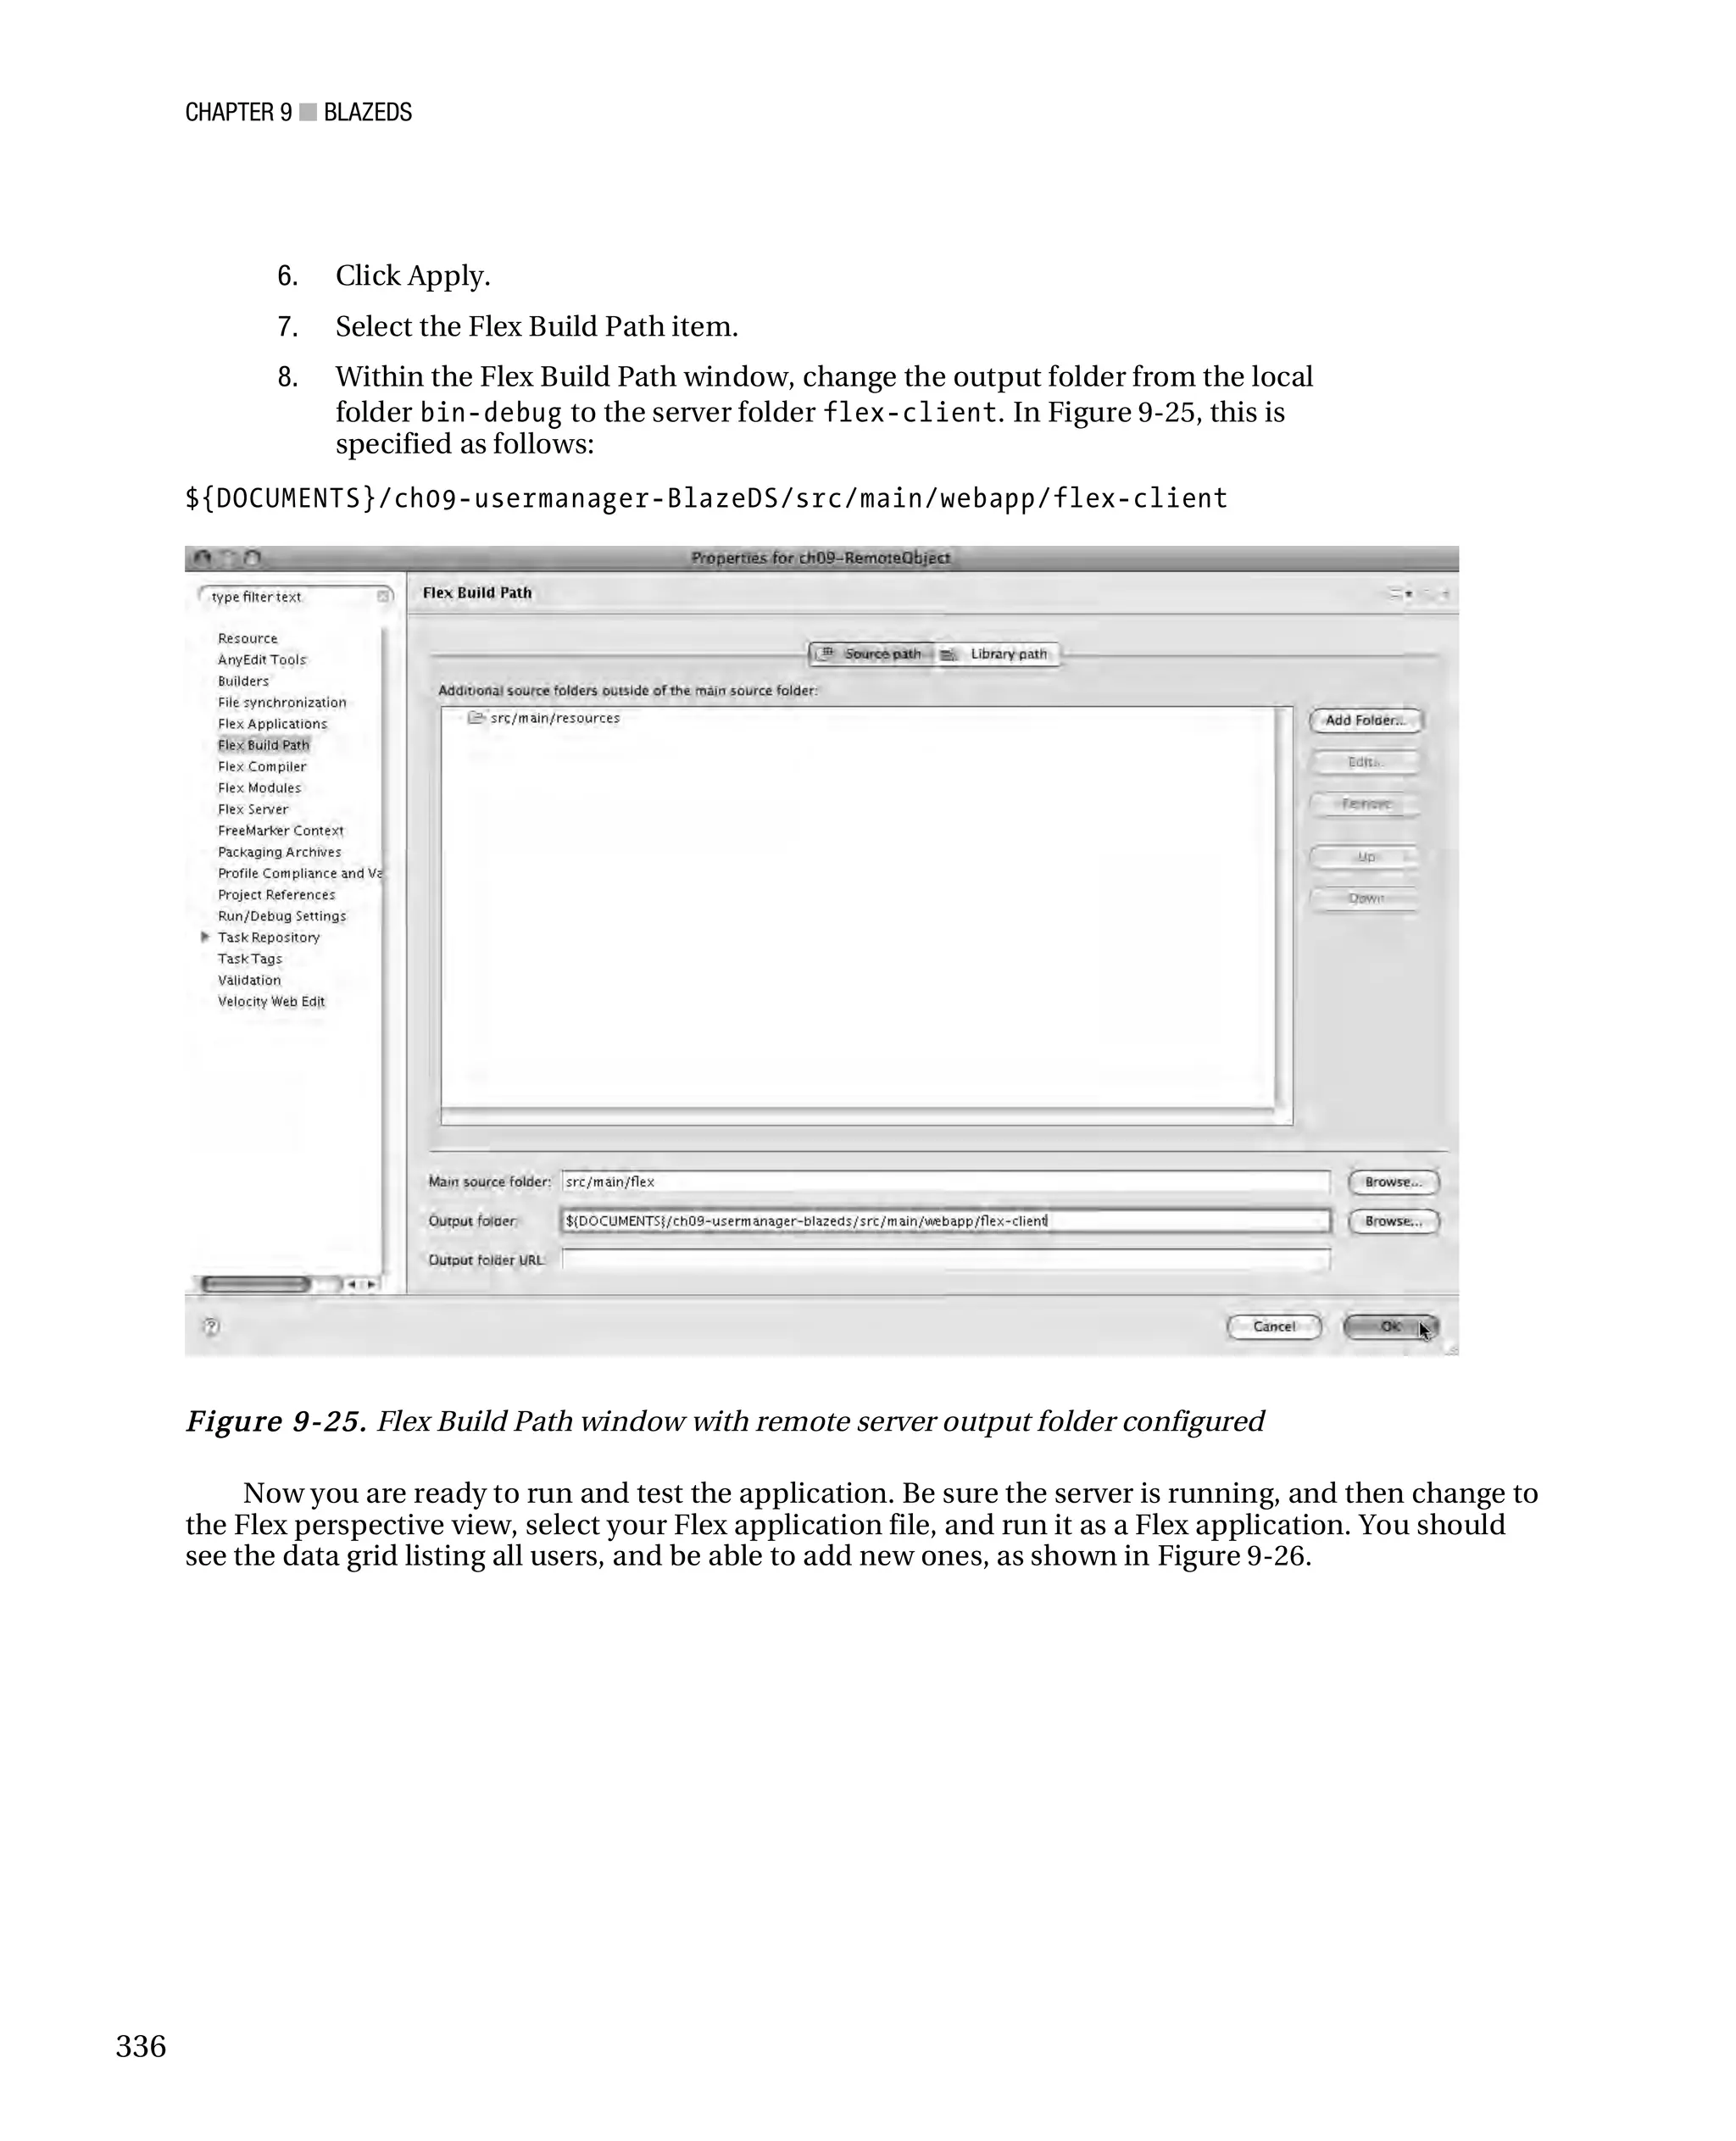
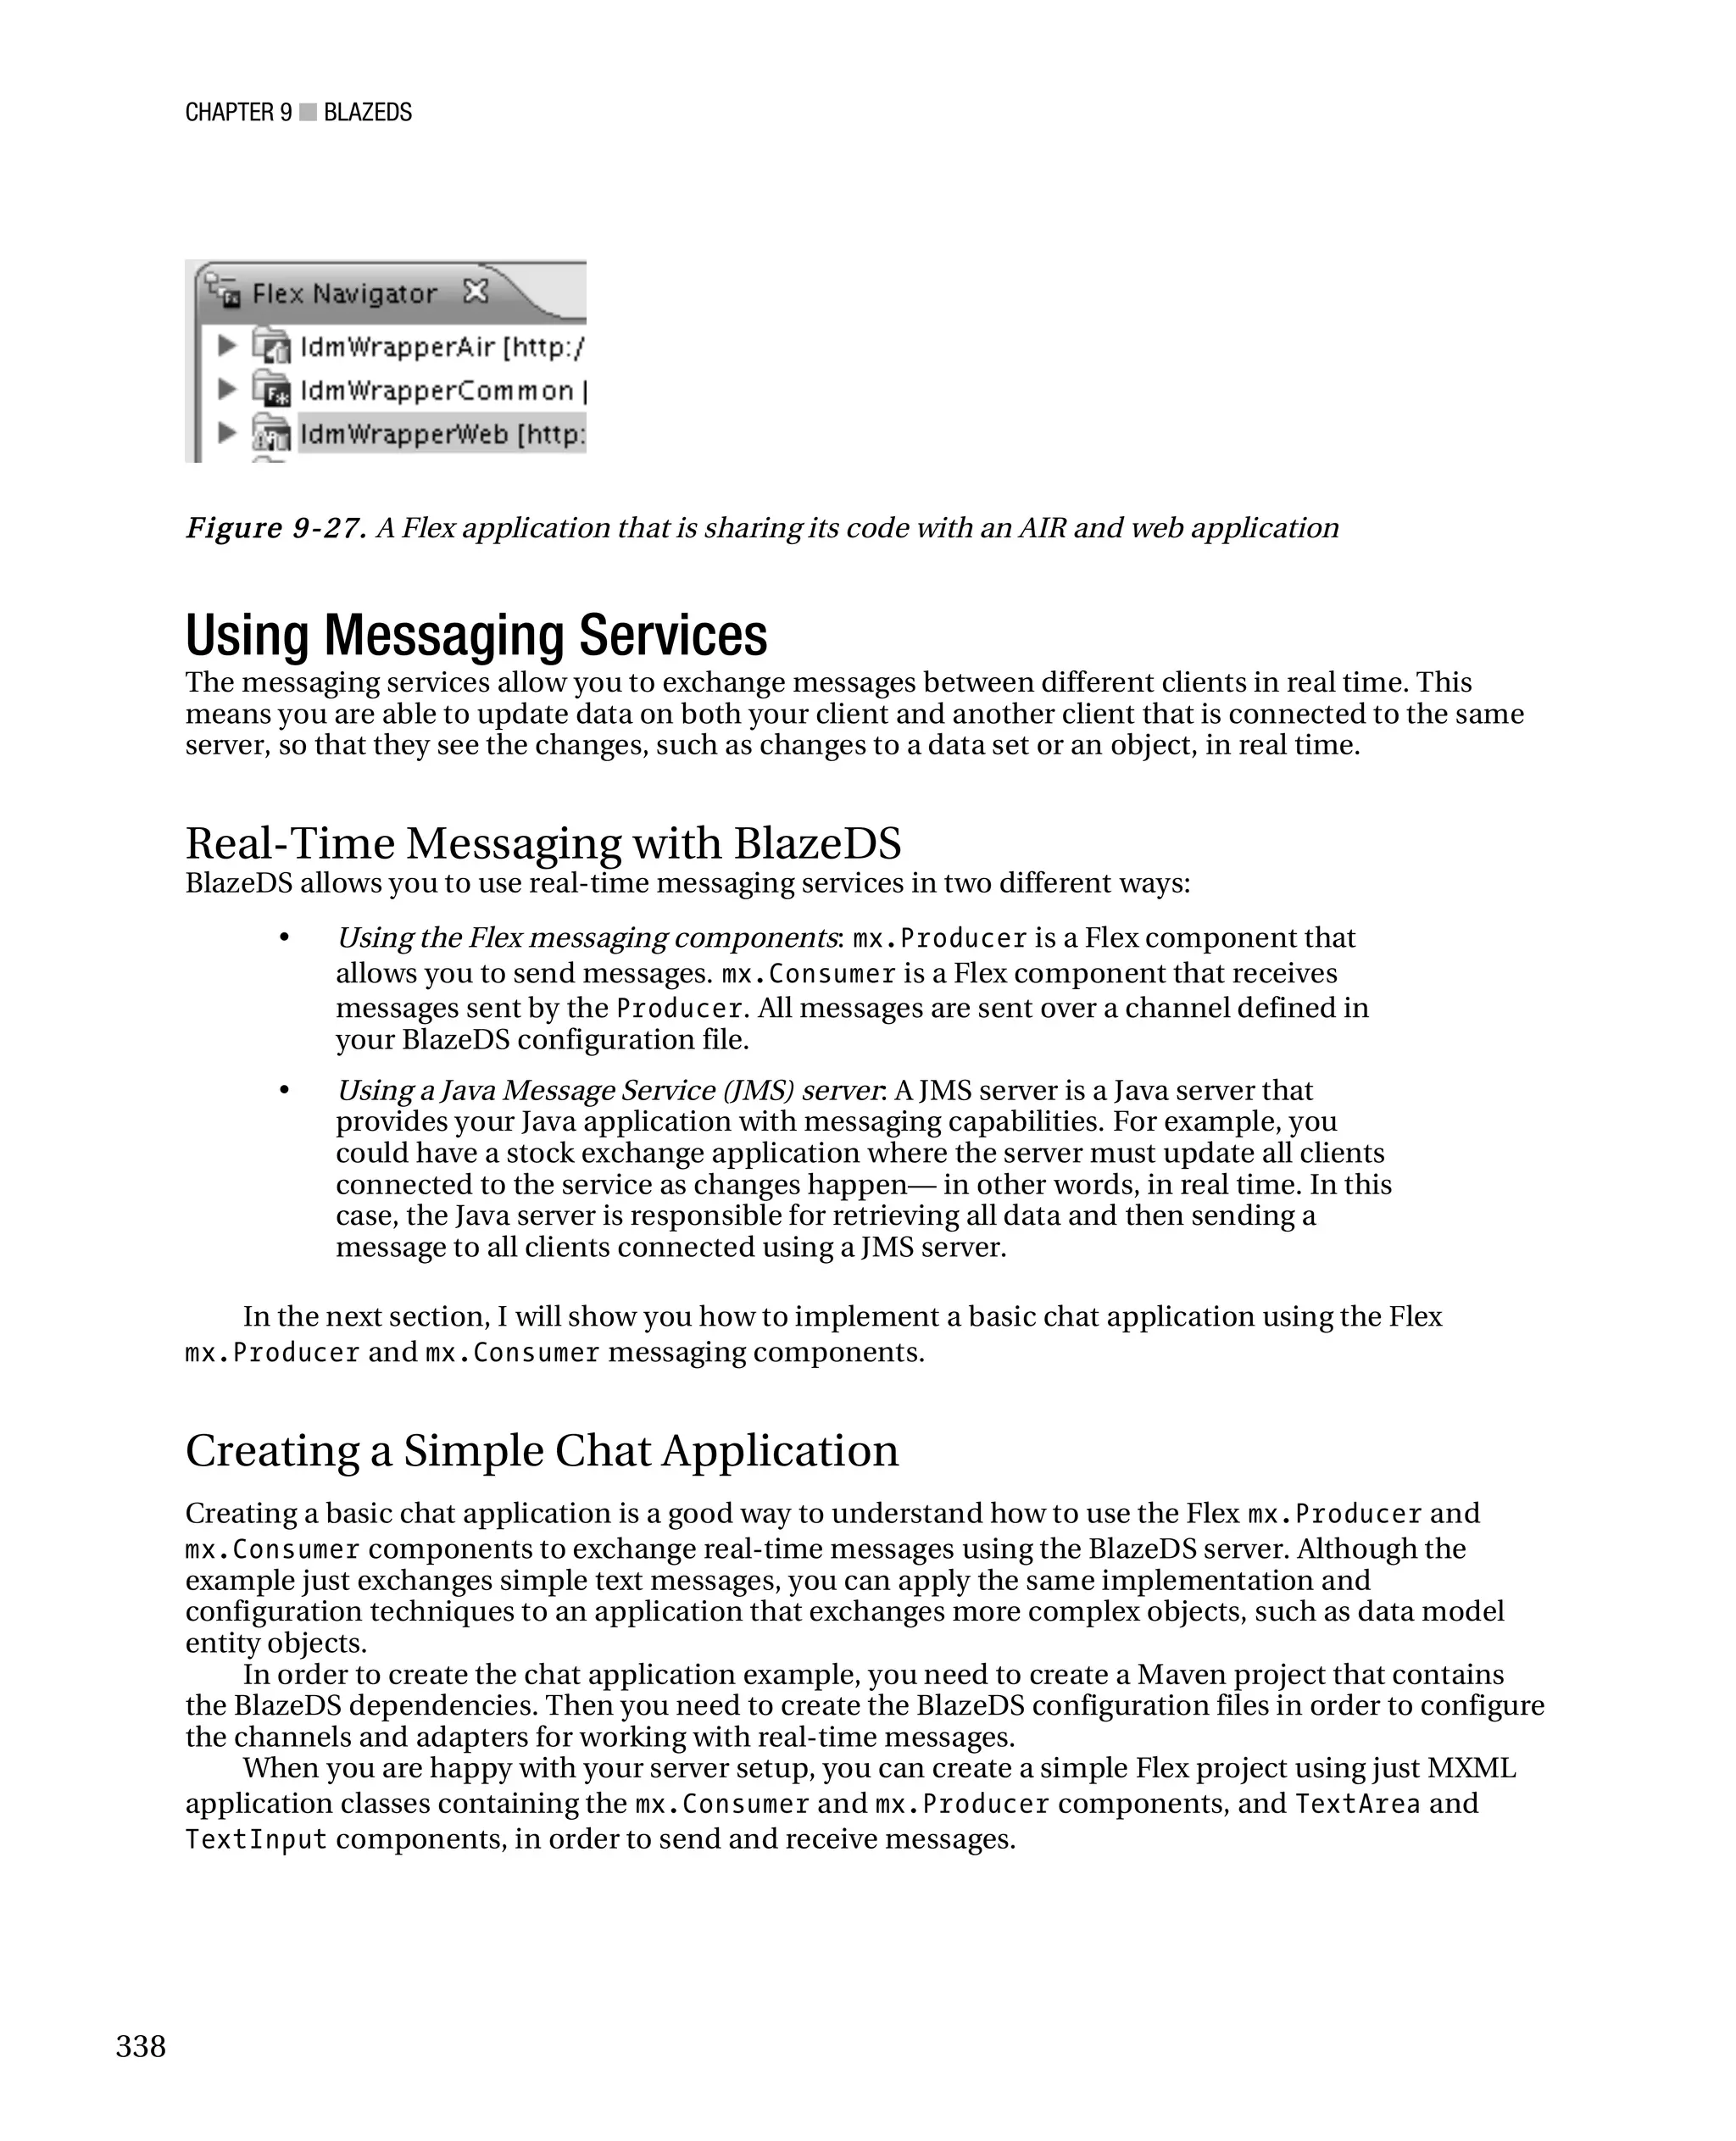
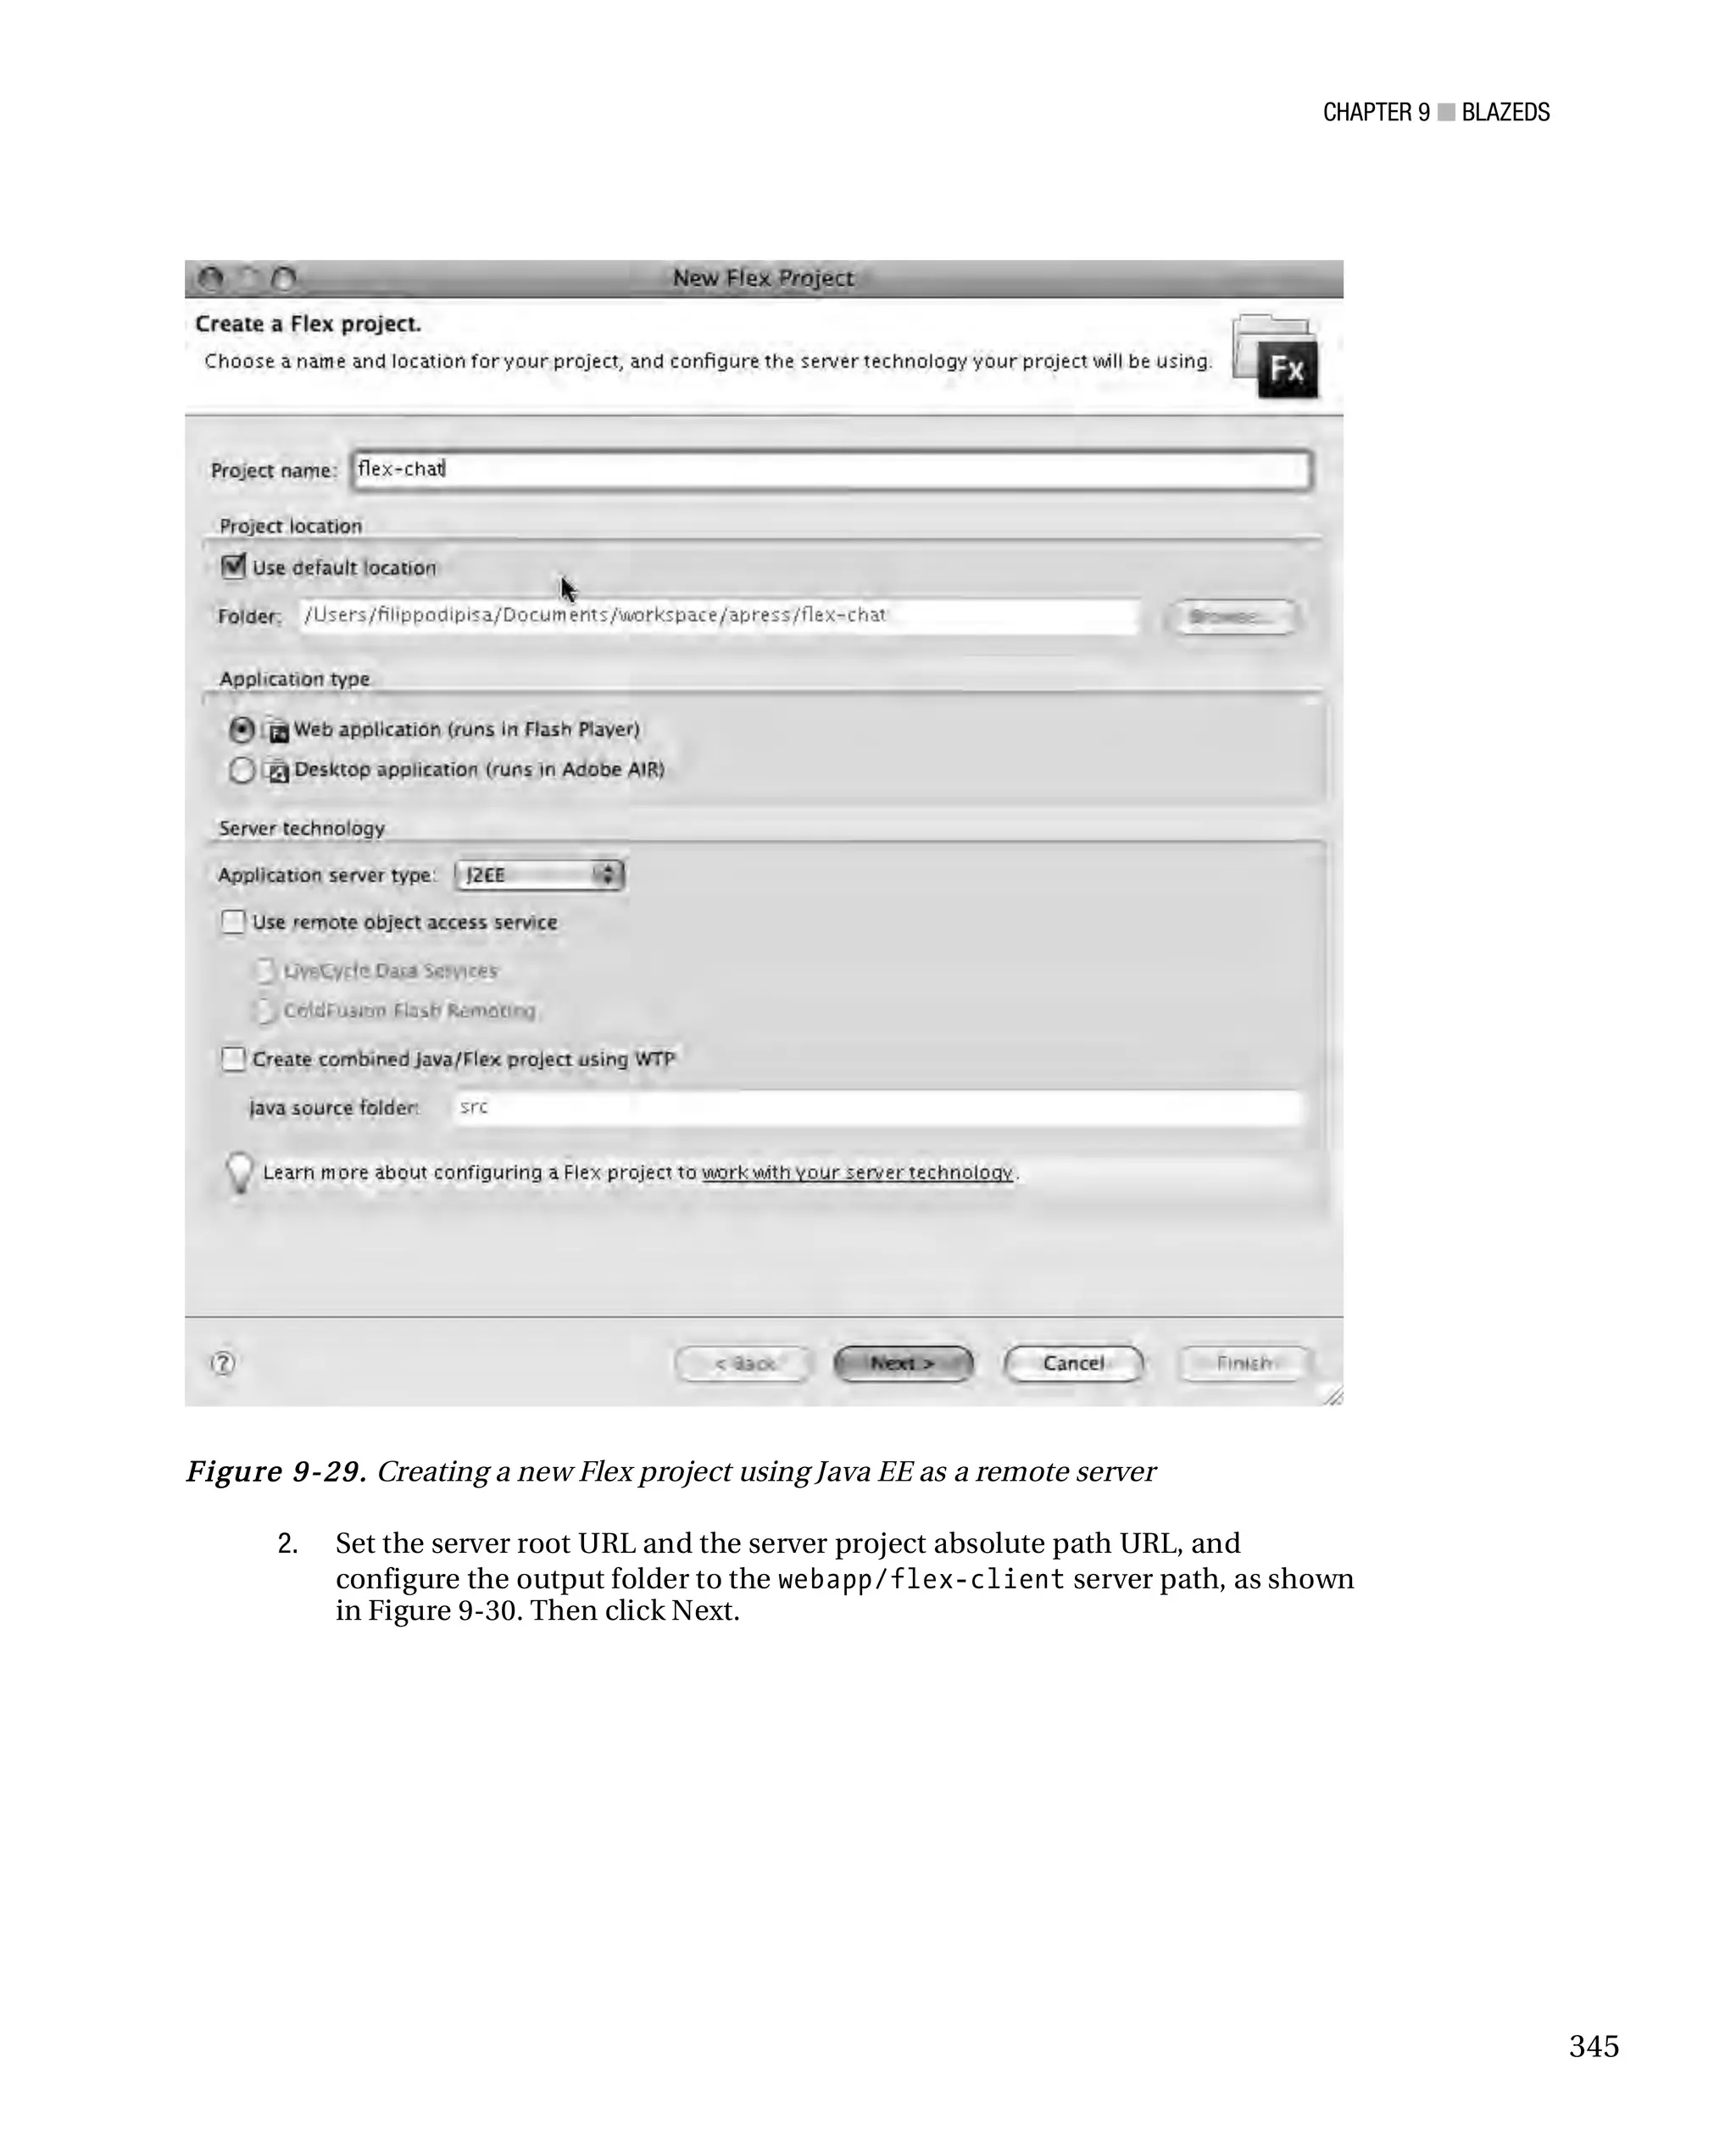
![CHAPTER 9 ■ BLAZEDS
<prefix>[BlazeDS]</prefix>
<includeDate>true</includeDate>
<includeTime>false</includeTime>
<includeLevel>true</includeLevel>
<includeCategory>true</includeCategory>
</properties>
<filters>
<pattern>Endpoint.*</pattern>
<pattern>Service.*</pattern>
<pattern>Message.*</pattern>
<pattern>DataService.*</pattern>
<pattern>Configuration</pattern>
</filters>
</target>
</logging>
<system>
<redeploy>
<enabled>true</enabled>
<watch-interval>20</watch-interval>
<watch-file>
{context.root}/WEB-INF/flex/flex-services.xml
</watch-file>
<watch-file>
{context.root}/WEB-INF/flex/flex-remoting.xml
</watch-file>
<watch-file>
{context.root}/WEB-INF/flex/flex-messages.xml
</watch-file>
<touch-file>{context.root}/WEB-INF/web.xml</touch-file>
</redeploy>
</system>
</services-config>
Listin g 9-4. BlazeDS flex-remoting.xml Configuration File
<?xml version="1.0" encoding="UTF-8"?>
<service id="remoting-service-@@messaging.id"
class="flex.messaging.services.RemotingService">
<adapters>
<adapter-definition id="java-object"
class="flex.messaging.services.remoting.adapters.JavaAdapter"
default="true"/>
</adapters>
<default-channels>
<channel ref="channel-amf"/>
307](https://image.slidesharecdn.com/beginningjavaandflex-migratingjavaspringhibernateandmavendeveloperstoadobeflex-100821073507-phpapp01/75/Beginning-java-and-flex-migrating-java-spring-hibernate-and-maven-developers-to-adobe-flex-326-2048.jpg)
![CHAPTER 9 ■ BLAZEDS
The Java method returns a List type of User that BlazeDS converts into an AS ArrayCollection in
order to work with the Flex client that made the request.
Although BlazeDS and Flex provide functionality to serialize between AS and Java objects, you can
use custom serialization by implementing the IExternalizable interface on your AS class and the
interface Externalizable on your Java class, as shown in Listings 9-6 and 9-7. In these interfaces, you
need to implement the methods readExternal and writeExternal on both Java and AS classes. Within
these two methods, you can decide which properties and which types you want to serialize between AS
and Java. This example serializes all properties as a String. In other cases, you might use another data
type such as output.writeFloat(…), or you could decide to not serialize a property because you don’t
find it useful.
Listin g 9-6. Example of Using Custom Serialization in AS (User.as)
[RemoteClass(alias="com.apress.usermanager.model.externalizable.User")]
public class User implements IExternalizable {
public var commonName:String;
public var lastName:String;
public function readExternal(input:IDataInput):void {
commonName = input.readObject() as String;
lastName = input.readObject();
}
public function writeExternal(output:IDataOutput):void {
output.writeObject(commonName);
output.writeObject(lastName);
}
}
Listin g 9-7. Example of Using Custom Serialization in Java (User.java)
public class User implements Externalizable {
public String commonName;
public String lastName;
public void readExternal(ObjectInput in) throws IOException,
ClassNotFoundException {
commonName = (String)in.readObject();
lastName = (String)in.readObject();
}
public void writeExternal(ObjectOutput output) throws IOException {
output.writeObject(commonName);
output.writeObject(lastName);
}
}
310](https://image.slidesharecdn.com/beginningjavaandflex-migratingjavaspringhibernateandmavendeveloperstoadobeflex-100821073507-phpapp01/75/Beginning-java-and-flex-migrating-java-spring-hibernate-and-maven-developers-to-adobe-flex-329-2048.jpg)
![CHAPTER 9 ■ BLAZEDS
Listin g 9-9. Complete Code for the flex-services.xml BlazeDS Configuration File
<?xml version="1.0" encoding="UTF-8"?>
<services-config>
<services>
<service-include file-path="flex-remoting.xml"/>
</services>
<channels>
<channel-definition id="channel-amf"
class="mx.messaging.channels.AMFChannel">
<endpoint
url="http://{server.name}:{server.port}/
{context.root}/messagebroker/amf"
class="flex.messaging.endpoints.AMFEndpoint"/>
<properties>
<polling-enabled>false</polling-enabled>
</properties>
</channel-definition>
</channels>
<logging>
<target class="flex.messaging.log.ConsoleTarget"
level="Error">
<properties>
<prefix>[BlazeDS]</prefix>
<includeDate>true</includeDate>
<includeTime>false</includeTime>
<includeLevel>true</includeLevel>
<includeCategory>true</includeCategory>
</properties>
<filters>
<pattern>Endpoint.*</pattern>
<pattern>Service.*</pattern>
<pattern>Message.*</pattern>
<pattern>DataService.*</pattern>
<pattern>Configuration</pattern>
</filters>
</target>
</logging>
<system>
<redeploy>
<enabled>true</enabled>
<watch-interval>20</watch-interval>
<watch-file>
{context.root}/WEB-INF/flex/flex-services.xml
313](https://image.slidesharecdn.com/beginningjavaandflex-migratingjavaspringhibernateandmavendeveloperstoadobeflex-100821073507-phpapp01/75/Beginning-java-and-flex-migrating-java-spring-hibernate-and-maven-developers-to-adobe-flex-332-2048.jpg)

![CHAPTER 9 ■ BLAZEDS
Figure 9-18. Debugging the application using the new configuration
When you run or debug the application using the new configuration, you should see Maven logging
in to the Eclipse console, as shown in Figure 9-19.
Figure 9-19. Eclipse console showing the Maven project running with the Jetty plug-in
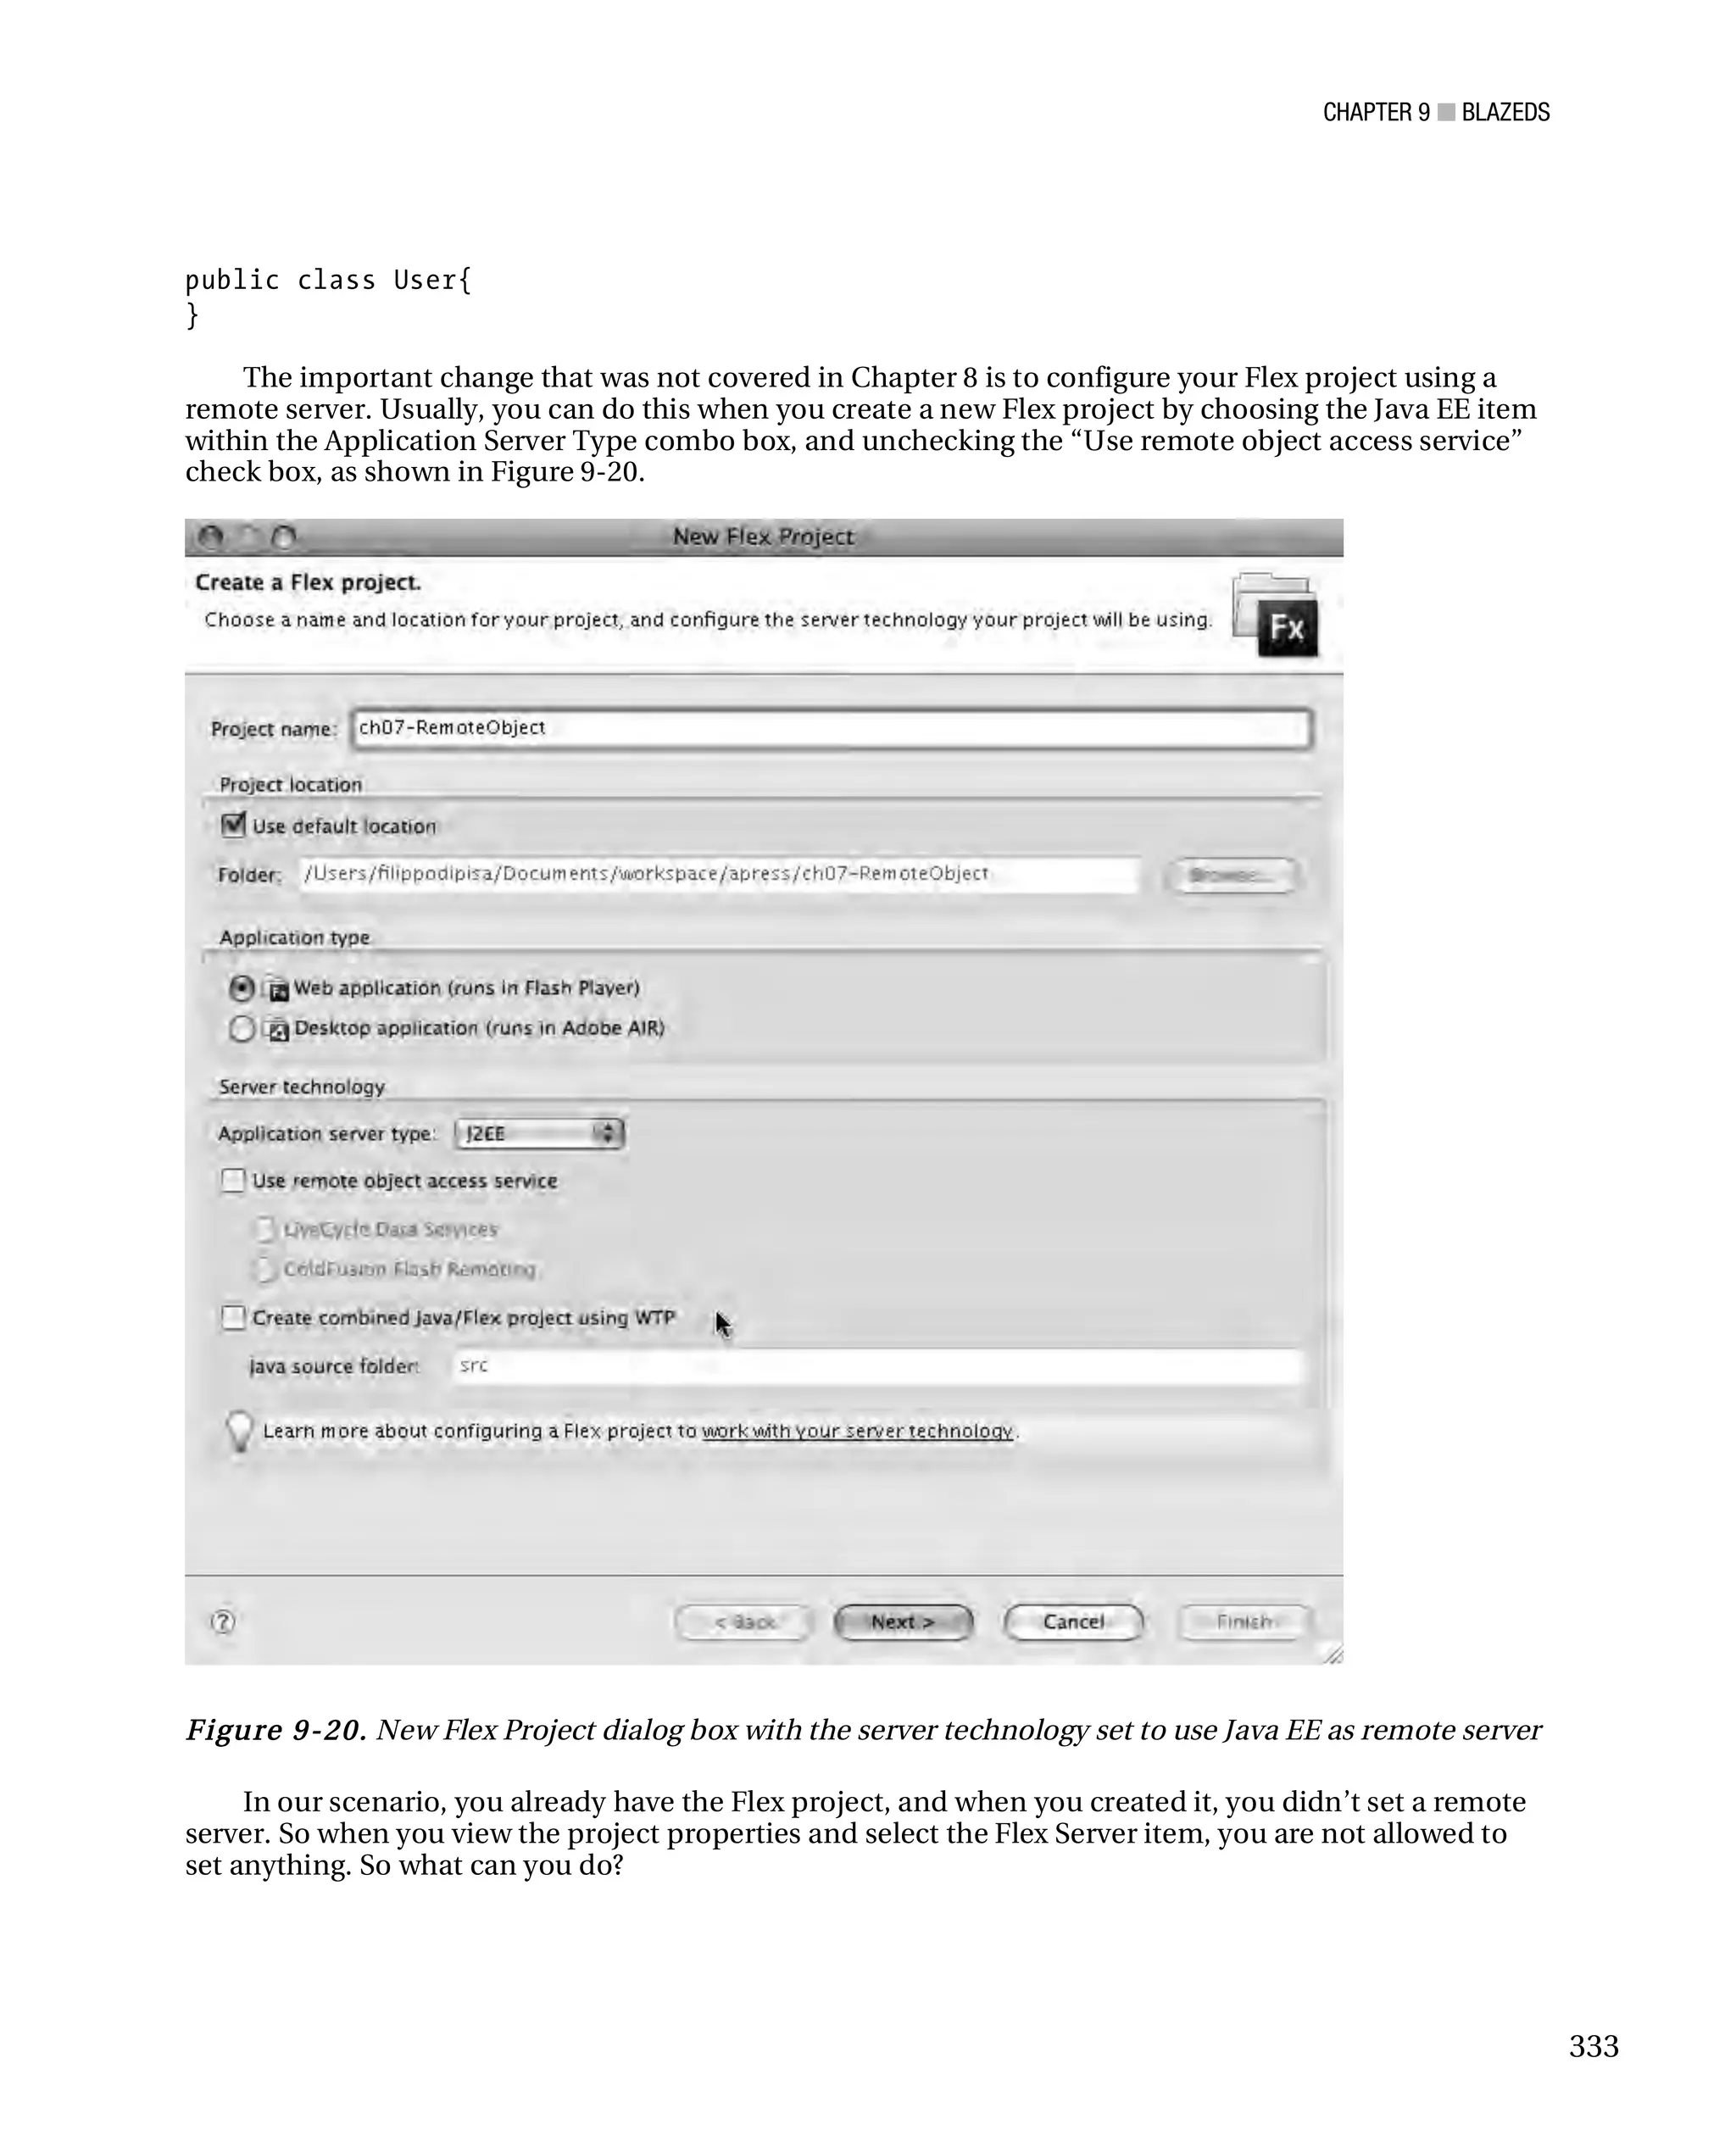
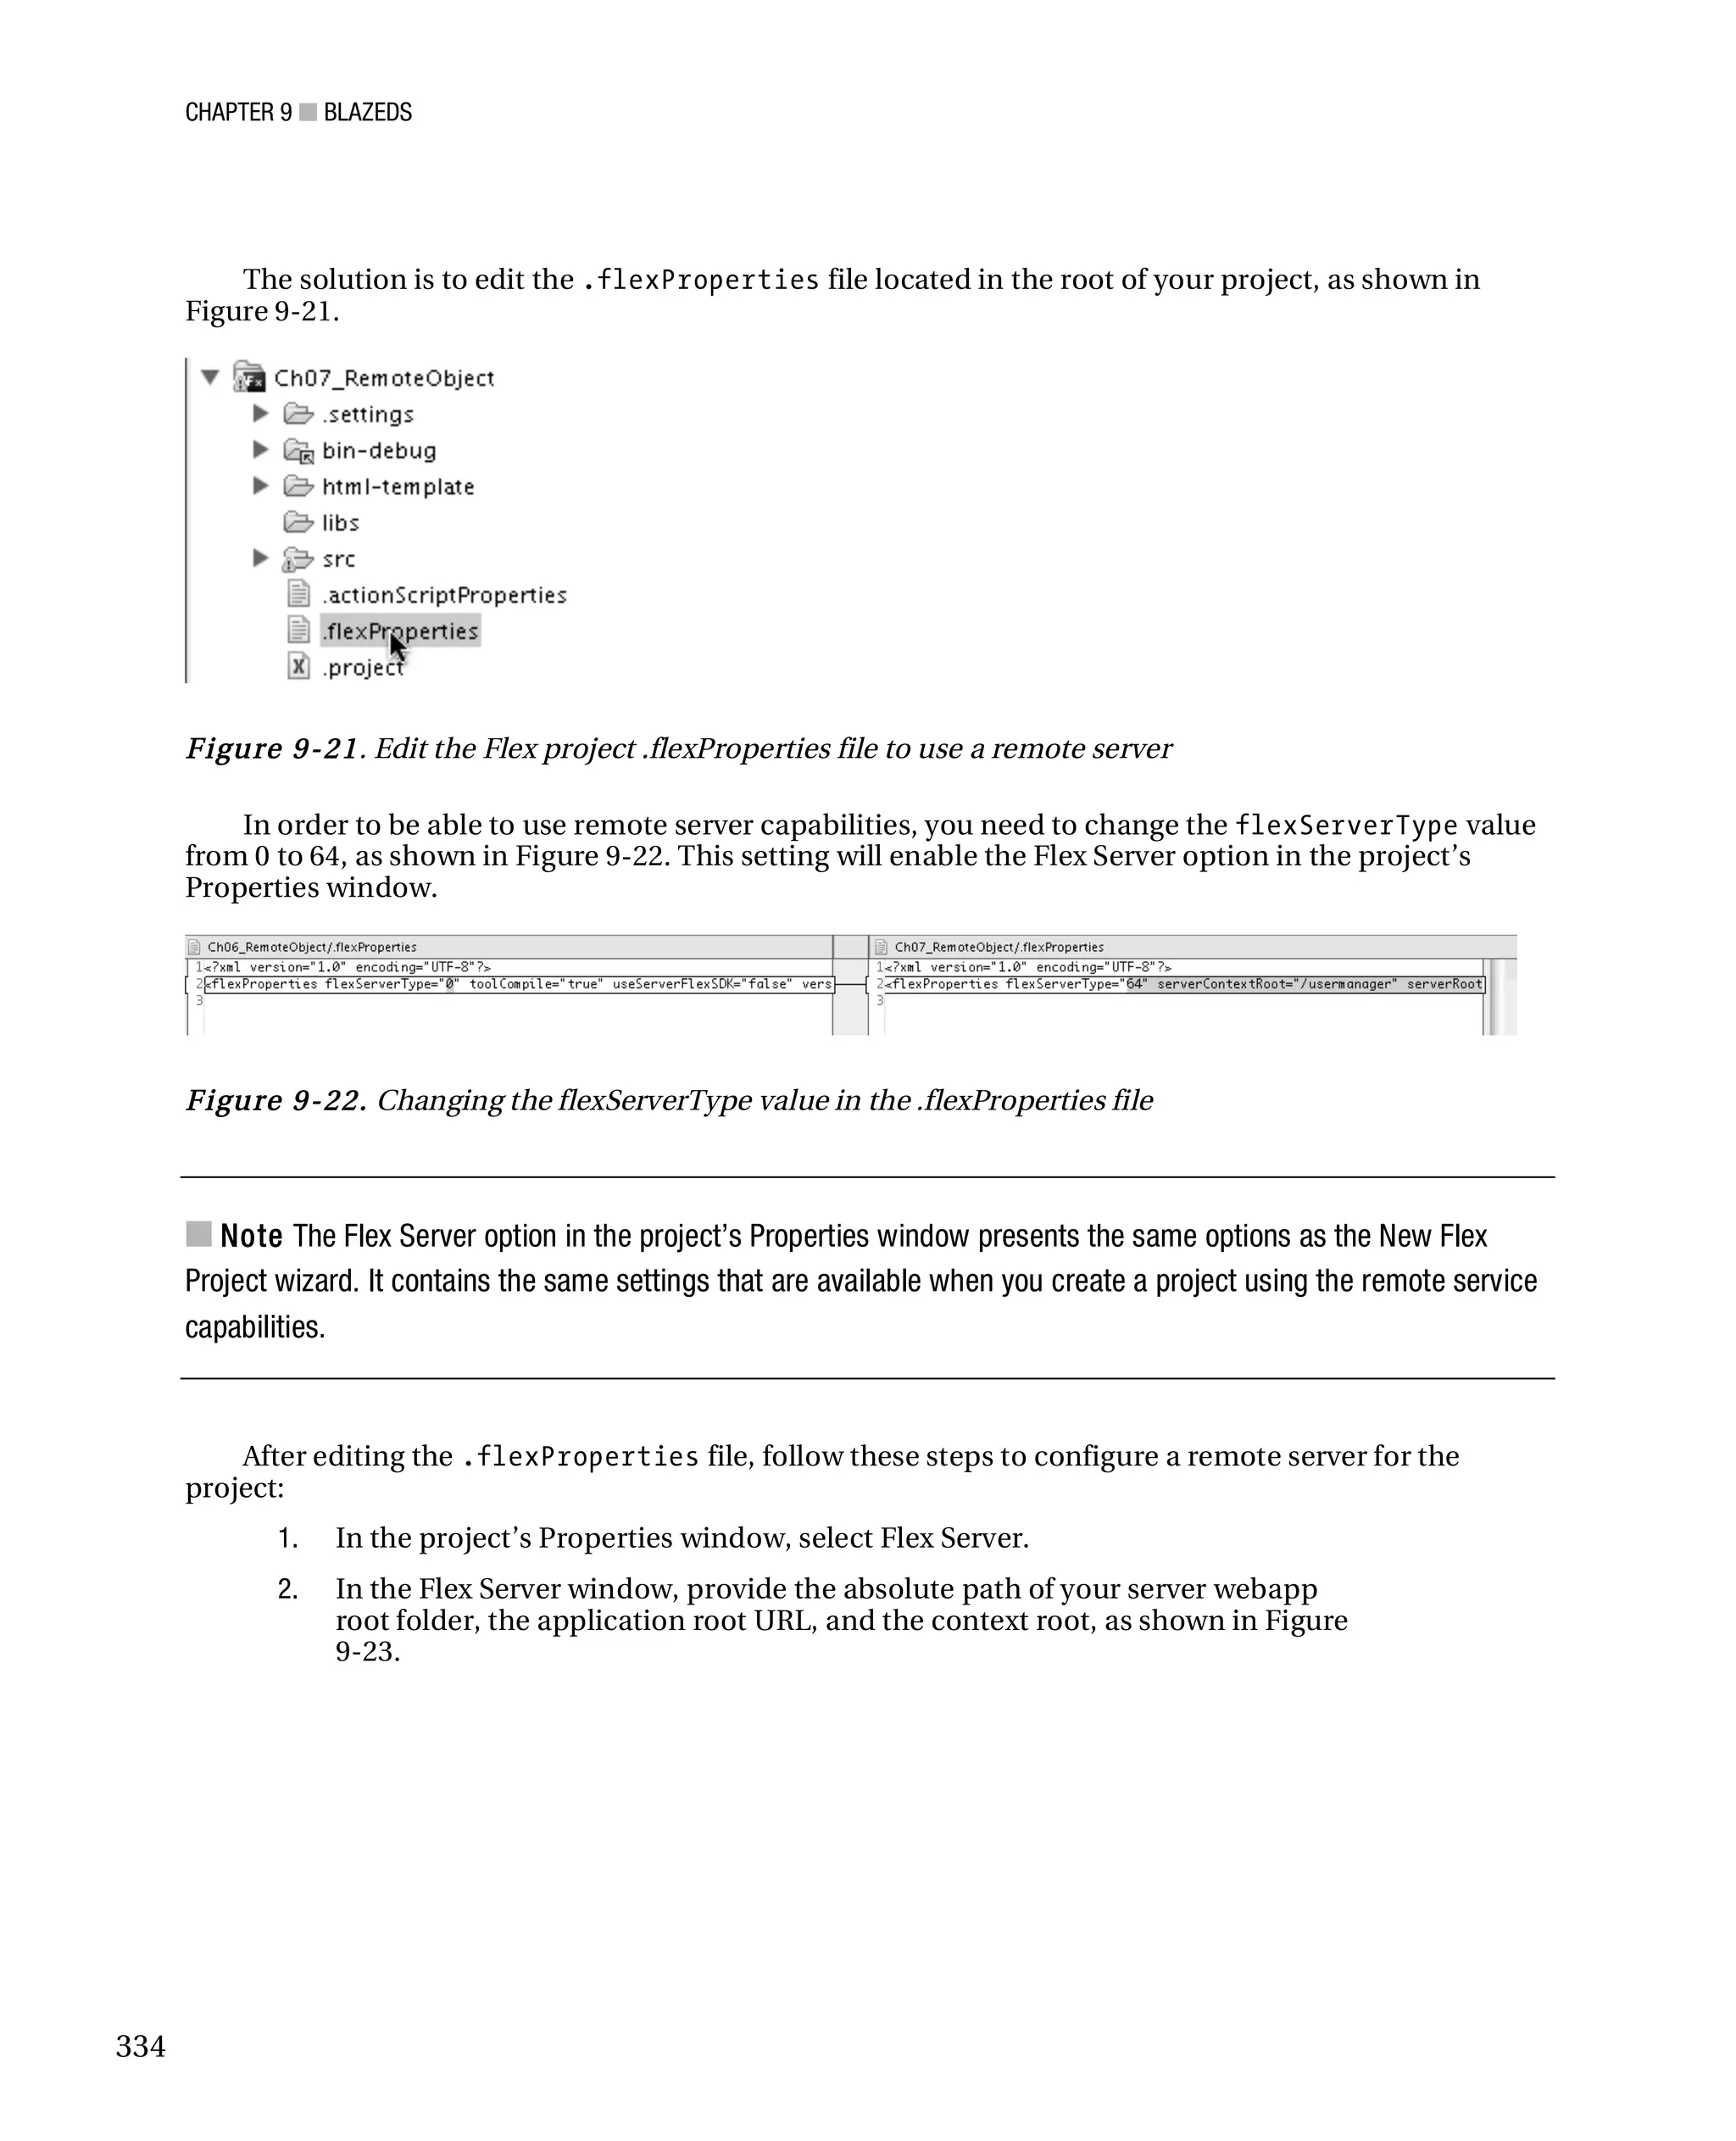
Creating the Flex Client
The Flex client for this example will be the same as the one you created for the HTTPService example
application in Chapter 8. The only differences will be the use of the RemoteObject component instead of
HTTPService, and the mapping of the User entity with the Java User object. As explained in Chapter 6,
you just need to replace the existing UserControlImpl code with the code provided in the
“RemoteObject” section of that chapter, and then map the client entity with the remote server one using
the RemoteClass metatag within the client entity:
[RemoteClass(alias="com.apress.usermanager.model.User")]
332](https://image.slidesharecdn.com/beginningjavaandflex-migratingjavaspringhibernateandmavendeveloperstoadobeflex-100821073507-phpapp01/75/Beginning-java-and-flex-migrating-java-spring-hibernate-and-maven-developers-to-adobe-flex-351-2048.jpg)

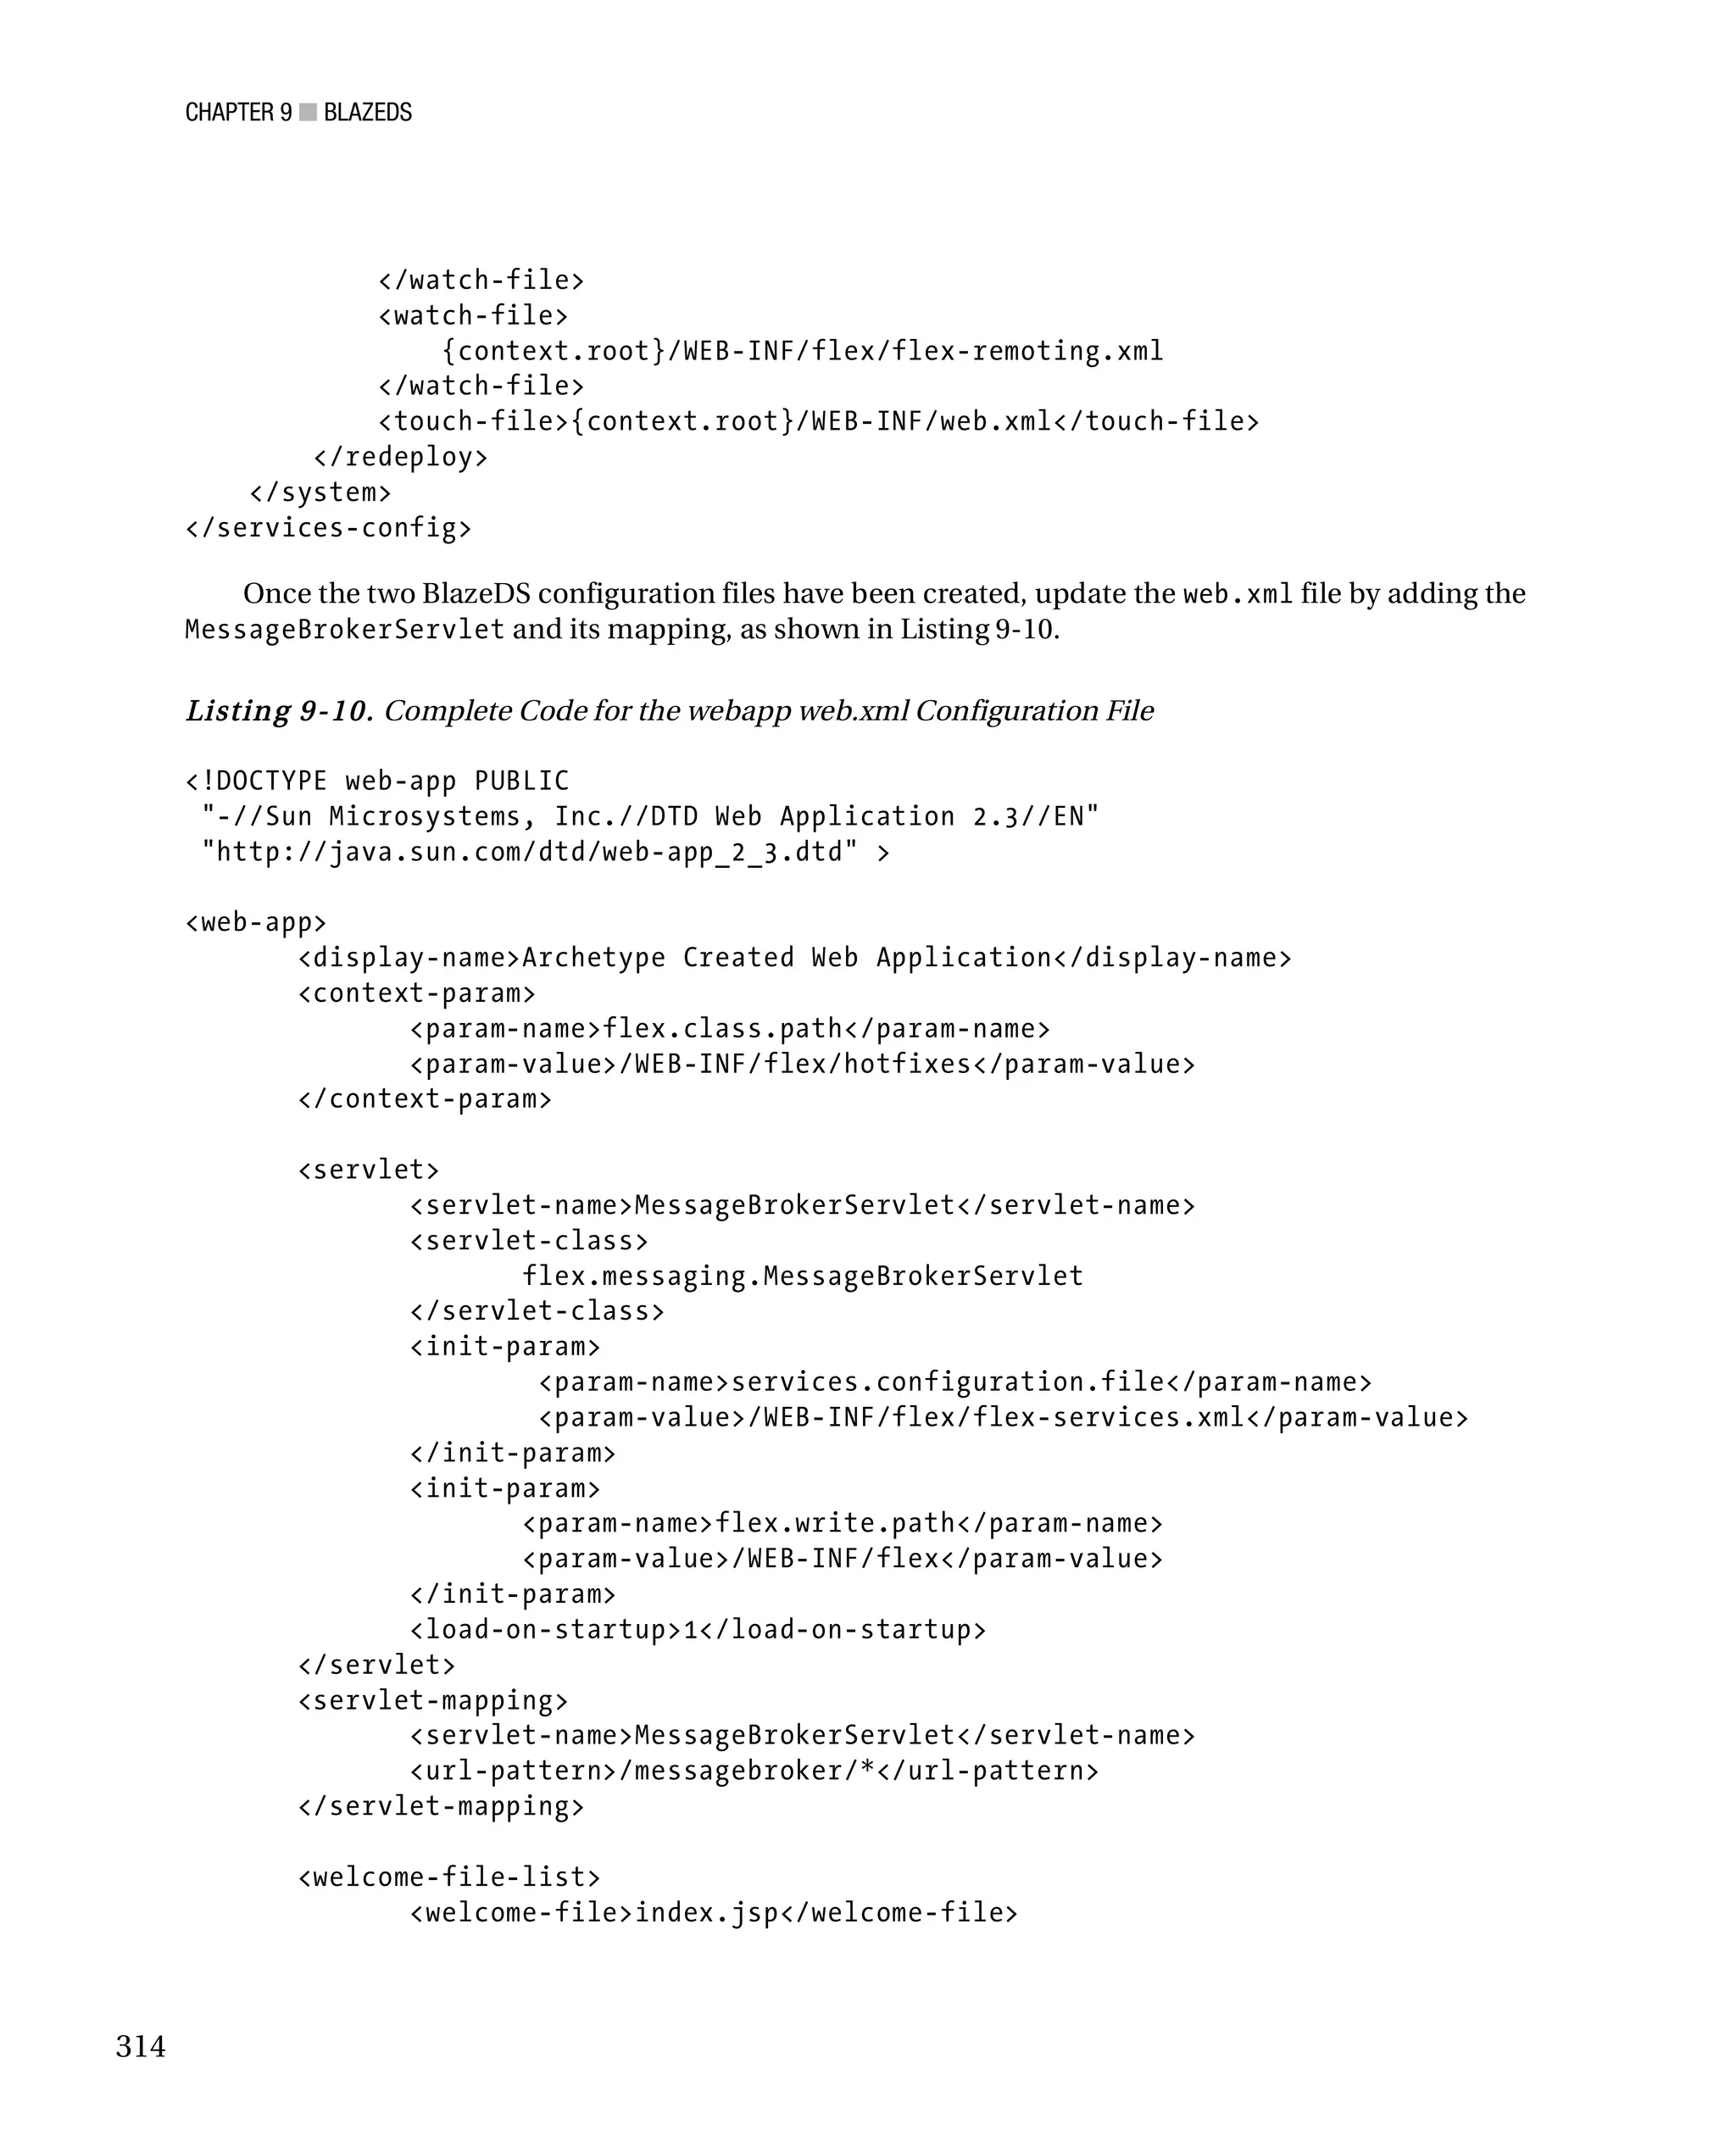
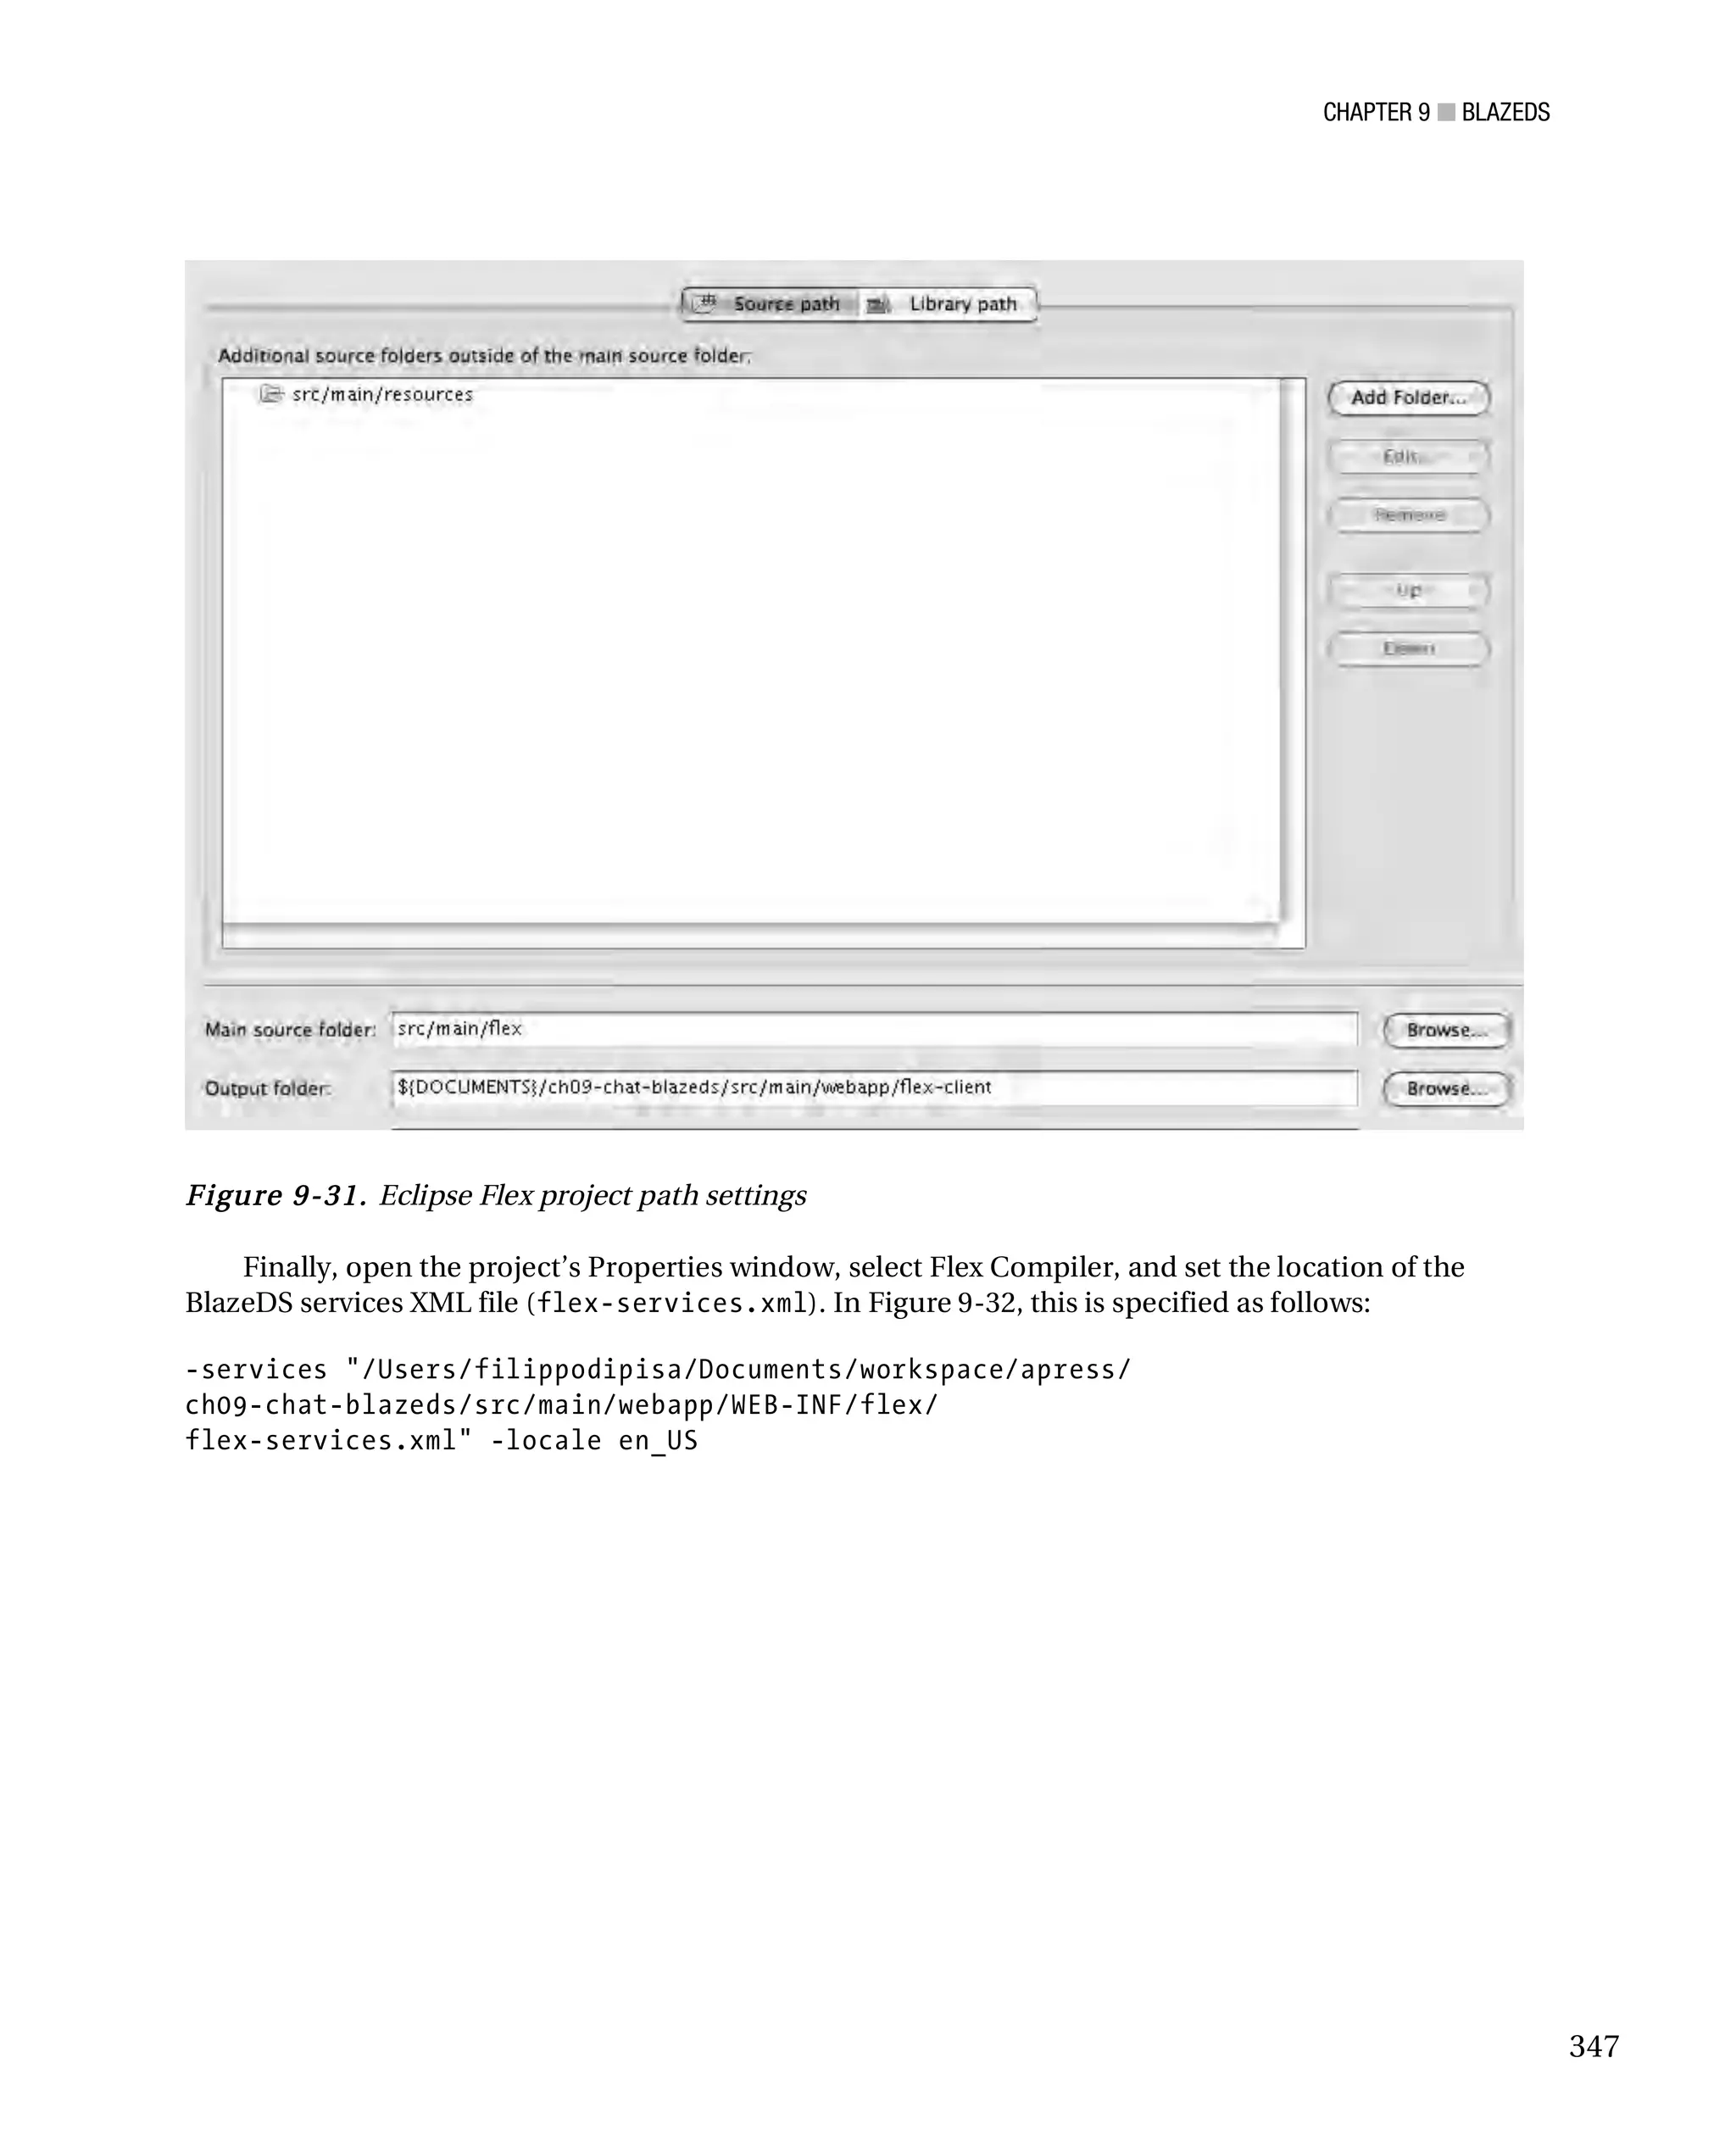
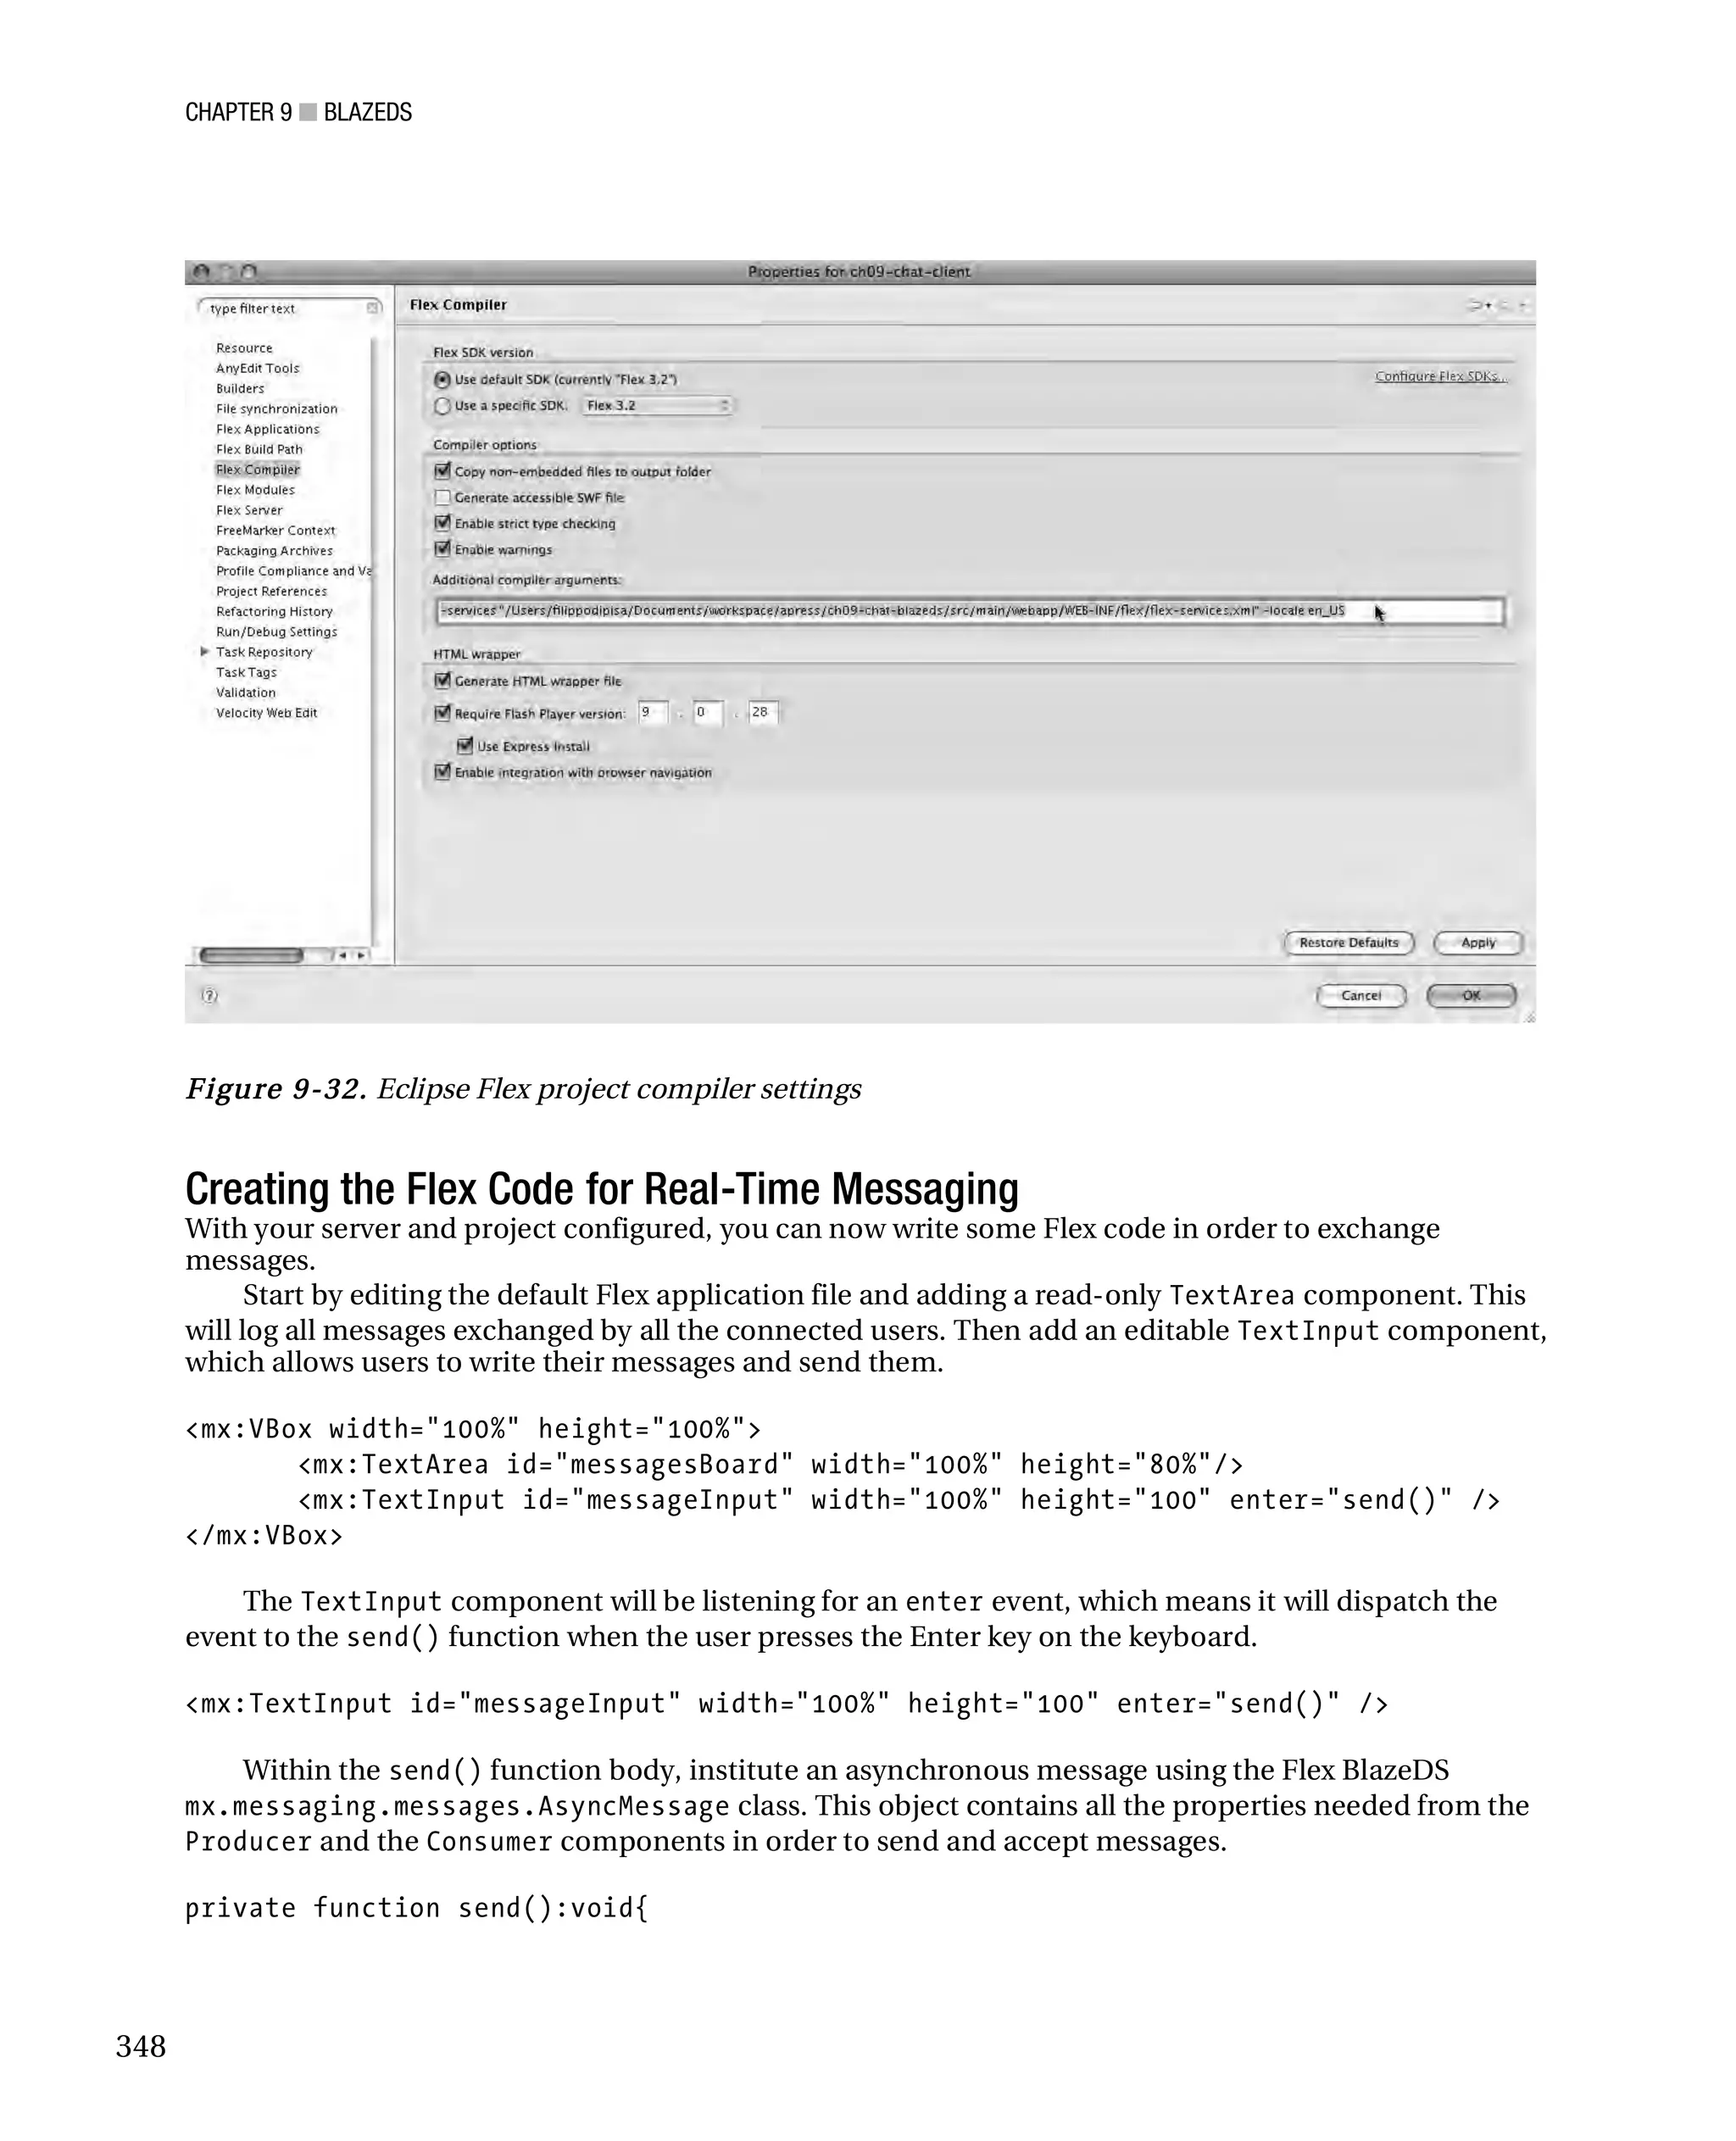
![CHAPTER 9 ■ BLAZEDS
Next, create a folder called flex to hold your BlazeDS configuration files.
In the new flex-messages.xml file, add all the XML definitions to tell BlazeDS to use the
flex.messaging.services.messaging.adapters.ActionScriptAdapter and the channel called
channel-polling-amf.
Then add some new XML definitions in the flex-services.xml file, to tell the BlazeDS server the
channel for real-time messages, its endpoints, and some properties, such the message polling interval
time, as shown in Listing 9-19 with the channel-polling-amf definition.
Listin g 9-19. Real-Time Messaging XML Definitions in the flex-services.xml File
<?xml version="1.0" encoding="UTF-8"?>
<services-config>
<services>
<service-include file-path="flex-remoting.xml" />
<service-include file-path="flex-messages.xml" />
</services>
<channels>
<channel-definition id="channel-amf"
class="mx.messaging.channels.AMFChannel">
<endpoint
url="http://{server.name}:{server.port}/{context.root}/messagebroker/amf"
class="flex.messaging.endpoints.AMFEndpoint" />
<properties>
<polling-enabled>false</polling-enabled>
</properties>
</channel-definition>
<channel-definition id="channel-polling-amf"
class="mx.messaging.channels.AMFChannel">
<endpoint
url="http://{server.name}:{server.port}/{context.root}/messagebroker/
amfpolling"
class="flex.messaging.endpoints.AMFEndpoint" />
<properties>
<polling-enabled>true</polling-enabled>
<polling-interval-seconds>4</polling-interval-seconds>
</properties>
</channel-definition>
</channels>
<logging>
<target class="flex.messaging.log.ConsoleTarget"
level="Error">
<properties>
<prefix>[BlazeDS]</prefix>
341](https://image.slidesharecdn.com/beginningjavaandflex-migratingjavaspringhibernateandmavendeveloperstoadobeflex-100821073507-phpapp01/75/Beginning-java-and-flex-migrating-java-spring-hibernate-and-maven-developers-to-adobe-flex-360-2048.jpg)

![CHAPTER 9 ■ BLAZEDS
var message:IMessage = new AsyncMessage();
message.headers = new Array();
message.headers["sender"] = USERNAME;
message.headers["recepient"] = USERNAME;
message.body.userId = USERNAME;
message.body.chatMessage = messageInput.text;
producer.send(message);
messageInput.text = "";
}
The AsyncMessage class APIs allow you to store the header and the body of the message in the
object. In this example, the message header will contain an associative array with the same username
that applies for both sender and recipient. To keep this application simple and easy to follow, I have
used only one username for both sender and receiver. This means that each client will be able to
exchange messages without any filters or security between the connected users. If you need filtering or
security, you will need to create a message receiver filter to distribute all the messages, following your
application logic and to meet its requirements.
Once you have set the headers and the body of your AsyncMessage, you need to pass it to the
Producer, in order for it to be sent. In this sample class, the Producer is a private variable that you have
set in the init() method on the application creationComplete event. The init() method is used to
initialize the Producer, the Consumer, and the ChannelSet objects.
private function init():void{
var channelSet : ChannelSet = new ChannelSet();
var amfChannel : AMFChannel = new AMFChannel();
amfChannel.url="http://localhost:8080/chat/messagebroker/amfpolling";
channelSet.addChannel(amfChannel);
producer = new Producer();
producer.destination="chat-application";
producer.channelSet = channelSet;
consumer = new Consumer();
consumer.destination="chat-application";
consumer.channelSet=channelSet;
consumer.addEventListener(MessageEvent.MESSAGE,messageHandler);
consumer.subscribe();
}
The Consumer listens for the event of type MessageEvent. When it is dispatched, it is passed to the
messageHandler function as defined in the listener. The messageHandler function checks if the header
of the message is set to recipient=filippo (filippo is the static username that I am using for both
sender and receiver). If the condition is satisfied, it will bind the message body with the message board
TextArea component.
private function messageHandler(event:MessageEvent):void {
349](https://image.slidesharecdn.com/beginningjavaandflex-migratingjavaspringhibernateandmavendeveloperstoadobeflex-100821073507-phpapp01/75/Beginning-java-and-flex-migrating-java-spring-hibernate-and-maven-developers-to-adobe-flex-368-2048.jpg)
![CHAPTER 9 ■ BLAZEDS
var message : IMessage = IMessage(event.message);
if(message.headers["recepient"] == USERNAME){
if(message.body.chatMessage != ""){
messagesBoard.htmlText += message.body.userId + ": " +
message.body.chatMessage + "n";
}
}
}
Listing 9-20 shows the complete listing for the Chat.mxml application component.
Listin g 9-20. Complete Code for ther Chat.mxml Application Component
<?xml version="1.0" encoding="utf-8"?>
<mx:Application xmlns:mx="http://www.adobe.com/2006/mxml"
layout="horizontal"
creationComplete="init()"
horizontalAlign="center"
verticalAlign="middle">
<mx:VBox width="100%" height="100%">
<mx:TextArea id="messagesBoard" width="100%" height="80%"/>
<mx:TextInput id="messageInput" width="100%" height="100"
enter="send()" />
</mx:VBox>
<mx:Script>
<
![CHAPTER 9 ■ BLAZEDS
private function init():void{
var channelSet : ChannelSet = new ChannelSet();
var amfChannel : AMFChannel = new AMFChannel();
amfChannel.url="http://localhost:8080/chat/messagebroker/amfpolling";
channelSet.addChannel(amfChannel);
producer = new Producer();
producer.destination="chat-application";
producer.channelSet = channelSet;
consumer = new Consumer();
consumer.destination="chat-application";
consumer.channelSet=channelSet;
consumer.addEventListener(MessageEvent.MESSAGE,messageHandler);
consumer.subscribe();
}
private function send():void{
var message:IMessage = new AsyncMessage();
message.headers = new Array();
message.headers["sender"] = USERNAME;
message.headers["recepient"] = USERNAME;
message.body.userId = USERNAME;
message.body.chatMessage = messageInput.text;
producer.send(message);
messageInput.text = "";
}
private function messageHandler(event:MessageEvent):void {
var message : IMessage = IMessage(event.message);
if(message.headers["recepient"] == USERNAME){
if(message.body.chatMessage != ""){
messagesBoard.htmlText +=
message.body.userId + ": " + message.body.chatMessage + "n";
}
}
}
]]>
</mx:Script>
</mx:Application>
351](https://image.slidesharecdn.com/beginningjavaandflex-migratingjavaspringhibernateandmavendeveloperstoadobeflex-100821073507-phpapp01/75/Beginning-java-and-flex-migrating-java-spring-hibernate-and-maven-developers-to-adobe-flex-370-2048.jpg)
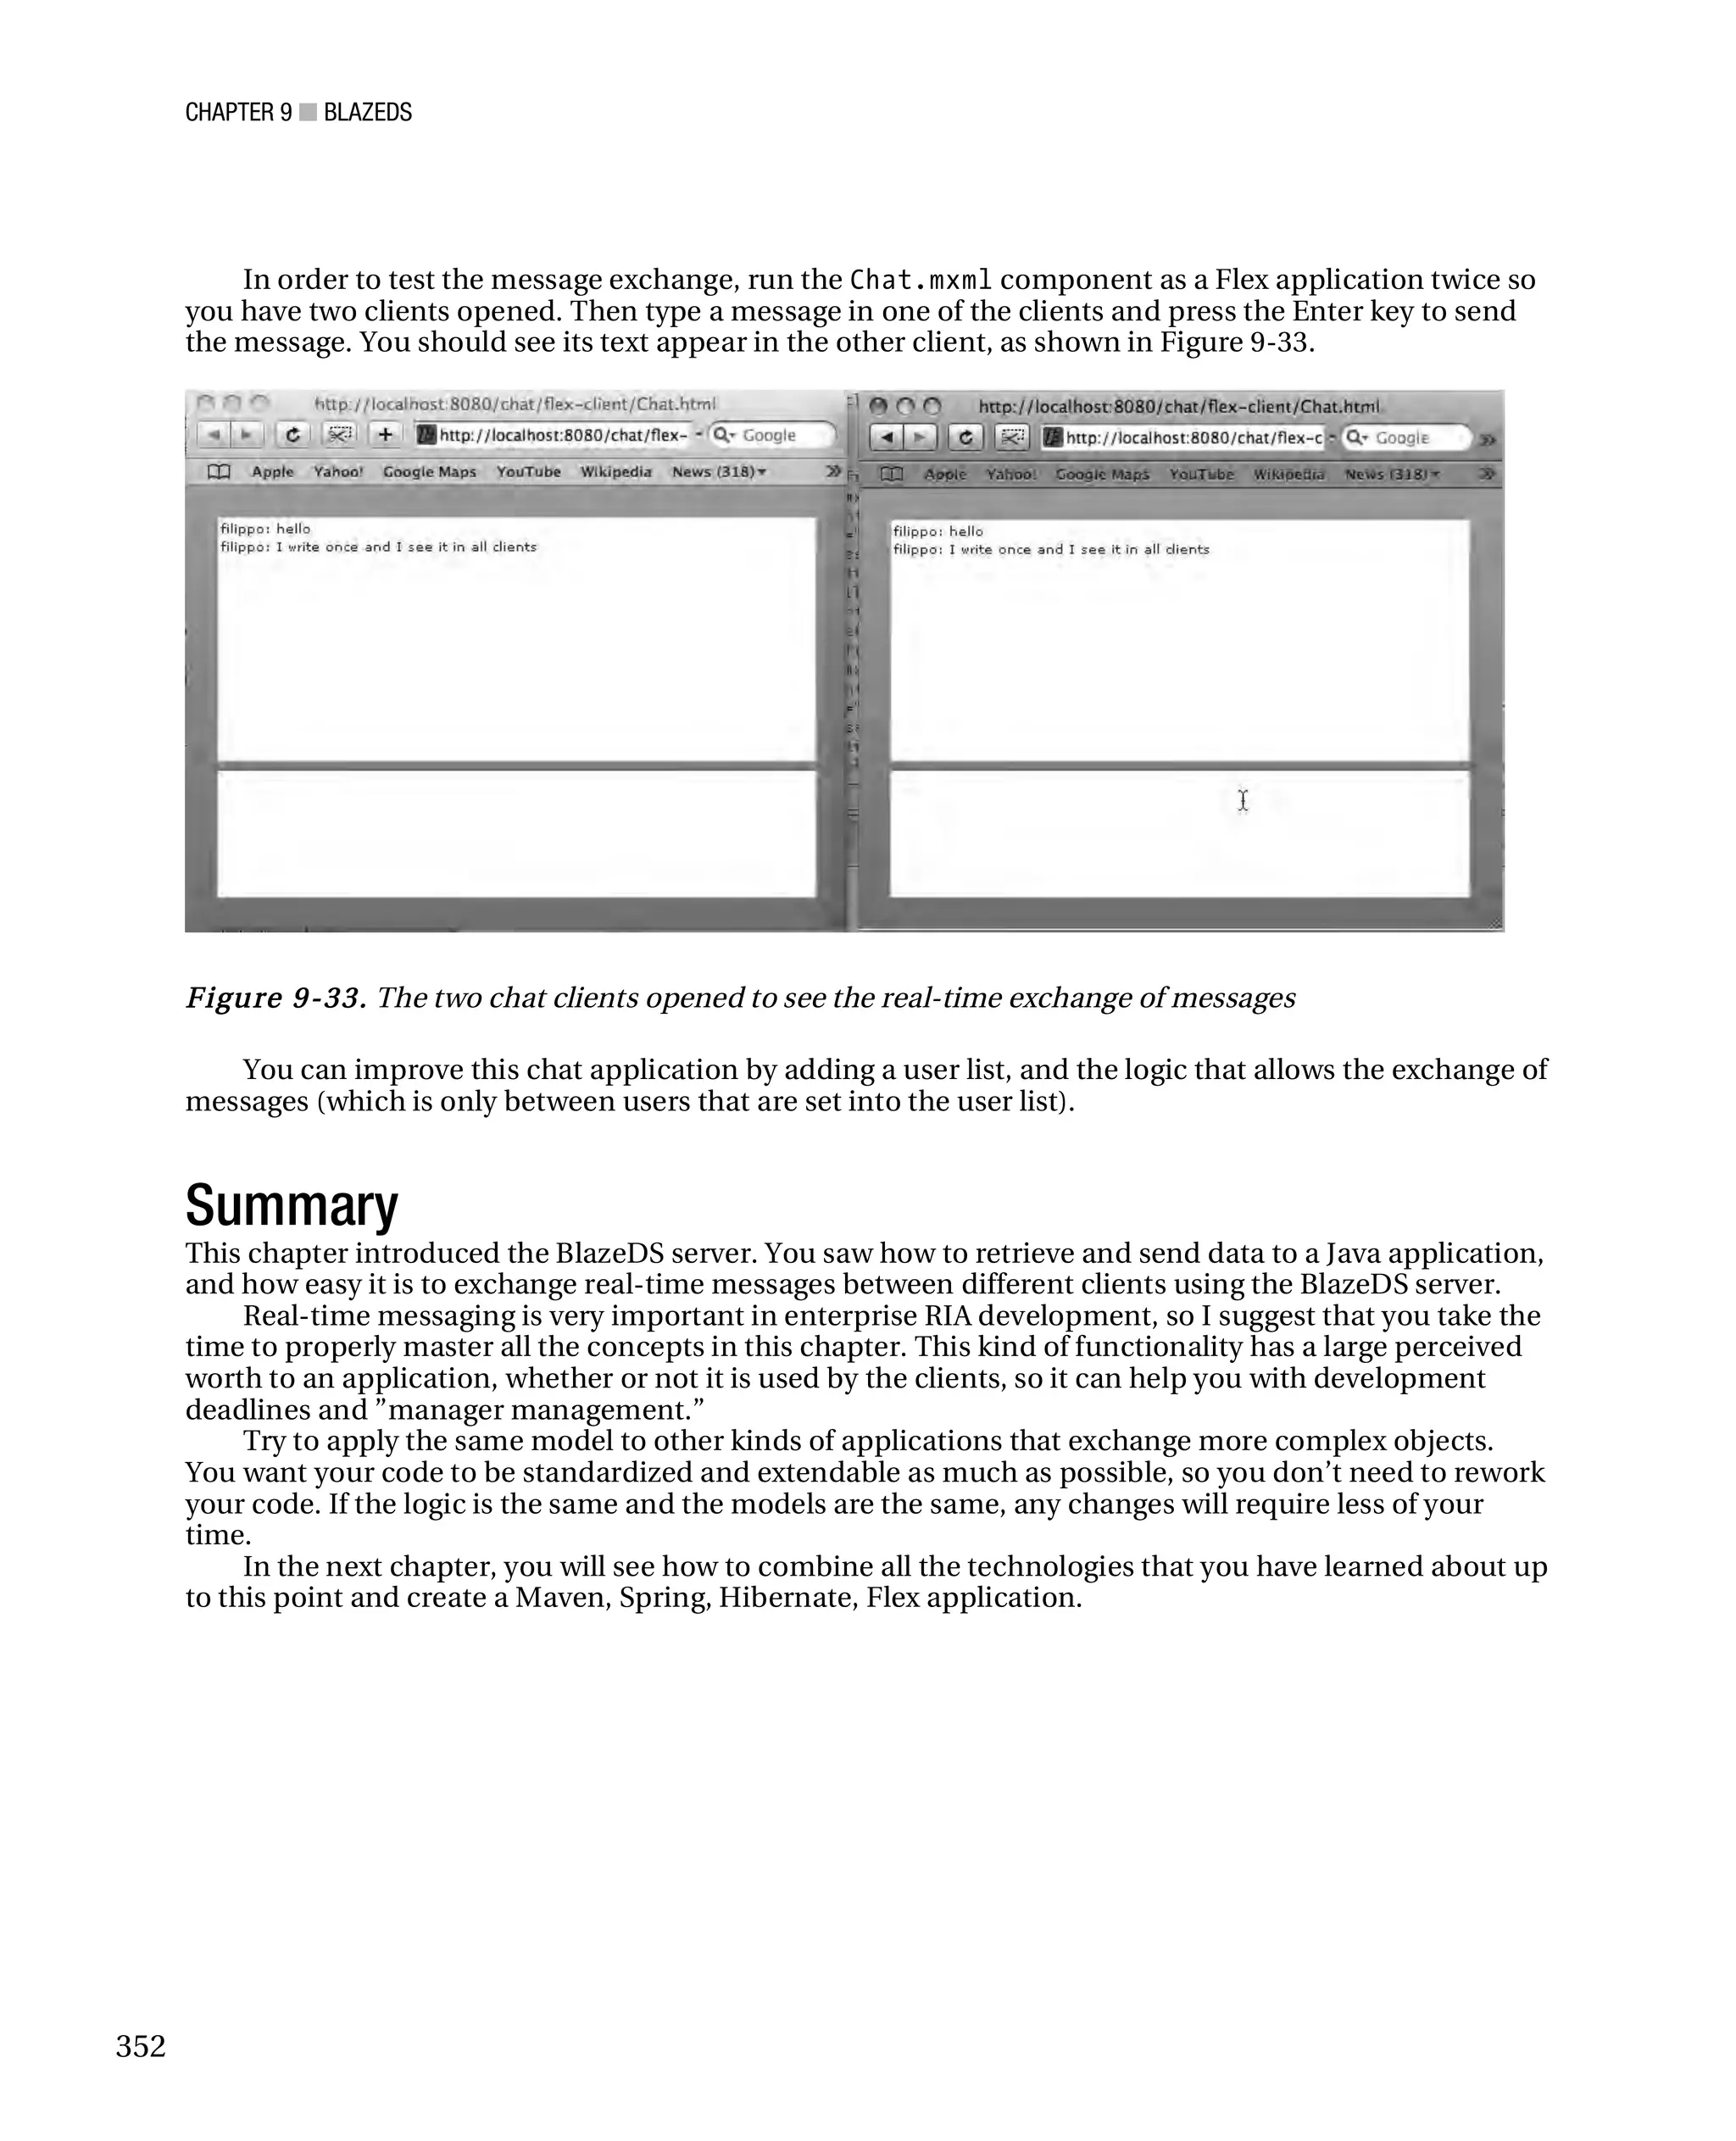
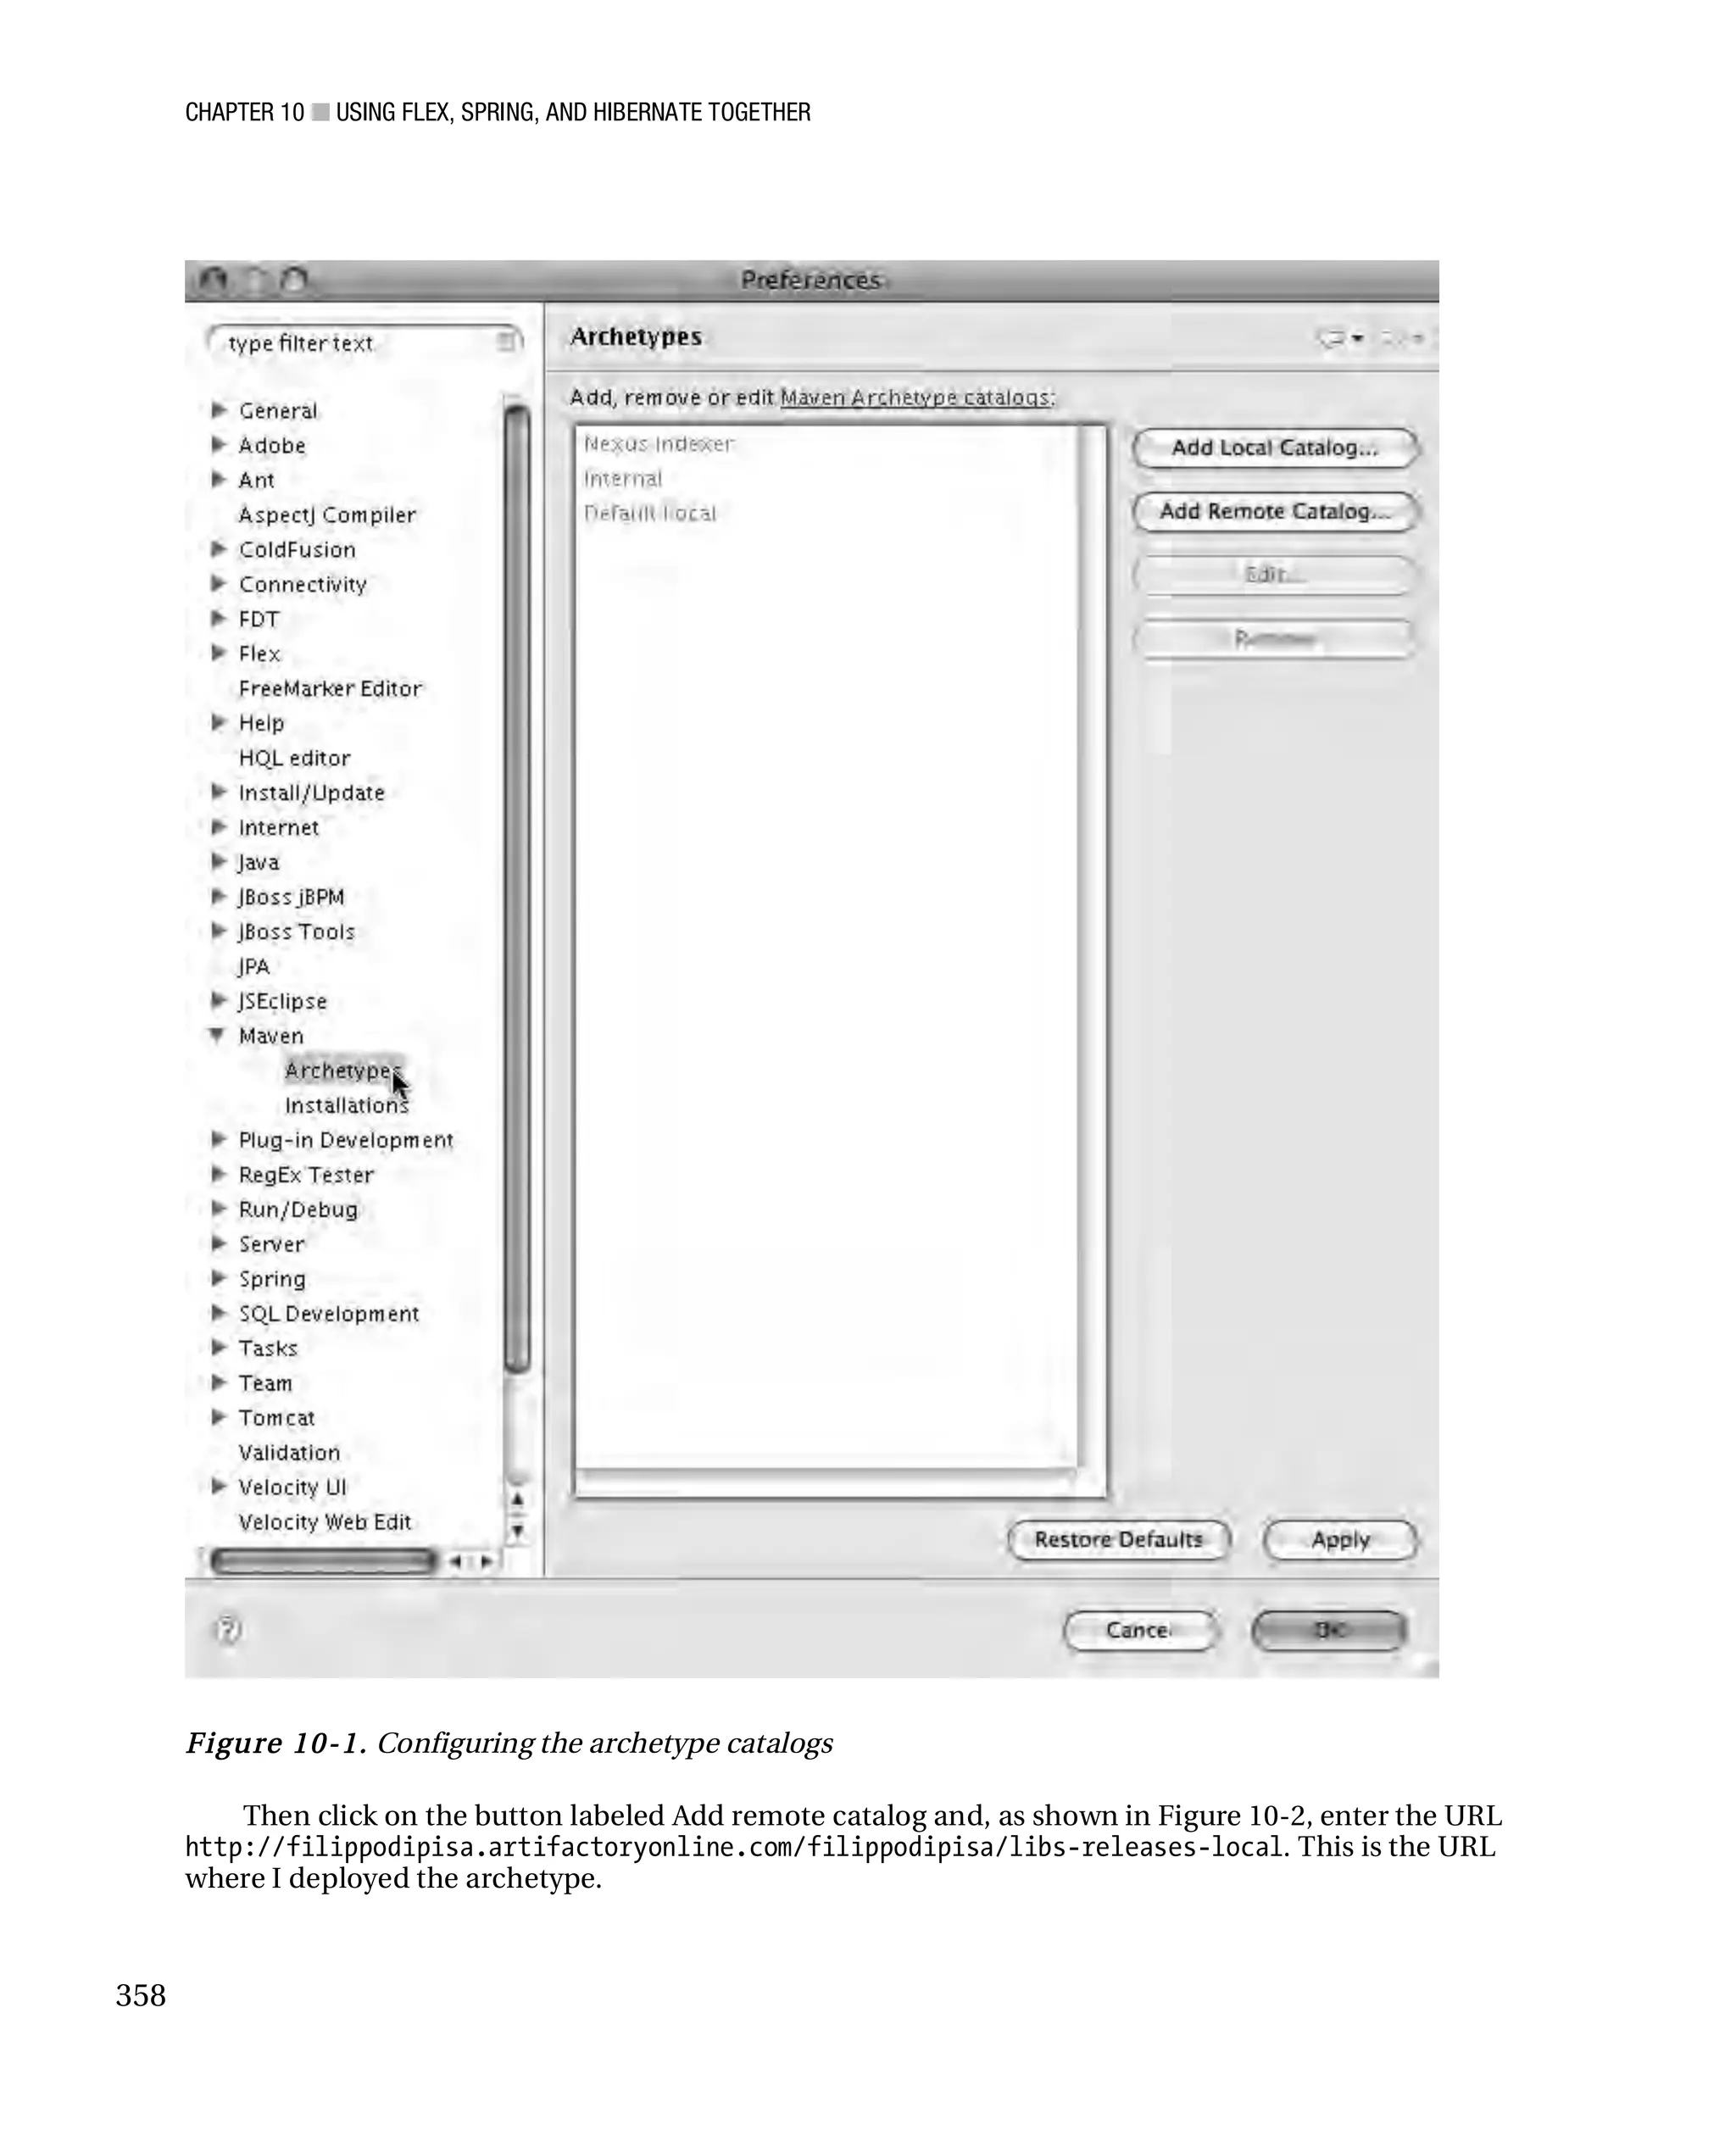
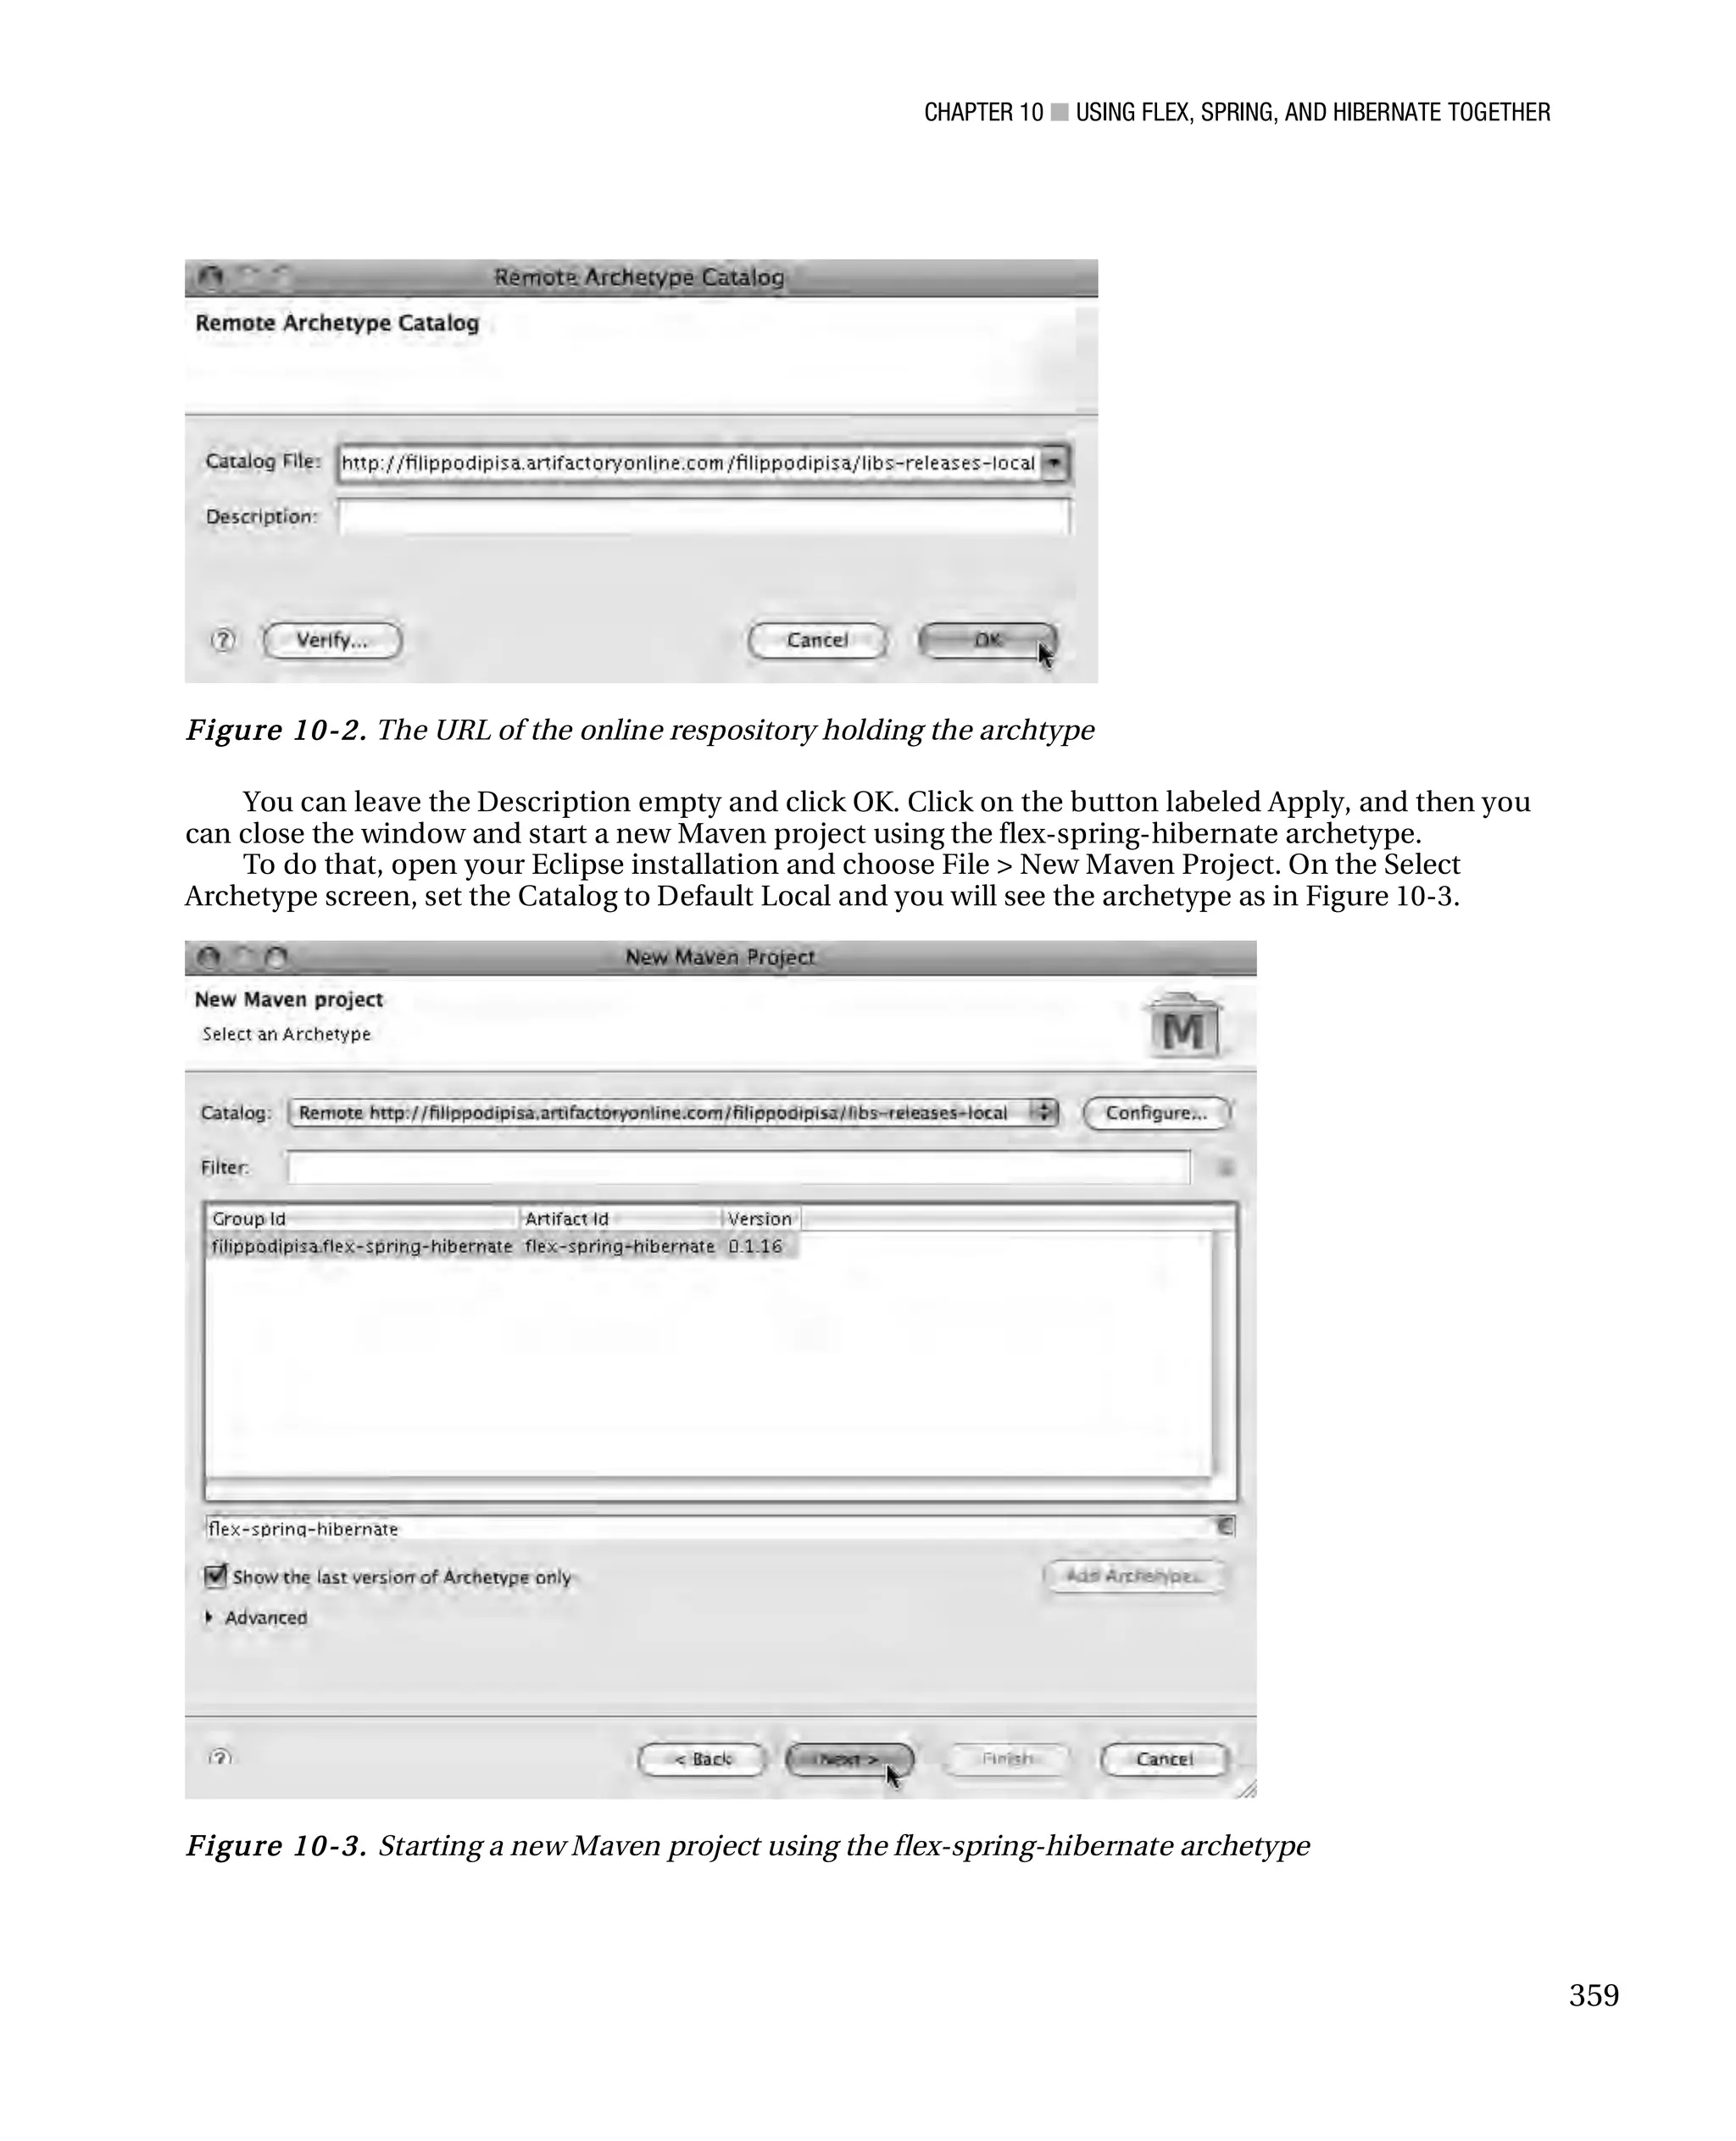
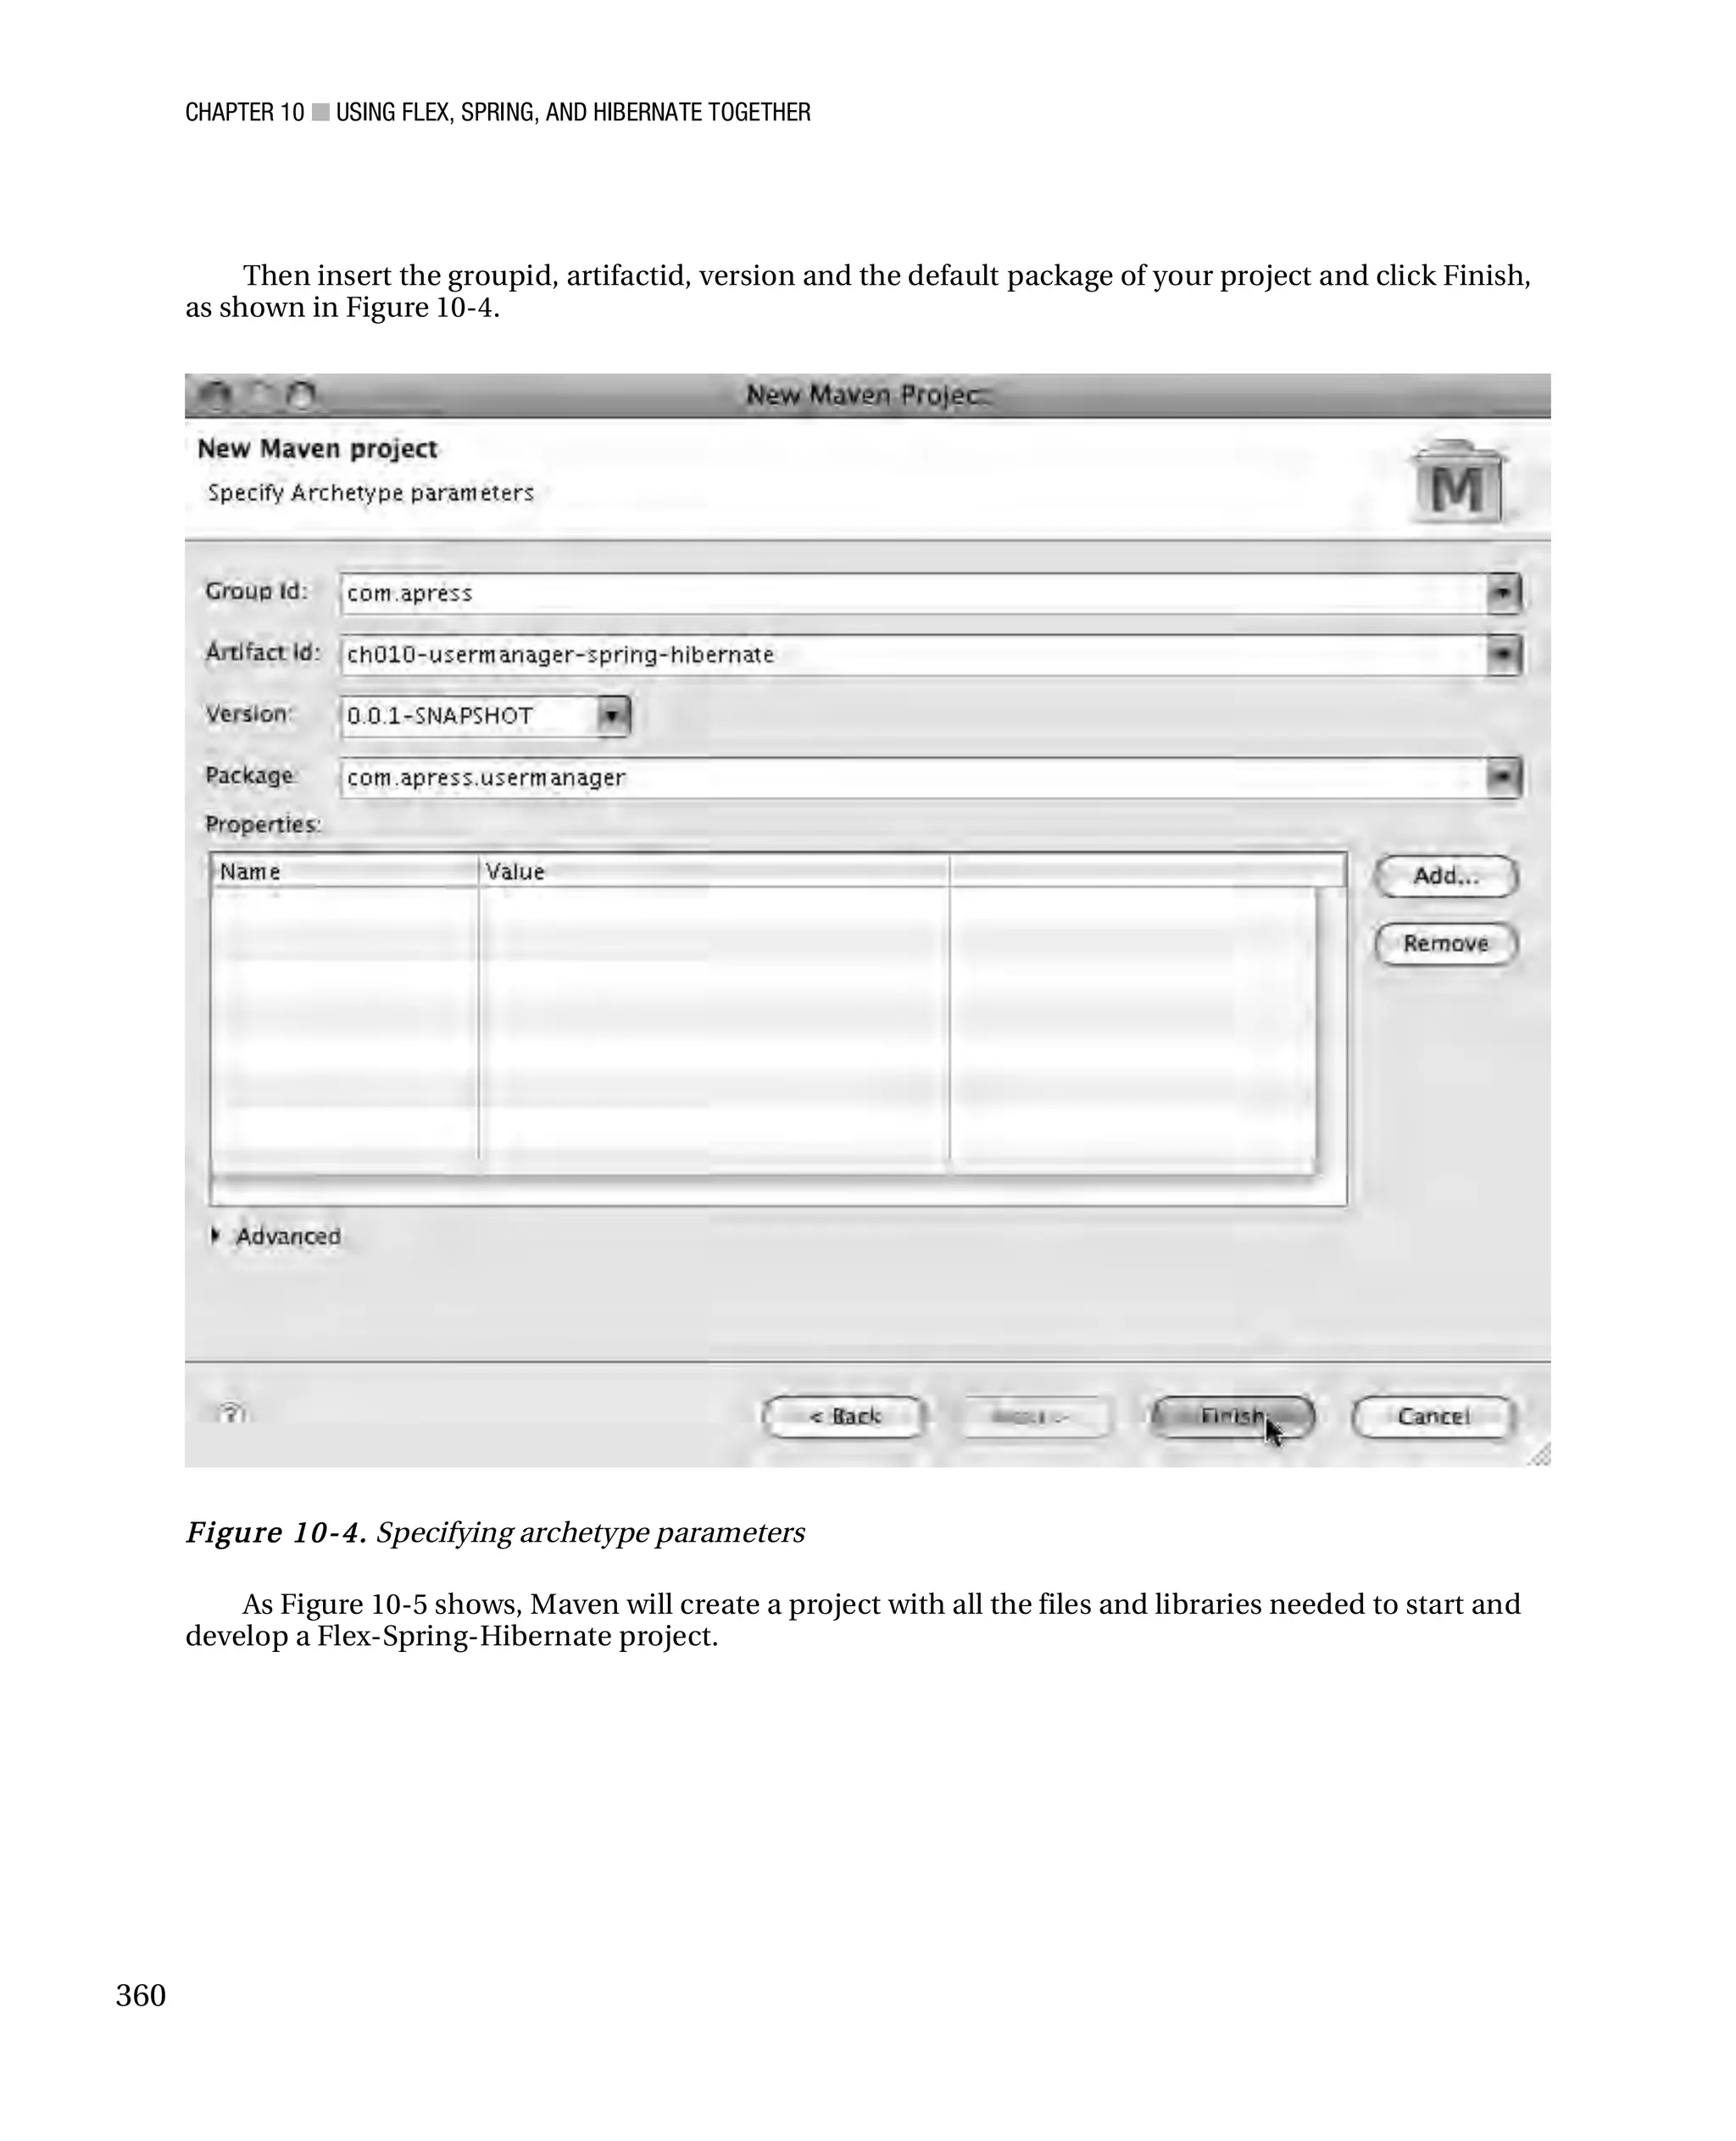
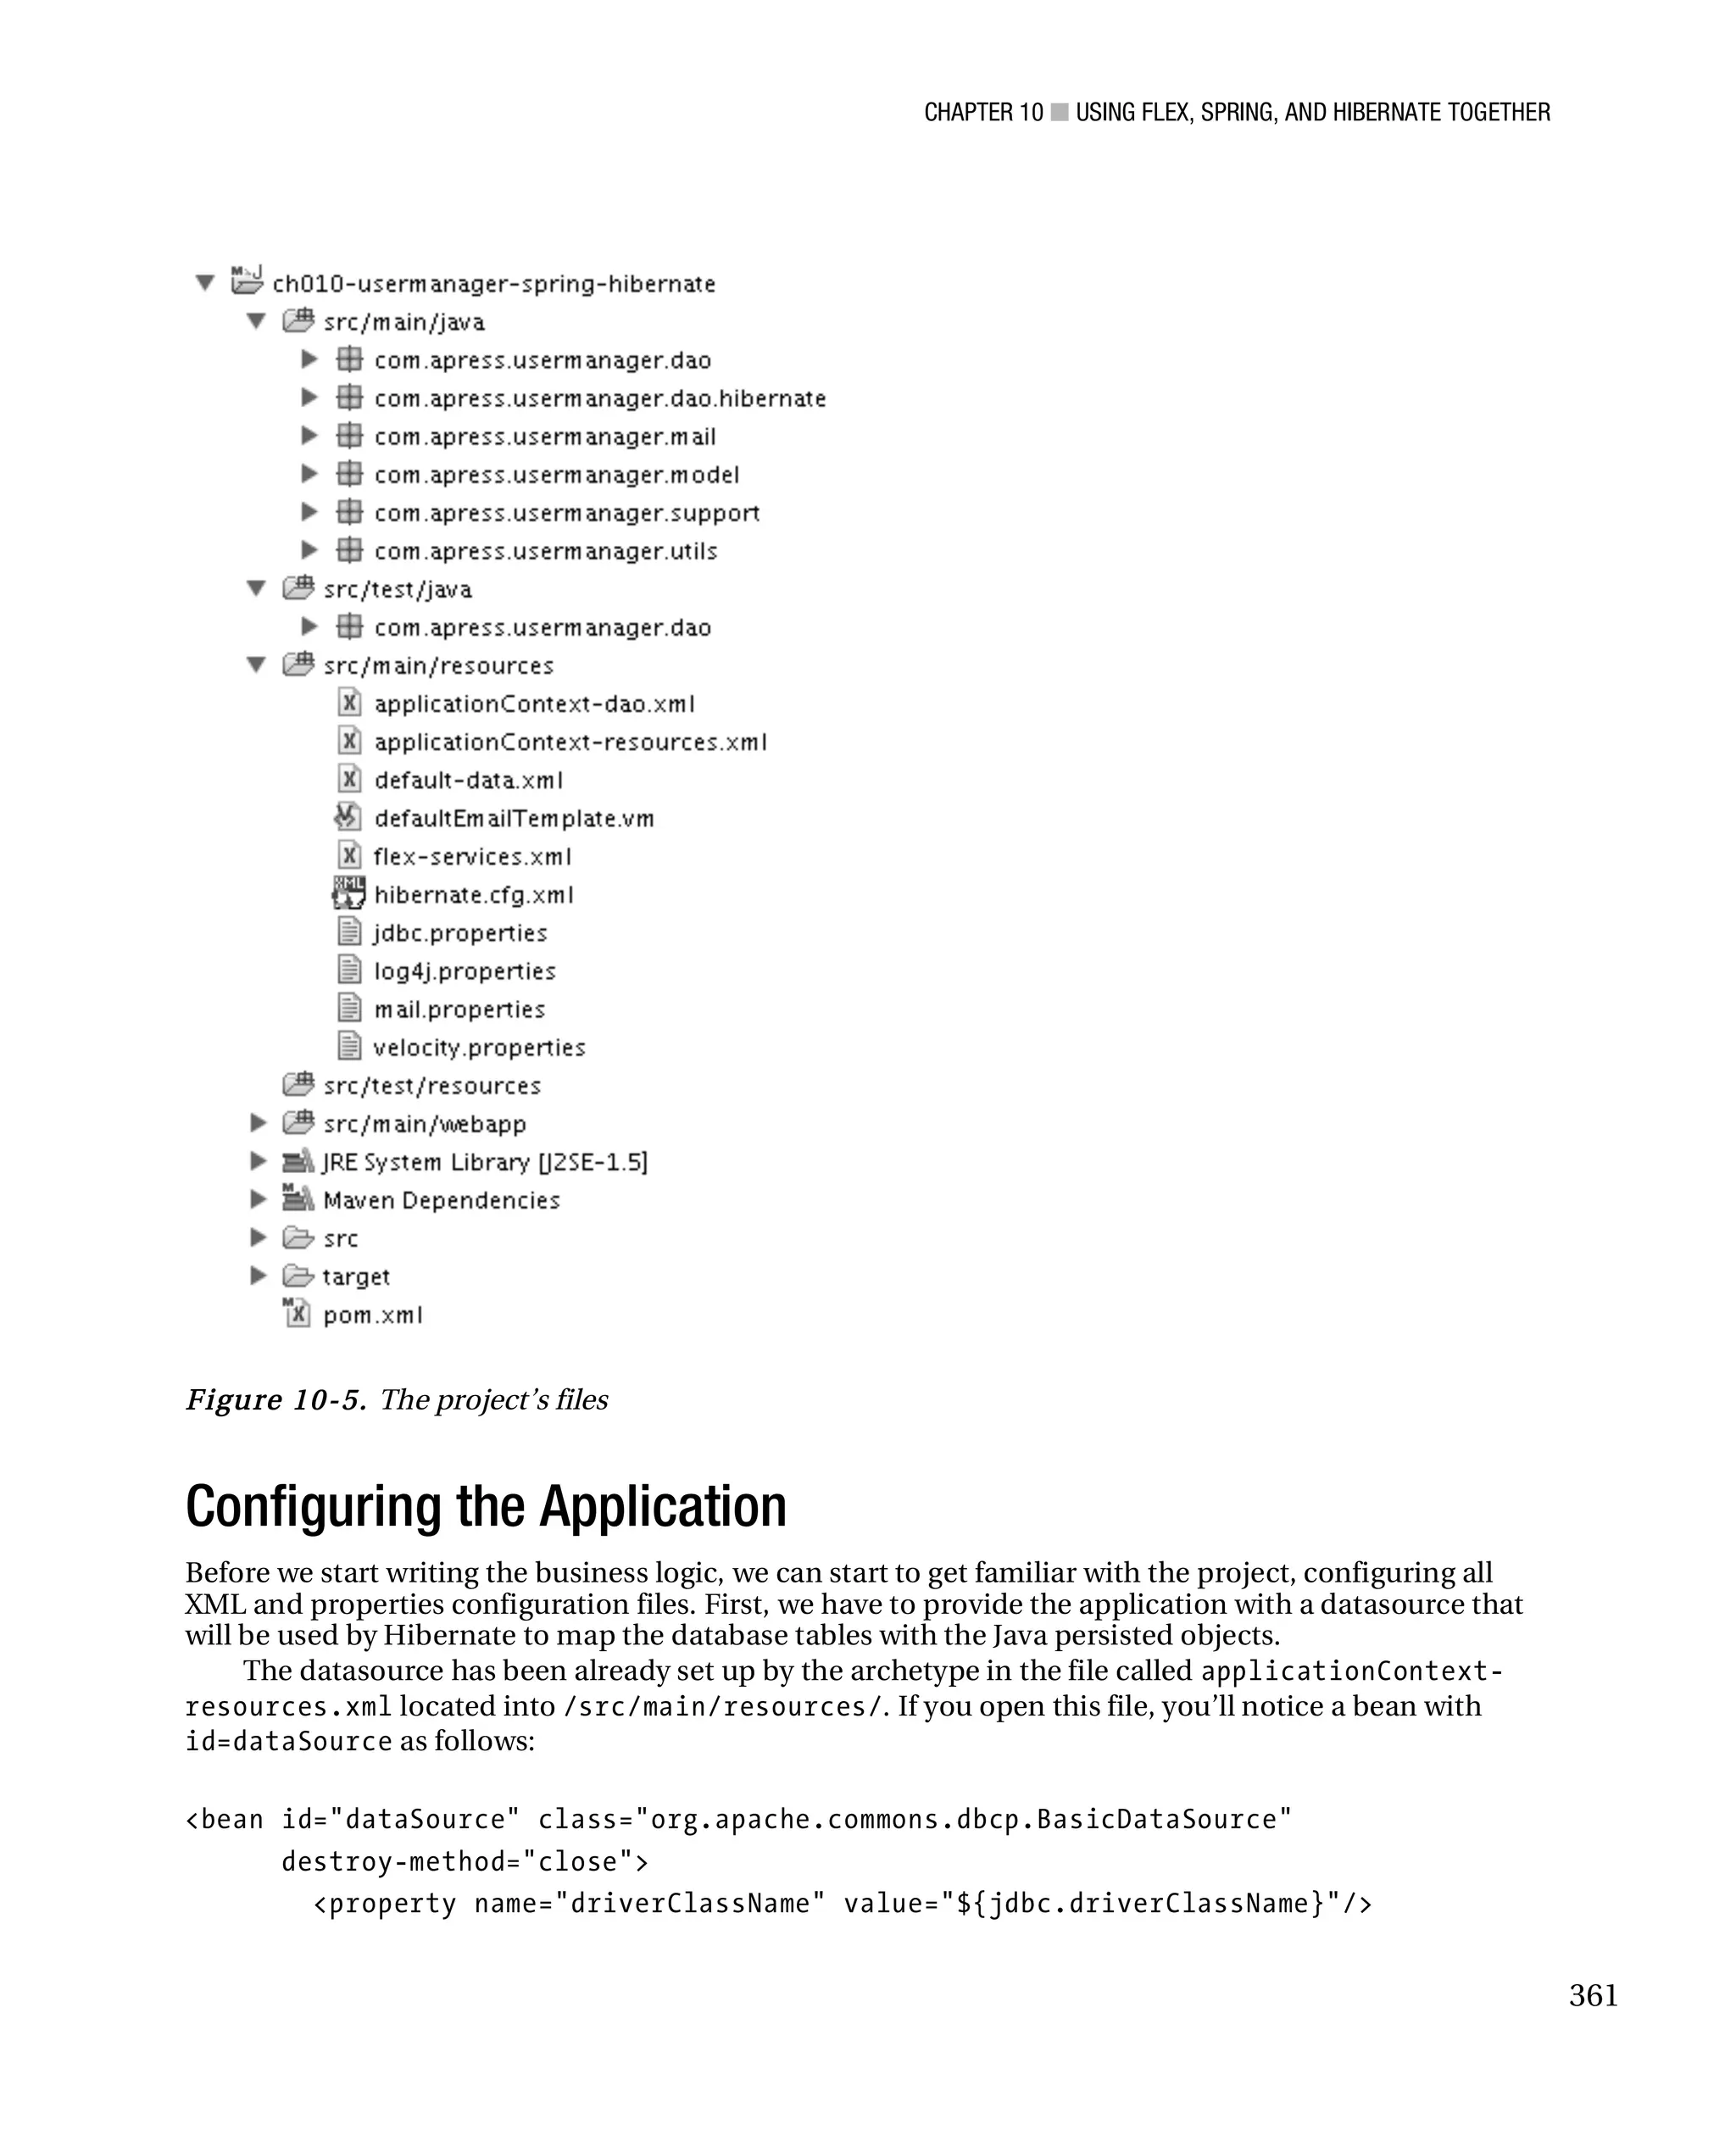
![CHAPTER 10 ■ USING FLEX, SPRING, AND HIBERNATE TOGETHER
<property name="url" value="${jdbc.url}"/>
<property name="username" value="${jdbc.username}"/>
<property name="password" value="${jdbc.password}"/>
<property name="maxActive" value="100"/>
<property name="maxWait" value="1000"/>
<property name="poolPreparedStatements" value="true"/>
<property name="defaultAutoCommit" value="true"/>
<property name="testOnBorrow" value="true"/>
<property name="validationQuery" value="select 1=1"/>
</bean>
This bean uses properties set in the jdbc.properties file to allow you to change your JDBC
properties without having to touch the bean configuration XML file.
To make your life easier and keep everything in one place, I set the jdbc.properties values into the
POM configuration file; when we compile, Maven will replace the variable set into the jdbc.properties
file with the ones set into the POM file.
So, let’s open jdbc.properties, which is located in the /src/main/resources/ path. This file
contains all the parameters needed to set up the JDBC connection, as follows:
jdbc.driverClassName=${jdbc.driverClassName}
jdbc.url=${jdbc.url}
jdbc.username=${jdbc.username}
jdbc.password=${jdbc.password}
hibernate.dialect=${hibernate.dialect}
# Needed by Hibernate3 Maven Plugin defined in pom.xml
hibernate.connection.username=${jdbc.username}
hibernate.connection.password=${jdbc.password}
hibernate.connection.url=${jdbc.url}
hibernate.connection.driver_class=${jdbc.driverClassName}
By default, the archetype sets the name of the database to the name given to the artifactId in the
project wizard. To properly configure the JDBC connection, let’s change the name of the database from
ch10-usermanager-spring-hibernate to apress_usermanager, and let’s change the username and
password to the real username and password of your MySQL installation. In my case, these are apress
and 123456, respectively.
To make these changes, open the POM file and change the JDBC values as the following:
<jdbc.url><![CDATA[jdbc:mysql://localhost:3306/apress_usermanager?createDatabaseIf
NotExist=true&useUnicode=true&characterEncoding=utf-
8&enableQueryTimeouts=false]]></jdbc.url>
<jdbc.username>user</jdbc.username>
<jdbc.password>pass</jdbc.password>
362](https://image.slidesharecdn.com/beginningjavaandflex-migratingjavaspringhibernateandmavendeveloperstoadobeflex-100821073507-phpapp01/75/Beginning-java-and-flex-migrating-java-spring-hibernate-and-maven-developers-to-adobe-flex-381-2048.jpg)

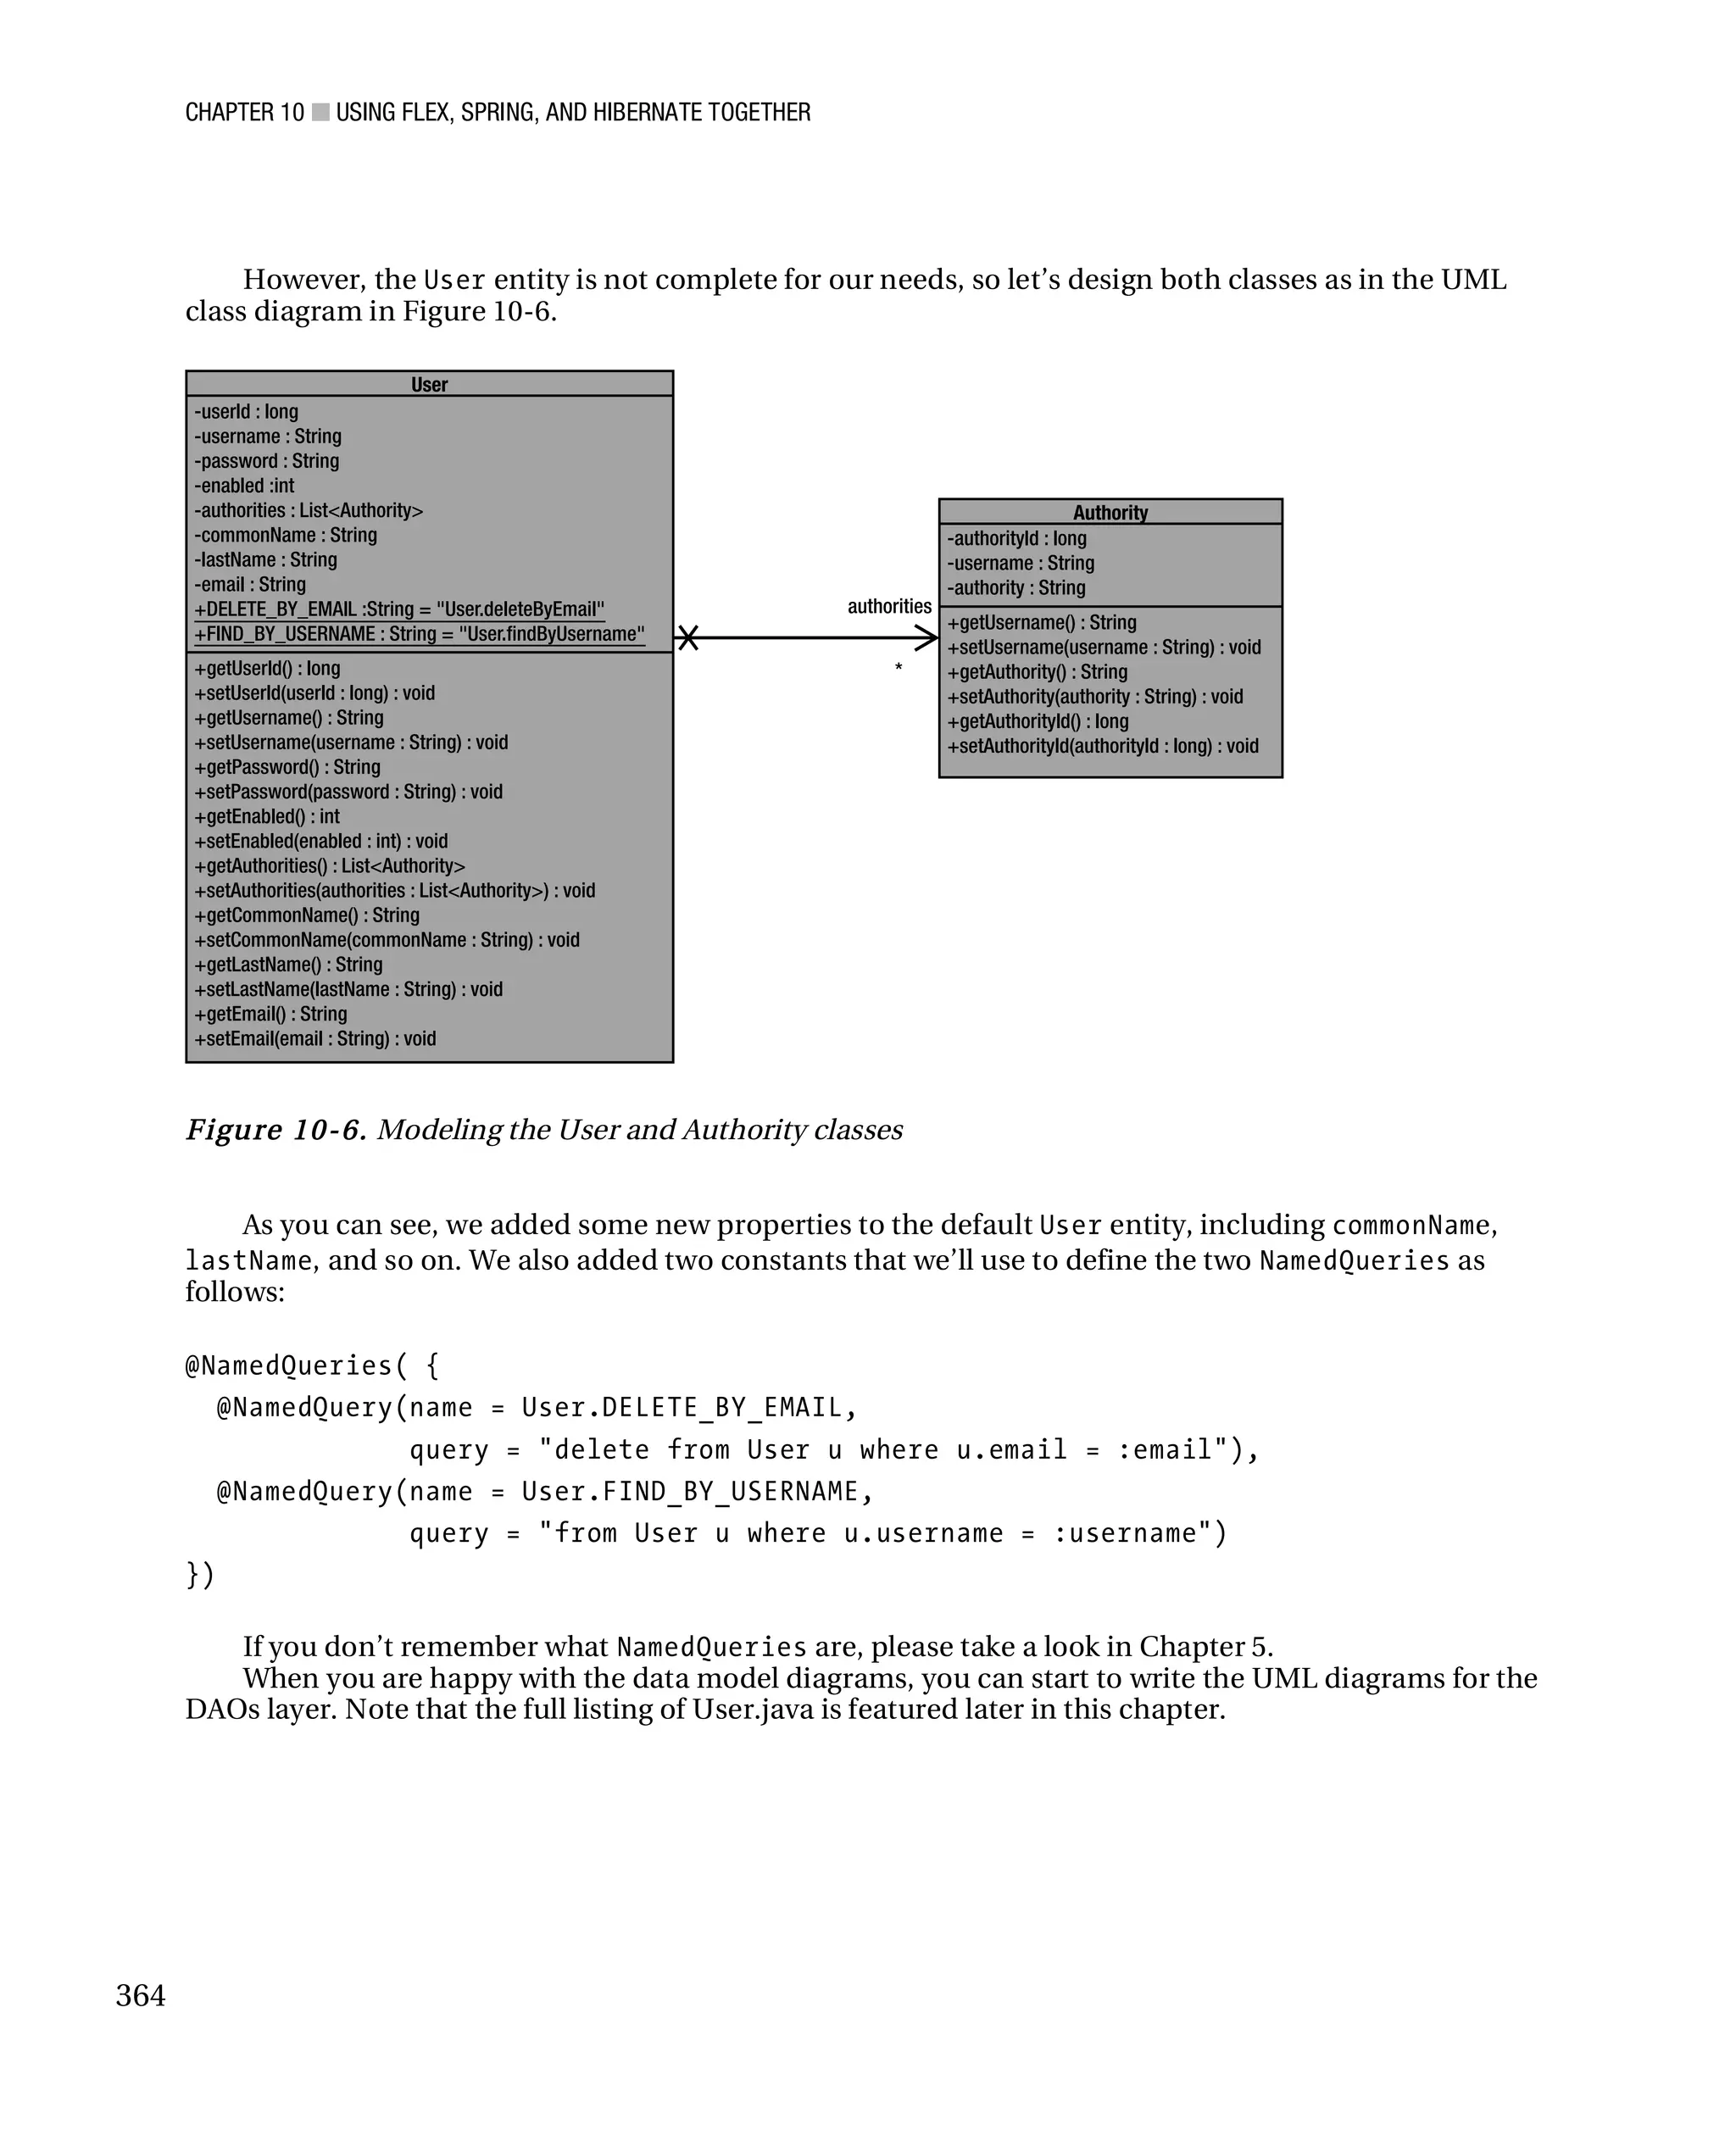
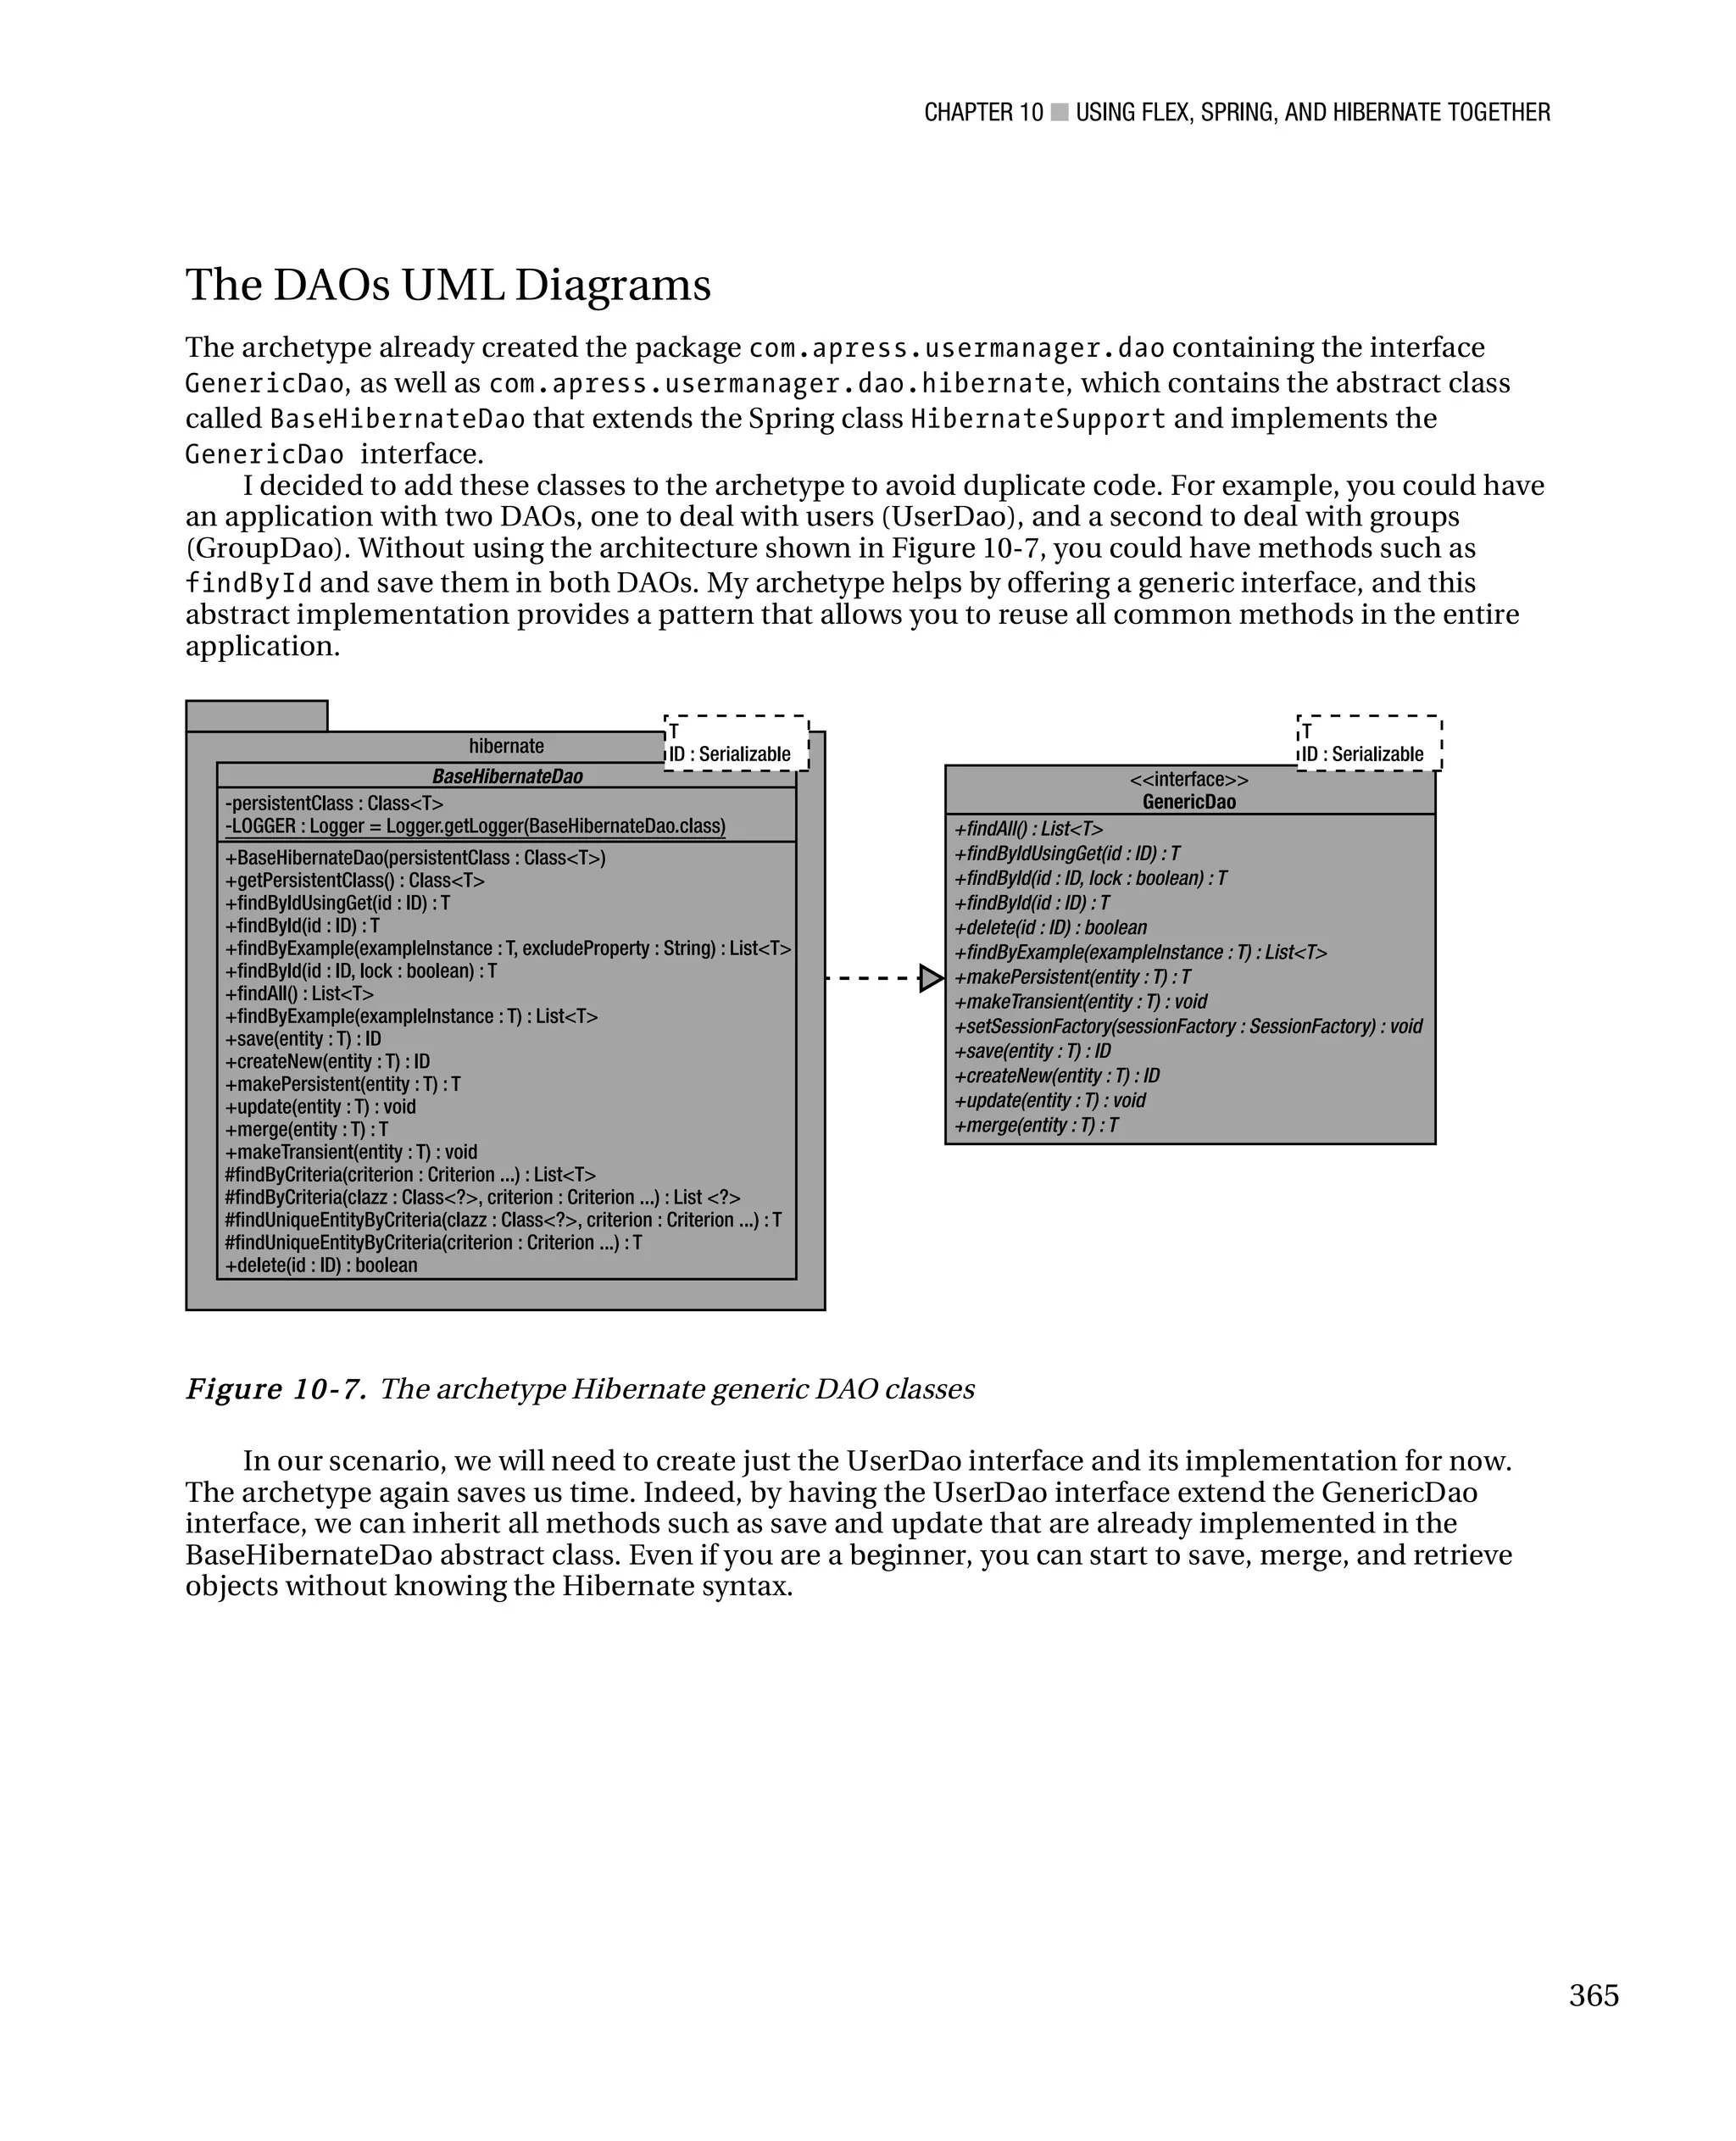
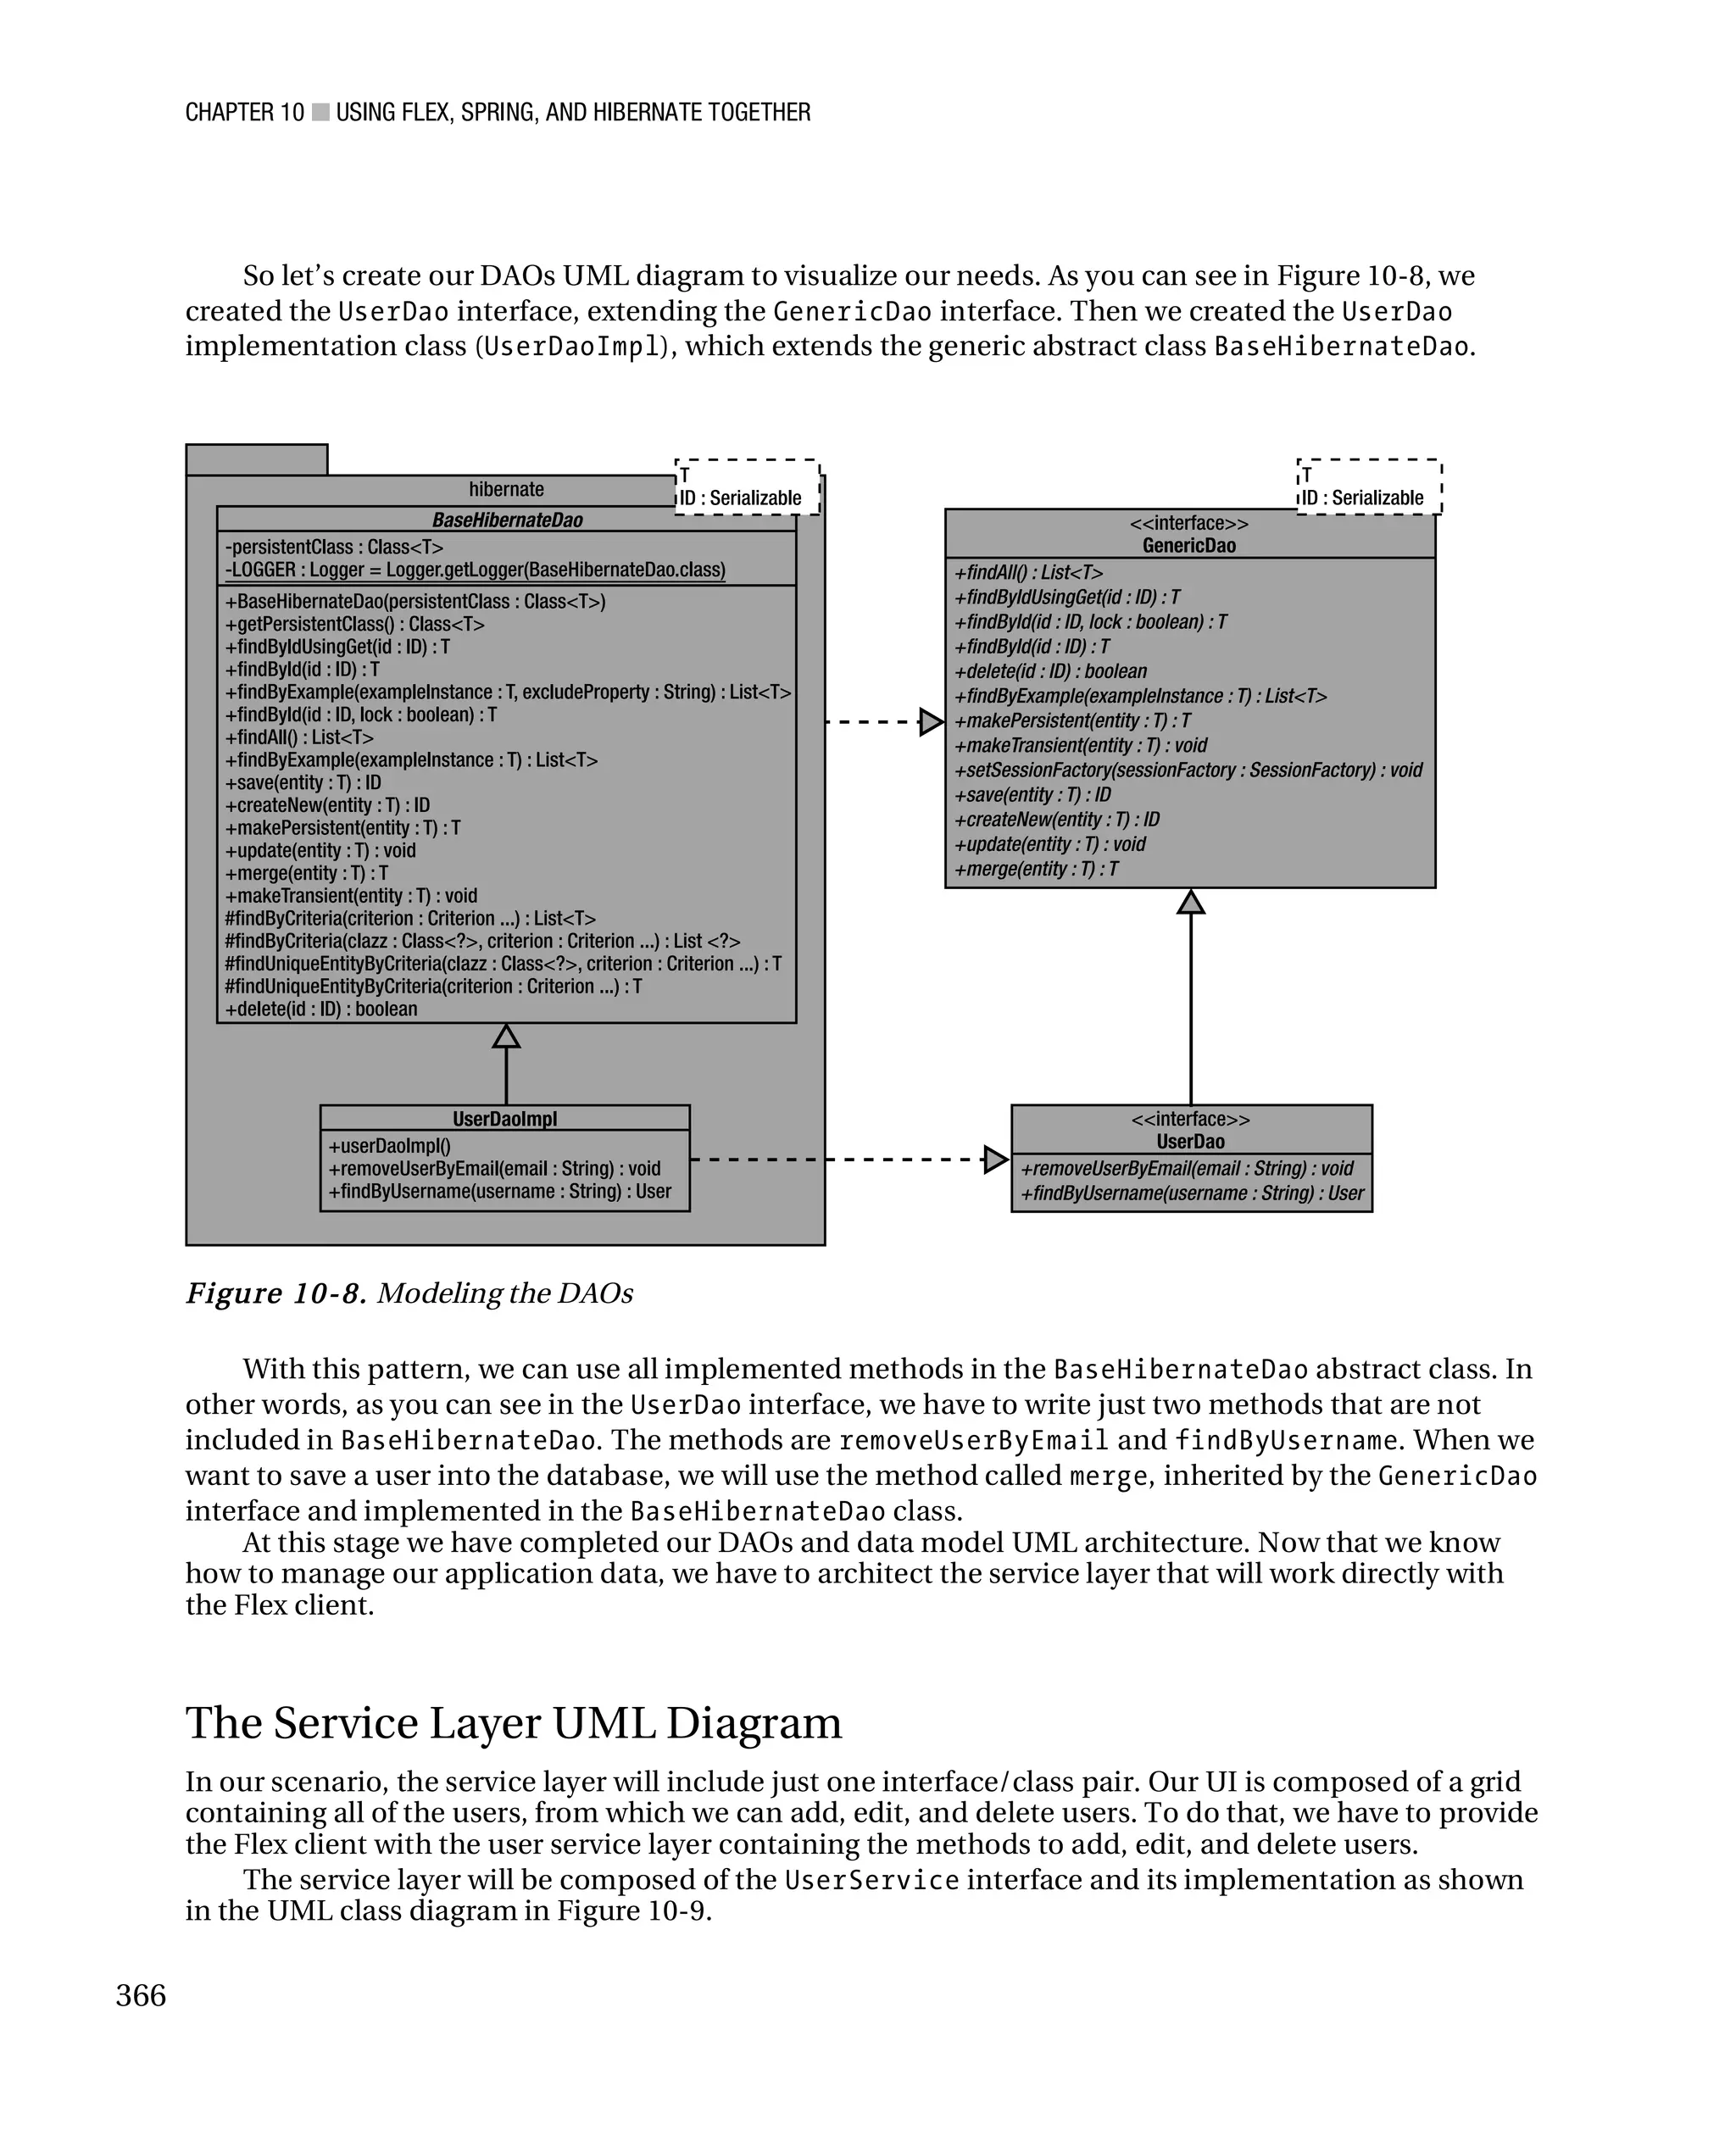
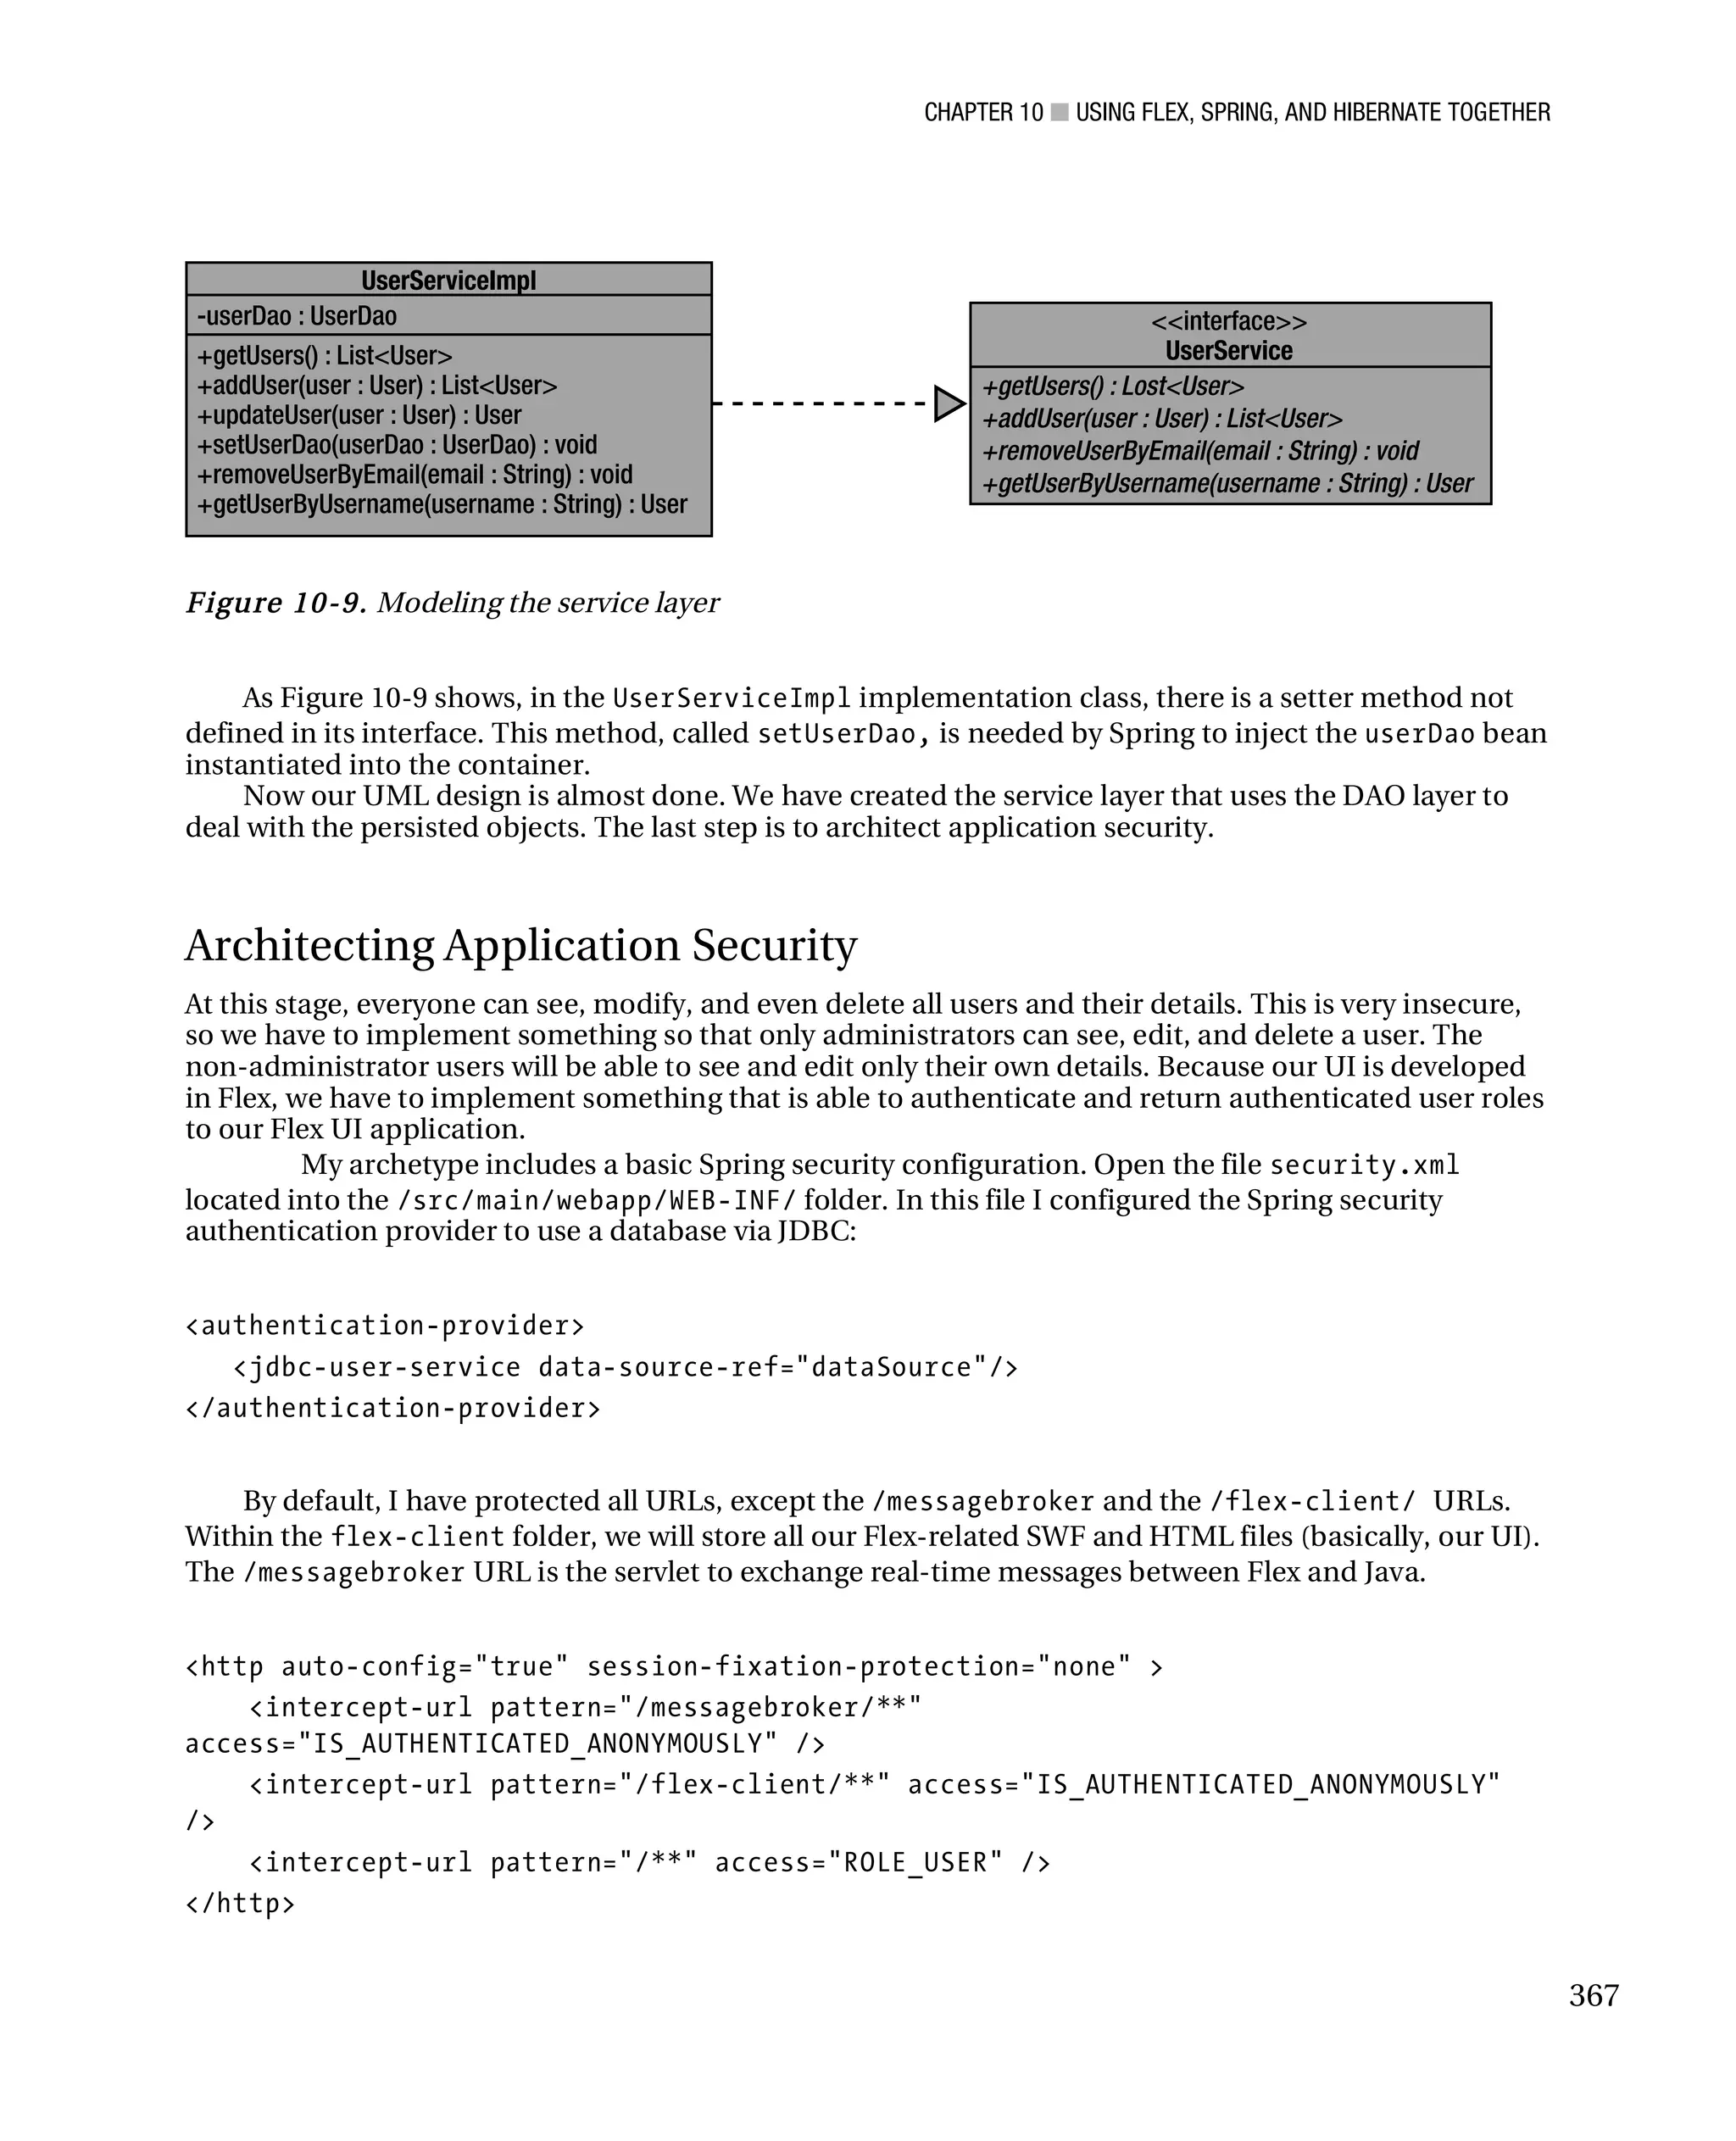
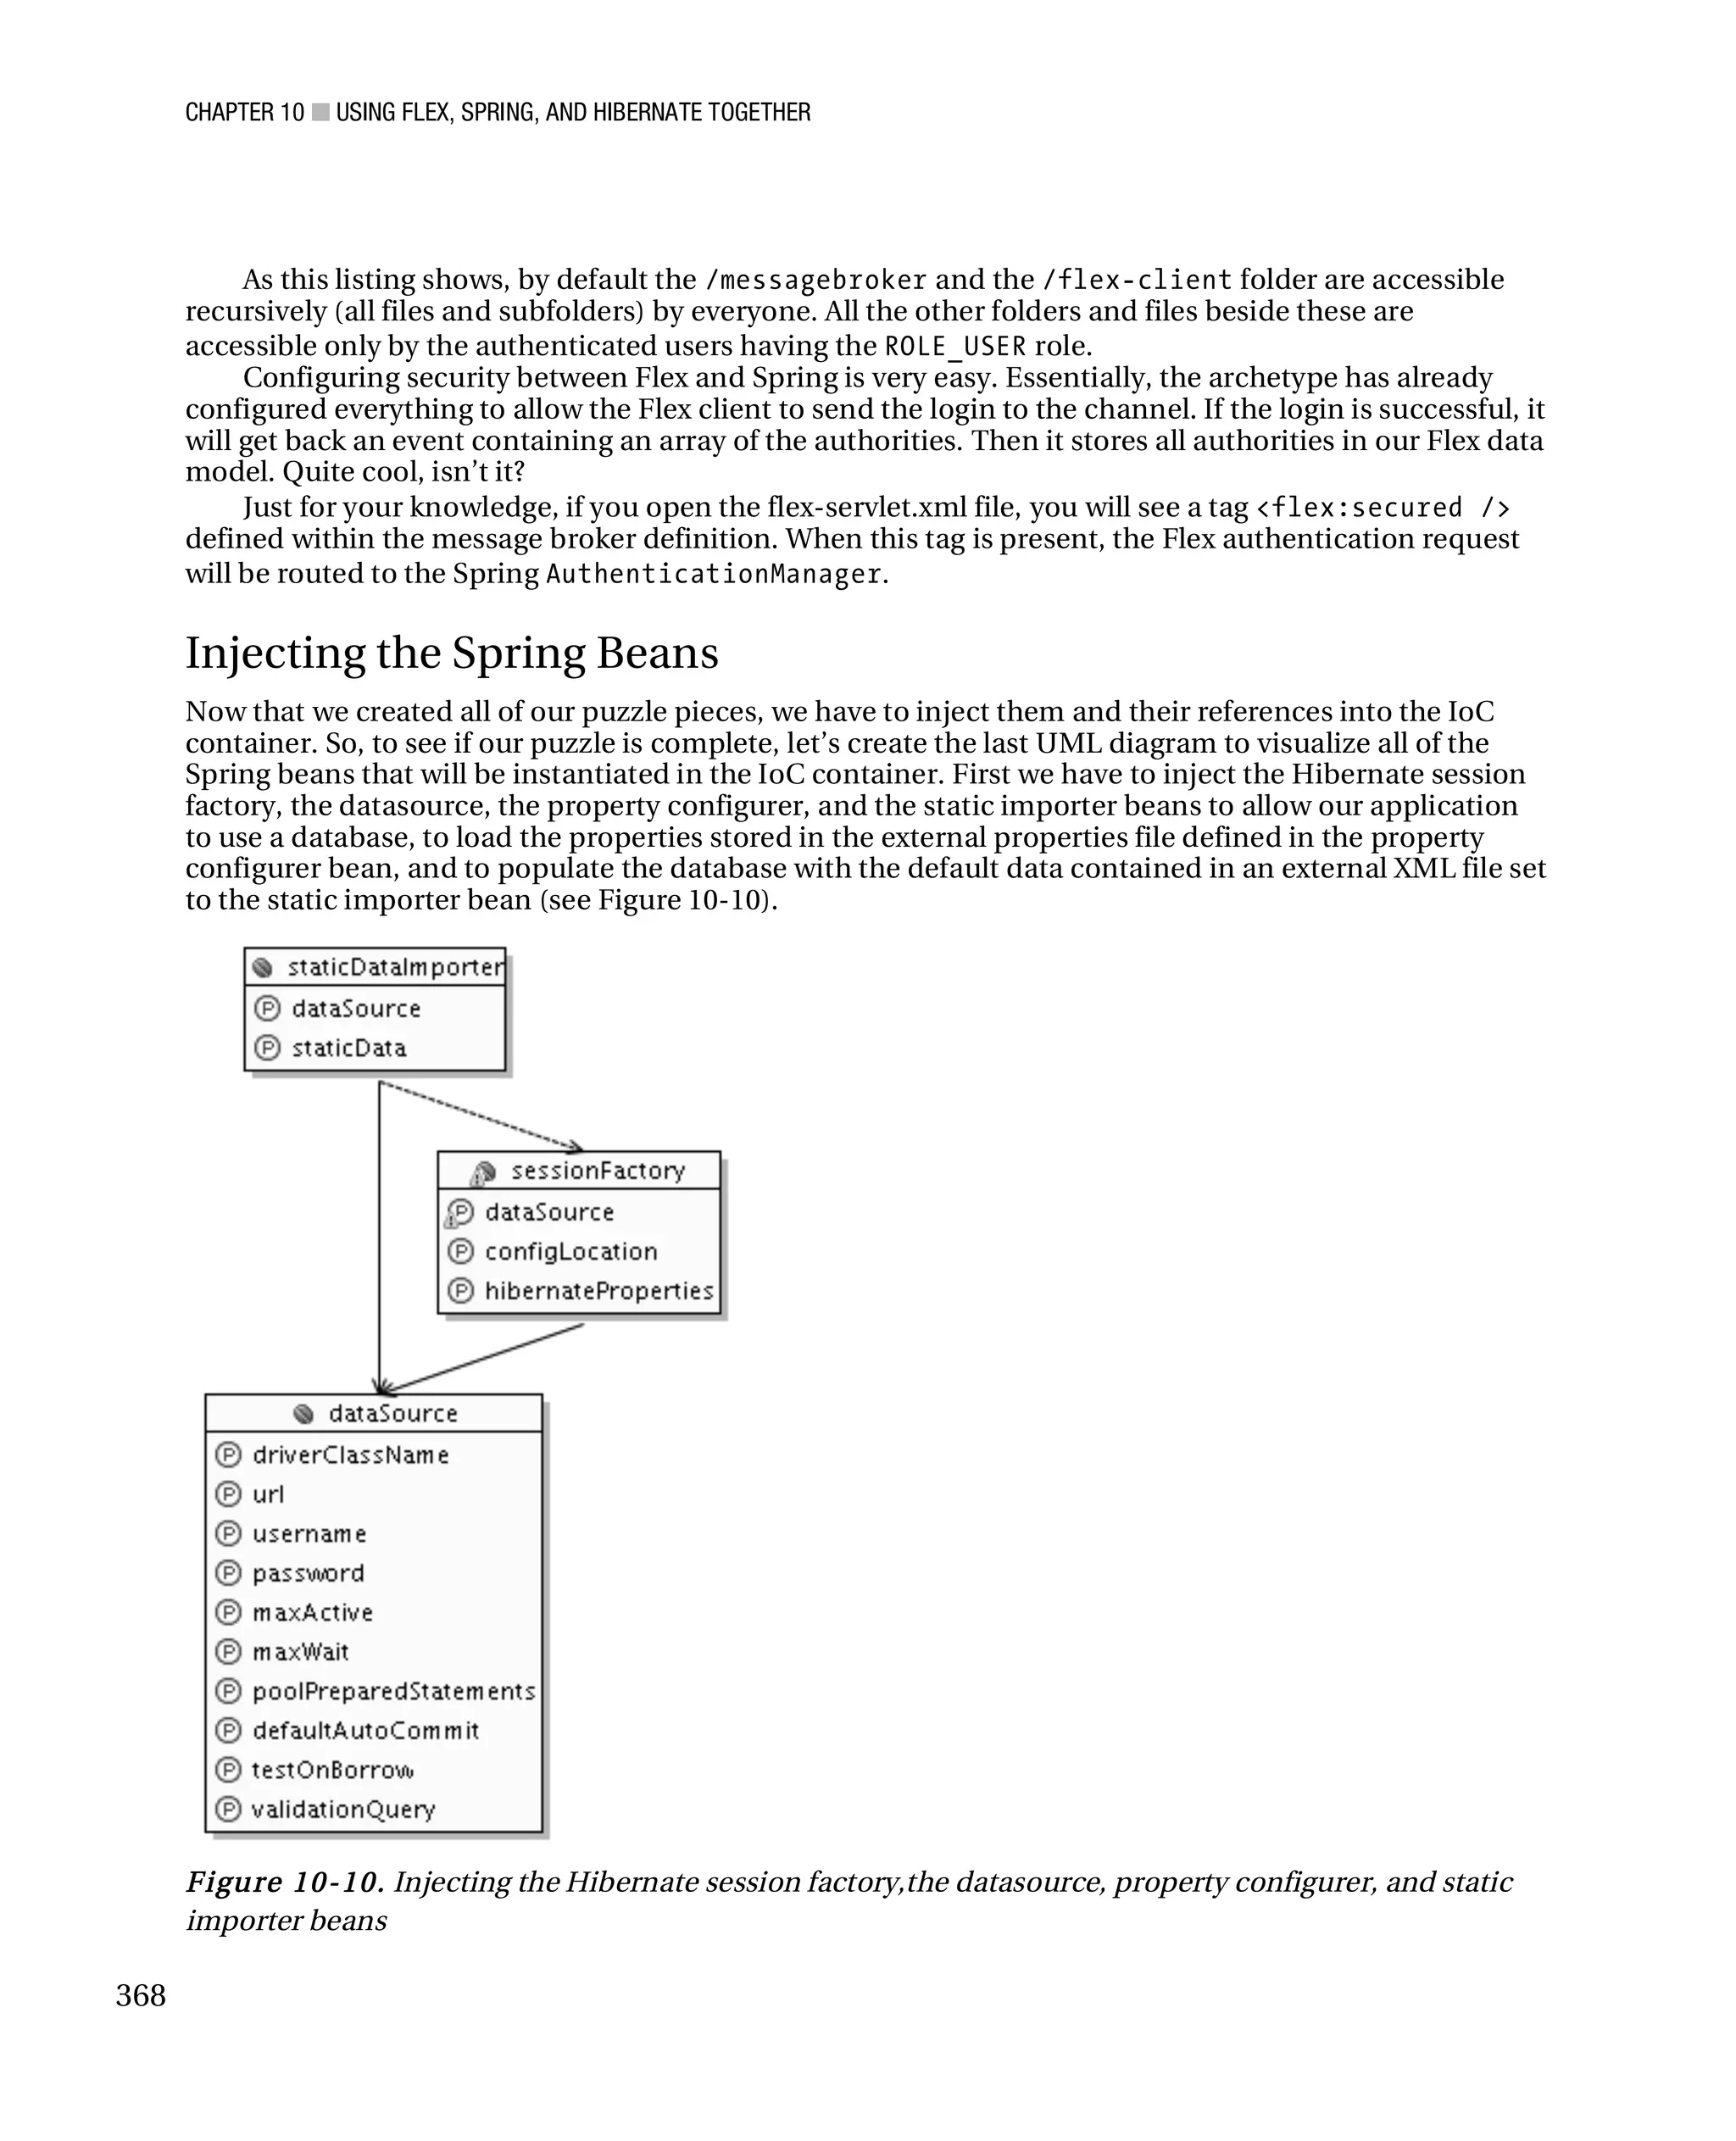
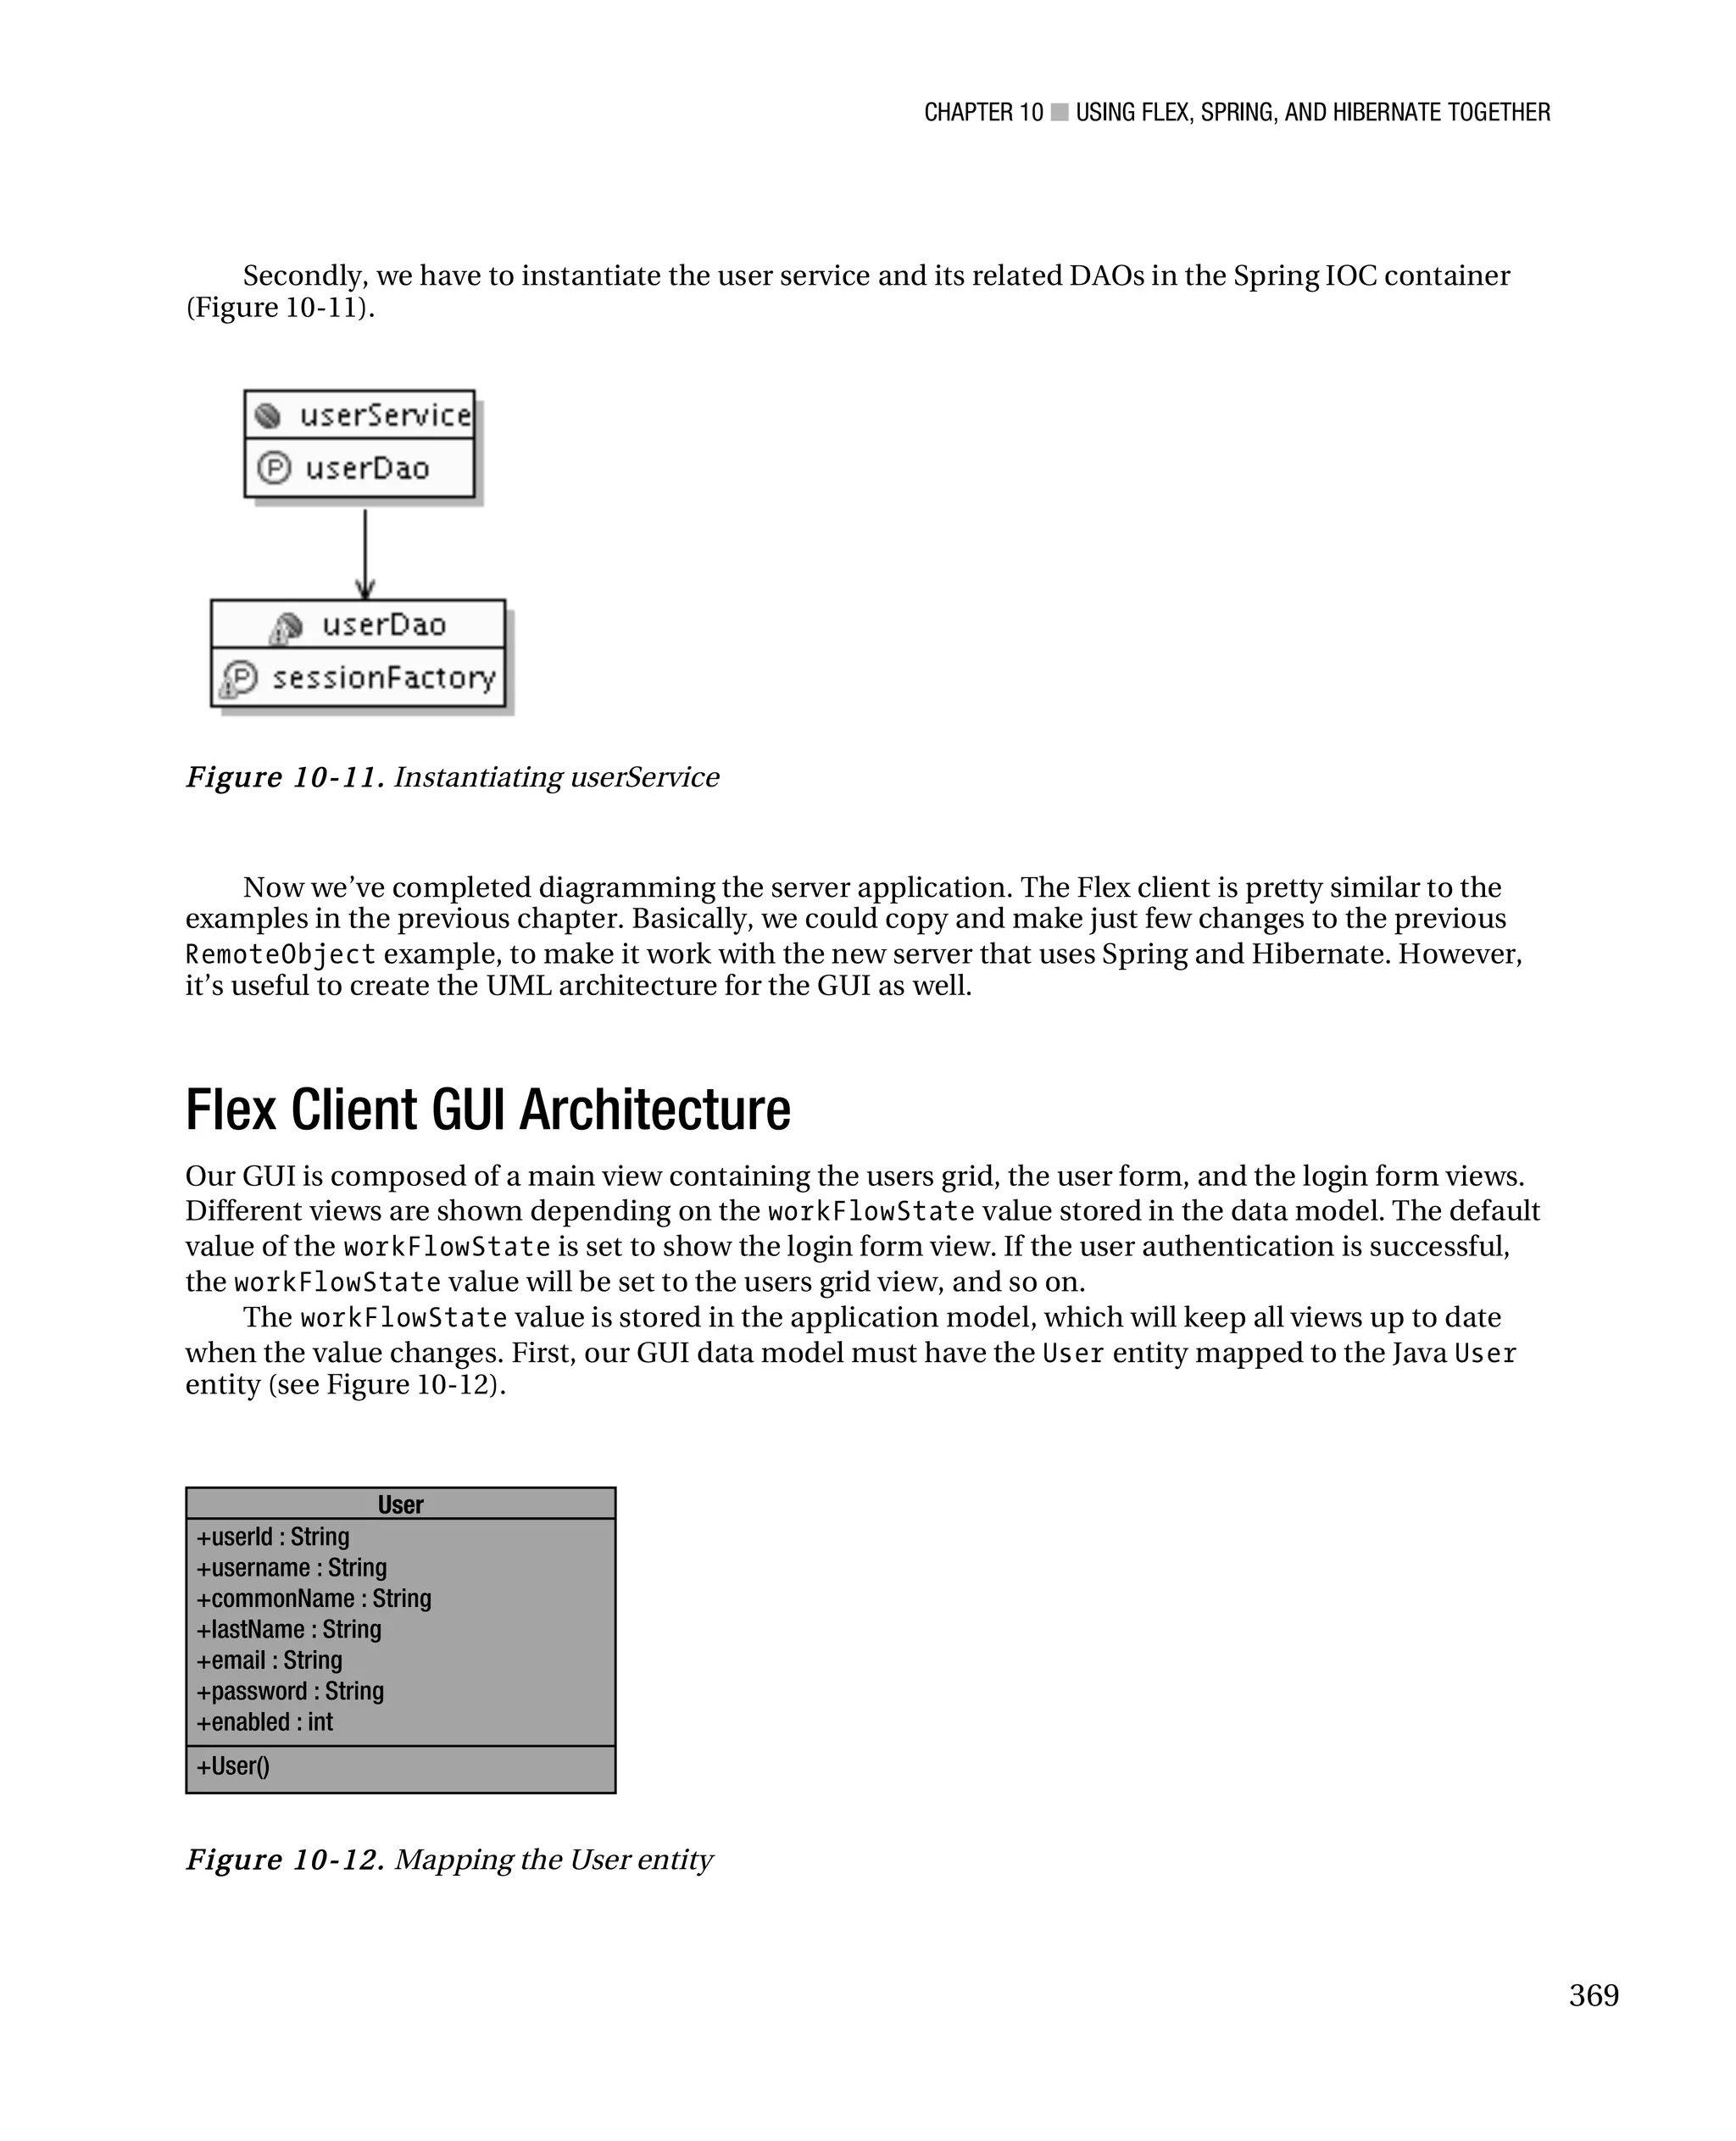
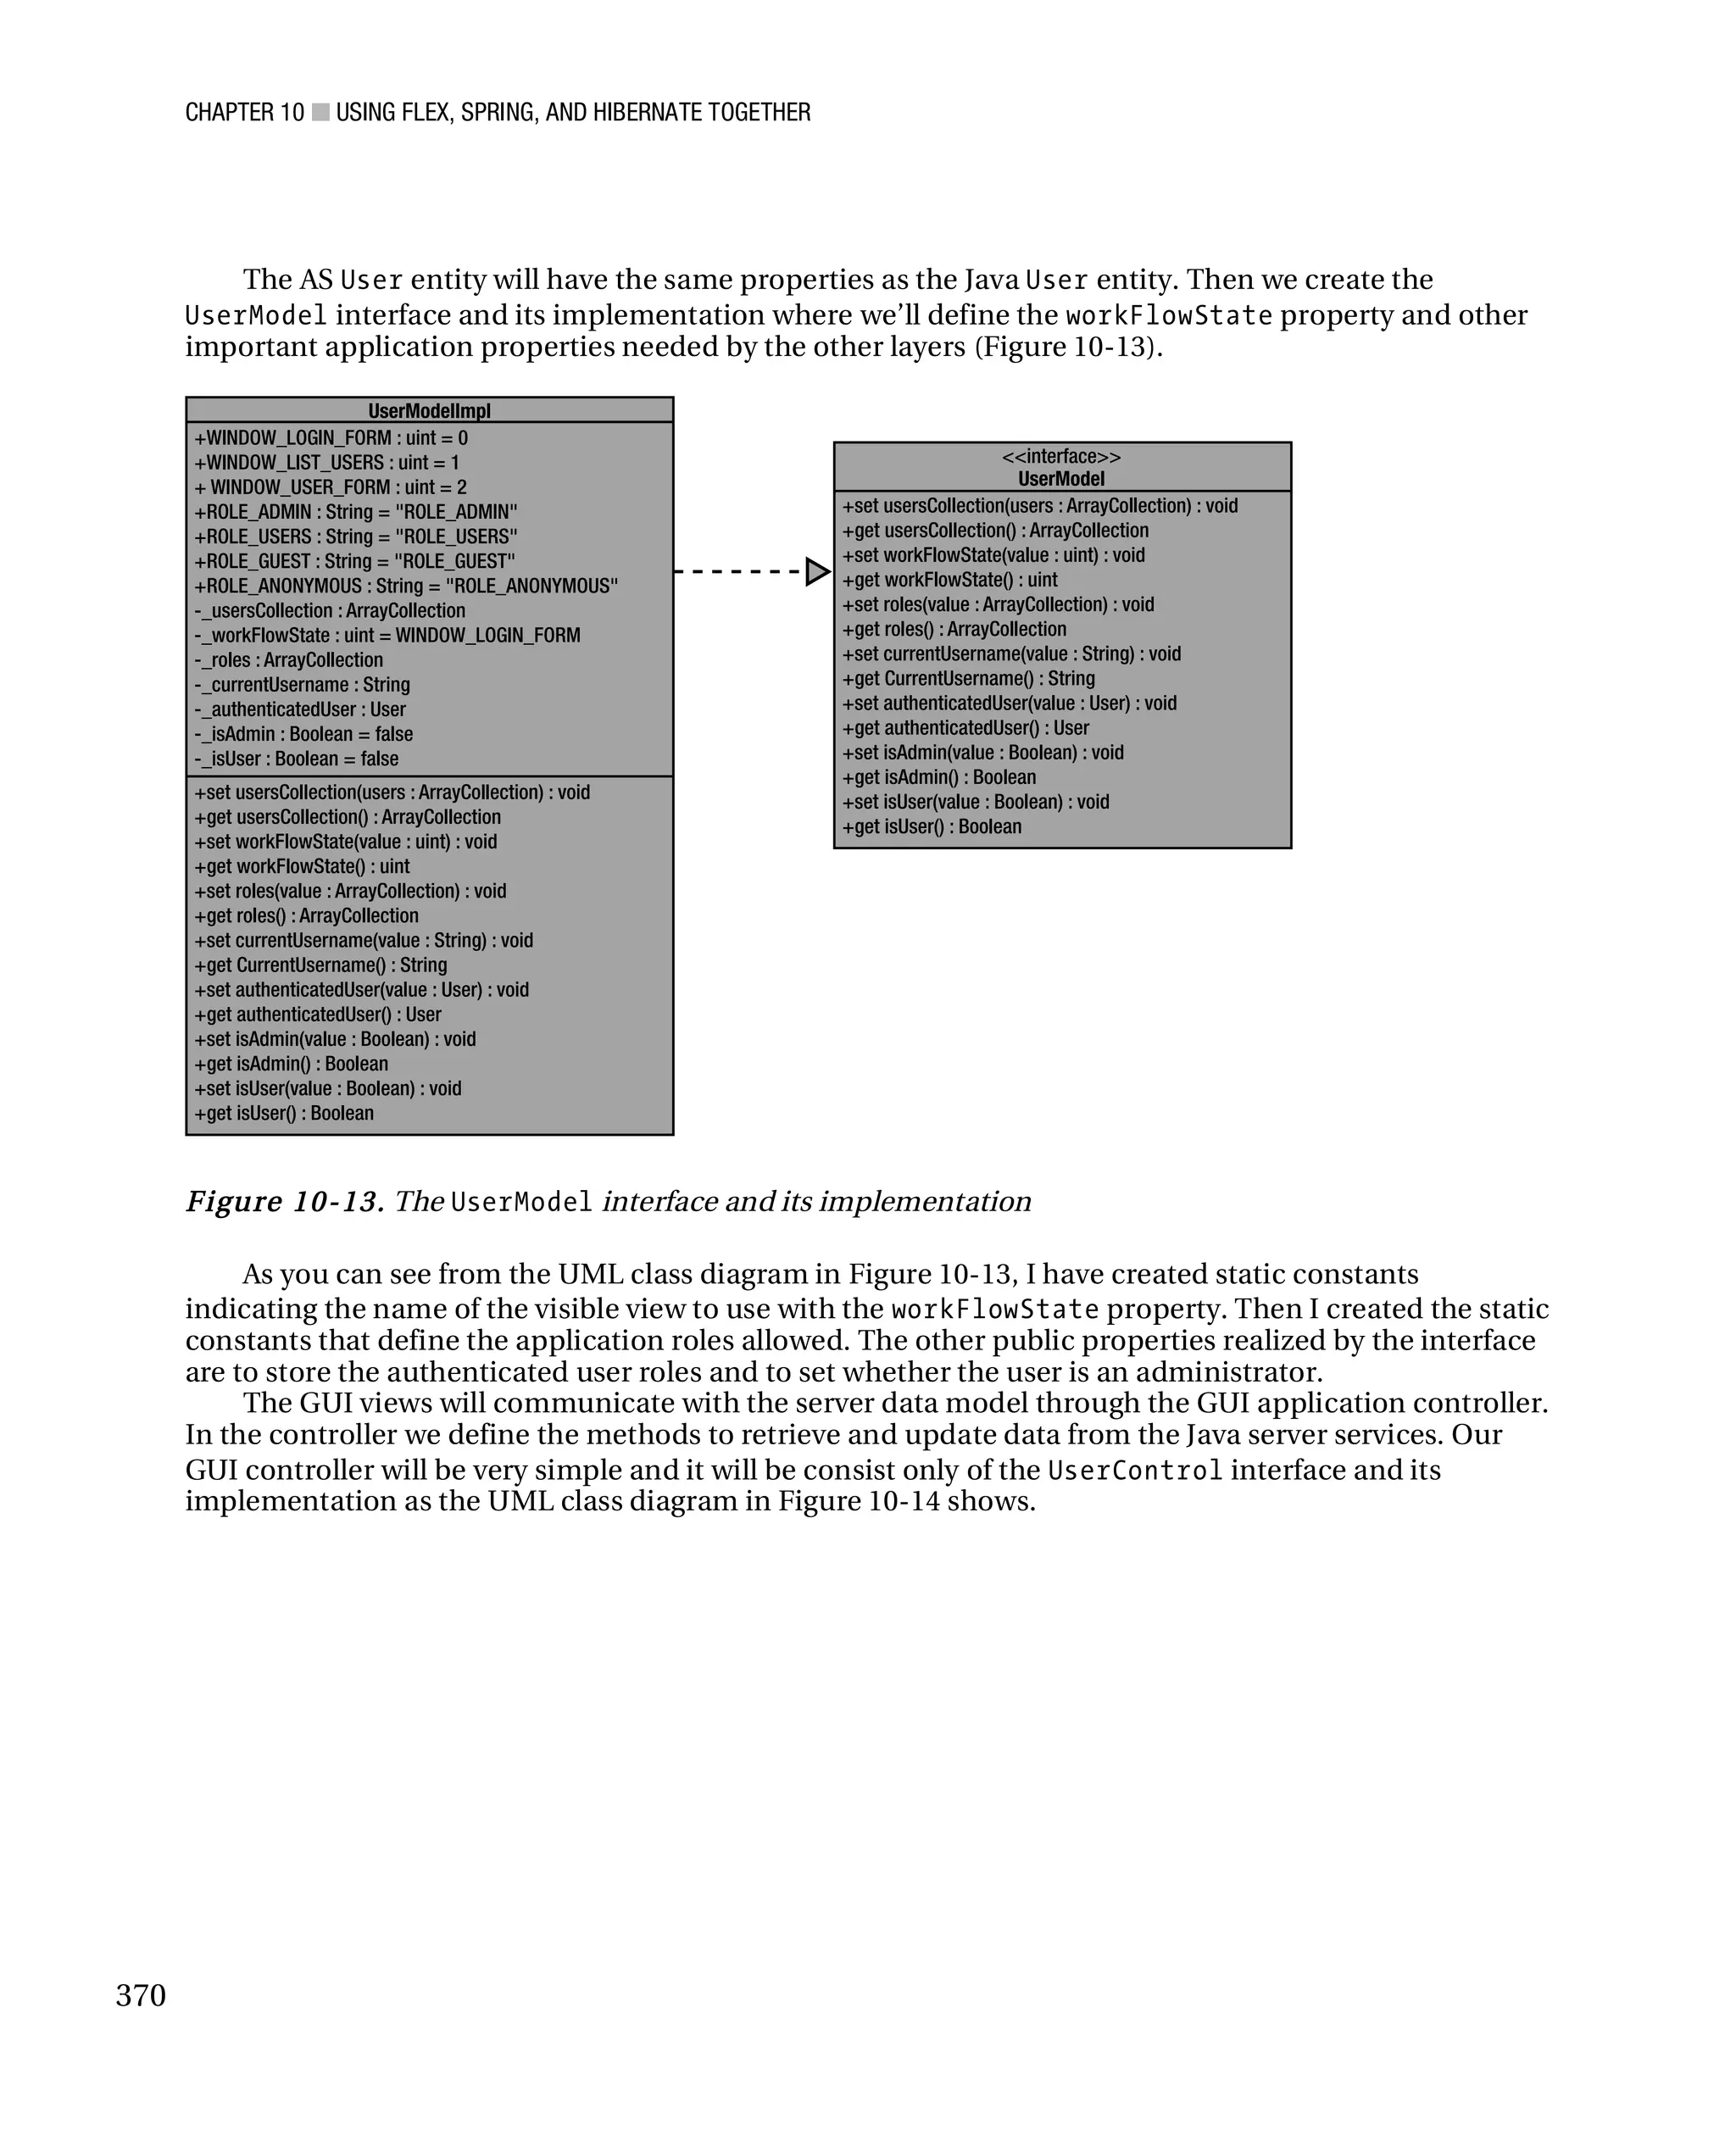

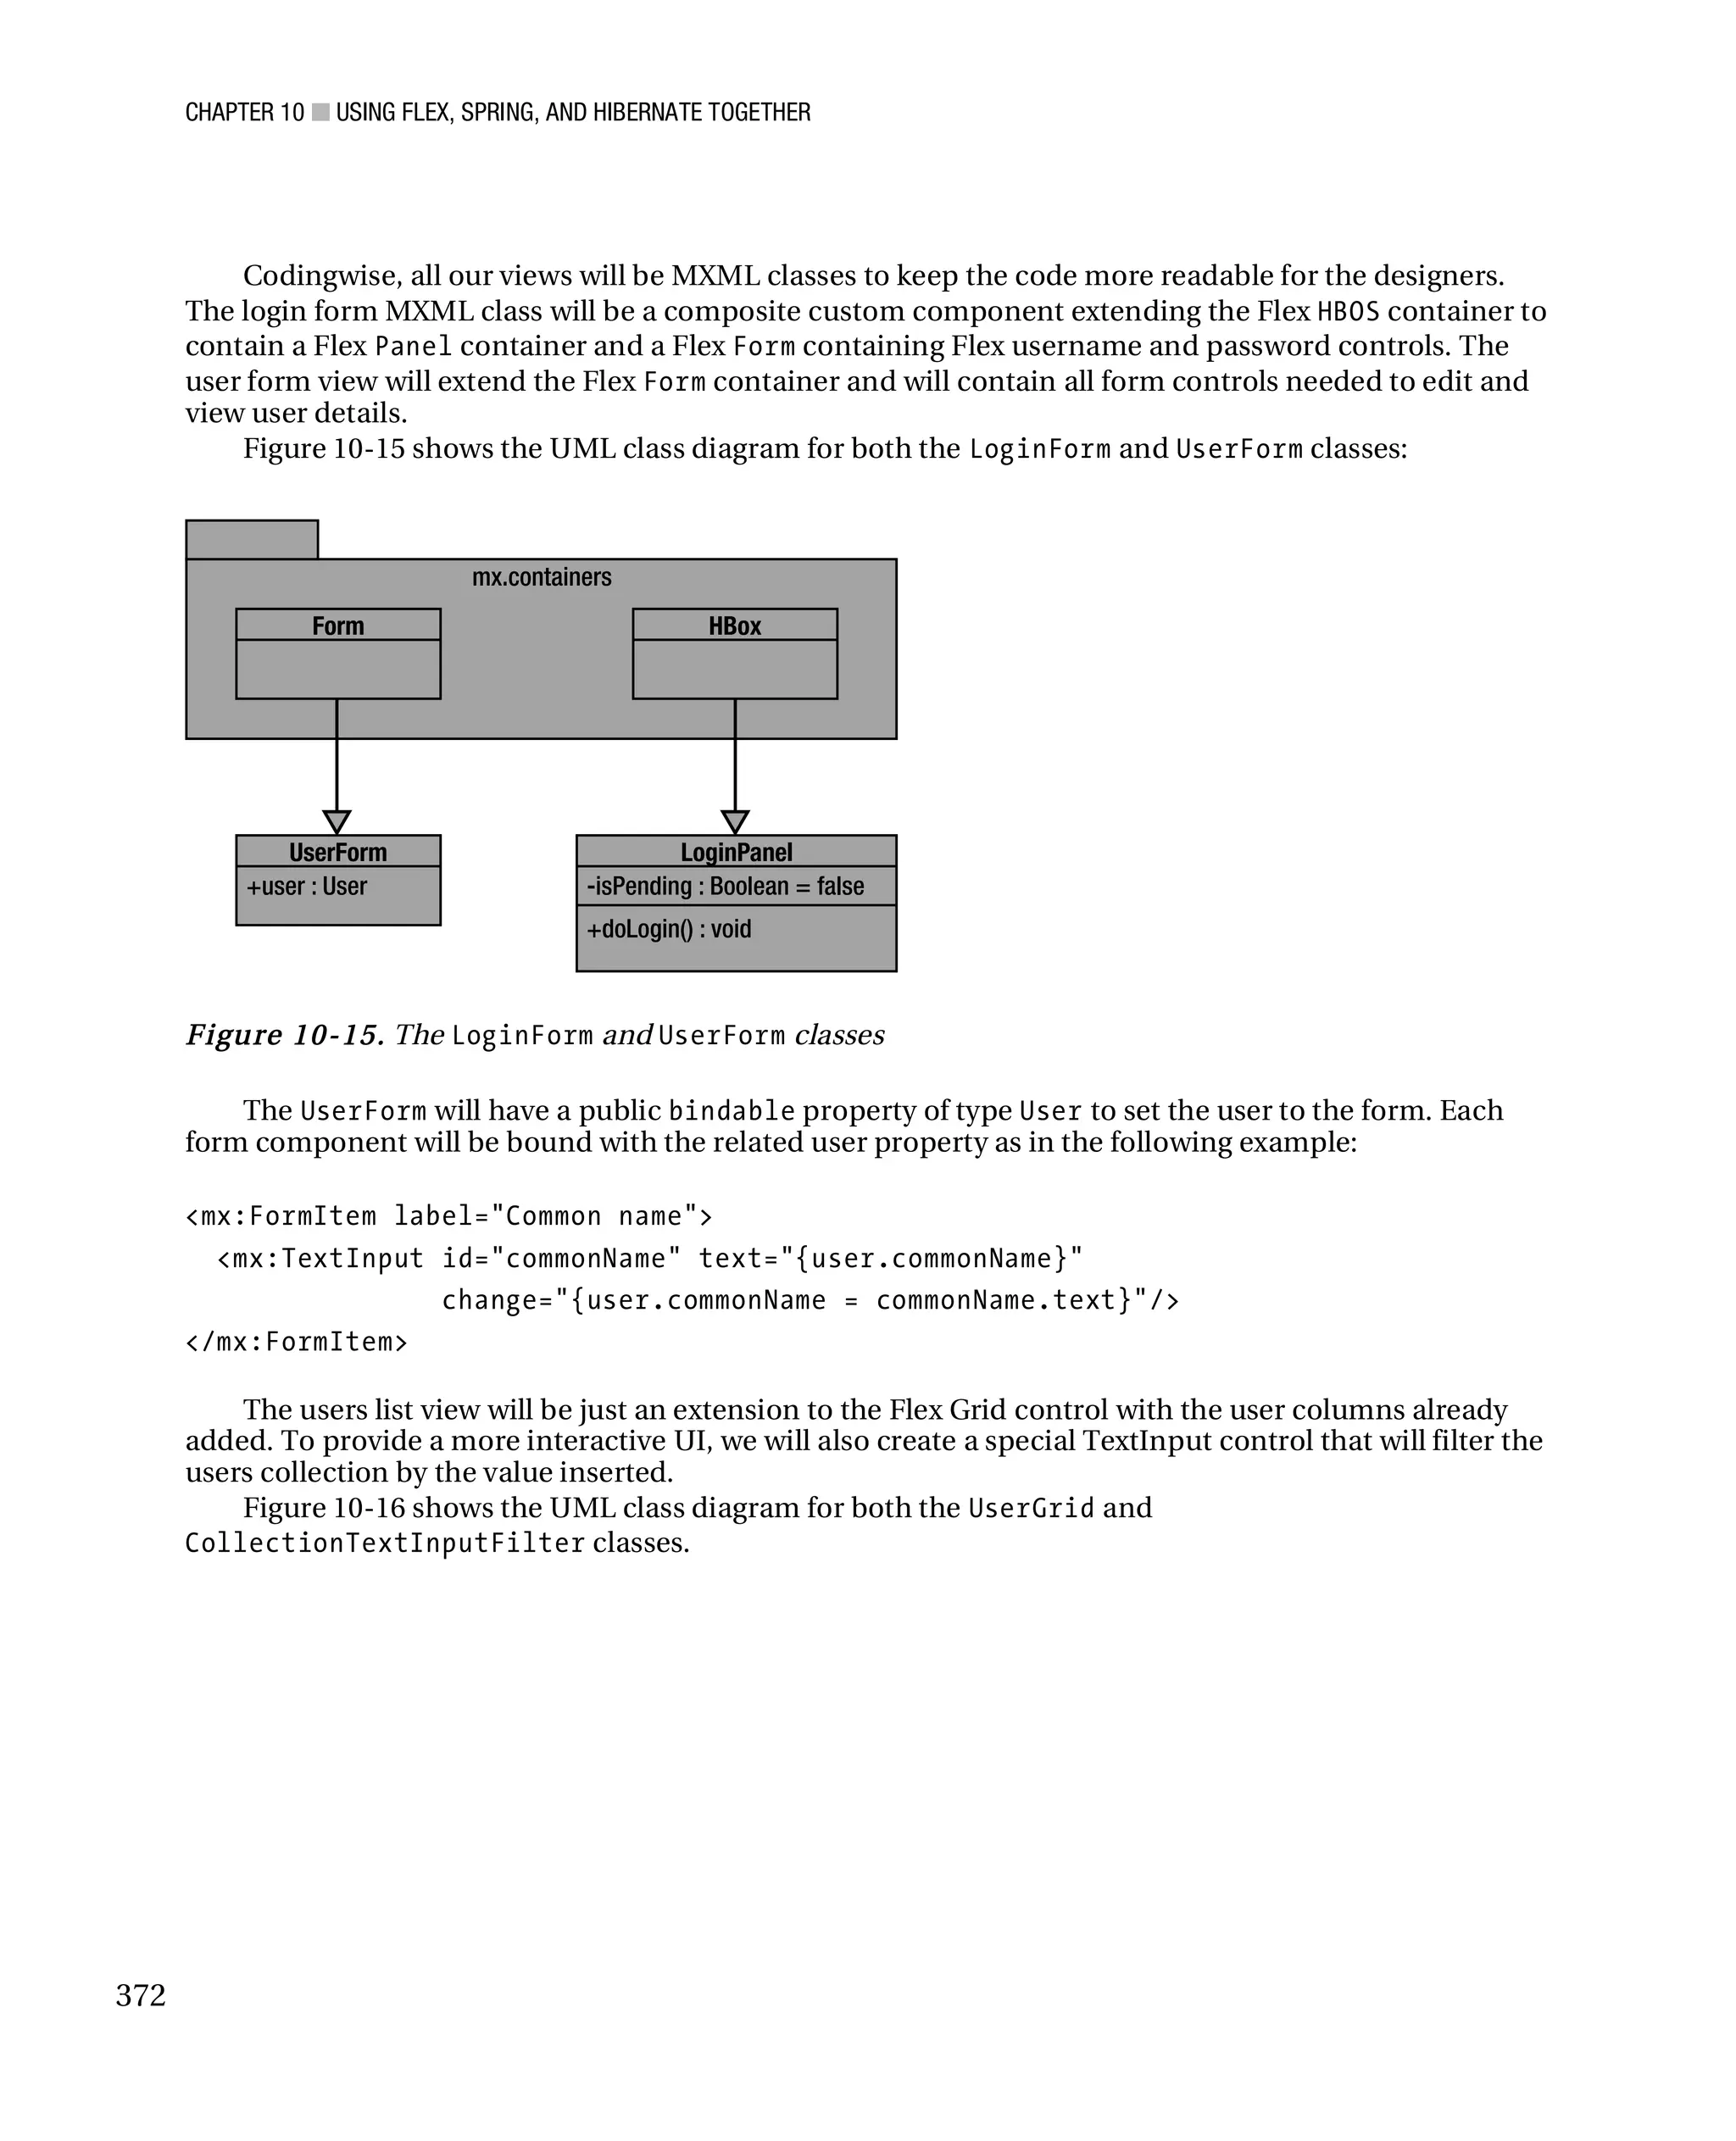
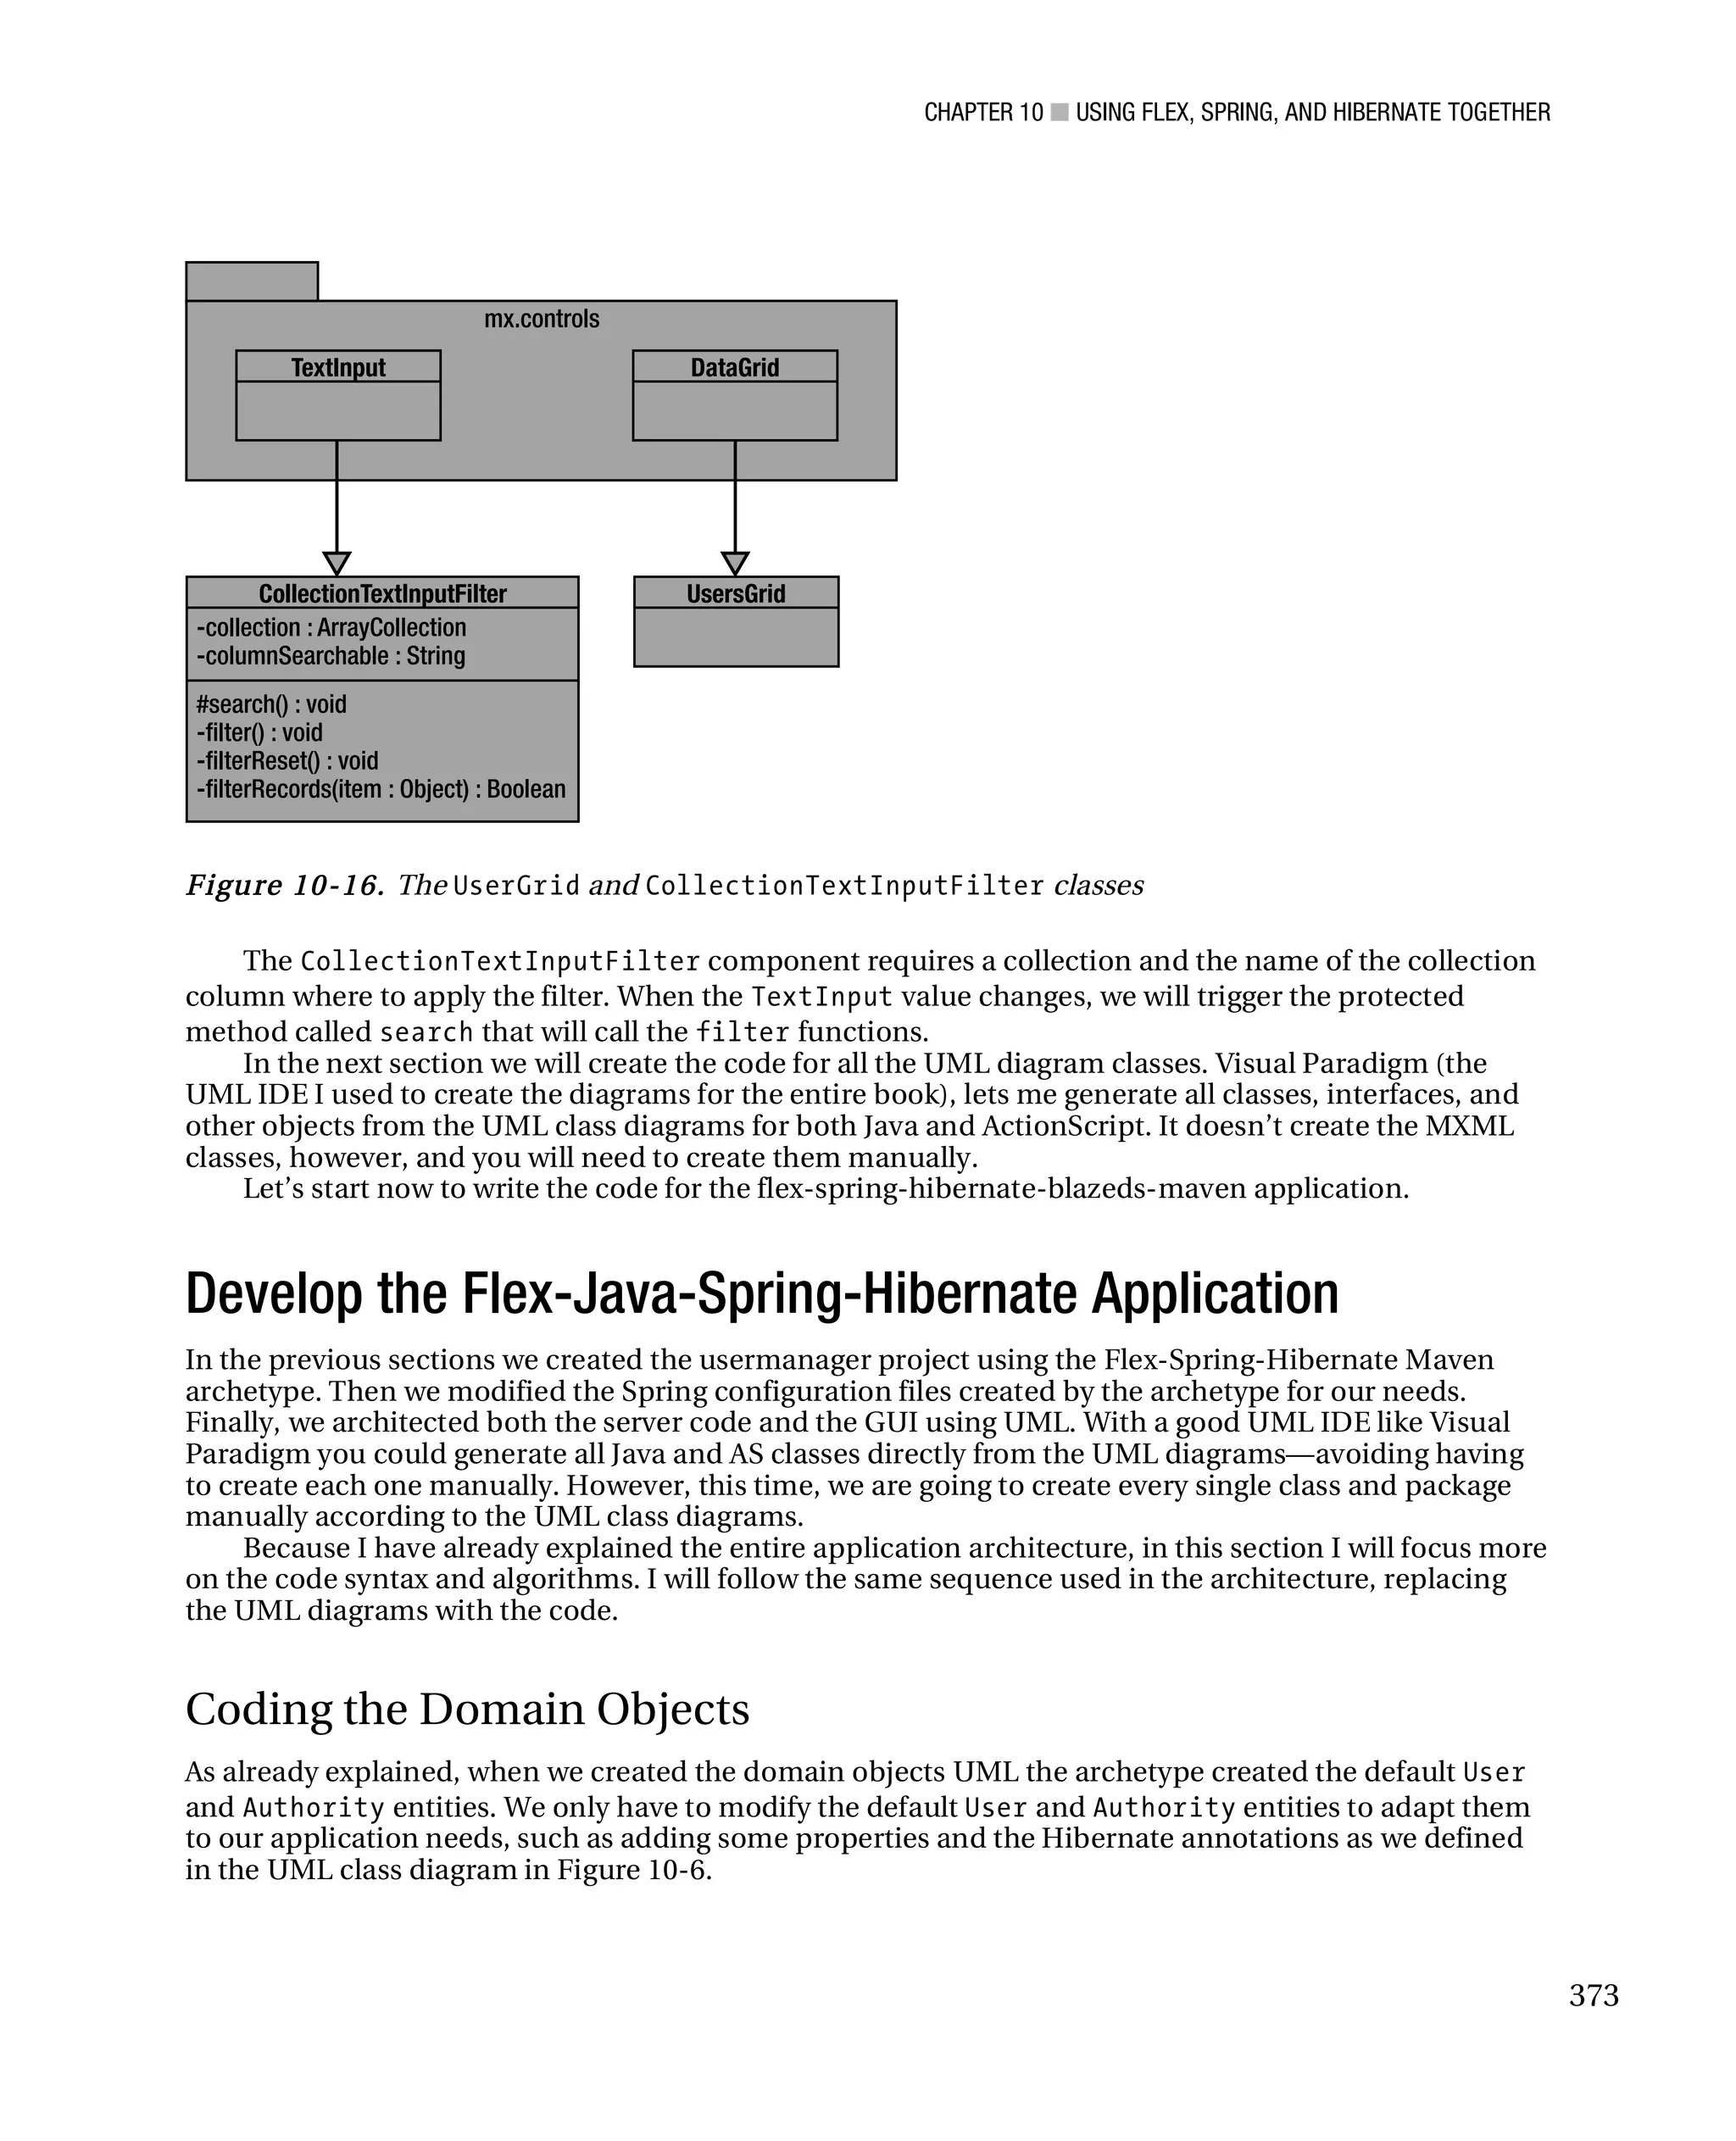
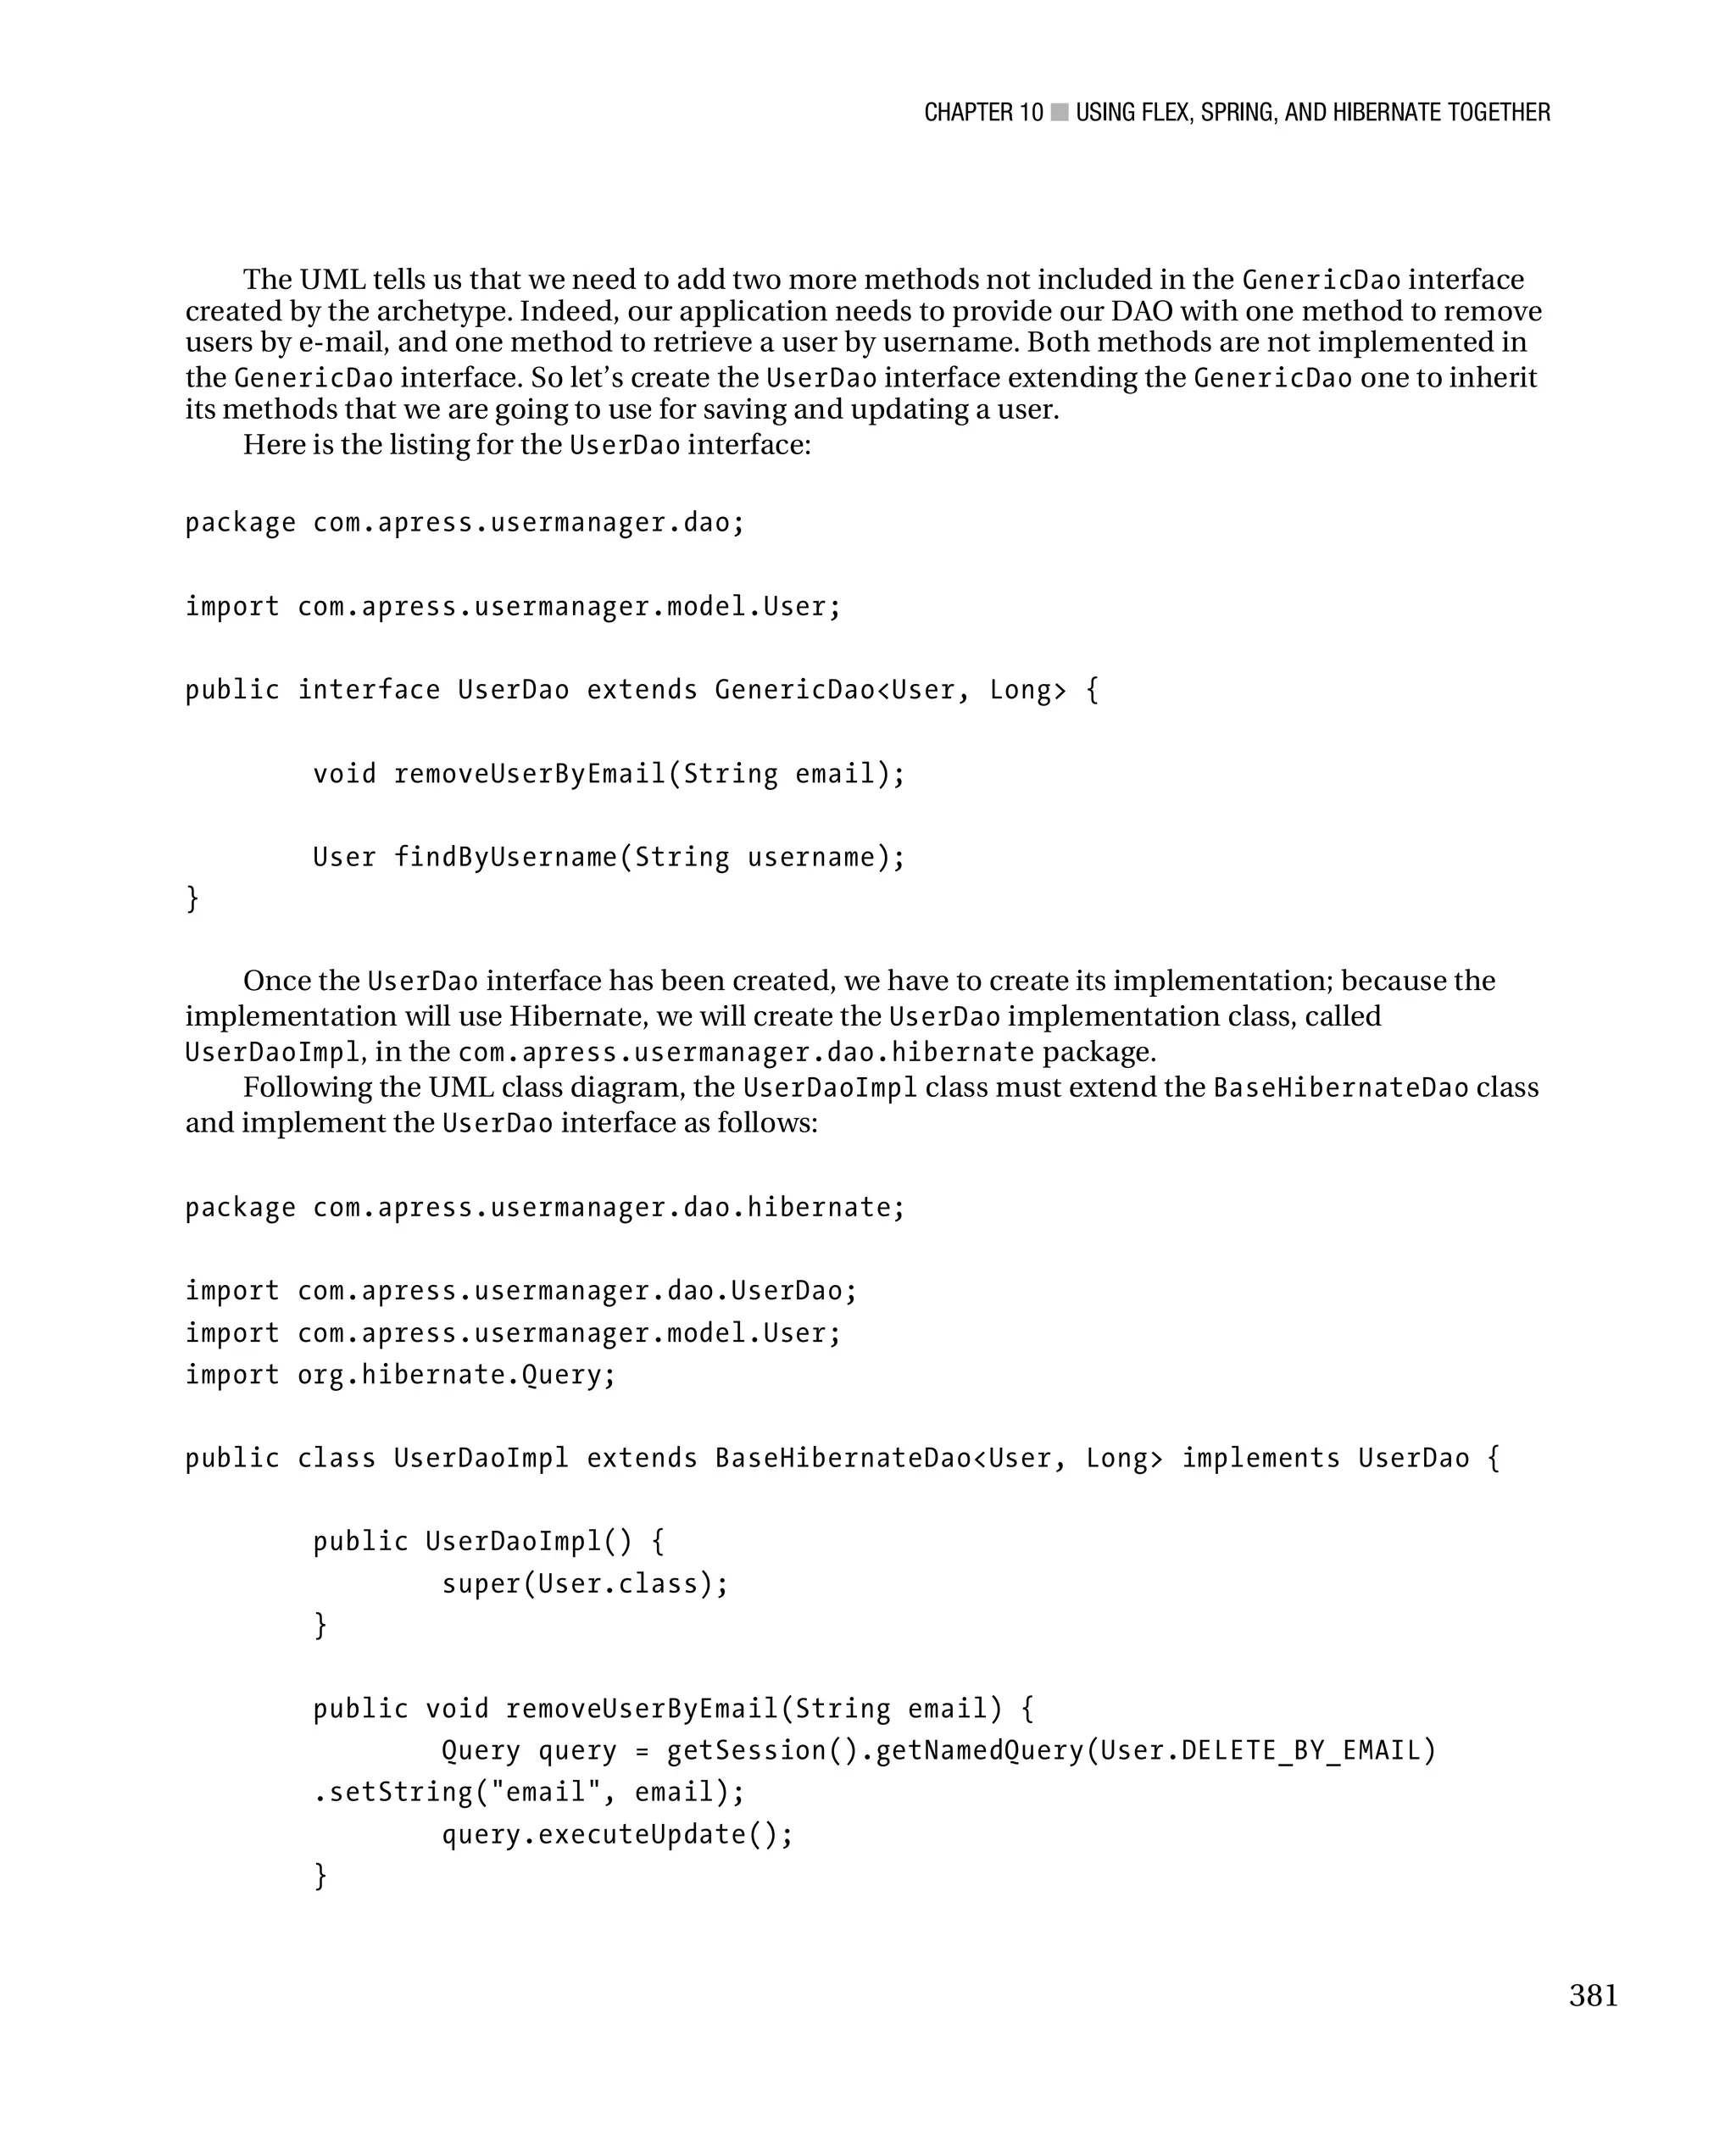
![CHAPTER 10 ■ USING FLEX, SPRING, AND HIBERNATE TOGETHER
public User findByUsername(String username) {
return (User)getSession().getNamedQuery(User.FIND_BY_USERNAME)
.setString("username", username).uniqueResult();
}
}
As you can see, to extend the BaseHibernateDao class you just have to write the code for the two
new methods realized by implementing the UserDao interface. For both methods, we will use the named
queries defined in our User entity class. That’s it.
Before starting to code the service layer, it would be good to create a test class to test the two new
just-implemented methods.
Create a Test Case
In order to create a test class able to work with Spring and Hibernate, you have to set up a test
environment to load all the configuration files and inject all the beans into the Spring IOC container.
Luckily, the archetype has already created the ConfigLocator and the BaseSpringTestCase classes in
the package com.apress.usermanager.dao stored into the /src/test/java folder. The
ConfigLocator object provides the methods to set and get the configuration files needed by our tests.
Below is the code for the ConfigLocator class:
package com.apress.usermanager.dao;
public class ConfigLocator {
private static final long serialVersionUID = 1L;
private String[] locations;
public ConfigLocator() {
locations = new String[] {
"classpath:/applicationContext-resources.xml",
"classpath:/applicationContext-dao.xml",
"/WEB-INF/applicationContext.xml",
"/WEB-INF/security.xml"
};
}
public void setLocations(String[] locations) {
this.locations = locations;
}
382](https://image.slidesharecdn.com/beginningjavaandflex-migratingjavaspringhibernateandmavendeveloperstoadobeflex-100821073507-phpapp01/75/Beginning-java-and-flex-migrating-java-spring-hibernate-and-maven-developers-to-adobe-flex-401-2048.jpg)
![CHAPTER 10 ■ USING FLEX, SPRING, AND HIBERNATE TOGETHER
public String[] getLocations() {
return locations;
}
}
The BaseSpringTestCase class extends the Spring
AbstractDependencyInjectionSpringContextTests class, overriding the getConfigLocation
method to use the configuration files set in the ConfigLocator class. Here is the code for the
BaseSpringTestCase class:
package com.apress.usermanager.dao;
import org.apache.commons.logging.Log;
import org.apache.commons.logging.LogFactory;
import org.springframework.test.AbstractDependencyInjectionSpringContextTests;
public abstract class BaseSpringTestCase extends
AbstractDependencyInjectionSpringContextTests {
/**
* Log variable for all child classes. Uses LogFactory.getLog(getClass())
* from Commons Logging
*/
protected final Log log = LogFactory.getLog(getClass());
/**
* Sets AutowireMode to AUTOWIRE_BY_NAME and configures all context files
* needed to tests DAOs.
*
* @return String array of Spring context files.
*/
@Override
protected String[] getConfigLocations() {
setAutowireMode(AUTOWIRE_BY_TYPE);
// to have a single place to add configLocations, even if more than
// one
// BaseTestCase class is present
return new ConfigLocator().getLocations();
}
}
383](https://image.slidesharecdn.com/beginningjavaandflex-migratingjavaspringhibernateandmavendeveloperstoadobeflex-100821073507-phpapp01/75/Beginning-java-and-flex-migrating-java-spring-hibernate-and-maven-developers-to-adobe-flex-402-2048.jpg)
![CHAPTER 10 ■ USING FLEX, SPRING, AND HIBERNATE TOGETHER
public void setUserService(UserService userService) {
this.userService = userService;
}
}
Now we are ready to configure BlazeDS in order to expose to the Flex GUI the Spring bean called
userService that contains the APIs that allow the Flex GUI to retrieve, edit, and add users.
Export Spring Services to BlazeDS
The last milestone of our application on the server side is to configure BlazeDS to allow the Flex GUI to
use the userService bean and its methods. The archetype already created all the configuration that
BlazeDS needs. The only thing you have to do is to define a remote destination using the XML definition
<flex:remoting-destination />.
To do that, open the f lex- se rvlet.x ml file and add a remoting destination for the userService bean
as follows:
<flex:remoting-destination ref="userService" />
By setting a remoting destination, we will be able to use the Spring userService APIs within our
Flex GUI using the RemoteObject component as follows:
public function updateUser(user:User) : void{
var service : RemoteObject = new RemoteObject("userService");
service.addEventListener("fault", handleFault);
service.addEventListener("result", updateUserResult);
service.updateUser(user);
}
In this example I created a Flex updateUser function that calls the userService bean remote
updateUser function in order to update a User from Flex to Java. Very easy, no?
At the end of the day, thanks to the archetype, we have to add just one or more destinations for the
beans we want to use within Flex.
<flex:remoting-destination ref="bean1" />
<flex:remoting-destination ref="bean2" />
<flex:remoting-destination ref="bean[n]" />
390](https://image.slidesharecdn.com/beginningjavaandflex-migratingjavaspringhibernateandmavendeveloperstoadobeflex-100821073507-phpapp01/75/Beginning-java-and-flex-migrating-java-spring-hibernate-and-maven-developers-to-adobe-flex-409-2048.jpg)
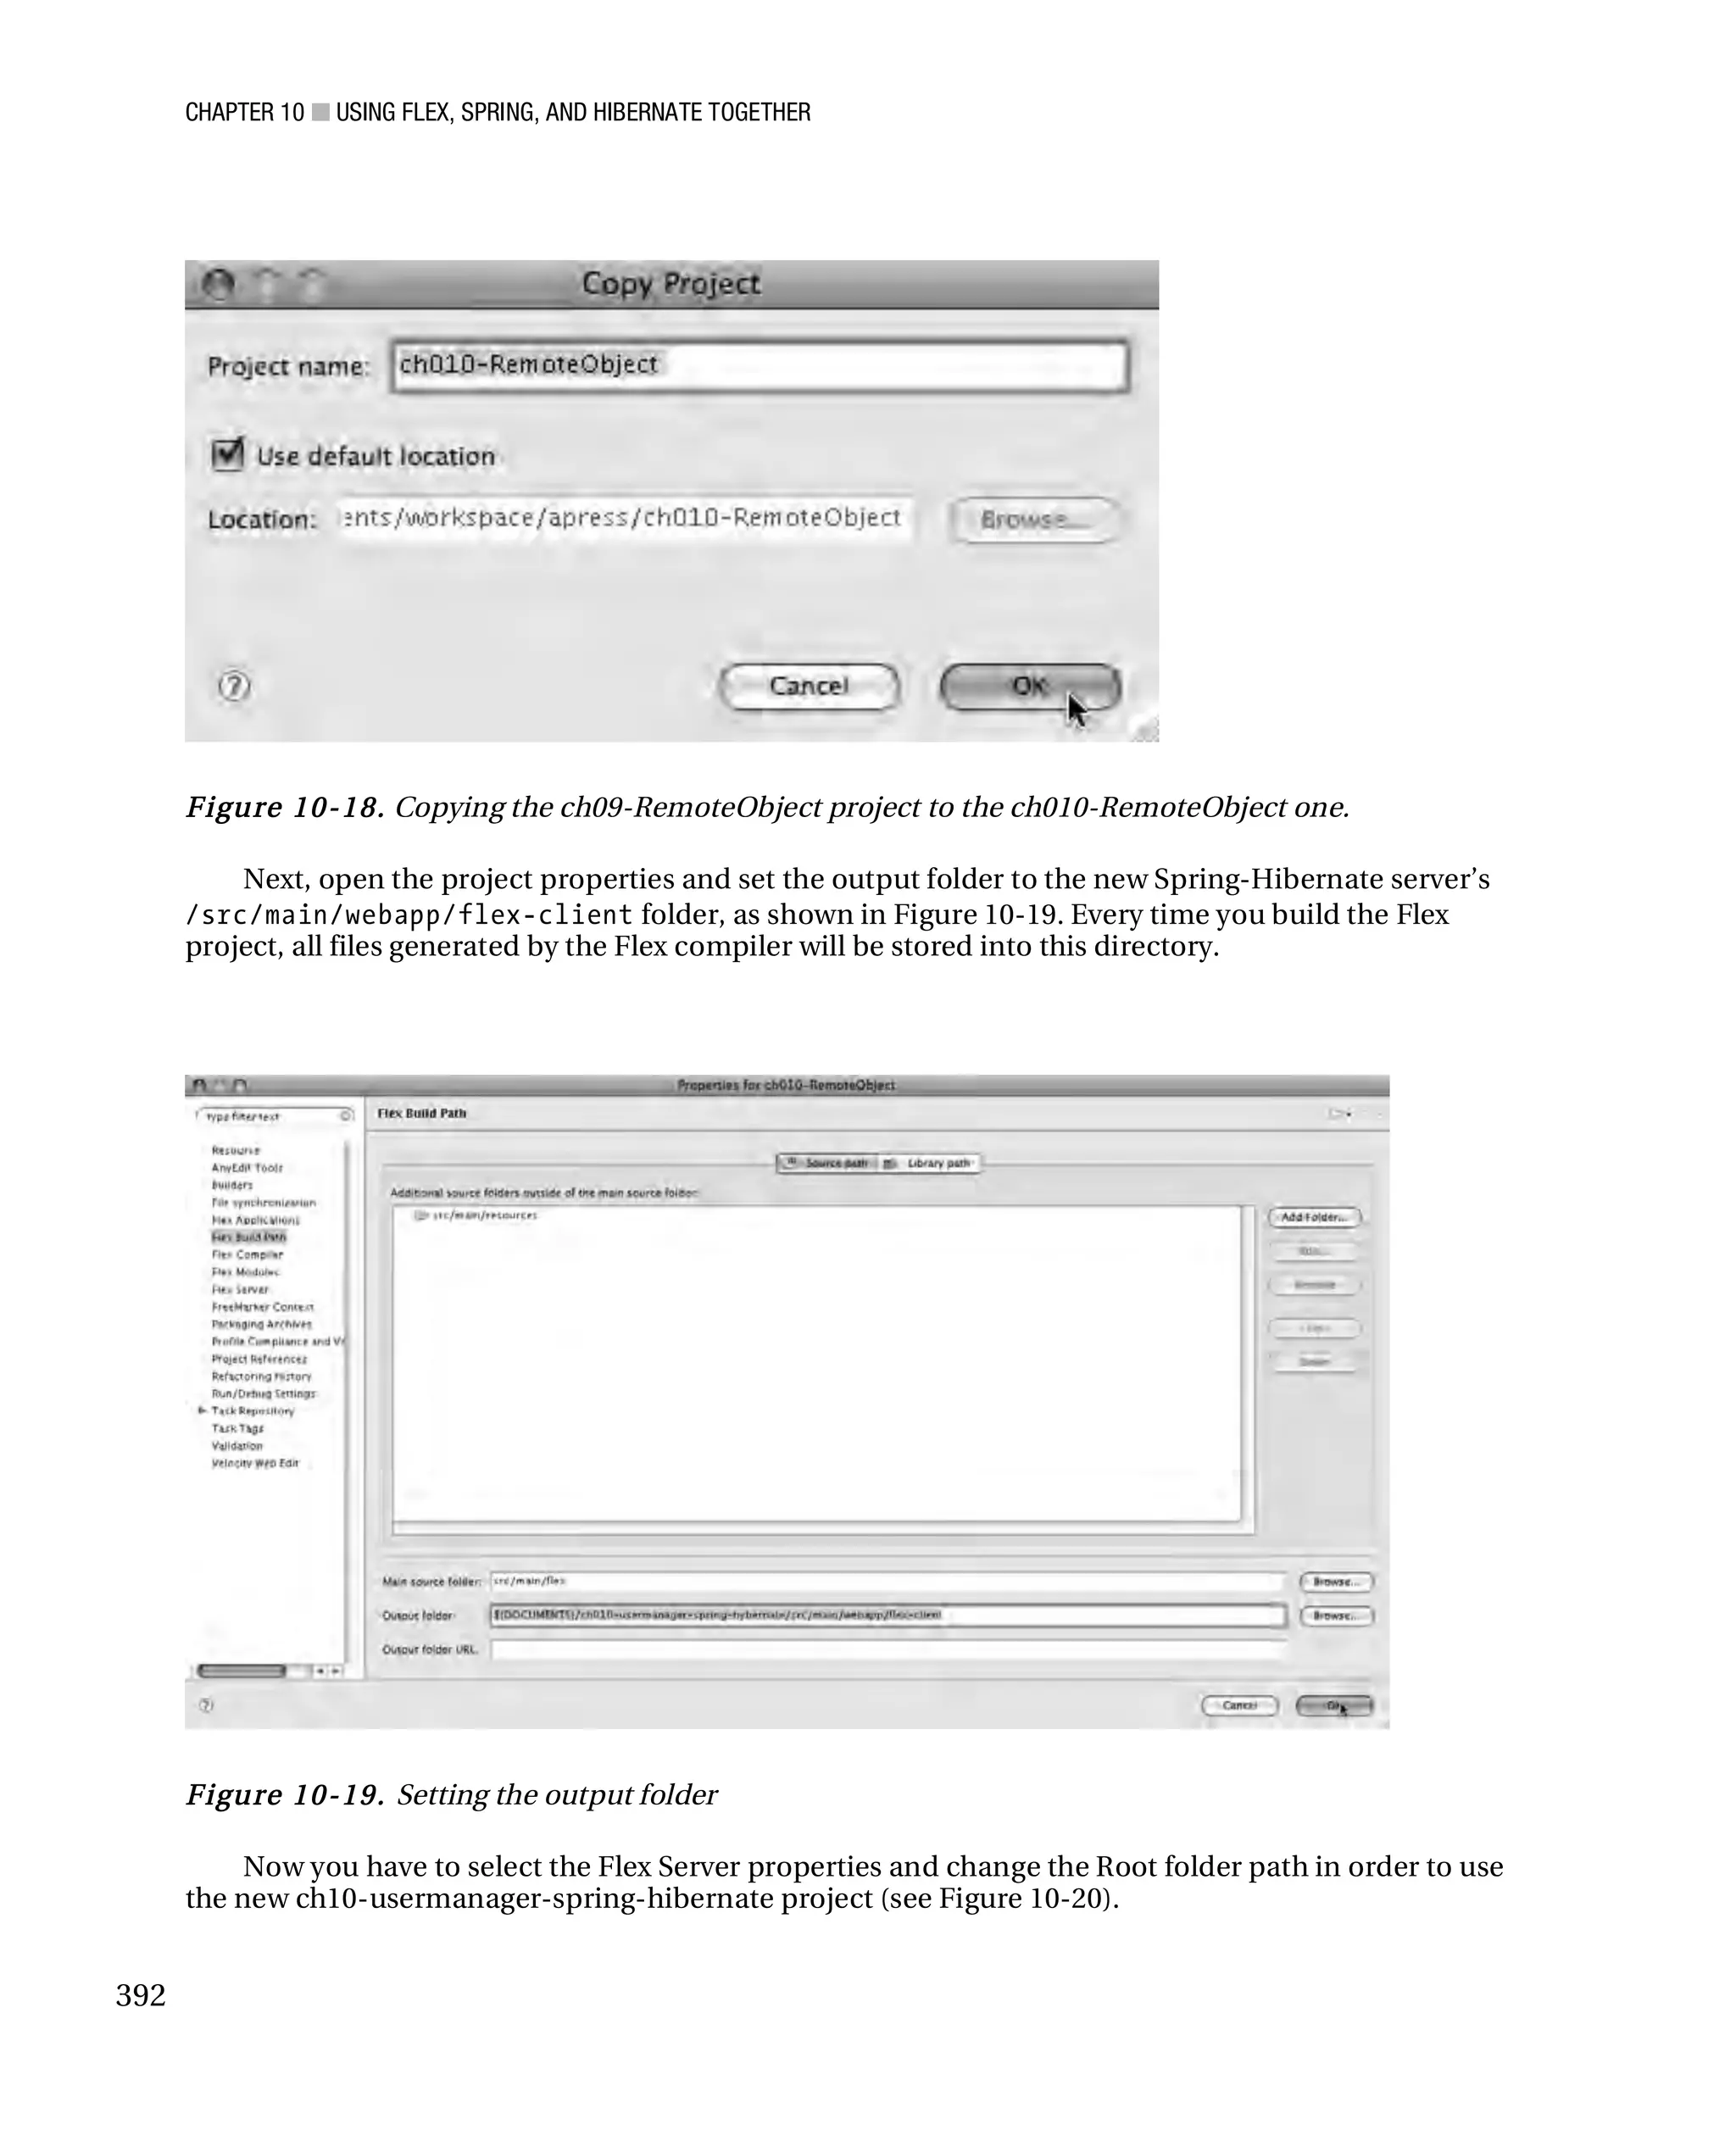
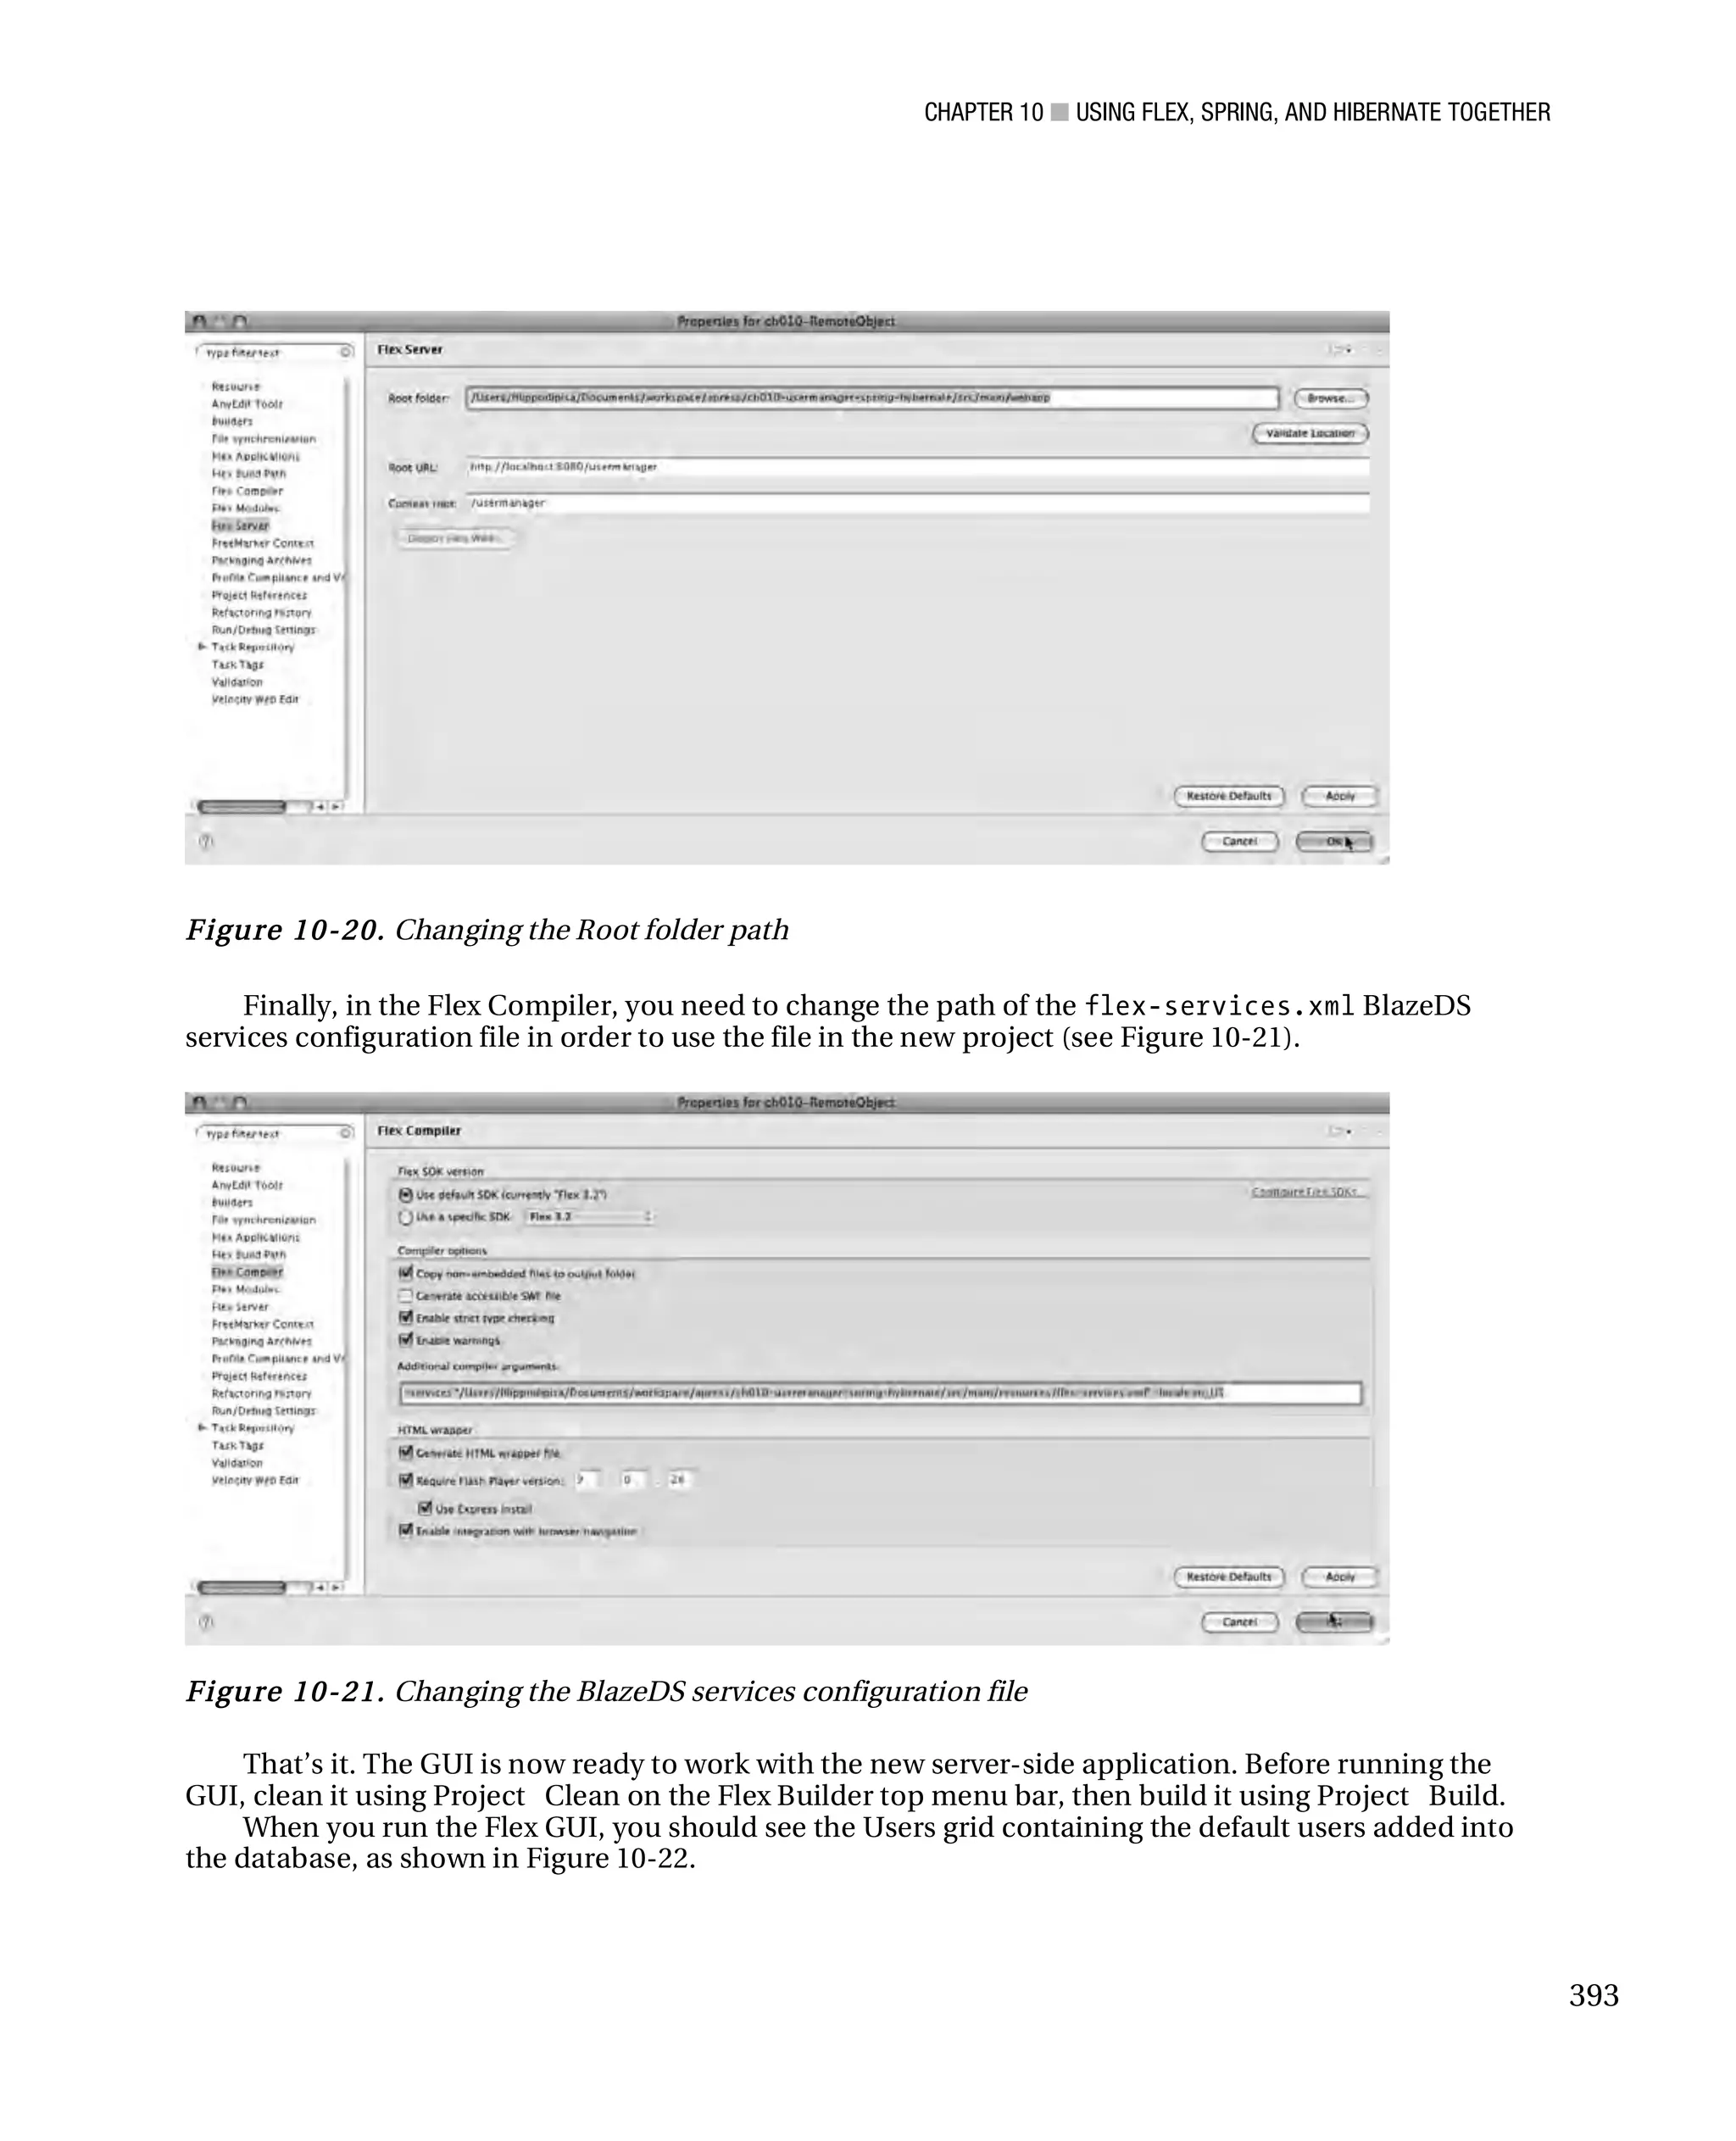
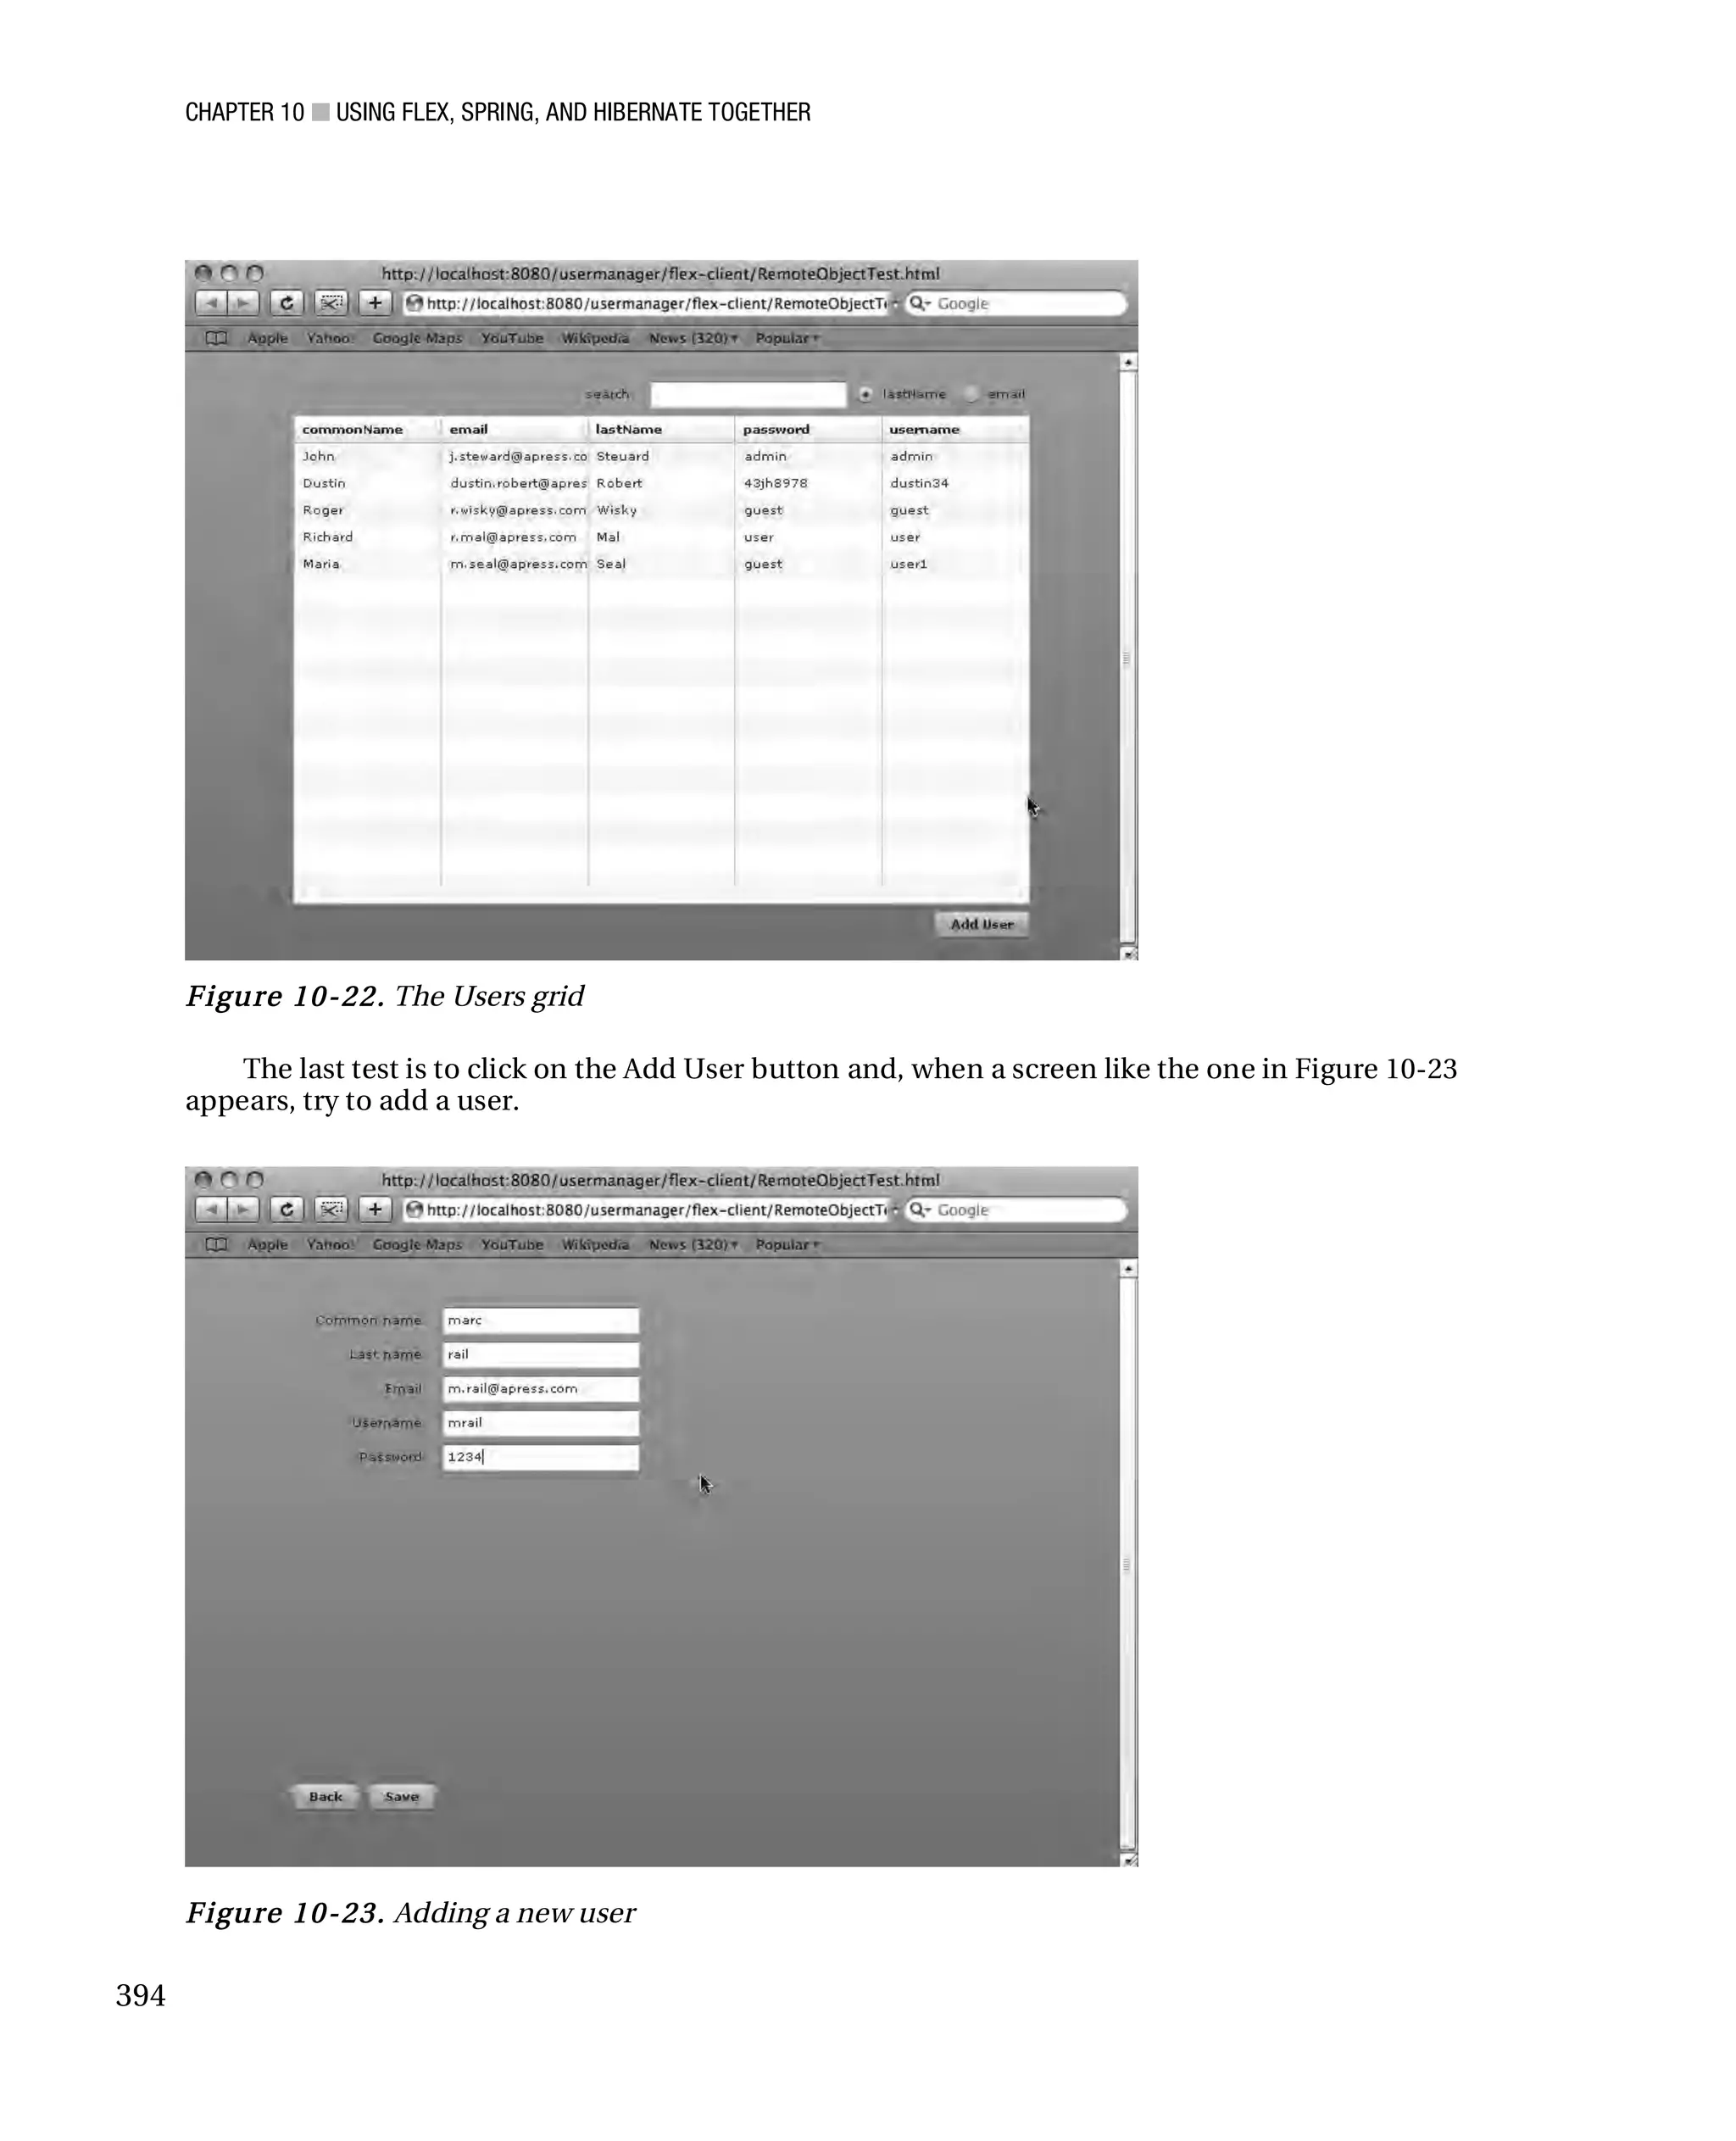
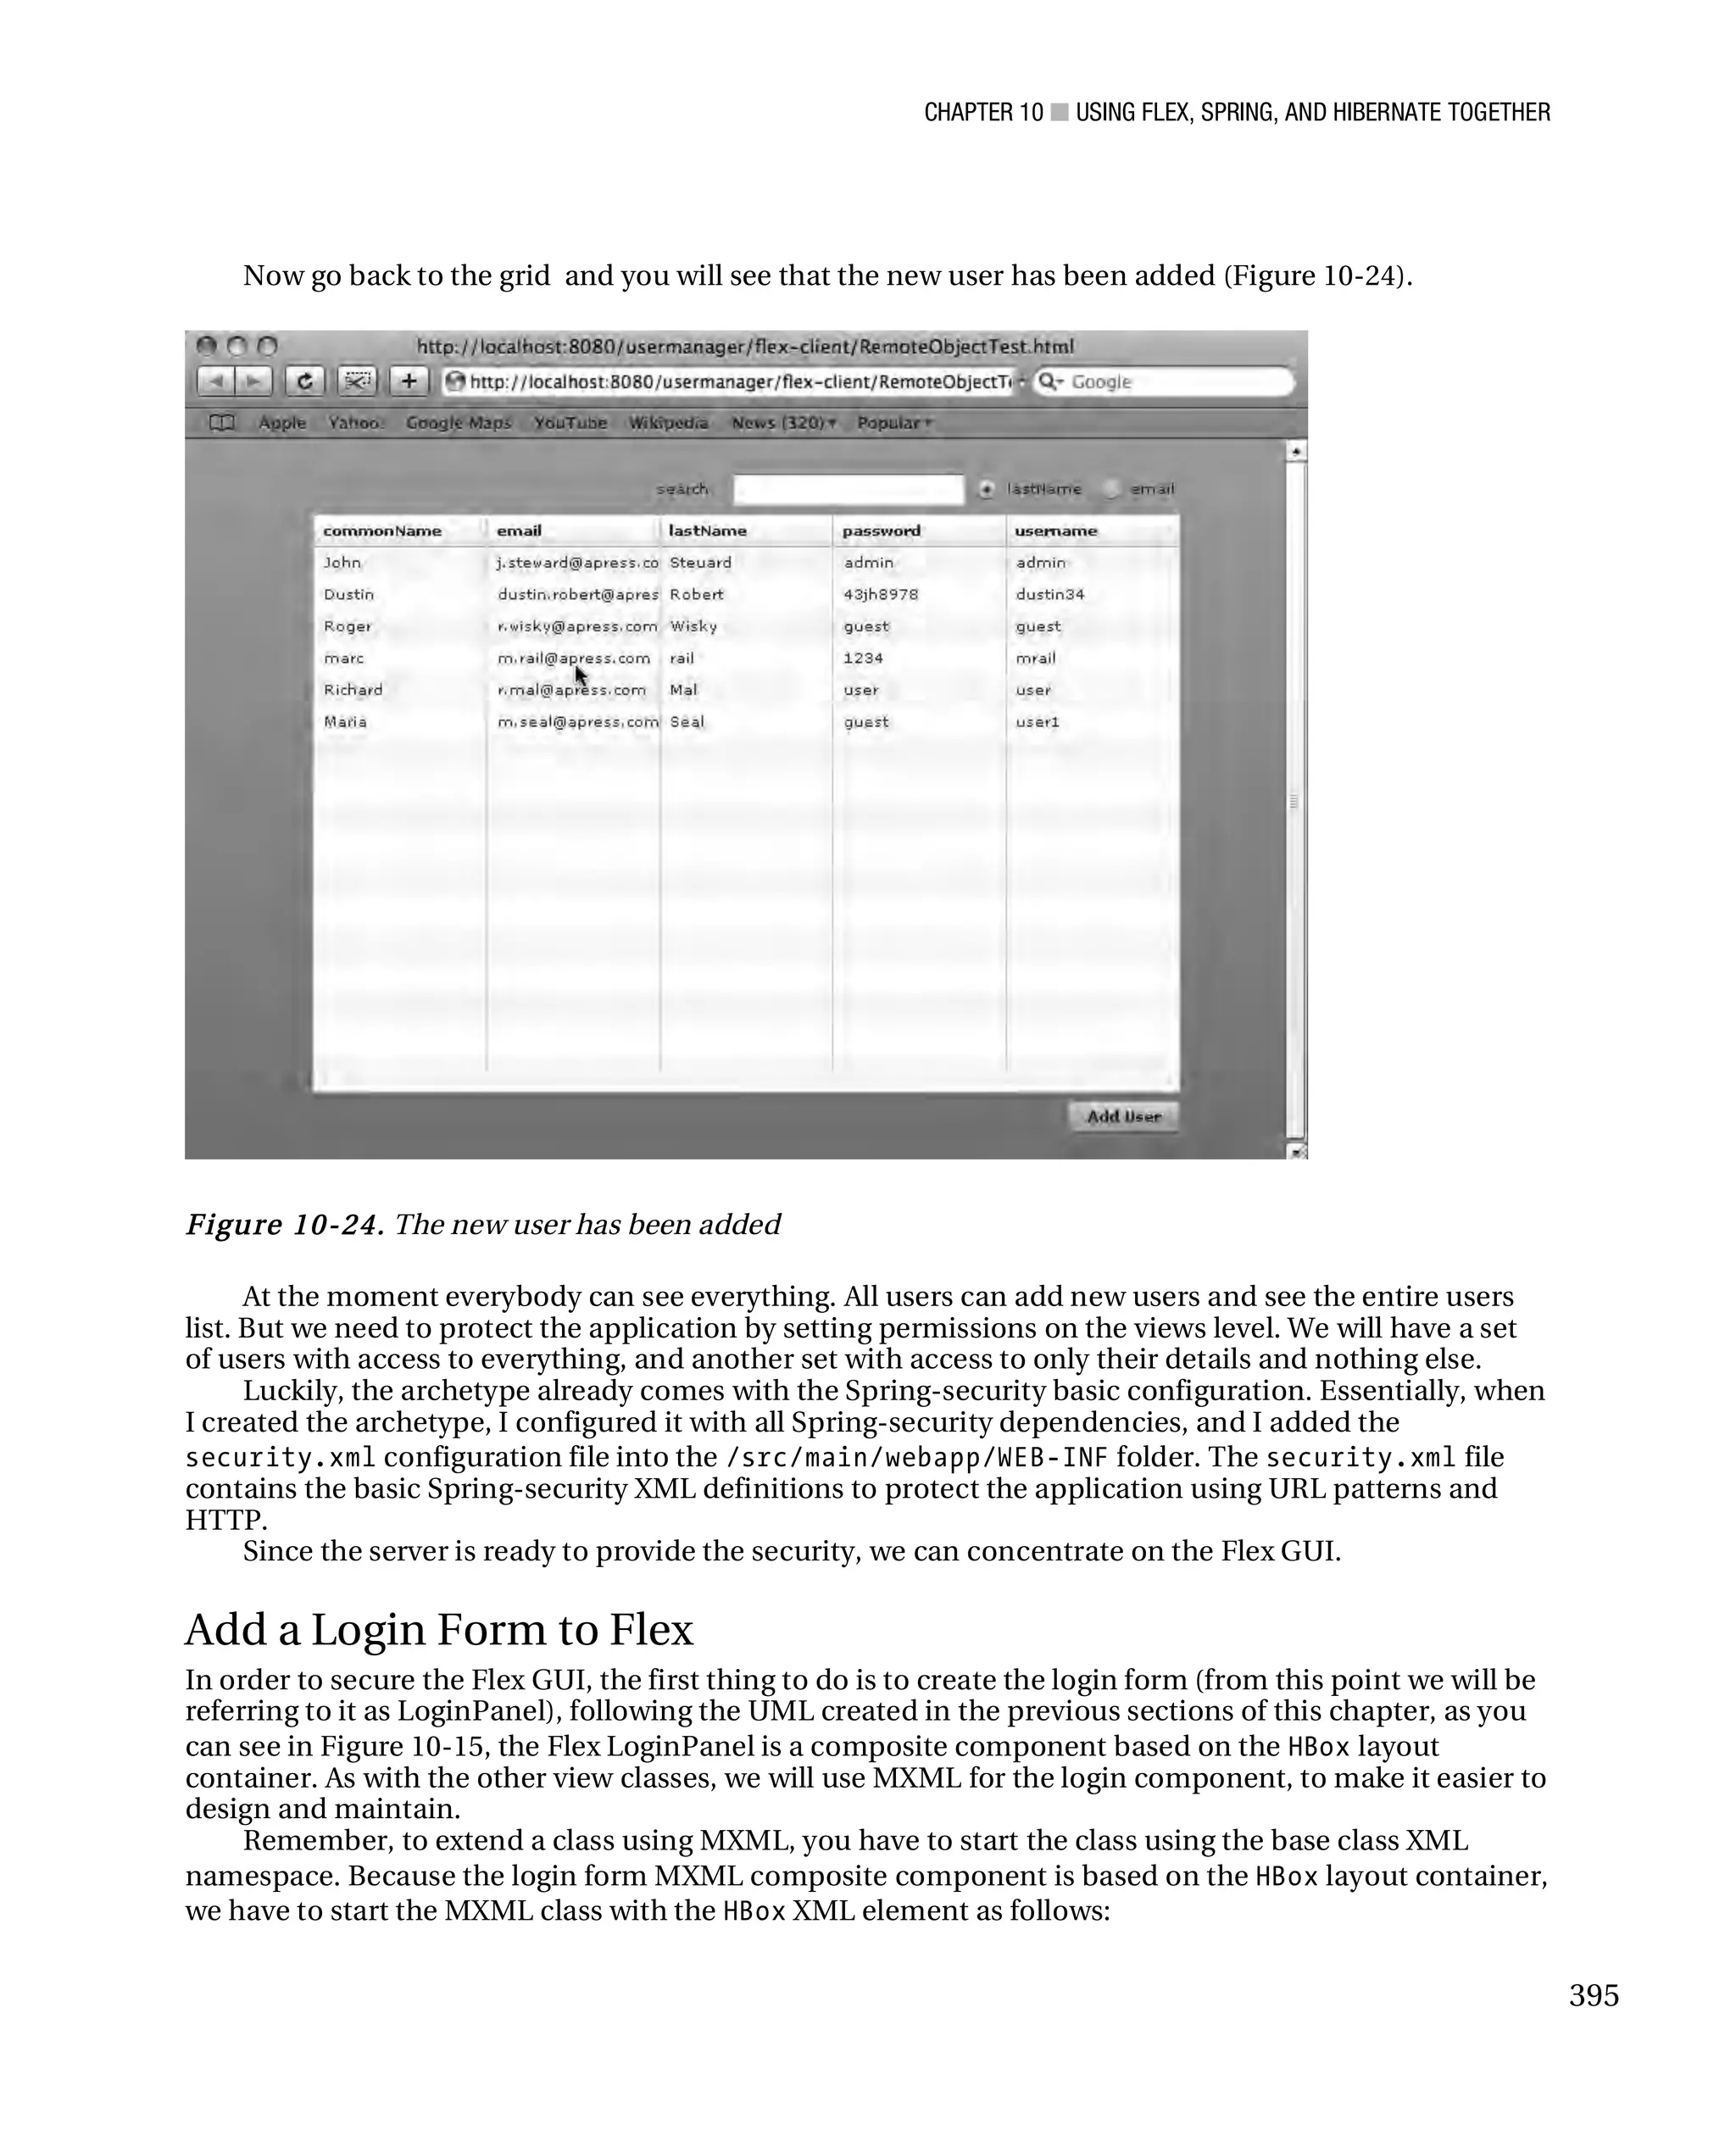
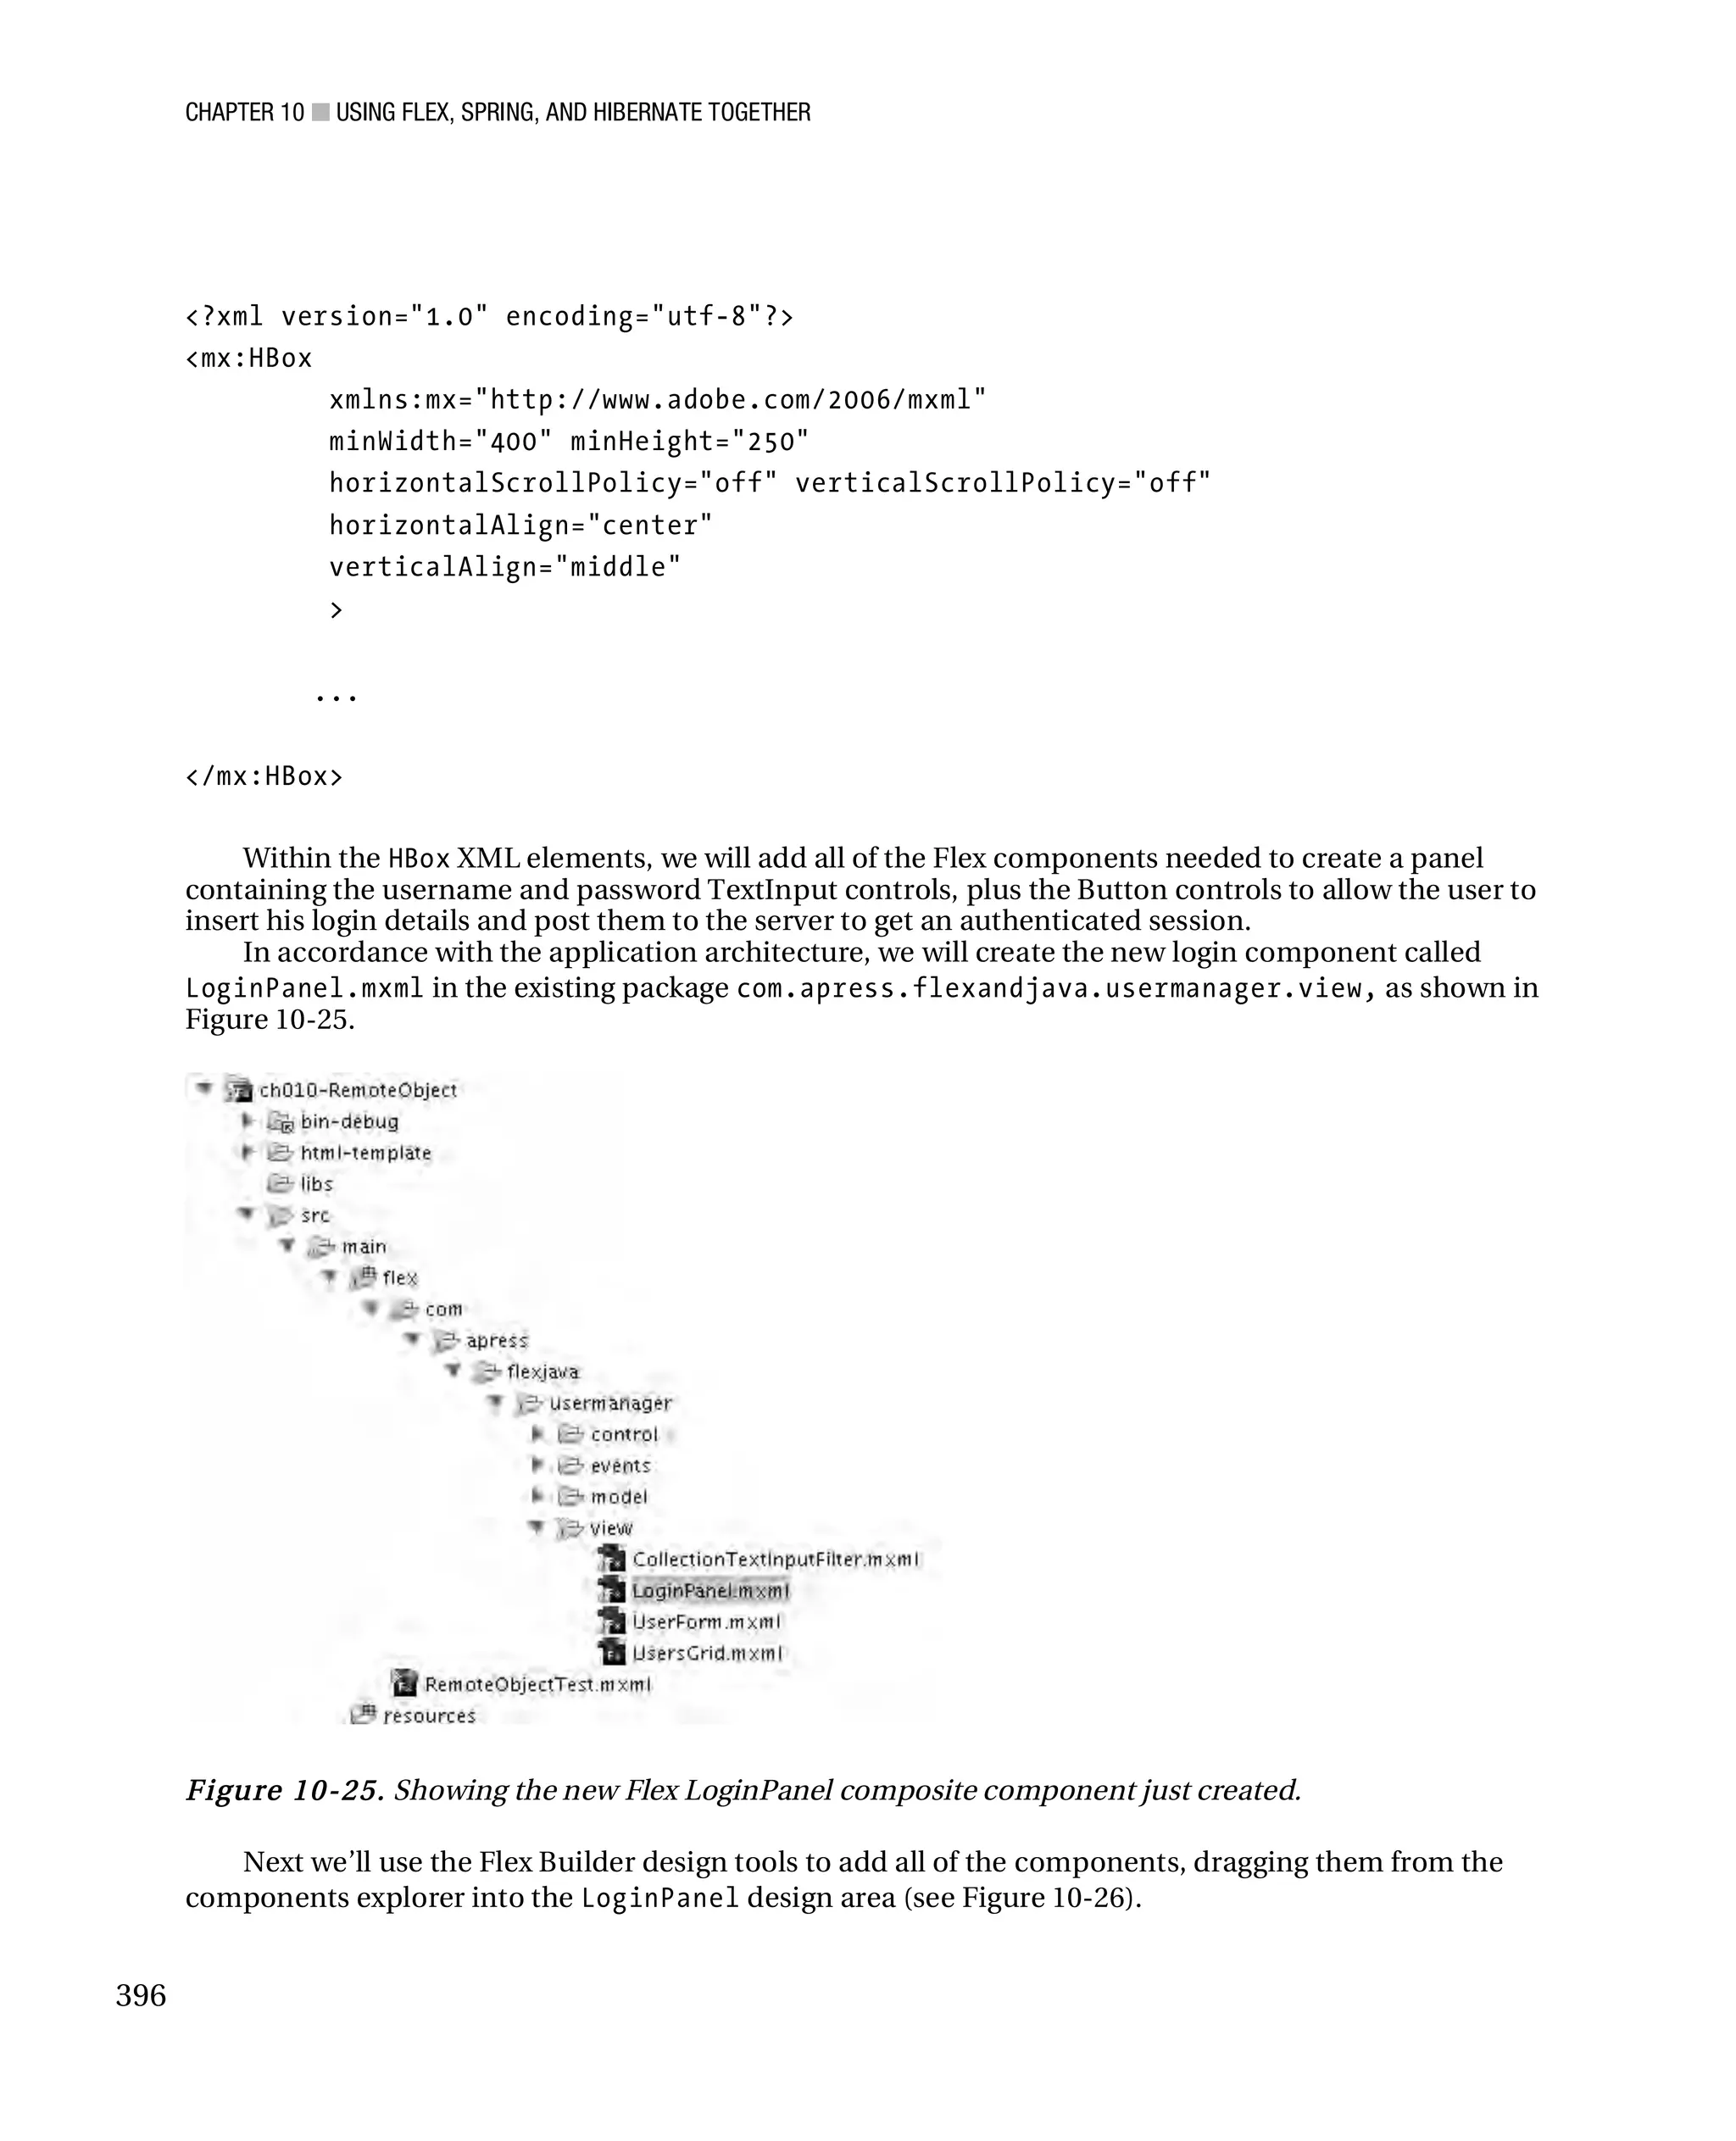
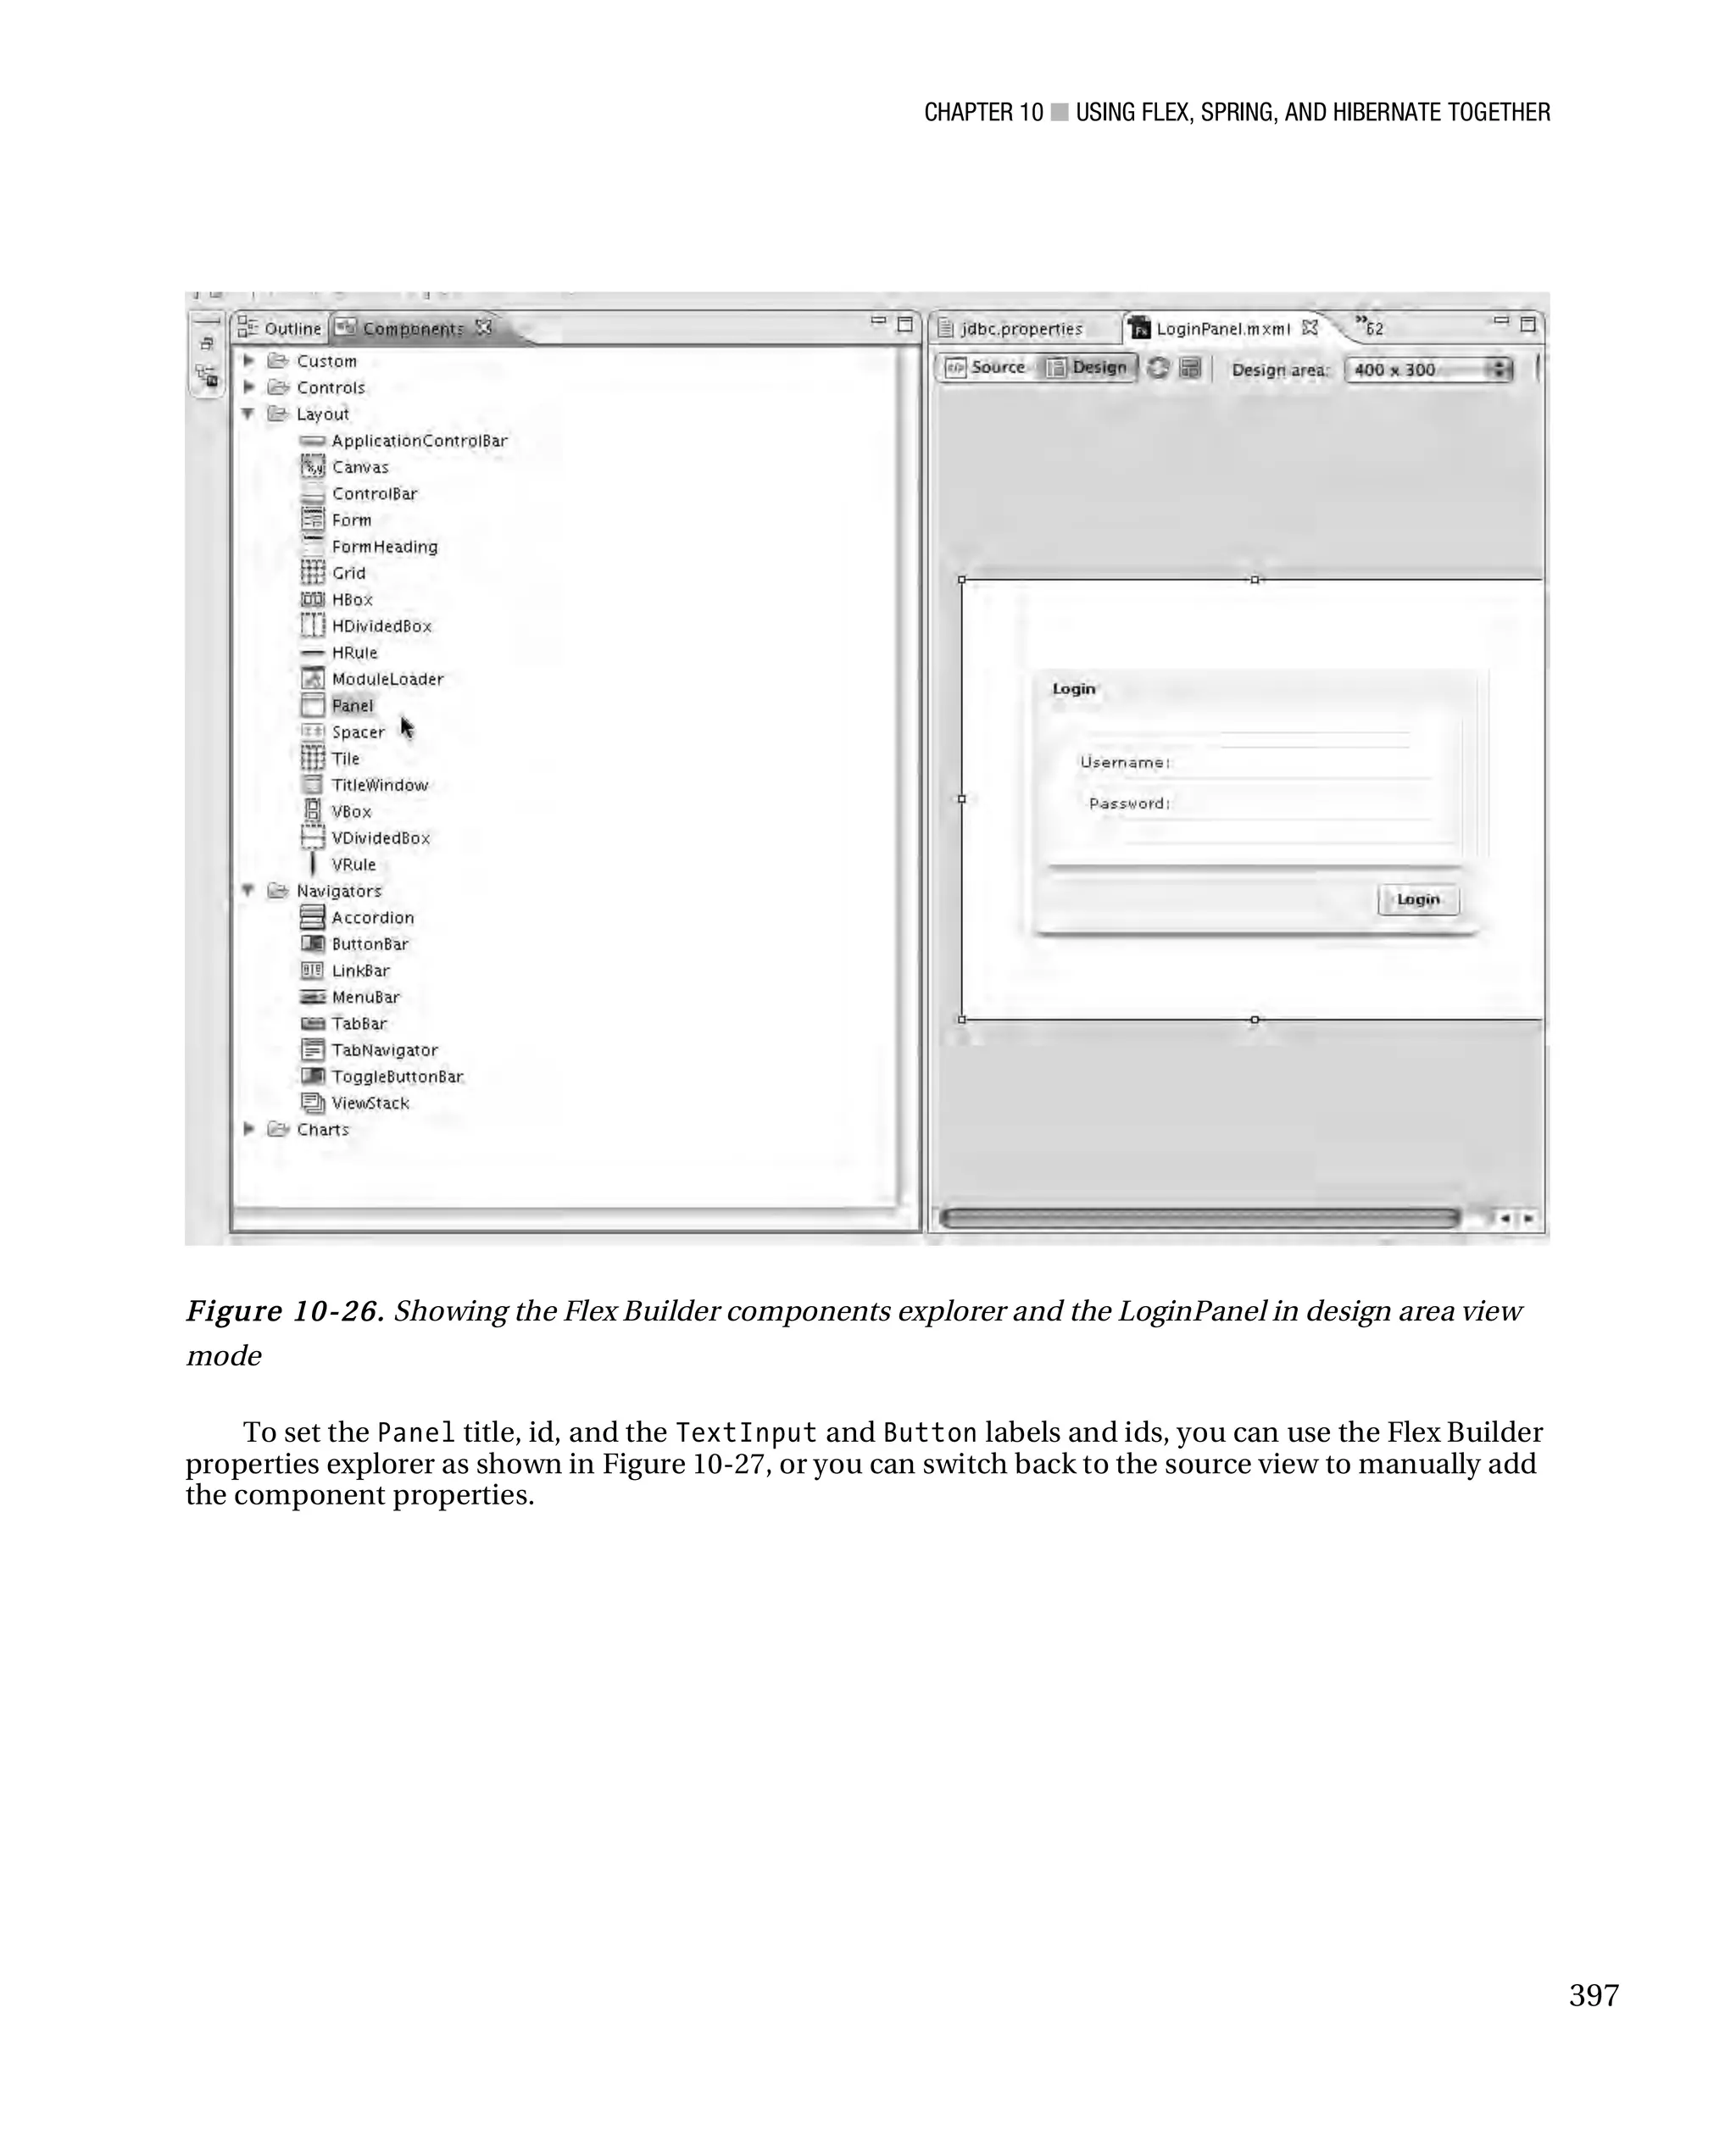
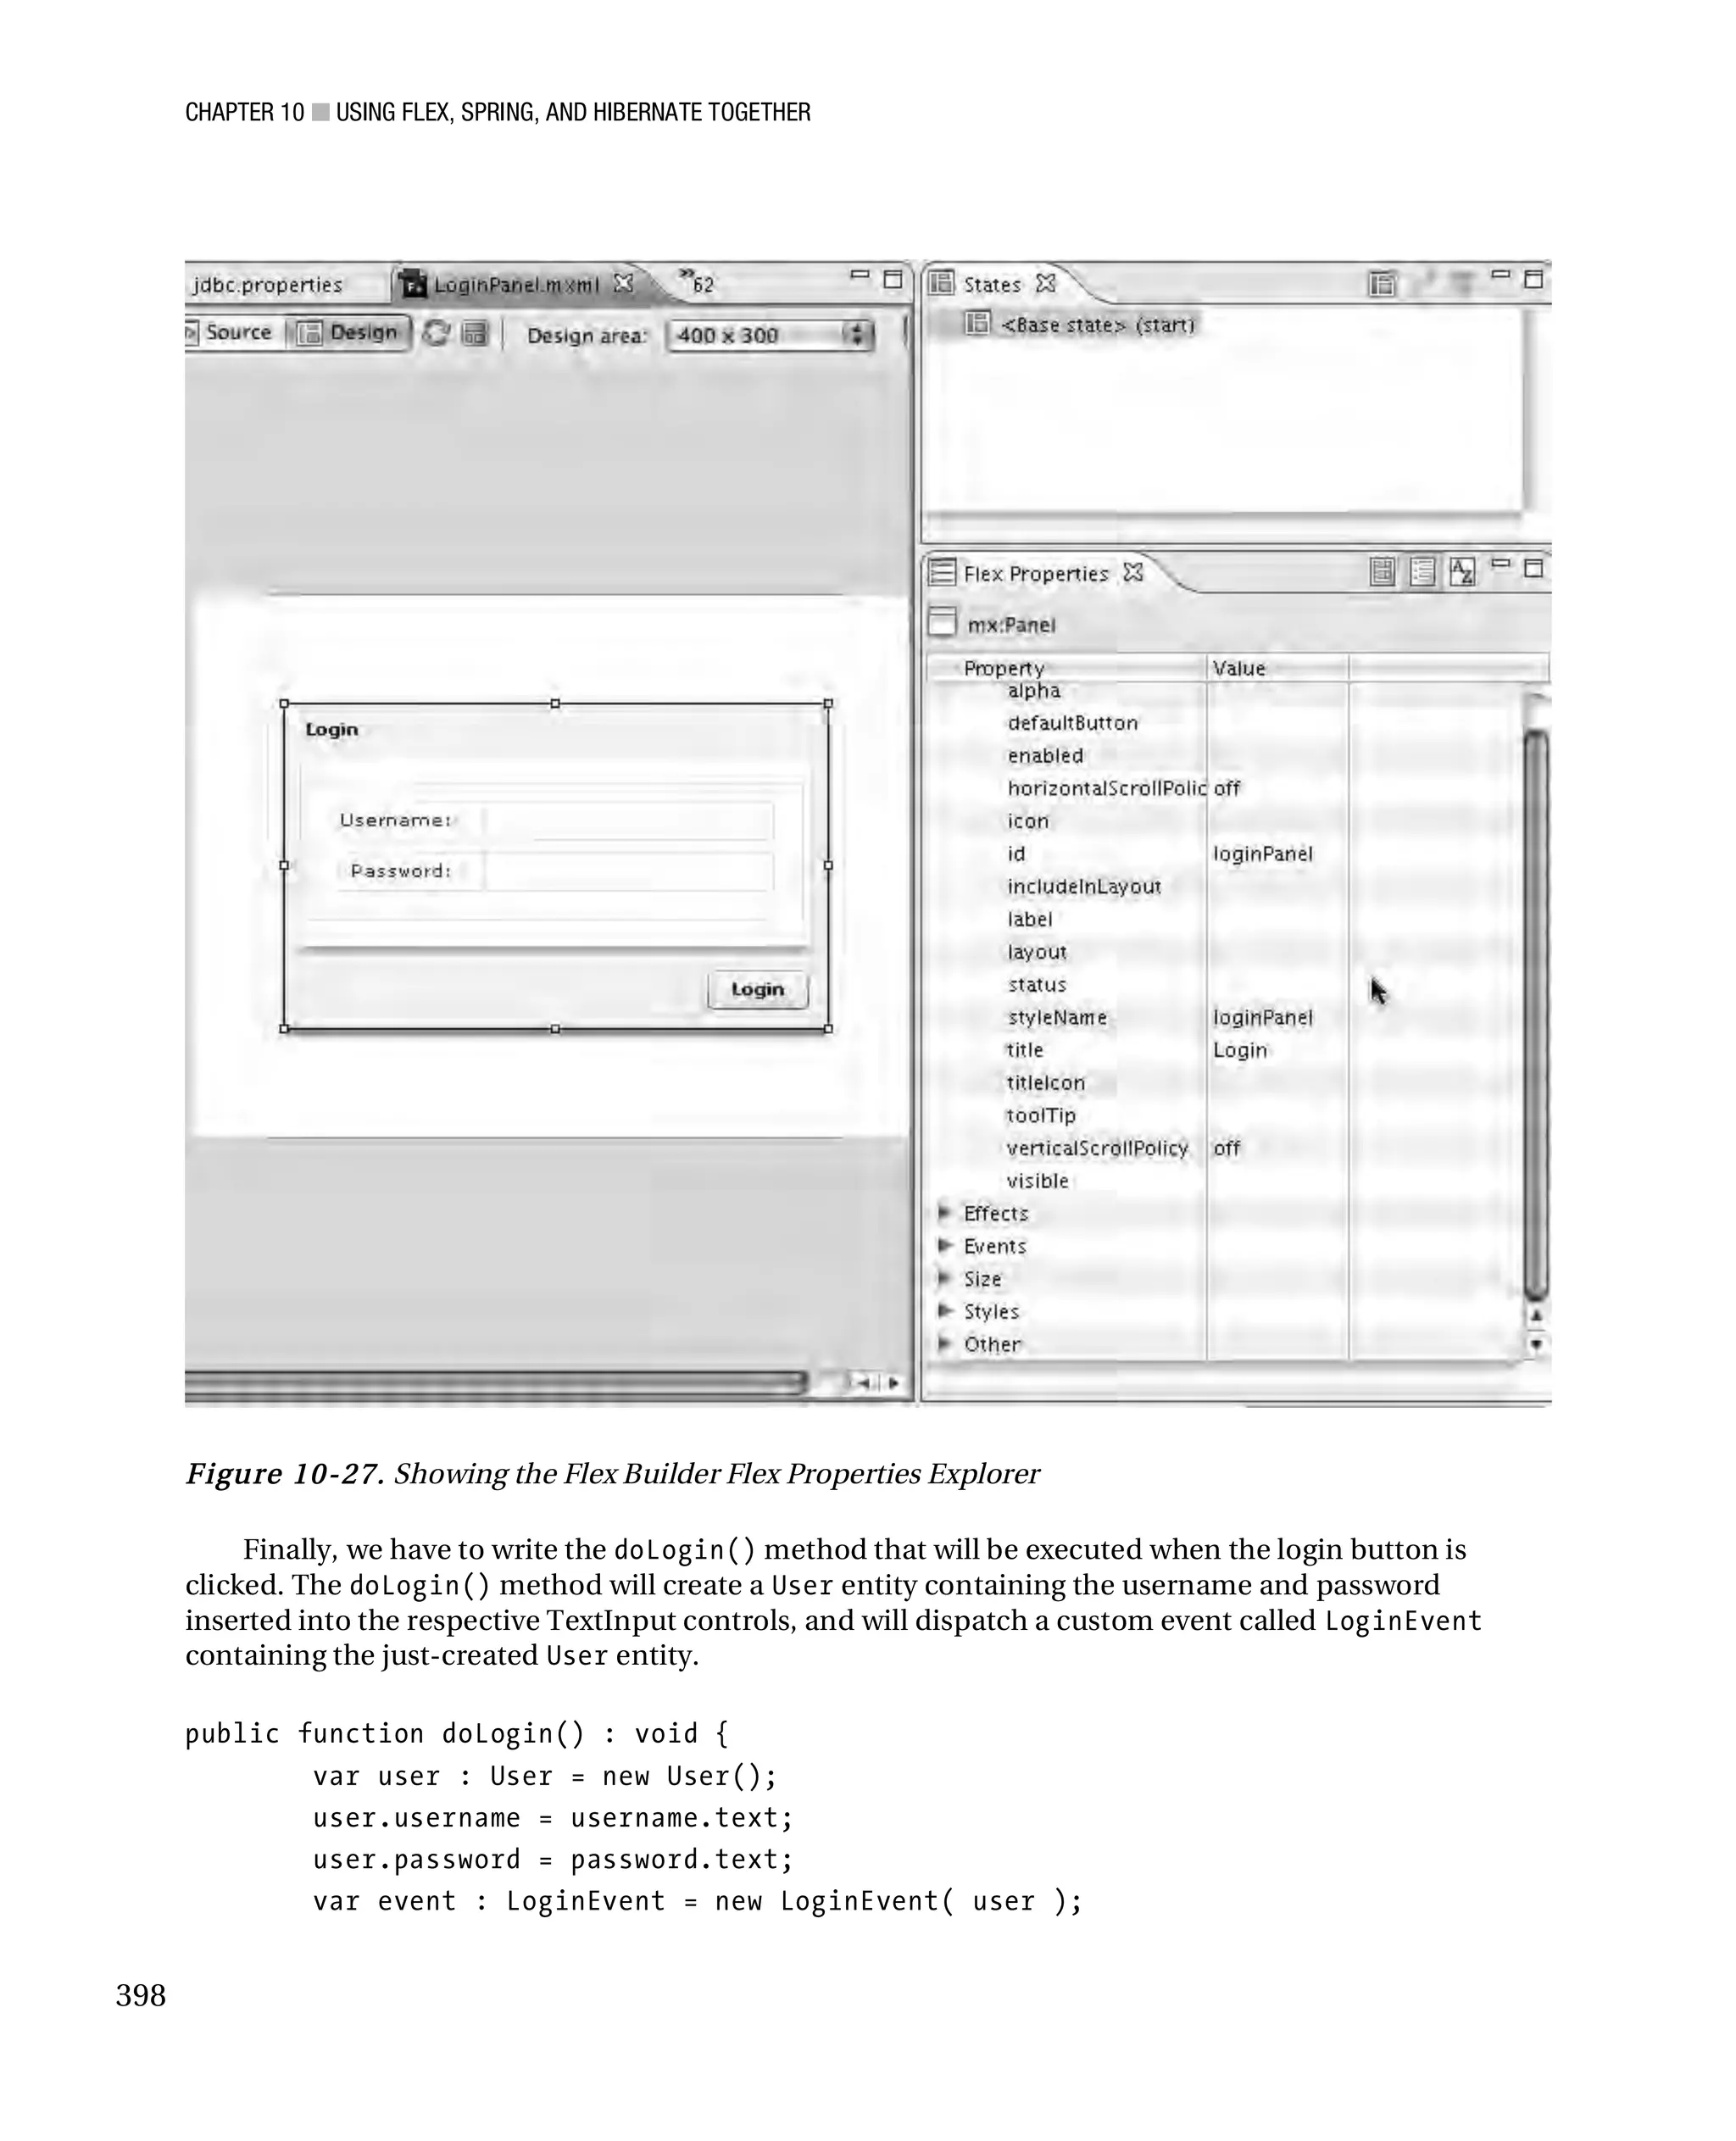
![CHAPTER 10 ■ USING FLEX, SPRING, AND HIBERNATE TOGETHER
super(LOGIN_EVENT, true);
user = u;
}
}
}
UserModel.as
package com.apress.flexjava.usermanager.model
{
import flash.events.IEventDispatcher;
import mx.collections.ArrayCollection;
[Bindable]
public interface UserModel extends IEventDispatcher
{
function set usersCollection(users : ArrayCollection) : void;
function get usersCollection() : ArrayCollection;
function set workFlowState(value : uint) : void;
function get workFlowState() : uint;
function set roles(value : ArrayCollection) : void;
function get roles() : ArrayCollection;
function set currentUsername(value : String) : void;
function get currentUsername() : String;
function set authenticatedUser(value : User) : void;
function get authenticatedUser() : User;
function set isAdmin(value : Boolean) : void;
407](https://image.slidesharecdn.com/beginningjavaandflex-migratingjavaspringhibernateandmavendeveloperstoadobeflex-100821073507-phpapp01/75/Beginning-java-and-flex-migrating-java-spring-hibernate-and-maven-developers-to-adobe-flex-426-2048.jpg)
![CHAPTER 10 ■ USING FLEX, SPRING, AND HIBERNATE TOGETHER
function get isAdmin() : Boolean;
function set isUser(value : Boolean) : void;
function get isUser() : Boolean;
}
}
UserModelImpl.as
package com.apress.flexjava.usermanager.model
{
import flash.events.EventDispatcher;
import mx.collections.ArrayCollection;
[Bindable]
public class UserModelImpl extends EventDispatcher implements UserModel
{
private var _usersCollection : ArrayCollection;
private var _workFlowState : uint = WINDOW_LOGIN_FORM;
private var _roles : ArrayCollection;
private var _currentUsername : String;
private var _authenticatedUser : User;
private var _isAdmin : Boolean = false;
public var _isUser : Boolean = false;
public function set usersCollection(value :
ArrayCollection) : void{
_usersCollection = value;
}
408](https://image.slidesharecdn.com/beginningjavaandflex-migratingjavaspringhibernateandmavendeveloperstoadobeflex-100821073507-phpapp01/75/Beginning-java-and-flex-migrating-java-spring-hibernate-and-maven-developers-to-adobe-flex-427-2048.jpg)
![CHAPTER 10 ■ USING FLEX, SPRING, AND HIBERNATE TOGETHER
user.password = password.text;
var event : LoginEvent = new LoginEvent(
user );
dispatchEvent(event);
isPending = true;
}
]]>
</mx:Script>
</mx:HBox>
RemoteObjectTest.mxml
<?xml version="1.0" encoding="utf-8"?>
<mx:Application xmlns:mx="http://www.adobe.com/2006/mxml"
xmlns:view="com.apress.flexjava.usermanager.view.*"
layout="horizontal"
creationComplete="init()"
horizontalAlign="center"
verticalAlign="middle">
<mx:ViewStack id="viewStack" selectedIndex="{model.workFlowState}">
<view:LoginPanel />
<mx:Panel horizontalAlign="right" paddingTop="10">
<mx:HBox>
<mx:FormItem label="search">
<view:CollectionTextInputFilter
tabIndex="1"
collection="{model.usersCollection}"
columnSearchable="{columnNameToSearch}" />
</mx:FormItem>
<mx:RadioButtonGroup id="searchMethodGroup"
itemClick="handleSearchMethod(event)"/>
<mx:RadioButton tabEnabled="true" tabIndex="2"
label="lastName" selected="true" groupName="searchMethodGroup"/>
<mx:RadioButton tabEnabled="true" tabIndex="3"
label="email" groupName="searchMethodGroup" />
</mx:HBox>
<view:UsersGrid dataProvider="{model.usersCollection}"
width="100%" height="100%" />
412](https://image.slidesharecdn.com/beginningjavaandflex-migratingjavaspringhibernateandmavendeveloperstoadobeflex-100821073507-phpapp01/75/Beginning-java-and-flex-migrating-java-spring-hibernate-and-maven-developers-to-adobe-flex-431-2048.jpg)
![CHAPTER 10 ■ USING FLEX, SPRING, AND HIBERNATE TOGETHER
<mx:ControlBar width="100%">
<mx:Button label="Add User"
click="{model.workFlowState = UserModelImpl.WINDOW_USER_FORM}" />
</mx:ControlBar>
</mx:Panel>
<mx:Panel horizontalAlign="center" verticalAlign="middle">
<view:UserForm id="userForm"
user="{model.authenticatedUser}" />
<mx:ControlBar width="100%">
<mx:Button label="Back" click="{model.workFlowState
= UserModelImpl.WINDOW_LIST_USERS}" visible="{model.isAdmin}" />
<mx:Button label="Save"
click="{control.addUser(userForm.user);model.workFlowState =
UserModelImpl.WINDOW_LIST_USERS}" visible="{model.isAdmin}" />
<mx:Button label="Update"
click="{control.updateUser(userForm.user);}" visible="{model.isUser}" />
</mx:ControlBar>
</mx:Panel>
</mx:ViewStack>
<mx:Script>
<![CDATA[
import
com.apress.flexjava.usermanager.control.UserControlImpl;
import com.apress.flexjava.usermanager.control.UserControl;
import com.apress.flexjava.usermanager.model.UserModel;
import mx.events.ItemClickEvent;
import mx.collections.ArrayCollection;
import com.apress.flexjava.usermanager.model.User;
import com.apress.flexjava.usermanager.model.UserModelImpl;
[Bindable]
private var columnNameToSearch : String = "lastName";
[Bindable]
private var model : UserModel;
[Bindable]
private var control : UserControl;
public function init():void{
model = new UserModelImpl();
413](https://image.slidesharecdn.com/beginningjavaandflex-migratingjavaspringhibernateandmavendeveloperstoadobeflex-100821073507-phpapp01/75/Beginning-java-and-flex-migrating-java-spring-hibernate-and-maven-developers-to-adobe-flex-432-2048.jpg)
![CHAPTER 10 ■ USING FLEX, SPRING, AND HIBERNATE TOGETHER
control = new UserControlImpl(model,this);
}
private function
handleSearchMethod(event:ItemClickEvent):void {
columnNameToSearch = event.currentTarget.selectedValue as
String;
}
]]>
</mx:Script>
</mx:Application>
Now you can run the server, compile the Flex GUI, and try to login as administrator and then as a
user to see the differences.
Summary
In this chapter we saw how to create a Flex-Spring-Hibernate project using the Flex-Spring-Hibernate
Maven archetype. The archetype created the entire project directory structure containing all of the
Spring, Hibernate, and BlazeDS configuration and properties files. It also added all packages usually
needed for this kind of application using the MVC and DAO patterns. The archetype also configured the
security using http Spring security and the database as the authentication provider.
On the Flex GUI side, we copied the Chapter 9 RemoteObject example, making a few changes to
implement security, such as the login form and permissions on the different views of the application
itself.
With this example, I tried to cover the most important aspects of Flex-Spring-Hibernate-Maven
development. You can reuse the same archetype to start you own project, and you’ll see how your
developer productivity will quickly increase.
Java and Flex let you create amazing applications using proper object-oriented languages and the
latest software engineering, making you not just a better developer but also a better software engineer.
414](https://image.slidesharecdn.com/beginningjavaandflex-migratingjavaspringhibernateandmavendeveloperstoadobeflex-100821073507-phpapp01/75/Beginning-java-and-flex-migrating-java-spring-hibernate-and-maven-developers-to-adobe-flex-433-2048.jpg)


![CHAPTER 3 ■ CONFIGURING YOUR DEVELOPMENT ENVIRONMENT
Table 3-1. Continued
svn export Exports a clean directory tree from the
repository or from your working copy to a
Example exporting from the repository local directory.
svn export http://localhost/repo/test
testwithoutsvn
A testwithoutsvn/test
Exported revision <revision_number>
Example exporting from the working copy
svn export test testwithoutsvn
Export complete.
svn help The SVN help for command and
subcommands, it will retrieve a list of all
Example help command subcommands.
svn help
Example help subcommand
svn help ci
commit (ci): Send changes from your working copy
to the repository.
usage: commit [PATH...]
svn import Imports a local directory into the
Subversion server.
Examples
svn import -m "my message" myproject
http://localhost/repo/myproject
Adding myproject/foo.java
…
Transmitting file data .........
Committed revision 21.
45](https://crownmelresort.com/image.slidesharecdn.com/beginningjavaandflex-migratingjavaspringhibernateandmavendeveloperstoadobeflex-100821073507-phpapp01/75/Beginning-java-and-flex-migrating-java-spring-hibernate-and-maven-developers-to-adobe-flex-64-2048.jpg)


![CHAPTER 3 ■ CONFIGURING YOUR DEVELOPMENT ENVIRONMENT
Table 3-2 lists the most important commands used with the MySQL monitor command-line tool.
Table 3-2. Important MySQL monitor commands
Action Command
Logging in mysql -u [username] -p
Logging in to a specific database mysql -u [username] -p [database name]
Running queries select * from my_example_table_name;
Selecting/change database use [database name];
Listing available databases how databases;
Back up a database mysqldump -c --create-options DB > file
Restore a database mysql -p dbname < db.sql
Create a database create database
Basic MySQL Operations Using MySQL Query Browser
MySQL Query Browser provides the same functionality as the MySQL command-line monitor, but its
graphical interface makes it easier for beginners. For example, to create a database, you simply right-
click and select the Create Schema item, as shown in Figure 3-21.
Figure 3-21. MySQL Query Browser create new database
57](https://crownmelresort.com/image.slidesharecdn.com/beginningjavaandflex-migratingjavaspringhibernateandmavendeveloperstoadobeflex-100821073507-phpapp01/75/Beginning-java-and-flex-migrating-java-spring-hibernate-and-maven-developers-to-adobe-flex-76-2048.jpg)


![CHAPTER 3 ■ CONFIGURING YOUR DEVELOPMENT ENVIRONMENT
One group can have many users, so the relationship to create is one-to-many. To create the relation
using MySQL query browser, edit the groups table, adding a column called user_id, as shown in Figure
3-28.
Figure 3-28. Adding a column to the groups table
When you’ve added the necessary information, click on Apply, then click on Execute to store your
changes.
Now we have to relate the user_id fields from both users and groups. Click on the symbol [+] on the
Foreign Keys section and select the users table in the box with the label Ref.Table (Figure 3-29). Now
select the user_id fields for both Column and Foreign Column in the grid on the right and again, click
on Apply and then Execute to store your changes (Figure 3-30).
61](https://crownmelresort.com/image.slidesharecdn.com/beginningjavaandflex-migratingjavaspringhibernateandmavendeveloperstoadobeflex-100821073507-phpapp01/75/Beginning-java-and-flex-migrating-java-spring-hibernate-and-maven-developers-to-adobe-flex-80-2048.jpg)


![CHAPTER 3 ■ CONFIGURING YOUR DEVELOPMENT ENVIRONMENT
• Lib: A directory that contains JAR archives of libraries (tag libraries and any utility
libraries called by server-side classes).
You can create application-specific subdirectories (package directories) in either the document root
or the WEB-INF/classes directory.
Installing Tomcat
Installing Tomcat on your machine requires a JVM. Tomcat 6 is designed to run on JDK 1.5, so it is
logical to use that. You can download the JVM Java installer from
http://java.sun.com/j2se/downloads
On Win d ows: You can download the Tomcat package for Windows from
http://tomcat.apache.org/download-60.cgi. Simply download the package and double-click to
start the installation. The Tomcat installation for Windows is pretty straightforward—you just follow the
wizard. Be aware that Tomcat will be installed as a Window service no matter what setting you use, and
the installation will determine your Java location automatically from either the registry or the
JAVA_HOME environment variable. After the installation, you can check it at
http://localhost:8080.You can start or stop the server easily by double-clicking on the tray icon or
through the Windows Service Manager.
On Linux or Mac O S: Installing Tomcat on Linux or Mac OS is as straightforward as the Windows
installation. Simply download the Tomcat 6 Binary Distribution Core (tar.gz) at
http://tomcat.apache.org/download-60.cgi. Create a Tomcat folder in /usr/local/. (I use
/usr/local as it is standard, but Tomcat can be installed in other directories if you assign them the
appropriate permissions.)
cd /usr/local/
sudo mkdir tomcat
Now go to the new Tomcat directory and unpack the tar.gz file
cd tomcat/
sudo tar -xvzf ~/Downloads/apache-tomcat-6.0.x.tar.gz
Before you can test the installation, you have to configure the tomcat-users.xml configuration file to
access the Tomcat administration page. This file is located in the conf directory (tomcat/conf).
sudo vi conf/tomcat-users.xml
<?xml version='1.0' encoding='utf-8'?>
<tomcat-users>
<role rolename="standard"/>
<role rolename="manager"/>
<user username="username" password="password" roles="standard,manager"/>
</tomcat-users>
Save the tomcat-users.xml and quit the vi editor
[esc] : wq
64](https://crownmelresort.com/image.slidesharecdn.com/beginningjavaandflex-migratingjavaspringhibernateandmavendeveloperstoadobeflex-100821073507-phpapp01/75/Beginning-java-and-flex-migrating-java-spring-hibernate-and-maven-developers-to-adobe-flex-83-2048.jpg)


![CHAPTER 4 ■ INVERSION OF CONTROL
The bean message will have a property called text with the value “How are you?” The bean
helloFilippo will have a reference property to the bean with the id=message.
<bean id="message" class="com.apress.flexjava.hellofilippo.Message" >
<property name="text" value="How are you?" />
</bean>
<bean id="helloFilippo" class="com.apress.flexjava.hellofilippo.HelloFilippo">
<property name="message" ref="message" />
</bean>
As you can see from the preceding code, we inject into the container the two classes with their
properties. In practice, the property with name=“text” corresponds to the setter method setText with
the class Message, and the property message corresponds to the setter method setMessage in the class
HelloFilippo.
The last piece of our puzzle is to write a Main class to instantiate the IoC container with its
configuration file ApplicationBean.xml; once the container has instantiated we get the bean
helloFilippo that is needed for our test.
package com.apress.flexjava.hellofilippo;
import org.springframework.context.ApplicationContext;
import org.springframework.context.support.ClassPathXmlApplicationContext;
public class Main {
public static void main(String[] args) {
ApplicationContext context =
new ClassPathXmlApplicationContext("ApplicationBeans.xml");
HelloFilippo helloFilippo = (HelloFilippo)
context.getBean("helloFilippo");
helloFilippo.hello();
}
}
To test the code, right click on the Main.java class and select Run As ➤ Java Application (see Figure
4-15).
107](https://crownmelresort.com/image.slidesharecdn.com/beginningjavaandflex-migratingjavaspringhibernateandmavendeveloperstoadobeflex-100821073507-phpapp01/75/Beginning-java-and-flex-migrating-java-spring-hibernate-and-maven-developers-to-adobe-flex-126-2048.jpg)


![CHAPTER 4 ■ INVERSION OF CONTROL
public void hello() {
System.out.println("Hello Filippo!" + message.getText());
}
@Autowired
public void setMessage(MessageForAnnotationConfiguration message) {
this.message = message;
}
}
As you can see, both classes are annotated with @Component. The HelloFilippoForAnnotation
class has the @Autowire annotation, which automatically injects the message object. Now I have to
create a Main class in which to instantiate the beans and the context.
package com.apress.flexjava.hellofilippo.testannotations;
import org.springframework.context.ApplicationContext;
import org.springframework.context.support.ClassPathXmlApplicationContext;
public class Main {
public static void main(String[] args) {
ApplicationContext context =
new ClassPathXmlApplicationContext
("ApplicationForAnnotationsConfiguration.xml");
HelloFilippoForAnnotationsConfiguration helloFilippo =
(HelloFilippoForAnnotationsConfiguration)
context.getBean("helloFilippoForAnnotationsConfiguration");
helloFilippo.hello();
}
}
In the Main class, I have instantiated the context loading the new Application XML configuration
file, and then I get the bean helloFilippoForAnnotationsConfiguration from the IoC container. As
you can see, the annotation @Component has informed Spring to inject the component with the same
name of the class in lowercase. If you want to give a different name, you can specify within the
@Component annotation.
@Component("myName")
However, I suggest you keep the default name. Using annotations is helpful for most scenarios, but
again you will need to use XML configuration as it is more readable by everybody, centralized, and more
scalable.
In the next section we are going to talk in more detail about the life cycle of a bean, so you will have
the full picture.
124](https://crownmelresort.com/image.slidesharecdn.com/beginningjavaandflex-migratingjavaspringhibernateandmavendeveloperstoadobeflex-100821073507-phpapp01/75/Beginning-java-and-flex-migrating-java-spring-hibernate-and-maven-developers-to-adobe-flex-143-2048.jpg)


![CHAPTER 5 ■ SPRING JDBC AND HIBERNATE
Figure 5-1. Two different implementations of the UserDao interface
The differences between the two classes will be the code inside each method. For example, the save
method of the class LdapUserDaoImpl will contain different code from the save method implemented
by the class HibernateUserDaoImpl, because one class must work with a database and the other class
with an LDAP directory server. The following code shows the save method implemented by
HibernateUserDaoImpl:
HibernateUserDaoImpl save method implemented
public void save(User user) {
getHibernateTemplate().saveOrUpdate(user);
}
And here’s the save method implemented by LdapUserDaoImpl:
public void save(User user) {
DirContextAdapter ctx = new DirContextAdapter();
ctx.setAttributeValues("objectclass", new String[]
{"top",
"person", "organizationalPerson", "inetOrgPerson"} );
HashMap<String,String> map = new LdapUserAttributeMapper
(ldapAttributesDto).mapFromLdapUserDto(ldapUserDto);
for(String key : map.keySet() ){
ctx.setAttributeValue(key, map.get(key));
}
ldapTemplate.bind(this.buildRdn(ldapContactDto.getUid()), ctx, null);
}
Our business layer will refer to the UserDao interface and not to its implementation classes; by
referring to the interface, it will be very easy to port our application from using a database to using LDAP
storage. All we have to do is inject into our container the new class LdapUserDaoImpl. Easy!
132](https://crownmelresort.com/image.slidesharecdn.com/beginningjavaandflex-migratingjavaspringhibernateandmavendeveloperstoadobeflex-100821073507-phpapp01/75/Beginning-java-and-flex-migrating-java-spring-hibernate-and-maven-developers-to-adobe-flex-151-2048.jpg)


![CHAPTER 5 ■ SPRING JDBC AND HIBERNATE
<type>jar</type>
<scope>compile</scope>
</dependency>
Finally, we need to create a Main class where we are going to instantiate our
UserDaoTraditionalJdbcImpl,call the findAll method to retrieve all users stored into our database,
and print them to the console.
Your Main class is like this:
package com.apress.flexjava.usermanager.business;
import java.util.List;
import com.apress.flexjava.usermanager.dao.UserDao;
import com.apress.flexjava.usermanager.dao.jdbc.UserDaoTraditionalJdbcImpl;
import com.apress.flexjava.usermanager.model.User;
public class Main {
private static final String JDBC_DRIVE_CLASS_NAME = "com.mysql.jdbc.Driver";
private static final String JDBC_URL = "jdbc:mysql://localhost:
3306/usermanager_test";
private static final String JDBC_USERNAME = " apress ";
private static final String JDBC_PASSWORD = " sserpa ";
public static void main(String[] args) {
UserDao userDao = new
UserDaoTraditionalJdbcImpl( JDBC_DRIVE_CLASS_NAME ,
JDBC_URL , JDBC_USERNAME , JDBC_PASSWORD );
List<User> users = userDao.findAll();
for (User user : users){
System. out .println(user.getForename() + " " +
user.getSurname() );
}
}
}
Now you can run the application using Eclipse by right-clicking on the Main class and choosing the
item run as Java application ; if everything is correct, you should see in your Eclipse console the result
shown in Figure 5-6.
140](https://crownmelresort.com/image.slidesharecdn.com/beginningjavaandflex-migratingjavaspringhibernateandmavendeveloperstoadobeflex-100821073507-phpapp01/75/Beginning-java-and-flex-migrating-java-spring-hibernate-and-maven-developers-to-adobe-flex-159-2048.jpg)


![CHAPTER 5 ■ SPRING JDBC AND HIBERNATE
Finally, you need to create a Main class where you instantiate your beanfactory to get the userDao
bean and call the findAll method to retrieve all users stored into the database and print them to the
console.
Here is the complete code for the Main class:
package com.apress.flexjava.usermanager.business;
import java.util.List;
import org.springframework.context.ApplicationContext;
import org.springframework.context.support.ClassPathXmlApplicationContext;
import com.apress.flexjava.usermanager.dao.UserDao;
import com.apress.flexjava.usermanager.model.User;
public class Main {
public static void main(String[] args) {
ApplicationContext context = new ClassPathXmlApplicationContext
("applicationContext.xml");
UserDao userDao = (UserDao)context.getBean("userDao");
List<User> users = userDao.findAll();
for (User user : users){
System.out.println(user.getForename() + " " +
user.getSurname() );
}
}
}
Now you can run the application using Eclipse as shown before by right-clicking on the Main class
and choosing run as Java application; if everything is correct, you should see the information(INFO) logs
of the Spring container and then the query result, as shown in Figure 5-7.
Figure 5-7. Eclipse console showing the users retrieved from the database plus the Spring INFO logs
You can see the differences between the class that uses the Standard JDBC and the class that uses
the Spring JDBC by using the Eclipse compare tool. Select the two classes to compare, right-click on one
of them to bring up the context menu, then choose Compare With ➤ Each Other (see Figure 5-8). The
results of the comparison are shown in Figure 5-9. I leave it to you to judge which is better!
146](https://crownmelresort.com/image.slidesharecdn.com/beginningjavaandflex-migratingjavaspringhibernateandmavendeveloperstoadobeflex-100821073507-phpapp01/75/Beginning-java-and-flex-migrating-java-spring-hibernate-and-maven-developers-to-adobe-flex-165-2048.jpg)


![CHAPTER 7 ■ FLEX (THE VIEW LAYER)
boxYellow.percentWidth = 40;
boxYellow.percentHeight = 100;
boxYellow.setStyle("borderThickness",5);
boxYellow.setStyle("borderStyle","solid");
boxYellow.setStyle("borderColor","#F6EE0E");
//add the first child to the main container
hBoxRed.addChild(boxYellow);
//create the second child of the the main container that will
contain other 2 boxes
var vBoxBlue : VBox = new VBox();
vBoxBlue.percentWidth=100;
vBoxBlue.percentHeight=100;
//set the style for the container
vBoxBlue.setStyle("borderThickness",5);
vBoxBlue.setStyle("borderStyle","solid");
vBoxBlue.setStyle("borderColor","#0E14F6");
vBoxBlue.setStyle("horizontalAlign","center");
vBoxBlue.setStyle("verticalAlign","middle");
vBoxBlue.setStyle("paddingLeft",10);
vBoxBlue.setStyle("paddingRight",10);
vBoxBlue.setStyle("paddingBottom",10);
vBoxBlue.setStyle("paddingTop",10);
//add the second child to the main container
hBoxRed.addChild(vBoxBlue);
//create the first child of the BoxBlue
var boxLightBlue : Box = new Box();
boxLightBlue.percentWidth = 100;
boxLightBlue.percentHeight = 50;
boxLightBlue.setStyle("borderThickness",5);
boxLightBlue.setStyle("borderStyle","solid");
boxLightBlue.setStyle("borderColor","#05DBEE");
//add the first chidl to the BoxBlue
vBoxBlue.addChild(boxLightBlue);
//create the second child of the BoxBlue
var boxGreen: Box = new Box();
boxGreen.percentWidth = 100;
boxGreen.percentHeight = 50;
boxGreen.setStyle("borderThickness",5);
boxGreen.setStyle("borderStyle","solid");
boxGreen.setStyle("borderColor","#05EEA4");
//add the second child of the BoxBlue
vBoxBlue.addChild(boxGreen);
}
]]>
</mx:Script>
</mx:Application>
211](https://crownmelresort.com/image.slidesharecdn.com/beginningjavaandflex-migratingjavaspringhibernateandmavendeveloperstoadobeflex-100821073507-phpapp01/75/Beginning-java-and-flex-migrating-java-spring-hibernate-and-maven-developers-to-adobe-flex-230-2048.jpg)
![CHAPTER 7 ■ FLEX (THE VIEW LAYER)
//add the second child of the BoxBlue
vBoxBlue.addChild(boxGreen);
}
]]>
</mx:Script>
</mx:Application>
As you can see, I created a function init() and added it to the application event listener
creationComplete, which is triggered when the application has been created. The init() function
creates all container instances and will add them to the application container and then to the other
containers that we want to nest. As noted, I used the property setStyle to set borders and colors for
each container.
In MXML you can do the same thing, and the code will be more readable for designers and those not
familiar with coding. Another advantage of using MXML for laying out objects is that you can use the
Flex Builder design perspective and see your changes in real time before compiling the code. This is
great for getting approval from those managers. Also, in source mode in MXML, you have access to all
code help to add more styles, while in AS you don’t. Here’s the MXML code.
<?xml version="1.0" encoding="utf-8"?>
<mx:Application xmlns:mx="http://www.adobe.com/2006/mxml" layout="absolute">
<mx:HBox id="hBoxRed"
borderThickness="5"
borderStyle="solid"
borderColor="#F60E0E"
width="90%"
height="90%"
horizontalCenter="0"
verticalCenter="0"
horizontalAlign="center"
verticalAlign="middle"
paddingLeft="10"
paddingRight="10"
paddingBottom="10"
paddingTop="10">
<mx:Box id="boxYellow"
borderThickness="5"
borderStyle="solid"
borderColor="#F6EE0E"
width="40%"
height="100%">
</mx:Box>
<mx:VBox id="vBoxBlue"
borderThickness="5"
borderStyle="solid"
borderColor="#0E14F6"
width="100%"
212](https://crownmelresort.com/image.slidesharecdn.com/beginningjavaandflex-migratingjavaspringhibernateandmavendeveloperstoadobeflex-100821073507-phpapp01/75/Beginning-java-and-flex-migrating-java-spring-hibernate-and-maven-developers-to-adobe-flex-231-2048.jpg)


![CHAPTER 7 ■ FLEX (THE VIEW LAYER)
Figure 7-29. Clicking on a button
Using events with MXML is very easy. Here’s an example of how to handle a click event using
MXML.
<?xml version="1.0" encoding="utf-8"?>
<mx:Application xmlns:mx="http://www.adobe.com/2006/mxml" layout="vertical">
<mx:Button id="myButton" label="click me!" click="doSomething(event)" />
<mx:Script>
<![CDATA[
i mport mx.controls.Alert;
p rivate f unction doSomething(event : Event) : v oid {
Alert.show(" The button dispatch the event of type "
"
+ event.type);
}
]]>
</mx:Script>
</mx:Application>
As you can see from the code, all you have to do is set the event handler function within the MXML
event property and pass the event to the handler. To see which events are available for each component,
you can use the syntax code helper, or the Flex Builder properties in visual mode, or the Flex Builder
Reference under the events section.
To open the syntax help, just press [CTRL+spacebar] within the MXML component tag as shown in
Figure 7-30. The event is identified by the thunder yellow icon.
230](https://crownmelresort.com/image.slidesharecdn.com/beginningjavaandflex-migratingjavaspringhibernateandmavendeveloperstoadobeflex-100821073507-phpapp01/75/Beginning-java-and-flex-migrating-java-spring-hibernate-and-maven-developers-to-adobe-flex-249-2048.jpg)

![CHAPTER 7 ■ FLEX (THE VIEW LAYER)
■ N ote You can instantiate each component created with MXML or with AS within both MXML and AS. For
example, if you create a class MyButton.mxml, you can use it like this:
<classpath:MyButton id="myButton"… />
or like this:
var myButton : MyButton = new MyButton();
And the reverse is also true—you can create the AS class MyButton.as and use at the same way as above.
To listen for an event in AS is a little bit different than in MXML because you have to use the
addEventListener method that each component based on the event model provides. You don’t have to
pass the event to the handler, as we did in MXML, though, because the event listener will do it for us.
Here’s an example of how to listen for the click event of a button in AS:
<?xml version="1.0" encoding="utf-8"?>
<mx:Application xmlns:mx="http://www.adobe.com/2006/mxml"
layout="vertical"
creationComplete="init()">
<mx:Script>
<![CDATA[
i mport mx.controls.Button;
i mport mx.controls.Alert;
p ublic f unction init() : v oid {
v ar myButton : Button = n ew Button();
myButton.label = " Click Me!";
m yButton.addEventListener(MouseEvent.CLICK,doSomething);
t his.addChild(myButton);
}
p ublic f unction doSomething(event : Event) : v oid {
Alert.show(" The button dispatch the event of type "
"
+
event.type);
}
]]>
</mx:Script>
</mx:Application>
232](https://crownmelresort.com/image.slidesharecdn.com/beginningjavaandflex-migratingjavaspringhibernateandmavendeveloperstoadobeflex-100821073507-phpapp01/75/Beginning-java-and-flex-migrating-java-spring-hibernate-and-maven-developers-to-adobe-flex-251-2048.jpg)

![CHAPTER 7 ■ FLEX (THE VIEW LAYER)
public static const BUTTON_MOVE_EVENT : String = "buttonMoveEvent";
public function ButtonMoveEvent(type:String, direction : String){
super(type);
this.direction = direction;
}
override public function clone():Event{
return new ButtonMoveEvent(type, direction);
}
}
}
In the custom event class, I store the direction as a public property, and provide a static constant to
use within both dispatcher and listener to tell to the compiler which type of event we are dealing with.
dispatchEvent(n ew ButtonMoveEvent(B uttonMoveEvent.BUTTON_MOVE_EVENT,direction));
n B
or
myButton.addEventListener(B uttonMoveEvent.BUTTON_MOVE_EVENT,buttonMoveHandler);
B
Now I must override the clone() method of the superclass Event to clone a copy of the event object
in order to have a new instance of the event. Practically speaking, when you dispatch the
ButtonMoveEvent, it will create an object containing the event type and the property direction that you
want to pass to the listener.
Once the custom event class has been created, you have to create the custom component that will
dispatch this event. The custom component ButtonJoker will extend the class Button because, at the
end of the day, ButtonJoker is a button with extra functionality.
Listin g 7-1. ButtonJoker Custom Event Class
package
{
import flash.events.MouseEvent;
import mx.controls.Button;
[Event(name="buttonMoveEvent", type="ButtonMoveEvent")]
public class ButtonJoker extends Button
{
private var moved : int = 1;
public var direction : String;
234](https://crownmelresort.com/image.slidesharecdn.com/beginningjavaandflex-migratingjavaspringhibernateandmavendeveloperstoadobeflex-100821073507-phpapp01/75/Beginning-java-and-flex-migrating-java-spring-hibernate-and-maven-developers-to-adobe-flex-253-2048.jpg)

![CHAPTER 7 ■ FLEX (THE VIEW LAYER)
[Event(name="buttonMoveEvent", type="ButtonMoveEvent")]
If you don’t specify the event metatag, you won’t be able to use it as an attribute within the MXML
new component tag, and the Flex compiler will return an error in the MXML class where you want to use
the event attribute; the error returns a message like “Cannot use the attribute buttonMoveEvent for the
component type ButtonJoker.
The ButtonJoker class will extend the Button class to inherit all Button properties, events and
methods. Then I add a private function called moveButtonJoker that will move the button and dispatch
the ButtonMoveEvent event once the MouseEvent.ROLL_OVER event has dispatched (see Figure 7-32).
Figure 7-32. Button and ButtonJoker class diagram
Now that we have our ButtonJoker custom component and our custom event ButtonMoveEvent,
we can create the application file where we’ll test the new custom component and handle the new
custom ButtonMoveEvent. Let’s create an application file called CustomEventTest.mxml and then add
the ButtonJoker component, a TextArea, and the event handler function for the custom Event
ButtonMoveEvent created previously. Our goal is to write a message containing the direction of the
ButtonJoker once it has moved. Here’s the code that does all this.
<?xml version="1.0" encoding="utf-8"?>
<mx:Application xmlns:mx="http://www.adobe.com/2006/mxml" xmlns:myComponents="*"
layout="vertical" >
<myComponents:ButtonJoker label="click me!"
buttonMoveEvent="buttonMoveHandler(event)" />
<mx:TextArea text="{message}" />
<mx:Script>
<
![CHAPTER 7 ■ FLEX (THE VIEW LAYER)
[Bindable]
private var message : String;
public function init() : void {
var myButton : ButtonJoker = new ButtonJoker();
myButton.label = "Click Me!";
myButton.addEventListener
(ButtonMoveEvent.BUTTON_MOVE_EVENT,buttonMoveHandler);
this.addChild(myButton);
}
public function buttonMoveHandler(event : ButtonMoveEvent) :
void {
message = "The button has moved to "+ event.direction;
}
]]>
</mx:Script>
</mx:Application>
■ N ote To use a custom component in your MXML, you have to add the namespace within the root tag of the
MXML class. In our case, we have to add xmlns:myComponents=”*”.
The ButtonJoker class is very easy to understand. We create an instance of our new custom
component ButtonJoker that passes the function buttonMoveHandler within the listener
buttonMoveEvent. The event handler sets the variable message with the direction dispatched by the
ButtonMoveEvent. The variable message is bound with the attribute text of the TextArea component,
which means that every time that the variable message changes, the TextArea text property will be
updated automatically.
In this example that explains how to create and dispatch a custom event, I also introduced the new
concepts of custom components and data binding, both important in Flex/AS development. Let’s
discuss data binding in more detail.
Data Binding
Data binding is a process that keeps the values of components or data sources in sync. In other words, if
you set an object as bindable it will dispatch any change to the others objects that are referring it.
In the example, we bind the variable countValue from the button component with id “count” to the
TextInput component with the id “counter”.
<?xml version="1.0" encoding="utf-8"?>
<mx:Application xmlns:mx="http://www.adobe.com/2006/mxml" layout="vertical">
237](https://crownmelresort.com/image.slidesharecdn.com/beginningjavaandflex-migratingjavaspringhibernateandmavendeveloperstoadobeflex-100821073507-phpapp01/75/Beginning-java-and-flex-migrating-java-spring-hibernate-and-maven-developers-to-adobe-flex-256-2048.jpg)
![CHAPTER 7 ■ FLEX (THE VIEW LAYER)
<mx:Button id="count" label="count" click="{countValue++}" />
<mx:TextInput id="counter" text="{countValue}" editable="false" />
<mx:Script>
<![CDATA[
[B indable]
B
p rivate v ar countValue : uint = 0;
]]>
</mx:Script>
</mx:Application>
Every time the button click event is dispatched, we increase countValue. Because we set the
variable countValue as Bindable, Flex will also update automatically the value in the TexInput
component. If we didn’t set the Bindable metatag, the value shown in TexInput would always remain 0.
Flex provides four different solutions to bind data:
• using the [Bindable] metatag
• using <mx:Binding> metatag as follows:
<?xml version="1.0" encoding="utf-8"?>
<mx:Application xmlns:mx="http://www.adobe.com/2006/mxml" layout="vertical">
< mx:Binding source="count.value.toString()" destination="counter.text" />
<mx:NumericStepper id="count" />
<mx:TextInput id="counter" editable="false" />
</mx:Application>
The Binding metatag manages the binding between a source and a destination value.
• bind data directly to component properties as follows:
<?xml version="1.0" encoding="utf-8"?>
<mx:Application xmlns:mx="http://www.adobe.com/2006/mxml" layout="vertical">
<mx:NumericStepper id="count" />
<mx:TextInput id="counter" text="{c ount.value}" editable="false" />
c
</mx:Application>
Here, the value properties of the NumericStepper component is bound to the property text of the
TextInput component.
• using mx.binding.utils.BindingUtils class as follows:
<?xml version="1.0" encoding="utf-8"?>
<mx:Application xmlns:mx="http://www.adobe.com/2006/mxml" layout="vertical"
creationComplete="init()">
<mx:NumericStepper id="count" />
<mx:TextInput id="counter" editable="false" />
<mx:Script>
<
![CHAPTER 7 ■ FLEX (THE VIEW LAYER)
}
]]>
</mx:Script>
</mx:Application>
BindingUtils is useful when you have to bind values within AS classes, but please don’t use mixed
with MXML; I only did this here for example purposes.
The best way to bind data is using the [Bindable] metatag.
In upcoming chapters I will show how to use data binding to set the state of your workflow.
Practically speaking, I will show you how to use data binding to set the current view of your application,
which means to open or change a screen after an event or a request has been dispatched by the user or
by another process.
The second important concept introduced with the CustomEventTest example is the creation of a
CustomComponent.
Creating Custom Components
Creating custom components makes an application more modular and easier to maintain. You can
reuse the custom components for different parts of the application without have to rewrite the same
code again and again. Another reason to create custom components is the need to personalize an
existing Flex component to meet your application requirements.
■ N ote A custom component is not just a class like the ButtonJoker shown in the previous example. It can also
be a set of classes, assets, and style sheets.
All existing visual components in Flex are derived from the UIComponent AS class.
To create a new visual component, you have to extend that class. To customize an existing Flex
component, you have to extend the component as we did with the Button in our ButtonJoker
component.
You can create a custom component by using MXML or AS, as shown in Figure 7-33.
Figure 7-33. Creating a custom component in MXML or AS
239](https://crownmelresort.com/image.slidesharecdn.com/beginningjavaandflex-migratingjavaspringhibernateandmavendeveloperstoadobeflex-100821073507-phpapp01/75/Beginning-java-and-flex-migrating-java-spring-hibernate-and-maven-developers-to-adobe-flex-258-2048.jpg)

![CHAPTER 7 ■ FLEX (THE VIEW LAYER)
[I nspectable]
I
p ublic v ar collection : ArrayCollection;
[I nspectable]
I
p ublic v ar columnSearchable : String;
p rotected f unction search():v oid {
v
i f (t his .text !=' ' ) {
t '
filter()
} e lse {
filterReset()
}
}
p rivate f unction filter():v oid {
v
collection.filterFunction = filterRecords;
collection.refresh();
}
p rivate f unction filterReset():v oid {
v
collection.filterFunction = n ull ;
collection.refresh();
}
p rivate f unction filterRecords(item:Object):Boolean {
v ar tags : String = item[columnSearchable];
i f ( tags != n ull ) {
r eturn tags.match(n ew RegExp(t his.text, " i" ));
n t
} e lse {
r eturn f alse ;
}
}
]]>
</mx:Script>
</mx:TextInput>
AS Custom Components
Probably for the most complex components it is better to use AS for the component logic and MXML for
the view as a normal application. However, you can use AS also for the view by just creating a normal AS
class that extends an existing component or the UIComponent class, or a set of classes with the main
class extending the UIComponent class. You can create visual and nonvisual components. An extension
of the Formatter class would be an example of a nonvisual component.
241](https://crownmelresort.com/image.slidesharecdn.com/beginningjavaandflex-migratingjavaspringhibernateandmavendeveloperstoadobeflex-100821073507-phpapp01/75/Beginning-java-and-flex-migrating-java-spring-hibernate-and-maven-developers-to-adobe-flex-260-2048.jpg)

![CHAPTER 7 ■ FLEX (THE VIEW LAYER)
• updateDisplayList()—this method is called when a call to the
invalidateDisplayList occurs; a component doesn't not appear on the screen
until the updateDisplayList function is executed. For example, you can override
the updateDisplayList method to change the position of all children of a
component or to draw any visual elements need by the component. Practically
speaking, you can draw a shape and add to the component at run time, or you can
reorder all children added to a VBox container.
In the next example, we will create a calculator AS custom component that dispatches the contents
of the display TextInput when it changes. To show the usage of the UIComponent
updateDisplayList() method, I made the calculator component not resizable.
package com.apress.flexandjava.components
{
i mport flash.events.Event;
i mport flash.events.MouseEvent;
i mport mx.containers.Panel;
i mport mx.containers.Tile;
i mport mx.controls.Button;
i mport mx.controls.TextInput;
[E vent (name=" displayChange", type=" flash.events.Event")]
E " "
p ublic c lass Calculator e xtends Panel
{
p rivate v ar tile : Tile;
p ublic v ar textInput : TextInput;
p rivate v ar operator : String;
p rivate c onst CALCULATOR_WIDTH : uint = 230;
p rivate c onst CALCULATOR_HEIGHT : uint = 230;
p ublic f unction Calculator() {
s uper();
setStyle (" paddingLeft", 10);
"
setStyle (" paddingRight", 10);
"
setStyle (" paddingTop", 10);
"
setStyle (" paddingBottom", 10);
"
}
o verride p rotected f unction createChildren():v oid{
v
s uper.createChildren();
243](https://crownmelresort.com/image.slidesharecdn.com/beginningjavaandflex-migratingjavaspringhibernateandmavendeveloperstoadobeflex-100821073507-phpapp01/75/Beginning-java-and-flex-migrating-java-spring-hibernate-and-maven-developers-to-adobe-flex-262-2048.jpg)
![CHAPTER 7 ■ FLEX (THE VIEW LAYER)
textInput = n ew TextInput();
textInput.percentWidth = 100;
addChild(textInput);
tile = n ew Tile();
addChild (tile);
f or (v ar i:uint = 0; i < 10; i++) {
v
v ar button:Button = n ew Button();
button.label = i.toString();
button.addEventListener(MouseEvent.CLICK, buttonClickHandler);
tile.addChild (button);
}
v ar mathOperatorsList : Array = [" +" ," -"," *" ," /" ];
" " " "
f or (v ar j:uint = 0; j < mathOperatorsList.length; j++){
v
v ar operatorButton : Button = n ew Button();
operatorButton.label = mathOperatorsList[j];
operatorButton.addEventListener(MouseEvent.CLICK,
operatorButtonClickHandler);
tile.addChild(operatorButton);
}
v ar calculateButton : Button = n ew Button();
calculateButton.label = ' =' ;
calculateButton.addEventListener(MouseEvent.CLICK,
calculateButtonClickHandler);
tile.addChild(calculateButton);
}
p rivate f unction buttonClickHandler(event : MouseEvent):v oid {
v
textInput.text += Button(event.currentTarget).label;
dispatchEvent(n ew Event(" displayChange"));
n "
}
p rivate f unction operatorButtonClickHandler(event : MouseEvent):v oid{
v
//implement the logic
}
p rivate f unction calculateButtonClickHandler(event :
MouseEvent):v oid {
v
//implement the logic
}
244](https://crownmelresort.com/image.slidesharecdn.com/beginningjavaandflex-migratingjavaspringhibernateandmavendeveloperstoadobeflex-100821073507-phpapp01/75/Beginning-java-and-flex-migrating-java-spring-hibernate-and-maven-developers-to-adobe-flex-263-2048.jpg)


![CHAPTER 8 ■ WORKING WITH DATA IN FLEX
In the MVC (Model-View-Controller) design pattern, the data model is the model layer. In the
upcoming HTTPService section, I will show you how to make the model layer interact with the view and
controller layers.
You can bind the data model to a view, or store it in a collection and bind the collection to a
component. For example, you might have a registration form that, when submitted, creates a User
object with the information sent by the form. Then you can bind all the User properties with the form
fields to give the user another form with the confirmation data (see Figure 8-1). Here is the listing of the
UserForm.mxml view:
<?xml version="1.0" encoding="utf-8"?>
<mx:Form xmlns:mx="http://www.adobe.com/2006/mxml" width="100%" height="100%">
<mx:FormItem label="Common name">
<mx:TextInput id=”commonNameText” text="{user.commonName}"/>
</mx:FormItem>
<mx:FormItem label="Last name">
<mx:TextInput id=”lastNameText” text="{user.lastName}" />
</mx:FormItem>
<mx:FormItem label="Email">
<mx:TextInput id=”emailText” text="{user.email} />
</mx:FormItem>
<mx:FormItem label="Username">
<mx:TextInput id=”usernameText” text="{user.username} />
</mx:FormItem>
<mx:FormItem label="Password">
<mx:TextInput id=”passwordText” text="{user.password}" />
</mx:FormItem>
<mx:Script>
<![CDATA[
import com.apress.flexjava.usermanager.model.User;
[Bindable]
public var user : User;
]]>
</mx:Script>
</mx:Form>
Figure 8-1. The user form created with the UserForm.mxml class
253](https://crownmelresort.com/image.slidesharecdn.com/beginningjavaandflex-migratingjavaspringhibernateandmavendeveloperstoadobeflex-100821073507-phpapp01/75/Beginning-java-and-flex-migrating-java-spring-hibernate-and-maven-developers-to-adobe-flex-272-2048.jpg)
![CHAPTER 8 ■ WORKING WITH DATA IN FLEX
You can also create a collection of Users and bind it to a DataGrid component. Here is the listing for
the UsersGrid.mxml view:
<?xml version="1.0" encoding="utf-8"?>
<mx:DataGrid xmlns:mx="http://www.adobe.com/2006/mxml" >
<mx:columns>
<mx:DataGridColumn dataField="commonName" headerText="Common Name" />
<mx:DataGridColumn dataField="lastName" headerText="Last Name" />
<mx:DataGridColumn dataField="email" headerText="Email" />
<mx:DataGridColumn dataField="username" headerText="Username" />
<mx:DataGridColumn dataField="password" headerText="Password" />
</mx:columns>
<mx:Script>
<![CDATA[
import mx.collections.ArrayCollection;
[Bindable]
[Inspectable]
public function set users(usersCollection : ArrayCollection)
: void {
this.dataProvider = usersCollection;
}
]]>
</mx:Script>
</mx:DataGrid>
And here is the Main MXML class where you can test the User collection bound to the DataGrid
component. You can call the Main class DataCollectionTest.mxml:
<?xml version="1.0" encoding="utf-8"?>
<mx:Application xmlns:mx="http://www.adobe.com/2006/mxml"
xmlns:view="com.apress.flexjava.usermanager.view.*"
layout="horizontal"
creationComplete="init()"
horizontalAlign="center"
verticalAlign="middle">
<view:UsersGrid dataProvider="{usersCollectionTest}" width="600"
height="400" />
<mx:Script>
<![CDATA[
import mx.collections.ArrayCollection;
import com.apress.flexjava.usermanager.model.User;
[Bindable]
public var usersCollectionTest : ArrayCollection;
254](https://crownmelresort.com/image.slidesharecdn.com/beginningjavaandflex-migratingjavaspringhibernateandmavendeveloperstoadobeflex-100821073507-phpapp01/75/Beginning-java-and-flex-migrating-java-spring-hibernate-and-maven-developers-to-adobe-flex-273-2048.jpg)
![CHAPTER 8 ■ WORKING WITH DATA IN FLEX
public function init() : void{
createUsersCollectionTest();
}
private function createUsersCollectionTest() : void {
usersCollectionTest = new ArrayCollection();
for(var i:int = 0; i<10; i++){
usersCollectionTest.addItem(userFactory("commonName"+i,
"lastName"+i,
"email"+i,
"username"+i,
"password"+i));
}
}
private function userFactory(commonName : String,
lastName : String,
email : String,
username : String,
password : String) : User
{
var user : User = new User();
user.commonName = commonName;
user.lastName = lastName;
user.email = email;
user.username = username;
user.password = password;
return user;
}
]]>
</mx:Script>
</mx:Application>
Because we don’t yet have a database or an XML list of users, in the application test code I created a
loop to add 10 users to the collection:
private function createUsersCollectionTest() : void {
usersCollectionTest = new ArrayCollection();
for(var i:int = 0; i<10; i++){
usersCollectionTest.addItem(userFactory("commonName"+i,
"lastName"+i,
255](https://crownmelresort.com/image.slidesharecdn.com/beginningjavaandflex-migratingjavaspringhibernateandmavendeveloperstoadobeflex-100821073507-phpapp01/75/Beginning-java-and-flex-migrating-java-spring-hibernate-and-maven-developers-to-adobe-flex-274-2048.jpg)

![CHAPTER 8 ■ WORKING WITH DATA IN FLEX
In the next example, I will bind an ArrayCollection with a DataGrid component. I’ll then use the
ICollectionView methods to sort and filter data, and because collections support notification changes,
I will also allow adding a new user to the collection—and see the result in real time within the DataGrid.
The goal of this example is to add a search TextInput control to the user’s DataGrid, as shown in
Figure 8-2. When you change value within the TextInput control, the DataGrid content will be filtered
by the value input into the search control. I’ll also add two RadioButton controls to select which
DataGrid column to search in.
Figure 8-2. The user manager sample application DataGrid
Starting with the code we used for the previous example, we just have to add a custom component
that extends the TextInput control with the filter collection functionality. Basically, the new custom
component will have two new properties to allow passing to the component the collection that we want
to filter and the column of the DataGrid we want to search in. Below, the two public attributes are
exposed by the component:
[Inspectable]
public var collection : ArrayCollection;
[Inspectable]
public var columnSearchable : String;
The [Inspectable] metatag defines information about an attribute of the Flex component. It
means that we will be able to see the attribute within the Flex builder code hints and property inspector.
For this component I will use MXML because it is a view component. Moreover, I want to make sure
you see how to use MXML to extend other components. I will call the component
CollectionTextInputFilter.mxml and save it into the view package
com.apress.flexjava.usermanager.view:
<?xml version="1.0" encoding="utf-8"?>
<mx:TextInput xmlns:mx="http://www.adobe.com/2006/mxml" change="search()">
</mx:TextInput>
The code above is the equivalent of
public class CollectionTextInputFilter extends TextInput{
}
257](https://crownmelresort.com/image.slidesharecdn.com/beginningjavaandflex-migratingjavaspringhibernateandmavendeveloperstoadobeflex-100821073507-phpapp01/75/Beginning-java-and-flex-migrating-java-spring-hibernate-and-maven-developers-to-adobe-flex-276-2048.jpg)
![CHAPTER 8 ■ WORKING WITH DATA IN FLEX
The body of the CollectionTextInputFilter.mxml custom component contains the methods
needed to filter the collection. First you pass to the collection the filter function filterRecords , then
you refresh the collection with the data filtered:
<?xml version="1.0" encoding="utf-8"?>
<mx:TextInput xmlns:mx="http://www.adobe.com/2006/mxml" change="search()">
<mx:Script>
<![CDATA[
import mx.collections.ArrayCollection;
[Inspectable]
public var collection : ArrayCollection;
[Inspectable]
public var columnSearchable : String;
protected function search():void {
if(this.text !='') {
filter()
} else {
filterReset()
}
}
private function filter():void {
collection.filterFunction = filterRecords;
collection.refresh();
}
private function filterReset():void {
collection.filterFunction = null;
collection.refresh();
}
private function filterRecords(item:Object):Boolean {
var tags : String = item[columnSearchable];
if( tags != null ) {
return tags.match(new RegExp(this.text, "i"));
} else {
return false;
}
}
]]>
</mx:Script>
</mx:TextInput>
258](https://crownmelresort.com/image.slidesharecdn.com/beginningjavaandflex-migratingjavaspringhibernateandmavendeveloperstoadobeflex-100821073507-phpapp01/75/Beginning-java-and-flex-migrating-java-spring-hibernate-and-maven-developers-to-adobe-flex-277-2048.jpg)

![CHAPTER 8 ■ WORKING WITH DATA IN FLEX
<![CDATA[
import mx.events.ItemClickEvent;
import mx.collections.ArrayCollection;
import com.apress.flexjava.usermanager.model.User;
[Bindable]
public var usersCollectionTest : ArrayCollection;
[Bindable]
private var columnNameToSearch : String = "lastName";
public function init() : void{
createUsersCollectionTest();
}
private function createUsersCollectionTest() : void {
usersCollectionTest = new ArrayCollection();
for(var i:int = 0; i<10; i++){
usersCollectionTest.addItem(userFactory("commonName"+i,
"lastName"+i,
"email"+i,
"username"+i,
"password"+i ));
}
}
private function userFactory(commonName : String,
lastName : String,
email : String,
username : String,
password : String) : User
{
var user : User = new User();
user.commonName = commonName;
user.lastName = lastName;
user.email = email;
user.username = username;
user.password = password;
return user;
}
private function handleSearchMethod
(event:ItemClickEvent):void {
columnNameToSearch =
260](https://crownmelresort.com/image.slidesharecdn.com/beginningjavaandflex-migratingjavaspringhibernateandmavendeveloperstoadobeflex-100821073507-phpapp01/75/Beginning-java-and-flex-migrating-java-spring-hibernate-and-maven-developers-to-adobe-flex-279-2048.jpg)
![CHAPTER 8 ■ WORKING WITH DATA IN FLEX
event.currentTarget.selectedValue as String;
}
]]>
</mx:Script>
</mx:Application>
Now it’s time to test and run the application. If everything is okay, you should see the list of users,
and if you try to write lastName0 in the search box, it will filter the DataGrid in real time, as shown in
Figure 8-3.
Figure 8-3. Real-time search
Collections are more complete than a simple array, of course, because they don’t just provide new
sort and filter functionality, but also dispatch events when changes are made. You can then bind those
events with the data-driven Flex controls through the dataProvider property.
Access to Remote Data
In the last example we created a DataGrid containing a list of users, and we added search functionality
to the collection. But a problem arises when you add new data—if you close the browser you will lose all
your data.
The solution is to store the data on a server so it can be shared over the network/Internet. When you
architect your application, you have to choose server-side storage, which can be a database, XML, or a
directory server (LDAP). Flex provides different ways of accessing server-side data:
• HTTP GET or POST, by using the HTTPService components;
• Adobe Action Message Format (AMF), by using the RemoteObject components;
• SOAP by using the WebService components;
These three methods can be used in both AS and MXML. Let’s explore these now.
261](https://crownmelresort.com/image.slidesharecdn.com/beginningjavaandflex-migratingjavaspringhibernateandmavendeveloperstoadobeflex-100821073507-phpapp01/75/Beginning-java-and-flex-migrating-java-spring-hibernate-and-maven-developers-to-adobe-flex-280-2048.jpg)


![CHAPTER 8 ■ WORKING WITH DATA IN FLEX
com.apress.usermanager.servlet.AddUserServlet
</servlet-class>
</servlet>
<servlet-mapping>
<servlet-name>GetUserServlet</servlet-name>
<url-pattern>/getusers</url-pattern>
</servlet-mapping>
<servlet-mapping>
<servlet-name>AddUserServlet</servlet-name>
<url-pattern>/adduser</url-pattern>
</servlet-mapping>
<welcome-file-list>
<welcome-file>index.jsp</welcome-file>
</welcome-file-list>
</web-app>
As you can see, I mapped GetUserServlet as /getusers and AddUserServlet as /adduser. Finally,
we can test the application by running the command mvn jetty:run from the command line within the
root of our project where the pom.xml file resides:
$ mvn jetty:run
If everything goes well, you should see the following message that indicates the application is ready
on port 8080:
2009-08-26 00:57:53.936::INFO: Started SelectChannelConnector@0.0.0.0:8080
[INFO] Started Jetty Server
[INFO] Starting scanner at interval of 4 seconds.
Now open a browser, type the URL http://localhost:8080/usermanager/getusers, and you
should see the XML from the users.xml file, as shown in Figure 8-11.
274](https://crownmelresort.com/image.slidesharecdn.com/beginningjavaandflex-migratingjavaspringhibernateandmavendeveloperstoadobeflex-100821073507-phpapp01/75/Beginning-java-and-flex-migrating-java-spring-hibernate-and-maven-developers-to-adobe-flex-293-2048.jpg)


![CHAPTER 8 ■ WORKING WITH DATA IN FLEX
As you can see here, we have created an interface and its implementation for each object. As I have
already mentioned, this programming methodology is called “programming to interface.” I will show
just the classes added to the previous example. The classes CollectionTextInputFilter,
UserForm,UsersDataGrid, User and Group have not been changed. Here is the complete code for the
user implementation model—UserModelImpl.as and its interface UserModel.as:
package com.apress.flexjava.usermanager.model
{
import flash.events.EventDispatcher;
import mx.collections.ArrayCollection;
[Bindable]
public class UserModelImpl extends EventDispatcher implements UserModel
{
private var _usersCollection: ArrayCollection;
private var _workFlowState : uint = WINDOW_LIST_USERS
public function set usersCollection (users : ArrayCollection) :
void{
_usersCollection = users;
}
public function get usersCollection() : ArrayCollection{
return _ usersCollection;
}
public function set workFlowState(value : uint) : void{
_workFlowState = value;
}
public function get workFlowState() : uint{
return _workFlowState;
}
public static const WINDOW_LIST_USERS : uint = 0;
public static const WINDOW_USER_FORM : uint = 1;
}
}
And here is UserModel.as:
package com.apress.flexjava.usermanager.model
{
import flash.events.IEventDispatcher;
281](https://crownmelresort.com/image.slidesharecdn.com/beginningjavaandflex-migratingjavaspringhibernateandmavendeveloperstoadobeflex-100821073507-phpapp01/75/Beginning-java-and-flex-migrating-java-spring-hibernate-and-maven-developers-to-adobe-flex-300-2048.jpg)
![CHAPTER 8 ■ WORKING WITH DATA IN FLEX
import mx.collections.ArrayCollection;
[Bindable]
public interface UserModel extends IEventDispatcher
{
function set usersCollection(users : ArrayCollection) : void;
function get usersCollection() : ArrayCollection;
function set workFlowState(value : uint) : void;
function get workFlowState() : uint;
}
}
}
This is the complete code for the controller—the user implementation controller
UserControlImpl.as and its interface UserControl.as:
package com.apress.flexjava.usermanager.control
{
import com.apress.flexjava.usermanager.model.User;
import com.apress.flexjava.usermanager.model.UserModel;
import flash.xml.XMLDocument;
import mx.collections.ArrayCollection;
import mx.controls.Alert;
import mx.rpc.AsyncToken;
import mx.rpc.events.FaultEvent;
import mx.rpc.events.ResultEvent;
import mx.rpc.http.HTTPService;
import mx.rpc.xml.SimpleXMLDecoder;
public class UserControlImpl implements UserControl
{
private var model : UserModel;
private var service : HTTPService;
public static const USERS_LIST_SERVICE_URL : String =
"http://localhost:8080/usermanager/getusers";
282](https://crownmelresort.com/image.slidesharecdn.com/beginningjavaandflex-migratingjavaspringhibernateandmavendeveloperstoadobeflex-100821073507-phpapp01/75/Beginning-java-and-flex-migrating-java-spring-hibernate-and-maven-developers-to-adobe-flex-301-2048.jpg)


![CHAPTER 8 ■ WORKING WITH DATA IN FLEX
[Bindable]
private var columnNameToSearch : String = "lastName";
[Bindable]
private var model : UserModel;
[Bindable]
private var control : UserControl;
public function init():void{
model = new UserModelImpl();
control = new UserControlImpl(model);
control.getUsers();
}
private function handleSearchMethod(event:ItemClickEvent):void {
columnNameToSearch = event.currentTarget.selectedValue as
String;
}
]]>
</mx:Script>
</mx:Application>
■ N ote As I mentioned, I “program to interface,” and for that approach I use an interface for each implemented
class. It is common in AS to identify an interface with a capital I at the beginning of the name. For example
IUserModel.as and UserModel.as should be the implementation. In Java, you add “Impl” at the end of the
implemented class. I prefer the Java way, not because I’m a Java addict, but it seems cleaner, and it’s good to
keep the same style for both the server and the client.
In this section, I introduced many new concepts that are the basis of our Flex-Java development. In
the next section I will show you how to use the RemoteObject instead of the HTTPService component.
RemoteObject Component
RemoteObject lets you access your server-side objects in a native way, which means you can access the
Java object while maintaining its data type in AS and vice versa.
To use the RemoteObject, you need a data service server such as Adobe BlazeDS; this allows you to
map a server-side object to your client-side object, and it automatically serializes them. For example, if
you want to pass the AS User object to a Java method that takes the User as an argument and inserts it
into a database or into an XML file, you just have to tell the compiler the mapping path between the AS
and the Java User entity.
286](https://crownmelresort.com/image.slidesharecdn.com/beginningjavaandflex-migratingjavaspringhibernateandmavendeveloperstoadobeflex-100821073507-phpapp01/75/Beginning-java-and-flex-migrating-java-spring-hibernate-and-maven-developers-to-adobe-flex-305-2048.jpg)
![CHAPTER 8 ■ WORKING WITH DATA IN FLEX
To Map an AS object to a server-side object, you can use the [RemoteClass] metatag, giving it the
server-side object class path that you want to map. In the code listed below, you map the Java User
entity (User.java), which is stored in the com.apress.usermanager.model Java package, with the AS User
entity (User.as) stored in the AS com.apress.flexjava.usermanager.model package.
package com.apress.flexjava.usermanager.model
{
[RemoteClass(alias="com.apress.usermanager.model.User")]
public class User
{
public function User(){
}
public var uid : String ;
public var username : String;
public var commonName : String;
public var lastName : String;
public var email : String;
public var password : String;
}
}
The object on the server can interact in its native datatype for both requests and responses.
RemoteObject saves a lot of development time because you don’t have to expose the logic of the
application as XML as you do when using the HTTPService component. Even if RemoteObject still uses
HTTP to exchange data, communication is faster than using HTTPService because the data has
serialized itself into a binary representation. This means that the object processing time is reduced, and
the client memory use and the transfer rate are also less.
In the previous example, we dealt with server-side objects through a Java servlet consumed by the
HTTPService component, appending all user properties on the URL. The next example shows how to get
the same results using the RemoteObject component.
■ N ote In this chapter I will show you just the difference between the two UserControlImpl classes using the
HTTPService and the RemoteObject components. To see how to actually use this class, I refer you to chapters 9
and 10 where I will show how to configure the remote server to allow the use of the RemoteObject component.
package com.apress.flexjava.usermanager.control
{
287](https://crownmelresort.com/image.slidesharecdn.com/beginningjavaandflex-migratingjavaspringhibernateandmavendeveloperstoadobeflex-100821073507-phpapp01/75/Beginning-java-and-flex-migrating-java-spring-hibernate-and-maven-developers-to-adobe-flex-306-2048.jpg)


![CHAPTER 8 ■ WORKING WITH DATA IN FLEX
[Bindable]
private var ip : String;
public function init() : void {
myService.GetGeoIPContext.send();
}
public function getGeoIPContextHandler(event : ResultEvent) : void{
ip = event.result.IP;
}
]]>
</mx:Script>
</mx:Application>
When I run the code, it will obtain my public IP address as shown in Figure 8-24.
Figure 8-24. The public IP address retrieved using the WebServices APIs
Creating ActionScript Code to Consume a Web Service using Flex
Builder
The other way to use the Web services is through Flex Builder. Let’s create another application class
called ASWebserviceTest.mxml. You know the routine: File ➤ New ➤ MXML Application. Then click on
the menu bar and select Data ➤ Import Web Service (WSDL) as in Figure 8-25.
Figure 8-25.The Eclipse “Import Web Service” wizard
The Import Web Service wizard will prompt where you need to insert information. First, you have to
confirm the project source folder, as shown in Figure 8-26.
294](https://crownmelresort.com/image.slidesharecdn.com/beginningjavaandflex-migratingjavaspringhibernateandmavendeveloperstoadobeflex-100821073507-phpapp01/75/Beginning-java-and-flex-migrating-java-spring-hibernate-and-maven-developers-to-adobe-flex-313-2048.jpg)


![CHAPTER 8 ■ WORKING WITH DATA IN FLEX
<mx:Script>
<![CDATA[
import net.webservicex.GetGeoIPContextResultEvent;
import net.webservicex.GeoIP;
import net.webservicex.GeoIPService;
[Bindable]
private var ip : String;
public function init() : void{
var myService:GeoIPService= new GeoIPService();
myService.addgetGeoIPContextEventListener(myResultHandlingFunction);
myService.getGeoIPContext();
}
public function myResultHandlingFunction
(event:GetGeoIPContextResultEvent):void{
ip = event.result.IP;
}
]]>
</mx:Script>
</mx:Application>
Both ways are fine and easy to use. I prefer to use the first approach, instantiating the WebService
component in AS rather than in MXML. The auto-generated classes solution is nice, even if the auto-
generated code is not in the same style of your application. In the next section, I will show how to store
data directly on the client machine.
Storing Data on the Local Machine
Flex provides a SharedObject class to store data on the hard drive of the user’s machine. This solution is
not suitable for our needs because the data is stored only on the user’s local machine, not shared over
the network/Internet. We could have used this solution in our previous example, but if we tried to see
the application from another machine, we would get different results. Also, you can save only a defined
amount on a user’s local machine, depending on the FlashPlayer settings. For example, if the user
configured his FlashPlayer to store just 10 KB, you can save a maximum of 10 KB and no more.
The shared object becomes useful when you have to store custom application settings or data on
the client. It works like a browser cookie. Each application owns its shared objects and can access them
only if they are running in the same domain. This is different from a cookie’s shared object as it doesn’t
expire by default and is limited to a size of 100 KB compared to the much smaller browser cookie size of
4 KB.
298](https://crownmelresort.com/image.slidesharecdn.com/beginningjavaandflex-migratingjavaspringhibernateandmavendeveloperstoadobeflex-100821073507-phpapp01/75/Beginning-java-and-flex-migrating-java-spring-hibernate-and-maven-developers-to-adobe-flex-317-2048.jpg)
![CHAPTER 8 ■ WORKING WITH DATA IN FLEX
■ N ote If you use Flash Media Server, you can also store the shared object on the server for other clients to
retrieve.
The next example will use the SharedObject class to store a shared object to the user’s local machine
in order to see the dates and how many times the user used the application. To show how the
SharedObejct works, I have added a button that calls a function to delete the shared object from the local
machine. To test it, refresh the browser repeatedly and you will see the date and the visit counter
changing.
For the example, I created a Label component to which I bind the variable lastVisitMessage, and a
Button that handles the function to delete the shared object from the user’s local machine:
<mx:Label text="{lastVisitMessage}"/>
<mx:Button label="Delete Shared Object" click="deleteSharedObject()"/>
The variable lastVisitMessage will be set when the application has loaded, then the application will
call the setSharedObject methods that create or update the shared object on the local machine:
private function setSharedObjet():void {
sharedObject.data.lastVisitDate = new Date();
sharedObject.data.counter = (getSharedObjet().counter ==
null)?1:getSharedObjet().counter + 1;
sharedObject.flush();
}
Here is the complete code:
<?xml version="1.0"?>
<mx:Application xmlns:mx="http://www.adobe.com/2006/mxml"
creationComplete="init()">
<mx:Label text="{lastVisitMessage}"/>
<mx:Button label="Delete Shared Objed" click="deleteSharedObject()"/>
<mx:Script>
<![CDATA[
public var sharedObject:SharedObject;
[Bindable]
public var lastVisitMessage:String;
public function init():void {
sharedObject = SharedObject.getLocal("sharedObjectTest");
if (sharedObject.data.lastVisitDate==null) {
lastVisitMessage = "This is the first time that you
use this application."
299](https://crownmelresort.com/image.slidesharecdn.com/beginningjavaandflex-migratingjavaspringhibernateandmavendeveloperstoadobeflex-100821073507-phpapp01/75/Beginning-java-and-flex-migrating-java-spring-hibernate-and-maven-developers-to-adobe-flex-318-2048.jpg)
![CHAPTER 8 ■ WORKING WITH DATA IN FLEX
} else {
lastVisitMessage = "This is the " + getSharedObjet().counter
+
" time that you used this application. Your last visit was on " +
getSharedObjet().lastVisitDate;
}
setSharedObjet();
}
private function getSharedObjet():Object {
return sharedObject.data;
}
private function setSharedObjet():void {
sharedObject.data.lastVisitDate = new Date();
sharedObject.data.counter = (getSharedObjet().counter ==
null)?1:getSharedObjet().counter + 1;
sharedObject.flush();
}
private function deleteSharedObject():void {
sharedObject.clear();
}
]]>
</mx:Script>
</mx:Application>
On refreshing your browser, you should see the counter and the date keep changing, as in Figure 8-
30.
Figure 8-30. Storing a “cookie” on the local machine through the Flex ShareObject APIs
Summary
In this chapter I showed you the most important ways to structure the data on the client and to access
data on a remote server. First, I showed you how to bind AS data collection to AS DataGrid components
and how to create a real time search into the collection using filters. Next, I created a Java application
that provided a list of users through servlets. The Flex client retrieved the XML using the HTTPService
component. Finally, I showed you how you can use the Flex RemoteObject component.
300](https://crownmelresort.com/image.slidesharecdn.com/beginningjavaandflex-migratingjavaspringhibernateandmavendeveloperstoadobeflex-100821073507-phpapp01/75/Beginning-java-and-flex-migrating-java-spring-hibernate-and-maven-developers-to-adobe-flex-319-2048.jpg)


![CHAPTER 9 ■ BLAZEDS
<prefix>[BlazeDS]</prefix>
<includeDate>true</includeDate>
<includeTime>false</includeTime>
<includeLevel>true</includeLevel>
<includeCategory>true</includeCategory>
</properties>
<filters>
<pattern>Endpoint.*</pattern>
<pattern>Service.*</pattern>
<pattern>Message.*</pattern>
<pattern>DataService.*</pattern>
<pattern>Configuration</pattern>
</filters>
</target>
</logging>
<system>
<redeploy>
<enabled>true</enabled>
<watch-interval>20</watch-interval>
<watch-file>
{context.root}/WEB-INF/flex/flex-services.xml
</watch-file>
<watch-file>
{context.root}/WEB-INF/flex/flex-remoting.xml
</watch-file>
<watch-file>
{context.root}/WEB-INF/flex/flex-messages.xml
</watch-file>
<touch-file>{context.root}/WEB-INF/web.xml</touch-file>
</redeploy>
</system>
</services-config>
Listin g 9-4. BlazeDS flex-remoting.xml Configuration File
<?xml version="1.0" encoding="UTF-8"?>
<service id="remoting-service-@@messaging.id"
class="flex.messaging.services.RemotingService">
<adapters>
<adapter-definition id="java-object"
class="flex.messaging.services.remoting.adapters.JavaAdapter"
default="true"/>
</adapters>
<default-channels>
<channel ref="channel-amf"/>
307](https://crownmelresort.com/image.slidesharecdn.com/beginningjavaandflex-migratingjavaspringhibernateandmavendeveloperstoadobeflex-100821073507-phpapp01/75/Beginning-java-and-flex-migrating-java-spring-hibernate-and-maven-developers-to-adobe-flex-326-2048.jpg)


![CHAPTER 9 ■ BLAZEDS
The Java method returns a List type of User that BlazeDS converts into an AS ArrayCollection in
order to work with the Flex client that made the request.
Although BlazeDS and Flex provide functionality to serialize between AS and Java objects, you can
use custom serialization by implementing the IExternalizable interface on your AS class and the
interface Externalizable on your Java class, as shown in Listings 9-6 and 9-7. In these interfaces, you
need to implement the methods readExternal and writeExternal on both Java and AS classes. Within
these two methods, you can decide which properties and which types you want to serialize between AS
and Java. This example serializes all properties as a String. In other cases, you might use another data
type such as output.writeFloat(…), or you could decide to not serialize a property because you don’t
find it useful.
Listin g 9-6. Example of Using Custom Serialization in AS (User.as)
[RemoteClass(alias="com.apress.usermanager.model.externalizable.User")]
public class User implements IExternalizable {
public var commonName:String;
public var lastName:String;
public function readExternal(input:IDataInput):void {
commonName = input.readObject() as String;
lastName = input.readObject();
}
public function writeExternal(output:IDataOutput):void {
output.writeObject(commonName);
output.writeObject(lastName);
}
}
Listin g 9-7. Example of Using Custom Serialization in Java (User.java)
public class User implements Externalizable {
public String commonName;
public String lastName;
public void readExternal(ObjectInput in) throws IOException,
ClassNotFoundException {
commonName = (String)in.readObject();
lastName = (String)in.readObject();
}
public void writeExternal(ObjectOutput output) throws IOException {
output.writeObject(commonName);
output.writeObject(lastName);
}
}
310](https://crownmelresort.com/image.slidesharecdn.com/beginningjavaandflex-migratingjavaspringhibernateandmavendeveloperstoadobeflex-100821073507-phpapp01/75/Beginning-java-and-flex-migrating-java-spring-hibernate-and-maven-developers-to-adobe-flex-329-2048.jpg)


![CHAPTER 9 ■ BLAZEDS
Listin g 9-9. Complete Code for the flex-services.xml BlazeDS Configuration File
<?xml version="1.0" encoding="UTF-8"?>
<services-config>
<services>
<service-include file-path="flex-remoting.xml"/>
</services>
<channels>
<channel-definition id="channel-amf"
class="mx.messaging.channels.AMFChannel">
<endpoint
url="http://{server.name}:{server.port}/
{context.root}/messagebroker/amf"
class="flex.messaging.endpoints.AMFEndpoint"/>
<properties>
<polling-enabled>false</polling-enabled>
</properties>
</channel-definition>
</channels>
<logging>
<target class="flex.messaging.log.ConsoleTarget"
level="Error">
<properties>
<prefix>[BlazeDS]</prefix>
<includeDate>true</includeDate>
<includeTime>false</includeTime>
<includeLevel>true</includeLevel>
<includeCategory>true</includeCategory>
</properties>
<filters>
<pattern>Endpoint.*</pattern>
<pattern>Service.*</pattern>
<pattern>Message.*</pattern>
<pattern>DataService.*</pattern>
<pattern>Configuration</pattern>
</filters>
</target>
</logging>
<system>
<redeploy>
<enabled>true</enabled>
<watch-interval>20</watch-interval>
<watch-file>
{context.root}/WEB-INF/flex/flex-services.xml
313](https://crownmelresort.com/image.slidesharecdn.com/beginningjavaandflex-migratingjavaspringhibernateandmavendeveloperstoadobeflex-100821073507-phpapp01/75/Beginning-java-and-flex-migrating-java-spring-hibernate-and-maven-developers-to-adobe-flex-332-2048.jpg)


![CHAPTER 9 ■ BLAZEDS
Figure 9-18. Debugging the application using the new configuration
When you run or debug the application using the new configuration, you should see Maven logging
in to the Eclipse console, as shown in Figure 9-19.
Figure 9-19. Eclipse console showing the Maven project running with the Jetty plug-in
Creating the Flex Client
The Flex client for this example will be the same as the one you created for the HTTPService example
application in Chapter 8. The only differences will be the use of the RemoteObject component instead of
HTTPService, and the mapping of the User entity with the Java User object. As explained in Chapter 6,
you just need to replace the existing UserControlImpl code with the code provided in the
“RemoteObject” section of that chapter, and then map the client entity with the remote server one using
the RemoteClass metatag within the client entity:
[RemoteClass(alias="com.apress.usermanager.model.User")]
332](https://crownmelresort.com/image.slidesharecdn.com/beginningjavaandflex-migratingjavaspringhibernateandmavendeveloperstoadobeflex-100821073507-phpapp01/75/Beginning-java-and-flex-migrating-java-spring-hibernate-and-maven-developers-to-adobe-flex-351-2048.jpg)


![CHAPTER 9 ■ BLAZEDS
Next, create a folder called flex to hold your BlazeDS configuration files.
In the new flex-messages.xml file, add all the XML definitions to tell BlazeDS to use the
flex.messaging.services.messaging.adapters.ActionScriptAdapter and the channel called
channel-polling-amf.
Then add some new XML definitions in the flex-services.xml file, to tell the BlazeDS server the
channel for real-time messages, its endpoints, and some properties, such the message polling interval
time, as shown in Listing 9-19 with the channel-polling-amf definition.
Listin g 9-19. Real-Time Messaging XML Definitions in the flex-services.xml File
<?xml version="1.0" encoding="UTF-8"?>
<services-config>
<services>
<service-include file-path="flex-remoting.xml" />
<service-include file-path="flex-messages.xml" />
</services>
<channels>
<channel-definition id="channel-amf"
class="mx.messaging.channels.AMFChannel">
<endpoint
url="http://{server.name}:{server.port}/{context.root}/messagebroker/amf"
class="flex.messaging.endpoints.AMFEndpoint" />
<properties>
<polling-enabled>false</polling-enabled>
</properties>
</channel-definition>
<channel-definition id="channel-polling-amf"
class="mx.messaging.channels.AMFChannel">
<endpoint
url="http://{server.name}:{server.port}/{context.root}/messagebroker/
amfpolling"
class="flex.messaging.endpoints.AMFEndpoint" />
<properties>
<polling-enabled>true</polling-enabled>
<polling-interval-seconds>4</polling-interval-seconds>
</properties>
</channel-definition>
</channels>
<logging>
<target class="flex.messaging.log.ConsoleTarget"
level="Error">
<properties>
<prefix>[BlazeDS]</prefix>
341](https://crownmelresort.com/image.slidesharecdn.com/beginningjavaandflex-migratingjavaspringhibernateandmavendeveloperstoadobeflex-100821073507-phpapp01/75/Beginning-java-and-flex-migrating-java-spring-hibernate-and-maven-developers-to-adobe-flex-360-2048.jpg)


![CHAPTER 9 ■ BLAZEDS
var message:IMessage = new AsyncMessage();
message.headers = new Array();
message.headers["sender"] = USERNAME;
message.headers["recepient"] = USERNAME;
message.body.userId = USERNAME;
message.body.chatMessage = messageInput.text;
producer.send(message);
messageInput.text = "";
}
The AsyncMessage class APIs allow you to store the header and the body of the message in the
object. In this example, the message header will contain an associative array with the same username
that applies for both sender and recipient. To keep this application simple and easy to follow, I have
used only one username for both sender and receiver. This means that each client will be able to
exchange messages without any filters or security between the connected users. If you need filtering or
security, you will need to create a message receiver filter to distribute all the messages, following your
application logic and to meet its requirements.
Once you have set the headers and the body of your AsyncMessage, you need to pass it to the
Producer, in order for it to be sent. In this sample class, the Producer is a private variable that you have
set in the init() method on the application creationComplete event. The init() method is used to
initialize the Producer, the Consumer, and the ChannelSet objects.
private function init():void{
var channelSet : ChannelSet = new ChannelSet();
var amfChannel : AMFChannel = new AMFChannel();
amfChannel.url="http://localhost:8080/chat/messagebroker/amfpolling";
channelSet.addChannel(amfChannel);
producer = new Producer();
producer.destination="chat-application";
producer.channelSet = channelSet;
consumer = new Consumer();
consumer.destination="chat-application";
consumer.channelSet=channelSet;
consumer.addEventListener(MessageEvent.MESSAGE,messageHandler);
consumer.subscribe();
}
The Consumer listens for the event of type MessageEvent. When it is dispatched, it is passed to the
messageHandler function as defined in the listener. The messageHandler function checks if the header
of the message is set to recipient=filippo (filippo is the static username that I am using for both
sender and receiver). If the condition is satisfied, it will bind the message body with the message board
TextArea component.
private function messageHandler(event:MessageEvent):void {
349](https://crownmelresort.com/image.slidesharecdn.com/beginningjavaandflex-migratingjavaspringhibernateandmavendeveloperstoadobeflex-100821073507-phpapp01/75/Beginning-java-and-flex-migrating-java-spring-hibernate-and-maven-developers-to-adobe-flex-368-2048.jpg)
![CHAPTER 9 ■ BLAZEDS
var message : IMessage = IMessage(event.message);
if(message.headers["recepient"] == USERNAME){
if(message.body.chatMessage != ""){
messagesBoard.htmlText += message.body.userId + ": " +
message.body.chatMessage + "n";
}
}
}
Listing 9-20 shows the complete listing for the Chat.mxml application component.
Listin g 9-20. Complete Code for ther Chat.mxml Application Component
<?xml version="1.0" encoding="utf-8"?>
<mx:Application xmlns:mx="http://www.adobe.com/2006/mxml"
layout="horizontal"
creationComplete="init()"
horizontalAlign="center"
verticalAlign="middle">
<mx:VBox width="100%" height="100%">
<mx:TextArea id="messagesBoard" width="100%" height="80%"/>
<mx:TextInput id="messageInput" width="100%" height="100"
enter="send()" />
</mx:VBox>
<mx:Script>
<
![CHAPTER 9 ■ BLAZEDS
private function init():void{
var channelSet : ChannelSet = new ChannelSet();
var amfChannel : AMFChannel = new AMFChannel();
amfChannel.url="http://localhost:8080/chat/messagebroker/amfpolling";
channelSet.addChannel(amfChannel);
producer = new Producer();
producer.destination="chat-application";
producer.channelSet = channelSet;
consumer = new Consumer();
consumer.destination="chat-application";
consumer.channelSet=channelSet;
consumer.addEventListener(MessageEvent.MESSAGE,messageHandler);
consumer.subscribe();
}
private function send():void{
var message:IMessage = new AsyncMessage();
message.headers = new Array();
message.headers["sender"] = USERNAME;
message.headers["recepient"] = USERNAME;
message.body.userId = USERNAME;
message.body.chatMessage = messageInput.text;
producer.send(message);
messageInput.text = "";
}
private function messageHandler(event:MessageEvent):void {
var message : IMessage = IMessage(event.message);
if(message.headers["recepient"] == USERNAME){
if(message.body.chatMessage != ""){
messagesBoard.htmlText +=
message.body.userId + ": " + message.body.chatMessage + "n";
}
}
}
]]>
</mx:Script>
</mx:Application>
351](https://crownmelresort.com/image.slidesharecdn.com/beginningjavaandflex-migratingjavaspringhibernateandmavendeveloperstoadobeflex-100821073507-phpapp01/75/Beginning-java-and-flex-migrating-java-spring-hibernate-and-maven-developers-to-adobe-flex-370-2048.jpg)


![CHAPTER 10 ■ USING FLEX, SPRING, AND HIBERNATE TOGETHER
<property name="url" value="${jdbc.url}"/>
<property name="username" value="${jdbc.username}"/>
<property name="password" value="${jdbc.password}"/>
<property name="maxActive" value="100"/>
<property name="maxWait" value="1000"/>
<property name="poolPreparedStatements" value="true"/>
<property name="defaultAutoCommit" value="true"/>
<property name="testOnBorrow" value="true"/>
<property name="validationQuery" value="select 1=1"/>
</bean>
This bean uses properties set in the jdbc.properties file to allow you to change your JDBC
properties without having to touch the bean configuration XML file.
To make your life easier and keep everything in one place, I set the jdbc.properties values into the
POM configuration file; when we compile, Maven will replace the variable set into the jdbc.properties
file with the ones set into the POM file.
So, let’s open jdbc.properties, which is located in the /src/main/resources/ path. This file
contains all the parameters needed to set up the JDBC connection, as follows:
jdbc.driverClassName=${jdbc.driverClassName}
jdbc.url=${jdbc.url}
jdbc.username=${jdbc.username}
jdbc.password=${jdbc.password}
hibernate.dialect=${hibernate.dialect}
# Needed by Hibernate3 Maven Plugin defined in pom.xml
hibernate.connection.username=${jdbc.username}
hibernate.connection.password=${jdbc.password}
hibernate.connection.url=${jdbc.url}
hibernate.connection.driver_class=${jdbc.driverClassName}
By default, the archetype sets the name of the database to the name given to the artifactId in the
project wizard. To properly configure the JDBC connection, let’s change the name of the database from
ch10-usermanager-spring-hibernate to apress_usermanager, and let’s change the username and
password to the real username and password of your MySQL installation. In my case, these are apress
and 123456, respectively.
To make these changes, open the POM file and change the JDBC values as the following:
<jdbc.url><![CDATA[jdbc:mysql://localhost:3306/apress_usermanager?createDatabaseIf
NotExist=true&useUnicode=true&characterEncoding=utf-
8&enableQueryTimeouts=false]]></jdbc.url>
<jdbc.username>user</jdbc.username>
<jdbc.password>pass</jdbc.password>
362](https://crownmelresort.com/image.slidesharecdn.com/beginningjavaandflex-migratingjavaspringhibernateandmavendeveloperstoadobeflex-100821073507-phpapp01/75/Beginning-java-and-flex-migrating-java-spring-hibernate-and-maven-developers-to-adobe-flex-381-2048.jpg)


![CHAPTER 10 ■ USING FLEX, SPRING, AND HIBERNATE TOGETHER
public User findByUsername(String username) {
return (User)getSession().getNamedQuery(User.FIND_BY_USERNAME)
.setString("username", username).uniqueResult();
}
}
As you can see, to extend the BaseHibernateDao class you just have to write the code for the two
new methods realized by implementing the UserDao interface. For both methods, we will use the named
queries defined in our User entity class. That’s it.
Before starting to code the service layer, it would be good to create a test class to test the two new
just-implemented methods.
Create a Test Case
In order to create a test class able to work with Spring and Hibernate, you have to set up a test
environment to load all the configuration files and inject all the beans into the Spring IOC container.
Luckily, the archetype has already created the ConfigLocator and the BaseSpringTestCase classes in
the package com.apress.usermanager.dao stored into the /src/test/java folder. The
ConfigLocator object provides the methods to set and get the configuration files needed by our tests.
Below is the code for the ConfigLocator class:
package com.apress.usermanager.dao;
public class ConfigLocator {
private static final long serialVersionUID = 1L;
private String[] locations;
public ConfigLocator() {
locations = new String[] {
"classpath:/applicationContext-resources.xml",
"classpath:/applicationContext-dao.xml",
"/WEB-INF/applicationContext.xml",
"/WEB-INF/security.xml"
};
}
public void setLocations(String[] locations) {
this.locations = locations;
}
382](https://crownmelresort.com/image.slidesharecdn.com/beginningjavaandflex-migratingjavaspringhibernateandmavendeveloperstoadobeflex-100821073507-phpapp01/75/Beginning-java-and-flex-migrating-java-spring-hibernate-and-maven-developers-to-adobe-flex-401-2048.jpg)
![CHAPTER 10 ■ USING FLEX, SPRING, AND HIBERNATE TOGETHER
public String[] getLocations() {
return locations;
}
}
The BaseSpringTestCase class extends the Spring
AbstractDependencyInjectionSpringContextTests class, overriding the getConfigLocation
method to use the configuration files set in the ConfigLocator class. Here is the code for the
BaseSpringTestCase class:
package com.apress.usermanager.dao;
import org.apache.commons.logging.Log;
import org.apache.commons.logging.LogFactory;
import org.springframework.test.AbstractDependencyInjectionSpringContextTests;
public abstract class BaseSpringTestCase extends
AbstractDependencyInjectionSpringContextTests {
/**
* Log variable for all child classes. Uses LogFactory.getLog(getClass())
* from Commons Logging
*/
protected final Log log = LogFactory.getLog(getClass());
/**
* Sets AutowireMode to AUTOWIRE_BY_NAME and configures all context files
* needed to tests DAOs.
*
* @return String array of Spring context files.
*/
@Override
protected String[] getConfigLocations() {
setAutowireMode(AUTOWIRE_BY_TYPE);
// to have a single place to add configLocations, even if more than
// one
// BaseTestCase class is present
return new ConfigLocator().getLocations();
}
}
383](https://crownmelresort.com/image.slidesharecdn.com/beginningjavaandflex-migratingjavaspringhibernateandmavendeveloperstoadobeflex-100821073507-phpapp01/75/Beginning-java-and-flex-migrating-java-spring-hibernate-and-maven-developers-to-adobe-flex-402-2048.jpg)


![CHAPTER 10 ■ USING FLEX, SPRING, AND HIBERNATE TOGETHER
public void setUserService(UserService userService) {
this.userService = userService;
}
}
Now we are ready to configure BlazeDS in order to expose to the Flex GUI the Spring bean called
userService that contains the APIs that allow the Flex GUI to retrieve, edit, and add users.
Export Spring Services to BlazeDS
The last milestone of our application on the server side is to configure BlazeDS to allow the Flex GUI to
use the userService bean and its methods. The archetype already created all the configuration that
BlazeDS needs. The only thing you have to do is to define a remote destination using the XML definition
<flex:remoting-destination />.
To do that, open the f lex- se rvlet.x ml file and add a remoting destination for the userService bean
as follows:
<flex:remoting-destination ref="userService" />
By setting a remoting destination, we will be able to use the Spring userService APIs within our
Flex GUI using the RemoteObject component as follows:
public function updateUser(user:User) : void{
var service : RemoteObject = new RemoteObject("userService");
service.addEventListener("fault", handleFault);
service.addEventListener("result", updateUserResult);
service.updateUser(user);
}
In this example I created a Flex updateUser function that calls the userService bean remote
updateUser function in order to update a User from Flex to Java. Very easy, no?
At the end of the day, thanks to the archetype, we have to add just one or more destinations for the
beans we want to use within Flex.
<flex:remoting-destination ref="bean1" />
<flex:remoting-destination ref="bean2" />
<flex:remoting-destination ref="bean[n]" />
390](https://crownmelresort.com/image.slidesharecdn.com/beginningjavaandflex-migratingjavaspringhibernateandmavendeveloperstoadobeflex-100821073507-phpapp01/75/Beginning-java-and-flex-migrating-java-spring-hibernate-and-maven-developers-to-adobe-flex-409-2048.jpg)


![CHAPTER 10 ■ USING FLEX, SPRING, AND HIBERNATE TOGETHER
super(LOGIN_EVENT, true);
user = u;
}
}
}
UserModel.as
package com.apress.flexjava.usermanager.model
{
import flash.events.IEventDispatcher;
import mx.collections.ArrayCollection;
[Bindable]
public interface UserModel extends IEventDispatcher
{
function set usersCollection(users : ArrayCollection) : void;
function get usersCollection() : ArrayCollection;
function set workFlowState(value : uint) : void;
function get workFlowState() : uint;
function set roles(value : ArrayCollection) : void;
function get roles() : ArrayCollection;
function set currentUsername(value : String) : void;
function get currentUsername() : String;
function set authenticatedUser(value : User) : void;
function get authenticatedUser() : User;
function set isAdmin(value : Boolean) : void;
407](https://crownmelresort.com/image.slidesharecdn.com/beginningjavaandflex-migratingjavaspringhibernateandmavendeveloperstoadobeflex-100821073507-phpapp01/75/Beginning-java-and-flex-migrating-java-spring-hibernate-and-maven-developers-to-adobe-flex-426-2048.jpg)
![CHAPTER 10 ■ USING FLEX, SPRING, AND HIBERNATE TOGETHER
function get isAdmin() : Boolean;
function set isUser(value : Boolean) : void;
function get isUser() : Boolean;
}
}
UserModelImpl.as
package com.apress.flexjava.usermanager.model
{
import flash.events.EventDispatcher;
import mx.collections.ArrayCollection;
[Bindable]
public class UserModelImpl extends EventDispatcher implements UserModel
{
private var _usersCollection : ArrayCollection;
private var _workFlowState : uint = WINDOW_LOGIN_FORM;
private var _roles : ArrayCollection;
private var _currentUsername : String;
private var _authenticatedUser : User;
private var _isAdmin : Boolean = false;
public var _isUser : Boolean = false;
public function set usersCollection(value :
ArrayCollection) : void{
_usersCollection = value;
}
408](https://crownmelresort.com/image.slidesharecdn.com/beginningjavaandflex-migratingjavaspringhibernateandmavendeveloperstoadobeflex-100821073507-phpapp01/75/Beginning-java-and-flex-migrating-java-spring-hibernate-and-maven-developers-to-adobe-flex-427-2048.jpg)


![CHAPTER 10 ■ USING FLEX, SPRING, AND HIBERNATE TOGETHER
user.password = password.text;
var event : LoginEvent = new LoginEvent(
user );
dispatchEvent(event);
isPending = true;
}
]]>
</mx:Script>
</mx:HBox>
RemoteObjectTest.mxml
<?xml version="1.0" encoding="utf-8"?>
<mx:Application xmlns:mx="http://www.adobe.com/2006/mxml"
xmlns:view="com.apress.flexjava.usermanager.view.*"
layout="horizontal"
creationComplete="init()"
horizontalAlign="center"
verticalAlign="middle">
<mx:ViewStack id="viewStack" selectedIndex="{model.workFlowState}">
<view:LoginPanel />
<mx:Panel horizontalAlign="right" paddingTop="10">
<mx:HBox>
<mx:FormItem label="search">
<view:CollectionTextInputFilter
tabIndex="1"
collection="{model.usersCollection}"
columnSearchable="{columnNameToSearch}" />
</mx:FormItem>
<mx:RadioButtonGroup id="searchMethodGroup"
itemClick="handleSearchMethod(event)"/>
<mx:RadioButton tabEnabled="true" tabIndex="2"
label="lastName" selected="true" groupName="searchMethodGroup"/>
<mx:RadioButton tabEnabled="true" tabIndex="3"
label="email" groupName="searchMethodGroup" />
</mx:HBox>
<view:UsersGrid dataProvider="{model.usersCollection}"
width="100%" height="100%" />
412](https://crownmelresort.com/image.slidesharecdn.com/beginningjavaandflex-migratingjavaspringhibernateandmavendeveloperstoadobeflex-100821073507-phpapp01/75/Beginning-java-and-flex-migrating-java-spring-hibernate-and-maven-developers-to-adobe-flex-431-2048.jpg)
![CHAPTER 10 ■ USING FLEX, SPRING, AND HIBERNATE TOGETHER
<mx:ControlBar width="100%">
<mx:Button label="Add User"
click="{model.workFlowState = UserModelImpl.WINDOW_USER_FORM}" />
</mx:ControlBar>
</mx:Panel>
<mx:Panel horizontalAlign="center" verticalAlign="middle">
<view:UserForm id="userForm"
user="{model.authenticatedUser}" />
<mx:ControlBar width="100%">
<mx:Button label="Back" click="{model.workFlowState
= UserModelImpl.WINDOW_LIST_USERS}" visible="{model.isAdmin}" />
<mx:Button label="Save"
click="{control.addUser(userForm.user);model.workFlowState =
UserModelImpl.WINDOW_LIST_USERS}" visible="{model.isAdmin}" />
<mx:Button label="Update"
click="{control.updateUser(userForm.user);}" visible="{model.isUser}" />
</mx:ControlBar>
</mx:Panel>
</mx:ViewStack>
<mx:Script>
<![CDATA[
import
com.apress.flexjava.usermanager.control.UserControlImpl;
import com.apress.flexjava.usermanager.control.UserControl;
import com.apress.flexjava.usermanager.model.UserModel;
import mx.events.ItemClickEvent;
import mx.collections.ArrayCollection;
import com.apress.flexjava.usermanager.model.User;
import com.apress.flexjava.usermanager.model.UserModelImpl;
[Bindable]
private var columnNameToSearch : String = "lastName";
[Bindable]
private var model : UserModel;
[Bindable]
private var control : UserControl;
public function init():void{
model = new UserModelImpl();
413](https://crownmelresort.com/image.slidesharecdn.com/beginningjavaandflex-migratingjavaspringhibernateandmavendeveloperstoadobeflex-100821073507-phpapp01/75/Beginning-java-and-flex-migrating-java-spring-hibernate-and-maven-developers-to-adobe-flex-432-2048.jpg)
![CHAPTER 10 ■ USING FLEX, SPRING, AND HIBERNATE TOGETHER
control = new UserControlImpl(model,this);
}
private function
handleSearchMethod(event:ItemClickEvent):void {
columnNameToSearch = event.currentTarget.selectedValue as
String;
}
]]>
</mx:Script>
</mx:Application>
Now you can run the server, compile the Flex GUI, and try to login as administrator and then as a
user to see the differences.
Summary
In this chapter we saw how to create a Flex-Spring-Hibernate project using the Flex-Spring-Hibernate
Maven archetype. The archetype created the entire project directory structure containing all of the
Spring, Hibernate, and BlazeDS configuration and properties files. It also added all packages usually
needed for this kind of application using the MVC and DAO patterns. The archetype also configured the
security using http Spring security and the database as the authentication provider.
On the Flex GUI side, we copied the Chapter 9 RemoteObject example, making a few changes to
implement security, such as the login form and permissions on the different views of the application
itself.
With this example, I tried to cover the most important aspects of Flex-Spring-Hibernate-Maven
development. You can reuse the same archetype to start you own project, and you’ll see how your
developer productivity will quickly increase.
Java and Flex let you create amazing applications using proper object-oriented languages and the
latest software engineering, making you not just a better developer but also a better software engineer.
414](https://crownmelresort.com/image.slidesharecdn.com/beginningjavaandflex-migratingjavaspringhibernateandmavendeveloperstoadobeflex-100821073507-phpapp01/75/Beginning-java-and-flex-migrating-java-spring-hibernate-and-maven-developers-to-adobe-flex-433-2048.jpg)


This document provides an introduction to developing applications using Java and Flex. It discusses the benefits of using lightweight frameworks like Spring, Hibernate and BlazeDS. It also introduces key concepts in Flex, Java and UML modeling. The document then presents a sample application that will be used throughout the book to demonstrate integrating Java and Flex using these frameworks. The application architecture includes presentation, service, data access layers and a domain model.


![DATED ------------ LEASE AGREEMENT between [PROPERTY OWNER NAME] and ...](https://cdn.slidesharecdn.com/ss_thumbnails/r2r-lease-template4-170701023539-thumbnail.jpg?width=640&height=640&fit=bounds)


![[Web开发Css系列].Apress.Pro.Css.Techniques.Nov.2006](https://cdn.slidesharecdn.com/ss_thumbnails/webcssapressprocsstechniquesnov2006-124531316749-phpapp02-thumbnail.jpg?width=640&height=640&fit=bounds)


