001 Core 15 - Java Programming - III Sem-converted.docx
1.
Page 1 of
CHAPTERCONTENT PAGE Nr
I DATA TYPES, CLASS & METHODS 02
II INHERITANCE – SUPER KEYWORD 09
III FINAL KEYBOARD & METHOD 15
IV PACKAGE IN JAVA 18
V JAVA – INTERFACES 26
VI EXCEPTION HANDLING 31
VII FINALLY () & CLOSE () STATEMENT 44
VIII THROW EXCEPTION IN JAVA 50
IX INTRODUCTION OF THREADS IN JAVA 57
X MULTITHREADING 66
XI THREAD METHODS & APPLETS 71
2.
Page 2 of
CHAPTER– I
DATA TYPES, CLASS & METHODS
Primitive data types in Java
To deal with numerical information, Java uses six predefined data types, called
primitive numerical data types. These are int, long, short, byte, float, and double,
and they allow us to represent integer and real numbers.
Java offers two additional non-numeric primitive data types: char (to
represent alphanumeric characters and special symbols) and Boolean (to
represent the truth values true and false).
We will describe these data types in Java by specifying for each of them:
The domain:
The set of possible values that can be represented in the memory of the
computer by means of the primitive data type (note that this set will always be
finite);
The set of operations: operators of the programming language that allow us
to perform elementary operations on values of the primitive data type (e.g., +, -, /, *,
etc.)
The set of literals: symbols of the language that define values of the primitive
data type (e.g., 10, 3.14, ’A’, true, etc.)
Moreover, we will specify the size of the memory occupied by a value of a
certain data type, which will be significant for the numeric data types.
The data type int
The most commonly used integer type is int. It is a signed 32-bit type that
has a range from –2,147,483,648 to 2,147,483,647. In addition to other uses,
Variables of type int are commonly employed to control loops and to index arrays.
Type Int
Dimension 32 bit (4 byte)
Domain the set of integer numbers in the interval [ 2
− 31,
+231 − 1]
(More than 4 billion values)
Operations+ Sum
- Difference
* Product
/ integer division
rest of the integer division
Literals sequences of digits denoting values of the domain
(e.g.,
275930)
Example:
int a, b, c;// Declaration of variables of type int a = 1;// Use of
literals b = 2;
c = a + b;// Arithmetic expression that involves operators of the language
Writing of numbers of type int: -
To write a number of types int, we can directly use the print() or println()
methods:
Example:
int i = 1; System.out.println(4); System.out.println(i); System.out.println(i + 4);
3.
Example:
Byte a, b,c; // Declaration of variables of byte type
b = Short.parseShort("22605");// Conversion from String to short c = ba;//
Arithmetic expression
Other primitive data types for integer numbers: long
long is a signed 64-bit type and is useful for those occasions where an int type is
not large enough to hold the desired value. The range of a long is quite large. This
makes it useful when big, whole numbers are needed.
Page 3 of
Note: the symbol + can be used both for the sum of two numbers and to
concatenate two strings: "aaa" + "bbb" corresponds to "aaa”. concat("bbb").
Note the difference between the following two statements:
System.out.println(3 + 4); // prints 7 (as int); + denotes sum System.out.println("3" +
4); // prints 34 (as String), since the integer 4 is
// first converted to a String; + denotes concat
IIn the first statement, “+” is applied to two integers, and hence denotes the addition
operator. Hence, the argument 3+4 of println() is of type int.
IIn the second statement, “+” is applied to a string and an integer, and hence denotes
string concatenation. More precisely, the integer 4 is first converted to the string
"4", and then concatenated to the string "3". Hence, the argument "3"+4 of
println() is of type String.
Both statements are correct, since the method println() is overloaded: The Java
library contains both the versions that accepts an integer as parameter, and a
version that accepts a string as parameter.
Other primitive data types for integer numbers: byte
The smallest integer type is byte. This is a signed 8-bit type that has a range from –128 to
127. Variables of type byte are especially useful when you’re working with a stream of
data from a network or file.
Type Byte
Dimension 8 bit (1 byte)
Domain the set of integer numbers in the interval [ 27, +27 1]
− −
=
[ 128, +127]
−
Operation
s
+ Sum
- Difference
* Product
/ integer division
rest of the integer division
Literals sequences of digits denoting values of the domain (e.g.,
47)
a = 1; // Use of literals
b = Byte.parseByte("47"); // Conversion from String to byte c = a - b; // Arithmetic
expression
other primitive data types for integer numbers: short
Short is a signed 16-bit type. It has a range from –32,768 to 32,767. It is probably
the least- used Java type, since it is defined as having its high byte first (called big-
endian format).
Type Short
Dimension16 bit (2 byte)
Domain the set of integer numbers in the interval [ 215, +215 1] =
− −
[ 32768, +32767]
−
4.
Page 4 of
Operation
s
+Sum
- Difference
* Product
/ integer division
rest of the integer division
Literals sequences of digits denoting values of the domain (e.g.,
22700)
Example:
Short a, b, c; //Declaration of variables of type short1
A=11300;
B=short.parseshort(“22605”); // Conversion from string to short c=b%a; // Arithmetic
expression
Other primitive data types for integer numbers: long
Long is a signed 64-bit data types and is useful for those occasions where an int type is not large
enough to hold the desired value. The range of a long is quite large. This makes it useful
when big, whole numbers are needed.
Example:
long a, b, c; // Declaration of variables of type
long a = 9000000000L;// Use of literals
b = Long.parseLong("9000000000l"); // Conversion from String to long c = b / 300000L
Primitive data types for real numbers: double
In Java there are two primitive data types for representing real numbers.
Due to the way in which real numbers are represented internally in memory, these
numbers are also called floating point numbers.
The data type for floating point numbers that is used by default in the Java
mathematical library is double.
Type Long
Dimension 64 bit (8 byte)
Domain the set of integer numbers in the interval
[ 263,
−
+263 1]
−
Operation
s
+ Sum
- Difference
* Product
/ integer division
rest of the integer division
Literals sequences of digits ending with an l (or L)
denoting values of the domain (e.g.,
9000000000L)
5.
representation in scientificnotation (e.g., 314E-2f)
sequences of digits with decimal dot ending with an f (or F) denoting value
Literals
Division
/
product
*
difference
-
Sum
+
Operations
∼ 7 decimal digits
Precision
3.4028235 · 10+38
absolute
Maximum
value
1.4012985 · 10 38
−
absolute
Minimum
value
set of 232 positive and
negativereal numbers
Domain
32 bit (4 byte)
Dimension
Float
Type
Page 5 of
Type Float
Dimension 32 bit(4 byte)
Domain
Set of 232
+ve and -ve
real
numbers
Minimum absolute
value
1.4012985.10-38
Maximum absolute
value
3.4028235.10+38
Precision 7 decimal digits
Operations
+ Sum
- Difference
* Product
/ Division
Literals
sequences of digits with decimal dot ending with an f (or F)
denoting values of the domain (e.g., 3.14f)
representation in scientific notation (e.g., 314E-2f)
Primitive data types for real numbers: float
Example:
float pi, a, b; // Declaration of variables of type float pi = 3.14f; // Use of literals
a = 314E-2F // Use of literals
a++;// Use of increment operator (equivalent to: a = a + 1.0d;)
Writing of numbers of type double or float
To write a number of type double or float, we can directly use the print() or
println() methods:
Example: The following code fragment
double d = 98d; System.out.println("d = " + d); float x = 0.0032f;
System.out.println("x = " + x);
prints on the
6.
Page 6 of
screend = 9.8E1 x
= 3.2E-3
Static:
The static can
be: Static
Variables Static
Methods
Static Blocks Of Code.
What is Static Variable in Java?
Static variable in Java is variable which belongs to the class and initialized
only once at the start of the execution.
1. It is a variable which belongs to the class and not to object(instance)
2. Static variables are initialized only once, at the start of the execution. These
3. variables will be initialized first, before the initialization of any
instance variables
4. A single copy to be shared by all instances of the class
5. A static variable can be accessed directly by the class name and doesn’t need
any object
Syntax:
<class-name>.<variable-name>
What is Static Method in Java?
Static method in Java is a method which belongs to the class and not to the object.
A static method can access only static data.
1. It is a method which belongs to the class and not to the object (instance)
2. A static method can access only static data. It can- not access non-
static data (instance variables)
3. A static method can call only other static methods and cannot call a
non-static method from it.
4. A static method can be accessed directly by the class name and doesn’t
need any object
5. A static method cannot refer to "this" or "super" keywords in
anyway Syntax:
<class-name>.<method-name>
Example: How to call static variables &
methods
Step 1: Copy the following code into a editor
public class Demo{
public static void main(String args[]){
Student s1 = new Student();
s1.showData();
Student s2 = new
Student(); s2.showData();
//Student.b++;
//s1.showData();
}}
class Student {
int a; //initialized to zero
static int b; //initialized to zero only when class is loaded not for each object
created. Student(){
//Constructor incrementing static variable b
b++;
}
public void showData()
{ System.out.println("Value of a =
"+a); System.out.println("Value of
7.
Page 7 of
b= "+b);
}
//public static void increment(){
//a++;
//}
}}Step 2: Save & Compile the code. Run the code as, java Demo.
Step 3: Expected output show below
Following diagram shows, how reference variables & objects are created and static
variables are accessed by the different instances.
Step 4: It is possible to access a static variable from outside the class using the
syntax ClassName.Variable_Name. Uncomment line # 7 & 8 . Save, Compile & Run.
Observe the output.
Value of a =
0 Value of b
= 1 Value of
a = 0 Value
of b = 2
Value of a =
0 Value of b
= 3
Step 5: Uncomment line 25,26 & 27. Save, Compile & Run.
8.
A static blockhelps to initialize the static data members, just like constructors help to initiali
Following program is the example of java static block.
Example: How to access static block public class Demo {
static int a; static int b; static {
a = 10;
b = 20;
}
public static void main(String args[]) {
Page 8 of
System.out.println("Value of a = " +
a); System.out.println("Value of b =
" + b);
}
}
you will get following output of the
program. Value of a = 10
Value of b = 20
9.
Page 9 of
Superkeyword in
java
CHAPTER - II
INHERITANCE - SUPER KEYWORD
Super keyword in java is a reference variable that is used to refer parent
class object. Super is an implicit keyword creates by JVM and supply each and every
java program for performing important role in three places.
1. Super keyword At Variable Level
2. Super keyword At Method Level
3. Super keyword At Constructor Level
When need of super keyword
Whenever the derived class is inherits the base class features, there is a
possibility that base class features are similar to derived class features and JVM
gets an ambiguity. In order to differentiate between base class features and
derived class features must be preceded by super keyword.
Syntax
super. baseclass features.
Super Keyword at Variable Level
Whenever the derived class inherit base class data members there is a
possibility that base class data member is similar to derived class data member
and JVM gets an ambiguity.
In order to differentiate between the data member of base class and
derived class, in the context of derived class the base class data members must be
preceded by super keyword.
Syntax
Super.baseclassdatamember
name
If we are not writing super keyword before the base class data member
name than it will be referred as current class data member name and base class
data member are hidden in the context of derived class. Program without using
super keyword
Example
class Employee
{
float salary=10000;
}
class HR extends Employee
{
float
salary=20000;
void display()
{
System.out.println("Salary: "+salary);//print current class salary
}
}
classSupervarible
{
publicstaticvoid main(String[]args)
10.
Page 10 of
Inthe above program in Employee and HR class salary is common properties of
both class the instance of current or derived class is referred by instance by default but here w
Program using super keyword at variable level Example
classEmployee
{
float salary=10000;
}
class HR extendsEmployee
{
float salary=20000;
void display()
{
System.out.println("Salary: "+super.salary);//print base class salary
}
}
classSupervarible
{
publicstaticvoid main(String[]args)
{
HR obj=new HR(); obj.display();
}
}
classStudent
{
HR obj=new
HR();
obj.display();
}
}
Output
Salary: 20000.0
Super Keyword at Method Level
The super keyword can also be used to invoke or call parent class method. It
should be use in case of method overriding. In other word super keyword use when
base class method name and derived class method name have same name.
Example of super keyword at method level
Example
11.
classStudent
{
void message()
{
System.out.println("Good MorningSir");
}
}
Page 11 of
{
void message()
{
System.out.println("Good Morning Sir");
}
}
classFacultyextendsStudent
{
void message()
{
System.out.println("Good Morning Students");
}
void display()
{
message();//will invoke or call current class message() method
super.message();//will invoke or call parent class message() method
}
publicstaticvoid main(Stringargs[])
{
Student s=newStudent();
s.display();
}
}
Output
Good Morning Students
Good Morning Sir
In the above example Student and Faculty both classes have message() method
if we call message() method from Student class, it will call the message() method of
Student class not of Person class because priority of local is high.
In case there is no method in subclass as parent, there is no need to use
super. In the example given below message() method is invoked from Student class
but Student class does not have message() method, so you can directly call
message() method.
Program where super is not required
Example
12.
Page 12 of
classFacultyextendsStudent
{
voiddisplay()
{
message();//will invoke or call parent class message() method
}
publicstaticvoid main(Stringargs[])
{
Student s=newStudent();
s.display();
}
}
Output
Good Morning Sir
Super Keyword at Constructor Level
The super keyword can also be used to invoke or call the parent class
constructor.
Constructor are calling from bottom to top and executing from top to bottom.
To establish the connection between base class constructor and derived
class constructors JVM provides two implicit methods they are:
Super()
Super(...)
Super()
Super() It is used for calling super class default constructor from the context of derived
class constructors.
Super keyword used to call base class constructor
Syntax
classEmployee
{
Employee()
{
System.out.println("Employee class Constructor");
}
}
class HR extendsEmployee
{
HR()
{
super();//will invoke or call parent class
constructor System.out.println("HR class
Constructor");
}
}
13.
classSupercons
{
publicstaticvoid main(String[]args)
{
HR obj=newHR();
}
}
Page 13 of
Output
Note: super() is added in each class constructor automatically by compiler.
In constructor, default constructor is provided by compiler automatically but it
also adds super()before the first statement of constructor.If you are creating your own
constructor and you do not have either this() or super() as the first statement,
compiler will provide super() as the first statement of the constructor.
Super(...)
Super(...) It is used for calling super class parameterize constructor from the
context of derived class constructor.
Important rules
Whenever we are using either super() or super(...) in the derived class
constructors the superalways must be as a first executable statement in the body
of derived class constructor otherwise we get a compile time error.
Employee class
Constructor HR class
Constructor
14.
Rule 1 andRule 3
Page 14 of
The following diagram use possibilities of using super() and super(.......)
Whenever the derived class constructor want to call default constructor of base
class, in the context of derived class constructors we write super(). Which is optional to
write because every base class constructor contains single form of default
constructor?
Rule 2 and Rule 4
Whenever the derived class constructor wants to call parameterized constructor
of base class in the context of derived class constructor we must write super(...). which
is mandatory to write because a base class may contain multiple forms of
parameterized constructors.
15.
Page 15 of
FinalKeyword In Java
CHAPTER- III
FINAL KEYBOARD & METHOD
The final keyword in java is used to restrict the user. The java final keyword can
be used in many context. Final can be:
1. variable
2. method
3. class
The final keyword can be applied with the variables, a final variable that have no
value it is called blank final variable or uninitialized final variable. It can be initialized in
the constructor only. The blank final variable can be static also which will be initialized
in the static block only. We will have detailed learning of these. Let's first learn the
basics of final keyword.
1. Java final variable
If you make any variable as final, you cannot change the value of final
variable(It will be constant).
Example of final variable
There is a final variable speedlimit, we are going to change the value of this
variable, but It can't be changed because final variable once assigned a value can
never be changed.
a. class Bike9{
b. final int speedlimit=90;//final variable
c. void run(){
d. speedlimit=400;
e. }
f. public static void main(String args[]){
g. Bike9 obj=new Bike9();
h. obj.run();
i. }
j. }//end of class
Test it Now
Output:Compile Time
Error
2. Java final method
If you make any method as final, you cannot override it.
Example of final method
a. class Bike{
b. final void run(){System.out.println("running");}
c. }
d.
e. class Honda extends Bike{
f. void run(){System.out.println("running safely with
100kmph");} g.
h. public static void main(String args[]){
i. Honda honda= new Honda();
j. honda.run();
k. }
l. }
Output:Compile Time Error
16.
Page 16 of
3.Java final class
If you make any class as final, you cannot extend it.
Example of final class
a. final class Bike{}
b. class Honda1 extends Bike{
c. void run(){System.out.println("running safely with
100kmph");} d.
e. public static void main(String args[]){
f. Honda1 honda= new Honda1();
g. honda.run();
h. }
i. }
Output:Compile Time Error
Q. Is final method inherited?
Ans: Yes, final method is inherited but you cannot override it. For Example:
a. class Bike{
b. final void run(){System.out.println("running...");}
c. }
d. class Honda2 extends Bike{
e. public static void main(String args[]){
f. new Honda2().run();
g. }
h. }
Output:running...
Q)What is blank or uninitialized final variable?
A final variable that is not initialized at the time of declaration is known as
blank final variable.
If you want to create a variable that is initialized at the time of creating object and
once initialized may not be changed, it is useful. For example PAN CARD number of an
employee.
It can be initialized only in constructor.
Example of blank final variable
a. class Student{
b. int id;
c. String name;
d. final String PAN_CARD_NUMBER;
e. ...
f. }
Que) Can we initialize blank final variable?
Yes, but only in constructor. For example:
a. class Bike10{
b. final int speedlimit;//blank final
variable c.
d. Bike10(){
e. speedlimit=70;
f. System.out.println(speedlimit);
17.
Page 17 of
g.}
h.
i. public static void main(String args[]){
j. new Bike10();
k. }
l. }
Output: 70
Static blank final variable
A static final variable that is not initialized at the time of declaration is known
as static blank final variable. It can be initialized only in static block.
Example of static blank final variable
a. class A{
b. static final int data;//static blank final variable
c. static{ data=50;}
d. public static void main(String args[]){
e. System.out.println(A.data);
f. }
18.
Page 18 of
Packagesin Java are the way to organize files when a project has many modules. Same
like we organized our files in Computer. For example, we store all movies in one folder and
Advantage of package
Package in Java
CHAPTER – IV
PACKAGE IN JAVA
A package is a collection of similar types of classes, interfaces and sub-packages.
Purpose of package
The purpose of package concept is to provide common classes and interfaces
for any program separately. In other words if we want to develop any class or
interface which is common for most of the java programs than such common classes
and interfaces must be place in a package.
a. Package is used to categorize the classes and interfaces so that they can be easily
maintained
b. Application development time is less, because reuse the code
c. Application memory space is less (main memory)
d. Application execution time is less
e. Application performance is enhance (improve)
f. Redundancy (repetition) of code is minimized
g. Package provides access protection.
h. Package removes naming
collision. i.
Types of package
Package is classified into two types.
19.
Page 19 of
1.Predefined or built-in package
2. User defined package
Predefined or built-in package
These are the package which are already designed by the Sun Microsystem and
supply as a part of java API, every predefined package is collection of predefined
classes, interfaces and sub-package.
User defined package
If any package is designed by the user is known as user defined package. User
defined package are those which are developed by java programmer and supply as
a part of their project to deal with common requirement.
Rules to create user defined package
a. Package statement should be the first statement of any package program.
b. Choose an appropriate class name or interface name and whose modifier
must be public.
c. Any package program can contain only one public class or only one public
interface but it can contain any number of normal classes.
d. Package program should not contain any main class (that means it should not
contain any main()
e. Modifier of constructor of the class which is present in the package must be a
public. (This is not applicable in case of interface because interface have no
constructor.)
f. The modifier of method of class or interface which is present in the
package must be public (This rule is optional in case of interface because
interface methods by default public)
g. Every package program should be save either with public class name
or public Interface name
Compile package programs
For compilation of package program first we save program with public className.java
and it compile using below syntax:
20.
Syntax
javac-d . className.java
javac-dpath className.java
Example
Import above class in below program using import packageName.className
Example
importmypack.A; publicclassHello
{
publicstaticvoid main(Stringarg[])
{
A a=new A(); a.show();
System.out.println("show() class A");
}
}
packagemypack; publicclass A
{
publicvoid show()
{
System.out.println("Sum method");
}
}
Page 20 of
Syntax
Explanations: In above syntax "-d" is a specific tool which is tell to java compiler
create a separate folder for the given package in given path. When we give specific
path then it create a new folder at that location and when we use . (dot) then it crate
a folder at current working directory.
Note: Any package program can be compile but can not be execute or run. These
programs can be executed through user defined program which are importing
package program.
Example of package program
Package program which is save with A.java and compile by javac -d . A.java
Explanations: In the above program first we create Package program which is save with
A.java and compiled by "javac -d . A.java". Again we import class "A" in class Hello
using "import mypack.A;" statement.
Java Access Modifiers – Public, Private, Protected & Default
21.
Page 21 of
Public,private and protected keywords while practising java programs, these are
called
access modifiers. An access modifier restricts the access of a class, constructor, data
member and method in another class. In java we have four access modifiers:
Default
Private
Protected
Public
1. Default access modifier
When we do not mention any access modifier, it is called default access
modifier. The scope of this modifier is limited to the package only. This means that if
we have a class with the default access modifier in a package, only those classes that
are in this package can access this class. No other class outside this package can access
this class. Similarly, if we have a default method or data member in a class, it would not
be visible in the class of another package. Lets see an example to understand this:
Default Access Modifier Example in Java
To understand this example, you must have the knowledge of packages in java.
In this example we have two classes, Test class is trying to access the default
method of Addition class, since class Test belongs to a different package, this
program would throw compilation error, because the scope of default modifier is
limited to the same package in which it is declared.
Addition.java
packageabcpackage;
publicclassAddition{
/* Since we didn't mention any access modifier here, it would
* be considered as default.
*/
intaddTwoNumbers(int a,int b){
returna+b;
}
}
Test.java
packagexyzpackage;
/* We are importing the abcpackage
* but still we will get error because the
* class we are trying to use has default access
* modifier.
*/
importabcpackage.*
; publicclassTest{
publicstaticvoid main(Stringargs[]){
Additionobj=newAddition();
/* It will throw error because we are trying to access
* the default method in another package
*/
obj.addTwoNumbers(10,21);
}
22.
Page 22 of
}
Output:
Exceptioninthread "main"java.lang.Error:Unresolved compilation
problem: The method addTwoNumbers(int,int)from the type Addition
is not visible at xyzpackage.Test.main(Test.java:12)
2. Private access modifier
The scope of private modifier is limited to the class only.
a. Private Data members and methods are only accessible within the class
b. Class and Interface cannot be declared as private
c. If a class has private constructor then you cannot create the object of that
class from outside of the class.
Let’s see an example to understand this:
Private access modifier example in java
This example throws compilation error because we are trying to access the
private data member and method of class ABC in the class Example. The private data
member and method are only accessible within the class.
class ABC{
privatedoublenum=100
; privateint square(int
a){
return a*a;
}
}
publicclassExample{
publicstaticvoid main(Stringargs[]){
ABC obj=new ABC();
System.out.println(obj.num);
System.out.println(obj.square(10));
}
}
Output:
Compile- time error
3. Protected Access Modifier
Protected data member and method are only accessible by the classes of
the same package and the subclasses present in any package. You can also say that
the protected access modifier is similar to default access modifier with one
exception that it has visibility in sub classes.
Classes cannot be declared protected. This access modifier is generally used in a
parent child relationship.
Protected access modifier example in Java
Indent In this example the class Test which is present in another package is able
to call the addTwoNumbers() method, which is declared protected. This is because
the Test class extends class Addition and the protected modifier allows the access of
protected members in subclasses (in any packages).
Addition.java
Package abcpackage;
23.
Page 23 of
publicclass Addition{
protected int addTwoNumbers(int a,int b){
return a+b;
}
}
Test.java
Package
xyzpackage; Import
abcpackage.*;
class Test extends Addition{
public static void main(String args[]){
Test obj=new Test();
System.out.println(obj.addTwoNumbers(11,22));
}
}
Output:
33
4. Public access modifier
The members, methods and classes that are declared public can be
accessed from anywhere. This modifier doesn’t put any restriction on the access.
Public access modifier example in java
The method addTwoNumbers() has public modifier and class Test is able to
access this method without even extending the Addition class. This is because public
modifier has visibility everywhere.
Addition.java
Package
abcpackage; public
class Addition{
public int addTwoNumbers(int a,int
b){ returna+b;
}
}
Test.java
Package
xyzpackage; Import
abcpackage.*; Class
Test{
Public static void main(String args[]){
Addition obj=new Addition();
System.out.println(obj.addTwoNumbers(100,1));
}
}
Output:
101
Lets see the scope of these access modifiers in tabular form:
The scope of access modifiers in tabular form
+ + + + +
|Class|Package|Subclass|Subclass|Outside|
|||(same package)|(diff package)|Class|
/* File name:
NameOfInterface.java */
importjava.lang.*;
// Any number of import statements
Public interface NameOfInterface{
// Any number of final, static fields
// Any number of abstract method declarations
}
Page 26 of
Java - Interfaces
CHAPTER – V
JAVA – INTERFACES
An interface is a reference type in Java. It is similar to class. It is a collection
of abstract methods. A class implements an interface, thereby inheriting the
abstract methods of the interface.
Along with abstract methods, an interface may also contain constants, default
methods, static methods, and nested types. Method bodies exist only for default
methods and static methods.
Writing an interface is similar to writing a class. But a class describes the
attributes and behaviors of an object. And an interface contains behaviors that a
class implements.
Unless the class that implements the interface is abstract, all the methods of
the interface need to be defined in the class.
An interface is similar to a class in the following ways −
a. An interface can contain any number of methods.
b. An interface is written in a file with a .java extension, with the name of the
interface matching the name of the file.
c. The byte code of an interface appears in a .class file.
d. Interfaces appear in packages, and their corresponding bytecode file must
be in a directory structure that matches the package name.
However, an interface is different from a class in several ways, including −
a. You cannot instantiate an interface.
b. An interface does not contain any constructors.
c. All of the methods in an interface are abstract.
d. An interface cannot contain instance fields. The only fields that can appear
in an interface must be declared both static and final.
e. An interface is not extended by a class; it is implemented by a class.
f. An interface can extend multiple interfaces.
Declaring Interfaces
The interface keyword is used to declare an interface. Here is a simple
example to declare an interface –
Example
Following is an example of an interface −
Interfaces have the following properties −
a. An interface is implicitly abstract. You do not need to use the abstract
keyword while declaring an interface.
b. Each method in an interface is also implicitly abstract, so the abstract
keyword is not needed.
c. Methods in an interface are implicitly public.
Example
27.
Page 27 of
ImplementingInterfaces
When a class implements an interface, you can think of the class as signing a
contract, agreeing to perform the specific behaviors of the interface. If a class does not
perform all the behaviors of the interface, the class must declare itself as abstract.
A class uses the implements keyword to implement an interface. The
implements keyword appears in the class declaration following the extends portion of
the declaration.
Example
This will produce the following result –
Output
Mammal eats
Mammal travels
When overriding methods defined in interfaces, there are several rules to be followed:
a. Checked exceptions should not be declared on implementation methods other
than the ones declared by the interface method or subclasses of those declared
by the interface method.
b. The signature of the interface method and the same return type or subtype
should be maintained when overriding the methods.
c. An implementation class itself can be abstract and if so, interface methods need
not be implemented.
When implementation interfaces, there are several rules:
a. A class can implement more than one interface at a time.
b. A class can extend only one class, but implement many interfaces.
/* File name :
Animal.java */
interfaceAnimal{
publicvoid eat();
publicvoid travel();
}
/* File name : MammalInt.java */
Public class Mammal Intimplements Animal{
Public void eat(){
System.out.println("Mammal eats");
}
Public void travel(){
System.out.println("Mammal
travels");
}
publicintnoOfLegs(){
return0;
}
publicstaticvoid
main(Stringargs[]){ MammalInt
m =newMammalInt(); m.eat();
m.travel();
}
}
28.
Package java.util;
Page 28of
c. An interface can extend another interface, in a similar way as a class can extend
another
class.
Extending Interfaces
An interface can extend another interface in the same way that a class can
extend another class. The extends keyword is used to extend an interface, and the
child interface inherits the methods of the parent interface.
The following Sports interface is extended by Hockey and Football interfaces.
Example
The Hockey interface has four methods, but it inherits two from Sports;
thus, a class that implements Hockey needs to implement all six methods. Similarly, a
class that implements Football needs to define the three methods from Football and
the two methods from Sports.
Extending Multiple Interfaces
A Java class can only extend one parent class. Multiple inheritance is not
allowed. Interfaces are not classes, however, and an interface can extend more
than one parent interface.
The extends keyword is used once, and the parent interfaces are declared in a
comma- separated list.
For example, if the Hockey interface extended both Sports and Event, it
would be declared as –
Example
Tagging Interfaces
The most common use of extending interfaces occurs when the parent interface
does not contain any methods. For example, the MouseListener interface in the
java.awt.event package extended java.util.EventListener, which is defined as –
Example
// Filename: Sports.java
Public interface Sports{
Public void setHomeTeam(String
name); Public void
setVisitingTeam(String name);
}
// Filename: Football.java
Public interface Football extends
Sports{ Public void
homeTeamScored(int points); Public
void visitingTeamScored(int points);
Public void endOfQuarter(int
quarter);
}
// Filename: Hockey.java
Public interface
HockeyextendsSports{ Public void
homeGoalScored();
Public void visitingGoalScored();
Public void endOfPeriod(int period);
Public void overtimePeriod(intot);
Public interface Hockey extends Sports , Event
29.
MyAbstractClassmyClassInstanc
e = newMyAbstractClass();
//not valid
Page 29 of
An interface with no methods in it is referred to as a tagging interface. There
are two basic design purposes of tagging interfaces −
Creates a common parent: As with the EventListener interface, which is extended by
dozens of other interfaces in the Java API, you can use a tagging interface to create
a common parent among a group of interfaces. For example, when an interface
extends EventListener, the JVM knows that this particular interface is going to be
used in an event delegation scenario.
Adds a data type to a class: This situation is where the term, tagging comes from. A
class that implements a tagging interface does not need to define any methods (since
the interface does not have any), but the class becomes an interface type through
polymorphism.
Abstract
A Java abstract class is a class which cannot be instantiated, meaning you cannot
create new instances of an abstract class. The purpose of an abstract class is to
function as a base for subclasses. This Java abstract class tutorial explains how abstract
classes are created in Java; what rules apply to them. This tutorial gets into the purpose
of abstract classes in Java in more detail towards the end of this text.
Declaring an Abstract Class in Java
In Java you declare that a class is abstract by adding the abstract keyword to
the class declaration. Here is a Java abstract class example:
That is all there is to declaring an abstract class in Java. Now you cannot create
instances
ofMyAbstractClass. Thus, the following Java code is no longer valid:
If you try to compile the code above the Java compiler will generate an error,
saying that you cannot instantiate MyAbstractClass because it is an abstract class.
Abstract Methods
An abstract class can have abstract methods. You declare a method abstract by
adding the abstractkeyword in front of the method declaration. Here is a Java
abstract method example:
An abstract method has no implementation. It just has a method signature. Just like
methods in a Java interface.
public interface EventListener
{}
public abstract class MyAbstractClass {
}
public abstract class MyAbstractClass {
public abstract void abstractMethod();
}
30.
public class MySubClassextends MyAbstractClass {
public void abstractMethod() {
System.out.println("My method implementation");
}
}
Page 30 of
If a class has an abstract method, the whole class must be declared abstract. Not all
methods in an abstract class have to be abstract methods. An abstract class can have a
mixture of abstract and non-abstract methods.
Subclasses of an abstract class must implement (override) all abstract methods
of its abstract superclass. The non-abstract methods of the superclass are just
inherited as they are. They can also be overridden, if needed.
Here is an example subclass of the abstract class MyAbstractClass:
Notice how MySubClass has to implement the abstract method abstractMethod()
from its abstract superclass MyAbstractClass.
The only time a subclass of an abstract class is not forced to implement all
abstract methods of its superclass, is if the subclass is also an abstract class.
Exception handling in java with examples
Exception handling is one of the most important feature of java
programming that allows us to handle the runtime errors caused by exceptions. In
this guide, we will learn what is an exception, types of it, exception classes and how to
handle exceptions in java with examples
31.
Page 31 of
Whatis an exception?
CHAPTER – VI
EXCEPTION HANDLING
An Exception is an unwanted event that interrupts the normal flow of the
program. When an exception occurs program execution gets terminated. In such
cases we get a system generated error message. The good thing about exceptions is
that they can be handled in Java. By handling the exceptions we can provide a
meaningful message to the user about the issue rather than a system generated
message, which may not be understandable to a user.
Why an exception occurs?
There can be several reasons that can cause a program to throw exception.
For example: Opening a non-existing file in your program, Network connection
problem, bad input data provided by user etc.
Exception Handling
If an exception occurs, which has not been handled by programmer then
program execution gets terminated and a system generated error message is
shown to the user. For example, look at the system generated exception below:
An exception generated by the system is given below
Exceptionin thread "main"java.lang.ArithmeticException:/by zero at
ExceptionDemo.main(ExceptionDemo.java:5)
ExceptionDemo:Theclass name
main :The method name
ExceptionDemo.java :The filename
java:5:Line number
This message is not user friendly so a user will not be able to understand
what went wrong. In order to let them know the reason in simple language, we
handle exceptions. We handle such conditions and then prints a user-friendly
warning message to user, which lets them correct the error as most of the time
exception occurs due to bad data provided by user.
Advantage of exception handling
Exception handling ensures that the flow of the program doesn’t break when an
exception occurs. For example, if a program has bunch of statements and an exception
occurs mid way after executing certain statements then the statements after the
exception will not execute and the program will
terminate abruptly. By handling we make sure that all the statements
execute and the flow of program doesn’t break.
Difference between error and exception
Errors indicate that something severe enough has gone wrong, the application
should crash rather than try to handle the error.
Exceptions are events that occurs in the code. A programmer can handle such
conditions and take necessary corrective actions. Few examples:
NullPointerException - When you try to use a reference that points to null.
ArithmeticException - When bad data is provided by user, for example, when you try to
divide a number by zero this exception occurs because dividing a number by zero
is undefined.
ArrayIndexOutOfBoundsException - When you try to access the elements of an array
out of its bounds, for example array size is 5 (which means it has five elements) and
you are trying to access the 10th element.
32.
Page 32 of
Typesof exceptions
There are two types of exceptions in
Java: 1.Checked exceptions
2.Unchecked exceptions
Checked exceptions
All exceptions other than Runtime Exceptions are known as Checked exceptions
as the compiler checks them during compilation to see whether the programmer has
handled them or not. If these exceptions are not handled/declared in the program,
you will get compilation error. For example, SQLException, IOException,
ClassNotFoundException etc.
Unchecked Exceptions
Runtime Exceptions are also known as Unchecked Exceptions. These exceptions
are not checked at compile-time so compiler does not check whether the programmer
has handled them or not but it’s the responsibility of the programmer to handle these
exceptions and provide a safe exit. For example, ArithmeticException,
NullPointerException, ArrayIndexOutOfBoundsException etc.
Try Catch in Java – Exception handling
Try-catch block is used for exception handling.
Try block
The try block contains set of statements where an exception can occur. A try
block is always followed by a catch block, which handles the exception that occurs
in associated try block. A try block must be followed by catch blocks or finally block
or both.
Syntax of try block
try{
//statements that may cause an exception
}
While writing a program, if you think that certain statements in a program can
throw a exception, enclosed them in try block and handle that exception.
33.
Page 33 of
Catchblock
A catch block is where you handle the exceptions, this block must follow the try
block. A single try block can have several catch blocks associated with it. You can
catch different exceptions in different catch blocks. When an exception occurs in try
block, the corresponding catch block that handles that particular exception
executes. For example, if an arithmetic exception occurs in try block then the
statements enclosed in catch block for arithmetic exception executes.
Syntax of try catch in java
try
{
//statements that may cause an exception
}
catch(exception(type) e(object))
{
//error handling code
}
Example: try catch block
If an exception occurs in try block, then the control of execution is passed to
the corresponding catch block. A single try block can have multiple catch blocks
associated with it, you should place the catch blocks in such a way that the generic
exception handler catch block is at the last(see in the example below).
The generic exception handler can handle all the exceptions but you should
place is at the end, if you place it at the before all the catch blocks then it will display
the generic message. You always want to give the user a meaningful message for each
type of exception rather than a generic message.
classExample1{
public static void main(String args[])
{ int num1, num2;
try{
/* We suspect that this block of statement can throw
* exception so we handled it by placing these statements
* inside try and handled the exception in catch block
*/
num1 =0;
num2 =62/ num1;
System.out.println(num2);
System.out.println("Hey I'm at the end of try block");
}
catch(ArithmeticException e){
/* This block will only execute if any Arithmetic exception
* occurs in try block
*/
System.out.println("You should not divide a number by zero");
}
catch(Exception e){
/* This is a generic Exception handler which means it can handle
34.
Page 34 of
*all the exceptions. This will execute if the exception is not
* handled by previous catch blocks.
*/
System.out.println("Exception occurred");
}
System.out.println("I'm out of try-catch block in Java.");
}
}
Output:
You should not divide a number by
zero I'm out of try-catch block in
Java.
Multiple catch blocks in Java
Rules about multiple catch blocks:
1.A single try block can have any number of catch blocks.
2.A generic catch block can handle all the exceptions. Whether it is Array Index Out Of
Bounds Exception or Arithmetic Exception or Null Pointer Exception or any other type
of exception, this handles all of them. To see the examples of NullPointerException
and ArrayIndexOutOfBoundsException, refer this article:
Exception Handling example programs.
catch(Exception e){
//This catch block catches all the exceptions
}
If you are wondering why we need other catch handlers when we have a generic that
can handle all. This is because in generic exception handler you can display a message
but you are not sure for which type of exception it may trigger so it will display the
same message for all the exceptions and user may not be able to understand which
exception occurred. Thats the reason you should place is at the end of all the
specific exception catch blocks
3.If no exception occurs in try block then the catch blocks are completely ignored.
4. Corresponding catch blocks execute for that specific type of exception:
catch(ArithmeticException e) is a catch block that can handle ArithmeticException
catch(NullPointerException e) is a catch block that can handle
NullPointerException
5. You can also throw exception, which is an advanced topic and I have covered it
in separate tutorials: user defined exception, throws keyword, throw vs throws.
Example of Multiple catch blocks
classExample2{
public static void main(String args[]){
try{
int a[]=newint[7];
a[4]=30/0;
System.out.println("First print statement in try block");
}
catch(ArithmeticException e){
System.out.println("Warning: ArithmeticException");
}
35.
Page 35 of
catch(ArrayIndexOutOfBoundsExceptione){
System.out.println("Warning: ArrayIndexOutOfBoundsException");
}
catch(Exception e){
System.out.println("Warning: Some Other exception");
}
System.out.println("Out of try-catch block...");
}
}
Output:
Warning:
ArithmeticException Out of
try-catch block...
In the above example there are multiple catch blocks and these catch blocks
executes sequentially when an exception occurs in try block. Which means if you put
the last catch block ( catch(Exception e)) at the first place, just after try block then in
case of any exception this block will execute as it can handle all exceptions. This catch
block should be placed at the last to avoid such situations.
Finally block
java finally block. executes whether an exception occurs or not. You should
place those statements in finally blocks, that must execute whether exception
occurs or not.
Nested try catch block in Java – Exception handling
When a try catch block is present in another try block then it is called the
nested try catch block. Each time a try block does not have a catch handler for a
particular exception, then the catch blocks of parent try block are inspected for that
exception, if match is found that that catch block executes.
If neither catch block nor parent catch block handles exception then the
system generated message would be shown for the exception, similar to what we see
when we don’thandle exception.
Lets see the syntax first then we will discuss this with an example.
Syntax of Nested try Catch
....
//Main try block
try{
statement 1;
statement 2;
//try-catch block inside another try
block try{
statement 3;
statement 4;
//try-catch block inside nested try
block try{
statement 5;
statement 6;
}
catch(Exception e2){
//Exception Message
}
36.
Page 36 of
}
catch(Exceptione1){
//Exception Message
}
}
//Catch of Main(parent) try
block catch(Exception e3){
//Exception Message
}
Nested Try Catch Example
Here we have deep (two level) nesting which means we have a try-catch block
inside a nested try block. To make you understand better I have given the names to
each try block in comments like try-block2, try-block3 etc.
This is how the structure is: try-block3 is inside try-block2 and try-block2 is inside
main try-block, you can say that the main try-block is a grandparent of the try-
block3. Refer the explanation which is given at the end of this code.
classNestingDemo{public static
void main(Stringargs[]){
//main try-
block try{
//try-block2
try{
//try-block3
try{
intarr[]={1,2,3,4};
/* I'm trying to display the value of
* an element which doesn't exist. The
* code should throw an exception
*/
System.out.println(arr[10])
;
}catch(ArithmeticException e){
System.out.print("Arithmetic Exception");
System.out.println(" handled in try-block3");
}
}
catch(ArithmeticException e){
System.out.print("Arithmetic Exception");
System.out.println(" handled in try-block2");
}
}
catch(ArithmeticException e3){
System.out.print("Arithmetic Exception");
System.out.println(" handled in main try-block");
}
catch(ArrayIndexOutOfBoundsException e4){
System.out.print("ArrayIndexOutOfBoundsException");
System.out.println(" handled in main try-block");
}
37.
Page 37 of
catch(Exceptione5){
System.out.print("Exception");
System.out.println(" handled in main try-
block");
}
}
}
Output:
ArrayIndexOutOfBoundsException handled in main try-block
As you can see that the ArrayIndexOutOfBoundsException occurred in the
grandchild try-block3. Since try-block3 is not handling this exception, the control then
gets transferred to the parent try-block2 and looked for the catch handlers in try-
block2. Since the try-block2 is also not handling that exception, the control gets
transferred to the main (grandparent) try- block where it found the appropriate
catch block for exception. This is how the the nesting structure works.
Example 2: Nested try block
classNest{
publicstaticvoid main(Stringargs[]){
//Parent try block
try{
try{
//Child try block1
System.out.println("Inside block1");
int b =45/0;
System.out.println(b);
}
catch(ArithmeticException e1){
System.out.println("Exception: e1");
}
//Child try
block2 try{
System.out.println("Inside block2");
int b =45/0;
System.out.println(b);
}
catch(ArrayIndexOutOfBoundsException e2){
System.out.println("Exception: e2");
}
System.out.println("Just other statement");
}
catch(ArithmeticException e3){
System.out.println("Arithmetic Exception");
System.out.println("Inside parent try catch block");
}
catch(ArrayIndexOutOfBoundsException e4){
System.out.println("ArrayIndexOutOfBoundsException");
System.out.println("Inside parent try catch block");
}
catch(Exception e5){
System.out.println("Exception");
System.out.println("Inside parent try catch block");
38.
Page 38 of
}
System.out.println("Nextstatement..");
}
}
Output:
Inside
block1
Exception:
e1 Inside
block2
ArithmeticException
nside parent trycatch
block Next statement..
This is another example that shows how the nested try block works. You can
see that there are two try-catch block inside main try block’s body. I’ve marked
them as block 1 and block 2 in above example.
Block1: I have divided an integer by zero and it caused an ArithmeticException, since the
catch of block1 is handling ArithmeticException "Exception: e1" displayed.
Block2: In block2, ArithmeticException occurred but block 2 catch is only handling Array
Index Out Of Bounds Exception so in this case control jump to the Main try-
catch(parent) body and checks for the ArithmeticException catch handler in parent
catch blocks. Since catch of parent try block is handling this exception using generic
Exception handler that handles all exceptions, the message “Inside parent try catch block”
displayed as output.
Parent try Catch block: No exception occurred here so the “Next statement.” displayed.
The important point to note here is that whenever the child catch blocks are not
handling any exception, the jumps to the parent catch blocks, if the exception is not
handled there as well then, the program will terminate abruptly showing system
generated message.
Checked and unchecked exceptions in java with examples
There are two types of exceptions: checked exception and unchecked exception.
In this guide, we will discuss them. The main difference between checked and
unchecked exception is that the checked exceptions are checked at compile-time
while unchecked exceptions are checked at runtime.
What are checked exceptions?
Checked exceptions are checked at compile-time. It means if a method is
throwing a checked exception then it should handle the exception using try-catch block
or it should declare the exception using throws keyword, otherwise the program
will give a compilation error.
Lets understand this with the help of an example:
Checked Exception Example
In this example we are reading the file myfile.txt and displaying its content
on the screen. In this program there are three places where a checked exception is
thrown as mentioned in the comments below. FileInputStream which is used for
specifying the file path and name, throws FileNotFoundException. The read() method
which reads the file content throws IOException and the close() method which
closes the file input stream also throws IOException.
import java.io.*;
39.
Page 39 of
classExample{
publicstaticvoidmain(Stringargs[])
{
FileInputStreamfis=null;
/*This constructor FileInputStream(File filename)
* throws FileNotFoundException which is a checked
* exception
*/
fis=newFileInputStream("B:/myfile.txt");
int k;
/* Method read() of FileInputStream class also throws
* a checked exception: IOException
*/
while(( k =fis.read())!=-1)
{
System.out.print((char)k);
}
/*The method close() closes the file input stream
* It throws
IOException*/
fis.close();
}
}
Output:
Exceptionin thread "main"java.lang.Error:Unresolved compilation problems:
Unhandled exception type FileNotFoundException
Unhandled exception type
IOException Unhandled exception
type IOException
Why this compilation error?
As I mentioned in the beginning that checked exceptions gets checked during
compile time. Since, we didn’t handled/declared the exceptions, our program gave the
compilation error.
How to resolve the error?
There are two ways to avoid this error. We will see both the ways one by one.
Method 1: Declare the exception using throws keyword.
As we know that all three occurrences of checked exceptions are inside main()
method so one way to avoid the compilation error is: Declare the exception in the
method using throws keyword. You may be thinking that our code is throwing
FileNotFoundException and IOException both then why we are declaring the
IOException alone. The reason is that IOException is a parent class of
FileNotFoundException so it by default covers that. If you want you can declare them
like this public static void main(String args[]) throws IOException,
FileNotFoundException.
import java.io.*;
classExample{
publicstaticvoid main(Stringargs[])throwsIOException
40.
Page 40 of
{
FileInputStreamfis=null;
fis=newFileInputStream("B:/myfile.txt")
;int k;
while(( k =fis.read())!=-1)
{
System.out.print((char)k);
}
fis.close();
}
}
Output:
File content is displayed on the screen.
Method 2: Handle them using try-catch blocks.
The approach we have used above is not good at all. It is not the best
exception handling practice. You should give meaningful message for each exception
type so that it would be easy for someone to understand the error. The code should
be like this:
import java.io.*;
class Example{
public static void main(String args[])
{
FileInputStreamfis=null;
try{
fis=newFileInputStream("B:/myfile.txt")
;
}catch(FileNotFoundExceptionfnfe)
{ System.out.println("The specified file is
not "+
"present at the given path");
}
int k;
try{
while(( k =fis.read())!=-1)
{
System.out.print((char)k);
}
fis.close();
}catch(IOExceptionioe){
System.out.println("I/O error occurred: "+ioe);
}
}
}
This code will run fine and will display the file content.
Here are the few other Checked Exceptions –
SQLException
IOException
ClassNotFoundException
InvocationTargetException
41.
Page 41 of
Whatare Unchecked exceptions?
Unchecked exceptions are not checked at compile time. It means if your
program is throwing an unchecked exception and even if you didn’t handle/declare
that exception, the program won’t give a compilation error. Most of the times these
exception occurs due to the bad data provided by user during the user-program
interaction. It is up to the programmer to judge the conditions in advance, that can
cause such exceptions and handle them appropriately. All Unchecked exceptions
are direct sub classes of RuntimeException class.
Lets understand this with an example:
Unchecked Exception Example
Class Example{
Public tatic oid main(String args[])
{
int num1=10;
int num2=0;
/*Since I'm dividing an integer with 0
* it should throw ArithmeticException
*/
int res=num1/num2;
System.out.println(res);
}
}
If you compile this code, it would compile successfully however when you will run it, it would
throw ArithmeticException. That clearly shows that unchecked exceptions are not
checked at compile-time, they occurs at runtime. Lets see another example.
classExample{
public static void main(String args[])
{
intarr[]={1,2,3,4,5};
/* My array has only 5 elements but we are trying to
* display the value of 8th element. It should throw
* ArrayIndexOutOfBoundsException
*/
System.out.println(arr[7]);
}
}
This code would also compile successfully since Array Index Out Of Bounds Exception is also
an
unchecked exception.
Note: It doesn’t mean that compiler is not checking these exceptions so we shouldn’t
handle them. In fact we should handle them more carefully. For e.g. In the above
example there should be a exception message to user that they are trying to display a
value which doesn’t exist in array so that user would be able to correct the issue.
Class Example{
Public static void main(String
args[]){ try{
int arr[]={1,2,3,4,5};
System.out.println(arr[7]);
}
42.
Page 42 of
catch(ArrayIndexOutOfBoundsExceptione){
System.out.println("The specified index does not exist
"+ "in array. Please correct the error.");
}
}
}
Output:
The specified index does not exist in array.Please correct the error.
Here are the few unchecked exception classes:
a. NullPointerException
b. ArrayIndexOutOfBoundsException
c. ArithmeticException
d. IllegalArgumentException
e. NumberFormatException
Java Finally block – Exception handling
A finally block contains all the crucial statements that must be executed
whether exception occurs or not. The statements present in this block will always
execute regardless of whether exception occurs in try block or not such as closing a
connection, stream etc.
Syntax of Finally block
try{
//Statements that may cause an exception
}
catch{
//Handling exception
}
finally{
//Statements to be executed
}
A Simple Example of finally block
Here you can see that the exception occurred in try block which has been
handled in catch block, after that finally block got executed.
Class Example
{
Public static void main(String args[]){
try{
intnum=121/0;
System.out.println(num);
}
catch(ArithmeticException e){
System.out.println("Number should not be divided by zero");
}
/* Finally block will always execute
* even if there is no exception in try block
*/
finally
{
System.out.println("This is finally block");
}
System.out.println("Out of try-catch-finally");
}
43.
Page 43 of
}
Output:
Numbershould not be divided by
zero Thisisfinally block
Out of try-catch-finally
Few Important points regarding finally block
1. A finally block must be associated with a try block, you cannot use finally without a
try block. You should place those statements in this block that must be executed
always.
2. Finally block is optional, as we have seen in previous tutorials that a try-catch
block is sufficient for exception handling, however if you place a finally block then
it will always run after the execution of try block.
3. In normal case when there is no exception in try block then the finally block is
executed after try block. However if an exception occurs then the catch block is
executed before finally block.
4. An exception in the finally block, behaves exactly like any other exception.
5. The statements present in the finally block execute even if the try block contains
control transfer statements like return, break
or continue. Lets see an example to see how finally works when return
statement is present in try block:
Another example of finally block and return statement.
You can see that even though we have return statement in the method, the
finally block still runs.
Class Java Finally
{
Public static void main(String args[])
{
System.out.println(JavaFinally.myMethod());
}
Public static int myMethod()
{
try{
return112;
}
finally{
System.out.println("This is Finally block");
System.out.println("Finally block ran even after return
statement");
}
}
}
Output of above program:
This is Finally block
Finally block ran even after return
statement 112
Cases when the finally block doesn’t execute
The circumstances that prevent execution of the code in a finally block are:
44.
Page 44 of
Finallyand Close()
CHAPTER – VII
FINALLY () & CLOSE () STATEMENT
close() statement is used to close all the open streams in a program. It’s a good
practice to use close() inside finally block. Since finally block executes even if exception
occurs so you can be sure that all input and output streams are closed properly
regardless of whether the exception occurs or not.
For example:
....
try{
OutputStreamosf=newFileOutputStream("filename");
OutputStreamosb=newBufferedOutputStream(opf);
ObjectOutput op =newObjectOutputStream(osb);
try{
output.writeObject(writableObject);
}
finally{
op.close();
}
}
catch(IOException e1)
{ System.out.println(e1);
}
...
Finally block without catch
A try-finally block is possible without catch block. Which means a try block can be
used with finally without having a catch block.
...
InputStream input
=null; try{
input =newFileInputStream("inputfile.txt");
}
finally{
if(input !=null){
try{
in.close();
}catch(IOExceptionexp)
{ System.out.println(exp);
}
}
}
Finally block and System.exit()
System.exit() statement behaves differently than return statement. Unlike
return statement whenever System.exit() gets called in try block then Finally block doesn’t
execute. Here is a code snippet that demonstrate the same:
....
try{
//try block
45.
Page 45 of
System.out.println("Insidetry block");
System.exit(0)
}
catch(Exceptionexp){
System.out.println(exp);
}
finally{
System.out.println("Java finally block");
}
....
In the above example if the System.exit(0) gets called without any exception then finally
won’t execute. However, if any exception occurs while calling System.exit(0) then finally
block will be executed.
Try-catch-finally block
Either a try statement should be associated with a catch block or with finally.
Since catch performs exception handling and finally performs the cleanup, the
best approach is to use both of them.
Syntax:
try{
//statements that may cause an exception
}
catch(…){
//error handling code
}
finally{
//statements to be executed
}
Examples of Try catch finally blocks
Example 1: The following example demonstrate the working of finally block when no
exception occurs in try block
Class Example1{
Publicstatic void main(String args[])
{ try{
System.out.println("First statement of try block");
intnum=45/3;
System.out.println(num);
}
catch(ArrayIndexOutOfBoundsException e){
System.out.println("ArrayIndexOutOfBoundsException");
}
finally{
System.out.println("finally block");
}
System.out.println("Out of try-catch-finally block");
}
}
46.
Page 46 of
Output:
Firststatement of try
block 15
finally block
Out of try-catch-finally block
Example 2: This example shows the working of finally block when an exception
occurs in try block but is not handled in the catch block:
Class Example2{
Public static void main(String args[]){
try{
System.out.println("First statement of try block");
intnum=45/0;
System.out.println(num);
}
catch(ArrayIndexOutOfBoundsException e){
System.out.println("ArrayIndexOutOfBoundsException");
}
finally{
System.out.println("finally block");
}
System.out.println("Out of try-catch-finally block");
}
}
Output:
First statement of try
block finally block
Exceptionin thread "main"java.lang.ArithmeticException:/by
zero at
beginnersbook.com.Example2.main(Details.java:6)
As you can see that the system generated exception message is shown but before
that the finally block successfully executed.
Example 3: When exception occurs in try block and handled properly in catch
block Class Example3{
Public static void main(String args[]){
try{
System.out.println("First statement of try block");
intnum=45/0;
System.out.println(num);
}
catch(ArithmeticException e){
System.out.println("ArithmeticException");
}
finally{
System.out.println("finally block");
}
System.out.println("Out of try-catch-finally block");
}
}
Output:
47.
Page 47 of
Firststatement of try block
ArithmeticException
finally block
Out of try-catch-finally block
Flow of control in try/catch blocks:
When exception doesn’t occur:
When the statements that are present in try block doesn’t throw any exception
then first, the body of try block executes and then the code after catch blocks. In
this case catch block never runs as they are meant to run when an exception
occurs. For example-
classExample1
{
publicstaticvoid main(Stringargs[])
{
int x =10;
int y
=10; try{
intnum= x/y;
System.out.println("next-statement: Inside try block");
}
catch(Exception
ex)
{
System.out.println("Exception");
}
System.out.println("next-statement: Outside of try-catch");
}
}
Output:
next-statement:Insidetry block
next-statement:Outside of try-catch
In the above example exception didn’t occur in try block so catch block didn’t run.
When exception occurs:
First have a look at the example below and then we will discuss the output:
classExample1
{
publicstaticvoid main(String args[])
{
int x =0;
int y
=10; try{
intnum= y/x;
System.out.println("next-statement: Inside try block");
}
catch(Exception
ex)
{
48.
Page 48 of
}
}
Output:
System.out.println("ExceptionOccurred");
}
System.out.println("next-statement: Outside of try-catch");
ExceptionOccurred
next-statement:Outside of try-catch
Point to note in above example: There are two statements present inside try block.
Since exception occurred because of first statement, the second statement didn’t execute.
Hence we can conclude that if an exception occurs then the rest of the try block doesn’t
execute and control passes to catch block.
Flow of control in try/catch/finally blocks:
1. If exception occurs in try block’s body then control immediately
transferred(skipping rest of the statements in try block) to the catch block. Once
catch block finished execution then finally block and after that rest of the
program.
2. If there is no exception occurred in the code which is present in try block then
first, the try block gets executed completely and then control gets transferred
to finally block (skipping catch blocks).
3. If a return statement is encountered either in try or catch block. In this case
finally block runs. Control first jumps to finally and then it returned back to
return statement.
Lets see this example to understand the above mentioned points:
Class TestExceptions{
Staticvoid myMethod(inttestnum)throwsException{
System.out.println("start - myMethod");
if(testnum==12)
thrownewException();
System.out.println("end -
myMethod"); return;
}
publicstaticvoid main(Stringargs[]){
inttestnum=12;
try{
System.out.println("try - first statement");
myMethod(testnum);
System.out.println("try - last
statement");
}
catch(Exception ex){
System.out.println("An Exception");
}
finally{
System.out.println("finally");
}
System.out.println("Out of try/catch/finally - statement");
}
}
Output:
49.
Page 49 of
try-first statement
start -
myMethod
AnException
finally
Out of try/catch/finally- statement
50.
Page 50 of
CHAPTER– VIII
THROW EXCEPTION IN JAVA
How to throw exception in java with example
In Java we have already defined exception classes such as Arithmetic Exception,
Null Pointer Exception, Array Index Out of Bounds exception etc. These exceptions are
set to trigger on different-2 conditions. For example, when we divide a number by
zero, this triggers Arithmetic Exception, when we try to access the array element
out of its bounds then we get Array Index Out of Bounds Exception.
We can define our own set of conditions or rules and throw an exception
explicitly using throw keyword. For example, we can throw Arithmetic Exception when
we divide number by 5, or any other numbers, what we need to do is just set the
condition and throw any exception using throw keyword. Throw keyword can also be
used for throwing custom exceptions, I have covered that in a separate tutorial, see
Custom Exceptions in Java.
Syntax of throw keyword:
Thrownewexception_class("error message");
For example:
thrownewArithmeticException("dividing a number by 5 is not allowed in this program");
Example of throw keyword
Lets say we have a requirement where we we need to only register the students
when their age is less than 12 and weight is less than 40, if any of the condition is
not met then the user should get an ArithmeticException with the warning message
“Student is not eligible for registration”. We have implemented the logic by placing the
code in the method that checks student eligibility if the entered student age and weight
doesn’t met the criteria then we throw the exception using throw keyword.
/* In this program we are checking the Student age
* if the student age<12 and weight <40 then our program
* should return that the student is not eligible for registration.
*/
Public class ThrowExample{
staticvoid checkEligibilty(intstuage,intstuweight){
if(stuage<12&&stuweight<40){
thrownewArithmeticException("Student is not eligible for registration");
}
else{
System.out.println("Student Entry is Valid!!");
}
}
publicstaticvoid main(Stringargs[]){
System.out.println("Welcome to the Registration process!!");
checkEligibilty(10,39);
System.out.println("Have a nice day..");
}
}
Output:
51.
Page 51 of
Welcometo the Registration process!!Exceptionin thread "main"
java.lang.ArithmeticException:Studentisnot eligible for registration
at
beginnersbook.com.ThrowExample.checkEligibilty(ThrowExample.java:9)
at beginnersbook.com.ThrowExample.main(ThrowExample.java:18)
In the above example we have throw an unchecked exception, same way we can
throw uncheckedand user-defined exception as well.
Throw Keyword Example in Java
Here, various examples to demonstrate how to throw an exception using
throw keyword. To understand these programs, you should have the basic knowledge
of what is throw keyword and why we throw exception using throw keyword, refer
this guide: throw in java.
Example 1: How to throw your own exception explicitly using throw keyword
This example shows how to throw a custom exception using throw. Refer this guide to
understand how to create your own exceptions.
classMyOwnExceptionextendsException{
publicMyOwnException(Stringmsg){
super(msg);
}
}
Class EmployeeTest{
staticvoidemployeeAge(int age) throws
MyOwnException{ if(age <0)
thrownewMyOwnException("Age can't be less than
zero"); else
System.out.println("Input is valid!!");
}
publicstaticvoid main(String[]args){
try{
employeeAge(-2);
}
catch(MyOwnException e){
e.printStackTrace();
}
}
}
Output:
beginnersbook.com.MyOwnException:Age can't be less than zero
Note: Method call should be in try block as it is throwing an exception.
Example2: How to throw an already defined exception using throw keyword
Class Exception2{
staticint sum(int num1,int num2){
if(num1 ==0)
thrownewArithmeticException("First parameter is not valid");
else
System.out.println("Both parameters are correct!!");
return num1+num2;
}
52.
Page 52 of
publicstaticvoidmain(Stringargs[]){
int res=sum(0,12);
System.out.println(res);
System.out.println("Continue Next statements");
}
}
Output:
Exceptionin thread main java.lang.ArithmeticException:
First parameter isnot valid
Similarly other exceptions, such as NullPointerException, ArrayIndexOutOfBoundsException
etc. can be thrown.
Throws Keyword Example in Java
Here we will see few examples of throws keyword. To understand these
programs, you should have the knowledge of throws keyword in java.
Example 1: Exception propagation using throws keyword
As you can see that we have an exception occurred in method1 which has been
handled in the chain-calling method method3(). This example shows how exception
propagation works. classExample1{
void method1()throwsArithmeticException{
thrownewArithmeticException("Calculation error");
}
void method2()throwsArithmeticException{
method1();
}
void method3(){
try{
method2();
}
catch(ArithmeticException e){
System.out.println("ArithmeticException handled");
}
}
publicstaticvoid main(Stringargs[])
{ Example1obj=newExample1();
obj.method3();
System.out.println("End Of
Program");
}
}
Output:
Arithmetic Exception
handled End of Program
Example 2: When you don’t handle exception and instead declare it at all the places
The ideal way to use throws is by declaring the exceptions in method
signature and handle the exceptions using try-catch in calling method. Lets see
what happens when we declare the exception at both the places, in method
signature as well as in calling method.
Class Exception Example{
53.
Page 53 of
voidmethod()throws Arithmetic Exception{
thrownew Arithmetic Exception("Arithmetic Exception Occurred");
}
}
Class Example1{
Public static void main(String args[]) throws ArithmeticException{
ExceptionExampleobj=newExceptionExample();
obj.method();
System.out.println("End Of Program");
}
}
Output:
Exceptionin thread "main"java.lang.ArithmeticException:
ArithmeticExceptionOccurred
at
ExceptionExample.method(Example1.java:4)
at Example1.main(Example1.java:10)
Throws clause in java – Exception handling
BY CHAITANYA SINGH | FILED UNDER: EXCEPTION HANDLING
As we know that there are two types of exception checked and unchecked.
Checked exception (compile time) force you to handle them, if you don’t handle them then
the program will not compile.
On the other hand unchecked exception (Runtime) doesn’t get checked during
compilation. Throws keyword is used for handling checked exceptions. By using throws
we can declare multiple exceptions in one go.
What is the need of having throws keyword when you can handle exception using try-catch?
The throws does the same thing that try-catch does but there are some cases
where you would prefer throws over try-catch. For example:
Lets say we have a method myMethod() that has statements that can throw
either ArithmeticException or NullPointerException, in this case you can use try-
catch as shown below:
publicvoidmyMethod()
{
try{
// Statements that might throw an exception
}
catch(ArithmeticException e){
// Exception handling statements
}
catch(NullPointerException e){
// Exception handling statements
}
}
But suppose you have several such methods that can cause exceptions, in that case it
would be tedious to write these try-catch for each method. The code will become
unnecessary long and will be less-readable.
54.
Page 54 of
Oneway to overcome this problem is by using throws like this: declare the exceptions
in
the method signature using throws and handle the exceptions where you are
calling this method by using try-catch.
Another advantage of using this approach is that you will be forced to
handle the exception when you call this method, all the exceptions that are declared
using throws, must be handled where you are calling this method else you will get
compilation error.
publicvoidmyMethod () throwsArithmeticException, NullPointerException
{
// Statements that might throw an exception
}
publicstaticvoid main(Stringargs[]){
try{
myMethod();
}
catch(ArithmeticException e){
// Exception handling statements
}
catch(NullPointerException e){
// Exception handling statements
}
}
Example of throws Keyword
In this example the method myMethod() is throwing two checked exceptions
so we have declared these exceptions in the method signature using throws Keyword.
If we do not declare these exceptions then the program will throw a compilation
error.
import java.io.*;
classThrowExampl
e{
voidmyMethod(intnum)throwsIOException,ClassNotFoundException{
if(num==1)
thrownewIOException("IOException Occurred");
else
thrownewClassNotFoundException("ClassNotFoundException");
}
}
publicclassExample1{
publicstaticvoid main(Stringargs[]){
try{
ThrowExampleobj=newThrowExample();
obj.myMethod(1);
}catch(Exception ex){
System.out.println(ex);
}
}
}
Output:
java.io.IOException:IOExceptionOccurr
ed
How to Catch multiple exceptions
55.
Page 55 of
BYCHAITANYA SINGH | FILED UNDER: EXCEPTION HANDLING
Catching multiple exceptions
Lets take an example to understand how to handle multiple
exceptions. classExample{
publicstaticvoid main(Stringargs[]){
try{
intarr[]=newint[7];
arr[4]=30/0;
System.out.println("Last Statement of try block");
}
catch(ArithmeticException e){
System.out.println("You should not divide a number by zero");
}
catch(ArrayIndexOutOfBoundsException e){
System.out.println("Accessing array elements outside of the limit");
}
catch(Exception e){
System.out.println("Some Other
Exception");
}
System.out.println("Out of the try-catch block");
}
}
Output:
You should not divide a number by
zero Out of the try-catch block
In the above example, the first catch block got executed because the code
we have written in try block throws ArithmeticException (because we divided the
number by zero).
Now lets change the code a little bit and see the change in output:
classExample{
publicstaticvoid main(Stringargs[]){
try{
intarr[]=newint[7];
arr[10]=10/5;
System.out.println("Last Statement of try block");
}
catch(ArithmeticException e){
System.out.println("You should not divide a number by zero");
}
catch(ArrayIndexOutOfBoundsException e){
System.out.println("Accessing array elements outside of the limit");
}
catch(Exception e){
System.out.println("Some Other
Exception");
}
System.out.println("Out of the try-catch block");
}
}
Output:
56.
Page 56 of
Accessingarray elements outside of the limit
Out of the try-catch block
In this case, the second catch block got executed because the code throws Array
Index Out Of Bounds Exception. We are trying to access the 11th element of array in
above program but the array size is only 7.
What did we observe from the above two examples?
1. It is clear that when an exception occurs, the specific catch block (that declares
that exception) executes. This is why in first example first block executed and in second
example second catch.
2. Although I have not shown you above, but if an exception occurs in above code
which is not Arithmetic and ArrayIndexOutOfBounds then the last generic catch
handler would execute.
Lets change the code again and see the output:
Class Example{
Public staticvoid main(String args[])
{ try{
intarr[]=newint[7];
arr[10]=10/5;
System.out.println("Last Statement of try block");
}
catch(Exception e){
System.out.println("Some Other
Exception");
}
catch(ArithmeticException e){
System.out.println("You should not divide a number by zero");
}
catch(ArrayIndexOutOfBoundsException e){
System.out.println("Accessing array elements outside of the limit");
}
System.out.println("Out of the try-catch block");
}
}
Output:
Compile time error:Exceptionin thread "main"java.lang.Error:
Unresolved compilation problems:Unreachablecatch block
forArithmeticException. Itis already handled by the catch block
forExceptionUnreachablecatch block
forArrayIndexOutOfBoundsException.Itis already handled by the catch block
for Exception at Example.main.
57.
Page 57 of
Whatare Java Threads?
A thread is a:
CHAPTER – IX
INTRODUCTION OF THREADS IN JAVA
a. Facility to allow multiple activities within a single process
b. Referred as lightweight process
c. A thread is a series of executed statements
d. Each thread has its own program counter, stack and local variables
e. A thread is a nested sequence of method calls
f. Its shares memory, files and per-process
state Read: Multithreading in Java
Whats the need of a thread or why we use Threads?
a. To perform asynchronous or background processing
b. Increases the responsiveness of GUI applications
c. Take advantage of multiprocessor systems
d. Simplify program logic when there are multiple independent
entities e.
What happens when a thread is invoked?
When a thread is invoked, there will be two paths of execution. One path will
execute the thread and the other path will follow the statement after the thread
invocation. There will be a separate stack and memory space for each thread.
Risk Factor
a. Proper co-ordination is required between threads accessing common variables
[use of synchronized and volatile] for consistence view of data
b. overuse of java threads can be hazardous to program’s performance and
its maintainability.
Threads in Java
Java threads facility and API is deceptively simple:
Every java program creates at least one thread [ main() thread ]. Additional
threads are created through the Thread constructor or by instantiating classes that
extend the Thread class.
Thread creation in Java
Thread implementation in java can be achieved in two ways:
A. Extending the java.lang.Thread class
B. Implementing the java.lang.Runnable Interface
Note: The Thread and Runnable are available in the java.lang.* package
A.By extending thread class
1. The class should extend Java Thread class.
2. The class should override the run() method.
3. The functionality that is expected by the Thread to be executed is written in
the run() method.
void start(): Creates a new thread and makes it
runnable. void run(): The new thread begins its life inside this method.
Example:
publicclassMyThreadextendsThread{
58.
Page 58 of
publicvoidrun(){
System.out.println("thread is running...");
}
publicstaticvoid main(String[]args){
MyThreadobj=newMyThread();
obj.start();
}
B.By Implementing Runnable interface
1. The class should implement the Runnable interface
2. The class should implement the run() method in the Runnable interface
3. The functionality that is expected by the Thread to be executed is put in the
run() method
Example:
Public class MyThreadimplementsRunnable{
publicvoid run(){
System.out.println("thread is running..");
}
publicstaticvoid
main(String[]args){ Thread t
=newThread(newMyThread());
t.start();
}
Extends Thread class vs Implements Runnable Interface?
Extending the Thread class will make your class unable to extend other classes,
because of the single inheritance feature in JAVA. However, this will give you a simpler
code structure. If you implement Runnable, you can gain better object-oriented design
and consistency and also avoid the single inheritance problems.
If you just want to achieve basic functionality of a thread you can simply
implement Runnable interface and override run() method. But if you want to do
something serious with thread object as it has other methods like suspend(), resume(),
..etc which are not available in Runnable interface then you may prefer to extend the
Thread class.
Thread life cycle in java
Read full article at: Thread life cycle in java
Ending Thread
A Thread ends due to the following reasons:
The thread ends when it comes when the run() method finishes its execution.
When the thread throws an Exception or Error that is not being caught in the
program.
Java program completes or ends.
Another thread calls stop() methods.
Synchronization of Threads
In many cases concurrently running threads share data and two threads try
to do operations on the same variables at the same time. This often results in
corrupt data as two threads try to operate on the same data.
A popular solution is to provide some kind of lock primitive. Only one thread can
acquire a particular lock at any particular time. This can be achieved by using
a keyword “synchronized” .
59.
Page 59 of
By using the synchronize only one thread can access the method at a time and a
second call will be blocked until the first call returns or wait() is called inside the
synchronized method.
Deadlock
Whenever there is multiple processes contending for exclusive access to
multiple locks, there is the possibility of deadlock. A set of processes or threads is said
to be deadlocked when each is waiting for an action that only one of the
others can perform. In Order to avoid deadlock, one should ensure that when you
acquire multiple locks, you always acquire the locks in the same order in all threads.
Guidelines for synchronization
Keep blocks short. Synchronized blocks should be short — as short as possible
while still protecting the integrity of related data operations.
Don’t block. Don’t ever call a method that might block, such as
InputStream.read(), inside a synchronized block or method.
Don’t invoke methods on other objects while holding a lock. This may sound
extreme, but it eliminates the most common source of deadlock.
Java Main Thread
Once a Java program starts, one thread starts running immediately. This is usually
called main thread of your program, because it is the one which is executed when
your program starts. The main thread is important for the following two reasons:
It is the thread from which the other (child) threads will be spawned
Often, it must be the last thread to finish the execution as it performs various
shutdown actions
Although the main thread is automatically created when your program starts, it
can be controlled through a Thread object. To do so, you must obtain a reference
to it by calling the method named currentThread(), is a public static member of the
Thread. Its general form is : static Thread currentThread()
This method returns a reference to the thread in which it is called. And once you
have a reference to the main thread, you can control it just like any other thread.
Java Main Thread Example
Here is an example demonstrates the concept of main thread in Java:
/* Java Program Example - Java Main Thread
* This program control the main Thread
*/
class JavaProgram
{
public static void main(String args[])
{
Thread thr = Thread.currentThread();
System.out.println("Current thread : " +
thr);
/* change the name of the thread */
60.
} catch(InterruptedException e){
System.out.println("Main thread interrupted");
}
}
}
When above java program is compile and executed, it will produce the following output:
In the above program a reference to the current thread (main thread in this case) is
obtained by calling the current thread) method, and this reference is stored in the local variable
between each line. The pause is executed by the sleep() specifies the delay period in milliseconds.
Page 60 of
thr.setName("My Thread");
System.out.println("After name change : " +
thr);
try {
for(int i=5; i>0; i--)
{
System.out.println(i);
Thread.sleep(1000);
}
System.out.println("stopped");
Notice here that the try catch block around this loop. The slep() method in the
thread might throw an interrupted exception. It will happen only if some other
thread wanted to interrupt this sleeping one. This program just prints a message.(as
shown in above program) if it gets interrupted.
Notice that the output produced when the is used as an argument to
println().This displays in order, the name of the thread and its priority and then the
name of its group.
61.
Page 61 of
Bydefault the name of the main thread is main. And its priority is 5, which is the
default value, and main is also the name of the group of threads to which this thread
belongs to.
A thread group is a data structure that controls the state of a collection of
threads as a whole. After the name of the thread is altered the is again output. This
time the new name of the thread is displayed.
In the above program as you can see sleep() causes the thread from which it is
called to suspend execution for the given period of milliseconds. Its general from
is:
Static void sleep(long milliseconds) 6throws interuptedexception
The number of milliseconds to suspend is given in milliseconds. This method
may throw an interrupted exception.
The sleep() has a second form, shown next, allows you to specify the period in
terms of milliseconds and nanoseconds:
Static void sleep (long milliseconds, Intenanoseconds) throws interrupted exception
This second form of sleep() method is useful only in environments that allow
timing periods as short a nanoseconds.
As the preceding program shows, you can use set name() method to set the name of
a
thread.
You can obtain the name of the thread by calling the method getname() this
method is not shown in the above program but you can try it. These methods are
the members of the thread class and are declared like this:
Final void setname (String thread
Name) final strings get Name ()
Here, Thread name specifies the name of the
thread. Creating a thread in java with
example
Creating a thread in java
To create a thread in java you need to instatiate an object of type thread java
provides two ways to create a thread
A. By implementing the Runnable interface.
B. By extending the thread class.
Here we’ll look at both the ways of creating a thread in java.
A.Implementing Runnable interface
One of the ways to create a thread in java is to implement the Runnable interface.
@functionlinterface
62.
Page 62 of
InterfaceRunnable
publicabstractvoid();
Notethe @Functional interface annotation on the top of the runnable
interface. That is a new annotation added in Java8. Read more about it here Functional
interface annotation in java 8
To implement runnable a class has to implement only the run() method inside
run() method we write the code for the new thread.
When using Runnable you have to explicitly create a thread class object by
passing the Runnable as parameter so that run() method of the thread can be
executed. java thread class defines several constructors, some of the commonly
used are.
Thread()
Thread(String
Name)
Thread(Runnable threadObi)
Thread(Runnable threadObi,String name)
You can use any of the last two in case of runnable to create a thread in java.
After the new thread is created, it will not start running until you call the start()
method, which is declared within thread class. As soon as start() method is called
upon a thread object following actions happen-
The thread’s state changes from New state to the runnable state.
Thread’s target run() method will execute (depends upon when thread gets
the CPU CYCLE).
Java Thread creation Example using Runnable
Class MyThread implements Runnable{
@Override
publicvoid run(){
System.out.println("Entered run method
"+Thread.currentThread().getName()); for(int i =0; i <5; i++){
System.out.println("My Thread"+ i);
}
System.out.println("Finished with MyThread");
}
}
publicclassThreadDemo{
publicstaticvoid main(String[]args){
// Passing runnable instance
Threadthread=newThread(newMyThread());
// Calling start
method
thread.start();
}
}
Output
Entered run method Thread-0
63.
Page 63 of
v
My
Thread0
My
Thread1
My
Thread2
My
Thread3
My
Thread4
Finishedwith MyThread
Here we are using the constructor Thread(Runnable threadObj) while creating a thread
object -
Thread thread = new Thread(new MyThread());.
Calling start() method on the thread will execute the run method where it will print
numbers along with the thread name.
Creating thread by extending Thread class
Another way to create a thread in Java is to create a class that extends Thread class
and then create an instance of that class. The extending class has to override the run()
method and also needs to call start() method to start execution of the new thread.
Thread creation Example by extending Thread
class Class MyThread extends Thread{
@Override
publicvoid run()
{
System.out.println("Entered run method
"+Thread.currentThread().getName()); for(int i =0; i <5; i++){
System.out.println("My Thread"+ i);
}
System.out.println("Finished with MyThread");
}
}
Public class ThreadDemo{
publicstaticvoid main(String[]args){
MyThread thread =newMyThread();
thread.start();
}
}
Here we are extending the thread class so we just need to create an instance of that
class that will be a thread object. Then we are calling start() method on that thread
object.
So these are the 2 ways provided in Java to create a new thread.
There are some other ways we can implement the run() method like, as an
anonymous class and starting Java 8 using a lambda expression. Lets see how
that can be done.
Java thread as an anonymous
class classInnerThread{
Thread t;
// Constructor
publicInnerThread(String
name){
// Anonymous class with run method
implemented Thread t =newThread(name){
@Override
publicvoid run()
{
Page 65 of
}
System.out.println("Finishedwith Inner Thread");
}
};
// starting the thread, which will start execution of run
method t.start();
}
}
publicclassThreadDemo{
publicstaticvoid main(String[]args){
InnerThread thread =newInnerThread("MyThread");
}
}
Here we are implementing the run method using an anonymous class. Note that
Thread class is not explicitly extended here and the implementation of the run()
method is provided when an instance of the thread is created.
Implementing Runnable as an anonymous class
If you want to do it using runnable interface run() method implementation it will only be
a small change.
classInnerThread{
Thread t;
// Constructor
publicInnerThread(String
name){
// Anonymous class with run method implemented
// using Runnable interface
Thread t =newThread(newRunnable(){
@Override
publicvoid run(){
System.out.println("Entered run method
"+Thread.currentThread().getName()); for(int i =0; i <5; i++){
System.out.println(name + i);
}
System.out.println("Finished with Inner Thread");
}
}, name);// Name of the thread, second param
// starting the thread, which will start execution of run
method t.start();
}
}
Implementing Runnable as Java Lambda expression
Java 8 onward it is also possible to use lambda expression to provide implementation
of the run method of the runnable interface. Runnable interface has a single abstract
method run() thus it can be considered as a functional interface. Lambda
expression can be used to provide implementation of that abstract method.
classLambdaThread{
publicLambdaThread(String
name){
// Lambda block - code inside the lambda block will
// be the implementation of the run
method. Runnable r =()->{
66.
publicclassThreadDemo{ publicstaticvoid main(String[]args){
LambdaThreadthread =newLambdaThread("LambdaThread");
}
}
Here we have used the lambda expression to provide implementation of the run method of th
Page 66 of
System.out.println("Entered run method
"+Thread.currentThread().getName()); for(int i =0; i <5; i++){
System.out.println("Lambda thread "+ i);
}
System.out.println("Finished with Lambda Thread");
};
//starting thread with the constructor of the thread class
// that takes runnable instance and String as
parameters newThread(r, name).start();
}
}
67.
Page 67 of
v
CHAPTER- X
MULTI THREADING
Multithreading in java with examples
Before we talk about multithreading, let’s discuss threads. A thread is a light-
weight smallest part of a process that can run concurrently with the other parts(other
threads) of the same process. Threads are independent because they all have separate
path of execution that’sthe reason if an exception occurs in one thread, it doesn’t affect the
execution of other threads. All threads of a process share the common memory. The
process of executing multiple threads simultaneously is known as multithreading.
Let’s summarize the discussion in points:
1. The main purpose of multithreading is to provide simultaneous execution of two or
more parts of a program to maximum utilize the CPU time. A multithreaded program
contains two or more parts that can run concurrently. Each such part of a program
called thread.
2. Threads are lightweight sub-processes, they share the common memory space.
In Multithreaded environment, programs that are benefited from multithreading,
utilize the maximum CPU time so that the idle time can be kept to minimum.
4. A thread can be in one of the following states:
NEW - A thread that has not yet started is in this state.
RUNNABLE - A thread executing in the Java virtual machine is in this state.
BLOCKED – A thread that is blocked waiting for a monitor lock is in this state.
WAITING – A thread that is waiting indefinitely for another thread to
perform a particular action is in this state.
TIMED_WAITING – A thread that is waiting for another thread to perform an
action for up to a specified waiting time is in this state.
TERMINATED – A thread that has exited is in this state.
A thread can be in only one state at a given point in time.
Multitasking vs Multithreading vs Multiprocessing vs parallel processing
Multitasking: Ability to execute more than one task at the same time is known as
multitasking.
Multithreading: We already discussed about it. It is a process of executing
multiple threads simultaneously. Multithreading is also known as Thread-based
Multitasking.
Multiprocessing: It is same as multitasking, however in multiprocessing more
than one CPUs are involved. On the other hand one CPU is involved in multitasking.
Parallel Processing: It refers to the utilization of multiple CPUs in a single computer
system.
Creating a thread in Java
There are two ways to create a thread in Java:
68.
Page 68 of
By extending Thread class.
By implementing Runnable interface.
Before we begin with the programs(code) of creating threads, let’s have a
look at these methods of Thread class. We have used few of these methods in the
example below.
getName(): It is used for Obtaining a thread’s name
getPriority(): Obtain a thread’s priority
isAlive(): Determine if a thread is still
running join(): Wait for a thread to
terminate
run(): Entry point for the thread
sleep(): suspend a thread for a period of
time start(): start a thread by calling its
run() method
Method 1: Thread creation by extending Thread class
Example 1:
classMultithreadingDemoextendsThread{
publicvoid run(){
System.out.println("My thread is in running state.");
}
publicstaticvoid main(Stringargs[]){
MultithreadingDemoobj=newMultithreadingDemo();
obj.start();
}
}
Output:
My thread isin running state.
Example 2:
Class CountextendsThread
{
Count()
{
super("my extending thread");
System.out.println("my thread created"+this);
start();
}
publicvoid run()
{
try
{
for(int i=0;i<10;i++)
{
System.out.println("Printing the count
"+ i); Thread.sleep(1000);
}
}
catch(InterruptedException e)
{
System.out.println("my thread interrupted");
69.
Page 69 of
}
System.out.println("Mythread run is over");
}
}
Class ExtendingExample
{
publicstaticvoid main(Stringargs[])
{
Countcnt=newCount();
try
{
while(cnt.isAlive())
{
System.out.println("Main thread will be alive till the child thread is
live"); Thread.sleep(1500);
}
}
catch(InterruptedException e)
{
System.out.println("Main thread interrupted");
}
System.out.println("Main thread's run is over");
}
}
Output:
my thread createdThread[my runnable
thread,5,main] Main thread will be alive till the
child thread is live Printing the count 0
Printing the count 1
Main thread will be alive till the child thread is
live Printing the count 2
Main thread will be alive till the child thread is
live Printing the count 3
Printing the count 4
Main thread will be alive till the child thread is
live Printing the count 5
Main thread will be alive till the child thread is
live Printing the count 6
Printing the count 7
Main thread will be alive till the child thread is
live Printing the count 8
Main thread will be alive till the child thread is
live Printing the count 9
mythread run is
over Main thread run
is over
Method 2: Thread creation by implementing Runnable Interface
A Simple Example
Class MultithreadingDemoimplementsRunnable{
publicvoid run(){
70.
Page 70 of
v
System.out.println("Mythread is in running state.");
}
publicstaticvoid main(Stringargs[]){
MultithreadingDemoobj=newMultithreadingDemo();
Threadtobj=newThread(obj);
tobj.start();
}
}
Output:
My thread isin running state.
Example Program 2:
Observe the output of this program and try to understand what is
happening in this program. If you have understood the usage of each thread method
then you should not face any issue, understanding this example.
Class CountimplementsRunnable
{
Threadmythread;
Count()
{
mythread=newThread(this,"my runnable thread");
System.out.println("my thread created"+mythread);
mythread.start();
}
publicvoid run()
{
try
{
for(int i=0;i<10;i++)
{
System.out.println("Printing the count
"+ i); Thread.sleep(1000);
}
}
catch(InterruptedException e)
{
System.out.println("my thread interrupted");
}
System.out.println("mythread run is over");
}
}
classRunnableExample
{
publicstaticvoid main(Stringargs[])
{
Countcnt=newCount();
try
{
while(cnt.mythread.isAlive())
{
71.
Page 71 of
System.out.println("Mainthread will be alive till the child thread is
live"); Thread.sleep(1500);
}
}
catch(InterruptedException e)
{
System.out.println("Main thread interrupted");
}
System.out.println("Main thread run is over");
}
}
Output:
my thread createdThread[my runnable
thread,5,main] Main thread will be alive till the
child thread is live Printing the count 0
Printing the count 1
Main thread will be alive till the child thread is
live Printing the count 2
Main thread will be alive till the child thread is
live Printing the count 3
Printing the count 4
Main thread will be alive till the child thread is
live Printing the count 5
Main thread will be alive till the child thread is live
Printing the count 6
Printing the count 7
Main thread will be alive till the child thread is
live Printing the count 8
Main thread will be alive till the child thread is
live Printing the count 9
mythread run is
over Main thread run
is over
Thread priorities
Thread priorities are the integers which decide how one thread should be
treated with respect to the others.
Thread priority decides when to switch from one running thread to another,
process is called context switching
A thread can voluntarily release control and the highest priority thread that is
ready to run is given the CPU.
A thread can be preempted by a higher priority thread no matter what the
lower priority thread is doing. Whenever a higher priority thread wants to
run it does.
To set the priority of the thread setPriority() method is used which is a
method of the class Thread Class.
In place of defining the priority in integers, we
can use MIN_PRIORITY, NORM_PRIORITY or MAX_PRIORITY.
72.
Page 72 of
v
Methods:isAlive() and
join()
CHAPTER – XI
THREAD METHODS & APPLETS
In all the practical situations main thread should finish last else other threads
which have spawned from the main thread will also finish.
To know whether the thread has finished we can call isAlive() on the thread
which returns true if the thread is not finished.
Another way to achieve this by using join() method, this method when called
from the parent thread makes parent thread wait till child thread terminates.
These methods are defined in the Thread class.
We have used isAlive() method in the above examples too.
Synchronization
Multithreading introduces asynchronous behavior to the programs. If a thread
is writing some data another thread may be reading the same data at that
time. This may bring inconsistency.
When two or more threads need access to a shared resource there should be
some way that the resource will be used only by one resource at a time. The
process to achieve this is called synchronization.
To implement the synchronous behavior java has synchronous method. Once a
thread is inside a synchronized method, no other thread can call any other
synchronized method on the same object. All the other threads then wait until
the first thread come out of the synchronized block.
When we want to synchronize access to objects of a class which was not
designed for the multithreaded access and the code of the method which
needs to be accessed synchronously is not available with us, in this case we
cannot add the synchronized to the appropriate methods. In java we have the
solution for this, put the calls to the methods (which needs to be synchronized)
defined by this class inside a synchronized block in following manner.
Priority of a Thread (Thread Priority):
Each thread have a priority. Priorities are represented by a number between 1 and 10. In
most cases, thread schedular schedules the threads according to their priority (known as
preemptive scheduling).
But it is not guaranteed because it depends on JVM specification that which scheduling it
chooses.
3 constants defined in Thread class:
1. public static int MIN_PRIORITY
2. public static int NORM_PRIORITY
3. public static int MAX_PRIORITY
Default priority of a thread is 5 (NORM_PRIORITY). The value of MIN_PRIORITY is 1
and the value of MAX_PRIORITY is 10.
Example of priority of a Thread:
1. class TestMultiPriority1 extends Thread{
2. public void run(){
3. System.out.println("running thread name is:"+Thread.currentThread().getName());
4. System.out.println("running thread priority
is:"+Thread.currentThread().getPriority()); 5.
6. }
7. public static void main(String args[]){
73.
Page 73 of
v
8.TestMultiPriority1 m1=new TestMultiPriority1();
9. TestMultiPriority1 m2=new TestMultiPriority1();
10. m1.setPriority(Thread.MIN_PRIORITY);
11. m2.setPriority(Thread.MAX_PRIORITY);
12. m1.start();
13. m2.start();
14.
15. }
16. }
Test it Now
Output:running thread name is:Thread-0
running thread priority is:10
running thread name
is:Thread-1 running thread
priority is:1
Inter-thread Communication in Java
Prerequisite : Multithreading in Java, Synchronized in Java
What is Polling and what are problems with it?
The process of testing a condition repeatedly till it becomes true is known as polling.
Polling is usually implemented with the help of loops to check whether a particular
condition is true or not. If it is true, certain action is taken. This waste many CPU
cycles and makes the implementation
inefficient.
For example, in a classic queuing problem where one thread is producing data and
other is consuming it.
How Java multi threading tackles this problem?
To avoid polling, Java uses three methods, namely, wait(), notify() and
notifyAll(). All these methods belong to object class as final so that all classes have
them. They must be used within a synchronized block only.
wait()-It tells the calling thread to give up the lock and go to sleep until some
other thread enters the same monitor and calls notify().
notify()-It wakes up one single thread that called wait() on the same object. It
should be noted that calling notify() does not actually give up a lock on a
resource.
notifyAll()-It wakes up all the threads that called wait() on the same object.
A simple Java program to demonstrate the three methods-
This program might only run in offline IDEs as it contains taking input at several points.
filter_none
edit
play_arrow
brightness_4
// Java program to demonstrate inter-thread communication
// (wait(), join() and notify()) in
Java importjava.util.Scanner;
publicclassthreadexample
{
Public static void main(String
args[]) Throws
74.
Page 74 of
InterruptedException
{
finalPCpc = newPC();
// Create a thread object that calls
pc.produce() Thread t1 =
newThread(newRunnable()
{
@Override
publicvoidrun()
{
try
{
pc.produce();
}
catch(InterruptedException e)
{
e.printStackTrace();
}
}
});
// Create another thread object that calls
// pc.consume()
Thread t2 = newThread(newRunnable()
{
@Override
publicvoidrun()
{
try
{
pc.consume();
}
catch(InterruptedException e)
{
e.printStackTrace();
}
}
});
// Start both
threads t1.start();
t2.start();
// t1 finishes before
t2 t1.join();
t2.join();
}
// PC (Produce Consumer) class with produce() and
75.
// releases thelock on shared resource wait();
// and waits till some other method invokes notify(). System.out.println("Resumed");
}
}
// Sleeps for some time and waits for a key press. After key
// is pressed, it notifies produce(). publicvoidconsume()throwsInterruptedException
{
// this makes the produce thread to run first. Thread.sleep(1000);
Scanner s = newScanner(System.in);
// synchronized block ensures only one thread
// running at a time. synchronized(this)
{
System.out.println("Waiting for return key."); s.nextLine();
System.out.println("Return key pressed");
// notifies the produce thread that it
// can wake up. notify();
Page 75 of
v
// consume()
methods. Public
static class PC
{
// Prints a string and waits for consume()
publicvoidproduce()throwsInterruptedException
{
// synchronized block ensures only one thread
// running at a
time.
synchronized(this)
{
System.out.println("producer thread running");
// Sleep
Thread.sleep(2000);
}
}
}
}
Output:
producer thread running
Waiting for return key.
Return key pressed
Resumed
As monstrous as it seem0073, it really is a piece of cake if you go through it twice.
1. In the main class a new PC object is created.
2. It runs produce and consume methods of PC object using two different
76.
Page 76 of
threadsnamely t1 and t2 and wait for these threads to finish.
Lets understand how our produce and consume method works.
First of all, use of synchronized block ensures that only one thread at a time runs.
Also since there is a sleep method just at the beginning of consume loop, the produce
thread gets a kickstart.
When the wait is called in produce method, it does two things. Firstly it releases the lock
it holds on PC object. Secondly it makes the produce thread to go on a waiting state until all
other threads have terminated, that is it can again acquire a lock on PC object and some
other method wakes it up by invoking notify or notifyAll on the same object.
Therefore we see that as soon as wait is called, the control transfers to consume thread
and it prints -“Waiting for return key”
After we press the return key, consume method invokes notify(). It also does 2 things-
Firstly, unlike wait(), it does not releases the lock on shared resource therefore for getting the
desired result, it is advised to use notify only at the end of your method. Secondly, it
notifies the waiting threads that now they can wake up but only after the current method
terminates.
As you might have observed that even after notifying, the control does not immediately
passes over to the produce thread. The reason for it being that we have called Thread.sleep()
after notify(). As we already know that the consume thread is holding a lock on PC object,
another thread cannot access it until it has released the lock. Hence only a 0fter the
consume thread finishes its sleep time and thereafter terminates by itself, the produce
thread cannot take back the control.
After a 2 second pause, the program terminates to its completion.
If you are still confused as to why we have used notify in consume thread, try
removing it and running your program again. As you must have noticed now that
the program never terminates.
The reason for this is straightforward-When you called wait on produce thread,
it went on waiting and never terminated. Since a program runs till all its threads have
terminated, it runs on and on.
There is a second way round this problem. You can use a second variant of
wait(). void wait(long timeout)
Java Suspend Resume Stop Threads
Sometimes, suspending the execution of a thread is useful. For example, a separate
thread can be used to display the time of day. If user does not want a clock, then its thread
can be suspended. Whatever the case, suspending a thread is a simple matter. Once
suspended, restarting the thread is also a simple matter.
The mechanisms to suspend, resume, and stop threads differ between early versions of
Java,
such as Java 1.0, and modern versions, beginning with Java 2. Prior to Java 2, a program used
the suspend(), resume(), and stop() methods, which are defined by the Thread, to pause,
restart, and stop the execution of a thread. Although these methods seem to be a
perfectly reasonable and convenient approach to managing the execution of threads, they
must not be used for new Java programs.
Java suspend Thread
The suspend() method of Thread class was deprecated by Java 2 several years ago.
This was done because the suspend() can sometimes cause serious system failures.
Assume that a thread has obtained locks on the critical data structures. If that
thread is suspended at that point, those locks are not relinquished. Other threads that may be
waiting for those resources can be deadlocked.
Java resume Thread
The resume() method is also deprecated. It doest not cause problems, but cannot be
used without the suspend() method as its counterpart.
77.
Page 77 of
Javastop Thread
The stop() method of Thread class, too, was deprecated by Java 2. This was done
because this method can sometimes cause serious system failures.
Assume that a thread is writing to a critically important data structure and
has completed only part of its changes. If that thread is stopped at that point, that data
structure might be left in a corrupted state. The trouble is that, the stop() causes
any lock the calling thread holds to be released. Thus, the corrupted data might be
used by another thread that is waiting on the same lock.
Java suspend resume stop Thread Example
Because you can-not now use the suspend (), resume(), or stop() methods to control a
thread, you might be thinking that no way exists to pause, restart, or terminate a thread. But
fortunately, this is not true. Instead, a thread must be designed so that the run () method
periodically checks to determine whether that thread should suspend, resume, or stop its own
execution. Typically, this is accomplished by establishing a flag variable that indicates the
execution state of the thread. As long as this flag is set to "running", run() method must
continue to let the thread execute. If this variable is set to "suspend", the thread must pause. If
it is set to "stop", the thread must terminate. Of course, a variety of ways exist in which to
write such code, but the central theme will be same for all the programs.
The following example illustrates how wait() and notify() methods that are inherited
from the Object can be used to control the execution of a thread. Let's consider its
operation. The NewThread class contains a boolean instance variable named suspendFlag which is
used to control the execution of the thread. It is initialized to false by the constructor. The
run() method contains a synchronized statement block that checks suspendFlag. If that
variable is true, the wait() method is invoked to suspend the execution of the thread. The
mysuspend() method sets suspendFlag to true. The myresume() method sets suspendFlag to false
and invokes notify() to wake up the thread. Finally, the main() method has been modified to
invoke the mysuspend() and myresume()methods.
class NewThread implements Runnable
{
String name; //name of
thread Thread thr;
booleansuspendFlag;
NewThread(String threadname)
{
name = threadname;
thr = new Thread(this, name);
System.out.println("New thread : " +
thr); suspendFlag = false;
thr.start(); // start the thread
}
/* this is the entry point for
thread */ public void run()
{
try
{
for(int i=12; i>0; i--)
{
System.out.println(name + " : "
+ i); Thread.sleep(200);
synchronized(this)
{
while(suspendFlag)
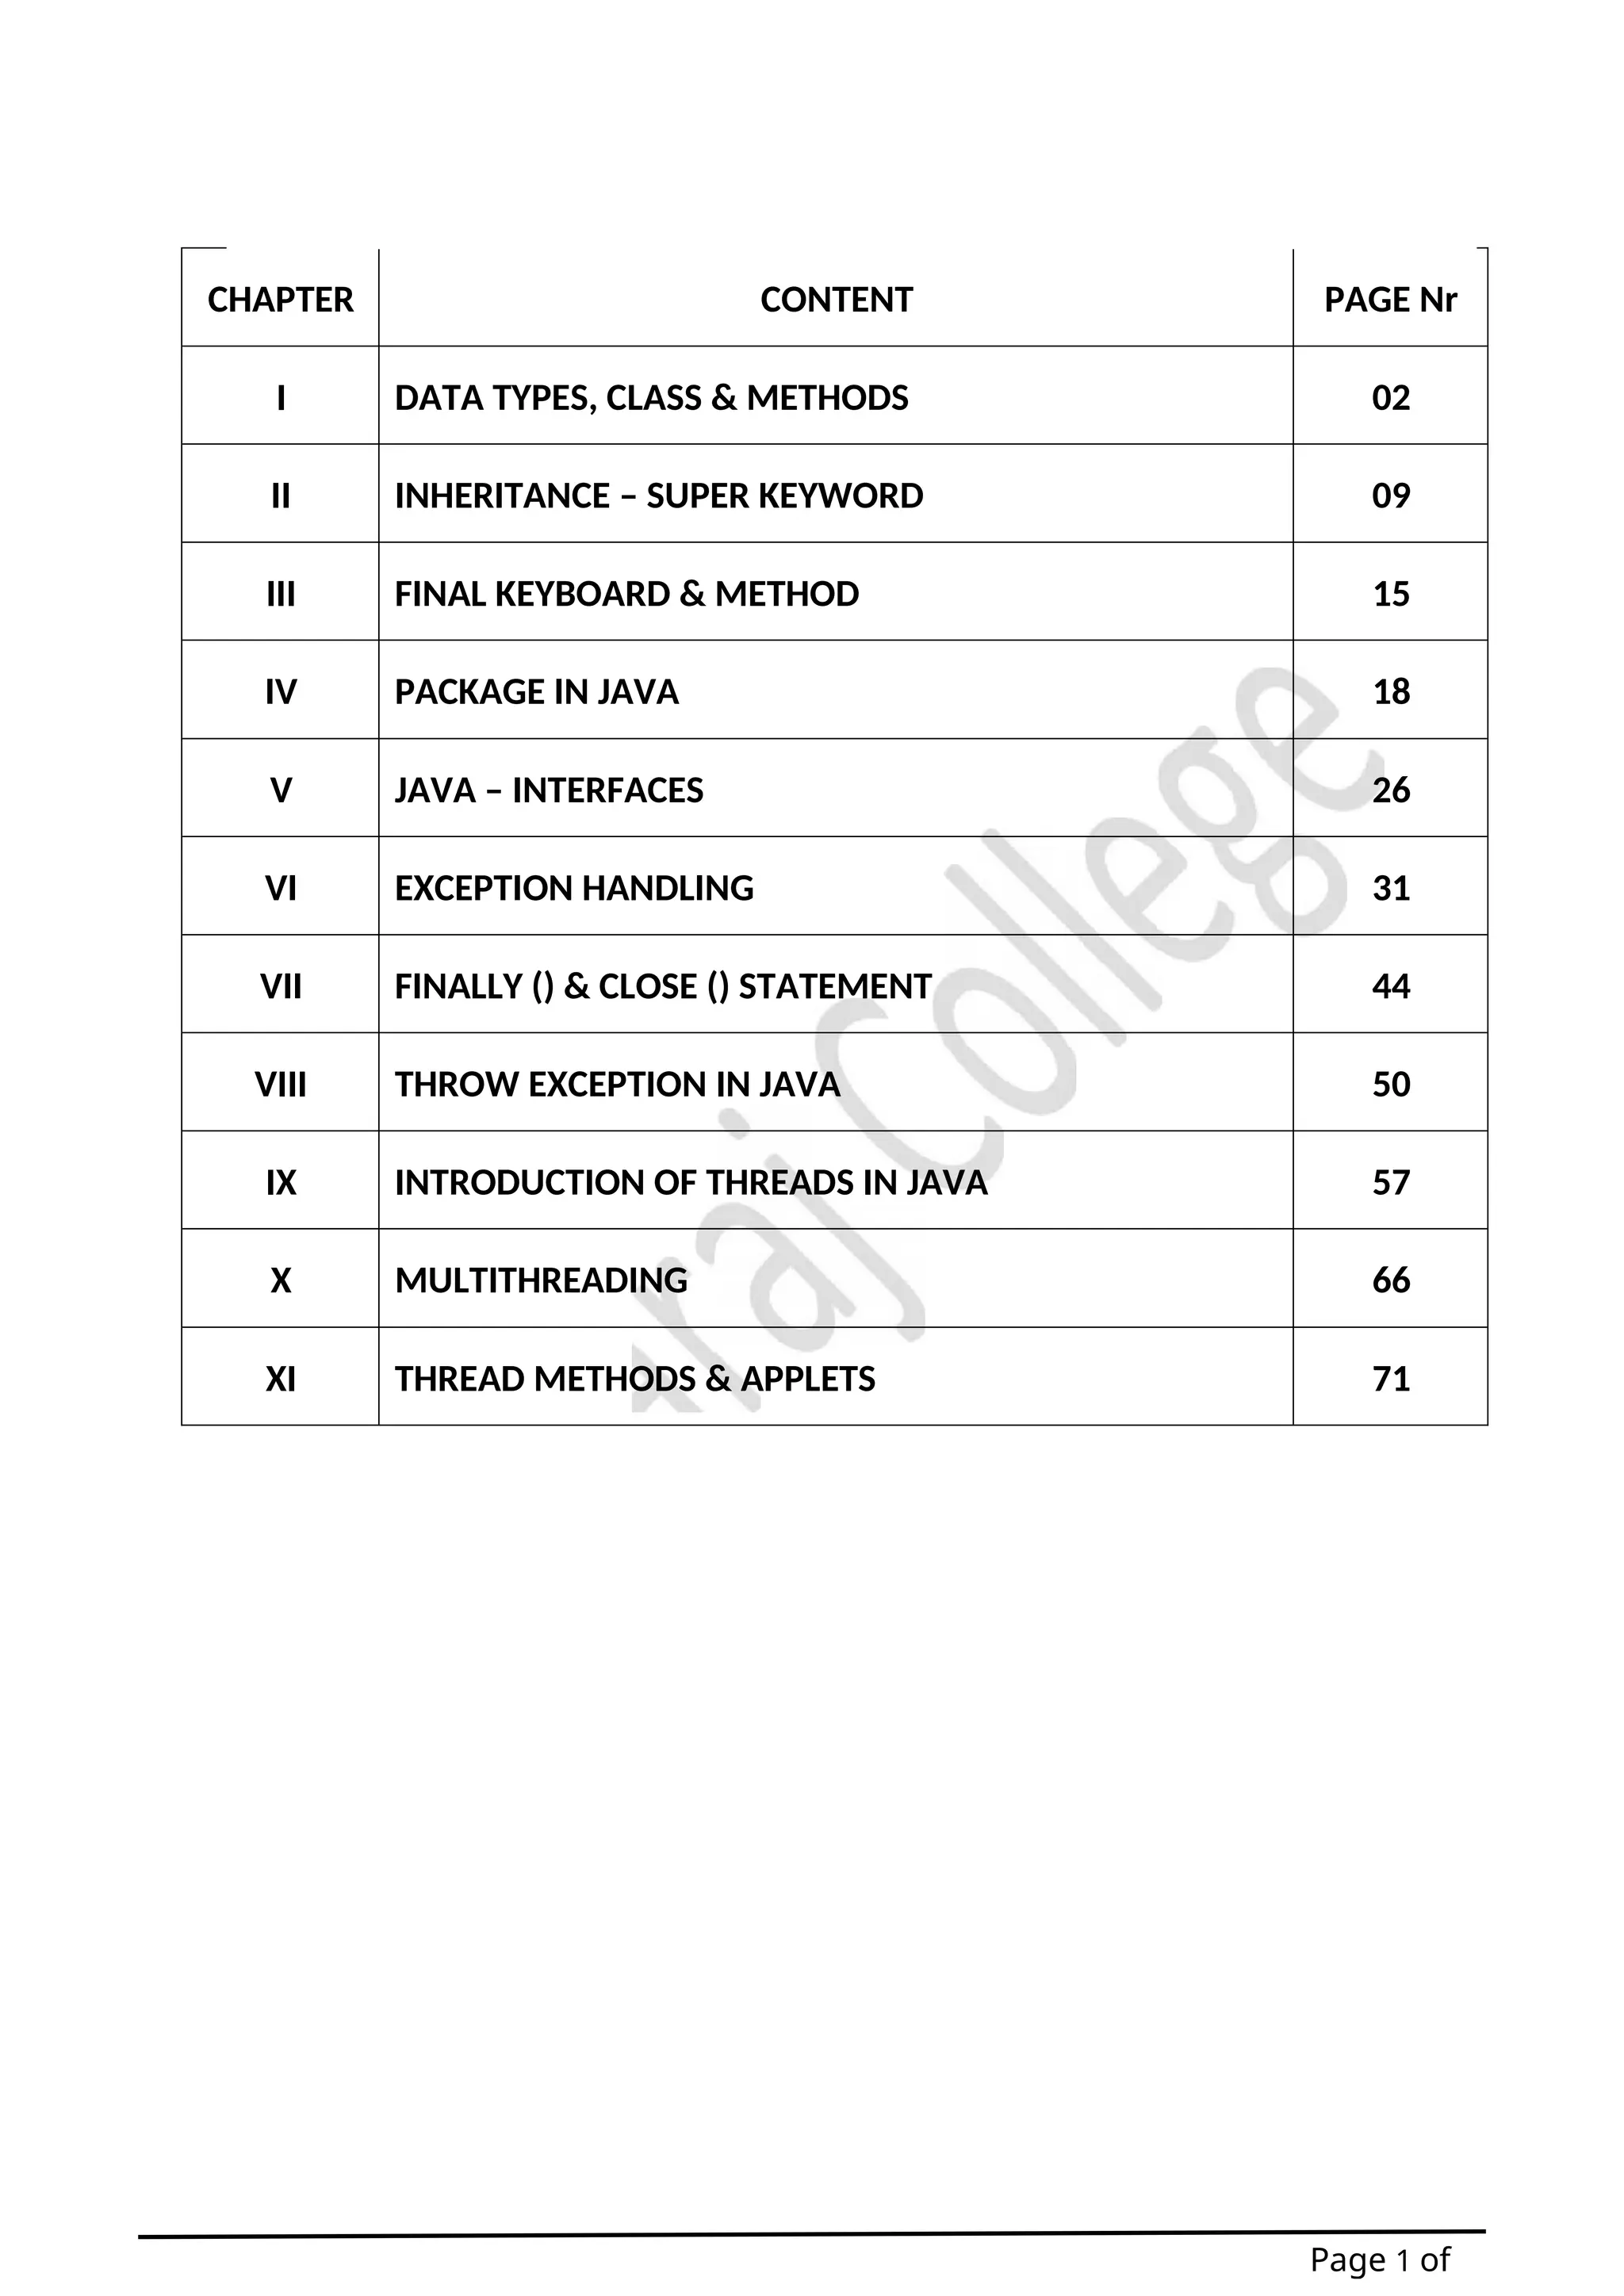
![Page 2 of
CHAPTER – I
DATA TYPES, CLASS & METHODS
Primitive data types in Java
To deal with numerical information, Java uses six predefined data types, called
primitive numerical data types. These are int, long, short, byte, float, and double,
and they allow us to represent integer and real numbers.
Java offers two additional non-numeric primitive data types: char (to
represent alphanumeric characters and special symbols) and Boolean (to
represent the truth values true and false).
We will describe these data types in Java by specifying for each of them:
The domain:
The set of possible values that can be represented in the memory of the
computer by means of the primitive data type (note that this set will always be
finite);
The set of operations: operators of the programming language that allow us
to perform elementary operations on values of the primitive data type (e.g., +, -, /, *,
etc.)
The set of literals: symbols of the language that define values of the primitive
data type (e.g., 10, 3.14, ’A’, true, etc.)
Moreover, we will specify the size of the memory occupied by a value of a
certain data type, which will be significant for the numeric data types.
The data type int
The most commonly used integer type is int. It is a signed 32-bit type that
has a range from –2,147,483,648 to 2,147,483,647. In addition to other uses,
Variables of type int are commonly employed to control loops and to index arrays.
Type Int
Dimension 32 bit (4 byte)
Domain the set of integer numbers in the interval [ 2
− 31,
+231 − 1]
(More than 4 billion values)
Operations+ Sum
- Difference
* Product
/ integer division
rest of the integer division
Literals sequences of digits denoting values of the domain
(e.g.,
275930)
Example:
int a, b, c;// Declaration of variables of type int a = 1;// Use of
literals b = 2;
c = a + b;// Arithmetic expression that involves operators of the language
Writing of numbers of type int: -
To write a number of types int, we can directly use the print() or println()
methods:
Example:
int i = 1; System.out.println(4); System.out.println(i); System.out.println(i + 4);](https://image.slidesharecdn.com/001core15-javaprogramming-iiisem-converted-250918083322-da68ab3b/75/001-Core-15-Java-Programming-III-Sem-converted-docx-2-2048.jpg)
![Example:
Byte a, b, c; // Declaration of variables of byte type
b = Short.parseShort("22605");// Conversion from String to short c = ba;//
Arithmetic expression
Other primitive data types for integer numbers: long
long is a signed 64-bit type and is useful for those occasions where an int type is
not large enough to hold the desired value. The range of a long is quite large. This
makes it useful when big, whole numbers are needed.
Page 3 of
Note: the symbol + can be used both for the sum of two numbers and to
concatenate two strings: "aaa" + "bbb" corresponds to "aaa”. concat("bbb").
Note the difference between the following two statements:
System.out.println(3 + 4); // prints 7 (as int); + denotes sum System.out.println("3" +
4); // prints 34 (as String), since the integer 4 is
// first converted to a String; + denotes concat
IIn the first statement, “+” is applied to two integers, and hence denotes the addition
operator. Hence, the argument 3+4 of println() is of type int.
IIn the second statement, “+” is applied to a string and an integer, and hence denotes
string concatenation. More precisely, the integer 4 is first converted to the string
"4", and then concatenated to the string "3". Hence, the argument "3"+4 of
println() is of type String.
Both statements are correct, since the method println() is overloaded: The Java
library contains both the versions that accepts an integer as parameter, and a
version that accepts a string as parameter.
Other primitive data types for integer numbers: byte
The smallest integer type is byte. This is a signed 8-bit type that has a range from –128 to
127. Variables of type byte are especially useful when you’re working with a stream of
data from a network or file.
Type Byte
Dimension 8 bit (1 byte)
Domain the set of integer numbers in the interval [ 27, +27 1]
− −
=
[ 128, +127]
−
Operation
s
+ Sum
- Difference
* Product
/ integer division
rest of the integer division
Literals sequences of digits denoting values of the domain (e.g.,
47)
a = 1; // Use of literals
b = Byte.parseByte("47"); // Conversion from String to byte c = a - b; // Arithmetic
expression
other primitive data types for integer numbers: short
Short is a signed 16-bit type. It has a range from –32,768 to 32,767. It is probably
the least- used Java type, since it is defined as having its high byte first (called big-
endian format).
Type Short
Dimension16 bit (2 byte)
Domain the set of integer numbers in the interval [ 215, +215 1] =
− −
[ 32768, +32767]
−](https://image.slidesharecdn.com/001core15-javaprogramming-iiisem-converted-250918083322-da68ab3b/75/001-Core-15-Java-Programming-III-Sem-converted-docx-3-2048.jpg)
![Page 4 of
Operation
s
+ Sum
- Difference
* Product
/ integer division
rest of the integer division
Literals sequences of digits denoting values of the domain (e.g.,
22700)
Example:
Short a, b, c; //Declaration of variables of type short1
A=11300;
B=short.parseshort(“22605”); // Conversion from string to short c=b%a; // Arithmetic
expression
Other primitive data types for integer numbers: long
Long is a signed 64-bit data types and is useful for those occasions where an int type is not large
enough to hold the desired value. The range of a long is quite large. This makes it useful
when big, whole numbers are needed.
Example:
long a, b, c; // Declaration of variables of type
long a = 9000000000L;// Use of literals
b = Long.parseLong("9000000000l"); // Conversion from String to long c = b / 300000L
Primitive data types for real numbers: double
In Java there are two primitive data types for representing real numbers.
Due to the way in which real numbers are represented internally in memory, these
numbers are also called floating point numbers.
The data type for floating point numbers that is used by default in the Java
mathematical library is double.
Type Long
Dimension 64 bit (8 byte)
Domain the set of integer numbers in the interval
[ 263,
−
+263 1]
−
Operation
s
+ Sum
- Difference
* Product
/ integer division
rest of the integer division
Literals sequences of digits ending with an l (or L)
denoting values of the domain (e.g.,
9000000000L)](https://image.slidesharecdn.com/001core15-javaprogramming-iiisem-converted-250918083322-da68ab3b/75/001-Core-15-Java-Programming-III-Sem-converted-docx-4-2048.jpg)
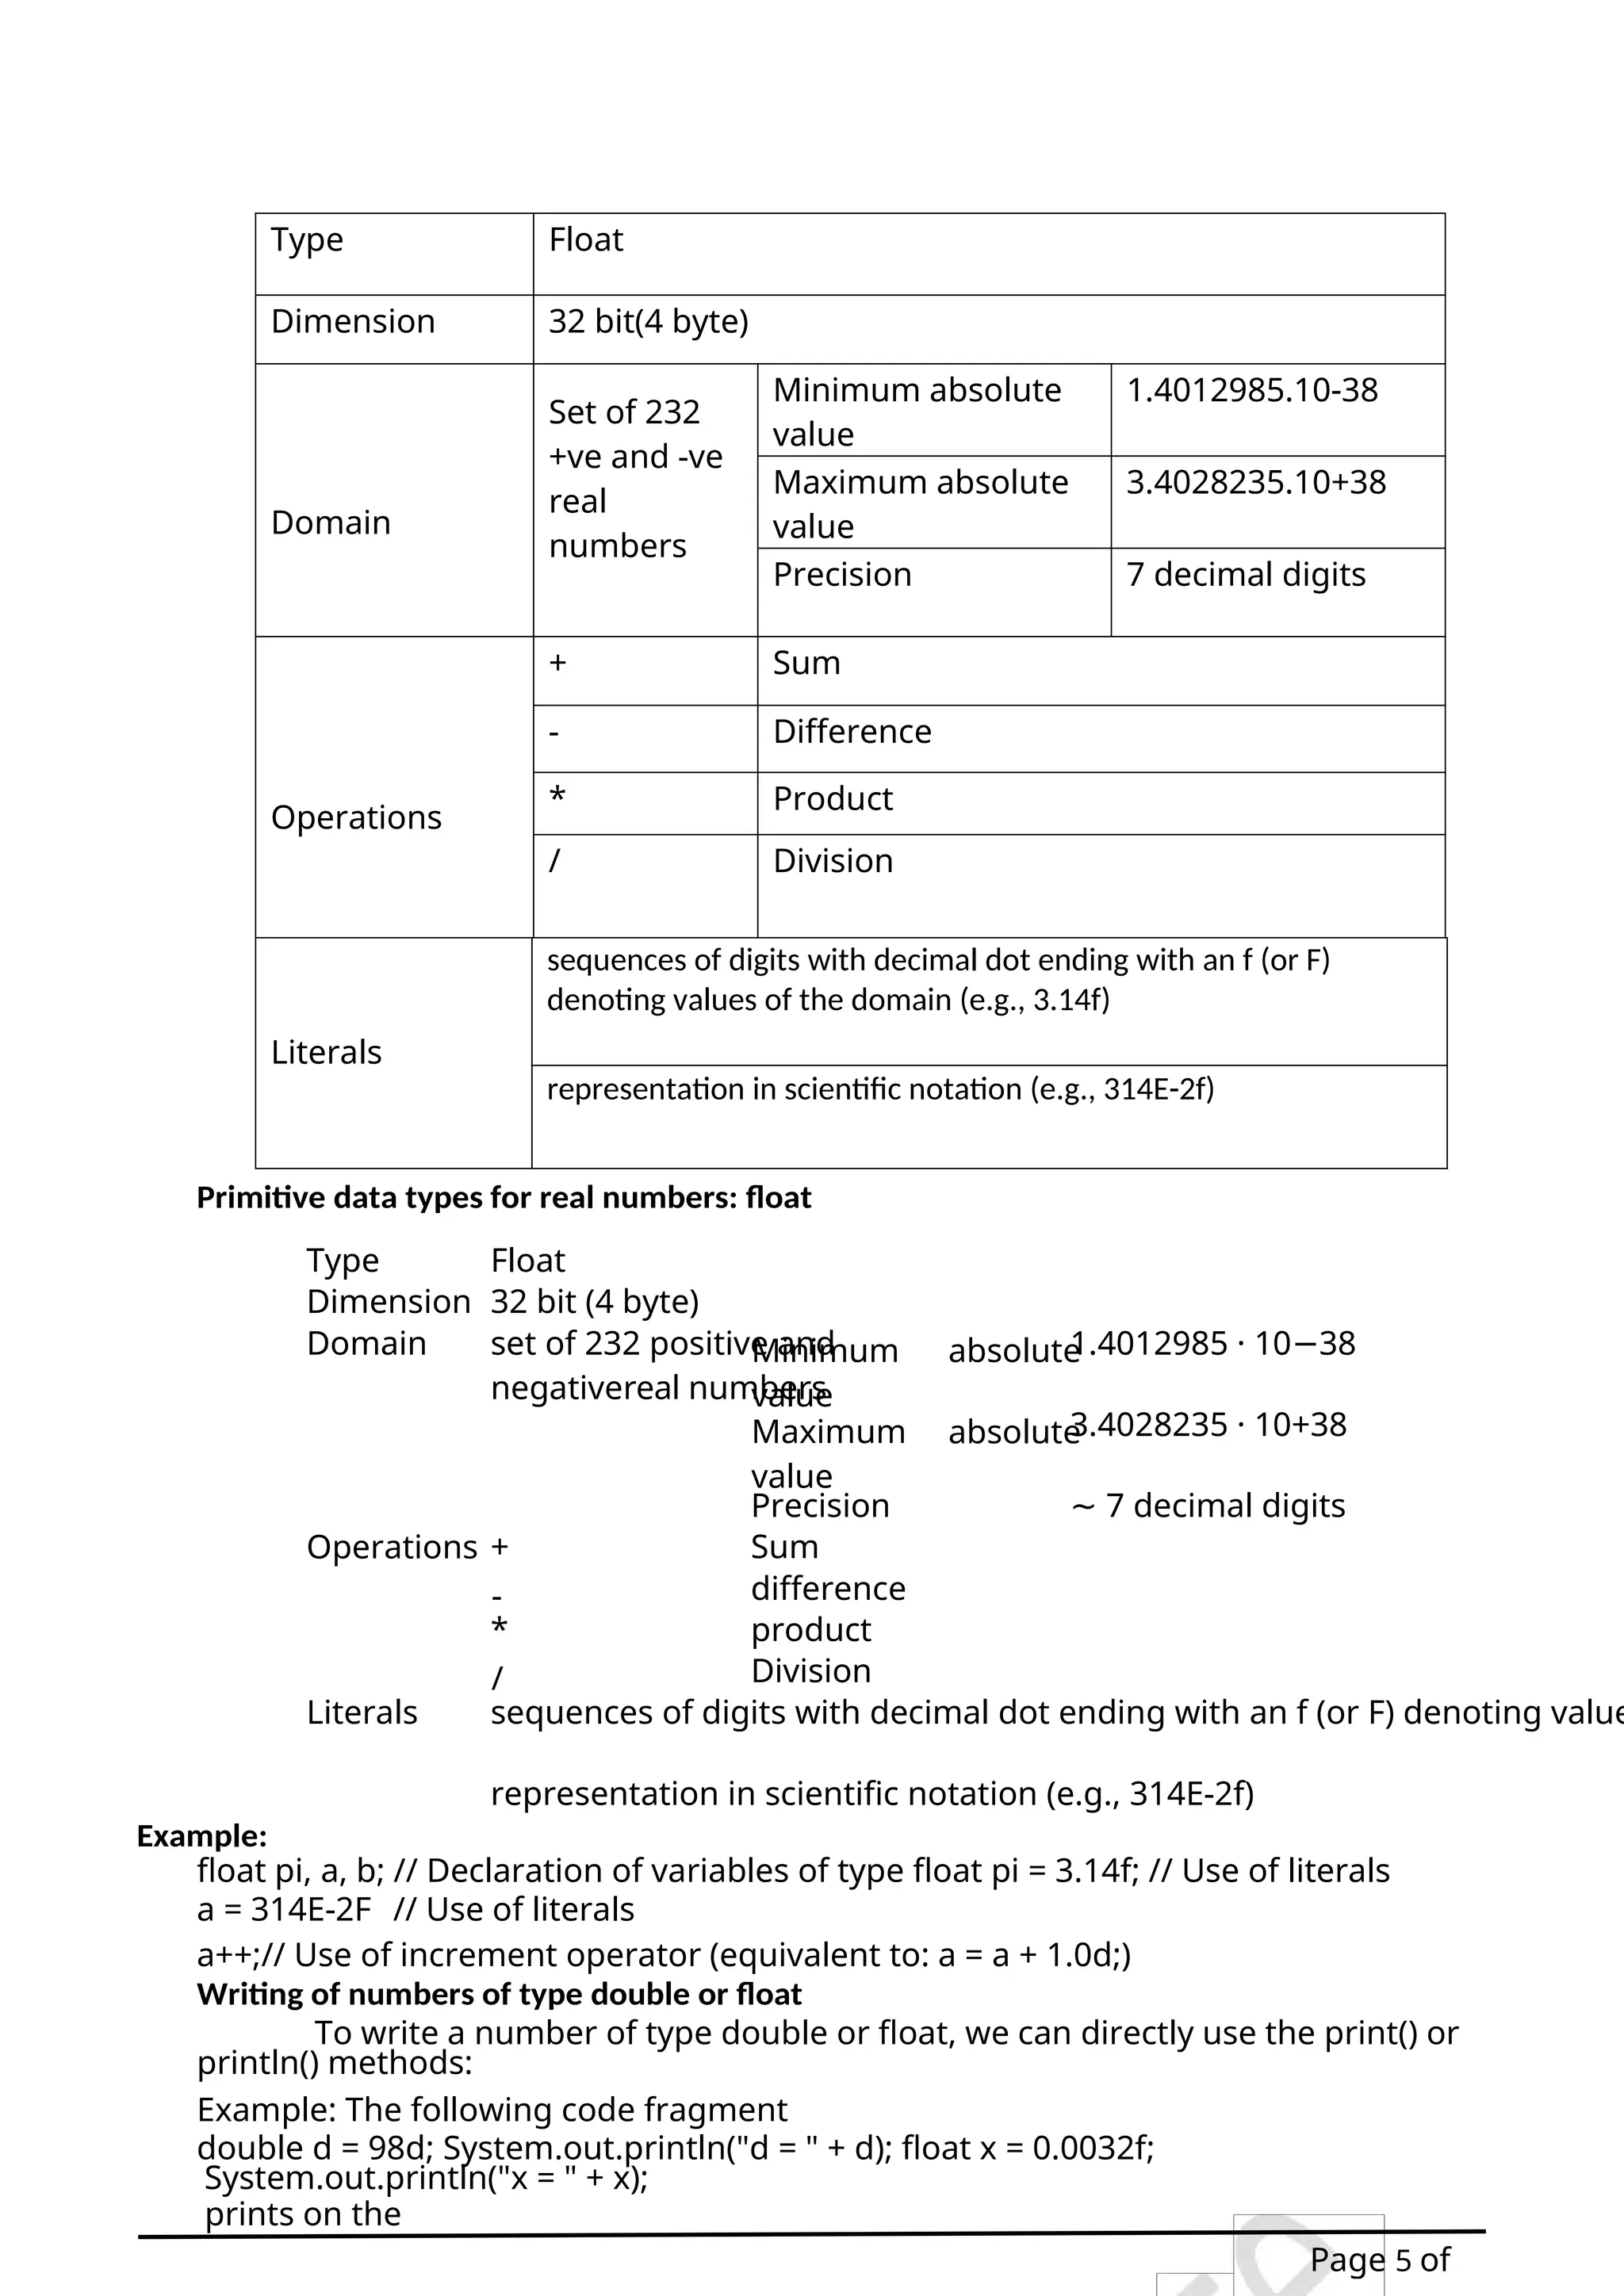
![Page 6 of
screen d = 9.8E1 x
= 3.2E-3
Static:
The static can
be: Static
Variables Static
Methods
Static Blocks Of Code.
What is Static Variable in Java?
Static variable in Java is variable which belongs to the class and initialized
only once at the start of the execution.
1. It is a variable which belongs to the class and not to object(instance)
2. Static variables are initialized only once, at the start of the execution. These
3. variables will be initialized first, before the initialization of any
instance variables
4. A single copy to be shared by all instances of the class
5. A static variable can be accessed directly by the class name and doesn’t need
any object
Syntax:
<class-name>.<variable-name>
What is Static Method in Java?
Static method in Java is a method which belongs to the class and not to the object.
A static method can access only static data.
1. It is a method which belongs to the class and not to the object (instance)
2. A static method can access only static data. It can- not access non-
static data (instance variables)
3. A static method can call only other static methods and cannot call a
non-static method from it.
4. A static method can be accessed directly by the class name and doesn’t
need any object
5. A static method cannot refer to "this" or "super" keywords in
anyway Syntax:
<class-name>.<method-name>
Example: How to call static variables &
methods
Step 1: Copy the following code into a editor
public class Demo{
public static void main(String args[]){
Student s1 = new Student();
s1.showData();
Student s2 = new
Student(); s2.showData();
//Student.b++;
//s1.showData();
}}
class Student {
int a; //initialized to zero
static int b; //initialized to zero only when class is loaded not for each object
created. Student(){
//Constructor incrementing static variable b
b++;
}
public void showData()
{ System.out.println("Value of a =
"+a); System.out.println("Value of](https://image.slidesharecdn.com/001core15-javaprogramming-iiisem-converted-250918083322-da68ab3b/75/001-Core-15-Java-Programming-III-Sem-converted-docx-6-2048.jpg)
![A static block helps to initialize the static data members, just like constructors help to initiali
Following program is the example of java static block.
Example: How to access static block public class Demo {
static int a; static int b; static {
a = 10;
b = 20;
}
public static void main(String args[]) {
Page 8 of
System.out.println("Value of a = " +
a); System.out.println("Value of b =
" + b);
}
}
you will get following output of the
program. Value of a = 10
Value of b = 20](https://image.slidesharecdn.com/001core15-javaprogramming-iiisem-converted-250918083322-da68ab3b/75/001-Core-15-Java-Programming-III-Sem-converted-docx-8-2048.jpg)
![Page 9 of
Super keyword in
java
CHAPTER - II
INHERITANCE - SUPER KEYWORD
Super keyword in java is a reference variable that is used to refer parent
class object. Super is an implicit keyword creates by JVM and supply each and every
java program for performing important role in three places.
1. Super keyword At Variable Level
2. Super keyword At Method Level
3. Super keyword At Constructor Level
When need of super keyword
Whenever the derived class is inherits the base class features, there is a
possibility that base class features are similar to derived class features and JVM
gets an ambiguity. In order to differentiate between base class features and
derived class features must be preceded by super keyword.
Syntax
super. baseclass features.
Super Keyword at Variable Level
Whenever the derived class inherit base class data members there is a
possibility that base class data member is similar to derived class data member
and JVM gets an ambiguity.
In order to differentiate between the data member of base class and
derived class, in the context of derived class the base class data members must be
preceded by super keyword.
Syntax
Super.baseclassdatamember
name
If we are not writing super keyword before the base class data member
name than it will be referred as current class data member name and base class
data member are hidden in the context of derived class. Program without using
super keyword
Example
class Employee
{
float salary=10000;
}
class HR extends Employee
{
float
salary=20000;
void display()
{
System.out.println("Salary: "+salary);//print current class salary
}
}
classSupervarible
{
publicstaticvoid main(String[]args)](https://image.slidesharecdn.com/001core15-javaprogramming-iiisem-converted-250918083322-da68ab3b/75/001-Core-15-Java-Programming-III-Sem-converted-docx-9-2048.jpg)
![Page 10 of
In the above program in Employee and HR class salary is common properties of
both class the instance of current or derived class is referred by instance by default but here w
Program using super keyword at variable level Example
classEmployee
{
float salary=10000;
}
class HR extendsEmployee
{
float salary=20000;
void display()
{
System.out.println("Salary: "+super.salary);//print base class salary
}
}
classSupervarible
{
publicstaticvoid main(String[]args)
{
HR obj=new HR(); obj.display();
}
}
classStudent
{
HR obj=new
HR();
obj.display();
}
}
Output
Salary: 20000.0
Super Keyword at Method Level
The super keyword can also be used to invoke or call parent class method. It
should be use in case of method overriding. In other word super keyword use when
base class method name and derived class method name have same name.
Example of super keyword at method level
Example](https://image.slidesharecdn.com/001core15-javaprogramming-iiisem-converted-250918083322-da68ab3b/75/001-Core-15-Java-Programming-III-Sem-converted-docx-10-2048.jpg)
![classStudent
{
void message()
{
System.out.println("Good Morning Sir");
}
}
Page 11 of
{
void message()
{
System.out.println("Good Morning Sir");
}
}
classFacultyextendsStudent
{
void message()
{
System.out.println("Good Morning Students");
}
void display()
{
message();//will invoke or call current class message() method
super.message();//will invoke or call parent class message() method
}
publicstaticvoid main(Stringargs[])
{
Student s=newStudent();
s.display();
}
}
Output
Good Morning Students
Good Morning Sir
In the above example Student and Faculty both classes have message() method
if we call message() method from Student class, it will call the message() method of
Student class not of Person class because priority of local is high.
In case there is no method in subclass as parent, there is no need to use
super. In the example given below message() method is invoked from Student class
but Student class does not have message() method, so you can directly call
message() method.
Program where super is not required
Example](https://image.slidesharecdn.com/001core15-javaprogramming-iiisem-converted-250918083322-da68ab3b/75/001-Core-15-Java-Programming-III-Sem-converted-docx-11-2048.jpg)
![Page 12 of
classFacultyextendsStudent
{
void display()
{
message();//will invoke or call parent class message() method
}
publicstaticvoid main(Stringargs[])
{
Student s=newStudent();
s.display();
}
}
Output
Good Morning Sir
Super Keyword at Constructor Level
The super keyword can also be used to invoke or call the parent class
constructor.
Constructor are calling from bottom to top and executing from top to bottom.
To establish the connection between base class constructor and derived
class constructors JVM provides two implicit methods they are:
Super()
Super(...)
Super()
Super() It is used for calling super class default constructor from the context of derived
class constructors.
Super keyword used to call base class constructor
Syntax
classEmployee
{
Employee()
{
System.out.println("Employee class Constructor");
}
}
class HR extendsEmployee
{
HR()
{
super();//will invoke or call parent class
constructor System.out.println("HR class
Constructor");
}
}](https://image.slidesharecdn.com/001core15-javaprogramming-iiisem-converted-250918083322-da68ab3b/75/001-Core-15-Java-Programming-III-Sem-converted-docx-12-2048.jpg)
![classSupercons
{
publicstaticvoid main(String[]args)
{
HR obj=new HR();
}
}
Page 13 of
Output
Note: super() is added in each class constructor automatically by compiler.
In constructor, default constructor is provided by compiler automatically but it
also adds super()before the first statement of constructor.If you are creating your own
constructor and you do not have either this() or super() as the first statement,
compiler will provide super() as the first statement of the constructor.
Super(...)
Super(...) It is used for calling super class parameterize constructor from the
context of derived class constructor.
Important rules
Whenever we are using either super() or super(...) in the derived class
constructors the superalways must be as a first executable statement in the body
of derived class constructor otherwise we get a compile time error.
Employee class
Constructor HR class
Constructor](https://image.slidesharecdn.com/001core15-javaprogramming-iiisem-converted-250918083322-da68ab3b/75/001-Core-15-Java-Programming-III-Sem-converted-docx-13-2048.jpg)
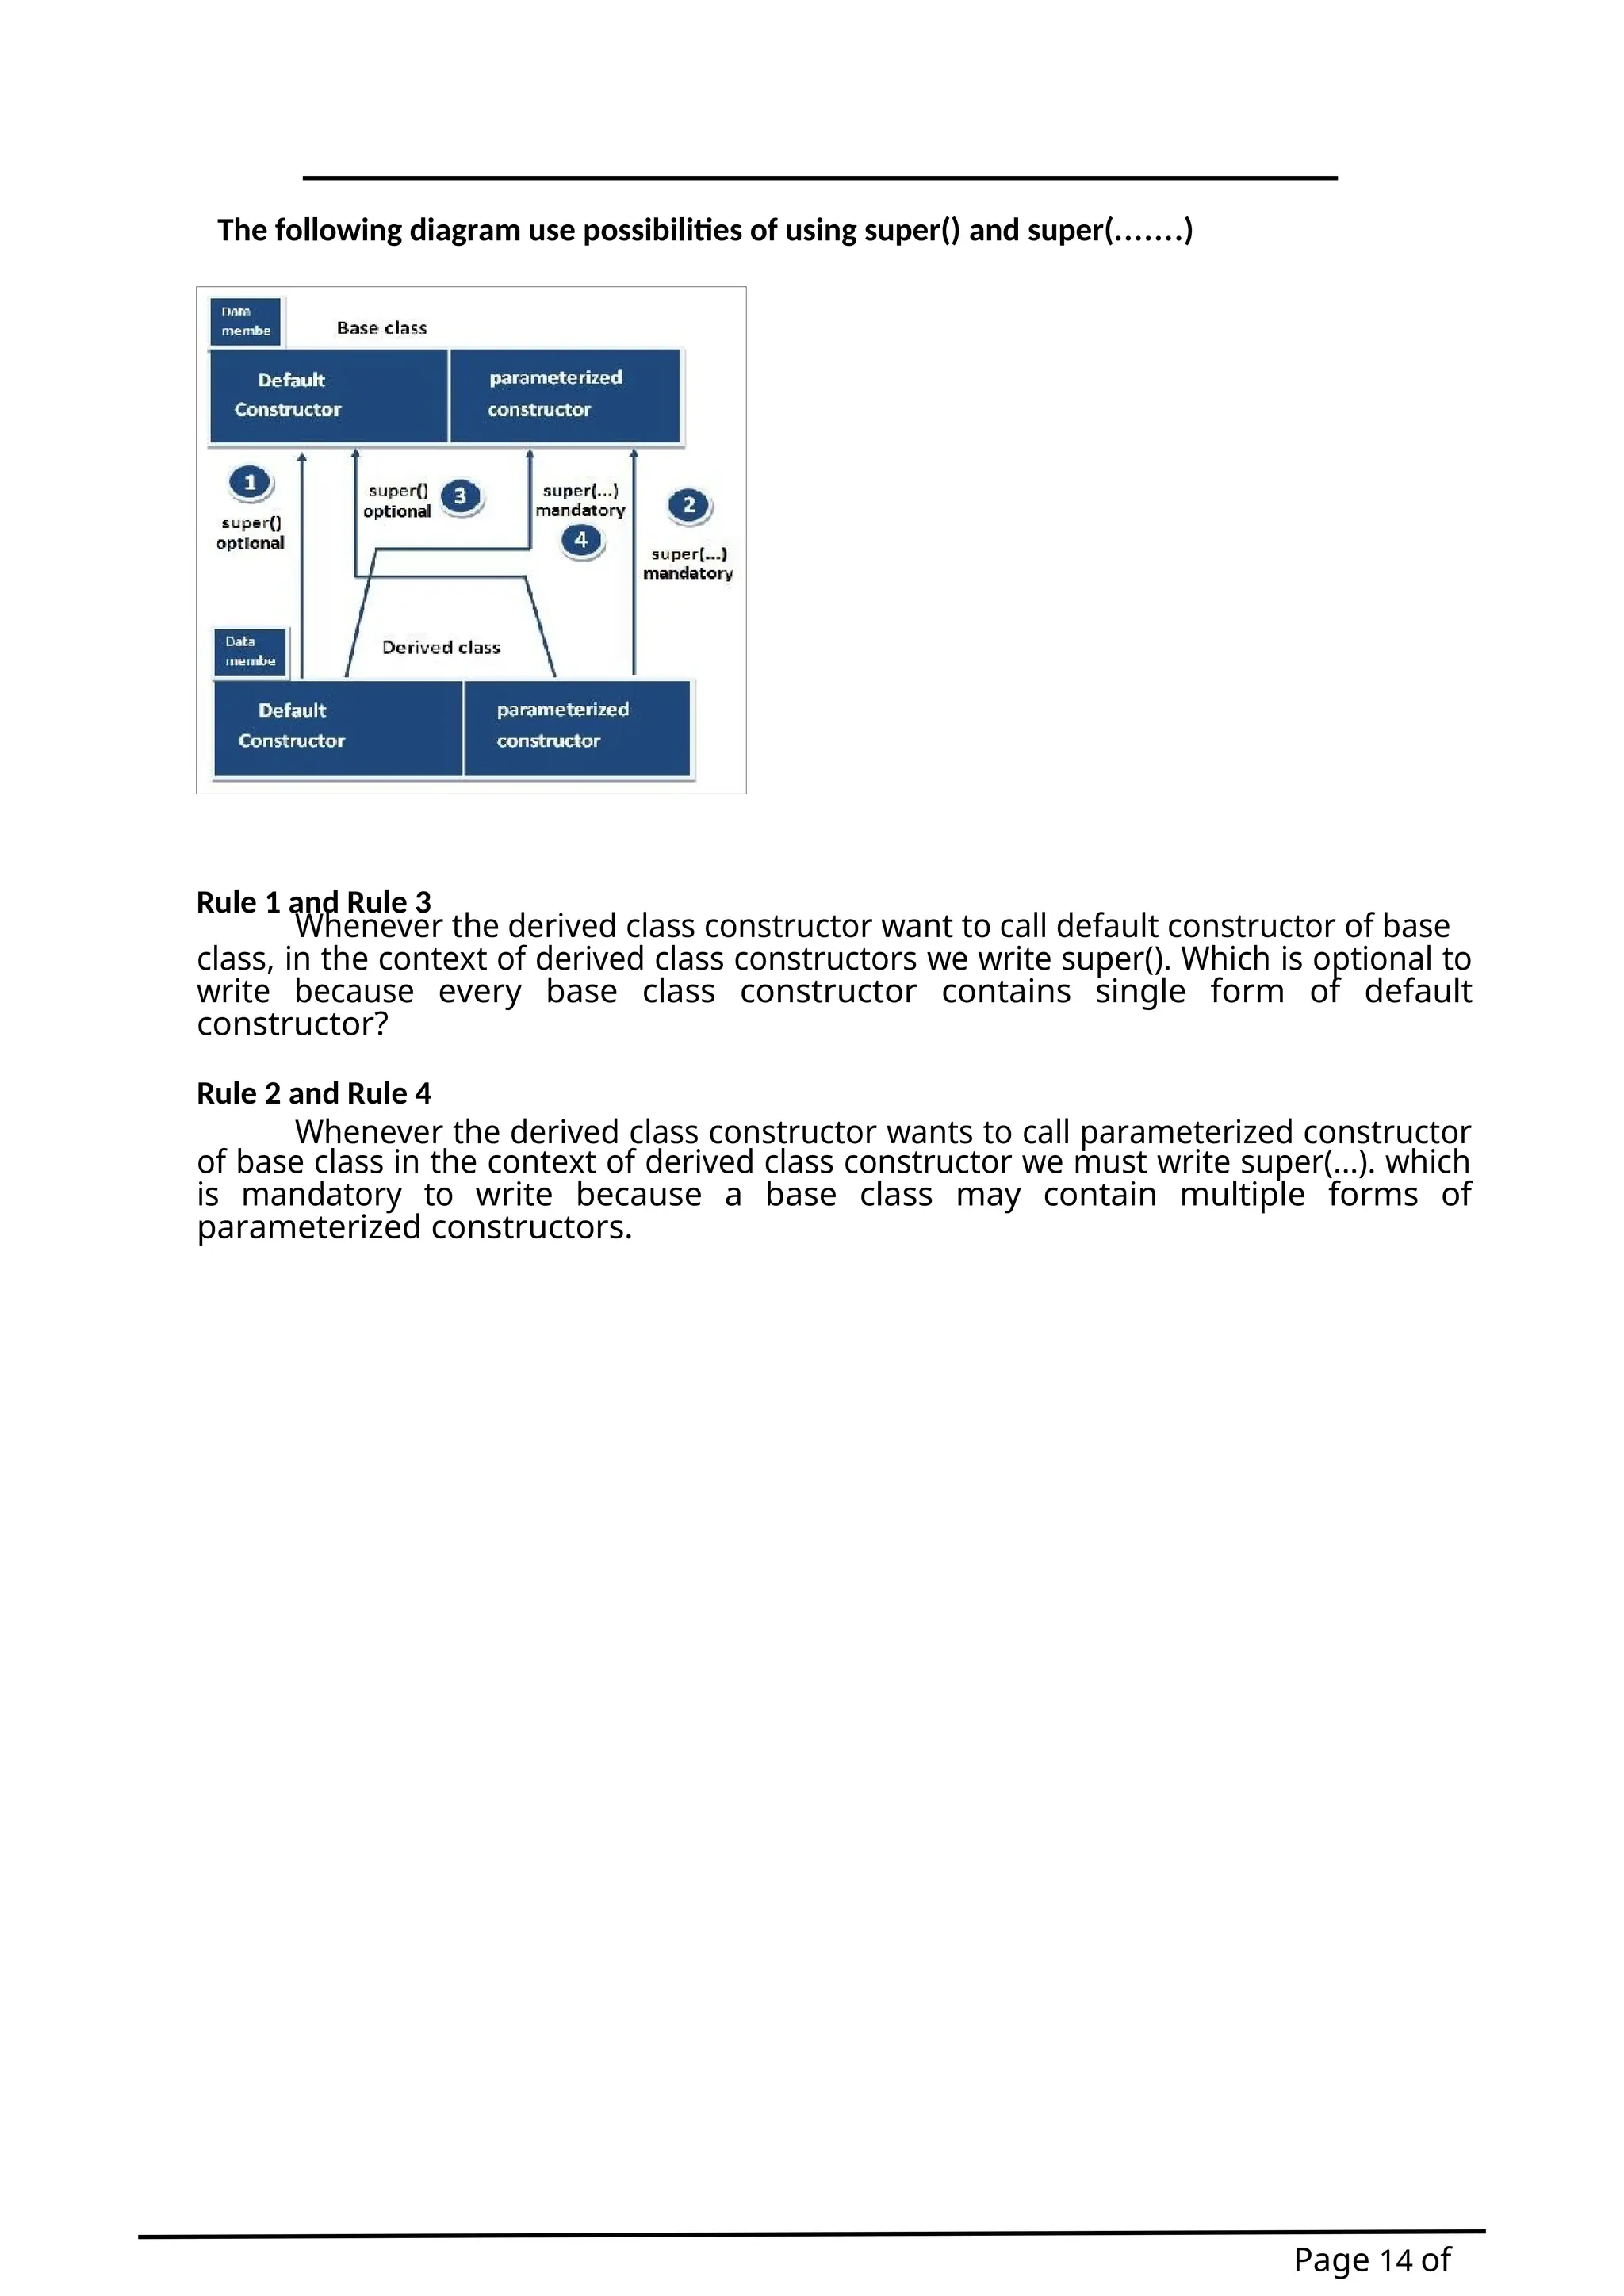
![Page 15 of
Final Keyword In Java
CHAPTER- III
FINAL KEYBOARD & METHOD
The final keyword in java is used to restrict the user. The java final keyword can
be used in many context. Final can be:
1. variable
2. method
3. class
The final keyword can be applied with the variables, a final variable that have no
value it is called blank final variable or uninitialized final variable. It can be initialized in
the constructor only. The blank final variable can be static also which will be initialized
in the static block only. We will have detailed learning of these. Let's first learn the
basics of final keyword.
1. Java final variable
If you make any variable as final, you cannot change the value of final
variable(It will be constant).
Example of final variable
There is a final variable speedlimit, we are going to change the value of this
variable, but It can't be changed because final variable once assigned a value can
never be changed.
a. class Bike9{
b. final int speedlimit=90;//final variable
c. void run(){
d. speedlimit=400;
e. }
f. public static void main(String args[]){
g. Bike9 obj=new Bike9();
h. obj.run();
i. }
j. }//end of class
Test it Now
Output:Compile Time
Error
2. Java final method
If you make any method as final, you cannot override it.
Example of final method
a. class Bike{
b. final void run(){System.out.println("running");}
c. }
d.
e. class Honda extends Bike{
f. void run(){System.out.println("running safely with
100kmph");} g.
h. public static void main(String args[]){
i. Honda honda= new Honda();
j. honda.run();
k. }
l. }
Output:Compile Time Error](https://image.slidesharecdn.com/001core15-javaprogramming-iiisem-converted-250918083322-da68ab3b/75/001-Core-15-Java-Programming-III-Sem-converted-docx-15-2048.jpg)
![Page 16 of
3. Java final class
If you make any class as final, you cannot extend it.
Example of final class
a. final class Bike{}
b. class Honda1 extends Bike{
c. void run(){System.out.println("running safely with
100kmph");} d.
e. public static void main(String args[]){
f. Honda1 honda= new Honda1();
g. honda.run();
h. }
i. }
Output:Compile Time Error
Q. Is final method inherited?
Ans: Yes, final method is inherited but you cannot override it. For Example:
a. class Bike{
b. final void run(){System.out.println("running...");}
c. }
d. class Honda2 extends Bike{
e. public static void main(String args[]){
f. new Honda2().run();
g. }
h. }
Output:running...
Q)What is blank or uninitialized final variable?
A final variable that is not initialized at the time of declaration is known as
blank final variable.
If you want to create a variable that is initialized at the time of creating object and
once initialized may not be changed, it is useful. For example PAN CARD number of an
employee.
It can be initialized only in constructor.
Example of blank final variable
a. class Student{
b. int id;
c. String name;
d. final String PAN_CARD_NUMBER;
e. ...
f. }
Que) Can we initialize blank final variable?
Yes, but only in constructor. For example:
a. class Bike10{
b. final int speedlimit;//blank final
variable c.
d. Bike10(){
e. speedlimit=70;
f. System.out.println(speedlimit);](https://image.slidesharecdn.com/001core15-javaprogramming-iiisem-converted-250918083322-da68ab3b/75/001-Core-15-Java-Programming-III-Sem-converted-docx-16-2048.jpg)
![Page 17 of
g. }
h.
i. public static void main(String args[]){
j. new Bike10();
k. }
l. }
Output: 70
Static blank final variable
A static final variable that is not initialized at the time of declaration is known
as static blank final variable. It can be initialized only in static block.
Example of static blank final variable
a. class A{
b. static final int data;//static blank final variable
c. static{ data=50;}
d. public static void main(String args[]){
e. System.out.println(A.data);
f. }](https://image.slidesharecdn.com/001core15-javaprogramming-iiisem-converted-250918083322-da68ab3b/75/001-Core-15-Java-Programming-III-Sem-converted-docx-17-2048.jpg)
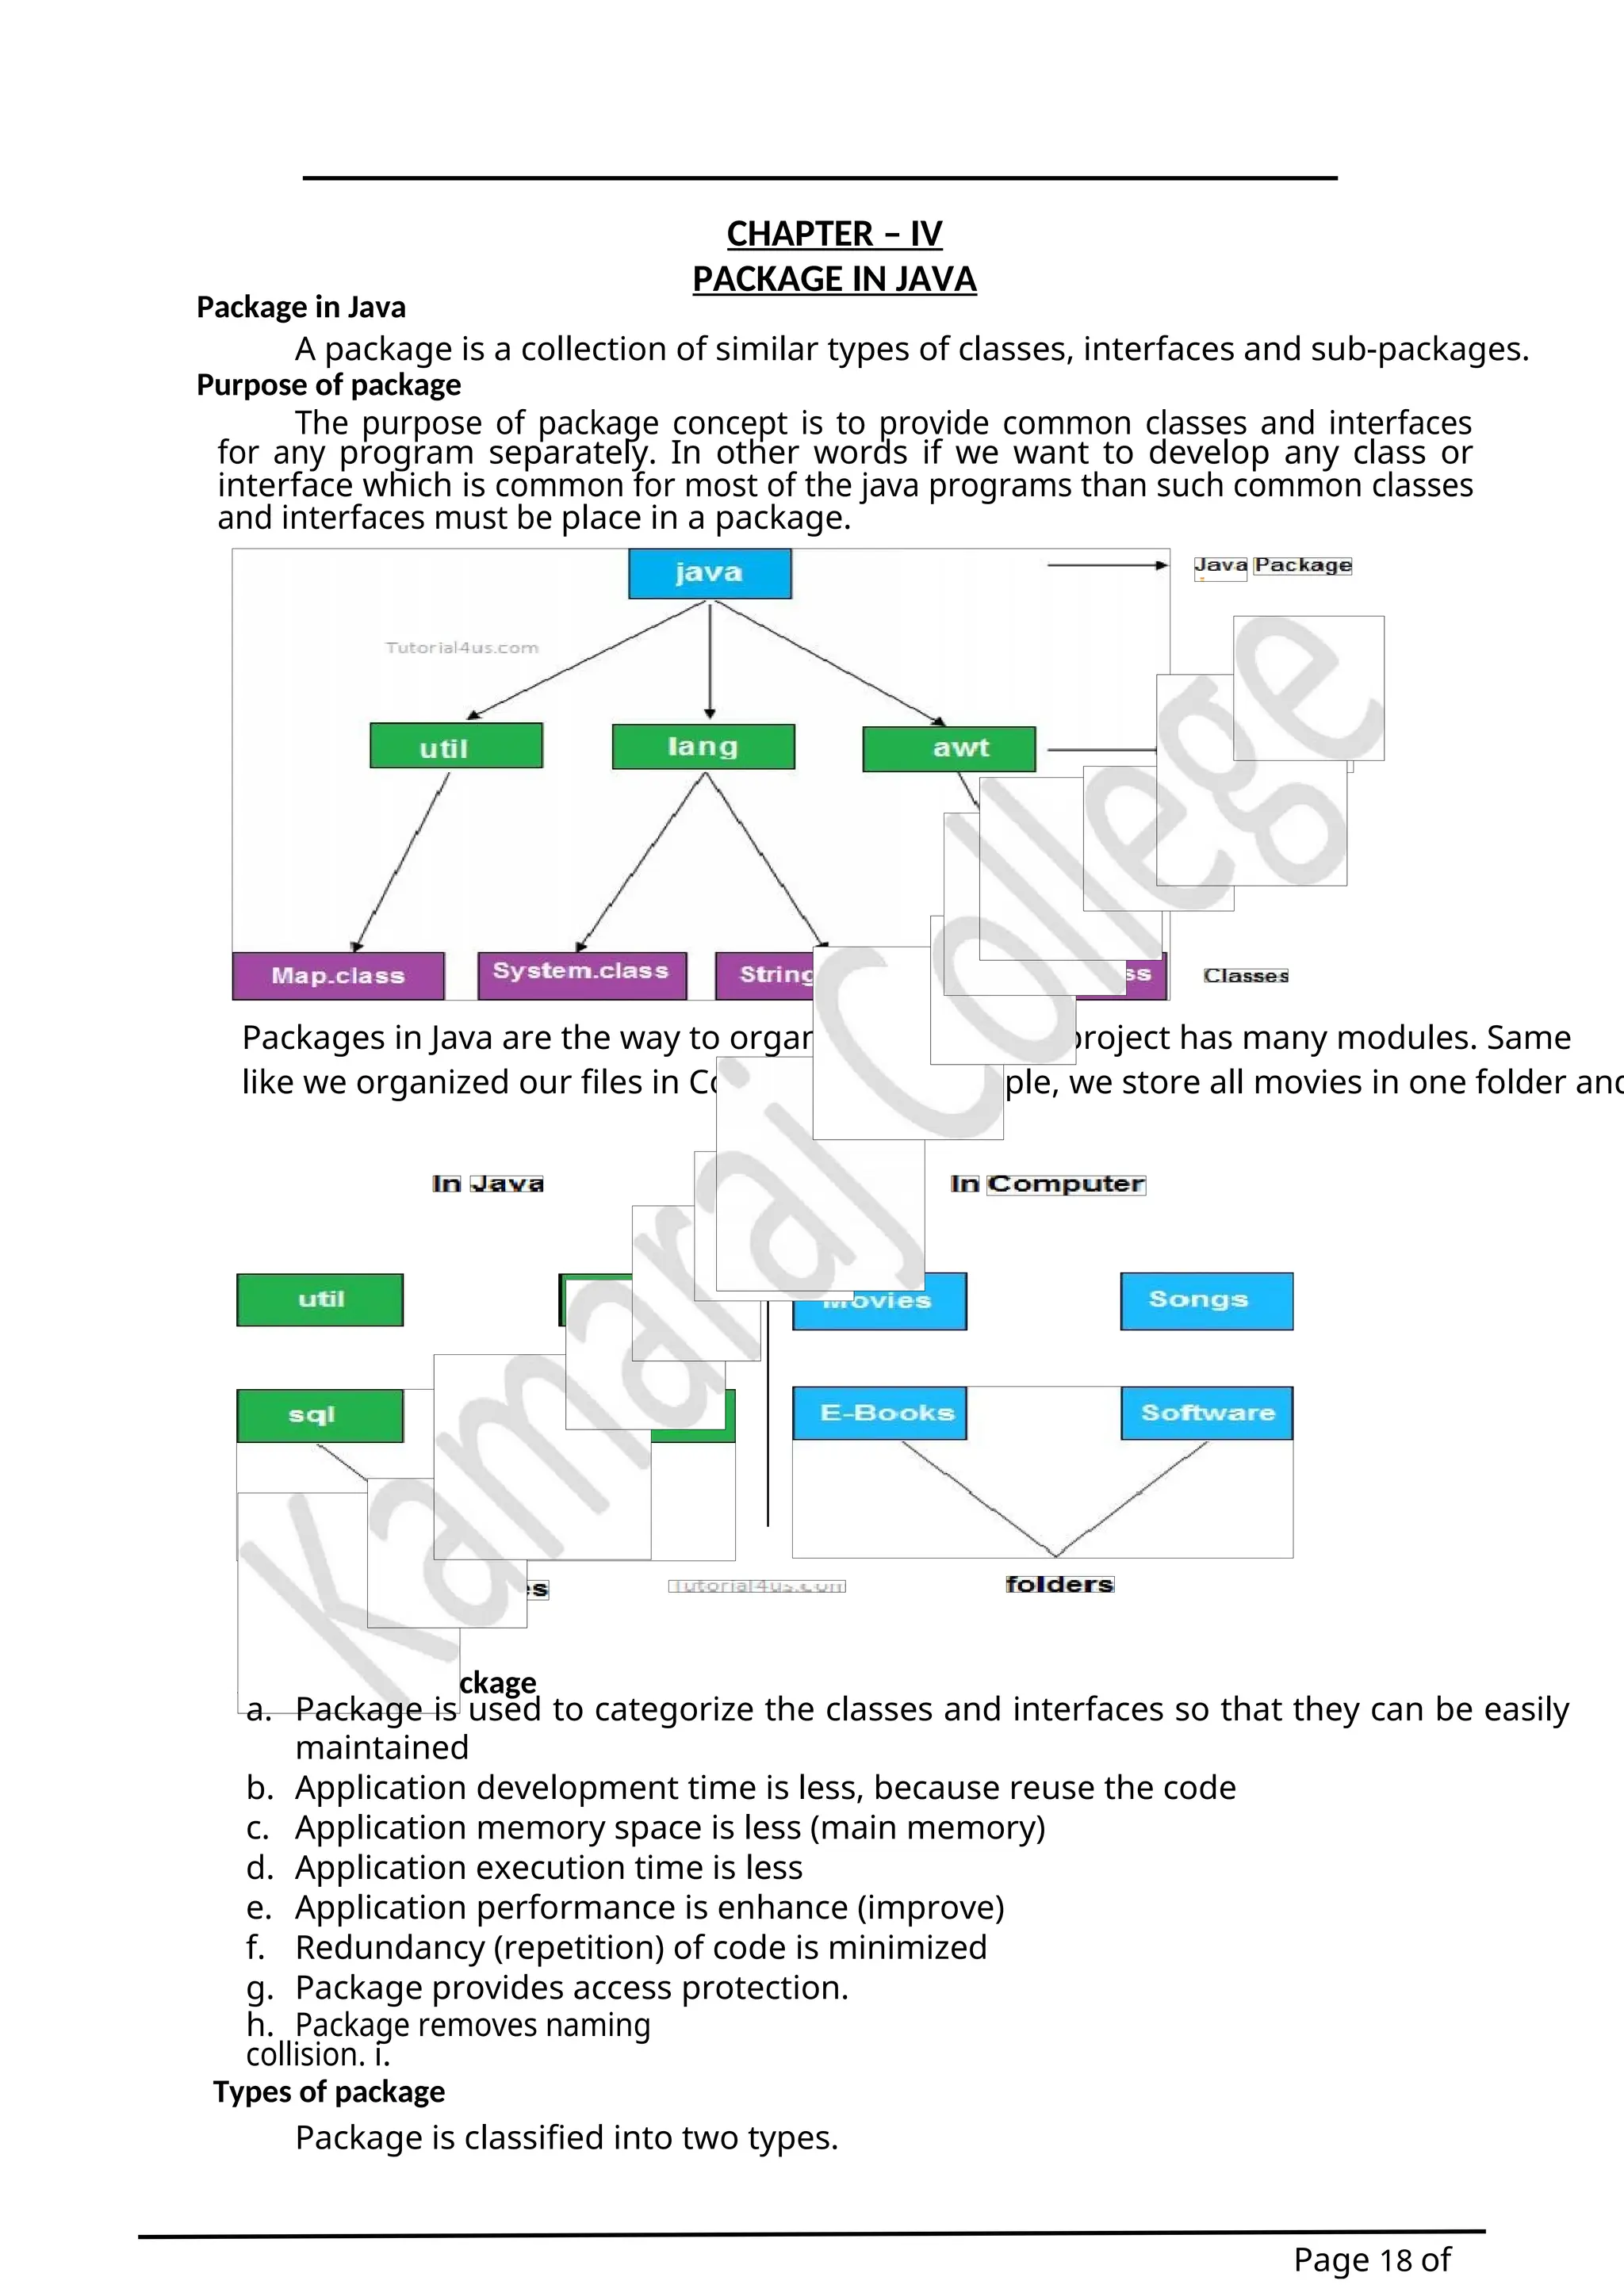
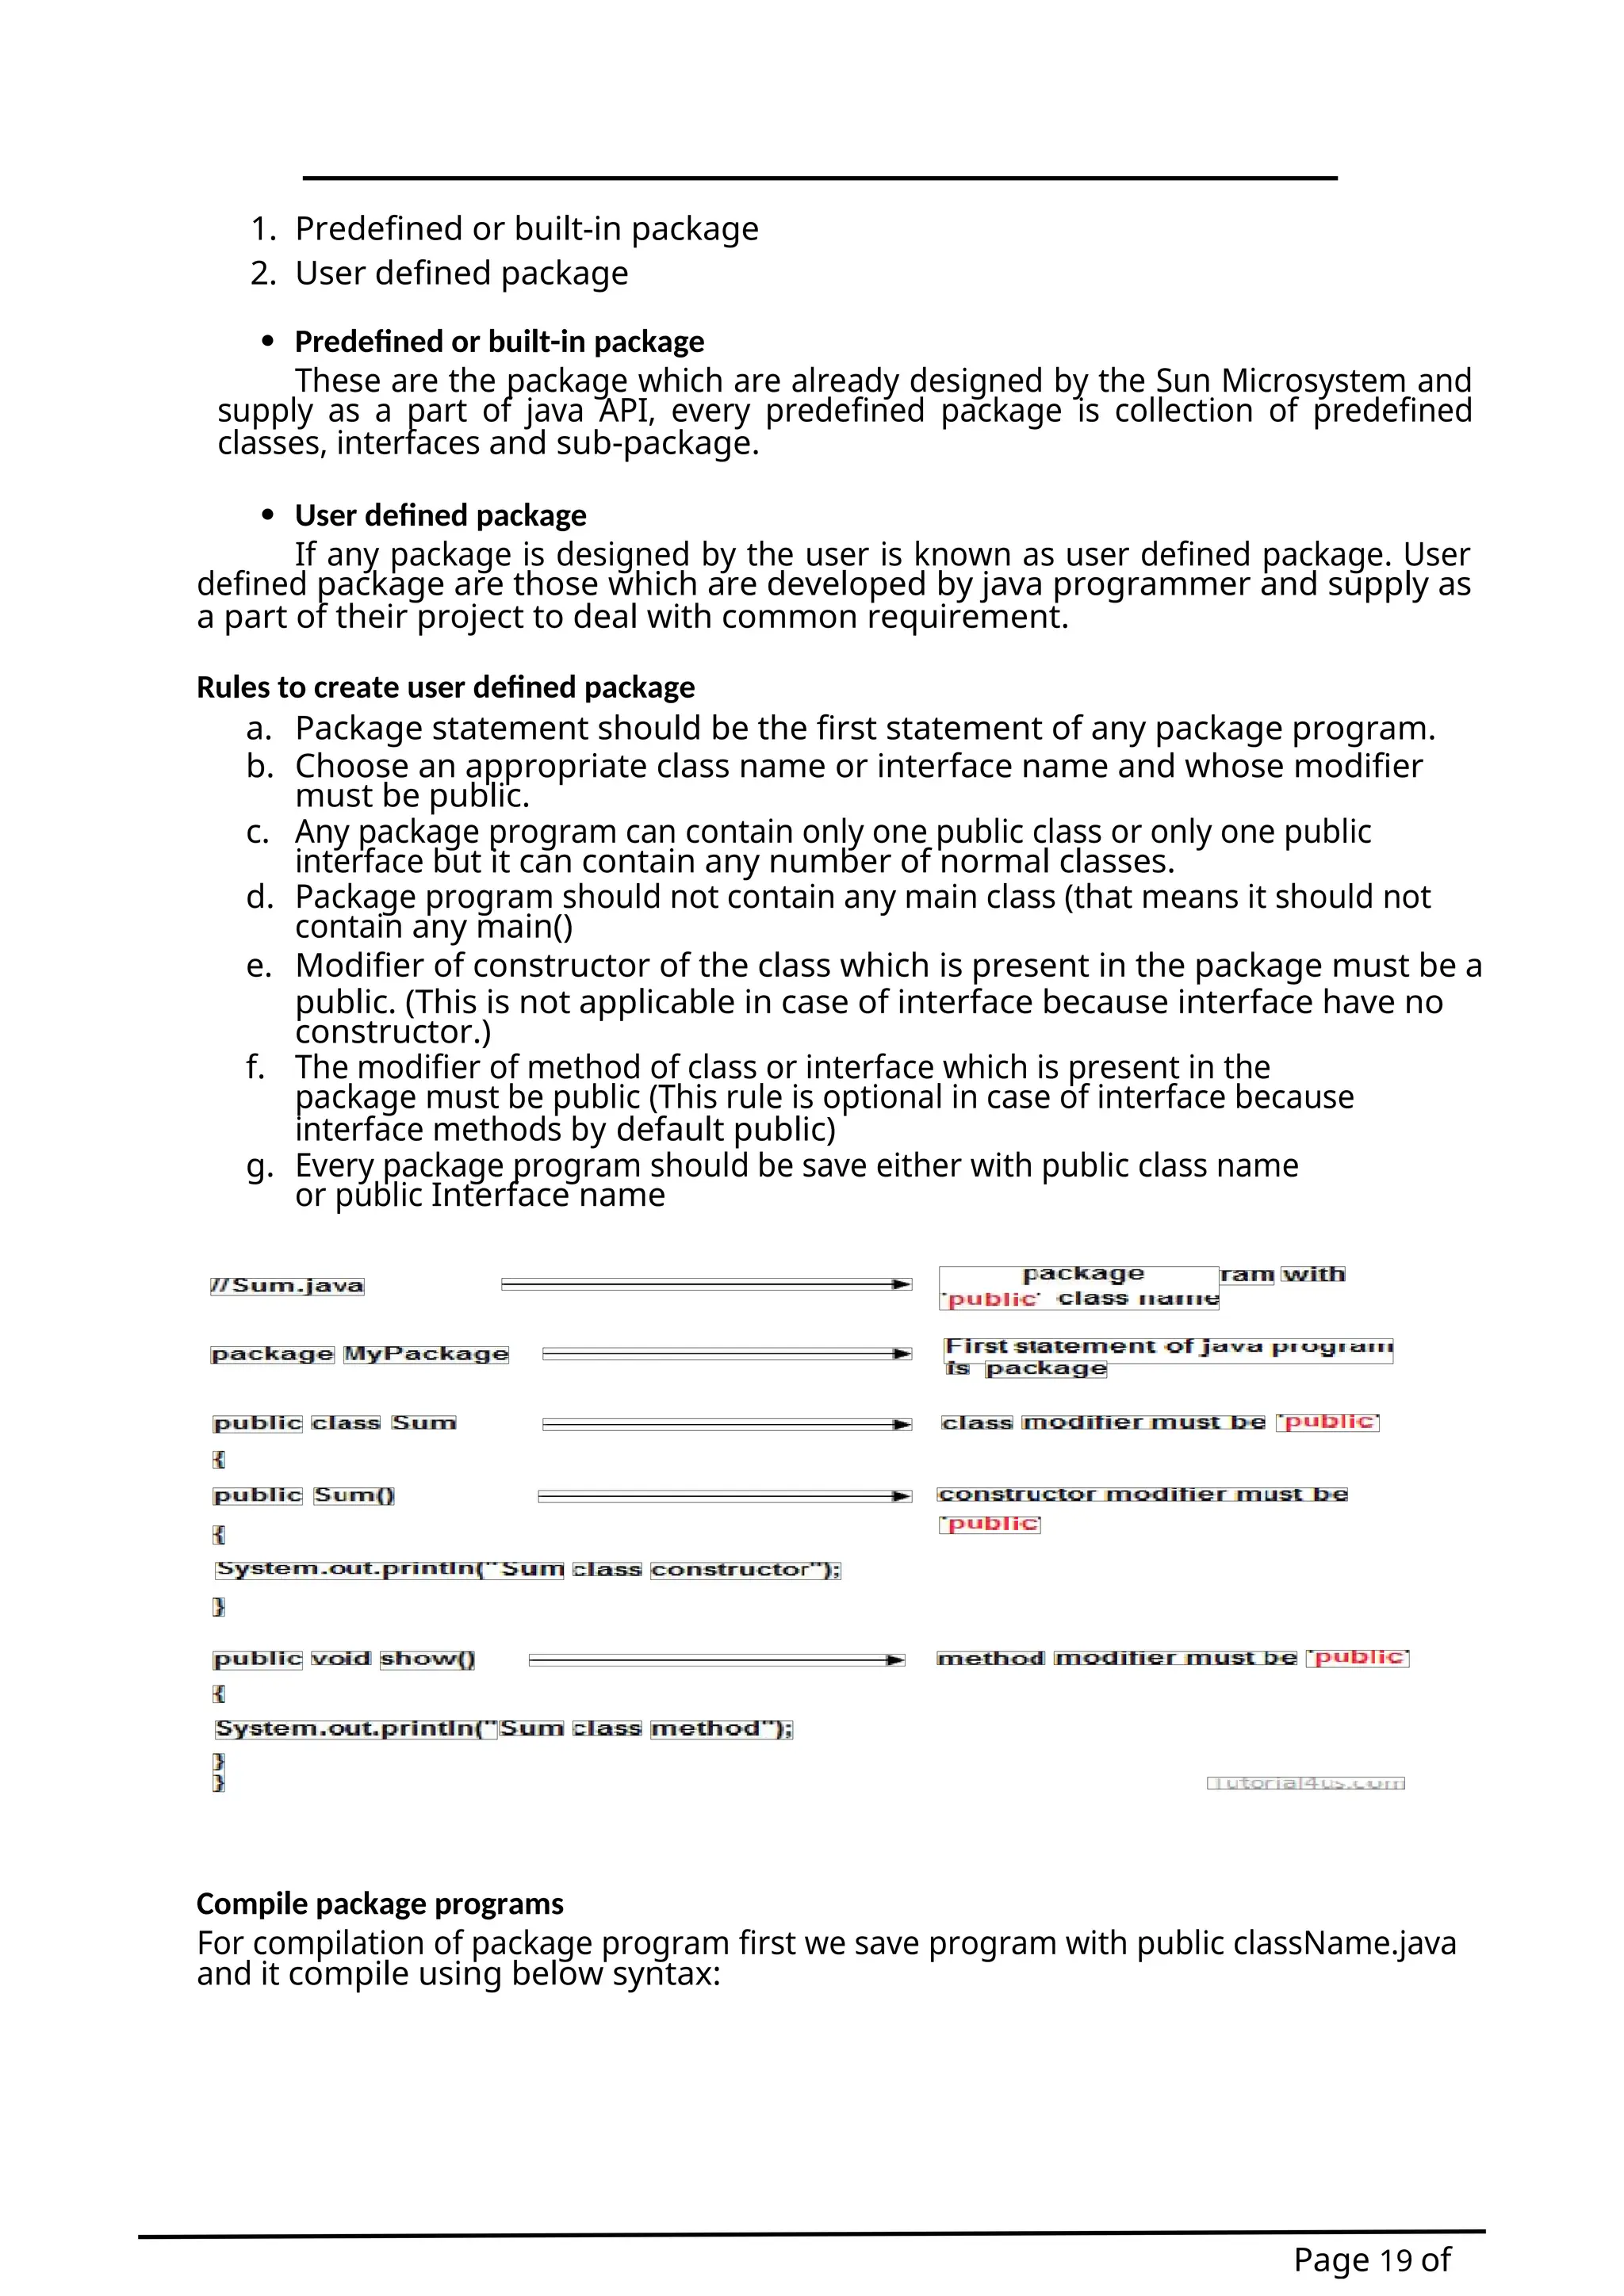
![Syntax
javac-d . className.java
javac-d path className.java
Example
Import above class in below program using import packageName.className
Example
importmypack.A; publicclassHello
{
publicstaticvoid main(Stringarg[])
{
A a=new A(); a.show();
System.out.println("show() class A");
}
}
packagemypack; publicclass A
{
publicvoid show()
{
System.out.println("Sum method");
}
}
Page 20 of
Syntax
Explanations: In above syntax "-d" is a specific tool which is tell to java compiler
create a separate folder for the given package in given path. When we give specific
path then it create a new folder at that location and when we use . (dot) then it crate
a folder at current working directory.
Note: Any package program can be compile but can not be execute or run. These
programs can be executed through user defined program which are importing
package program.
Example of package program
Package program which is save with A.java and compile by javac -d . A.java
Explanations: In the above program first we create Package program which is save with
A.java and compiled by "javac -d . A.java". Again we import class "A" in class Hello
using "import mypack.A;" statement.
Java Access Modifiers – Public, Private, Protected & Default](https://image.slidesharecdn.com/001core15-javaprogramming-iiisem-converted-250918083322-da68ab3b/75/001-Core-15-Java-Programming-III-Sem-converted-docx-20-2048.jpg)
![Page 21 of
Public, private and protected keywords while practising java programs, these are
called
access modifiers. An access modifier restricts the access of a class, constructor, data
member and method in another class. In java we have four access modifiers:
Default
Private
Protected
Public
1. Default access modifier
When we do not mention any access modifier, it is called default access
modifier. The scope of this modifier is limited to the package only. This means that if
we have a class with the default access modifier in a package, only those classes that
are in this package can access this class. No other class outside this package can access
this class. Similarly, if we have a default method or data member in a class, it would not
be visible in the class of another package. Lets see an example to understand this:
Default Access Modifier Example in Java
To understand this example, you must have the knowledge of packages in java.
In this example we have two classes, Test class is trying to access the default
method of Addition class, since class Test belongs to a different package, this
program would throw compilation error, because the scope of default modifier is
limited to the same package in which it is declared.
Addition.java
packageabcpackage;
publicclassAddition{
/* Since we didn't mention any access modifier here, it would
* be considered as default.
*/
intaddTwoNumbers(int a,int b){
returna+b;
}
}
Test.java
packagexyzpackage;
/* We are importing the abcpackage
* but still we will get error because the
* class we are trying to use has default access
* modifier.
*/
importabcpackage.*
; publicclassTest{
publicstaticvoid main(Stringargs[]){
Additionobj=newAddition();
/* It will throw error because we are trying to access
* the default method in another package
*/
obj.addTwoNumbers(10,21);
}](https://image.slidesharecdn.com/001core15-javaprogramming-iiisem-converted-250918083322-da68ab3b/75/001-Core-15-Java-Programming-III-Sem-converted-docx-21-2048.jpg)
![Page 22 of
}
Output:
Exceptionin thread "main"java.lang.Error:Unresolved compilation
problem: The method addTwoNumbers(int,int)from the type Addition
is not visible at xyzpackage.Test.main(Test.java:12)
2. Private access modifier
The scope of private modifier is limited to the class only.
a. Private Data members and methods are only accessible within the class
b. Class and Interface cannot be declared as private
c. If a class has private constructor then you cannot create the object of that
class from outside of the class.
Let’s see an example to understand this:
Private access modifier example in java
This example throws compilation error because we are trying to access the
private data member and method of class ABC in the class Example. The private data
member and method are only accessible within the class.
class ABC{
privatedoublenum=100
; privateint square(int
a){
return a*a;
}
}
publicclassExample{
publicstaticvoid main(Stringargs[]){
ABC obj=new ABC();
System.out.println(obj.num);
System.out.println(obj.square(10));
}
}
Output:
Compile- time error
3. Protected Access Modifier
Protected data member and method are only accessible by the classes of
the same package and the subclasses present in any package. You can also say that
the protected access modifier is similar to default access modifier with one
exception that it has visibility in sub classes.
Classes cannot be declared protected. This access modifier is generally used in a
parent child relationship.
Protected access modifier example in Java
Indent In this example the class Test which is present in another package is able
to call the addTwoNumbers() method, which is declared protected. This is because
the Test class extends class Addition and the protected modifier allows the access of
protected members in subclasses (in any packages).
Addition.java
Package abcpackage;](https://image.slidesharecdn.com/001core15-javaprogramming-iiisem-converted-250918083322-da68ab3b/75/001-Core-15-Java-Programming-III-Sem-converted-docx-22-2048.jpg)
![Page 23 of
public class Addition{
protected int addTwoNumbers(int a,int b){
return a+b;
}
}
Test.java
Package
xyzpackage; Import
abcpackage.*;
class Test extends Addition{
public static void main(String args[]){
Test obj=new Test();
System.out.println(obj.addTwoNumbers(11,22));
}
}
Output:
33
4. Public access modifier
The members, methods and classes that are declared public can be
accessed from anywhere. This modifier doesn’t put any restriction on the access.
Public access modifier example in java
The method addTwoNumbers() has public modifier and class Test is able to
access this method without even extending the Addition class. This is because public
modifier has visibility everywhere.
Addition.java
Package
abcpackage; public
class Addition{
public int addTwoNumbers(int a,int
b){ returna+b;
}
}
Test.java
Package
xyzpackage; Import
abcpackage.*; Class
Test{
Public static void main(String args[]){
Addition obj=new Addition();
System.out.println(obj.addTwoNumbers(100,1));
}
}
Output:
101
Lets see the scope of these access modifiers in tabular form:
The scope of access modifiers in tabular form
+ + + + +
|Class|Package|Subclass|Subclass|Outside|
|||(same package)|(diff package)|Class|](https://image.slidesharecdn.com/001core15-javaprogramming-iiisem-converted-250918083322-da68ab3b/75/001-Core-15-Java-Programming-III-Sem-converted-docx-23-2048.jpg)
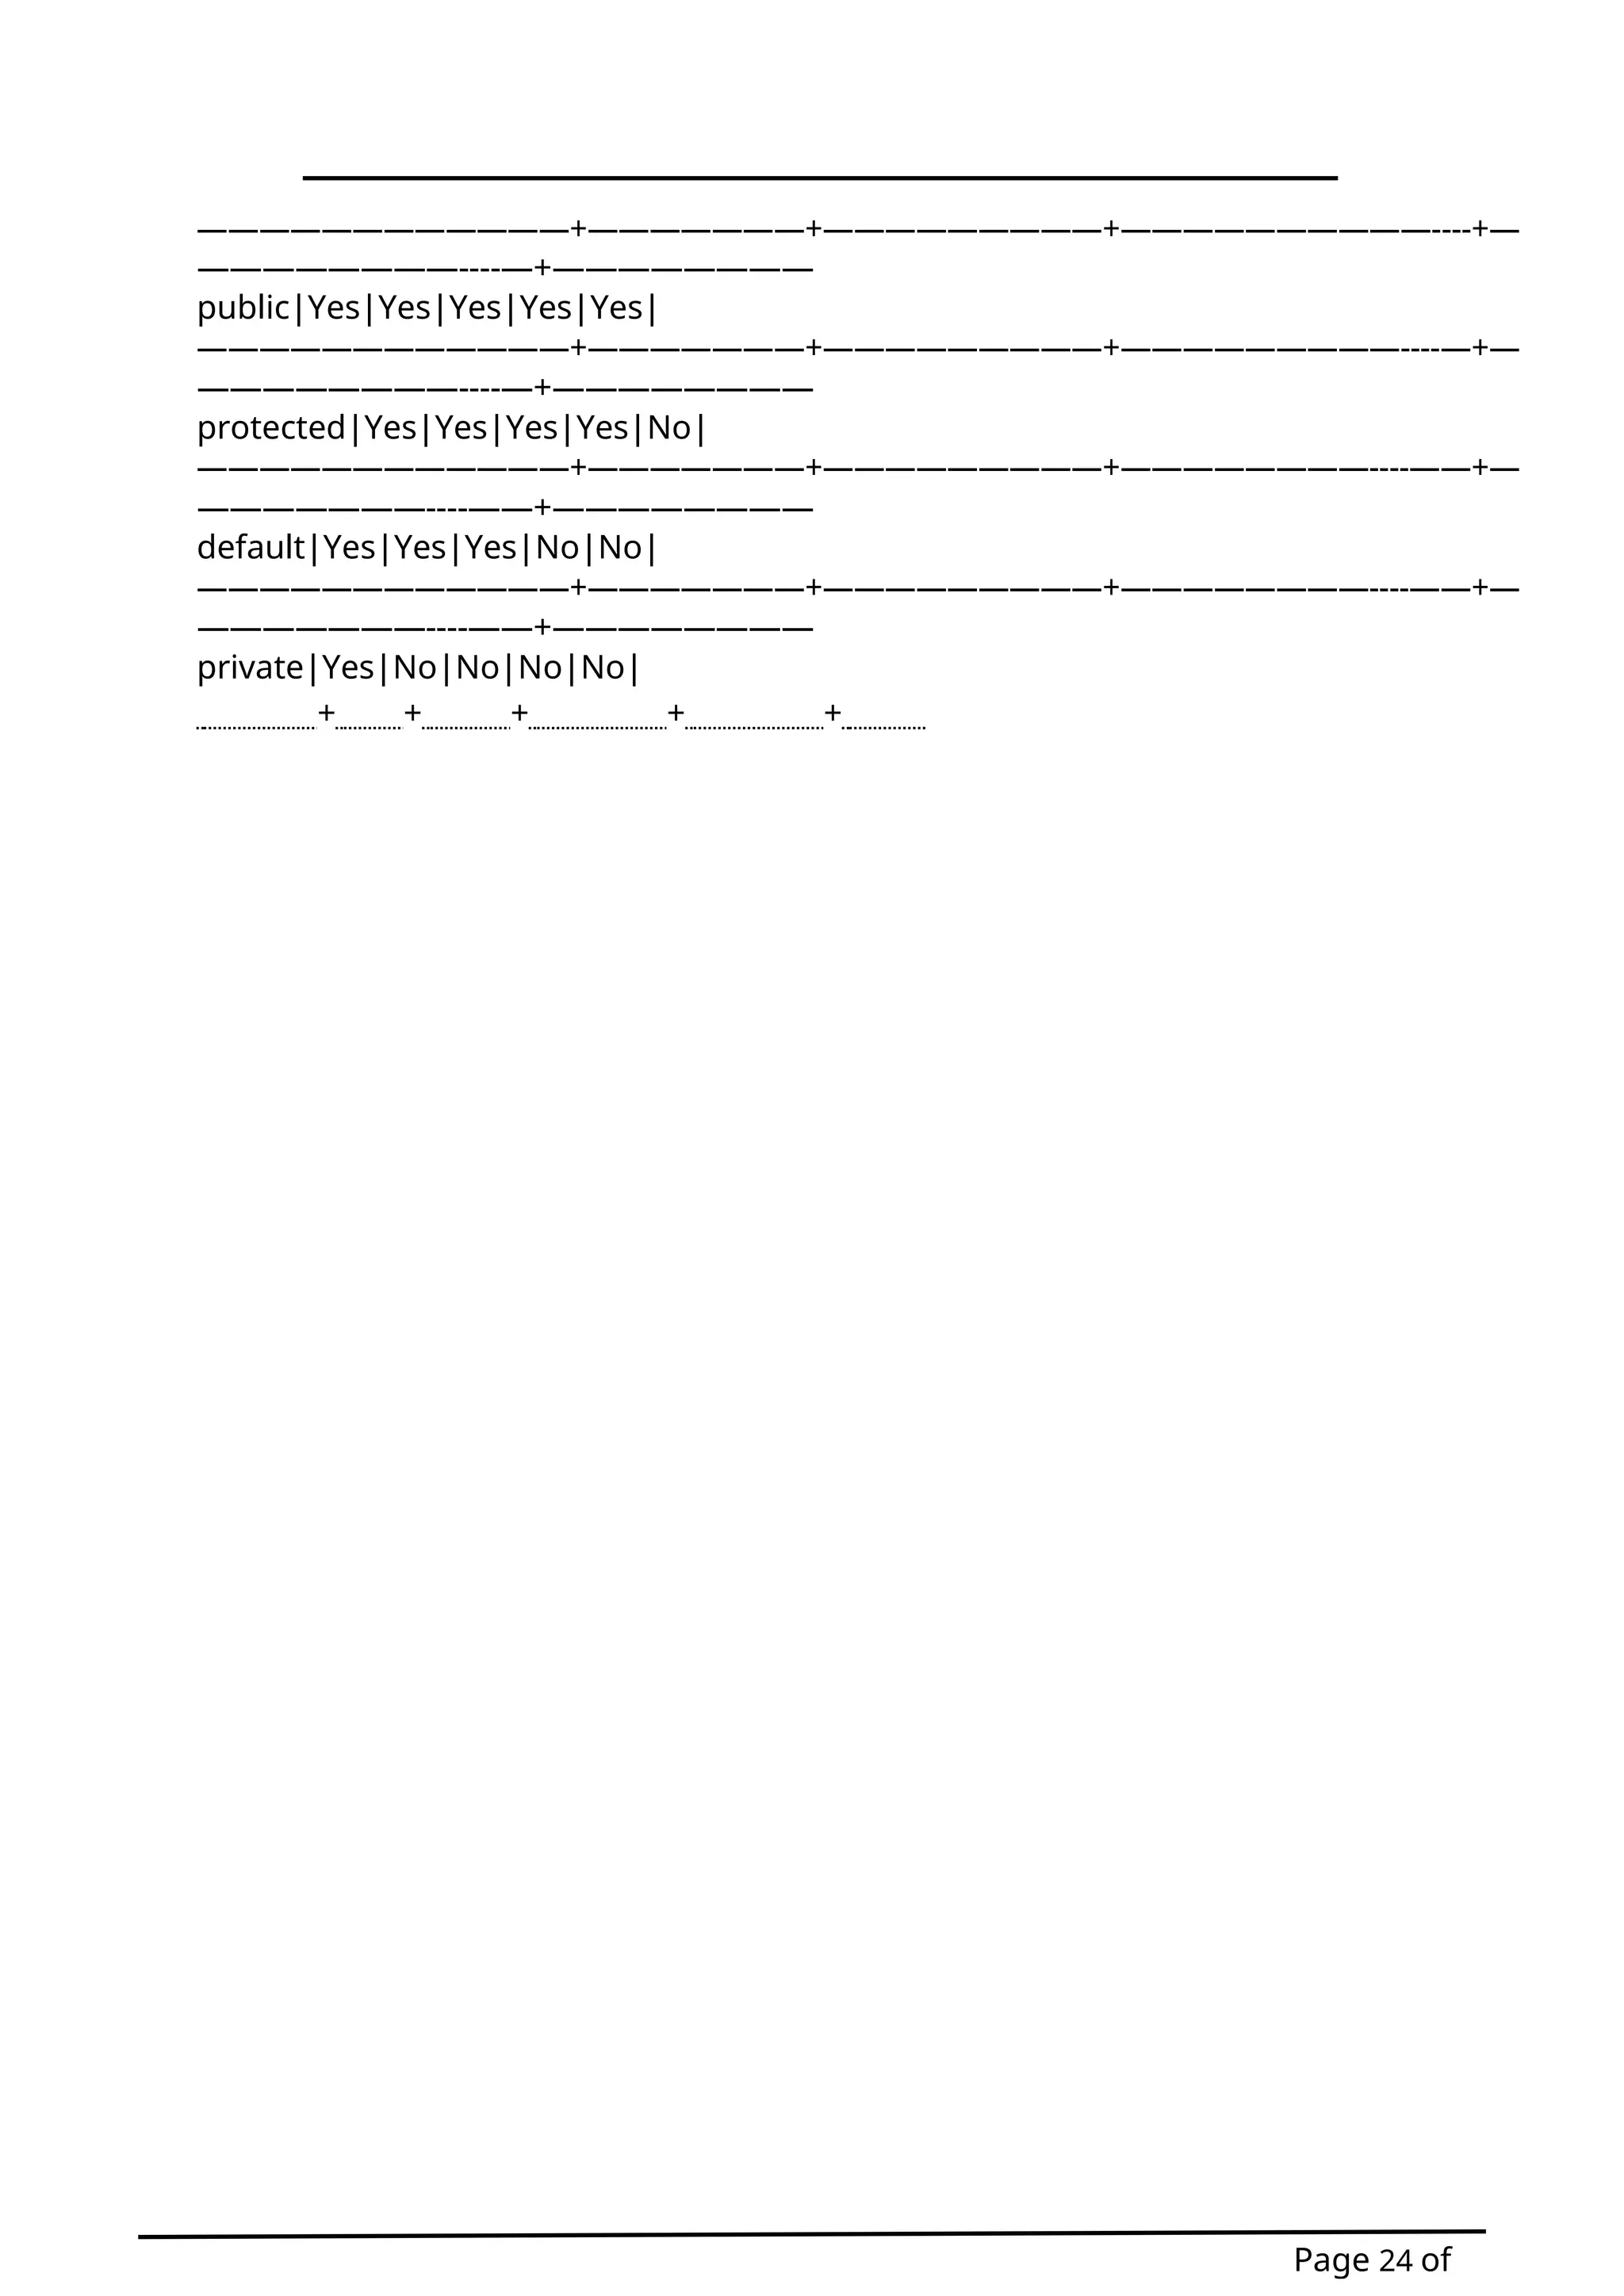

![Page 27 of
Implementing Interfaces
When a class implements an interface, you can think of the class as signing a
contract, agreeing to perform the specific behaviors of the interface. If a class does not
perform all the behaviors of the interface, the class must declare itself as abstract.
A class uses the implements keyword to implement an interface. The
implements keyword appears in the class declaration following the extends portion of
the declaration.
Example
This will produce the following result –
Output
Mammal eats
Mammal travels
When overriding methods defined in interfaces, there are several rules to be followed:
a. Checked exceptions should not be declared on implementation methods other
than the ones declared by the interface method or subclasses of those declared
by the interface method.
b. The signature of the interface method and the same return type or subtype
should be maintained when overriding the methods.
c. An implementation class itself can be abstract and if so, interface methods need
not be implemented.
When implementation interfaces, there are several rules:
a. A class can implement more than one interface at a time.
b. A class can extend only one class, but implement many interfaces.
/* File name :
Animal.java */
interfaceAnimal{
publicvoid eat();
publicvoid travel();
}
/* File name : MammalInt.java */
Public class Mammal Intimplements Animal{
Public void eat(){
System.out.println("Mammal eats");
}
Public void travel(){
System.out.println("Mammal
travels");
}
publicintnoOfLegs(){
return0;
}
publicstaticvoid
main(Stringargs[]){ MammalInt
m =newMammalInt(); m.eat();
m.travel();
}
}](https://image.slidesharecdn.com/001core15-javaprogramming-iiisem-converted-250918083322-da68ab3b/75/001-Core-15-Java-Programming-III-Sem-converted-docx-27-2048.jpg)
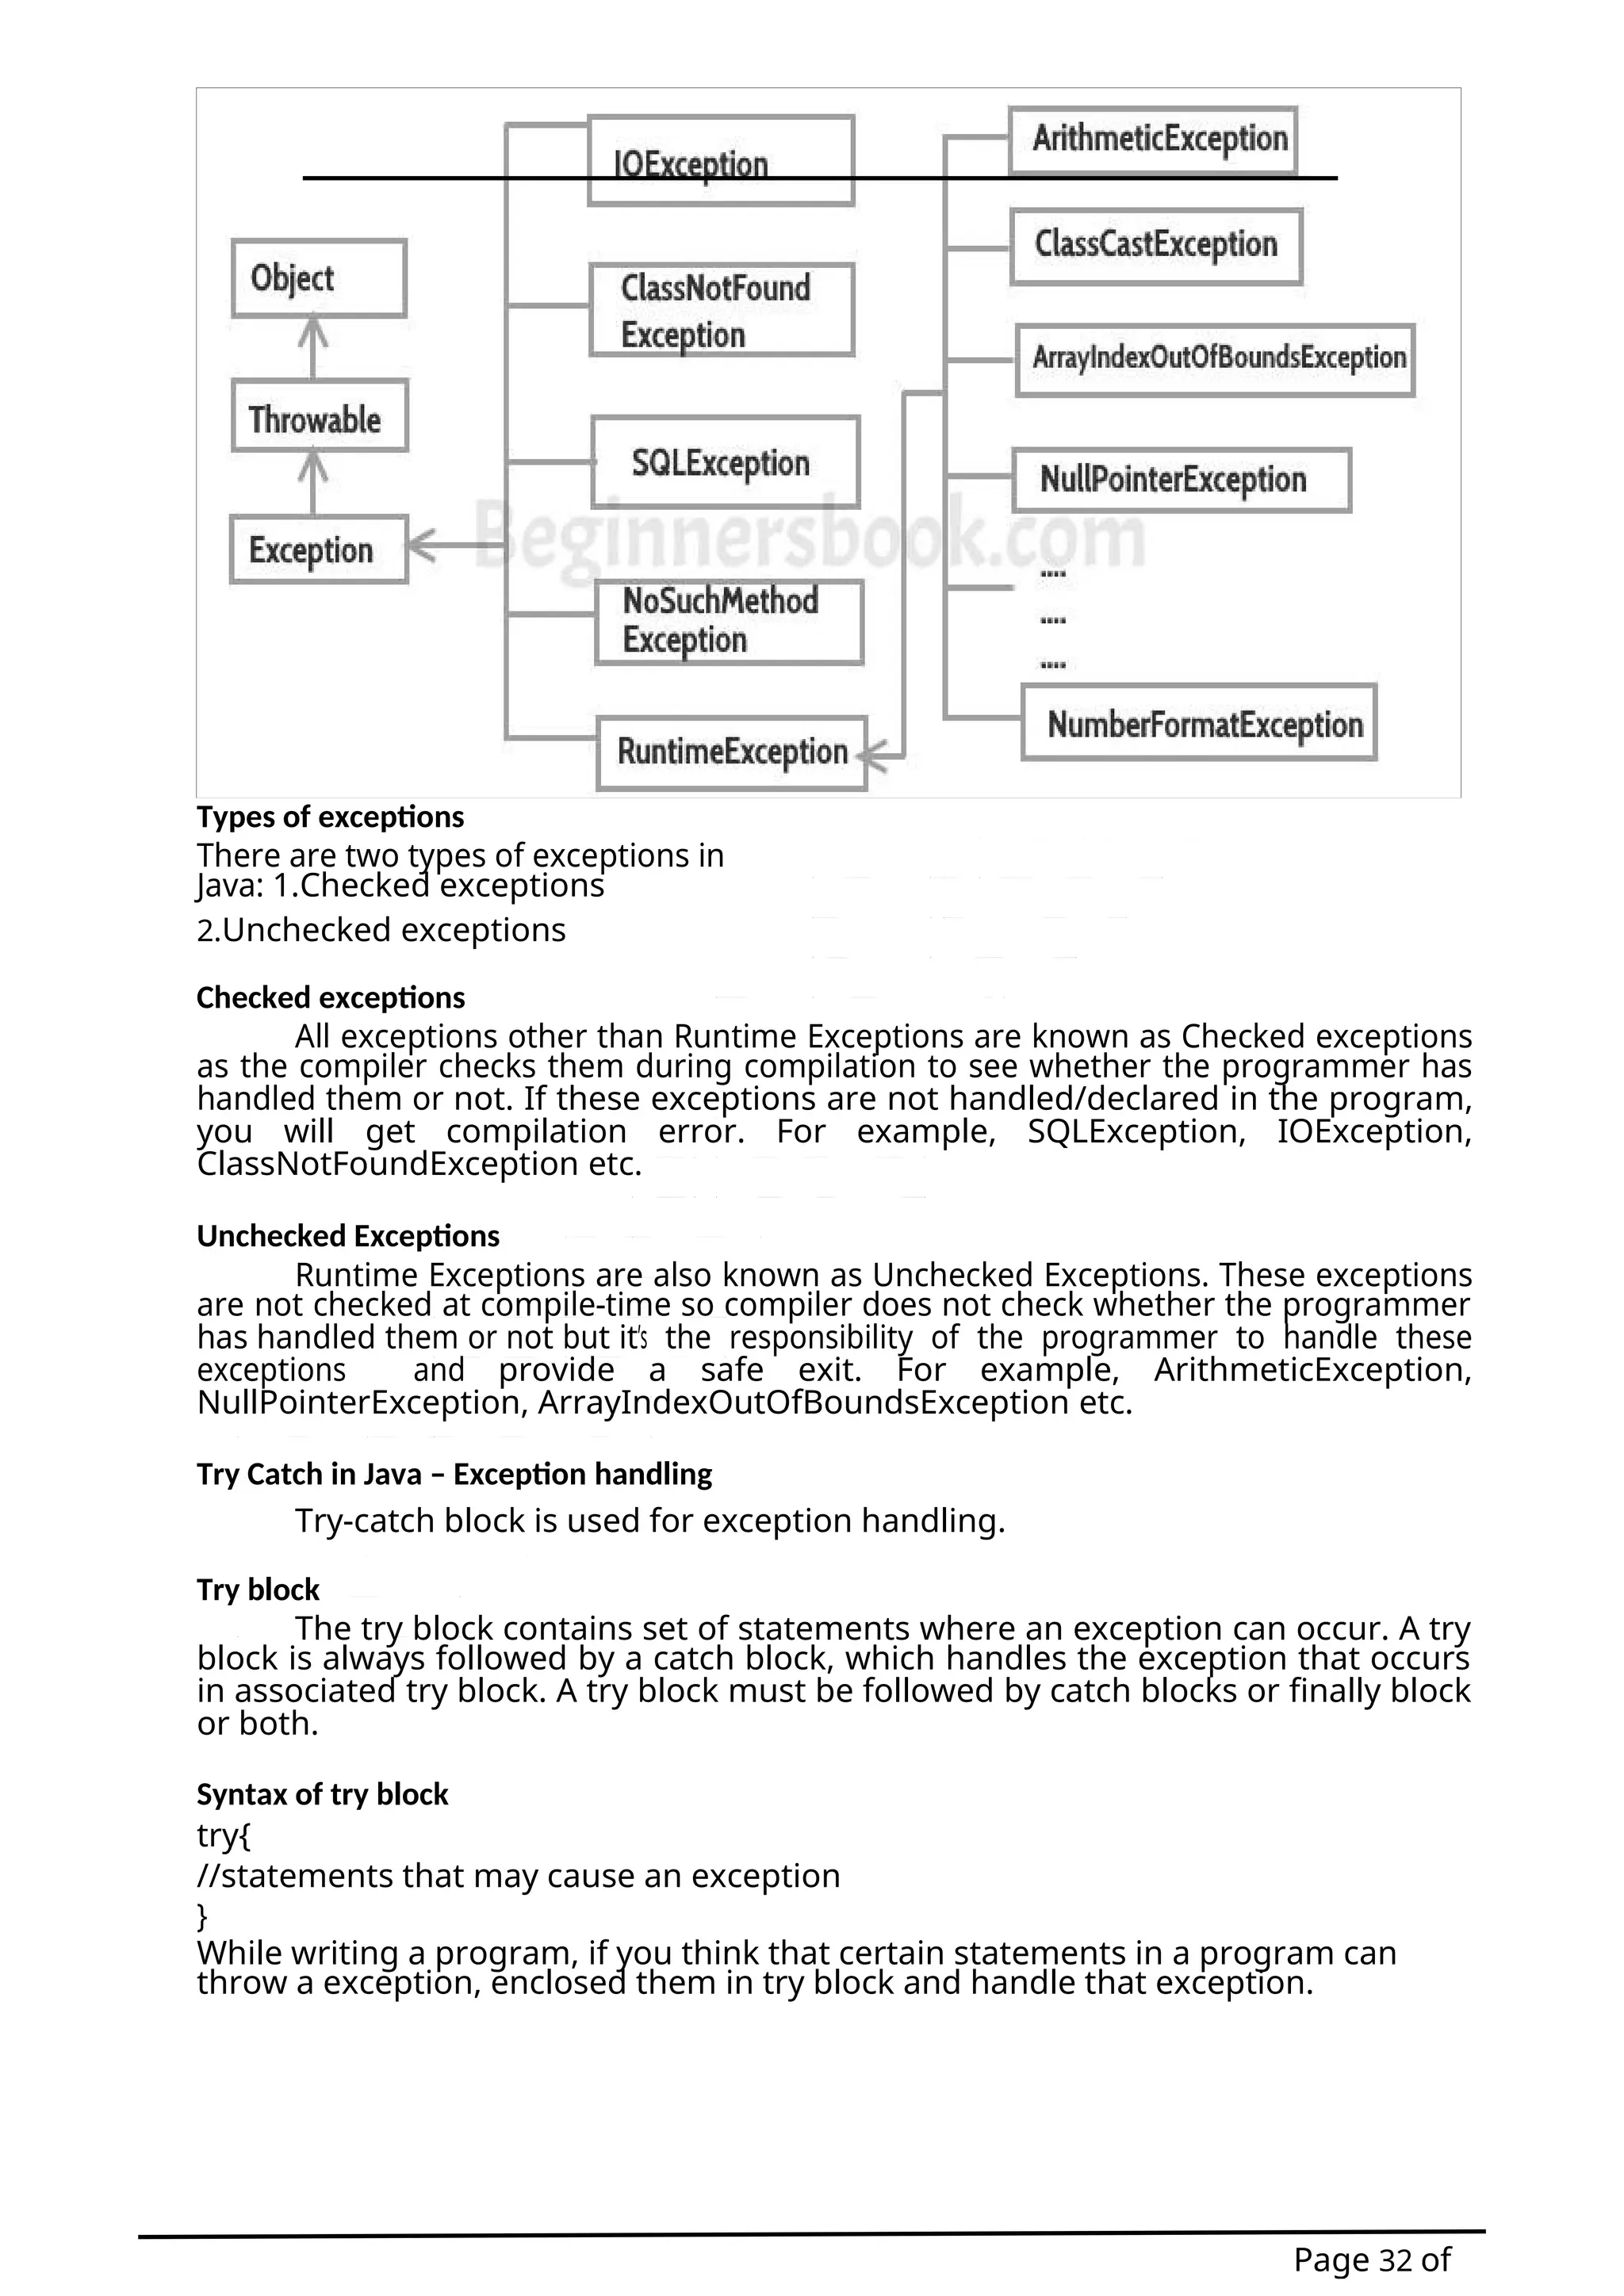
![Page 33 of
Catch block
A catch block is where you handle the exceptions, this block must follow the try
block. A single try block can have several catch blocks associated with it. You can
catch different exceptions in different catch blocks. When an exception occurs in try
block, the corresponding catch block that handles that particular exception
executes. For example, if an arithmetic exception occurs in try block then the
statements enclosed in catch block for arithmetic exception executes.
Syntax of try catch in java
try
{
//statements that may cause an exception
}
catch(exception(type) e(object))
{
//error handling code
}
Example: try catch block
If an exception occurs in try block, then the control of execution is passed to
the corresponding catch block. A single try block can have multiple catch blocks
associated with it, you should place the catch blocks in such a way that the generic
exception handler catch block is at the last(see in the example below).
The generic exception handler can handle all the exceptions but you should
place is at the end, if you place it at the before all the catch blocks then it will display
the generic message. You always want to give the user a meaningful message for each
type of exception rather than a generic message.
classExample1{
public static void main(String args[])
{ int num1, num2;
try{
/* We suspect that this block of statement can throw
* exception so we handled it by placing these statements
* inside try and handled the exception in catch block
*/
num1 =0;
num2 =62/ num1;
System.out.println(num2);
System.out.println("Hey I'm at the end of try block");
}
catch(ArithmeticException e){
/* This block will only execute if any Arithmetic exception
* occurs in try block
*/
System.out.println("You should not divide a number by zero");
}
catch(Exception e){
/* This is a generic Exception handler which means it can handle](https://image.slidesharecdn.com/001core15-javaprogramming-iiisem-converted-250918083322-da68ab3b/75/001-Core-15-Java-Programming-III-Sem-converted-docx-33-2048.jpg)
![Page 34 of
* all the exceptions. This will execute if the exception is not
* handled by previous catch blocks.
*/
System.out.println("Exception occurred");
}
System.out.println("I'm out of try-catch block in Java.");
}
}
Output:
You should not divide a number by
zero I'm out of try-catch block in
Java.
Multiple catch blocks in Java
Rules about multiple catch blocks:
1.A single try block can have any number of catch blocks.
2.A generic catch block can handle all the exceptions. Whether it is Array Index Out Of
Bounds Exception or Arithmetic Exception or Null Pointer Exception or any other type
of exception, this handles all of them. To see the examples of NullPointerException
and ArrayIndexOutOfBoundsException, refer this article:
Exception Handling example programs.
catch(Exception e){
//This catch block catches all the exceptions
}
If you are wondering why we need other catch handlers when we have a generic that
can handle all. This is because in generic exception handler you can display a message
but you are not sure for which type of exception it may trigger so it will display the
same message for all the exceptions and user may not be able to understand which
exception occurred. Thats the reason you should place is at the end of all the
specific exception catch blocks
3.If no exception occurs in try block then the catch blocks are completely ignored.
4. Corresponding catch blocks execute for that specific type of exception:
catch(ArithmeticException e) is a catch block that can handle ArithmeticException
catch(NullPointerException e) is a catch block that can handle
NullPointerException
5. You can also throw exception, which is an advanced topic and I have covered it
in separate tutorials: user defined exception, throws keyword, throw vs throws.
Example of Multiple catch blocks
classExample2{
public static void main(String args[]){
try{
int a[]=newint[7];
a[4]=30/0;
System.out.println("First print statement in try block");
}
catch(ArithmeticException e){
System.out.println("Warning: ArithmeticException");
}](https://image.slidesharecdn.com/001core15-javaprogramming-iiisem-converted-250918083322-da68ab3b/75/001-Core-15-Java-Programming-III-Sem-converted-docx-34-2048.jpg)
![Page 36 of
}
catch(Exception e1){
//Exception Message
}
}
//Catch of Main(parent) try
block catch(Exception e3){
//Exception Message
}
Nested Try Catch Example
Here we have deep (two level) nesting which means we have a try-catch block
inside a nested try block. To make you understand better I have given the names to
each try block in comments like try-block2, try-block3 etc.
This is how the structure is: try-block3 is inside try-block2 and try-block2 is inside
main try-block, you can say that the main try-block is a grandparent of the try-
block3. Refer the explanation which is given at the end of this code.
classNestingDemo{public static
void main(Stringargs[]){
//main try-
block try{
//try-block2
try{
//try-block3
try{
intarr[]={1,2,3,4};
/* I'm trying to display the value of
* an element which doesn't exist. The
* code should throw an exception
*/
System.out.println(arr[10])
;
}catch(ArithmeticException e){
System.out.print("Arithmetic Exception");
System.out.println(" handled in try-block3");
}
}
catch(ArithmeticException e){
System.out.print("Arithmetic Exception");
System.out.println(" handled in try-block2");
}
}
catch(ArithmeticException e3){
System.out.print("Arithmetic Exception");
System.out.println(" handled in main try-block");
}
catch(ArrayIndexOutOfBoundsException e4){
System.out.print("ArrayIndexOutOfBoundsException");
System.out.println(" handled in main try-block");
}](https://image.slidesharecdn.com/001core15-javaprogramming-iiisem-converted-250918083322-da68ab3b/75/001-Core-15-Java-Programming-III-Sem-converted-docx-36-2048.jpg)
![Page 37 of
catch(Exception e5){
System.out.print("Exception");
System.out.println(" handled in main try-
block");
}
}
}
Output:
ArrayIndexOutOfBoundsException handled in main try-block
As you can see that the ArrayIndexOutOfBoundsException occurred in the
grandchild try-block3. Since try-block3 is not handling this exception, the control then
gets transferred to the parent try-block2 and looked for the catch handlers in try-
block2. Since the try-block2 is also not handling that exception, the control gets
transferred to the main (grandparent) try- block where it found the appropriate
catch block for exception. This is how the the nesting structure works.
Example 2: Nested try block
classNest{
publicstaticvoid main(Stringargs[]){
//Parent try block
try{
try{
//Child try block1
System.out.println("Inside block1");
int b =45/0;
System.out.println(b);
}
catch(ArithmeticException e1){
System.out.println("Exception: e1");
}
//Child try
block2 try{
System.out.println("Inside block2");
int b =45/0;
System.out.println(b);
}
catch(ArrayIndexOutOfBoundsException e2){
System.out.println("Exception: e2");
}
System.out.println("Just other statement");
}
catch(ArithmeticException e3){
System.out.println("Arithmetic Exception");
System.out.println("Inside parent try catch block");
}
catch(ArrayIndexOutOfBoundsException e4){
System.out.println("ArrayIndexOutOfBoundsException");
System.out.println("Inside parent try catch block");
}
catch(Exception e5){
System.out.println("Exception");
System.out.println("Inside parent try catch block");](https://image.slidesharecdn.com/001core15-javaprogramming-iiisem-converted-250918083322-da68ab3b/75/001-Core-15-Java-Programming-III-Sem-converted-docx-37-2048.jpg)
![Page 39 of
classExample{
publicstaticvoid main(Stringargs[])
{
FileInputStreamfis=null;
/*This constructor FileInputStream(File filename)
* throws FileNotFoundException which is a checked
* exception
*/
fis=newFileInputStream("B:/myfile.txt");
int k;
/* Method read() of FileInputStream class also throws
* a checked exception: IOException
*/
while(( k =fis.read())!=-1)
{
System.out.print((char)k);
}
/*The method close() closes the file input stream
* It throws
IOException*/
fis.close();
}
}
Output:
Exceptionin thread "main"java.lang.Error:Unresolved compilation problems:
Unhandled exception type FileNotFoundException
Unhandled exception type
IOException Unhandled exception
type IOException
Why this compilation error?
As I mentioned in the beginning that checked exceptions gets checked during
compile time. Since, we didn’t handled/declared the exceptions, our program gave the
compilation error.
How to resolve the error?
There are two ways to avoid this error. We will see both the ways one by one.
Method 1: Declare the exception using throws keyword.
As we know that all three occurrences of checked exceptions are inside main()
method so one way to avoid the compilation error is: Declare the exception in the
method using throws keyword. You may be thinking that our code is throwing
FileNotFoundException and IOException both then why we are declaring the
IOException alone. The reason is that IOException is a parent class of
FileNotFoundException so it by default covers that. If you want you can declare them
like this public static void main(String args[]) throws IOException,
FileNotFoundException.
import java.io.*;
classExample{
publicstaticvoid main(Stringargs[])throwsIOException](https://image.slidesharecdn.com/001core15-javaprogramming-iiisem-converted-250918083322-da68ab3b/75/001-Core-15-Java-Programming-III-Sem-converted-docx-39-2048.jpg)
![Page 40 of
{
FileInputStreamfis=null;
fis=newFileInputStream("B:/myfile.txt")
; int k;
while(( k =fis.read())!=-1)
{
System.out.print((char)k);
}
fis.close();
}
}
Output:
File content is displayed on the screen.
Method 2: Handle them using try-catch blocks.
The approach we have used above is not good at all. It is not the best
exception handling practice. You should give meaningful message for each exception
type so that it would be easy for someone to understand the error. The code should
be like this:
import java.io.*;
class Example{
public static void main(String args[])
{
FileInputStreamfis=null;
try{
fis=newFileInputStream("B:/myfile.txt")
;
}catch(FileNotFoundExceptionfnfe)
{ System.out.println("The specified file is
not "+
"present at the given path");
}
int k;
try{
while(( k =fis.read())!=-1)
{
System.out.print((char)k);
}
fis.close();
}catch(IOExceptionioe){
System.out.println("I/O error occurred: "+ioe);
}
}
}
This code will run fine and will display the file content.
Here are the few other Checked Exceptions –
SQLException
IOException
ClassNotFoundException
InvocationTargetException](https://image.slidesharecdn.com/001core15-javaprogramming-iiisem-converted-250918083322-da68ab3b/75/001-Core-15-Java-Programming-III-Sem-converted-docx-40-2048.jpg)
![Page 41 of
What are Unchecked exceptions?
Unchecked exceptions are not checked at compile time. It means if your
program is throwing an unchecked exception and even if you didn’t handle/declare
that exception, the program won’t give a compilation error. Most of the times these
exception occurs due to the bad data provided by user during the user-program
interaction. It is up to the programmer to judge the conditions in advance, that can
cause such exceptions and handle them appropriately. All Unchecked exceptions
are direct sub classes of RuntimeException class.
Lets understand this with an example:
Unchecked Exception Example
Class Example{
Public tatic oid main(String args[])
{
int num1=10;
int num2=0;
/*Since I'm dividing an integer with 0
* it should throw ArithmeticException
*/
int res=num1/num2;
System.out.println(res);
}
}
If you compile this code, it would compile successfully however when you will run it, it would
throw ArithmeticException. That clearly shows that unchecked exceptions are not
checked at compile-time, they occurs at runtime. Lets see another example.
classExample{
public static void main(String args[])
{
intarr[]={1,2,3,4,5};
/* My array has only 5 elements but we are trying to
* display the value of 8th element. It should throw
* ArrayIndexOutOfBoundsException
*/
System.out.println(arr[7]);
}
}
This code would also compile successfully since Array Index Out Of Bounds Exception is also
an
unchecked exception.
Note: It doesn’t mean that compiler is not checking these exceptions so we shouldn’t
handle them. In fact we should handle them more carefully. For e.g. In the above
example there should be a exception message to user that they are trying to display a
value which doesn’t exist in array so that user would be able to correct the issue.
Class Example{
Public static void main(String
args[]){ try{
int arr[]={1,2,3,4,5};
System.out.println(arr[7]);
}](https://image.slidesharecdn.com/001core15-javaprogramming-iiisem-converted-250918083322-da68ab3b/75/001-Core-15-Java-Programming-III-Sem-converted-docx-41-2048.jpg)
![Page 42 of
catch(ArrayIndexOutOfBoundsException e){
System.out.println("The specified index does not exist
"+ "in array. Please correct the error.");
}
}
}
Output:
The specified index does not exist in array.Please correct the error.
Here are the few unchecked exception classes:
a. NullPointerException
b. ArrayIndexOutOfBoundsException
c. ArithmeticException
d. IllegalArgumentException
e. NumberFormatException
Java Finally block – Exception handling
A finally block contains all the crucial statements that must be executed
whether exception occurs or not. The statements present in this block will always
execute regardless of whether exception occurs in try block or not such as closing a
connection, stream etc.
Syntax of Finally block
try{
//Statements that may cause an exception
}
catch{
//Handling exception
}
finally{
//Statements to be executed
}
A Simple Example of finally block
Here you can see that the exception occurred in try block which has been
handled in catch block, after that finally block got executed.
Class Example
{
Public static void main(String args[]){
try{
intnum=121/0;
System.out.println(num);
}
catch(ArithmeticException e){
System.out.println("Number should not be divided by zero");
}
/* Finally block will always execute
* even if there is no exception in try block
*/
finally
{
System.out.println("This is finally block");
}
System.out.println("Out of try-catch-finally");
}](https://image.slidesharecdn.com/001core15-javaprogramming-iiisem-converted-250918083322-da68ab3b/75/001-Core-15-Java-Programming-III-Sem-converted-docx-42-2048.jpg)
![Page 43 of
}
Output:
Number should not be divided by
zero Thisisfinally block
Out of try-catch-finally
Few Important points regarding finally block
1. A finally block must be associated with a try block, you cannot use finally without a
try block. You should place those statements in this block that must be executed
always.
2. Finally block is optional, as we have seen in previous tutorials that a try-catch
block is sufficient for exception handling, however if you place a finally block then
it will always run after the execution of try block.
3. In normal case when there is no exception in try block then the finally block is
executed after try block. However if an exception occurs then the catch block is
executed before finally block.
4. An exception in the finally block, behaves exactly like any other exception.
5. The statements present in the finally block execute even if the try block contains
control transfer statements like return, break
or continue. Lets see an example to see how finally works when return
statement is present in try block:
Another example of finally block and return statement.
You can see that even though we have return statement in the method, the
finally block still runs.
Class Java Finally
{
Public static void main(String args[])
{
System.out.println(JavaFinally.myMethod());
}
Public static int myMethod()
{
try{
return112;
}
finally{
System.out.println("This is Finally block");
System.out.println("Finally block ran even after return
statement");
}
}
}
Output of above program:
This is Finally block
Finally block ran even after return
statement 112
Cases when the finally block doesn’t execute
The circumstances that prevent execution of the code in a finally block are:](https://image.slidesharecdn.com/001core15-javaprogramming-iiisem-converted-250918083322-da68ab3b/75/001-Core-15-Java-Programming-III-Sem-converted-docx-43-2048.jpg)

![Page 45 of
System.out.println("Inside try block");
System.exit(0)
}
catch(Exceptionexp){
System.out.println(exp);
}
finally{
System.out.println("Java finally block");
}
....
In the above example if the System.exit(0) gets called without any exception then finally
won’t execute. However, if any exception occurs while calling System.exit(0) then finally
block will be executed.
Try-catch-finally block
Either a try statement should be associated with a catch block or with finally.
Since catch performs exception handling and finally performs the cleanup, the
best approach is to use both of them.
Syntax:
try{
//statements that may cause an exception
}
catch(…){
//error handling code
}
finally{
//statements to be executed
}
Examples of Try catch finally blocks
Example 1: The following example demonstrate the working of finally block when no
exception occurs in try block
Class Example1{
Publicstatic void main(String args[])
{ try{
System.out.println("First statement of try block");
intnum=45/3;
System.out.println(num);
}
catch(ArrayIndexOutOfBoundsException e){
System.out.println("ArrayIndexOutOfBoundsException");
}
finally{
System.out.println("finally block");
}
System.out.println("Out of try-catch-finally block");
}
}](https://image.slidesharecdn.com/001core15-javaprogramming-iiisem-converted-250918083322-da68ab3b/75/001-Core-15-Java-Programming-III-Sem-converted-docx-45-2048.jpg)
![Page 46 of
Output:
First statement of try
block 15
finally block
Out of try-catch-finally block
Example 2: This example shows the working of finally block when an exception
occurs in try block but is not handled in the catch block:
Class Example2{
Public static void main(String args[]){
try{
System.out.println("First statement of try block");
intnum=45/0;
System.out.println(num);
}
catch(ArrayIndexOutOfBoundsException e){
System.out.println("ArrayIndexOutOfBoundsException");
}
finally{
System.out.println("finally block");
}
System.out.println("Out of try-catch-finally block");
}
}
Output:
First statement of try
block finally block
Exceptionin thread "main"java.lang.ArithmeticException:/by
zero at
beginnersbook.com.Example2.main(Details.java:6)
As you can see that the system generated exception message is shown but before
that the finally block successfully executed.
Example 3: When exception occurs in try block and handled properly in catch
block Class Example3{
Public static void main(String args[]){
try{
System.out.println("First statement of try block");
intnum=45/0;
System.out.println(num);
}
catch(ArithmeticException e){
System.out.println("ArithmeticException");
}
finally{
System.out.println("finally block");
}
System.out.println("Out of try-catch-finally block");
}
}
Output:](https://image.slidesharecdn.com/001core15-javaprogramming-iiisem-converted-250918083322-da68ab3b/75/001-Core-15-Java-Programming-III-Sem-converted-docx-46-2048.jpg)
![Page 47 of
First statement of try block
ArithmeticException
finally block
Out of try-catch-finally block
Flow of control in try/catch blocks:
When exception doesn’t occur:
When the statements that are present in try block doesn’t throw any exception
then first, the body of try block executes and then the code after catch blocks. In
this case catch block never runs as they are meant to run when an exception
occurs. For example-
classExample1
{
publicstaticvoid main(Stringargs[])
{
int x =10;
int y
=10; try{
intnum= x/y;
System.out.println("next-statement: Inside try block");
}
catch(Exception
ex)
{
System.out.println("Exception");
}
System.out.println("next-statement: Outside of try-catch");
}
}
Output:
next-statement:Insidetry block
next-statement:Outside of try-catch
In the above example exception didn’t occur in try block so catch block didn’t run.
When exception occurs:
First have a look at the example below and then we will discuss the output:
classExample1
{
publicstaticvoid main(String args[])
{
int x =0;
int y
=10; try{
intnum= y/x;
System.out.println("next-statement: Inside try block");
}
catch(Exception
ex)
{](https://image.slidesharecdn.com/001core15-javaprogramming-iiisem-converted-250918083322-da68ab3b/75/001-Core-15-Java-Programming-III-Sem-converted-docx-47-2048.jpg)
![Page 48 of
}
}
Output:
System.out.println("Exception Occurred");
}
System.out.println("next-statement: Outside of try-catch");
ExceptionOccurred
next-statement:Outside of try-catch
Point to note in above example: There are two statements present inside try block.
Since exception occurred because of first statement, the second statement didn’t execute.
Hence we can conclude that if an exception occurs then the rest of the try block doesn’t
execute and control passes to catch block.
Flow of control in try/catch/finally blocks:
1. If exception occurs in try block’s body then control immediately
transferred(skipping rest of the statements in try block) to the catch block. Once
catch block finished execution then finally block and after that rest of the
program.
2. If there is no exception occurred in the code which is present in try block then
first, the try block gets executed completely and then control gets transferred
to finally block (skipping catch blocks).
3. If a return statement is encountered either in try or catch block. In this case
finally block runs. Control first jumps to finally and then it returned back to
return statement.
Lets see this example to understand the above mentioned points:
Class TestExceptions{
Staticvoid myMethod(inttestnum)throwsException{
System.out.println("start - myMethod");
if(testnum==12)
thrownewException();
System.out.println("end -
myMethod"); return;
}
publicstaticvoid main(Stringargs[]){
inttestnum=12;
try{
System.out.println("try - first statement");
myMethod(testnum);
System.out.println("try - last
statement");
}
catch(Exception ex){
System.out.println("An Exception");
}
finally{
System.out.println("finally");
}
System.out.println("Out of try/catch/finally - statement");
}
}
Output:](https://image.slidesharecdn.com/001core15-javaprogramming-iiisem-converted-250918083322-da68ab3b/75/001-Core-15-Java-Programming-III-Sem-converted-docx-48-2048.jpg)
![Page 50 of
CHAPTER – VIII
THROW EXCEPTION IN JAVA
How to throw exception in java with example
In Java we have already defined exception classes such as Arithmetic Exception,
Null Pointer Exception, Array Index Out of Bounds exception etc. These exceptions are
set to trigger on different-2 conditions. For example, when we divide a number by
zero, this triggers Arithmetic Exception, when we try to access the array element
out of its bounds then we get Array Index Out of Bounds Exception.
We can define our own set of conditions or rules and throw an exception
explicitly using throw keyword. For example, we can throw Arithmetic Exception when
we divide number by 5, or any other numbers, what we need to do is just set the
condition and throw any exception using throw keyword. Throw keyword can also be
used for throwing custom exceptions, I have covered that in a separate tutorial, see
Custom Exceptions in Java.
Syntax of throw keyword:
Thrownewexception_class("error message");
For example:
thrownewArithmeticException("dividing a number by 5 is not allowed in this program");
Example of throw keyword
Lets say we have a requirement where we we need to only register the students
when their age is less than 12 and weight is less than 40, if any of the condition is
not met then the user should get an ArithmeticException with the warning message
“Student is not eligible for registration”. We have implemented the logic by placing the
code in the method that checks student eligibility if the entered student age and weight
doesn’t met the criteria then we throw the exception using throw keyword.
/* In this program we are checking the Student age
* if the student age<12 and weight <40 then our program
* should return that the student is not eligible for registration.
*/
Public class ThrowExample{
staticvoid checkEligibilty(intstuage,intstuweight){
if(stuage<12&&stuweight<40){
thrownewArithmeticException("Student is not eligible for registration");
}
else{
System.out.println("Student Entry is Valid!!");
}
}
publicstaticvoid main(Stringargs[]){
System.out.println("Welcome to the Registration process!!");
checkEligibilty(10,39);
System.out.println("Have a nice day..");
}
}
Output:](https://image.slidesharecdn.com/001core15-javaprogramming-iiisem-converted-250918083322-da68ab3b/75/001-Core-15-Java-Programming-III-Sem-converted-docx-50-2048.jpg)
![Page 51 of
Welcome to the Registration process!!Exceptionin thread "main"
java.lang.ArithmeticException:Studentisnot eligible for registration
at
beginnersbook.com.ThrowExample.checkEligibilty(ThrowExample.java:9)
at beginnersbook.com.ThrowExample.main(ThrowExample.java:18)
In the above example we have throw an unchecked exception, same way we can
throw uncheckedand user-defined exception as well.
Throw Keyword Example in Java
Here, various examples to demonstrate how to throw an exception using
throw keyword. To understand these programs, you should have the basic knowledge
of what is throw keyword and why we throw exception using throw keyword, refer
this guide: throw in java.
Example 1: How to throw your own exception explicitly using throw keyword
This example shows how to throw a custom exception using throw. Refer this guide to
understand how to create your own exceptions.
classMyOwnExceptionextendsException{
publicMyOwnException(Stringmsg){
super(msg);
}
}
Class EmployeeTest{
staticvoidemployeeAge(int age) throws
MyOwnException{ if(age <0)
thrownewMyOwnException("Age can't be less than
zero"); else
System.out.println("Input is valid!!");
}
publicstaticvoid main(String[]args){
try{
employeeAge(-2);
}
catch(MyOwnException e){
e.printStackTrace();
}
}
}
Output:
beginnersbook.com.MyOwnException:Age can't be less than zero
Note: Method call should be in try block as it is throwing an exception.
Example2: How to throw an already defined exception using throw keyword
Class Exception2{
staticint sum(int num1,int num2){
if(num1 ==0)
thrownewArithmeticException("First parameter is not valid");
else
System.out.println("Both parameters are correct!!");
return num1+num2;
}](https://image.slidesharecdn.com/001core15-javaprogramming-iiisem-converted-250918083322-da68ab3b/75/001-Core-15-Java-Programming-III-Sem-converted-docx-51-2048.jpg)
![Page 52 of
publicstaticvoid main(Stringargs[]){
int res=sum(0,12);
System.out.println(res);
System.out.println("Continue Next statements");
}
}
Output:
Exceptionin thread main java.lang.ArithmeticException:
First parameter isnot valid
Similarly other exceptions, such as NullPointerException, ArrayIndexOutOfBoundsException
etc. can be thrown.
Throws Keyword Example in Java
Here we will see few examples of throws keyword. To understand these
programs, you should have the knowledge of throws keyword in java.
Example 1: Exception propagation using throws keyword
As you can see that we have an exception occurred in method1 which has been
handled in the chain-calling method method3(). This example shows how exception
propagation works. classExample1{
void method1()throwsArithmeticException{
thrownewArithmeticException("Calculation error");
}
void method2()throwsArithmeticException{
method1();
}
void method3(){
try{
method2();
}
catch(ArithmeticException e){
System.out.println("ArithmeticException handled");
}
}
publicstaticvoid main(Stringargs[])
{ Example1obj=newExample1();
obj.method3();
System.out.println("End Of
Program");
}
}
Output:
Arithmetic Exception
handled End of Program
Example 2: When you don’t handle exception and instead declare it at all the places
The ideal way to use throws is by declaring the exceptions in method
signature and handle the exceptions using try-catch in calling method. Lets see
what happens when we declare the exception at both the places, in method
signature as well as in calling method.
Class Exception Example{](https://image.slidesharecdn.com/001core15-javaprogramming-iiisem-converted-250918083322-da68ab3b/75/001-Core-15-Java-Programming-III-Sem-converted-docx-52-2048.jpg)
![Page 53 of
void method()throws Arithmetic Exception{
thrownew Arithmetic Exception("Arithmetic Exception Occurred");
}
}
Class Example1{
Public static void main(String args[]) throws ArithmeticException{
ExceptionExampleobj=newExceptionExample();
obj.method();
System.out.println("End Of Program");
}
}
Output:
Exceptionin thread "main"java.lang.ArithmeticException:
ArithmeticExceptionOccurred
at
ExceptionExample.method(Example1.java:4)
at Example1.main(Example1.java:10)
Throws clause in java – Exception handling
BY CHAITANYA SINGH | FILED UNDER: EXCEPTION HANDLING
As we know that there are two types of exception checked and unchecked.
Checked exception (compile time) force you to handle them, if you don’t handle them then
the program will not compile.
On the other hand unchecked exception (Runtime) doesn’t get checked during
compilation. Throws keyword is used for handling checked exceptions. By using throws
we can declare multiple exceptions in one go.
What is the need of having throws keyword when you can handle exception using try-catch?
The throws does the same thing that try-catch does but there are some cases
where you would prefer throws over try-catch. For example:
Lets say we have a method myMethod() that has statements that can throw
either ArithmeticException or NullPointerException, in this case you can use try-
catch as shown below:
publicvoidmyMethod()
{
try{
// Statements that might throw an exception
}
catch(ArithmeticException e){
// Exception handling statements
}
catch(NullPointerException e){
// Exception handling statements
}
}
But suppose you have several such methods that can cause exceptions, in that case it
would be tedious to write these try-catch for each method. The code will become
unnecessary long and will be less-readable.](https://image.slidesharecdn.com/001core15-javaprogramming-iiisem-converted-250918083322-da68ab3b/75/001-Core-15-Java-Programming-III-Sem-converted-docx-53-2048.jpg)
![Page 54 of
One way to overcome this problem is by using throws like this: declare the exceptions
in
the method signature using throws and handle the exceptions where you are
calling this method by using try-catch.
Another advantage of using this approach is that you will be forced to
handle the exception when you call this method, all the exceptions that are declared
using throws, must be handled where you are calling this method else you will get
compilation error.
publicvoidmyMethod () throwsArithmeticException, NullPointerException
{
// Statements that might throw an exception
}
publicstaticvoid main(Stringargs[]){
try{
myMethod();
}
catch(ArithmeticException e){
// Exception handling statements
}
catch(NullPointerException e){
// Exception handling statements
}
}
Example of throws Keyword
In this example the method myMethod() is throwing two checked exceptions
so we have declared these exceptions in the method signature using throws Keyword.
If we do not declare these exceptions then the program will throw a compilation
error.
import java.io.*;
classThrowExampl
e{
voidmyMethod(intnum)throwsIOException,ClassNotFoundException{
if(num==1)
thrownewIOException("IOException Occurred");
else
thrownewClassNotFoundException("ClassNotFoundException");
}
}
publicclassExample1{
publicstaticvoid main(Stringargs[]){
try{
ThrowExampleobj=newThrowExample();
obj.myMethod(1);
}catch(Exception ex){
System.out.println(ex);
}
}
}
Output:
java.io.IOException:IOExceptionOccurr
ed
How to Catch multiple exceptions](https://image.slidesharecdn.com/001core15-javaprogramming-iiisem-converted-250918083322-da68ab3b/75/001-Core-15-Java-Programming-III-Sem-converted-docx-54-2048.jpg)
![Page 55 of
BY CHAITANYA SINGH | FILED UNDER: EXCEPTION HANDLING
Catching multiple exceptions
Lets take an example to understand how to handle multiple
exceptions. classExample{
publicstaticvoid main(Stringargs[]){
try{
intarr[]=newint[7];
arr[4]=30/0;
System.out.println("Last Statement of try block");
}
catch(ArithmeticException e){
System.out.println("You should not divide a number by zero");
}
catch(ArrayIndexOutOfBoundsException e){
System.out.println("Accessing array elements outside of the limit");
}
catch(Exception e){
System.out.println("Some Other
Exception");
}
System.out.println("Out of the try-catch block");
}
}
Output:
You should not divide a number by
zero Out of the try-catch block
In the above example, the first catch block got executed because the code
we have written in try block throws ArithmeticException (because we divided the
number by zero).
Now lets change the code a little bit and see the change in output:
classExample{
publicstaticvoid main(Stringargs[]){
try{
intarr[]=newint[7];
arr[10]=10/5;
System.out.println("Last Statement of try block");
}
catch(ArithmeticException e){
System.out.println("You should not divide a number by zero");
}
catch(ArrayIndexOutOfBoundsException e){
System.out.println("Accessing array elements outside of the limit");
}
catch(Exception e){
System.out.println("Some Other
Exception");
}
System.out.println("Out of the try-catch block");
}
}
Output:](https://image.slidesharecdn.com/001core15-javaprogramming-iiisem-converted-250918083322-da68ab3b/75/001-Core-15-Java-Programming-III-Sem-converted-docx-55-2048.jpg)
![Page 56 of
Accessing array elements outside of the limit
Out of the try-catch block
In this case, the second catch block got executed because the code throws Array
Index Out Of Bounds Exception. We are trying to access the 11th element of array in
above program but the array size is only 7.
What did we observe from the above two examples?
1. It is clear that when an exception occurs, the specific catch block (that declares
that exception) executes. This is why in first example first block executed and in second
example second catch.
2. Although I have not shown you above, but if an exception occurs in above code
which is not Arithmetic and ArrayIndexOutOfBounds then the last generic catch
handler would execute.
Lets change the code again and see the output:
Class Example{
Public staticvoid main(String args[])
{ try{
intarr[]=newint[7];
arr[10]=10/5;
System.out.println("Last Statement of try block");
}
catch(Exception e){
System.out.println("Some Other
Exception");
}
catch(ArithmeticException e){
System.out.println("You should not divide a number by zero");
}
catch(ArrayIndexOutOfBoundsException e){
System.out.println("Accessing array elements outside of the limit");
}
System.out.println("Out of the try-catch block");
}
}
Output:
Compile time error:Exceptionin thread "main"java.lang.Error:
Unresolved compilation problems:Unreachablecatch block
forArithmeticException. Itis already handled by the catch block
forExceptionUnreachablecatch block
forArrayIndexOutOfBoundsException.Itis already handled by the catch block
for Exception at Example.main.](https://image.slidesharecdn.com/001core15-javaprogramming-iiisem-converted-250918083322-da68ab3b/75/001-Core-15-Java-Programming-III-Sem-converted-docx-56-2048.jpg)
![Page 57 of
What are Java Threads?
A thread is a:
CHAPTER – IX
INTRODUCTION OF THREADS IN JAVA
a. Facility to allow multiple activities within a single process
b. Referred as lightweight process
c. A thread is a series of executed statements
d. Each thread has its own program counter, stack and local variables
e. A thread is a nested sequence of method calls
f. Its shares memory, files and per-process
state Read: Multithreading in Java
Whats the need of a thread or why we use Threads?
a. To perform asynchronous or background processing
b. Increases the responsiveness of GUI applications
c. Take advantage of multiprocessor systems
d. Simplify program logic when there are multiple independent
entities e.
What happens when a thread is invoked?
When a thread is invoked, there will be two paths of execution. One path will
execute the thread and the other path will follow the statement after the thread
invocation. There will be a separate stack and memory space for each thread.
Risk Factor
a. Proper co-ordination is required between threads accessing common variables
[use of synchronized and volatile] for consistence view of data
b. overuse of java threads can be hazardous to program’s performance and
its maintainability.
Threads in Java
Java threads facility and API is deceptively simple:
Every java program creates at least one thread [ main() thread ]. Additional
threads are created through the Thread constructor or by instantiating classes that
extend the Thread class.
Thread creation in Java
Thread implementation in java can be achieved in two ways:
A. Extending the java.lang.Thread class
B. Implementing the java.lang.Runnable Interface
Note: The Thread and Runnable are available in the java.lang.* package
A.By extending thread class
1. The class should extend Java Thread class.
2. The class should override the run() method.
3. The functionality that is expected by the Thread to be executed is written in
the run() method.
void start(): Creates a new thread and makes it
runnable. void run(): The new thread begins its life inside this method.
Example:
publicclassMyThreadextendsThread{](https://image.slidesharecdn.com/001core15-javaprogramming-iiisem-converted-250918083322-da68ab3b/75/001-Core-15-Java-Programming-III-Sem-converted-docx-57-2048.jpg)
![Page 58 of
publicvoid run(){
System.out.println("thread is running...");
}
publicstaticvoid main(String[]args){
MyThreadobj=newMyThread();
obj.start();
}
B.By Implementing Runnable interface
1. The class should implement the Runnable interface
2. The class should implement the run() method in the Runnable interface
3. The functionality that is expected by the Thread to be executed is put in the
run() method
Example:
Public class MyThreadimplementsRunnable{
publicvoid run(){
System.out.println("thread is running..");
}
publicstaticvoid
main(String[]args){ Thread t
=newThread(newMyThread());
t.start();
}
Extends Thread class vs Implements Runnable Interface?
Extending the Thread class will make your class unable to extend other classes,
because of the single inheritance feature in JAVA. However, this will give you a simpler
code structure. If you implement Runnable, you can gain better object-oriented design
and consistency and also avoid the single inheritance problems.
If you just want to achieve basic functionality of a thread you can simply
implement Runnable interface and override run() method. But if you want to do
something serious with thread object as it has other methods like suspend(), resume(),
..etc which are not available in Runnable interface then you may prefer to extend the
Thread class.
Thread life cycle in java
Read full article at: Thread life cycle in java
Ending Thread
A Thread ends due to the following reasons:
The thread ends when it comes when the run() method finishes its execution.
When the thread throws an Exception or Error that is not being caught in the
program.
Java program completes or ends.
Another thread calls stop() methods.
Synchronization of Threads
In many cases concurrently running threads share data and two threads try
to do operations on the same variables at the same time. This often results in
corrupt data as two threads try to operate on the same data.
A popular solution is to provide some kind of lock primitive. Only one thread can
acquire a particular lock at any particular time. This can be achieved by using
a keyword “synchronized” .](https://image.slidesharecdn.com/001core15-javaprogramming-iiisem-converted-250918083322-da68ab3b/75/001-Core-15-Java-Programming-III-Sem-converted-docx-58-2048.jpg)
![Page 59 of
By using the synchronize only one thread can access the method at a time and a
second call will be blocked until the first call returns or wait() is called inside the
synchronized method.
Deadlock
Whenever there is multiple processes contending for exclusive access to
multiple locks, there is the possibility of deadlock. A set of processes or threads is said
to be deadlocked when each is waiting for an action that only one of the
others can perform. In Order to avoid deadlock, one should ensure that when you
acquire multiple locks, you always acquire the locks in the same order in all threads.
Guidelines for synchronization
Keep blocks short. Synchronized blocks should be short — as short as possible
while still protecting the integrity of related data operations.
Don’t block. Don’t ever call a method that might block, such as
InputStream.read(), inside a synchronized block or method.
Don’t invoke methods on other objects while holding a lock. This may sound
extreme, but it eliminates the most common source of deadlock.
Java Main Thread
Once a Java program starts, one thread starts running immediately. This is usually
called main thread of your program, because it is the one which is executed when
your program starts. The main thread is important for the following two reasons:
It is the thread from which the other (child) threads will be spawned
Often, it must be the last thread to finish the execution as it performs various
shutdown actions
Although the main thread is automatically created when your program starts, it
can be controlled through a Thread object. To do so, you must obtain a reference
to it by calling the method named currentThread(), is a public static member of the
Thread. Its general form is : static Thread currentThread()
This method returns a reference to the thread in which it is called. And once you
have a reference to the main thread, you can control it just like any other thread.
Java Main Thread Example
Here is an example demonstrates the concept of main thread in Java:
/* Java Program Example - Java Main Thread
* This program control the main Thread
*/
class JavaProgram
{
public static void main(String args[])
{
Thread thr = Thread.currentThread();
System.out.println("Current thread : " +
thr);
/* change the name of the thread */](https://image.slidesharecdn.com/001core15-javaprogramming-iiisem-converted-250918083322-da68ab3b/75/001-Core-15-Java-Programming-III-Sem-converted-docx-59-2048.jpg)
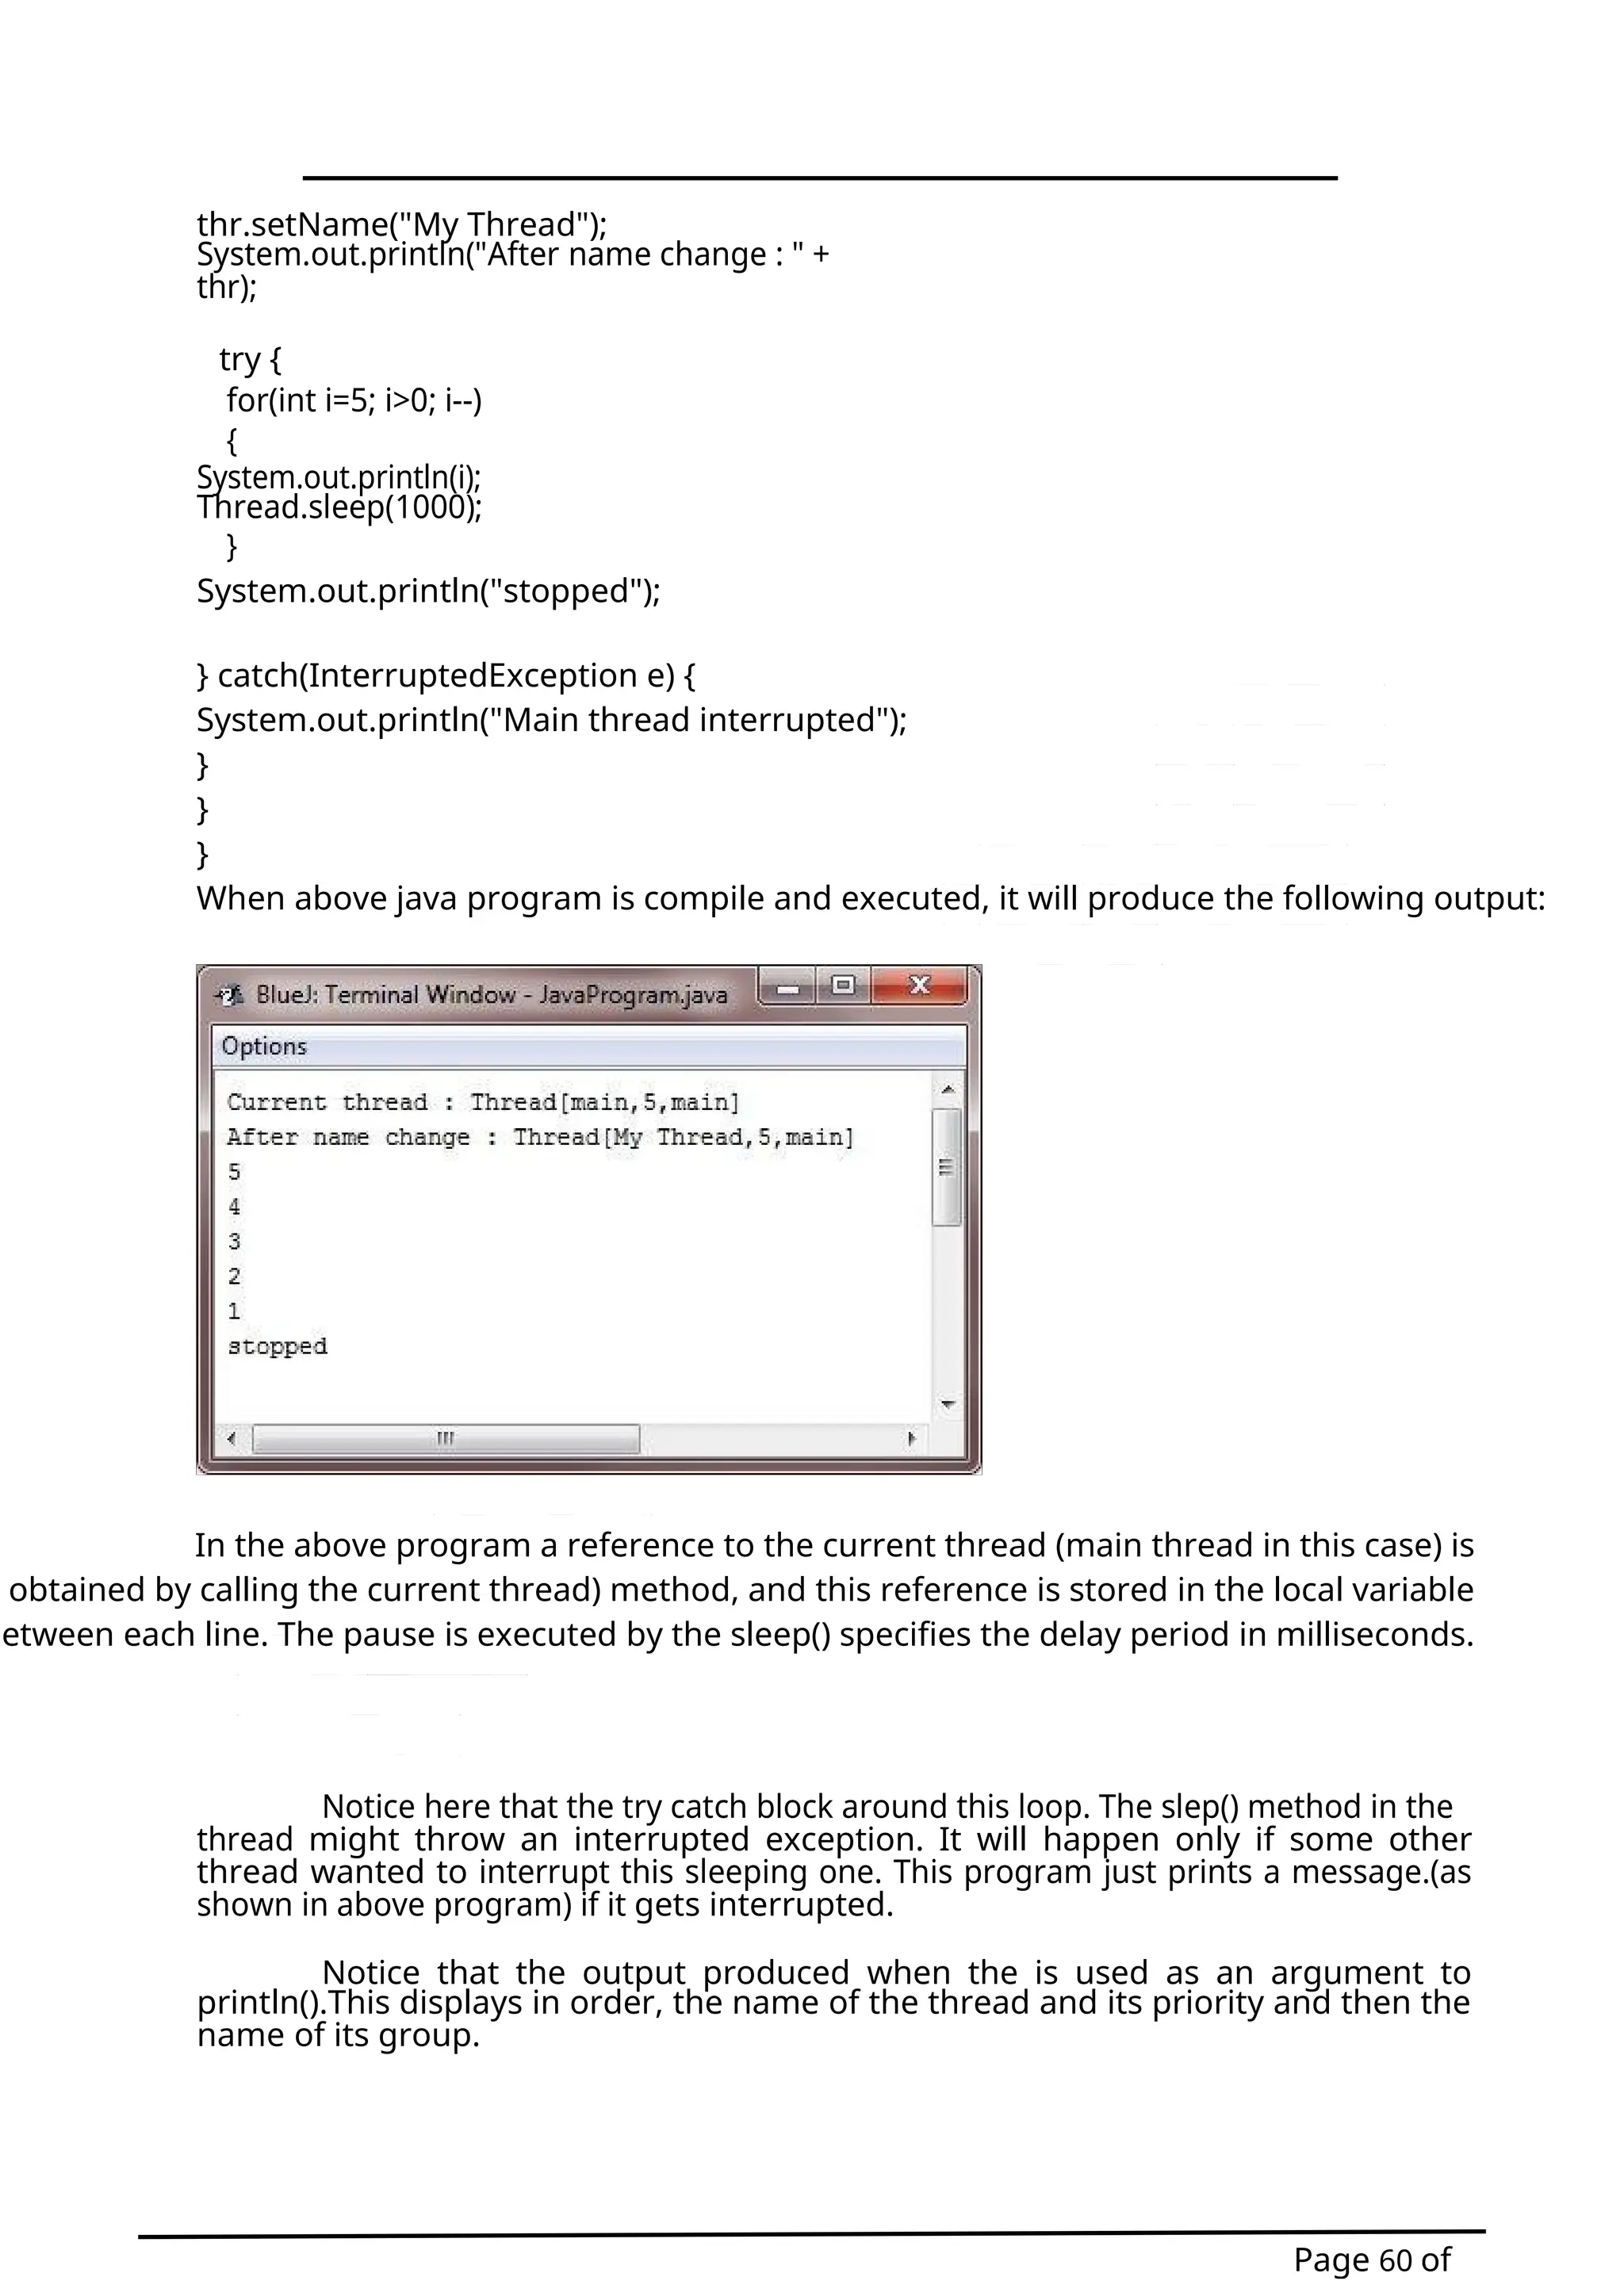
![Page 62 of
InterfaceRunnable
publicabstractvoid();
Note the @Functional interface annotation on the top of the runnable
interface. That is a new annotation added in Java8. Read more about it here Functional
interface annotation in java 8
To implement runnable a class has to implement only the run() method inside
run() method we write the code for the new thread.
When using Runnable you have to explicitly create a thread class object by
passing the Runnable as parameter so that run() method of the thread can be
executed. java thread class defines several constructors, some of the commonly
used are.
Thread()
Thread(String
Name)
Thread(Runnable threadObi)
Thread(Runnable threadObi,String name)
You can use any of the last two in case of runnable to create a thread in java.
After the new thread is created, it will not start running until you call the start()
method, which is declared within thread class. As soon as start() method is called
upon a thread object following actions happen-
The thread’s state changes from New state to the runnable state.
Thread’s target run() method will execute (depends upon when thread gets
the CPU CYCLE).
Java Thread creation Example using Runnable
Class MyThread implements Runnable{
@Override
publicvoid run(){
System.out.println("Entered run method
"+Thread.currentThread().getName()); for(int i =0; i <5; i++){
System.out.println("My Thread"+ i);
}
System.out.println("Finished with MyThread");
}
}
publicclassThreadDemo{
publicstaticvoid main(String[]args){
// Passing runnable instance
Threadthread=newThread(newMyThread());
// Calling start
method
thread.start();
}
}
Output
Entered run method Thread-0](https://image.slidesharecdn.com/001core15-javaprogramming-iiisem-converted-250918083322-da68ab3b/75/001-Core-15-Java-Programming-III-Sem-converted-docx-62-2048.jpg)
![Page 63 of
v
My
Thread0
My
Thread1
My
Thread2
My
Thread3
My
Thread4
Finished with MyThread
Here we are using the constructor Thread(Runnable threadObj) while creating a thread
object -
Thread thread = new Thread(new MyThread());.
Calling start() method on the thread will execute the run method where it will print
numbers along with the thread name.
Creating thread by extending Thread class
Another way to create a thread in Java is to create a class that extends Thread class
and then create an instance of that class. The extending class has to override the run()
method and also needs to call start() method to start execution of the new thread.
Thread creation Example by extending Thread
class Class MyThread extends Thread{
@Override
publicvoid run()
{
System.out.println("Entered run method
"+Thread.currentThread().getName()); for(int i =0; i <5; i++){
System.out.println("My Thread"+ i);
}
System.out.println("Finished with MyThread");
}
}
Public class ThreadDemo{
publicstaticvoid main(String[]args){
MyThread thread =newMyThread();
thread.start();
}
}
Here we are extending the thread class so we just need to create an instance of that
class that will be a thread object. Then we are calling start() method on that thread
object.
So these are the 2 ways provided in Java to create a new thread.
There are some other ways we can implement the run() method like, as an
anonymous class and starting Java 8 using a lambda expression. Lets see how
that can be done.
Java thread as an anonymous
class classInnerThread{
Thread t;
// Constructor
publicInnerThread(String
name){
// Anonymous class with run method
implemented Thread t =newThread(name){
@Override
publicvoid run()
{](https://image.slidesharecdn.com/001core15-javaprogramming-iiisem-converted-250918083322-da68ab3b/75/001-Core-15-Java-Programming-III-Sem-converted-docx-63-2048.jpg)

![Page 65 of
}
System.out.println("Finished with Inner Thread");
}
};
// starting the thread, which will start execution of run
method t.start();
}
}
publicclassThreadDemo{
publicstaticvoid main(String[]args){
InnerThread thread =newInnerThread("MyThread");
}
}
Here we are implementing the run method using an anonymous class. Note that
Thread class is not explicitly extended here and the implementation of the run()
method is provided when an instance of the thread is created.
Implementing Runnable as an anonymous class
If you want to do it using runnable interface run() method implementation it will only be
a small change.
classInnerThread{
Thread t;
// Constructor
publicInnerThread(String
name){
// Anonymous class with run method implemented
// using Runnable interface
Thread t =newThread(newRunnable(){
@Override
publicvoid run(){
System.out.println("Entered run method
"+Thread.currentThread().getName()); for(int i =0; i <5; i++){
System.out.println(name + i);
}
System.out.println("Finished with Inner Thread");
}
}, name);// Name of the thread, second param
// starting the thread, which will start execution of run
method t.start();
}
}
Implementing Runnable as Java Lambda expression
Java 8 onward it is also possible to use lambda expression to provide implementation
of the run method of the runnable interface. Runnable interface has a single abstract
method run() thus it can be considered as a functional interface. Lambda
expression can be used to provide implementation of that abstract method.
classLambdaThread{
publicLambdaThread(String
name){
// Lambda block - code inside the lambda block will
// be the implementation of the run
method. Runnable r =()->{](https://image.slidesharecdn.com/001core15-javaprogramming-iiisem-converted-250918083322-da68ab3b/75/001-Core-15-Java-Programming-III-Sem-converted-docx-65-2048.jpg)
![publicclassThreadDemo{ publicstaticvoid main(String[]args){
LambdaThread thread =newLambdaThread("LambdaThread");
}
}
Here we have used the lambda expression to provide implementation of the run method of th
Page 66 of
System.out.println("Entered run method
"+Thread.currentThread().getName()); for(int i =0; i <5; i++){
System.out.println("Lambda thread "+ i);
}
System.out.println("Finished with Lambda Thread");
};
//starting thread with the constructor of the thread class
// that takes runnable instance and String as
parameters newThread(r, name).start();
}
}](https://image.slidesharecdn.com/001core15-javaprogramming-iiisem-converted-250918083322-da68ab3b/75/001-Core-15-Java-Programming-III-Sem-converted-docx-66-2048.jpg)
![Page 68 of
By extending Thread class.
By implementing Runnable interface.
Before we begin with the programs(code) of creating threads, let’s have a
look at these methods of Thread class. We have used few of these methods in the
example below.
getName(): It is used for Obtaining a thread’s name
getPriority(): Obtain a thread’s priority
isAlive(): Determine if a thread is still
running join(): Wait for a thread to
terminate
run(): Entry point for the thread
sleep(): suspend a thread for a period of
time start(): start a thread by calling its
run() method
Method 1: Thread creation by extending Thread class
Example 1:
classMultithreadingDemoextendsThread{
publicvoid run(){
System.out.println("My thread is in running state.");
}
publicstaticvoid main(Stringargs[]){
MultithreadingDemoobj=newMultithreadingDemo();
obj.start();
}
}
Output:
My thread isin running state.
Example 2:
Class CountextendsThread
{
Count()
{
super("my extending thread");
System.out.println("my thread created"+this);
start();
}
publicvoid run()
{
try
{
for(int i=0;i<10;i++)
{
System.out.println("Printing the count
"+ i); Thread.sleep(1000);
}
}
catch(InterruptedException e)
{
System.out.println("my thread interrupted");](https://image.slidesharecdn.com/001core15-javaprogramming-iiisem-converted-250918083322-da68ab3b/75/001-Core-15-Java-Programming-III-Sem-converted-docx-68-2048.jpg)
![Page 69 of
}
System.out.println("My thread run is over");
}
}
Class ExtendingExample
{
publicstaticvoid main(Stringargs[])
{
Countcnt=newCount();
try
{
while(cnt.isAlive())
{
System.out.println("Main thread will be alive till the child thread is
live"); Thread.sleep(1500);
}
}
catch(InterruptedException e)
{
System.out.println("Main thread interrupted");
}
System.out.println("Main thread's run is over");
}
}
Output:
my thread createdThread[my runnable
thread,5,main] Main thread will be alive till the
child thread is live Printing the count 0
Printing the count 1
Main thread will be alive till the child thread is
live Printing the count 2
Main thread will be alive till the child thread is
live Printing the count 3
Printing the count 4
Main thread will be alive till the child thread is
live Printing the count 5
Main thread will be alive till the child thread is
live Printing the count 6
Printing the count 7
Main thread will be alive till the child thread is
live Printing the count 8
Main thread will be alive till the child thread is
live Printing the count 9
mythread run is
over Main thread run
is over
Method 2: Thread creation by implementing Runnable Interface
A Simple Example
Class MultithreadingDemoimplementsRunnable{
publicvoid run(){](https://image.slidesharecdn.com/001core15-javaprogramming-iiisem-converted-250918083322-da68ab3b/75/001-Core-15-Java-Programming-III-Sem-converted-docx-69-2048.jpg)
![Page 70 of
v
System.out.println("My thread is in running state.");
}
publicstaticvoid main(Stringargs[]){
MultithreadingDemoobj=newMultithreadingDemo();
Threadtobj=newThread(obj);
tobj.start();
}
}
Output:
My thread isin running state.
Example Program 2:
Observe the output of this program and try to understand what is
happening in this program. If you have understood the usage of each thread method
then you should not face any issue, understanding this example.
Class CountimplementsRunnable
{
Threadmythread;
Count()
{
mythread=newThread(this,"my runnable thread");
System.out.println("my thread created"+mythread);
mythread.start();
}
publicvoid run()
{
try
{
for(int i=0;i<10;i++)
{
System.out.println("Printing the count
"+ i); Thread.sleep(1000);
}
}
catch(InterruptedException e)
{
System.out.println("my thread interrupted");
}
System.out.println("mythread run is over");
}
}
classRunnableExample
{
publicstaticvoid main(Stringargs[])
{
Countcnt=newCount();
try
{
while(cnt.mythread.isAlive())
{](https://image.slidesharecdn.com/001core15-javaprogramming-iiisem-converted-250918083322-da68ab3b/75/001-Core-15-Java-Programming-III-Sem-converted-docx-70-2048.jpg)
![Page 71 of
System.out.println("Main thread will be alive till the child thread is
live"); Thread.sleep(1500);
}
}
catch(InterruptedException e)
{
System.out.println("Main thread interrupted");
}
System.out.println("Main thread run is over");
}
}
Output:
my thread createdThread[my runnable
thread,5,main] Main thread will be alive till the
child thread is live Printing the count 0
Printing the count 1
Main thread will be alive till the child thread is
live Printing the count 2
Main thread will be alive till the child thread is
live Printing the count 3
Printing the count 4
Main thread will be alive till the child thread is
live Printing the count 5
Main thread will be alive till the child thread is live
Printing the count 6
Printing the count 7
Main thread will be alive till the child thread is
live Printing the count 8
Main thread will be alive till the child thread is
live Printing the count 9
mythread run is
over Main thread run
is over
Thread priorities
Thread priorities are the integers which decide how one thread should be
treated with respect to the others.
Thread priority decides when to switch from one running thread to another,
process is called context switching
A thread can voluntarily release control and the highest priority thread that is
ready to run is given the CPU.
A thread can be preempted by a higher priority thread no matter what the
lower priority thread is doing. Whenever a higher priority thread wants to
run it does.
To set the priority of the thread setPriority() method is used which is a
method of the class Thread Class.
In place of defining the priority in integers, we
can use MIN_PRIORITY, NORM_PRIORITY or MAX_PRIORITY.](https://image.slidesharecdn.com/001core15-javaprogramming-iiisem-converted-250918083322-da68ab3b/75/001-Core-15-Java-Programming-III-Sem-converted-docx-71-2048.jpg)
![Page 72 of
v
Methods: isAlive() and
join()
CHAPTER – XI
THREAD METHODS & APPLETS
In all the practical situations main thread should finish last else other threads
which have spawned from the main thread will also finish.
To know whether the thread has finished we can call isAlive() on the thread
which returns true if the thread is not finished.
Another way to achieve this by using join() method, this method when called
from the parent thread makes parent thread wait till child thread terminates.
These methods are defined in the Thread class.
We have used isAlive() method in the above examples too.
Synchronization
Multithreading introduces asynchronous behavior to the programs. If a thread
is writing some data another thread may be reading the same data at that
time. This may bring inconsistency.
When two or more threads need access to a shared resource there should be
some way that the resource will be used only by one resource at a time. The
process to achieve this is called synchronization.
To implement the synchronous behavior java has synchronous method. Once a
thread is inside a synchronized method, no other thread can call any other
synchronized method on the same object. All the other threads then wait until
the first thread come out of the synchronized block.
When we want to synchronize access to objects of a class which was not
designed for the multithreaded access and the code of the method which
needs to be accessed synchronously is not available with us, in this case we
cannot add the synchronized to the appropriate methods. In java we have the
solution for this, put the calls to the methods (which needs to be synchronized)
defined by this class inside a synchronized block in following manner.
Priority of a Thread (Thread Priority):
Each thread have a priority. Priorities are represented by a number between 1 and 10. In
most cases, thread schedular schedules the threads according to their priority (known as
preemptive scheduling).
But it is not guaranteed because it depends on JVM specification that which scheduling it
chooses.
3 constants defined in Thread class:
1. public static int MIN_PRIORITY
2. public static int NORM_PRIORITY
3. public static int MAX_PRIORITY
Default priority of a thread is 5 (NORM_PRIORITY). The value of MIN_PRIORITY is 1
and the value of MAX_PRIORITY is 10.
Example of priority of a Thread:
1. class TestMultiPriority1 extends Thread{
2. public void run(){
3. System.out.println("running thread name is:"+Thread.currentThread().getName());
4. System.out.println("running thread priority
is:"+Thread.currentThread().getPriority()); 5.
6. }
7. public static void main(String args[]){](https://image.slidesharecdn.com/001core15-javaprogramming-iiisem-converted-250918083322-da68ab3b/75/001-Core-15-Java-Programming-III-Sem-converted-docx-72-2048.jpg)
![Page 73 of
v
8. TestMultiPriority1 m1=new TestMultiPriority1();
9. TestMultiPriority1 m2=new TestMultiPriority1();
10. m1.setPriority(Thread.MIN_PRIORITY);
11. m2.setPriority(Thread.MAX_PRIORITY);
12. m1.start();
13. m2.start();
14.
15. }
16. }
Test it Now
Output:running thread name is:Thread-0
running thread priority is:10
running thread name
is:Thread-1 running thread
priority is:1
Inter-thread Communication in Java
Prerequisite : Multithreading in Java, Synchronized in Java
What is Polling and what are problems with it?
The process of testing a condition repeatedly till it becomes true is known as polling.
Polling is usually implemented with the help of loops to check whether a particular
condition is true or not. If it is true, certain action is taken. This waste many CPU
cycles and makes the implementation
inefficient.
For example, in a classic queuing problem where one thread is producing data and
other is consuming it.
How Java multi threading tackles this problem?
To avoid polling, Java uses three methods, namely, wait(), notify() and
notifyAll(). All these methods belong to object class as final so that all classes have
them. They must be used within a synchronized block only.
wait()-It tells the calling thread to give up the lock and go to sleep until some
other thread enters the same monitor and calls notify().
notify()-It wakes up one single thread that called wait() on the same object. It
should be noted that calling notify() does not actually give up a lock on a
resource.
notifyAll()-It wakes up all the threads that called wait() on the same object.
A simple Java program to demonstrate the three methods-
This program might only run in offline IDEs as it contains taking input at several points.
filter_none
edit
play_arrow
brightness_4
// Java program to demonstrate inter-thread communication
// (wait(), join() and notify()) in
Java importjava.util.Scanner;
publicclassthreadexample
{
Public static void main(String
args[]) Throws](https://image.slidesharecdn.com/001core15-javaprogramming-iiisem-converted-250918083322-da68ab3b/75/001-Core-15-Java-Programming-III-Sem-converted-docx-73-2048.jpg)

![Page 78 of
{
wait();
}
}
}
}
catch(InterruptedException e)
{
System.out.println(name + " interrupted");
}
System.out.println(name + " exiting...");
}
synchronized void mysuspend()
{
suspendFlag = true;
}
synchronized void myresume()
{
suspendFlag =
false; notify();
}
}
class SuspendResumeThread
{
public static void main(String args[])
{
NewThread obj1 = new
NewThread("One"); NewThread obj2 =
new NewThread("two");
try
{
Thread.sleep(1000);
obj1.mysuspend();
System.out.println("Suspending thread One...");
Thread.sleep(1000);
obj1.myresume();
System.out.println("Resuming thread One...");
obj2.mysuspend();
System.out.println("Suspending thread Two...");
Thread.sleep(1000);
obj2.myresume();
System.out.println("Resuming thread Two...");
}
catch(InterruptedException e)
{
System.out.println("Main thread Interrupted..!!");
}
/* wait for threads to finish
*/ try
{
System.out.println("Waiting for threads to finish...");
obj1.thr.join();](https://image.slidesharecdn.com/001core15-javaprogramming-iiisem-converted-250918083322-da68ab3b/75/001-Core-15-Java-Programming-III-Sem-converted-docx-78-2048.jpg)

![Page 2 of
CHAPTER – I
DATA TYPES, CLASS & METHODS
Primitive data types in Java
To deal with numerical information, Java uses six predefined data types, called
primitive numerical data types. These are int, long, short, byte, float, and double,
and they allow us to represent integer and real numbers.
Java offers two additional non-numeric primitive data types: char (to
represent alphanumeric characters and special symbols) and Boolean (to
represent the truth values true and false).
We will describe these data types in Java by specifying for each of them:
The domain:
The set of possible values that can be represented in the memory of the
computer by means of the primitive data type (note that this set will always be
finite);
The set of operations: operators of the programming language that allow us
to perform elementary operations on values of the primitive data type (e.g., +, -, /, *,
etc.)
The set of literals: symbols of the language that define values of the primitive
data type (e.g., 10, 3.14, ’A’, true, etc.)
Moreover, we will specify the size of the memory occupied by a value of a
certain data type, which will be significant for the numeric data types.
The data type int
The most commonly used integer type is int. It is a signed 32-bit type that
has a range from –2,147,483,648 to 2,147,483,647. In addition to other uses,
Variables of type int are commonly employed to control loops and to index arrays.
Type Int
Dimension 32 bit (4 byte)
Domain the set of integer numbers in the interval [ 2
− 31,
+231 − 1]
(More than 4 billion values)
Operations+ Sum
- Difference
* Product
/ integer division
rest of the integer division
Literals sequences of digits denoting values of the domain
(e.g.,
275930)
Example:
int a, b, c;// Declaration of variables of type int a = 1;// Use of
literals b = 2;
c = a + b;// Arithmetic expression that involves operators of the language
Writing of numbers of type int: -
To write a number of types int, we can directly use the print() or println()
methods:
Example:
int i = 1; System.out.println(4); System.out.println(i); System.out.println(i + 4);](https://crownmelresort.com/image.slidesharecdn.com/001core15-javaprogramming-iiisem-converted-250918083322-da68ab3b/75/001-Core-15-Java-Programming-III-Sem-converted-docx-2-2048.jpg)
![Example:
Byte a, b, c; // Declaration of variables of byte type
b = Short.parseShort("22605");// Conversion from String to short c = ba;//
Arithmetic expression
Other primitive data types for integer numbers: long
long is a signed 64-bit type and is useful for those occasions where an int type is
not large enough to hold the desired value. The range of a long is quite large. This
makes it useful when big, whole numbers are needed.
Page 3 of
Note: the symbol + can be used both for the sum of two numbers and to
concatenate two strings: "aaa" + "bbb" corresponds to "aaa”. concat("bbb").
Note the difference between the following two statements:
System.out.println(3 + 4); // prints 7 (as int); + denotes sum System.out.println("3" +
4); // prints 34 (as String), since the integer 4 is
// first converted to a String; + denotes concat
IIn the first statement, “+” is applied to two integers, and hence denotes the addition
operator. Hence, the argument 3+4 of println() is of type int.
IIn the second statement, “+” is applied to a string and an integer, and hence denotes
string concatenation. More precisely, the integer 4 is first converted to the string
"4", and then concatenated to the string "3". Hence, the argument "3"+4 of
println() is of type String.
Both statements are correct, since the method println() is overloaded: The Java
library contains both the versions that accepts an integer as parameter, and a
version that accepts a string as parameter.
Other primitive data types for integer numbers: byte
The smallest integer type is byte. This is a signed 8-bit type that has a range from –128 to
127. Variables of type byte are especially useful when you’re working with a stream of
data from a network or file.
Type Byte
Dimension 8 bit (1 byte)
Domain the set of integer numbers in the interval [ 27, +27 1]
− −
=
[ 128, +127]
−
Operation
s
+ Sum
- Difference
* Product
/ integer division
rest of the integer division
Literals sequences of digits denoting values of the domain (e.g.,
47)
a = 1; // Use of literals
b = Byte.parseByte("47"); // Conversion from String to byte c = a - b; // Arithmetic
expression
other primitive data types for integer numbers: short
Short is a signed 16-bit type. It has a range from –32,768 to 32,767. It is probably
the least- used Java type, since it is defined as having its high byte first (called big-
endian format).
Type Short
Dimension16 bit (2 byte)
Domain the set of integer numbers in the interval [ 215, +215 1] =
− −
[ 32768, +32767]
−](https://crownmelresort.com/image.slidesharecdn.com/001core15-javaprogramming-iiisem-converted-250918083322-da68ab3b/75/001-Core-15-Java-Programming-III-Sem-converted-docx-3-2048.jpg)
![Page 4 of
Operation
s
+ Sum
- Difference
* Product
/ integer division
rest of the integer division
Literals sequences of digits denoting values of the domain (e.g.,
22700)
Example:
Short a, b, c; //Declaration of variables of type short1
A=11300;
B=short.parseshort(“22605”); // Conversion from string to short c=b%a; // Arithmetic
expression
Other primitive data types for integer numbers: long
Long is a signed 64-bit data types and is useful for those occasions where an int type is not large
enough to hold the desired value. The range of a long is quite large. This makes it useful
when big, whole numbers are needed.
Example:
long a, b, c; // Declaration of variables of type
long a = 9000000000L;// Use of literals
b = Long.parseLong("9000000000l"); // Conversion from String to long c = b / 300000L
Primitive data types for real numbers: double
In Java there are two primitive data types for representing real numbers.
Due to the way in which real numbers are represented internally in memory, these
numbers are also called floating point numbers.
The data type for floating point numbers that is used by default in the Java
mathematical library is double.
Type Long
Dimension 64 bit (8 byte)
Domain the set of integer numbers in the interval
[ 263,
−
+263 1]
−
Operation
s
+ Sum
- Difference
* Product
/ integer division
rest of the integer division
Literals sequences of digits ending with an l (or L)
denoting values of the domain (e.g.,
9000000000L)](https://crownmelresort.com/image.slidesharecdn.com/001core15-javaprogramming-iiisem-converted-250918083322-da68ab3b/75/001-Core-15-Java-Programming-III-Sem-converted-docx-4-2048.jpg)

![Page 6 of
screen d = 9.8E1 x
= 3.2E-3
Static:
The static can
be: Static
Variables Static
Methods
Static Blocks Of Code.
What is Static Variable in Java?
Static variable in Java is variable which belongs to the class and initialized
only once at the start of the execution.
1. It is a variable which belongs to the class and not to object(instance)
2. Static variables are initialized only once, at the start of the execution. These
3. variables will be initialized first, before the initialization of any
instance variables
4. A single copy to be shared by all instances of the class
5. A static variable can be accessed directly by the class name and doesn’t need
any object
Syntax:
<class-name>.<variable-name>
What is Static Method in Java?
Static method in Java is a method which belongs to the class and not to the object.
A static method can access only static data.
1. It is a method which belongs to the class and not to the object (instance)
2. A static method can access only static data. It can- not access non-
static data (instance variables)
3. A static method can call only other static methods and cannot call a
non-static method from it.
4. A static method can be accessed directly by the class name and doesn’t
need any object
5. A static method cannot refer to "this" or "super" keywords in
anyway Syntax:
<class-name>.<method-name>
Example: How to call static variables &
methods
Step 1: Copy the following code into a editor
public class Demo{
public static void main(String args[]){
Student s1 = new Student();
s1.showData();
Student s2 = new
Student(); s2.showData();
//Student.b++;
//s1.showData();
}}
class Student {
int a; //initialized to zero
static int b; //initialized to zero only when class is loaded not for each object
created. Student(){
//Constructor incrementing static variable b
b++;
}
public void showData()
{ System.out.println("Value of a =
"+a); System.out.println("Value of](https://crownmelresort.com/image.slidesharecdn.com/001core15-javaprogramming-iiisem-converted-250918083322-da68ab3b/75/001-Core-15-Java-Programming-III-Sem-converted-docx-6-2048.jpg)

![A static block helps to initialize the static data members, just like constructors help to initiali
Following program is the example of java static block.
Example: How to access static block public class Demo {
static int a; static int b; static {
a = 10;
b = 20;
}
public static void main(String args[]) {
Page 8 of
System.out.println("Value of a = " +
a); System.out.println("Value of b =
" + b);
}
}
you will get following output of the
program. Value of a = 10
Value of b = 20](https://crownmelresort.com/image.slidesharecdn.com/001core15-javaprogramming-iiisem-converted-250918083322-da68ab3b/75/001-Core-15-Java-Programming-III-Sem-converted-docx-8-2048.jpg)
![Page 9 of
Super keyword in
java
CHAPTER - II
INHERITANCE - SUPER KEYWORD
Super keyword in java is a reference variable that is used to refer parent
class object. Super is an implicit keyword creates by JVM and supply each and every
java program for performing important role in three places.
1. Super keyword At Variable Level
2. Super keyword At Method Level
3. Super keyword At Constructor Level
When need of super keyword
Whenever the derived class is inherits the base class features, there is a
possibility that base class features are similar to derived class features and JVM
gets an ambiguity. In order to differentiate between base class features and
derived class features must be preceded by super keyword.
Syntax
super. baseclass features.
Super Keyword at Variable Level
Whenever the derived class inherit base class data members there is a
possibility that base class data member is similar to derived class data member
and JVM gets an ambiguity.
In order to differentiate between the data member of base class and
derived class, in the context of derived class the base class data members must be
preceded by super keyword.
Syntax
Super.baseclassdatamember
name
If we are not writing super keyword before the base class data member
name than it will be referred as current class data member name and base class
data member are hidden in the context of derived class. Program without using
super keyword
Example
class Employee
{
float salary=10000;
}
class HR extends Employee
{
float
salary=20000;
void display()
{
System.out.println("Salary: "+salary);//print current class salary
}
}
classSupervarible
{
publicstaticvoid main(String[]args)](https://crownmelresort.com/image.slidesharecdn.com/001core15-javaprogramming-iiisem-converted-250918083322-da68ab3b/75/001-Core-15-Java-Programming-III-Sem-converted-docx-9-2048.jpg)
![Page 10 of
In the above program in Employee and HR class salary is common properties of
both class the instance of current or derived class is referred by instance by default but here w
Program using super keyword at variable level Example
classEmployee
{
float salary=10000;
}
class HR extendsEmployee
{
float salary=20000;
void display()
{
System.out.println("Salary: "+super.salary);//print base class salary
}
}
classSupervarible
{
publicstaticvoid main(String[]args)
{
HR obj=new HR(); obj.display();
}
}
classStudent
{
HR obj=new
HR();
obj.display();
}
}
Output
Salary: 20000.0
Super Keyword at Method Level
The super keyword can also be used to invoke or call parent class method. It
should be use in case of method overriding. In other word super keyword use when
base class method name and derived class method name have same name.
Example of super keyword at method level
Example](https://crownmelresort.com/image.slidesharecdn.com/001core15-javaprogramming-iiisem-converted-250918083322-da68ab3b/75/001-Core-15-Java-Programming-III-Sem-converted-docx-10-2048.jpg)
![classStudent
{
void message()
{
System.out.println("Good Morning Sir");
}
}
Page 11 of
{
void message()
{
System.out.println("Good Morning Sir");
}
}
classFacultyextendsStudent
{
void message()
{
System.out.println("Good Morning Students");
}
void display()
{
message();//will invoke or call current class message() method
super.message();//will invoke or call parent class message() method
}
publicstaticvoid main(Stringargs[])
{
Student s=newStudent();
s.display();
}
}
Output
Good Morning Students
Good Morning Sir
In the above example Student and Faculty both classes have message() method
if we call message() method from Student class, it will call the message() method of
Student class not of Person class because priority of local is high.
In case there is no method in subclass as parent, there is no need to use
super. In the example given below message() method is invoked from Student class
but Student class does not have message() method, so you can directly call
message() method.
Program where super is not required
Example](https://crownmelresort.com/image.slidesharecdn.com/001core15-javaprogramming-iiisem-converted-250918083322-da68ab3b/75/001-Core-15-Java-Programming-III-Sem-converted-docx-11-2048.jpg)
![Page 12 of
classFacultyextendsStudent
{
void display()
{
message();//will invoke or call parent class message() method
}
publicstaticvoid main(Stringargs[])
{
Student s=newStudent();
s.display();
}
}
Output
Good Morning Sir
Super Keyword at Constructor Level
The super keyword can also be used to invoke or call the parent class
constructor.
Constructor are calling from bottom to top and executing from top to bottom.
To establish the connection between base class constructor and derived
class constructors JVM provides two implicit methods they are:
Super()
Super(...)
Super()
Super() It is used for calling super class default constructor from the context of derived
class constructors.
Super keyword used to call base class constructor
Syntax
classEmployee
{
Employee()
{
System.out.println("Employee class Constructor");
}
}
class HR extendsEmployee
{
HR()
{
super();//will invoke or call parent class
constructor System.out.println("HR class
Constructor");
}
}](https://crownmelresort.com/image.slidesharecdn.com/001core15-javaprogramming-iiisem-converted-250918083322-da68ab3b/75/001-Core-15-Java-Programming-III-Sem-converted-docx-12-2048.jpg)
![classSupercons
{
publicstaticvoid main(String[]args)
{
HR obj=new HR();
}
}
Page 13 of
Output
Note: super() is added in each class constructor automatically by compiler.
In constructor, default constructor is provided by compiler automatically but it
also adds super()before the first statement of constructor.If you are creating your own
constructor and you do not have either this() or super() as the first statement,
compiler will provide super() as the first statement of the constructor.
Super(...)
Super(...) It is used for calling super class parameterize constructor from the
context of derived class constructor.
Important rules
Whenever we are using either super() or super(...) in the derived class
constructors the superalways must be as a first executable statement in the body
of derived class constructor otherwise we get a compile time error.
Employee class
Constructor HR class
Constructor](https://crownmelresort.com/image.slidesharecdn.com/001core15-javaprogramming-iiisem-converted-250918083322-da68ab3b/75/001-Core-15-Java-Programming-III-Sem-converted-docx-13-2048.jpg)

![Page 15 of
Final Keyword In Java
CHAPTER- III
FINAL KEYBOARD & METHOD
The final keyword in java is used to restrict the user. The java final keyword can
be used in many context. Final can be:
1. variable
2. method
3. class
The final keyword can be applied with the variables, a final variable that have no
value it is called blank final variable or uninitialized final variable. It can be initialized in
the constructor only. The blank final variable can be static also which will be initialized
in the static block only. We will have detailed learning of these. Let's first learn the
basics of final keyword.
1. Java final variable
If you make any variable as final, you cannot change the value of final
variable(It will be constant).
Example of final variable
There is a final variable speedlimit, we are going to change the value of this
variable, but It can't be changed because final variable once assigned a value can
never be changed.
a. class Bike9{
b. final int speedlimit=90;//final variable
c. void run(){
d. speedlimit=400;
e. }
f. public static void main(String args[]){
g. Bike9 obj=new Bike9();
h. obj.run();
i. }
j. }//end of class
Test it Now
Output:Compile Time
Error
2. Java final method
If you make any method as final, you cannot override it.
Example of final method
a. class Bike{
b. final void run(){System.out.println("running");}
c. }
d.
e. class Honda extends Bike{
f. void run(){System.out.println("running safely with
100kmph");} g.
h. public static void main(String args[]){
i. Honda honda= new Honda();
j. honda.run();
k. }
l. }
Output:Compile Time Error](https://crownmelresort.com/image.slidesharecdn.com/001core15-javaprogramming-iiisem-converted-250918083322-da68ab3b/75/001-Core-15-Java-Programming-III-Sem-converted-docx-15-2048.jpg)
![Page 16 of
3. Java final class
If you make any class as final, you cannot extend it.
Example of final class
a. final class Bike{}
b. class Honda1 extends Bike{
c. void run(){System.out.println("running safely with
100kmph");} d.
e. public static void main(String args[]){
f. Honda1 honda= new Honda1();
g. honda.run();
h. }
i. }
Output:Compile Time Error
Q. Is final method inherited?
Ans: Yes, final method is inherited but you cannot override it. For Example:
a. class Bike{
b. final void run(){System.out.println("running...");}
c. }
d. class Honda2 extends Bike{
e. public static void main(String args[]){
f. new Honda2().run();
g. }
h. }
Output:running...
Q)What is blank or uninitialized final variable?
A final variable that is not initialized at the time of declaration is known as
blank final variable.
If you want to create a variable that is initialized at the time of creating object and
once initialized may not be changed, it is useful. For example PAN CARD number of an
employee.
It can be initialized only in constructor.
Example of blank final variable
a. class Student{
b. int id;
c. String name;
d. final String PAN_CARD_NUMBER;
e. ...
f. }
Que) Can we initialize blank final variable?
Yes, but only in constructor. For example:
a. class Bike10{
b. final int speedlimit;//blank final
variable c.
d. Bike10(){
e. speedlimit=70;
f. System.out.println(speedlimit);](https://crownmelresort.com/image.slidesharecdn.com/001core15-javaprogramming-iiisem-converted-250918083322-da68ab3b/75/001-Core-15-Java-Programming-III-Sem-converted-docx-16-2048.jpg)
![Page 17 of
g. }
h.
i. public static void main(String args[]){
j. new Bike10();
k. }
l. }
Output: 70
Static blank final variable
A static final variable that is not initialized at the time of declaration is known
as static blank final variable. It can be initialized only in static block.
Example of static blank final variable
a. class A{
b. static final int data;//static blank final variable
c. static{ data=50;}
d. public static void main(String args[]){
e. System.out.println(A.data);
f. }](https://crownmelresort.com/image.slidesharecdn.com/001core15-javaprogramming-iiisem-converted-250918083322-da68ab3b/75/001-Core-15-Java-Programming-III-Sem-converted-docx-17-2048.jpg)


![Syntax
javac-d . className.java
javac-d path className.java
Example
Import above class in below program using import packageName.className
Example
importmypack.A; publicclassHello
{
publicstaticvoid main(Stringarg[])
{
A a=new A(); a.show();
System.out.println("show() class A");
}
}
packagemypack; publicclass A
{
publicvoid show()
{
System.out.println("Sum method");
}
}
Page 20 of
Syntax
Explanations: In above syntax "-d" is a specific tool which is tell to java compiler
create a separate folder for the given package in given path. When we give specific
path then it create a new folder at that location and when we use . (dot) then it crate
a folder at current working directory.
Note: Any package program can be compile but can not be execute or run. These
programs can be executed through user defined program which are importing
package program.
Example of package program
Package program which is save with A.java and compile by javac -d . A.java
Explanations: In the above program first we create Package program which is save with
A.java and compiled by "javac -d . A.java". Again we import class "A" in class Hello
using "import mypack.A;" statement.
Java Access Modifiers – Public, Private, Protected & Default](https://crownmelresort.com/image.slidesharecdn.com/001core15-javaprogramming-iiisem-converted-250918083322-da68ab3b/75/001-Core-15-Java-Programming-III-Sem-converted-docx-20-2048.jpg)
![Page 21 of
Public, private and protected keywords while practising java programs, these are
called
access modifiers. An access modifier restricts the access of a class, constructor, data
member and method in another class. In java we have four access modifiers:
Default
Private
Protected
Public
1. Default access modifier
When we do not mention any access modifier, it is called default access
modifier. The scope of this modifier is limited to the package only. This means that if
we have a class with the default access modifier in a package, only those classes that
are in this package can access this class. No other class outside this package can access
this class. Similarly, if we have a default method or data member in a class, it would not
be visible in the class of another package. Lets see an example to understand this:
Default Access Modifier Example in Java
To understand this example, you must have the knowledge of packages in java.
In this example we have two classes, Test class is trying to access the default
method of Addition class, since class Test belongs to a different package, this
program would throw compilation error, because the scope of default modifier is
limited to the same package in which it is declared.
Addition.java
packageabcpackage;
publicclassAddition{
/* Since we didn't mention any access modifier here, it would
* be considered as default.
*/
intaddTwoNumbers(int a,int b){
returna+b;
}
}
Test.java
packagexyzpackage;
/* We are importing the abcpackage
* but still we will get error because the
* class we are trying to use has default access
* modifier.
*/
importabcpackage.*
; publicclassTest{
publicstaticvoid main(Stringargs[]){
Additionobj=newAddition();
/* It will throw error because we are trying to access
* the default method in another package
*/
obj.addTwoNumbers(10,21);
}](https://crownmelresort.com/image.slidesharecdn.com/001core15-javaprogramming-iiisem-converted-250918083322-da68ab3b/75/001-Core-15-Java-Programming-III-Sem-converted-docx-21-2048.jpg)
![Page 22 of
}
Output:
Exceptionin thread "main"java.lang.Error:Unresolved compilation
problem: The method addTwoNumbers(int,int)from the type Addition
is not visible at xyzpackage.Test.main(Test.java:12)
2. Private access modifier
The scope of private modifier is limited to the class only.
a. Private Data members and methods are only accessible within the class
b. Class and Interface cannot be declared as private
c. If a class has private constructor then you cannot create the object of that
class from outside of the class.
Let’s see an example to understand this:
Private access modifier example in java
This example throws compilation error because we are trying to access the
private data member and method of class ABC in the class Example. The private data
member and method are only accessible within the class.
class ABC{
privatedoublenum=100
; privateint square(int
a){
return a*a;
}
}
publicclassExample{
publicstaticvoid main(Stringargs[]){
ABC obj=new ABC();
System.out.println(obj.num);
System.out.println(obj.square(10));
}
}
Output:
Compile- time error
3. Protected Access Modifier
Protected data member and method are only accessible by the classes of
the same package and the subclasses present in any package. You can also say that
the protected access modifier is similar to default access modifier with one
exception that it has visibility in sub classes.
Classes cannot be declared protected. This access modifier is generally used in a
parent child relationship.
Protected access modifier example in Java
Indent In this example the class Test which is present in another package is able
to call the addTwoNumbers() method, which is declared protected. This is because
the Test class extends class Addition and the protected modifier allows the access of
protected members in subclasses (in any packages).
Addition.java
Package abcpackage;](https://crownmelresort.com/image.slidesharecdn.com/001core15-javaprogramming-iiisem-converted-250918083322-da68ab3b/75/001-Core-15-Java-Programming-III-Sem-converted-docx-22-2048.jpg)
![Page 23 of
public class Addition{
protected int addTwoNumbers(int a,int b){
return a+b;
}
}
Test.java
Package
xyzpackage; Import
abcpackage.*;
class Test extends Addition{
public static void main(String args[]){
Test obj=new Test();
System.out.println(obj.addTwoNumbers(11,22));
}
}
Output:
33
4. Public access modifier
The members, methods and classes that are declared public can be
accessed from anywhere. This modifier doesn’t put any restriction on the access.
Public access modifier example in java
The method addTwoNumbers() has public modifier and class Test is able to
access this method without even extending the Addition class. This is because public
modifier has visibility everywhere.
Addition.java
Package
abcpackage; public
class Addition{
public int addTwoNumbers(int a,int
b){ returna+b;
}
}
Test.java
Package
xyzpackage; Import
abcpackage.*; Class
Test{
Public static void main(String args[]){
Addition obj=new Addition();
System.out.println(obj.addTwoNumbers(100,1));
}
}
Output:
101
Lets see the scope of these access modifiers in tabular form:
The scope of access modifiers in tabular form
+ + + + +
|Class|Package|Subclass|Subclass|Outside|
|||(same package)|(diff package)|Class|](https://crownmelresort.com/image.slidesharecdn.com/001core15-javaprogramming-iiisem-converted-250918083322-da68ab3b/75/001-Core-15-Java-Programming-III-Sem-converted-docx-23-2048.jpg)


![Page 27 of
Implementing Interfaces
When a class implements an interface, you can think of the class as signing a
contract, agreeing to perform the specific behaviors of the interface. If a class does not
perform all the behaviors of the interface, the class must declare itself as abstract.
A class uses the implements keyword to implement an interface. The
implements keyword appears in the class declaration following the extends portion of
the declaration.
Example
This will produce the following result –
Output
Mammal eats
Mammal travels
When overriding methods defined in interfaces, there are several rules to be followed:
a. Checked exceptions should not be declared on implementation methods other
than the ones declared by the interface method or subclasses of those declared
by the interface method.
b. The signature of the interface method and the same return type or subtype
should be maintained when overriding the methods.
c. An implementation class itself can be abstract and if so, interface methods need
not be implemented.
When implementation interfaces, there are several rules:
a. A class can implement more than one interface at a time.
b. A class can extend only one class, but implement many interfaces.
/* File name :
Animal.java */
interfaceAnimal{
publicvoid eat();
publicvoid travel();
}
/* File name : MammalInt.java */
Public class Mammal Intimplements Animal{
Public void eat(){
System.out.println("Mammal eats");
}
Public void travel(){
System.out.println("Mammal
travels");
}
publicintnoOfLegs(){
return0;
}
publicstaticvoid
main(Stringargs[]){ MammalInt
m =newMammalInt(); m.eat();
m.travel();
}
}](https://crownmelresort.com/image.slidesharecdn.com/001core15-javaprogramming-iiisem-converted-250918083322-da68ab3b/75/001-Core-15-Java-Programming-III-Sem-converted-docx-27-2048.jpg)


![Page 33 of
Catch block
A catch block is where you handle the exceptions, this block must follow the try
block. A single try block can have several catch blocks associated with it. You can
catch different exceptions in different catch blocks. When an exception occurs in try
block, the corresponding catch block that handles that particular exception
executes. For example, if an arithmetic exception occurs in try block then the
statements enclosed in catch block for arithmetic exception executes.
Syntax of try catch in java
try
{
//statements that may cause an exception
}
catch(exception(type) e(object))
{
//error handling code
}
Example: try catch block
If an exception occurs in try block, then the control of execution is passed to
the corresponding catch block. A single try block can have multiple catch blocks
associated with it, you should place the catch blocks in such a way that the generic
exception handler catch block is at the last(see in the example below).
The generic exception handler can handle all the exceptions but you should
place is at the end, if you place it at the before all the catch blocks then it will display
the generic message. You always want to give the user a meaningful message for each
type of exception rather than a generic message.
classExample1{
public static void main(String args[])
{ int num1, num2;
try{
/* We suspect that this block of statement can throw
* exception so we handled it by placing these statements
* inside try and handled the exception in catch block
*/
num1 =0;
num2 =62/ num1;
System.out.println(num2);
System.out.println("Hey I'm at the end of try block");
}
catch(ArithmeticException e){
/* This block will only execute if any Arithmetic exception
* occurs in try block
*/
System.out.println("You should not divide a number by zero");
}
catch(Exception e){
/* This is a generic Exception handler which means it can handle](https://crownmelresort.com/image.slidesharecdn.com/001core15-javaprogramming-iiisem-converted-250918083322-da68ab3b/75/001-Core-15-Java-Programming-III-Sem-converted-docx-33-2048.jpg)
![Page 34 of
* all the exceptions. This will execute if the exception is not
* handled by previous catch blocks.
*/
System.out.println("Exception occurred");
}
System.out.println("I'm out of try-catch block in Java.");
}
}
Output:
You should not divide a number by
zero I'm out of try-catch block in
Java.
Multiple catch blocks in Java
Rules about multiple catch blocks:
1.A single try block can have any number of catch blocks.
2.A generic catch block can handle all the exceptions. Whether it is Array Index Out Of
Bounds Exception or Arithmetic Exception or Null Pointer Exception or any other type
of exception, this handles all of them. To see the examples of NullPointerException
and ArrayIndexOutOfBoundsException, refer this article:
Exception Handling example programs.
catch(Exception e){
//This catch block catches all the exceptions
}
If you are wondering why we need other catch handlers when we have a generic that
can handle all. This is because in generic exception handler you can display a message
but you are not sure for which type of exception it may trigger so it will display the
same message for all the exceptions and user may not be able to understand which
exception occurred. Thats the reason you should place is at the end of all the
specific exception catch blocks
3.If no exception occurs in try block then the catch blocks are completely ignored.
4. Corresponding catch blocks execute for that specific type of exception:
catch(ArithmeticException e) is a catch block that can handle ArithmeticException
catch(NullPointerException e) is a catch block that can handle
NullPointerException
5. You can also throw exception, which is an advanced topic and I have covered it
in separate tutorials: user defined exception, throws keyword, throw vs throws.
Example of Multiple catch blocks
classExample2{
public static void main(String args[]){
try{
int a[]=newint[7];
a[4]=30/0;
System.out.println("First print statement in try block");
}
catch(ArithmeticException e){
System.out.println("Warning: ArithmeticException");
}](https://crownmelresort.com/image.slidesharecdn.com/001core15-javaprogramming-iiisem-converted-250918083322-da68ab3b/75/001-Core-15-Java-Programming-III-Sem-converted-docx-34-2048.jpg)

![Page 36 of
}
catch(Exception e1){
//Exception Message
}
}
//Catch of Main(parent) try
block catch(Exception e3){
//Exception Message
}
Nested Try Catch Example
Here we have deep (two level) nesting which means we have a try-catch block
inside a nested try block. To make you understand better I have given the names to
each try block in comments like try-block2, try-block3 etc.
This is how the structure is: try-block3 is inside try-block2 and try-block2 is inside
main try-block, you can say that the main try-block is a grandparent of the try-
block3. Refer the explanation which is given at the end of this code.
classNestingDemo{public static
void main(Stringargs[]){
//main try-
block try{
//try-block2
try{
//try-block3
try{
intarr[]={1,2,3,4};
/* I'm trying to display the value of
* an element which doesn't exist. The
* code should throw an exception
*/
System.out.println(arr[10])
;
}catch(ArithmeticException e){
System.out.print("Arithmetic Exception");
System.out.println(" handled in try-block3");
}
}
catch(ArithmeticException e){
System.out.print("Arithmetic Exception");
System.out.println(" handled in try-block2");
}
}
catch(ArithmeticException e3){
System.out.print("Arithmetic Exception");
System.out.println(" handled in main try-block");
}
catch(ArrayIndexOutOfBoundsException e4){
System.out.print("ArrayIndexOutOfBoundsException");
System.out.println(" handled in main try-block");
}](https://crownmelresort.com/image.slidesharecdn.com/001core15-javaprogramming-iiisem-converted-250918083322-da68ab3b/75/001-Core-15-Java-Programming-III-Sem-converted-docx-36-2048.jpg)
![Page 37 of
catch(Exception e5){
System.out.print("Exception");
System.out.println(" handled in main try-
block");
}
}
}
Output:
ArrayIndexOutOfBoundsException handled in main try-block
As you can see that the ArrayIndexOutOfBoundsException occurred in the
grandchild try-block3. Since try-block3 is not handling this exception, the control then
gets transferred to the parent try-block2 and looked for the catch handlers in try-
block2. Since the try-block2 is also not handling that exception, the control gets
transferred to the main (grandparent) try- block where it found the appropriate
catch block for exception. This is how the the nesting structure works.
Example 2: Nested try block
classNest{
publicstaticvoid main(Stringargs[]){
//Parent try block
try{
try{
//Child try block1
System.out.println("Inside block1");
int b =45/0;
System.out.println(b);
}
catch(ArithmeticException e1){
System.out.println("Exception: e1");
}
//Child try
block2 try{
System.out.println("Inside block2");
int b =45/0;
System.out.println(b);
}
catch(ArrayIndexOutOfBoundsException e2){
System.out.println("Exception: e2");
}
System.out.println("Just other statement");
}
catch(ArithmeticException e3){
System.out.println("Arithmetic Exception");
System.out.println("Inside parent try catch block");
}
catch(ArrayIndexOutOfBoundsException e4){
System.out.println("ArrayIndexOutOfBoundsException");
System.out.println("Inside parent try catch block");
}
catch(Exception e5){
System.out.println("Exception");
System.out.println("Inside parent try catch block");](https://crownmelresort.com/image.slidesharecdn.com/001core15-javaprogramming-iiisem-converted-250918083322-da68ab3b/75/001-Core-15-Java-Programming-III-Sem-converted-docx-37-2048.jpg)

![Page 39 of
classExample{
publicstaticvoid main(Stringargs[])
{
FileInputStreamfis=null;
/*This constructor FileInputStream(File filename)
* throws FileNotFoundException which is a checked
* exception
*/
fis=newFileInputStream("B:/myfile.txt");
int k;
/* Method read() of FileInputStream class also throws
* a checked exception: IOException
*/
while(( k =fis.read())!=-1)
{
System.out.print((char)k);
}
/*The method close() closes the file input stream
* It throws
IOException*/
fis.close();
}
}
Output:
Exceptionin thread "main"java.lang.Error:Unresolved compilation problems:
Unhandled exception type FileNotFoundException
Unhandled exception type
IOException Unhandled exception
type IOException
Why this compilation error?
As I mentioned in the beginning that checked exceptions gets checked during
compile time. Since, we didn’t handled/declared the exceptions, our program gave the
compilation error.
How to resolve the error?
There are two ways to avoid this error. We will see both the ways one by one.
Method 1: Declare the exception using throws keyword.
As we know that all three occurrences of checked exceptions are inside main()
method so one way to avoid the compilation error is: Declare the exception in the
method using throws keyword. You may be thinking that our code is throwing
FileNotFoundException and IOException both then why we are declaring the
IOException alone. The reason is that IOException is a parent class of
FileNotFoundException so it by default covers that. If you want you can declare them
like this public static void main(String args[]) throws IOException,
FileNotFoundException.
import java.io.*;
classExample{
publicstaticvoid main(Stringargs[])throwsIOException](https://crownmelresort.com/image.slidesharecdn.com/001core15-javaprogramming-iiisem-converted-250918083322-da68ab3b/75/001-Core-15-Java-Programming-III-Sem-converted-docx-39-2048.jpg)
![Page 40 of
{
FileInputStreamfis=null;
fis=newFileInputStream("B:/myfile.txt")
; int k;
while(( k =fis.read())!=-1)
{
System.out.print((char)k);
}
fis.close();
}
}
Output:
File content is displayed on the screen.
Method 2: Handle them using try-catch blocks.
The approach we have used above is not good at all. It is not the best
exception handling practice. You should give meaningful message for each exception
type so that it would be easy for someone to understand the error. The code should
be like this:
import java.io.*;
class Example{
public static void main(String args[])
{
FileInputStreamfis=null;
try{
fis=newFileInputStream("B:/myfile.txt")
;
}catch(FileNotFoundExceptionfnfe)
{ System.out.println("The specified file is
not "+
"present at the given path");
}
int k;
try{
while(( k =fis.read())!=-1)
{
System.out.print((char)k);
}
fis.close();
}catch(IOExceptionioe){
System.out.println("I/O error occurred: "+ioe);
}
}
}
This code will run fine and will display the file content.
Here are the few other Checked Exceptions –
SQLException
IOException
ClassNotFoundException
InvocationTargetException](https://crownmelresort.com/image.slidesharecdn.com/001core15-javaprogramming-iiisem-converted-250918083322-da68ab3b/75/001-Core-15-Java-Programming-III-Sem-converted-docx-40-2048.jpg)
![Page 41 of
What are Unchecked exceptions?
Unchecked exceptions are not checked at compile time. It means if your
program is throwing an unchecked exception and even if you didn’t handle/declare
that exception, the program won’t give a compilation error. Most of the times these
exception occurs due to the bad data provided by user during the user-program
interaction. It is up to the programmer to judge the conditions in advance, that can
cause such exceptions and handle them appropriately. All Unchecked exceptions
are direct sub classes of RuntimeException class.
Lets understand this with an example:
Unchecked Exception Example
Class Example{
Public tatic oid main(String args[])
{
int num1=10;
int num2=0;
/*Since I'm dividing an integer with 0
* it should throw ArithmeticException
*/
int res=num1/num2;
System.out.println(res);
}
}
If you compile this code, it would compile successfully however when you will run it, it would
throw ArithmeticException. That clearly shows that unchecked exceptions are not
checked at compile-time, they occurs at runtime. Lets see another example.
classExample{
public static void main(String args[])
{
intarr[]={1,2,3,4,5};
/* My array has only 5 elements but we are trying to
* display the value of 8th element. It should throw
* ArrayIndexOutOfBoundsException
*/
System.out.println(arr[7]);
}
}
This code would also compile successfully since Array Index Out Of Bounds Exception is also
an
unchecked exception.
Note: It doesn’t mean that compiler is not checking these exceptions so we shouldn’t
handle them. In fact we should handle them more carefully. For e.g. In the above
example there should be a exception message to user that they are trying to display a
value which doesn’t exist in array so that user would be able to correct the issue.
Class Example{
Public static void main(String
args[]){ try{
int arr[]={1,2,3,4,5};
System.out.println(arr[7]);
}](https://crownmelresort.com/image.slidesharecdn.com/001core15-javaprogramming-iiisem-converted-250918083322-da68ab3b/75/001-Core-15-Java-Programming-III-Sem-converted-docx-41-2048.jpg)
![Page 42 of
catch(ArrayIndexOutOfBoundsException e){
System.out.println("The specified index does not exist
"+ "in array. Please correct the error.");
}
}
}
Output:
The specified index does not exist in array.Please correct the error.
Here are the few unchecked exception classes:
a. NullPointerException
b. ArrayIndexOutOfBoundsException
c. ArithmeticException
d. IllegalArgumentException
e. NumberFormatException
Java Finally block – Exception handling
A finally block contains all the crucial statements that must be executed
whether exception occurs or not. The statements present in this block will always
execute regardless of whether exception occurs in try block or not such as closing a
connection, stream etc.
Syntax of Finally block
try{
//Statements that may cause an exception
}
catch{
//Handling exception
}
finally{
//Statements to be executed
}
A Simple Example of finally block
Here you can see that the exception occurred in try block which has been
handled in catch block, after that finally block got executed.
Class Example
{
Public static void main(String args[]){
try{
intnum=121/0;
System.out.println(num);
}
catch(ArithmeticException e){
System.out.println("Number should not be divided by zero");
}
/* Finally block will always execute
* even if there is no exception in try block
*/
finally
{
System.out.println("This is finally block");
}
System.out.println("Out of try-catch-finally");
}](https://crownmelresort.com/image.slidesharecdn.com/001core15-javaprogramming-iiisem-converted-250918083322-da68ab3b/75/001-Core-15-Java-Programming-III-Sem-converted-docx-42-2048.jpg)
![Page 43 of
}
Output:
Number should not be divided by
zero Thisisfinally block
Out of try-catch-finally
Few Important points regarding finally block
1. A finally block must be associated with a try block, you cannot use finally without a
try block. You should place those statements in this block that must be executed
always.
2. Finally block is optional, as we have seen in previous tutorials that a try-catch
block is sufficient for exception handling, however if you place a finally block then
it will always run after the execution of try block.
3. In normal case when there is no exception in try block then the finally block is
executed after try block. However if an exception occurs then the catch block is
executed before finally block.
4. An exception in the finally block, behaves exactly like any other exception.
5. The statements present in the finally block execute even if the try block contains
control transfer statements like return, break
or continue. Lets see an example to see how finally works when return
statement is present in try block:
Another example of finally block and return statement.
You can see that even though we have return statement in the method, the
finally block still runs.
Class Java Finally
{
Public static void main(String args[])
{
System.out.println(JavaFinally.myMethod());
}
Public static int myMethod()
{
try{
return112;
}
finally{
System.out.println("This is Finally block");
System.out.println("Finally block ran even after return
statement");
}
}
}
Output of above program:
This is Finally block
Finally block ran even after return
statement 112
Cases when the finally block doesn’t execute
The circumstances that prevent execution of the code in a finally block are:](https://crownmelresort.com/image.slidesharecdn.com/001core15-javaprogramming-iiisem-converted-250918083322-da68ab3b/75/001-Core-15-Java-Programming-III-Sem-converted-docx-43-2048.jpg)

![Page 45 of
System.out.println("Inside try block");
System.exit(0)
}
catch(Exceptionexp){
System.out.println(exp);
}
finally{
System.out.println("Java finally block");
}
....
In the above example if the System.exit(0) gets called without any exception then finally
won’t execute. However, if any exception occurs while calling System.exit(0) then finally
block will be executed.
Try-catch-finally block
Either a try statement should be associated with a catch block or with finally.
Since catch performs exception handling and finally performs the cleanup, the
best approach is to use both of them.
Syntax:
try{
//statements that may cause an exception
}
catch(…){
//error handling code
}
finally{
//statements to be executed
}
Examples of Try catch finally blocks
Example 1: The following example demonstrate the working of finally block when no
exception occurs in try block
Class Example1{
Publicstatic void main(String args[])
{ try{
System.out.println("First statement of try block");
intnum=45/3;
System.out.println(num);
}
catch(ArrayIndexOutOfBoundsException e){
System.out.println("ArrayIndexOutOfBoundsException");
}
finally{
System.out.println("finally block");
}
System.out.println("Out of try-catch-finally block");
}
}](https://crownmelresort.com/image.slidesharecdn.com/001core15-javaprogramming-iiisem-converted-250918083322-da68ab3b/75/001-Core-15-Java-Programming-III-Sem-converted-docx-45-2048.jpg)
![Page 46 of
Output:
First statement of try
block 15
finally block
Out of try-catch-finally block
Example 2: This example shows the working of finally block when an exception
occurs in try block but is not handled in the catch block:
Class Example2{
Public static void main(String args[]){
try{
System.out.println("First statement of try block");
intnum=45/0;
System.out.println(num);
}
catch(ArrayIndexOutOfBoundsException e){
System.out.println("ArrayIndexOutOfBoundsException");
}
finally{
System.out.println("finally block");
}
System.out.println("Out of try-catch-finally block");
}
}
Output:
First statement of try
block finally block
Exceptionin thread "main"java.lang.ArithmeticException:/by
zero at
beginnersbook.com.Example2.main(Details.java:6)
As you can see that the system generated exception message is shown but before
that the finally block successfully executed.
Example 3: When exception occurs in try block and handled properly in catch
block Class Example3{
Public static void main(String args[]){
try{
System.out.println("First statement of try block");
intnum=45/0;
System.out.println(num);
}
catch(ArithmeticException e){
System.out.println("ArithmeticException");
}
finally{
System.out.println("finally block");
}
System.out.println("Out of try-catch-finally block");
}
}
Output:](https://crownmelresort.com/image.slidesharecdn.com/001core15-javaprogramming-iiisem-converted-250918083322-da68ab3b/75/001-Core-15-Java-Programming-III-Sem-converted-docx-46-2048.jpg)
![Page 47 of
First statement of try block
ArithmeticException
finally block
Out of try-catch-finally block
Flow of control in try/catch blocks:
When exception doesn’t occur:
When the statements that are present in try block doesn’t throw any exception
then first, the body of try block executes and then the code after catch blocks. In
this case catch block never runs as they are meant to run when an exception
occurs. For example-
classExample1
{
publicstaticvoid main(Stringargs[])
{
int x =10;
int y
=10; try{
intnum= x/y;
System.out.println("next-statement: Inside try block");
}
catch(Exception
ex)
{
System.out.println("Exception");
}
System.out.println("next-statement: Outside of try-catch");
}
}
Output:
next-statement:Insidetry block
next-statement:Outside of try-catch
In the above example exception didn’t occur in try block so catch block didn’t run.
When exception occurs:
First have a look at the example below and then we will discuss the output:
classExample1
{
publicstaticvoid main(String args[])
{
int x =0;
int y
=10; try{
intnum= y/x;
System.out.println("next-statement: Inside try block");
}
catch(Exception
ex)
{](https://crownmelresort.com/image.slidesharecdn.com/001core15-javaprogramming-iiisem-converted-250918083322-da68ab3b/75/001-Core-15-Java-Programming-III-Sem-converted-docx-47-2048.jpg)
![Page 48 of
}
}
Output:
System.out.println("Exception Occurred");
}
System.out.println("next-statement: Outside of try-catch");
ExceptionOccurred
next-statement:Outside of try-catch
Point to note in above example: There are two statements present inside try block.
Since exception occurred because of first statement, the second statement didn’t execute.
Hence we can conclude that if an exception occurs then the rest of the try block doesn’t
execute and control passes to catch block.
Flow of control in try/catch/finally blocks:
1. If exception occurs in try block’s body then control immediately
transferred(skipping rest of the statements in try block) to the catch block. Once
catch block finished execution then finally block and after that rest of the
program.
2. If there is no exception occurred in the code which is present in try block then
first, the try block gets executed completely and then control gets transferred
to finally block (skipping catch blocks).
3. If a return statement is encountered either in try or catch block. In this case
finally block runs. Control first jumps to finally and then it returned back to
return statement.
Lets see this example to understand the above mentioned points:
Class TestExceptions{
Staticvoid myMethod(inttestnum)throwsException{
System.out.println("start - myMethod");
if(testnum==12)
thrownewException();
System.out.println("end -
myMethod"); return;
}
publicstaticvoid main(Stringargs[]){
inttestnum=12;
try{
System.out.println("try - first statement");
myMethod(testnum);
System.out.println("try - last
statement");
}
catch(Exception ex){
System.out.println("An Exception");
}
finally{
System.out.println("finally");
}
System.out.println("Out of try/catch/finally - statement");
}
}
Output:](https://crownmelresort.com/image.slidesharecdn.com/001core15-javaprogramming-iiisem-converted-250918083322-da68ab3b/75/001-Core-15-Java-Programming-III-Sem-converted-docx-48-2048.jpg)

![Page 50 of
CHAPTER – VIII
THROW EXCEPTION IN JAVA
How to throw exception in java with example
In Java we have already defined exception classes such as Arithmetic Exception,
Null Pointer Exception, Array Index Out of Bounds exception etc. These exceptions are
set to trigger on different-2 conditions. For example, when we divide a number by
zero, this triggers Arithmetic Exception, when we try to access the array element
out of its bounds then we get Array Index Out of Bounds Exception.
We can define our own set of conditions or rules and throw an exception
explicitly using throw keyword. For example, we can throw Arithmetic Exception when
we divide number by 5, or any other numbers, what we need to do is just set the
condition and throw any exception using throw keyword. Throw keyword can also be
used for throwing custom exceptions, I have covered that in a separate tutorial, see
Custom Exceptions in Java.
Syntax of throw keyword:
Thrownewexception_class("error message");
For example:
thrownewArithmeticException("dividing a number by 5 is not allowed in this program");
Example of throw keyword
Lets say we have a requirement where we we need to only register the students
when their age is less than 12 and weight is less than 40, if any of the condition is
not met then the user should get an ArithmeticException with the warning message
“Student is not eligible for registration”. We have implemented the logic by placing the
code in the method that checks student eligibility if the entered student age and weight
doesn’t met the criteria then we throw the exception using throw keyword.
/* In this program we are checking the Student age
* if the student age<12 and weight <40 then our program
* should return that the student is not eligible for registration.
*/
Public class ThrowExample{
staticvoid checkEligibilty(intstuage,intstuweight){
if(stuage<12&&stuweight<40){
thrownewArithmeticException("Student is not eligible for registration");
}
else{
System.out.println("Student Entry is Valid!!");
}
}
publicstaticvoid main(Stringargs[]){
System.out.println("Welcome to the Registration process!!");
checkEligibilty(10,39);
System.out.println("Have a nice day..");
}
}
Output:](https://crownmelresort.com/image.slidesharecdn.com/001core15-javaprogramming-iiisem-converted-250918083322-da68ab3b/75/001-Core-15-Java-Programming-III-Sem-converted-docx-50-2048.jpg)
![Page 51 of
Welcome to the Registration process!!Exceptionin thread "main"
java.lang.ArithmeticException:Studentisnot eligible for registration
at
beginnersbook.com.ThrowExample.checkEligibilty(ThrowExample.java:9)
at beginnersbook.com.ThrowExample.main(ThrowExample.java:18)
In the above example we have throw an unchecked exception, same way we can
throw uncheckedand user-defined exception as well.
Throw Keyword Example in Java
Here, various examples to demonstrate how to throw an exception using
throw keyword. To understand these programs, you should have the basic knowledge
of what is throw keyword and why we throw exception using throw keyword, refer
this guide: throw in java.
Example 1: How to throw your own exception explicitly using throw keyword
This example shows how to throw a custom exception using throw. Refer this guide to
understand how to create your own exceptions.
classMyOwnExceptionextendsException{
publicMyOwnException(Stringmsg){
super(msg);
}
}
Class EmployeeTest{
staticvoidemployeeAge(int age) throws
MyOwnException{ if(age <0)
thrownewMyOwnException("Age can't be less than
zero"); else
System.out.println("Input is valid!!");
}
publicstaticvoid main(String[]args){
try{
employeeAge(-2);
}
catch(MyOwnException e){
e.printStackTrace();
}
}
}
Output:
beginnersbook.com.MyOwnException:Age can't be less than zero
Note: Method call should be in try block as it is throwing an exception.
Example2: How to throw an already defined exception using throw keyword
Class Exception2{
staticint sum(int num1,int num2){
if(num1 ==0)
thrownewArithmeticException("First parameter is not valid");
else
System.out.println("Both parameters are correct!!");
return num1+num2;
}](https://crownmelresort.com/image.slidesharecdn.com/001core15-javaprogramming-iiisem-converted-250918083322-da68ab3b/75/001-Core-15-Java-Programming-III-Sem-converted-docx-51-2048.jpg)
![Page 52 of
publicstaticvoid main(Stringargs[]){
int res=sum(0,12);
System.out.println(res);
System.out.println("Continue Next statements");
}
}
Output:
Exceptionin thread main java.lang.ArithmeticException:
First parameter isnot valid
Similarly other exceptions, such as NullPointerException, ArrayIndexOutOfBoundsException
etc. can be thrown.
Throws Keyword Example in Java
Here we will see few examples of throws keyword. To understand these
programs, you should have the knowledge of throws keyword in java.
Example 1: Exception propagation using throws keyword
As you can see that we have an exception occurred in method1 which has been
handled in the chain-calling method method3(). This example shows how exception
propagation works. classExample1{
void method1()throwsArithmeticException{
thrownewArithmeticException("Calculation error");
}
void method2()throwsArithmeticException{
method1();
}
void method3(){
try{
method2();
}
catch(ArithmeticException e){
System.out.println("ArithmeticException handled");
}
}
publicstaticvoid main(Stringargs[])
{ Example1obj=newExample1();
obj.method3();
System.out.println("End Of
Program");
}
}
Output:
Arithmetic Exception
handled End of Program
Example 2: When you don’t handle exception and instead declare it at all the places
The ideal way to use throws is by declaring the exceptions in method
signature and handle the exceptions using try-catch in calling method. Lets see
what happens when we declare the exception at both the places, in method
signature as well as in calling method.
Class Exception Example{](https://crownmelresort.com/image.slidesharecdn.com/001core15-javaprogramming-iiisem-converted-250918083322-da68ab3b/75/001-Core-15-Java-Programming-III-Sem-converted-docx-52-2048.jpg)
![Page 53 of
void method()throws Arithmetic Exception{
thrownew Arithmetic Exception("Arithmetic Exception Occurred");
}
}
Class Example1{
Public static void main(String args[]) throws ArithmeticException{
ExceptionExampleobj=newExceptionExample();
obj.method();
System.out.println("End Of Program");
}
}
Output:
Exceptionin thread "main"java.lang.ArithmeticException:
ArithmeticExceptionOccurred
at
ExceptionExample.method(Example1.java:4)
at Example1.main(Example1.java:10)
Throws clause in java – Exception handling
BY CHAITANYA SINGH | FILED UNDER: EXCEPTION HANDLING
As we know that there are two types of exception checked and unchecked.
Checked exception (compile time) force you to handle them, if you don’t handle them then
the program will not compile.
On the other hand unchecked exception (Runtime) doesn’t get checked during
compilation. Throws keyword is used for handling checked exceptions. By using throws
we can declare multiple exceptions in one go.
What is the need of having throws keyword when you can handle exception using try-catch?
The throws does the same thing that try-catch does but there are some cases
where you would prefer throws over try-catch. For example:
Lets say we have a method myMethod() that has statements that can throw
either ArithmeticException or NullPointerException, in this case you can use try-
catch as shown below:
publicvoidmyMethod()
{
try{
// Statements that might throw an exception
}
catch(ArithmeticException e){
// Exception handling statements
}
catch(NullPointerException e){
// Exception handling statements
}
}
But suppose you have several such methods that can cause exceptions, in that case it
would be tedious to write these try-catch for each method. The code will become
unnecessary long and will be less-readable.](https://crownmelresort.com/image.slidesharecdn.com/001core15-javaprogramming-iiisem-converted-250918083322-da68ab3b/75/001-Core-15-Java-Programming-III-Sem-converted-docx-53-2048.jpg)
![Page 54 of
One way to overcome this problem is by using throws like this: declare the exceptions
in
the method signature using throws and handle the exceptions where you are
calling this method by using try-catch.
Another advantage of using this approach is that you will be forced to
handle the exception when you call this method, all the exceptions that are declared
using throws, must be handled where you are calling this method else you will get
compilation error.
publicvoidmyMethod () throwsArithmeticException, NullPointerException
{
// Statements that might throw an exception
}
publicstaticvoid main(Stringargs[]){
try{
myMethod();
}
catch(ArithmeticException e){
// Exception handling statements
}
catch(NullPointerException e){
// Exception handling statements
}
}
Example of throws Keyword
In this example the method myMethod() is throwing two checked exceptions
so we have declared these exceptions in the method signature using throws Keyword.
If we do not declare these exceptions then the program will throw a compilation
error.
import java.io.*;
classThrowExampl
e{
voidmyMethod(intnum)throwsIOException,ClassNotFoundException{
if(num==1)
thrownewIOException("IOException Occurred");
else
thrownewClassNotFoundException("ClassNotFoundException");
}
}
publicclassExample1{
publicstaticvoid main(Stringargs[]){
try{
ThrowExampleobj=newThrowExample();
obj.myMethod(1);
}catch(Exception ex){
System.out.println(ex);
}
}
}
Output:
java.io.IOException:IOExceptionOccurr
ed
How to Catch multiple exceptions](https://crownmelresort.com/image.slidesharecdn.com/001core15-javaprogramming-iiisem-converted-250918083322-da68ab3b/75/001-Core-15-Java-Programming-III-Sem-converted-docx-54-2048.jpg)
![Page 55 of
BY CHAITANYA SINGH | FILED UNDER: EXCEPTION HANDLING
Catching multiple exceptions
Lets take an example to understand how to handle multiple
exceptions. classExample{
publicstaticvoid main(Stringargs[]){
try{
intarr[]=newint[7];
arr[4]=30/0;
System.out.println("Last Statement of try block");
}
catch(ArithmeticException e){
System.out.println("You should not divide a number by zero");
}
catch(ArrayIndexOutOfBoundsException e){
System.out.println("Accessing array elements outside of the limit");
}
catch(Exception e){
System.out.println("Some Other
Exception");
}
System.out.println("Out of the try-catch block");
}
}
Output:
You should not divide a number by
zero Out of the try-catch block
In the above example, the first catch block got executed because the code
we have written in try block throws ArithmeticException (because we divided the
number by zero).
Now lets change the code a little bit and see the change in output:
classExample{
publicstaticvoid main(Stringargs[]){
try{
intarr[]=newint[7];
arr[10]=10/5;
System.out.println("Last Statement of try block");
}
catch(ArithmeticException e){
System.out.println("You should not divide a number by zero");
}
catch(ArrayIndexOutOfBoundsException e){
System.out.println("Accessing array elements outside of the limit");
}
catch(Exception e){
System.out.println("Some Other
Exception");
}
System.out.println("Out of the try-catch block");
}
}
Output:](https://crownmelresort.com/image.slidesharecdn.com/001core15-javaprogramming-iiisem-converted-250918083322-da68ab3b/75/001-Core-15-Java-Programming-III-Sem-converted-docx-55-2048.jpg)
![Page 56 of
Accessing array elements outside of the limit
Out of the try-catch block
In this case, the second catch block got executed because the code throws Array
Index Out Of Bounds Exception. We are trying to access the 11th element of array in
above program but the array size is only 7.
What did we observe from the above two examples?
1. It is clear that when an exception occurs, the specific catch block (that declares
that exception) executes. This is why in first example first block executed and in second
example second catch.
2. Although I have not shown you above, but if an exception occurs in above code
which is not Arithmetic and ArrayIndexOutOfBounds then the last generic catch
handler would execute.
Lets change the code again and see the output:
Class Example{
Public staticvoid main(String args[])
{ try{
intarr[]=newint[7];
arr[10]=10/5;
System.out.println("Last Statement of try block");
}
catch(Exception e){
System.out.println("Some Other
Exception");
}
catch(ArithmeticException e){
System.out.println("You should not divide a number by zero");
}
catch(ArrayIndexOutOfBoundsException e){
System.out.println("Accessing array elements outside of the limit");
}
System.out.println("Out of the try-catch block");
}
}
Output:
Compile time error:Exceptionin thread "main"java.lang.Error:
Unresolved compilation problems:Unreachablecatch block
forArithmeticException. Itis already handled by the catch block
forExceptionUnreachablecatch block
forArrayIndexOutOfBoundsException.Itis already handled by the catch block
for Exception at Example.main.](https://crownmelresort.com/image.slidesharecdn.com/001core15-javaprogramming-iiisem-converted-250918083322-da68ab3b/75/001-Core-15-Java-Programming-III-Sem-converted-docx-56-2048.jpg)
![Page 57 of
What are Java Threads?
A thread is a:
CHAPTER – IX
INTRODUCTION OF THREADS IN JAVA
a. Facility to allow multiple activities within a single process
b. Referred as lightweight process
c. A thread is a series of executed statements
d. Each thread has its own program counter, stack and local variables
e. A thread is a nested sequence of method calls
f. Its shares memory, files and per-process
state Read: Multithreading in Java
Whats the need of a thread or why we use Threads?
a. To perform asynchronous or background processing
b. Increases the responsiveness of GUI applications
c. Take advantage of multiprocessor systems
d. Simplify program logic when there are multiple independent
entities e.
What happens when a thread is invoked?
When a thread is invoked, there will be two paths of execution. One path will
execute the thread and the other path will follow the statement after the thread
invocation. There will be a separate stack and memory space for each thread.
Risk Factor
a. Proper co-ordination is required between threads accessing common variables
[use of synchronized and volatile] for consistence view of data
b. overuse of java threads can be hazardous to program’s performance and
its maintainability.
Threads in Java
Java threads facility and API is deceptively simple:
Every java program creates at least one thread [ main() thread ]. Additional
threads are created through the Thread constructor or by instantiating classes that
extend the Thread class.
Thread creation in Java
Thread implementation in java can be achieved in two ways:
A. Extending the java.lang.Thread class
B. Implementing the java.lang.Runnable Interface
Note: The Thread and Runnable are available in the java.lang.* package
A.By extending thread class
1. The class should extend Java Thread class.
2. The class should override the run() method.
3. The functionality that is expected by the Thread to be executed is written in
the run() method.
void start(): Creates a new thread and makes it
runnable. void run(): The new thread begins its life inside this method.
Example:
publicclassMyThreadextendsThread{](https://crownmelresort.com/image.slidesharecdn.com/001core15-javaprogramming-iiisem-converted-250918083322-da68ab3b/75/001-Core-15-Java-Programming-III-Sem-converted-docx-57-2048.jpg)
![Page 58 of
publicvoid run(){
System.out.println("thread is running...");
}
publicstaticvoid main(String[]args){
MyThreadobj=newMyThread();
obj.start();
}
B.By Implementing Runnable interface
1. The class should implement the Runnable interface
2. The class should implement the run() method in the Runnable interface
3. The functionality that is expected by the Thread to be executed is put in the
run() method
Example:
Public class MyThreadimplementsRunnable{
publicvoid run(){
System.out.println("thread is running..");
}
publicstaticvoid
main(String[]args){ Thread t
=newThread(newMyThread());
t.start();
}
Extends Thread class vs Implements Runnable Interface?
Extending the Thread class will make your class unable to extend other classes,
because of the single inheritance feature in JAVA. However, this will give you a simpler
code structure. If you implement Runnable, you can gain better object-oriented design
and consistency and also avoid the single inheritance problems.
If you just want to achieve basic functionality of a thread you can simply
implement Runnable interface and override run() method. But if you want to do
something serious with thread object as it has other methods like suspend(), resume(),
..etc which are not available in Runnable interface then you may prefer to extend the
Thread class.
Thread life cycle in java
Read full article at: Thread life cycle in java
Ending Thread
A Thread ends due to the following reasons:
The thread ends when it comes when the run() method finishes its execution.
When the thread throws an Exception or Error that is not being caught in the
program.
Java program completes or ends.
Another thread calls stop() methods.
Synchronization of Threads
In many cases concurrently running threads share data and two threads try
to do operations on the same variables at the same time. This often results in
corrupt data as two threads try to operate on the same data.
A popular solution is to provide some kind of lock primitive. Only one thread can
acquire a particular lock at any particular time. This can be achieved by using
a keyword “synchronized” .](https://crownmelresort.com/image.slidesharecdn.com/001core15-javaprogramming-iiisem-converted-250918083322-da68ab3b/75/001-Core-15-Java-Programming-III-Sem-converted-docx-58-2048.jpg)
![Page 59 of
By using the synchronize only one thread can access the method at a time and a
second call will be blocked until the first call returns or wait() is called inside the
synchronized method.
Deadlock
Whenever there is multiple processes contending for exclusive access to
multiple locks, there is the possibility of deadlock. A set of processes or threads is said
to be deadlocked when each is waiting for an action that only one of the
others can perform. In Order to avoid deadlock, one should ensure that when you
acquire multiple locks, you always acquire the locks in the same order in all threads.
Guidelines for synchronization
Keep blocks short. Synchronized blocks should be short — as short as possible
while still protecting the integrity of related data operations.
Don’t block. Don’t ever call a method that might block, such as
InputStream.read(), inside a synchronized block or method.
Don’t invoke methods on other objects while holding a lock. This may sound
extreme, but it eliminates the most common source of deadlock.
Java Main Thread
Once a Java program starts, one thread starts running immediately. This is usually
called main thread of your program, because it is the one which is executed when
your program starts. The main thread is important for the following two reasons:
It is the thread from which the other (child) threads will be spawned
Often, it must be the last thread to finish the execution as it performs various
shutdown actions
Although the main thread is automatically created when your program starts, it
can be controlled through a Thread object. To do so, you must obtain a reference
to it by calling the method named currentThread(), is a public static member of the
Thread. Its general form is : static Thread currentThread()
This method returns a reference to the thread in which it is called. And once you
have a reference to the main thread, you can control it just like any other thread.
Java Main Thread Example
Here is an example demonstrates the concept of main thread in Java:
/* Java Program Example - Java Main Thread
* This program control the main Thread
*/
class JavaProgram
{
public static void main(String args[])
{
Thread thr = Thread.currentThread();
System.out.println("Current thread : " +
thr);
/* change the name of the thread */](https://crownmelresort.com/image.slidesharecdn.com/001core15-javaprogramming-iiisem-converted-250918083322-da68ab3b/75/001-Core-15-Java-Programming-III-Sem-converted-docx-59-2048.jpg)


![Page 62 of
InterfaceRunnable
publicabstractvoid();
Note the @Functional interface annotation on the top of the runnable
interface. That is a new annotation added in Java8. Read more about it here Functional
interface annotation in java 8
To implement runnable a class has to implement only the run() method inside
run() method we write the code for the new thread.
When using Runnable you have to explicitly create a thread class object by
passing the Runnable as parameter so that run() method of the thread can be
executed. java thread class defines several constructors, some of the commonly
used are.
Thread()
Thread(String
Name)
Thread(Runnable threadObi)
Thread(Runnable threadObi,String name)
You can use any of the last two in case of runnable to create a thread in java.
After the new thread is created, it will not start running until you call the start()
method, which is declared within thread class. As soon as start() method is called
upon a thread object following actions happen-
The thread’s state changes from New state to the runnable state.
Thread’s target run() method will execute (depends upon when thread gets
the CPU CYCLE).
Java Thread creation Example using Runnable
Class MyThread implements Runnable{
@Override
publicvoid run(){
System.out.println("Entered run method
"+Thread.currentThread().getName()); for(int i =0; i <5; i++){
System.out.println("My Thread"+ i);
}
System.out.println("Finished with MyThread");
}
}
publicclassThreadDemo{
publicstaticvoid main(String[]args){
// Passing runnable instance
Threadthread=newThread(newMyThread());
// Calling start
method
thread.start();
}
}
Output
Entered run method Thread-0](https://crownmelresort.com/image.slidesharecdn.com/001core15-javaprogramming-iiisem-converted-250918083322-da68ab3b/75/001-Core-15-Java-Programming-III-Sem-converted-docx-62-2048.jpg)
![Page 63 of
v
My
Thread0
My
Thread1
My
Thread2
My
Thread3
My
Thread4
Finished with MyThread
Here we are using the constructor Thread(Runnable threadObj) while creating a thread
object -
Thread thread = new Thread(new MyThread());.
Calling start() method on the thread will execute the run method where it will print
numbers along with the thread name.
Creating thread by extending Thread class
Another way to create a thread in Java is to create a class that extends Thread class
and then create an instance of that class. The extending class has to override the run()
method and also needs to call start() method to start execution of the new thread.
Thread creation Example by extending Thread
class Class MyThread extends Thread{
@Override
publicvoid run()
{
System.out.println("Entered run method
"+Thread.currentThread().getName()); for(int i =0; i <5; i++){
System.out.println("My Thread"+ i);
}
System.out.println("Finished with MyThread");
}
}
Public class ThreadDemo{
publicstaticvoid main(String[]args){
MyThread thread =newMyThread();
thread.start();
}
}
Here we are extending the thread class so we just need to create an instance of that
class that will be a thread object. Then we are calling start() method on that thread
object.
So these are the 2 ways provided in Java to create a new thread.
There are some other ways we can implement the run() method like, as an
anonymous class and starting Java 8 using a lambda expression. Lets see how
that can be done.
Java thread as an anonymous
class classInnerThread{
Thread t;
// Constructor
publicInnerThread(String
name){
// Anonymous class with run method
implemented Thread t =newThread(name){
@Override
publicvoid run()
{](https://crownmelresort.com/image.slidesharecdn.com/001core15-javaprogramming-iiisem-converted-250918083322-da68ab3b/75/001-Core-15-Java-Programming-III-Sem-converted-docx-63-2048.jpg)

![Page 65 of
}
System.out.println("Finished with Inner Thread");
}
};
// starting the thread, which will start execution of run
method t.start();
}
}
publicclassThreadDemo{
publicstaticvoid main(String[]args){
InnerThread thread =newInnerThread("MyThread");
}
}
Here we are implementing the run method using an anonymous class. Note that
Thread class is not explicitly extended here and the implementation of the run()
method is provided when an instance of the thread is created.
Implementing Runnable as an anonymous class
If you want to do it using runnable interface run() method implementation it will only be
a small change.
classInnerThread{
Thread t;
// Constructor
publicInnerThread(String
name){
// Anonymous class with run method implemented
// using Runnable interface
Thread t =newThread(newRunnable(){
@Override
publicvoid run(){
System.out.println("Entered run method
"+Thread.currentThread().getName()); for(int i =0; i <5; i++){
System.out.println(name + i);
}
System.out.println("Finished with Inner Thread");
}
}, name);// Name of the thread, second param
// starting the thread, which will start execution of run
method t.start();
}
}
Implementing Runnable as Java Lambda expression
Java 8 onward it is also possible to use lambda expression to provide implementation
of the run method of the runnable interface. Runnable interface has a single abstract
method run() thus it can be considered as a functional interface. Lambda
expression can be used to provide implementation of that abstract method.
classLambdaThread{
publicLambdaThread(String
name){
// Lambda block - code inside the lambda block will
// be the implementation of the run
method. Runnable r =()->{](https://crownmelresort.com/image.slidesharecdn.com/001core15-javaprogramming-iiisem-converted-250918083322-da68ab3b/75/001-Core-15-Java-Programming-III-Sem-converted-docx-65-2048.jpg)
![publicclassThreadDemo{ publicstaticvoid main(String[]args){
LambdaThread thread =newLambdaThread("LambdaThread");
}
}
Here we have used the lambda expression to provide implementation of the run method of th
Page 66 of
System.out.println("Entered run method
"+Thread.currentThread().getName()); for(int i =0; i <5; i++){
System.out.println("Lambda thread "+ i);
}
System.out.println("Finished with Lambda Thread");
};
//starting thread with the constructor of the thread class
// that takes runnable instance and String as
parameters newThread(r, name).start();
}
}](https://crownmelresort.com/image.slidesharecdn.com/001core15-javaprogramming-iiisem-converted-250918083322-da68ab3b/75/001-Core-15-Java-Programming-III-Sem-converted-docx-66-2048.jpg)

![Page 68 of
By extending Thread class.
By implementing Runnable interface.
Before we begin with the programs(code) of creating threads, let’s have a
look at these methods of Thread class. We have used few of these methods in the
example below.
getName(): It is used for Obtaining a thread’s name
getPriority(): Obtain a thread’s priority
isAlive(): Determine if a thread is still
running join(): Wait for a thread to
terminate
run(): Entry point for the thread
sleep(): suspend a thread for a period of
time start(): start a thread by calling its
run() method
Method 1: Thread creation by extending Thread class
Example 1:
classMultithreadingDemoextendsThread{
publicvoid run(){
System.out.println("My thread is in running state.");
}
publicstaticvoid main(Stringargs[]){
MultithreadingDemoobj=newMultithreadingDemo();
obj.start();
}
}
Output:
My thread isin running state.
Example 2:
Class CountextendsThread
{
Count()
{
super("my extending thread");
System.out.println("my thread created"+this);
start();
}
publicvoid run()
{
try
{
for(int i=0;i<10;i++)
{
System.out.println("Printing the count
"+ i); Thread.sleep(1000);
}
}
catch(InterruptedException e)
{
System.out.println("my thread interrupted");](https://crownmelresort.com/image.slidesharecdn.com/001core15-javaprogramming-iiisem-converted-250918083322-da68ab3b/75/001-Core-15-Java-Programming-III-Sem-converted-docx-68-2048.jpg)
![Page 69 of
}
System.out.println("My thread run is over");
}
}
Class ExtendingExample
{
publicstaticvoid main(Stringargs[])
{
Countcnt=newCount();
try
{
while(cnt.isAlive())
{
System.out.println("Main thread will be alive till the child thread is
live"); Thread.sleep(1500);
}
}
catch(InterruptedException e)
{
System.out.println("Main thread interrupted");
}
System.out.println("Main thread's run is over");
}
}
Output:
my thread createdThread[my runnable
thread,5,main] Main thread will be alive till the
child thread is live Printing the count 0
Printing the count 1
Main thread will be alive till the child thread is
live Printing the count 2
Main thread will be alive till the child thread is
live Printing the count 3
Printing the count 4
Main thread will be alive till the child thread is
live Printing the count 5
Main thread will be alive till the child thread is
live Printing the count 6
Printing the count 7
Main thread will be alive till the child thread is
live Printing the count 8
Main thread will be alive till the child thread is
live Printing the count 9
mythread run is
over Main thread run
is over
Method 2: Thread creation by implementing Runnable Interface
A Simple Example
Class MultithreadingDemoimplementsRunnable{
publicvoid run(){](https://crownmelresort.com/image.slidesharecdn.com/001core15-javaprogramming-iiisem-converted-250918083322-da68ab3b/75/001-Core-15-Java-Programming-III-Sem-converted-docx-69-2048.jpg)
![Page 70 of
v
System.out.println("My thread is in running state.");
}
publicstaticvoid main(Stringargs[]){
MultithreadingDemoobj=newMultithreadingDemo();
Threadtobj=newThread(obj);
tobj.start();
}
}
Output:
My thread isin running state.
Example Program 2:
Observe the output of this program and try to understand what is
happening in this program. If you have understood the usage of each thread method
then you should not face any issue, understanding this example.
Class CountimplementsRunnable
{
Threadmythread;
Count()
{
mythread=newThread(this,"my runnable thread");
System.out.println("my thread created"+mythread);
mythread.start();
}
publicvoid run()
{
try
{
for(int i=0;i<10;i++)
{
System.out.println("Printing the count
"+ i); Thread.sleep(1000);
}
}
catch(InterruptedException e)
{
System.out.println("my thread interrupted");
}
System.out.println("mythread run is over");
}
}
classRunnableExample
{
publicstaticvoid main(Stringargs[])
{
Countcnt=newCount();
try
{
while(cnt.mythread.isAlive())
{](https://crownmelresort.com/image.slidesharecdn.com/001core15-javaprogramming-iiisem-converted-250918083322-da68ab3b/75/001-Core-15-Java-Programming-III-Sem-converted-docx-70-2048.jpg)
![Page 71 of
System.out.println("Main thread will be alive till the child thread is
live"); Thread.sleep(1500);
}
}
catch(InterruptedException e)
{
System.out.println("Main thread interrupted");
}
System.out.println("Main thread run is over");
}
}
Output:
my thread createdThread[my runnable
thread,5,main] Main thread will be alive till the
child thread is live Printing the count 0
Printing the count 1
Main thread will be alive till the child thread is
live Printing the count 2
Main thread will be alive till the child thread is
live Printing the count 3
Printing the count 4
Main thread will be alive till the child thread is
live Printing the count 5
Main thread will be alive till the child thread is live
Printing the count 6
Printing the count 7
Main thread will be alive till the child thread is
live Printing the count 8
Main thread will be alive till the child thread is
live Printing the count 9
mythread run is
over Main thread run
is over
Thread priorities
Thread priorities are the integers which decide how one thread should be
treated with respect to the others.
Thread priority decides when to switch from one running thread to another,
process is called context switching
A thread can voluntarily release control and the highest priority thread that is
ready to run is given the CPU.
A thread can be preempted by a higher priority thread no matter what the
lower priority thread is doing. Whenever a higher priority thread wants to
run it does.
To set the priority of the thread setPriority() method is used which is a
method of the class Thread Class.
In place of defining the priority in integers, we
can use MIN_PRIORITY, NORM_PRIORITY or MAX_PRIORITY.](https://crownmelresort.com/image.slidesharecdn.com/001core15-javaprogramming-iiisem-converted-250918083322-da68ab3b/75/001-Core-15-Java-Programming-III-Sem-converted-docx-71-2048.jpg)
![Page 72 of
v
Methods: isAlive() and
join()
CHAPTER – XI
THREAD METHODS & APPLETS
In all the practical situations main thread should finish last else other threads
which have spawned from the main thread will also finish.
To know whether the thread has finished we can call isAlive() on the thread
which returns true if the thread is not finished.
Another way to achieve this by using join() method, this method when called
from the parent thread makes parent thread wait till child thread terminates.
These methods are defined in the Thread class.
We have used isAlive() method in the above examples too.
Synchronization
Multithreading introduces asynchronous behavior to the programs. If a thread
is writing some data another thread may be reading the same data at that
time. This may bring inconsistency.
When two or more threads need access to a shared resource there should be
some way that the resource will be used only by one resource at a time. The
process to achieve this is called synchronization.
To implement the synchronous behavior java has synchronous method. Once a
thread is inside a synchronized method, no other thread can call any other
synchronized method on the same object. All the other threads then wait until
the first thread come out of the synchronized block.
When we want to synchronize access to objects of a class which was not
designed for the multithreaded access and the code of the method which
needs to be accessed synchronously is not available with us, in this case we
cannot add the synchronized to the appropriate methods. In java we have the
solution for this, put the calls to the methods (which needs to be synchronized)
defined by this class inside a synchronized block in following manner.
Priority of a Thread (Thread Priority):
Each thread have a priority. Priorities are represented by a number between 1 and 10. In
most cases, thread schedular schedules the threads according to their priority (known as
preemptive scheduling).
But it is not guaranteed because it depends on JVM specification that which scheduling it
chooses.
3 constants defined in Thread class:
1. public static int MIN_PRIORITY
2. public static int NORM_PRIORITY
3. public static int MAX_PRIORITY
Default priority of a thread is 5 (NORM_PRIORITY). The value of MIN_PRIORITY is 1
and the value of MAX_PRIORITY is 10.
Example of priority of a Thread:
1. class TestMultiPriority1 extends Thread{
2. public void run(){
3. System.out.println("running thread name is:"+Thread.currentThread().getName());
4. System.out.println("running thread priority
is:"+Thread.currentThread().getPriority()); 5.
6. }
7. public static void main(String args[]){](https://crownmelresort.com/image.slidesharecdn.com/001core15-javaprogramming-iiisem-converted-250918083322-da68ab3b/75/001-Core-15-Java-Programming-III-Sem-converted-docx-72-2048.jpg)
![Page 73 of
v
8. TestMultiPriority1 m1=new TestMultiPriority1();
9. TestMultiPriority1 m2=new TestMultiPriority1();
10. m1.setPriority(Thread.MIN_PRIORITY);
11. m2.setPriority(Thread.MAX_PRIORITY);
12. m1.start();
13. m2.start();
14.
15. }
16. }
Test it Now
Output:running thread name is:Thread-0
running thread priority is:10
running thread name
is:Thread-1 running thread
priority is:1
Inter-thread Communication in Java
Prerequisite : Multithreading in Java, Synchronized in Java
What is Polling and what are problems with it?
The process of testing a condition repeatedly till it becomes true is known as polling.
Polling is usually implemented with the help of loops to check whether a particular
condition is true or not. If it is true, certain action is taken. This waste many CPU
cycles and makes the implementation
inefficient.
For example, in a classic queuing problem where one thread is producing data and
other is consuming it.
How Java multi threading tackles this problem?
To avoid polling, Java uses three methods, namely, wait(), notify() and
notifyAll(). All these methods belong to object class as final so that all classes have
them. They must be used within a synchronized block only.
wait()-It tells the calling thread to give up the lock and go to sleep until some
other thread enters the same monitor and calls notify().
notify()-It wakes up one single thread that called wait() on the same object. It
should be noted that calling notify() does not actually give up a lock on a
resource.
notifyAll()-It wakes up all the threads that called wait() on the same object.
A simple Java program to demonstrate the three methods-
This program might only run in offline IDEs as it contains taking input at several points.
filter_none
edit
play_arrow
brightness_4
// Java program to demonstrate inter-thread communication
// (wait(), join() and notify()) in
Java importjava.util.Scanner;
publicclassthreadexample
{
Public static void main(String
args[]) Throws](https://crownmelresort.com/image.slidesharecdn.com/001core15-javaprogramming-iiisem-converted-250918083322-da68ab3b/75/001-Core-15-Java-Programming-III-Sem-converted-docx-73-2048.jpg)


![Page 78 of
{
wait();
}
}
}
}
catch(InterruptedException e)
{
System.out.println(name + " interrupted");
}
System.out.println(name + " exiting...");
}
synchronized void mysuspend()
{
suspendFlag = true;
}
synchronized void myresume()
{
suspendFlag =
false; notify();
}
}
class SuspendResumeThread
{
public static void main(String args[])
{
NewThread obj1 = new
NewThread("One"); NewThread obj2 =
new NewThread("two");
try
{
Thread.sleep(1000);
obj1.mysuspend();
System.out.println("Suspending thread One...");
Thread.sleep(1000);
obj1.myresume();
System.out.println("Resuming thread One...");
obj2.mysuspend();
System.out.println("Suspending thread Two...");
Thread.sleep(1000);
obj2.myresume();
System.out.println("Resuming thread Two...");
}
catch(InterruptedException e)
{
System.out.println("Main thread Interrupted..!!");
}
/* wait for threads to finish
*/ try
{
System.out.println("Waiting for threads to finish...");
obj1.thr.join();](https://crownmelresort.com/image.slidesharecdn.com/001core15-javaprogramming-iiisem-converted-250918083322-da68ab3b/75/001-Core-15-Java-Programming-III-Sem-converted-docx-78-2048.jpg)