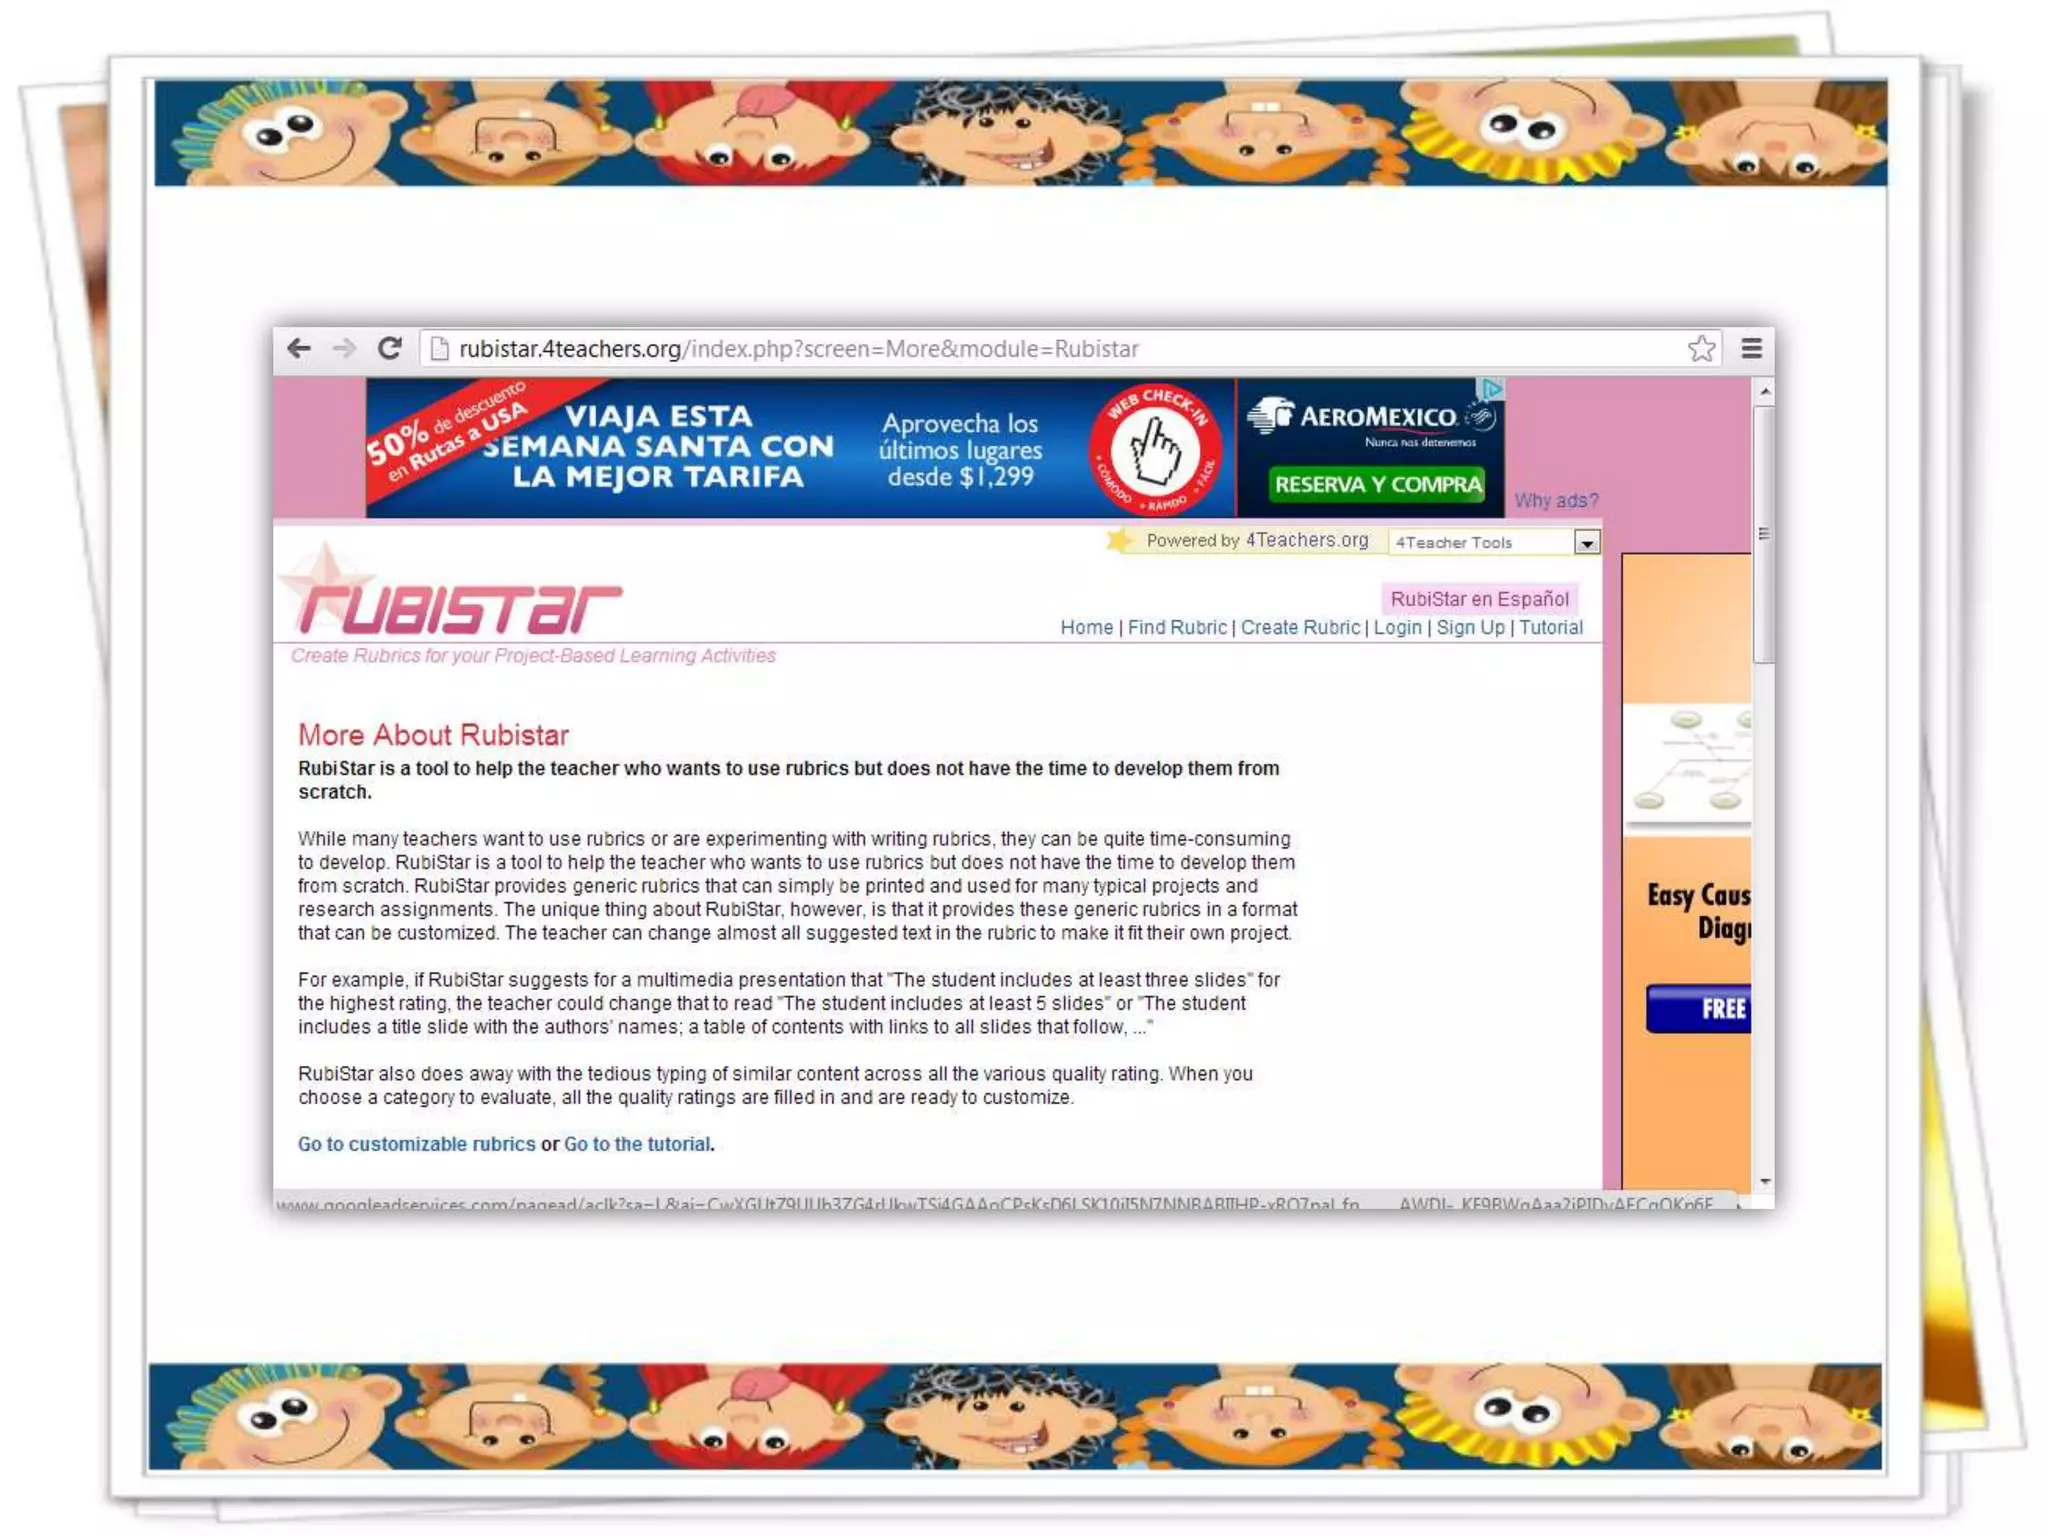
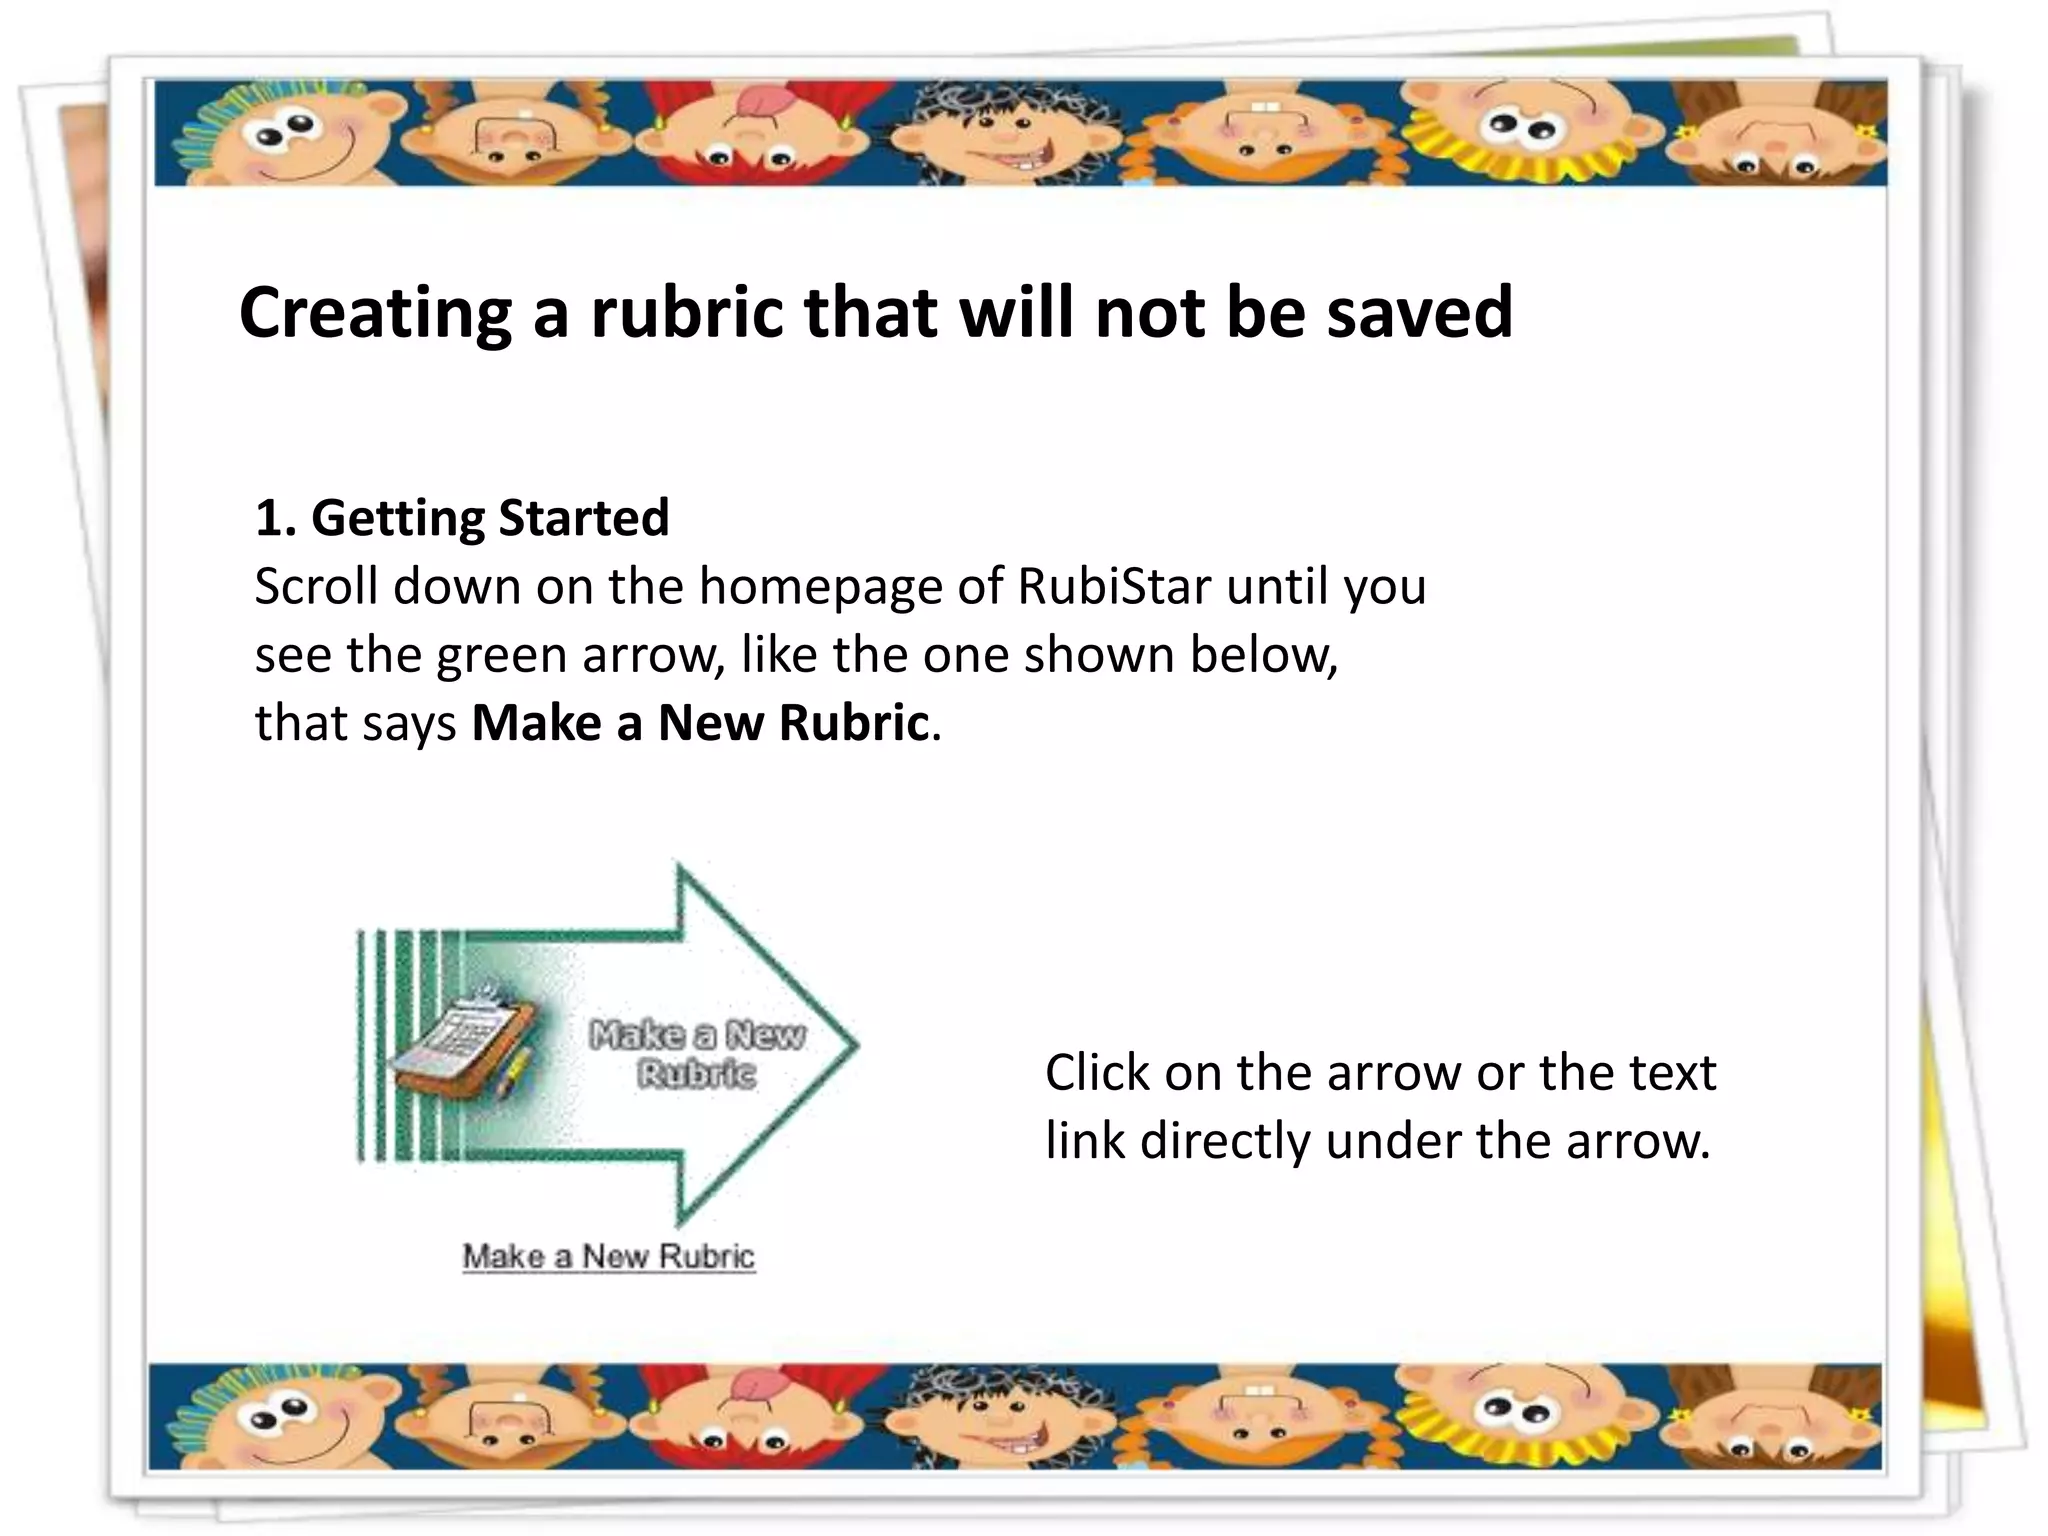
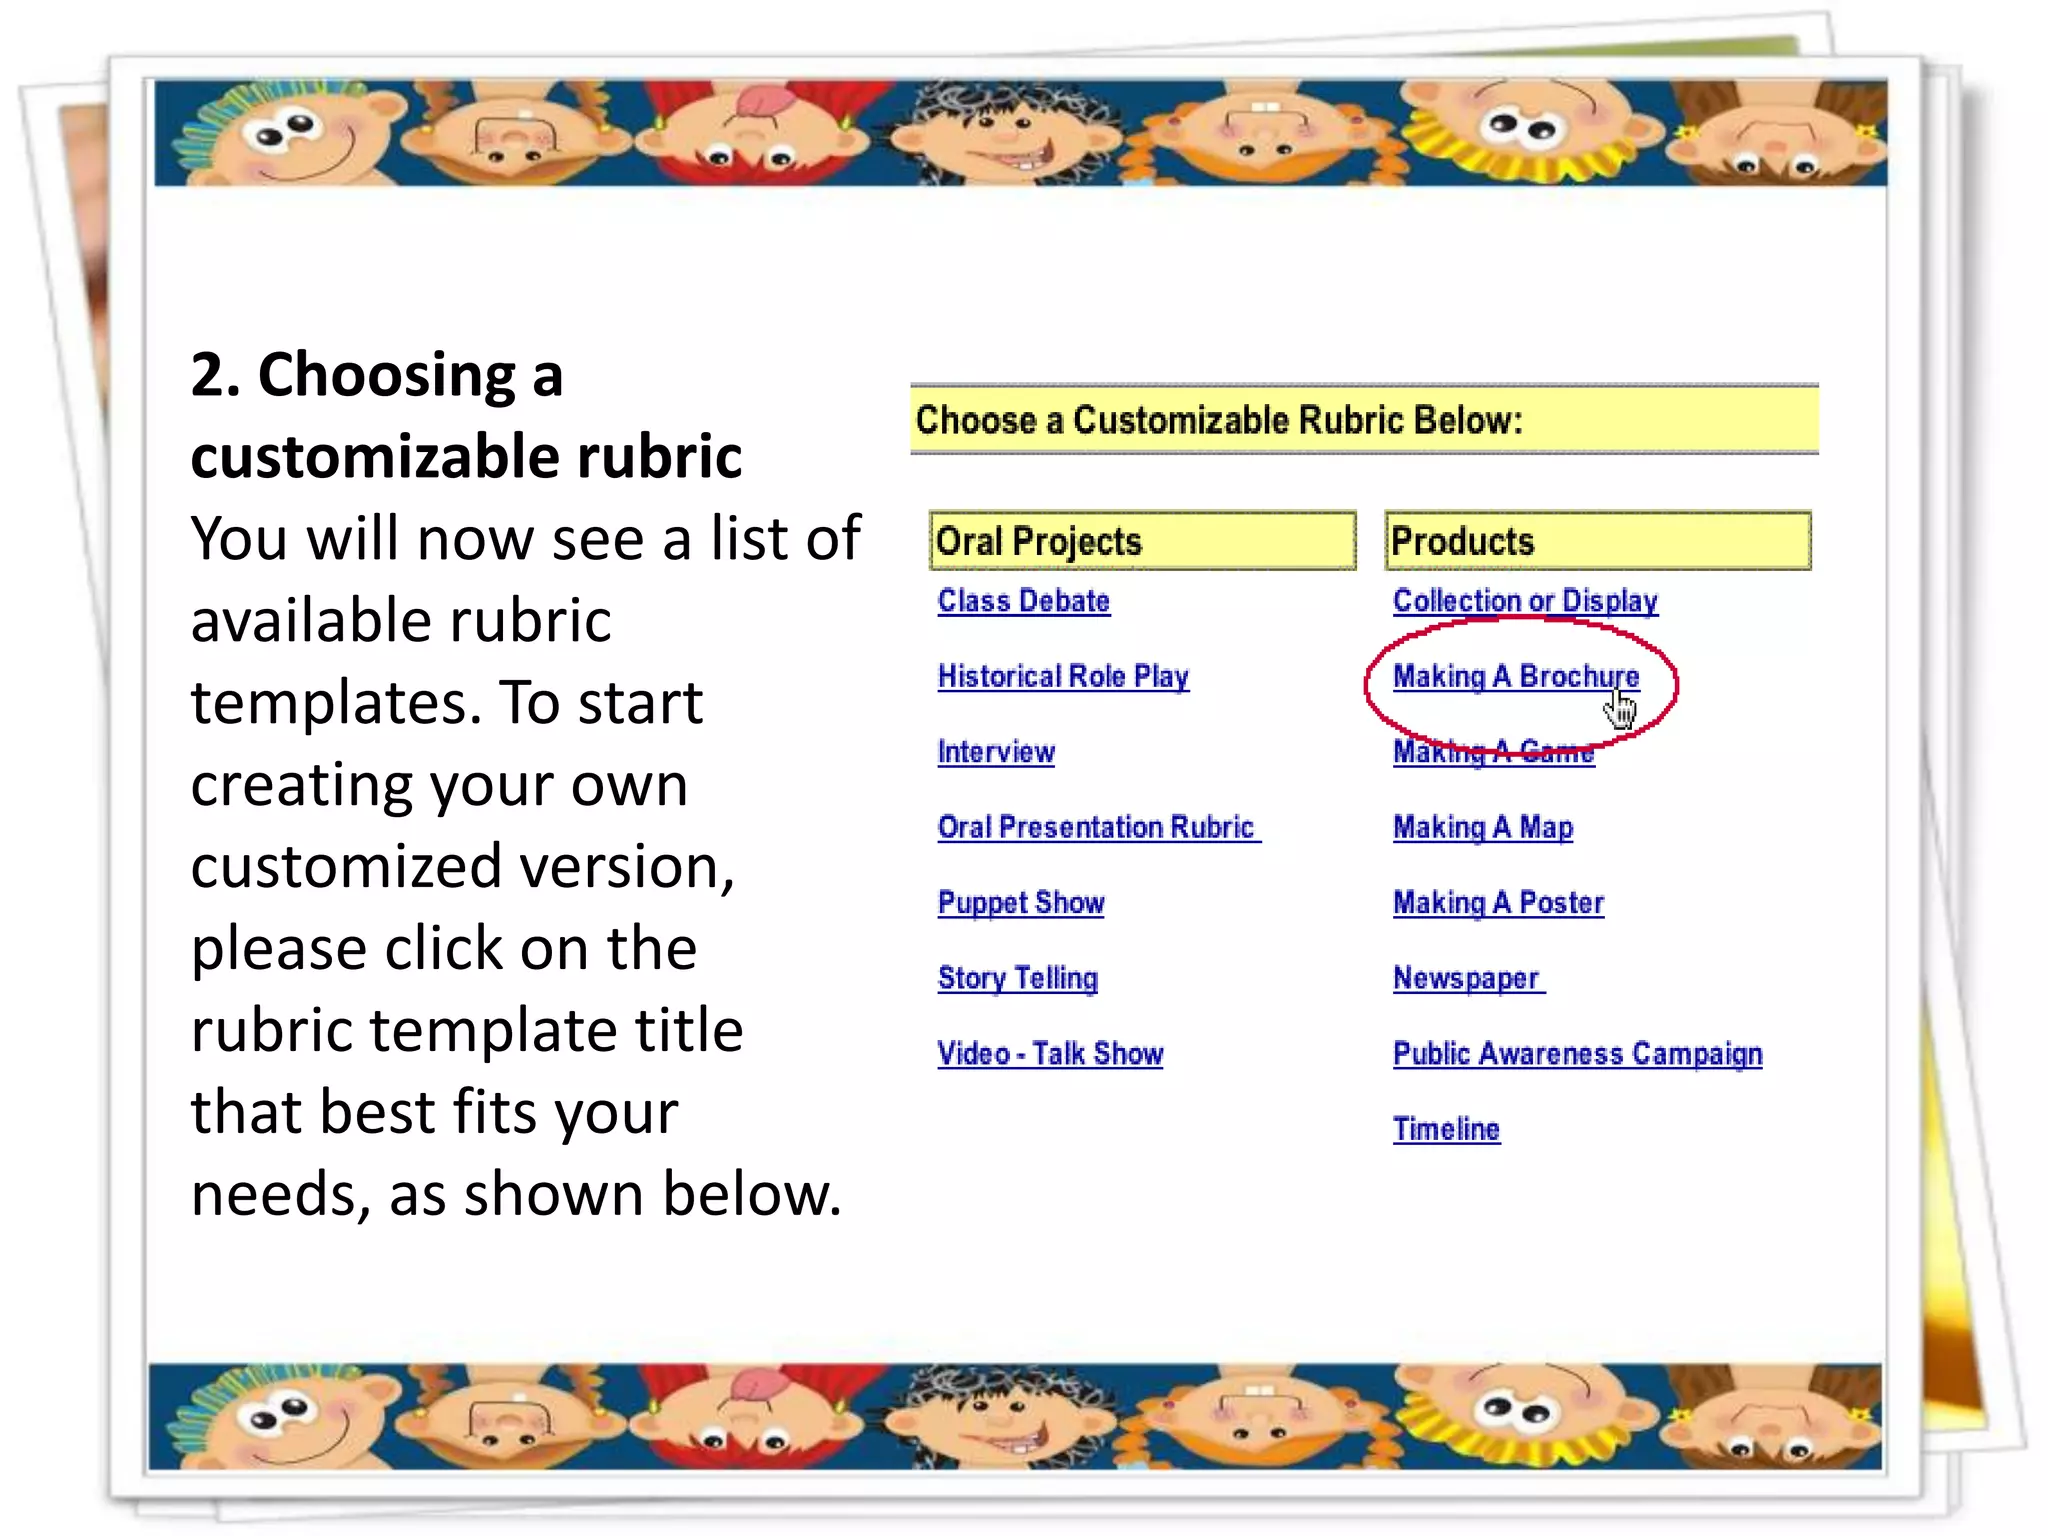
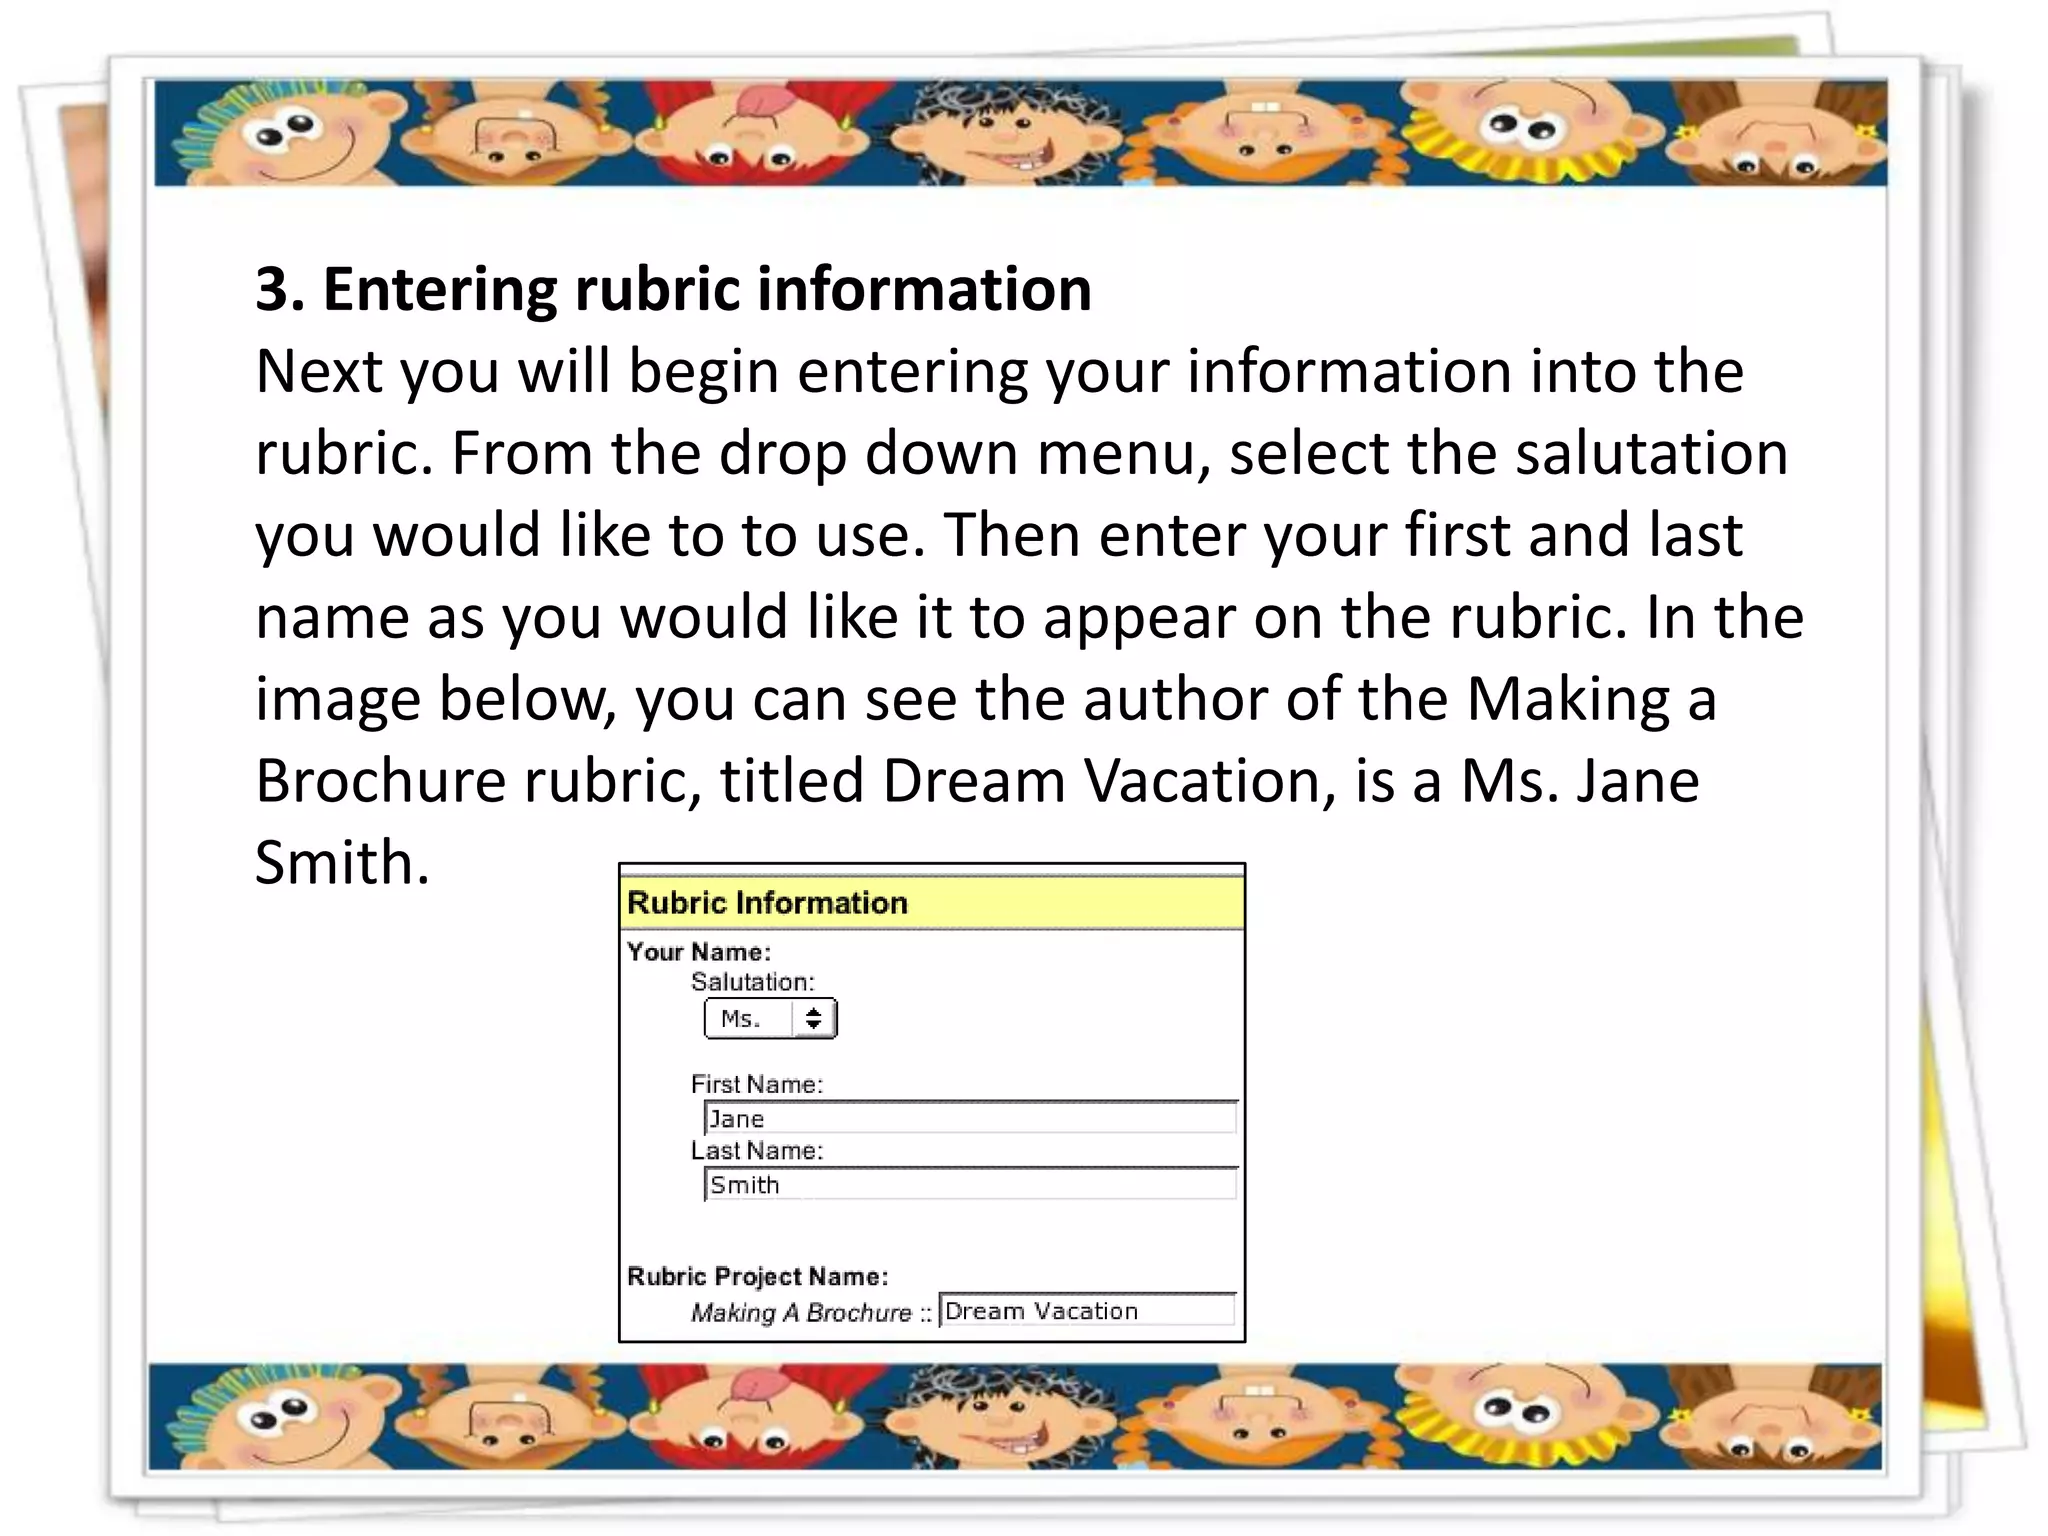
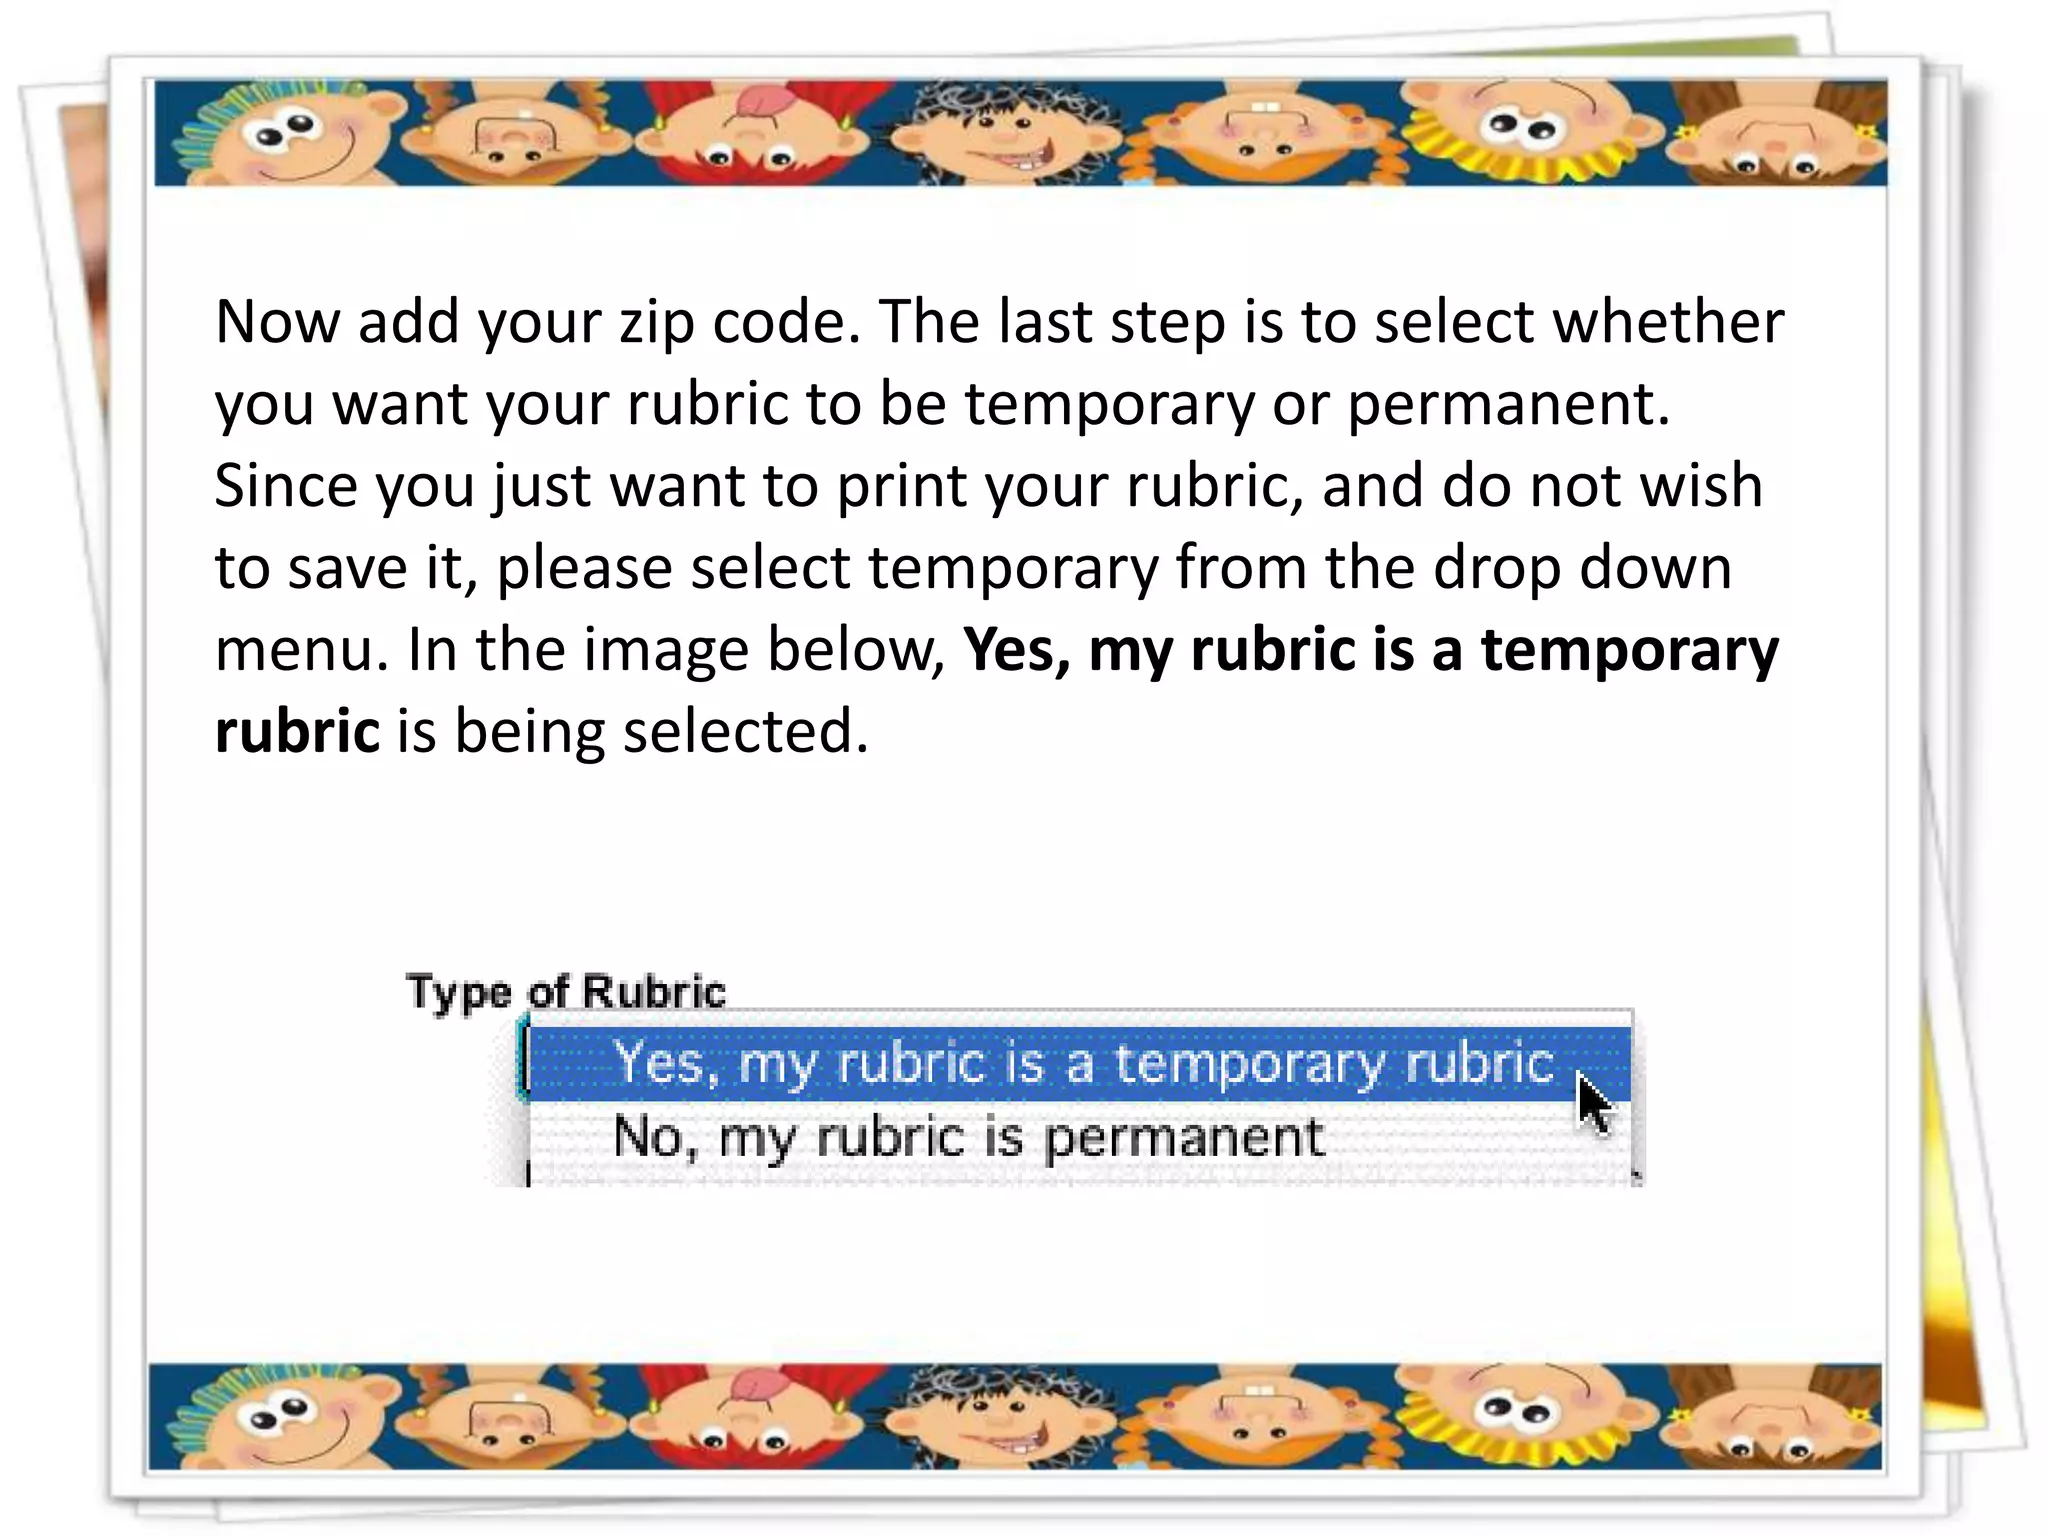
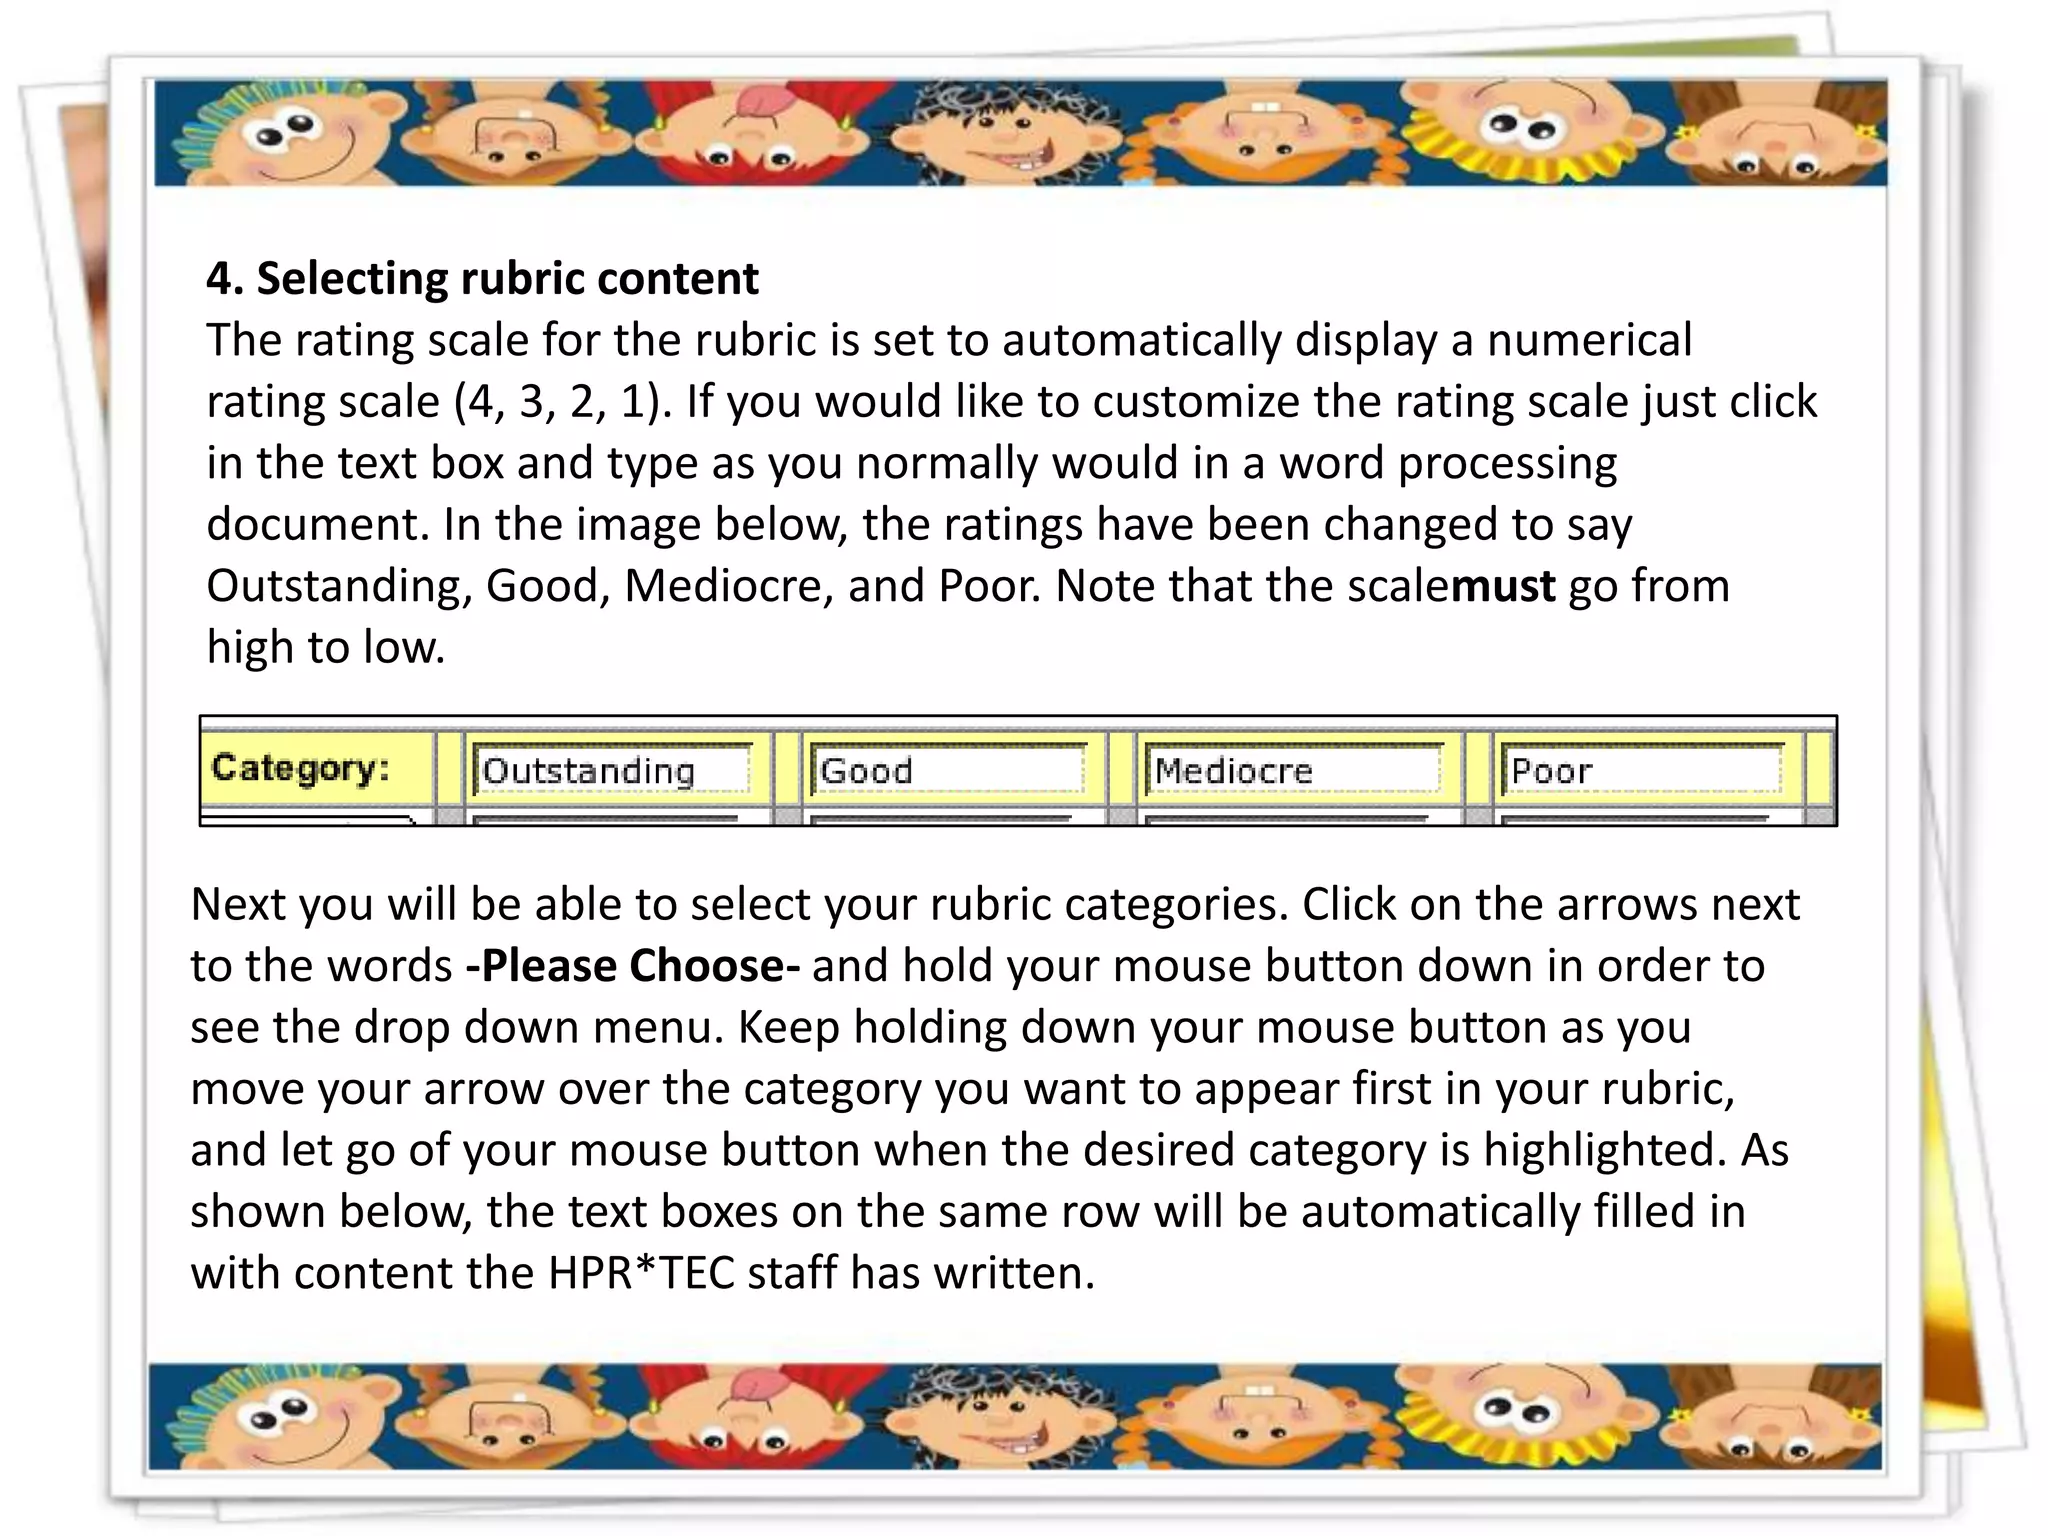
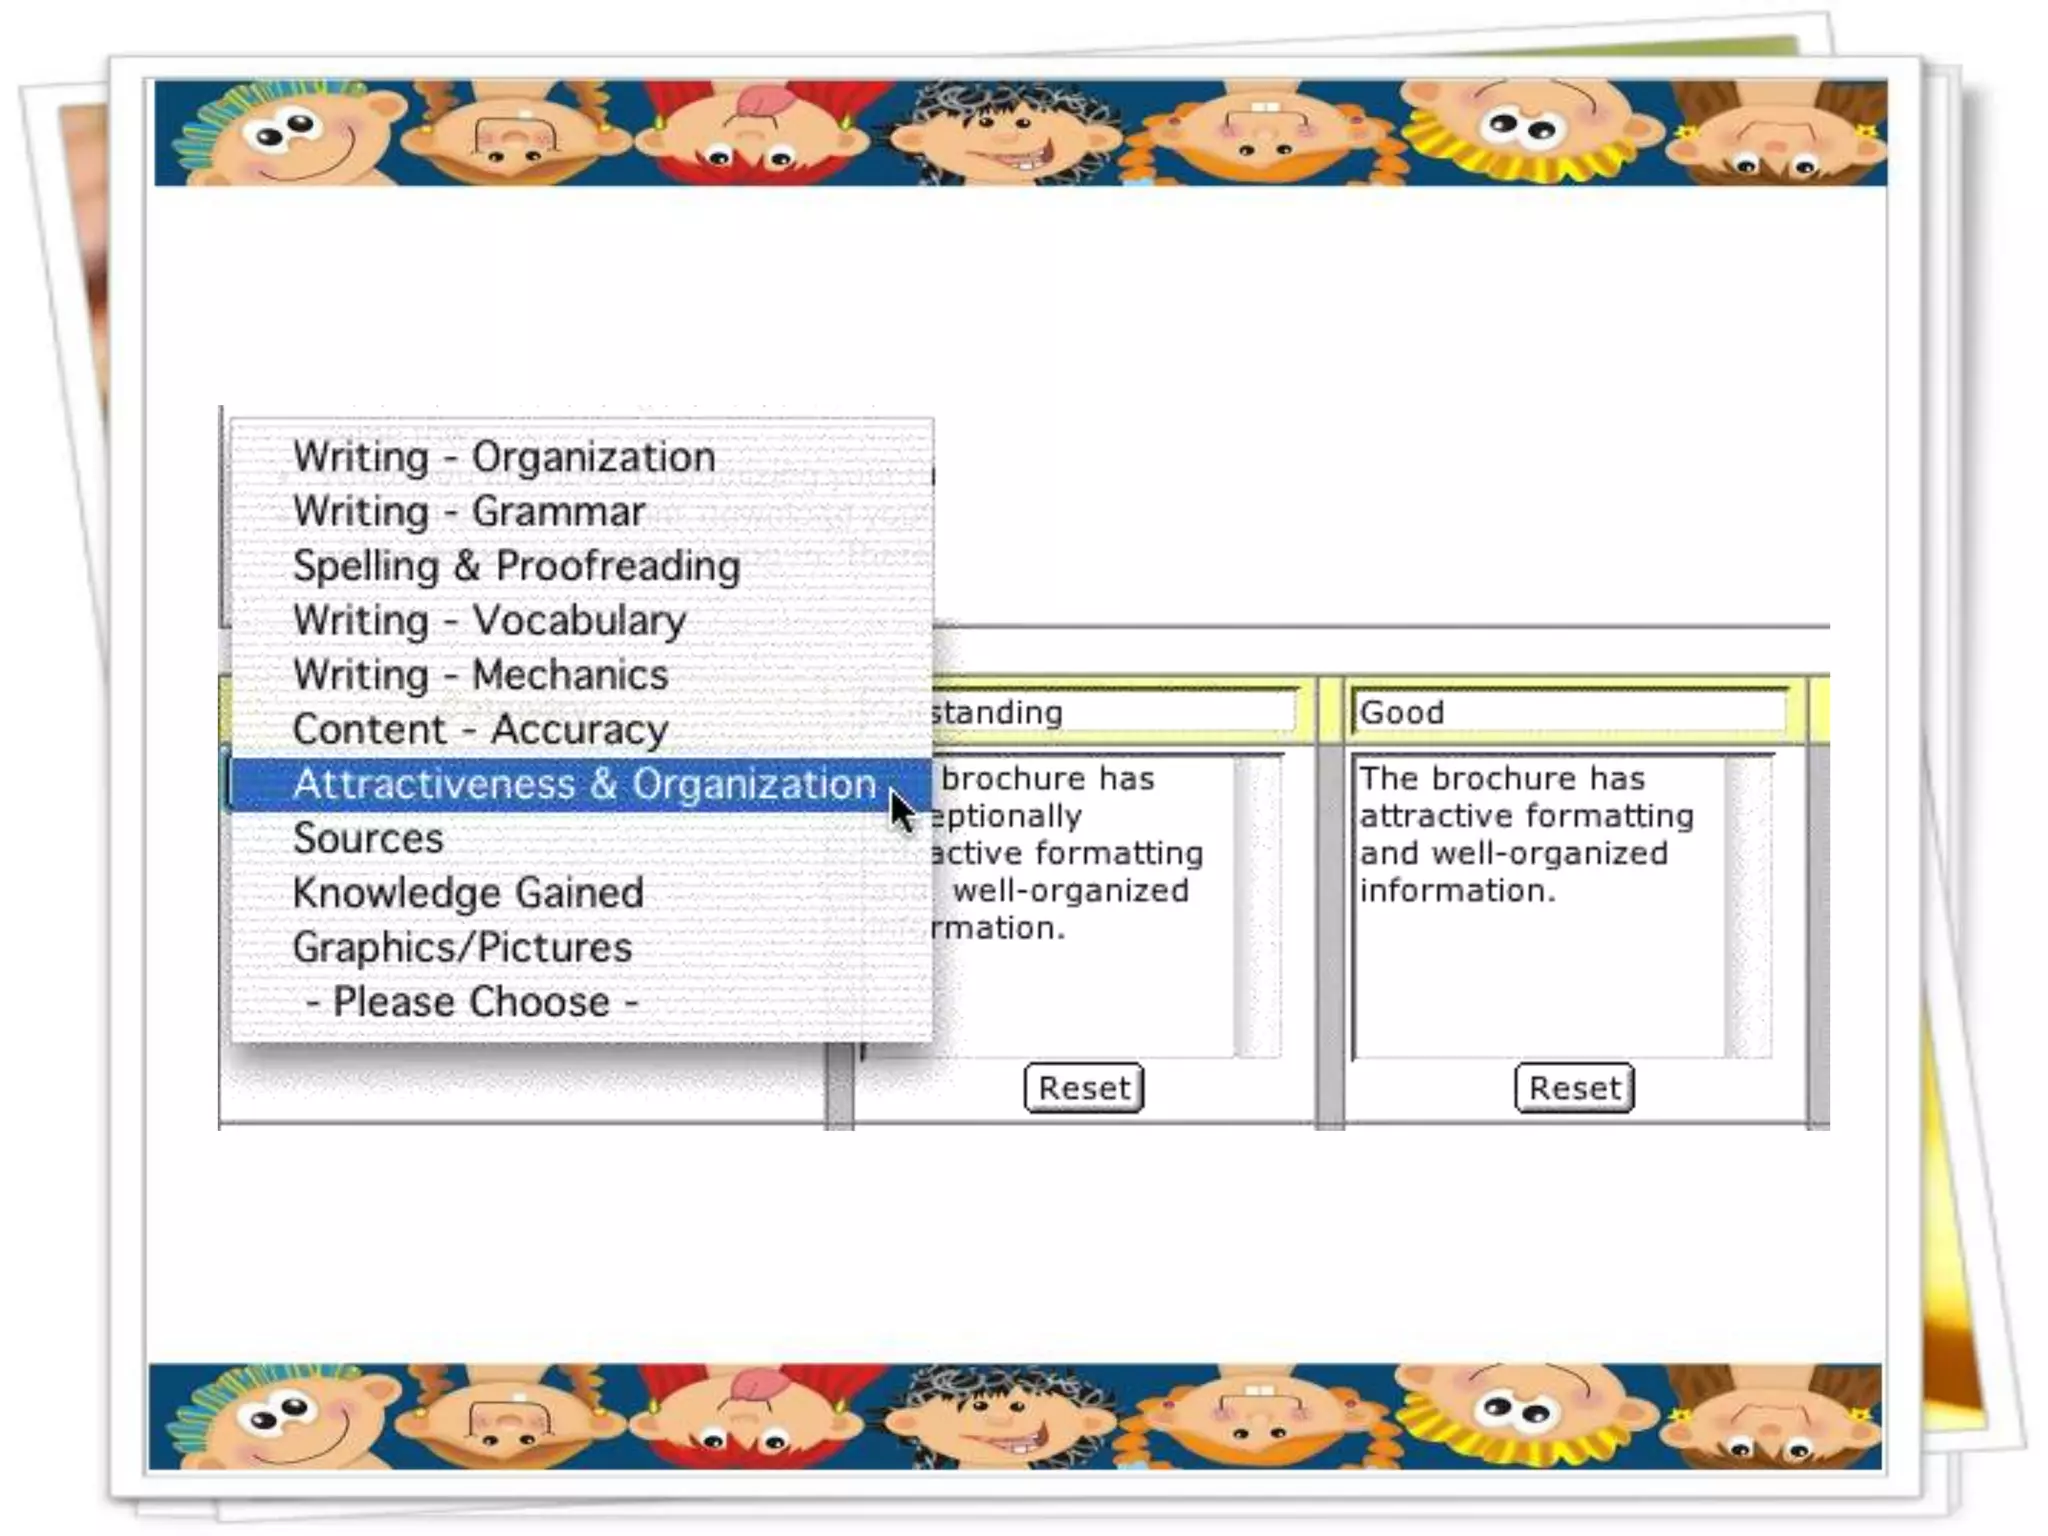
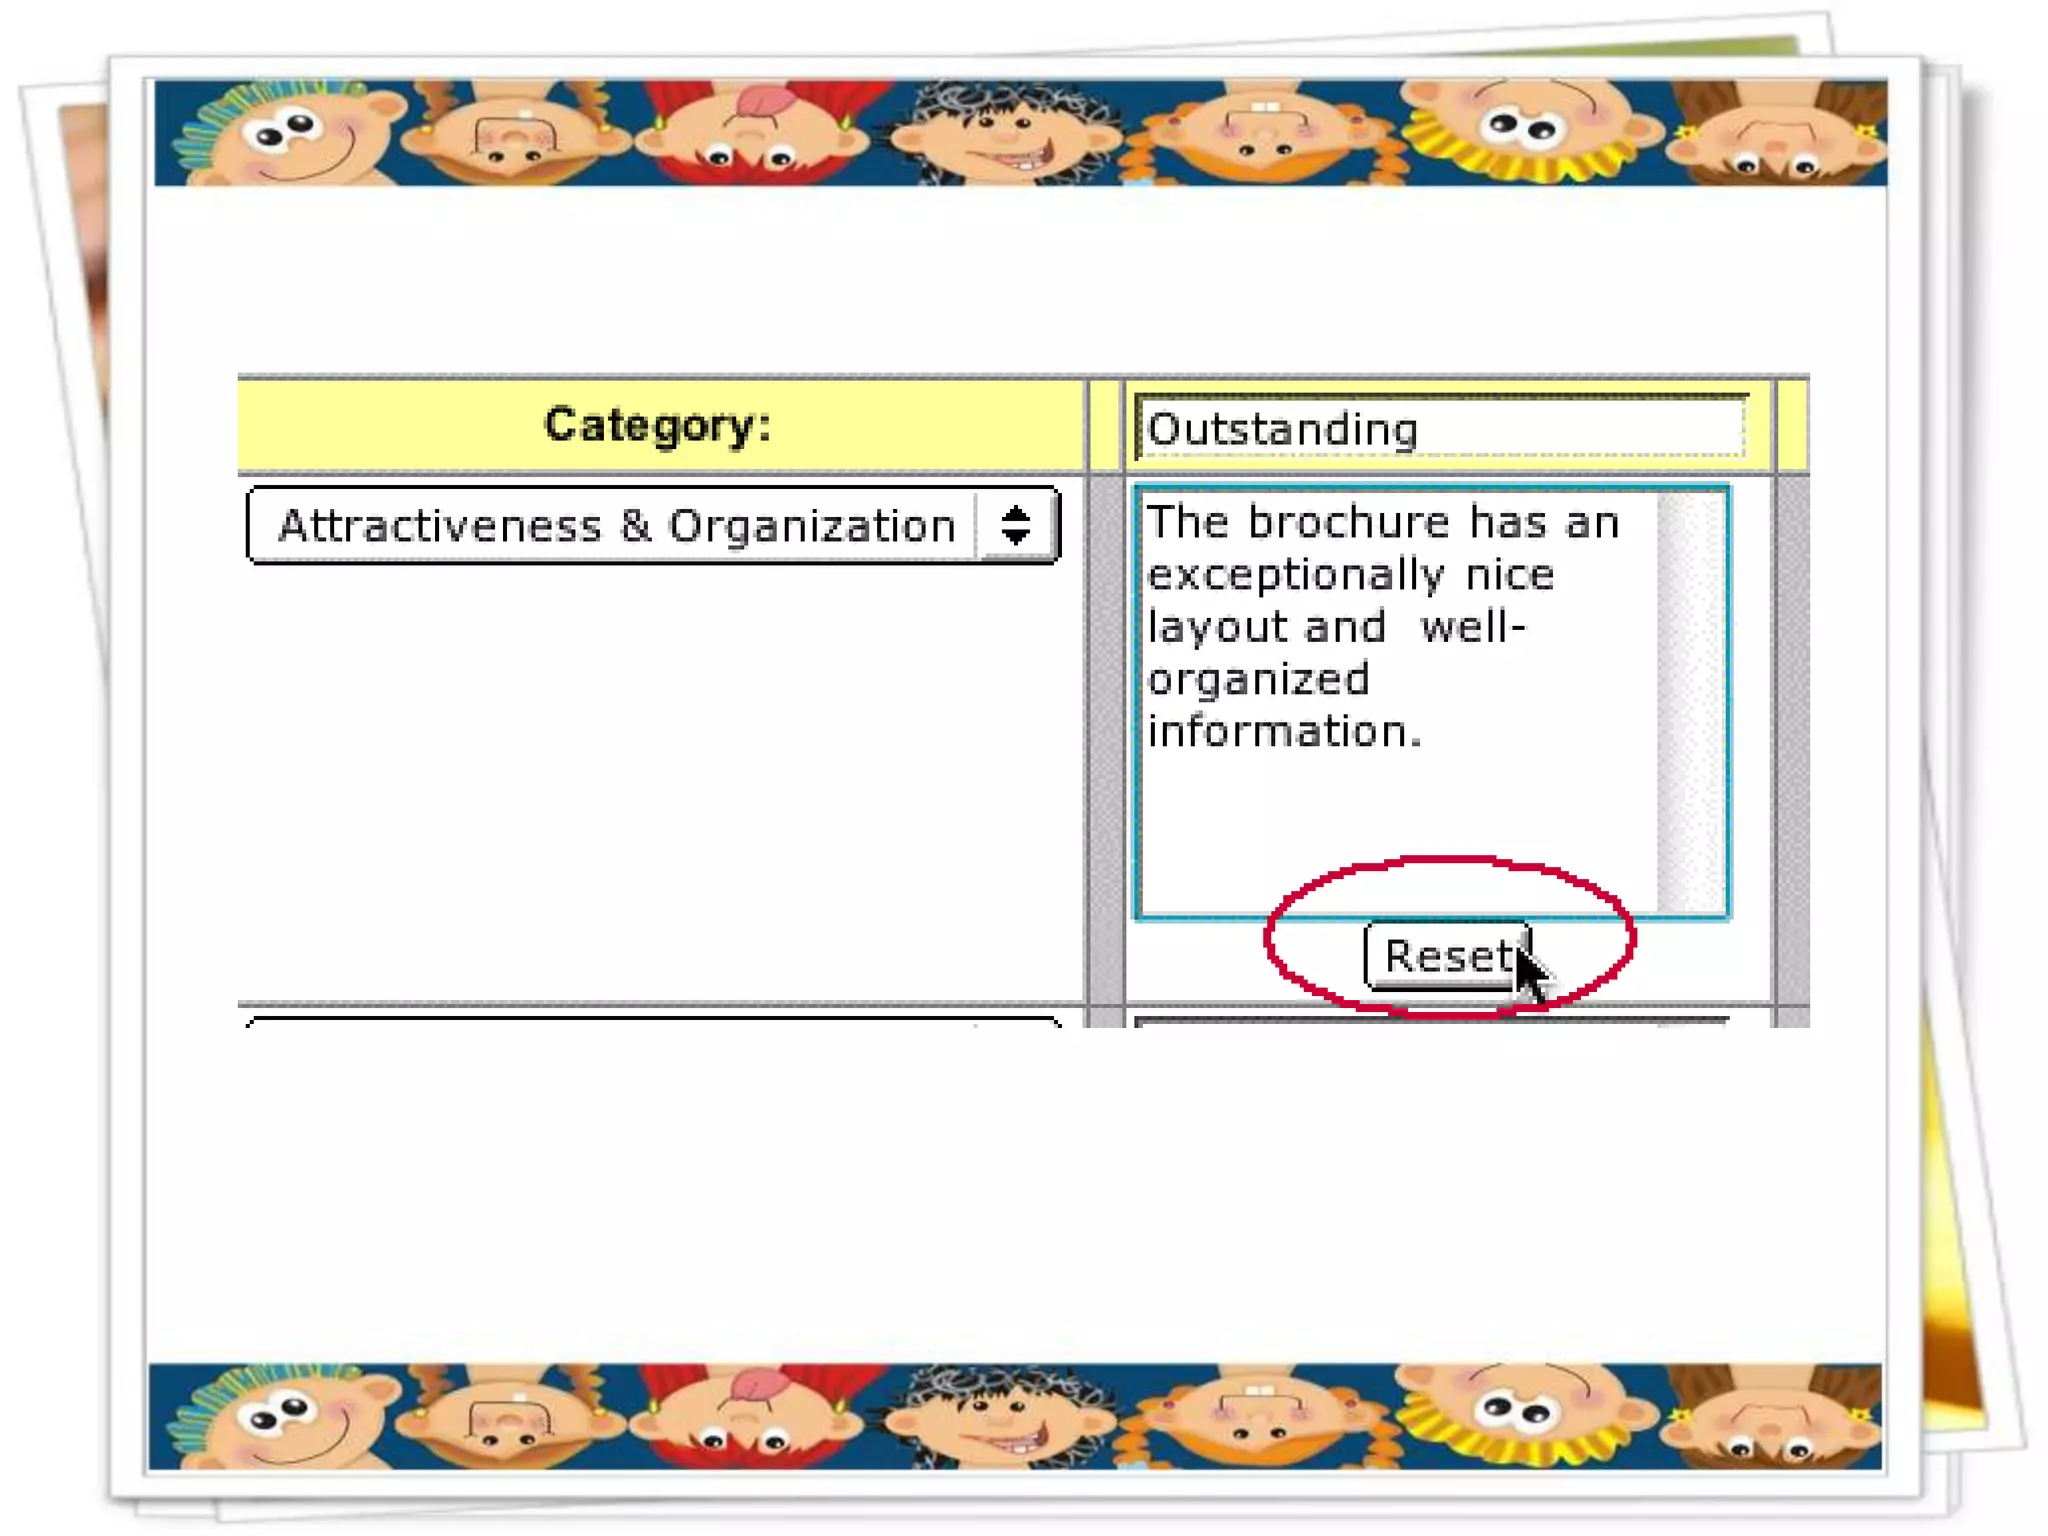
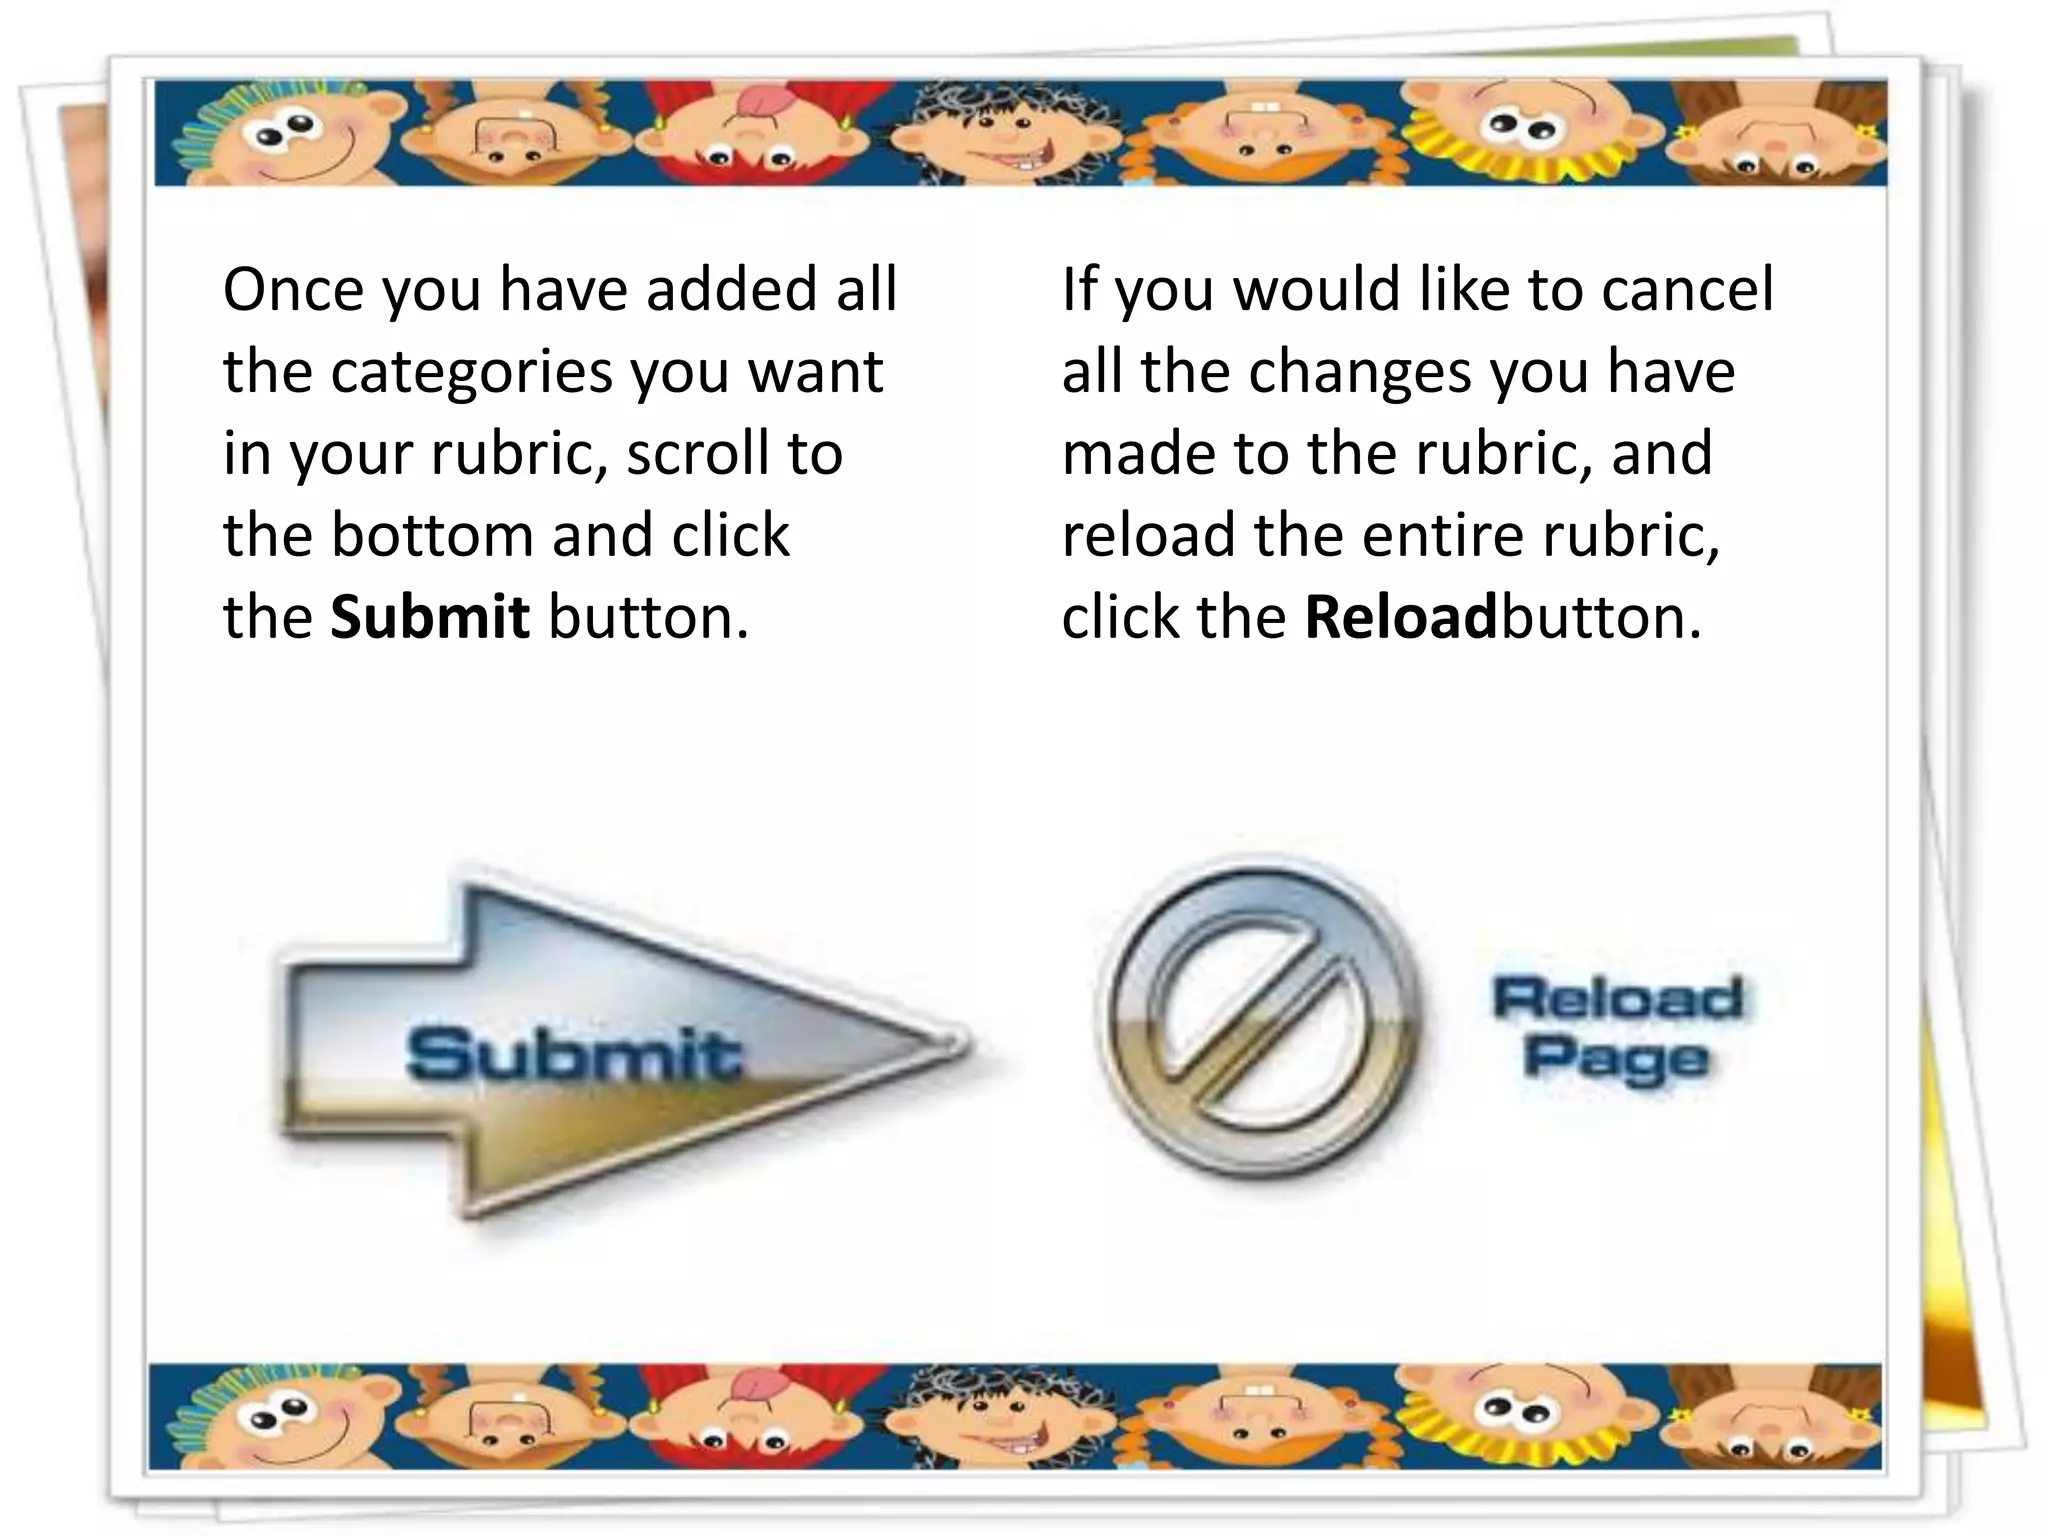
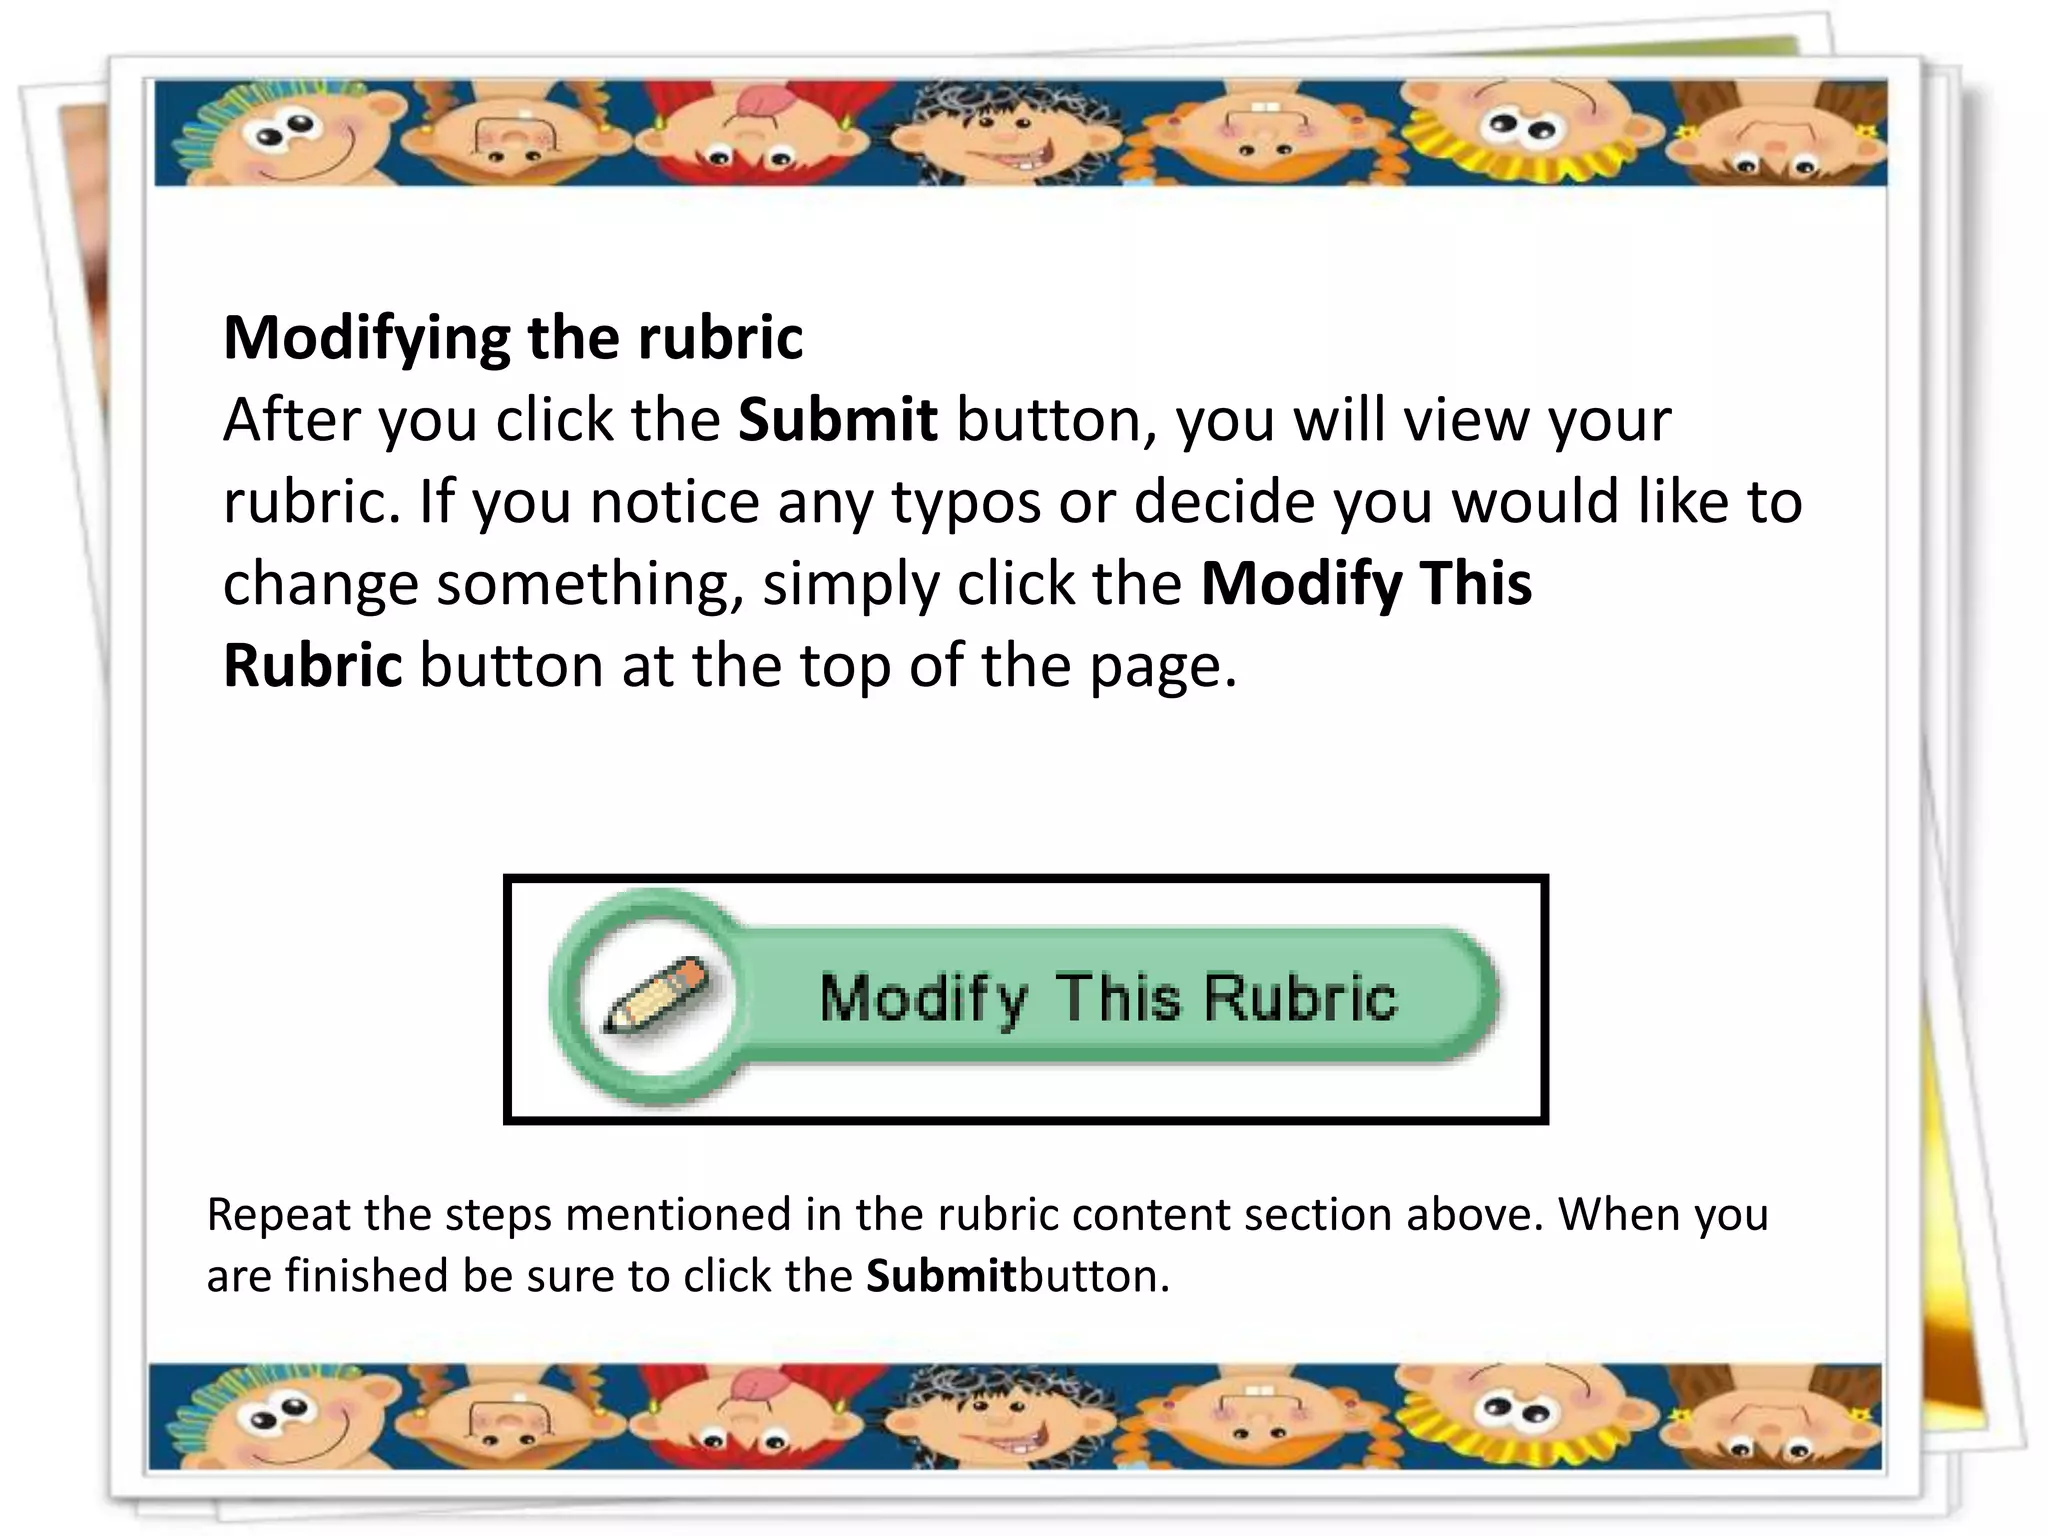
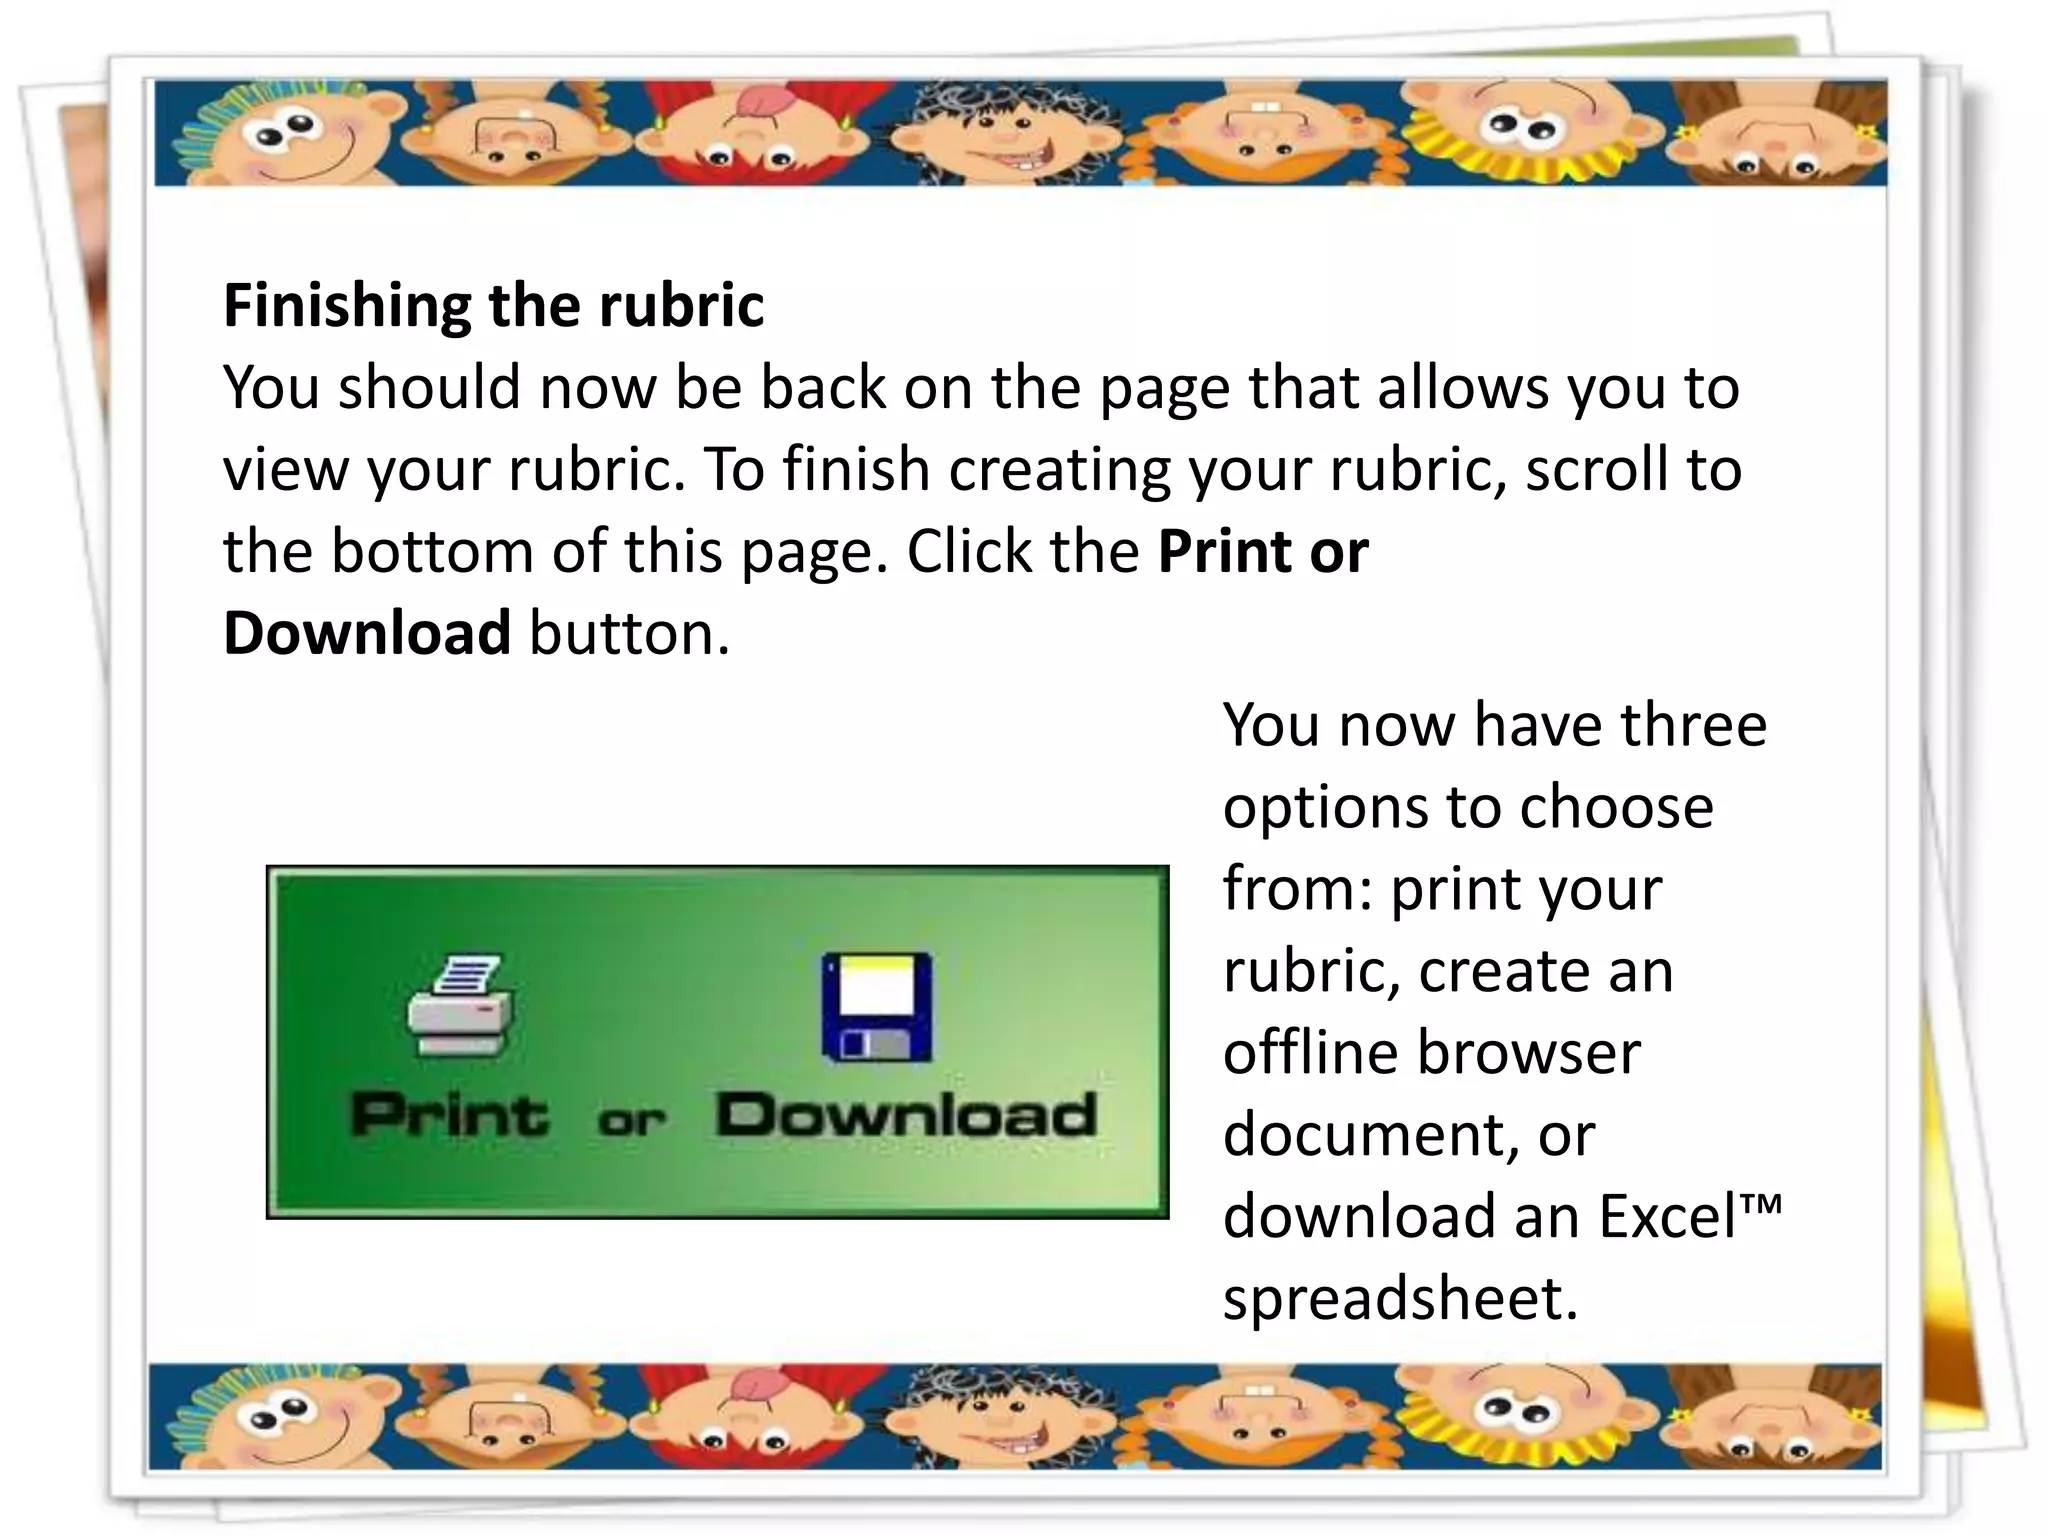
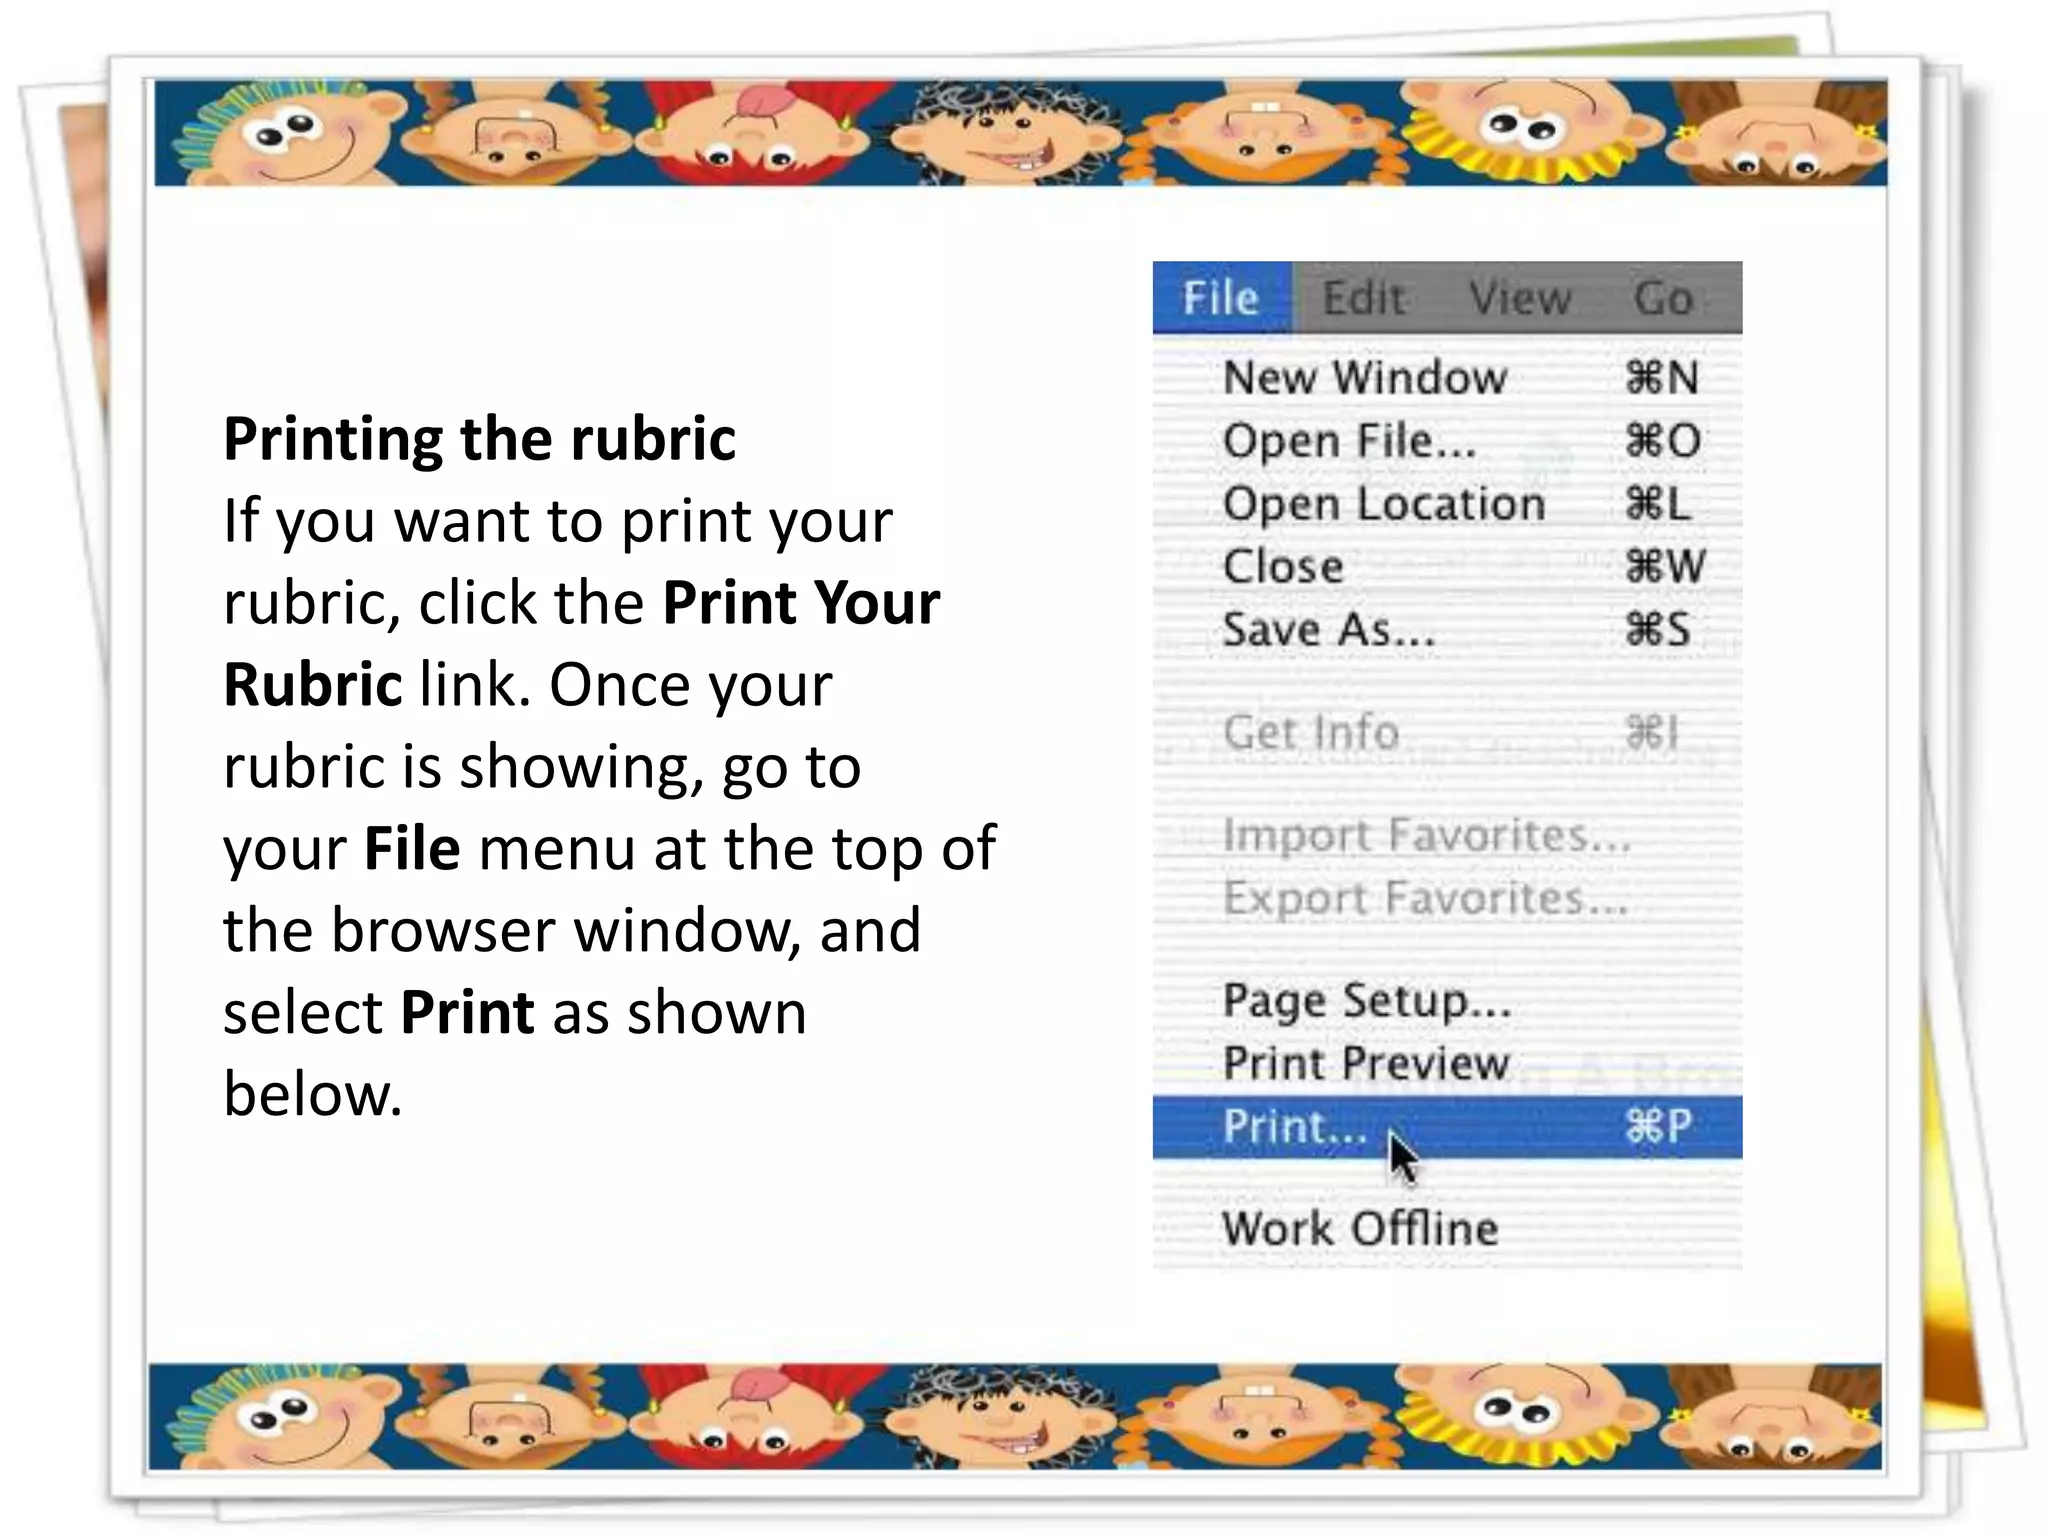
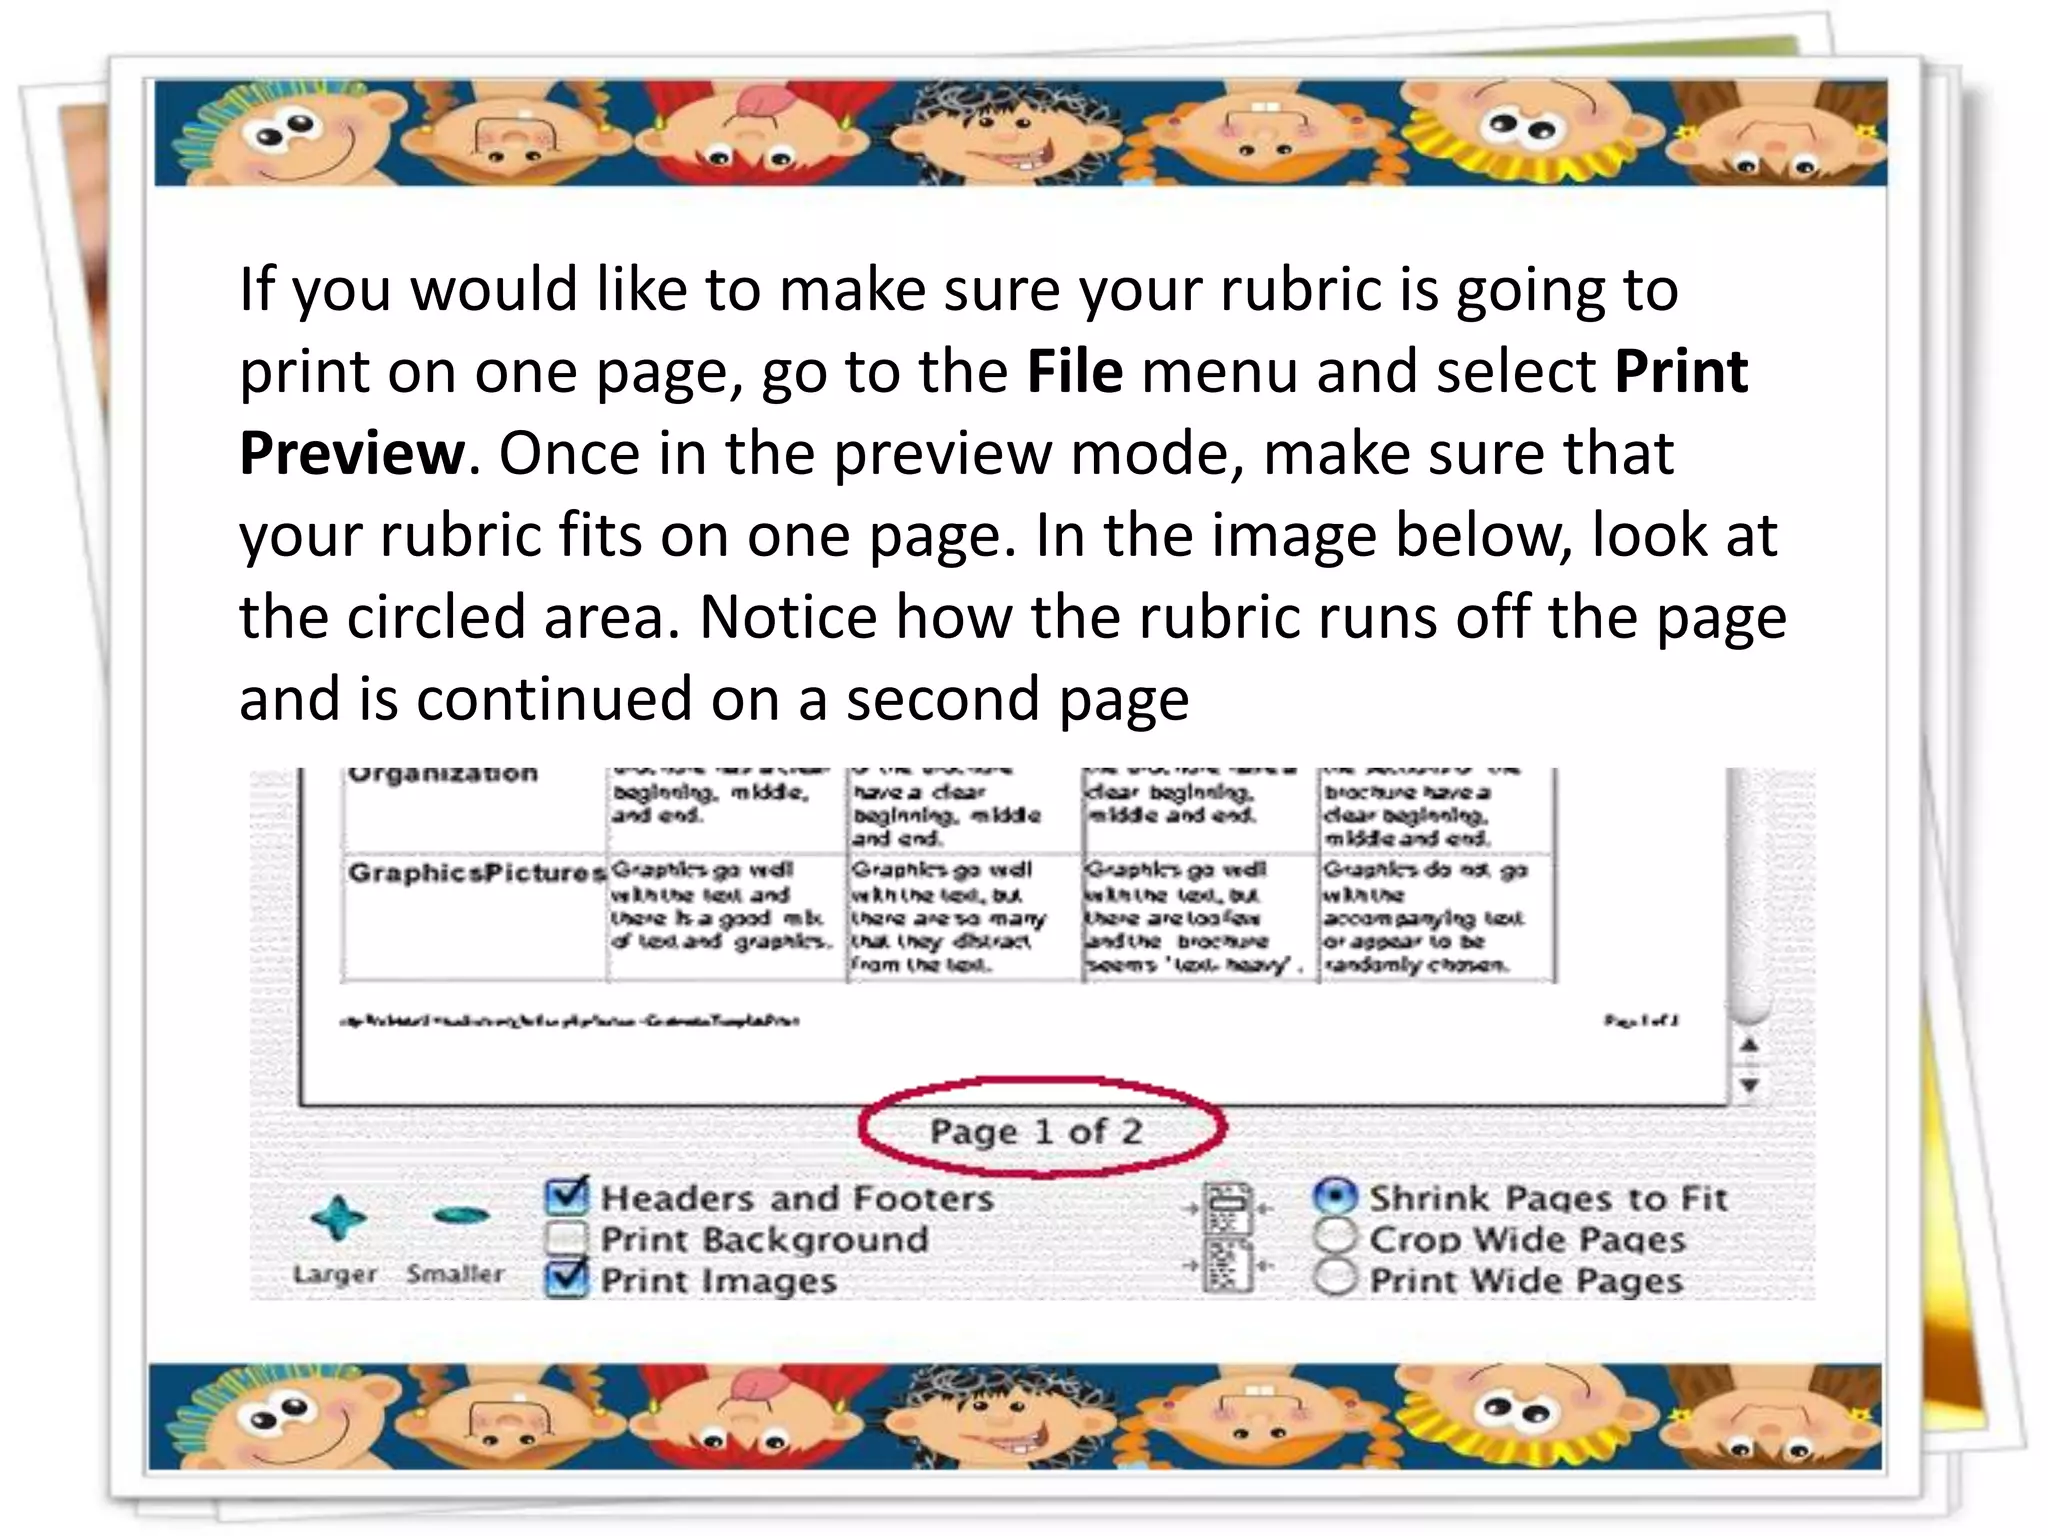
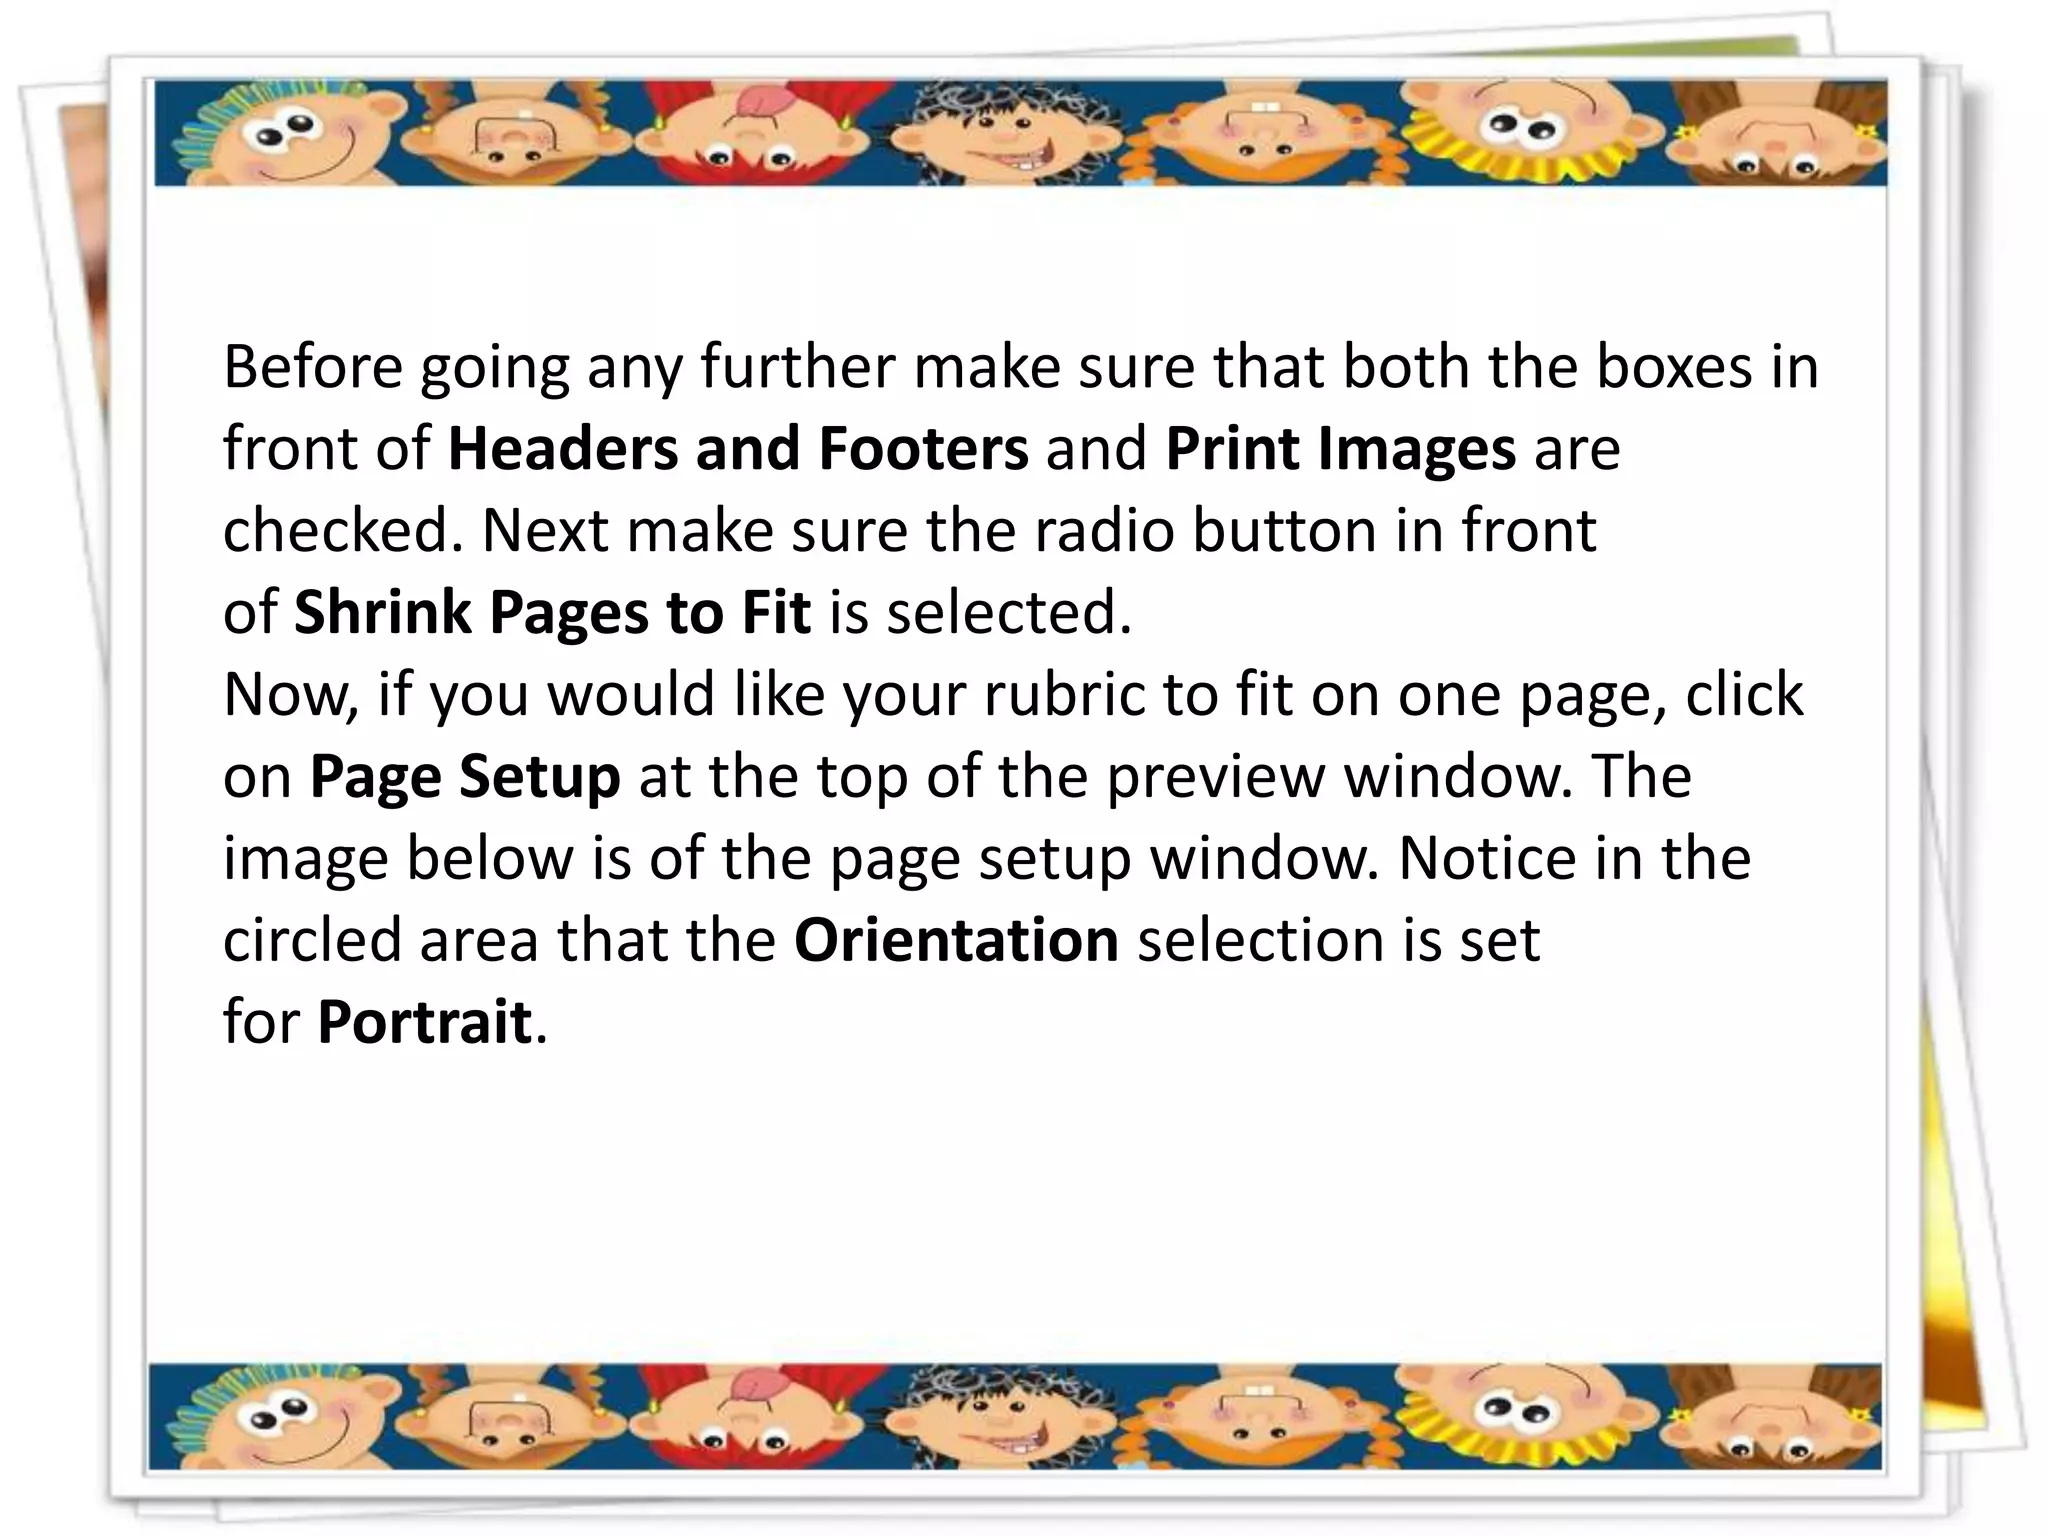
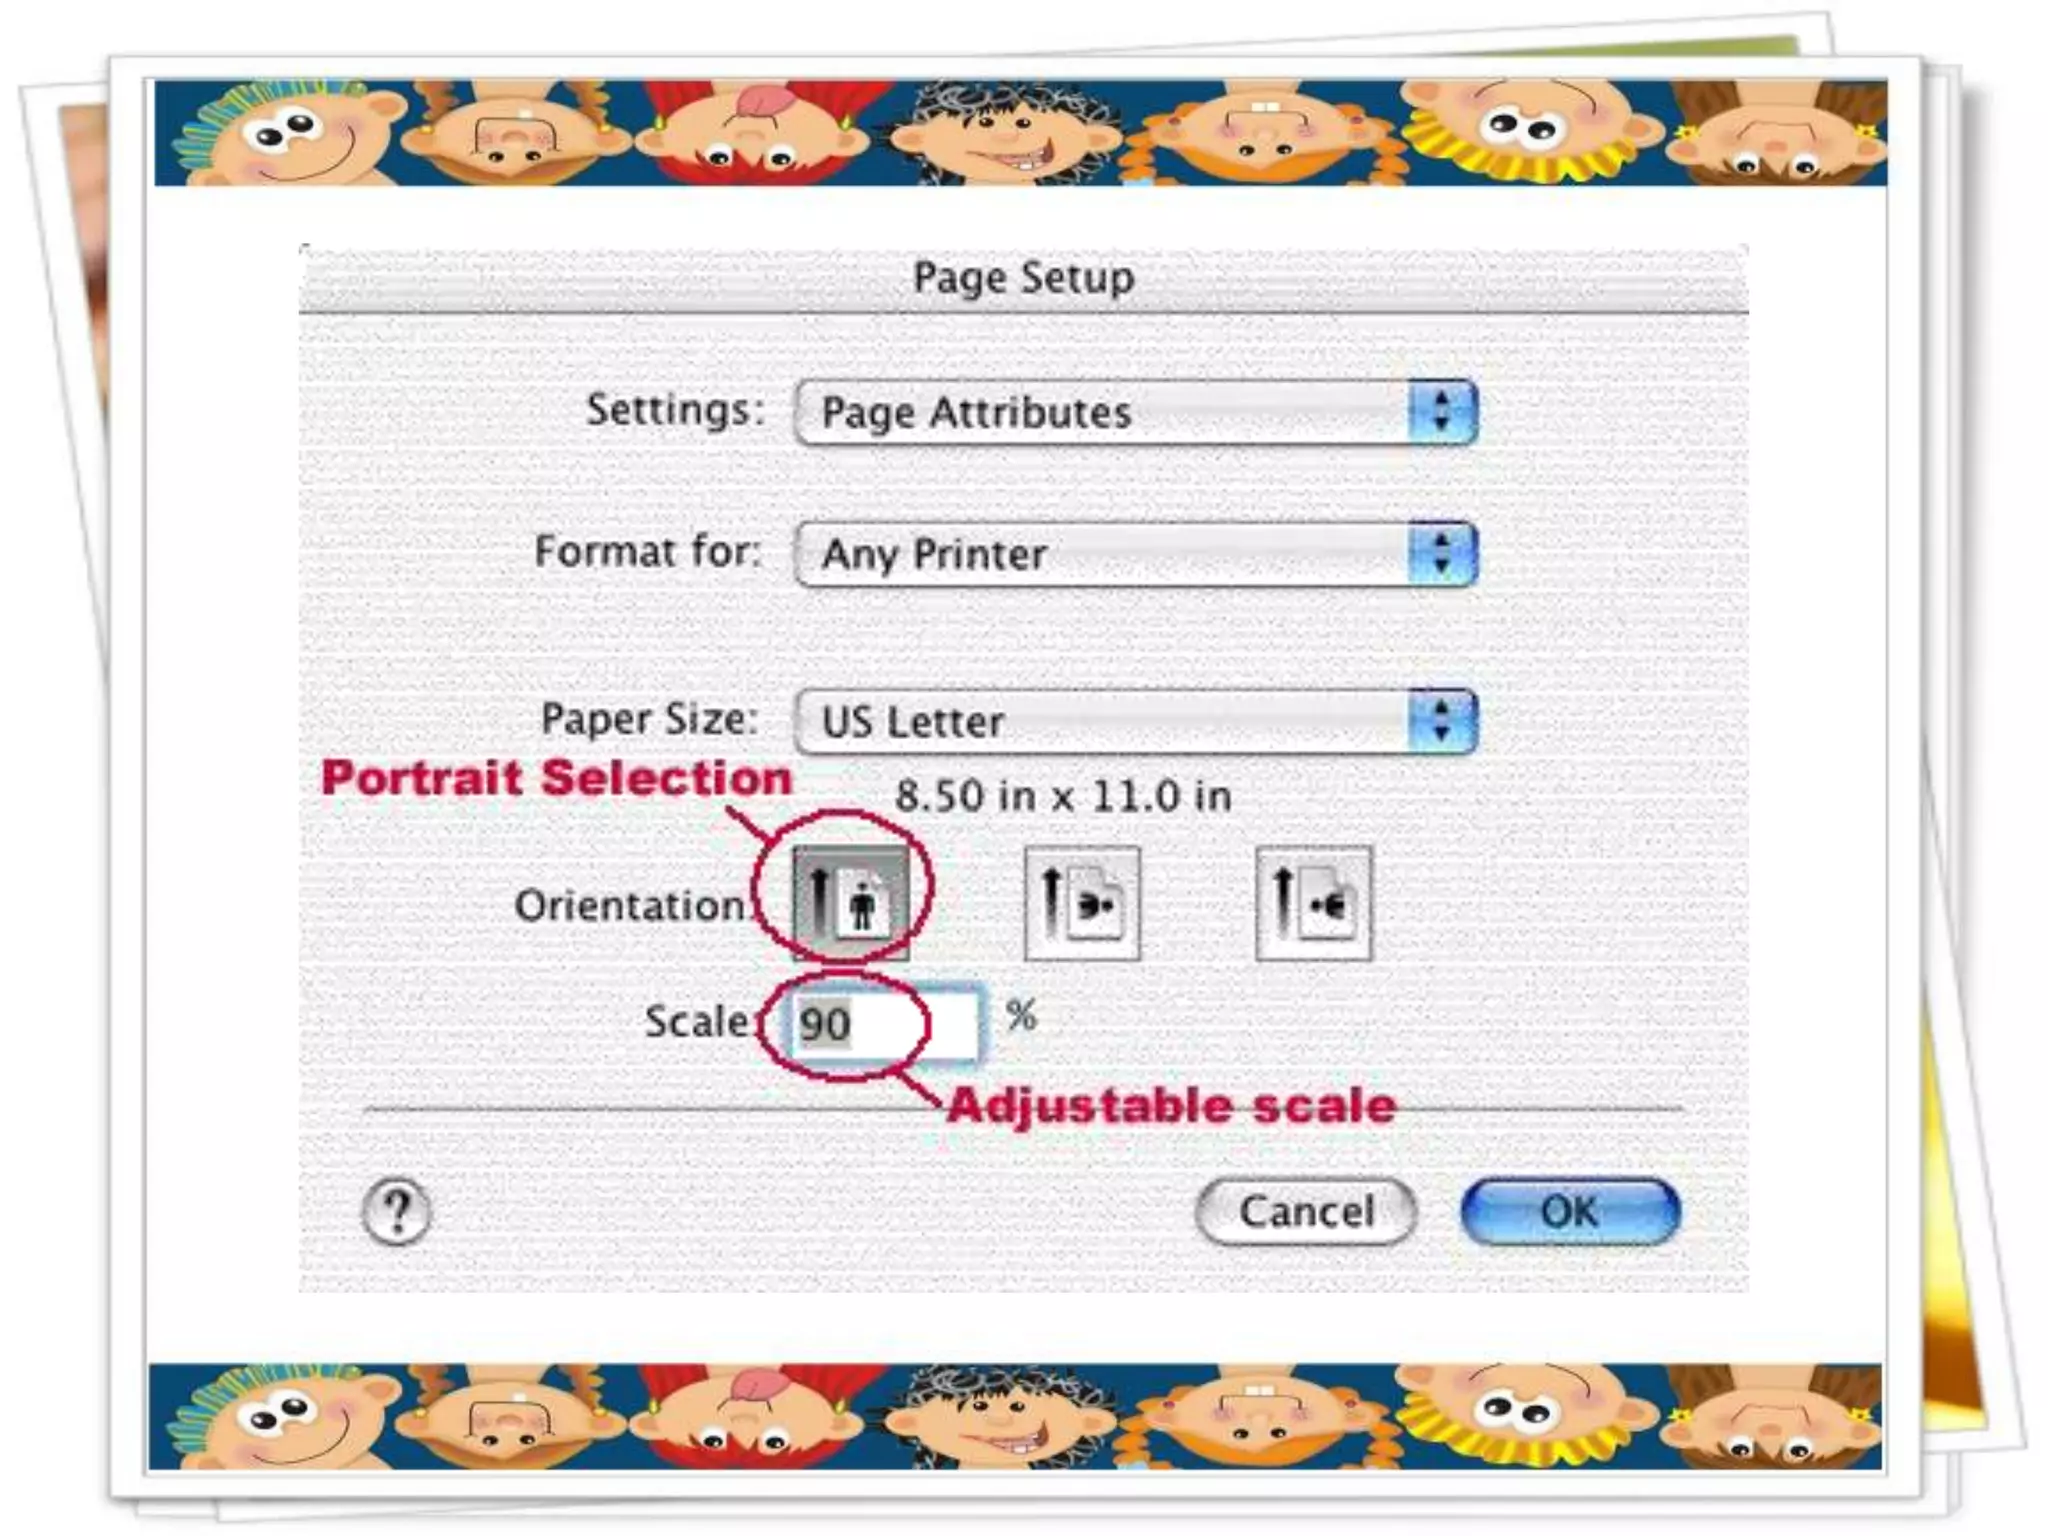
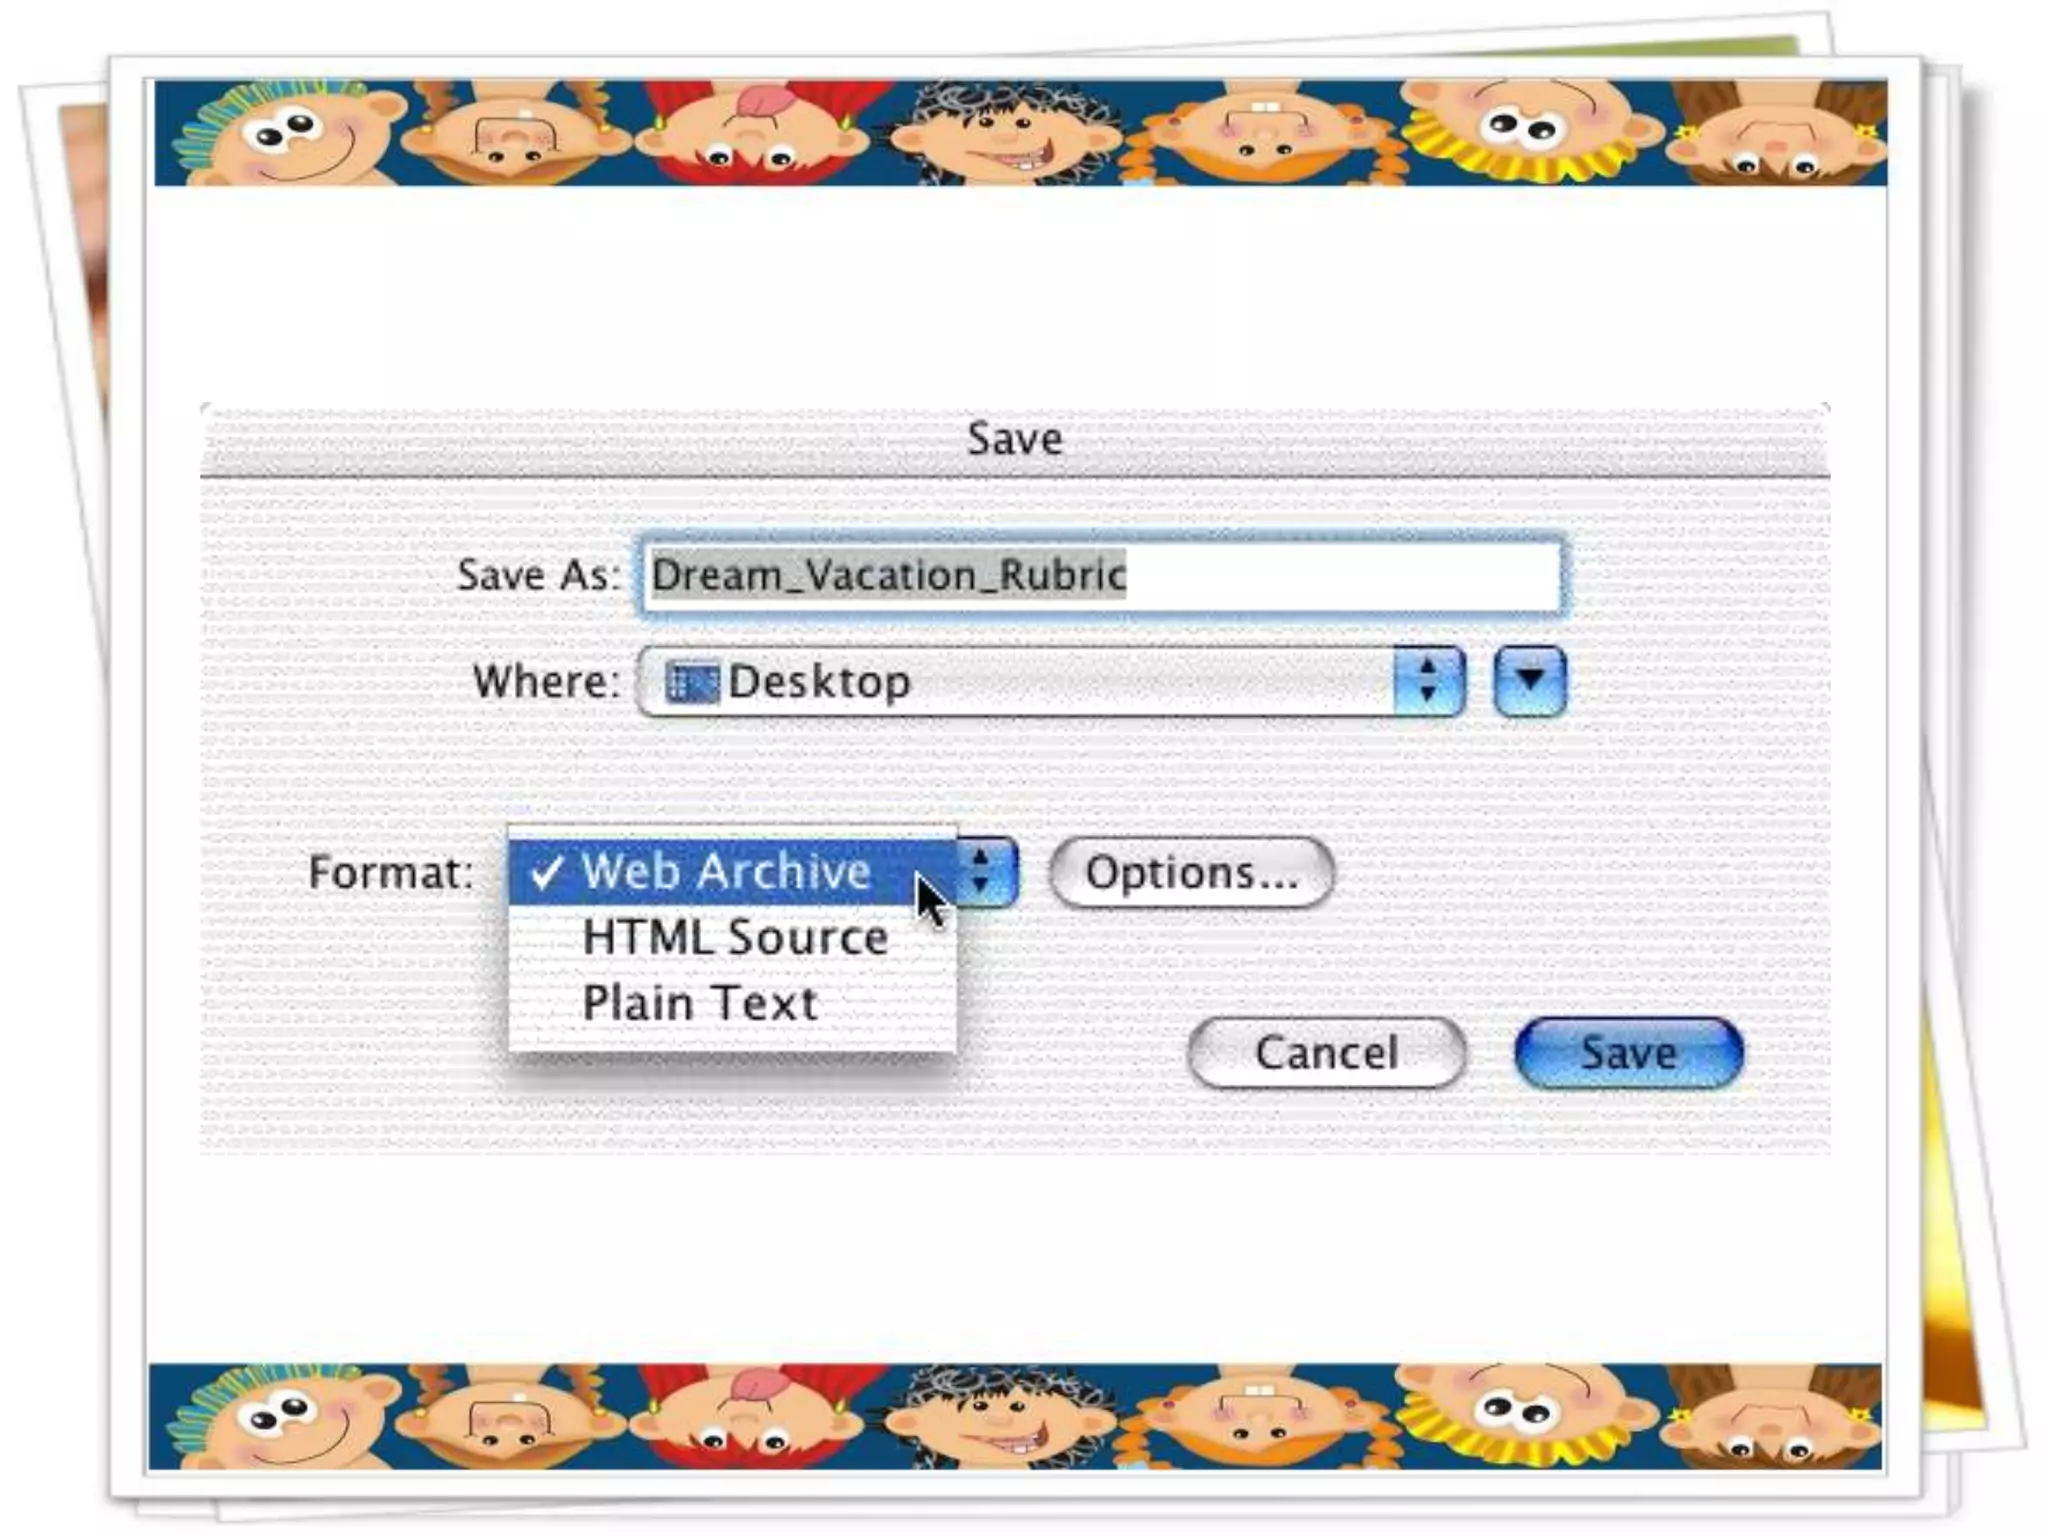
Rubistar
Creating a rubric that will not be saved

1. Getting Started
Scroll down on the homepage of RubiStar until you
see the green arrow, like the one shown below,
that says Make a New Rubric.


                                Click on the arrow or the text
                                link directly under the arrow.
2. Choosing a
customizable rubric
You will now see a list of
available rubric
templates. To start
creating your own
customized version,
please click on the
rubric template title
that best fits your
needs, as shown below.
3. Entering rubric information
Next you will begin entering your information into the
rubric. From the drop down menu, select the salutation
you would like to to use. Then enter your first and last
name as you would like it to appear on the rubric. In the
image below, you can see the author of the Making a
Brochure rubric, titled Dream Vacation, is a Ms. Jane
Smith.
Now add your zip code. The last step is to select whether
you want your rubric to be temporary or permanent.
Since you just want to print your rubric, and do not wish
to save it, please select temporary from the drop down
menu. In the image below, Yes, my rubric is a temporary
rubric is being selected.
4. Selecting rubric content
The rating scale for the rubric is set to automatically display a numerical
rating scale (4, 3, 2, 1). If you would like to customize the rating scale just click
in the text box and type as you normally would in a word processing
document. In the image below, the ratings have been changed to say
Outstanding, Good, Mediocre, and Poor. Note that the scalemust go from
high to low.


Next you will be able to select your rubric categories. Click on the arrows next
to the words -Please Choose- and hold your mouse button down in order to
see the drop down menu. Keep holding down your mouse button as you
move your arrow over the category you want to appear first in your rubric,
and let go of your mouse button when the desired category is highlighted. As
shown below, the text boxes on the same row will be automatically filled in
with content the HPR*TEC staff has written.
Repeat the previous step for all of the categories you wish to include in your
rubric. You can put the categories in any order, but don't leave blank rows
between your categories. Always start from the top. If you do not wish to use
all of the categories, that is okay. If you don't choose a category it will not
appear in the final rubric.
You can edit the text by clicking in the boxes. It is just like editing on a word
processor. Highlight the words that you want to take out, and hit delete on your
keyboard, or highlight words and type over them. Just remember that if you
change the text on the Outstanding category, you probably will need to also
change the text under Good, Mediocre, and Poor, too.
If at any time you would like to erase all the changes you made to one box, click
the Reset button as shown in the image below. This will reset all the
information to its original state when you first selected it.
Once you have added all     If you would like to cancel
the categories you want     all the changes you have
in your rubric, scroll to   made to the rubric, and
the bottom and click        reload the entire rubric,
the Submit button.          click the Reloadbutton.
Modifying the rubric
After you click the Submit button, you will view your
rubric. If you notice any typos or decide you would like to
change something, simply click the Modify This
Rubric button at the top of the page.


Repeat the steps mentioned in the rubric content section above. When you
are finished be sure to click the Submitbutton.
Finishing the rubric
You should now be back on the page that allows you to
view your rubric. To finish creating your rubric, scroll to
the bottom of this page. Click the Print or
Download button.
                                      You now have three
                                      options to choose
                                      from: print your
                                      rubric, create an
                                      offline browser
                                      document, or
                                      download an Excel™
                                      spreadsheet.
Printing the rubric
If you want to print your
rubric, click the Print Your
Rubric link. Once your
rubric is showing, go to
your File menu at the top of
the browser window, and
select Print as shown
below.
If you would like to make sure your rubric is going to
print on one page, go to the File menu and select Print
Preview. Once in the preview mode, make sure that
your rubric fits on one page. In the image below, look at
the circled area. Notice how the rubric runs off the page
and is continued on a second page
Before going any further make sure that both the boxes in
front of Headers and Footers and Print Images are
checked. Next make sure the radio button in front
of Shrink Pages to Fit is selected.
Now, if you would like your rubric to fit on one page, click
on Page Setup at the top of the preview window. The
image below is of the page setup window. Notice in the
circled area that the Orientation selection is set
for Portrait.
Directly under the Orientation selection is a text box
marked Scale. By default the Scale will be set at
100%.To make your rubric fit on one page lower this
percentage. Start with a decrease to 90%. Click OK, and
look at the preview window to see if your rubric now
fits. If it still doesn't, use the trial and error method of
decreasing the percentage and viewing the results until
you reach your goal. Once you have found the correct
scale percentage, press the Printbutton located at the
top of the preview window.
Creating an offline browser document
If you want to create a document, click on the Create an Offline
Browser Document link. When you click on this link, your rubric will
be displayed in your Web browser. You may choose to save the page
to your computer so that you may view the file later. Please keep in
mind that this is not the same as creating a bookmark to an online
document. You are actually saving your rubric onto your computer,
and the rubric may be viewed without having your computer online.
To save the document, go to your File menu located at the top of
your browser window and choose Save As. In the dialogue box
rename your rubric and select the location in which you want to
save your rubric. Make sure you remember where you save your
document. You also need to make sure that the format you are
saving the rubric in isWeb Page Complete or Web Archive, as shown
in the image below.
Downloading an Excel™ spreadsheet
This option is available for only certain versions of
browsers and Excel™. Please check the specifications
listed directly under this option in RubiStar. If you
have the right versions, then go ahead and click
the Download Excel™ Spreadsheet link. Your Web
browser will prompt you that you are about to
download a file. Make sure that you choose
to Save it, and be sure to save it in a location you will
remember.

Rubistar tutorial

  • 1.
  • 3.
    Creating a rubricthat will not be saved 1. Getting Started Scroll down on the homepage of RubiStar until you see the green arrow, like the one shown below, that says Make a New Rubric. Click on the arrow or the text link directly under the arrow.
  • 4.
    2. Choosing a customizablerubric You will now see a list of available rubric templates. To start creating your own customized version, please click on the rubric template title that best fits your needs, as shown below.
  • 5.
    3. Entering rubricinformation Next you will begin entering your information into the rubric. From the drop down menu, select the salutation you would like to to use. Then enter your first and last name as you would like it to appear on the rubric. In the image below, you can see the author of the Making a Brochure rubric, titled Dream Vacation, is a Ms. Jane Smith.
  • 6.
    Now add yourzip code. The last step is to select whether you want your rubric to be temporary or permanent. Since you just want to print your rubric, and do not wish to save it, please select temporary from the drop down menu. In the image below, Yes, my rubric is a temporary rubric is being selected.
  • 7.
    4. Selecting rubriccontent The rating scale for the rubric is set to automatically display a numerical rating scale (4, 3, 2, 1). If you would like to customize the rating scale just click in the text box and type as you normally would in a word processing document. In the image below, the ratings have been changed to say Outstanding, Good, Mediocre, and Poor. Note that the scalemust go from high to low. Next you will be able to select your rubric categories. Click on the arrows next to the words -Please Choose- and hold your mouse button down in order to see the drop down menu. Keep holding down your mouse button as you move your arrow over the category you want to appear first in your rubric, and let go of your mouse button when the desired category is highlighted. As shown below, the text boxes on the same row will be automatically filled in with content the HPR*TEC staff has written.
  • 9.
    Repeat the previousstep for all of the categories you wish to include in your rubric. You can put the categories in any order, but don't leave blank rows between your categories. Always start from the top. If you do not wish to use all of the categories, that is okay. If you don't choose a category it will not appear in the final rubric. You can edit the text by clicking in the boxes. It is just like editing on a word processor. Highlight the words that you want to take out, and hit delete on your keyboard, or highlight words and type over them. Just remember that if you change the text on the Outstanding category, you probably will need to also change the text under Good, Mediocre, and Poor, too. If at any time you would like to erase all the changes you made to one box, click the Reset button as shown in the image below. This will reset all the information to its original state when you first selected it.
  • 11.
    Once you haveadded all If you would like to cancel the categories you want all the changes you have in your rubric, scroll to made to the rubric, and the bottom and click reload the entire rubric, the Submit button. click the Reloadbutton.
  • 12.
    Modifying the rubric Afteryou click the Submit button, you will view your rubric. If you notice any typos or decide you would like to change something, simply click the Modify This Rubric button at the top of the page. Repeat the steps mentioned in the rubric content section above. When you are finished be sure to click the Submitbutton.
  • 13.
    Finishing the rubric Youshould now be back on the page that allows you to view your rubric. To finish creating your rubric, scroll to the bottom of this page. Click the Print or Download button. You now have three options to choose from: print your rubric, create an offline browser document, or download an Excel™ spreadsheet.
  • 14.
    Printing the rubric Ifyou want to print your rubric, click the Print Your Rubric link. Once your rubric is showing, go to your File menu at the top of the browser window, and select Print as shown below.
  • 15.
    If you wouldlike to make sure your rubric is going to print on one page, go to the File menu and select Print Preview. Once in the preview mode, make sure that your rubric fits on one page. In the image below, look at the circled area. Notice how the rubric runs off the page and is continued on a second page
  • 16.
    Before going anyfurther make sure that both the boxes in front of Headers and Footers and Print Images are checked. Next make sure the radio button in front of Shrink Pages to Fit is selected. Now, if you would like your rubric to fit on one page, click on Page Setup at the top of the preview window. The image below is of the page setup window. Notice in the circled area that the Orientation selection is set for Portrait.
  • 18.
    Directly under theOrientation selection is a text box marked Scale. By default the Scale will be set at 100%.To make your rubric fit on one page lower this percentage. Start with a decrease to 90%. Click OK, and look at the preview window to see if your rubric now fits. If it still doesn't, use the trial and error method of decreasing the percentage and viewing the results until you reach your goal. Once you have found the correct scale percentage, press the Printbutton located at the top of the preview window.
  • 19.
    Creating an offlinebrowser document If you want to create a document, click on the Create an Offline Browser Document link. When you click on this link, your rubric will be displayed in your Web browser. You may choose to save the page to your computer so that you may view the file later. Please keep in mind that this is not the same as creating a bookmark to an online document. You are actually saving your rubric onto your computer, and the rubric may be viewed without having your computer online. To save the document, go to your File menu located at the top of your browser window and choose Save As. In the dialogue box rename your rubric and select the location in which you want to save your rubric. Make sure you remember where you save your document. You also need to make sure that the format you are saving the rubric in isWeb Page Complete or Web Archive, as shown in the image below.
  • 21.
    Downloading an Excel™spreadsheet This option is available for only certain versions of browsers and Excel™. Please check the specifications listed directly under this option in RubiStar. If you have the right versions, then go ahead and click the Download Excel™ Spreadsheet link. Your Web browser will prompt you that you are about to download a file. Make sure that you choose to Save it, and be sure to save it in a location you will remember.