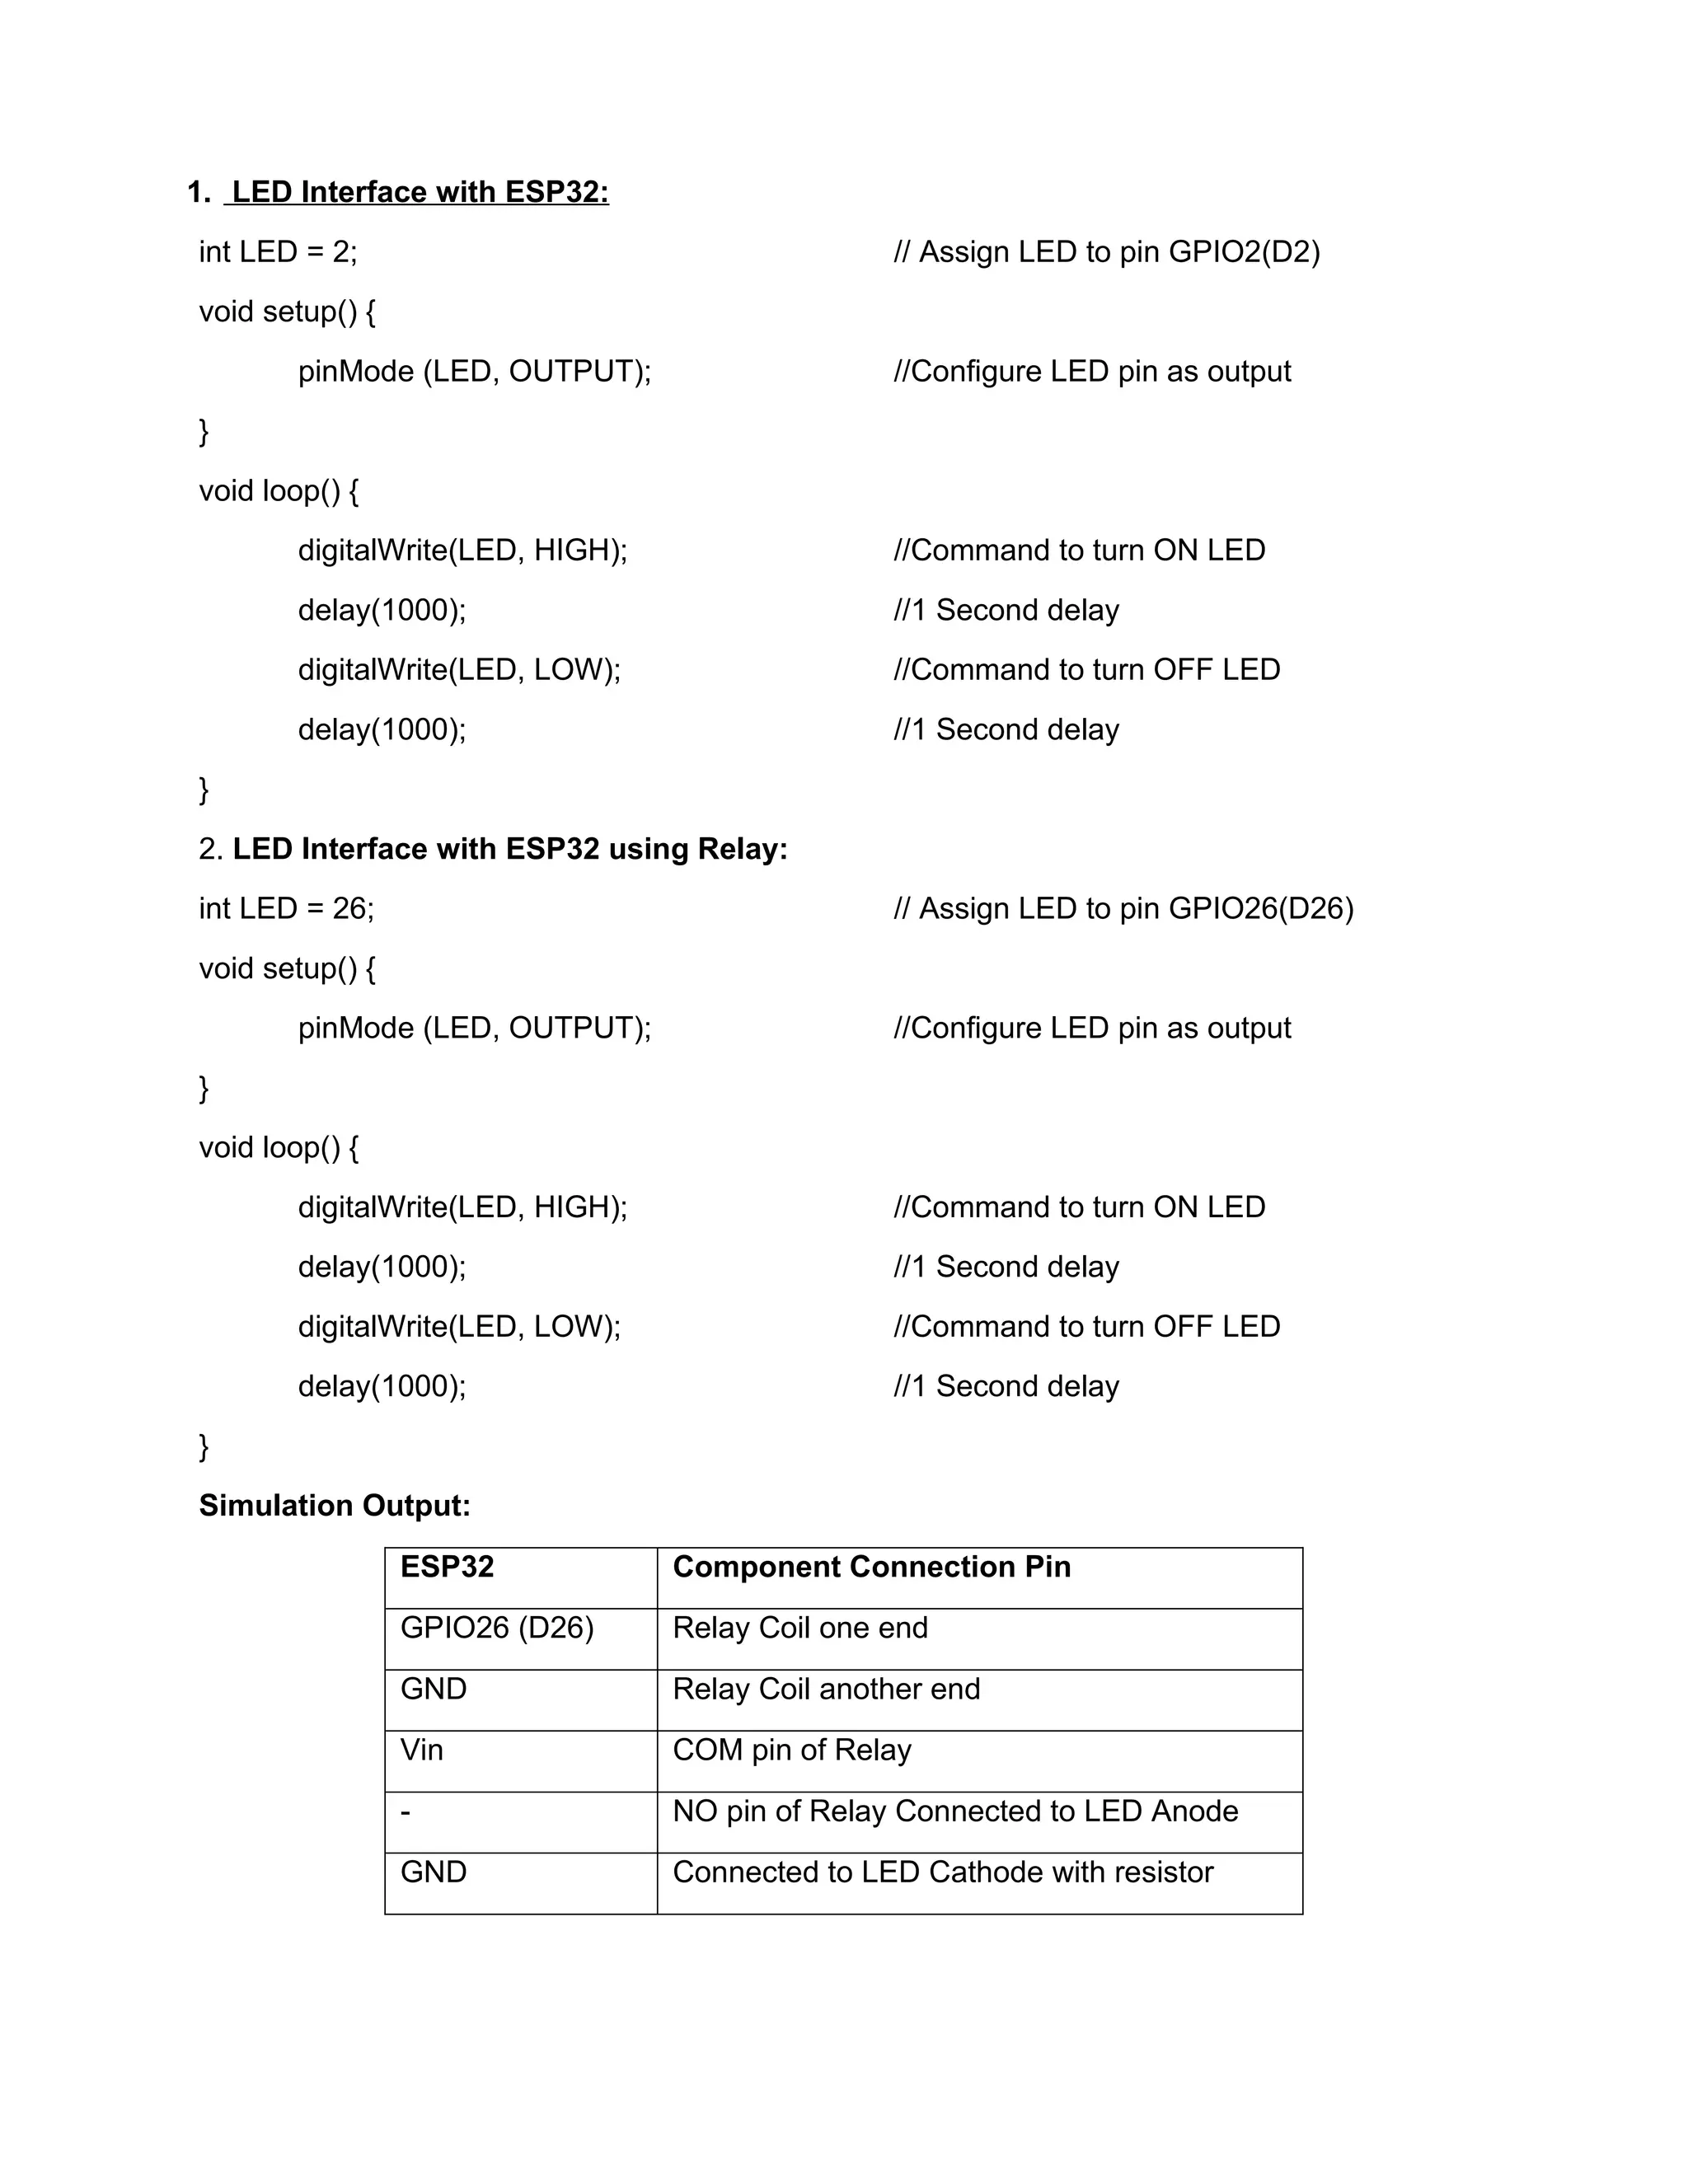
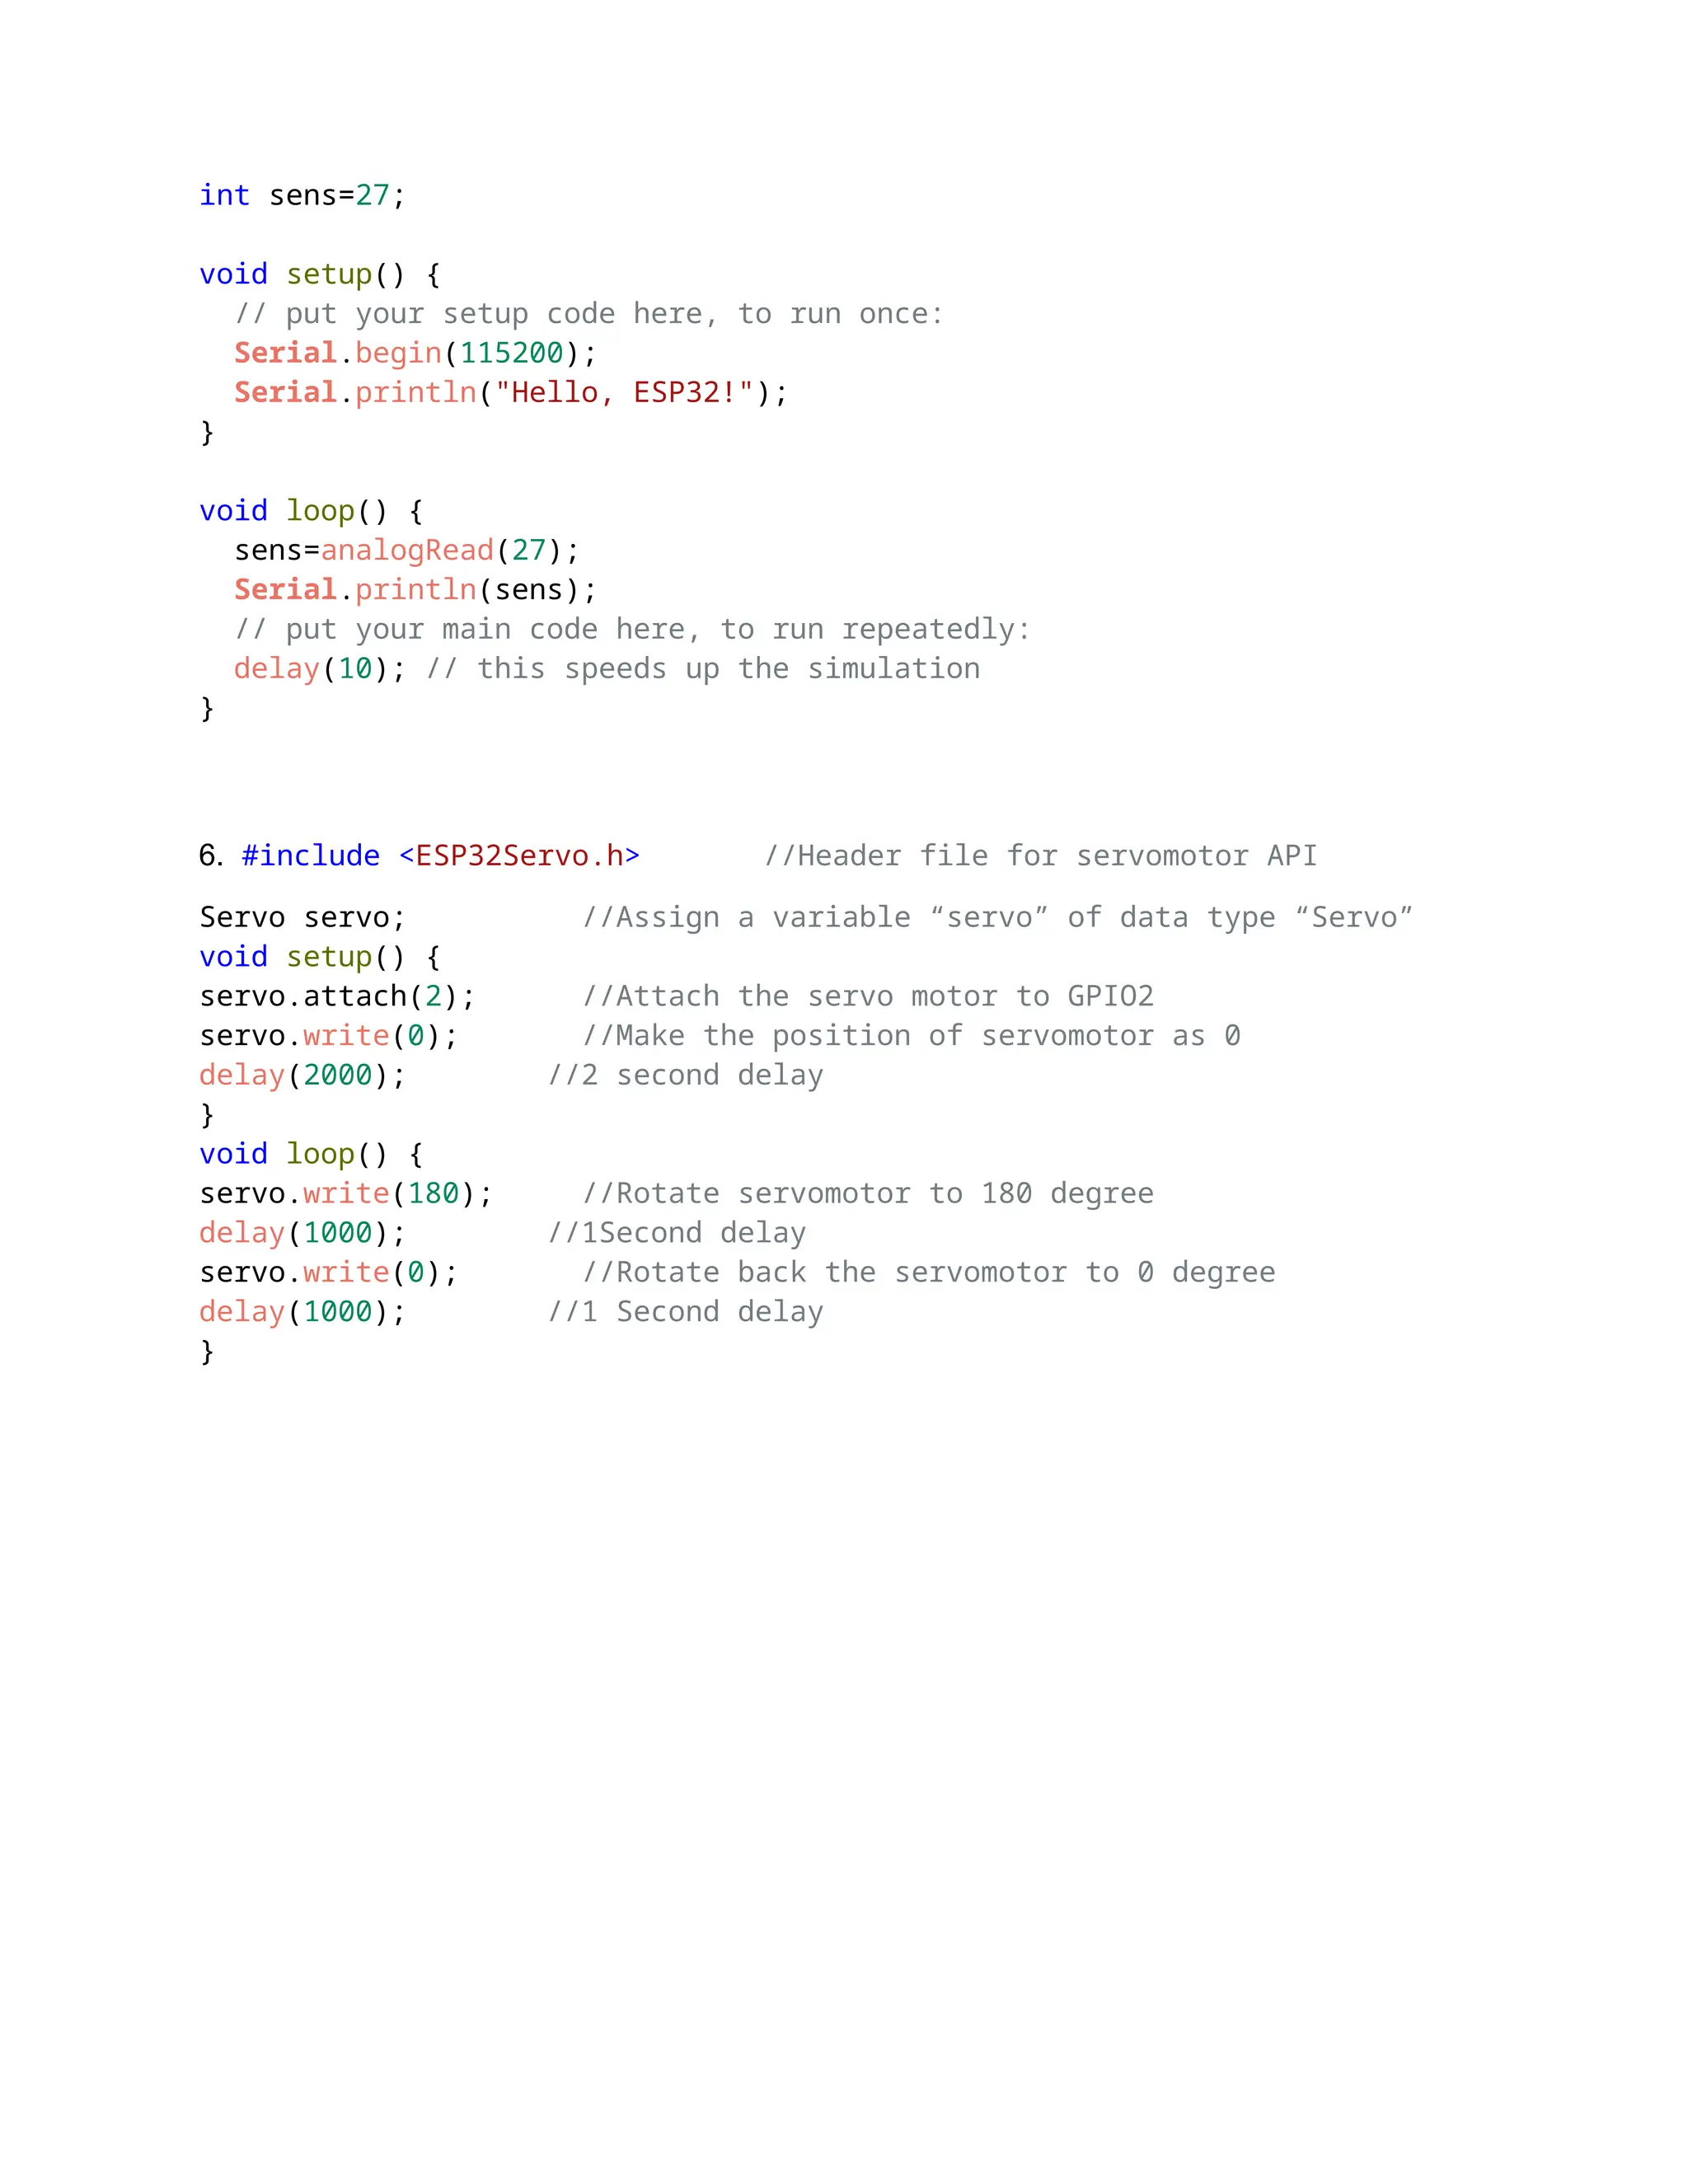
1. LED Interface with ESP32:
int LED = 2; // Assign LED to pin GPIO2(D2)
void setup() {
pinMode (LED, OUTPUT); //Configure LED pin as output
}
void loop() {
digitalWrite(LED, HIGH); //Command to turn ON LED
delay(1000); //1 Second delay
digitalWrite(LED, LOW); //Command to turn OFF LED
delay(1000); //1 Second delay
}
2. LED Interface with ESP32 using Relay:
int LED = 26; // Assign LED to pin GPIO26(D26)
void setup() {
pinMode (LED, OUTPUT); //Configure LED pin as output
}
void loop() {
digitalWrite(LED, HIGH); //Command to turn ON LED
delay(1000); //1 Second delay
digitalWrite(LED, LOW); //Command to turn OFF LED
delay(1000); //1 Second delay
}
Simulation Output:
ESP32 Component Connection Pin
GPIO26 (D26) Relay Coil one end
GND Relay Coil another end
Vin COM pin of Relay
- NO pin of Relay Connected to LED Anode
GND Connected to LED Cathode with resistor
3. ESP32 Switch & LED:
const int BUTTON = 5; //Connect button to D5
const int LED1=4; //Connect LED to D4
int ledState = LOW; //Default state of LED is low
int previousButtonState;
int presentButtonState;
void setup()
{
pinMode(BUTTON,INPUT); //Configure Button as input
pinMode(LED1, OUTPUT); //Configure LED as output
}
void loop()
{
presentButtonState = digitalRead(BUTTON);
if(presentButtonState==HIGH) //If Button state is high
{
digitalWrite(LED1, HIGH); //Turn ON LED
}
else //If button state is low
{
digitalWrite(LED1, LOW); //Turn LOW LED
}
}
4. Ultrasonic sensor simulation
const int trigPin = 5;
const int echoPin = 18;
//define sound speed in cm/uS
#define SOUND_SPEED 0.034
#define CM_TO_INCH 0.393701
long duration;
float distanceCm;
float distanceInch;
void setup() {
Serial.begin(115200); // Starts the serial communication
pinMode(trigPin, OUTPUT); // Sets the trigPin as an Output
pinMode(echoPin, INPUT); // Sets the echoPin as an Input
}
void loop() {
// Clears the trigPin
digitalWrite(trigPin, LOW);
delayMicroseconds(2);
// Sets the trigPin on HIGH state for 10 micro seconds
digitalWrite(trigPin, HIGH);
delayMicroseconds(10);
digitalWrite(trigPin, LOW);
// Reads the echoPin, returns the sound wave travel time in microseconds
duration = pulseIn(echoPin, HIGH);
// Calculate the distance
distanceCm = duration * SOUND_SPEED/2;
// Convert to inches
distanceInch = distanceCm * CM_TO_INCH;
// Prints the distance in the Serial Monitor
Serial.print("Distance (cm): ");
Serial.println(distanceCm);
Serial.print("Distance (inch): ");
Serial.println(distanceInch);
delay(1000);
}
5. ldr Interfacing
int sens=27;
void setup() {
// put your setup code here, to run once:
Serial.begin(115200);
Serial.println("Hello, ESP32!");
}
void loop() {
sens=analogRead(27);
Serial.println(sens);
// put your main code here, to run repeatedly:
delay(10); // this speeds up the simulation
}
6. #include <ESP32Servo.h> //Header file for servomotor API
Servo servo; //Assign a variable “servo” of data type “Servo”
void setup() {
servo.attach(2); //Attach the servo motor to GPIO2
servo.write(0); //Make the position of servomotor as 0
delay(2000); //2 second delay
}
void loop() {
servo.write(180); //Rotate servomotor to 180 degree
delay(1000); //1Second delay
servo.write(0); //Rotate back the servomotor to 0 degree
delay(1000); //1 Second delay
}

IOT excercise ESP32 Simulation projects.docx

  • 1.
    1. LED Interfacewith ESP32: int LED = 2; // Assign LED to pin GPIO2(D2) void setup() { pinMode (LED, OUTPUT); //Configure LED pin as output } void loop() { digitalWrite(LED, HIGH); //Command to turn ON LED delay(1000); //1 Second delay digitalWrite(LED, LOW); //Command to turn OFF LED delay(1000); //1 Second delay } 2. LED Interface with ESP32 using Relay: int LED = 26; // Assign LED to pin GPIO26(D26) void setup() { pinMode (LED, OUTPUT); //Configure LED pin as output } void loop() { digitalWrite(LED, HIGH); //Command to turn ON LED delay(1000); //1 Second delay digitalWrite(LED, LOW); //Command to turn OFF LED delay(1000); //1 Second delay } Simulation Output: ESP32 Component Connection Pin GPIO26 (D26) Relay Coil one end GND Relay Coil another end Vin COM pin of Relay - NO pin of Relay Connected to LED Anode GND Connected to LED Cathode with resistor
  • 2.
    3. ESP32 Switch& LED: const int BUTTON = 5; //Connect button to D5 const int LED1=4; //Connect LED to D4 int ledState = LOW; //Default state of LED is low int previousButtonState; int presentButtonState; void setup() { pinMode(BUTTON,INPUT); //Configure Button as input pinMode(LED1, OUTPUT); //Configure LED as output } void loop() { presentButtonState = digitalRead(BUTTON); if(presentButtonState==HIGH) //If Button state is high { digitalWrite(LED1, HIGH); //Turn ON LED } else //If button state is low { digitalWrite(LED1, LOW); //Turn LOW LED } } 4. Ultrasonic sensor simulation const int trigPin = 5;
  • 3.
    const int echoPin= 18; //define sound speed in cm/uS #define SOUND_SPEED 0.034 #define CM_TO_INCH 0.393701 long duration; float distanceCm; float distanceInch; void setup() { Serial.begin(115200); // Starts the serial communication pinMode(trigPin, OUTPUT); // Sets the trigPin as an Output pinMode(echoPin, INPUT); // Sets the echoPin as an Input } void loop() { // Clears the trigPin digitalWrite(trigPin, LOW); delayMicroseconds(2); // Sets the trigPin on HIGH state for 10 micro seconds digitalWrite(trigPin, HIGH); delayMicroseconds(10); digitalWrite(trigPin, LOW); // Reads the echoPin, returns the sound wave travel time in microseconds duration = pulseIn(echoPin, HIGH); // Calculate the distance distanceCm = duration * SOUND_SPEED/2; // Convert to inches distanceInch = distanceCm * CM_TO_INCH; // Prints the distance in the Serial Monitor Serial.print("Distance (cm): "); Serial.println(distanceCm); Serial.print("Distance (inch): "); Serial.println(distanceInch); delay(1000); } 5. ldr Interfacing
  • 4.
    int sens=27; void setup(){ // put your setup code here, to run once: Serial.begin(115200); Serial.println("Hello, ESP32!"); } void loop() { sens=analogRead(27); Serial.println(sens); // put your main code here, to run repeatedly: delay(10); // this speeds up the simulation } 6. #include <ESP32Servo.h> //Header file for servomotor API Servo servo; //Assign a variable “servo” of data type “Servo” void setup() { servo.attach(2); //Attach the servo motor to GPIO2 servo.write(0); //Make the position of servomotor as 0 delay(2000); //2 second delay } void loop() { servo.write(180); //Rotate servomotor to 180 degree delay(1000); //1Second delay servo.write(0); //Rotate back the servomotor to 0 degree delay(1000); //1 Second delay }